With Trello Organising Your Entire Life How To Get Started
12
10 tips to start using Trello as a simple but powerful organisation system How To Get Started Organising Your Entire Life With Trello
Transcript of With Trello Organising Your Entire Life How To Get Started
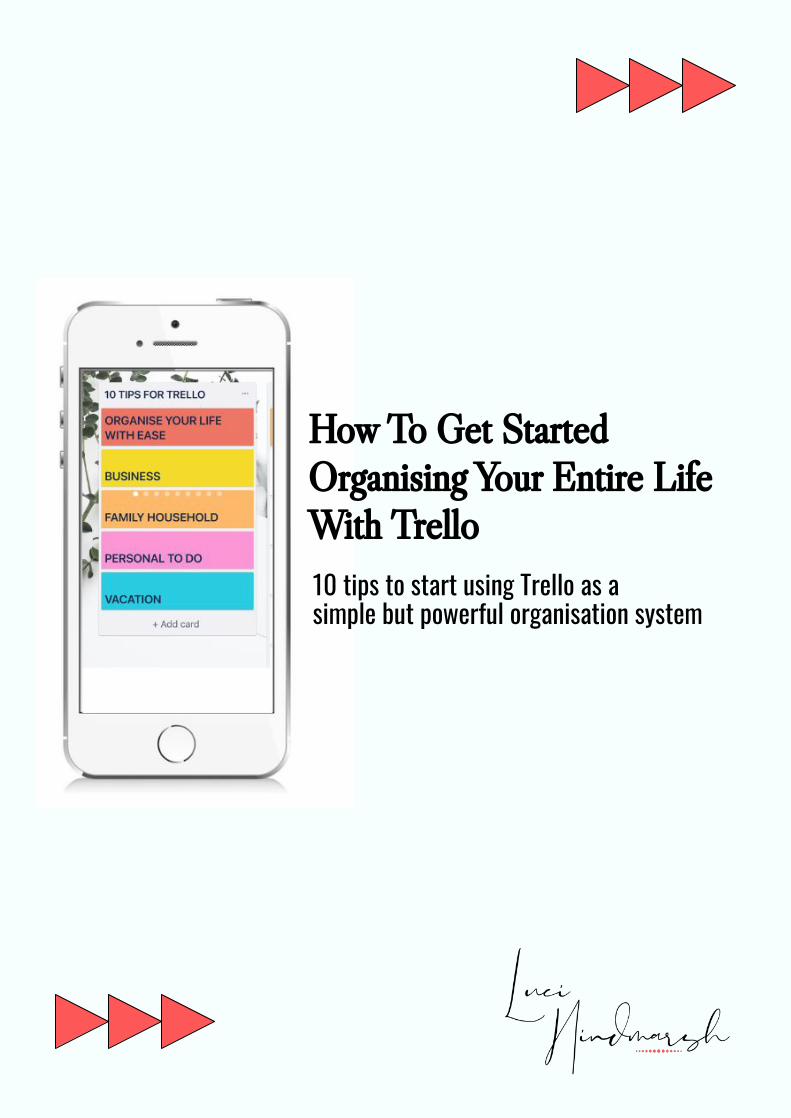
10 tips to start using Trello as a simple but powerful organisation system
How To Get Started Organising Your Entire Life With Trello
HelloSo you are here because you are looking for a better way to get organised and I am here to help you.
One of the biggest hurdles to having an organisation system that works is having the time to find and set one up. Which is where this guide can help you.
I’ve been using Trello for several years, both for my business and for personal organisation. Trello is second-nature to me, so I can help you get the best out of Trello with these 10 tips.
Once set up you will have the foundations of an organisation system that is simple and easy to use.
Before you dive into the ten tips, I want to set the scene for you, by giving you a quick overview of Trello and why I love using it to stay organised.
Hello TrelloTrello is a free visual project management and collaboration tool that you can use online, desktop or mobile app.
The beauty of Trello is its simplicity and I firmly believe that simplicity wins when it comes to creating an organisation system that works.
What’s really important to understand is that Trello is a tool rather than a system. This guide isn’t about taking someone else's organisation system and trying to make it work for you.
I also firmly believe that digital beats paper-based systems hands down when it comes to having a centralised system and keeping things flowing.
Use the 10 tips on the following pages to get started with using Trello in the best possible way.
Grab Trello here: trello.com/platforms
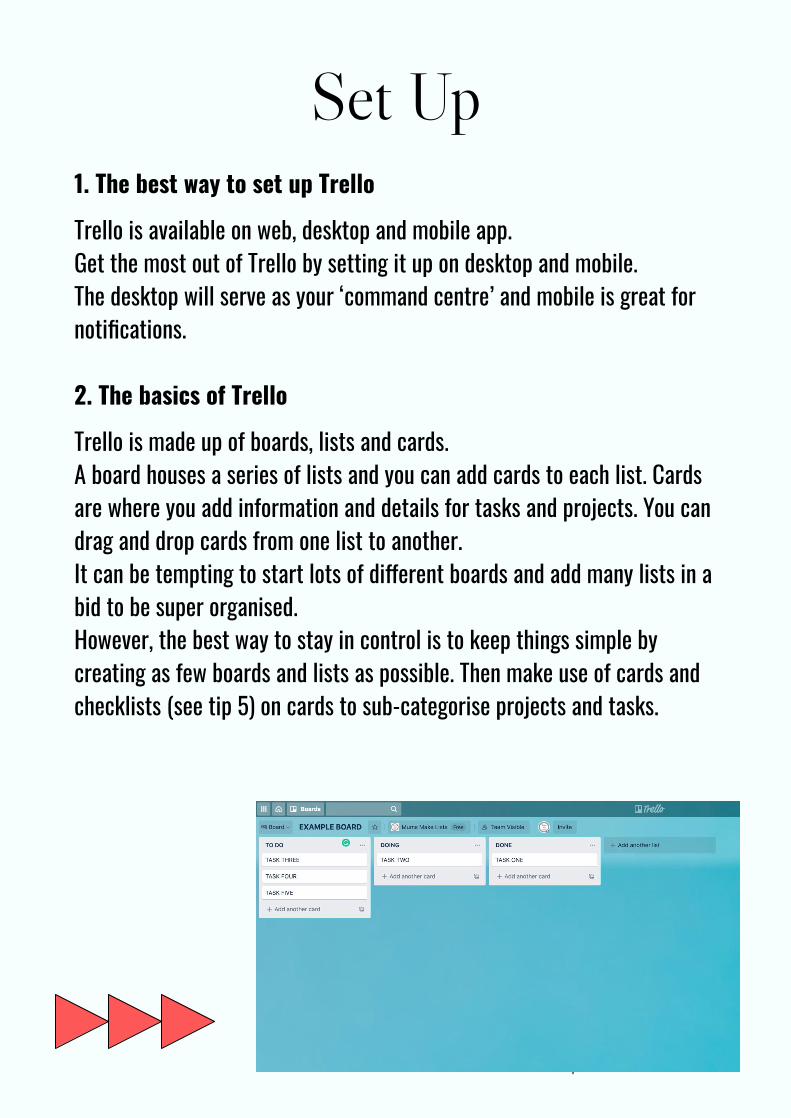
Set Up1. The best way to set up TrelloTrello is available on web, desktop and mobile app.Get the most out of Trello by setting it up on desktop and mobile. The desktop will serve as your ‘command centre’ and mobile is great for notifications.
2. The basics of TrelloTrello is made up of boards, lists and cards. A board houses a series of lists and you can add cards to each list. Cards are where you add information and details for tasks and projects. You can drag and drop cards from one list to another.It can be tempting to start lots of different boards and add many lists in a bid to be super organised. However, the best way to stay in control is to keep things simple by creating as few boards and lists as possible. Then make use of cards and checklists (see tip 5) on cards to sub-categorise projects and tasks.

Flow3. Create a basic flow
There are many ways to use Trello to organise different aspects of your life, but it’s best to start off by creating a basic flow that you can use across your boards.
The most basic flow is taken from the Kanban project management method that Trello is based on. It has three lists:
1. To Do2. Doing3. Done
This flow allows you to keep track of what needs to be done, what is currently being worked on and most satisfying of all, which tasks have been completed.
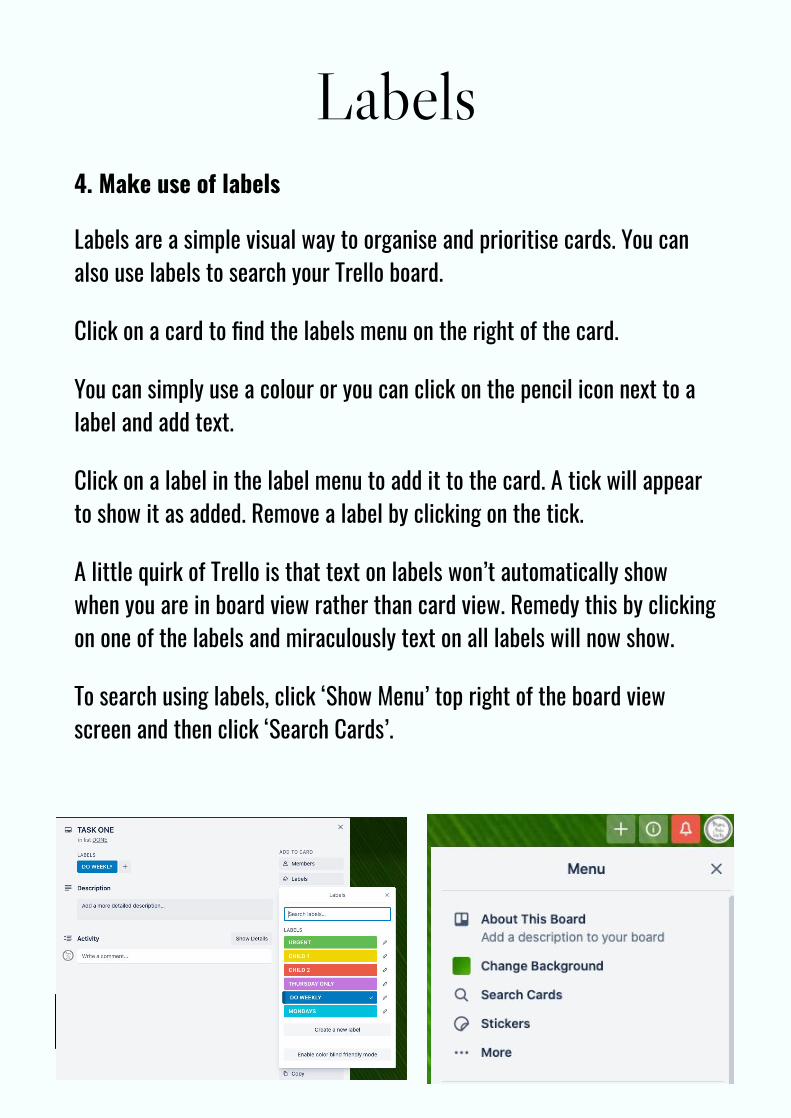
Labels4. Make use of labels
Labels are a simple visual way to organise and prioritise cards. You can also use labels to search your Trello board.
Click on a card to find the labels menu on the right of the card.
You can simply use a colour or you can click on the pencil icon next to a label and add text.
Click on a label in the label menu to add it to the card. A tick will appear to show it as added. Remove a label by clicking on the tick.
A little quirk of Trello is that text on labels won’t automatically show when you are in board view rather than card view. Remedy this by clicking on one of the labels and miraculously text on all labels will now show.
To search using labels, click ‘Show Menu’ top right of the board view screen and then click ‘Search Cards’.
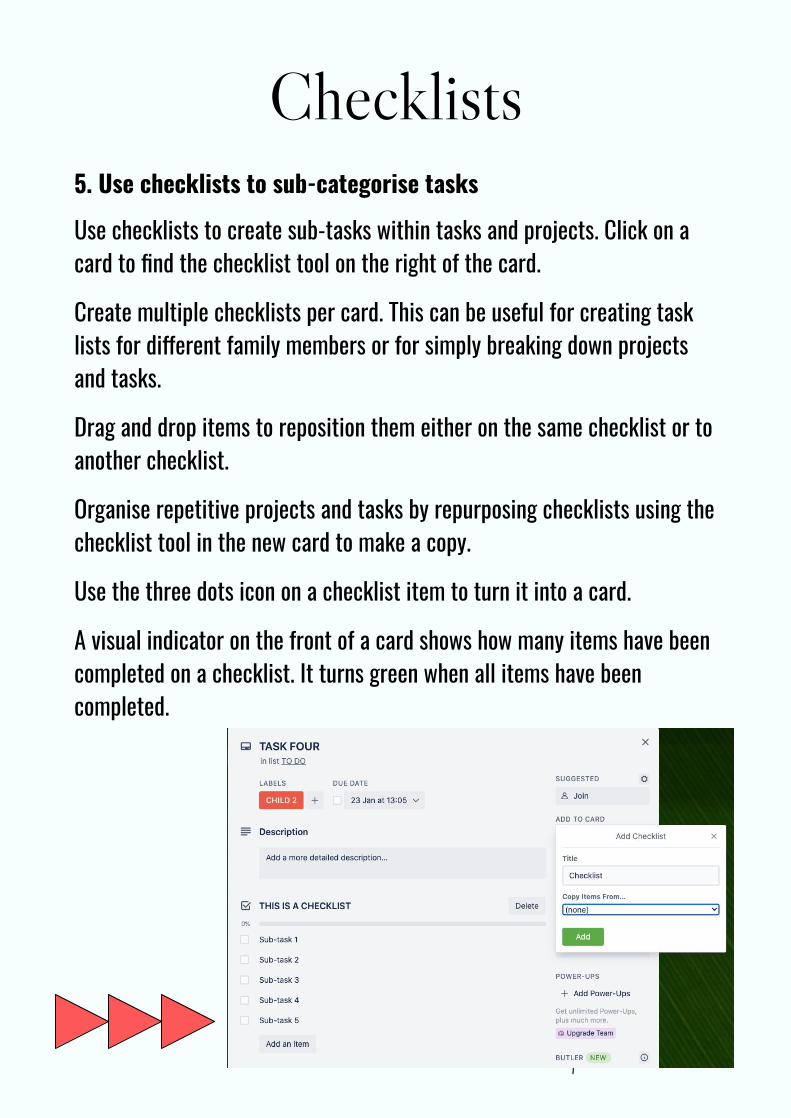
Checklists5. Use checklists to sub-categorise tasksUse checklists to create sub-tasks within tasks and projects. Click on a card to find the checklist tool on the right of the card.
Create multiple checklists per card. This can be useful for creating task lists for different family members or for simply breaking down projects and tasks.
Drag and drop items to reposition them either on the same checklist or to another checklist.
Organise repetitive projects and tasks by repurposing checklists using the checklist tool in the new card to make a copy.
Use the three dots icon on a checklist item to turn it into a card.
A visual indicator on the front of a card shows how many items have been completed on a checklist. It turns green when all items have been completed.
Teamwork6. Creating a team, sharing information and delegating
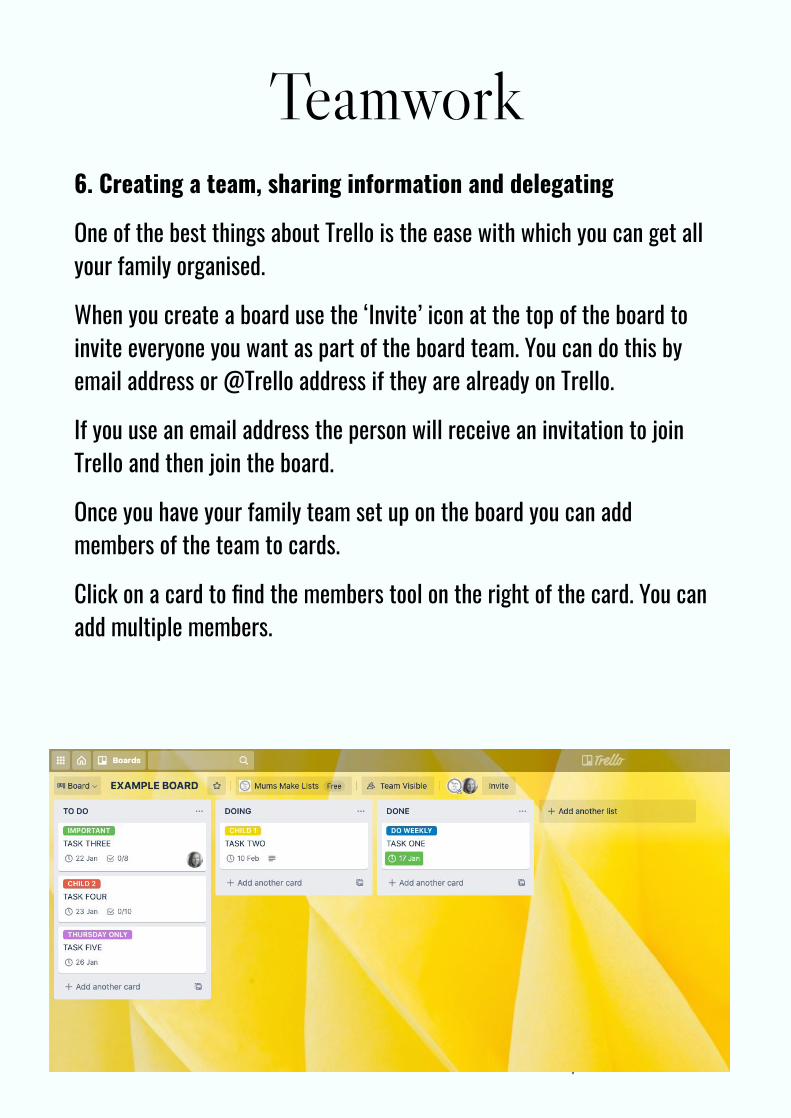
One of the best things about Trello is the ease with which you can get all your family organised.
When you create a board use the ‘Invite’ icon at the top of the board to invite everyone you want as part of the board team. You can do this by email address or @Trello address if they are already on Trello.
If you use an email address the person will receive an invitation to join Trello and then join the board.
Once you have your family team set up on the board you can add members of the team to cards.
Click on a card to find the members tool on the right of the card. You can add multiple members.
Notifications7. Be clever when setting up notifications
Setting up notifications can be the difference between finding Trello amazing or amazingly frustrating.
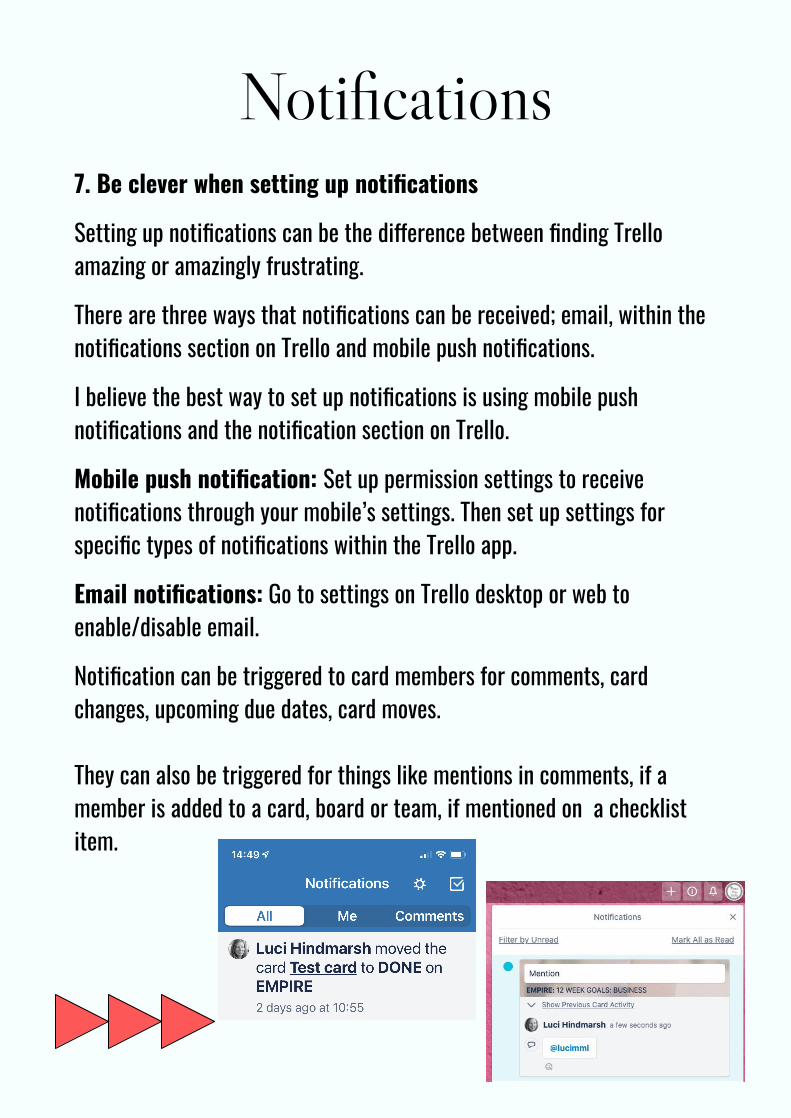
There are three ways that notifications can be received; email, within the notifications section on Trello and mobile push notifications.
I believe the best way to set up notifications is using mobile push notifications and the notification section on Trello.
Mobile push notification: Set up permission settings to receive notifications through your mobile’s settings. Then set up settings for specific types of notifications within the Trello app.
Email notifications: Go to settings on Trello desktop or web to enable/disable email.
Notification can be triggered to card members for comments, card changes, upcoming due dates, card moves.
They can also be triggered for things like mentions in comments, if a member is added to a card, board or team, if mentioned on a checklist item.
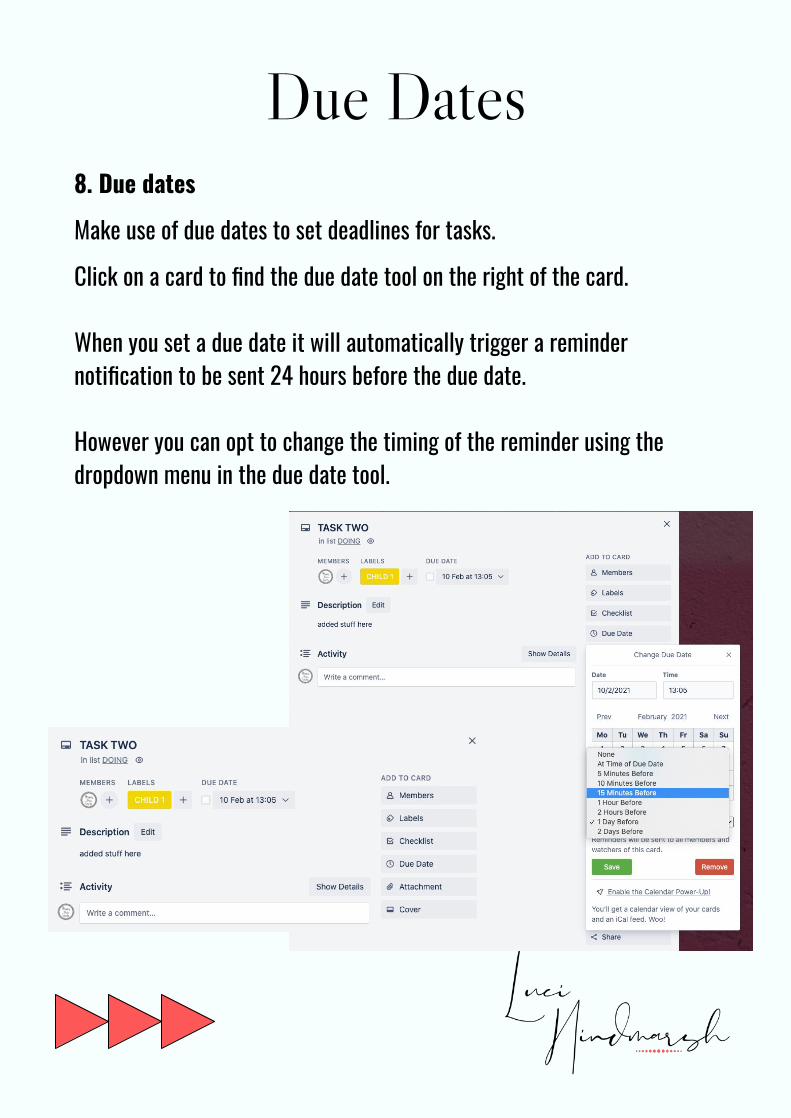
Due Dates8. Due datesMake use of due dates to set deadlines for tasks. Click on a card to find the due date tool on the right of the card.
When you set a due date it will automatically trigger a reminder notification to be sent 24 hours before the due date.
However you can opt to change the timing of the reminder using the dropdown menu in the due date tool.
Calendar9. Make use of the Calendar power-up to get super organised
You are allowed one power-up with the free Trello plan. Think of power-ups as apps.
The Calendar power-up is by far the most useful, because you can sync it with any existing calendars you have, which means you can manage everything from Trello.
As soon as you add a due date to a card it will appear on the Calendar. You can also drag and drop cards around on the Calendar to re-organise dates.
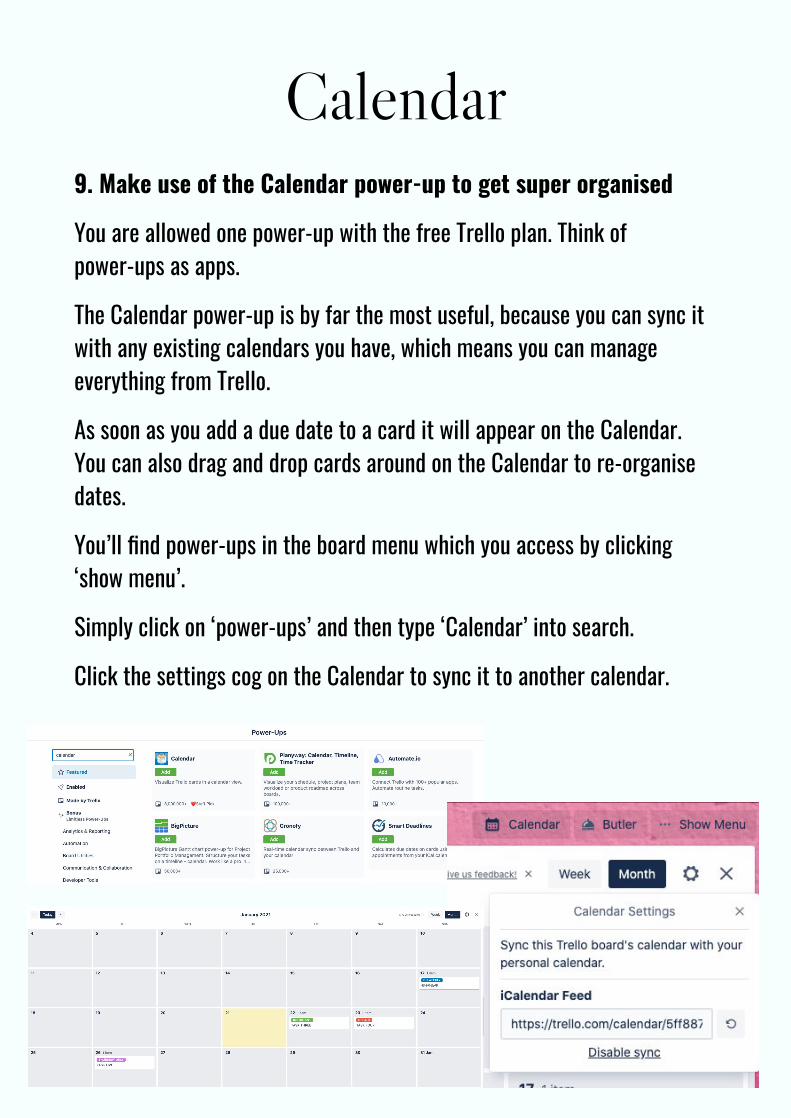
You’ll find power-ups in the board menu which you access by clicking ‘show menu’.
Simply click on ‘power-ups’ and then type ‘Calendar’ into search.
Click the settings cog on the Calendar to sync it to another calendar.
Think Pretty10. Make Trello more visual with backgrounds and card cover imagesYou can increase the visual impact of Trello by adding different colour backgrounds or image backgrounds to boards and card covers. This is super useful if you are a visual thinker.
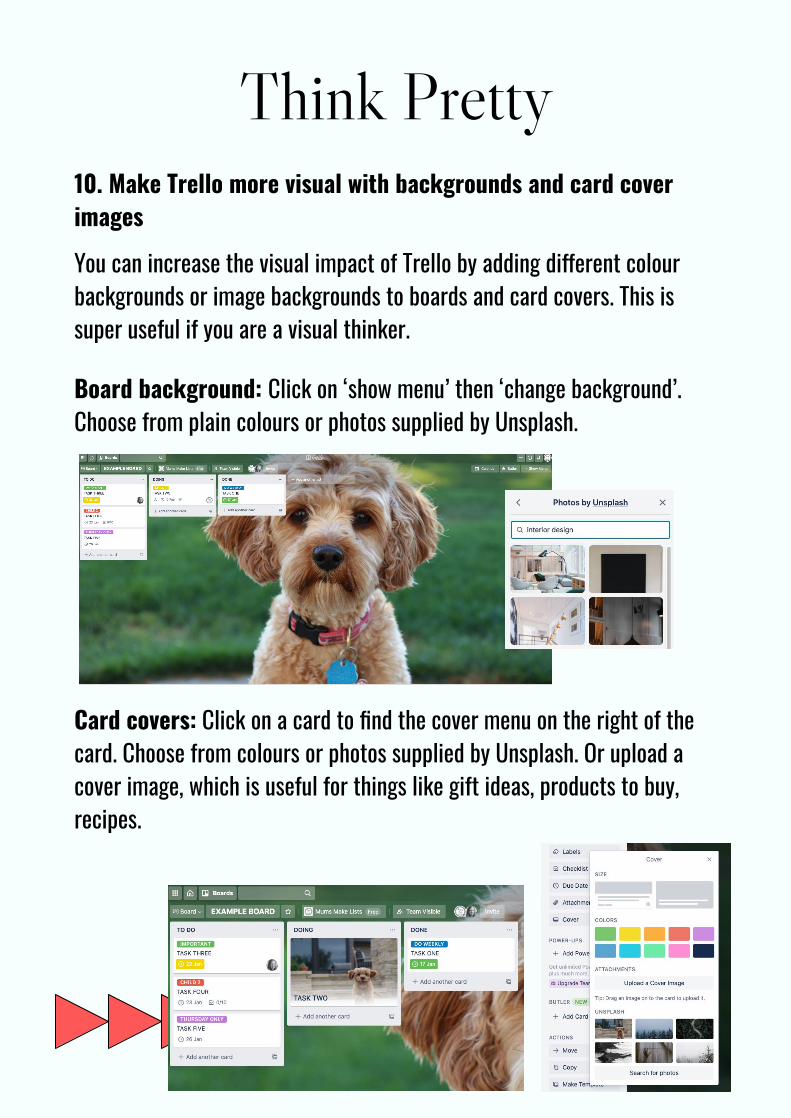
Board background: Click on ‘show menu’ then ‘change background’. Choose from plain colours or photos supplied by Unsplash.
Card covers: Click on a card to find the cover menu on the right of the card. Choose from colours or photos supplied by Unsplash. Or upload a cover image, which is useful for things like gift ideas, products to buy, recipes.