HOW TO USE TRELLO TO ORGANIZE AND MANAGE TASKS AND TEAM PROJECTS
description

Check other tutorials at vatwist.wordpress.com
How to use Trello
organize anything together

Check other tutorials at vatwist.wordpress.com
How to get there
In your browser, type www.trello.com, hit Enter.
Check other tutorials at vatwist.wordpress.com
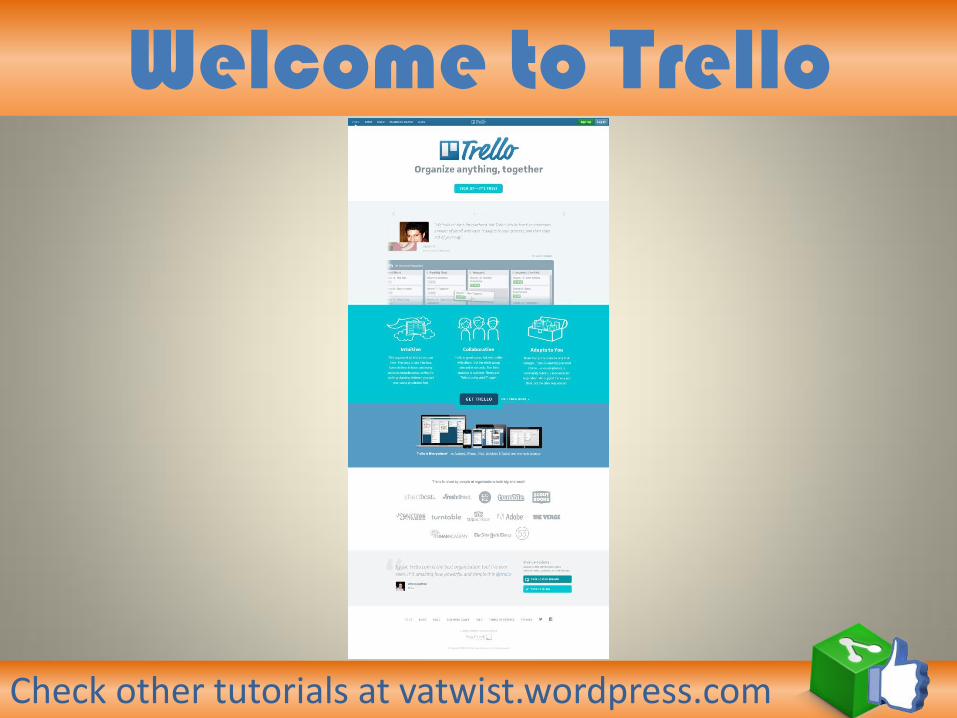
Welcome to Trello

Check other tutorials at vatwist.wordpress.com
Signing up
Yes it’s free. They also have paid accounts. Click, ‘Sign up- Its’ Free’

Check other tutorials at vatwist.wordpress.com
Signing up There are two ways of signing up, by email or by an existing Google account.

Check other tutorials at vatwist.wordpress.com
Signing up By an existing Google account. Click, ‘Google Account’.

Check other tutorials at vatwist.wordpress.com
Signing up
Choose among your existing account. Click it.

Check other tutorials at vatwist.wordpress.com
Signing up Click ‘Accept’.

Check other tutorials at vatwist.wordpress.com
Dashboard Some of the parts.
Click to expand.
Notification icon
User profile icon Board icon

Check other tutorials at vatwist.wordpress.com
Dashboard Click on this to show how dashboard looks like with contents on it. It will
lead you to a sample template.

Check other tutorials at vatwist.wordpress.com
Navigation This is the “board” as what trello calls it. This is how it looks like with the
lists (contents) on it.

Check other tutorials at vatwist.wordpress.com
Navigation These are the sample lists with cards on it.

Check other tutorials at vatwist.wordpress.com
Navigation This is the admin panel.
It shows the members who are online. Also the activities. It is on the right side
of the dashboard.

Check other tutorials at vatwist.wordpress.com
Navigation On Menu. The following options are under it.

Check other tutorials at vatwist.wordpress.com
Adding member
Add members by typing their e-mail address or username. Then click the (name). *he/she should have a trello account

Check other tutorials at vatwist.wordpress.com
Adding member QG|quagmire is now being added as a member. By
clicking his name a toggled box will appear displaying the following choices of actions.

Check other tutorials at vatwist.wordpress.com
Adding member To change his permissions, click ‘change permissions’. By
default, newly added member are in ‘normal’ permission.

Check other tutorials at vatwist.wordpress.com
Adding member
Status Icons
Admin
Green: Online
Yellow: Idle

Check other tutorials at vatwist.wordpress.com
Create a new board On the upper right corner of the admin panel. Click the ‘+’ icon right beside your username

Check other tutorials at vatwist.wordpress.com
Create a new board This little pop window will appear. This tutorial will cover the basics, so lets choose the ‘new board’ for this time.
Click ‘new board…’

Check other tutorials at vatwist.wordpress.com
Creating a new board Type a title for your board.

Check other tutorials at vatwist.wordpress.com
Create a new board You can customize the privacy of this board. Click ‘Change’ to view the options and its description.
Check other tutorials at vatwist.wordpress.com
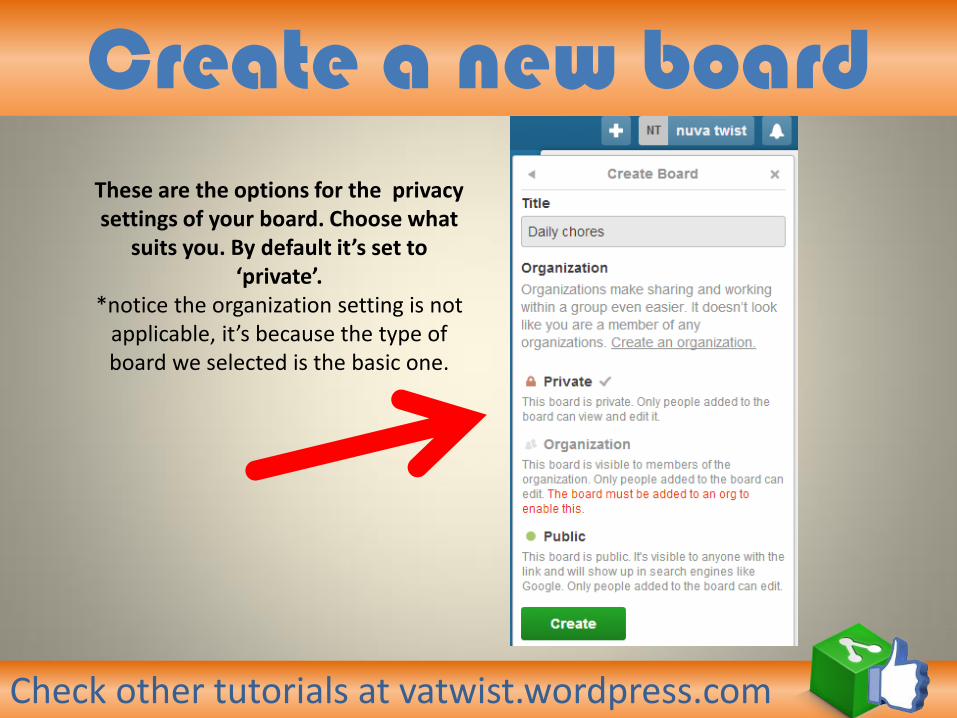
Create a new board These are the options for the privacy settings of your board. Choose what
suits you. By default it’s set to ‘private’.
*notice the organization setting is not applicable, it’s because the type of board we selected is the basic one.

Check other tutorials at vatwist.wordpress.com
Create a new board After setting the privacy , click ‘create’.

Check other tutorials at vatwist.wordpress.com
Create a new board This is how your board looks. Trello pre-added 3 basic lists of “To do”,
“doing”, and “done”.
Check other tutorials at vatwist.wordpress.com
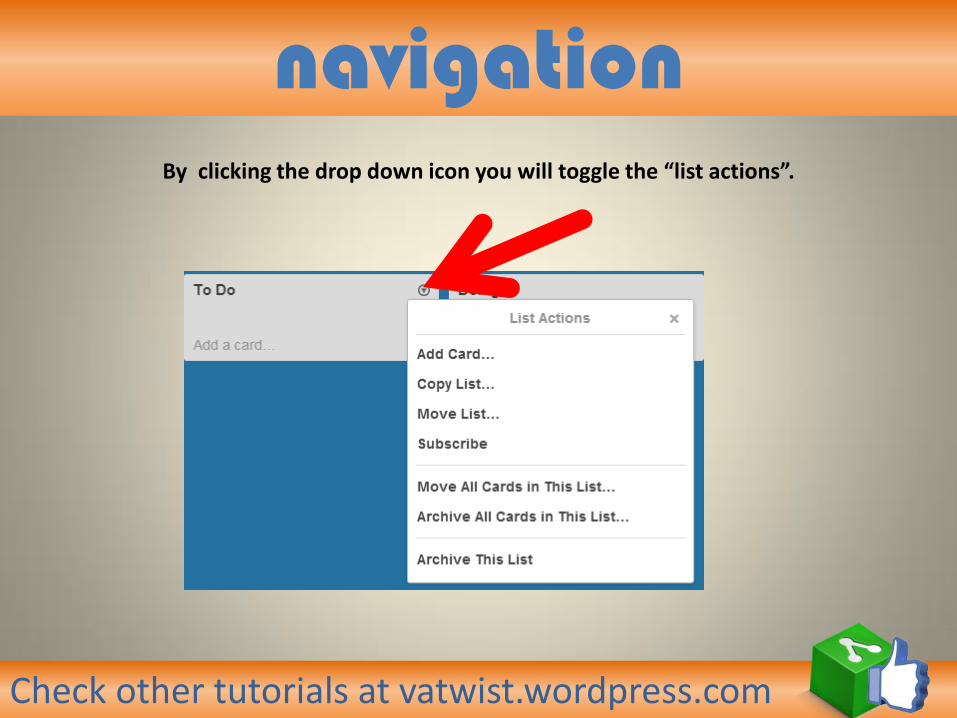
navigation By clicking the drop down icon you will toggle the “list actions”.

Check other tutorials at vatwist.wordpress.com
navigation To change the name of the list. Just click on the name, and it toggle
into a text box. Type the name you prefer, then Click ‘Save’.
Check other tutorials at vatwist.wordpress.com
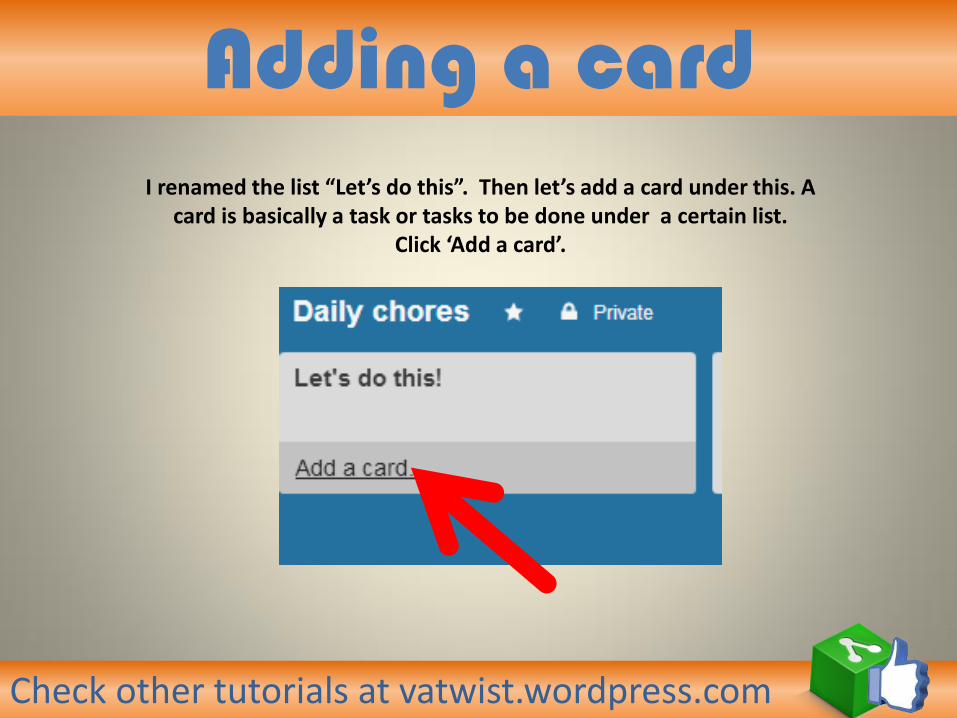
Adding a card I renamed the list “Let’s do this”. Then let’s add a card under this. A
card is basically a task or tasks to be done under a certain list. Click ‘Add a card’.

Check other tutorials at vatwist.wordpress.com
navigation It will then place a text box, type the name of your task.
Then click ‘Add’.

Check other tutorials at vatwist.wordpress.com
navigation The card is added, then automatically a new card (text box) will appear. Type again a task if you have more tasks under this list. If none, just hit “Esc” on your keyboard or the icon
‘x’ beside the ‘add’.

Check other tutorials at vatwist.wordpress.com
Editing card So I added 3 more cards. What’s next? Let’s edit one card. Just click the card.

Check other tutorials at vatwist.wordpress.com
Editing a card
A window will pop-up. These are the things you can edit and integrate on your card. Let’s check them one
by one.

Check other tutorials at vatwist.wordpress.com
Card’s description. You can put more information regarding the card so that members will have additional information regarding the task.
Click ‘Edit the card description’.
Editing a card

Check other tutorials at vatwist.wordpress.com
Type the description you want. I just added a simple note/reminder. Click, ‘save’.
Editing a card

Check other tutorials at vatwist.wordpress.com
Comment box. You can write anything here. For example compliments, additional reminder, as if it’s like a chat box for to
communicate regarding this specific card (task). Then, Click ‘comment’.
Comment

Check other tutorials at vatwist.wordpress.com
The comment will then reflect to the activity section of the card as well as in the admin activity panel.
Activity report

Check other tutorials at vatwist.wordpress.com
You can also address a member by “mentioning” him/her in the comment box, using this format “@(name)”.
mention

Check other tutorials at vatwist.wordpress.com
Once the comment has been sent. It will appear on the activity panel. And a notification will prompt on quagmire’s end.
mention

Check other tutorials at vatwist.wordpress.com
labeling
Labels helps you classify cards. You can change the color of the task. As well as put titles on it. It even has an option for those
color blind members.

Check other tutorials at vatwist.wordpress.com
classify
I chose color green and labeled it as “priority”. Click, ‘Save’.
*you can add more than one label
Check other tutorials at vatwist.wordpress.com
Assigning
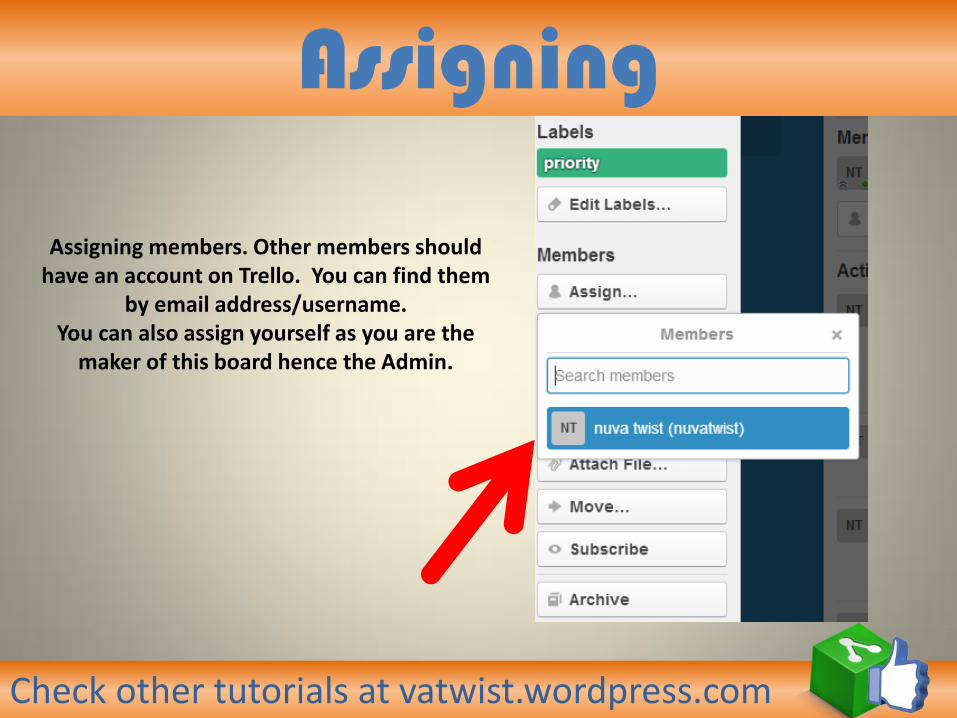
Assigning members. Other members should have an account on Trello. You can find them
by email address/username. You can also assign yourself as you are the
maker of this board hence the Admin.

Check other tutorials at vatwist.wordpress.com
Checklist
Actions panel. For more specific task items, you can add a checklist under your list. Click ‘Add checklist’.
Check other tutorials at vatwist.wordpress.com
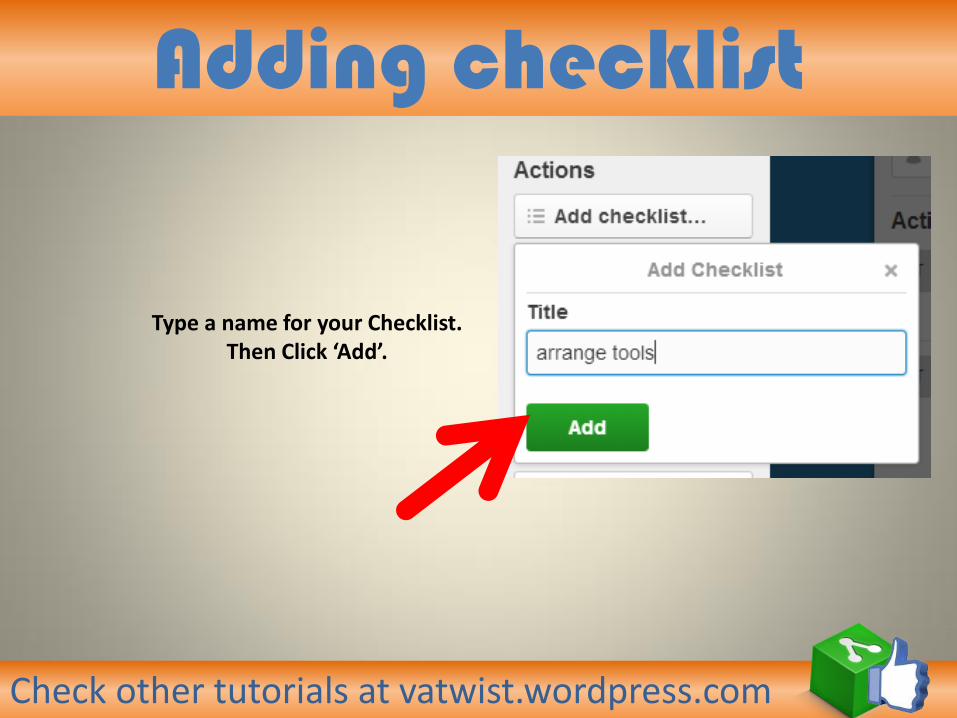
Adding checklist
Type a name for your Checklist. Then Click ‘Add’.
Check other tutorials at vatwist.wordpress.com
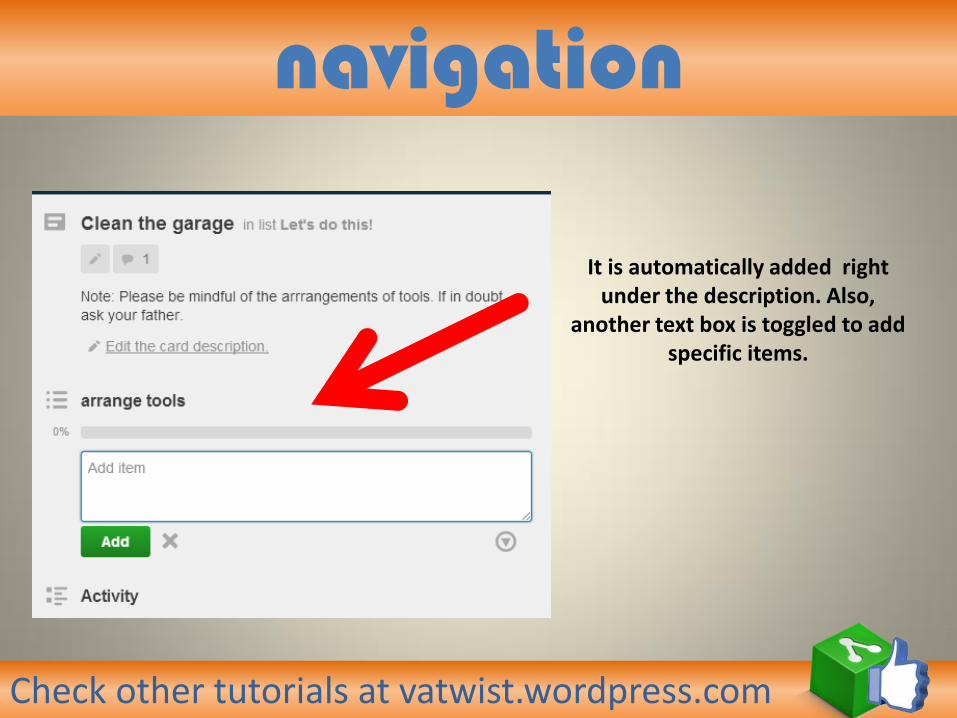
navigation
It is automatically added right under the description. Also,
another text box is toggled to add specific items.

Check other tutorials at vatwist.wordpress.com
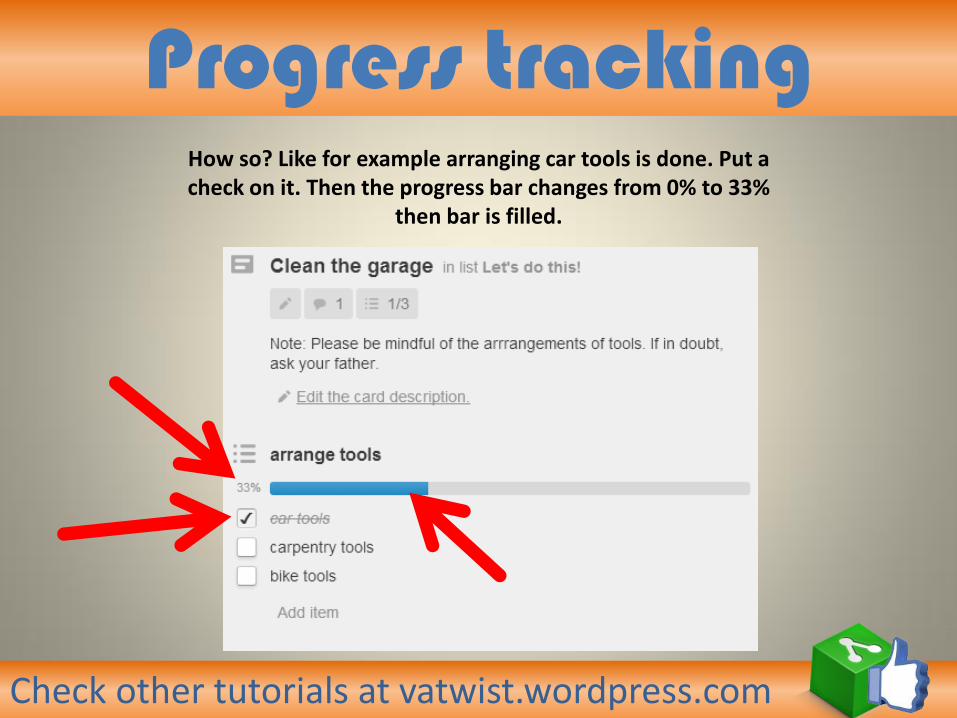
Progress tracking So I added the following items (3). Notice the bar with the 0% label on it. This is to track the progress of you checklist.
Check other tutorials at vatwist.wordpress.com
Progress tracking How so? Like for example arranging car tools is done. Put a check on it. Then the progress bar changes from 0% to 33%
then bar is filled.

Check other tutorials at vatwist.wordpress.com
navigation Another progress tracking tool is just above the description. Just
beside the checklist icon. Notice the “1/3”, meaning 1 out of 3 items is crossed out or done.

Check other tutorials at vatwist.wordpress.com
Deadline Next is the ‘due date’. This sets time frame to your list. To
set, Click ‘Due date…’

Check other tutorials at vatwist.wordpress.com
Setting time frame
Set the date and time of deadline for your card (task). Then click ‘Save’.

Check other tutorials at vatwist.wordpress.com
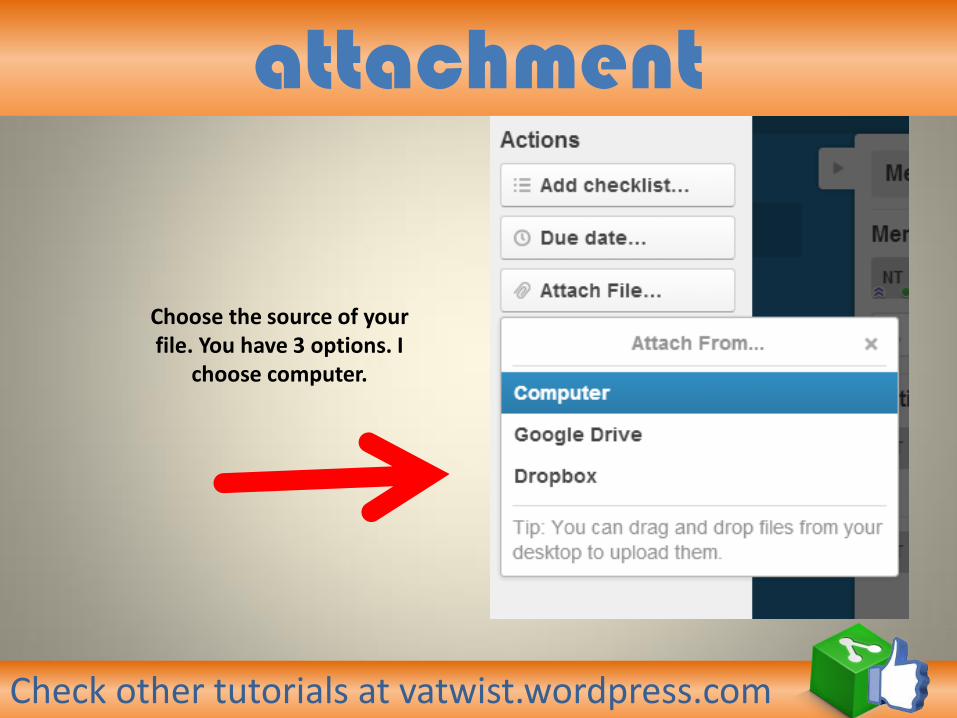
Attachments You can also attach a file to this card. To add file, click ‘Attach file’.
Check other tutorials at vatwist.wordpress.com
attachment
Choose the source of your file. You have 3 options. I
choose computer.

Check other tutorials at vatwist.wordpress.com
navigation Then choose a file from your
computer. Click ‘Open’.

Check other tutorials at vatwist.wordpress.com
navigation It is then reflected on as attachments
just above the check list.
Check other tutorials at vatwist.wordpress.com
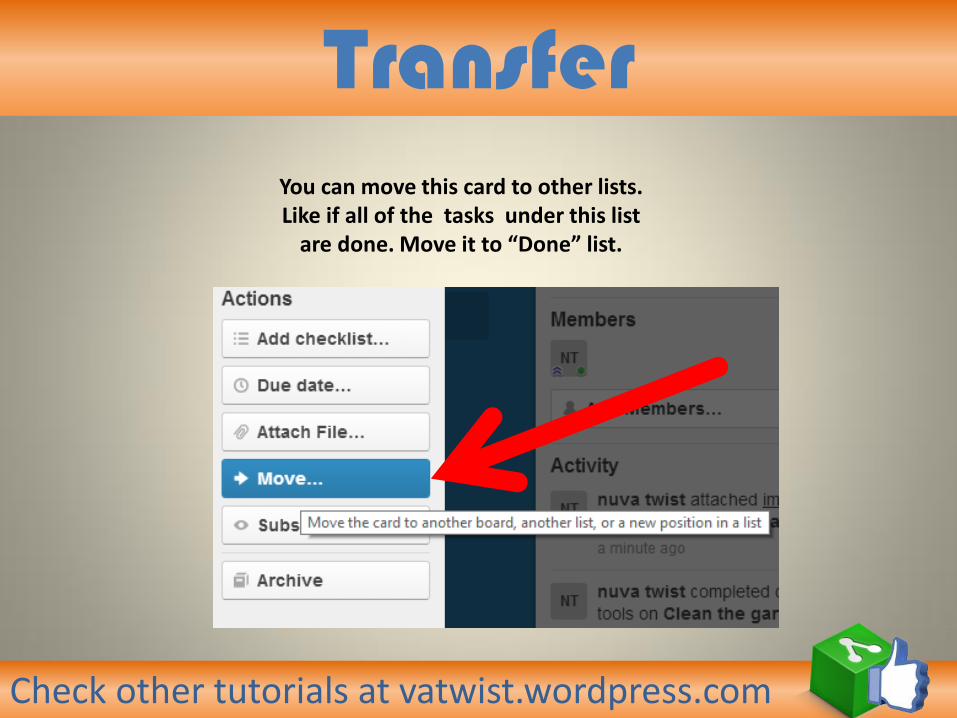
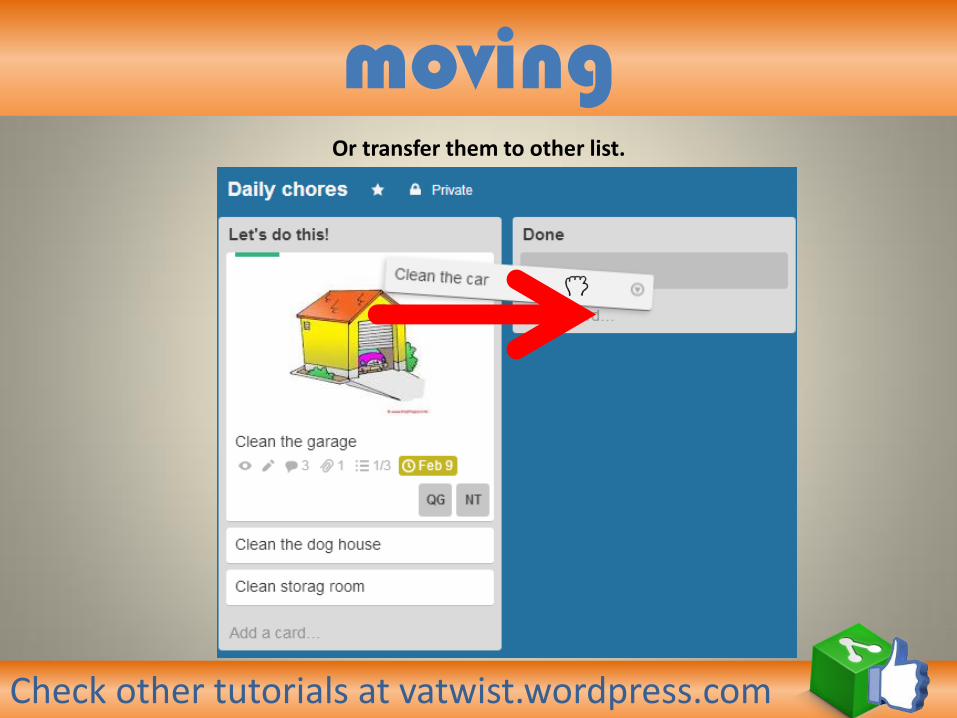
Transfer You can move this card to other lists. Like if all of the tasks under this list
are done. Move it to “Done” list.

Check other tutorials at vatwist.wordpress.com
navigation Not just that. You can even move it on
another board or within the same card and at specified position.

Check other tutorials at vatwist.wordpress.com
Subscription Subscription. Member who subscribe to
this card will get notifications to changes made with this card.
*Also “assigning” someone makes him automatically a subscriber of this card.

Check other tutorials at vatwist.wordpress.com
More actions Also there are more actions available. Other items are self-
explanatory. However this link box is handy when you want to share this to other people beside the members, just copy the
URL. Be sure that this board is set to public.

Check other tutorials at vatwist.wordpress.com
Icons Going back to the main board. Let’s see the changes. Have you
noticed them? Aside from the attached mage

Check other tutorials at vatwist.wordpress.com
navigation Let’s zoom in and identify those changes.
Attachment which is an clip art of a garage.
Due Date. Hover over it and you’ll see the remaining hours.
Assign member/s
The color label
Check other tutorials at vatwist.wordpress.com
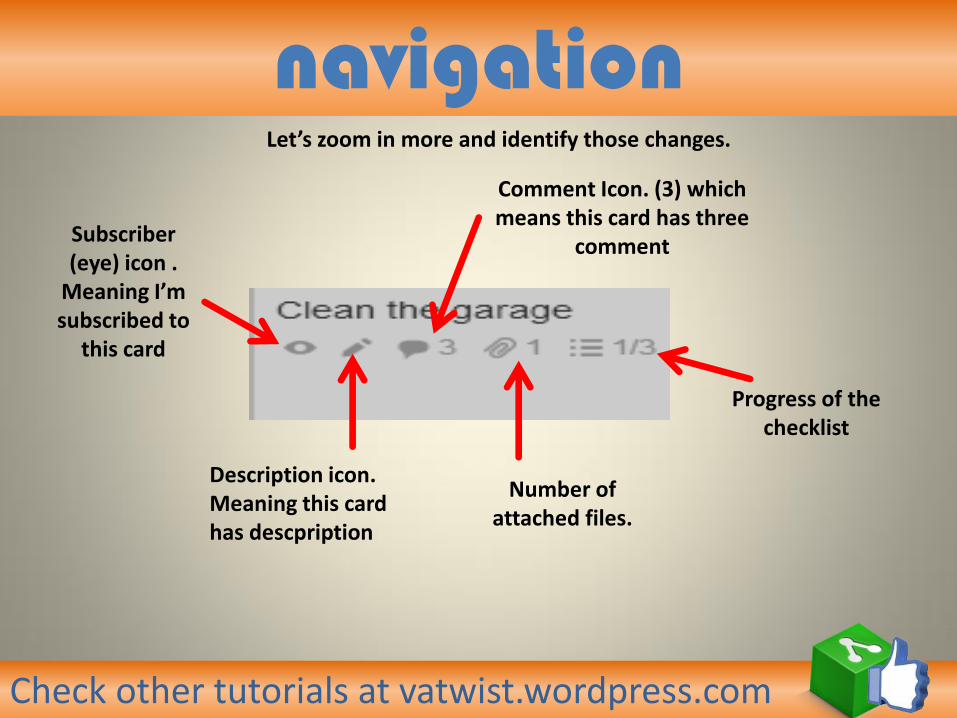
navigation Let’s zoom in more and identify those changes.
Progress of the checklist
Number of attached files.
Description icon. Meaning this card has descpription
Subscriber (eye) icon .
Meaning I’m subscribed to
this card
Comment Icon. (3) which means this card has three
comment

Check other tutorials at vatwist.wordpress.com
Adding list Three lists might not be enough. And so you can add one or more
lists. Click ‘Add list’.
Check other tutorials at vatwist.wordpress.com
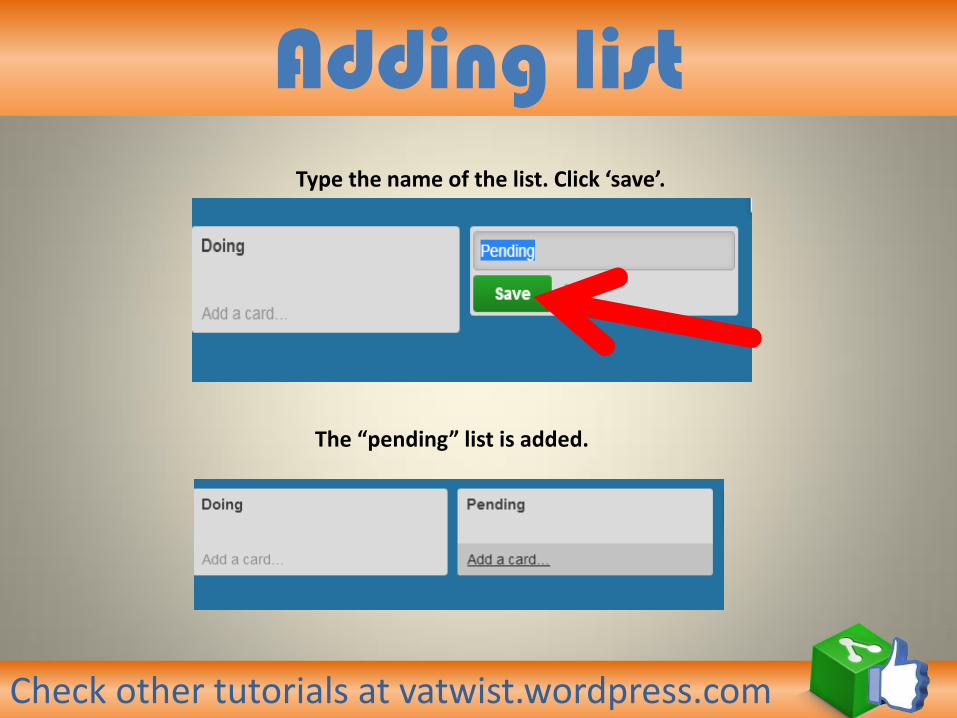
Adding list Type the name of the list. Click ‘save’.
The “pending” list is added.

Check other tutorials at vatwist.wordpress.com
Adding list You can also add a list by double clicking anywhere on the board. The position is
determined by the place where you double clicked. For this instance, it’s between 2nd and 3rd list. It recognizes then as an insertion between the two,
making it 3rd.
Check other tutorials at vatwist.wordpress.com
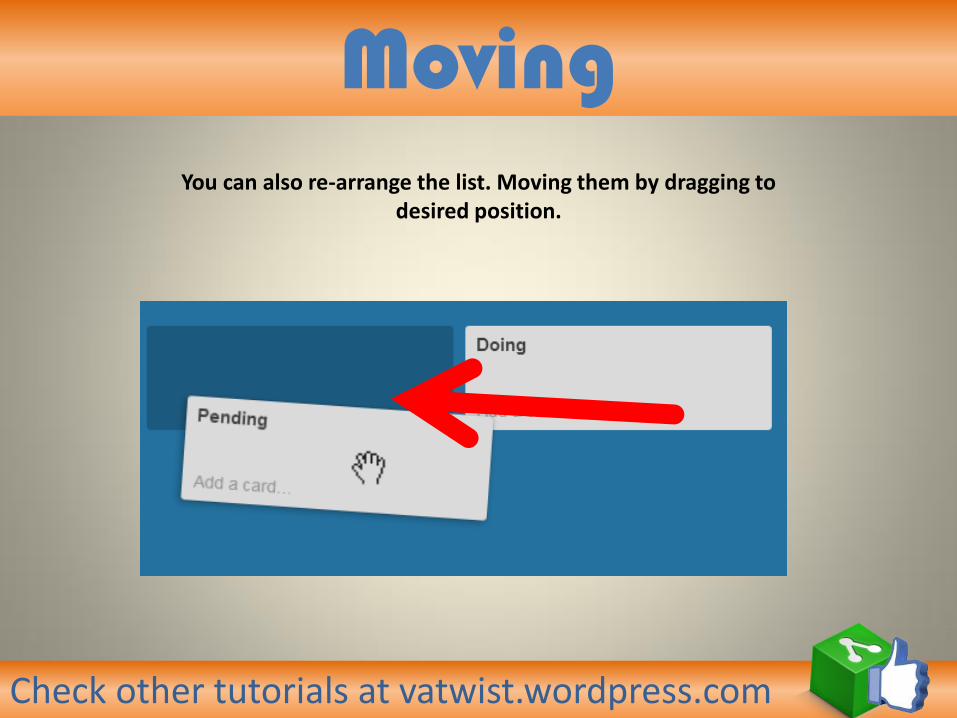
Moving You can also re-arrange the list. Moving them by dragging to
desired position.

Check other tutorials at vatwist.wordpress.com
moving The same thing with cards. You can drag them to desired position
within the list.
Check other tutorials at vatwist.wordpress.com
moving Or transfer them to other list.
Check other tutorials at vatwist.wordpress.com
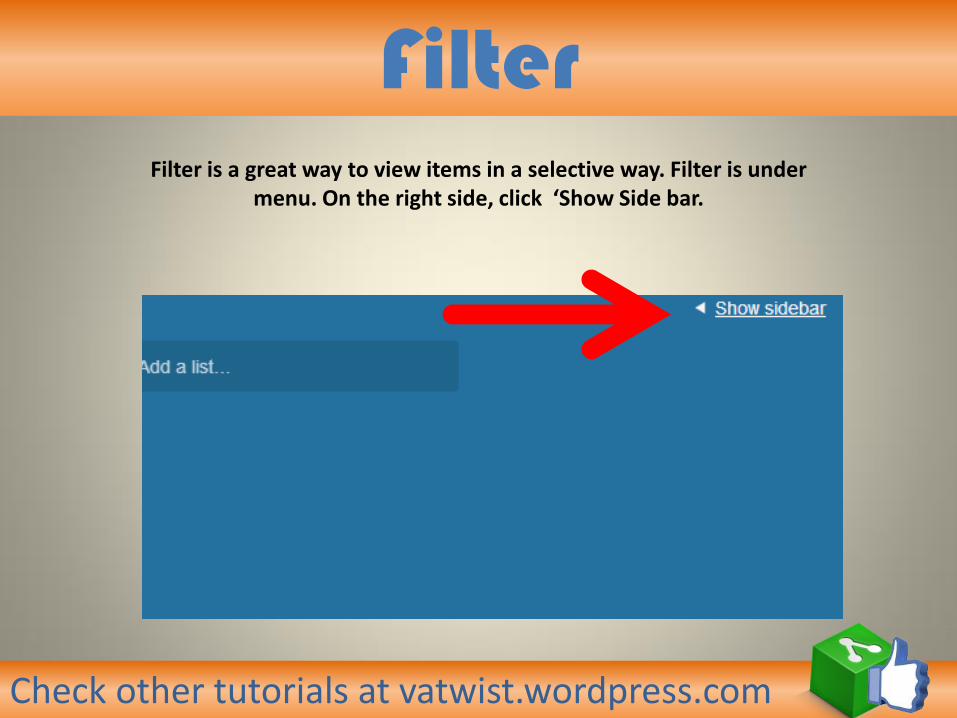
Filter Filter is a great way to view items in a selective way. Filter is under
menu. On the right side, click ‘Show Side bar.

Check other tutorials at vatwist.wordpress.com
Filter Click ‘Menu’ to expand. Then click ‘Filter cards’.

Check other tutorials at vatwist.wordpress.com
Filter
These are the options on how you can filter your
cards. By label; members; due date; also by keyword
search.

Check other tutorials at vatwist.wordpress.com
Archiving There are no delete options for the lists. You can only archive them.
Click drop down icon to expand.

Check other tutorials at vatwist.wordpress.com
Archiving list Archiving means it has the option to be restored.
Click ‘Archive this list’.

Check other tutorials at vatwist.wordpress.com
Archiving list
The archive list will then disappear and transferred to archived items.

Check other tutorials at vatwist.wordpress.com
Archiving list To view archived items. Under Menu. Click ‘Archived items’.

Check other tutorials at vatwist.wordpress.com
Archiving list
The ‘Doing’ list should be here. You can place it back to board by clicling ‘Send to Board’.

Check other tutorials at vatwist.wordpress.com
Stickers You can also add stickers to each of the cards. Under Menu,
click ‘Stickers’.

Check other tutorials at vatwist.wordpress.com
Stickers For the free account. These are the available stickers.

Check other tutorials at vatwist.wordpress.com
Stickers To place stickers. Just drag one into the card you want it to put on.
Check other tutorials at vatwist.wordpress.com
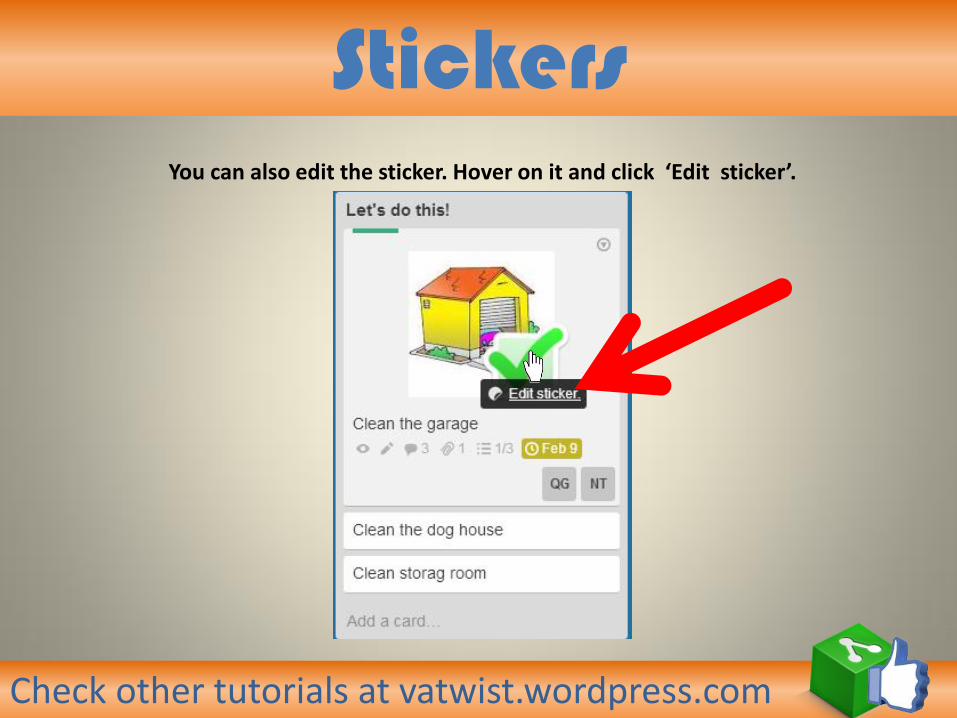
Stickers You can also edit the sticker. Hover on it and click ‘Edit sticker’.

Check other tutorials at vatwist.wordpress.com
Stickers The following actions can be done: move; rotate or remove.

Check other tutorials at vatwist.wordpress.com
Power - ups Under Menu, click ‘Power-Ups’.

Check other tutorials at vatwist.wordpress.com
Power - ups Then this pop-up window will appear.

Check other tutorials at vatwist.wordpress.com
Power - ups Voting.

Check other tutorials at vatwist.wordpress.com
Power - ups Voting. Click ‘Enable’ to activate.

Check other tutorials at vatwist.wordpress.com
Power - ups Calendar. Click ‘Enable’ to activate
‘

Check other tutorials at vatwist.wordpress.com
Power - ups Click ‘Enabled’ for iCalendar feed.
*for Mac users only

Check other tutorials at vatwist.wordpress.com
Power - ups
A URL for the feed is given. Copy and paste to the browser open in the new tab.

Check other tutorials at vatwist.wordpress.com
Power - ups A calendar icon is now available. Click to view.

Check other tutorials at vatwist.wordpress.com
Power - ups This is the calendar. The card is placed on the deadline date.
Check other tutorials at vatwist.wordpress.com
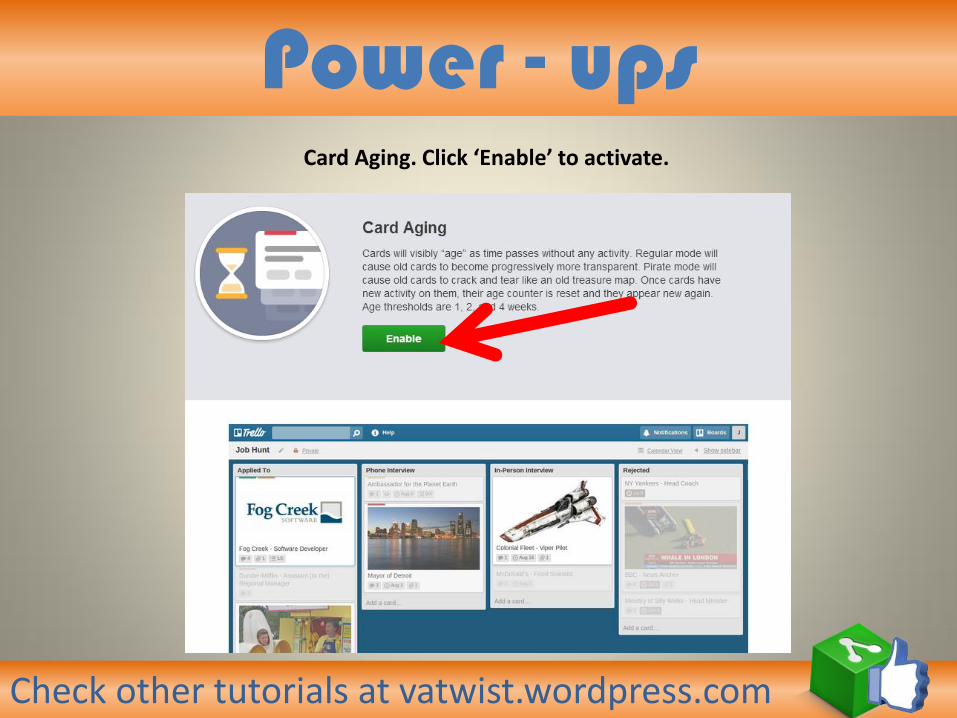
Power - ups Card Aging. Click ‘Enable’ to activate.
Check other tutorials at vatwist.wordpress.com
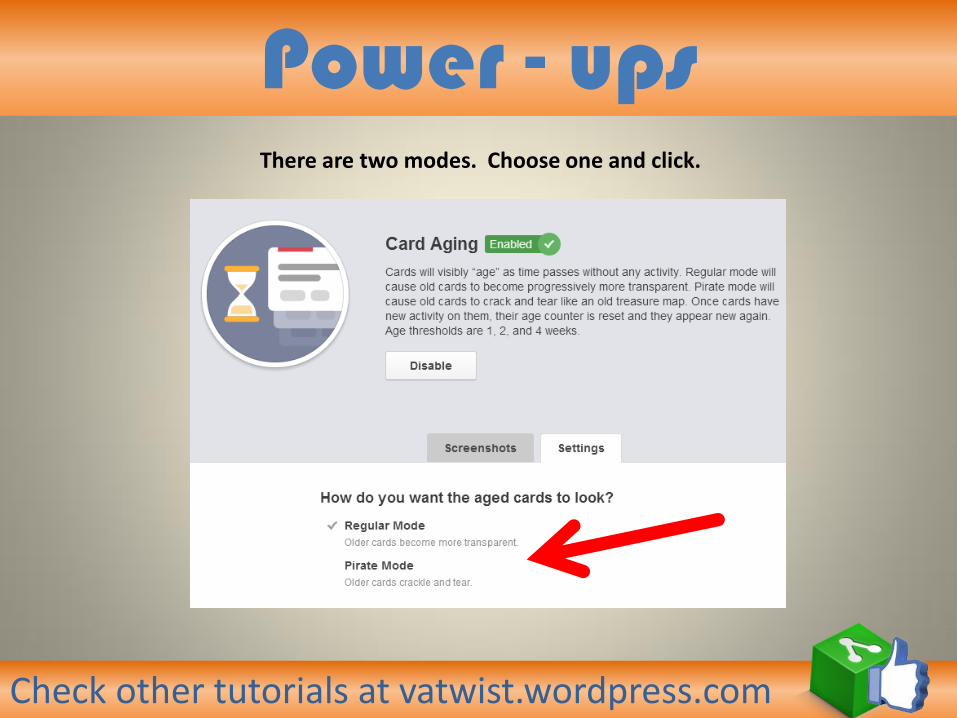
Power - ups There are two modes. Choose one and click.

Check other tutorials at vatwist.wordpress.com
Settings Under the menu is the general settings. Click ‘Settings’ to expand.

Check other tutorials at vatwist.wordpress.com
Settings
These are the options for the settings.

Check other tutorials at vatwist.wordpress.com
Settings From here you can rename the board if you want to

Check other tutorials at vatwist.wordpress.com
Settings If your board was the “organization” type. You can
change organization type here provided that you have set-up more than one .

Check other tutorials at vatwist.wordpress.com
Settings You can also change the background color of your board.
These are the color pallet available for the free account.

Check other tutorials at vatwist.wordpress.com
Settings
You can again set the privacy of the board here. Whether it can viewed privately or
publicly, and or by an organization.

Check other tutorials at vatwist.wordpress.com
Settings
Set the commenting permission according to your preference.

Check other tutorials at vatwist.wordpress.com
Settings
Set who can send invitations to view this
board.

Check other tutorials at vatwist.wordpress.com
Settings Email Settings. A dedicated email
address for the board is generated.
Please do check the tip for this particular
feature.
You can also change the placement of the cards
within the email
Check other tutorials at vatwist.wordpress.com
Settings
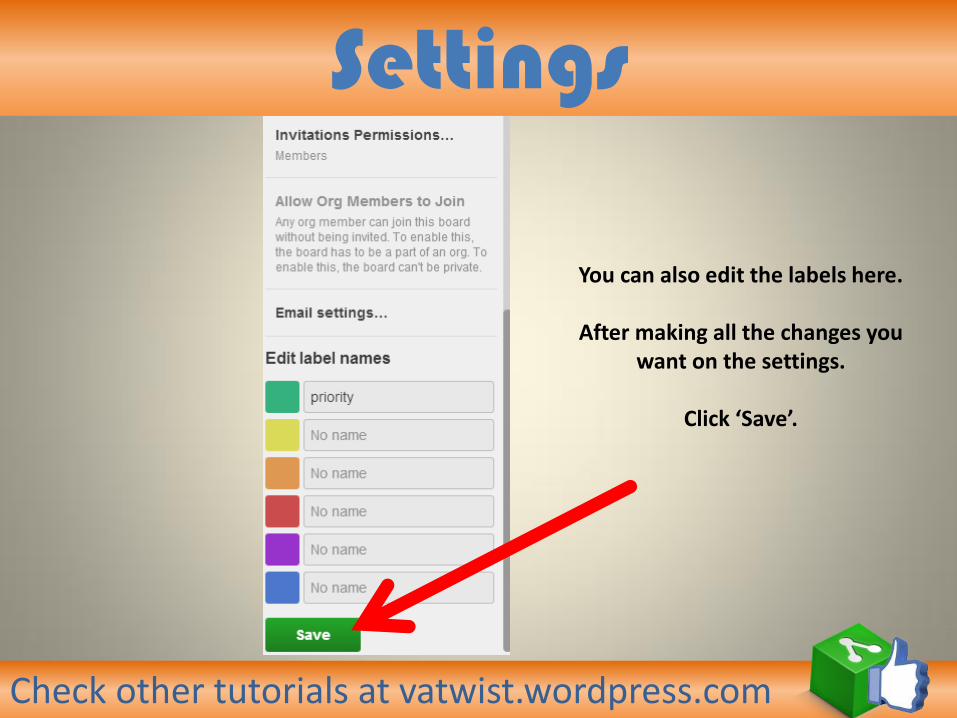
You can also edit the labels here.
After making all the changes you want on the settings.
Click ‘Save’.

Check other tutorials at vatwist.wordpress.com
End I hope you had a blast learning Trello. This is very helpful in project management specially when members are not
at your workstation or the set-up of each members of the team is overseas.
Stay updated for more tutorials.
Did you find it useful?
Please like it and share. Thank you.