Scribus templates / Scribus TemplatesScribus templates / Scribus Templates ... securi ...
Upload
vuongquynhCategory
view
230download
0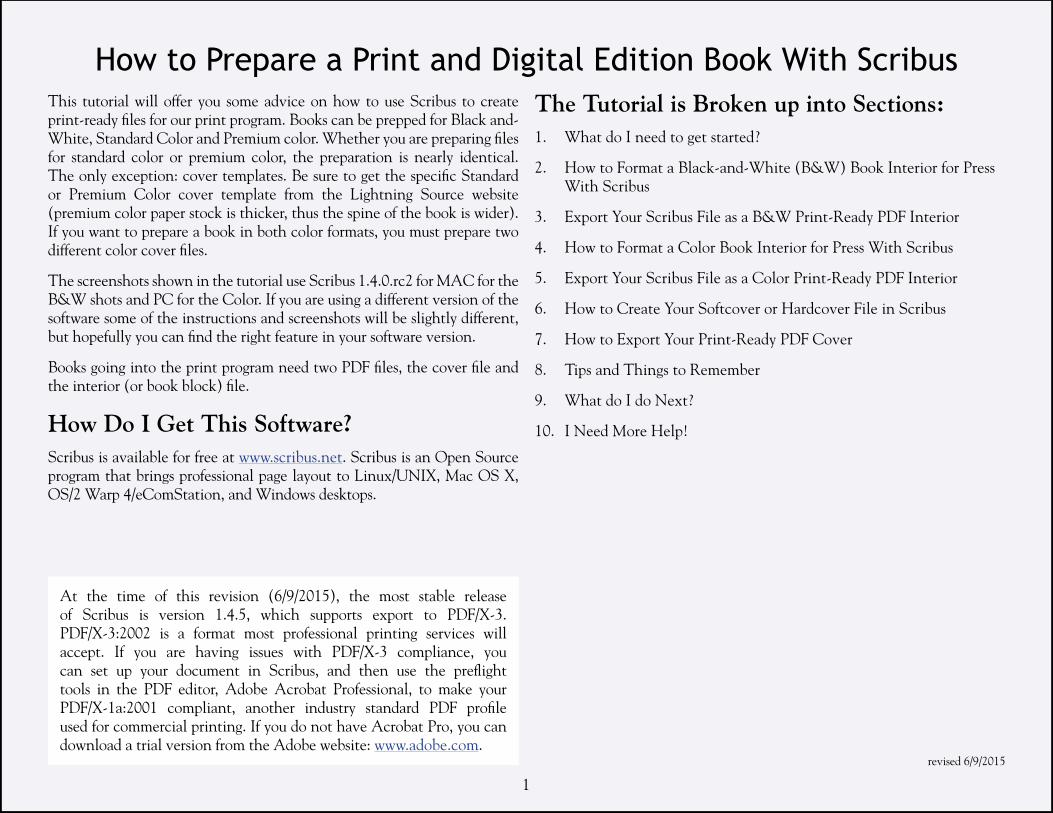
1
This tutorial will offer you some advice on how to use Scribus to create print-ready fi les for our print program. Books can be prepped for Black and- White, Standard Color and Premium color. Whether you are preparing fi les for standard color or premium color, the preparation is nearly identical. The only exception: cover templates. Be sure to get the specifi c Standard or Premium Color cover template from the Lightning Source website (premium color paper stock is thicker, thus the spine of the book is wider). If you want to prepare a book in both color formats, you must prepare two different color cover fi les.
The screenshots shown in the tutorial use Scribus 1.4.0.rc2 for MAC for the B&W shots and PC for the Color. If you are using a different version of the software some of the instructions and screenshots will be slightly different, but hopefully you can fi nd the right feature in your software version.
Books going into the print program need two PDF fi les, the cover fi le and the interior (or book block) fi le.
How Do I Get This Software?Scribus is available for free at www.scribus.net. Scribus is an Open Source program that brings professional page layout to Linux/UNIX, Mac OS X, OS/2 Warp 4/eComStation, and Windows desktops.
The Tutorial is Broken up into Sections:1. What do I need to get started?
2. How to Format a Black-and-White (B&W) Book Interior for Press With Scribus
3. Export Your Scribus File as a B&W Print-Ready PDF Interior
4. How to Format a Color Book Interior for Press With Scribus
5. Export Your Scribus File as a Color Print-Ready PDF Interior
6. How to Create Your Softcover or Hardcover File in Scribus
7. How to Export Your Print-Ready PDF Cover
8. Tips and Things to Remember
9. What do I do Next?
10. I Need More Help!
How to Prepare a Print and Digital Edition Book With Scribus
revised 6/9/2015
At the time of this revision (6/9/2015), the most stable release of Scribus is version 1.4.5, which supports export to PDF/X-3. PDF/X-3:2002 is a format most professional printing services will accept. If you are having issues with PDF/X-3 compliance, you can set up your document in Scribus, and then use the prefl ight tools in the PDF editor, Adobe Acrobat Professional, to make your PDF/X-1a:2001 compliant, another industry standard PDF profi le used for commercial printing. If you do not have Acrobat Pro, you can download a trial version from the Adobe website: www.adobe.com.
2
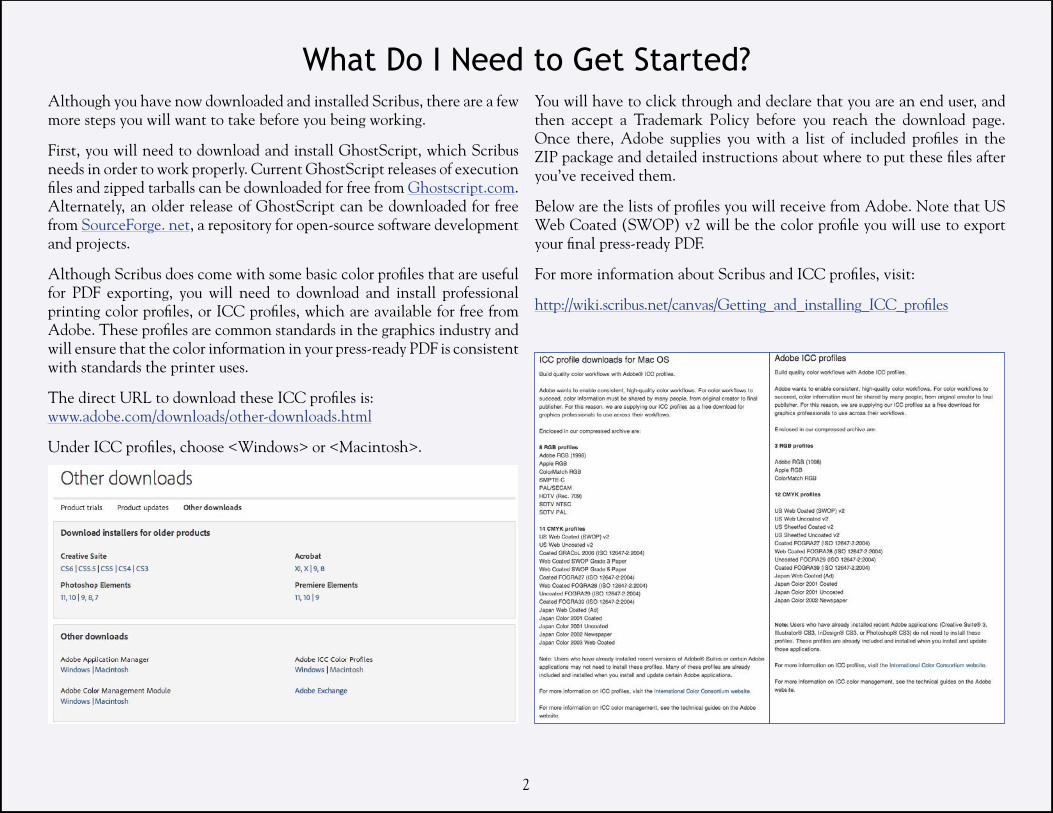
Although you have now downloaded and installed Scribus, there are a few more steps you will want to take before you being working.
First, you will need to download and install GhostScript, which Scribus needs in order to work properly. Current GhostScript releases of execution fi les and zipped tarballs can be downloaded for free from Ghostscript.com. Alternately, an older release of GhostScript can be downloaded for free from SourceForge. net, a repository for open-source software development and projects.
Although Scribus does come with some basic color profi les that are useful for PDF exporting, you will need to download and install professional printing color profi les, or ICC profi les, which are available for free from Adobe. These profi les are common standards in the graphics industry and will ensure that the color information in your press-ready PDF is consistent with standards the printer uses.
The direct URL to download these ICC profi les is:www.adobe.com/downloads/other-downloads.html
Under ICC profi les, choose <Windows> or <Macintosh>.
You will have to click through and declare that you are an end user, and then accept a Trademark Policy before you reach the download page. Once there, Adobe supplies you with a list of included profi les in the ZIP package and detailed instructions about where to put these fi les after you’ve received them.
Below are the lists of profi les you will receive from Adobe. Note that US Web Coated (SWOP) v2 will be the color profi le you will use to export your fi nal press-ready PDF.
For more information about Scribus and ICC profi les, visit:
http://wiki.scribus.net/canvas/Getting_and_installing_ICC_profi les
What Do I Need to Get Started?
3
This is a basic step-by-step to help take you through all of the stages to laying out a B&W book block in Scribus.
For your convenience, we have created a few template fi les for different standard book sizes to make your layout work easier. You can fi nd these templates under the BOOK PRINTING section of your publisher menu under the Preparing your book for print option.
Open Scribus then, in the File pull-down menu, open the template. Make sure you are using the right B&W template for your book.
Click the Windows pull-down and open the Properties window.
Color books have a few more hoops to jump through, so if you are working on a color book, please fl ip to that section of the tutorial.
How to Format a B&W Book Interior for Press With Scribus
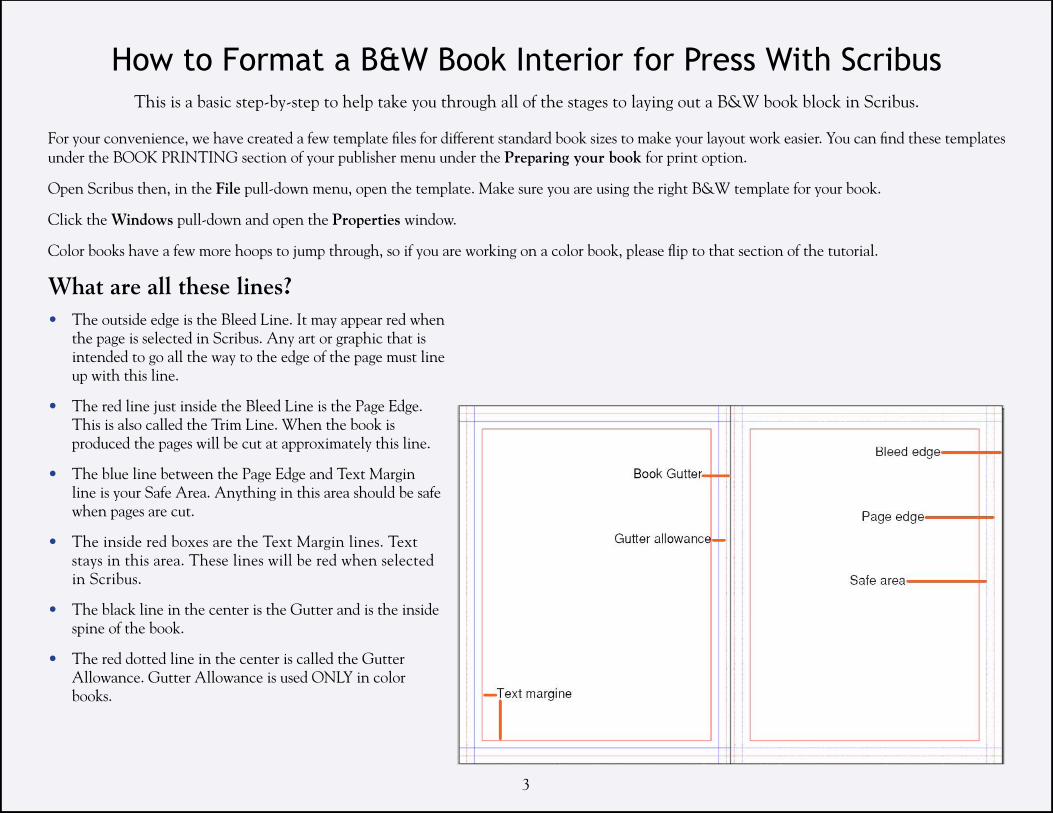
What are all these lines?• The outside edge is the Bleed Line. It may appear red when
the page is selected in Scribus. Any art or graphic that is intended to go all the way to the edge of the page must line up with this line.
• The red line just inside the Bleed Line is the Page Edge. This is also called the Trim Line. When the book is produced the pages will be cut at approximately this line.
• The blue line between the Page Edge and Text Margin line is your Safe Area. Anything in this area should be safe when pages are cut.
• The inside red boxes are the Text Margin lines. Text stays in this area. These lines will be red when selected in Scribus.
• The black line in the center is the Gutter and is the inside spine of the book.
• The red dotted line in the center is called the Gutter Allowance. Gutter Allowance is used ONLY in color books.
4
Creating Master Pages
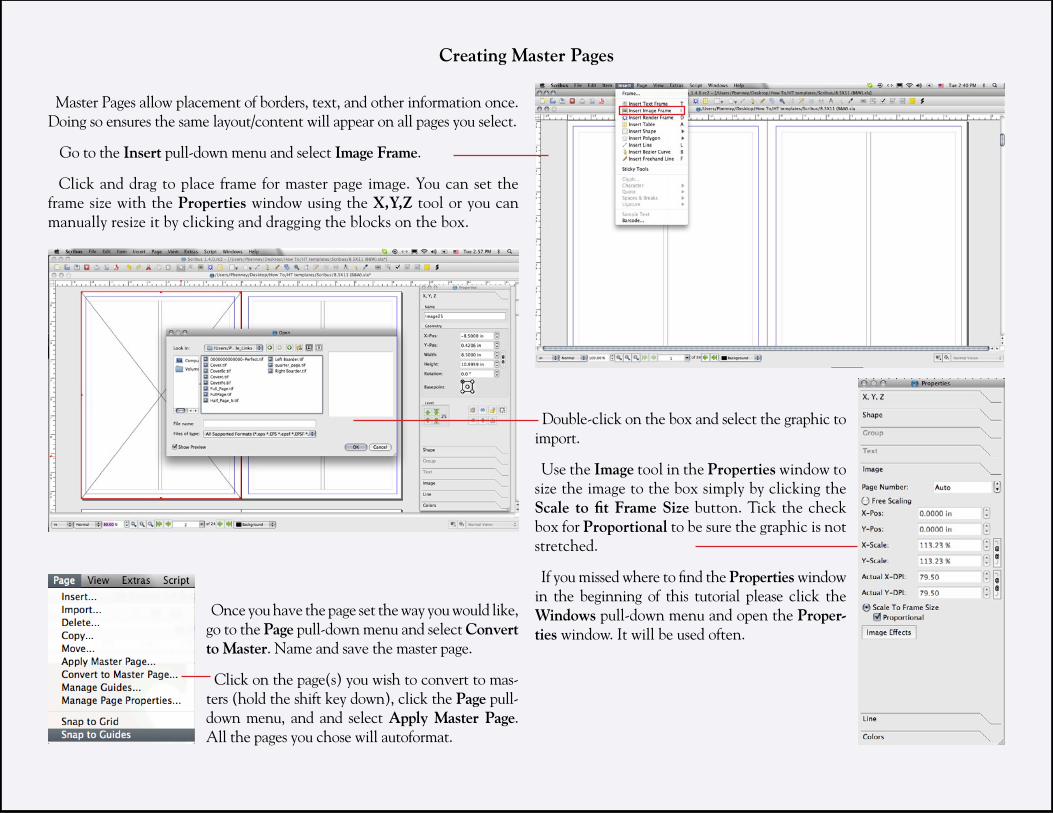
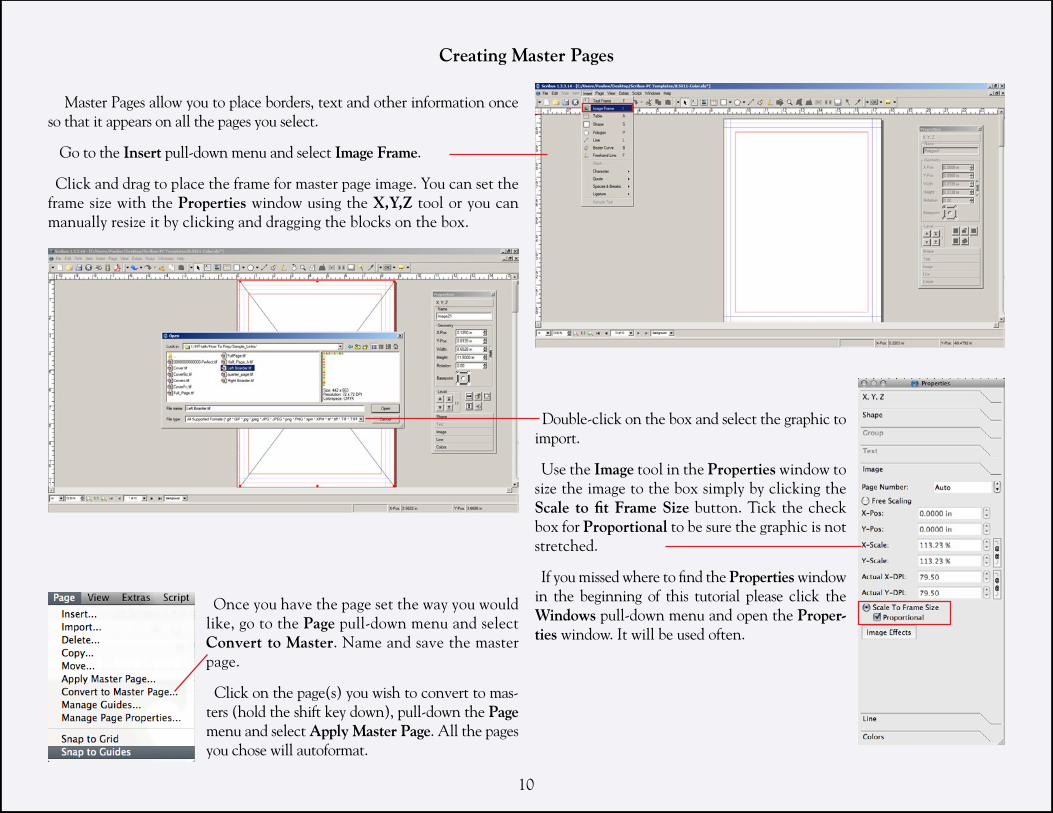
Master Pages allow placement of borders, text, and other information once. Doing so ensures the same layout/content will appear on all pages you select.
Go to the Insert pull-down menu and select Image Frame.
Click and drag to place frame for master page image. You can set the frame size with the Properties window using the X,Y,Z tool or you can manually resize it by clicking and dragging the blocks on the box.
Double-click on the box and select the graphic to import.
Use the Image tool in the Properties window to size the image to the box simply by clicking the Scale to fit Frame Size button. Tick the check box for Proportional to be sure the graphic is not stretched.
If you missed where to find the Properties window in the beginning of this tutorial please click the Windows pull-down menu and open the Proper-ties window. It will be used often.
Once you have the page set the way you would like, go to the Page pull-down menu and select Convert to Master. Name and save the master page.
Click on the page(s) you wish to convert to mas-ters (hold the shift key down), click the Page pull-down menu, and and select Apply Master Page. All the pages you chose will autoformat.
5
Adding and Formatting Text
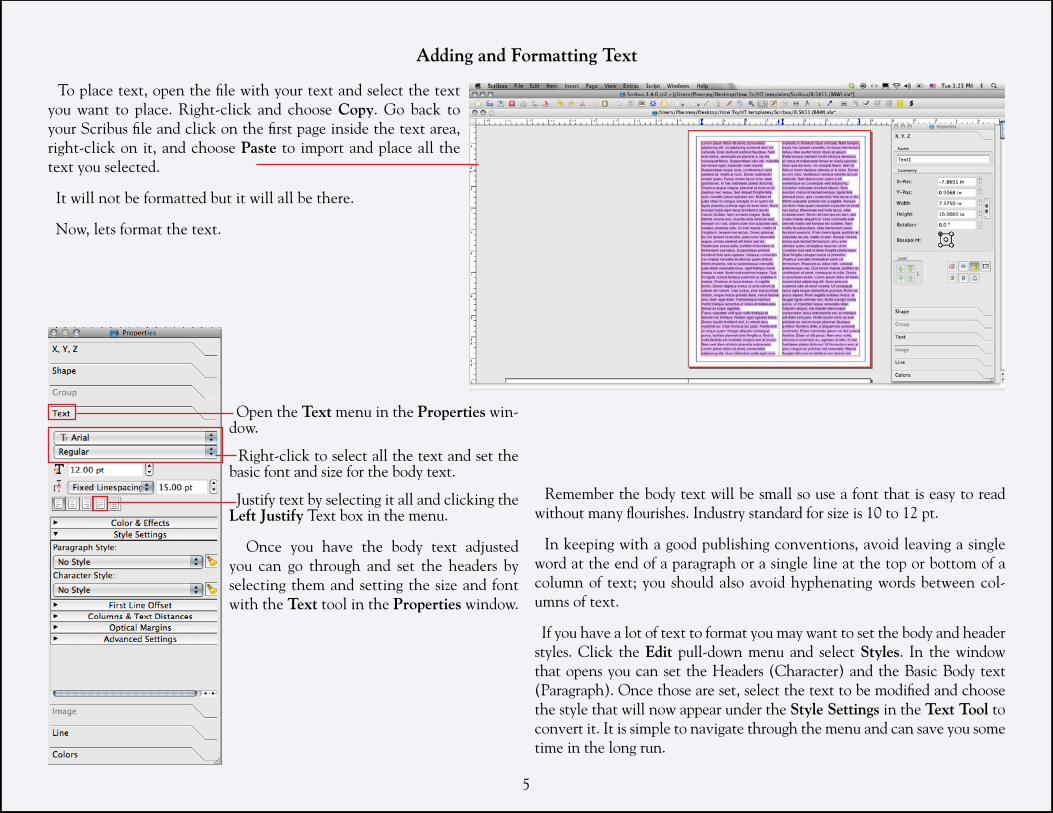
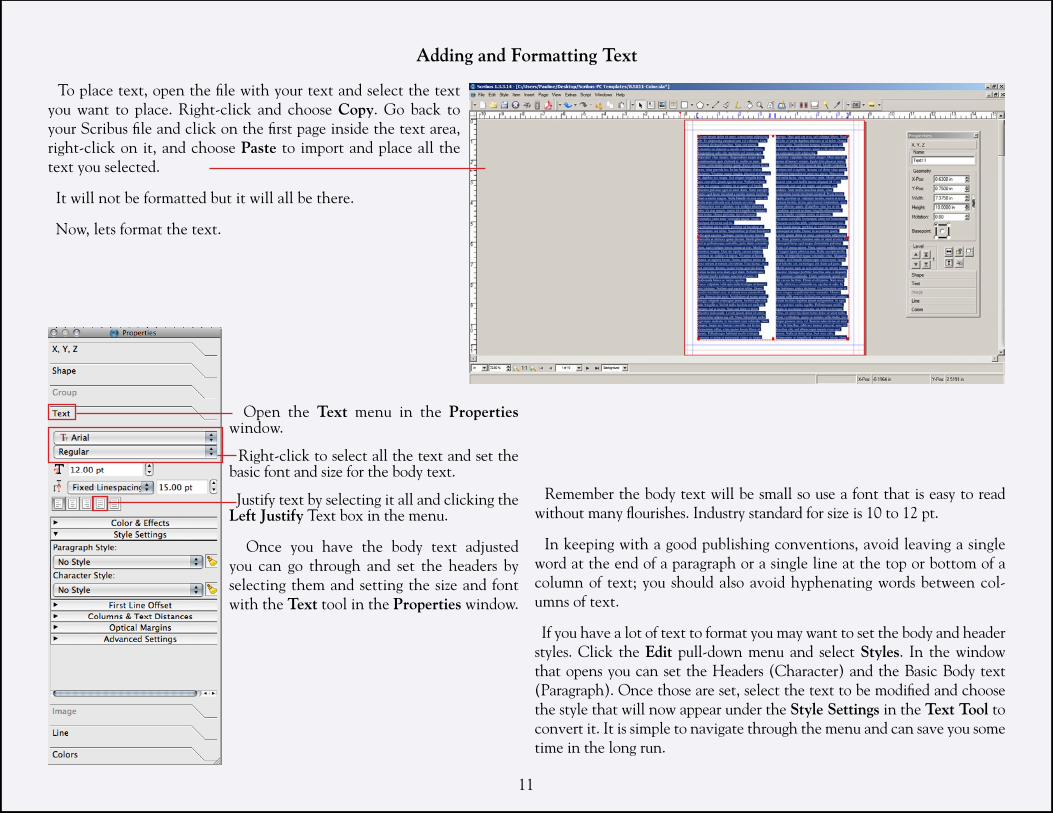
To place text, open the file with your text and select the text you want to place. Right-click and choose Copy. Go back to your Scribus file and click on the first page inside the text area, right-click on it, and choose Paste to import and place all the text you selected.
It will not be formatted but it will all be there.
Now, lets format the text.
Open the Text menu in the Properties win-dow.
Right-click to select all the text and set the basic font and size for the body text.
Justify text by selecting it all and clicking the Left Justify Text box in the menu.
Once you have the body text adjusted you can go through and set the headers by selecting them and setting the size and font with the Text tool in the Properties window.
Remember the body text will be small so use a font that is easy to read without many flourishes. Industry standard for size is 10 to 12 pt.
In keeping with a good publishing conventions, avoid leaving a single word at the end of a paragraph or a single line at the top or bottom of a column of text; you should also avoid hyphenating words between col-umns of text.
If you have a lot of text to format you may want to set the body and header styles. Click the Edit pull-down menu and select Styles. In the window that opens you can set the Headers (Character) and the Basic Body text (Paragraph). Once those are set, select the text to be modified and choose the style that will now appear under the Style Settings in the Text Tool to convert it. It is simple to navigate through the menu and can save you some time in the long run.
6
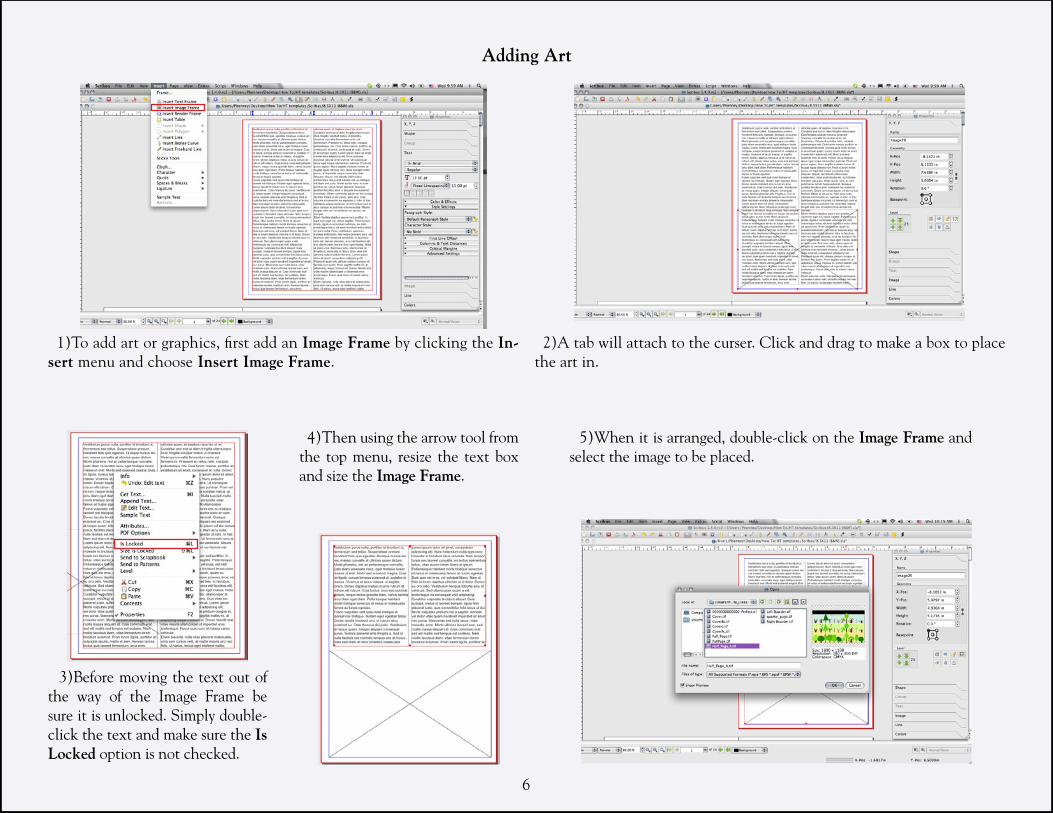
1)To add art or graphics, first add an Image Frame by clicking the In-sert menu and choose Insert Image Frame.
2)A tab will attach to the curser. Click and drag to make a box to place the art in.
Adding Art
3)Before moving the text out of the way of the Image Frame be sure it is unlocked. Simply double-click the text and make sure the Is Locked option is not checked.
4)Then using the arrow tool from the top menu, resize the text box and size the Image Frame.
5)When it is arranged, double-click on the Image Frame and select the image to be placed.
7
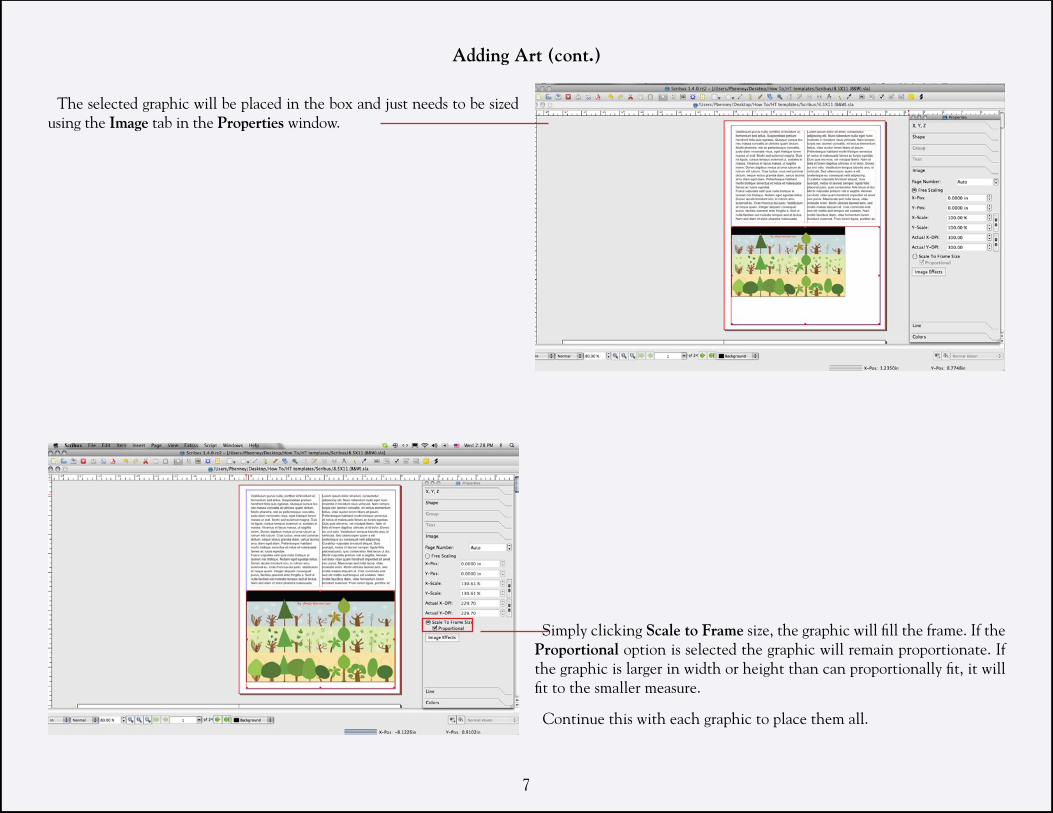
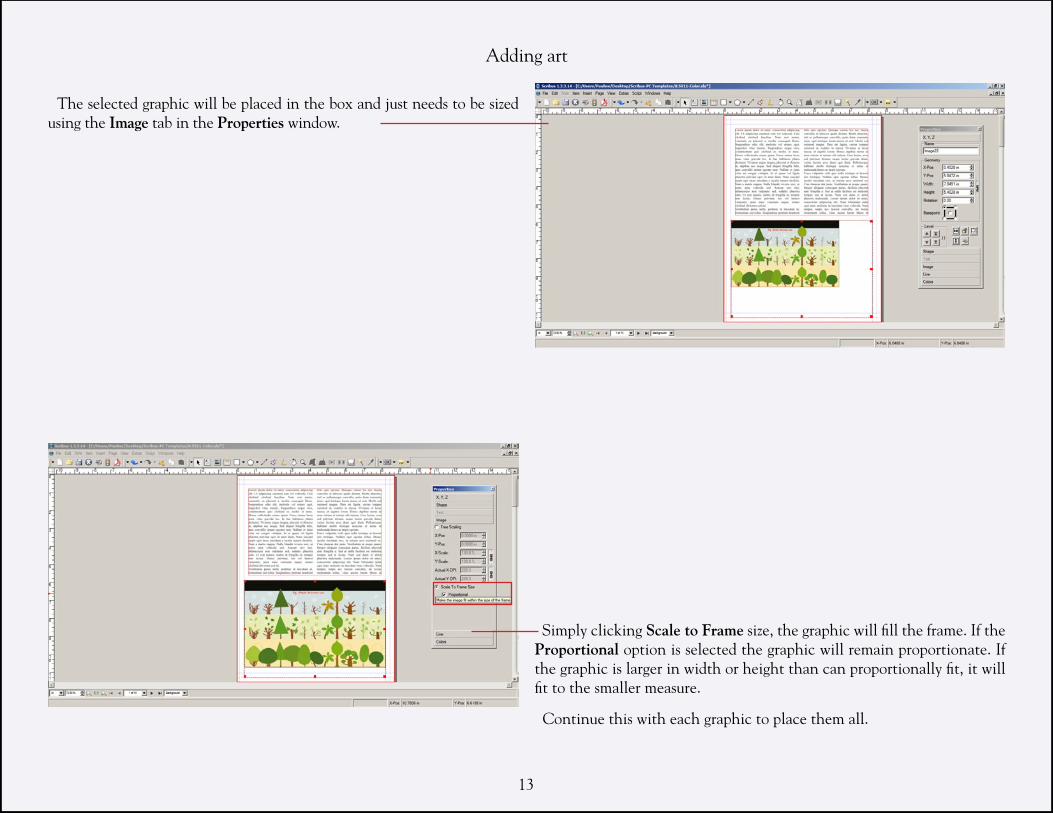
The selected graphic will be placed in the box and just needs to be sized using the Image tab in the Properties window.
Adding Art (cont.)
Simply clicking Scale to Frame size, the graphic will fill the frame. If the Proportional option is selected the graphic will remain proportionate. If the graphic is larger in width or height than can proportionally fit, it will fit to the smaller measure.
Continue this with each graphic to place them all.
8
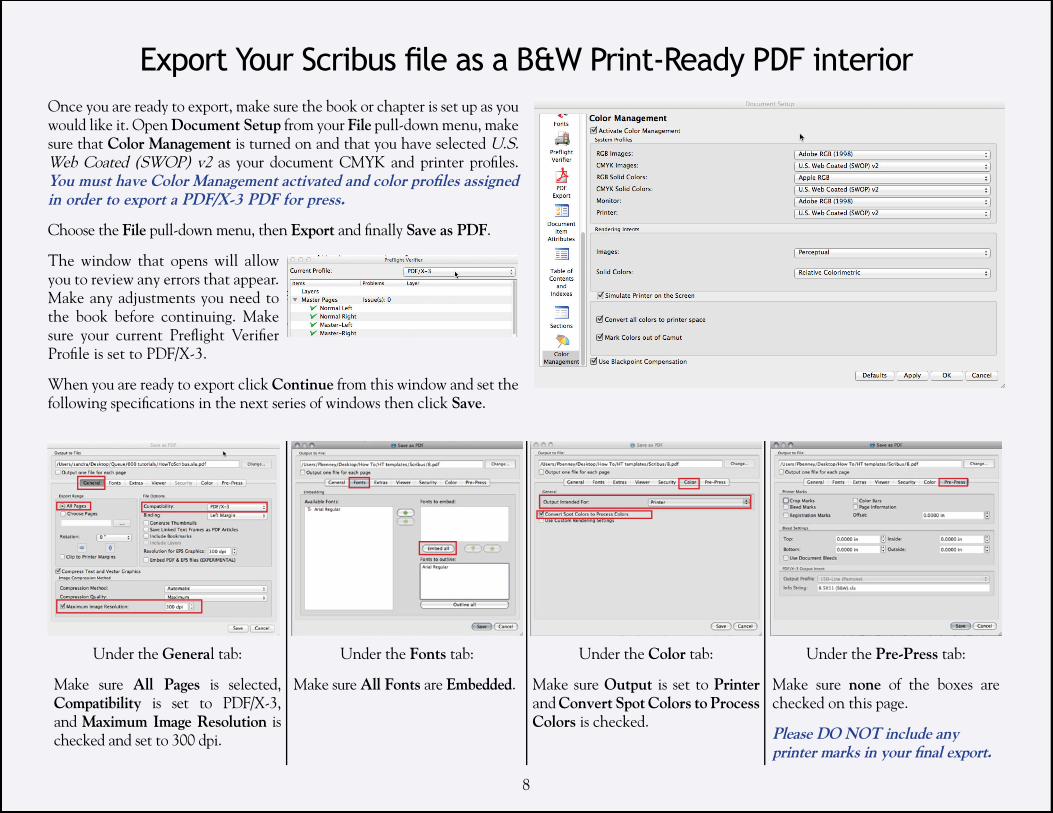
Once you are ready to export, make sure the book or chapter is set up as you would like it. Open Document Setup from your File pull-down menu, make sure that Color Management is turned on and that you have selected U.S. Web Coated (SWOP) v2 as your document CMYK and printer profi les. You must have Color Management activated and color profi les assigned in order to export a PDF/X-3 PDF for press.
Choose the File pull-down menu, then Export and fi nally Save as PDF.
The window that opens will allow you to review any errors that appear. Make any adjustments you need to the book before continuing. Make sure your current Prefl ight Verifi er Profi le is set to PDF/X-3.
When you are ready to export click Continue from this window and set the following specifi cations in the next series of windows then click Save.
Export Your Scribus fi le as a B&W Print-Ready PDF interior
Under the General tab:
Make sure All Pages is selected, Compatibility is set to PDF/X-3, and Maximum Image Resolution is checked and set to 300 dpi.
Under the Fonts tab:
Make sure All Fonts are Embedded.
Under the Color tab:
Make sure Output is set to Printer and Convert Spot Colors to Process Colors is checked.
Under the Pre-Press tab:
Make sure none of the boxes are checked on this page.
Please DO NOT include anyprinter marks in your fi nal export.

9
How to Format a Color Book Interior for Press With ScribusThis is a basic step-by-step to help take you through all the stages to laying out a color book block in Scribus.
For your convenience we have created a few templates fi les for different standard book sizes to make your layout work easier. You can fi nd these templates under the PRINT section of your publisher menu under the TEMPLATES FOR PRINT LAYOUT publisher tool option.
Open Scribus then in the File pull-down menu open the template. Make sure you are using the right color template for your book.
Click the Windows pull-down and open the Properties window
Color books have a few more hoops to jump through, so please use the color interior guide ONLY for color books.
What are all these lines?
• The outside edge is the Bleed Line. It may appear red when the page is selected in Scribus. Any art or graphic that is intended to go all the way to the edge of the page must line up with this line. Bleed Lines are used ONLY in color books.
• The red line just inside the Bleed Line is the Page Edge. This is also called the Trim Line. When the book is produced the pages will be cut at approximately this line.
• The blue line between the Page Edge and Text Margin line is your Safe Area. Anything in this area should be safe when pages are cut.
• The inside red boxes are the Text Margin lines. Text stays in this area. These lines will be red when selected in Scribus.
• The black line in the center is the Gutter and is the inside spine of the book. The area between the Gutter Line and the Gutter Allowance line should be free of any art, graphics or text.
• The red dotted line in the center is called the Gutter Allowance. The area between the Gutter Line and the Gutter Allowance line should be free of any art, graphics or text. This is where the pages are glued into the book. The glue does not adhere well to color ink, so it is very important to keep this area free from any print items. Gutter Allowance is used ONLY in color books.
10
Creating Master Pages
Master Pages allow you to place borders, text and other information once so that it appears on all the pages you select.
Go to the Insert pull-down menu and select Image Frame.
Click and drag to place the frame for master page image. You can set the frame size with the Properties window using the X,Y,Z tool or you can manually resize it by clicking and dragging the blocks on the box.
Double-click on the box and select the graphic to import.
Use the Image tool in the Properties window to size the image to the box simply by clicking the Scale to fit Frame Size button. Tick the check box for Proportional to be sure the graphic is not stretched.
If you missed where to find the Properties window in the beginning of this tutorial please click the Windows pull-down menu and open the Proper-ties window. It will be used often.
Once you have the page set the way you would like, go to the Page pull-down menu and select Convert to Master. Name and save the master page.
Click on the page(s) you wish to convert to mas-ters (hold the shift key down), pull-down the Page menu and select Apply Master Page. All the pages you chose will autoformat.
11
Adding and Formatting Text
To place text, open the file with your text and select the text you want to place. Right-click and choose Copy. Go back to your Scribus file and click on the first page inside the text area, right-click on it, and choose Paste to import and place all the text you selected.
It will not be formatted but it will all be there.
Now, lets format the text.
Remember the body text will be small so use a font that is easy to read without many flourishes. Industry standard for size is 10 to 12 pt.
In keeping with a good publishing conventions, avoid leaving a single word at the end of a paragraph or a single line at the top or bottom of a column of text; you should also avoid hyphenating words between col-umns of text.
If you have a lot of text to format you may want to set the body and header styles. Click the Edit pull-down menu and select Styles. In the window that opens you can set the Headers (Character) and the Basic Body text (Paragraph). Once those are set, select the text to be modified and choose the style that will now appear under the Style Settings in the Text Tool to convert it. It is simple to navigate through the menu and can save you some time in the long run.
Open the Text menu in the Properties window.
Right-click to select all the text and set the basic font and size for the body text.
Justify text by selecting it all and clicking the Left Justify Text box in the menu.
Once you have the body text adjusted you can go through and set the headers by selecting them and setting the size and font with the Text tool in the Properties window.

12
Adding Art
1)To add art or graphics, first add an Image Frame by clicking the In-sert menu and choose Insert Image Frame.
2)A tab will attach to the curser. Click and drag to make a box to place the art in.
3)Before moving the text out of the way of the Image Frame be sure it is unlocked. Simply double-click the text and make sure the Is Locked option is not checked.
4)Then using the arrow tool from the top menu, resize the text box and size the Image Frame.
5)When it is arranged, double-click on the Image Frame and select the image to be placed.
13
The selected graphic will be placed in the box and just needs to be sized using the Image tab in the Properties window.
Adding art
Simply clicking Scale to Frame size, the graphic will fill the frame. If the Proportional option is selected the graphic will remain proportionate. If the graphic is larger in width or height than can proportionally fit, it will fit to the smaller measure.
Continue this with each graphic to place them all.
14
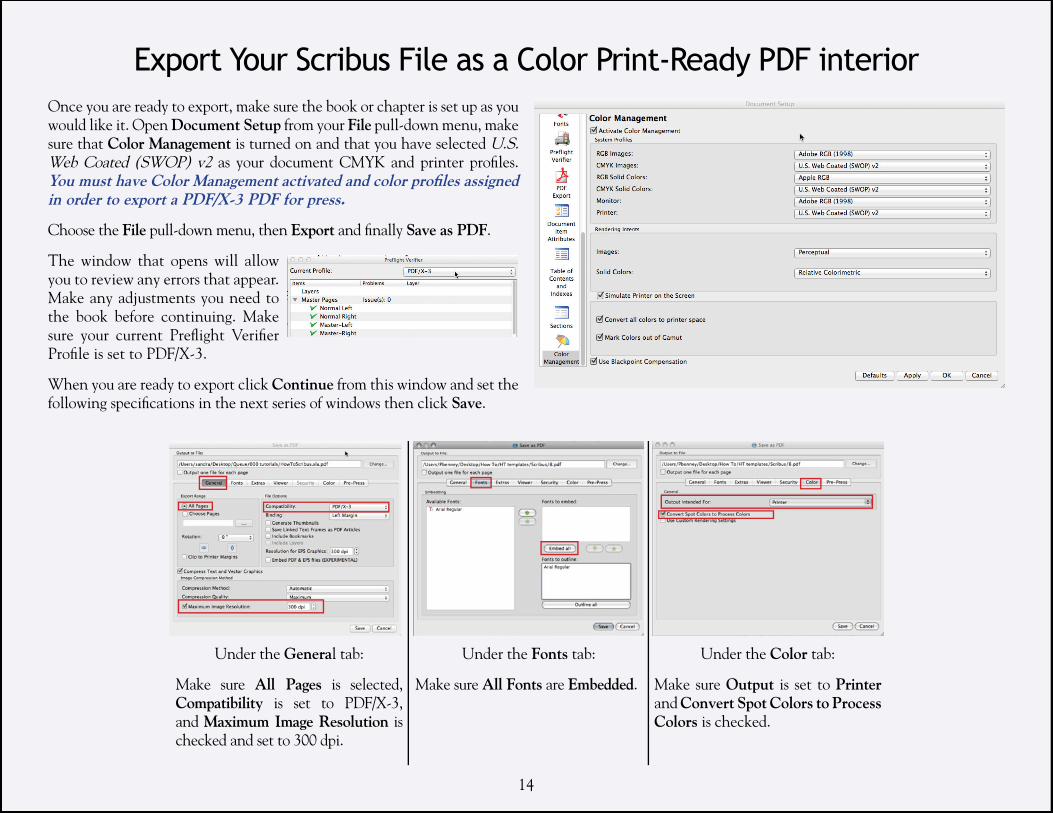
Export Your Scribus File as a Color Print-Ready PDF interiorOnce you are ready to export, make sure the book or chapter is set up as you would like it. Open Document Setup from your File pull-down menu, make sure that Color Management is turned on and that you have selected U.S. Web Coated (SWOP) v2 as your document CMYK and printer profi les. You must have Color Management activated and color profi les assigned in order to export a PDF/X-3 PDF for press.
Choose the File pull-down menu, then Export and fi nally Save as PDF.
The window that opens will allow you to review any errors that appear. Make any adjustments you need to the book before continuing. Make sure your current Prefl ight Verifi er Profi le is set to PDF/X-3.
When you are ready to export click Continue from this window and set the following specifi cations in the next series of windows then click Save.
Under the General tab:
Make sure All Pages is selected, Compatibility is set to PDF/X-3, and Maximum Image Resolution is checked and set to 300 dpi.
Under the Fonts tab:
Make sure All Fonts are Embedded.
Under the Color tab:
Make sure Output is set to Printer and Convert Spot Colors to Process Colors is checked.
15
How to Create Your Hardcover or Softcover File in Scribus Filling out the Cover Template Page:
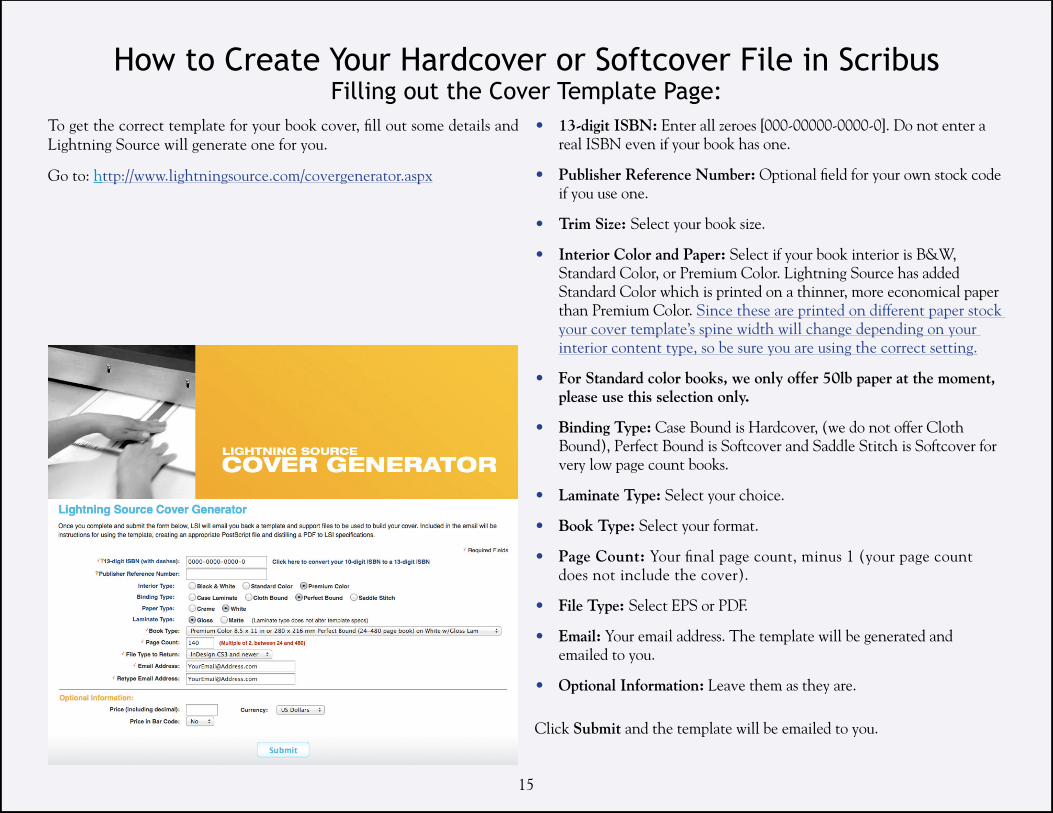
To get the correct template for your book cover, fi ll out some details and Lightning Source will generate one for you.
Go to: http://www.lightningsource.com/covergenerator.aspx
• 13-digit ISBN: Enter all zeroes [000-00000-0000-0]. Do not enter a real ISBN even if your book has one.
• Publisher Reference Number: Optional fi eld for your own stock code if you use one.
• Trim Size: Select your book size.
• Interior Color and Paper: Select if your book interior is B&W, Standard Color, or Premium Color. Lightning Source has added Standard Color which is printed on a thinner, more economical paper than Premium Color. Since these are printed on different paper stock your cover template’s spine width will change depending on your interior content type, so be sure you are using the correct setting.
• For Standard color books, we only offer 50lb paper at the moment, please use this selection only.
• Binding Type: Case Bound is Hardcover, (we do not offer Cloth Bound), Perfect Bound is Softcover and Saddle Stitch is Softcover for very low page count books.
• Laminate Type: Select your choice.
• Book Type: Select your format.
• Page Count: Your fi nal page count, minus 1 (your page count does not include the cover).
• File Type: Select EPS or PDF.
• Email: Your email address. The template will be generated and emailed to you.
• Optional Information: Leave them as they are.
Click Submit and the template will be emailed to you.
16
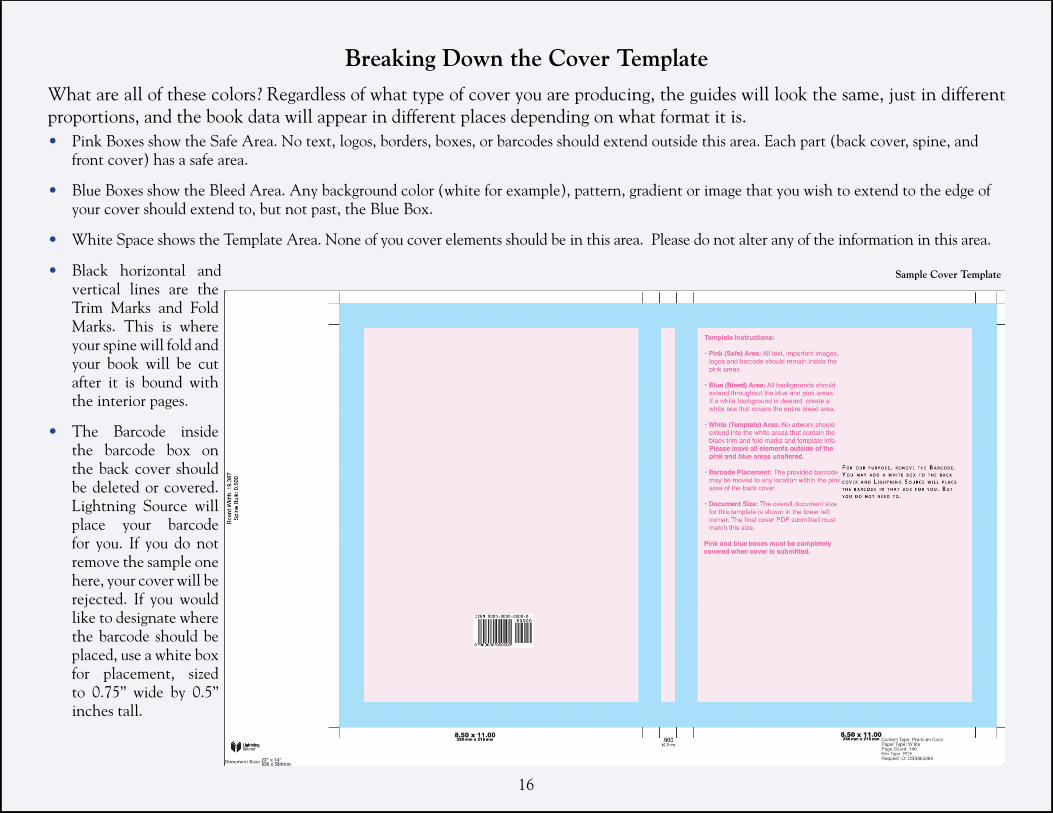
Breaking Down the Cover TemplateWhat are all of these colors? Regardless of what type of cover you are producing, the guides will look the same, just in differentproportions, and the book data will appear in different places depending on what format it is.• Pink Boxes show the Safe Area. No text, logos, borders, boxes, or barcodes should extend outside this area. Each part (back cover, spine, and
front cover) has a safe area.
• Blue Boxes show the Bleed Area. Any background color (white for example), pattern, gradient or image that you wish to extend to the edge of your cover should extend to, but not past, the Blue Box.
• White Space shows the Template Area. None of you cover elements should be in this area. Please do not alter any of the information in this area.
Sample Cover Template• Black horizontal and vertical lines are the Trim Marks and Fold Marks. This is where your spine will fold and your book will be cut after it is bound with the interior pages.
• The Barcode inside the barcode box on the back cover should be deleted or covered. Lightning Source will place your barcode for you. If you do not remove the sample one here, your cover will be rejected. If you would like to designate where the barcode should be placed, use a white box for placement, sized to 0.75” wide by 0.5” inches tall.
17
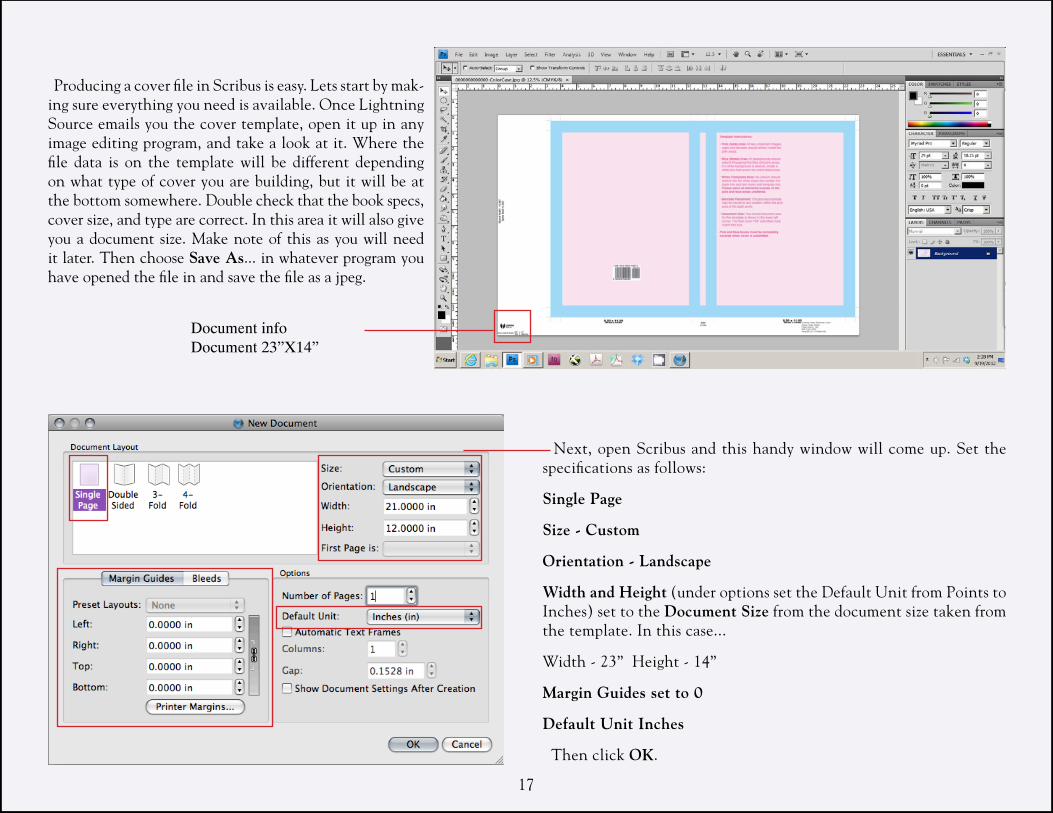
Producing a cover file in Scribus is easy. Lets start by mak-ing sure everything you need is available. Once Lightning Source emails you the cover template, open it up in any image editing program, and take a look at it. Where the file data is on the template will be different depending on what type of cover you are building, but it will be at the bottom somewhere. Double check that the book specs, cover size, and type are correct. In this area it will also give you a document size. Make note of this as you will need it later. Then choose Save As... in whatever program you have opened the file in and save the file as a jpeg.
Next, open Scribus and this handy window will come up. Set the specifications as follows:
Single Page
Size - Custom
Orientation - Landscape
Width and Height (under options set the Default Unit from Points to Inches) set to the Document Size from the document size taken from the template. In this case...
Width - 23” Height - 14”
Margin Guides set to 0
Default Unit Inches
Then click OK.
Document infoDocument 23”X14”
18
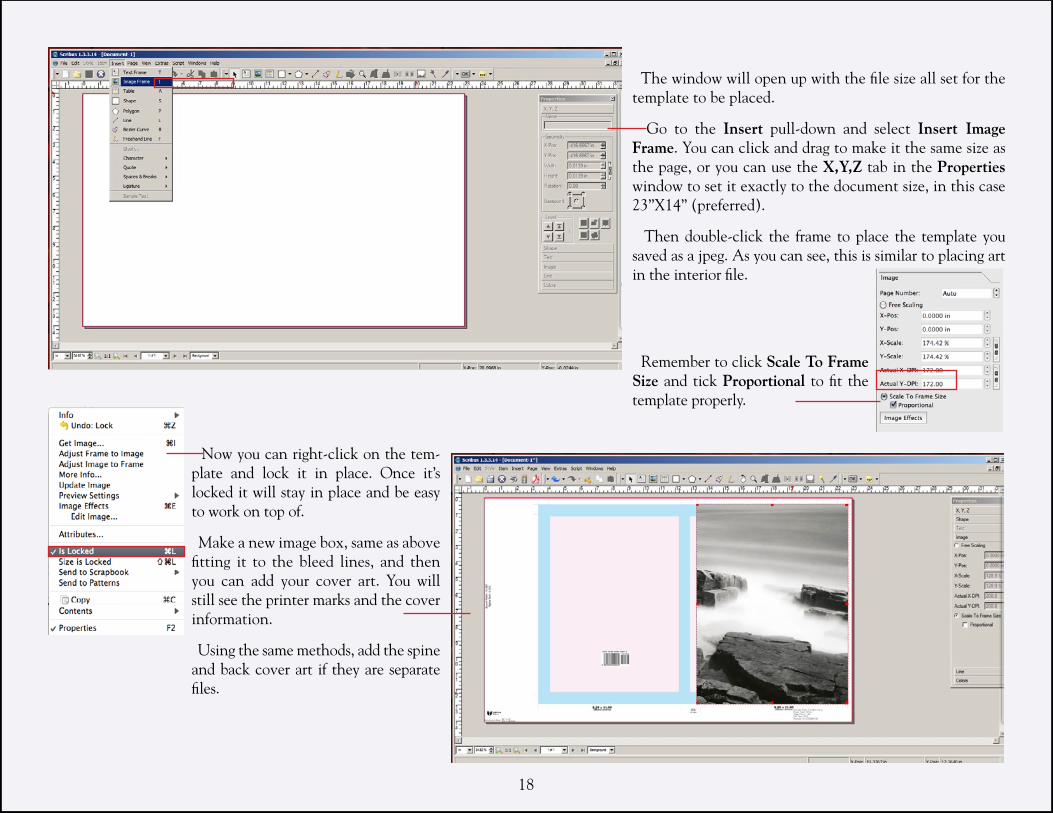
The window will open up with the file size all set for the template to be placed.
Go to the Insert pull-down and select Insert Image Frame. You can click and drag to make it the same size as the page, or you can use the X,Y,Z tab in the Properties window to set it exactly to the document size, in this case 23”X14” (preferred).
Then double-click the frame to place the template you saved as a jpeg. As you can see, this is similar to placing art in the interior file.
Now you can right-click on the tem-plate and lock it in place. Once it’s locked it will stay in place and be easy to work on top of.
Make a new image box, same as above fitting it to the bleed lines, and then you can add your cover art. You will still see the printer marks and the cover information.
Using the same methods, add the spine and back cover art if they are separate files.
Remember to click Scale To Frame Size and tick Proportional to fit the template properly.
19
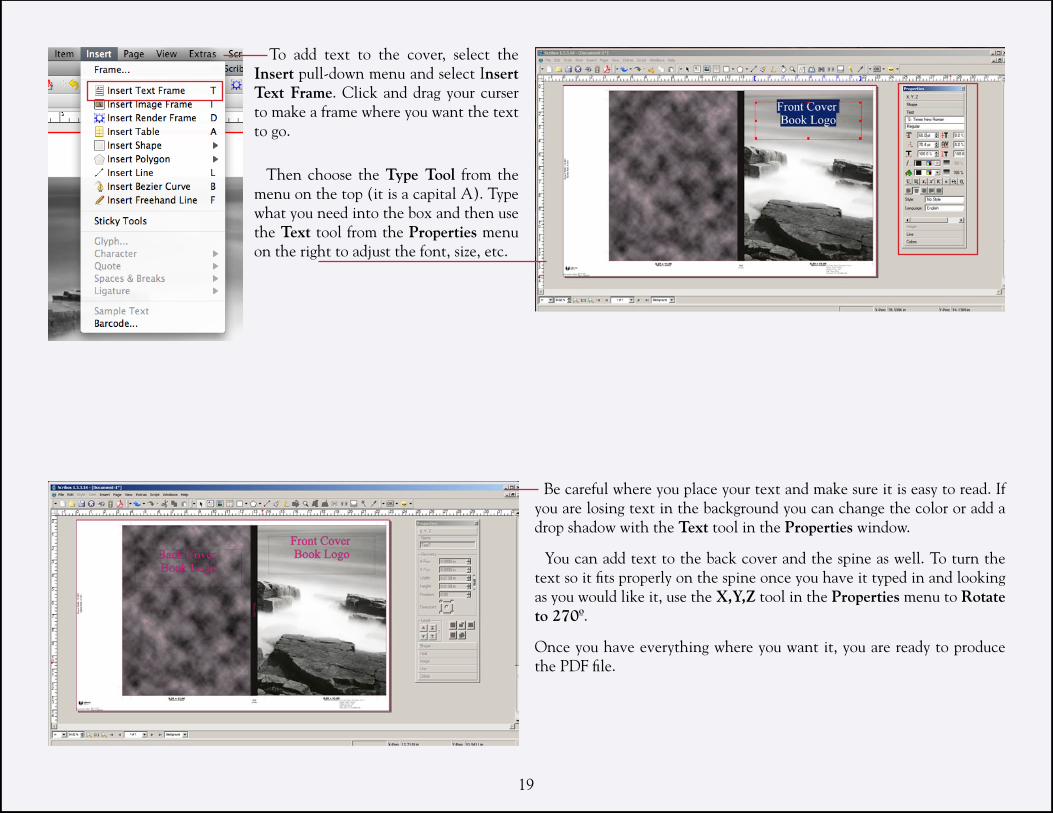
To add text to the cover, select the Insert pull-down menu and select Insert Text Frame. Click and drag your curser to make a frame where you want the text to go.
Then choose the Type Tool from the menu on the top (it is a capital A). Type what you need into the box and then use the Text tool from the Properties menu on the right to adjust the font, size, etc.
Be careful where you place your text and make sure it is easy to read. If you are losing text in the background you can change the color or add a drop shadow with the Text tool in the Properties window.
You can add text to the back cover and the spine as well. To turn the text so it fits properly on the spine once you have it typed in and looking as you would like it, use the X,Y,Z tool in the Properties menu to Rotate to 270º.
Once you have everything where you want it, you are ready to produce the PDF file.
20
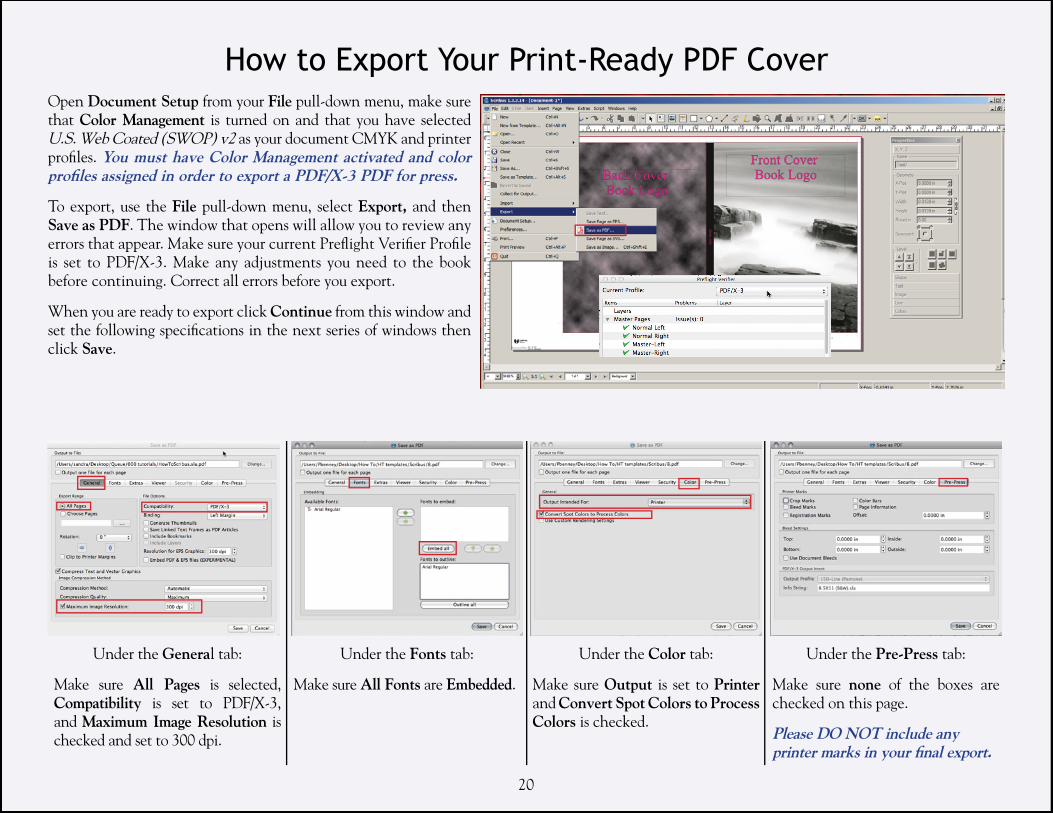
Open Document Setup from your File pull-down menu, make sure that Color Management is turned on and that you have selected U.S. Web Coated (SWOP) v2 as your document CMYK and printer profi les. You must have Color Management activated and color profi les assigned in order to export a PDF/X-3 PDF for press.
To export, use the File pull-down menu, select Export, and then Save as PDF. The window that opens will allow you to review any errors that appear. Make sure your current Prefl ight Verifi er Profi le is set to PDF/X-3. Make any adjustments you need to the book before continuing. Correct all errors before you export.
When you are ready to export click Continue from this window and set the following specifi cations in the next series of windows then click Save.
How to Export Your Print-Ready PDF Cover
Under the General tab:
Make sure All Pages is selected, Compatibility is set to PDF/X-3, and Maximum Image Resolution is checked and set to 300 dpi.
Under the Fonts tab:
Make sure All Fonts are Embedded.
Under the Color tab:
Make sure Output is set to Printer and Convert Spot Colors to Process Colors is checked.
Under the Pre-Press tab:
Make sure none of the boxes are checked on this page.
Please DO NOT include anyprinter marks in your fi nal export.
21
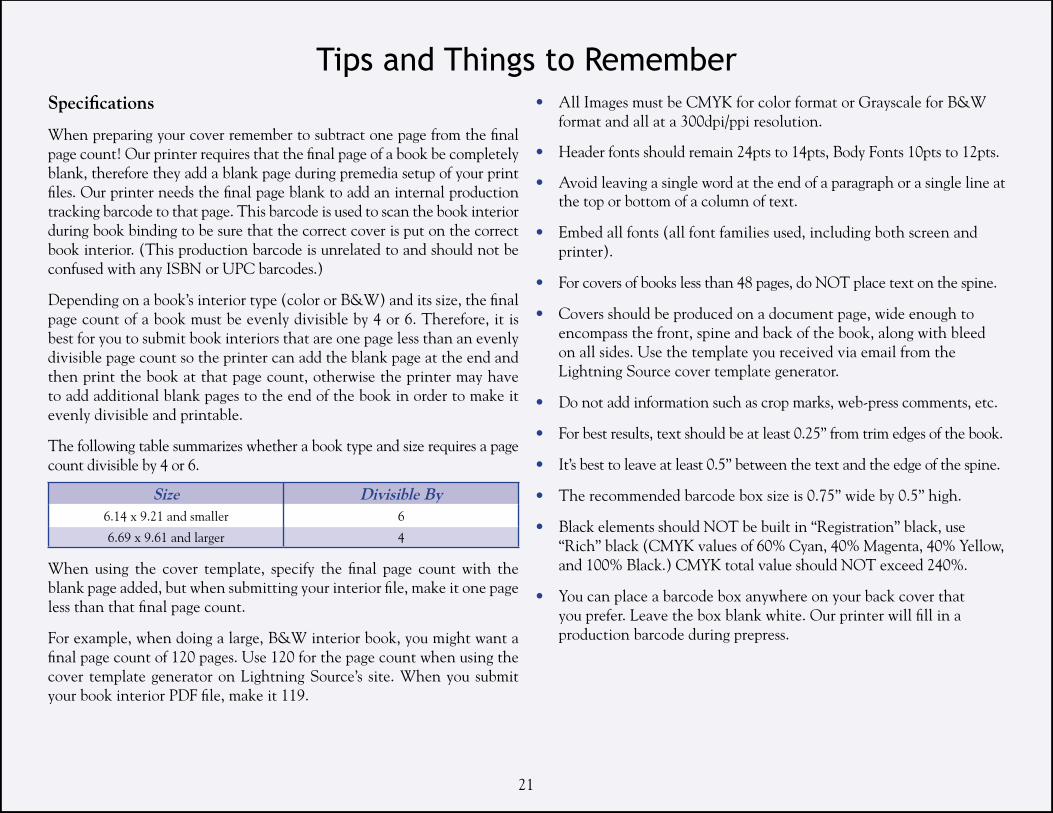
Specifi cations
When preparing your cover remember to subtract one page from the fi nal page count! Our printer requires that the fi nal page of a book be completely blank, therefore they add a blank page during premedia setup of your print fi les. Our printer needs the fi nal page blank to add an internal production tracking barcode to that page. This barcode is used to scan the book interior during book binding to be sure that the correct cover is put on the correct book interior. (This production barcode is unrelated to and should not be confused with any ISBN or UPC barcodes.)
Depending on a book’s interior type (color or B&W) and its size, the fi nal page count of a book must be evenly divisible by 4 or 6. Therefore, it is best for you to submit book interiors that are one page less than an evenly divisible page count so the printer can add the blank page at the end and then print the book at that page count, otherwise the printer may have to add additional blank pages to the end of the book in order to make it evenly divisible and printable.
The following table summarizes whether a book type and size requires a page count divisible by 4 or 6.
Size Divisible By6.14 x 9.21 and smaller 6
6.69 x 9.61 and larger 4
When using the cover template, specify the fi nal page count with the blank page added, but when submitting your interior fi le, make it one page less than that fi nal page count.
For example, when doing a large, B&W interior book, you might want a fi nal page count of 120 pages. Use 120 for the page count when using the cover template generator on Lightning Source’s site. When you submit your book interior PDF fi le, make it 119.
• All Images must be CMYK for color format or Grayscale for B&W format and all at a 300dpi/ppi resolution.
• Header fonts should remain 24pts to 14pts, Body Fonts 10pts to 12pts.
• Avoid leaving a single word at the end of a paragraph or a single line at the top or bottom of a column of text.
• Embed all fonts (all font families used, including both screen and printer).
• For covers of books less than 48 pages, do NOT place text on the spine.
• Covers should be produced on a document page, wide enough to encompass the front, spine and back of the book, along with bleed on all sides. Use the template you received via email from the Lightning Source cover template generator.
• Do not add information such as crop marks, web-press comments, etc.
• For best results, text should be at least 0.25” from trim edges of the book.
• It’s best to leave at least 0.5” between the text and the edge of the spine.
• The recommended barcode box size is 0.75” wide by 0.5” high.
• Black elements should NOT be built in “Registration” black, use “Rich” black (CMYK values of 60% Cyan, 40% Magenta, 40% Yellow, and 100% Black.) CMYK total value should NOT exceed 240%.
• You can place a barcode box anywhere on your back cover that you prefer. Leave the box blank white. Our printer will fi ll in a production barcode during prepress.
Tips and Things to Remember
22
What do I do next?Once you have your fi nished interior PDF fi le and cover PDF fi le, it’s time to upload them!
Log into your account on site and go to the PRINT section of your publisher menu.
Use the UPLOAD AND MANAGE PRINT PRODUCTS tool. This tool will walk you through the process of uploading your two PDF fi les and setting pricing and other information for your print title.
After a successful upload, your titles will go into premedia processing to verify that the fi les are suitable for print. You will receive email notifi cations with further information.
10. I Need More Help!Your publisher service rep is not really an expert on print layout, so chances are slim that he or she will be able to answer questions not answered in this tutorial. However, please do email us your questions anyway so we can help fi nd an answer if we can and also so that we can improve this tutorial so it answers more questions for everyone.
You can also fi nd people with professional skills at print layout and contract them to create your print fi les. The cost of this work depends on how much of the work you do yourself before handing it over for layout.
We can recommend someone for layout if you would like. Please contact Publisher service for details.
Or you can also fi nd freelance layout professionals at sites like www.elance.com