DOK-Projekt System PSA 80 ENU PSA PUA P3 Papier-A5 … · 8 English PUA 81 PUA 82 PUA 85 19V...
28
PSA / PUA English Printed: 29.09.2017 | Doc-Nr: PUB / 5070471 / 000 / 06
Transcript of DOK-Projekt System PSA 80 ENU PSA PUA P3 Papier-A5 … · 8 English PUA 81 PUA 82 PUA 85 19V...

PSA / PUA
English
Printed: 29.09.2017 | Doc-Nr: PUB / 5070471 / 000 / 06

Printed: 29.09.2017 | Doc-Nr: PUB / 5070471 / 000 / 06
English 1
1 Information about the documentation
1.1 About this documentation• Read this documentation before initial operation or use. This is a prerequisite for safe, trouble-free
handling and use of the product.• Observe the safety instructions and warnings in this documentation and on the product.• Always keep the operating instructions with the product and make sure that the operating instructions
are with the product when it is given to other persons.
1.2 Explanation of signs used1.2.1 WarningsWarnings alert persons to hazards that occur when handling or using the product. The following signal wordsare used in combination with a symbol:
DANGER! Draws attention to imminent danger that will lead to serious personal injury or fatality.WARNING! Draws attention to a potential hazard that could lead to serious personal injury orfatality.CAUTION! Draws attention to a potentially dangerous situation that could lead to slight personalinjury or damage to the equipment or other property.
1.2.2 SymbolsThe following symbols are used:
Read the operating instructions before use.
Instructions for use and other useful information
Protection class II (double-insulated)
For indoor use only
1.2.3 IllustrationsThe following symbols are used in illustrations:
These numbers refer to the corresponding illustrations found at the beginning of these operatinginstructions.Item reference numbers are used in the overview illustration and refer to the numbers used inthe product overview section.
1.3 Product informationHilti products are designed for professional use and may be operated, serviced and maintained only bytrained, authorized personnel. This personnel must be informed of any particular hazards that may beencountered. The product and its ancillary equipment may present hazards when used incorrectly byuntrained personnel or when used not as directed.▶ Make a note in one of the following tables of the designation and serial number printed on the type
identification plate.▶ Always quote this information when you contact a Hilti representative or Hilti Service to enquire about
the product.PSA 80, PSA 81, PSA 82 and PSA 83 product informationBattery PSA 80 | PSA 81 | PSA 82 | PSA 83Generation 01Serial no.
PSA 81 Product informationBattery PSA 81Generation 02
Printed: 29.09.2017 | Doc-Nr: PUB / 5070471 / 000 / 06
2 English
Serial no.PSA 81 Product informationBattery PSA 81Generation 05Serial no.
PSA 85 and PSA 86 product informationCharger PSA 85 | PSA 86Generation 01
PUA 81 and PUA 85 19V product informationAC adapter PUA 81 | PUA 85 19VGeneration 01
PUA 82 and PUA 86 19V product informationMotor vehicle poweradapter
PUA 82 | PUA 86 19V
Generation 01
2 Safety
2.1 Additional safety instructionsPersonal safety▶ Modification of the tool is not permitted.▶ Do not use force when inserting the batteries in the tool.▶ The tool is not intended for use by debilitated persons who have received no special training. Keep the
tool out of reach of children.▶ This appliance may be used by children 8 years of age or older and by persons with physical, sensory
or mental disabilities or little relevant experience or know-how so long as they are supervised or theyhave received instruction on the safe use of the appliance and on the potential resulting hazards. Do notallow children to play with the appliance. Do not allow unsupervised children to clean the appliance or toperform maintenance tasks intended to be carried out by users.
▶ Store tools in a secure place when not in use. When not in use, tools must be stored in a dry, high placeor locked away out of reach of children.
▶ Ensure that the tool and the AC adapter do not present an obstacle that could lead to a risk of trippingor personal injury.
▶ Do not expose the supply cords to heat, oil or sharp edges.▶ Never operate the appliance when it is dirty or wet. Dust (especially dust from conductive materials)
or dampness adhering to the surface of the appliance may, under unfavorable conditions, lead toelectric shock.
▶ Remove the battery if the tool is to remain unused for a long period of time.▶ Under abusive conditions, liquid may be ejected from the battery. Avoid contact with the liquid. If contact
accidentally occurs, flush with water. If the liquid contacts the eyes, also seek medical attention. Liquidejected from the battery may cause skin irritation or burns.
▶ Have the electric tool repaired only by a qualified specialist using only genuine Hilti spare parts. Thesafety of the electric tool can thus be maintained.
▶ Do not touch the supply cord or extension cord if it is damaged while you are working. Disconnect thesupply cord plug from the power outlet. Damaged supply cords and extension cords present a risk ofelectric shock.
Electrical▶ Although the device complies with the strict requirements of the applicable directives, Hilti cannot
entirely rule out the possibility of interference to the device caused by powerful electromagnetic radiation,possibly leading to incorrect operation.
▶ Use the battery charger only inside dry rooms. Water entering an electric appliance will increase the riskof electric shock.
▶ When the battery is not in use, keep it away from other metal objects such as paper clips, coins, keys,nails, screws, or other small metal objects that could cause bridging between the terminals. A shortcircuit between the contacts may result in burning injuries or fire.
Printed: 29.09.2017 | Doc-Nr: PUB / 5070471 / 000 / 06
English 3
▶ Check the tool and batteries for damage before use after long periods of storage.▶ Never continue to use or attempt to charge damaged batteries, e.g. batteries with cracks, broken parts,
bent or pushed-in / pulled-out contacts).▶ The plug on the supply cord of the electric tool must match the power outlet. Do not change the plug
in any way. Do not use adapter plugs with earthed (grounded) electric tools. Unmodified plugs andmatching outlets reduce risk of electric shock.
▶ Use the battery charger only inside dry rooms. Water entering an electric appliance will increase the riskof electric shock.
Cleaning and drying the tool▶ Clean the tool with a clean, soft cloth.▶ Maintain the appliance carefully. Check to ensure that no parts are broken or damaged in such a way
that the appliance might no longer function correctly. Have damaged parts repaired before using theappliance.
▶ Do not abuse the cord. Never use the cord to carry or hang up the electric tool or to pull the plug outof the power outlet. Keep the cord well away from heat, oil, sharp edges and moving parts. Damagedcords increase the risk of electric shock.
2.2 Use and care of battery-powered tools▶ Use only the Hilti batteries specified for use with this product.▶ Observe the special guidelines applicable to the transport, storage and use of Li-ion batteries.▶ Check that the product is switched off before fitting the battery.▶ Do not expose batteries to high temperatures, direct sunlight or fire.▶ Do not disassemble, crush or incinerate batteries and do not subject them to temperatures over 75°C
(167°F).▶ Do not attempt to charge or continue to use damaged batteries.▶ If the battery is too hot to touch it may be defective. In this case, place the tool in a non-flammable
location, well away from flammable materials, where it can be kept under observation and allowed tocool down. Contact Hilti Service after the battery has cooled down.
Printed: 29.09.2017 | Doc-Nr: PUB / 5070471 / 000 / 06

4 English
3 Description
3.1 Accessories
@ Battery PSA 81 ; AC adapter PUA 81
Printed: 29.09.2017 | Doc-Nr: PUB / 5070471 / 000 / 06
English 5
= Battery PSA 82% Charger PSA 85& Battery PSA 83( PUA 82 motor vehicle power adapter
) AC adapter PUA 85 19V+ Battery PSA 80§ PUA 86 19V motor vehicle power adapter/ Charger PSA 86
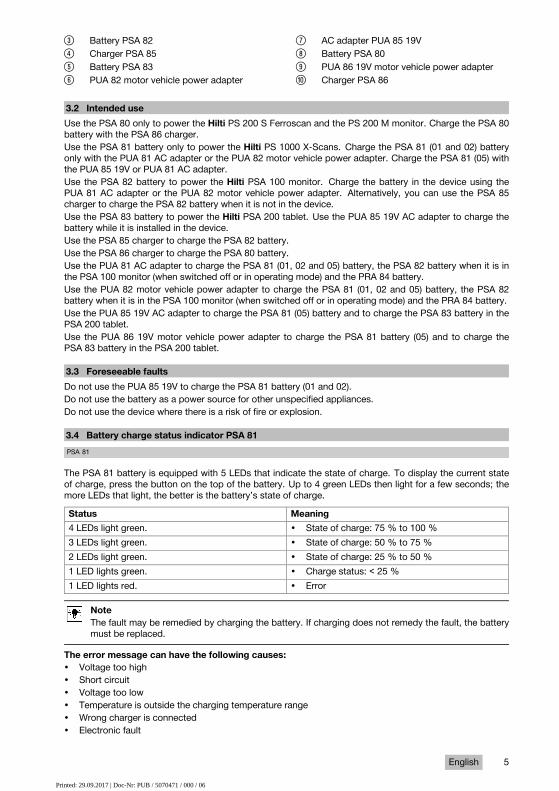
3.2 Intended useUse the PSA 80 only to power the Hilti PS 200 S Ferroscan and the PS 200 M monitor. Charge the PSA 80battery with the PSA 86 charger.Use the PSA 81 battery only to power the Hilti PS 1000 X-Scans. Charge the PSA 81 (01 and 02) batteryonly with the PUA 81 AC adapter or the PUA 82 motor vehicle power adapter. Charge the PSA 81 (05) withthe PUA 85 19V or PUA 81 AC adapter.Use the PSA 82 battery to power the Hilti PSA 100 monitor. Charge the battery in the device using thePUA 81 AC adapter or the PUA 82 motor vehicle power adapter. Alternatively, you can use the PSA 85charger to charge the PSA 82 battery when it is not in the device.Use the PSA 83 battery to power the Hilti PSA 200 tablet. Use the PUA 85 19V AC adapter to charge thebattery while it is installed in the device.Use the PSA 85 charger to charge the PSA 82 battery.Use the PSA 86 charger to charge the PSA 80 battery.Use the PUA 81 AC adapter to charge the PSA 81 (01, 02 and 05) battery, the PSA 82 battery when it is inthe PSA 100 monitor (when switched off or in operating mode) and the PRA 84 battery.Use the PUA 82 motor vehicle power adapter to charge the PSA 81 (01, 02 and 05) battery, the PSA 82battery when it is in the PSA 100 monitor (when switched off or in operating mode) and the PRA 84 battery.Use the PUA 85 19V AC adapter to charge the PSA 81 (05) battery and to charge the PSA 83 battery in thePSA 200 tablet.Use the PUA 86 19V motor vehicle power adapter to charge the PSA 81 battery (05) and to charge thePSA 83 battery in the PSA 200 tablet.
3.3 Foreseeable faultsDo not use the PUA 85 19V to charge the PSA 81 battery (01 and 02).Do not use the battery as a power source for other unspecified appliances.Do not use the device where there is a risk of fire or explosion.
3.4 Battery charge status indicator PSA 81PSA 81
The PSA 81 battery is equipped with 5 LEDs that indicate the state of charge. To display the current stateof charge, press the button on the top of the battery. Up to 4 green LEDs then light for a few seconds; themore LEDs that light, the better is the battery’s state of charge.Status Meaning4 LEDs light green. • State of charge: 75 % to 100 %3 LEDs light green. • State of charge: 50 % to 75 %2 LEDs light green. • State of charge: 25 % to 50 %1 LED lights green. • Charge status: < 25 %1 LED lights red. • Error
NoteThe fault may be remedied by charging the battery. If charging does not remedy the fault, the batterymust be replaced.
The error message can have the following causes:• Voltage too high• Short circuit• Voltage too low• Temperature is outside the charging temperature range• Wrong charger is connected• Electronic fault
Printed: 29.09.2017 | Doc-Nr: PUB / 5070471 / 000 / 06
6 English
While charging, the LEDs show the following statuses:Status Meaning3 LEDs light, 1 LED blinks. • State of charge: 75 % to 100 %2 LEDs light, 1 LED blinks. • State of charge: 50 % to 75 %1 LED lights, 1 LED blinks. • State of charge: 25 % to 50 %1 LED blinks. • Charge status: < 25 %
NoteThe PSA 81 (01 and 02) battery may be charged only with the PUA 81 AC adapter.The PSA 81 (05) battery can be charged using the PUA 81 or PUA 85 19V AC adapter.
3.5 PSA 82 battery charging status display on the PSA 100 monitorPSA 82PUA 81
The charging LED can have the following statuses:Status Meaning1 LED lights green. • The battery is fully charged.LED 1 blinks green • The battery is chargingNo LED lights while in operating mode • The battery is discharging.
3.6 Charging status display on the PSA 82 battery when charging with the PSA 85 chargerPSA 82PSA 85
The charging LED can have the following statuses:Status Meaning1 LED lights green. • The battery is fully charged.1 LED lights orange. • The battery is charging.1 LED lights red. • State of charge: < 25 %
3.7 Charging status display on the PSA 86 chargerPSA 86
Status Meaning1 LED lights red. • The battery is charging.1 LED lights green. • The charger is in working order.1 LED blinks red • The battery is fully charged.1 LED blinks green • The charger or the battery is not in working
order.The error message can have the following causes:• Voltage too high• Short circuit• Voltage too low• Temperature is outside the charging temperature range• Electronic fault
NoteIf the battery is not recognized by the charger, this may indicate that the battery is defective. In thiscase, the battery can no longer be charged and only the green LED on the charger lights when thebattery is inserted. To obtain a replacement battery, please contact Hilti Customer Service.
Printed: 29.09.2017 | Doc-Nr: PUB / 5070471 / 000 / 06
English 7
4 Technical data
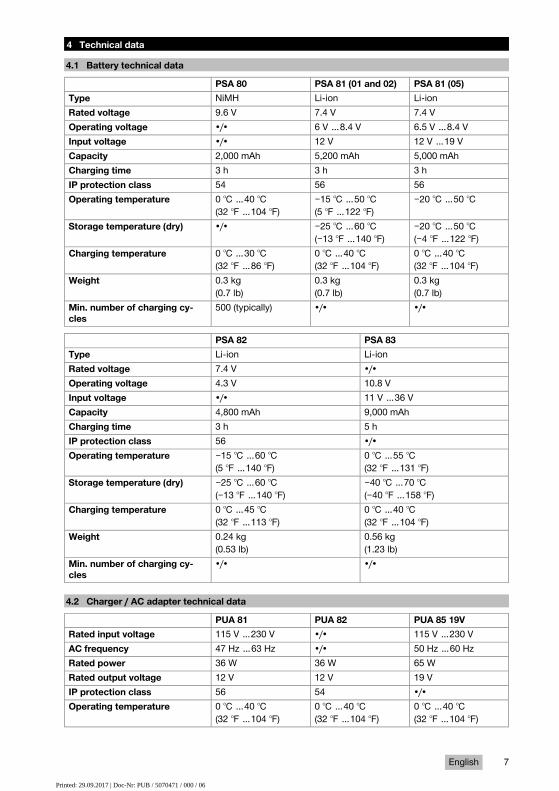
4.1 Battery technical dataPSA 80 PSA 81 (01 and 02) PSA 81 (05)
Type NiMH Liion LiionRated voltage 9.6 V 7.4 V 7.4 VOperating voltage •/• 6 V …8.4 V 6.5 V …8.4 VInput voltage •/• 12 V 12 V …19 VCapacity 2,000 mAh 5,200 mAh 5,000 mAhCharging time 3 h 3 h 3 hIP protection class 54 56 56Operating temperature 0 ℃ …40 ℃
(32 ℉ …104 ℉)−15 ℃ …50 ℃(5 ℉ …122 ℉)
−20 ℃ …50 ℃
Storage temperature (dry) •/• −25 ℃ …60 ℃(−13 ℉ …140 ℉)
−20 ℃ …50 ℃(−4 ℉ …122 ℉)
Charging temperature 0 ℃ …30 ℃(32 ℉ …86 ℉)
0 ℃ …40 ℃(32 ℉ …104 ℉)
0 ℃ …40 ℃(32 ℉ …104 ℉)
Weight 0.3 kg(0.7 lb)
0.3 kg(0.7 lb)
0.3 kg(0.7 lb)
Min. number of charging cy-cles
500 (typically) •/• •/•
PSA 82 PSA 83Type Liion LiionRated voltage 7.4 V •/•Operating voltage 4.3 V 10.8 VInput voltage •/• 11 V …36 VCapacity 4,800 mAh 9,000 mAhCharging time 3 h 5 hIP protection class 56 •/•Operating temperature −15 ℃ …60 ℃
(5 ℉ …140 ℉)0 ℃ …55 ℃(32 ℉ …131 ℉)
Storage temperature (dry) −25 ℃ …60 ℃(−13 ℉ …140 ℉)
−40 ℃ …70 ℃(−40 ℉ …158 ℉)
Charging temperature 0 ℃ …45 ℃(32 ℉ …113 ℉)
0 ℃ …40 ℃(32 ℉ …104 ℉)
Weight 0.24 kg(0.53 lb)
0.56 kg(1.23 lb)
Min. number of charging cy-cles
•/• •/•
4.2 Charger / AC adapter technical dataPUA 81 PUA 82 PUA 85 19V
Rated input voltage 115 V …230 V •/• 115 V …230 VAC frequency 47 Hz …63 Hz •/• 50 Hz …60 HzRated power 36 W 36 W 65 WRated output voltage 12 V 12 V 19 VIP protection class 56 54 •/•Operating temperature 0 ℃ …40 ℃
(32 ℉ …104 ℉)0 ℃ …40 ℃(32 ℉ …104 ℉)
0 ℃ …40 ℃(32 ℉ …104 ℉)
Printed: 29.09.2017 | Doc-Nr: PUB / 5070471 / 000 / 06
8 English
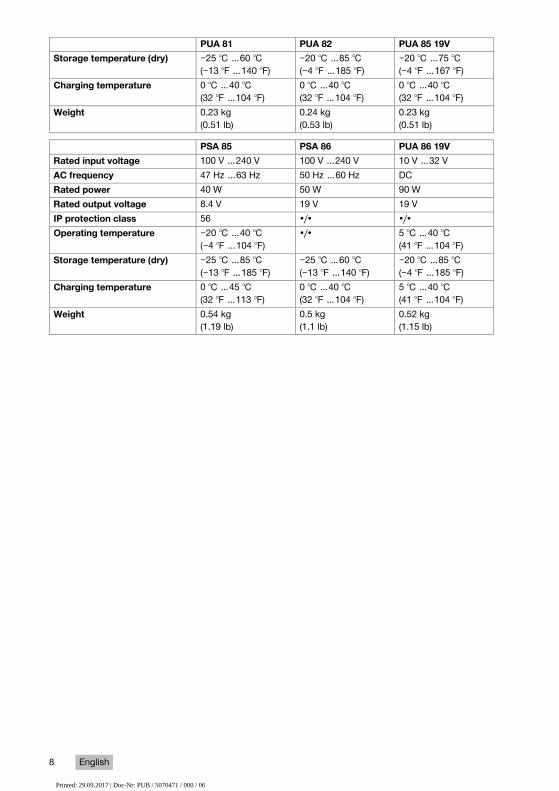
PUA 81 PUA 82 PUA 85 19VStorage temperature (dry) −25 ℃ …60 ℃
(−13 ℉ …140 ℉)−20 ℃ …85 ℃(−4 ℉ …185 ℉)
−20 ℃ …75 ℃(−4 ℉ …167 ℉)
Charging temperature 0 ℃ …40 ℃(32 ℉ …104 ℉)
0 ℃ …40 ℃(32 ℉ …104 ℉)
0 ℃ …40 ℃(32 ℉ …104 ℉)
Weight 0.23 kg(0.51 lb)
0.24 kg(0.53 lb)
0.23 kg(0.51 lb)
PSA 85 PSA 86 PUA 86 19VRated input voltage 100 V …240 V 100 V …240 V 10 V …32 VAC frequency 47 Hz …63 Hz 50 Hz …60 Hz DCRated power 40 W 50 W 90 WRated output voltage 8.4 V 19 V 19 VIP protection class 56 •/• •/•Operating temperature −20 ℃ …40 ℃
(−4 ℉ …104 ℉)•/• 5 ℃ …40 ℃
(41 ℉ …104 ℉)Storage temperature (dry) −25 ℃ …85 ℃
(−13 ℉ …185 ℉)−25 ℃ …60 ℃(−13 ℉ …140 ℉)
−20 ℃ …85 ℃(−4 ℉ …185 ℉)
Charging temperature 0 ℃ …45 ℃(32 ℉ …113 ℉)
0 ℃ …40 ℃(32 ℉ …104 ℉)
5 ℃ …40 ℃(41 ℉ …104 ℉)
Weight 0.54 kg(1.19 lb)
0.5 kg(1.1 lb)
0.52 kg(1.15 lb)
Printed: 29.09.2017 | Doc-Nr: PUB / 5070471 / 000 / 06
English 9
5 Operation
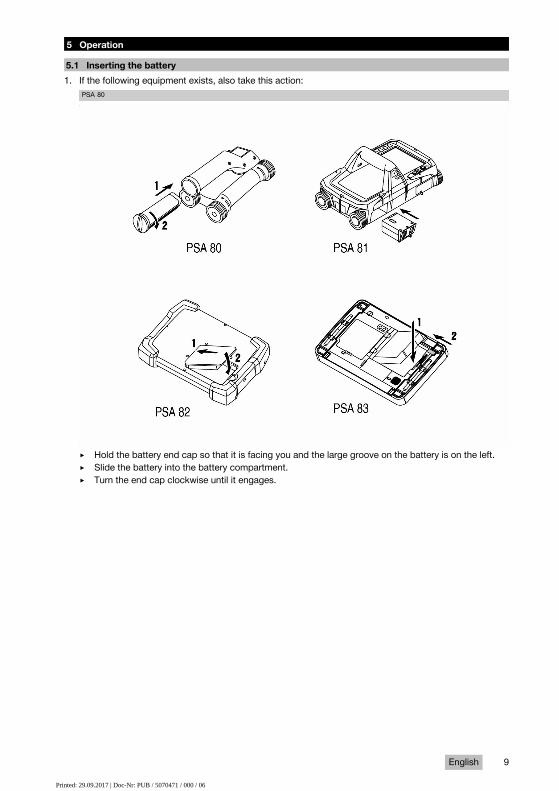
5.1 Inserting the battery1. If the following equipment exists, also take this action:
PSA 80
▶ Hold the battery end cap so that it is facing you and the large groove on the battery is on the left.▶ Slide the battery into the battery compartment.▶ Turn the end cap clockwise until it engages.
Printed: 29.09.2017 | Doc-Nr: PUB / 5070471 / 000 / 06
10 English
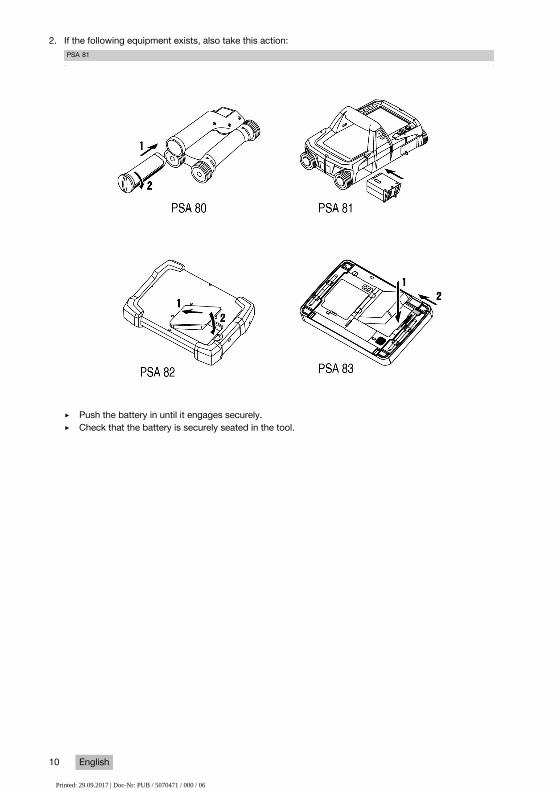
2. If the following equipment exists, also take this action:PSA 81
▶ Push the battery in until it engages securely.▶ Check that the battery is securely seated in the tool.
Printed: 29.09.2017 | Doc-Nr: PUB / 5070471 / 000 / 06

English 11
3. If the following equipment exists, also take this action:PSA 82
▶ Insert the battery at an angle into the battery compartment.▶ Push the battery into the battery compartment until it is heard to engage.▶ Check that the battery is securely seated in the tool.
Printed: 29.09.2017 | Doc-Nr: PUB / 5070471 / 000 / 06
12 English
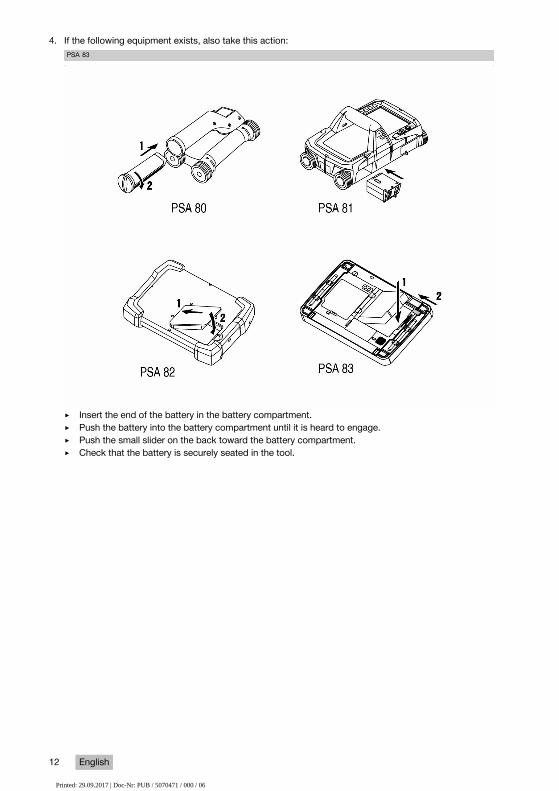
4. If the following equipment exists, also take this action:PSA 83
▶ Insert the end of the battery in the battery compartment.▶ Push the battery into the battery compartment until it is heard to engage.▶ Push the small slider on the back toward the battery compartment.▶ Check that the battery is securely seated in the tool.
Printed: 29.09.2017 | Doc-Nr: PUB / 5070471 / 000 / 06
English 13
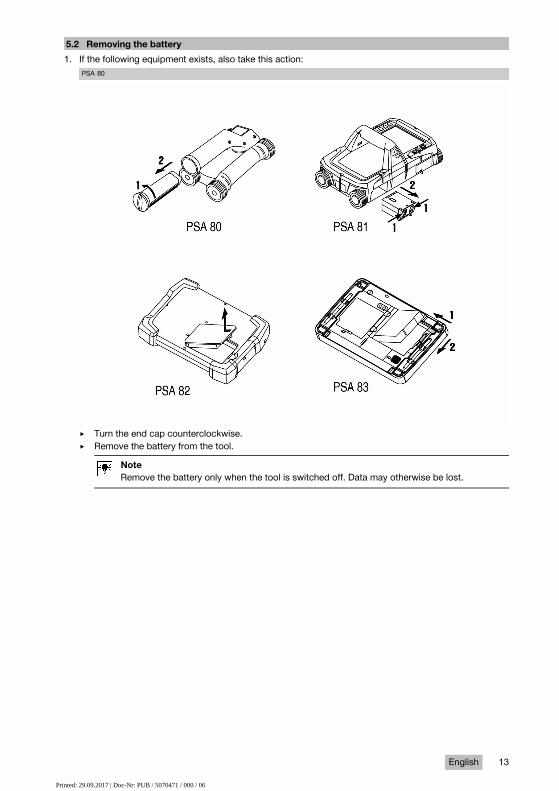
5.2 Removing the battery1. If the following equipment exists, also take this action:
PSA 80
▶ Turn the end cap counterclockwise.▶ Remove the battery from the tool.
NoteRemove the battery only when the tool is switched off. Data may otherwise be lost.
Printed: 29.09.2017 | Doc-Nr: PUB / 5070471 / 000 / 06

14 English
2. If the following equipment exists, also take this action:PSA 81
▶ Press the catch together.▶ Remove the battery.
NoteRemove the battery only when the tool is switched off. Data may otherwise be lost.
Printed: 29.09.2017 | Doc-Nr: PUB / 5070471 / 000 / 06
English 15
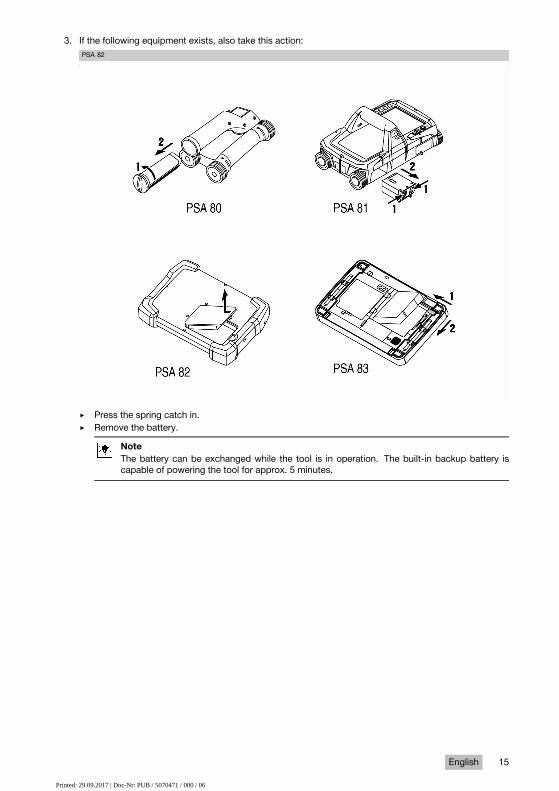
3. If the following equipment exists, also take this action:PSA 82
▶ Press the spring catch in.▶ Remove the battery.
NoteThe battery can be exchanged while the tool is in operation. The built-in backup battery iscapable of powering the tool for approx. 5 minutes.
Printed: 29.09.2017 | Doc-Nr: PUB / 5070471 / 000 / 06

16 English
4. If the following equipment exists, also take this action:PSA 83
▶ Push the small slider on the back away from the battery compartment.▶ Push the large slider toward the small slider.◁ The battery is lifted.
▶ Remove the battery.
Printed: 29.09.2017 | Doc-Nr: PUB / 5070471 / 000 / 06

English 17
5.3 Charging the battery1. If the following equipment exists, also take this action:
PSA 80
▶ Make sure the system to be charged is standing securely.▶ Remove the battery. → page 13▶ Connect the AC adapter to the charger.▶ Plug the country-specific supply cord into the AC adapter.◁ 1 LED lights green.
▶ Insert the battery in the charger.◁ 1 LED lights red.◁ The battery is charging.
NoteCharge the battery for at least 14 hours before using it for the first time.
▶ When the battery is fully charged, disconnect the battery from the charger.▶ Insert the battery in the tool. → page 9
Printed: 29.09.2017 | Doc-Nr: PUB / 5070471 / 000 / 06

18 English
2. If the following equipment exists, also take this action:PSA 81
▶ Make sure the system to be charged is standing securely.▶ Remove the battery. → page 13▶ Connect the PUA 81 AC adapter to the battery.◁ The battery is charging
NoteCharge the battery for at least 2 hours before using it for the first time.Alternatively, you can use the motor vehicle power adapter to charge the PUA 82 battery.
▶ Press the button on the top of the battery.◁ Charge status is displayed
▶ Insert the battery in the tool. → page 9
Printed: 29.09.2017 | Doc-Nr: PUB / 5070471 / 000 / 06
English 19
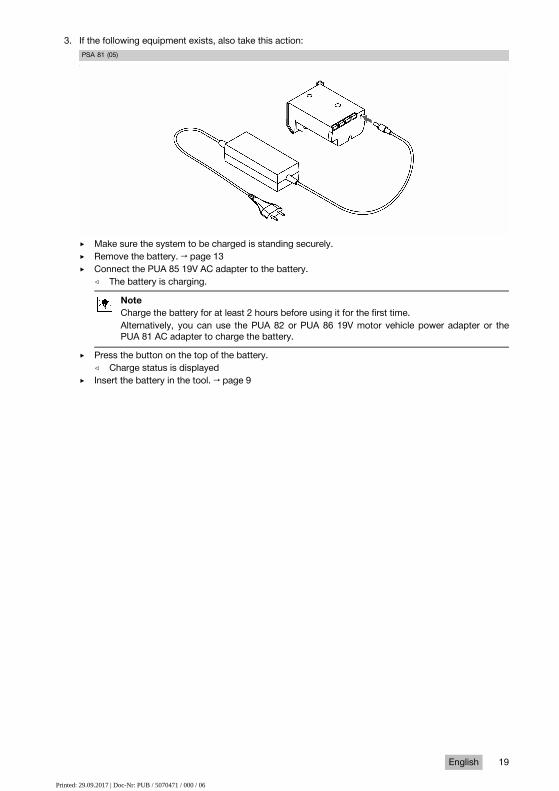
3. If the following equipment exists, also take this action:PSA 81 (05)
▶ Make sure the system to be charged is standing securely.▶ Remove the battery. → page 13▶ Connect the PUA 85 19V AC adapter to the battery.◁ The battery is charging.
NoteCharge the battery for at least 2 hours before using it for the first time.Alternatively, you can use the PUA 82 or PUA 86 19V motor vehicle power adapter or thePUA 81 AC adapter to charge the battery.
▶ Press the button on the top of the battery.◁ Charge status is displayed
▶ Insert the battery in the tool. → page 9
Printed: 29.09.2017 | Doc-Nr: PUB / 5070471 / 000 / 06
20 English
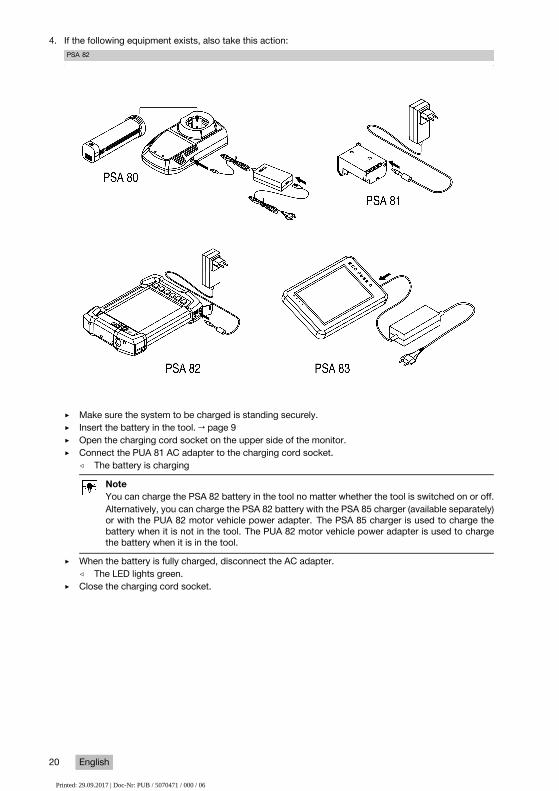
4. If the following equipment exists, also take this action:PSA 82
▶ Make sure the system to be charged is standing securely.▶ Insert the battery in the tool. → page 9▶ Open the charging cord socket on the upper side of the monitor.▶ Connect the PUA 81 AC adapter to the charging cord socket.◁ The battery is charging
NoteYou can charge the PSA 82 battery in the tool no matter whether the tool is switched on or off.Alternatively, you can charge the PSA 82 battery with the PSA 85 charger (available separately)or with the PUA 82 motor vehicle power adapter. The PSA 85 charger is used to charge thebattery when it is not in the tool. The PUA 82 motor vehicle power adapter is used to chargethe battery when it is in the tool.
▶ When the battery is fully charged, disconnect the AC adapter.◁ The LED lights green.
▶ Close the charging cord socket.
Printed: 29.09.2017 | Doc-Nr: PUB / 5070471 / 000 / 06
English 21
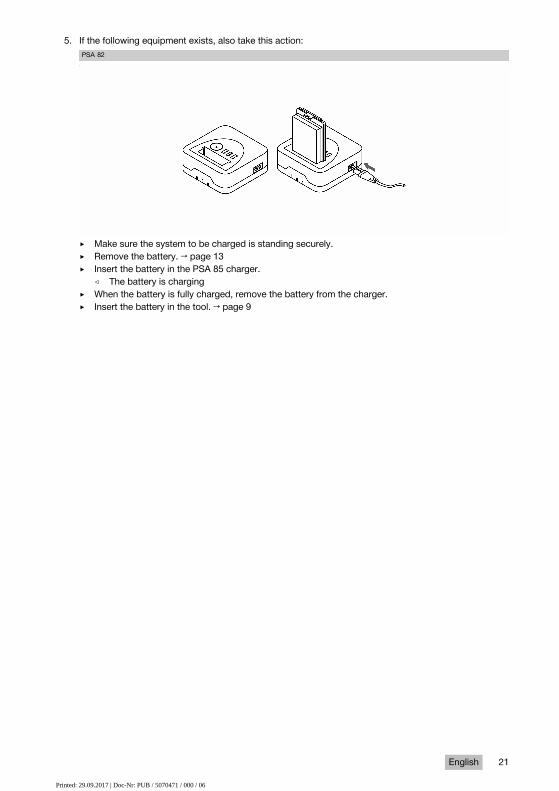
5. If the following equipment exists, also take this action:PSA 82
▶ Make sure the system to be charged is standing securely.▶ Remove the battery. → page 13▶ Insert the battery in the PSA 85 charger.◁ The battery is charging
▶ When the battery is fully charged, remove the battery from the charger.▶ Insert the battery in the tool. → page 9
Printed: 29.09.2017 | Doc-Nr: PUB / 5070471 / 000 / 06
22 English
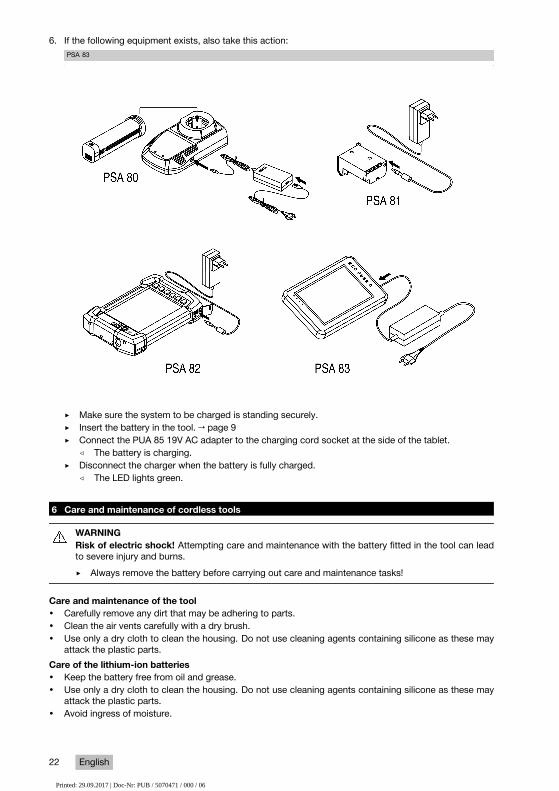
6. If the following equipment exists, also take this action:PSA 83
▶ Make sure the system to be charged is standing securely.▶ Insert the battery in the tool. → page 9▶ Connect the PUA 85 19V AC adapter to the charging cord socket at the side of the tablet.◁ The battery is charging.
▶ Disconnect the charger when the battery is fully charged.◁ The LED lights green.
6 Care and maintenance of cordless tools
WARNINGRisk of electric shock! Attempting care and maintenance with the battery fitted in the tool can leadto severe injury and burns.▶ Always remove the battery before carrying out care and maintenance tasks!
Care and maintenance of the tool• Carefully remove any dirt that may be adhering to parts.• Clean the air vents carefully with a dry brush.• Use only a dry cloth to clean the housing. Do not use cleaning agents containing silicone as these may
attack the plastic parts.Care of the lithiumion batteries• Keep the battery free from oil and grease.• Use only a dry cloth to clean the housing. Do not use cleaning agents containing silicone as these may
attack the plastic parts.• Avoid ingress of moisture.
Printed: 29.09.2017 | Doc-Nr: PUB / 5070471 / 000 / 06
English 23
Maintenance• Check all visible parts and controls for signs of damage at regular intervals and make sure that they all
function correctly.• Do not operate the battery-powered tool if signs of damage are found or if parts malfunction. Have the
tool repaired by Hilti Service immediately.• After cleaning and maintenance, fit all guards or protective devices and check that they function correctly.
NoteTo help ensure safe and reliable operation, use only genuine Hilti spare parts and consumables. Spareparts, consumables and accessories approved by Hilti for use with the product can be found at yourlocal Hilti Center or online at: www.hilti.com
7 DisposalMost of the materials from which Hilti tools and appliances are manufactured can be recycled. The
materials must be correctly separated before they can be recycled. In many countries, your old tools,machines or appliances can be returned to Hilti for recycling. Ask Hilti Service or your Hilti representativefor further information.
▶ Disposal of electric tools or appliances together with household waste is not permissible.
8 Manufacturer’s warranty▶ Please contact your local Hilti representative if you have questions about the warranty conditions.
9 FCC statement / IC statementCAUTION This product has been tested and found to comply with the limits for a Class B digital device,pursuant to part 15 of the FCC Rules. These limits are designed to provide reasonable protection againstharmful interference in a residential installation. These products generate, use and can radiate highfrequencies and, if not installed and used in accordance with the instructions, may cause interference toradio communications.There is no guarantee that interference will not occur in a particular installation. If this product does causeharmful interference to radio or television reception, which can be determined by turning the product off andon, the user is encouraged to try to correct the interference by taking the following measures:▶ Re-orient or move the receiving antenna.▶ Increase the distance between the product and receiver.▶ Connect the product to a power outlet on a circuit other than that to which the receiver is connected.▶ Consult your dealer or an experienced TV / radio technician for assistance.Changes or modifications not expressly approved by Hilti may restrict the user’s right to operate the product.This product complies with the requirements in Paragraph 15 of the FCC Rules and RSS 210 of IC.Operation of the product is subject to the following conditions:▶ This product should cause no harmful interference.▶ This product must accept any interference received, including interference that may cause undesired
operation.
Printed: 29.09.2017 | Doc-Nr: PUB / 5070471 / 000 / 06

Printed: 29.09.2017 | Doc-Nr: PUB / 5070471 / 000 / 06

Printed: 29.09.2017 | Doc-Nr: PUB / 5070471 / 000 / 06

Hilti = registered trademark of Hilti Corp., Schaan**
20170929Printed: 29.09.2017 | Doc-Nr: PUB / 5070471 / 000 / 06