
WIZ100SR User’s Manual
34
WIZ100SR User’s Manual (Version 1.1) ©2007 WIZnet Co., Inc. All Rights Reserved. For more information, visit our website at http://www.wiznet.co.kr
Transcript of WIZ100SR User’s Manual

WIZ100SR User’s Manual
(Version 1.1)
©2007 WIZnet Co., Inc. All Rights Reserved.
For more information, visit our website at http://www.wiznet.co.kr

WIZ100SR User’s Manual ii
WIZnet’s Online Technical Support
If you have something to ask about WIZnet products, write down your question on Q&A Board in WIZnet website (www.wiznet.co.kr). WIZnet will give an answer as soon as possible.
CCLLIICCKK

WIZ100SR User’s Manual iii
COPYRIGHT NOTICE
Copyright 2007 WIZnet, Inc. All Rights Reserved.
Technical Support: [email protected]
Sales & Distribution: [email protected]
For more information, visit our website at http://www.wiznet.co.kr

WIZ100SR User’s Manual iv
Table of Contents
1. Introduction ............................................................................................. 1
1.1 Key Features ............................................................................... 11.2 Products Contents (EVB model) ......................................................... 11.3 Products Specification ..................................................................... 2
1.3.1. WIZ100SR Module
1.3.2. WIZ100SR Test Board
1.3.2.1. Serial Interface
1.3.2.2. LED
2. Getting Started ......................................................................................... 5
2.1 Hardware Installation Procedure ......................................................... 52.2 Configuration Tool .......................................................................... 6
2.2.1. Network Configuration
2.2.2 Serial configuration
3. Firmware Upload ........................................................................................ 15
4. Serial Configuration.................................................................................... 17
4-1. Serial Command Format ...................................................................... 174-2. WIZ110SR Configuration with Serial Command ......................................... 19
5. PIN Assignment and Dimension.................................................................... 21
6. Demonstration and Test ................................................................................ 23
6. Reference Schematic ............................................................................... 29
WIZ100SR User’s Manual v
Figures
FIGURE 1. WIZ100SR TEST BOARD ........................................................................................................... 3
FIGURE 2. SERIAL PIN ASSINGMENT OF WIZ100SR TEST BOARD ............................................................ 4
FIGURE 3. SERIAL CABLE ............................................................................................................................. 5
FIGURE 4. CONFIGURATION TOOL (NETWORK CONFIG) ............................................................................. 6FIGURE 5. TCP SERVER MODE .................................................................................................................... 8
FIGURE 6. TCP CLIENT MODE ..................................................................................................................... 9
FIGURE 7. UDP MODE ............................................................................................................................... 10
FIGURE 8. CONFIGURATION TOOL (SERIAL CONFIG.) ................................................................................ 11
FIGURE 9. CONFIGURATION TOOL (OPTION CONFIG.) ............................................................................... 12
FIGURE 10. SELECT OPERATION MODE FOR PASSWORD SETTING ........................................................... 14
FIGURE 11. BOARD SEARCH WINDOW ...................................................................................................... 15
FIGURE 12. OPEN DIALOG BOX FOR UPLOADING ....................................................................................... 16
FIGURE 13. FIRMWARE UPLOADING WINDOW ............................................................................................ 16
FIGURE 14. COMPLETE UPLOADING .......................................................................................................... 16
FIGURE 15. SERIAL CONFIGURATION ENABLE SETTING ........................................................................... 19
FIGURE 16. SERIAL COMMAND ................................................................................................................ 20
FIGURE 17. WIZ100SR PIN ASSIGNMENT ................................................................................................ 21
FIGURE 18. WIZ100SR DIMENSION ......................................................................................................... 22
FIGURE 19. DATA FLOW (SERIAL -> ETHERNET) ....................................................................................... 23
FIGURE 20. DATA FLOW (ETHERNET -> SERIAL) ....................................................................................... 24
FIGURE 21. RESULT WINDOW AFTER RUNNING “SETTING” ...................................................................... 25
FIGURE 22. SERIAL TERMINAL PROGRAM CONFIGURATION ..................................................................... 26
FIGURE 23. NETWORK TERMINAL PROGRAM CONFIGURATION ................................................................ 26
FIGURE 24. RECEIVED DATA BY NETWORK TERMINAL PROGRAM .......................................................... 27
FIGURE 25. DEVICE TERMINAL PROGRAM ................................................................................................. 28
FIGURE 26. SCHEMATI ............................................................................................................................... 29
Tables
TABLE 1. PRODUCTS CONTENTS ................................................................................................................. 2
TABLE 2. WIZ100SR MODULE SPECIFICATION .......................................................................................... 3
TABLE 3 SERIAL PIN DESCRIPTION .............................................................................................................. 4
TABLE 4. SERIAL COMMAND – COMMAND FRAME FORMAT ...................................................................... 17
TABLE 5. SERIAL COMMAND - REPLY FRAME FORMAT .............................................................................. 17
TABLE 6. SERIAL COMMAND - STX & ETX ............................................................................................. 17
TABLE 7. SERIAL COMMAND – REPLY CODE ............................................................................................. 17
TABLE 8. SERIAL COMMAND – COMMAND CODE ....................................................................................... 19
TABLE 9. SERIAL COMMAND TESTING PROCEDURE .................................................................................. 20
TABLE 10 WIZ100SR PIN FUNCTIONS ..................................................................................................... 22
TABLE 11 WIZ100SR DIMENSION ............................................................................................................. 23

Hardwired Internet Connectivity Wizard (WIZnet, Inc.) 1
1. Introduction
WIZ100SR is a gateway module that converts RS-232 protocol into TCP/IP protocol. It enables
remote gauging, managing and control of a device through the network based on Ethernet and
TCP/IP by connecting to the existing equipment with RS-232 serial interface. In other words,
WIZ100SR is a protocol converter that transmits the data sent by serial equipment as TCP/IP
data type and converts back the TCP/IP data received through the network into serial data to
transmit back to the equipment
1.1 Key Features
- Direct Connection to the Serial Device
Adding Network Function Simply and Quickly
Providing Firmware Customization
- System Stability and Reliability by using W5100 Hardware Chip
- Supports PPPoE Connection
- Supports Serial Configuration – with Simple and Easy command
- Supports Password for the Security
- Configuration Tool Program
- 10/100 Ethernet Interface and max 230Kbps Serial Interface
- RoHS Compliant
1.2 Products Contents (EVB model)
WIZ100SR Module
WIZ100SR Test Board

Hardwired Internet Connectivity Wizard (WIZnet, Inc.) 2
Serial Cable
(to connect Serial device and Test board)
Network Cable
(Crossover Cable)
Power
(DC 5V 500mA Adaptor)
CD
(including Manual, H/W Schematic and S/W)
Table 1. Products Contents
1.3 Products Specification
1.3.1.WIZ100SR Module
Category Specification
Protocol TCP, UDP, IP, ARP, ICMP, IGMP, Ethernet MAC, PPPoE
Network Interface 10/100 Base-T Ethernet (Auto detection)
Serial Port 1 RS-232 port (3.3V LVTTL)
CPU 8051 compatible
Serial line format 8-N-1, 8-O-1, 8-E-1, 7-O-1, 7-E-1

Hardwired Internet Connectivity Wizard (WIZnet, Inc.) 3
Serial flow control None, XON/XOFF, CTS/RTS
Serial signal TXD, RXD, RTS, CTS, DTR, DSR, GND
Software Remote Downlod and Configuration
Serial Transmission Speed 1200bps ~ 230Kbps
Memory Internal Memory (62KB Flash Memory, 2KB EEPROM, 16KB
SRAM)
Temperature 10’C ~ 80’C (Operating), -40~85’C (Storage)
Humidity 10~90%
Power 3.3V, 150mA
Connector type 2x12 2mm Pin header array
Size 50mm x 30mm x 8.85mm
Table 2. WIZ100SR Module Specification
1.3.2. WIZ100SR Test Board
Figure 1. WIZ100SR Test Board
Power Switch WIZ100SR Module
Reset Switch
Mode Switch
Norma/Config
Collision LED 100_LED 10_LED
Link_LED
RJ45
Connector
Power
Adaptor RS232
Connector

Hardwired Internet Connectivity Wizard (WIZnet, Inc.) 4
NOTE : Be careful of setting Mode Switch. If Mode Swich is set as Config mode, the
network function is not normally operating. For the function test, set it as Normal mode.
! If LED(D5) is on, it indicates that network is connected or Config mode is set.
1.3.2.1. Serial Interface
6 987
21 43 5
Figure 2. Serial Pin Assingment of WIZ100SR Test Board
Pin Number Signal Description
1 NC Not Connected
2 RxD Receive Data
3 TxD Transmit Data
4 DTR Data Terminal Ready
5 GND Ground
6 DSR Data Set Ready
7 RTS Request To Send
8 CTS Clear To Send
9 NC Not Connected
Table 3 Serial Pin Description
" RxD, TxD, GND : These are all you need if the device does not use hardware handshaking.
" RxD, TxD, GND, RTS, CTS : These are the signals used when serial device uses hardware
handshaking.
" DTR, DSR : not used
Hardwired Internet Connectivity Wizard (WIZnet, Inc.) 5
CD 1
RD 2
TD 3
DTR 4
GND 5
DSR 6
RTS 7
CTS 8
1 CD
2 RD
3 TD
4 DTR
5 GND
6 DSR
7 RTS
8 CTS
PIN PIN SIGNALSIGNAL
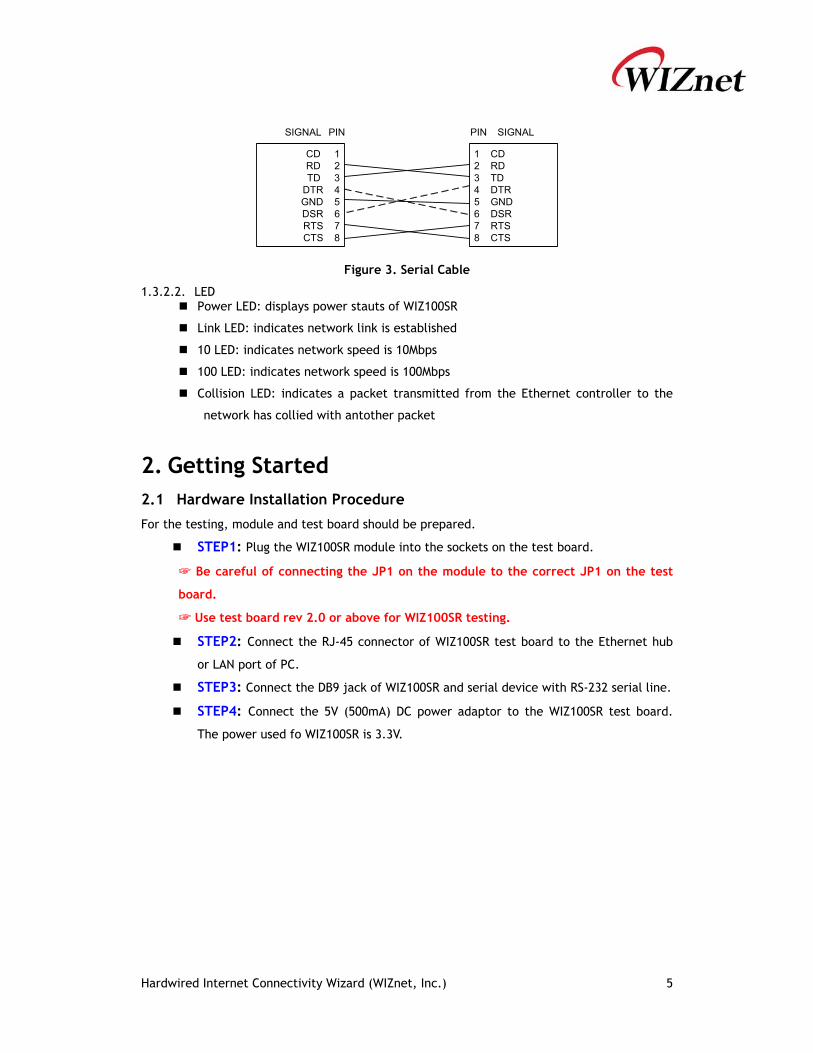
Figure 3. Serial Cable
1.3.2.2. LED " Power LED: displays power stauts of WIZ100SR
" Link LED: indicates network link is established
" 10 LED: indicates network speed is 10Mbps
" 100 LED: indicates network speed is 100Mbps
" Collision LED: indicates a packet transmitted from the Ethernet controller to the
network has collied with antother packet
2. Getting Started
2.1 Hardware Installation Procedure
For the testing, module and test board should be prepared.
" STEP1: Plug the WIZ100SR module into the sockets on the test board.
Be careful of connecting the JP1 on the module to the correct JP1 on the test
board.
Use test board rev 2.0 or above for WIZ100SR testing.
" STEP2: Connect the RJ-45 connector of WIZ100SR test board to the Ethernet hub
or LAN port of PC.
" STEP3: Connect the DB9 jack of WIZ100SR and serial device with RS-232 serial line.
" STEP4: Connect the 5V (500mA) DC power adaptor to the WIZ100SR test board.
The power used fo WIZ100SR is 3.3V.

Hardwired Internet Connectivity Wizard (WIZnet, Inc.) 6
2.2 Configuration Tool
2.2.1. Network Configuration
Figure 4. Configuration Tool (Network Config)
Version : Displays firmware version.
You can use PPPoE, Serial Command, Password function from firmware Ver.2.5.
Enable Serial Debug Mode : If this mode is checked, you can monitor the status and socket
message of WIZ110SR (listen OK, connect fail etc.) through serial terminal. If Debug mode is
on, debug message can cause abnormal operation of the serial device. Therefore, just use this
mode only for Debug mode.
Board List : If you click “Search” button, all the MAC addresses on a same subnet, will be
displayed.
IP Configuration Method: Select IP setting mode, you can select among Static, DHCP,
PPPoE mode.
- Static: ”Static” is option for setting WIZ110SR IP as static. First select MAC address which
Hardwired Internet Connectivity Wizard (WIZnet, Inc.) 7
you wanted to set as static IP in ‘board list’. Then “Local IP, Subnet, Gateway box enabled.
Input Static IP address and click “setting” button. Then IP set as you wanted.(PPPoE ID,
Password box is disabled)
- DHCP: Set this option to use DHCP mode. First, check ‘DHCP’ and click ‘Setting’ button. If IP
address is successfully acquired from DHCP server, the MAC address will be displayed on the
board list. (It takes some time to acquire IP address from DHCP server)
When a module on the board list is selected, IP address, Subnet mask and Gateway are
displayed. If module could not acquire network information from DHCP server, IP address,
Gateway Address and Subnet mask will be initialized to 0.0.0.0.
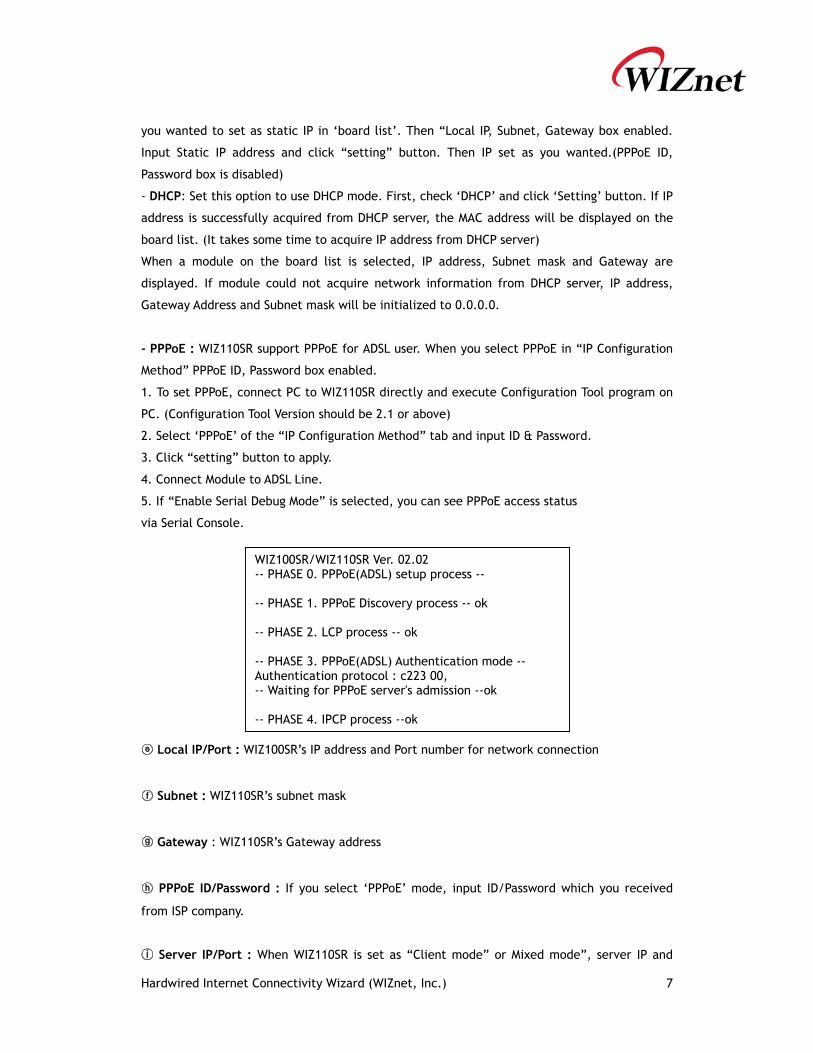
- PPPoE : WIZ110SR support PPPoE for ADSL user. When you select PPPoE in “IP Configuration
Method” PPPoE ID, Password box enabled.
1. To set PPPoE, connect PC to WIZ110SR directly and execute Configuration Tool program on
PC. (Configuration Tool Version should be 2.1 or above)
2. Select ‘PPPoE’ of the “IP Configuration Method” tab and input ID & Password.
3. Click “setting” button to apply.
4. Connect Module to ADSL Line.
5. If “Enable Serial Debug Mode” is selected, you can see PPPoE access status
via Serial Console.
Local IP/Port : WIZ100SR’s IP address and Port number for network connection
Subnet : WIZ110SR’s subnet mask
Gateway : WIZ110SR’s Gateway address
PPPoE ID/Password : If you select ‘PPPoE’ mode, input ID/Password which you received
from ISP company.
Server IP/Port : When WIZ110SR is set as “Client mode” or Mixed mode”, server IP and
WIZ100SR/WIZ110SR Ver. 02.02-- PHASE 0. PPPoE(ADSL) setup process --
-- PHASE 1. PPPoE Discovery process -- ok
-- PHASE 2. LCP process -- ok
-- PHASE 3. PPPoE(ADSL) Authentication mode -- Authentication protocol : c223 00, -- Waiting for PPPoE server's admission --ok
-- PHASE 4. IPCP process --ok

Hardwired Internet Connectivity Wizard (WIZnet, Inc.) 8
port should be set. WIZ110SR attempts to connect this IP address.
Network mode: client/server/mixed :
This is to select the communication method based on TCP – TCP Server, TCP Client, and Mixed.
TCP is the protocol to establish the connection before data communication, but UDP just
proceeds the data communication without connection establishment.
TCP Server operates as a server and TCP Client as a client on the connection establishment.
The mixed mode supports both of TCP server and client.
This Network mode is just related to the connection establishment process. It just defines
who will request the connection first and who will be waiting for the connection requests.
<TCP server mode>
Figure 5. TCP Server mode
At the TCP Server mode, WIZ110SR waits for the connection requests.
TCP Server mode can be useful when the monitoring center tries to connect to the device
(where WIZ110SR is installed) in order to check the status or provide the commands. In
normal time WIZ110SR is on the waiting status, and if there is any connection request from
the monitoring center, data communication is processed and connection is closed.
In order to operate this mode, Local IP, Subnet, Gateway Address and Local Port Number
should be configured first.
As illustrated in the above figure, data transmission proceeds as follows,
1. The host connects to the WIZ1q0SR which is configured as TCP Server mode.
2. As the connection is established, data can be transmitted in both directions – from the
host to the WIZ110SR, and from the WIZ110SR to the host
<TCP client mode>

Hardwired Internet Connectivity Wizard (WIZnet, Inc.) 9
Figure 6. TCP Client mode
If WIZ110SR is set as TCP Client, it tries to establish connection to the server.
To operate this mode, Local IP, Subnet, Gateway Address, Server IP, and Server port number
should be set. If server IP had domain name, use DNS function.
In TCP Client mode, WIZ110SR can actively establish a TCP connection to a host computer
when power is supplied.
As illustrated in the above figure, data transmission proceeds as follows:
1. As power is supplied, WIZ110SR board operating as TCP client mode actively establishes a
connection to the server.
2. If the connection is complete, data can be transmitted in both directions – from the host
to the WIZ110SR and from WIZ110SR to the host
<Mixed mode>
In this mode, WIZ110SR normally operates as TCP Server and waits for the connection
request from the peer. However, if WIZ110SR receives data from the serial device before
connection is established, it changes to the client mode and sends the data to the server IP.
Therefore, at the mixed mode, the server mode is operated prior to the client mode.
As like TCP Server mode, the Mixed mode is useful for the case that the monitoring center
tries to connect to the serial device (in which WIZ110SR is used) to check device status. In
addition to this, if any emergency occurs in the serial device, the module will change to
Client mode to establish the connection to the server and deliver the emergency status of
the device.
Use UDP mode

Hardwired Internet Connectivity Wizard (WIZnet, Inc.) 10
Figure 7. UDP mode
At the UDP mode, the connection establishment is not defined. Just set the IP address and
port number of the peer and send the data.
Use DNS : If DNS function is needed, check this option and input the domain name of DNS
server. DNS(Domain Name System) is the database system having information about IP address
and corresponding domain name. When connecting to domain name, you can use DNS function
of WIZ110SR. Input IP address of DNS server provided by ISP in DNS Server IP, and domain
name in the Server (Domain)
Direct IP Search
Direct IP Search can be used for searching WIZ110SR not installed in the same subnet.
If the Direct IP search is checked, the configuration tool use the TCP instead UDP broadcast to
search modules. Therefore, network information of the module such as IP address, subnet
mask and gateway is required.
If you check Direct IP search, the field to input IP address will be activated. In this field,
input IP address of the module, and click “Search” button.
If module does not have valid network information, Direct IP search is not available.
Search
The Search function is used to search all modules existing on the same LAN. By using UDP
broadcast, all modules on the same subnet will be searched.
The searched module is displayed as MAC address in the “Board list”.
Setting
This function is to complete the configuration change.
If you select the MAC address from the “Board list”, the default configuration value of the
module will be displayed. Change the configuration and click “Setting” button to complete
the configuration. The module will re-initialize with the changed configuration.
The configuration value can be changed in below steps.
Select the mac address of which configuration value should be changed in the “Board list.

Hardwired Internet Connectivity Wizard (WIZnet, Inc.) 11
The values configured will be displayed.
Change the value
Click “Setting” button. The configuration change will be complete.
The module will be initialized to the changed values (re-booting is processed)
To check configuration result, click ‘Search’ button.
Upload
Firmware will be uploaded through network
After uploading the firmware, 20~30 seconds are required for initialization.
Exit : Close the configuration tool program.
2.2.2 Serial configuration
Figure 8. Configuration Tool (Serial Config.)
Serial
Serial Configuration value of selected module is displayed.
In order to change the serial configuration of WIZ100SR, this menu can be used.

Hardwired Internet Connectivity Wizard (WIZnet, Inc.) 12
By clicking the “Setting” button, changed value can be applied.
2.2.3 Option configuration
Figure 9. Configuration Tool (Option Config.)
Inactivity time
After the connection is established, if there is not data transmission within the time defined
in Inactivity time, the connection is closed automatically.
The default value is ‘0’. If ‘0’ is set, this function is not activated. In this default setting, the
connection is maintained even though there is no data transmission. In order to close the
connection, the ‘Close’ command should be given.
This function can be used for more than two or more systems to connect to a WIZ110SR
module. If one system keeps connection to the WIZ110SR, other systems can not connect to
the module. If there is no data transmission during the time defined in Inactivity time, the
connection will be closed for other system to be connected.

Hardwired Internet Connectivity Wizard (WIZnet, Inc.) 13
Inactivity Time also can be useful for the case when the server system is unexpectedly
shut down. In this status, if there is not any data communication during the time defined in
the Inactivity time, WIZ110SR will close the connection and enter into waiting status.
Data Packing Condition
You can designate how the serial data can be packed to be sent to the Ethernet. There are 3
delimiters - time, size and character. If all of them are set as ‘0’, whenever the serial data is
arrived, they are sent to the Ethernet.
a. Time: Every designated time, serial data converted to Ethernet.
b. Size: Every designated data size, serial data converted to Ethernet.
c. Char: Every designated character, serial data converted to Ethernet. (It’s available only
Hex.)
When any of three delimiters is satisfied, data can be sent to the Ethernet.
Ex) Delimiter: Size=10, Char=0x0D
Serial data : 0123456789abc
Ethernet data : 0123456789
“abc” data remains in the serial buffer of module
Password
‘Password’ function is for blocking client’s access which is not allowed
’Password’ function can be operated only in ‘TCP Server’ mode. If ‘password’ function works,
clients should input password to access.
1. Execute Configuration Tool program.(Configuration Tool version should be 2.1 or
above)
2. Select ‘Server’ of “Operation Mode”.

Hardwired Internet Connectivity Wizard (WIZnet, Inc.) 14
Figure 10. Select Operation mode for Password setting
3. As shown in Figure 9, select Option tab and check 'Enable' combo box of "Password" menu.
4. Input password.
5. Click "Setting" button to apply password setting
6. When the client access this module, client should send 'password' to server module first,
and then acess will be allowed.
Serial Configuration:
This function is module setting through serial communication not via network with
configuration tool program. When you want to set via serial communication, check
“enable”. Please detail about serial configuration refers to “4. Serial Configuration”.

Hardwired Internet Connectivity Wizard (WIZnet, Inc.) 15
3. Firmware Upload
Run ‘WIZ100SR/WIZ110SR Configuration Tool’ program, and click “Search” button.
If the moduel is properly connected to the network, “Searching Complete” message and
MAC address will be displayed on the “Board List” as shown in Figure.11.
Figure 11. Board Search Window
Select a module shown in “Board list”, and click “Upload” button.
Before uploading through Ethernet, you should set the network information of WIZ100SR first
by Configuration Tool program as shown abovr Fig 10. By using Ping test, you can check if
network is correctly configured.
When the window as shown in Figure 12 is displayed, select file fo upload and click
“Open” button.

Hardwired Internet Connectivity Wizard (WIZnet, Inc.) 16
Figure 12. Open dialog box for uploading
Do not upload any other files except for WIZ100SR application firmware file.
A dialogue box titled “Processing” will be displayed as below.
Figure 13. Firmware uploading window
When uploading is complete, a message box with “Complete Uploading” will be
displayed as shown in Figure 14.
Figure 14. Complete Uploading

Hardwired Internet Connectivity Wizard (WIZnet, Inc.) 17
4. Serial Configuration
4-1. Serial Command Format
Serial Command is used to set WIZ110SR parameter. This function is using S/W trigger of
WIZ110SR, if input specific letters(three characters), you can start configuration mode.
Frame Format
Command Frame Format
Descriptor STX Command code Parameter ETX
Length(bytes) 1 2 Variable 1
Table 4. Serial Command – Command Frame Format
Reply Frame format
Descriptor STX Reply code Parameter ETX
Length(bytes) 1 1 Variable 1
Table 5. Serial Command - Reply Frame Format
STX & ETX
Setting Comments
STX ‘<’ : Hex = 3Ch
ETX ‘>’ : Hex = 3Eh
Table 6. Serial Command - STX & ETX
Reply Code
Reply Comments
S Command was successful
F Command failed
1 Invalid command
2 Invalid parameter
E Enter serial command mode
Table 7. Serial Command – Reply Code
Command Code
Command Parameter Comments
WIxxx.xxx.xxx.xxx
(eg. 192.168.11.133) Set Local IP
WSxxx.xxx.xxx.xxx
(eg. 255.255.255.0) Set Subnet mask
WGxxx.xxx.xxx.xxx
(eg. 192.168.11.1) Set Gateway
WP 0~65535 Set Local IP’s port number
WD 0 : Static Set the IP configuration method

Hardwired Internet Connectivity Wizard (WIZnet, Inc.) 18
1 : DHCP
WM0 : TCP server1 : TCP client
2 : UDP Set the operation mode
WC0 : startup
1 : any character TCP client method
WB
XXXXeg. [Baudrate]1: 115200, 2: 57600,
3: 38400, 4: 19200, 5: 9600, 6: 4800, 7: 2400,8: 1200 [data byte] 7 : 7bit, 8bit
[parity] 0 : no parity, 1 : Odd, 2 :Even
[Flow] 0 : no, 1 : Xon/Xoff, 2 :RTS/CTS
Set the serial baud rate, data, parity and flow control.
4bytes:[Baud][data byte][parity][flow]
WT0 : Disable
1 : H/W trigger 2 : S/W trigger
Set the serial command method
WU0 : Disable1 : Enable
USE DNS use or not.
WExxxxxx
(eg. In hex format : 2B 2B 2B) Set the command mode character
WXxxx.xxx.xxx.xxx
(eg. 192.168.11.144) Set server IP address
WN 0~65535 Set server port number
WR Restart
WVxxx.xxx.xxx.xxx
(eg. 255.255.255.0) DNS IP setting
WWxxxxxxxxxxxxxxxxxxxxxxxxxxxxxxx
(eg. wiznet.co.kr) Domain setting
WY PPPoE ID PPPoE ID setting
WZ PPPoE Password PPPoE Password setting
OC XX Set delimiter character in hex
OS 0~255 Set delimiter size
OT 0~65535 Set delimiter time
OI 0~65535 Set Inactivity timer value
Command Parameter Comments
RU0 : Disable 1 : Enable
DNS usage
RV IP address DNS IP check
RW Domain Domain check
RY PPPoE ID PPPoE ID check
RZ PPPoE Password PPPoE Password check
RI Get Local IP
RS Get Subnet mask
RG Get Gateway
RP Get Local IP’s port number

Hardwired Internet Connectivity Wizard (WIZnet, Inc.) 19
RD Get the IP configuration method
RM Get the operation mode
RC Get the TCP client method
RB Get the serial baud rate
RT Get the serial command method
RE Get the command mode character
RF Get the firmware version
RX Get the server IP address
RN Get the server port number
QC Get delimiter character in hex
QS Get delimiter size
QT Get delimiter time
QI Get Inactivity timer value
Table 8. Serial Command – Command Code
4-2. WIZ110SR Configuration with Serial Command
Check WIZ110SR Firmware Version. If Version is lower, download the latest firmware
from download page of http://www.wiznet.co.kr , Serial Configuration function is
supported firmware version 2.5 or above.
Figure 15. Serial Configuration Enable Setting
Default Serial configuration status of module is ‘disable’. So click enable check box
of Serial Configuration and click “setting” button.

Hardwired Internet Connectivity Wizard (WIZnet, Inc.) 20
Input any three characters for the serial command mode trigger (in above Figure, 2B,
2B, 2B are input)
If you finish enable setting, you can test as below procedure. This procedure is
‘checking module IP and change to other IP address’
1 “+++”input Enter Serial Configuration mode
2 “<WI192.168.99.124>” input Change module IP to 192.168.99.124
3 “<S>” Check answer Notice success IP setting
4 “<RI>” input check module IP address
5“<S192.168.99.124>” Check answer
check the changed module IP address
6 “<WR>” input reboot
7 “<S>” check answer Notice success of reboot command
8 Module reboot
Table 9. Serial Command Testing Procedure
Above procedure is shown in serial conslole as below figure.
Figure 16. Serial Command
<S><S192.168.99.124><S>
WIZ100SR/WIZ110SR Ver. 01.02
MAC ADDRESS : 00.08.DC.13.AE.4F
SUBNET MASK : 255.255.255.0
G/W IP ADDRESS : 192.168.99.1
LOCAL IP ADDRESS : 192.168.99.124

Hardwired Internet Connectivity Wizard (WIZnet, Inc.) 21
5. PIN Assignment and Dimension
Figure 17. WIZ100SR Pin Assignment
PIN NAME Functions I/O
RESET Reset (Active High) Input
TXD RS-232 Data Output Output
RTS RS-232 Request To Send Output Optional
DTR RS-232 Data Terminal Ready Output Optional
RXD RS-232 Data Input Input
CTS RS-232 Clear To Send Input Optional
DSR RS-232 Data Set Ready Input Optional
TPRX- Ethernet Differential Input- Input
TPRX+ Ethernet Differential Input+ Input
TPTX- Ethernet Differential Output- Output
TPTX+ Ethernet Differential Output+ Output
/LINK_LED Link LED Output
/10_LED 10 Mbps LED Output
/100_LED 100 Mbps LED Output

Hardwired Internet Connectivity Wizard (WIZnet, Inc.) 22
/COL_LED Collision LED Output
Status High: Not connected
Low: Connected Output
PWFBOUT Power Feedback Out Output
VCC 3.3V Power Power
Table 10 WIZ100SR PIN Functions
1) All signal level is 3.3V LVTTL.
2) A high on RESET pin about minimum 1.2 usec must be applied for proper
operation.
3) ‘Connected’ of Status pin means the TCP socket of WIZ100SR is connected to
remote system.
4) /LINK_LED pin is used to check if Ethernet cable is physically connected or not.
Figure 18. WIZ100SR Dimension
Symbol Dimension(mm)
A 45.7
B 50.0

Hardwired Internet Connectivity Wizard (WIZnet, Inc.) 23
C 4.0
D 2.0
E 30.0
Table 11 WIZ100SR Dimension
6. Demonstration and Test
In this chapter, we give an example that can be used to test the function of WIZ100SR.
The testing environment is as follows;
Hardware
# PC that has an RS-232 serial port.
# EG-SR-7100A+ & EG-SR-7100A Test B/D Rev2.0 (For the EG-SR-7100A+ testing,
use the test board version 2.0 or above.)
# Ethernet cross-over cable to connect PC's and EG-SR-7100A+'s LAN ports.
# RS-232 cable to connect PC's COM port with EG-SR-7100A+'s serial data port.
Software
# Windows operating system installed on testing PC.
# EG-SR-7100A Configuration tool (For the DNS function, use Configuration Tool
ver 3.2.0 or above)
# Hyper terminal
Figure 19. Data Flow (Serial -> Ethernet)

Hardwired Internet Connectivity Wizard (WIZnet, Inc.) 24
Figure 20. Data Flow (Ethernet -> Serial)
STEP1.
Make sure the position of the mode switch is normal mode. (If JP4 of the test board is
configured as Config mode, the network function is disabled, and the Configuration Tool
can not be used.)
Connect the computer and WIZ100SR Test Board by using RS-232.
Connect the computer and WIZ100SR Test Board by Ethernet cable (Direct or Crossover
Cable).
Power on the WIZ100SR Test Board.
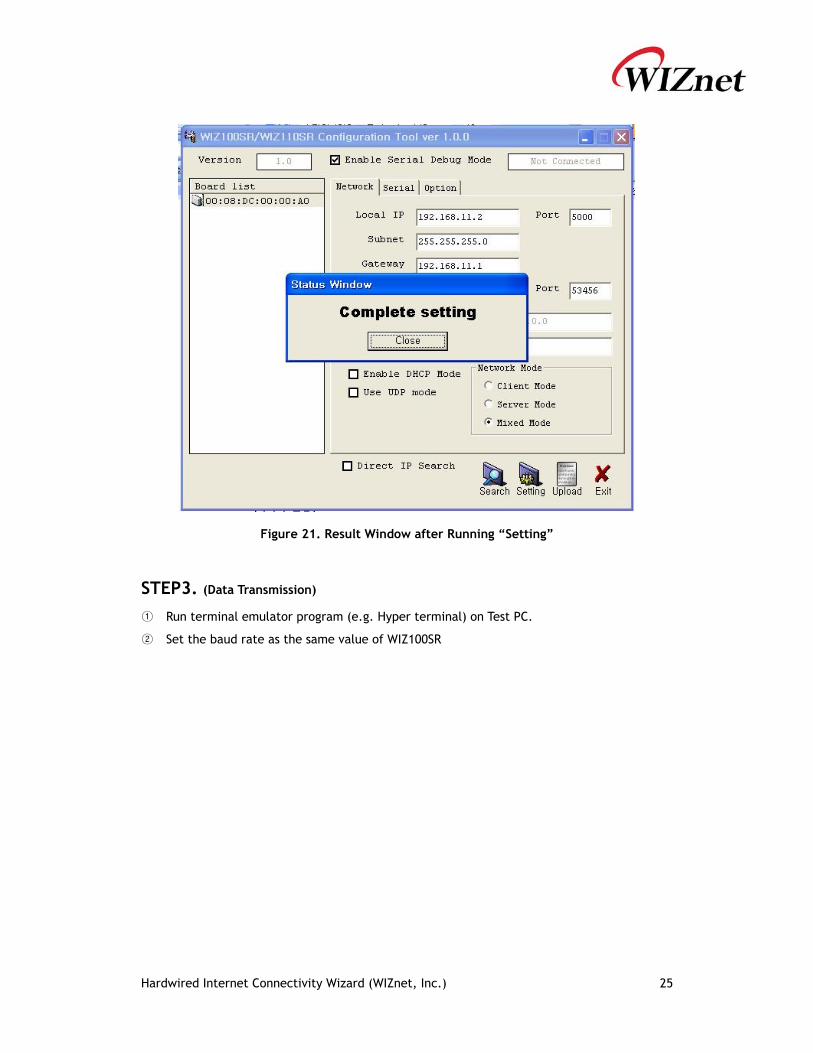
STEP2. (WIZ100SR Environment Setup)
Modules are searched by click search button of the Configuration Tool.
Select the board to be configured and change the value. To apply the changed value,
click Setting button.
If changed value is succefully applied, the “Complete setting” message is displayed as
shown in Figure 21.
Hardwired Internet Connectivity Wizard (WIZnet, Inc.) 25
Figure 21. Result Window after Running “Setting”
STEP3. (Data Transmission)
Run terminal emulator program (e.g. Hyper terminal) on Test PC.
Set the baud rate as the same value of WIZ100SR

Hardwired Internet Connectivity Wizard (WIZnet, Inc.) 26
Figure 22. Serial Terminal Program Configuration
Execute another Hyper terminal and set the IP address and port number.
Figure 23. Network Terminal Program Configuration
Type some charater on the serial Hyper terminal screen. In this example, “01234567890”
is entered.
Make sure this data is shown on the Network Hyper terminal window. (Serial to Ethernet)

Hardwired Internet Connectivity Wizard (WIZnet, Inc.) 27
Figure 24. Received Data by Network Terminal Program
As the same way, type some charaters on the network Hyper terminal, and then make
sure these data are shown in the serial Hyper terminal window. (Ethernet to Serial)
* Above test can be performed more easily and conveniently by using Device Terminal program.
Below is the screen of the Devie Terminal program.

Hardwired Internet Connectivity Wizard (WIZnet, Inc.) 28
Figure 25. Device Terminal Program
Device Terminal is the program into which serial and network terminals integrated for more
efficient testing of WIZnet gateway modules.
As shown in Figure 25, at the upper part of the program, you configure serial setting of
WIZ100SR. By click “Open” button, serial communication is available.
At the Network Terminal, the lower part of the program, it is possible to test both of TCP
Client and TCP Server modes. If Server Mode is checked, Device Terminal will operate as
server mode, and the WIZ100SR module will work as client mode. The PC where the Device
Terminal is operating will work as a server, the IP address of the PC should be set as Server IP
of the module. If Server mode is not checked, Device Terminal will operate as client mode,
and the module as server. For the IP address and port, input IP address and port number of
WIZ100SR and click “Connect” button for network communication.
When serial and network terminals are connected, input any charater at the Data Input
window and click “Send” button. You can check the data transferred to another window.

Hardwired Internet Connectivity Wizard (WIZnet, Inc.) 29
6. Reference Schematic
Figure 26. Schemati