RULES OF SAFE PAINTBALL MARKER HANDLING
2
DISASSEMBLY / CLEANING OF BALL DETENT STEP 1. Remove barrel from DL9. See instructions “Removing your barrel “ for more help. STEP 2. Using an o-ring remover, or dental pick, remove the 2 o-rings from the base of the barrel. STEP 3. With o-rings removed, slide ball detent out of the barrel. (See Figure G) STEP 4. Clean detents and o-rings with soft rag. STEP 5. Place cleaned detent into detent slot barrel, and add barrel o-rings. CAUTION: This product is intended to be used at a velocity no greater than 300 feet per second (fps). Paintball markers are not intended to shoot within 10 feet. WARNING: The paintball Marker may have excess gas after removal of the Co2/ Compress Air Tank. Death or serious injury may occur if all paintballs and air is not discharged prior storing the marker. WARNING: Never store Co2/ Compressed Air Tanks attached to the marker. Death or serious injury may occur if marker is stored with air source still attached. WARNING: Serious injury or even death might occur if individuals are within 300 feet (100 meters) of a shooting ranger without proper eye protection. Unloading Your Marker WARNING: Always wear proper eye, face, and ear protection designed especially to stop paintballs while unloading and working on your paintball marker. STEP 1. Make sure barrel plug is securely in barrel. STEP 2. Put marker on safe. (Push left to right) STEP 3. Remove magazine and remove loader – Loosen the feed neck set screw and remove paintball loader. When removing the loader, make sure to remove all paintballs. CAUTION: There may be paintballs in the Marker’s breach; remove barrel plug and take a couple of shots in a safe direction. STEP 4. Turn Marker upside down to remove paintballs from feed port. STEP 5. Remove Barrel. STEP 6. Remove air source from constant air adapter by turning counter-clockwise. After removing propellant source, point marker in safe direction and discharge until marker is degassed. STEP 7. Use a squeegee to dislodge any paintballs that might remain in the barrel. Do not unload your marker indoors. WARNING: Do not look down the breach of the marker at any time. Installing/Removing Your Barrel Removing Your Barrel STEP 1. Grasping the tip of the barrel, firmly rotate the barrel so the “RELEASE” text is facing the left side of the marker and visible through the heat shield window. STEP 2. Firmly grasp the barrel and pull the barrel away from the marker. The barrel should easily slide out of the marker. If the barrel hesitates to slide out, re-confirm that “RELEASE” is visible through the heat shield window. (See Figure A.) Installing Your Barrel STEP 1. Insert barrel into DL9 heat shield with the text “RELEASE” facing to the left. Slowly slide the barrel further into heat shield until you hear an audible “click”. STEP 2. Once inserted into the heat shield, you may twist the barrel to either “Loader”(to shoot paintballs from the loader), or “Magazine”(to shoot paintballs from the magazine). Loading Paintballs In The Magazine IMPORTANT: The Barrel must be installed before loading the Magazine or Paintball Loader. IMPORTANT: Always have the marker on safe mode until you are ready to operate. IMPORTANT: Storing paintballs in a temperature of 59° F (15°C) or below will affect the quality and performance of the paintballs. IMPORTANT: The magazine should be clean and free of any shell fragment or dirt before loading paintballs. WARNING: DO NOT freeze the paintballs. STEP 1. Slide the ball pusher towards the bottom of the magazine and turn to the left to place the guide pin in the locked position. (Fig B) STEP 2. Load only 9 Paintballs (.68 Cal.) STEP 3. Follow the guided line to insert the Magazine straight into the Trigger Housing until it snaps into position. STEP 4. Turn the ball pusher pin right to the un-locked position. IMPORTANT: If the ball pusher pin is not released, the spring will not push the paintballs into the markers breach. Releasing The Magazine Push the magazine release button located on the right side of the markers handle. This will allow the magazine to slide out the handle. NOTE: Never take apart the magazine release button unless the magazine does not release from the trigger frame. (Fig C) IMPORTANT: NEVER slam the magazine into the receiver, excessive force inserting the magazine will push a paintball past the ball detents and roll out the barrel. NOTE: Do not store magazine(s) loaded with paintballs for an extended period of time as the pressure from the magazine spring will cause the paintballs to de-form and not shoot properly. HELPFUL TIP: Paintballs left in the magazine during storage will cause premature paintball breakage and poor accuracy. Do not store your magazine with paintballs loaded inside. Field Strip Guide STEP 1. EYE PROTECTION: Make sure you and everyone within range 300 yards (100 meters) is properly protected from paintball impacts. Put marker on Safe. STEP 2. Remove loader, magazine, and paintballs from marker STEP 3. Remove cocking pin and bolt. Clean bolt from broken paintballs. STEP 4. Use a barrel squeegee to clean broken paintballs from your marker’s barrel. (Fig D) Cleaning and Maintenance Guide Disassembly STEP 1. EYE PROTECTION: Make sure you and everyone within range (200 yards) is properly protected from paintball impacts. Put marker on Safe. STEP 2. Remove gas supply, loader, magazine, and paintballs from marker. STEP 3. Use a barrel squeegee to clean broken paintballs from your marker’s barrel. (Fig D) STEP 4. Make sure cocking pin is in the forward position. Pull trigger to release if necessary. STEP 5. Remove quick pull pin, cocking pin, bolt, hammer plug, bumper and spring. (Fig E) Key Description Barrel Barrel O-Ring Receiver Cladding RH Cladding LH Short Cladding Screws Long Cladding Screws Bolt O-Ring Hammer O-Ring Bolt Bolt Pin Cocking Knob Knob Bearing Ball Detent Knob Spring Velocity Adjuster Screw Velocity Adjuster O-Ring Velocity Adjuster Housing Spring Guide Hammer Bumper Main Spring Hammer Quick Strip Pin Barrel Detent Screw Barrel Detent Cupseal(Complete) Front Plug Front Plug O-Ring Valve Spring Air Hose Magazine Assembly Trigger Frame Trigger Trigger Arm Trigger Arm Spring Trigger Arm Pin Safety Spring 1 2 3 4 5 6 7 8 9 10 11 12 13 14 15 16 17 18 19 20 21 22 23 24 25 26 27 28 29 30 31 32 33 34 35 36 37 Safety Bearing Safety Sear Trigger Spring Sear Spring Grip Screw Grip RH Grip LH Large Trigger Pin Medium Trigger Pin Small Trigger Pin Mag Release Button Mag Release Spring Mag Pin Mag Release Slide Feedneck Feedneck Clamp Screw Feedneck Nut Feedneck Screw Front Plug Screw Grip Frame Screw 38 39 40 41 42 43 44 45 46 47 48 49 50 51 52 53 54 55 56 57 58 1 2 14 31 52 51 50 49 24 25 3 8 13 15 18 16 17 20 19 21 11 9 22 30 23 27 28 29 26 4 5 6 7 57 55 54 53 10 56 12 32 43 44 45 58 58 LUBRICATION POINTS PUNTOS DE LUBRICACIÓN POINTS DE LUBRIFICATION 33 34 35 46 39 38 37 47 47 40 42 48 36 41 Need an Illustrated Parts List. Call 1-800-220-3222 www.paintballsolutions.com Figure A RELEASE LOADER MAGAZINE Figure F Figure D .68 Caliber USER’S MANUAL Safety Information, Annotated Diagram, Warranty Information, Trouble Shooting Guide, Operating Instructions Semi-Auto Paintball Marker 1. Read these instructions before using this product. 2. Do not use unless everyone within range is wearing eye, face and ear protection designed specifically to stop paintballs and complies with specification ASTM F1776. 3. Never point the paintball marker at anyone that is not wearing a paintball mask that complies with specification ASTM F1776. 4. Do not modify your marker’s pressurized air system or cylinder in any way. 5. Keep the marker on safe until ready to shoot 6. Never use anything other than .68 caliber paintballs. Do not attempt to shoot used paintballs. 7. Treat every marker as if it were loaded. 8. Never look down the barrel of a paintball marker. 9. Keep your finger off the trigger until ready to shoot. 10. Never point the marker at anything you don’t wish to shoot 11. Keep the barrel blocking device in/on the marker’s muzzle when not shooting. 12. Keep the paintball marker on safe when not in use. 13. Always remove paintballs and propellant source before disassembly. 14. After removing propellant source, point marker in safe direction and discharge until marker is degassed. 15. Store the marker unloaded and degassed in a secure place. 16. Follow warning listed on the gas source for handling and storage 17. Do not shoot at fragile objects such as windows 18. Always measure your marker’s velocity before playing paintball and never shoot at velocities in excess of 91.44 m/s (300 ft/s) 19. Never engage in vandalism. 20. Some paintballs may cause staining of some porous surfaces such as brick, stucco, and wood. RULES OF SAFE PAINTBALL MARKER HANDLING WARNING: This is not a toy. Eye protection designed specifically for paintball must be worn by the user and persons within range. Must be 18 years or older to purchase. Persons under 18 must have adult supervision. READ OWNER’S MANUAL BEFORE USING. FAILURE TO FOLLOW ALL SAFTEY WARNINGS COULD CAUSE SEVERE INJURY OR EVEN DEATH Basic Marker Care And Maintenance Note: Any cosmetic or mechanical changes will void the warranty and may not satisfy ASTM standards for safety. Use only JT paintball approved replacement parts and updated components. Follow these easy points to keep your marker in top shape for years to come. - Read the manual thoroughly before using the marker. - Lubricate all O-rings in the marker using ONLY mineral oil. - Place 3 drops of mineral oil in ASA with each change of gas source. - Familiarize yourself with the exploded diagram provided in the manual before disassembly. - Wipe off all parts before re-assembly. - Re-lubricate O-rings before re-assembly. - NEVER immerse the marker in water. Water will cause internals to rust. - Call customer service if you have further questions at 1-800-220-3222. Operation Guide / Start Up WARNING: Be sure the paintball marker is always pointed in a safe direction. Read the following operating instructions and WITHOUT LOADING ANY PAINTBALLS proceed several times through the operating steps with your paintball marker (dry fire the paintball marker at a safe target) so that you will be able to operate the marker properly and safely. STEP 1. Always attach a barrel blocking device over the tip of the barrel for safety precautions when not shooting/ playing. STEP 2. JT Paintball recommends having the Marker in the SAFE MODE position before use. To operate, push the safety button from the “PUSH SAFE” side of the Trigger Frame. This will position the Marker in a lock SAFE MODE. To disengage the safety in a safely manner, point the Marker in a safe direction, and push the safety button towards the opposite side of the Trigger Frame. CAUTION: Do not disengage safety button until step 6. STEP 3. Attach a CO2/Compressed Air Tank to the Markers C/A adapter. Using a CO2/Compressed Air Tank firmly tighten clockwise to the Markers C/A adapter until it is snug. HELPFUL TIP: Make sure to have the CO2/ Compressed Air Tank filled before attaching. NOTE: O-rings in the Markers parts kit are NOT supplied to attach with a CO2/ Compressed Air Tank. IMPORTANT: You should never need to use any hand tool to attach a CO2/ COMPRESSED AIR TANK to the Markers C/A adapter. STEP 4. Attach the Magazine to the Trigger Housing or attach Paintball Loader to the Marker’s clamping feed neck and tighten the screw. NOTE: The loader and Magazine can only be filled with .68 Caliber Paintballs. NOTE: Add 3 drops of mineral oil to the ASA adapter prior to attaching the refillable cylinder. Check the website at: www.paintballsolutions.com for approved lubricants. STEP 5. Cocking the Marker. Pull back the Side Cocking Handle until you hear and feel the bolt latches. CAUTION: Should you let go of the Side Cocking Handle before it latches, your Marker may fire. STEP 6. Remove the barrel blocking device in the barrel. Now you can release the safety button. CAUTION: With the safety button released in the FIRE position the Marker is ready to shoot/play. By pulling the Trigger the marker will fire a paintball. IMPORTANT: Only test your Marker in a safe direction or in a designated playing field. STEP 7. Performing a velocity (fps) check. Turning the Velocity Adjuster/Spring Guide clockwise will increase the velocity (fps) while turning counter-clockwise will decrease the velocity (fps). NOTE: Your Marker is intended to be used in a paintball facility with the proper paintball protection. IMPORTANT: JT Paintball recommends using a chronograph to ensure Marker’s velocity is under 300 (fps). STEP 8. When finished playing, remove all paintballs from the Magazine and Loader. Then detach the loader from the Markers feed neck by loosening the set screw on feed neck clamp. WARNING: There may be one paintball in the Marker’s breach; take a shot or two in a safe direction to make sure the barrel and Receiver are empty. STEP 9. The Marker needs to be in the SAFE MODE and un-cocked after each use. STEP 10. Unscrew the CO2/Compressed Air Tank from the Markers C/A adapter. By turning the tank counter clockwise will detach from the Markers C/A adapter. CAUTION: Never expose any skin underneath the C/A adapters bleed hole when removing the tank. This can run the risk of getting skin burn from the releasing of the GAS. IMPORTANT: You should never need to use any hand tool to detach a CO2/ Compressed Air Tank from the Markers C/A adapter. STEP 11. Store the Marker in a paintball bag or in a safe place. WARNING: Before/ after use of the Marker, make sure to fasten all screws. Loose screws may prevent the Marker from functioning properly. HELPFUL TIP: It’s a good practice to lubricate your Marker before and after each use, especially when storing the Marker for an extended period of time. Add a few drops of paintball gun oil on the Striker O-ring (SEE DISASSEMBLE/REASSEMBLE AND CLEANING OR REAR INTERNALS). Before storing the Marker, make sure the Marker is in the SAFE MODE, un-cocked position without air source attached, any paintball inside the Marker has been removed and with barrel blocking device on. IMPORTANT: • Firing velocity will vary according to altitude, climate condition, and type of paintball used. • It may be dangerous approximately within 300 feet (100 meter) of shooting range. • Before using your marker in play, you must always first perform a “SAFE VELOCITY TEST”. This can only be accomplished by using a testing device called a “Velocity Chronograph“ and can be performed at a paintball dealership or local playing field. 2-15 Made in Taiwan JT Paintball 11723 Lime Kiln Rd. Neosho, MO 64854 JT Paintball is a brand of KEE Action Sports, LLC. COCKING PIN Pasador de Percutor Goupille d’armement BALL FEED PORT Puerto de alimentación Entrée d’alimentation HAMMER PLUG Tapón de Martillo/Velocidad Bouchon du per cuteur/vitesse BOTTOM-LINE CONSTANT AIR ADAPTER Adaptador de Aire Constante de Linea Base Adaptateur d’air constant de ligne de fond STEEL BRAIDED HOSE Manguera de Acero Tejido Tuyau en acier tressé GRIP ASSEMBLY Armazón de Cacha Crosse GRIP ASSEMBLY RETAINING SCREW Tornillo de Aseguramiento Vis d’arrèt SINGLE TRIGGER Gatillo para do Dedos Détente à solo doigts VELOCITY ADJUSTMENT SCREW Tornillo de Ajuste de Velocidad Vis de réglage de la vitesse VALVE PLUG Tapón de Válvula Obturateur de valve SAFETY Seguro Verrou de sécurité REFILLABLE CYLINDER (not Included) Cilindro Rellenable (no Incluida) Cylindre Réutilisable (non fournie) QUICK PULL PIN Pasador de Tracción Rápida Goupille de Traction Rapide LUBRICATION POINTS PUNTOS DE LUBRICACIÓN POINTS DE LUBRIFICATION MAGAZINE Magasin Tambor REMOVABLE BARREL Cañón Removible Canon amovible BARREL PLUG Tapón del coñon Obturateur de canon JT Paintball is a brand of KEE Action Sports, LLC. Design rights & all rights reserved. All patterns, drawings, photographs, instructions or manuals remain the intellectual property of the manufacturer. All rights will be strictly enforced. ASTM International, formerly known as the American Society for Testing and Materials (ASTM), is a globally recognized leader in the development and delivery of international voluntary consensus standards used around the world to improve product quality, enhance safety, facilitate market access and trade, and build consumer confidence. ASTM International, 100 Barr Harbor Drive, PO Box C700, West Conshohocken, PA, 19428-2959 USA, www.astm.org PATENT(S): See www.paintballsolutions.com/patents © 2013-2014 KEE Action Sports. All rights reserved. This KEE Action Sports product is protected by one or more United States and International patents. KEE Action Sports Trademarks, Designs and Copyrights are protected by one or more United States patents and International Law. For more information contact KEE Action Sports at info@ keeactionsports.com Warranty Repair Return Procedure A returned product must be accompanied by a Return Authorization (RA) number on the outside of the box; please call Paintball Solutions at 1.800.220.3222 to obtain an RA number before shipping product to JT Paintball. All warranty returns must be accompanied by the operator’s name, address, and telephone number. Include operator’s fax and e-mail if possible. Operator must remove all paintballs before shipping, and must pack product securely to avoid damage during shipping. Include a brief description of what does not appear to work correctly. Ship to: JT Paintball, 11723 Lime Kiln Rd., Neosho, MO 64850. Problem Gas Leaks from Cylinder Connection Damaged Cylinder O-ring Replace O-ring Gas Leaks from Inside barrel Damaged Valve Seal Replace Valve Stem Assembly Marker Fails to Recock Damaged Striker O-ring Lack of Gas Pressure Replace Striker O-ring Refill Cylinder Marker Fails to Discharge Marker Wasn’t Cocked Lack of Gas Pressure Lack of Lubricant or Paintball Debris Gas Source not Fully Engaged Cock Marker Before Firing Refill Cylinder Refer to Field Strip Guide Section Screw Gas Source into Bottom Line Constant Air Adapter Troubleshooting Guide Cause Cure Rapid Fire or Mechanism sticks/ Hangs up Broken Shell No Lubrication Clean Mechanism Lubricate bolt and Striker Broken Paintballs Excessive Paint Buildup in Barrel Defective Paintballs Squeegee out Paintball Particles from Barrel Replace Paintballs DETENT O-RINGS Figure G Figure C CAUTION: Parts may be under spring tension. Failure to remove parts properly could cause injury. STEP 6. Pull trigger and tap rear of the receiver against towel on flat surface to remove hammer. STEP 7. Grasp hammer with fingers and pull from receiver NOTE: Examine hammer O-ring for any damage and replace if necessary. WARNING: Always wear proper paintball eye protection when handling your marker, including disassembly and reassembly. Failure to do so could cause serious injury or event death Cleaning and Maintenance Guide Reassembly STEP 1. Clean and Lubricate all lubrication points and O-rings with mineral oil only. STEP 2. Replace hammer bolt assembly into receiver with sear flat down. NOTE: It is necessary to pull the trigger 3 or more times while applying pressure to hammer bolt assembly with your finger in order to fully seat the hammer. (Fig. F) STEP 3. Follow Steps 1-5 of Cleaning and Maintenance Guide Disassembly in reverse order. NOTE: The bolt is uniquely designed to be installed with the air through hole downward. If you install with air through hole upward the cocking pin will not fully insert into the bolt. This is to prevent Incorrect reassembly. Figure B Figure E
Transcript of RULES OF SAFE PAINTBALL MARKER HANDLING
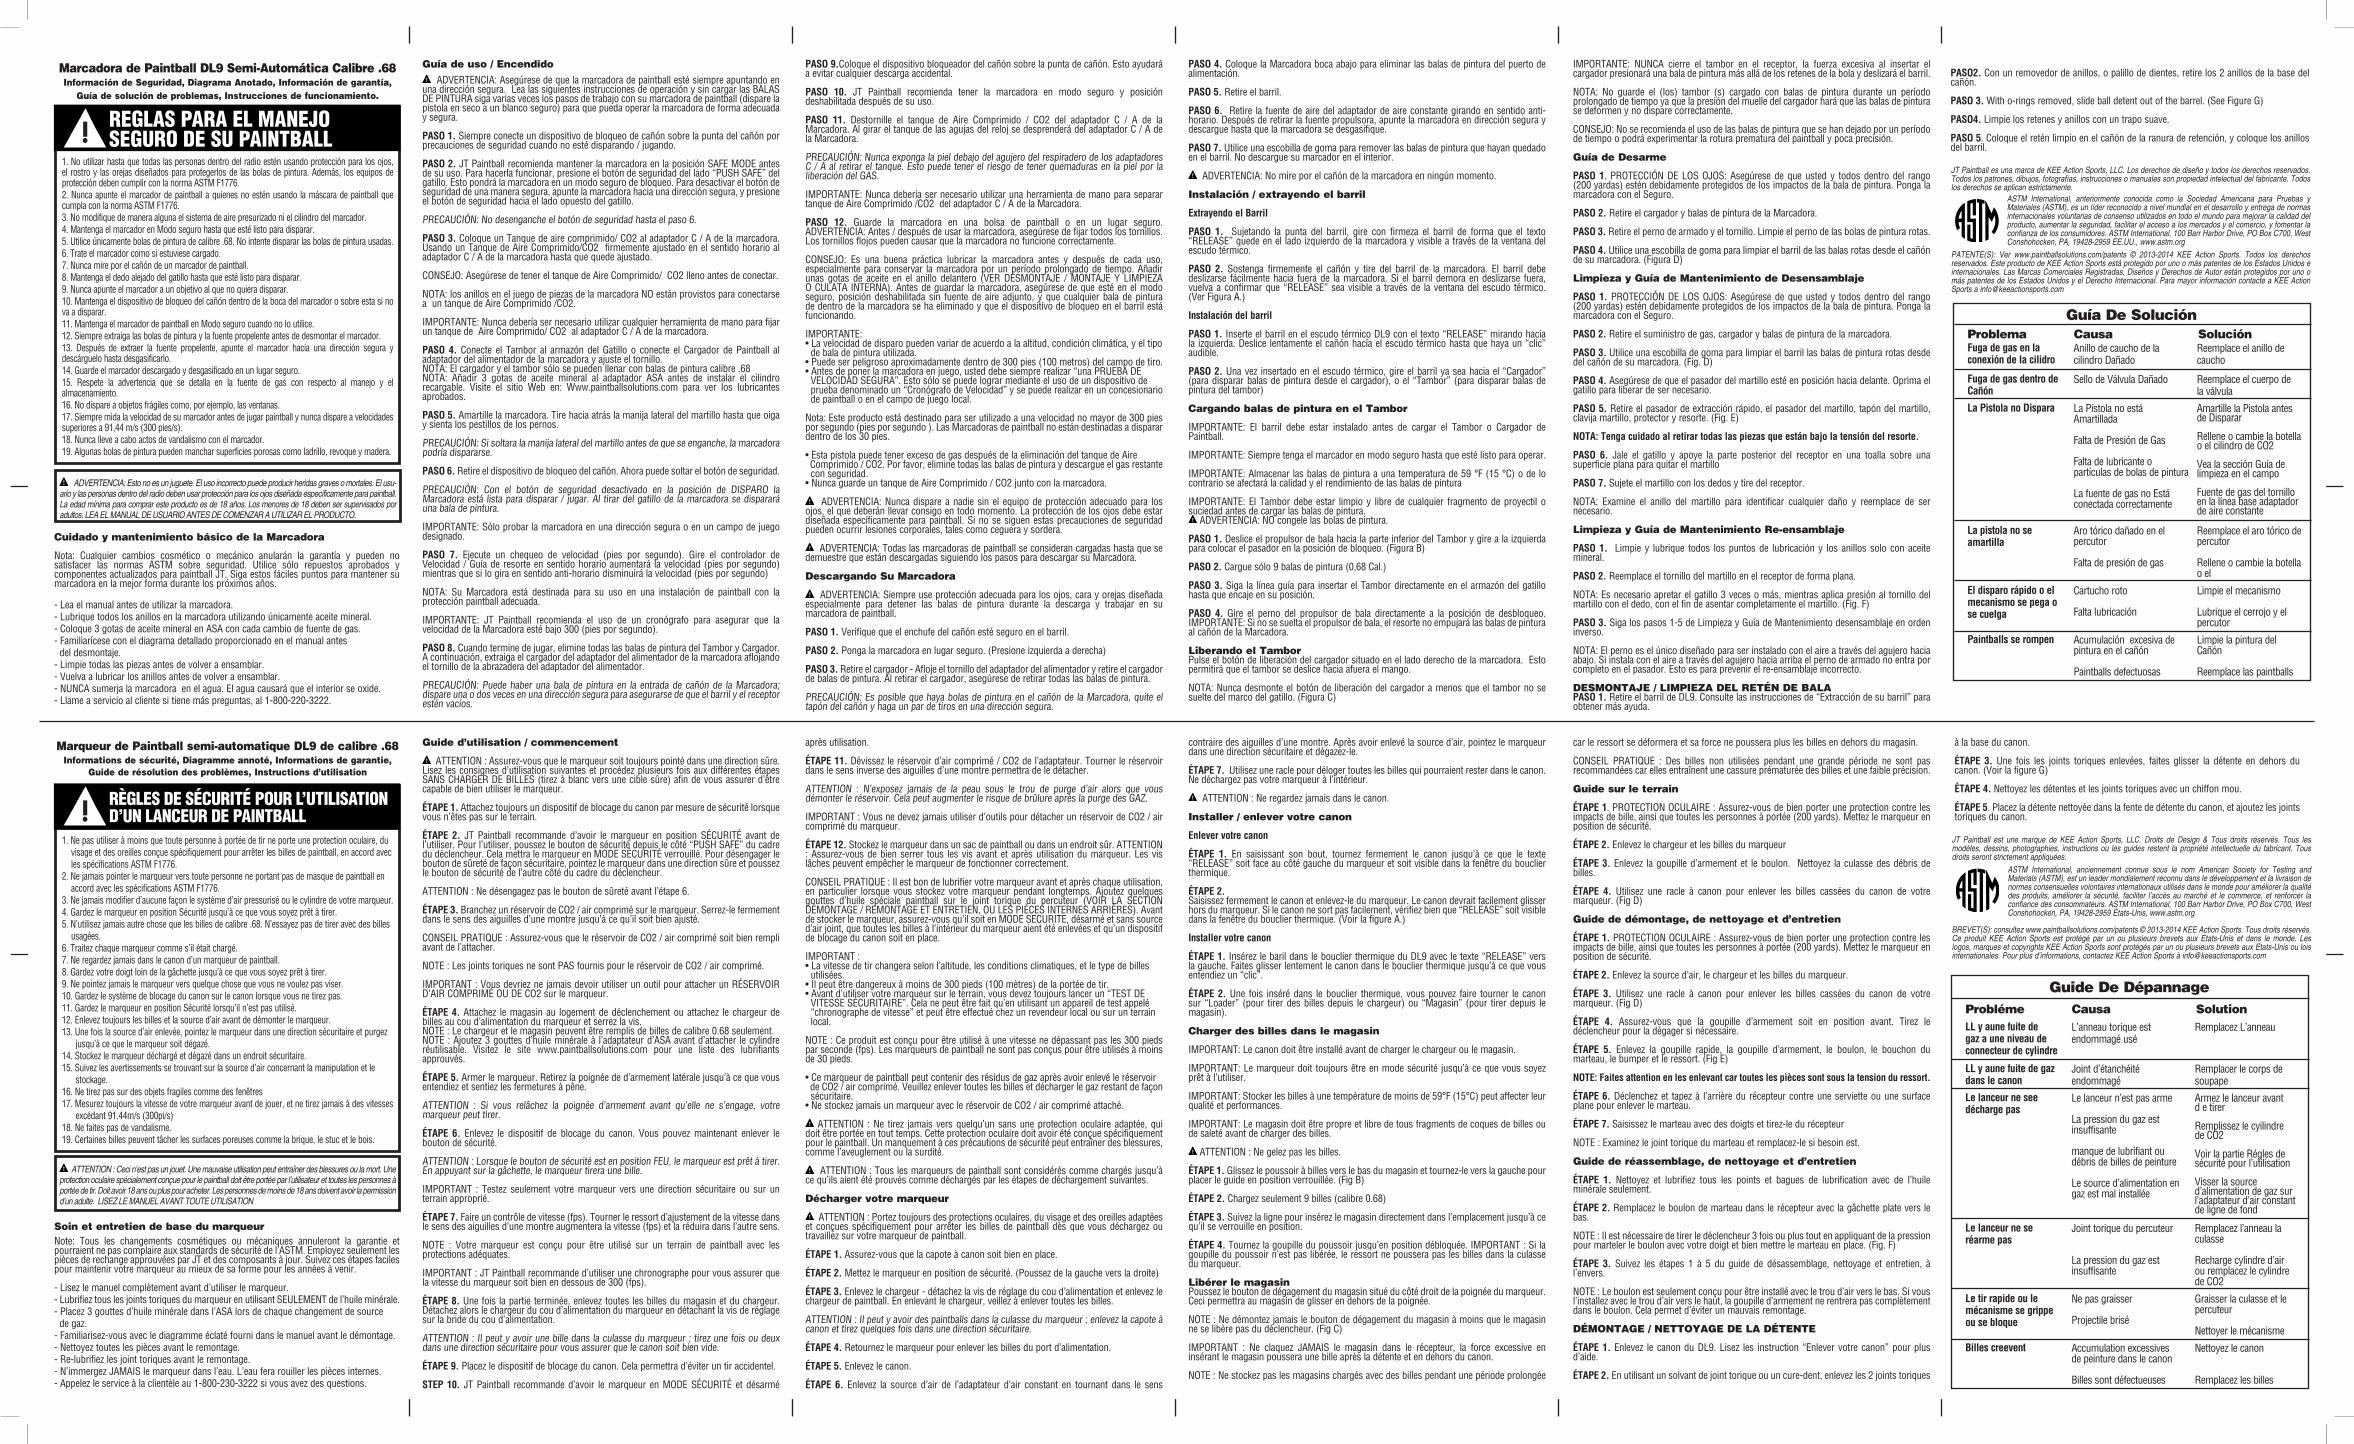
DISASSEMBLY / CLEANING OF BALL DETENT STEP 1. Remove barrel from DL9. See instructions “Removing your barrel “ for more help. STEP 2. Using an o-ring remover, or dental pick, remove the 2 o-rings from the base of the barrel. STEP 3. With o-rings removed, slide ball detent out of the barrel. (See Figure G) STEP 4. Clean detents and o-rings with soft rag. STEP 5. Place cleaned detent into detent slot barrel, and add barrel o-rings.
CAUTION: This product is intended to be used at a velocity no greater than 300 feet per second (fps). Paintball markers are not intended to shoot within 10 feet.
WARNING: The paintball Marker may have excess gas after removal of the Co2/Compress Air Tank. Death or serious injury may occur if all paintballs and air is not discharged prior storing the marker.
WARNING: Never store Co2/ Compressed Air Tanks attached to the marker. Death or serious injury may occur if marker is stored with air source still attached.
WARNING: Serious injury or even death might occur if individuals are within 300 feet (100 meters) of a shooting ranger without proper eye protection.
Unloading Your Marker WARNING: Always wear proper eye, face, and ear protection designed especially
to stop paintballs while unloading and working on your paintball marker.
STEP 1. Make sure barrel plug is securely in barrel.
STEP 2. Put marker on safe. (Push left to right)
STEP 3. Remove magazine and remove loader – Loosen the feed neck set screw and remove paintball loader. When removing the loader, make sure to remove all paintballs.
CAUTION: There may be paintballs in the Marker’s breach; remove barrel plug and take a couple of shots in a safe direction.
STEP 4. Turn Marker upside down to remove paintballs from feed port.
STEP 5. Remove Barrel.
STEP 6. Remove air source from constant air adapter by turning counter-clockwise. After removing propellant source, point marker in safe direction and discharge until marker is degassed.
STEP 7. Use a squeegee to dislodge any paintballs that might remain in the barrel. Do not unload your marker indoors.
WARNING: Do not look down the breach of the marker at any time.
Installing/Removing Your BarrelRemoving Your Barrel
STEP 1. Grasping the tip of the barrel, firmly rotate the barrel so the “RELEASE” text is facing the left side of the marker and visible through the heat shield window. STEP 2. Firmly grasp the barrel and pull the barrel away from the marker. The barrel should easily slide out of the marker. If the barrel hesitates to slide out, re-confirm that “RELEASE” is visible through the heat shield window. (See Figure A.)Installing Your Barrel STEP 1. Insert barrel into DL9 heat shield with the text “RELEASE” facing to the left. Slowly slide the barrel further into heat shield until you hear an audible “click”. STEP 2. Once inserted into the heat shield, you may twist the barrel to either “Loader”(to shoot paintballs from the loader), or “Magazine”(to shoot paintballs from the magazine).
Loading Paintballs In The MagazineIMPORTANT: The Barrel must be installed before loading the Magazine or Paintball Loader.
IMPORTANT: Always have the marker on safe mode until you are ready to operate.
IMPORTANT: Storing paintballs in a temperature of 59° F (15°C) or below will affect the quality and performance of the paintballs.
IMPORTANT: The magazine should be clean and free of any shell fragment or dirt before loading paintballs.
WARNING: DO NOT freeze the paintballs.
STEP 1. Slide the ball pusher towards the bottom of the magazine and turn to the left to place the guide pin in the locked position. (Fig B)
STEP 2. Load only 9 Paintballs (.68 Cal.)
STEP 3. Follow the guided line to insert the Magazine straight into the Trigger Housing until it snaps into position.
STEP 4. Turn the ball pusher pin right to the un-locked position. IMPORTANT: If the ball pusher pin is not released, the spring will not push the paintballs into the markers breach.
Releasing The MagazinePush the magazine release button located on the right side of the markers handle. This will allow the magazine to slide out the handle.
NOTE: Never take apart the magazine release button unless the magazine does not release from the trigger frame. (Fig C)
IMPORTANT: NEVER slam the magazine into the receiver, excessive force inserting the magazine will push a paintball past the ball detents and roll out the barrel.
NOTE: Do not store magazine(s) loaded with paintballs for an extended period of time as the pressure from the magazine spring will cause the paintballs to de-form and not shoot properly.
HELPFUL TIP: Paintballs left in the magazine during storage will cause premature paintball breakage and poor accuracy. Do not store your magazine with paintballs loaded inside.
Field Strip GuideSTEP 1. EYE PROTECTION: Make sure you and everyone within range 300 yards (100 meters) is properly protected from paintball impacts. Put marker on Safe.
STEP 2. Remove loader, magazine, and paintballs from marker
STEP 3. Remove cocking pin and bolt. Clean bolt from broken paintballs.
STEP 4. Use a barrel squeegee to clean broken paintballs from your marker’s barrel. (Fig D)
Cleaning and Maintenance Guide Disassembly
STEP 1. EYE PROTECTION: Make sure you and everyone within range (200 yards) is properly protected from paintball impacts. Put marker on Safe.
STEP 2. Remove gas supply, loader, magazine, and paintballs from marker.STEP 3. Use a barrel squeegee to clean broken paintballs from your marker’s barrel. (Fig D)
STEP 4. Make sure cocking pin is in the forward position. Pull trigger to release if necessary.
STEP 5. Remove quick pull pin, cocking pin, bolt, hammer plug, bumper and spring. (Fig E)
Key Description
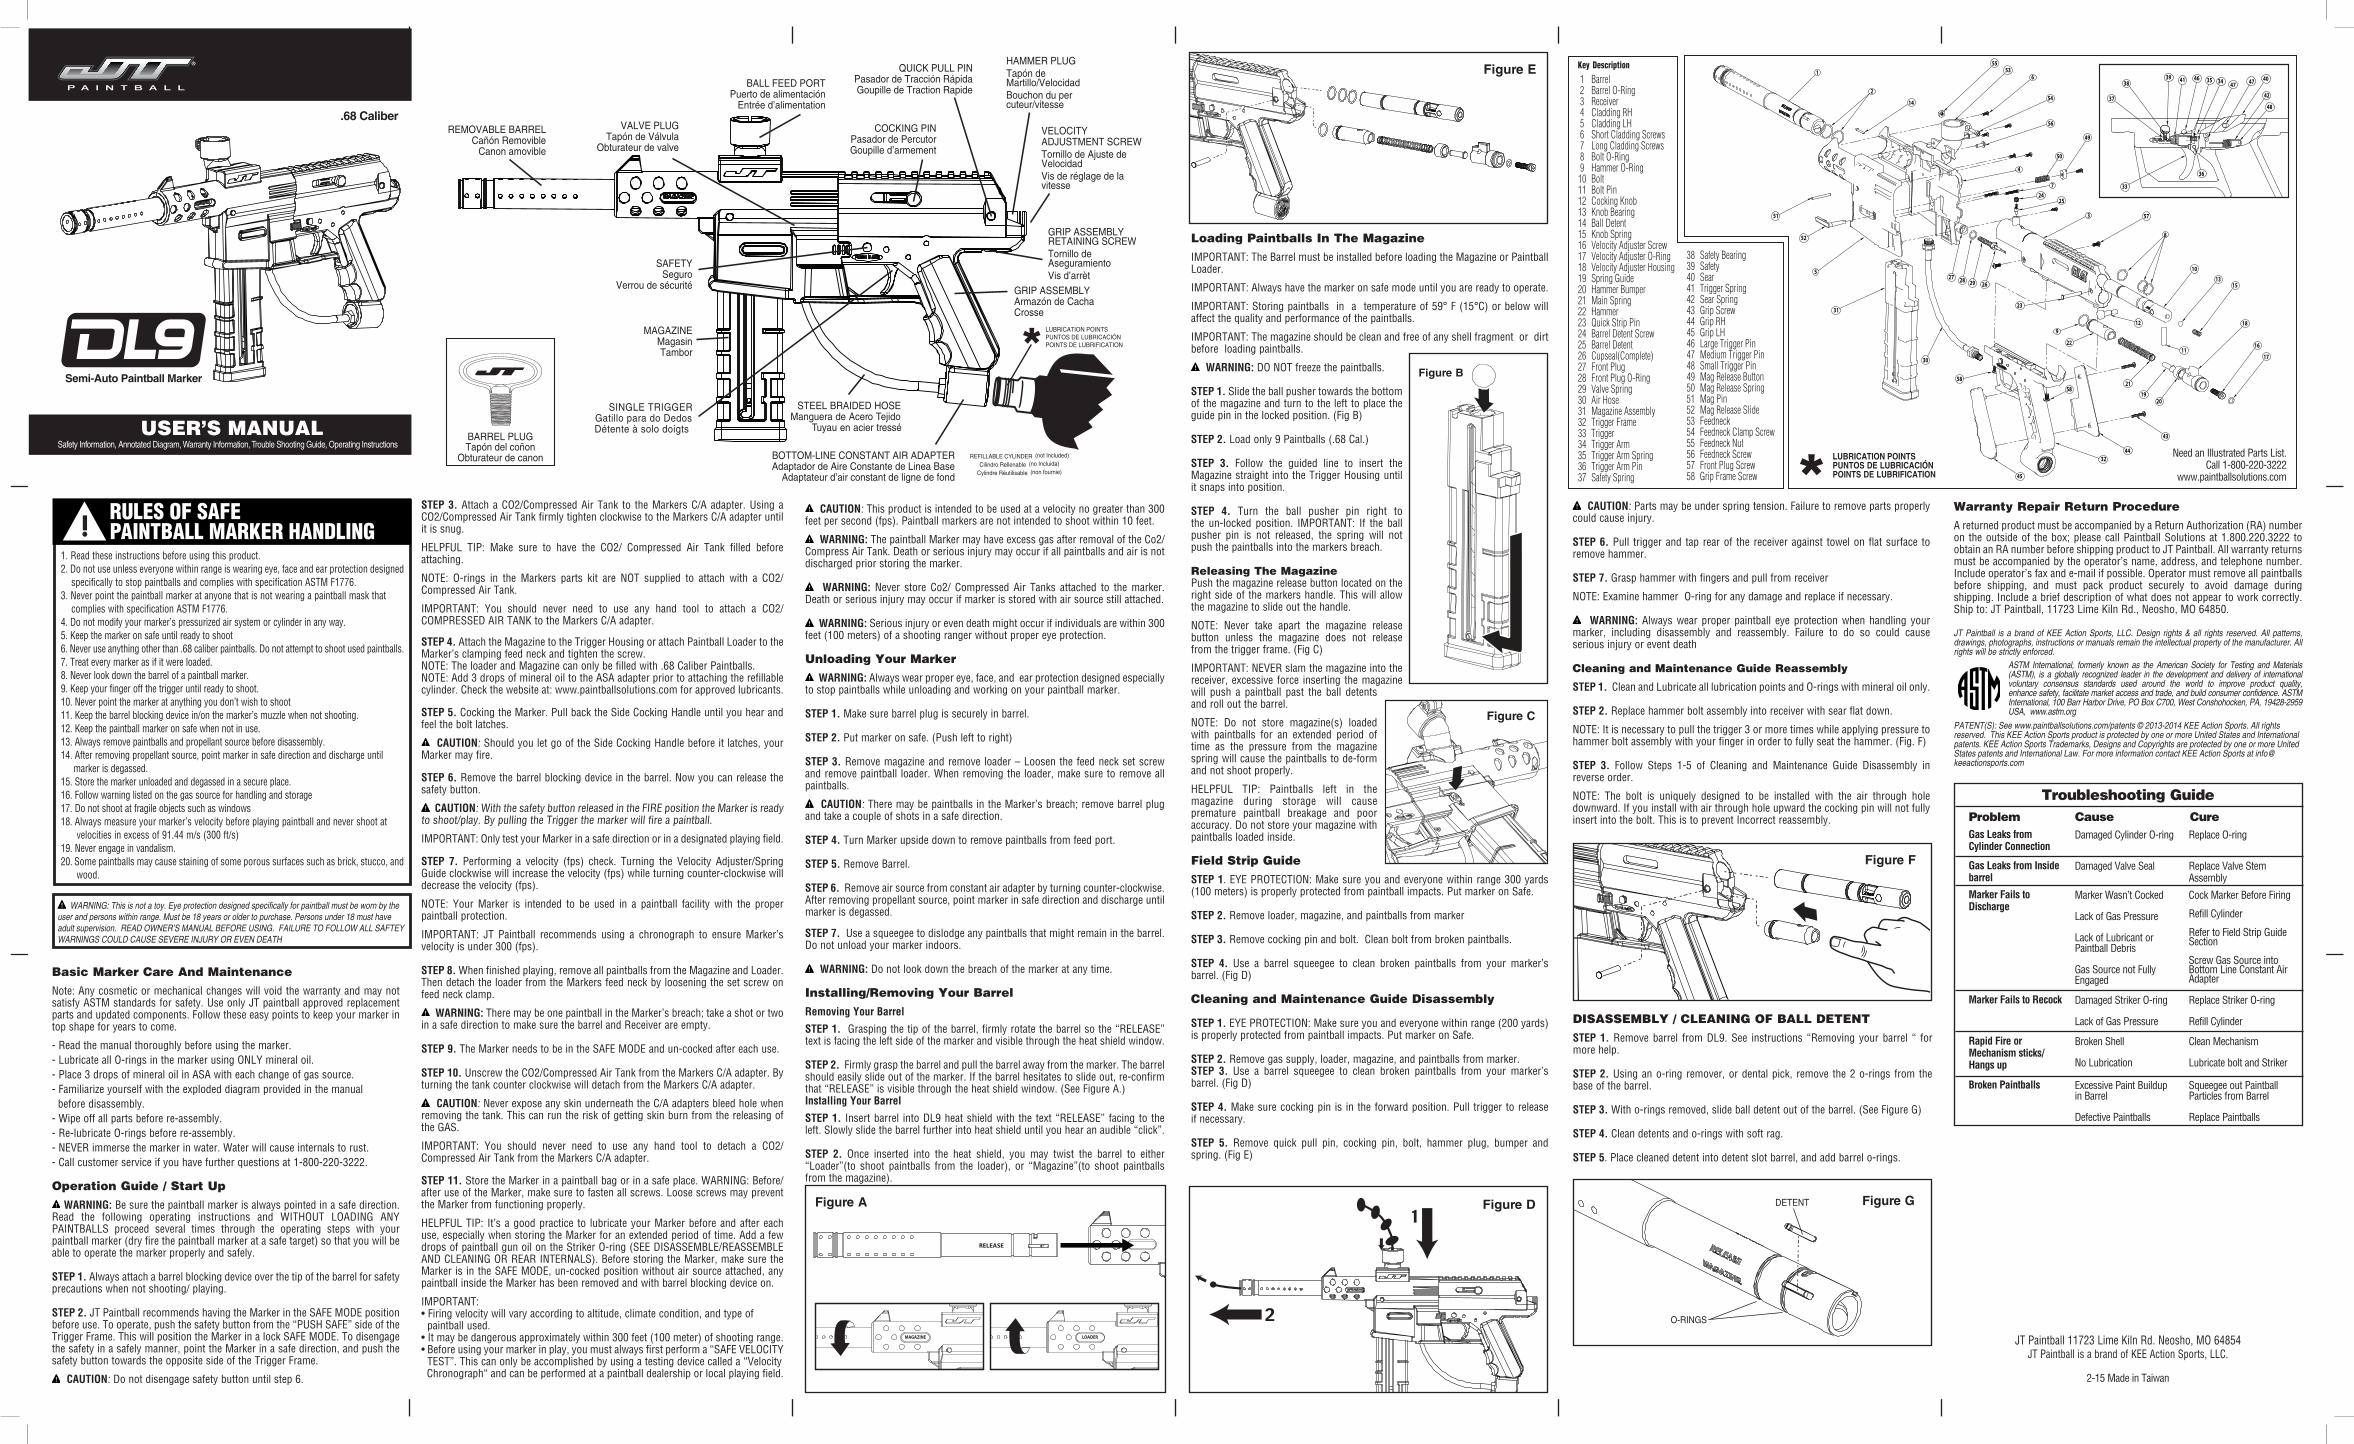
BarrelBarrel O-RingReceiverCladding RHCladding LHShort Cladding ScrewsLong Cladding Screws Bolt O-RingHammer O-RingBoltBolt PinCocking KnobKnob BearingBall DetentKnob SpringVelocity Adjuster ScrewVelocity Adjuster O-RingVelocity Adjuster HousingSpring GuideHammer BumperMain SpringHammerQuick Strip PinBarrel Detent ScrewBarrel DetentCupseal(Complete)Front PlugFront Plug O-RingValve SpringAir HoseMagazine AssemblyTrigger FrameTriggerTrigger ArmTrigger Arm SpringTrigger Arm PinSafety Spring
123456789
10111213141516171819202122232425262728293031323334353637
Safety BearingSafetySearTrigger SpringSear SpringGrip ScrewGrip RHGrip LHLarge Trigger PinMedium Trigger PinSmall Trigger PinMag Release ButtonMag Release SpringMag PinMag Release SlideFeedneckFeedneck Clamp ScrewFeedneck NutFeedneck ScrewFront Plug ScrewGrip Frame Screw
383940414243444546474849505152535455565758
1
2
14
31
52
51
50
49
2425
3
8
1315
18
16
17
2019
21
11
9
22
30
23
27 28 29 26
4
5
6
7
57
55
54
53
10
56
12
32
43
44
45
58
58
LUBRICATION POINTSPUNTOS DE LUBRICACIÓNPOINTS DE LUBRIFICATION
33
3435463938
37
47 47 40
42
48
36
41
Need an Illustrated Parts List. Call 1-800-220-3222
www.paintballsolutions.com
Figure A
RELEASE
LOADERMAGAZINE
Figure F
Figure D
.68 Caliber
USER’S MANUALSafety Information, Annotated Diagram, Warranty Information, Trouble Shooting Guide, Operating Instructions
Semi-Auto Paintball Marker
1. Read these instructions before using this product. 2. Do not use unless everyone within range is wearing eye, face and ear protection designed specifically to stop paintballs and complies with specification ASTM F1776.3. Never point the paintball marker at anyone that is not wearing a paintball mask that complies with specification ASTM F1776.4. Do not modify your marker’s pressurized air system or cylinder in any way.5. Keep the marker on safe until ready to shoot6. Never use anything other than .68 caliber paintballs. Do not attempt to shoot used paintballs.7. Treat every marker as if it were loaded.8. Never look down the barrel of a paintball marker.9. Keep your finger off the trigger until ready to shoot.10. Never point the marker at anything you don’t wish to shoot11. Keep the barrel blocking device in/on the marker’s muzzle when not shooting.12. Keep the paintball marker on safe when not in use.13. Always remove paintballs and propellant source before disassembly.14. After removing propellant source, point marker in safe direction and discharge until marker is degassed.15. Store the marker unloaded and degassed in a secure place.16. Follow warning listed on the gas source for handling and storage17. Do not shoot at fragile objects such as windows18. Always measure your marker’s velocity before playing paintball and never shoot at velocities in excess of 91.44 m/s (300 ft/s)19. Never engage in vandalism.20. Some paintballs may cause staining of some porous surfaces such as brick, stucco, and wood.
RULES OF SAFEPAINTBALL MARKER HANDLING
WARNING: This is not a toy. Eye protection designed specifically for paintball must be worn by the user and persons within range. Must be 18 years or older to purchase. Persons under 18 must have adult supervision. READ OWNER’S MANUAL BEFORE USING. FAILURE TO FOLLOW ALL SAFTEY WARNINGS COULD CAUSE SEVERE INJURY OR EVEN DEATH
Basic Marker Care And MaintenanceNote: Any cosmetic or mechanical changes will void the warranty and may not satisfy ASTM standards for safety. Use only JT paintball approved replacement parts and updated components. Follow these easy points to keep your marker in top shape for years to come.
- Read the manual thoroughly before using the marker.- Lubricate all O-rings in the marker using ONLY mineral oil.- Place 3 drops of mineral oil in ASA with each change of gas source.- Familiarize yourself with the exploded diagram provided in the manual before disassembly.- Wipe off all parts before re-assembly.- Re-lubricate O-rings before re-assembly.- NEVER immerse the marker in water. Water will cause internals to rust.- Call customer service if you have further questions at 1-800-220-3222.
Operation Guide / Start Up WARNING: Be sure the paintball marker is always pointed in a safe direction.
Read the following operating instructions and WITHOUT LOADING ANY PAINTBALLS proceed several times through the operating steps with your paintball marker (dry fire the paintball marker at a safe target) so that you will be able to operate the marker properly and safely.
STEP 1. Always attach a barrel blocking device over the tip of the barrel for safety precautions when not shooting/ playing.
STEP 2. JT Paintball recommends having the Marker in the SAFE MODE position before use. To operate, push the safety button from the “PUSH SAFE” side of the Trigger Frame. This will position the Marker in a lock SAFE MODE. To disengage the safety in a safely manner, point the Marker in a safe direction, and push the safety button towards the opposite side of the Trigger Frame.
CAUTION: Do not disengage safety button until step 6.
STEP 3. Attach a CO2/Compressed Air Tank to the Markers C/A adapter. Using a CO2/Compressed Air Tank firmly tighten clockwise to the Markers C/A adapter until it is snug.
HELPFUL TIP: Make sure to have the CO2/ Compressed Air Tank filled before attaching.
NOTE: O-rings in the Markers parts kit are NOT supplied to attach with a CO2/Compressed Air Tank.
IMPORTANT: You should never need to use any hand tool to attach a CO2/ COMPRESSED AIR TANK to the Markers C/A adapter.
STEP 4. Attach the Magazine to the Trigger Housing or attach Paintball Loader to the Marker’s clamping feed neck and tighten the screw.NOTE: The loader and Magazine can only be filled with .68 Caliber Paintballs.NOTE: Add 3 drops of mineral oil to the ASA adapter prior to attaching the refillable cylinder. Check the website at: www.paintballsolutions.com for approved lubricants.
STEP 5. Cocking the Marker. Pull back the Side Cocking Handle until you hear and feel the bolt latches.
CAUTION: Should you let go of the Side Cocking Handle before it latches, your Marker may fire.
STEP 6. Remove the barrel blocking device in the barrel. Now you can release the safety button.
CAUTION: With the safety button released in the FIRE position the Marker is ready to shoot/play. By pulling the Trigger the marker will fire a paintball.
IMPORTANT: Only test your Marker in a safe direction or in a designated playing field.
STEP 7. Performing a velocity (fps) check. Turning the Velocity Adjuster/Spring Guide clockwise will increase the velocity (fps) while turning counter-clockwise will decrease the velocity (fps).
NOTE: Your Marker is intended to be used in a paintball facility with the proper paintball protection.
IMPORTANT: JT Paintball recommends using a chronograph to ensure Marker’s velocity is under 300 (fps).
STEP 8. When finished playing, remove all paintballs from the Magazine and Loader. Then detach the loader from the Markers feed neck by loosening the set screw on feed neck clamp.
WARNING: There may be one paintball in the Marker’s breach; take a shot or two in a safe direction to make sure the barrel and Receiver are empty.
STEP 9. The Marker needs to be in the SAFE MODE and un-cocked after each use.
STEP 10. Unscrew the CO2/Compressed Air Tank from the Markers C/A adapter. By turning the tank counter clockwise will detach from the Markers C/A adapter.
CAUTION: Never expose any skin underneath the C/A adapters bleed hole when removing the tank. This can run the risk of getting skin burn from the releasing of the GAS.
IMPORTANT: You should never need to use any hand tool to detach a CO2/ Compressed Air Tank from the Markers C/A adapter.
STEP 11. Store the Marker in a paintball bag or in a safe place. WARNING: Before/after use of the Marker, make sure to fasten all screws. Loose screws may prevent the Marker from functioning properly.
HELPFUL TIP: It’s a good practice to lubricate your Marker before and after each use, especially when storing the Marker for an extended period of time. Add a few drops of paintball gun oil on the Striker O-ring (SEE DISASSEMBLE/REASSEMBLE AND CLEANING OR REAR INTERNALS). Before storing the Marker, make sure the Marker is in the SAFE MODE, un-cocked position without air source attached, any paintball inside the Marker has been removed and with barrel blocking device on.
IMPORTANT:• Firing velocity will vary according to altitude, climate condition, and type of paintball used. • It may be dangerous approximately within 300 feet (100 meter) of shooting range.• Before using your marker in play, you must always first perform a “SAFE VELOCITY TEST”. This can only be accomplished by using a testing device called a “Velocity Chronograph“ and can be performed at a paintball dealership or local playing field. 2-15 Made in Taiwan
JT Paintball 11723 Lime Kiln Rd. Neosho, MO 64854JT Paintball is a brand of KEE Action Sports, LLC.
COCKING PIN Pasador de Percutor Goupille d’armement
BALL FEED PORTPuerto de alimentación
Entrée d’alimentation
HAMMER PLUGTapón de Martillo/VelocidadBouchon du percuteur/vitesse
BOTTOM-LINE CONSTANT AIR ADAPTERAdaptador de Aire Constante de Linea Base
Adaptateur d’air constant de ligne de fond
STEEL BRAIDED HOSEManguera de Acero Tejido
Tuyau en acier tressé
GRIP ASSEMBLYArmazón de CachaCrosse
GRIP ASSEMBLYRETAINING SCREWTornillo deAseguramientoVis d’arrèt
SINGLE TRIGGERGatillo para do DedosDétente à solo doigts
VELOCITYADJUSTMENT SCREWTornillo de Ajuste de VelocidadVis de réglage de la vitesse
VALVE PLUGTapón de Válvula
Obturateur de valve
SAFETYSeguro
Verrou de sécurité
REFILLABLE CYLINDER (not Included)
Cilindro Rellenable (no Incluida)
Cylindre Réutilisable (non fournie)
QUICK PULL PINPasador de Tracción RápidaGoupille de Traction Rapide
LUBRICATION POINTSPUNTOS DE LUBRICACIÓNPOINTS DE LUBRIFICATION
MAGAZINEMagasinTambor
REMOVABLE BARRELCañón Removible
Canon amovible
BARREL PLUGTapón del coñon
Obturateur de canon
JT Paintball is a brand of KEE Action Sports, LLC. Design rights & all rights reserved. All patterns, drawings, photographs, instructions or manuals remain the intellectual property of the manufacturer. All rights will be strictly enforced.
ASTM International, formerly known as the American Society for Testing and Materials (ASTM), is a globally recognized leader in the development and delivery of international voluntary consensus standards used around the world to improve product quality, enhance safety, facilitate market access and trade, and build consumer confidence. ASTM International, 100 Barr Harbor Drive, PO Box C700, West Conshohocken, PA, 19428-2959 USA, www.astm.org
PATENT(S): See www.paintballsolutions.com/patents © 2013-2014 KEE Action Sports. All rights reserved. This KEE Action Sports product is protected by one or more United States and International patents. KEE Action Sports Trademarks, Designs and Copyrights are protected by one or more United States patents and International Law. For more information contact KEE Action Sports at [email protected]
Warranty Repair Return ProcedureA returned product must be accompanied by a Return Authorization (RA) number on the outside of the box; please call Paintball Solutions at 1.800.220.3222 to obtain an RA number before shipping product to JT Paintball. All warranty returns must be accompanied by the operator’s name, address, and telephone number. Include operator’s fax and e-mail if possible. Operator must remove all paintballs before shipping, and must pack product securely to avoid damage during shipping. Include a brief description of what does not appear to work correctly. Ship to: JT Paintball, 11723 Lime Kiln Rd., Neosho, MO 64850.
ProblemGas Leaks from Cylinder Connection
Damaged Cylinder O-ring Replace O-ring
Gas Leaks from Inside barrel
Damaged Valve Seal Replace Valve Stem Assembly
Marker Fails to Recock Damaged Striker O-ring
Lack of Gas Pressure
Replace Striker O-ring
Refill Cylinder
Marker Fails to Discharge
Marker Wasn’t Cocked
Lack of Gas Pressure
Lack of Lubricant or Paintball Debris
Gas Source not Fully Engaged
Cock Marker Before Firing
Refill Cylinder
Refer to Field Strip Guide Section
Screw Gas Source into Bottom Line Constant Air Adapter
Troubleshooting GuideCause Cure
Rapid Fire or Mechanism sticks/ Hangs up
Broken Shell
No Lubrication
Clean Mechanism
Lubricate bolt and Striker
Broken Paintballs Excessive Paint Buildup in Barrel
Defective Paintballs
Squeegee out Paintball Particles from Barrel
Replace Paintballs
DETENT
O-RINGS
Figure G
Figure C
CAUTION: Parts may be under spring tension. Failure to remove parts properly could cause injury.
STEP 6. Pull trigger and tap rear of the receiver against towel on flat surface to remove hammer.
STEP 7. Grasp hammer with fingers and pull from receiver
NOTE: Examine hammer O-ring for any damage and replace if necessary.
WARNING: Always wear proper paintball eye protection when handling your marker, including disassembly and reassembly. Failure to do so could cause serious injury or event death
Cleaning and Maintenance Guide Reassembly
STEP 1. Clean and Lubricate all lubrication points and O-rings with mineral oil only.
STEP 2. Replace hammer bolt assembly into receiver with sear flat down.
NOTE: It is necessary to pull the trigger 3 or more times while applying pressure to hammer bolt assembly with your finger in order to fully seat the hammer. (Fig. F)
STEP 3. Follow Steps 1-5 of Cleaning and Maintenance Guide Disassembly in reverse order.
NOTE: The bolt is uniquely designed to be installed with the air through hole downward. If you install with air through hole upward the cocking pin will not fully insert into the bolt. This is to prevent Incorrect reassembly.
Figure B
Figure E
ProblémeLL y aune fuite de gaz a une niveau de connecteur de cylindre
L’anneau torique est endommagé usé
Remplacez L’anneau
LL y aune fuite de gaz dans le canon
Joint d’étanchéité endommagé
Remplacer le corps de soupape
Le lanceur ne se réarme pas
Joint torique du percuteur
La pression du gaz est insuffisante
Remplacez l’anneau la culasse
Recharge cylindre d’air ou remplacez le cylindre de CO2
Le lanceur ne see décharge pas
Le lanceur n’est pas arme
La pression du gaz est insuffisante
manque de lubrifiant ou débris de billes de peinture
Le source d’alimentation en gaz est mal installée
Armez le lanceur avant d e tirer
Remplissez le cyilindre de CO2
Voir la partie Régles de sécurité pour l’utilisation
Visser la source d’alimentation de gaz sur l’adaptateur d’air constant de ligne de fond
Guide De DépannageCausa Solution
Le tir rapide ou le mécanisme se grippe ou se bloque
Ne pas graisser
Projectile brisé
Graisser la culasse et le percuteur
Nettoyer le mécanisme
Billes creevent Accumulation excessives de peinture dans le canon
Billes sont défectueuses
Nettoyez le canon
Remplacez les billes
JT Paintball est une marque de KEE Action Sports, LLC. Droits de Design & Tous droits réservés. Tous les modèles, dessins, photographies, instructions ou les guides restent la propriété intellectuelle du fabricant. Tous droits seront strictement appliquées.
ASTM International, anciennement connue sous le nom American Society for Testing and Materials (ASTM), est un leader mondialement reconnu dans le développement et la livraison de normes consensuelles volontaires internationaux utilisés dans le monde pour améliorer la qualité des produits, améliorer la sécurité, faciliter l’accès au marché et le commerce, et renforcer la confiance des consommateurs. ASTM International, 100 Barr Harbor Drive, PO Box C700, West Conshohocken, PA, 19428-2959 États-Unis, www.astm.org
BREVET(S): consultez www.paintballsolutions.com/patents © 2013-2014 KEE Action Sports. Tous droits réservés. Ce produit KEE Action Sports est protégé par un ou plusieurs brevets aux Etats-Unis et dans le monde. Les logos, marques et copyrights KEE Action Sports sont protégés par un ou plusieurs brevets aux Etats-Unis ou lois internationales. Pour plus d’informations, contactez KEE Action Sports à [email protected]
ProblemaFuga de gas en la conexión de la cilidro
Anillo de caucho de la cilindro Dañado
Reemplace el anillo de caucho
Fuga de gas dentro de Cañón
Sello de Válvula Dañado Reemplace el cuerpo de la válvula
La pistola no se amartilla
Aro tórico dañado en el percutor
Falta de presión de gas
Reemplace el aro tórico de percutor
Rellene o cambie la botella o el
La Pistola no Dispara La Pistola no estáAmartillada
Falta de Presión de Gas
Falta de lubricante o partículas de bolas de pintura
La fuente de gas no Está conectada correctamente
Amartille la Pistola antes de Disparar
Rellene o cambie la botella o el cilindro de CO2
Vea la sección Guía de limpieza en el campo
Fuente de gas del tornillo en la línea base adaptador de aire constante
Guía De SoluciónCausa Solución
El disparo rápido o el mecanismo se pega o se cuelga
Cartucho roto
Falta lubricación
Limpie el mecanismo
Lubrique el cerrojo y el percutor
Paintballs se rompen Acumulación excesiva de pintura en el cañón
Paintballs defectuosas
Limpie la pintura del Cañón
Reemplace las paintballs
Marcadora de Paintball DL9 Semi-Automática Calibre .68Información de Seguridad, Diagrama Anotado, Información de garantía,
Guía de solución de problemas, Instrucciones de funcionamiento.
Marqueur de Paintball semi-automatique DL9 de calibre .68Informations de sécurité, Diagramme annoté, Informations de garantie,
Guide de résolution des problèmes, Instructions d’utilisation
Guía de uso / Encendido
ADVERTENCIA: Asegúrese de que la marcadora de paintball esté siempre apuntando en una dirección segura. Lea las siguientes instrucciones de operación y sin cargar las BALAS DE PINTURA siga varias veces los pasos de trabajo con su marcadora de paintball (dispare la pistola en seco a un blanco seguro) para que pueda operar la marcadora de forma adecuada y segura.
PASO 1. Siempre conecte un dispositivo de bloqueo de cañón sobre la punta del cañón por precauciones de seguridad cuando no esté disparando / jugando.
PASO 2. JT Paintball recomienda mantener la marcadora en la posición SAFE MODE antes de su uso. Para hacerla funcionar, presione el botón de seguridad del lado “PUSH SAFE” del gatillo. Esto pondrá la marcadora en un modo seguro de bloqueo. Para desactivar el botón de seguridad de una manera segura, apunte la marcadora hacia una dirección segura, y presione el botón de seguridad hacia el lado opuesto del gatillo.
PRECAUCIÓN: No desenganche el botón de seguridad hasta el paso 6.
PASO 3. Coloque un Tanque de aire comprimido/ CO2 al adaptador C / A de la marcadora. Usando un Tanque de Aire Comprimido/CO2 firmemente ajustado en el sentido horario al adaptador C / A de la marcadora hasta que quede ajustado.
CONSEJO: Asegúrese de tener el tanque de Aire Comprimido/ CO2 lleno antes de conectar.
NOTA: los anillos en el juego de piezas de la marcadora NO están provistos para conectarse a un tanque de Aire Comprimido /CO2.
IMPORTANTE: Nunca debería ser necesario utilizar cualquier herramienta de mano para fijar un tanque de Aire Comprimido/ CO2 al adaptador C / A de la marcadora.
PASO 4. Conecte el Tambor al armazón del Gatillo o conecte el Cargador de Paintball al adaptador del alimentador de la marcadora y ajuste el tornillo.NOTA: El cargador y el tambor sólo se pueden llenar con balas de pintura calibre .68NOTA: Añadir 3 gotas de aceite mineral al adaptador ASA antes de instalar el cilindro recargable. Visite el sitio Web en: Www.paintballsolutions.com para ver los lubricantes aprobados.
PASO 5. Amartille la marcadora. Tire hacia atrás la manija lateral del martillo hasta que oiga y sienta los pestillos de los pernos.
PRECAUCIÓN: Si soltara la manija lateral del martillo antes de que se enganche, la marcadora podría dispararse.
PASO 6. Retire el dispositivo de bloqueo del cañón. Ahora puede soltar el botón de seguridad.
PRECAUCIÓN: Con el botón de seguridad desactivado en la posición de DISPARO la Marcadora está lista para disparar / jugar. Al tirar del gatillo de la marcadora se disparará una bala de pintura.
IMPORTANTE: Sólo probar la marcadora en una dirección segura o en un campo de juego designado.
PASO 7. Ejecute un chequeo de velocidad (pies por segundo). Gire el controlador de Velocidad / Guía de resorte en sentido horario aumentará la velocidad (pies por segundo) mientras que si lo gira en sentido anti-horario disminuirá la velocidad (pies por segundo)
NOTA: Su Marcadora está destinada para su uso en una instalación de paintball con la protección paintball adecuada.
IMPORTANTE: JT Paintball recomienda el uso de un cronógrafo para asegurar que la velocidad de la Marcadora esté bajo 300 (pies por segundo).
PASO 8. Cuando termine de jugar, elimine todas las balas de pintura del Tambor y Cargador. A continuación, extraiga el cargador del adaptador del alimentador de la marcadora aflojando el tornillo de la abrazadera del adaptador del alimentador.
PRECAUCIÓN: Puede haber una bala de pintura en la entrada de cañón de la Marcadora; dispare una o dos veces en una dirección segura para asegurarse de que el barril y el receptor estén vacíos.
Guide d’utilisation / commencement
ATTENTION : Assurez-vous que le marqueur soit toujours pointé dans une direction sûre. Lisez les consignes d’utilisation suivantes et procédez plusieurs fois aux différentes étapes SANS CHARGER DE BILLES (tirez à blanc vers une cible sûre) afin de vous assurer d’être capable de bien utiliser le marqueur.
ÉTAPE 1. Attachez toujours un dispositif de blocage du canon par mesure de sécurité lorsque vous n’êtes pas sur le terrain.
ÉTAPE 2. JT Paintball recommande d’avoir le marqueur en position SÉCURITÉ avant de l’utiliser. Pour l’utiliser, poussez le bouton de sécurité depuis le côté “PUSH SAFE” du cadre du déclencheur. Cela mettra le marqueur en MODE SÉCURITÉ verrouillé. Pour désengager le bouton de sûreté de façon sécuritaire, pointez le marqueur dans une direction sûre et poussez le bouton de sécurité de l’autre côté du cadre du déclencheur.
ATTENTION : Ne désengagez pas le bouton de sûreté avant l’étape 6.
ÉTAPE 3. Branchez un réservoir de CO2 / air comprimé sur le marqueur. Serrez-le fermement dans le sens des aiguilles d’une montre jusqu’à ce qu’il soit bien ajusté.
CONSEIL PRATIQUE : Assurez-vous que le réservoir de CO2 / air comprimé soit bien rempli avant de l’attacher.
NOTE : Les joints toriques ne sont PAS fournis pour le réservoir de CO2 / air comprimé.
IMPORTANT : Vous devriez ne jamais devoir utiliser un outil pour attacher un RÉSERVOIR D’AIR COMPRIMÉ OU DE CO2 sur le marqueur.
ÉTAPE 4. Attachez le magasin au logement de déclenchement ou attachez le chargeur de billes au cou d’alimentation du marqueur et serrez la vis.NOTE : Le chargeur et le magasin peuvent être remplis de billes de calibre 0.68 seulement.NOTE : Ajoutez 3 gouttes d’huile minérale à l’adaptateur d’ASA avant d’attacher le cylindre réutilisable. Visitez le site www.paintballsolutions.com pour une liste des lubrifiants approuvés.
ÉTAPE 5. Armer le marqueur. Retirez la poignée de d’armement latérale jusqu’à ce que vous entendiez et sentiez les fermetures à pêne.
ATTENTION : Si vous relâchez la poignée d’armement avant qu’elle ne s’engage, votre marqueur peut tirer.
ÉTAPE 6. Enlevez le dispositif de blocage du canon. Vous pouvez maintenant enlever le bouton de sécurité.
ATTENTION : Lorsque le bouton de sécurité est en position FEU, le marqueur est prêt à tirer. En appuyant sur la gâchette, le marqueur tirera une bille.
IMPORTANT : Testez seulement votre marqueur vers une direction sécuritaire ou sur un terrain approprié.
ÉTAPE 7. Faire un contrôle de vitesse (fps). Tourner le ressort d’ajustement de la vitesse dans le sens des aiguilles d’une montre augmentera la vitesse (fps) et la réduira dans l’autre sens.
NOTE : Votre marqueur est conçu pour être utilisé sur un terrain de paintball avec les protections adéquates.
IMPORTANT : JT Paintball recommande d’utiliser une chronographe pour vous assurer que la vitesse du marqueur soit bien en dessous de 300 (fps).
ÉTAPE 8. Une fois la partie terminée, enlevez toutes les billes du magasin et du chargeur. Détachez alors le chargeur du cou d’alimentation du marqueur en détachant la vis de réglage sur la bride du cou d’alimentation.
ATTENTION : Il peut y avoir une bille dans la culasse du marqueur ; tirez une fois ou deux dans une direction sécuritaire pour vous assurer que le canon soit bien vide.
ÉTAPE 9. Placez le dispositif de blocage du canon. Cela permettra d’éviter un tir accidentel.
STEP 10. JT Paintball recommande d’avoir le marqueur en MODE SÉCURITÉ et désarmé
PASO 9.Coloque el dispositivo bloqueador del cañón sobre la punta de cañón. Esto ayudará a evitar cualquier descarga accidental.
PASO 10. JT Paintball recomienda tener la marcadora en modo seguro y posición deshabilitada después de su uso.
PASO 11. Destornille el tanque de Aire Comprimido / CO2 del adaptador C / A de la Marcadora. Al girar el tanque de las agujas del reloj se desprenderá del adaptador C / A de la Marcadora.
PRECAUCIÓN: Nunca exponga la piel debajo del agujero del respiradero de los adaptadores C / A al retirar el tanque. Esto puede tener el riesgo de tener quemaduras en la piel por la liberación del GAS.
IMPORTANTE: Nunca debería ser necesario utilizar una herramienta de mano para separar tanque de Aire Comprimido /CO2 del adaptador C / A de la Marcadora.
PASO 12. Guarde la marcadora en una bolsa de paintball o en un lugar seguro. ADVERTENCIA: Antes / después de usar la marcadora, asegúrese de fijar todos los tornillos. Los tornillos flojos pueden causar que la marcadora no funcione correctamente.
CONSEJO: Es una buena práctica lubricar la marcadora antes y después de cada uso, especialmente para conservar la marcadora por un período prolongado de tiempo. Añadir unas gotas de aceite en el anillo delantero (VER DESMONTAJE / MONTAJE Y LIMPIEZA O CULATA INTERNA). Antes de guardar la marcadora, asegúrese de que esté en el modo seguro, posición deshabilitada sin fuente de aire adjunto, y que cualquier bala de pintura de dentro de la marcadora se ha eliminado y que el dispositivo de bloqueo en el barril está funcionando.
IMPORTANTE: • La velocidad de disparo pueden variar de acuerdo a la altitud, condición climática, y el tipo de bala de pintura utilizada. • Puede ser peligroso aproximadamente dentro de 300 pies (100 metros) del campo de tiro.• Antes de poner la marcadora en juego, usted debe siempre realizar “una PRUEBA DE VELOCIDAD SEGURA”. Esto sólo se puede lograr mediante el uso de un dispositivo de prueba denominado un “Cronógrafo de Velocidad” y se puede realizar en un concesionario de paintball o en el campo de juego local.
Nota: Este producto está destinado para ser utilizado a una velocidad no mayor de 300 pies por segundo (pies por segundo ). Las Marcadoras de paintball no están destinadas a disparar dentro de los 30 pies.
• Esta pistola puede tener exceso de gas después de la eliminación del tanque de Aire Comprimido / CO2. Por favor, elimine todas las balas de pintura y descargue el gas restante con seguridad. • Nunca guarde un tanque de Aire Comprimido / CO2 junto con la marcadora.
ADVERTENCIA: Nunca dispare a nadie sin el equipo de protección adecuado para los ojos, el que deberán llevar consigo en todo momento. La protección de los ojos debe estar diseñada específicamente para paintball. Si no se siguen estas precauciones de seguridad pueden ocurrir lesiones corporales, tales como ceguera y sordera.
ADVERTENCIA: Todas las marcadoras de paintball se consideran cargadas hasta que se demuestre que están descargadas siguiendo los pasos para descargar su Marcadora.
Descargando Su Marcadora
ADVERTENCIA: Siempre use protección adecuada para los ojos, cara y orejas diseñada especialmente para detener las balas de pintura durante la descarga y trabajar en su marcadora de paintball.
PASO 1. Verifique que el enchufe del cañón esté seguro en el barril.
PASO 2. Ponga la marcadora en lugar seguro. (Presione izquierda a derecha)
PASO 3. Retire el cargador - Afloje el tornillo del adaptador del alimentador y retire el cargador de balas de pintura. Al retirar el cargador, asegúrese de retirar todas las balas de pintura.
PRECAUCIÓN: Es posible que haya bolas de pintura en el cañón de la Marcadora, quite el tapón del cañón y haga un par de tiros en una dirección segura.
après utilisation.
ÉTAPE 11. Dévissez le réservoir d’air comprimé / CO2 de l’adaptateur. Tourner le réservoir dans le sens inverse des aiguilles d’une montre permettra de le détacher.
ATTENTION : N’exposez jamais de la peau sous le trou de purge d’air alors que vous démonter le réservoir. Cela peut augmenter le risque de brûlure après la purge des GAZ.
IMPORTANT : Vous ne devez jamais utiliser d’outils pour détacher un réservoir de CO2 / air comprimé du marqueur.
ÉTAPE 12. Stockez le marqueur dans un sac de paintball ou dans un endroit sûr. ATTENTION : Assurez-vous de bien serrer tous les vis avant et après utilisation du marqueur. Les vis lâches peuvent empêcher le marqueur de fonctionner correctement.
CONSEIL PRATIQUE : Il est bon de lubrifier votre marqueur avant et après chaque utilisation, en particulier lorsque vous stockez votre marqueur pendant longtemps. Ajoutez quelques gouttes d’huile spéciale paintball sur le joint torique du percuteur (VOIR LA SECTION DÉMONTAGE / REMONTAGE ET ENTRETIEN, OU LES PIÈCES INTERNES ARRIÈRES). Avant de stocker le marqueur, assurez-vous qu’il soit en MODE SECURITE, désarmé et sans source d’air joint, que toutes les billes à l’intérieur du marqueur aient été enlevées et qu’un dispositif de blocage du canon soit en place.
IMPORTANT :• La vitesse de tir changera selon l’altitude, les conditions climatiques, et le type de billes utilisées. • Il peut être dangereux à moins de 300 pieds (100 mètres) de la portée de tir.• Avant d’utiliser votre marqueur sur le terrain, vous devez toujours lancer un “TEST DE VITESSE SÉCURITAIRE”. Cela ne peut être fait qu’en utilisant un appareil de test appelé “chronographe de vitesse” et peut être effectué chez un revendeur local ou sur un terrain local.
NOTE : Ce produit est conçu pour être utilisé à une vitesse ne dépassant pas les 300 pieds par seconde (fps). Les marqueurs de paintball ne sont pas conçus pour être utilisés à moins de 30 pieds.
• Ce marqueur de paintball peut contenir des résidus de gaz après avoir enlevé le réservoir de CO2 / air comprimé. Veuillez enlever toutes les billes et décharger le gaz restant de façon sécuritaire.• Ne stockez jamais un marqueur avec le réservoir de CO2 / air comprimé attaché.
ATTENTION : Ne tirez jamais vers quelqu’un sans une protection oculaire adaptée, qui doit être portée en tout temps. Cette protection oculaire doit avoir été conçue spécifiquement pour le paintball. Un manquement à ces précautions de sécurité peut entraîner des blessures, comme l’aveuglement ou la surdité.
ATTENTION : Tous les marqueurs de paintball sont considérés comme chargés jusqu’à ce qu’ils aient été prouvés comme déchargés par les étapes de déchargement suivantes.
Décharger votre marqueur
ATTENTION : Portez toujours des protections oculaires, du visage et des oreilles adaptées et conçues spécifiquement pour arrêter les billes de paintball dès que vous déchargez ou travaillez sur votre marqueur de paintball.
ÉTAPE 1. Assurez-vous que la capote à canon soit bien en place.
ÉTAPE 2. Mettez le marqueur en position de sécurité. (Poussez de la gauche vers la droite)
ÉTAPE 3. Enlevez le chargeur - détachez la vis de réglage du cou d’alimentation et enlevez le chargeur de paintball. En enlevant le chargeur, veillez à enlever toutes les billes.
ATTENTION : Il peut y avoir des paintballs dans la culasse du marqueur ; enlevez la capote à canon et tirez quelques fois dans une direction sécuritaire.
ÉTAPE 4. Retournez le marqueur pour enlever les billes du port d’alimentation.
ÉTAPE 5. Enlevez le canon.
ÉTAPE 6. Enlevez la source d’air de l’adaptateur d’air constant en tournant dans le sens
PASO 4. Coloque la Marcadora boca abajo para eliminar las balas de pintura del puerto de alimentación.
PASO 5. Retire el barril.
PASO 6. Retire la fuente de aire del adaptador de aire constante girando en sentido anti-horario. Después de retirar la fuente propulsora, apunte la marcadora en dirección segura y descargue hasta que la marcadora se desgasifique.
PASO 7. Utilice una escobilla de goma para remover las balas de pintura que hayan quedado en el barril. No descargue su marcador en el interior.
ADVERTENCIA: No mire por el cañón de la marcadora en ningún momento.
Instalación / extrayendo el barril
Extrayendo el Barril
PASO 1. Sujetando la punta del barril, gire con firmeza el barril de forma que el texto “RELEASE” quede en el lado izquierdo de la marcadora y visible a través de la ventana del escudo térmico.
PASO 2. Sostenga firmemente el cañón y tire del barril de la marcadora. El barril debe deslizarse fácilmente hacia fuera de la marcadora. Si el barril demora en deslizarse fuera, vuelva a confirmar que “RELEASE” sea visible a través de la ventana del escudo térmico. (Ver Figura A.)
Instalación del barril
PASO 1. Inserte el barril en el escudo térmico DL9 con el texto “RELEASE” mirando hacia la izquierda. Deslice lentamente el cañón hacía el escudo térmico hasta que haya un “clic” audible.
PASO 2. Una vez insertado en el escudo térmico, gire el barril ya sea hacia el “Cargador” (para disparar balas de pintura desde el cargador), o el “Tambor” (para disparar balas de pintura del tambor)
Cargando balas de pintura en el Tambor
IMPORTANTE: El barril debe estar instalado antes de cargar el Tambor o Cargador de Paintball.
IMPORTANTE: Siempre tenga el marcador en modo seguro hasta que esté listo para operar.
IMPORTANTE: Almacenar las balas de pintura a una temperatura de 59 °F (15 °C) o de lo contrario se afectará la calidad y el rendimiento de las balas de pintura
IMPORTANTE: El Tambor debe estar limpio y libre de cualquier fragmento de proyectil o suciedad antes de cargar las balas de pintura.
ADVERTENCIA: NO congele las bolas de pintura.
PASO 1. Deslice el propulsor de bala hacia la parte inferior del Tambor y gire a la izquierda para colocar el pasador en la posición de bloqueo. (Figura B)
PASO 2. Cargue sólo 9 balas de pintura (0,68 Cal.)
PASO 3. Siga la línea guía para insertar el Tambor directamente en el armazón del gatillo hasta que encaje en su posición.
PASO 4. Gire el perno del propulsor de bala directamente a la posición de desbloqueo. IMPORTANTE: Si no se suelta el propulsor de bala, el resorte no empujará las balas de pintura al cañón de la Marcadora.
Liberando el TamborPulse el botón de liberación del cargador situado en el lado derecho de la marcadora. Esto permitirá que el tambor se deslice hacia afuera el mango.
NOTA: Nunca desmonte el botón de liberación del cargador a menos que el tambor no se suelte del marco del gatillo. (Figura C)
contraire des aiguilles d’une montre. Après avoir enlevé la source d’air, pointez le marqueur dans une direction sécuritaire et dégazez-le.
ÉTAPE 7. Utilisez une racle pour déloger toutes les billes qui pourraient rester dans le canon. Ne déchargez pas votre marqueur à l’intérieur.
ATTENTION : Ne regardez jamais dans le canon.
Installer / enlever votre canon
Enlever votre canon
ÉTAPE 1. En saisissant son bout, tournez fermement le canon jusqu’à ce que le texte “RELEASE” soit face au côté gauche du marqueur et soit visible dans la fenêtre du bouclier thermique. ÉTAPE 2.Saisissez fermement le canon et enlevez-le du marqueur. Le canon devrait facilement glisser hors du marqueur. Si le canon ne sort pas facilement, vérifiez bien que “RELEASE” soit visible dans la fenêtre du bouclier thermique. (Voir la figure A.)
Installer votre canon ÉTAPE 1. Insérez le baril dans le bouclier thermique du DL9 avec le texte “RELEASE” vers la gauche. Faites glisser lentement le canon dans le bouclier thermique jusqu’à ce que vous entendiez un “clic”. ÉTAPE 2. Une fois inséré dans le bouclier thermique, vous pouvez faire tourner le canon sur “Loader” (pour tirer des billes depuis le chargeur) ou “Magasin” (pour tirer depuis le magasin).
Charger des billes dans le magasin
IMPORTANT: Le canon doit être installé avant de charger le chargeur ou le magasin.
IMPORTANT: Le marqueur doit toujours être en mode sécurité jusqu’à ce que vous soyez prêt à l’utiliser.
IMPORTANT: Stocker les billes à une température de moins de 59°F (15°C) peut affecter leur qualité et performances.
IMPORTANT: Le magasin doit être propre et libre de tous fragments de coques de billes ou de saleté avant de charger des billes.
ATTENTION : Ne gelez pas les billes.
ÉTAPE 1. Glissez le poussoir à billes vers le bas du magasin et tournez-le vers la gauche pour placer le guide en position verrouillée. (Fig B)
ÉTAPE 2. Chargez seulement 9 billes (calibre 0.68)
ÉTAPE 3. Suivez la ligne pour insérez le magasin directement dans l’emplacement jusqu’à ce qu’il se verrouille en position.
ÉTAPE 4. Tournez la goupille du poussoir jusqu’en position débloquée. IMPORTANT : Si la goupille du poussoir n’est pas libérée, le ressort ne poussera pas les billes dans la culasse du marqueur.
Libérer le magasinPoussez le bouton de dégagement du magasin situé du côté droit de la poignée du marqueur. Ceci permettra au magasin de glisser en dehors de la poignée.
NOTE : Ne démontez jamais le bouton de dégagement du magasin à moins que le magasin ne se libère pas du déclencheur. (Fig C)
IMPORTANT : Ne claquez JAMAIS le magasin dans le récepteur, la force excessive en insérant le magasin poussera une bille après la détente et en dehors du canon.
NOTE : Ne stockez pas les magasins chargés avec des billes pendant une période prolongée
IMPORTANTE: NUNCA cierre el tambor en el receptor, la fuerza excesiva al insertar el cargador presionará una bala de pintura más allá de los retenes de la bola y deslizará el barril.
NOTA: No guarde el (los) tambor (s) cargado con balas de pintura durante un período prolongado de tiempo ya que la presión del muelle del cargador hará que las balas de pintura se deformen y no dispare correctamente.
CONSEJO: No se recomienda el uso de las balas de pintura que se han dejado por un período de tiempo o podrá experimentar la rotura prematura del paintball y poca precisión.
Guía de Desarme
PASO 1. PROTECCIÓN DE LOS OJOS: Asegúrese de que usted y todos dentro del rango (200 yardas) estén debidamente protegidos de los impactos de la bala de pintura. Ponga la marcadora con el Seguro.
PASO 2. Retire el cargador y balas de pintura de la Marcadora.
PASO 3. Retire el perno de armado y el tornillo. Limpie el perno de las bolas de pintura rotas.
PASO 4. Utilice una escobilla de goma para limpiar el barril de las balas rotas desde el cañón de su marcadora. (Figura D)
Limpieza y Guía de Mantenimiento de Desensamblaje
PASO 1. PROTECCIÓN DE LOS OJOS: Asegúrese de que usted y todos dentro del rango (200 yardas) estén debidamente protegidos de los impactos de la bala de pintura. Ponga la marcadora con el Seguro.
PASO 2. Retire el suministro de gas, cargador y balas de pintura de la marcadora.
PASO 3. Utilice una escobilla de goma para limpiar el barril las balas de pintura rotas desde del cañón de su marcadora. (Fig. D)
PASO 4. Asegúrese de que el pasador del martillo esté en posición hacia delante. Oprima el gatillo para liberar de ser necesario.
PASO 5. Retire el pasador de extracción rápido, el pasador del martillo, tapón del martillo, clavija martillo, protector y resorte. (Fig. E)
NOTA: Tenga cuidado al retirar todas las piezas que están bajo la tensión del resorte.
PASO 6. Jale el gatillo y apoye la parte posterior del receptor en una toalla sobre una superficie plana para quitar el martillo
PASO 7. Sujete el martillo con los dedos y tire del receptor.
NOTA: Examine el anillo del martillo para identificar cualquier daño y reemplace de ser necesario.
Limpieza y Guía de Mantenimiento Re-ensamblaje
PASO 1. Limpie y lubrique todos los puntos de lubricación y los anillos solo con aceite mineral.
PASO 2. Reemplace el tornillo del martillo en el receptor de forma plana.
NOTA: Es necesario apretar el gatillo 3 veces o más, mientras aplica presión al tornillo del martillo con el dedo, con el fin de asentar completamente el martillo. (Fig. F)
PASO 3. Siga los pasos 1-5 de Limpieza y Guía de Mantenimiento desensamblaje en orden inverso.
NOTA: El perno es el único diseñado para ser instalado con el aire a través del agujero hacia abajo. Si instala con el aire a través del agujero hacia arriba el perno de armado no entra por completo en el pasador. Esto es para prevenir el re-ensamblaje incorrecto.
DESMONTAJE / LIMPIEZA DEL RETÉN DE BALAPASO 1. Retire el barril de DL9. Consulte las instrucciones de “Extracción de su barril” para obtener más ayuda.
car le ressort se déformera et sa force ne poussera plus les billes en dehors du magasin.
CONSEIL PRATIQUE : Des billes non utilisées pendant une grande période ne sont pas recommandées car elles entraînent une cassure prématurée des billes et une faible précision.
Guide sur le terrain
ÉTAPE 1. PROTECTION OCULAIRE : Assurez-vous de bien porter une protection contre les impacts de bille, ainsi que toutes les personnes à portée (200 yards). Mettez le marqueur en position de sécurité.
ÉTAPE 2. Enlevez le chargeur et les billes du marqueur
ÉTAPE 3. Enlevez la goupille d’armement et le boulon. Nettoyez la culasse des débris de billes.
ÉTAPE 4. Utilisez une racle à canon pour enlever les billes cassées du canon de votre marqueur. (Fig D)
Guide de démontage, de nettoyage et d’entretien
ÉTAPE 1. PROTECTION OCULAIRE : Assurez-vous de bien porter une protection contre les impacts de bille, ainsi que toutes les personnes à portée (200 yards). Mettez le marqueur en position de sécurité.
ÉTAPE 2. Enlevez la source d’air, le chargeur et les billes du marqueur.
ÉTAPE 3. Utilisez une racle à canon pour enlever les billes cassées du canon de votre marqueur. (Fig D)
ÉTAPE 4. Assurez-vous que la goupille d’armement soit en position avant. Tirez le déclencheur pour la dégager si nécessaire.
ÉTAPE 5. Enlevez la goupille rapide, la goupille d’armement, le boulon, le bouchon du marteau, le bumper et le ressort. (Fig E)
NOTE: Faites attention en les enlevant car toutes les pièces sont sous la tension du ressort.
ÉTAPE 6. Déclenchez et tapez à l’arrière du récepteur contre une serviette ou une surface plane pour enlever le marteau.
ÉTAPE 7. Saisissez le marteau avec des doigts et tirez-le du récepteur
NOTE : Examinez le joint torique du marteau et remplacez-le si besoin est.
Guide de réassemblage, de nettoyage et d’entretien
ÉTAPE 1. Nettoyez et lubrifiez tous les points et bagues de lubrification avec de l’huile minérale seulement.
ÉTAPE 2. Remplacez le boulon de marteau dans le récepteur avec la gâchette plate vers le bas.
NOTE : Il est nécessaire de tirer le déclencheur 3 fois ou plus tout en appliquant de la pression pour marteler le boulon avec votre doigt et bien mettre le marteau en place. (Fig. F)
ÉTAPE 3. Suivez les étapes 1 à 5 du guide de désassemblage, nettoyage et entretien, à l’envers.
NOTE : Le boulon est seulement conçu pour être installé avec le trou d’air vers le bas. Si vous l’installez avec le trou d’air vers le haut, la goupille d’armement ne rentrera pas complètement dans le boulon. Cela permet d’éviter un mauvais remontage.
DÉMONTAGE / NETTOYAGE DE LA DÉTENTE
ÉTAPE 1. Enlevez le canon du DL9. Lisez les instruction “Enlever votre canon” pour plus d’aide. ÉTAPE 2. En utilisant un solvant de joint torique ou un cure-dent, enlevez les 2 joints toriques
JT Paintball es una marca de KEE Action Sports, LLC. Los derechos de diseño y todos los derechos reservados. Todos los patrones, dibujos, fotografías, instrucciones o manuales son propiedad intelectual del fabricante. Todos los derechos se aplican estrictamente.
ASTM International, anteriormente conocida como la Sociedad Americana para Pruebas y Materiales (ASTM), es un líder reconocido a nivel mundial en el desarrollo y entrega de normas internacionales voluntarias de consenso utilizados en todo el mundo para mejorar la calidad del producto, aumentar la seguridad, facilitar el acceso a los mercados y el comercio, y fomentar la confianza de los consumidores. ASTM International, 100 Barr Harbor Drive, PO Box C700, West Conshohocken, PA, 19428-2959 EE.UU., www.astm.org
PATENTE(S): Ver www.paintballsolutions.com/patents © 2013-2014 KEE Action Sports. Todos los derechos reservados. Este producto de KEE Action Sports está protegido por uno o más patentes de los Estados Unidos e internacionales. Las Marcas Comerciales Registradas, Diseños y Derechos de Autor están protegidos por uno o más patentes de los Estados Unidos y el Derecho Internacional. Para mayor información contacte a KEE Action Sports a [email protected]
1. Ne pas utiliser à moins que toute personne à portée de tir ne porte une protection oculaire, du visage et des oreilles conçue spécifiquement pour arrêter les billes de paintball, en accord avec les spécifications ASTM F1776.2. Ne jamais pointer le marqueur vers toute personne ne portant pas de masque de paintball en accord avec les spécifications ASTM F1776.3. Ne jamais modifier d’aucune façon le système d’air pressurisé ou le cylindre de votre marqueur.4. Gardez le marqueur en position Sécurité jusqu’à ce que vous soyez prêt à tirer.5. N’utilisez jamais autre chose que les billes de calibre .68. N’essayez pas de tirer avec des billes usagées.6. Traitez chaque marqueur comme s’il était chargé.7. Ne regardez jamais dans le canon d’un marqueur de paintball.8. Gardez votre doigt loin de la gâchette jusqu’à ce que vous soyez prêt à tirer.9. Ne pointez jamais le marqueur vers quelque chose que vous ne voulez pas viser.10. Gardez le système de blocage du canon sur le canon lorsque vous ne tirez pas.11. Gardez le marqueur en position Sécurité lorsqu’il n’est pas utilisé.12. Enlevez toujours les billes et la source d’air avant de démonter le marqueur.13. Une fois la source d’air enlevée, pointez le marqueur dans une direction sécuritaire et purgez jusqu’à ce que le marqueur soit dégazé.14. Stockez le marqueur déchargé et dégazé dans un endroit sécuritaire.15. Suivez les avertissements se trouvant sur la source d’air concernant la manipulation et le stockage.16. Ne tirez pas sur des objets fragiles comme des fenêtres17. Mesurez toujours la vitesse de votre marqueur avant de jouer, et ne tirez jamais à des vitesses excédant 91.44m/s (300pi/s)18. Ne faites pas de vandalisme.19. Certaines billes peuvent tâcher les surfaces poreuses comme la brique, le stuc et le bois.
RÈGLES DE SÉCURITÉ POUR L’UTILISATION D’UN LANCEUR DE PAINTBALL
ATTENTION : Ceci n’est pas un jouet. Une mauvaise utilisation peut entraîner des blessures ou la mort. Une protection oculaire spécialement conçue pour le paintball doit être portée par l’utilisateur et toutes les personnes à portée de tir. Doit avoir 18 ans ou plus pour acheter. Les personnes de moins de 18 ans doivent avoir la permission d’un adulte. LISEZ LE MANUEL AVANT TOUTE UTILISATION
1. No utilizar hasta que todas las personas dentro del radio estén usando protección para los ojos, el rostro y las orejas diseñados para protegerlos de las bolas de pintura. Además, los equipos de protección deben cumplir con la norma ASTM F1776.2. Nunca apunte el marcador de paintball a quienes no estén usando la máscara de paintball que cumpla con la norma ASTM F1776.3. No modifique de manera alguna el sistema de aire presurizado ni el cilindro del marcador.4. Mantenga el marcador en Modo seguro hasta que esté listo para disparar.5. Utilice únicamente bolas de pintura de calibre .68. No intente disparar las bolas de pintura usadas.6. Trate el marcador como si estuviese cargado.7. Nunca mire por el cañón de un marcador de paintball.8. Mantenga el dedo alejado del gatillo hasta que esté listo para disparar.9. Nunca apunte el marcador a un objetivo al que no quiera disparar.10. Mantenga el dispositivo de bloqueo del cañón dentro de la boca del marcador o sobre esta si no va a disparar.11. Mantenga el marcador de paintball en Modo seguro cuando no lo utilice.12. Siempre extraiga las bolas de pintura y la fuente propelente antes de desmontar el marcador.13. Después de extraer la fuente propelente, apunte el marcador hacia una dirección segura y descárguelo hasta desgasificarlo.14. Guarde el marcador descargado y desgasificado en un lugar seguro.15. Respete la advertencia que se detalla en la fuente de gas con respecto al manejo y el almacenamiento.16. No dispare a objetos frágiles como, por ejemplo, las ventanas.17. Siempre mida la velocidad de su marcador antes de jugar paintball y nunca dispare a velocidades superiores a 91,44 m/s (300 pies/s).18. Nunca lleve a cabo actos de vandalismo con el marcador.19. Algunas bolas de pintura pueden manchar superficies porosas como ladrillo, revoque y madera.
REGLAS PARA EL MANEJOSEGURO DE SU PAINTBALL
ADVERTENCIA: Esto no es un juguete. El uso incorrecto puede producir heridas graves o mortales. El usu-ario y las personas dentro del radio deben usar protección para los ojos diseñada específicamente para paintball. La edad mínima para comprar este producto es de 18 años. Los menores de 18 deben ser supervisados por adultos. LEA EL MANUAL DE USUARIO ANTES DE COMENZAR A UTILIZAR EL PRODUCTO.
Cuidado y mantenimiento básico de la Marcadora
Nota: Cualquier cambios cosmético o mecánico anularán la garantía y pueden no satisfacer las normas ASTM sobre seguridad. Utilice sólo repuestos aprobados y componentes actualizados para paintball JT. Siga estos fáciles puntos para mantener su marcadora en la mejor forma durante los próximos años.
- Lea el manual antes de utilizar la marcadora.- Lubrique todos los anillos en la marcadora utilizando únicamente aceite mineral. - Coloque 3 gotas de aceite mineral en ASA con cada cambio de fuente de gas.- Familiarícese con el diagrama detallado proporcionado en el manual antes del desmontaje.- Limpie todas las piezas antes de volver a ensamblar.- Vuelva a lubricar los anillos antes de volver a ensamblar.- NUNCA sumerja la marcadora en el agua. El agua causará que el interior se oxide.- Llame a servicio al cliente si tiene más preguntas, al 1-800-220-3222.
Soin et entretien de base du marqueurNote: Tous les changements cosmétiques ou mécaniques annuleront la garantie et pourraient ne pas complaire aux standards de sécurité de l’ASTM. Employez seulement les pièces de rechange approuvées par JT et des composants à jour. Suivez ces étapes faciles pour maintenir votre marqueur au mieux de sa forme pour les années à venir.
- Lisez le manuel complètement avant d’utiliser le marqueur.- Lubrifiez tous les joints toriques du marqueur en utilisant SEULEMENT de l’huile minérale.- Placez 3 gouttes d’huile minérale dans l’ASA lors de chaque changement de source de gaz.- Familiarisez-vous avec le diagramme éclaté fourni dans le manuel avant le démontage.- Nettoyez toutes les pièces avant le remontage.- Re-lubrifiez les joint toriques avant le remontage.- N’immergez JAMAIS le marqueur dans l’eau. L’eau fera rouiller les pièces internes.- Appelez le service à la clientèle au 1-800-230-3222 si vous avez des questions.
PASO2. Con un removedor de anillos, o palillo de dientes, retire los 2 anillos de la base del cañón.
PASO 3. With o-rings removed, slide ball detent out of the barrel. (See Figure G)
PASO4. Limpie los retenes y anillos con un trapo suave.
PASO 5. Coloque el retén limpio en el cañón de la ranura de retención, y coloque los anillos del barril.
à la base du canon. ÉTAPE 3. Une fois les joints toriques enlevées, faites glisser la détente en dehors du canon. (Voir la figure G)
ÉTAPE 4. Nettoyez les détentes et les joints toriques avec un chiffon mou. ÉTAPE 5. Placez la détente nettoyée dans la fente de détente du canon, et ajoutez les joints toriques du canon.