SEMI AUTOMATIC PAINTBALL MARKER OWNER’S MANUAL … · OWNER’S MANUAL and DO’S AND DON’TS OF...
2
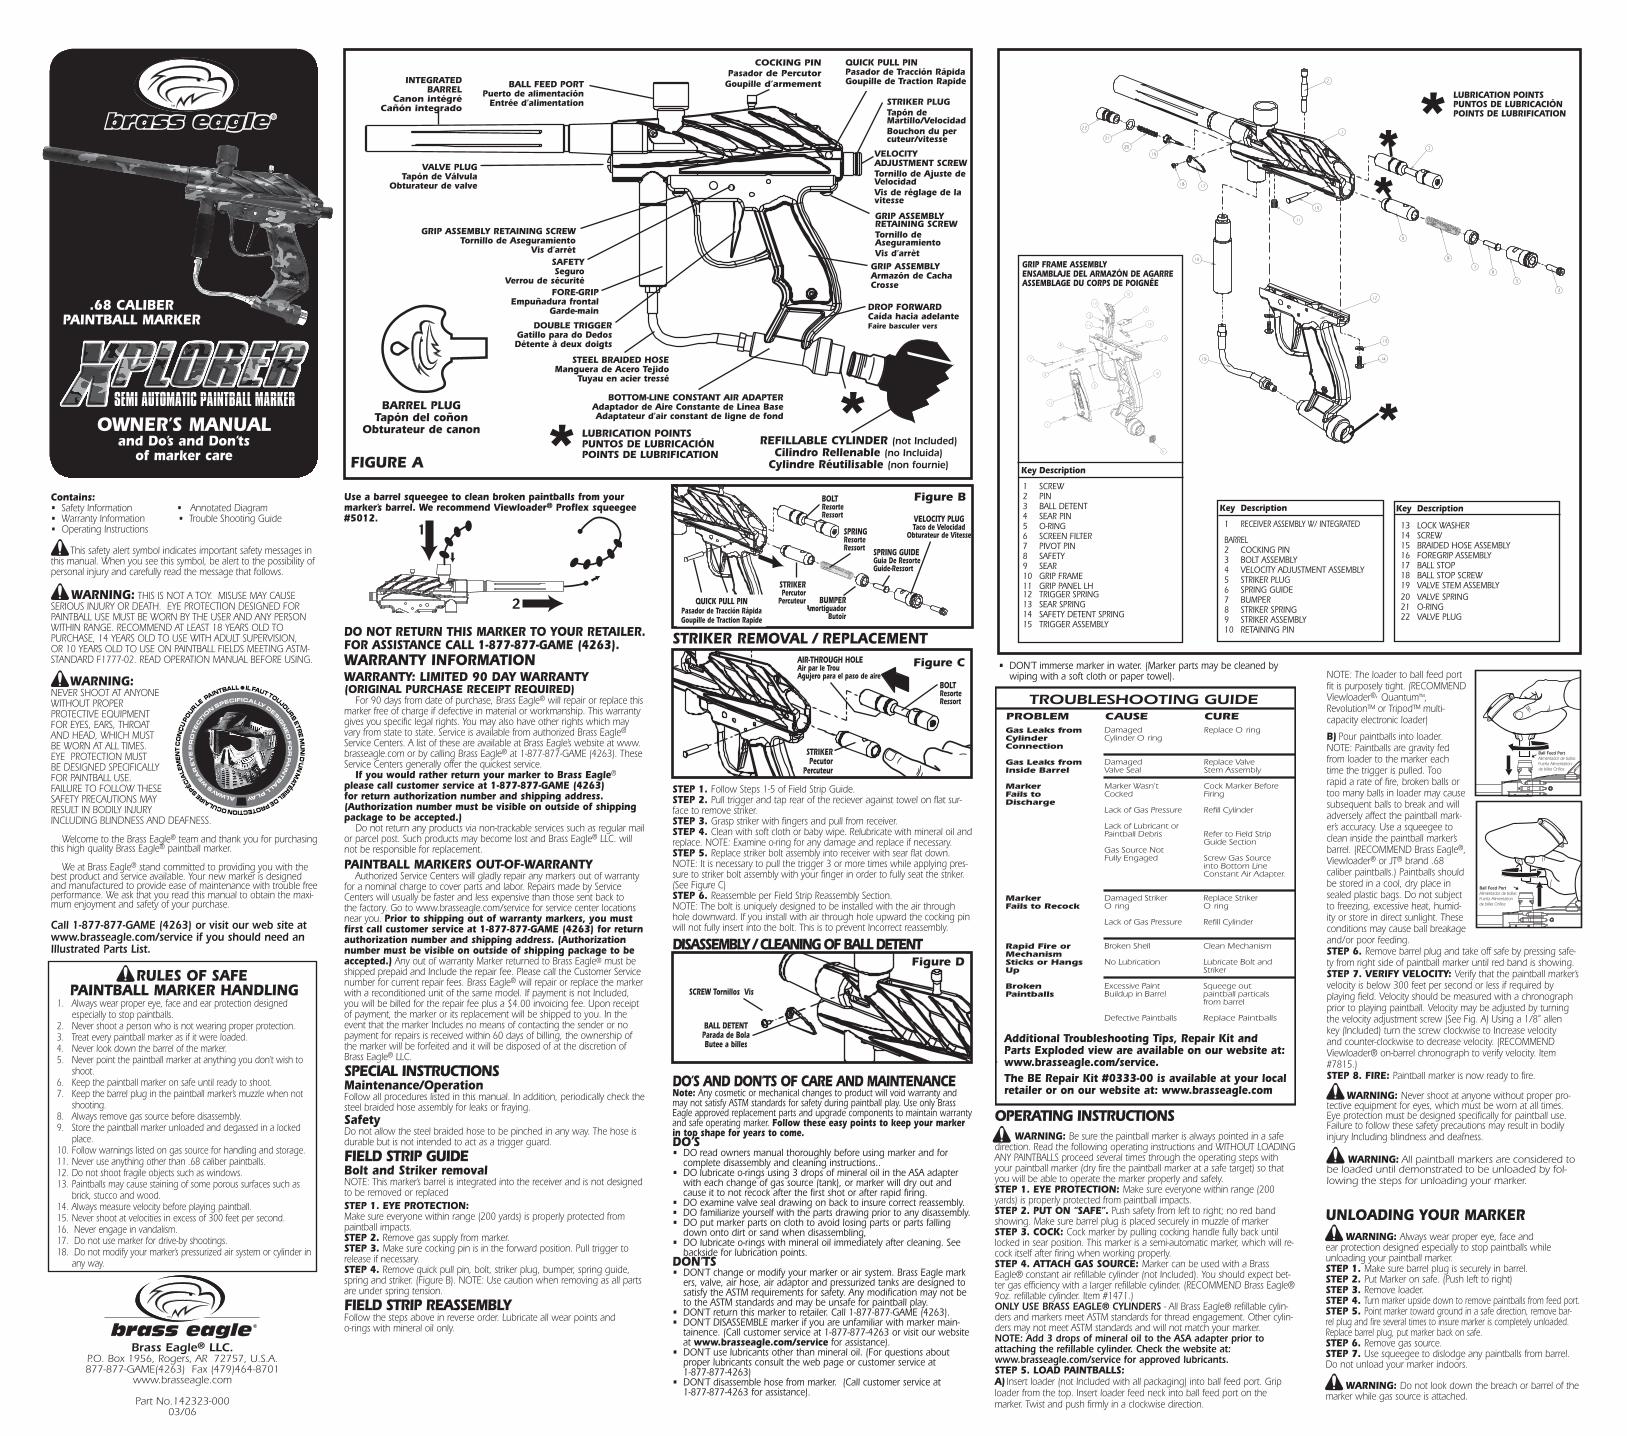
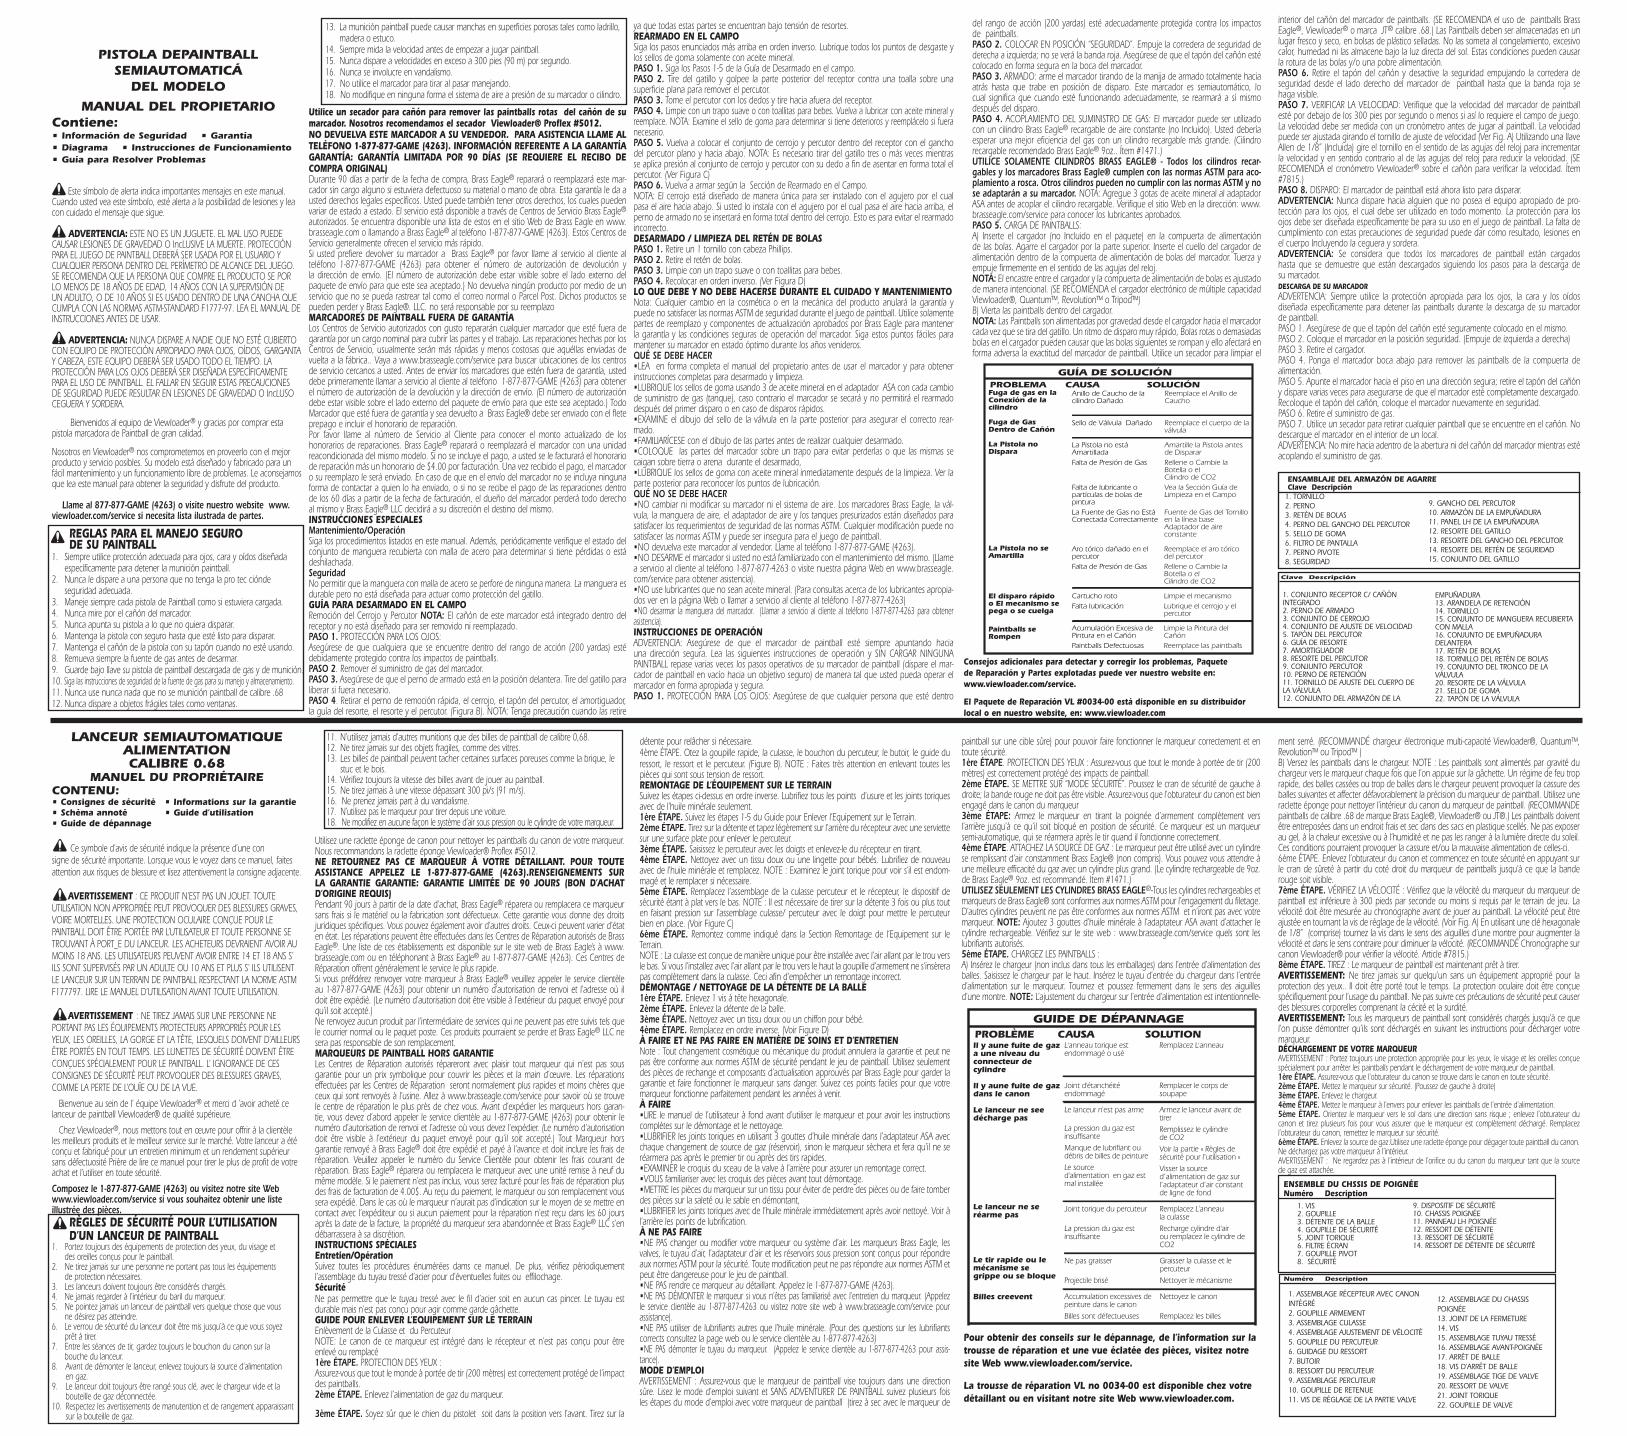
OWNER’S MANUAL and DO’S AND DON’TS OF MARKER CARE Contains: • Safety Information • Annotated Diagram • Warranty Information • Trouble Shooting Guide • Operating Instructions This safety alert symbol indicates important safety messages in this manual. When you see this symbol, be alert to the possibility of personal injury and carefully read the message that follows. WARNING: THIS IS NOT A TOY. MISUSE MAY CAUSE SERIOUS INJURY OR DEATH. EYE PROTECTION DESIGNED FOR PAINTBALL USE MUST BE WORN BY THE USER AND ANY PERSON WITHIN RANGE. RECOMMEND AT LEAST 18 YEARS OLD TO PURCHASE, 14 YEARS OLD TO USE WITH ADULT SUPERVISION, OR 10 YEARS OLD TO USE ON PAINTBALL FIELDS MEETING ASTM- STANDARD F1777-02. READ OPERATION MANUAL BEFORE USING. WARNING: NEVER SHOOT AT ANYONE WITHOUT PROPER PROTECTIVE EQUIPMENT FOR EYES, EARS, THROAT AND HEAD, WHICH MUST BE WORN AT ALL TIMES. EYE PROTECTION MUST BE DESIGNED SPECIFICALLY FOR PAINTBALL USE. FAILURE TO FOLLOW THESE SAFETY PRECAUTIONS MAY RESULT IN BODILY INJURY INCLUDING BLINDNESS AND DEAFNESS. Welcome to the Brass Eagle ® team and thank you for purchasing this high quality Brass Eagle ® paintball marker. We at Brass Eagle ® stand committed to providing you with the best product and service available. Your new marker is designed and manufactured to provide ease of maintenance with trouble free performance. We ask that you read this manual to obtain the maxi- mum enjoyment and safety of your purchase. Call 1-877-877-GAME (4263) or visit our web site at www.brasseagle.com/service if you should need an Illustrated Parts List. RULES OF SAFE PAINTBALL MARKER HANDLING 1. Always wear proper eye, face and ear protection designed especially to stop paintballs. 2. Never shoot a person who is not wearing proper protection. 3. Treat every paintball marker as if it were loaded. 4. Never look down the barrel of the marker. 5. Never point the paintball marker at anything you don’t wish to shoot. 6. Keep the paintball marker on safe until ready to shoot. 7. Keep the barrel plug in the paintball marker’s muzzle when not shooting. 8. Always remove gas source before disassembly. 9. Store the paintball marker unloaded and degassed in a locked place. 10. Follow warnings listed on gas source for handling and storage. 11. Never use anything other than .68 caliber paintballs. 12. Do not shoot fragile objects such as windows. 13. Paintballs may cause staining of some porous surfaces such as brick, stucco and wood. 14. Always measure velocity before playing paintball. 15. Never shoot at velocities in excess of 300 feet per second. 16. Never engage in vandalism. 17. Do not use marker for drive-by shootings. 18. Do not modify your marker’s pressurized air system or cylinder in any way. Use a barrel squeegee to clean broken paintballs from your marker’s barrel. We recommend Viewloader ® Proflex squeegee #5012. DO NOT RETURN THIS MARKER TO YOUR RETAILER. FOR ASSISTANCE CALL 1-877-877-GAME (4263). WARRANTY INFORMATION WARRANTY: LIMITED 90 DAY WARRANTY (ORIGINAL PURCHASE RECEIPT REQUIRED) For 90 days from date of purchase, Brass Eagle ® will repair or replace this marker free of charge if defective in material or workmanship. This warranty gives you specific legal rights. You may also have other rights which may vary from state to state. Service is available from authorized Brass Eagle ® Service Centers. A list of these are available at Brass Eagle’s website at www. brasseagle.com or by calling Brass Eagle ® at 1-877-877-GAME (4263). These Service Centers generally offer the quickest service. If you would rather return your marker to Brass Eagle ® please call customer service at 1-877-877-GAME (4263) for return authorization number and shipping address. (Authorization number must be visible on outside of shipping package to be accepted.) Do not return any products via non-trackable services such as regular mail or parcel post. Such products may become lost and Brass Eagle ® LLC. will not be responsible for replacement. PAINTBALL MARKERS OUT-OF-WARRANTY Authorized Service Centers will gladly repair any markers out of warranty for a nominal charge to cover parts and labor. Repairs made by Service Centers will usually be faster and less expensive than those sent back to the factory. Go to www.brasseagle.com/service for service center locations near you. Prior to shipping out of warranty markers, you must first call customer service at 1-877-877-GAME (4263) for return authorization number and shipping address. (Authorization number must be visible on outside of shipping package to be accepted.) Any out of warranty Marker returned to Brass Eagle® must be shipped prepaid and Include the repair fee. Please call the Customer Service number for current repair fees. Brass Eagle ® will repair or replace the marker with a reconditioned unit of the same model. If payment is not Included, you will be billed for the repair fee plus a $4.00 invoicing fee. Upon receipt of payment, the marker or its replacement will be shipped to you. In the event that the marker Includes no means of contacting the sender or no payment for repairs is received within 60 days of billing, the ownership of the marker will be forfeited and it will be disposed of at the discretion of Brass Eagle ® LLC. SPECIAL INSTRUCTIONS Maintenance/Operation Follow all procedures listed in this manual. In addition, periodically check the steel braided hose assembly for leaks or fraying. Safety Do not allow the steel braided hose to be pinched in any way. The hose is durable but is not intended to act as a trigger guard. FIELD STRIP GUIDE Bolt and Striker removal NOTE: This marker’s barrel is integrated into the receiver and is not designed to be removed or replaced STEP 1. EYE PROTECTION: Make sure everyone within range (200 yards) is properly protected from paintball impacts. STEP 2. Remove gas supply from marker. STEP 3. Make sure cocking pin is in the forward position. Pull trigger to release if necessary. STEP 4. Remove quick pull pin, bolt, striker plug, bumper, spring guide, spring and striker. (Figure B). NOTE: Use caution when removing as all parts are under spring tension. FIELD STRIP REASSEMBLY Follow the steps above in reverse order. Lubricate all wear points and o-rings with mineral oil only. Brass Eagle ® LLC. P.O. Box 1956, Rogers, AR 72757, U.S.A. 877-877-GAME(4263) Fax (479)464-8701 www.brasseagle.com Part No.142323-000 03/06 FIGURE A COCKING PIN Pasador de Percutor Goupille d’armement BALL FEED PORT Puerto de alimentación Entrée d’alimentation STRIKER PLUG Tapón de Martillo/Velocidad Bouchon du per cuteur/vitesse BOTTOM-LINE CONSTANT AIR ADAPTER Adaptador de Aire Constante de Linea Base Adaptateur d’air constant de ligne de fond STEEL BRAIDED HOSE Manguera de Acero Tejido Tuyau en acier tressé GRIP ASSEMBLY Armazón de Cacha Crosse GRIP ASSEMBLY RETAINING SCREW Tornillo de Aseguramiento Vis d’arrèt BARREL PLUG Tapón del coñon Obturateur de canon DOUBLE TRIGGER Gatillo para do Dedos Détente à deux doigts VELOCITY ADJUSTMENT SCREW Tornillo de Ajuste de Velocidad Vis de réglage de la vitesse VALVE PLUG Tapón de Válvula Obturateur de valve SAFETY Seguro Verrou de sécurité GRIP ASSEMBLY RETAINING SCREW Tornillo de Aseguramiento Vis d’arrèt REFILLABLE CYLINDER (not Included) Cilindro Rellenable (no Incluida) Cylindre Réutilisable (non fournie) QUICK PULL PIN Pasador de Tracción Rápida Goupille de Traction Rapide * LUBRICATION POINTS PUNTOS DE LUBRICACIÓN POINTS DE LUBRIFICATION * .68 CALIBER PAINTBALL MARKER UNLOADING YOUR MARKER WARNING: Always wear proper eye, face and ear protection designed especially to stop paintballs while unloading your paintball marker. STEP 1. Make sure barrel plug is securely in barrel. STEP 2. Put Marker on safe. (Push left to right) STEP 3. Remove loader. STEP 4. Turn marker upside down to remove paintballs from feed port. STEP 5. Point marker toward ground in a safe direction, remove bar- rel plug and fire several times to insure marker is completely unloaded. Replace barrel plug, put marker back on safe. STEP 6. Remove gas source. STEP 7. Use squeegee to dislodge any paintballs from barrel. Do not unload your marker indoors. WARNING: Do not look down the breach or barrel of the marker while gas source is attached. Additional Troubleshooting Tips, Repair Kit and Parts Exploded view are available on our website at: www.brasseagle.com/service. The BE Repair Kit #0333-00 is available at your local retailer or on our website at: www.brasseagle.com OPERATING INSTRUCTIONS WARNING: Be sure the paintball marker is always pointed in a safe direction. Read the following operating instructions and WITHOUT LOADING ANY PAINTBALLS proceed several times through the operating steps with your paintball marker (dry fire the paintball marker at a safe target) so that you will be able to operate the marker properly and safely. STEP 1. EYE PROTECTION: Make sure everyone within range (200 yards) is properly protected from paintball impacts. STEP 2. PUT ON “SAFE”. Push safety from left to right; no red band showing. Make sure barrel plug is placed securely in muzzle of marker STEP 3. COCK: Cock marker by pulling cocking handle fully back until locked in sear position. This marker is a semi-automatic marker, which will re- cock itself after firing when working properly. STEP 4. ATTACH GAS SOURCE: Marker can be used with a Brass Eagle® constant air refillable cylinder (not Included). You should expect bet- ter gas efficiency with a larger refillable cylinder. (RECOMMEND Brass Eagle® 9oz. refillable cylinder. Item #1471.) ONLY USE BRASS EAGLE® CYLINDERS - All Brass Eagle® refillable cylin- ders and markers meet ASTM standards for thread engagement. Other cylin- ders may not meet ASTM standards and will not match your marker. NOTE: Add 3 drops of mineral oil to the ASA adapter prior to attaching the refillable cylinder. Check the website at: www.brasseagle.com/service for approved lubricants. STEP 5. LOAD PAINTBALLS: A) Insert loader (not Included with all packaging) into ball feed port. Grip loader from the top. Insert loader feed neck into ball feed port on the marker. Twist and push firmly in a clockwise direction. NOTE: The loader to ball feed port fit is purposely tight. (RECOMMEND Viewloader ®, Quantum ™ , Revolution™ or Tripod™ multi- capacity electronic loader) B) Pour paintballs into loader. NOTE: Paintballs are gravity fed from loader to the marker each time the trigger is pulled. Too rapid a rate of fire, broken balls or too many balls in loader may cause subsequent balls to break and will adversely affect the paintball mark- er’s accuracy. Use a squeegee to clean inside the paintball marker’s barrel. (RECOMMEND Brass Eagle ® , Viewloader ® or JT ® brand .68 caliber paintballs.) Paintballs should be stored in a cool, dry place in sealed plastic bags. Do not subject to freezing, excessive heat, humid- ity or store in direct sunlight. These conditions may cause ball breakage and/or poor feeding. STEP 6. Remove barrel plug and take off safe by pressing safe- ty from right side of paintball marker until red band is showing. STEP 7. VERIFY VELOCITY: Verify that the paintball marker’s velocity is below 300 feet per second or less if required by playing field. Velocity should be measured with a chronograph prior to playing paintball. Velocity may be adjusted by turning the velocity adjustment screw (See Fig. A) Using a 1/8” allen key (Included) turn the screw clockwise to Increase velocity and counter-clockwise to decrease velocity. (RECOMMEND Viewloader® on-barrel chronograph to verify velocity. Item #7815.) STEP 8. FIRE: Paintball marker is now ready to fire. WARNING: Never shoot at anyone without proper pro- tective equipment for eyes, which must be worn at all times. Eye protection must be designed specifically for paintball use. Failure to follow these safety precautions may result in bodily injury Including blindness and deafness. WARNING: All paintball markers are considered to be loaded until demonstrated to be unloaded by fol- lowing the steps for unloading your marker. STRIKER REMOVAL / REPLACEMENT STEP 1. Follow Steps 1-5 of Field Strip Guide. STEP 2. Pull trigger and tap rear of the reciever against towel on flat sur- face to remove striker. STEP 3. Grasp striker with fingers and pull from receiver. STEP 4. Clean with soft cloth or baby wipe. Relubricate with mineral oil and replace. NOTE: Examine o-ring for any damage and replace if necessary. STEP 5. Replace striker bolt assembly into receiver with sear flat down. NOTE: It is necessary to pull the trigger 3 or more times while applying pres- sure to striker bolt assembly with your finger in order to fully seat the striker. (See Figure C) STEP 6. Reassemble per Field Strip Reassembly Section. NOTE: The bolt is uniquely designed to be installed with the air through hole downward. If you install with air through hole upward the cocking pin will not fully insert into the bolt. This is to prevent Incorrect reassembly. DISASSEMBLY / CLEANING OF BALL DETENT SCREW Tornillos Vis BALL DETENT Parada de Bola Butee a billes * LUBRICATION POINTS PUNTOS DE LUBRICACIÓN POINTS DE LUBRIFICATION GRIP FRAME ASSEMBLY ENSAMBLAJE DEL ARMAZÓN DE AGARRE ASSEMBLAGE DU CORPS DE POIGNÉE Key Description 1 RECEIVER ASSEMBLY W/ INTEGRATED BARREL 2 COCKING PIN 3 BOLT ASSEMBLY 4 VELOCITY ADJUSTMENT ASSEMBLY 5 STRIKER PLUG 6 SPRING GUIDE 7 BUMPER 8 STRIKER SPRING 9 STRIKER ASSEMBLY 10 RETAINING PIN Key Description 1 SCREW 2 PIN 3 BALL DETENT 4 SEAR PIN 5 O-RING 6 SCREEN FILTER 7 PIVOT PIN 8 SAFETY 9 SEAR 10 GRIP FRAME 11 GRIP PANEL LH 12 TRIGGER SPRING 13 SEAR SPRING 14 SAFETY DETENT SPRING 15 TRIGGER ASSEMBLY Key Description 13 LOCK WASHER 14 SCREW 15 BRAIDED HOSE ASSEMBLY 16 FOREGRIP ASSEMBLY 17 BALL STOP 18 BALL STOP SCREW 19 VALVE STEM ASSEMBLY 20 VALVE SPRING 21 O-RING 22 VALVE PLUG Figure B VELOCITY PLUG Taco de Velocidad Obturateur de Vitesse SPRING Resorte Ressort SPRING GUIDE Guia De Resorte Guide-Ressort BUMPER Amortiguador Butoir STRIKER Percutor Percuteur QUICK PULL PIN Pasador de Tracción Rápida Goupille de Traction Rapide BOLT Resorte Ressort Figure C STRIKER Pecutor Percuteur BOLT Resorte Ressort • DON’T immerse marker in water. (Marker parts may be cleaned by wiping with a soft cloth or paper towel). DROP FORWARD Caída hacia adelante Faire basculer vers FORE-GRIP Empuñadura frontal Garde-main INTEGRATED BARREL Canon intégré Cañón integrado AIR-THROUGH HOLE Air par le Trou Agujero para el paso de aire DO’S AND DON’TS OF CARE AND MAINTENANCE Note: Any cosmetic or mechanical changes to product will void warranty and may not satisfy ASTM standards for safety during paintball play. Use only Brass Eagle approved replacement parts and upgrade components to maintain warranty and safe operating marker. Follow these easy points to keep your marker in top shape for years to come. DO’S • DO read owners manual thoroughly before using marker and for complete disassembly and cleaning instructions.. • DO lubricate o-rings using 3 drops of mineral oil in the ASA adapter with each change of gas source (tank), or marker will dry out and cause it to not recock after the first shot or after rapid firing. • DO examine valve seal drawing on back to insure correct reassembly. • DO familiarize yourself with the parts drawing prior to any disassembly. • DO put marker parts on cloth to avoid losing parts or parts falling down onto dirt or sand when disassembling, • DO lubricate o-rings with mineral oil immediately after cleaning. See backside for lubrication points. DON’TS • DON’T change or modify your marker or air system. Brass Eagle mark ers, valve, air hose, air adaptor and pressurized tanks are designed to satisfy the ASTM requirements for safety. Any modification may not be to the ASTM standards and may be unsafe for paintball play. • DON’T return this marker to retailer. Call 1-877-877-GAME (4263). • DON’T DISASSEMBLE marker if you are unfamiliar with marker main- tainence. (Call customer service at 1-877-877-4263 or visit our website at www.brasseagle.com/service for assistance). • DON’T use lubricants other than mineral oil. (For questions about proper lubricants consult the web page or customer service at 1-877-877-4263) • DON’T disassemble hose from marker. (Call customer service at 1-877-877-4263 for assistance). Figure D OWNER’S MANUAL and Do’s and Don’ts of marker care Ball Feed Port Alimentador de bollas Puerta Alimentation de billes Orifice Ball Feed Port Alimentador de bollas Puerta Alimentation de billes Orifice SEMI AUTOMATIC PAINTBALL MARKER
Transcript of SEMI AUTOMATIC PAINTBALL MARKER OWNER’S MANUAL … · OWNER’S MANUAL and DO’S AND DON’TS OF...
OWNER’S MANUAL andDO’S AND DON’TS OF
MARKER CARE
Contains:• Safety Information • Annotated Diagram• Warranty Information • Trouble Shooting Guide• Operating Instructions
This safety alert symbol indicates important safety messages in this manual. When you see this symbol, be alert to the possibility of personal injury and carefully read the message that follows.
WARNING: THIS IS NOT A TOY. MISUSE MAY CAUSE SERIOUS INJURY OR DEATH. EYE PROTECTION DESIGNED FOR PAINTBALL USE MUST BE WORN BY THE USER AND ANY PERSON WITHIN RANGE. RECOMMEND AT LEAST 18 YEARS OLD TO PURCHASE, 14 YEARS OLD TO USE WITH ADULT SUPERVISION, OR 10 YEARS OLD TO USE ON PAINTBALL FIELDS MEETING ASTM-STANDARD F1777-02. READ OPERATION MANUAL BEFORE USING.
WARNING: NEVER SHOOT AT ANYONE WITHOUT PROPER PROTECTIVE EQUIPMENT FOR EYES, EARS, THROAT AND HEAD, WHICH MUST BE WORN AT ALL TIMES. EYE PROTECTION MUST BE DESIGNED SPECIFICALLY FOR PAINTBALL USE. FAILURE TO FOLLOW THESE SAFETY PRECAUTIONS MAY RESULT IN BODILY INJURY INCLUDING BLINDNESS AND DEAFNESS.
Welcome to the Brass Eagle® team and thank you for purchasing this high quality Brass Eagle® paintball marker.
We at Brass Eagle® stand committed to providing you with the best product and service available. Your new marker is designed and manufactured to provide ease of maintenance with trouble free performance. We ask that you read this manual to obtain the maxi-mum enjoyment and safety of your purchase.
Call 1-877-877-GAME (4263) or visit our web site at www.brasseagle.com/service if you should need an Illustrated Parts List.
RULES OF SAFEPAINTBALL MARKER HANDLING
1. Always wear proper eye, face and ear protection designed especially to stop paintballs.2. Never shoot a person who is not wearing proper protection.3. Treat every paintball marker as if it were loaded.4. Never look down the barrel of the marker.5. Never point the paintball marker at anything you don’t wish to shoot.6. Keep the paintball marker on safe until ready to shoot.7. Keep the barrel plug in the paintball marker’s muzzle when not shooting.8. Always remove gas source before disassembly.9. Store the paintball marker unloaded and degassed in a locked place.10. Follow warnings listed on gas source for handling and storage.11. Never use anything other than .68 caliber paintballs.12. Do not shoot fragile objects such as windows.13. Paintballs may cause staining of some porous surfaces such as brick, stucco and wood.14. Always measure velocity before playing paintball.15. Never shoot at velocities in excess of 300 feet per second.16. Never engage in vandalism.17. Do not use marker for drive-by shootings.18. Do not modify your marker’s pressurized air system or cylinder in any way.
Use a barrel squeegee to clean broken paintballs from your marker’s barrel. We recommend Viewloader® Proflex squeegee #5012.
DO NOT RETURN THIS MARKER TO YOUR RETAILER. FOR ASSISTANCE CALL 1-877-877-GAME (4263).WARRANTY INFORMATIONWARRANTY: LIMITED 90 DAY WARRANTY(ORIGINAL PURCHASE RECEIPT REQUIRED) For 90 days from date of purchase, Brass Eagle® will repair or replace this marker free of charge if defective in material or workmanship. This warranty gives you specific legal rights. You may also have other rights which may vary from state to state. Service is available from authorized Brass Eagle® Service Centers. A list of these are available at Brass Eagle’s website at www.brasseagle.com or by calling Brass Eagle® at 1-877-877-GAME (4263). These Service Centers generally offer the quickest service. If you would rather return your marker to Brass Eagle® please call customer service at 1-877-877-GAME (4263) for return authorization number and shipping address. (Authorization number must be visible on outside of shipping package to be accepted.) Do not return any products via non-trackable services such as regular mail or parcel post. Such products may become lost and Brass Eagle® LLC. will not be responsible for replacement.
PAINTBALL MARKERS OUT-OF-WARRANTY Authorized Service Centers will gladly repair any markers out of warranty for a nominal charge to cover parts and labor. Repairs made by Service Centers will usually be faster and less expensive than those sent back to the factory. Go to www.brasseagle.com/service for service center locations near you. Prior to shipping out of warranty markers, you must first call customer service at 1-877-877-GAME (4263) for return authorization number and shipping address. (Authorization number must be visible on outside of shipping package to be accepted.) Any out of warranty Marker returned to Brass Eagle® must be shipped prepaid and Include the repair fee. Please call the Customer Service number for current repair fees. Brass Eagle® will repair or replace the marker with a reconditioned unit of the same model. If payment is not Included, you will be billed for the repair fee plus a $4.00 invoicing fee. Upon receipt of payment, the marker or its replacement will be shipped to you. In the event that the marker Includes no means of contacting the sender or no payment for repairs is received within 60 days of billing, the ownership of the marker will be forfeited and it will be disposed of at the discretion of Brass Eagle® LLC.
SPECIAL INSTRUCTIONSMaintenance/OperationFollow all procedures listed in this manual. In addition, periodically check the steel braided hose assembly for leaks or fraying.SafetyDo not allow the steel braided hose to be pinched in any way. The hose is durable but is not intended to act as a trigger guard.
FIELD STRIP GUIDEBolt and Striker removalNOTE: This marker’s barrel is integrated into the receiver and is not designed to be removed or replacedSTEP 1. EYE PROTECTION: Make sure everyone within range (200 yards) is properly protected from paintball impacts.STEP 2. Remove gas supply from marker.STEP 3. Make sure cocking pin is in the forward position. Pull trigger to release if necessary.STEP 4. Remove quick pull pin, bolt, striker plug, bumper, spring guide, spring and striker. (Figure B). NOTE: Use caution when removing as all parts are under spring tension.
FIELD STRIP REASSEMBLYFollow the steps above in reverse order. Lubricate all wear points ando-rings with mineral oil only.
Brass Eagle® LLC.P.O. Box 1956, Rogers, AR 72757, U.S.A.877-877-GAME(4263) Fax (479)464-8701
www.brasseagle.com
Part No.142323-00003/06
FIGURE A
COCKING PINPasador de Percutor
Goupille d’armementBALL FEED PORTPuerto de alimentación
Entrée d’alimentation STRIKER PLUGTapón de Martillo/VelocidadBouchon du percuteur/vitesse
BOTTOM-LINE CONSTANT AIR ADAPTERAdaptador de Aire Constante de Linea BaseAdaptateur d’air constant de ligne de fond
STEEL BRAIDED HOSEManguera de Acero Tejido
Tuyau en acier tressé
GRIP ASSEMBLYArmazón de CachaCrosse
GRIP ASSEMBLYRETAINING SCREWTornillo deAseguramientoVis d’arrèt
BARREL PLUGTapón del coñon
Obturateur de canon
DOUBLE TRIGGERGatillo para do DedosDétente à deux doigts
VELOCITYADJUSTMENT SCREWTornillo de Ajuste de VelocidadVis de réglage de la vitesse
VALVE PLUGTapón de Válvula
Obturateur de valve
SAFETYSeguro
Verrou de sécurité
GRIP ASSEMBLY RETAINING SCREWTornillo de Aseguramiento
Vis d’arrèt
REFILLABLE CYLINDER (not Included)Cilindro Rellenable (no Incluida)
Cylindre Réutilisable (non fournie)
QUICK PULL PINPasador de Tracción RápidaGoupille de Traction Rapide
* LUBRICATION POINTS PUNTOS DE LUBRICACIÓN POINTS DE LUBRIFICATION
*
.68 CALIBERPAINTBALL MARKER
UNLOADING YOUR MARKER WARNING: Always wear proper eye, face and ear protection designed especially to stop paintballs while unloading your paintball marker.STEP 1. Make sure barrel plug is securely in barrel.STEP 2. Put Marker on safe. (Push left to right)STEP 3. Remove loader.STEP 4. Turn marker upside down to remove paintballs from feed port.STEP 5. Point marker toward ground in a safe direction, remove bar-rel plug and fire several times to insure marker is completely unloaded. Replace barrel plug, put marker back on safe.STEP 6. Remove gas source.STEP 7. Use squeegee to dislodge any paintballs from barrel.Do not unload your marker indoors.
WARNING: Do not look down the breach or barrel of the marker while gas source is attached.
Additional Troubleshooting Tips, Repair Kit and Parts Exploded view are available on our website at: www.brasseagle.com/service.The BE Repair Kit #0333-00 is available at your local retailer or on our website at: www.brasseagle.com
OPERATING INSTRUCTIONS WARNING: Be sure the paintball marker is always pointed in a safe direction. Read the following operating instructions and WITHOUT LOADING ANY PAINTBALLS proceed several times through the operating steps with your paintball marker (dry fire the paintball marker at a safe target) so that you will be able to operate the marker properly and safely.STEP 1. EYE PROTECTION: Make sure everyone within range (200 yards) is properly protected from paintball impacts.STEP 2. PUT ON “SAFE”. Push safety from left to right; no red band showing. Make sure barrel plug is placed securely in muzzle of markerSTEP 3. COCK: Cock marker by pulling cocking handle fully back until locked in sear position. This marker is a semi-automatic marker, which will re-cock itself after firing when working properly.STEP 4. ATTACH GAS SOURCE: Marker can be used with a Brass Eagle® constant air refillable cylinder (not Included). You should expect bet-ter gas efficiency with a larger refillable cylinder. (RECOMMEND Brass Eagle® 9oz. refillable cylinder. Item #1471.) ONLY USE BRASS EAGLE® CYLINDERS - All Brass Eagle® refillable cylin-ders and markers meet ASTM standards for thread engagement. Other cylin-ders may not meet ASTM standards and will not match your marker.NOTE: Add 3 drops of mineral oil to the ASA adapter prior to attaching the refillable cylinder. Check the website at:www.brasseagle.com/service for approved lubricants.STEP 5. LOAD PAINTBALLS: A) Insert loader (not Included with all packaging) into ball feed port. Grip loader from the top. Insert loader feed neck into ball feed port on the marker. Twist and push firmly in a clockwise direction.
NOTE: The loader to ball feed port fit is purposely tight. (RECOMMEND Viewloader®, Quantum™, Revolution™ or Tripod™ multi-capacity electronic loader)
B) Pour paintballs into loader. NOTE: Paintballs are gravity fed from loader to the marker each time the trigger is pulled. Too rapid a rate of fire, broken balls or too many balls in loader may cause subsequent balls to break and will adversely affect the paintball mark-er’s accuracy. Use a squeegee to clean inside the paintball marker’s barrel. (RECOMMEND Brass Eagle®, Viewloader® or JT® brand .68 caliber paintballs.) Paintballs should be stored in a cool, dry place in sealed plastic bags. Do not subject to freezing, excessive heat, humid-ity or store in direct sunlight. These conditions may cause ball breakage and/or poor feeding.STEP 6. Remove barrel plug and take off safe by pressing safe-ty from right side of paintball marker until red band is showing.STEP 7. VERIFY VELOCITY: Verify that the paintball marker’s velocity is below 300 feet per second or less if required by playing field. Velocity should be measured with a chronograph prior to playing paintball. Velocity may be adjusted by turning the velocity adjustment screw (See Fig. A) Using a 1/8” allen key (Included) turn the screw clockwise to Increase velocity and counter-clockwise to decrease velocity. (RECOMMEND Viewloader® on-barrel chronograph to verify velocity. Item #7815.) STEP 8. FIRE: Paintball marker is now ready to fire. WARNING: Never shoot at anyone without proper pro-tective equipment for eyes, which must be worn at all times. Eye protection must be designed specifically for paintball use. Failure to follow these safety precautions may result in bodily injury Including blindness and deafness. WARNING: All paintball markers are considered to be loaded until demonstrated to be unloaded by fol-lowing the steps for unloading your marker.
STRIKER REMOVAL / REPLACEMENT
STEP 1. Follow Steps 1-5 of Field Strip Guide.STEP 2. Pull trigger and tap rear of the reciever against towel on flat sur-face to remove striker.STEP 3. Grasp striker with fingers and pull from receiver.STEP 4. Clean with soft cloth or baby wipe. Relubricate with mineral oil and replace. NOTE: Examine o-ring for any damage and replace if necessary.STEP 5. Replace striker bolt assembly into receiver with sear flat down. NOTE: It is necessary to pull the trigger 3 or more times while applying pres-sure to striker bolt assembly with your finger in order to fully seat the striker. (See Figure C)STEP 6. Reassemble per Field Strip Reassembly Section.NOTE: The bolt is uniquely designed to be installed with the air through hole downward. If you install with air through hole upward the cocking pin will not fully insert into the bolt. This is to prevent Incorrect reassembly.
DISASSEMBLY / CLEANING OF BALL DETENT
SCREW Tornillos Vis
BALL DETENTParada de BolaButee a billes
* LUBRICATION POINTS PUNTOS DE LUBRICACIÓN POINTS DE LUBRIFICATION
GRIP FRAME ASSEMBLYENSAMBLAJE DEL ARMAZÓN DE AGARREASSEMBLAGE DU CORPS DE POIGNÉE
Key Description
1 RECEIVERASSEMBLYW/INTEGRATED
BARREL2 COCKINGPIN3 BOLTASSEMBLY4 VELOCITYADJUSTMENTASSEMBLY5 STRIKERPLUG6 SPRINGGUIDE7 BUMPER8 STRIKERSPRING9 STRIKERASSEMBLY10 RETAININGPIN
Key Description
1 SCREW2 PIN3 BALLDETENT4 SEARPIN5 O-RING6 SCREENFILTER7 PIVOTPIN8 SAFETY9 SEAR10 GRIPFRAME11 GRIPPANELLH12 TRIGGERSPRING13 SEARSPRING14 SAFETYDETENTSPRING15 TRIGGERASSEMBLY
Key Description
13 LOCKWASHER14 SCREW15 BRAIDEDHOSEASSEMBLY16 FOREGRIPASSEMBLY17 BALLSTOP18 BALLSTOPSCREW19 VALVESTEMASSEMBLY20 VALVESPRING21 O-RING22 VALVEPLUG
Figure B
VELOCITY PLUGTaco de Velocidad
Obturateur de VitesseSPRINGResorteRessort SPRING GUIDE
Guia De ResorteGuide-Ressort
BUMPER Amortiguador
Butoir
STRIKERPercutor
PercuteurQUICK PULL PINPasador de Tracción Rápida Goupille de Traction Rapide
BOLTResorteRessort
Figure C
STRIKERPecutor
Percuteur
BOLTResorteRessort
• DON’Timmersemarkerinwater.(Markerpartsmaybecleanedby wipingwithasoftclothorpapertowel).
DROP FORWARDCaída hacia adelanteFaire basculer vers
FORE-GRIPEmpuñadura frontal
Garde-main
INTEGRATED BARREL
Canon intégré Cañón integrado
AIR-THROUGH HOLEAir par le TrouAgujero para el paso de aire
DO’S AND DON’TS OF CARE AND MAINTENANCENote: AnycosmeticormechanicalchangestoproductwillvoidwarrantyandmaynotsatisfyASTMstandardsforsafetyduringpaintballplay.UseonlyBrassEagleapprovedreplacementpartsandupgradecomponentstomaintainwarrantyandsafeoperatingmarker.Follow these easy points to keep your marker in top shape for years to come. DO’S• DOreadownersmanualthoroughlybeforeusingmarkerandfor completedisassemblyandcleaninginstructions..• DOlubricateo-ringsusing3dropsofmineraloilintheASAadapter witheachchangeofgassource(tank),ormarkerwilldryoutand causeittonotrecockafterthefirstshotorafterrapidfiring.• DOexaminevalvesealdrawingonbacktoinsurecorrectreassembly.• DOfamiliarizeyourselfwiththepartsdrawingpriortoanydisassembly.• DOputmarkerpartsonclothtoavoidlosingpartsorpartsfalling downontodirtorsandwhendisassembling,• DOlubricateo-ringswithmineraloilimmediatelyaftercleaning.See backsideforlubricationpoints.DON’TS• DON’Tchangeormodifyyourmarkerorairsystem.BrassEaglemark ers,valve,airhose,airadaptorandpressurizedtanksaredesignedto satisfytheASTMrequirementsforsafety.Anymodificationmaynotbe totheASTMstandardsandmaybeunsafeforpaintballplay.• DON’Treturnthismarkertoretailer.Call1-877-877-GAME(4263).• DON’TDISASSEMBLEmarkerifyouareunfamiliarwithmarkermain- tainence.(Callcustomerserviceat1-877-877-4263orvisitourwebsite atwww.brasseagle.com/serviceforassistance).• DON’Tuselubricantsotherthanmineraloil.(Forquestionsabout properlubricantsconsultthewebpageorcustomerserviceat 1-877-877-4263)• DON’Tdisassemblehosefrommarker.(Callcustomerserviceat 1-877-877-4263forassistance).
Figure D
OWNER’S MANUALand Do’s and Don’ts
of marker care
Ball Feed PortAlimentador de bollas Puerta Alimentationde billes Orifice
Ball Feed PortAlimentador de bollas Puerta Alimentationde billes Orifice
SEMI AUTOMATIC PAINTBALL MARKER
13. La munición paintball puede causar manchas en superficies porosas tales como ladrillo, madera o estuco.14. Siempre mida la velocidad antes de empezar a jugar paintball.15. Nunca dispare a velocidades en exceso a 300 pies (90 m) por segundo.16. Nunca se involucre en vandalismo.17. No utilice el marcador para tirar al pasar manejando.18. No modifique en ninguna forma el sistema de aire a presión de su marcador o cilindro.
PISTOLA DEPAINTBALLSEMIAUTOMATICÁ
DEL MODELO
MANUAL DEL PROPIETARIOContiene:• Información de Seguridad • Garantía• Diagrama • Instrucciones de Funcionamiento• Guía para Resolver Problemas
Este símbolo de alerta indica importantes mensajes en este manual. Cuando usted vea este símbolo, esté alerta a la posibilidad de lesiones y lea con cuidado el mensaje que sigue.
ADVERTENCIA: ESTE NO ES UN JUGUETE. EL MAL USO PUEDE CAUSAR LESIONES DE GRAVEDAD O IncLUSIVE LA MUERTE. PROTECCIÓN PARA EL JUEGO DE PAINTBALL DEBERÁ SER USADA POR EL USUARIO Y CUALQUIER PERSONA DENTRO DEL PERÍMETRO DE ALCANCE DEL JUEGO. SE RECOMIENDA QUE LA PERSONA QUE COMPRE EL PRODUCTO SE POR LO MENOS DE 18 AÑOS DE EDAD, 14 AÑOS CON LA SUPERVISIÓN DE UN ADULTO, O DE 10 AÑOS SI ES USADO DENTRO DE UNA CANCHA QUE CUMPLA CON LAS NORMAS ASTM-STANDARD F1777-97. LEA EL MANUAL DE INSTRUCCIONES ANTES DE USAR.
ADVERTENCIA: NUNCA DISPARE A NADIE QUE NO ESTÉ CUBIERTO CON EQUIPO DE PROTECCIÓN APROPIADO PARA OJOS, OÍDOS, GARGANTA Y CABEZA, ESTE EQUIPO DEBERÁ SER USADO TODO EL TIEMPO. LA PROTECCIÓN PARA LOS OJOS DEBERÁ SER DISEÑADA ESPECÍFICAMENTE PARA EL USO DE PAINTBALL. EL FALLAR EN SEGUIR ESTAS PRECAUCIONES DE SEGURIDAD PUEDE RESULTAR EN LESIONES DE GRAVEDAD O IncLUSO CEGUERA Y SORDERA.
Bienvenidos al equipo de Viewloader® y gracias por comprar esta pistola marcadora de Paintball de gran calidad.
Nosotros en Viewloader® nos comprometemos en proveerlo con el mejor producto y servicio posibles. Su modelo está diseñado y fabricado para un fácil mantenimiento y un funcionamiento libre de problemas. Le aconsejamos que lea este manual para obtener la seguridad y disfrute del producto.
Llame al 877-877-GAME (4263) o visite nuestro website www.viewloader.com/service si necesita lista ilustrada de partes.
REGLAS PARA EL MANEJO SEGURO DE SU PAINTBALL1. Siempre utilice protección adecuada para ojos, cara y oídos diseñada específicamente para detener la munición paintball.2. Nunca le dispare a una persona que no tenga la pro tec ciónde seguridad adecuada.3. Maneje siempre cada pistola de Paintball como si estuviera cargada.4. Nunca mire por el cañón del marcador.5. Nunca apunta su pistola a lo que no quiera disparar.6. Mantenga la pistola con seguro hasta que esté listo para disparar.7. Mantenga el cañón de la pistola con su tapón cuando no esté usando.8. Remueva siempre la fuente de gas antes de desarmar.9. Guarde bajo llave su pistola de paintball descargada de gas y de munición.10. Siga las instrucciones de seguridad de la fuente de gas para su manejo y almacenamiento.11. Nunca use nunca nada que no se munición paintball de calibre .6812. Nunca dispare a objetos frágiles tales como ventanas.
LANCEUR SEMIAUTOMATIQUE ALIMENTATIONCALIBRE 0.68
MANUEL DU PROPRIÉTAIRECONTENU:• Consignes de sécurité • Informations sur la garantie • Schéma annoté • Guide d’utilisation• Guide de dépannage
Ce symbole d’avis de sécurité indique la présence d’une consigne de sécurité importante. Lorsque vous le voyez dans ce manuel, faites attention aux risques de blessure et lisez attentivement la consigne adjacente.
AVERTISSEMENT : CE PRODUIT N’EST PAS UN JOUET. TOUTE UTILISATION NON APPROPRIÉE PEUT PROVOQUER DES BLESSURES GRAVES, VOIRE MORTELLES. UNE PROTECTION OCULAIRE CONÇUE POUR LE PAINTBALL DOIT ÊTRE PORTÉE PAR L’UTILISATEUR ET TOUTE PERSONNE SE TROUVANT À PORT_E DU LANCEUR. LES ACHETEURS DEVRAIENT AVOIR AU MOINS 18 ANS. LES UTILISATEURS PEUVENT AVOIR ENTRE 14 ET 18 ANS S’ ILS SONT SUPERVISÉS PAR UN ADULTE OU 10 ANS ET PLUS S’ ILS UTILISENT LE LANCEUR SUR UN TERRAIN DE PAINTBALL RESPECTANT LA NORME ASTM F177797. LIRE LE MANUEL D’UTILISATION AVANT TOUTE UTILISATION.
AVERTISSEMENT : NE TIREZ JAMAIS SUR UNE PERSONNE NE PORTANT PAS LES ÉQUIPEMENTS PROTECTEURS APPROPRIÉS POUR LES YEUX, LES OREILLES, LA GORGE ET LA TÊTE, LESQUELS DOIVENT D’AILLEURS ÊTRE PORTÉS EN TOUT TEMPS. LES LUNETTES DE SÉCURITÉ DOIVENT ÊTRE CONÇUES SPÉCIALEMENT POUR LE PAINTBALL. L’ IGNORANCE DE CES CONSIGNES DE SÉCURITÉ PEUT PROVOQUER DES BLESSURES GRAVES, COMME LA PERTE DE L’OUÏE OU DE LA VUE.
Bienvenue au sein de l’ équipe Viewloader® et merci d ’avoir acheté ce lanceur de paintball Viewloader® de qualité supérieure.
Chez Viewloader®, nous mettons tout en œuvre pour offrir à la clientèle les meilleurs produits et le meilleur service sur le marché. Votre lanceur a été conçu et fabriqué pour un entretien minimum et un rendement supérieur sans défectuosité Prière de lire ce manuel pour tirer le plus de profit de votre achat et l’utiliser en toute sécurité.
Composez le 1-877-877-GAME (4263) ou visitez notre site Web www.viewloader.com/service si vous souhaitez obtenir une liste illustrée des pièces. RÈGLES DE SÉCURITÉ POUR L’UTILISATION D’UN LANCEUR DE PAINTBALL1. Portez toujours des équipements de protection des yeux, du visage et des oreilles conçus pour le paintball.2. Ne tirez jamais sur une personne ne portant pas tous les équipements de protection nécessaires.3. Les lanceurs doivent toujours être considérés chargés.4. Ne jamais regarder à l’intérieur du baril du marqueur. 5. Ne pointez jamais un lanceur de paintball vers quelque chose que vous ne désirez pas atteindre.6. Le verrou de sécurité du lanceur doit être mis jusqu’à ce que vous soyez prêt à tirer.7. Entre les séances de tir, gardez toujours le bouchon du canon sur la bouche du lanceur.8. Avant de démonter le lanceur, enlevez toujours la source d’alimentation en gaz.9. Le lanceur doit toujours être rangé sous clé, avec le chargeur vide et la bouteille de gaz déconnectée.10. Respectez les avertissements de manutention et de rangement apparaissant sur la bouteille de gaz.
11. N’utilisez jamais d’autres munitions que des billes de paintball de calibre 0,68.12. Ne tirez jamais sur des objets fragiles, comme des vitres.13. Les billes de paintball peuvent tacher certaines surfaces poreuses comme la brique, le stuc et le bois.14. Vérifiez toujours la vitesse des billes avant de jouer au paintball.15. Ne tirez jamais à une vitesse dépassant 300 pi/s (91 m/s).16. Ne prenez jamais part à du vandalisme.17. N’utilisez pas le marqueur pour tirer depuis une voiture.18. Ne modifiez en aucune façon le système d’air sous pression ou le cylindre de votre marqueur.
Consejos adicionales para detectar y corregir los problemas, Paquete de Reparación y Partes explotadas puede ver nuestro website en: www.viewloader.com/service.
El Paquete de Reparación VL #0034-00 está disponible en su distribuidor local o en nuestro website, en: www.viewloader.com
Pour obtenir des conseils sur le dépannage, de l’information sur la trousse de réparation et une vue éclatée des pièces, visitez notre site Web www.viewloader.com/service.
La trousse de réparation VL no 0034-00 est disponible chez votre détaillant ou en visitant notre site Web www.viewloader.com.
Clave Descripción
ENSAMBLAJE DEL ARMAZÓN DE AGARRE Clave Descripción1.TORNILLO2.PERNO3.RETÉNDEBOLAS4.PERNODELGANCHODELPERCUTOR5.SELLODEGOMA6.FILTRODEPANTALLA7.PERNOPIVOTE8.SEGURIDAD
Numéro Description
ENSEMBLE DU CHSSIS DE POIGNÉE Numéro Description
Utilisez une raclette éponge de canon pour nettoyer les paintballs du canon de votre marqueur. Nous recommandons la raclette éponge Viewloader® Proflex #5012.NE RETOURNEZ PAS CE MARQUEUR À VOTRE DÉTAILLANT. POUR TOUTE ASSISTANCE APPELEZ LE 1-877-877-GAME (4263).RENSEIGNEMENTS SUR LA GARANTIE GARANTIE: GARANTIE LIMITÉE DE 90 JOURS (BON D’ACHAT D’ORIGINE REQUIS)Pendant 90 jours à partir de la date d’achat, Brass Eagle® réparera ou remplacera ce marqueur sans frais si le matériel ou la fabrication sont défectueux. Cette garantie vous donne des droits juridiques spécifiques. Vous pouvez également avoir d’autres droits. Ceux-ci peuvent varier d’état en état. Les réparations peuvent être effectuées dans les Centres de Réparation autorisés de Brass Eagle®. Une liste de ces établissements est disponible sur le site web de Brass Eagle’s à www.brasseagle.com ou en téléphonant à Brass Eagle® au 1-877-877-GAME (4263). Ces Centres de Réparation offrent généralement le service le plus rapide.Si vous préfdérez renvoyer votre marqueur à Brass Eagle® veuillez appeler le service clientèle au 1-877-877-GAME (4263) pour obtenir un numéro d’autorisation de renvoi et l’adresse où il doit être expédié. (Le numéro d’autorisation doit être visible à l’extérieur du paquet envoyé pour qu’il soit accepté.)Ne renvoyez aucun produit par l’intermédiaire de services qui ne peuvent pas etre suivis tels que le courrier normal ou le paquet poste. Ces produits pourraient se perdre et Brass Eagle® LLC ne sera pas responsable de son remplacement.MARQUEURS DE PAINTBALL HORS GARANTIELes Centres de Réparation autorisés répareront avec plaisir tout marqueur qui n’est pas sous garantie pour un prix symbolique pour couvrir les pièces et la main d’œuvre. Les réparations effectuées par les Centres de Réparation seront normalement plus rapides et moins chères que ceux qui sont renvoyés à l’usine. Allez à www.brasseagle.com/service pour savoir où se trouve le centre de réparation le plus près de chez vous. Avant d’expédier les marqueurs hors garan-tie, vous devez d’abord appeler le service clientèle au 1-877-877-GAME (4263) pour obtenir le numéro d’autorisation de renvoi et l’adresse où vous devez l’expédier. (Le numéro d’autorisation doit être visible à l’extérieur du paquet envoyé pour qu’il soit accepté.) Tout Marqueur hors garantie renvoyé à Brass Eagle® doit être expédié et payé à l’avance et doit inclure les frais de réparation. Veuillez appeler le numéro du Service Clientèle pour obtenir les frais courant de réparation. Brass Eagle® réparera ou remplacera le marqueur avec une unité remise à neuf du même modèle. Si le paiement n’est pas inclus, vous serez facturé pour les frais de réparation plus des frais de facturation de 4.00$. Au reçu du paiement, le marqueur ou son remplacement vous sera expédié. Dans le cas où le marqueur n’aurait pas d’indication sur le moyen de se mettre en contact avec l’expéditeur ou si aucun paiement pour la réparation n’est reçu dans les 60 jours après la date de la facture, la propriété du marqueur sera abandonnée et Brass Eagle® LLC s’en débarrassera à sa discrétion.INSTRUCTIONS SPÉCIALESEntretien/OpérationSuivez toutes les procédures énumérées dams ce manuel. De plus, vérifiez périodiquement l’assemblage du tuyau tressé d’acier pour d’éventuelles fuites ou effilochage.SécuritéNe pas permettre que le tuyau tressé avec le fil d’acier soit en aucun cas pincer. Le tuyau est durable mais n’est pas conçu pour agir comme garde gâchette.GUIDE POUR ENLEVER L’EQUIPEMENT SUR LE TERRAINEnlèvement de la Culasse et du PercuteurNOTE: Le canon de ce marqueur est intégré dans le récepteur et n’est pas conçu pour être enlevé ou remplacé1ère ÉTAPE. PROTECTION DES YEUX : Assurez-vous que tout le monde à portée de tir (200 mètres) est correctement protégé de l’impact des paintballs.2ème ÉTAPE. Enlevez l’alimentation de gaz du marqueur.
3ème ÉTAPE. Soyez sûr que le chien du pistolet soit dans la position vers l’avant. Tirez sur la
détente pour relâcher si nécessaire.4ème ÉTAPE. Otez la goupille rapide, la culasse, le bouchon du percuteur, le butoir, le guide du ressort, le ressort et le percuteur. (Figure B). NOTE : Faites très attention en enlevant toutes les pièces qui sont sous tension de ressort. REMONTAGE DE L’ÉQUIPEMENT SUR LE TERRAINSuivez les étapes ci-dessus en ordre inverse. Lubrifiez tous les points d’usure et les joints toriques avec de l’huile minérale seulement. 1ère ÉTAPE. Suivez les étapes 1-5 du Guide pour Enlever l’Equipement sur le Terrain.2ème ÉTAPE. Tirez sur la détente et tapez légèrement sur l’arrière du récepteur avec une serviette sur une surface plate pour enlever le percuteur.3ème ÉTAPE. Saisissez le percuteur avec les doigts et enlevez-le du récepteur en tirant.4ème ÉTAPE. Nettoyez avec un tissu doux ou une lingette pour bébés. Lubrifiez de nouveau avec de l’huile minérale et remplacez. NOTE : Examinez le joint torique pour voir s’il est endom-magé et le remplacer si nécessaire.5ème ÉTAPE. Remplacez l’assemblage de la culasse percuteur et le récepteur, le dispositif de sécurité étant à plat vers le bas. NOTE : Il est nécessaire de tirer sur la détente 3 fois ou plus tout en faisant pression sur l’assemblage culasse/ percuteur avec le doigt pour mettre le percuteur bien en place. (Voir Figure C)6ème ÉTAPE. Remontez comme indiqué dans la Section Remontage de l’Equipement sur le Terrain.NOTE : La culasse est conçue de manière unique pour être installée avec l’air allant par le trou vers le bas. Si vous l’installez avec l’air allant par le trou vers le haut la goupille d’armement ne s’insèrera pas complètement dans la culasse. Ceci afin d’empêcher un remontage incorrect.DÉMONTAGE / NETTOYAGE DE LA DÉTENTE DE LA BALLE1ère ÉTAPE. Enlevez 1 vis à tête hexagonale.2ème ÉTAPE. Enlevez la détente de la balle.3ème ÉTAPE. Nettoyez avec un tissu doux ou un chiffon pour bébé.4ème ÉTAPE. Remplacez en ordre inverse. (Voir Figure D)À FAIRE ET NE PAS FAIRE EN MATIÈRE DE SOINS ET D’ENTRETIENNote : Tout changement cosmétique ou mécanique du produit annulera la garantie et peut ne pas être conforme aux normes ASTM de sécurité pendant le jeu de paintball. Utilisez seulement des pièces de rechange et composants d’actualisation approuvés par Brass Eagle pour garder la garantie et faire fonctionner le marqueur sans danger. Suivez ces points faciles pour que votre marqueur fonctionne parfaitement pendant les années à venir. À FAIRE•LIRE le manuel de l’utilisateur à fond avant d’utiliser le marqueur et pour avoir les instructions complètes sur le démontage et le nettoyage.•LUBRIFIER les joints toriques en utilisant 3 gouttes d’huile minérale dans l’adaptateur ASA avec chaque changement de source de gaz (réservoir), sinon le marqueur sèchera et fera qu’il ne se réarmera pas après le premier tir ou après des tirs rapides. •EXAMINER le croquis du sceau de la valve à l’arrière pour assurer un remontage correct.•VOUS familiariser avec les croquis des pièces avant tout démontage.•METTRE les pièces du marqueur sur un tissu pour éviter de perdre des pièces ou de faire tomber des pièces sur la saleté ou le sable en démontant,•LUBRIFIER les joints toriques avec de l’huile minérale immédiatement après avoir nettoyé. Voir à l’arrière les points de lubrification.À NE PAS FAIRE•NE PAS changer ou modifier votre marqueur ou système d’air. Les marqueurs Brass Eagle, les valves, le tuyau d’air, l’adaptateur d’air et les réservoirs sous pression sont conçus pour répondre aux normes ASTM pour la sécurité. Toute modification peut ne pas répondre aux normes ASTM et peut être dangereuse pour le jeu de paintball.•NE PAS rendre ce marqueur au détaillant. Appelez le 1-877-877-GAME (4263).•NE PAS DÉMONTER le marqueur si vous n’êtes pas familiarisé avec l’entretien du marqueur. (Appelez le service clientèle au 1-877-877-4263 ou visitez notre site web à www.brasseagle.com/service pour assistance).•NE PAS utiliser de lubrifiants autres que l’huile minérale. (Pour des questions sur les lubrifiants corrects consultez la page web ou le service clientèle au 1-877-877-4263)•NE PAS démonter le tuyau du marqueur. (Appelez le service clientèle au 1-877-877-4263 pour assis-tance).MODE D’EMPLOIAVERTISSEMENT : Assurez-vous que le marqueur de paintball vise toujours dans une direction sûre. Lisez le mode d’emploi suivant et SANS ADVENTURER DE PAINTBALL suivez plusieurs fois les étapes du mode d’emploi avec votre marqueur de paintball (tirez à sec avec le marqueur de
paintball sur une cible sûre) pour pouvoir faire fonctionner le marqueur correctement et en toute sécurité.1ère ÉTAPE. PROTECTION DES YEUX : Assurez-vous que tout le monde à portée de tir (200 mètres) est correctement protégé des impacts de paintball.2ème ÉTAPE. SE METTRE SUR “MODE SÉCURITÉ”. Poussez le cran de sécurité de gauche à droite; la bande rouge ne doit pas être visible. Assurez-vous que l’obturateur du canon est bien engagé dans le canon du marqueur3ème ÉTAPE: Armez le marqueur en tirant la poignée d’armement complètement vers l’arrière jusqu’à ce qu’il soit bloqué en position de sécurité. Ce marqueur est un marqueur semi-automatique, qui se réarmera après le tir quand il fonctionne correctement.4ème ÉTAPE. ATTACHEZ LA SOURCE DE GAZ : Le marqueur peut être utilisé avec un cylindre se remplissant d’air constamment Brass Eagle® (non compris). Vous pouvez vous attendre à une meilleure efficacité du gaz avec un cylindre plus grand. (Le cylindre rechargeable de 9oz. de Brass Eagle® 9oz. est recommandé. Item #1471.) UTILISEZ SEULEMENT LES CYLINDRES BRASS EAGLE®-Tous les cylindres rechargeables et marqueurs de Brass Eagle® sont conformes aux normes ASTM pour l’engagement du filetage. D’autres cylindres peuvent ne pas être conformes aux normes ASTM et n’iront pas avec votre marqueur. NOTE: Ajoutez 3 gouttes d’huile minérale à l’adaptateur ASA avant d’attacher le cylindre rechargeable. Vérifiez sur le site web : www.brasseagle.com/service quels sont les lubrifiants autorisés.5ème ÉTAPE. CHARGEZ LES PAINTBALLS : A) Insérez le chargeur (non inclus dans tous les emballages) dans l’entrée d’alimentation des balles. Saisissez le chargeur par le haut. Insérez le tuyau d’entrée du chargeur dans l’entrée d’alimentation sur le marqueur. Tournez et poussez fermement dans le sens des aiguilles d’une montre. NOTE: L’ajustement du chargeur sur l’entrée d’alimentation est intentionnelle-
ment serré. (RECOMMANDÉ chargeur électronique multi-capacité Viewloader®, Quantum™, Revolution™ ou Tripod™ )B) Versez les paintballs dans le chargeur. NOTE : Les paintballs sont alimentés par gravité du chargeur vers le marqueur chaque fois que l’on appuie sur la gâchette. Un régime de feu trop rapide, des balles cassées ou trop de balles dans le chargeur peuvent provoquer la cassure des balles suivantes et affecter défavorablement la précision du marqueur de paintball. Utilisez une raclette éponge pour nettoyer l’intérieur du canon du marqueur de paintball. (RECOMMANDE paintballs de calibre .68 de marque Brass Eagle®, Viewloader® ou JT®.) Les paintballs doivent être entreposées dans un endroit frais et sec dans des sacs en plastique scellés. Ne pas exposer au gel, à la chaleur excessive ou à l’humidité et ne pas les ranger à la lumière directe du soleil. Ces conditions pourraient provoquer la cassure et/ou la mauvaise alimentation de celles-ci.6ème ÉTAPE. Enlevez l’obturateur du canon et commencez en toute sécurité en appuyant sur le cran de sûreté à partir du coté droit du marqueur de paintballs jusqu’à ce que la bande rouge soit visible.7ème ÉTAPE. VÉRIFIEZ LA VÉLOCITÉ : Vérifiez que la vélocité du marqueur du marqueur de paintball est inférieure à 300 pieds par seconde ou moins si requis par le terrain de jeu. La vélocité doit être mesurée au chronographe avant de jouer au paintball. La vélocité peut être ajustée en tournant la vis de réglage de la vélocité. (Voir Fig. A) En utilisant une clé hexagonale de 1/8” (comprise) tournez la vis dans le sens des aiguilles d’une montre pour augmenter la vélocité et dans le sens contraire pour diminuer la vélocité. (RECOMMANDÉ Chronographe sur canon Viewloader® pour vérifier la vélocité. Article #7815.) 8ème ÉTAPE. TIREZ : Le marqueur de paintball est maintenant prêt à tirer.AVERTISSEMENT: Ne tirez jamais sur quelqu’un sans un équipement approprié pour la protection des yeux.. Il doit être porté tout le temps. La protection oculaire doit être conçue spécifiquement pour l’usage du paintball. Ne pas suivre ces précautions de sécurité peut causer des blessures corporelles comprenant la cécité et la surdité.AVERTISSEMENT: Tous les marqueurs de paintball sont considérés chargés jusqu’à ce que l’on puisse démontrer qu’ils sont déchargés en suivant les instructions pour décharger votre marqueur.DÉCHARGEMENT DE VOTRE MARQUEURAVERTISSEMENT : Portez toujours une protection appropriée pour les yeux, le visage et les oreilles conçue spécialement pour arrêter les paintballs pendant le déchargement de votre marqueur de paintball.1ère ÉTAPE. Assurez-vous que l’obturateur du canon se trouve dans le canon en toute sécurité.2ème ÉTAPE. Mettez le marqueur sur sécurité. (Poussez de gauche à droite)3ème ÉTAPE. Enlevez le chargeur.4ème ÉTAPE. Mettez le marqueur à l’envers pour enlever les paintballs de l’entrée d’alimentation.5ème ÉTAPE. Orientez le marqueur vers le sol dans une direction sans risque ; enlevez l’obturateur du canon et tirez plusieurs fois pour vous assurer que le marqueur est complètement déchargé. Remplacez l’obturateur du canon, remettez le marqueur sur sécurité.6ème ÉTAPE. Enlevez la source de gaz.Utilisez une raclette éponge pour dégager toute paintball du canon. Ne déchargez pas votre marqueur à l’intérieur.AVERTISSEMENT : Ne regardez pas à l’intérieur de l’orifice ou du canon du marqueur tant que la source de gaz est attachée.
Utilice un secador para cañón para remover las paintballs rotas del cañón de su marcador. Nosotros recomendamos el secador Viewloader® Proflex #5012.NO DEVUELVA ESTE MARCADOR A SU VENDEDOR. PARA ASISTENCIA LLAME AL TELÉFONO 1-877-877-GAME (4263). INFORMACIÓN REFERENTE A LA GARANTÍA GARANTÍA: GARANTÍA LIMITADA POR 90 DÍAS (SE REQUIERE EL RECIBO DE COMPRA ORIGINAL)Durante 90 días a partir de la fecha de compra, Brass Eagle® reparará o reemplazará este mar-cador sin cargo alguno si estuviera defectuoso su material o mano de obra. Esta garantía le da a usted derechos legales específicos. Usted puede también tener otros derechos, los cuales pueden variar de estado a estado. El servicio está disponible a través de Centros de Servicio Brass Eagle® autorizados. Se encuentra disponible una lista de estos en el sitio Web de Brass Eagle en www.brasseagle.com o llamando a Brass Eagle® al teléfono 1-877-877-GAME (4263). Estos Centros de Servicio generalmente ofrecen el servicio más rápido.Si usted prefiere devolver su marcador a Brass Eagle® por favor llame al servicio al cliente al teléfono 1-877-877-GAME (4263) para obtener el número de autorización de devolución y la dirección de envío. (El número de autorización debe estar visible sobre el lado externo del paquete de envío para que este sea aceptado.) No devuelva ningún producto por medio de un servicio que no se pueda rastrear tal como el correo normal o Parcel Post. Dichos productos se pueden perder y Brass Eagle®. LLC. no será responsable por su reemplazoMARCADORES DE PAINTBALL FUERA DE GARANTÍALos Centros de Servicio autorizados con gusto repararán cualquier marcador que esté fuera de garantía por un cargo nominal para cubrir las partes y el trabajo. Las reparaciones hechas por los Centros de Servicio, usualmente serán más rápidas y menos costosas que aquéllas enviadas de vuelta a la fábrica.. Vaya a www.brasseagle.com/service para buscar ubicaciones de los centros de servicio cercanos a usted. Antes de enviar los marcadores que estén fuera de garantía, usted debe primeramente llamar a servicio al cliente al teléfono 1-877-877-GAME (4263) para obtener el número de autorización de la devolución y la dirección de envío. (El número de autorización debe estar visible sobre el lado externo del paquete de envío para que este sea aceptado.) Todo Marcador que esté fuera de garantía y sea devuelto a Brass Eagle® debe ser enviado con el flete prepago e incluir el honorario de reparación. Por favor llame al número de Servicio al Cliente para conocer el monto actualizado de los honorarios de reparaciones. Brass Eagle® reparará o reemplazará el marcador con una unidad reacondicionada del mismo modelo. Si no se incluye el pago, a usted se le facturará el honorario de reparación más un honorario de $4.00 por facturación. Una vez recibido el pago, el marcador o su reemplazo le será enviado. En caso de que en el envío del marcador no se incluya ninguna forma de contactar a quien lo ha enviado, o si no se recibe el pago de las reparaciones dentro de los 60 días a partir de la fecha de facturación, el dueño del marcador perderá todo derecho al mismo y Brass Eagle® LLC decidirá a su discreción el destino del mismo.INSTRUCCIONES ESPECIALESMantenimiento/OperaciónSiga los procedimientos listados en este manual. Además, periódicamente verifique el estado del conjunto de manguera recubierta con malla de acero para determinar si tiene pérdidas o está deshilachada.SeguridadNo permitir que la manguera con malla de acero se perfore de ninguna manera. La manguera es durable pero no está diseñada para actuar como protección del gatillo.GUÍA PARA DESARMADO EN EL CAMPORemoción del Cerrojo y Percutor NOTA: El cañón de este marcador está integrado dentro del receptor y no está diseñado para ser removido ni reemplazado.PASO 1. PROTECCIÓN PARA LOS OJOS: Asegúrese de que cualquiera que se encuentre dentro del rango de acción (200 yardas) esté debidamente protegido contra los impactos de paintballs.PASO 2. Remover el suministro de gas del marcador.PASO 3. Asegúrese de que el perno de armado está en la posición delantera. Tire del gatillo para liberar si fuera necesario.PASO 4. Retirar el perno de remoción rápida, el cerrojo, el tapón del percutor, el amortiguador, la guía del resorte, el resorte y el percutor. (Figura B). NOTA: Tenga precaución cuando las retire
ya que todas estas partes se encuentran bajo tensión de resortes.REARMADO EN EL CAMPOSiga los pasos enunciados más arriba en orden inverso. Lubrique todos los puntos de desgaste y los sellos de goma solamente con aceite mineral. PASO 1. Siga los Pasos 1-5 de la Guía de Desarmado en el campo.PASO 2. Tire del gatillo y golpee la parte posterior del receptor contra una toalla sobre una superficie plana para remover el percutor.PASO 3. Tome el percutor con los dedos y tire hacia afuera del receptor.PASO 4. Limpie con un trapo suave o con toallitas para bebes. Vuelva a lubricar con aceite mineral y reemplace. NOTA: Examine el sello de goma para determinar si tiene deterioros y reemplácelo si fuera necesario.PASO 5. Vuelva a colocar el conjunto de cerrojo y percutor dentro del receptor con el gancho del percutor plano y hacia abajo. NOTA: Es necesario tirar del gatillo tres o más veces mientras se aplica presión al conjunto de cerrojo y percutor con su dedo a fin de asentar en forma total el percutor. (Ver Figura C)PASO 6. Vuelva a armar según la Sección de Rearmado en el Campo.NOTA: El cerrojo está diseñado de manera única para ser instalado con el agujero por el cual pasa el aire hacia abajo. Si usted lo instala con el agujero por el cual pasa el aire hacia arriba, el perno de armado no se insertará en forma total dentro del cerrojo. Esto es para evitar el rearmado incorrecto.DESARMADO / LIMPIEZA DEL RETÉN DE BOLASPASO 1. Retire un 1 tornillo con cabeza Phillips.PASO 2. Retire el retén de bolas.PASO 3. Limpie con un trapo suave o con toallitas para bebes.PASO 4. Recolocar en orden inverso. (Ver Figura D)LO QUE DEBE Y NO DEBE HACERSE DURANTE EL CUIDADO Y MANTENIMIENTONota: Cualquier cambio en la cosmética o en la mecánica del producto anulará la garantía y puede no satisfacer las normas ASTM de seguridad durante el juego de paintball. Utilice solamente partes de reemplazo y componentes de actualización aprobados por Brass Eagle para mantener la garantía y las condiciones seguras de operación del marcador. Siga estos puntos fáciles para mantener su marcador en estado óptimo durante los años venideros. QUÉ SE DEBE HACER•LEA en forma completa el manual del propietario antes de usar el marcador y para obtener instrucciones completas para desarmado y limpieza.•LUBRIQUE los sellos de goma usando 3 de aceite mineral en el adaptador ASA con cada cambio de suministro de gas (tanque), caso contrario el marcador se secará y no permitirá el rearmado después del primer disparo o en caso de disparos rápidos. •EXAMINE el dibujo del sello de la válvula en la parte posterior para asegurar el correcto rear-mado.•FAMILIARÍCESE con el dibujo de las partes antes de realizar cualquier desarmado.•COLOQUE las partes del marcador sobre un trapo para evitar perderlas o que las mismas se caigan sobre tierra o arena durante el desarmado, •LUBRIQUE los sellos de goma con aceite mineral inmediatamente después de la limpieza. Ver la parte posterior para reconocer los puntos de lubricación.QUÉ NO SE DEBE HACER•NO cambiar ni modificar su marcador ni el sistema de aire. Los marcadores Brass Eagle, la vál-vula, la manguera de aire, el adaptador de aire y los tanques presurizados están diseñados para satisfacer los requerimientos de seguridad de las normas ASTM. Cualquier modificación puede no satisfacer las normas ASTM y puede ser insegura para el juego de paintball.•NO devuelva este marcador al vendedor. Llame al teléfono 1-877-877-GAME (4263).•NO DESARME el marcador si usted no está familiarizado con el mantenimiento del mismo. (Llame a servicio al cliente al teléfono 1-877-877-4263 o visite nuestra página Web en www.brasseagle.com/service para obtener asistencia).•NO use lubricantes que no sean aceite mineral. (Para consultas acerca de los lubricantes apropia-dos ver en la página Web o llamar a servicio al cliente al teléfono 1-877-877-4263)•NO desarmar la manguera del marcador. (Llamar a servicio al cliente al teléfono 1-877-877-4263 para obtener asistencia).INSTRUCCIONES DE OPERACIÓNADVERTENCIA: Asegúrese de que el marcador de paintball esté siempre apuntando hacia una dirección segura. Lea las siguientes instrucciones de operación y SIN CARGAR NINGUNA PAINTBALL repase varias veces los pasos operativos de su marcador de paintball (dispare el mar-cador de paintball en vacío hacia un objetivo seguro) de manera tal que usted pueda operar el marcador en forma apropiada y segura.PASO 1. PROTECCIÓN PARA LOS OJOS: Asegúrese de que cualquier persona que esté dentro
del rango de acción (200 yardas) esté adecuadamente protegida contra los impactos de paintballs.PASO 2. COLOCAR EN POSICIÓN “SEGURIDAD”. Empuje la corredera de seguridad de derecha a izquierda; no se verá la banda roja. Asegúrese de que el tapón del cañón esté colocado en forma segura en la boca del marcador.PASO 3. ARMADO: arme el marcador tirando de la manija de armado totalmente hacia atrás hasta que trabe en posición de disparo. Este marcador es semiautomático, lo cual significa que cuando esté funcionando adecuadamente, se rearmará a sí mismo después del disparo.PASO 4. ACOPLAMIENTO DEL SUMINISTRO DE GAS: El marcador puede ser utilizado con un cilindro Brass Eagle® recargable de aire constante (no Incluido). Usted debería esperar una mejor eficiencia del gas con un cilindro recargable más grande. (Cilindro recargable recomendado Brass Eagle® 9oz.. Ítem #1471.) UTILICE SOLAMENTE CILINDROS BRASS EAGLE® - Todos los cilindros recar-gables y los marcadores Brass Eagle® cumplen con las normas ASTM para aco-plamiento a rosca. Otros cilindros pueden no cumplir con las normas ASTM y no se adaptarán a su marcador. NOTA: Agregue 3 gotas de aceite mineral al adaptador ASA antes de acoplar el cilindro recargable. Verifique el sitio Web en la dirección: www.brasseagle.com/service para conocer los lubricantes aprobados.PASO 5. CARGA DE PAINTBALLS: A) Inserte el cargador (no Incluido en el paquete) en la compuerta de alimentación de las bolas. Agarre el cargador por la parte superior. Inserte el cuello del cargador de alimentación dentro de la compuerta de alimentación de bolas del marcador. Tuerza y empuje firmemente en el sentido de las agujas del reloj. NOTA: El encastre entre el cargador y la compuerta de alimentación de bolas es ajustado de manera intencional. (SE RECOMIENDA el cargador electrónico de múltiple capacidad Viewloader®, Quantum™, Revolution™ o Tripod™)B) Vierta las paintballs dentro del cargador. NOTA: Las Paintballs son alimentadas por gravedad desde el cargador hacia el marcador cada vez que se tira del gatillo. Un ritmo de disparo muy rápido, Bolas rotas o demasiadas bolas en el cargador pueden causar que las bolas siguientes se rompan y ello afectará en forma adversa la exactitud del marcador de paintball. Utilice un secador para limpiar el
interior del cañón del marcador de paintballs. (SE RECOMIENDA el uso de paintballs Brass Eagle®, Viewloader® o marca JT® calibre .68.) Las Paintballs deben ser almacenadas en un lugar fresco y seco, en bolsas de plástico selladas. No las someta al congelamiento, excesivo calor, humedad ni las almacene bajo la luz directa del sol. Estas condiciones pueden causar la rotura de las bolas y/o una pobre alimentación.PASO 6. Retire el tapón del cañón y desactive la seguridad empujando la corredera de seguridad desde el lado derecho del marcador de paintball hasta que la banda roja se haga visible.PASO 7. VERIFICAR LA VELOCIDAD: Verifique que la velocidad del marcador de paintball esté por debajo de los 300 pies por segundo o menos si así lo requiere el campo de juego. La velocidad debe ser medida con un cronómetro antes de jugar al paintball. La velocidad puede ser ajustada girando el tornillo de ajuste de velocidad (Ver Fig. A) Utilizando una llave Allen de 1/8” (Incluida) gire el tornillo en el sentido de las agujas del reloj para incrementar la velocidad y en sentido contrario al de las agujas del reloj para reducir la velocidad. (SE RECOMIENDA el cronómetro Viewloader® sobre el cañón para verificar la velocidad. Ítem #7815.) PASO 8. DISPARO: El marcador de paintball está ahora listo para disparar.ADVERTENCIA: Nunca dispare hacia alguien que no posea el equipo apropiado de pro-tección para los ojos, el cual debe ser utilizado en todo momento. La protección para los ojos debe ser diseñada específicamente be para su uso en el juego de paintball. La falta de cumplimiento con estas precauciones de seguridad puede dar como resultado, lesiones en el cuerpo Incluyendo la ceguera y sordera.ADVERTENCIA: Se considera que todos los marcadores de paintball están cargados hasta que se demuestre que están descargados siguiendo los pasos para la descarga de su marcador.DESCARGA DE SU MARCADORADVERTENCIA: Siempre utilice la protección apropiada para los ojos, la cara y los oídos diseñada específicamente para detener las paintballs durante la descarga de su marcador de paintball.PASO 1. Asegúrese de que el tapón del cañón esté seguramente colocado en el mismo.PASO 2. Coloque el marcador en la posición seguridad. (Empuje de izquierda a derecha)PASO 3. Retire el cargador.PASO 4. Ponga el marcador boca abajo para remover las paintballs de la compuerta de alimentación.PASO 5. Apunte el marcador hacia el piso en una dirección segura; retire el tapón del cañón y dispare varias veces para asegurarse de que el marcador esté completamente descargado. Recoloque el tapón del cañón, coloque el marcador nuevamente en seguridad.PASO 6. Retire el suministro de gas.PASO 7. Utilice un secador para retirar cualquier paintball que se encuentre en el cañón. No descargue el marcador en el interior de un local.ADVERTENCIA: No mire hacia adentro de la abertura ni del cañón del marcador mientras esté acoplando el suministro de gas.
9.GANCHODELPERCUTOR10.ARMAZÓNDELAEMPUÑADURA11.PANELLHDELAEMPUÑADURA12.RESORTEDELGATILLO13.RESORTEDELGANCHODELPERCUTOR14.RESORTEDELRETÉNDESEGURIDAD15.CONJUNTODELGATILLO
1.CONJUNTORECEPTORC/CAÑÓNINTEGRADO2.PERNODEARMADO3.CONJUNTODECERROJO4.CONJUNTODEAJUSTEDEVELOCIDAD5.TAPÓNDELPERCUTOR6.GUÍADERESORTE7.AMORTIGUADOR8.RESORTEDELPERCUTOR9.CONJUNTOPERCUTOR10.PERNODERETENCIÓN11.TORNILLODEAJUSTEDELCUERPODELAVÁLVULA12.CONJUNTODELARMAZÓNDELA
EMPUÑADURA13.ARANDELADERETENCIÓN14.TORNILLO15.CONJUNTODEMANGUERARECUBIERTACONMALLA16.CONJUNTODEEMPUÑADURADELANTERA17.RETÉNDEBOLAS18.TORNILLODELRETÉNDEBOLAS19.CONJUNTODELTRONCODELAVÁLVULA20.RESORTEDELAVÁLVULA21.SELLODEGOMA22.TAPÓNDELAVÁLVULA
1.VIS2.GOUPILLE3.DÉTENTEDELABALLE4.GOUPILLEDESÉCURITÉ5.JOINTTORIQUE6.FILTREÉCRAN7.GOUPILLEPIVOT8.SÉCURITÉ
9.DISPOSITIFDESÉCURITÉ10.CHASSISPOIGNÉE11.PANNEAULHPOIGNÉE12.RESSORTDEDÉTENTE13.RESSORTDESÉCURITÉ14.RESSORTDEDÉTENTEDESÉCURITÉ
1.ASSEMBLAGERÉCEPTEURAVECCANONINTÉGRÉ2.GOUPILLEARMEMENT3.ASSEMBLAGECULASSE4.ASSEMBLAGEAJUSTEMENTDEVÉLOCITÉ5.GOUPILLEDUPERCUTEUR6.GUIDAGEDURESSORT7.BUTOIR8.RESSORTDUPERCUTEUR9.ASSEMBLAGEPERCUTEUR10.GOUPILLEDERETENUE11.VISDERÉGLAGEDELAPARTIEVALVE
12.ASSEMBLAGEDUCHASSISPOIGNÉE13.JOINTDELAFERMETURE14.VIS15.ASSEMBLAGETUYAUTRESSÉ16.ASSEMBLAGEAVANT-POIGNÉE17.ARRÊTDEBALLE18.VISD’ARRÊTDEBALLE19.ASSEMBLAGETIGEDEVALVE20.RESSORTDEVALVE21.JOINTTORIQUE22.GOUPILLEDEVALVE