Paintball Marker User’s Manual - phantomonline.com€¦ · User’s Manual Paintball Marker ®...
12
530 South Springbrook Road Newberg, OR 97132 User’s Manual Paintball Marker ® Component Concepts, Inc., 530 South Springbrook Road, Newberg, OR 97132 Phone: (503) 554-8095 Fax: (503) 554-9370 www.phantomonline.com / [email protected]
Transcript of Paintball Marker User’s Manual - phantomonline.com€¦ · User’s Manual Paintball Marker ®...

530 South Springbrook Road Newberg, OR 97132
User’s Manual
Paintball Marker
®
Component Concepts, Inc., 530 South Springbrook Road, Newberg, OR 97132 Phone: (503) 554-8095 Fax: (503) 554-9370
www.phantomonline.com / [email protected]
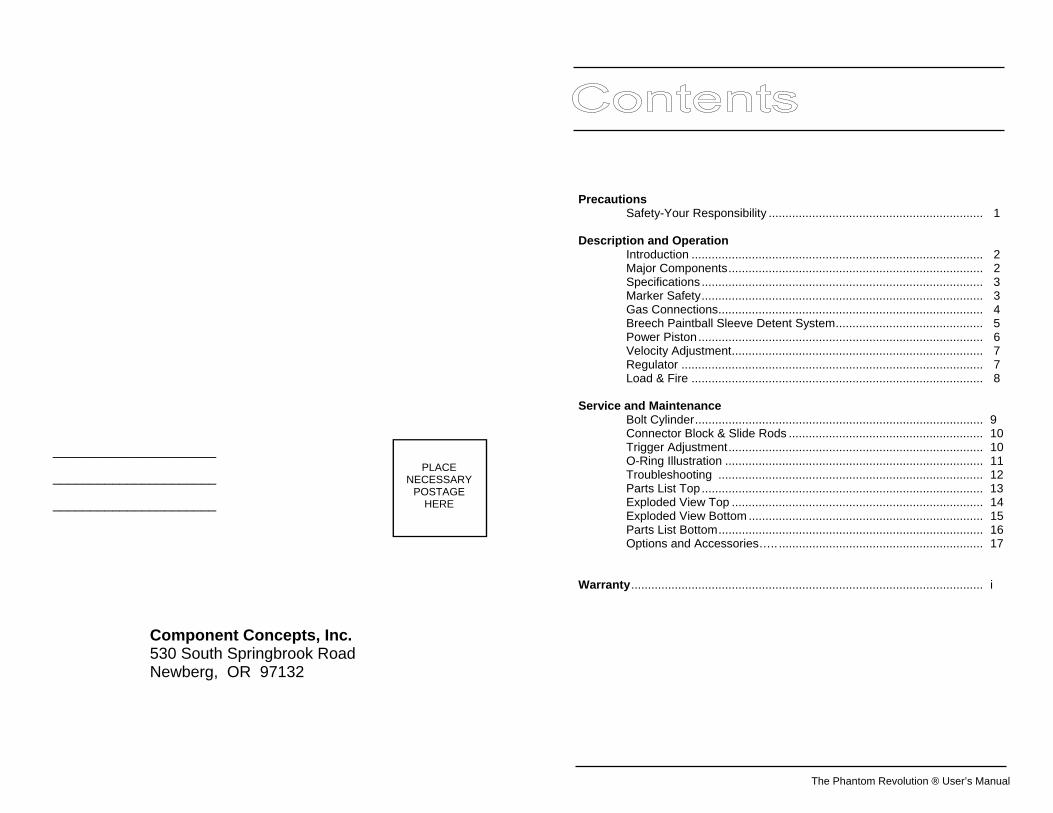
The information in this manual is subject to change without notice and does not represent a commitment on the part of Component Concepts, Inc. CCI reserves the right to make improvements to products without incurring any obligation to incorporate such improvements in products previously sold. Copyright© 2012 by Component Concepts, Inc. All rights are reserved. The PHANTOM REVOLUTION ® is a registered trademark of Component Concepts, Inc.
The Phantom Revolution ® User’s Manual The Phantom Revolution ® User’s Manual i
Component Concepts, Inc. 530 South Springbrook Road
Newberg, OR 97132
We are open 9 AM to 5 PM PST Monday through Friday. Phone: 503-554-8095 Fax: 503-554-9370
The limited warranty begins on the date of purchase. This warranty applies to all models of the Phantom products and accessories manufactured or sold by Component Concepts, Inc. (CCI). CCI pledges to you, the owner, that the Phantom products are free from defects in materials and workmanship for 180 days. During the term of this warranty, at no additional charge to the owner, excluding shipping, CCI will repair or replace any defective parts of the Phantom products with new or, at the option of CCI, refurbished parts. The owner must prepay any shipping charges. In addition, the owner is responsible for insuring any product returned and assumes the risk of loss during shipping. All parts and products replaced under this warranty become the property of CCI.
______________________
______________________
______________________
PLACE NECESSARY
POSTAGE HERE
Component Concepts, Inc. 530 South Springbrook Road Newberg, OR 97132
The Phantom Revolution ® User’s Manual
Precautions Safety-Your Responsibility ................................................................ 1 Description and Operation Introduction ....................................................................................... 2 Major Components ............................................................................ 2 Specifications .................................................................................... 3 Marker Safety .................................................................................... 3 Gas Connections ............................................................................... 4 Breech Paintball Sleeve Detent System ............................................ 5 Power Piston ..................................................................................... 6 Velocity Adjustment ........................................................................... 7 Regulator .......................................................................................... 7 Load & Fire ....................................................................................... 8 Service and Maintenance Bolt Cylinder ...................................................................................... 9 Connector Block & Slide Rods .......................................................... 10 Trigger Adjustment ............................................................................ 10 O-Ring Illustration ............................................................................. 11 Troubleshooting ............................................................................... 12 Parts List Top .................................................................................... 13 Exploded View Top ........................................................................... 14 Exploded View Bottom ...................................................................... 15 Parts List Bottom ............................................................................... 16 Options and Accessories….. ............................................................. 17 Warranty ......................................................................................................... i
Safety-Your Responsibility
The Phantom Revolution ® User’s Manual 1
The Phantom Revolution is designed and built to provide safe and dependable service if handled according to instructions. Read and understand the instructions and warnings in this manual before using the Phantom Revolution. Failure to do so could result in personal injury or property damage. These precautions are given here for your safety and for the protection of the marker. Review them carefully before using or performing general maintenance or repairs on the marker.
Do not handle this marker until you are thoroughly familiar with its mechanical characteristics. Always wear approved eye protection when operating this or any paintball marker. Pressurize only while the marker is in use. Keep exposed flesh away from escaping compressed gas . When not in use engage marker safety “ON”. Never point the marker in the direction of anything you do not intend to mark. Never look directly into the barrel. Use only .68 caliber paintballs. Do not attempt to service the marker without first removing the compressed gas source. Do not fire the marker at a target that is less than two feet away.
WARNING The Phantom Revolution is a dangerous weapon if mishandled. This marker is not a toy. Follow the basic rules of safe firearms handling and the laws governing the ownership and use of gas-fired markers. Careless handling of any gas powered marker may cause serious injury.
WARNING The Phantom Revolution is a dangerous weapon if mishandled. Never clean, lubricate, disassemble, assemble, or work on the marker while it is pressurized. Observe safety precautions.
(fold)
Warranty Registration Card
Product Purchased________________________________Price ____________________
Serial Number_________________________________Date Purchased ______________
Owner __________________________________________________________________
Address _________________________________________________________________
City_______________________State_____Zip_________Phone ___________________
Purchased From __________________________________________________________
Address _________________________________________________________________
City_______________________State_____Zip_________Phone ___________________
Comments _______________________________________________________________
________________________________________________________________________
________________________________________________________________________
________________________________________________________________________
The Phantom Revolution ® User’s Manual 17
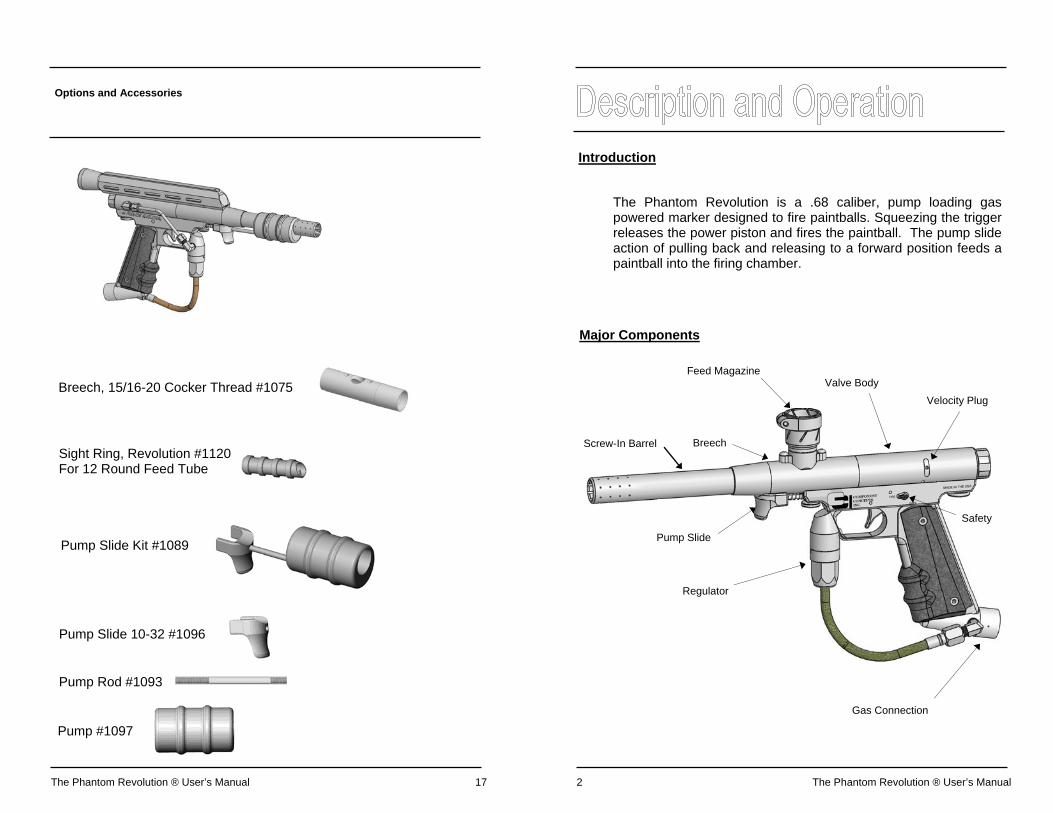
Options and Accessories
Breech, 15/16-20 Cocker Thread #1075
Sight Ring, Revolution #1120 For 12 Round Feed Tube
Pump Slide Kit #1089
Pump Slide 10-32 #1096
Pump #1097
Pump Rod #1093
2 The Phantom Revolution ® User’s Manual
Introduction
The Phantom Revolution is a .68 caliber, pump loading gas powered marker designed to fire paintballs. Squeezing the trigger releases the power piston and fires the paintball. The pump slide action of pulling back and releasing to a forward position feeds a paintball into the firing chamber.
Velocity Plug
Major Components
Valve Body
Screw-In Barrel
Pump Slide
Gas Connection
Breech
Regulator
Safety
Feed Magazine
The Phantom Revolution ® User’s Manual 3
Specifications
Description and Operation
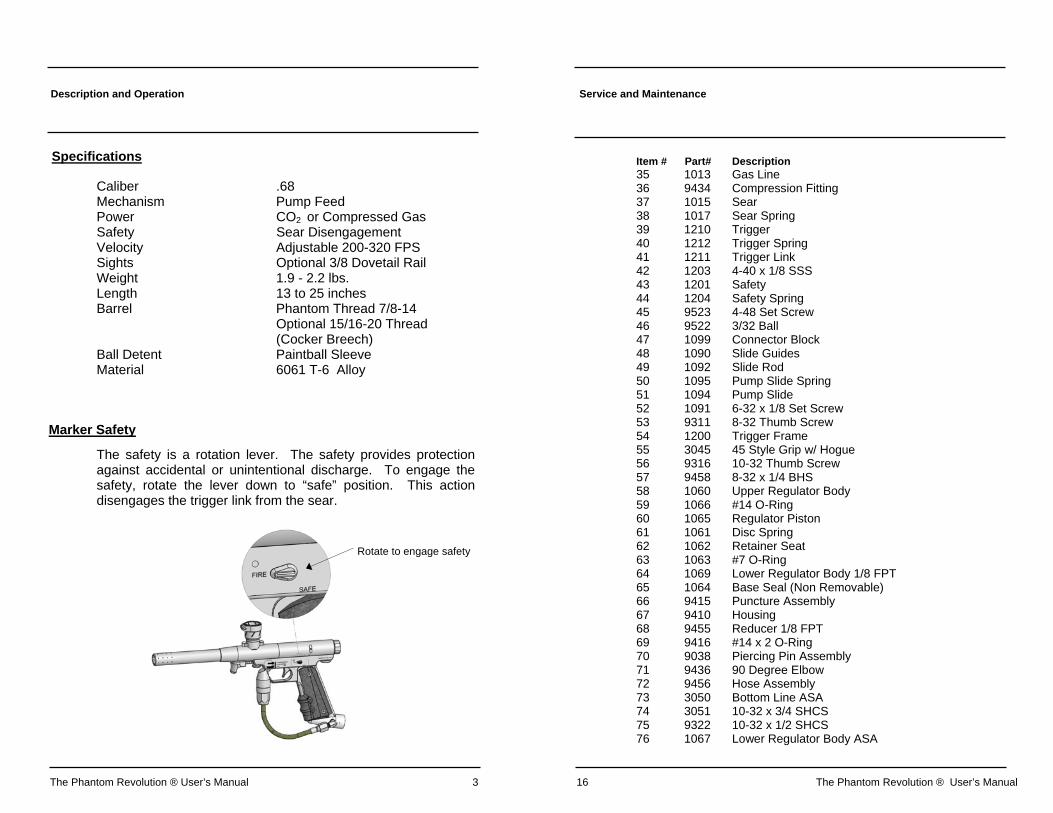
Caliber .68 Mechanism Pump Feed Power CO2 or Compressed Gas Safety Sear Disengagement Velocity Adjustable 200-320 FPS Sights Optional 3/8 Dovetail Rail Weight 1.9 - 2.2 lbs. Length 13 to 25 inches Barrel Phantom Thread 7/8-14 Optional 15/16-20 Thread (Cocker Breech) Ball Detent Paintball Sleeve Material 6061 T-6 Alloy
Marker Safety
The safety is a rotation lever. The safety provides protection against accidental or unintentional discharge. To engage the safety, rotate the lever down to “safe” position. This action disengages the trigger link from the sear.
Rotate to engage safety
16 The Phantom Revolution ® User’s Manual
Service and Maintenance
Item # Part# Description 35 1013 Gas Line 36 9434 Compression Fitting 37 1015 Sear 38 1017 Sear Spring 39 1210 Trigger 40 1212 Trigger Spring 41 1211 Trigger Link 42 1203 4-40 x 1/8 SSS 43 1201 Safety 44 1204 Safety Spring 45 9523 4-48 Set Screw 46 9522 3/32 Ball 47 1099 Connector Block 48 1090 Slide Guides 49 1092 Slide Rod 50 1095 Pump Slide Spring 51 1094 Pump Slide 52 1091 6-32 x 1/8 Set Screw 53 9311 8-32 Thumb Screw 54 1200 Trigger Frame 55 3045 45 Style Grip w/ Hogue 56 9316 10-32 Thumb Screw 57 9458 8-32 x 1/4 BHS 58 1060 Upper Regulator Body 59 1066 #14 O-Ring 60 1065 Regulator Piston 61 1061 Disc Spring 62 1062 Retainer Seat 63 1063 #7 O-Ring 64 1069 Lower Regulator Body 1/8 FPT 65 1064 Base Seal (Non Removable) 66 9415 Puncture Assembly 67 9410 Housing 68 9455 Reducer 1/8 FPT 69 9416 #14 x 2 O-Ring 70 9038 Piercing Pin Assembly 71 9436 90 Degree Elbow 72 9456 Hose Assembly 73 3050 Bottom Line ASA 74 3051 10-32 x 3/4 SHCS 75 9322 10-32 x 1/2 SHCS 76 1067 Lower Regulator Body ASA
The Phantom Revolution ® User’s Manual 15
Service and Maintenance
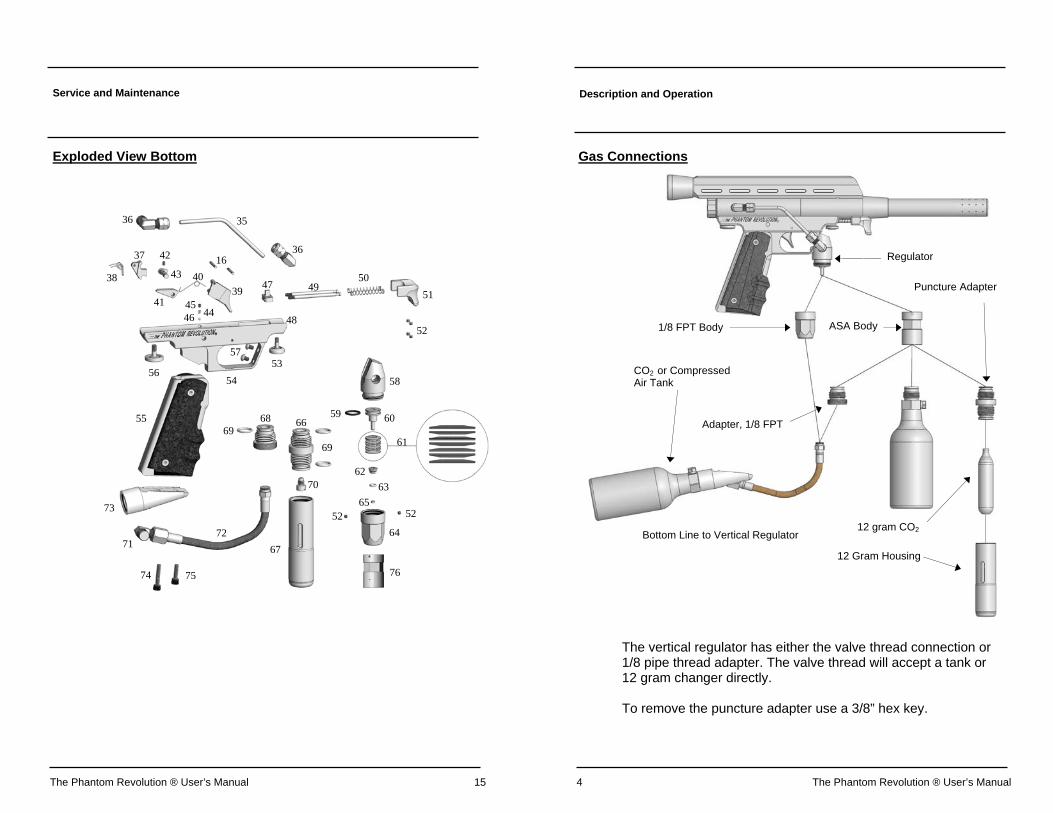
Exploded View Bottom
35
36 37
38 39
40
41
42
43
44 45 46
47
48
49 50
51
52
53 54
55
56
57
58
59 60
61
62 63
52
64
65
66
67
68
69
70
71 72
73
74 75
16
52
69
36
76
4 The Phantom Revolution ® User’s Manual
Description and Operation
Gas Connections
The vertical regulator has either the valve thread connection or 1/8 pipe thread adapter. The valve thread will accept a tank or 12 gram changer directly. To remove the puncture adapter use a 3/8” hex key.
Puncture Adapter
12 gram CO2
CO2 or Compressed Air Tank
Regulator
12 Gram Housing
Bottom Line to Vertical Regulator
Adapter, 1/8 FPT
1/8 FPT Body ASA Body
The Phantom Revolution ® User’s Manual 5
Description and Operation
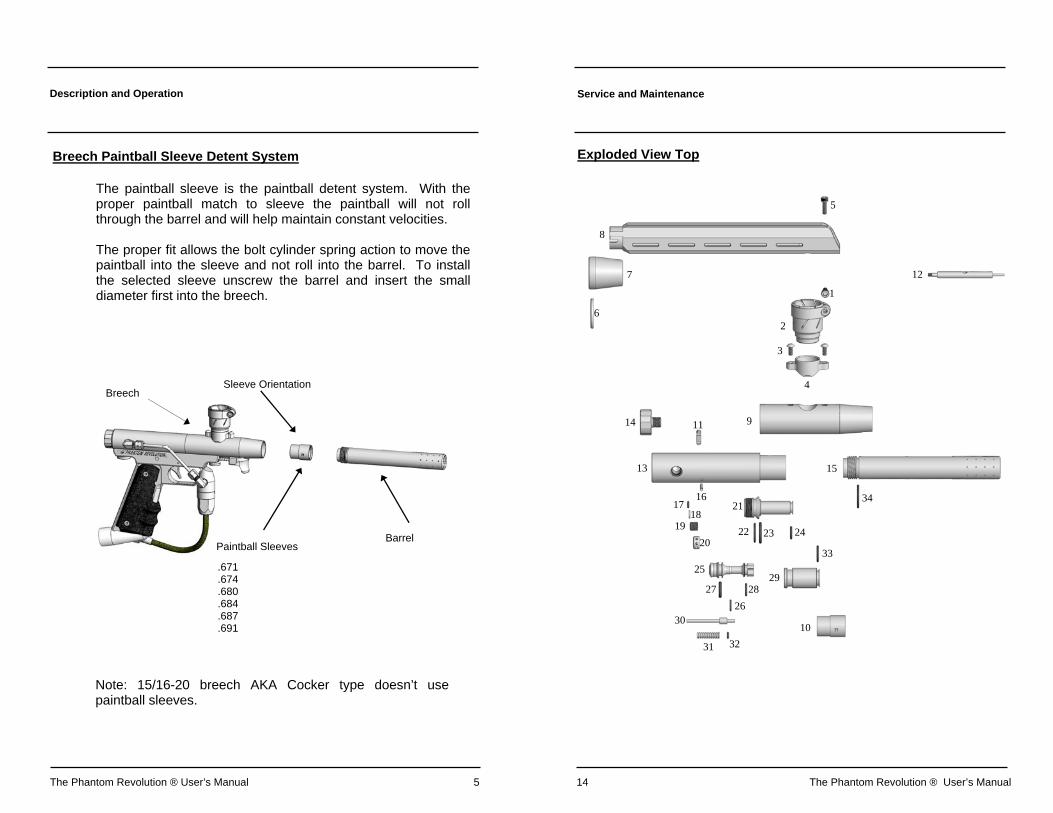
Breech Paintball Sleeve Detent System
The paintball sleeve is the paintball detent system. With the proper paintball match to sleeve the paintball will not roll through the barrel and will help maintain constant velocities. The proper fit allows the bolt cylinder spring action to move the paintball into the sleeve and not roll into the barrel. To install the selected sleeve unscrew the barrel and insert the small diameter first into the breech.
Sleeve Orientation Breech
Paintball Sleeves Barrel
.671
.674
.680
.684
.687
.691
Note: 15/16-20 breech AKA Cocker type doesn’t use paintball sleeves.
Exploded View Top
14 The Phantom Revolution ® User’s Manual
Service and Maintenance
1
2
3
4
5
6
7
8
9
10
11
12
13
14
15
16 17
32
18 19
20
21
22 23 24
25
27 28 29
30
31
33
26
34
The Phantom Revolution ® User’s Manual 13
Service and Maintenance
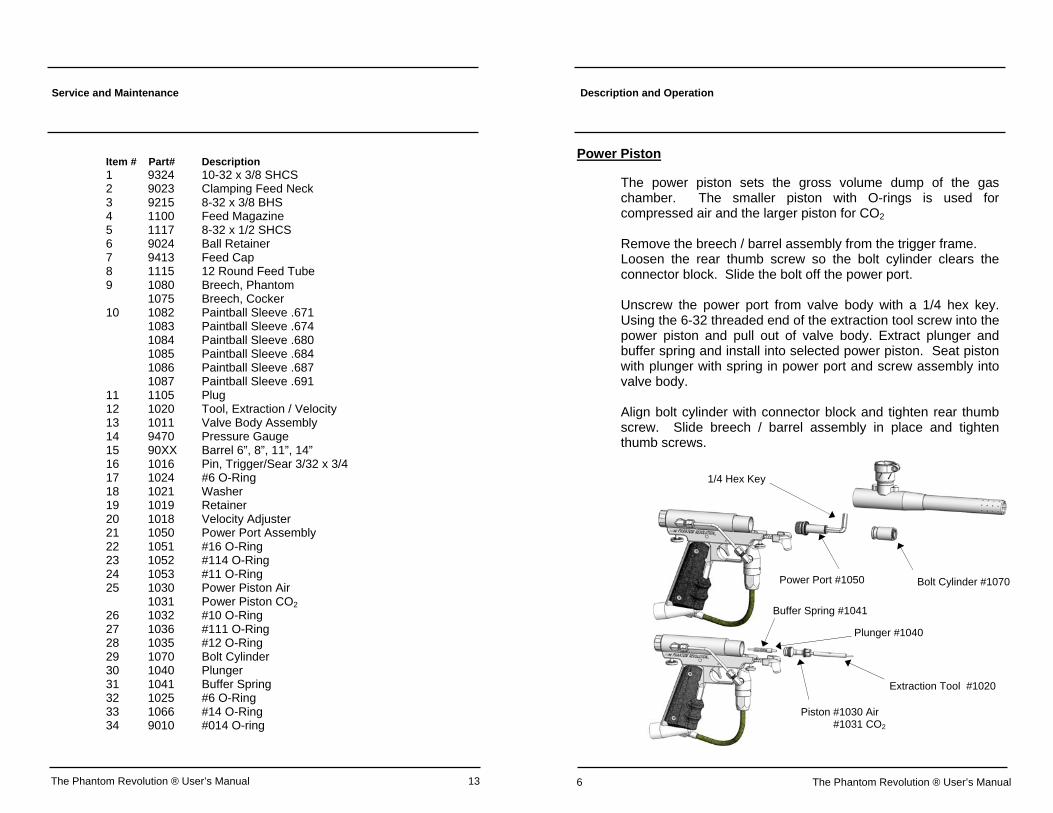
Item # Part# Description 1 9324 10-32 x 3/8 SHCS 2 9023 Clamping Feed Neck 3 9215 8-32 x 3/8 BHS 4 1100 Feed Magazine 5 1117 8-32 x 1/2 SHCS 6 9024 Ball Retainer 7 9413 Feed Cap 8 1115 12 Round Feed Tube 9 1080 Breech, Phantom 1075 Breech, Cocker 10 1082 Paintball Sleeve .671 1083 Paintball Sleeve .674 1084 Paintball Sleeve .680 1085 Paintball Sleeve .684 1086 Paintball Sleeve .687 1087 Paintball Sleeve .691 11 1105 Plug 12 1020 Tool, Extraction / Velocity 13 1011 Valve Body Assembly 14 9470 Pressure Gauge 15 90XX Barrel 6”, 8”, 11”, 14” 16 1016 Pin, Trigger/Sear 3/32 x 3/4 17 1024 #6 O-Ring 18 1021 Washer 19 1019 Retainer 20 1018 Velocity Adjuster 21 1050 Power Port Assembly 22 1051 #16 O-Ring 23 1052 #114 O-Ring 24 1053 #11 O-Ring 25 1030 Power Piston Air 1031 Power Piston CO2 26 1032 #10 O-Ring 27 1036 #111 O-Ring 28 1035 #12 O-Ring 29 1070 Bolt Cylinder 30 1040 Plunger 31 1041 Buffer Spring 32 1025 #6 O-Ring 33 1066 #14 O-Ring 34 9010 #014 O-ring
The power piston sets the gross volume dump of the gas chamber. The smaller piston with O-rings is used for compressed air and the larger piston for CO2 Remove the breech / barrel assembly from the trigger frame. Loosen the rear thumb screw so the bolt cylinder clears the connector block. Slide the bolt off the power port. Unscrew the power port from valve body with a 1/4 hex key. Using the 6-32 threaded end of the extraction tool screw into the power piston and pull out of valve body. Extract plunger and buffer spring and install into selected power piston. Seat piston with plunger with spring in power port and screw assembly into valve body. Align bolt cylinder with connector block and tighten rear thumb screw. Slide breech / barrel assembly in place and tighten thumb screws.
6 The Phantom Revolution ® User’s Manual
Description and Operation
Bolt Cylinder #1070
Plunger #1040
Power Piston
1/4 Hex Key
Extraction Tool #1020
Piston #1030 Air #1031 CO2
Power Port #1050
Buffer Spring #1041
The Phantom Revolution ® User’s Manual 7
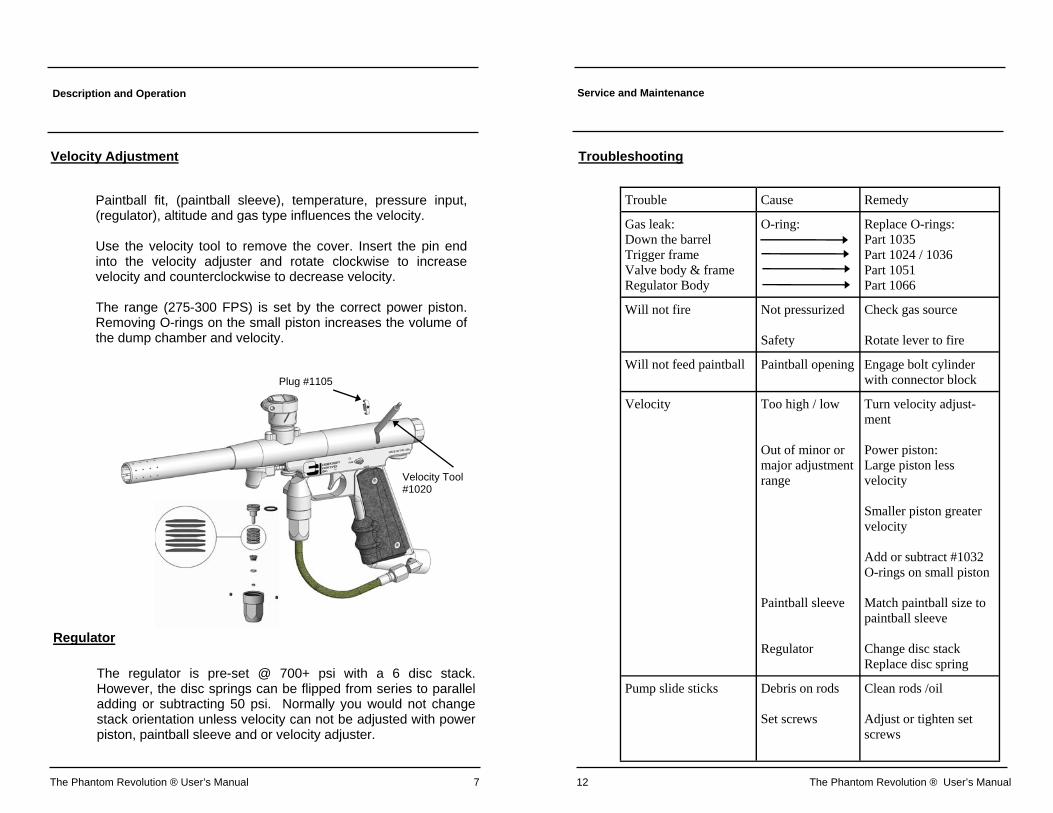
Velocity Adjustment
Paintball fit, (paintball sleeve), temperature, pressure input, (regulator), altitude and gas type influences the velocity. Use the velocity tool to remove the cover. Insert the pin end into the velocity adjuster and rotate clockwise to increase velocity and counterclockwise to decrease velocity. The range (275-300 FPS) is set by the correct power piston. Removing O-rings on the small piston increases the volume of the dump chamber and velocity.
Velocity Tool #1020
Plug #1105
Description and Operation
Regulator
The regulator is pre-set @ 700+ psi with a 6 disc stack. However, the disc springs can be flipped from series to parallel adding or subtracting 50 psi. Normally you would not change stack orientation unless velocity can not be adjusted with power piston, paintball sleeve and or velocity adjuster.
12 The Phantom Revolution ® User’s Manual
Service and Maintenance
Troubleshooting
Trouble Cause Remedy
Gas leak: Down the barrel Trigger frame Valve body & frame Regulator Body
O-ring: Replace O-rings: Part 1035 Part 1024 / 1036 Part 1051 Part 1066
Will not fire Not pressurized Safety
Check gas source Rotate lever to fire
Will not feed paintball Paintball opening Engage bolt cylinder with connector block
Velocity Too high / low Out of minor or major adjustment range Paintball sleeve Regulator
Turn velocity adjust-ment Power piston: Large piston less velocity Smaller piston greater velocity Add or subtract #1032 O-rings on small piston Match paintball size to paintball sleeve Change disc stack Replace disc spring
Pump slide sticks Debris on rods Set screws
Clean rods /oil Adjust or tighten set screws
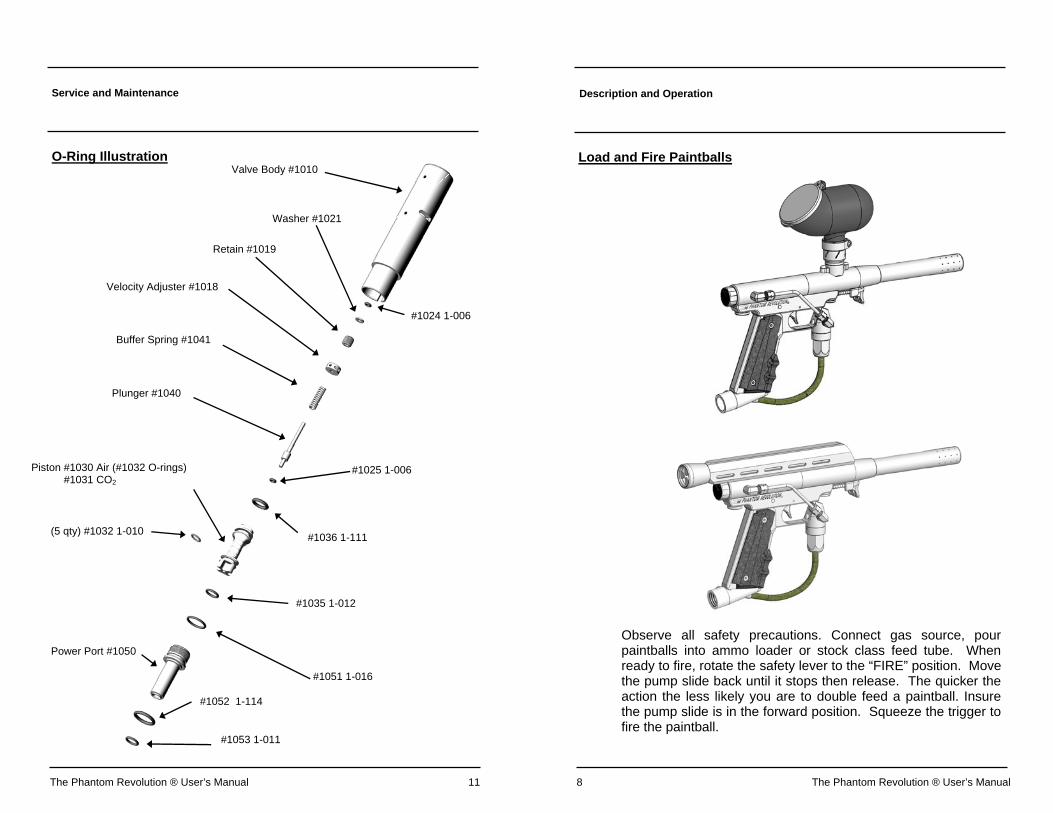
O-Ring Illustration
#1025 1-006
#1036 1-111
The Phantom Revolution ® User’s Manual 11
Service and Maintenance
#1035 1-012
Washer #1021
#1024 1-006
Retain #1019
Plunger #1040
Velocity Adjuster #1018
Piston #1030 Air (#1032 O-rings) #1031 CO2
Valve Body #1010
#1053 1-011
Buffer Spring #1041
#1051 1-016
Power Port #1050
#1052 1-114
(5 qty) #1032 1-010
8 The Phantom Revolution ® User’s Manual
Observe all safety precautions. Connect gas source, pour paintballs into ammo loader or stock class feed tube. When ready to fire, rotate the safety lever to the “FIRE” position. Move the pump slide back until it stops then release. The quicker the action the less likely you are to double feed a paintball. Insure the pump slide is in the forward position. Squeeze the trigger to fire the paintball.
Load and Fire Paintballs
Description and Operation
The Phantom Revolution ® User’s Manual 9
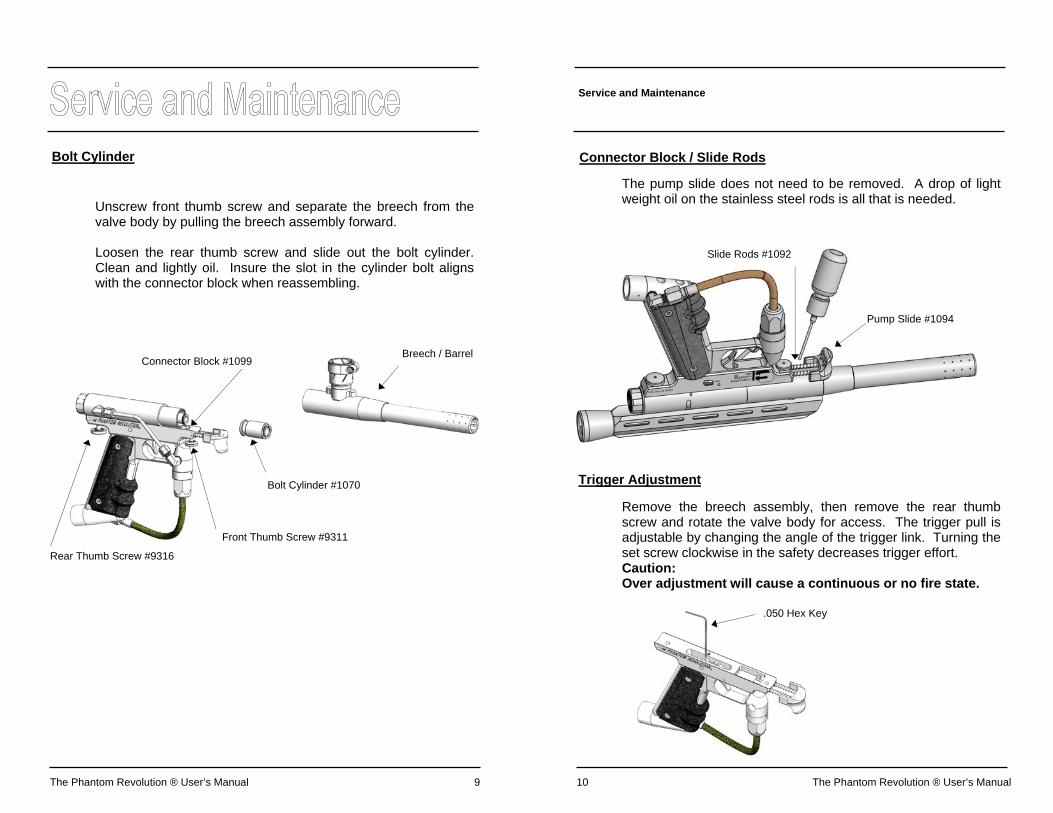
Bolt Cylinder
Unscrew front thumb screw and separate the breech from the valve body by pulling the breech assembly forward. Loosen the rear thumb screw and slide out the bolt cylinder. Clean and lightly oil. Insure the slot in the cylinder bolt aligns with the connector block when reassembling.
Front Thumb Screw #9311
Bolt Cylinder #1070
Rear Thumb Screw #9316
Connector Block #1099 Breech / Barrel
Connector Block / Slide Rods
10 The Phantom Revolution ® User’s Manual
Service and Maintenance
Slide Rods #1092
The pump slide does not need to be removed. A drop of light weight oil on the stainless steel rods is all that is needed.
Pump Slide #1094
Trigger Adjustment
Remove the breech assembly, then remove the rear thumb screw and rotate the valve body for access. The trigger pull is adjustable by changing the angle of the trigger link. Turning the set screw clockwise in the safety decreases trigger effort. Caution: Over adjustment will cause a continuous or no fire state.
.050 Hex Key