PROBLEM CAUSE CURE Marker Discharge Elbo CAUSE CURE Marker Discharge Marker is not Cocked Elbow...
2
WARNING: Always wear proper eye, face and ear protection designed especially to stop paintballs while un- loading your paintball marker (Fig J). STEP 1. Make sure barrel plug is securely in muzzle of marker (Fig K). STEP 2. Put Marker on safe. Push safety from left to right, no red showing (Fig L). STEP 3. Remove the CO2 cylinder by un-screwing the piercing screw (Fig M). STEP 4. Remove loader and elbow (Fig N). STEP 5. Turn marker upside down to remove paintballs from feed port (Fig O). STEP 6. Insert squeegee into feed port (Fig P) and barrel (Fig Q) to insure Brass Eagle 1201 S.E. 30th Street Bentonville, AR 72712, U.S.A. 877-877-GAME(4263) Fax: (479)464-8701 www.brasseagle.com Part No. 142597-000 REV 06/07 RULES OF SAFE PAINTBALL MARKER HANDLING 1. Always wear proper eye, face and ear protection designed especially to stop paintballs. 2. Never shoot a person who is not wearing proper protection. 3. Treat every paintball marker as if it were loaded. 4. Never look down the barrel of the marker. 5. Never point the paintball marker at anything you don’t wish to shoot. 6. Keep the paintball marker on safe until ready to shoot. 7. Keep the barrel plug in the paintball marker’s muzzle when not shooting. 8. Always remove gas source before disassembly. 9. Store the paintball marker unloaded and degassed in a locked place. 10. Follow warnings listed on gas source for handling and storage. 11. Never use anything other than .68 caliber paintballs. 12. Do not shoot fragile objects such as windows. 13. Paintballs may cause staining of some porous surfaces such as brick, stucco and wood. 14. Always measure velocity before playing paintball. 15. Never shoot at velocities in excess of 300 feet per second. 16. Never engage in vandalism. 17. Do not use marker for drive-by shooting. 18. Do not modify your marker’s pressurized air system or cylinder in anyway. PROBLEM CAUSE CURE Marker Fails to Discharge Marker is not Cocked Lack of Gas Pressure Gas Source Not Fully Engaged Operating Temperature Too Cold Broken Paintball Jet is sticking in the grip frame Cock Marker Pump Handle Install New 12gm CO2 Cylinders Tighten Piercing Screw Operate in Warmer Temperature Squeegee Out Paintball Fragments in Barrel Wait until it warms up TROUBLE SHOOTING GUIDE UNLOADING YOUR MARKER Pump Handle Manija de la Bomba Poignée de la pompe Barrel Plug Tapón del Cañón Bouchon de canon Ball Feed Port Compuerta de Alimentación de Paintballs Entrée d’alimentation des billes Barrel Cañón Canon Safety Seguro Cran de sûreté Trigger Gatillo Gâchette FIGURE A - Talon Ghost CO2 Piercing Screw Tornillo Perforador del Suministro de CO2 Vis de perçage pour CO2 OWNER’S MANUAL Contains: • Safety Information • Cleaning • Warranty Information • Annotated Diagram • Operating Instructions • Trouble Shooting Guide • How to Unload This safety alert symbol indicates important safety mes- sages in this manual. When you see this symbol, be alert to the possibility of personal injury and carefully read the mes- sage that follows. WARNING: THIS IS NOT A TOY. MISUSE MAY CAUSE SERIOUS INJURY OR DEATH. EYE PROTECTION DESIGNED FOR PAINTBALL USE MUST BE WORN BY THE USER AND ANY PERSON WITHIN RANGE. RECOMMEND AT LEAST 18 YEARS OLD TO PURCHASE, 14 YEARS OLD TO USE WITH ADULT SUPERVISION, OR 10 YEARS OLD TO USE ON PAINTBALL FIELDS MEETING ASTM-STANDARD F1777-02. READ OPERATION MANUAL BEFORE USING. WARNING: NEVER SHOOT AT ANYONE WITHOUT PROPER PROTECTIVE EQUIPMENT FOR EYES, EARS, THROAT AND HEAD, WHICH MUST BE WORN AT ALL TIMES. EYE PROTECTION MUST BE DESIGNED SPECIFICALLY FOR PAINTBALL USE. FAILURE TO FOLLOW THESE SAFETY PRECAUTIONS MAY RESULT IN BODILY INJURY INCLUDING BLINDNESS AND DEAFNESS. Welcome to the Brass Eagle® team and thank you for pur- chasing this high quality Brass Eagle® paintball marker. We at Brass Eagle® stand committed to providing you with the best product and service available. Your new marker is designed and manufactured to provide ease of maintenance with trouble free performance. We ask that you read this man- ual to obtain the maximum enjoyment of your purchase. Call 1-877-877-GAME (4263) or visit www.brasseagle.com if you should need an illustrated parts list. .68 CALIBER | PUMP ACTION CO2 POWERED | PAINTBALL MARKER 40 Round Hopper Tolva Redonda de 40 Chargeur 40 coups WARNING: Be sure the paintball marker is always pointed in a safe direction. Read the following operating instructions and WITHOUT LOADING ANY PAINTBALLS OR CO2 proceed several times through the operating steps with your paintball marker (dry fire the paintball marker at a safe target) so that you will be able to operate the marker properly and safely. Step 1. EYE PROTECTION: Make sure everyone within range (200 yards) is properly protected from paintball impacts. (Fig A) Step 2. PUT ON ‘SAFE’ AND ATTACH BARREL PLUG. Push safety from left to right; (Fig B) (no red band showing). Make sure barrel plug is placed securely in muzzle of marker. (Fig C) Step 3. INSTALL LOADER AND LOAD PAINTBALLS: 1) Press Elbow (Included) into ball feed port. Press loader into the elbow. (Fig D) 2) Pour paintballs into loader.. NOTE: Paintballs are gravity fed from loader to the marker each time the marker is cocked. Too rapid a rate of fire, broken balls or too many balls in loader may cause subsequent balls to break and will adversely affect the paintball marker’s accuracy. Use a squeegee to clean inside the paintball marker’s barrel. (RECOMMEND Brass Eagle ® , Stryker ™ or JT ® brand .68 caliber paintballs.) Step 4. ATTACH CO2 POWER SOURCE Marker can be used with Brass Eagle ® 12 gram CO2 cylinders. Use piercing screw to install the CO2 cylinder (Fig E). Turn screw clockwise to tighten until cartridge has been pierced. DO NOT OVER TIGHTEN. WARNING: Use only CO2 cylinders which are 12 gram type. (Recommend Brass Eagle TM 12 gram CO2 cylinders Item #7105, #7115 or #7125) Any attempt to use other sizes and/or cylinders containing other types of gas could be extremely dangerous. The use of gasses other than CO2 could result in an explosion or rupture of the marker, caus- ing serious injury. WARNING: CO2 cylinders may explode at temperatures above 130˚F (54.4˚C). Step 5. REMOVE BARREL PLUG AND TAKE OFF ‘SAFE’ Remove barrel plug (Fig F) and take off safe by pressing safety from right side of marker until red band is showing. (Fig G) Step 6. COCK: Cock marker by pulling pump arm completely back until you hear “click” (sound of sear engaging) (Fig H). Push pump arm completely forward until “click” is heard again (Fig I). OPERATING INSTRUCTIONS NOTE: The marker will not cock with the safety on. Now anti-double feed feature is engaged and a second ball cannot be fed into chamber until the marker is fired. The Talon Ghost is a pump actuat- ed marker, which needs to be pumped after firing to chamber the next paintball and to compress the hammer spring. The marker may not cock (sear may not engage) when the 12 gram CO2 is low on pressure or when there is no 12 gram CO2 cylinder installed. STEP 7. VERIFY VELOCITY: Verify that the paintball marker’s velocity is below 300 feet per second or less if required by playing field (ASTM standard F1777-02). Velocity should be measured with a chronograph prior to playing paintball Step 8. FIRE. Marker is now ready to fire. Pull trigger to fire the marker. NOTE: Keep the paintball marker on safe until ready to shoot. Keep the barrel plug in the paintball marker’s barrel when not shooting. WARNING: Never shoot at anyone without proper protec- tive equipment for eyes, which must be worn at all times. Eye pro- tection must be designed specifically for paintball use. Failure to follow these safety precautions may result in bodily injury includ- ing blindness and deafness. Paintballs should be stored in a cool, dry place in sealed plastic bags. Do not subject to freezing, excessive heat, humidity or store in direct sunlight. These conditions may cause ball break- age and/or poor feeding. Cleaning your marker prevents 90% of marker problems Step 1. Thoroughly clean barrel and breach area. (Fig R) Recommends Viewloader® Battle Swab™ paintball Squeegee for easy cleaning. Step 2. Remove any paintball residue and gelatin fragments (paintball shells). Use rubbing alcohol or diaper wipes if greater cleaning is desired (Fig S). WARRANTY INFORMATION WARRANTY: LIMITED 90 DAY WARRANTY (ORIGINAL PURCHASE RECEIPT REQUIRED) For 90 days from date of purchase, Brass Eagle ® will repair or replace this marker free of charge if defective in material or workmanship. This warranty gives you specific legal rights. You may also have other rights which may vary from state to state. Service is available from authorized Brass Eagle ® Service Centers. A list of these is available at Brass Eagle’s website–www.brasseagle.com/service or by calling Brass Eagle® at 1-877-877-GAME (4263). These Service Centers generally offer the quickest service. If you would rather return your marker to Brass Eagle ® please call consumer service at 1-877-877-GAME (4263) for return authorization number and shipping address. (Authorization number must be visible on outside of shipping package to be accepted.) Do Not return any products via non-trackable services such as regular mail or parcel post. Such products may become lost and Brass Eagle ® Inc. will not be responsible for replacement. PAINTBALL MARKERS OUT OF WARRANTY Authorized Service Centers will gladly repair any markers out of warranty for a nominal charge to cover parts and labor. Repairs made by Service Centers will usually be faster and less expensive than those sent back to the factory. Go to www.brasseagle.com/service for service center locations near you. Prior to shipping “out of warranty markers,” you should first call Customer service at 1-800-755-5061 for return authorization number and shipping address. (Return Authorization number must be visible on outside of shipping package to be accepted. Any product returned without the use of the RMA# will be refused and returned to sender. Any out of warranty marker returned to JT Sports® must be shipped prepaid and include the repair fee. Please call the Customer Service number for current repair fees. JT Sports® will repair or replace the marker with a reconditioned unit of the same model. Upon receipt of payment, the repaired marker or its replacement will be shipped to you. Use a barrel squeegee to clean broken paintballs from your marker’s barrel. We recommend the Viewloader ® Battle Swab ™ paint- ball Squeegee for easy cleaning. WARNING: Never look down the barrel of the marker. FIGURE G FIGURE E FIGURE D FIGURE A FIGURE F FIGURE B FIGURE H FIGURE I FIGURE J FIGURE K FIGURE L FIGURE M FIGURE P FIGURE O FIGURE O FIGURE Q Sight Mira Viseur FIGURE R FIGURE S FIGURE C paintballs are removed (Fig P). Do not unload your marker indoors. Elbow Codo Coude FIGURE N FIGURE O CLEANING
Transcript of PROBLEM CAUSE CURE Marker Discharge Elbo CAUSE CURE Marker Discharge Marker is not Cocked Elbow...
WARNING: Always wear proper eye, face and ear protection designed especially to stop paintballs while un-loading your paintball marker (Fig J).
STEP 1. Make sure barrel plug is securely in muzzle of marker (Fig K).
STEP 2. Put Marker on safe. Push safety from left to right, no red showing (Fig L).
STEP 3. Remove the CO2 cylinder by un-screwing the piercing screw (Fig M).
STEP 4. Remove loader and elbow (Fig N).
STEP 5. Turn marker upside down to remove paintballs from feed port (Fig O).
STEP 6. Insert squeegee into feed port (Fig P) and barrel (Fig Q) to insure
Brass Eagle1201 S.E. 30th Street Bentonville, AR 72712, U.S.A.
877-877-GAME(4263) Fax: (479)464-8701www.brasseagle.com
Part No. 142597-000 REV 06/07
RULES OF SAFEPAINTBALL MARKER HANDLING
1. Always wear proper eye, face and ear protection designed especially to stop paintballs.2. Never shoot a person who is not wearing proper protection.3. Treat every paintball marker as if it were loaded.4. Never look down the barrel of the marker.5. Never point the paintball marker at anything you don’t wish to shoot.6. Keep the paintball marker on safe until ready to shoot.7. Keep the barrel plug in the paintball marker’s muzzle when not shooting.8. Always remove gas source before disassembly.9. Store the paintball marker unloaded and degassed in a locked place.10. Follow warnings listed on gas source for handling and storage.11. Never use anything other than .68 caliber paintballs.12. Do not shoot fragile objects such as windows.13. Paintballs may cause staining of some porous surfaces such as brick, stucco and wood.14. Always measure velocity before playing paintball.15. Never shoot at velocities in excess of 300 feet per second.16. Never engage in vandalism.17. Do not use marker for drive-by shooting.18. Do not modify your marker’s pressurized air system or cylinder in anyway.
PROBLEM CAUSE CURE
Marker Fails to Discharge
Marker is not Cocked Lack of Gas Pressure
Gas Source Not Fully Engaged
Operating Temperature Too Cold
Broken Paintball
Jet is sticking in the grip frame
Cock MarkerPump Handle
Install New 12gm CO2 Cylinders
Tighten Piercing Screw
Operate in Warmer Temperature
Squeegee Out Paintball Fragments in Barrel
Wait until it warms up
TROUBLE SHOOTING GUIDE
UNLOADING YOUR MARKER
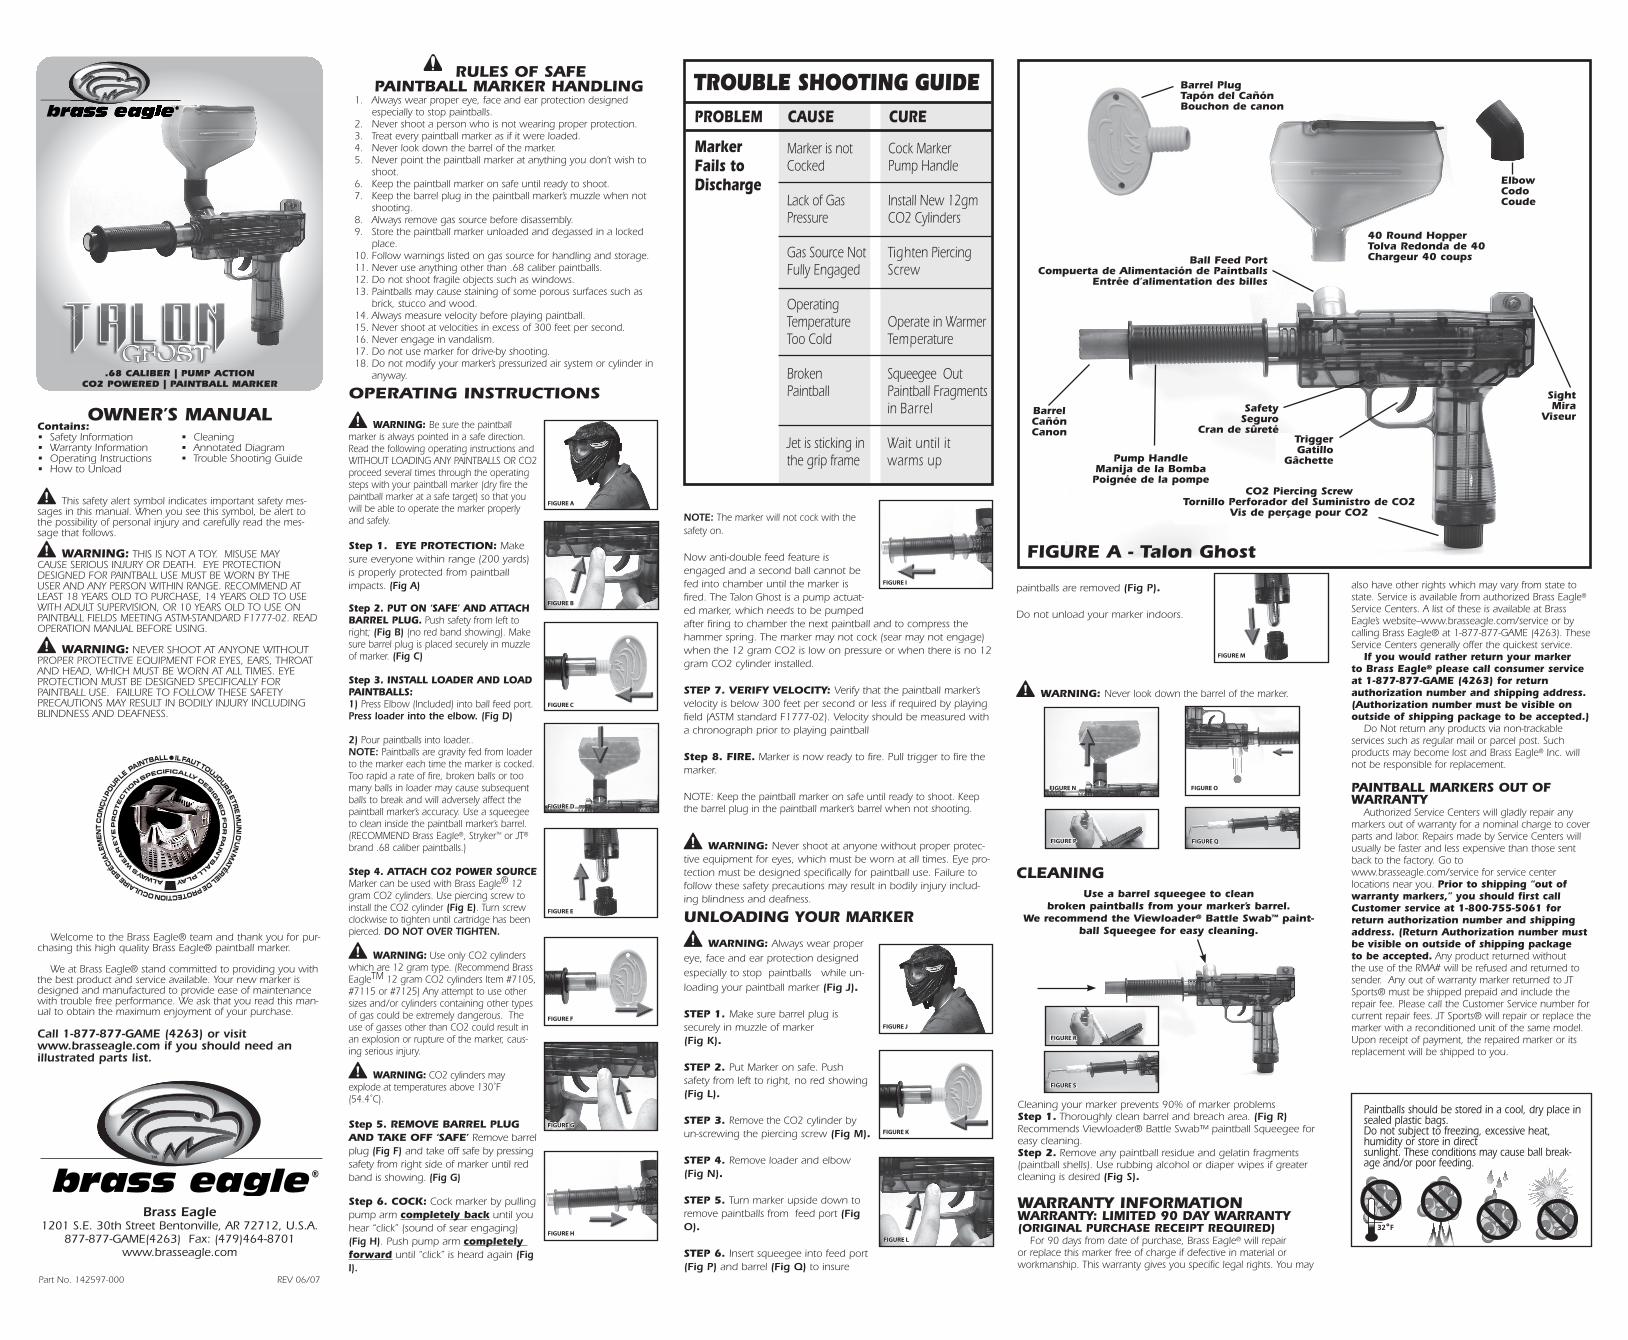
Pump HandleManija de la BombaPoignée de la pompe
Barrel PlugTapón del CañónBouchon de canon
Ball Feed PortCompuerta de Alimentación de Paintballs
Entrée d’alimentation des billes
BarrelCañónCanon
SafetySeguro
Cran de sûretéTriggerGatillo
Gâchette
FIGURE A - Talon Ghost
CO2 Piercing ScrewTornillo Perforador del Suministro de CO2
Vis de perçage pour CO2
OWNER’S MANUALContains:• Safety Information • Cleaning• Warranty Information • Annotated Diagram• Operating Instructions • Trouble Shooting Guide• How to Unload
This safety alert symbol indicates important safety mes-sages in this manual. When you see this symbol, be alert to the possibility of personal injury and carefully read the mes-sage that follows.
WARNING: THIS IS NOT A TOY. MISUSE MAY CAUSE SERIOUS INJURY OR DEATH. EYE PROTECTION DESIGNED FOR PAINTBALL USE MUST BE WORN BY THE USER AND ANY PERSON WITHIN RANGE. RECOMMEND AT LEAST 18 YEARS OLD TO PURCHASE, 14 YEARS OLD TO USE WITH ADULT SUPERVISION, OR 10 YEARS OLD TO USE ON PAINTBALL FIELDS MEETING ASTM-STANDARD F1777-02. READ OPERATION MANUAL BEFORE USING.
WARNING: NEVER SHOOT AT ANYONE WITHOUT PROPER PROTECTIVE EQUIPMENT FOR EYES, EARS, THROAT AND HEAD, WHICH MUST BE WORN AT ALL TIMES. EYE PROTECTION MUST BE DESIGNED SPECIFICALLY FOR PAINTBALL USE. FAILURE TO FOLLOW THESE SAFETY PRECAUTIONS MAY RESULT IN BODILY INJURY INCLUDING BLINDNESS AND DEAFNESS.
Welcome to the Brass Eagle® team and thank you for pur-chasing this high quality Brass Eagle® paintball marker.
We at Brass Eagle® stand committed to providing you with the best product and service available. Your new marker is designed and manufactured to provide ease of maintenance with trouble free performance. We ask that you read this man-ual to obtain the maximum enjoyment of your purchase.
Call 1-877-877-GAME (4263) or visit www.brasseagle.com if you should need an illustrated parts list.
.68 CALIBER | PUMP ACTIONCO2 POWERED | PAINTBALL MARKER
40 Round HopperTolva Redonda de 40Chargeur 40 coups
WARNING: Be sure the paintball marker is always pointed in a safe direction. Read the following operating instructions and WITHOUT LOADING ANY PAINTBALLS OR CO2 proceed several times through the operating steps with your paintball marker (dry fire the paintball marker at a safe target) so that you will be able to operate the marker properly and safely.
Step 1. EYE PROTECTION: Make sure everyone within range (200 yards) is properly protected from paintball impacts. (Fig A)
Step 2. PUT ON ‘SAFE’ AND ATTACH BARREL PLUG. Push safety from left to right; (Fig B) (no red band showing). Make sure barrel plug is placed securely in muzzle of marker. (Fig C)
Step 3. INSTALL LOADER AND LOAD PAINTBALLS:1) Press Elbow (Included) into ball feed port. Press loader into the elbow. (Fig D)
2) Pour paintballs into loader.. NOTE: Paintballs are gravity fed from loader to the marker each time the marker is cocked. Too rapid a rate of fire, broken balls or too many balls in loader may cause subsequent balls to break and will adversely affect the paintball marker’s accuracy. Use a squeegee to clean inside the paintball marker’s barrel. (RECOMMEND Brass Eagle®, Stryker™ or JT® brand .68 caliber paintballs.)
Step 4. ATTACH CO2 POWER SOURCE Marker can be used with Brass Eagle® 12 gram CO2 cylinders. Use piercing screw to install the CO2 cylinder (Fig E). Turn screw clockwise to tighten until cartridge has been pierced. DO NOT OVER TIGHTEN.
WARNING: Use only CO2 cylinders which are 12 gram type. (Recommend Brass EagleTM 12 gram CO2 cylinders Item #7105, #7115 or #7125) Any attempt to use other sizes and/or cylinders containing other types of gas could be extremely dangerous. The use of gasses other than CO2 could result in an explosion or rupture of the marker, caus-ing serious injury.
WARNING: CO2 cylinders may explode at temperatures above 130˚F (54.4˚C).
Step 5. REMOVE BARREL PLUG AND TAKE OFF ‘SAFE’ Remove barrel plug (Fig F) and take off safe by pressing safety from right side of marker until red band is showing. (Fig G)
Step 6. COCK: Cock marker by pulling pump arm completely back until you hear “click” (sound of sear engaging) (Fig H). Push pump arm completely forward until “click” is heard again (Fig I).
OPERATING INSTRUCTIONS
NOTE: The marker will not cock with the safety on.
Now anti-double feed feature is engaged and a second ball cannot be fed into chamber until the marker is fired. The Talon Ghost is a pump actuat-ed marker, which needs to be pumped after firing to chamber the next paintball and to compress the hammer spring. The marker may not cock (sear may not engage) when the 12 gram CO2 is low on pressure or when there is no 12 gram CO2 cylinder installed.
STEP 7. VERIFY VELOCITY: Verify that the paintball marker’s velocity is below 300 feet per second or less if required by playing field (ASTM standard F1777-02). Velocity should be measured with a chronograph prior to playing paintball
Step 8. FIRE. Marker is now ready to fire. Pull trigger to fire the marker.
NOTE: Keep the paintball marker on safe until ready to shoot. Keep the barrel plug in the paintball marker’s barrel when not shooting.
WARNING: Never shoot at anyone without proper protec-tive equipment for eyes, which must be worn at all times. Eye pro-tection must be designed specifically for paintball use. Failure to follow these safety precautions may result in bodily injury includ-ing blindness and deafness.
Paintballs should be stored in a cool, dry place in sealed plastic bags.Do not subject to freezing, excessive heat, humidity or store in direct sunlight. These conditions may cause ball break-age and/or poor feeding.
Cleaning your marker prevents 90% of marker problemsStep 1. Thoroughly clean barrel and breach area. (Fig R) Recommends Viewloader® Battle Swab™ paintball Squeegee for easy cleaning.Step 2. Remove any paintball residue and gelatin fragments (paintball shells). Use rubbing alcohol or diaper wipes if greater cleaning is desired (Fig S).
WARRANTY INFORMATIONWARRANTY: LIMITED 90 DAY WARRANTY(ORIGINAL PURCHASE RECEIPT REQUIRED) For 90 days from date of purchase, Brass Eagle® will repair or replace this marker free of charge if defective in material or workmanship. This warranty gives you specific legal rights. You may
also have other rights which may vary from state to state. Service is available from authorized Brass Eagle® Service Centers. A list of these is available at Brass Eagle’s website–www.brasseagle.com/service or by calling Brass Eagle® at 1-877-877-GAME (4263). These Service Centers generally offer the quickest service. If you would rather return your marker to Brass Eagle® please call consumer service at 1-877-877-GAME (4263) for return authorization number and shipping address. (Authorization number must be visible on outside of shipping package to be accepted.) Do Not return any products via non-trackable services such as regular mail or parcel post. Such products may become lost and Brass Eagle® Inc. will not be responsible for replacement.
PAINTBALL MARKERS OUT OF WARRANTY Authorized Service Centers will gladly repair any markers out of warranty for a nominal charge to cover parts and labor. Repairs made by Service Centers will usually be faster and less expensive than those sent back to the factory. Go to www.brasseagle.com/service for service center locations near you. Prior to shipping “out of warranty markers,” you should first call Customer service at 1-800-755-5061 for return authorization number and shipping address. (Return Authorization number must be visible on outside of shipping package to be accepted. Any product returned without the use of the RMA# will be refused and returned to sender. Any out of warranty marker returned to JT Sports® must be shipped prepaid and include the repair fee. Please call the Customer Service number for current repair fees. JT Sports® will repair or replace the marker with a reconditioned unit of the same model. Upon receipt of payment, the repaired marker or its replacement will be shipped to you.
Use a barrel squeegee to cleanbroken paintballs from your marker’s barrel.
We recommend the Viewloader® Battle Swab™ paint-ball Squeegee for easy cleaning.
WARNING: Never look down the barrel of the marker.
FIGURE G
FIGURE E
FIGURE D
FIGURE A
FIGURE F
FIGURE B
FIGURE H
FIGURE I
FIGURE J
FIGURE K
FIGURE L
FIGURE M
FIGURE P FIGURE OFIGURE OFIGURE Q
SightMira
Viseur
FIGURE R
FIGURE S
FIGURE C
paintballs are removed (Fig P).
Do not unload your marker indoors.
ElbowCodoCoude
FIGURE N FIGURE O
CLEANING

Talon Ghost™ MARCADOR DE PAINTBALLCALIBER.68 | ACCIONADO A BOMBAENERGIZADO CON CO2MANUAL DEL PROPIETARIOContiene:• Información sobre Seguridad • Limpieza• Información acerca de la Garantía • Diagrama Comentado• Instrucciones de Operación • Guía para Búsqueda de Fallas• Cómo Descargarlo
Este símbolo de alerta de seguridad precede a los mensajes importantes de seguridad de este manual. Cuando usted vea este símbolo, esté alerta a la posibilidad de posibles lesiones personales y lea el mensaje que sigue en forma cuidadosa.
ADVERTENCIA: ESTO NO ES UN JUGUETE. EL MAL USO PUEDE CAUSAR LESIONES DE GRAVEDAD E INCLUSIVE LA MUERTE. EL USUARIO Y CUALQUIER PERSONA QUE SE ENCUENTRE DENTRO DEL RADIO DE ACCIÓN DEBEÁN USAR PROTECCIÓN PARA LOS OJOS DISEÑADA PARA SER UTILIZADA EN EL JUEGO DE PAINTBALL. SE RECOMIENDA QUE LA PERSONA QUE COMPRE EL PRODUCTO TENGA COMO MÍNIMO 18 AÑOS DE EDAD, 14 AÑOS DE EDAD PARA UTILIZARLO BAJO LA SUPERVISIÓN DE UN ADULTO O 10 AÑOS DE EDAD PARA UTILIZARLO EN CAMPOS DE PAINTBALL QUE CUMPLAN CON LAS NORMAS ASTM-STANDARD F1777-02. LEA EL MANUAL DE OPERACIÓN ANTES DE UTILIZARLO.
ADVERTENCIA: NUNCA LE DISPARE A ALGUIEN QUE NO ESTÉ UTILIZANDO EL EQUIPO DE PROTECCIÓN APROPIADO PARA LOS OJOS, OÍDOS, GARGANTA Y CABEZA, EL CUAL SE DEBE UTILIZAR EN TODO MOMENTO. LA PROTECCIÓN PARA LOS OJOS DEBE ESTAR DISEÑADA ESPECIALMENTE PARA SER UTILIZADA EN EL JUEGO DE PAINTBALL. EL NO CUMPLIMIENTO DE ESTAS INSTRUCCIONES DE SEGURIDAD PUEDE CAUSAR LESIONES CORPORALES INCLUYENDO CEGUERA Y SORDERA.
Bienvenido al equipo de Brass Eagle® y gracias por comprar este marcador de de paintball Brass Eagle® de alta calidad.
Nosotros en Brass Eagle® estamos comprometidos con brindarle el mejor producto y servicio disponibles. Su nuevo marcador está diseñado y fabricado para proporcionar un mantenimiento fácil y un desempeño libre de problemas. Le pedimos que lea este manual para que usted pueda disfrutar al máximo de su compra.
Llame al teléfono 1-877-877-GAME (4263) o visite la dirección de Internet www.brasseagle.com si necesita una lista de partes ilustrada.
REGLAS PARA EL MANEJO SEGURO DE SU MARCADOR DE PAINTBALL 1. Utilice siempre la protección adecuada para los ojos, cara y oídos diseñada especialmente para detener las paintballs.2. Nunca le dispare a una persona que no esté utilizando la protección apropiada.3. Trate a cada marcador de paintball como si estuviera cargado.4. Nunca mire hacia adentro del cañón del marcador.5. Nunca apunte el marcador de paintball hacia algo a lo cual usted no le quiera disparar.
6. Mantenga el marcador de paintball con el seguro puesto hasta estar listo para disparar.7. Mantenga el tapón del cañón en la boca del marcador de paintball cuando no esté disparando. 8. Antes de desarmarlo retire siempre el suministro de gas.9. Guarde el marcador de paintball descargado y sin gas en un lugar cerrado con llave.10. Atienda las advertencias que se encuentran en el suministro de gas para la manipulación y almacenaje.11. Nunca utilice ninguna otra cosa más que paintballs calibre .68.12. No dispare hacia objetos frágiles tales como ventanas.13. Las Paintballs pueden causar manchas en superficies porosas tales como ladrillo, estuco y madera.14. Mida siempre la velocidad antes de comenzar a jugar paintball.15. Nunca dispare a velocidades que excedan los 300 pies por segundo.16. Nunca se involucre en vandalismo.17. No utilice el marcador para disparar al pasar manejando.18. No modifique en ninguna forma el sistema de aire a presión de su marcador o cilindro.
INSTRUCCIONES DE OPERACIÓN
ADVERTENCIA: Asegúrese de que el marcador de paintball esté siempre apuntando en una dirección segura. Lea las siguientes instrucciones de operación y SIN CARGAR NINGUNA PAINTBALL NI ACTIVAR EL CO2 repase varias veces los pasos de la operación con su marcador de paintball (dispare el marcador de paintball hacia un blanco seguro) de modo tal de estar en condiciones de operar el marcador de manera apropiada y segura.
Paso 1. PROTECCIÓN PARA LOS OJOS: Asegúrese de que todo aquel que se encuentre dentro del radio de acción (200 yardas) esté adecuadamente protegido contra impactos de paintballs. (Fig. A)
Paso 2. COLOCAR EL ‘SEGURO’ Y PONER EL TAPÓN DEL CAÑÓN. Empuje el seguro de izquierda a derecha; (Fig. B) (que no se vea la banda roja). Asegúrese de que la tapa del cañón esté colocada en forma firme en la boca del marcador. (Fig. C)
Paso 3. INSTALE EL CARGADOR Y CARGUE LAS PAINTBALLS:1) Oprima el Codo (Incluido) en la compuerta de alimentación de las paintballs. Oprima el cargador hacia adentro del codo. (Fig. D)
2) Introduzca las paintballs dentro del cargador.
NOTA: Las Paintballs se alimentan por gravedad desde el cargador hacia el mar-cador cada vez que el marcador es armado. Una tasa de disparo muy rápida, las paintballs rotas o el exceso de paintballs en el cargador, pueden causar la rotura de las paintballs siguientes además de afectar adversamente la exactitud del marcador de paintball. Use un secador de caucho para limpiar la parte interior del cañón del marcador de paintball. (SE RECOMIENDA Brass Eagle®, Stryker™ o JT® calibre.68.)
Paso 4. ACOPLAR EL SUMINISTRO DE ENERGÍS DE CO2 El marcador se puede utilizar con cilindros Brass Eagle® de 12 gramos. Utilice el tornillo perforador para instalar el cilindro de CO2 (Fig. E). Gire el tornillo en el sentido de las agujas del reloj apretándolo hasta que el cilindro se perfore. NO APRETAR DEMASIADO.
ADVERTENCIA: Utilice solamente cilindros de CO2 que sean del tipo de 12 gramos. (Se recomiendan los cilindros de CO2 Brass EagleTM de12 gramos
Ítems Nos. 7105, 7115 o 7125) Cualquier intento de utilizar cilindros de otros tamaños y/o cilindros que contengan otros tipos de gas podría ser extremada-mente peligroso. El uso de otros gases que no sean CO2 podría causar una explosión o la ruptura del marcador, causando serias lesiones.
ADVERTENCIA: Los cilindros de CO2 pueden explotar a temperaturas por encima de los 130˚F (54.4˚C).
Paso 5. QUITAR LA TAPA DEL CAÑÓN Y EL ‘SEGURO’ Quite la tapa del cañón (Fig. F) y retire el seguro oprimiendo el seguro desde el lado derecho del marcador hasta que aparezca la banda roja. (Fig. G)
Paso 6. ARMADO: Arme el marcador tirando del brazo de la bomba completa-mente hacia atrás hasta escuchar un “clic” (sonido del disparador cuando engan-cha) (Fig. H). Empujar el brazo de la bomba completamente hacia adelante hasta escuchar un “clic” otra vez (Fig. I).
NOTA: El marcador no se puede armar con el seguro puesto.
Ahora está acoplado el dispositivo que evita la doble alimentación y no se podrá alimentar una segunda bola dentro de la cámara hasta disparar el marcador. El Talon Ghost es un marcador accionado mediante una bomba, la cual necesita ser accionada después de disparar para colocar la pantball siguiente dentro de la cámara y para comprimir el resorte el martillo. El marcador no se puede armar (el disparador no se puede acoplar) cuando la presión del cilindro de CO2 de 12 gramos es baja o cuando no esté instalado ningún cilindro de CO2 de 12 gramos.
PASO 7. VERIFICAR LA VELOCIDAD: Verifique que la velocidad del marcador de paintball esté por debajo de los 300 pies por segundo o sea inferior si así lo requi-ere el campo de juego (norma ASTM F1777-02). La velocidad se debe medir con un cronómetro antes de jugar paintball
Paso 8. DISPARO. El marcador está ahora listo para dispara. Tire del gatillo para disparar el marcador.
NOTA: Mantenga el marcador de paintball con el seguro hasta estar listo para disparar. Mantenga el tapón del cañón en el cañón del marcador de paintball cuando no esté disparando.
ADVERTENCIA: Nunca le dispare a alguien que no esté utilizando el equipo de protección adecuado para los ojos, el cual se debe utilizar en todo momento. La protección para los ojos debe estar diseñada específicamente para su uso en el juego de paintball. El no cumplimiento de estas instrucciones de seguridad puede causar lesiones corporales incluyendo ceguera y sordera.
DESCARGA DE SU MARCADOR
ADVERTENCIA: Utilice siempre la protección adecuada para los ojos, cara y oídos diseñada especialmente para detener las paintballs, cuando descargue su marcador de paintball (Fig. J).
PASO 1. Asegúrese de que el tapón del cañón esté firmemente colocado en la boca del marcador (Fig. K).
PASO 2. Colocar el Seguro del marcador. Empujar el seguro de izquierda a dere-cha, hasta que no se vea la banda roja (Fig. L).
PASO 3. Retirar el cilindro de CO2 desatornillando el tornillo perforador (Fig. M).
PASO 4. Retirar el cargador y el codo (Fig. N).
PASO 5. Colocar el marcador boca abajo para remover las paintballs de la com-puerta de alimentación (Fig. O).
PASO 6. Introducir el secador dentro de la compuerta de alimentación (Fig. P) y el cañón (Fig. Q) para asegurarse de que las paintballs hayan sido retiradas (Fig. P).
No descargue su marcador en interiores.
ADVERTENCIA: Nunca mire hacia adentro del cañón del marcador.
LIMPIEZA
R
S
Utilice el secador del cañón para retirar los restosde paintballs rotas del cañón de su marcador.Recomendamos el Secador para paintball Viewloader® Battle Swab™ para facili-tar la limpieza.
La limpieza de su marcador evita el 90% de los problemas del marcadorPaso 1. Limpie el cañón y el área de la abertura en forma completa. (Fig. R) Se recomienda el Secador para paintball Viewloader® Battle Swab™ para facilitar la limpieza.Paso 2. Retire todo residuo de paintball y fragmentos de gelatina (carcasas de paintballs). Utilice alcohol para friegas o toallas de pañal si se desea una mayor limpieza (Fig. S).
INFORMACIÓN ACERCA DE LA GARANTÍAGARANTÍA: GARANTÍA LIMITADA DURANTE 90 DÍAS(SE REQUIERE EL RECIBI ORIGINAL DE COMPRA) Durante 90 días a partir de la fecha de compra, Brass Eagle® reparará o reem-plazará este marcador sin cargo alguno si tuviera algún defecto en los materiales o la mano de obra. Esta garantía le da derechos legales. Usted podría además tener otros derechos los cuales pueden variar de estado a estado. El servicio de reparación está disponible en los Centros de Servicio autorizados Brass Eagle®. En el sitio de Internet de Brass Eagle’s en la dirección www.brasseagle.com/service o bien llamando por teléfono a Brass Eagle® al número 1-877-877-GAME (4263) está disponible una lista de estos centros. Estos Centros de Servicio en general ofrecen el servicio más rápido posible. Si usted prefiere regresar su marcador a Brass Eagle® por favor llame a servicios al consumidor al teléfono 1-877-877-GAME (4263) para obtener un número de autorización para regresarlo y la direc-ción de envío. (El número de autorización debe estar visible en el
exterior del paquete para que sea aceptado.) No envíe ningún producto por medio de un servicio al que no se le pueda hacer seguimiento tal como el correo regular o parcel post. Tales productos se pueden perder y Brass Eagle® Inc. no se hará responsable del reemplazo.
MARCADORES DE PAINTBALL QUE ESTÁN FUERA DE GARANTÍA los Centros de Servicio Autorizados gustosos repararán cualquier marcador que esté fuera de garantía por un cargo nominal para cubrir el costo de las partes y la mano de obra. Las reparaciones hechas por los Centros de Servicio usualmente son más rápidas y menos costosas que aquellas que se envían de vuelta a la fábrica. Diríjase al sitio de Internet www.brasseagle.com/service para conocer las ubicaciones de los centros de servicio cercanos a su domicilio. Antes de enviar los “los marcadores que están fuera de garantía,” usted debería lla-mar primeramente a Servicios al Cliente al teléfono 1-800-755-5061 para obtener un número de autorización para el envío, dirección de envío. (El Número de Autorización para el envío debe estar en un lugar visible en el exterior de la caja para que para que la misma sea aceptada. Cualquier producto regresado sin el número RMA será rechazado y reenviado al remitente). Todo marcador que esté fuera de garantía y sea enviado a JT Sports® se deberá enviar con flete prepago e incluir el importe de la reparación. Por favor llame al número de teléfono de Servicio al Cliente para conocer el valor actualizado de los costos de reparación. JT Sports® reparará o reemplazará el marcador con una unidad reacondicionada del mismo modelo. Una vez recibido el pago, se le enviará el marcador reparado o su reem-plazo.
Las Paintballs se deben almacenar en un lugar fresco y seco, en bolsas plásticas cerradas herméticamente.No las someta a congelamiento, excesivo calor, humedad ni las almacene directa-mente bajo la luz solar. estas condiciones pueden causar la ruptura de la paintballs y/o mala alimentación en el marcador.
PROBLEMA CAUSA SOLUCIÓN
El Marcador no se Descarga
El Marcador no está Armado
Falta de Presión de Gas
En Suministro de Gas no está AcopladoTotalmente
Muy Baja Temperatura de Operación
Paintball Rota
Armar la Manija de la Bomba del Marcador
Instalar Cilindros de CO2 de 12gm Nuevos
Apretar el Tornillo Perforador
Operar bajo Temperaturas más Cálidas
Retire los Fragmentos de Paintballs con el Secador
GUÍA PARA LA BÚSQUEDA DE FALLAS
PROBLÈME CAUSE SOLUTION
Le marqueur ne tire pas
Le marqueur n’est pas armé
La pression de gaz est insuffisante
La source d’alimentationn’est pas complètementengagée
La température defonctionnementest trop basse
Paintballs cassées
Armer la pompe du marqueur
Insérer une nouvelle bouteille de 12 g de CO2
Resserrer la vis de perçage
Faire fonctionner à température plus élevée
Nettoyer les fragments de billes de peinture à l’aide d’une raclette
GUIDE DE DÉPANNAGE
Talon Ghost™ MARQUEUR DE PAINTBALLCALIBRE .68 | PNEUMATIQUEALIMENTÉ PAR CO2
MANUEL DE L’UTILISATEURCe manuel contient :• Informations relatives à la sécurité • Nettoyage • Informations sur la garantie • Diagramme annoté• Mode d’emploi • Guide de dépannage• Comment décharger le marqueur
Ce symbole d’alerte de sécurité accompagne dans ce manuel d’importants messages concernant la sécurité. Quand ce symbole apparaît, il vous alerte à la possibilité de préjudice corporel ; lisez donc attentivement le message qui suit.
MISE EN GARDE: CECI N’EST PAS UN JOUET. SA MAUVAISE UTILISATION EST SUSCEPTIBLE DE CAUSER DES BLESSURES GRAVES OU MÊME LA MORT. UNE PROTECTION POUR LES YEUX CONÇUE POUR L’UTILISATION DANS LE CADRE DU PAINTBALL DOIT ÊTRE UTILISÉE PAR L’UTILISATEUR ET PAR TOUTE PERSONNE À PORTÉE DE TIR. IL EST RECOMMANDÉ DE RÉSERVER L’ACHAT DE CET INSTRUMENT AUX PERSONNES ÂGÉES DE PLUS DE 18 ANS, D’EN RÉSERVER L’UTILISATION AUX PERSONNES DE PLUS DE 14 ANS SOUS LA SURVEILLANCE D’UN ADULTE, OU DE PLUS DE 10 ANS POUR SON UTILISATION SUR UN TERRAIN DE PAINTBALL CONFORME AUX NORMES ASTM F1777-02. LIRE LE MANUEL D’UTILISATION AVANT L’UTILISATION.
MISE EN GARDE: NE JAMAIS TIRER SUR QUELQU’UN QUI EST DEPOURVU D’EQUIPEMENTS DE PROTECTION POUR LES YEUX APPROPRIES, QUI DOIVENT ETRE PORTES EN TOUT TEMPS. LA PROTECTION POUR LES YEUX DOIT ETRE CONÇUE SPECIFIQUEMENT POUR L’UTILISATION DANS LE CADRE DU PAINTBALL. LE MANQUEMENT A CES PRECAUTIONS DE SECURITE PEUT CAUSER DES BLESSURES CORPORELLES, Y COMPRIS LA CECITE ET LA SURDITE.
Bienvenue au sein de l’équipe Brass Eagle® ; nous vous remercions de votre achat d’un marqueur de paintball Brass Eagle® de haute qualité.
Chez Brass Eagle®, nous nous engageons à vous offrir les meilleurs produits et le meilleur service disponibles. Votre nouveau marqueur est conçu et fabriqué de façon à présenter un entretien facile et une performance sans problèmes. Nous vous demandons de lire ce manuel pour que votre achat vous procure un maximum de plaisir.
Composez le 1-877-877-GAME (4263), ou visitez notre site Web àwww.brasseagle.com si vous avez besoin d’une liste illustrée des pièces.
RÈGLES DE SÉCURITÉ MANIEMENT DU MARQUEUR DE PAINTBALL
Portez en tout temps la protection appropriée pour vos yeux, votre visage et vos oreilles conçue spécialement pour arrêter les paintballs.
Ne tirez jamais sur une personne dépourvue de protection appropriée.Traitez chaque marqueur de paintball comme s’il était chargé.Ne regardez jamais dans le canon du marqueur.Ne pointez jamais le marqueur sur un objet quel qu’il soit sur lequel vous
n’avez pas l’intention de tirer.Gardez la sûreté enclenchée jusqu’à ce que vous soyez prêt à tirer.Gardez le bouchon dans la bouche du canon du marqueur lorsque vous ne
1.
2.3.4.5.
6.7.
tirez pas.Retirez toujours la source de gaz avant de démonter le marqueur.Remisez le marqueur de paintball sous clé après l’avoir déchargé et
déconnecté de l’alimentation de gaz.Suivez les mises en garde détaillées sur la source de gaz concernant le
maniement et le remisage.N’utilisez jamais de paintballs d’un calibre autre que du .68.Ne tirez pas sur des objets fragiles tels que des fenêtres.Les paintballs sont susceptibles de tacher certaines surfaces poreuses telles que
la brique, le stuc et le bois.Mesurez toujours la vélocité avant de jouer au paintball.Ne tirez jamais à des vélocités excédant 300 pieds par seconde.Ne vous livrez jamais à des actes de vandalisme.N’utilisez pas le marqueur pour faire feu à partir d’un véhicule.Ne modifiez d’aucune façon le système d’air sous pression ou le cylindre de
votre marqueur.
MODE D’EMPLOI
MISE EN GARDE: Assurez-vous que le marqueur de paintball est toujours pointé dans une direction sûre. Lire les instructions suivantes et passez en revue les étapes de l’utilisation avec votre marqueur de paintball AVANT DE CHARGER DES PAINTBALLS OU DU CO2 (tirez à vide avec votre marqueur sur une cible sûre) pour vous puissiez utiliser votre marqueur correctement et en toute sécurité.
1ère étape. PROTECTION DES YEUX : Assurez-vous que toute personne se trouvant à portée de tir (200 mètres) est protégée adéquatement de tout impact de paintballs. (fig A)
2e étape. ENCLENCHEZ LA SÛRETÉ ET BOUCHEZ LE CANON. Déplacez la sûreté de gauche à droite ; (fig B) (la bande rouge ne devrait pas être visible). Assurez-vous que le bouchon de canon est bien placé dans la bouche du marqueur (fig. C).
3e étape. INSTALLEZ LE CHARGEUR ET CHARGEZ LES BILLES DE PEINTURE : 1) Appuyez sur le Coude (inclus) pour l’insérer dans l’entrée d’alimentation. Appuyez pour insérer le chargeur dans le coude. (fig D)
2) Versez les billes de peinture dans le chargeur. REMARQUE : Les paintballs du chargeur sont alimentées par gravité dans le marqueur chaque fois que le marqueur est armé. Une cadence de tir trop rapide, des billes brisées ou un excès de billes dans le chargeur peuvent occasionner la casse des balles suivantes, ce qui pourrait affecter négativement la précision du marqueur de paintball. Nettoyez l’intérieur du canon du marqueur à l’aide d’une raclette. (RECOMMANDATION : billes de paintball de marque Brass Eagle®, Stryker™ ou JT®de calibre .68.
4e étape. FIXATION DE LA SOURCE D’ALIMENTATION AU CO2 Le marqueur fonctionne avec des bouteilles de CO2 de 12 grammes Brass Eagle®. Utilisez la vis de perçage pour installer la bouteille de CO2 (fig E). Faites tourner la vis dans le sens des aiguilles de la montre pour serrer jusqu’à ce que la bouteille ait été percée. NE SERREZ PAS À L’EXCÈS.
MISE EN GARDE: Utilisez uniquement des bouteilles de CO2 de type 12 grammes. (Les bouteilles de CO2 Brass EagleMD 12 grammes, articles numéros 7105, 7115 ou 7125 sont RECOMMANDÉES) Toute tentative d’utiliser
8.9.
10.
11.12.13.
14.15.16.17.18.
d’autres tailles et/ou des bouteilles contenant d’autres types de gaz pourrait se révéler extrêmement dangereuse. L’utilisation de tout gaz autre que du CO2 est susceptible de causer une explosion ou l’éclatement du marqueur, et de provoquer des blessures graves.
MISE EN GARDE: Les bouteilles de CO2 sont susceptibles d’exploser à des températures supérieures à 54.4 ˚C (130 ˚F).
5e étape. RETIREZ LE BOUCHON DE CANON ET DÉCLENCHEZ LA SÛRETÉ Retirez le bouchon de canon (fig F) et relâchez la sûreté en appuyant sur le cran du côté droit du marqueur jusqu’à ce que la bande rouge soit visible. (fig G)
6e étape. ARMEMENT : Armez le marqueur en tirant le bras de la pompe à fond vers l’arrière jusqu’à ce que vous entendiez un déclic (le son de la gâchette qui s’enclenche) (fig H). Poussez le bras de la pompe à fond vers l’avant jusqu’à ce vous entendiez un nouveau déclic (fig I).
REMARQUE : Il est impossible d’armer le marqueur avec la sûreté enclenchée.
La caractéristique anti-double chargement est désormais engagée et une seconde bille ne peut pas passer dans la chambre avant la mise à feu du marqueur. Le Talon Ghost est un marqueur à pompe qui doit être pompé après chaque coup pour propulser une nouvelle bille de peinture dans la chambre et pour comprimer le ressort de chien. Il est possible que le marqueur ne puisse être armé (la gâchette ne s’engrène pas) quand la pression de la bouteille de 12 grammes de CO2 est basse, ou quand aucune bouteille de 12 grammes de CO2 n’est installée.
7e étape. VÉRIFICATION DE LA VÉLOCITÉ : Vérifiez que la vélocité du marqueur de paintball est inférieure à 300 pieds par secondes, ou même moins selon les exigences du terrain de jeu (norme ASTM F1777-02). La vélocité devrait être mesurée au chronographe avant de jouer au paintball.
8e étape. TIREZ Le marqueur est désormais prêt à tirer. Tirez sur la gâchette du marqueur pour faire feu.
REMARQUE : Gardez la sûreté enclenchée jusqu’à ce que vous soyez prêt à tirer. Gardez le bouchon dans la bouche du canon du marqueur lorsque vous ne tirez pas.
MISE EN GARDE: Ne tirez jamais sur quelqu’un qui est dépourvu d’équipement de protection pour les yeux approprié, qui doit être porté en tout temps. La protection pour les yeux doit être conçue spécifiquement pour l’utilisation dans le cadre du paintball. Le manquement à ces précautions de sécurité peut causer des blessures corporelles, y compris la cécité et la surdité.
COMMENT DÉCHARGER LE MARQUEUR
MISE EN GARDE: Lorsque vous déchargez votre marqueur de paintball, portez toujours la protection appropriée pour vos yeux, votre visage et vos oreilles conçue spécialement pour arrêter les paintballs (fig J).
1ère étape. Assurez-vous que le bouchon de canon est fermement placé dans la bouche du canon (fig K).
2e étape. Enclenchez la sûreté. Appuyez sur le levier de sûreté de gauche à droite, jusqu’à ce que la bande rouge soit invisible. (fig L).
3e étape. Retirez la bouteille de CO2 en dévissant la vis de perçage (fig M).
4e étape. Retirez le chargeur et le coude (fig N).
5e étape. Retournez le marqueur pour sortir les billes de peinture de l’orifice d’alimentation (fig O).
6e étape. Insérez la raclette dans l’entrée d’alimentation (fig P) et dans le canon (fig Q) pour s’assurer que toutes les paintballs sont sorties (fig P).
Ne déchargez pas votre marqueur à l’intérieur.
MISE EN GARDE: Ne regardez jamais dans le canon du marqueur.
NETTOYAGE
R
S
Utilisez une raclette pour nettoyer les paintballs brisées du canon de votre marqueur. Pour un nettoyage facile, nous recommandons l’utilisation des raclettes de paintball Viewloader® Battle SwabMD.
Le nettoyage du marqueur prévient 90% des problèmes de marqueur. 1ère étape. Nettoyez soigneusement le canon et sa jonction avec le chargeur (fig R) Nous recommandons les raclettes de paintball Viewloader® Battle Swab™ pour un nettoyage facile.2e étape. Retirez tous résidus de paintballs et tous fragments de gélatines (provenant des coques des billes de peinture). Pour un nettoyage plus en profondeur, utilisez de l’alcool dénaturé ou des débarbouillettes pour bébés (fig S).
INFORMATIONS RELATIVES À LA GARANTIEGARANTIE : GARANTIE LIMITÉE DE 90 JOURS (REÇU D’ACHAT ORIGINAL REQUIS) Brass Eagle® réparera ou remplacera gracieusement ce marqueur en cas de défaut de matériel ou de fabrication pendant 90 jours à partir de la date d’achat. Cette garantie vous confère certains droits spécifiques. D’autres droits susceptibles de changer d’un état à l’autre existent peut-être. Le service après-vente est disponible auprès des Centres de service Brass Eagle® agréés. Vous pouvez consulter une liste de ces centres sur le site Web Brass Eagle–www.brasseagle.com/service ou en appelant Brass Eagle® au 1-877-877-GAME (4263). Ces Centres de service offrent généralement le service le plus rapide.
Si vous préférez retourner votre chargeur à Brass Eagle®, veuillez appeler le service à la clientèle au 1-877-877-GAME (4263) pour obtenir un numéro d’autorisation de retour et l’adresse d’expédition. (Le numéro d’autorisation doit figurer clairement à l’extérieur du colis pour que celui-ci soit accepté.) Ne retourner aucun produit par un service ne permettant pas le suivi de l’expédition, tel que le courrier ordinaire ou par colis postal. Des produits expédiés de cette façon sont susceptibles d’être perdus et Brass Eagle® Inc. ne pourra alors être tenu responsable de leur remplacement.
MARQUEURS DE PAINTBALL HORS GARANTIE Les Centres de service agréés se feront un plaisir de réparer tout marqueur hors garantie pour un prix nominal couvrant les pièces et la main d’oeuvre. Les réparations effectuées par les Centres de service seront généralement plus rapides et moins coûteuses que celles où les articles sont renvoyés à la fabrique. Vous trouverez l’adresse du Centre de service le plus proche sur www.brasseagle.com/service. Avant d’expédier tout “marqueur hors garantie”, il est indispensable que vous appeliez le service à la clientèle au 1-800-755-5061 pour obtenir un numéro d’autorisation de retour et l’adresse d’expédition. (Le numéro d’autorisation doit figurer clairement à l’extérieur du colis pour que celui-ci soit accepté.) Tout article retourné sans Numéro d’autorisation de retour sera refusé et retourné à l’expéditeur. Tout marqueur hors garantie retourné à JT Sports® doit être expédié en port payé et inclure le règlement des frais de réparation. Veuillez téléphoner au numéro du Service à la clientèle pour vous informer du tarif actuel des réparations. JT Sports® réparera ou remplacera le marqueur avec une unité du même modèle remise à neuf. Le marqueur réparé ou son remplacement vous sera expédié dès la réception de votre paiement.
Les paintballs devraient être remisées dans un endroit frais et sec dans des sacs en plastique scellés.Gardez-les à l’abri du gel, de la chaleur et de l’humidité excessives et entreposez-les à l’abri des rayons du soleil. Au cas contraire, ces conditions pourraient occasionner le bris des paintballs et/ou des problèmes d’alimentation.
PROBLEMA CAUSA SOLUCIÓN
El Marcador no se Descarga
El Marcador no está Armado
Falta de Presión de Gas
En Suministro de Gas no está AcopladoTotalmente
Muy Baja Temperatura de Operación
Paintball Rota
Armar la Manija de la Bomba del Marcador
Instalar Cilindros de CO2 de 12gm Nuevos
Apretar el Tornillo Perforador
Operar bajo Temperaturas más Cálidas
Retire los Fragmentos de Paintballs con el Secador
GUÍA PARA LA BÚSQUEDA DE FALLAS
PROBLÈME CAUSE SOLUTION
Le marqueur ne tire pas
Le marqueur n’est pas armé
La pression de gaz est insuffisante
La source d’alimentationn’est pas complètementengagée
La température defonctionnementest trop basse
Paintballs cassées
Armer la pompe du marqueur
Insérer une nouvelle bouteille de 12 g de CO2
Resserrer la vis de perçage
Faire fonctionner à température plus élevée
Nettoyer les fragments de billes de peinture à l’aide d’une raclette
GUIDE DE DÉPANNAGE