Cryptocaryon irritans Infections (Marine White Spot Disease) in Fish1
UNDER THE SEAA Scratch and MakeyMakey Tutorial
Georgia Gwinnett College S3
INTRODUCTION
• In this Scratch tutorial, we are going to program the Under The Sea animation into a game!
• Students will learn how to program:
• An animated crab that the user can control with the MakeyMakey for direction.
• Falling sprites that the crab can catch and gain points.
• Import music into the stage.
• A scoreboard for the game.
• All files needed for this game will be from the Under the Sea Folder on your Desktop
and the Scratch 2.0 Library.

OPEN SCRATCH SOFTWARE
Open the scratch game by double
clicking this icon.
It can be found on the desktop of
your computer or laptop.
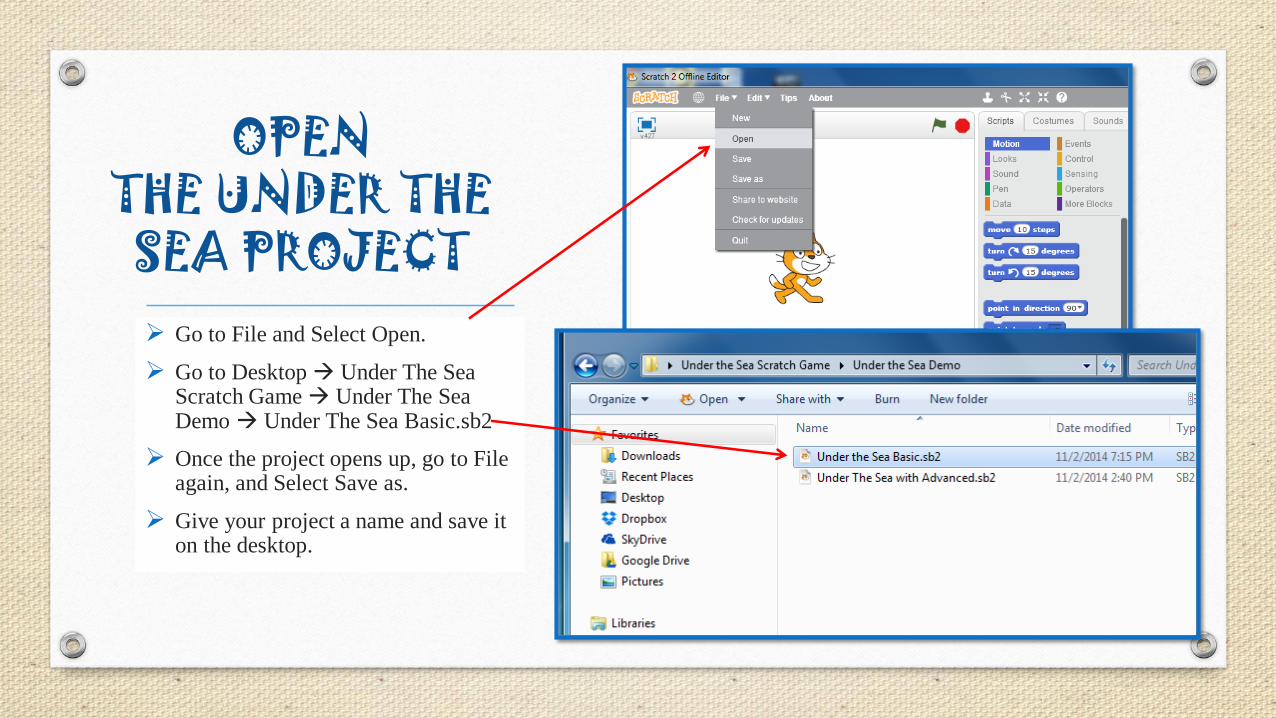
OPEN THE UNDER THE SEA PROJECT Go to File and Select Open.
Go to Desktop Under The Sea Scratch Game Under The Sea Demo Under The Sea Basic.sb2
Once the project opens up, go to File again, and Select Save as.
Give your project a name and save it on the desktop.

Under The Sea Scratch ProjectHit the space bar to see the Crab animation.
• Once you have saved your project,
double check to make sure the
project looks like the image to the
right.
• Note: The scripts for the Crab
animations and Stage/Background
Music setup has been provided to
get you started.

SPRITES Import the following sprites for the Crab
to catch.
Left-click the button to upload new sprites.
Click DesktopUnder the Sea Scratch Game Folder Sprites SVG
Press down the ctrl key and select fish1, worm, and soda can to import to the Stage.
You may need to move the sprites apart on the stage by dragging them across the stage.
Your stage should look like the image to the right.
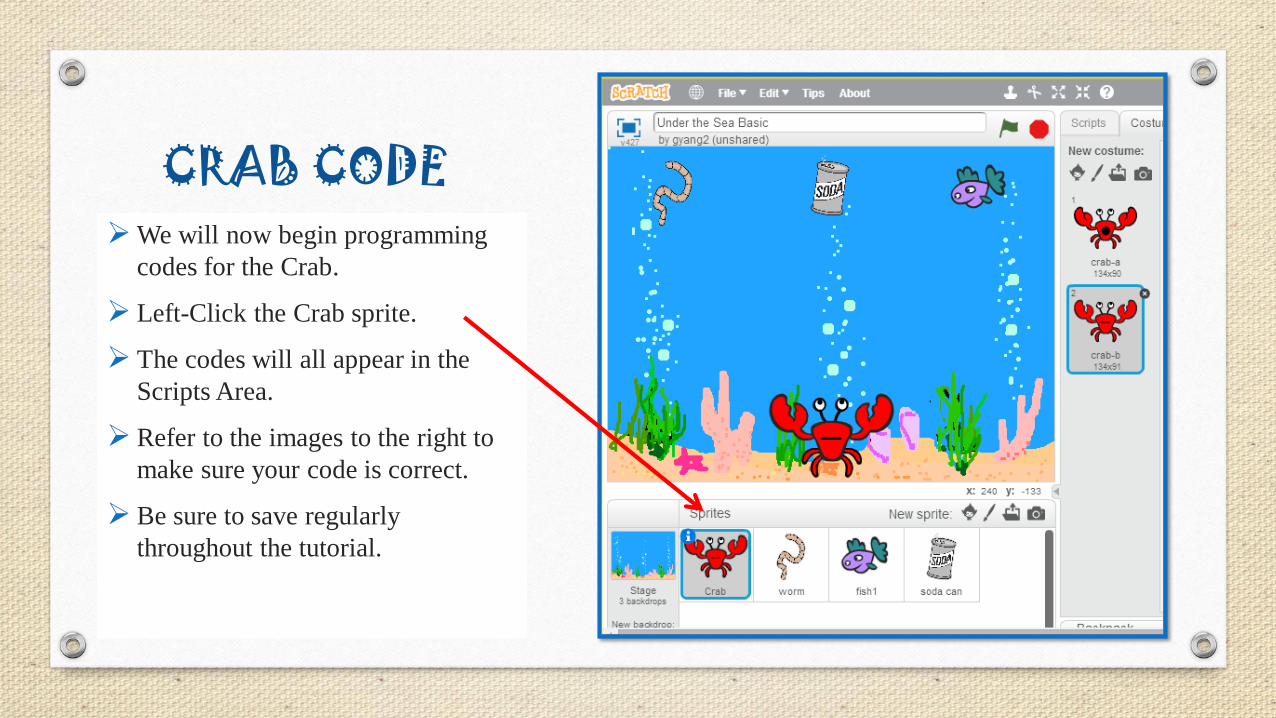
CRAB CODEWe will now begin programming
codes for the Crab.
Left-Click the Crab sprite.
The codes will all appear in the
Scripts Area.
Refer to the images to the right to
make sure your code is correct.
Be sure to save regularly
throughout the tutorial.
CRABCODE
The crab code will allow us to
control and move the Crab
across the stage.
Our Crab will be controlled by
the left and right arrow keys,
which will later be connected to
the MaKey MaKey.
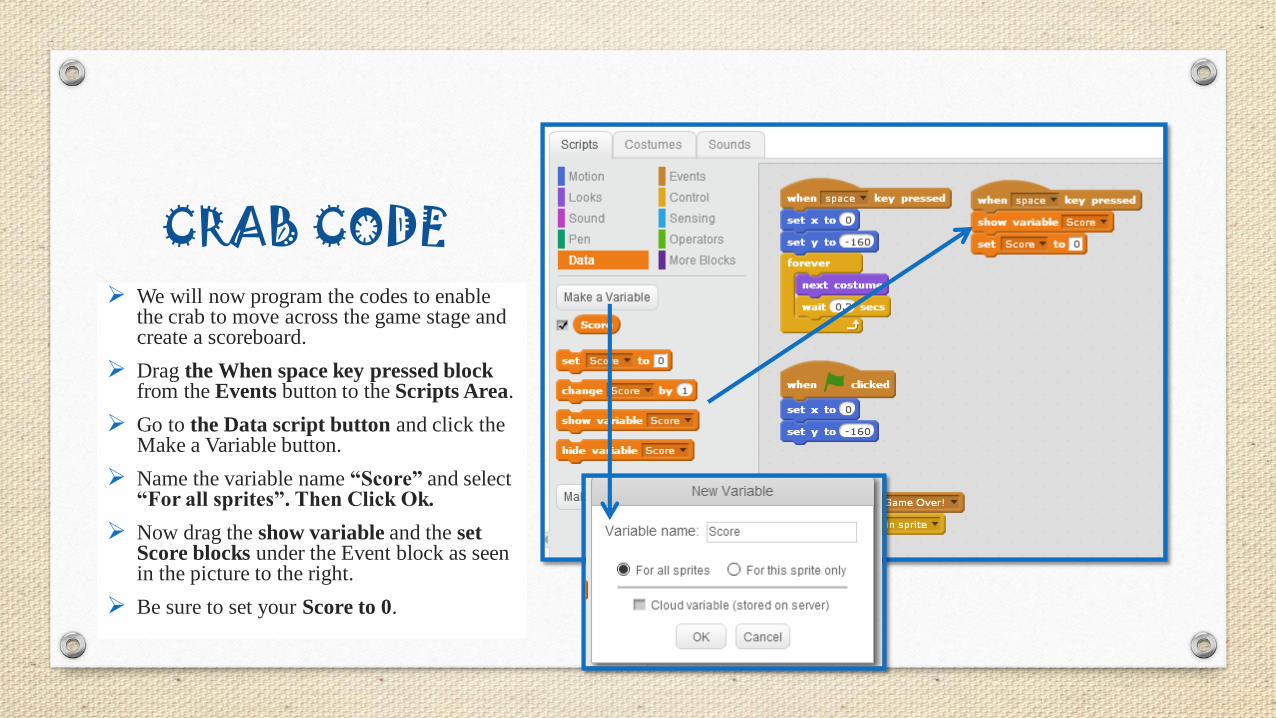
CRAB CODE We will now program the codes to enable
the crab to move across the game stage and create a scoreboard.
Drag the When space key pressed block from the Events button to the Scripts Area.
Go to the Data script button and click the Make a Variable button.
Name the variable name “Score” and select “For all sprites”. Then Click Ok.
Now drag the show variable and the set Score blocks under the Event block as seen in the picture to the right.
Be sure to set your Score to 0.

CRAB CODE Next, drag the forever block from the Control button under
the set Score to 0 block .
Drag the two if- then block from Control button inside the forever block.
Inside each if-then blank, drag the key pressed? block into the blank from the Sensing button.
Set one key to left arrow and the other key to right arrow.
Inside each if block, drag a change by x block from the Motion button.
A positive number shifts the sprite to the right. Set X = 10.
A negative number shifts the sprite to the left. Set X = -10.
This code will allow the crab to shift left and right across the stage.
Check your results and test your code.
You should have 4 separate scripts of code for the Crab sprite.
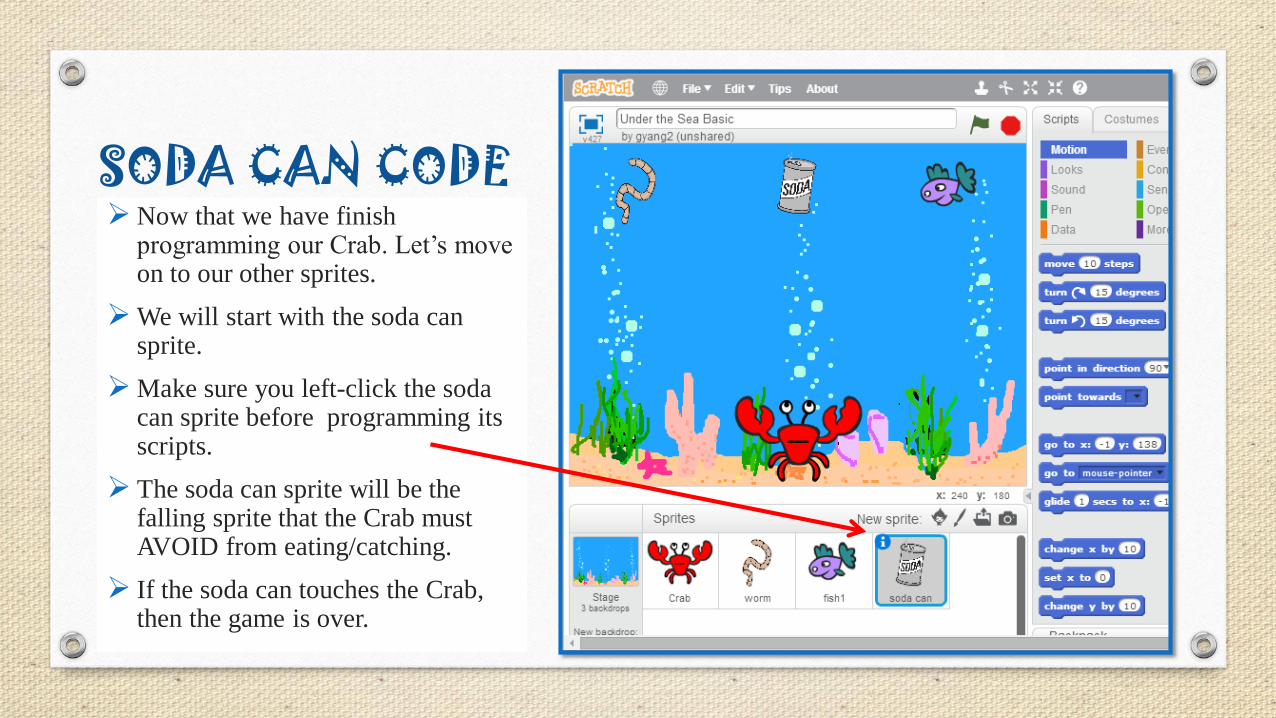
SODA CAN CODENow that we have finish
programming our Crab. Let’s move on to our other sprites.
We will start with the soda can sprite.
Make sure you left-click the soda can sprite before programming its scripts.
The soda can sprite will be the falling sprite that the Crab must AVOID from eating/catching.
If the soda can touches the Crab, then the game is over.
SODA CAN CODE PART 1
Part 1 code will hide and set the
start position for the soda can
sprite.
It will then randomize the time
for how long it takes the sprite
to start falling between 1 to 4
seconds.
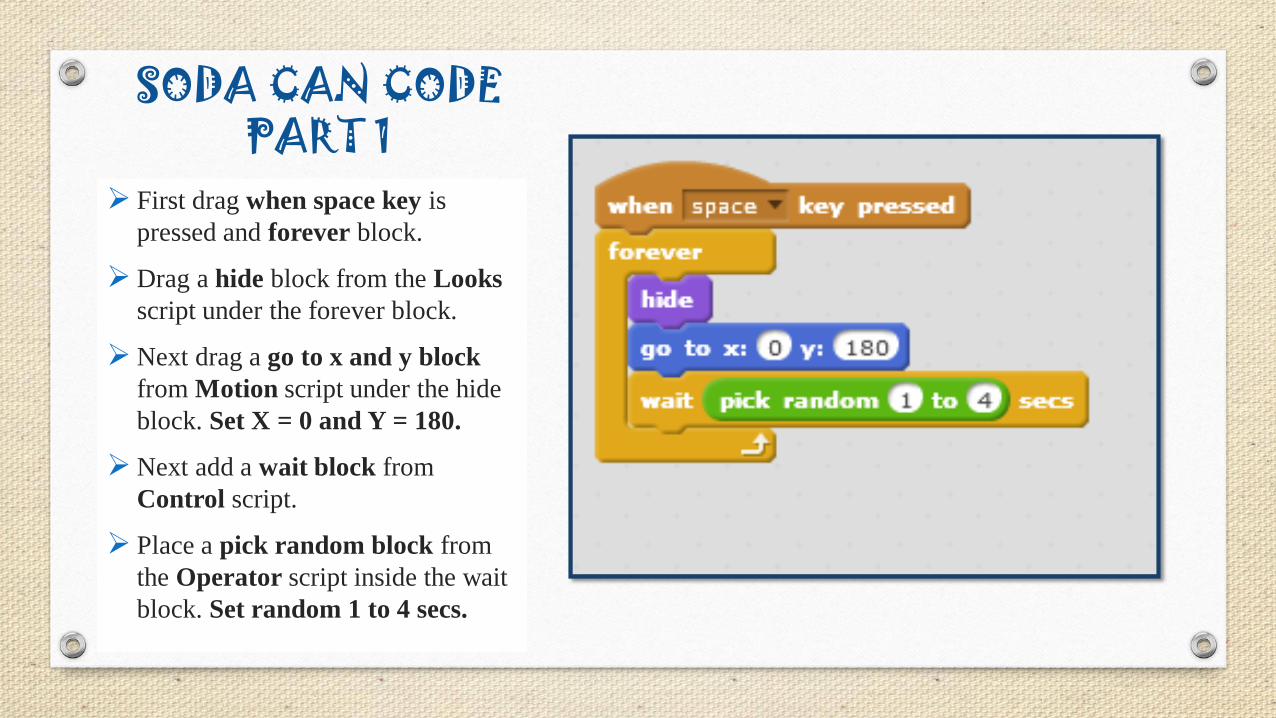
SODA CAN CODE PART 1
First drag when space key is
pressed and forever block.
Drag a hide block from the Looks
script under the forever block.
Next drag a go to x and y block
from Motion script under the hide
block. Set X = 0 and Y = 180.
Next add a wait block from
Control script.
Place a pick random block from
the Operator script inside the wait
block. Set random 1 to 4 secs.
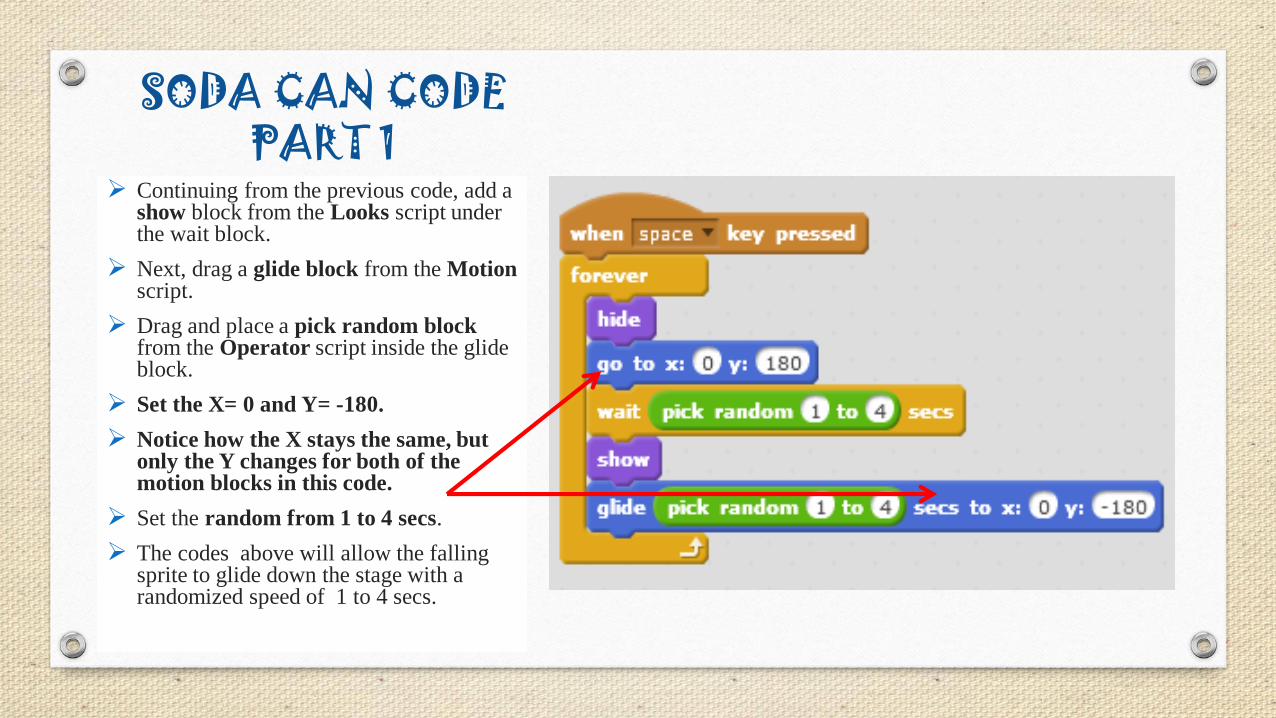
SODA CAN CODE PART 1
Continuing from the previous code, add a show block from the Looks script under the wait block.
Next, drag a glide block from the Motionscript.
Drag and place a pick random block from the Operator script inside the glide block.
Set the X= 0 and Y= -180.
Notice how the X stays the same, but only the Y changes for both of the motion blocks in this code.
Set the random from 1 to 4 secs.
The codes above will allow the falling sprite to glide down the stage with a randomized speed of 1 to 4 secs.
SODA CAN CODE PART 2
Part 2 code will allow the soda can
sprite to stop the Under the Sea song
and then switch to play the game over
song when it touches the Crab sprite.
This code will then broadcast a Game
Over message to all the other sprites in
the game to notify that the game is
over.
Once the message is sent, all scripts in
the game will stop and the user will
have to restart the game again.
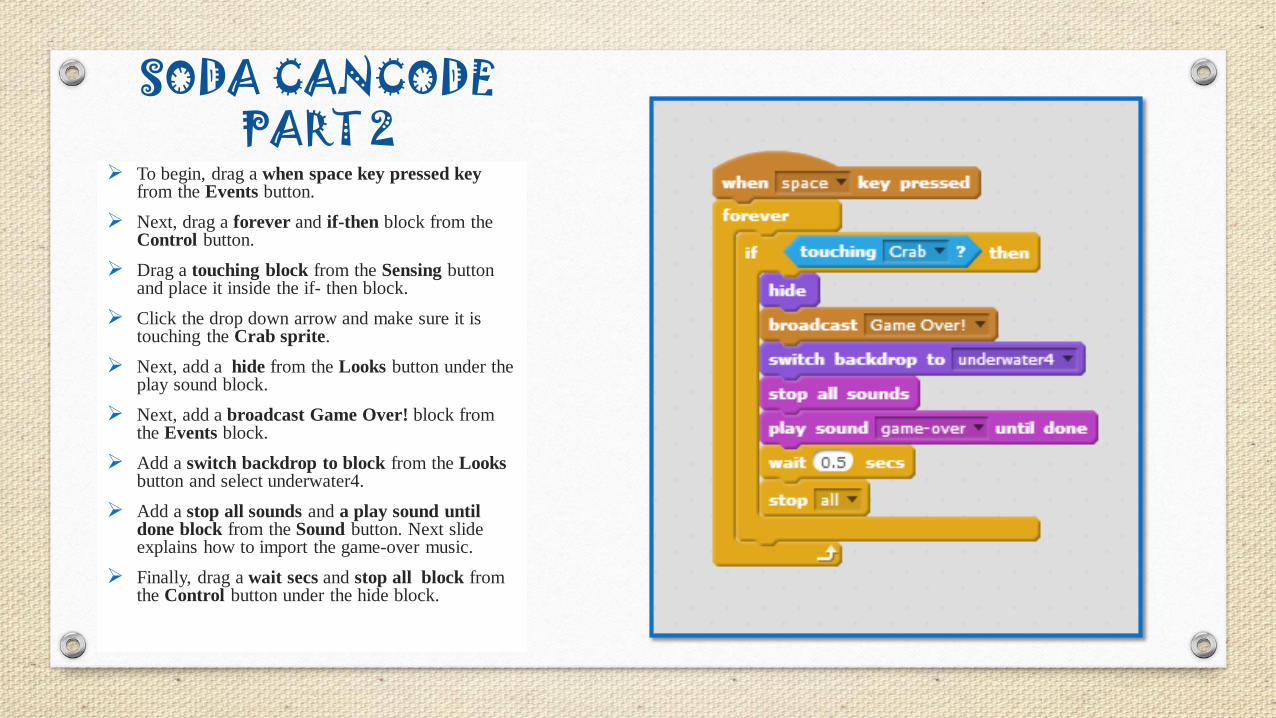
SODA CANCODE PART 2
To begin, drag a when space key pressed key from the Events button.
Next, drag a forever and if-then block from the Control button.
Drag a touching block from the Sensing button and place it inside the if- then block.
Click the drop down arrow and make sure it is touching the Crab sprite.
Next, add a hide from the Looks button under the play sound block.
Next, add a broadcast Game Over! block from the Events block.
Add a switch backdrop to block from the Looksbutton and select underwater4.
Add a stop all sounds and a play sound until done block from the Sound button. Next slide explains how to import the game-over music.
Finally, drag a wait secs and stop all block from the Control button under the hide block.
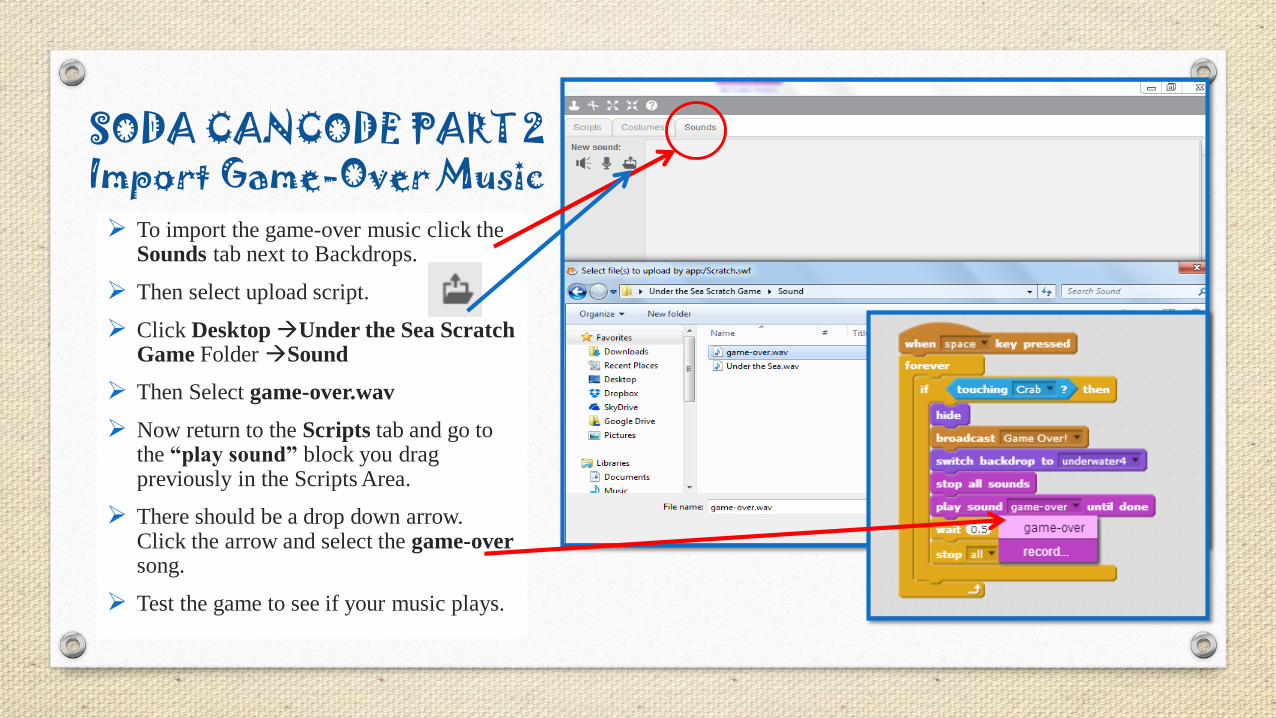
SODA CANCODE PART 2Import Game-Over Music To import the game-over music click the
Sounds tab next to Backdrops.
Then select upload script.
Click DesktopUnder the Sea Scratch Game Folder Sound
Then Select game-over.wav
Now return to the Scripts tab and go to the “play sound” block you drag previously in the Scripts Area.
There should be a drop down arrow. Click the arrow and select the game-over song.
Test the game to see if your music plays.
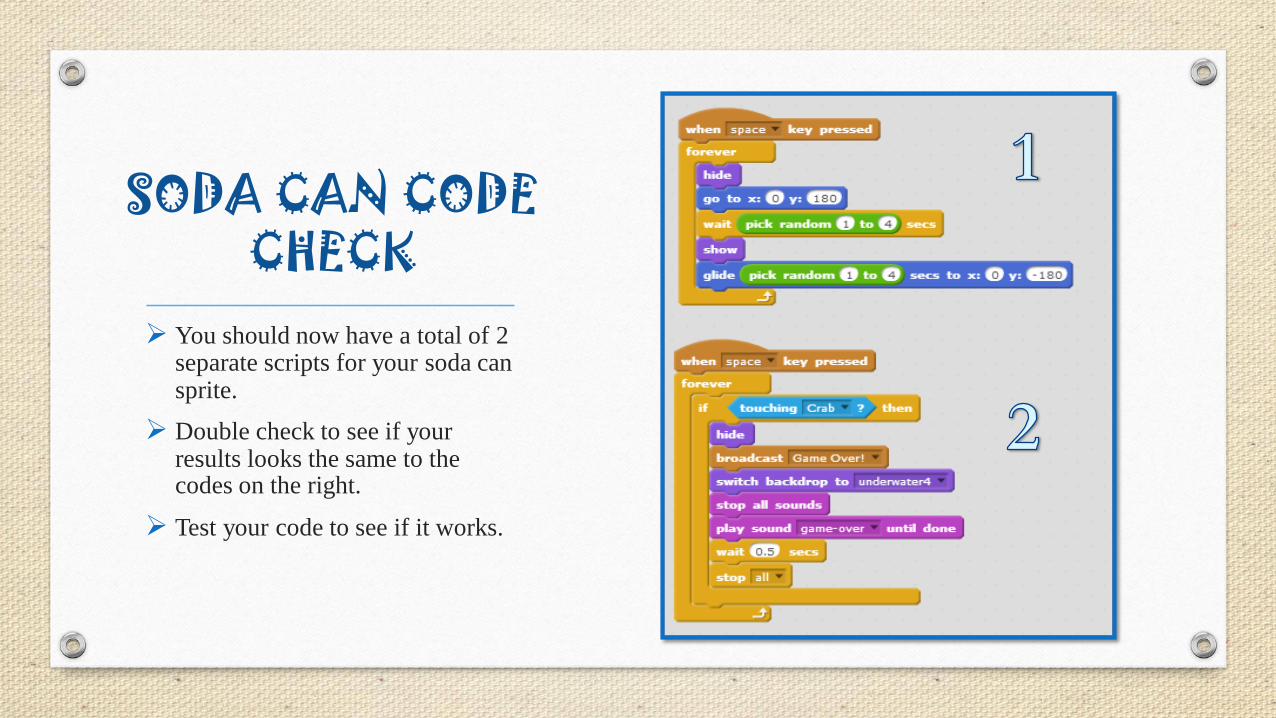
SODA CAN CODE CHECK
You should now have a total of 2 separate scripts for your soda can sprite.
Double check to see if your results looks the same to the codes on the right.
Test your code to see if it works.

FISH1 CODE Now that we have finish
programming our soda can sprite. Let’s move on to the edible sprites that the Crab can catch/eat.
We will program new sprites to be falling objects in which our crab will have be able to catch and eat.
Start with the fish1 sprite.
Make sure you left-click the fish1 sprite before programming its scripts.
Each falling sprite will require 3 separate Scripts of code. We will break it down and program each script by parts.
FISH1 CODE PART 1
Part 1 code will hide and set the start
position for the fish1 sprite.
It will then randomize the time for
how long it takes the sprite to start
falling between 1 to 4 seconds.
Remember to save project!
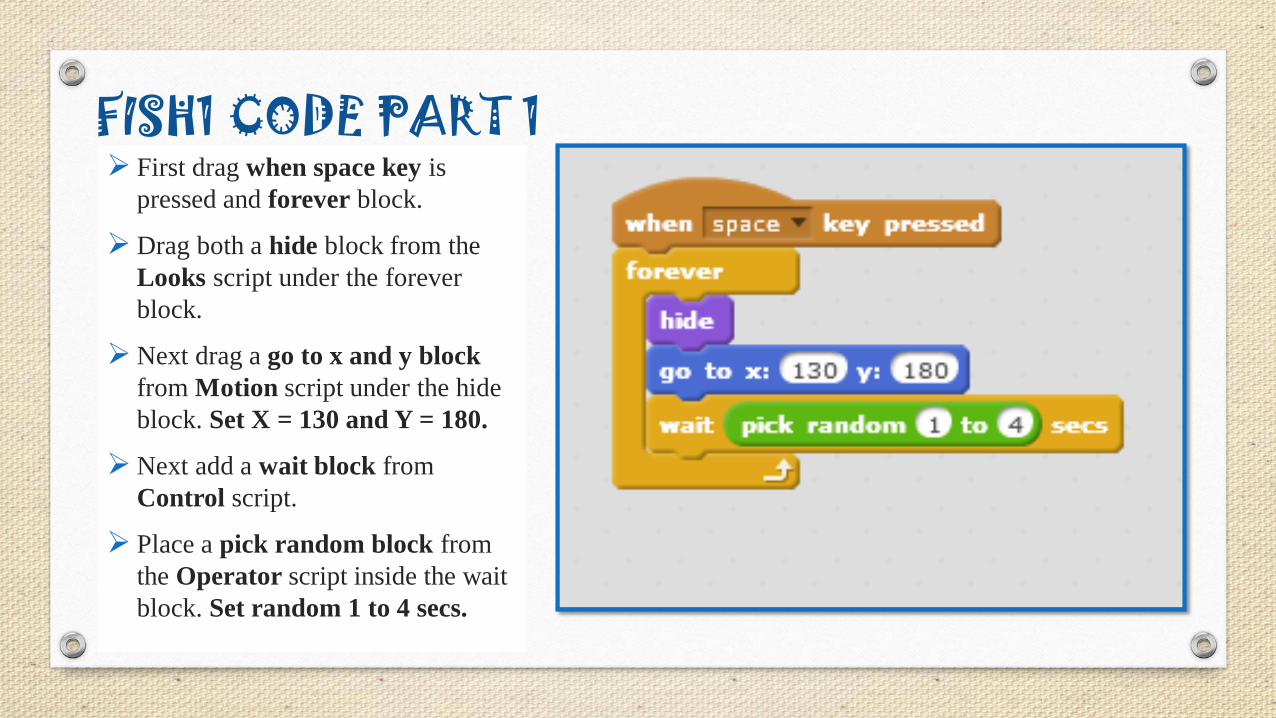
FISH1 CODE PART 1 First drag when space key is
pressed and forever block.
Drag both a hide block from the
Looks script under the forever
block.
Next drag a go to x and y block
from Motion script under the hide
block. Set X = 130 and Y = 180.
Next add a wait block from
Control script.
Place a pick random block from
the Operator script inside the wait
block. Set random 1 to 4 secs.
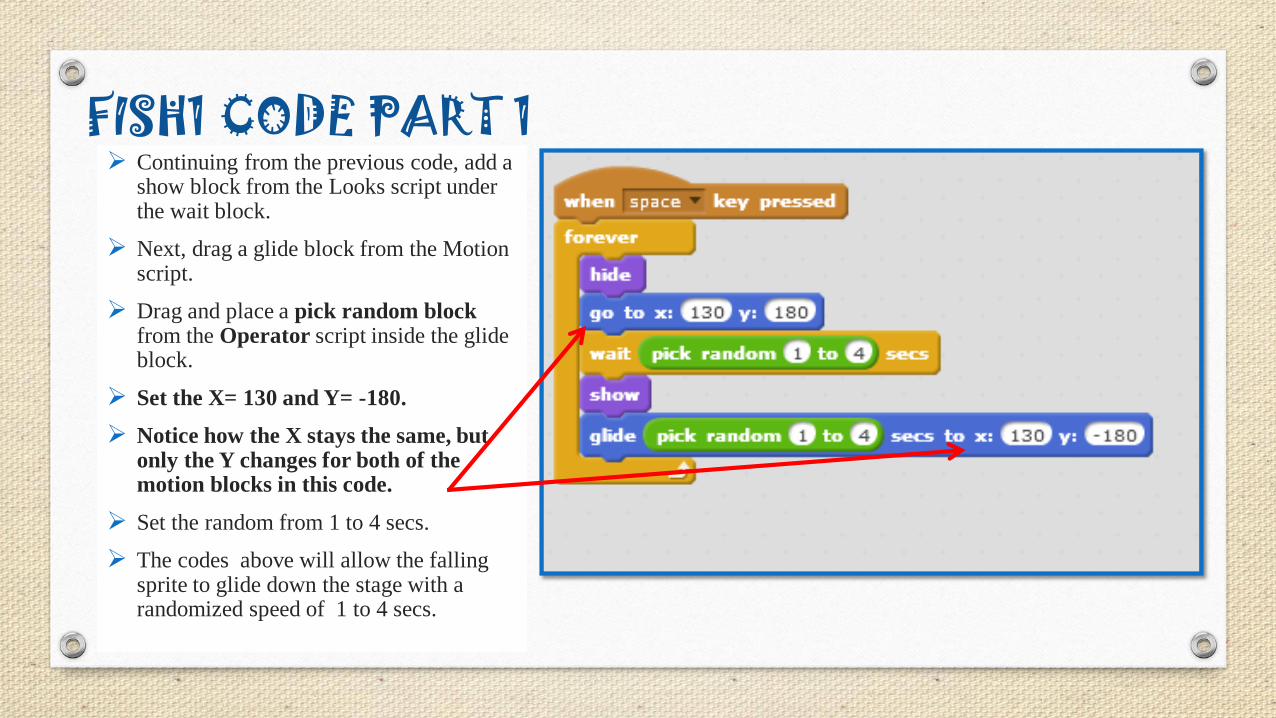
FISH1 CODE PART 1 Continuing from the previous code, add a
show block from the Looks script under the wait block.
Next, drag a glide block from the Motion script.
Drag and place a pick random block from the Operator script inside the glide block.
Set the X= 130 and Y= -180.
Notice how the X stays the same, but only the Y changes for both of the motion blocks in this code.
Set the random from 1 to 4 secs.
The codes above will allow the falling sprite to glide down the stage with a randomized speed of 1 to 4 secs.
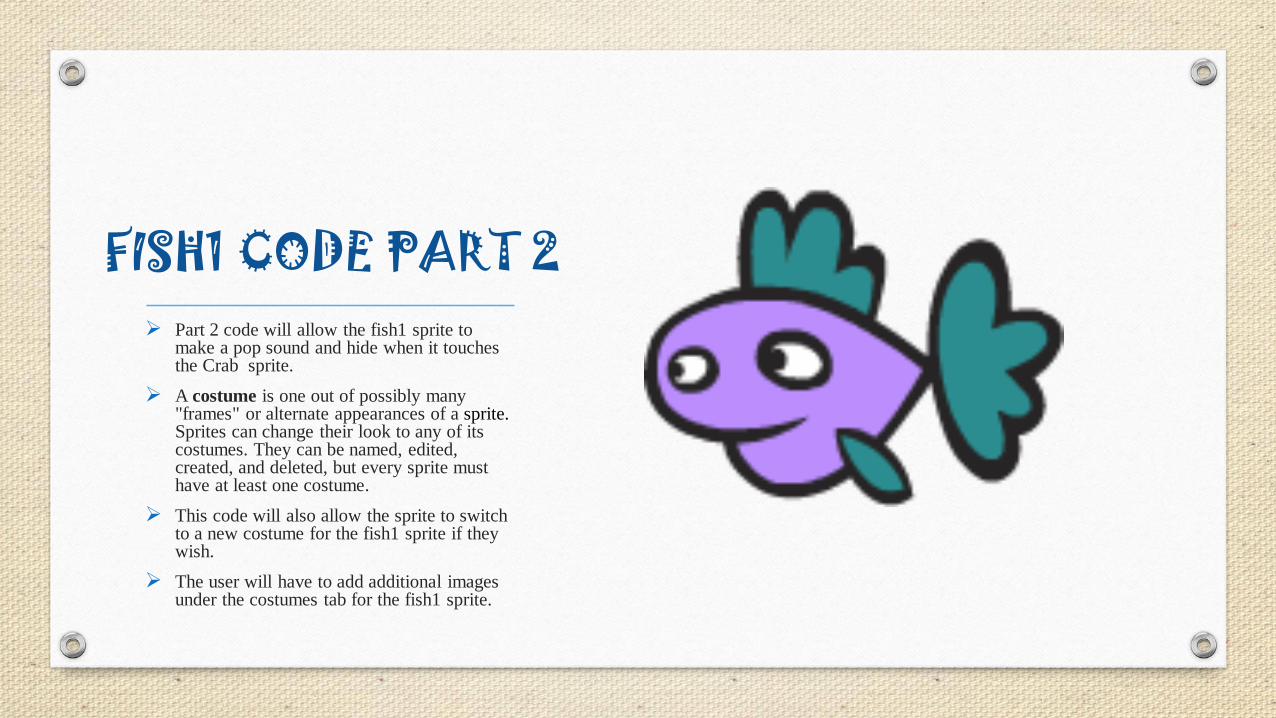
FISH1 CODE PART 2 Part 2 code will allow the fish1 sprite to
make a pop sound and hide when it touches the Crab sprite.
A costume is one out of possibly many "frames" or alternate appearances of a sprite.Sprites can change their look to any of its costumes. They can be named, edited, created, and deleted, but every sprite must have at least one costume.
This code will also allow the sprite to switch to a new costume for the fish1 sprite if they wish.
The user will have to add additional images under the costumes tab for the fish1 sprite.
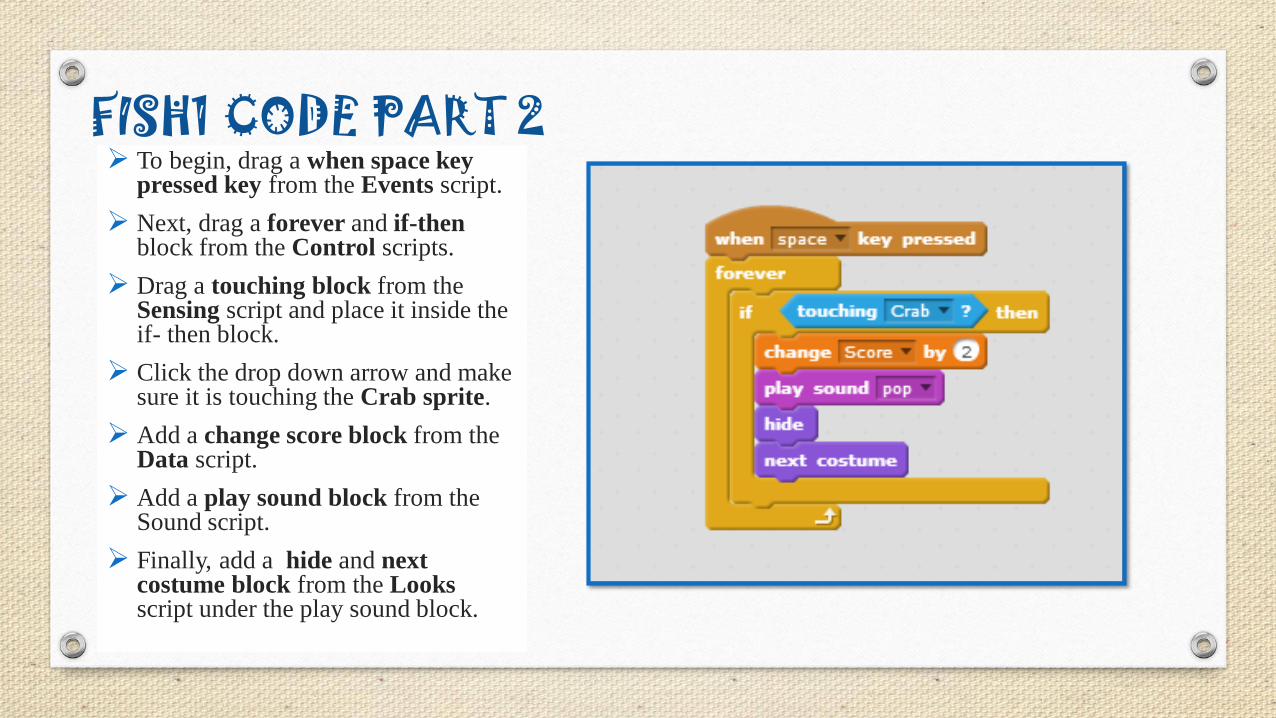
FISH1 CODE PART 2 To begin, drag a when space key
pressed key from the Events script.
Next, drag a forever and if-then block from the Control scripts.
Drag a touching block from the Sensing script and place it inside the if- then block.
Click the drop down arrow and make sure it is touching the Crab sprite.
Add a change score block from the Data script.
Add a play sound block from the Sound script.
Finally, add a hide and next costume block from the Looksscript under the play sound block.
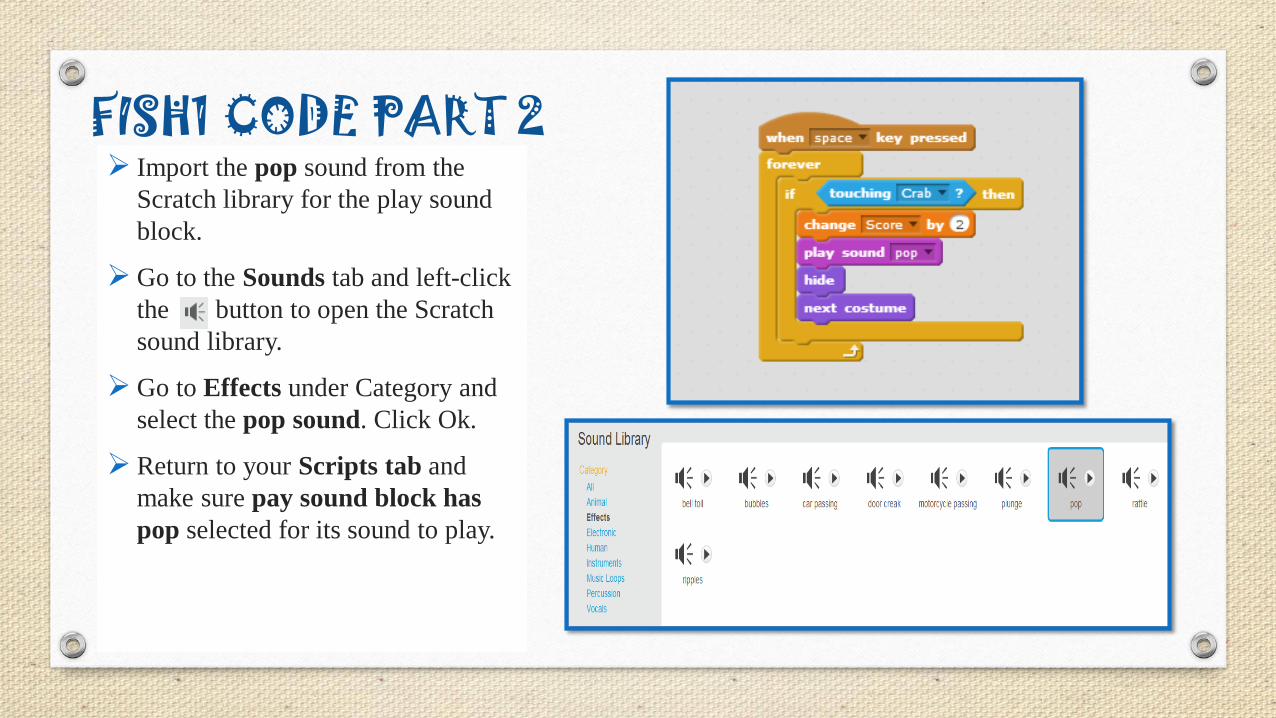
FISH1 CODE PART 2 Import the pop sound from the
Scratch library for the play sound
block.
Go to the Sounds tab and left-click
the button to open the Scratch
sound library.
Go to Effects under Category and
select the pop sound. Click Ok.
Return to your Scripts tab and
make sure pay sound block has
pop selected for its sound to play.
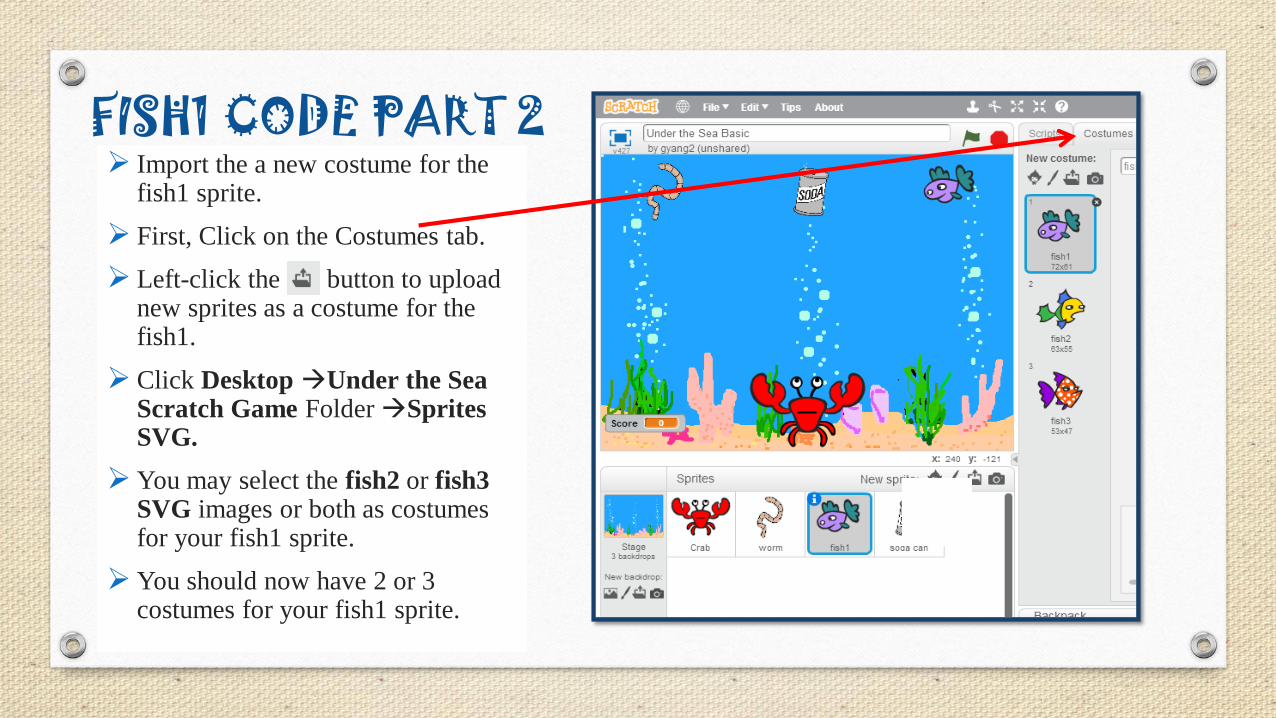
FISH1 CODE PART 2 Import the a new costume for the
fish1 sprite.
First, Click on the Costumes tab.
Left-click the button to upload new sprites as a costume for the fish1.
Click Desktop Under the Sea Scratch Game FolderSprites SVG.
You may select the fish2 or fish3SVG images or both as costumes for your fish1 sprite.
You should now have 2 or 3 costumes for your fish1 sprite.
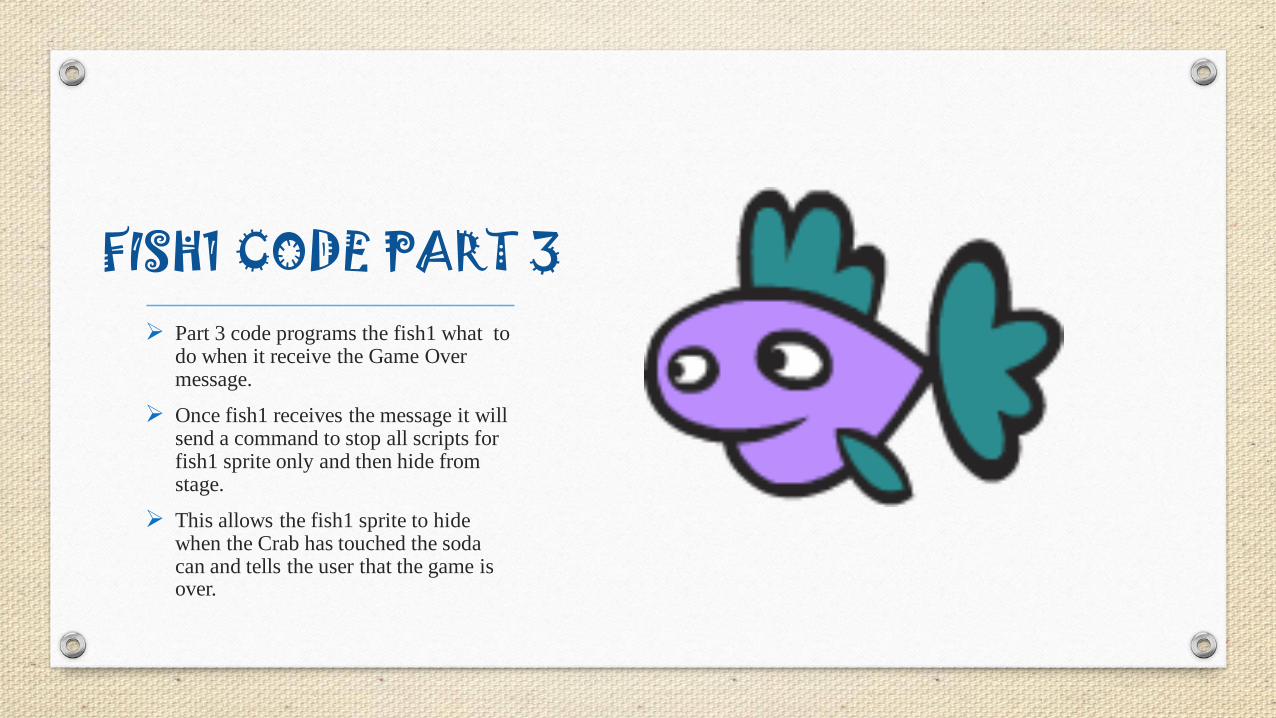
FISH1 CODE PART 3 Part 3 code programs the fish1 what to
do when it receive the Game Over message.
Once fish1 receives the message it will send a command to stop all scripts for fish1 sprite only and then hide from stage.
This allows the fish1 sprite to hide when the Crab has touched the soda can and tells the user that the game is over.
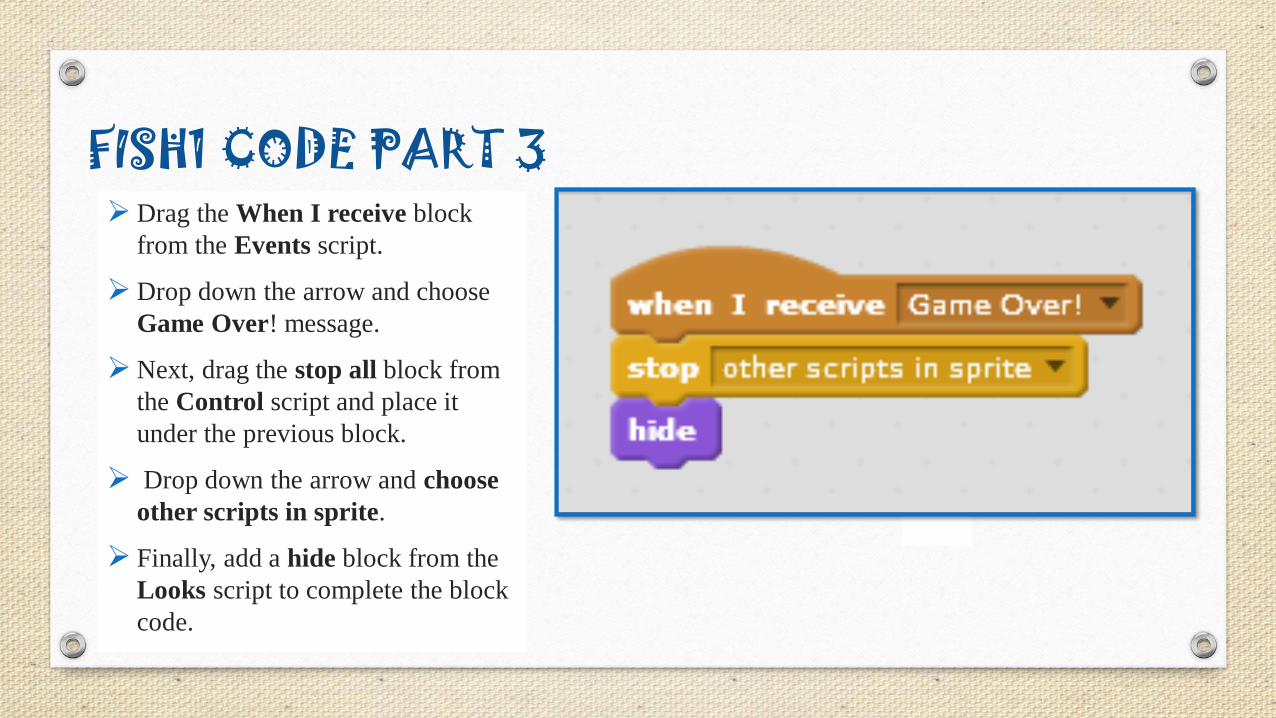
FISH1 CODE PART 3Drag the When I receive block
from the Events script.
Drop down the arrow and choose
Game Over! message.
Next, drag the stop all block from
the Control script and place it
under the previous block.
Drop down the arrow and choose
other scripts in sprite.
Finally, add a hide block from the
Looks script to complete the block
code.
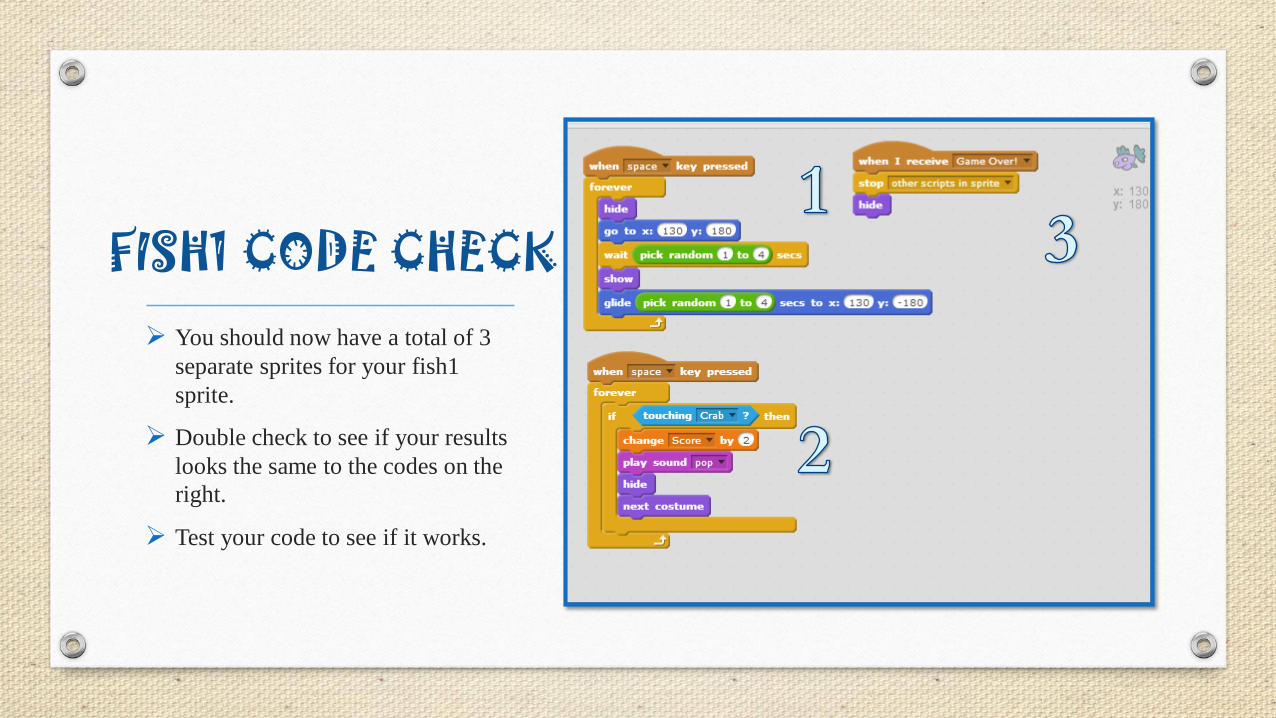
FISH1 CODE CHECK
You should now have a total of 3
separate sprites for your fish1
sprite.
Double check to see if your results
looks the same to the codes on the
right.
Test your code to see if it works.
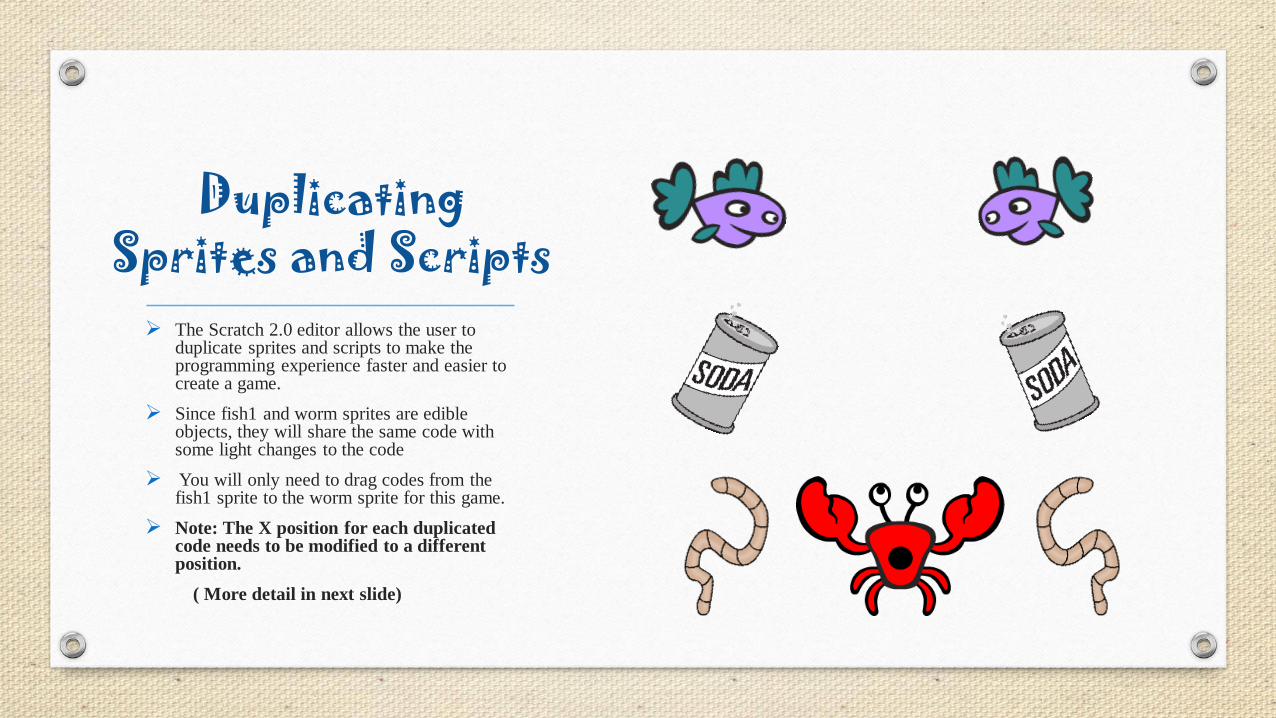
Duplicating Sprites and Scripts
The Scratch 2.0 editor allows the user to duplicate sprites and scripts to make the programming experience faster and easier to create a game.
Since fish1 and worm sprites are edible objects, they will share the same code with some light changes to the code
You will only need to drag codes from the fish1 sprite to the worm sprite for this game.
Note: The X position for each duplicated code needs to be modified to a different position.
( More detail in next slide)
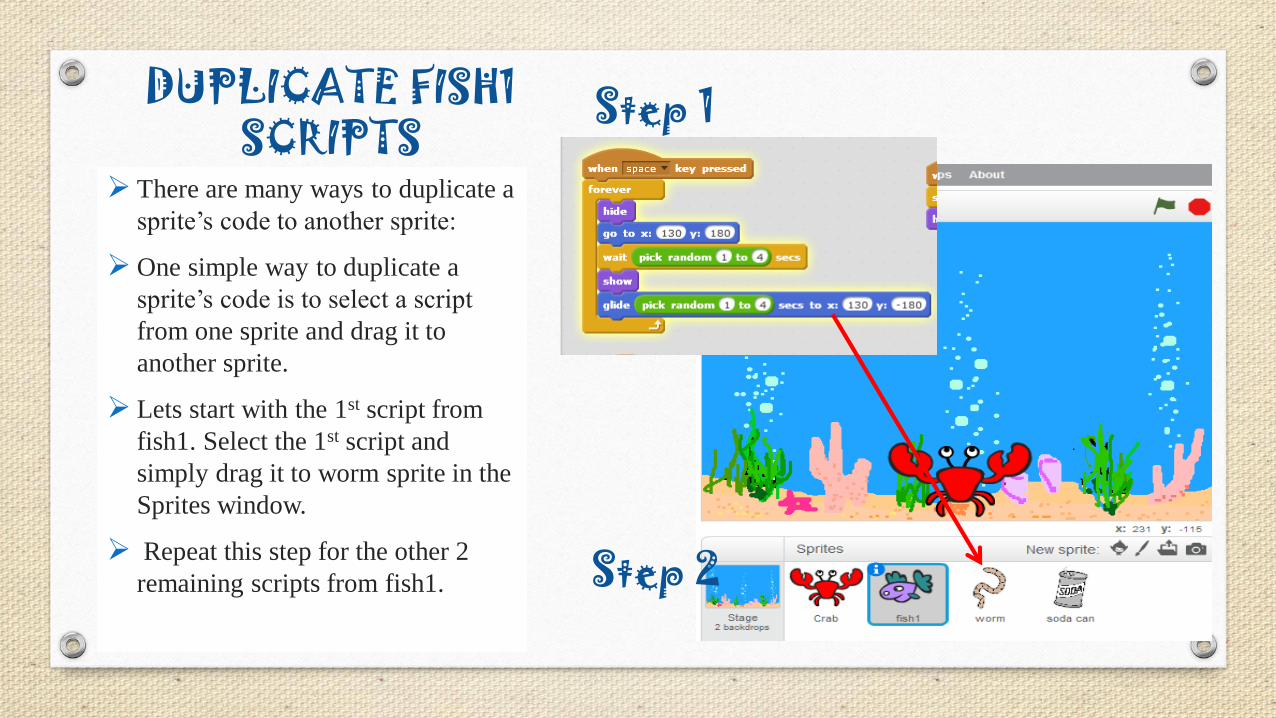
DUPLICATE FISH1 SCRIPTS
There are many ways to duplicate a
sprite’s code to another sprite:
One simple way to duplicate a
sprite’s code is to select a script
from one sprite and drag it to
another sprite.
Lets start with the 1st script from
fish1. Select the 1st script and
simply drag it to worm sprite in the
Sprites window.
Repeat this step for the other 2
remaining scripts from fish1.
Step 1
Step 2

DUPLICATE FISH1 SCRIPTS
Now click on the worm sprite, and you should now have the 3 scripts you dragged in the worm’s scripts area.
Note: You will need to rearrange the scripts so that will not be placed on top of each other.
Note: Be sure you change the X position for each 1st Script you copied to a different X-axis position of your choosing.
This allows your worm sprite to fall from a different position.
Example is given here:
Under The Sea Game Test Check
Once you have finished, please make sure your game is working correctly, by testing and playing the game.
Please raise your hand so that an Instructor can check your game, before moving on to the MakeyMakey tutorial.
Your must be checked, before receiving a MakeyMakey kit.
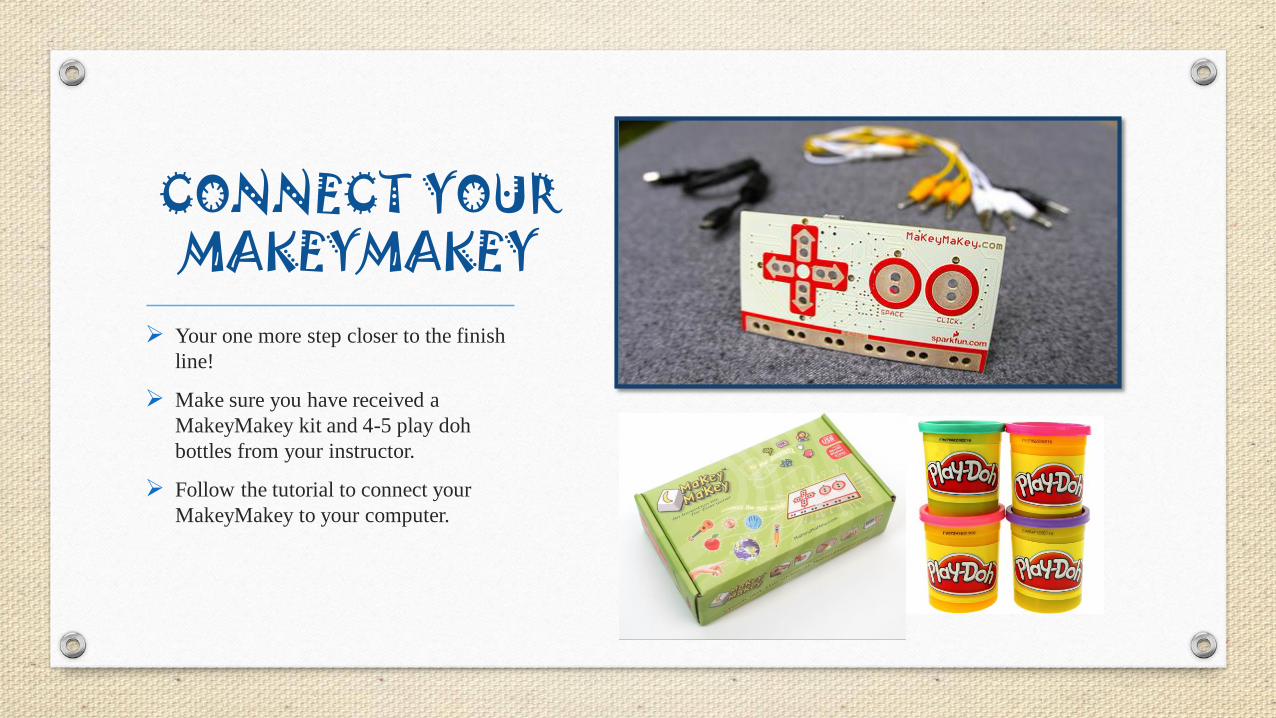
CONNECT YOUR MAKEYMAKEY
Your one more step closer to the finish
line!
Make sure you have received a
MakeyMakey kit and 4-5 play doh
bottles from your instructor.
Follow the tutorial to connect your
MakeyMakey to your computer.

MAKEYMAKEYCIRCUIT BOARD
Open the kit and grab your
MakeMakey board and USB cable.
Plug your board into the computer.
Small side of USB cable plugs into
MaKey MaKey,
A red light should turn on, which
tells you that the board is on and
connected to the computer.
Close any pop-ups if they show up
on the computer.
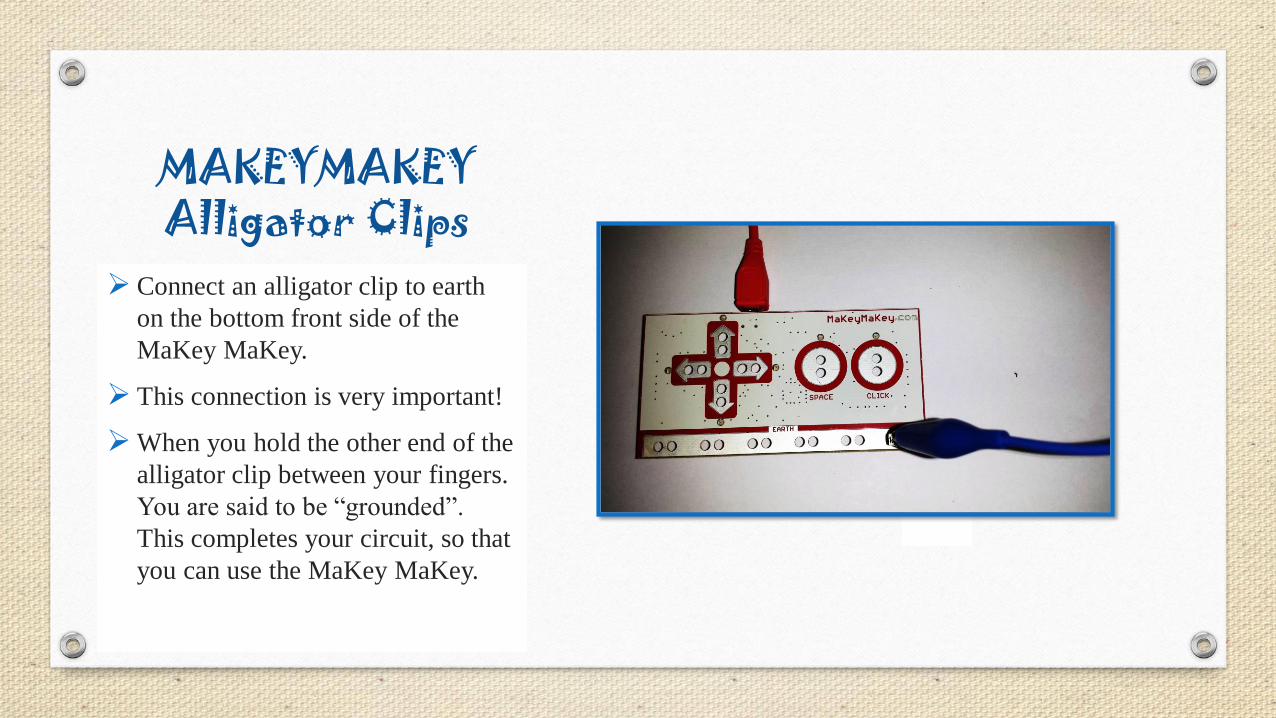
MAKEYMAKEYAlligator Clips
Connect an alligator clip to earth
on the bottom front side of the
MaKey MaKey.
This connection is very important!
When you hold the other end of the
alligator clip between your fingers.
You are said to be “grounded”.
This completes your circuit, so that
you can use the MaKey MaKey.
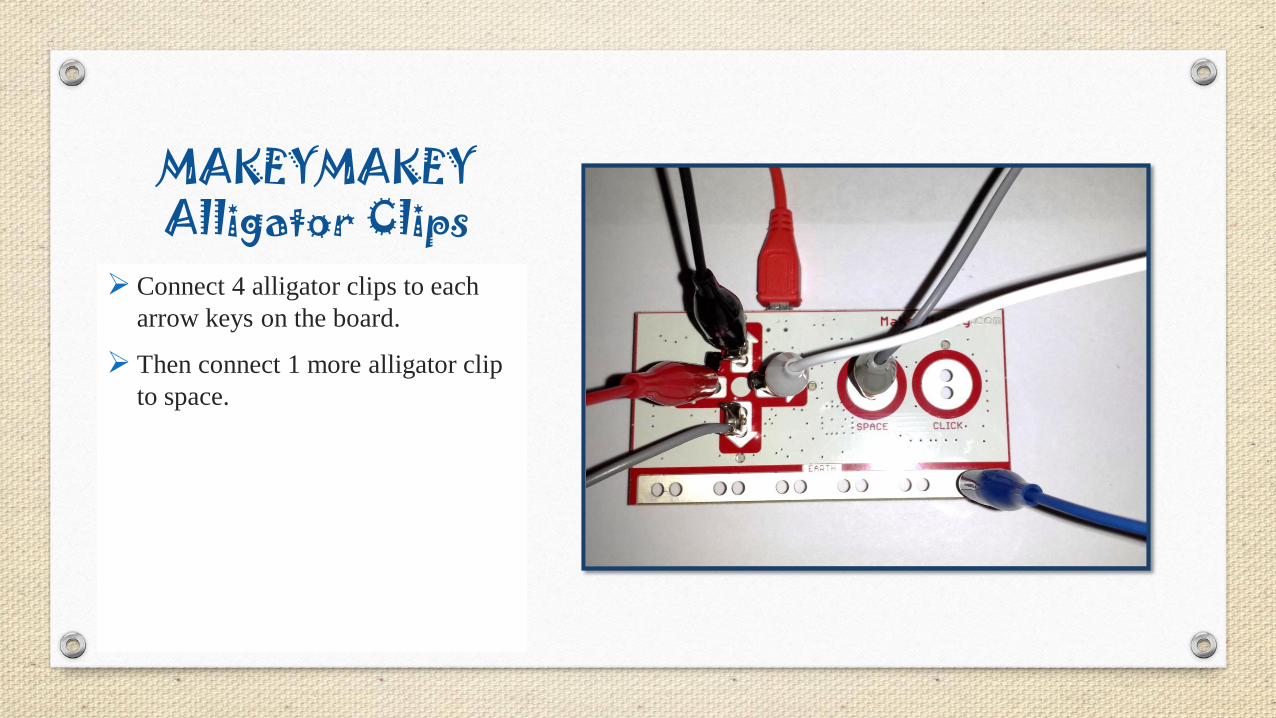
MAKEYMAKEYAlligator Clips
Connect 4 alligator clips to each
arrow keys on the board.
Then connect 1 more alligator clip
to space.

MAKEYMAKEYConnect Stuff
Now Connect each ends of the
alligator clips to something
conductive and you can now play
your game!
Play Doh
Aluminum Foil Tap
Spoons
Fruits
People

CONGRATULATIONS!You Finished Your Under the Sea Game!
See Next Slide for Additional Challenges
BONUS Prize Challenge: Program a code that allows
your crab to jump when you press the up arrow key!
Edit your crab sprite
Add extra Sprites or duplicate them
Add a Score condition
Design your own background
Design your own sprite
Change Music and Sounds
Play around with the codes and have fun!!!
Use different objects with your MakeyMakey board.

SURVEY
Copy and paste the URL below into your browser to take the survey!
Thanks, we appreciate your feedback!
http://tinyurl.com/ggctech