VU+ Zero EasySetupGuide english - VU...
16
English DOWNLOAD ONLY
Transcript of VU+ Zero EasySetupGuide english - VU...

What's included ?
HDMICable
RCU
RCU Batteries
* The contents in this guide are subject to change without prior notice.
PowerAdapter
Easy Setup Guide
External IRCable
English
DOWNLO
AD O
NLY

What's included ?
HDMICable
RCU
RCU Batteries
* The contents in this guide are subject to change without prior notice.
PowerAdapter
Easy Setup Guide
External IRCable
1
English
DOWNLO
AD O
NLY

Front Panel
IR ReceiverStatus LED
Smartcard reader slot
2
Rear Panel
A/V Jack External IR Sensor or RS232
Ethernet
On/O� Switch
LNB IN
USB 2.0
HDMIConnects to TV using a HDMI cable for both audio and video signals.
DOWNLO
AD O
NLY

Front Panel
IR ReceiverStatus LED
Smartcard reader slot
Rear Panel
A/V Jack External IR Sensor or RS232
Ethernet
On/O� Switch
LNB IN
USB 2.0
HDMIConnects to TV using a HDMI cable for both audio and video signals.
3
DOWNLO
AD O
NLY
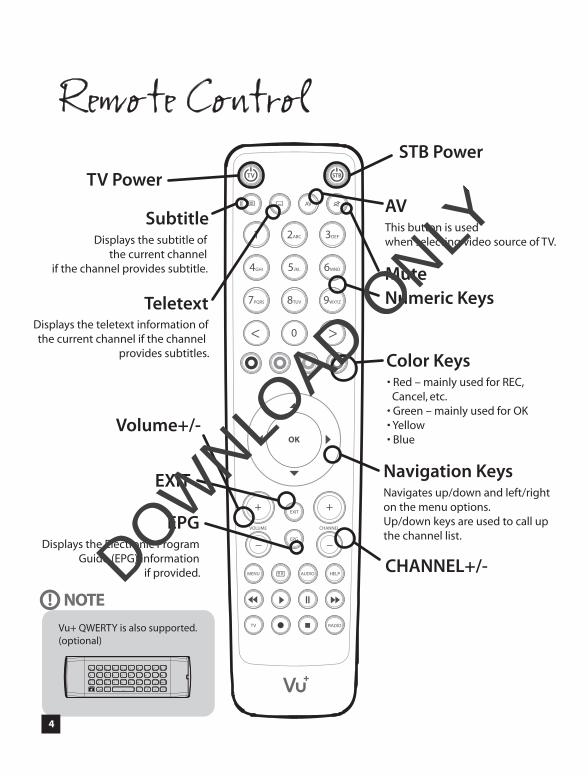
Remote ControlTV Power
Navigation KeysNavigates up/down and left/righton the menu options. Up/down keys are used to call upthe channel list.
TeletextDisplays the teletext information ofthe current channel if the channel
provides subtitles.
SubtitleDisplays the subtitle of
the current channelif the channel provides subtitle.
AVThis button is usedwhen selecting video source of TV.
EPGDisplays the Electronic Program
Guide (EPG) informationif provided. CHANNEL+/-
Color Keys • Red – mainly used for REC, Cancel, etc. • Green – mainly used for OK • Yellow • Blue
Volume+/-
EXIT
Numeric KeysMute
STB Power
Vu+ QWERTY is also supported. (optional)
NOTE
4
Connecting Cable
1. Connect a Satellite signal cable to the tuner input.
2. Connect ZERO to the TVOne HDMI cable is included in the accessory box. Connect one end of the cable to the HDMI inputof TV. Connect the other end to the HDMI output of ZERO.
DOWNLO
AD O
NLY

Remote ControlTV Power
Navigation KeysNavigates up/down and left/righton the menu options. Up/down keys are used to call upthe channel list.
TeletextDisplays the teletext information ofthe current channel if the channel
provides subtitles.
SubtitleDisplays the subtitle of
the current channelif the channel provides subtitle.
AVThis button is usedwhen selecting video source of TV.
EPGDisplays the Electronic Program
Guide (EPG) informationif provided. CHANNEL+/-
Color Keys • Red – mainly used for REC, Cancel, etc. • Green – mainly used for OK • Yellow • Blue
Volume+/-
EXIT
Numeric KeysMute
STB Power
Vu+ QWERTY is also supported. (optional)
NOTE
Connecting Cable
1. Connect a Satellite signal cable to the tuner input.
2. Connect ZERO to the TVOne HDMI cable is included in the accessory box. Connect one end of the cable to the HDMI inputof TV. Connect the other end to the HDMI output of ZERO.
5
DOWNLO
AD O
NLY

Connecting Cable3. Power UpA power cord and an adapter are provided in the accessory box. Plug the round end of the adapter power cord into the power input of ZERO
AC input condition
• Nominal Voltage Range: 100 – 240 VAC• Maximum Voltage Range: 90 – 264 VAC• Nominal Frequency: 50 / 60 Hz• Maximum Frequency Range: 47 – 63 Hz
NOTE
6
Run First Time InstallationStep 1. Language Selection
Step 2. Con�guring Satellite Connection
Welcome.
This start wizard will guide you through the basic setup of your STB.Press the OK button on your remote control to move to the next step.
English
German
Catalan
Croatian
Please use the UP and DOWN keys to select your language.Afterwards press the OK button.
DOWNLO
AD O
NLY

Connecting Cable3. Power UpA power cord and an adapter are provided in the accessory box. Plug the round end of the adapter power cord into the power input of ZERO
AC input condition
• Nominal Voltage Range: 100 – 240 VAC• Maximum Voltage Range: 90 – 264 VAC• Nominal Frequency: 50 / 60 Hz• Maximum Frequency Range: 47 – 63 Hz
NOTE
Run First Time InstallationStep 1. Language Selection
Step 2. Con�guring Satellite Connection
Welcome.
This start wizard will guide you through the basic setup of your STB.Press the OK button on your remote control to move to the next step.
English
German
Catalan
Croatian
Please use the UP and DOWN keys to select your language.Afterwards press the OK button.
7
DOWNLO
AD O
NLY

Run First Time Installation
Using LEFT/RIGHT key, you can choose one of the following Configuration Modes:
• Nothing connected • Simple• Advanced: for an advanced user configuration.
Use the up/down keys on your remote control to select an option. After that, press OK.
Use wizard to set up basic features
Exit wizard
Use the left and right buttons to change an option.
Configuration Mode not configured
8
Run First Time InstallationIf you choose Simple configuration mode, the following picture will appear.
The five modes are available for the satellite cable connection between LNB and your Vu+ as below :
• Single This option is used to receive a single satellite with a single LNB. The cable from LNB is directlyconnected to Vu+.
For the other modes, please refer to the user manual of ZERO.
Use the left and right buttons to change an option.Please set up tuner A.
Mode
Satellite
Send DiSEqC
Configuration Mode
Single
Astra(19.2E)
no
Simple
DOWNLO
AD O
NLY

Run First Time Installation
Using LEFT/RIGHT key, you can choose one of the following Configuration Modes:
• Nothing connected • Simple• Advanced: for an advanced user configuration.
Use the up/down keys on your remote control to select an option. After that, press OK.
Use wizard to set up basic features
Exit wizard
Use the left and right buttons to change an option.
Configuration Mode not configured
Run First Time InstallationIf you choose Simple configuration mode, the following picture will appear.
The five modes are available for the satellite cable connection between LNB and your Vu+ as below :
• Single This option is used to receive a single satellite with a single LNB. The cable from LNB is directlyconnected to Vu+.
For the other modes, please refer to the user manual of ZERO.
Use the left and right buttons to change an option.Please set up tuner A.
Mode
Satellite
Send DiSEqC
Configuration Mode
Single
Astra(19.2E)
no
Simple
9
DOWNLO
AD O
NLY

Step 3. Install Default Service ListHere you will be asked whether you want to install the default satellite lists. Press OK and the following image appears:
Run First Time Installation
Do you want to install default sat lists ?
Yes
No
Please choose the default services lists you want to install.
Astra(19.2E)
Hotbird(13.0E)
no
no
Step 4. Channel Scan
Run First Time Installation
• Selecting Scan Mode - Automatic Scan / Manual ScanChannel scanning is possible either in Automatic Scan mode or Manual Scan mode.
Do you want to do a service scan?
Yes, do a manual scan now
No, scan later manually
Yes, do an automatic scan now
Press OK to initiate the channel scan.
• Channel ScanningThe scanned channels will be displayed if the previous configurations have been done correctly.
scan done! 2 services found!
ANIXE HDASTRA HD+
Service Scan
10
DOWNLO
AD O
NLY

Step 3. Install Default Service ListHere you will be asked whether you want to install the default satellite lists. Press OK and the following image appears:
Run First Time Installation
Do you want to install default sat lists ?
Yes
No
Please choose the default services lists you want to install.
Astra(19.2E)
Hotbird(13.0E)
no
no
Step 4. Channel Scan
Run First Time Installation
• Selecting Scan Mode - Automatic Scan / Manual ScanChannel scanning is possible either in Automatic Scan mode or Manual Scan mode.
Do you want to do a service scan?
Yes, do a manual scan now
No, scan later manually
Yes, do an automatic scan now
Press OK to initiate the channel scan.
• Channel ScanningThe scanned channels will be displayed if the previous configurations have been done correctly.
scan done! 2 services found!
ANIXE HDASTRA HD+
Service Scan
11
DOWNLO
AD O
NLY

Step 5. Parental Control Option Here you can choose whether to enable the parental control option. If you press OK,you will be asked to enter PIN number
Enable parental control
Protect setup
Protect services
yes
no
no
Parental control setup
New PIN
Reenter new PIN
****
****
Change pin code
12
For more information about ZERO
1. Go to "Plugins" from Main Menu
2. Click "Opera Web Browser"
3. Go to "Tools" - "Bookmark"
4. Click "User Manual"
Easy way to consult the manual: By long pressing 'Help' button, you can also access to On-Screen Manual page.
DOWNLO
AD O
NLY

Step 5. Parental Control Option Here you can choose whether to enable the parental control option. If you press OK,you will be asked to enter PIN number
Enable parental control
Protect setup
Protect services
yes
no
no
Parental control setup
New PIN
Reenter new PIN
****
****
Change pin code
13
For more information about ZERO
1. Go to "Plugins" from Main Menu
2. Click "Opera Web Browser"
3. Go to "Tools" - "Bookmark"
4. Click "User Manual"
Easy way to consult the manual: By long pressing 'Help' button, you can also access to On-Screen Manual page.
DOWNLO
AD O
NLY

14
A Guide to Request of GPLv2 based SoftwareThis product contains software whose rights holders license it on the terms of the GNU GeneralPublic License, version 2 (GPLv2). You can find the text of this license in its English original versionin the manual for this product. We will provide you with the complete corresponding source codeof the software licensed under the GPLv2.
if you send us a written request by email to the following addresses:
Vu+ Support Team, [email protected]
detailing the name of the product and indicating how we can contact you.
Please note that we will ask you to pay us a certain amount of money for the costs incurred.The amount can be varied according to your location and Vu+ Support Team will notify the exactcost when receiving the request.This offer is valid for three years from the moment we distributed the product.
In addition, you can access the source code for our devices using the command below.
git clone http://archive.vuplus.com/git/dvbapp.git
Copyright© 2014 All Rights Reserved by Ceru., Ltd.
DOWNLO
AD O
NLY