Student Information Systemtraining.hr.ufl.edu/instructionguides/registration/...Training and...
117
Training and Organizational Development Updated: March 22, 2018 Office of Human Resources Page 1 of 2 University of Florida, Gainesville, FL 32611 Student Information System ADVISEE STUDENT CENTER: VIEW A STUDENT’S ENROLLMENT APPOINTMENT TIME This instruction guide will walk you through how to view a Student’s Registration Appointment Time via the Student Services Center in myUFL. NAVIGATION Use the following navigation to navigate to the Student Services Center: 1. Click the NavBar icon 2. Click Main Menu 3. Click Student Information System 4. Click Self Service 5. Click Advisor Center 6. Click Advisee Student Center PROCESS Use the following steps to view a student’s appointment time: 1. Enter the student’s UFID in the ID field 2. Click the Search button 11111111
Transcript of Student Information Systemtraining.hr.ufl.edu/instructionguides/registration/...Training and...

Training and Organizational Development Updated: March 22, 2018 Office of Human Resources Page 1 of 2 University of Florida, Gainesville, FL 32611
Student Information System
ADVISEE STUDENT CENTER: VIEW A STUDENT’S ENROLLMENT APPOINTMENT TIME This instruction guide will walk you through how to view a Student’s Registration Appointment Time via the Student Services Center in myUFL.
NAVIGATION Use the following navigation to navigate to the Student Services Center:
1. Click the NavBar icon 2. Click Main Menu 3. Click Student Information System 4. Click Self Service 5. Click Advisor Center 6. Click Advisee Student Center
PROCESS Use the following steps to view a student’s appointment time:
1. Enter the student’s UFID in the ID field 2. Click the Search button
11111111
Training and Organizational Development Updated: March 22, 2018 Office of Human Resources Page 2 of 2 University of Florida, Gainesville, FL 32611
Student Information System
3. If the page does not default to the Student Center tab, click on that tab 4. Scroll down to view the Enrollment Dates section 5. Click the Details link
6. Select the desired term 7. Click the Continue button
8. Here you can see the student’s Enrollment Appointment time
FOR ADDITIONAL ASSISTANCE Technical Issues The UF Computing Help Desk 352-392-HELP helpdesk.ufl.edu
Policies and Directives Office of the University Registrar 352-392-1374 registrar.ufl.edu

Training and Organizational Development Updated: April 12, 2018 Office of Human Resources Page 1 of 3 University of Florida, Gainesville, FL 32611
Student Information System
CLASS PERMISSIONS The process detailed below shows the steps for giving students permission to enroll in a departmentally controlled section of a class. The process also shows the steps for overriding requisites for all sections of a class.
QUICK TIP! Adding a student to a permission roster does not enroll the student. The student still needs to enroll in the class.
A permission does not automatically override requisite, closed class, time conflict or other restrictions on the class that the student may encounter.
NAVIGATION Use the following navigation to navigate to the Class Permissions Page:
1. Click the NavBar icon 2. Click Main Menu 3. Click Student Information System 4. Click Records and Enrollment 5. Click Term Processing 6. Click Class Permissions 7. Click Class Permissions
PROCESS Use the following steps to use the permission override:
1. Enter Term 2. Enter the Subject Area 3. Enter the Catalog Nbr 4. Select the Academic Career 5. Click the Search button 6. Select the desired class
Training and Organizational Development Updated: April 12, 2018 Office of Human Resources Page 2 of 3 University of Florida, Gainesville, FL 32611
Student Information System
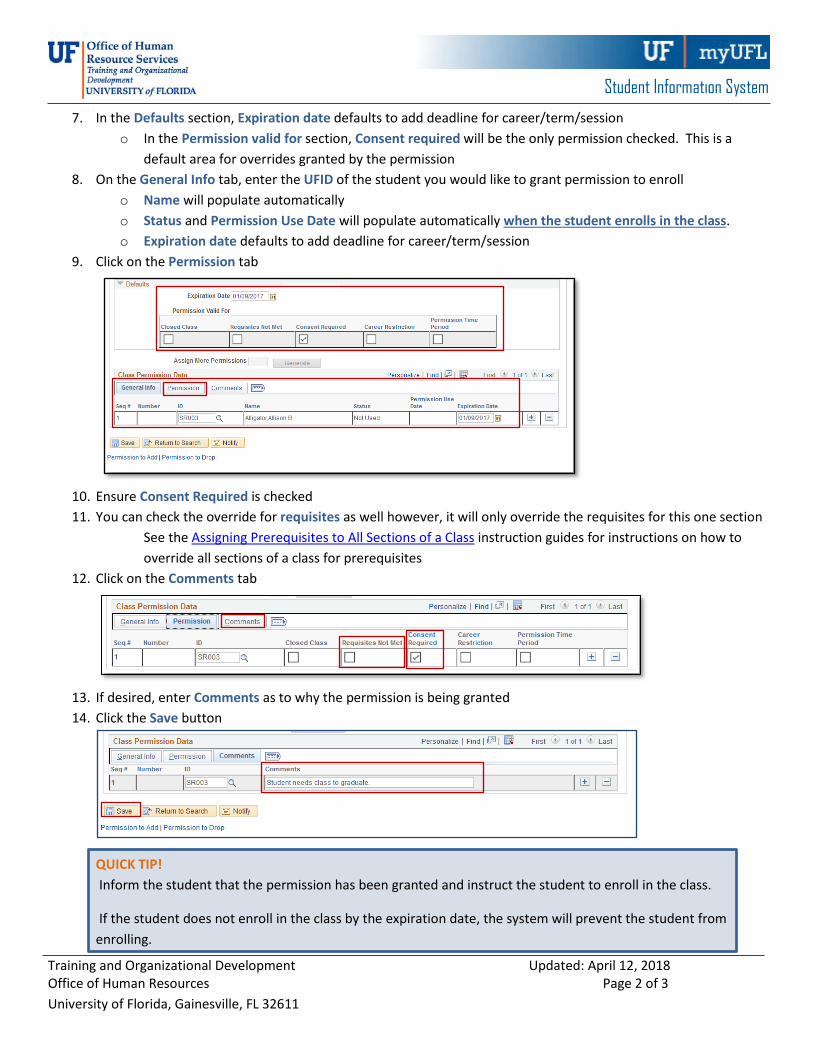
7. In the Defaults section, Expiration date defaults to add deadline for career/term/session o In the Permission valid for section, Consent required will be the only permission checked. This is a
default area for overrides granted by the permission 8. On the General Info tab, enter the UFID of the student you would like to grant permission to enroll
o Name will populate automatically o Status and Permission Use Date will populate automatically when the student enrolls in the class. o Expiration date defaults to add deadline for career/term/session
9. Click on the Permission tab
10. Ensure Consent Required is checked 11. You can check the override for requisites as well however, it will only override the requisites for this one section
See the Assigning Prerequisites to All Sections of a Class instruction guides for instructions on how to override all sections of a class for prerequisites
12. Click on the Comments tab
13. If desired, enter Comments as to why the permission is being granted 14. Click the Save button
QUICK TIP! Inform the student that the permission has been granted and instruct the student to enroll in the class.
If the student does not enroll in the class by the expiration date, the system will prevent the student from enrolling.

Training and Organizational Development Updated: April 12, 2018 Office of Human Resources Page 3 of 3 University of Florida, Gainesville, FL 32611
Student Information System
FOR ADDITIONAL ASSISTANCE Technical Issues The UF Computing Help Desk 352-392-HELP helpdesk.ufl.edu
Policies and Directives Office of the University Registrar 352-392-1374 registrar.ufl.edu
Training and Organizational Development Updated: February 26, 2018 Office of Human Resources Page 1 of 5 University of Florida, Gainesville, FL 32611
Student Information System
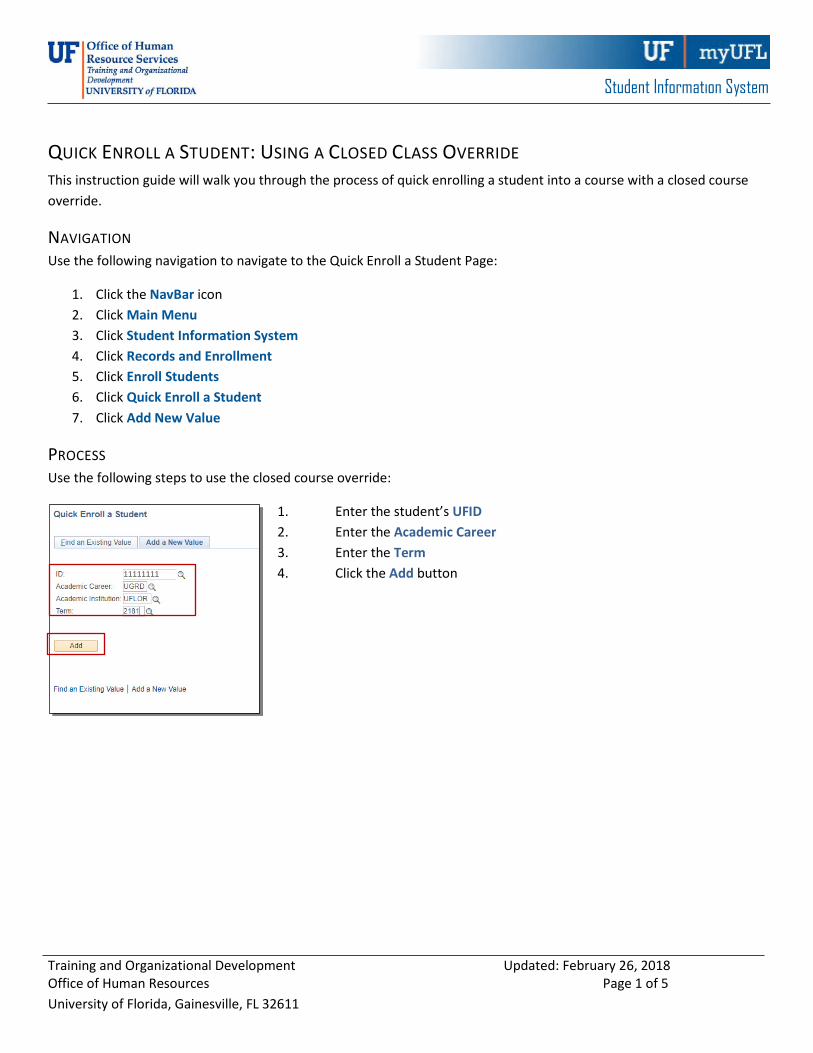
QUICK ENROLL A STUDENT: USING A CLOSED CLASS OVERRIDE This instruction guide will walk you through the process of quick enrolling a student into a course with a closed course override.
NAVIGATION Use the following navigation to navigate to the Quick Enroll a Student Page:
1. Click the NavBar icon 2. Click Main Menu 3. Click Student Information System 4. Click Records and Enrollment 5. Click Enroll Students 6. Click Quick Enroll a Student 7. Click Add New Value
PROCESS Use the following steps to use the closed course override:
1. Enter the student’s UFID 2. Enter the Academic Career 3. Enter the Term 4. Click the Add button
11111111

Training and Organizational Development Updated: February 26, 2018 Office of Human Resources Page 2 of 5 University of Florida, Gainesville, FL 32611
Student Information System
5. Enter the class number in the Class Nbr field 6. Press the tab key to see the course code populate 7. Click the Submit button
NOTE: If you do not know the class number, you can click the Look up icon (magnifying glass) to search for the class. See screen shot below for an example of what the look up screen looks like.
11111111
Training and Organizational Development Updated: February 26, 2018 Office of Human Resources Page 3 of 5 University of Florida, Gainesville, FL 32611
Student Information System
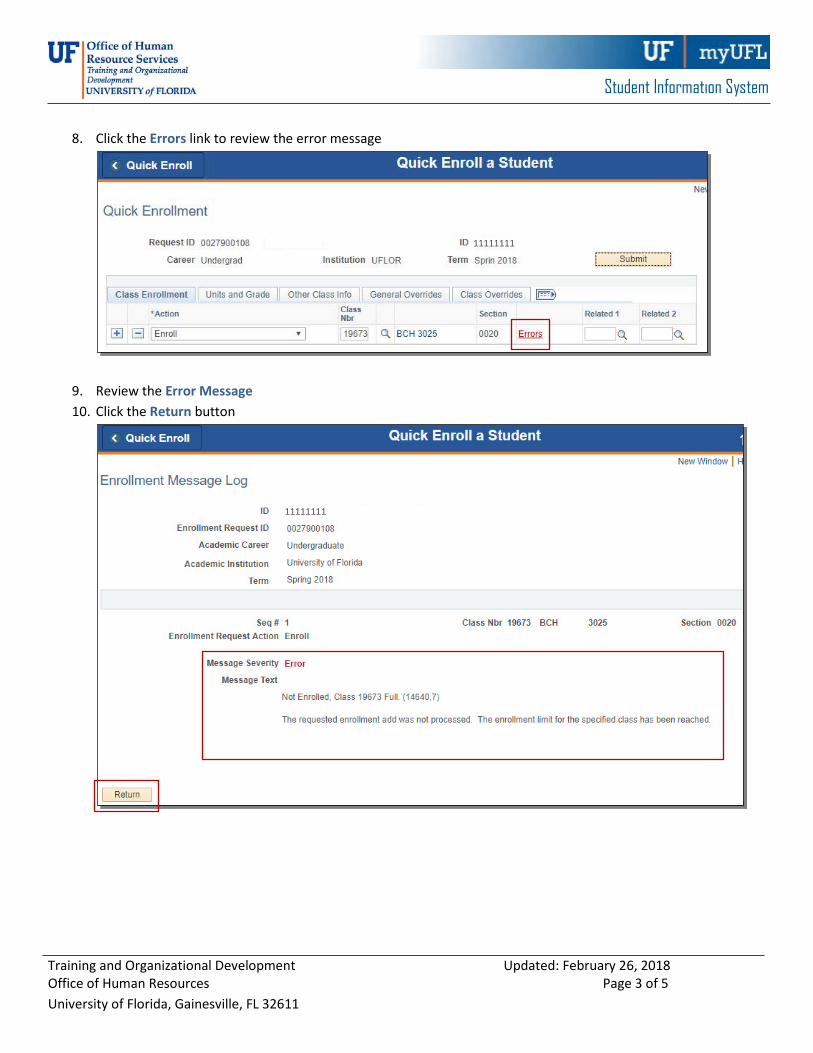
8. Click the Errors link to review the error message
9. Review the Error Message 10. Click the Return button
11111111
11111111
Training and Organizational Development Updated: February 26, 2018 Office of Human Resources Page 4 of 5 University of Florida, Gainesville, FL 32611
Student Information System
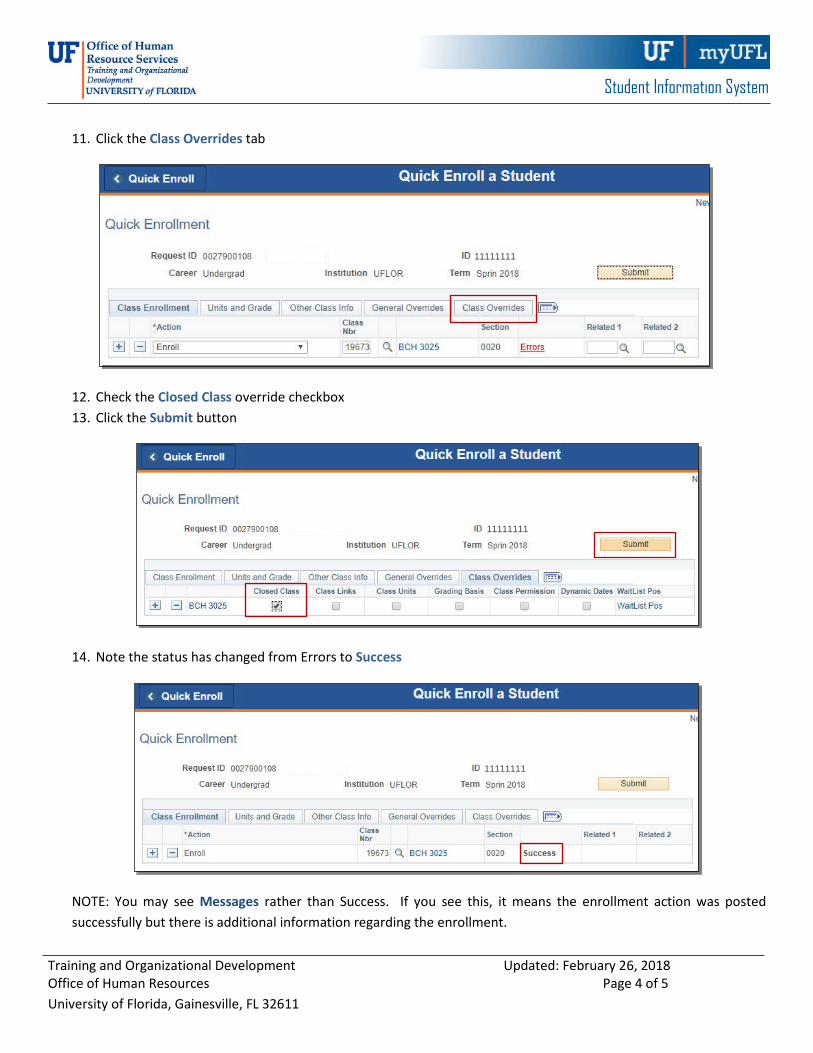
11. Click the Class Overrides tab
12. Check the Closed Class override checkbox 13. Click the Submit button
14. Note the status has changed from Errors to Success
NOTE: You may see Messages rather than Success. If you see this, it means the enrollment action was posted successfully but there is additional information regarding the enrollment.
11111111
11111111
11111111

Training and Organizational Development Updated: February 26, 2018 Office of Human Resources Page 5 of 5 University of Florida, Gainesville, FL 32611
Student Information System
FOR ADDITIONAL ASSISTANCE Technical Issues The UF Computing Help Desk 352-392-HELP helpdesk.ufl.edu
Policies and Directives Office of the University Registrar 352-392-1374 registrar.ufl.edu

Training and Organizational Development Updated: February 26, 2018 Office of Human Resources Page 1 of 3 University of Florida, Gainesville, FL 32611
Student Information System
QUICK ENROLL A STUDENT: DROP This instruction guide will walk you through the process of using the Quick Enroll a Student page to drop a student from a course.
NAVIGATION Use the following navigation to navigate to the Quick Enroll a Student Page:
1. Click the NavBar icon 2. Click Main Menu 3. Click Student Information System 4. Click Records and Enrollment 5. Click Enroll Students 6. Click Quick Enroll a Student 7. Click Add New Value
PROCESS Use the following steps to drop a course:
1. Enter the student’s UFID 2. Enter the Academic Career 3. Enter the Term 4. Click the Add button
11111111
Training and Organizational Development Updated: February 26, 2018 Office of Human Resources Page 2 of 3 University of Florida, Gainesville, FL 32611
Student Information System
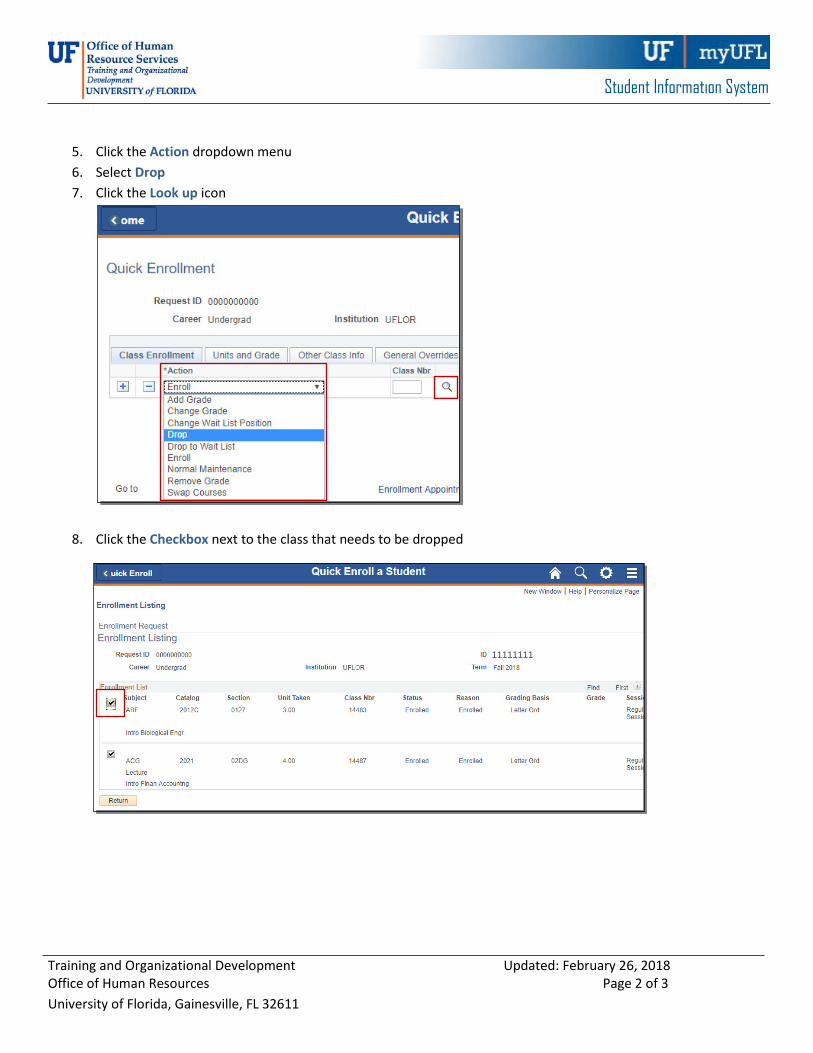
5. Click the Action dropdown menu 6. Select Drop 7. Click the Look up icon
8. Click the Checkbox next to the class that needs to be dropped
11111111

Training and Organizational Development Updated: February 26, 2018 Office of Human Resources Page 3 of 3 University of Florida, Gainesville, FL 32611
Student Information System
9. Note the course code has populated 10. Click the Submit button
11. Note the status has changed from Pending to Success
NOTE: If the drop results in a W grade instead of Success, you will see Messages. The message means that dropping the course resulted in a W grade and the drop was posted successfully.
FOR ADDITIONAL ASSISTANCE Technical Issues The UF Computing Help Desk 352-392-HELP helpdesk.ufl.edu
Policies and Directives Office of the University Registrar 352-392-1374 registrar.ufl.edu
11111111
11111111
Training and Organizational Development Updated: May 7, 2018 Office of Human Resources Page 1 of 3 University of Florida, Gainesville, FL 32611
Student Information System
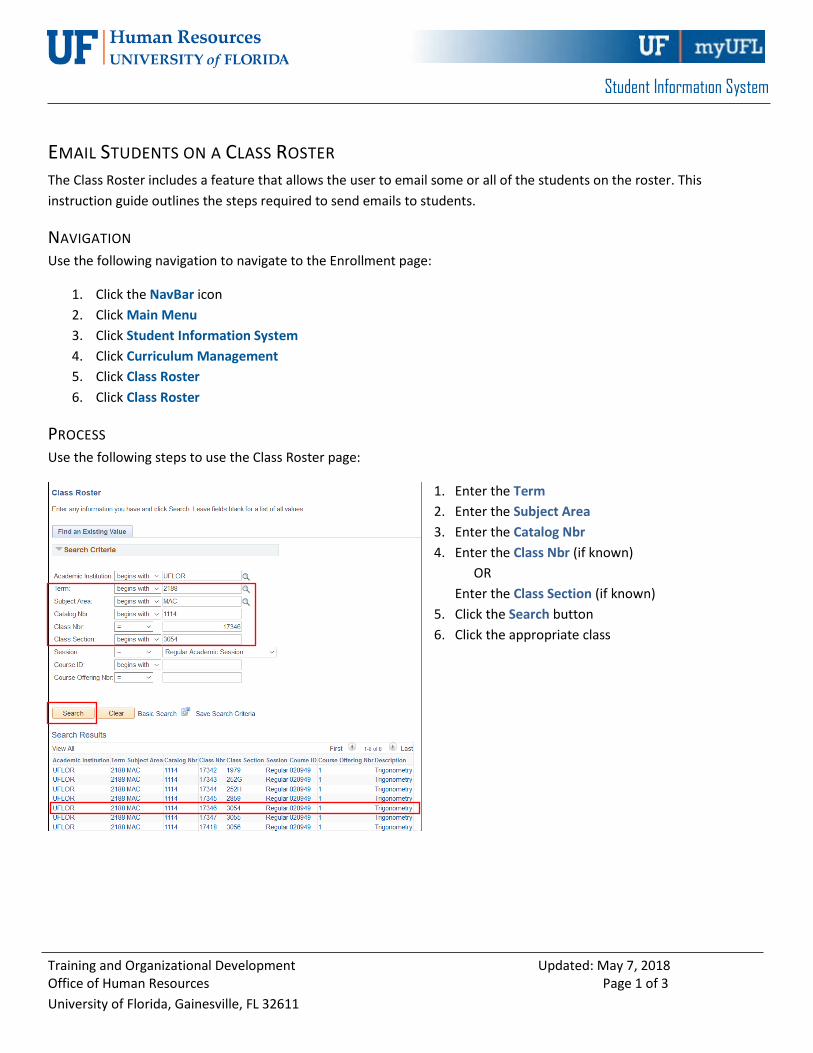
EMAIL STUDENTS ON A CLASS ROSTER The Class Roster includes a feature that allows the user to email some or all of the students on the roster. This instruction guide outlines the steps required to send emails to students.
NAVIGATION Use the following navigation to navigate to the Enrollment page:
1. Click the NavBar icon 2. Click Main Menu 3. Click Student Information System 4. Click Curriculum Management 5. Click Class Roster 6. Click Class Roster
PROCESS Use the following steps to use the Class Roster page:
1. Enter the Term 2. Enter the Subject Area 3. Enter the Catalog Nbr 4. Enter the Class Nbr (if known) OR
Enter the Class Section (if known) 5. Click the Search button 6. Click the appropriate class
Training and Organizational Development Updated: May 7, 2018 Office of Human Resources Page 2 of 3 University of Florida, Gainesville, FL 32611
Student Information System
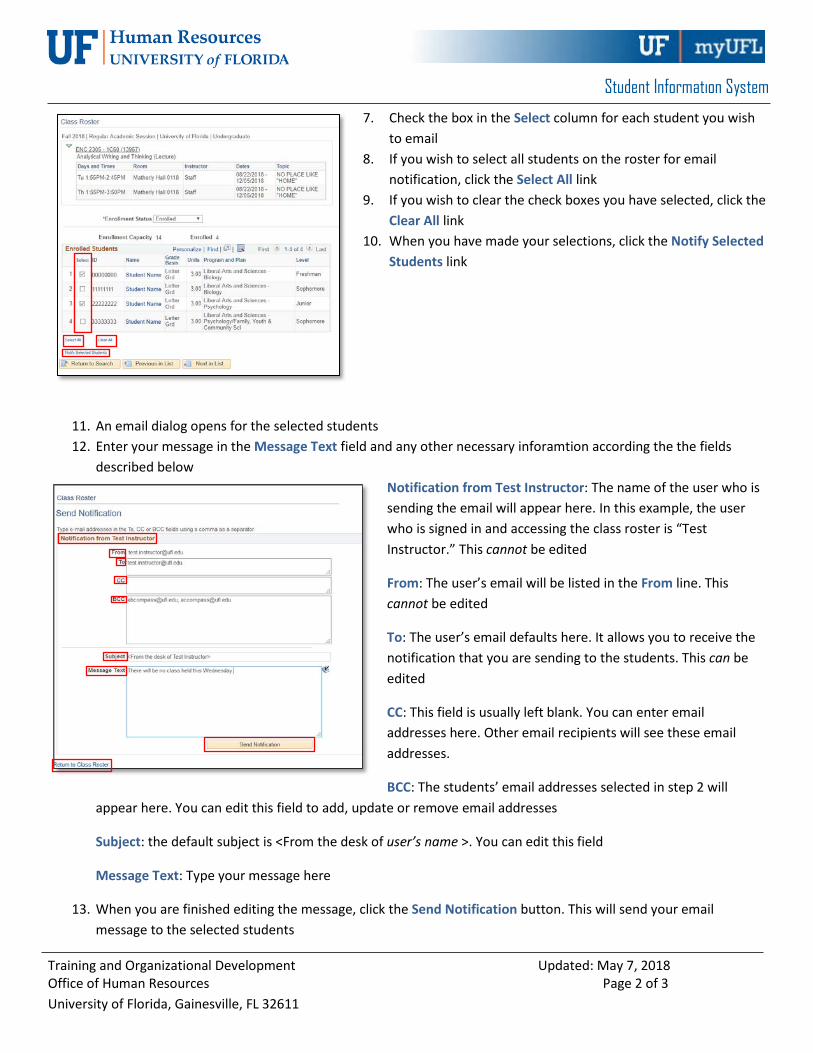
7. Check the box in the Select column for each student you wish to email
8. If you wish to select all students on the roster for email notification, click the Select All link
9. If you wish to clear the check boxes you have selected, click the Clear All link
10. When you have made your selections, click the Notify Selected Students link
11. An email dialog opens for the selected students 12. Enter your message in the Message Text field and any other necessary inforamtion according the the fields
described below Notification from Test Instructor: The name of the user who is sending the email will appear here. In this example, the user who is signed in and accessing the class roster is “Test Instructor.” This cannot be edited
From: The user’s email will be listed in the From line. This cannot be edited
To: The user’s email defaults here. It allows you to receive the notification that you are sending to the students. This can be edited
CC: This field is usually left blank. You can enter email addresses here. Other email recipients will see these email addresses.
BCC: The students’ email addresses selected in step 2 will appear here. You can edit this field to add, update or remove email addresses
Subject: the default subject is <From the desk of user’s name >. You can edit this field
Message Text: Type your message here
13. When you are finished editing the message, click the Send Notification button. This will send your email message to the selected students

Training and Organizational Development Updated: May 7, 2018 Office of Human Resources Page 3 of 3 University of Florida, Gainesville, FL 32611
Student Information System
14. You can return to the class roster by clicking the Return to Class Roster link. If you click this link without clicking the Send Notification button, the email will not be sent to the students
FOR ADDITIONAL ASSISTANCE Technical Issues The UF Computing Help Desk 352-392-HELP helpdesk.ufl.edu
Policies and Procedures Office of the University Registrar 352-392-1374 registrar.ufl.edu

Training and Organizational Development Updated: February 26, 2018 Office of Human Resources Page 1 of 3 University of Florida, Gainesville, FL 32611
Student Information System
QUICK ENROLL A STUDENT: ENROLL This instruction guide will walk you through the process of quick enrolling a student into a course.
NAVIGATION Use the following navigation to navigate to the Quick Enroll a Student Page:
1. Click the NavBar icon 2. Click Main Menu 3. Click Student Information System 4. Click Records and Enrollment 5. Click Enroll Students 6. Click Quick Enroll a Student 7. Click Add New Value
PROCESS Use the following steps to enroll a student into a course:
1. Enter the student’s UFID 2. Enter the Academic Career 3. Enter the Term 4. Click the Add button
11111111

Training and Organizational Development Updated: February 26, 2018 Office of Human Resources Page 2 of 3 University of Florida, Gainesville, FL 32611
Student Information System
5. Enter the class number in the Clas Nbr field 6. Press the tab key to see the course code populate 7. Click the Submit button
8. Note the status has changed from Errors to Messages
o The status may also change to Errors or Success. If it changes to errors, click the Errors link to review the error message. If it changes to Success, the student has been successfully registered
9. If the status has changed to Messages, click the Messages link to review the message
11111111
11111111

Training and Organizational Development Updated: February 26, 2018 Office of Human Resources Page 3 of 3 University of Florida, Gainesville, FL 32611
Student Information System
10. This message means the General Education requirement was set to Yes. This indicates the student was enrolled in the course successfully.
FOR ADDITIONAL ASSISTANCE Technical Issues The UF Computing Help Desk 352-392-HELP helpdesk.ufl.edu
Policies and Directives Office of the University Registrar 352-392-1374 registrar.ufl.edu
11111111

Training and Organizational Development 4/25/2018 Office of Human Resources Page 1 of 5 University of Florida, Gainesville, FL 32611
Student Information System
ENROLLMENT You can use the Enrollment page to view a student’s enrollment information, including information on the last person who updated the student’s enrollment record.
NAVIGATION Use the following navigation to navigate to the Enrollment page:
1. Click the NavBar icon 2. Click Main Menu 3. Click Student Information System 4. Click Records and Enrollment 5. Click Enroll Students 6. Click Enrollment
PROCESS Use the following steps to use the Enrollment Page:
1. Enter a UFID or First Name and Last Name 2. Click the Search button

Training and Organizational Development 4/25/2018 Office of Human Resources Page 2 of 5 University of Florida, Gainesville, FL 32611
Student Information System
STUDENT ENROLLMENT 1 TAB The Student Enrollment 1 tab displays course information for a student in a given term.
In this example, this student has 3 enrollment transactions in the term. You can click the View All link to view all of the student’s enrollments, or you can click the next icon (right arrow).
Class Details Basic information about the class including course title and section. You will also see the enrollment status of the student.
NOTE: In cases where students receive a W grade, the status will appear as enrolled, but the status reason will be “Withdrawn from Class” as is the case here.
You may also see students in dropped status without a grade. In these cases, you should see a reason such as “Cancelled Class.”
Grading Student’s grading basis and the student’s grade if a grade has been assigned. Also, if the student is repeating the class, a repeat code will appear at the time of grading.
Units Notes the units taken at the time the student enrolled in the class.
NOTE: On this page, the Units Earned will not reflect a failing or a W grade as is the case here. These fields indicate the credit and course count values as of the date that the student enrolled and do not reflect the impact of a Failing grade.
Training and Organizational Development 4/25/2018 Office of Human Resources Page 3 of 5 University of Florida, Gainesville, FL 32611
Student Information System
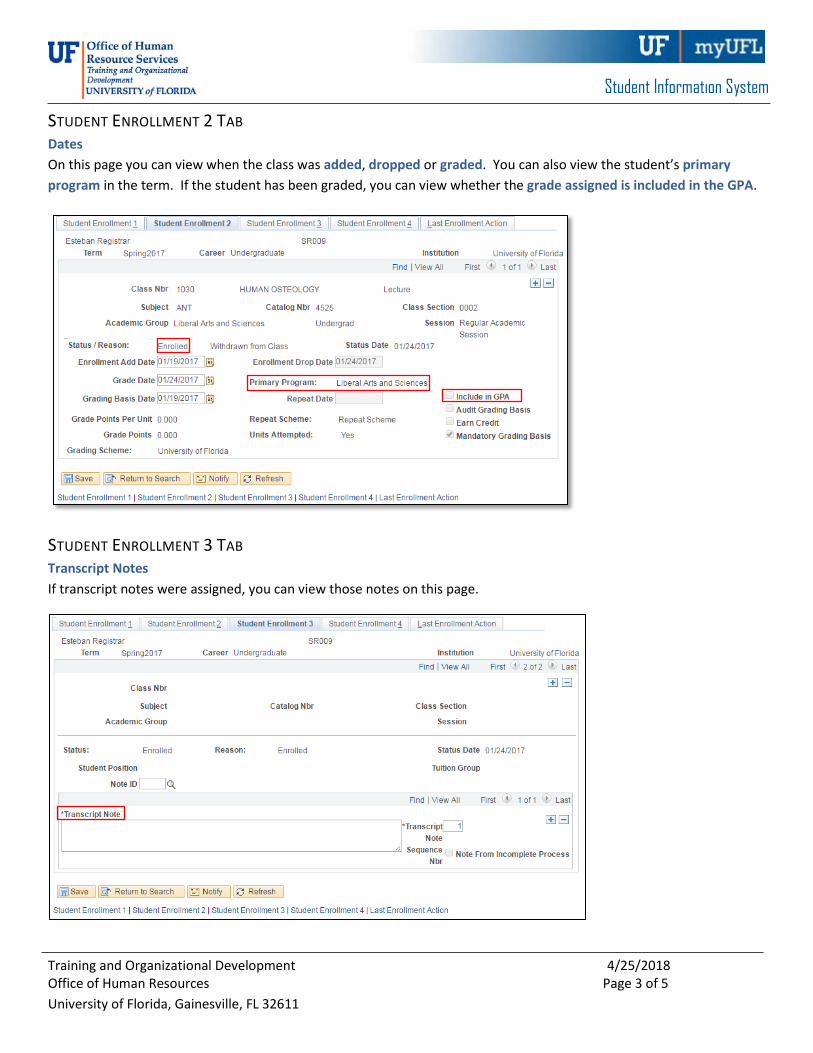
STUDENT ENROLLMENT 2 TAB Dates On this page you can view when the class was added, dropped or graded. You can also view the student’s primary program in the term. If the student has been graded, you can view whether the grade assigned is included in the GPA.
STUDENT ENROLLMENT 3 TAB Transcript Notes If transcript notes were assigned, you can view those notes on this page.

Training and Organizational Development 4/25/2018 Office of Human Resources Page 4 of 5 University of Florida, Gainesville, FL 32611
Student Information System
STUDENT ENROLLMENT 4 TAB Requirement Designation If the class has a Writing or Math requirement, you will see that information on this page. Also, if a separate grade is required for the Math or Writing requirement, you can view that grade here.
NOTE: Independent Studies - Instructor ID is not being used at UF.
LAST ENROLLMENT ACTION TAB This page displays the last action taken on each class line and the UFID of the individual who performed the action.

Training and Organizational Development 4/25/2018 Office of Human Resources Page 5 of 5 University of Florida, Gainesville, FL 32611
Student Information System
FOR ADDITIONAL ASSISTANCE Technical Issues The UF Computing Help Desk 352-392-HELP helpdesk.ufl.edu
Policies and Procedures Office of the University Registrar 352-392-1374 registrar.ufl.edu

Training and Organizational Development Updated: February 26, 2018 Office of Human Resources Page 1 of 3 University of Florida, Gainesville, FL 32611
Student Information System
ENROLLMENT REQUEST: USING A CLOSED CLASS OVERRIDE This instruction guide will walk you through the process of enrolling a student into a course with a closed course override.
NAVIGATION Use the following navigation to navigate to the Enrollment Request Page:
1. Click the NavBar icon 2. Click Main Menu 3. Click Student Information System 4. Click Records and Enrollment 5. Click Enroll Students 6. Click Enrollment Request 7. Click Add New Value
PROCESS Use the following steps to use the closed course override:
1. Enter the student’s UFID 2. Enter the Academic Career 3. Enter the Term 4. Click the Add button
11111111

Training and Organizational Development Updated: February 26, 2018 Office of Human Resources Page 2 of 3 University of Florida, Gainesville, FL 32611
Student Information System
5. Enter the class number in the Class Nbr field or use the Look up icon if the class number is unknown 6. Press the tab key to see the course code populate 7. Click the Submit button
8. Note the Status now says Errors Found. Scroll down to review the error message
9. Review the Error Message
The above error message indicates the class is already full.
10. Check the box next to the Closed Class override
11111111
11111111

Training and Organizational Development Updated: February 26, 2018 Office of Human Resources Page 3 of 3 University of Florida, Gainesville, FL 32611
Student Information System
11. Scroll to the top of the page 12. Click the Submit button
13. Note the status has changed from Errors to Success
NOTE: You may see Messages rather than Success. If you see this, it means the enrollment action was posted successfully but there is additional information regarding the enrollment.
FOR ADDITIONAL ASSISTANCE Technical Issues The UF Computing Help Desk 352-392-HELP helpdesk.ufl.edu
Policies and Directives Office of the University Registrar 352-392-1374 registrar.ufl.edu
11111111

Training and Organizational Development Updated: February 26, 2018 Office of Human Resources Page 1 of 3 University of Florida, Gainesville, FL 32611
Student Information System
ENROLLMENT REQUEST: DROP This instruction guide will walk you through the process of using the Enrollment Request page to drop a student from a course.
NAVIGATION Use the following navigation to navigate to the Enrollment Request Page:
1. Click the NavBar icon 2. Click Main Menu 3. Click Student Information System 4. Click Records and Enrollment 5. Click Enroll Students 6. Click Enrollment Request 7. Click Add New Value
PROCESS Use the following steps to drop a course:
1. Enter the student’s UFID 2. Enter the Academic Career 3. Enter the Term 4. Click the Add button
5. Click the Action dropdown menu 6. Select Drop 7. Click the Look up icon
11111111

Training and Organizational Development Updated: February 26, 2018 Office of Human Resources Page 2 of 3 University of Florida, Gainesville, FL 32611
Student Information System
8. Click the Checkbox next to the class that needs to be dropped
9. Note the course information has populated 10. Click the Submit button
11. Note the status has changed from Pending to Success
11111111
11111111

Training and Organizational Development Updated: February 26, 2018 Office of Human Resources Page 3 of 3 University of Florida, Gainesville, FL 32611
Student Information System
NOTE: If the drop results in a W grade instead of Success, you will see Messages. The message means that dropping the course resulted in a W grade and the drop was posted successfully.
FOR ADDITIONAL ASSISTANCE Technical Issues The UF Computing Help Desk 352-392-HELP helpdesk.ufl.edu
Policies and Directives Office of the University Registrar 352-392-1374 registrar.ufl.edu
Training and Organizational Development Updated: February 26, 2018 Office of Human Resources Page 1 of 2 University of Florida, Gainesville, FL 32611
Student Information System
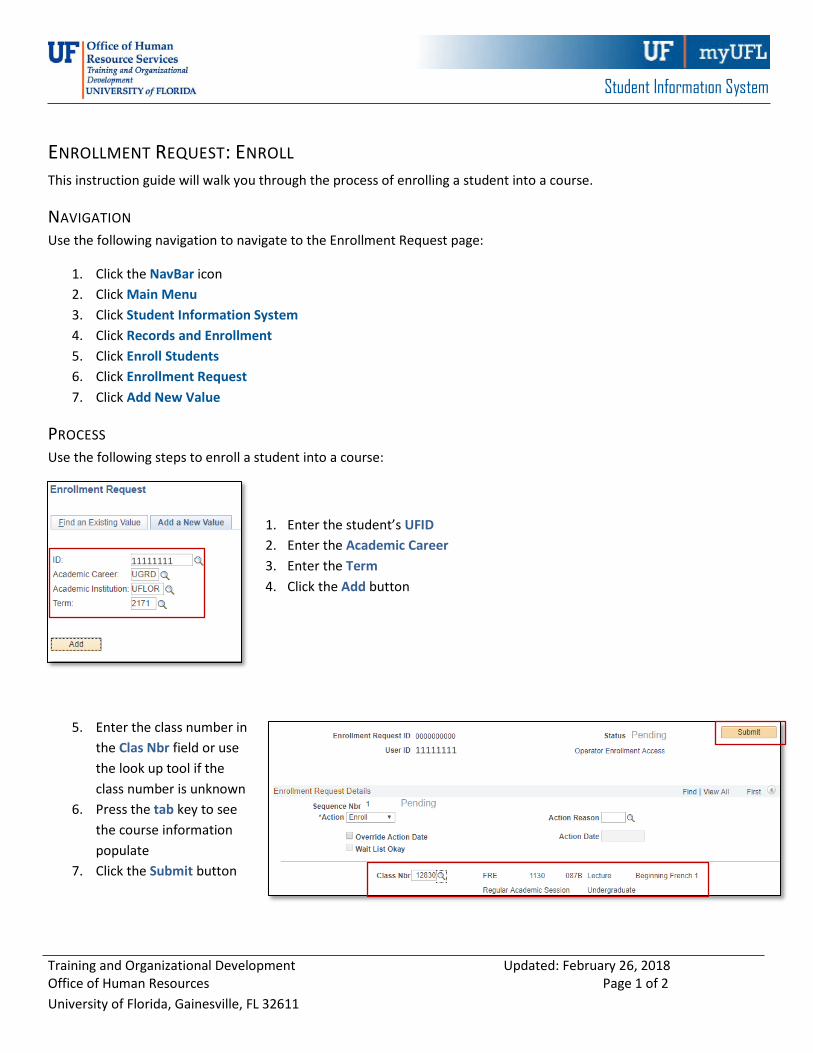
ENROLLMENT REQUEST: ENROLL This instruction guide will walk you through the process of enrolling a student into a course.
NAVIGATION Use the following navigation to navigate to the Enrollment Request page:
1. Click the NavBar icon 2. Click Main Menu 3. Click Student Information System 4. Click Records and Enrollment 5. Click Enroll Students 6. Click Enrollment Request 7. Click Add New Value
PROCESS Use the following steps to enroll a student into a course:
1. Enter the student’s UFID 2. Enter the Academic Career 3. Enter the Term 4. Click the Add button
5. Enter the class number in the Clas Nbr field or use the look up tool if the class number is unknown
6. Press the tab key to see the course information populate
7. Click the Submit button
11111111
11111111

Training and Organizational Development Updated: February 26, 2018 Office of Human Resources Page 2 of 2 University of Florida, Gainesville, FL 32611
Student Information System
8. Note the status has changed from Pending to Success
NOTE: You may see Messages rather than Success. If you see this, it means the enrollment action was posted successfully but there is additional information regarding the enrollment.
FOR ADDITIONAL ASSISTANCE Technical Issues The UF Computing Help Desk 352-392-HELP helpdesk.ufl.edu
Policies and Directives Office of the University Registrar 352-392-1374 registrar.ufl.edu
11111111
Training and Organizational Development Updated: March 26, 2018 Office of Human Resources Page 1 of 5 University of Florida, Gainesville, FL 32611
Student Information System
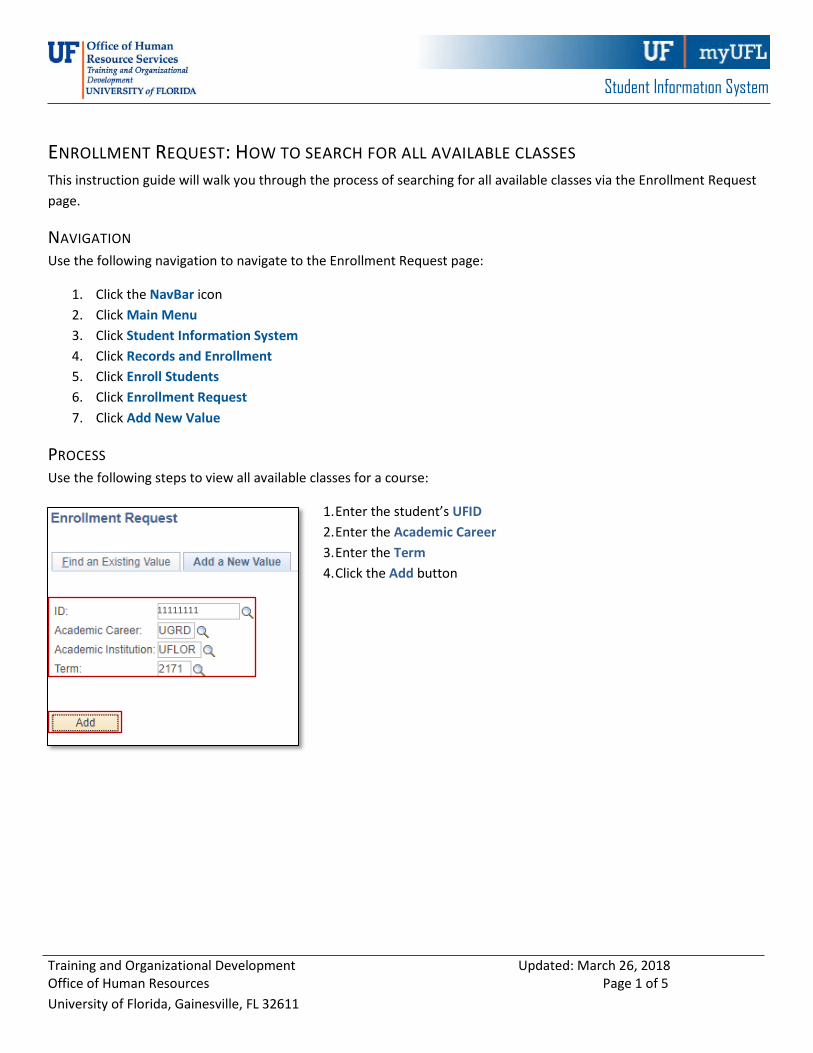
ENROLLMENT REQUEST: HOW TO SEARCH FOR ALL AVAILABLE CLASSES This instruction guide will walk you through the process of searching for all available classes via the Enrollment Request page.
NAVIGATION Use the following navigation to navigate to the Enrollment Request page:
1. Click the NavBar icon 2. Click Main Menu 3. Click Student Information System 4. Click Records and Enrollment 5. Click Enroll Students 6. Click Enrollment Request 7. Click Add New Value
PROCESS Use the following steps to view all available classes for a course:
1. Enter the student’s UFID 2. Enter the Academic Career 3. Enter the Term 4. Click the Add button
11111111

Training and Organizational Development Updated: March 26, 2018 Office of Human Resources Page 2 of 5 University of Florida, Gainesville, FL 32611
Student Information System
5. Click the Look up icon (magnifying glass) in the Class Nbr section
6. Click the OK button on the pop-up message
o Note: This message is just letting you know that you need to enter search criteria in order to see results
7. Click the select subject button

Training and Organizational Development Updated: March 26, 2018 Office of Human Resources Page 3 of 5 University of Florida, Gainesville, FL 32611
Student Information System
8. Click the Select link next to the desired subject
9. Click the OK button on the pop-up message
o Note: This message is just letting you know that you need to enter additional search criteria in order to see results

Training and Organizational Development Updated: March 26, 2018 Office of Human Resources Page 4 of 5 University of Florida, Gainesville, FL 32611
Student Information System
10. Enter the course number into the Course Number field 11. Click the Search button
12. All available classes will be listed. Choose the desired class by clicking the Select button
3414

Training and Organizational Development Updated: March 26, 2018 Office of Human Resources Page 5 of 5 University of Florida, Gainesville, FL 32611
Student Information System
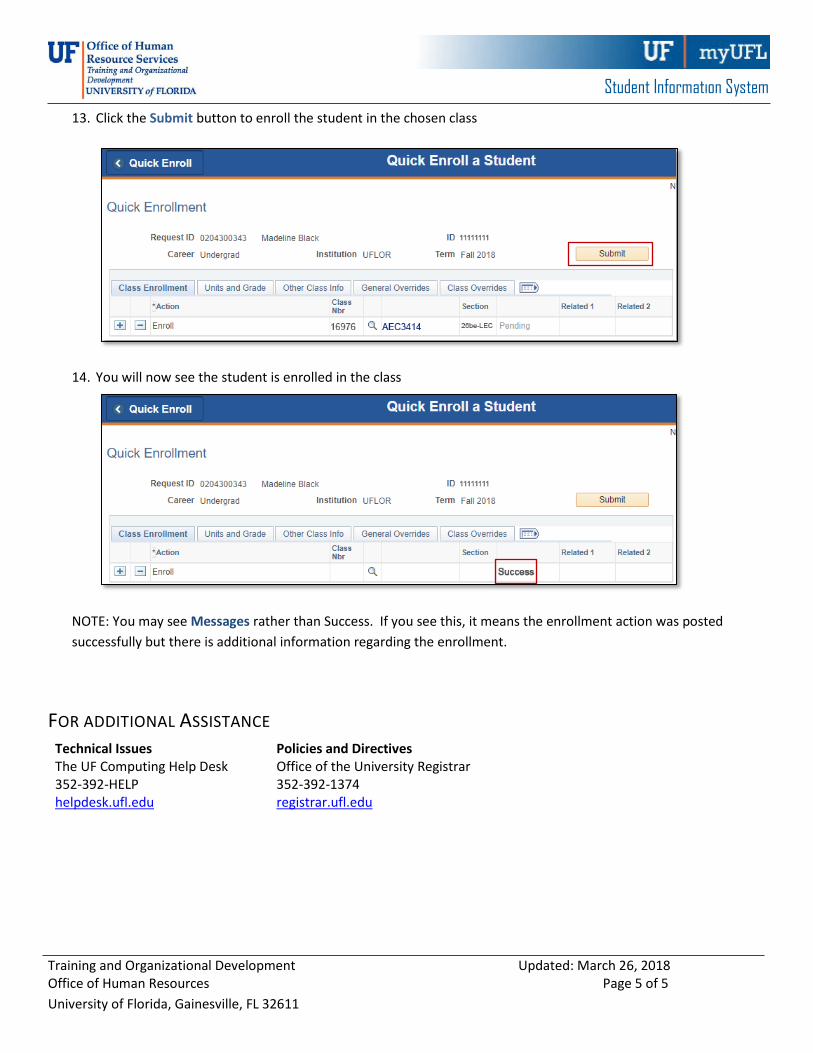
13. Click the Submit button to enroll the student in the chosen class
14. You will now see the student is enrolled in the class
NOTE: You may see Messages rather than Success. If you see this, it means the enrollment action was posted successfully but there is additional information regarding the enrollment.
FOR ADDITIONAL ASSISTANCE Technical Issues The UF Computing Help Desk 352-392-HELP helpdesk.ufl.edu
Policies and Directives Office of the University Registrar 352-392-1374 registrar.ufl.edu

Training and Organizational Development Updated: February 26, 2018 Office of Human Resources Page 1 of 3 University of Florida, Gainesville, FL 32611
Student Information System
ENROLLMENT REQUEST: USING A PERMISSION OVERRIDE This instruction guide will walk you through the process of enrolling a student into a course with a permission override.
NAVIGATION Use the following navigation to navigate to the Enrollment Request page:
1. Click the NavBar icon 2. Click Main Menu 3. Click Student Information System 4. Click Records and Enrollment 5. Click Enroll Students 6. Click Enrollment Request 7. Click Add New Value
PROCESS Use the following steps to use the permission override:
1. Enter the student’s UFID 2. Enter the Academic Career 3. Enter the Term 4. Click the Add button
5. Enter the class number in
the Class Nbr field 6. Press the tab key to see the
course information populate
7. Click the Submit button
11111111
11111111
Training and Organizational Development Updated: February 26, 2018 Office of Human Resources Page 2 of 3 University of Florida, Gainesville, FL 32611
Student Information System
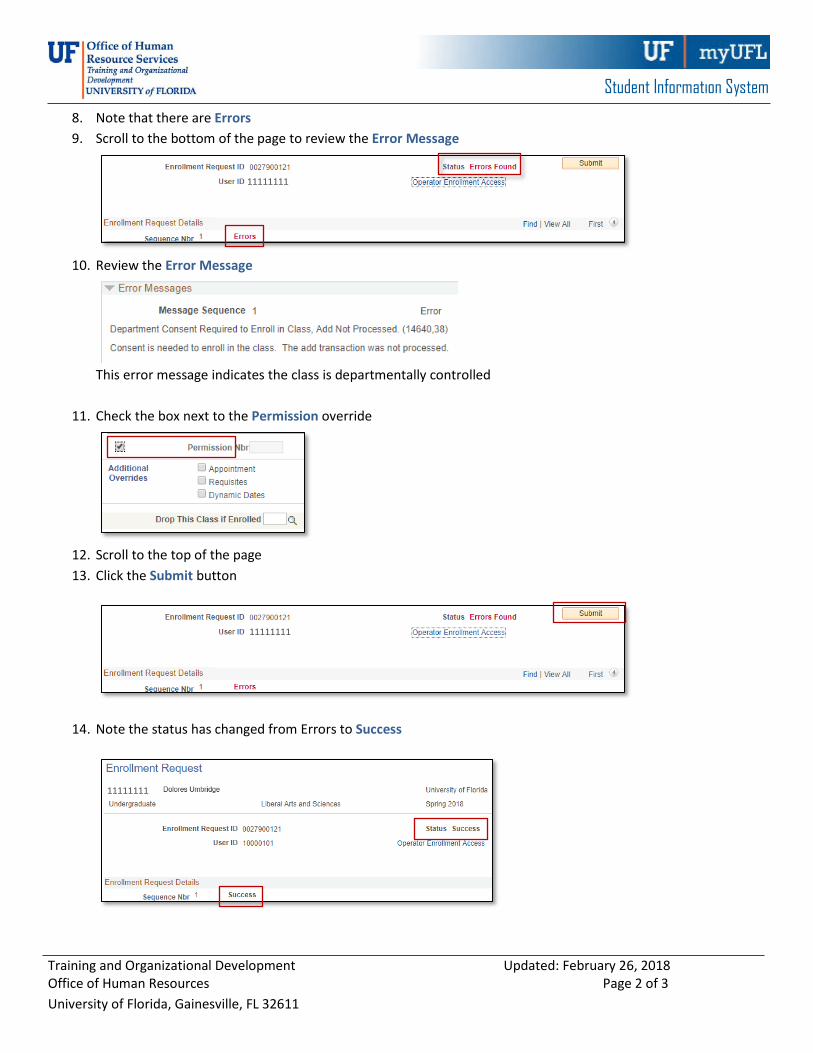
8. Note that there are Errors 9. Scroll to the bottom of the page to review the Error Message
10. Review the Error Message
This error message indicates the class is departmentally controlled
11. Check the box next to the Permission override
12. Scroll to the top of the page 13. Click the Submit button
14. Note the status has changed from Errors to Success
11111111
11111111
11111111

Training and Organizational Development Updated: February 26, 2018 Office of Human Resources Page 3 of 3 University of Florida, Gainesville, FL 32611
Student Information System
NOTE: You may see Messages rather than Success. If you see this, it means the enrollment action was posted successfully but there is additional information regarding the enrollment.
FOR ADDITIONAL ASSISTANCE Technical Issues The UF Computing Help Desk 352-392-HELP helpdesk.ufl.edu
Policies and Directives Office of the University Registrar 352-392-1374 registrar.ufl.edu

Training and Organizational Development Updated: February 26, 2018 Office of Human Resources Page 1 of 3 University of Florida, Gainesville, FL 32611
Student Information System
ENROLLMENT REQUEST: USING A REQUISITES OVERRIDE This instruction guide will walk you through the process of enrolling a student into a course with a requisites override.
NAVIGATION Use the following navigation to navigate to the Enrollment Request page:
1. Click the NavBar icon 2. Click Main Menu 3. Click Student Information System 4. Click Records and Enrollment 5. Click Enroll Students 6. Click Enrollment Request 7. Click Add New Value
PROCESS Use the following steps to use the requisites override:
1. Enter the student’s UFID 2. Enter the Academic Career 3. Enter the Term 4. Click the Add button
5. Enter the class number
in the Clas Nbr field 6. Press the tab key to see
the course code populate
7. Click the Submit button
11111111
11111111

Training and Organizational Development Updated: February 26, 2018 Office of Human Resources Page 2 of 3 University of Florida, Gainesville, FL 32611
Student Information System
8. Note the status has changed from Pending to Errors
9. Scroll to the bottom of the page to review the Error Message 10. Review the Error Message
This error indicates the class has a prerequisite that the student has not yet completed.
11. Check the box next to the Requisites override
12. Scroll to the top of the page 13. Click the Submit button
14. Note the status has changed from Errors to Success
NOTE: You may see Messages rather than Success. If you see this, it means the enrollment action was posted successfully but there is additional information regarding the enrollment.
11111111
11111111

Training and Organizational Development Updated: February 26, 2018 Office of Human Resources Page 3 of 3 University of Florida, Gainesville, FL 32611
Student Information System
FOR ADDITIONAL ASSISTANCE Technical Issues The UF Computing Help Desk 352-392-HELP helpdesk.ufl.edu
Policies and Directives Office of the University Registrar 352-392-1374 registrar.ufl.edu

Training and Organizational Development Updated: April 24, 2018 Office of Human Resources Page 1 of 5 University of Florida, Gainesville, FL 32611
Student Information System
ENROLLMENT REQUEST SEARCH The Enrollment Request Search function allows you to search and review enrollment requests—both successful and unsuccessful—by student, class, and/or user.
NAVIGATION Use the following navigation to navigate to the Enrollment Request Page:
1. Click the NavBar icon 2. Click Main Menu 3. Click Student Information System 4. Click Records and Enrollment 5. Click Enroll Students 6. Click Enrollment Request Search
PROCESS Use the following steps to use the Enrollment Request Search:
1. Click the Search button.
QUICK TIP!
It is not necessary to enter the Academic Institution. Simply click the search button and the system will automatically use “UFLOR”.
2. On the search screen, enter the various search parameters to locate the information you desire. The most common searches use a combination of the following:
• Term: Always identify the desired term • User ID: The UFID of who entered the
transaction • ID: UFID • Class Nbr: Transactions for a particular class • Enrollment Action Range: Transactions
within a particular date range

Training and Organizational Development Updated: April 24, 2018 Office of Human Resources Page 2 of 5 University of Florida, Gainesville, FL 32611
Student Information System
NOTE: Additional search values may be used as desired:
• Enrollment Request Source: how the transaction was attempted, such as: o Enrollment Request (entered by staff) o Quick Enroll (entered by staff) o Self Service Enrollment (transactions attempted by student)
• Enrollment Request Action: the transaction being attempted, such as: o Drop o Enroll
OPTIONAL TIPS 1. Click on the Personalize link in the Enrollment List bar to personalize the search results.
a. You can remove and reorder the columns as desired. 2. Click on the Download link (the grid icon) to the right of the Find link in the Enrollment List bar to load your
search results into a spreadsheet. 3. You can also click on the expand all columns icon to expand all columns if you don’t wish to tab through all the
columns.
NOTE: the Personalize and the Download icons are no longer options for you to use if you expand the page.
REVIEWING THE RESULTS FIELDS 1-7
• User ID: User who attempted the transaction
• First Name Column: User who attempted the transaction
• ID: Student’s UFID • Second Name Column:
Student’s Name • Class Number/Subject
Area/Catalog Nbr: details on the class
1 2 3
Training and Organizational Development Updated: April 24, 2018 Office of Human Resources Page 3 of 5 University of Florida, Gainesville, FL 32611
Student Information System
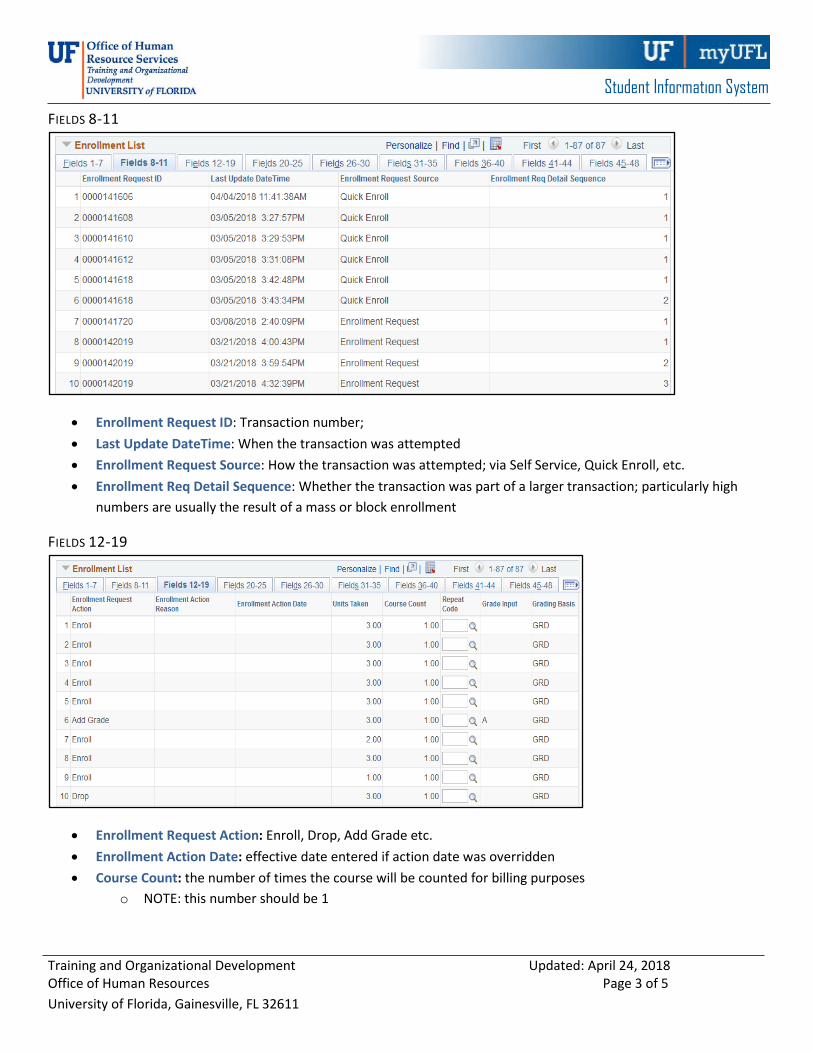
FIELDS 8-11
• Enrollment Request ID: Transaction number; • Last Update DateTime: When the transaction was attempted • Enrollment Request Source: How the transaction was attempted; via Self Service, Quick Enroll, etc. • Enrollment Req Detail Sequence: Whether the transaction was part of a larger transaction; particularly high
numbers are usually the result of a mass or block enrollment
FIELDS 12-19
• Enrollment Request Action: Enroll, Drop, Add Grade etc. • Enrollment Action Date: effective date entered if action date was overridden • Course Count: the number of times the course will be counted for billing purposes
o NOTE: this number should be 1

Training and Organizational Development Updated: April 24, 2018 Office of Human Resources Page 4 of 5 University of Florida, Gainesville, FL 32611
Student Information System
FIELDS 20-25 These functions are not being used at UF. You should not see any values populated in these fields.
FIELDS 26-30, FIELDS 31-35, AND FIELDS 36-40 Check boxes show what overrides were entered for the transaction
FIELDS 41-44
• Enrollment Req Detail Status: status of the transaction:
o P = Pending – class was added to enrollment cart but not processed o S = Success – transaction was completed successfully o M = Messages – transaction was completed successfully, but a message was produced (such as repeat
message, requirement designation set, etc.) o E = Error – transaction failed
• Requirement Designation – when a value is populated in this field, it indicates the writing or the Math requirement assigned to the class.

Training and Organizational Development Updated: April 24, 2018 Office of Human Resources Page 5 of 5 University of Florida, Gainesville, FL 32611
Student Information System
NOTE: Requirement designation option of N will appear on all enrollments. It is a default value of N and has no impact on the requirement designation assigned to the course.
FIELDS 45-48
• Transcript Note ID: When populated, indicates that a transcript note is attached to the class enrollment • Academic Program: Student’s program
FOR ADDITIONAL ASSISTANCE Technical Issues The UF Computing Help Desk 352-392-HELP helpdesk.ufl.edu
Policies and Procedures Office of the University Registrar 352-392-1374 registrar.ufl.edu

Training and Organizational Development Updated: February 26, 2018 Office of Human Resources Page 1 of 3 University of Florida, Gainesville, FL 32611
Student Information System
ENROLLMENT REQUEST: USING A TIME CONFLICT OVERRIDE This instruction guide will walk you through the process of enrolling a student into a course with a time conflict override.
NAVIGATION Use the following navigation to navigate to the Enrollment Request page:
1. Click the NavBar icon 2. Click Main Menu 3. Click Student Information System 4. Click Records and Enrollment 5. Click Enroll Students 6. Click Enrollment Request 7. Click Add New Value
PROCESS Use the following steps to use the time conflict override:
1. Enter the student’s UFID 2. Enter the Academic Career 3. Enter the Term 4. Click the Add button
5. Enter the class number in the Clas Nbr field
6. Press the tab key to see the course code populate
7. Click the Submit button
11111111
11111111

Training and Organizational Development Updated: February 26, 2018 Office of Human Resources Page 2 of 3 University of Florida, Gainesville, FL 32611
Student Information System
8. Note the status has changed from Pending to Errors
9. Scroll to the bottom of the page 10. Review the Error Message
This error indicates this class time conflicts with another class on the student’s schedule
11. Check the box next to the Time Conflict override
12. Scroll to the top of the page 13. Click the Submit button
14. Note the status has changed from Errors to Success
NOTE: You may see Messages rather than Success. If you see this, it means the enrollment action was posted successfully but there is additional information regarding the enrollment.
11111111
11111111

Training and Organizational Development Updated: February 26, 2018 Office of Human Resources Page 3 of 3 University of Florida, Gainesville, FL 32611
Student Information System
FOR ADDITIONAL ASSISTANCE Technical Issues The UF Computing Help Desk 352-392-HELP helpdesk.ufl.edu
Policies and Directives Office of the University Registrar 352-392-1374 registrar.ufl.edu

Training and Organizational Development Updated: February 26, 2018 Office of Human Resources Page 1 of 3 University of Florida, Gainesville, FL 32611
Student Information System
ENROLLMENT REQUEST: USING A UNIT LOAD OVERRIDE This instruction guide will walk you through the process of enrolling a student into a course with a unit load override.
NAVIGATION Use the following navigation to navigate to the Enrollment Request page:
1. Click the NavBar icon 2. Click Main Menu 3. Click Student Information System 4. Click Records and Enrollment 5. Click Enroll Students 6. Click Enrollment Request 7. Click Add New Value
PROCESS Use the following steps to use the unit load override:
1. Enter the student’s UFID 2. Enter the Academic Career 3. Enter the Term 4. Click the Add button
5. Enter the class number in the Clas Nbr field
6. Press the tab key to see the course code populate
7. Click the Submit button
11111111
11111111

Training and Organizational Development Updated: February 26, 2018 Office of Human Resources Page 2 of 3 University of Florida, Gainesville, FL 32611
Student Information System
8. Note the status has changed from Pending to Errors
9. Scroll to the bottom of the page
10. Review the Error Message
This error indicates the student is registered for more than the allowable maximum term unit load (generally 18 credit hours).
11. Check the box next to the Unit Load override
12. Scroll to the top of the page 13. Click the Submit button
14. Note the status has changed from Errors to Success
NOTE: You may see Messages rather than Success. If you see this, it means the enrollment action was posted successfully but there is additional information regarding the enrollment.
FOR ADDITIONAL ASSISTANCE
11111111
11111111

Training and Organizational Development Updated: February 26, 2018 Office of Human Resources Page 3 of 3 University of Florida, Gainesville, FL 32611
Student Information System
Technical Issues The UF Computing Help Desk 352-392-HELP helpdesk.ufl.edu
Policies and Directives Office of the University Registrar 352-392-1374 registrar.ufl.edu

Training and Organizational Development Updated: February 26, 2018 Office of Human Resources Page 1 of 2 University of Florida, Gainesville, FL 32611
Student Information System
ENROLLMENT REQUEST: USING A UNITS TAKEN OVERRIDE This instruction guide will walk you through the process of enrolling a student into a course with a units taken override.
NAVIGATION Use the following navigation to navigate to the Enrollment Request page:
1. Click the NavBar icon 2. Click Main Menu 3. Click Student Information System 4. Click Records and Enrollment 5. Click Enroll Students 6. Click Enrollment Request
PROCESSS Use the following steps to use the units taken override:
1. Enter the student’s UFID 2. Enter the Academic Career 3. Enter the Term 4. Click the Add button
5. Enter the class number in
the Clas Nbr field 6. Press the tab key to see the
course code populate 7. Click the Submit button
8. Note the status has changed from Pending to Errors

Training and Organizational Development Updated: February 26, 2018 Office of Human Resources Page 2 of 2 University of Florida, Gainesville, FL 32611
Student Information System
9. Scroll to the bottom of the page 10. Review the Error Message
This error message indicates the class has an invalid number of credits (also known as units) assigned to it. In order to enroll a student in the class, you must input a unit value between 1 and 5.
11. Check the box next to the Units Taken override 12. Update the units in the Units Taken field to a number between 1 and 5
13. Scroll to the top of the page 14. Click the Submit button
15. Note the status has changed from Errors to Success
FOR ADDITIONAL ASSISTANCE Technical Issues The UF Computing Help Desk 352-392-HELP helpdesk.ufl.edu
Policies and Directives Office of the University Registrar 352-392-1374 registrar.ufl.edu
Training and Organizational Development Updated: February 26, 2018 Office of Human Resources Page 1 of 3 University of Florida, Gainesville, FL 32611
Student Information System
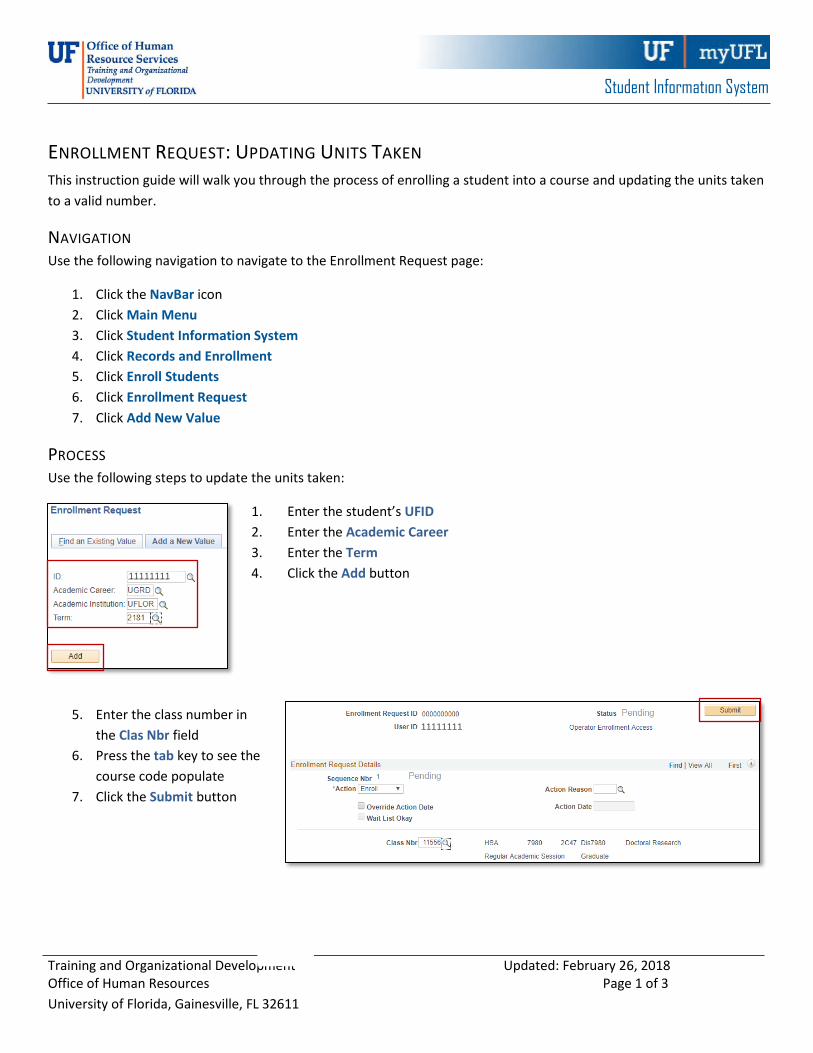
ENROLLMENT REQUEST: UPDATING UNITS TAKEN This instruction guide will walk you through the process of enrolling a student into a course and updating the units taken to a valid number.
NAVIGATION Use the following navigation to navigate to the Enrollment Request page:
1. Click the NavBar icon 2. Click Main Menu 3. Click Student Information System 4. Click Records and Enrollment 5. Click Enroll Students 6. Click Enrollment Request 7. Click Add New Value
PROCESS Use the following steps to update the units taken:
1. Enter the student’s UFID 2. Enter the Academic Career 3. Enter the Term 4. Click the Add button
5. Enter the class number in
the Clas Nbr field 6. Press the tab key to see the
course code populate 7. Click the Submit button
11111111
11111111
11111111

Training and Organizational Development Updated: February 26, 2018 Office of Human Resources Page 2 of 3 University of Florida, Gainesville, FL 32611
Student Information System
8. Note the status has changed from Pending to Errors
9. Scroll to the bottom of the page
10. Review the Error Message
This error message indicates the class has an invalid number of credits (also known as units) assigned to it. In order to enroll a student in the class, you must input a valid unit number.
11. Check the box next to Units Taken 12. Update the units in the Units Taken field to a valid number
13. Scroll to the top of the page 14. Click the Submit button
15. Note the status has changed from Errors to Success
NOTE: You may see Messages rather than Success. If you see this, it means the enrollment action was posted successfully but there is additional information regarding the enrollment.
11111111
11111111
Training and Organizational Development Updated: February 26, 2018 Office of Human Resources Page 3 of 3 University of Florida, Gainesville, FL 32611
Student Information System
FOR ADDITIONAL ASSISTANCE Technical Issues The UF Computing Help Desk 352-392-HELP helpdesk.ufl.edu
Policies and Directives Office of the University Registrar 352-392-1374 registrar.ufl.edu

Training and Organizational Development Updated: May 29, 2018 UF Human Resources Page 1 of 2
Student Information System
ENROLLMENT REQUEST: WEEKLY SCHEDULE This instruction guide will walk you thought the process of accessing a student’s weekly schedule via the Enrollment Request page.
NAVIGATION Use the following navigation to navigate to the Enrollment Request Page:
1. Click the NavBar icon 2. Click Main Menu 3. Click Student Information System 4. Click Records and Enrollment 5. Click Enroll Students 6. Click Enrollment Request 7. Click Add New Value
PROCESS Use the following steps to navigate to a student’s weekly schedule from the Enrollment Request page:
1. Enter the student’s UFID 2. Enter the Academic Career 3. Enter the Term 4. Click the Add button
5. RIGHT CLICK the red arrow next to the student’s name 6. A menu will appear with available actions. Click Weekly Schedule
11111111

Training and Organizational Development Updated: May 29, 2018 UF Human Resources Page 2 of 2
Student Information System
The Weekly Schedule displays
FOR ADDITIONAL ASSISTANCE Technical Issues The UF Computing Help Desk 352-392-HELP helpdesk.ufl.edu
Policies and Procedures Office of the University Registrar 352-392-1374 registrar.ufl.edu

Training and Organizational Development Updated: February 26, 2018 Office of Human Resources Page 1 of 4 University of Florida, Gainesville, FL 32611
Student Information System
QUICK ENROLL A STUDENT: USING A PERMISSION OVERRIDE This instruction guide will walk you through the process of quick enrolling a student into a course with a permission override.
NAVIGATION Use the following navigation to navigate to the Quick Enroll a Student Page:
1. Click the NavBar icon 2. Click Main Menu 3. Click Student Information System 4. Click Records and Enrollment 5. Click Enroll Students 6. Click Quick Enroll a Student
PROCESS Use the following steps to use the permission override:
1. Enter the student’s UFID 2. Enter the Academic Career 3. Enter the Term 4. Click the Add button
11111111

Training and Organizational Development Updated: February 26, 2018 Office of Human Resources Page 2 of 4 University of Florida, Gainesville, FL 32611
Student Information System
5. Enter the class number in the Class Nbr field 6. Press the tab key to see the course code populate 7. Click the Submit button
8. Click the Errors link to review the error message
11111111
11111111

Training and Organizational Development Updated: February 26, 2018 Office of Human Resources Page 3 of 4 University of Florida, Gainesville, FL 32611
Student Information System
9. Review the Error Message
10. Click the Return button 11. Click the Class Overrides tab
11111111
11111111

Training and Organizational Development Updated: February 26, 2018 Office of Human Resources Page 4 of 4 University of Florida, Gainesville, FL 32611
Student Information System
12. Check the Class Permission override checkbox 13. Click the Submit button
14. Note the status has changed from Errors to Success
NOTE: You may see Messages rather than Success. If you see this, it means the enrollment action was posted successfully but there is additional information regarding the enrollment.
FOR ADDITIONAL ASSISTANCE Technical Issues The UF Computing Help Desk 352-392-HELP helpdesk.ufl.edu
Policies and Directives Office of the University Registrar 352-392-1374 registrar.ufl.edu
11111111
11111111
Training and Organizational Development Updated: April 12, 2018 Office of Human Resources Page 1 of 3 University of Florida, Gainesville, FL 32611
Student Information System
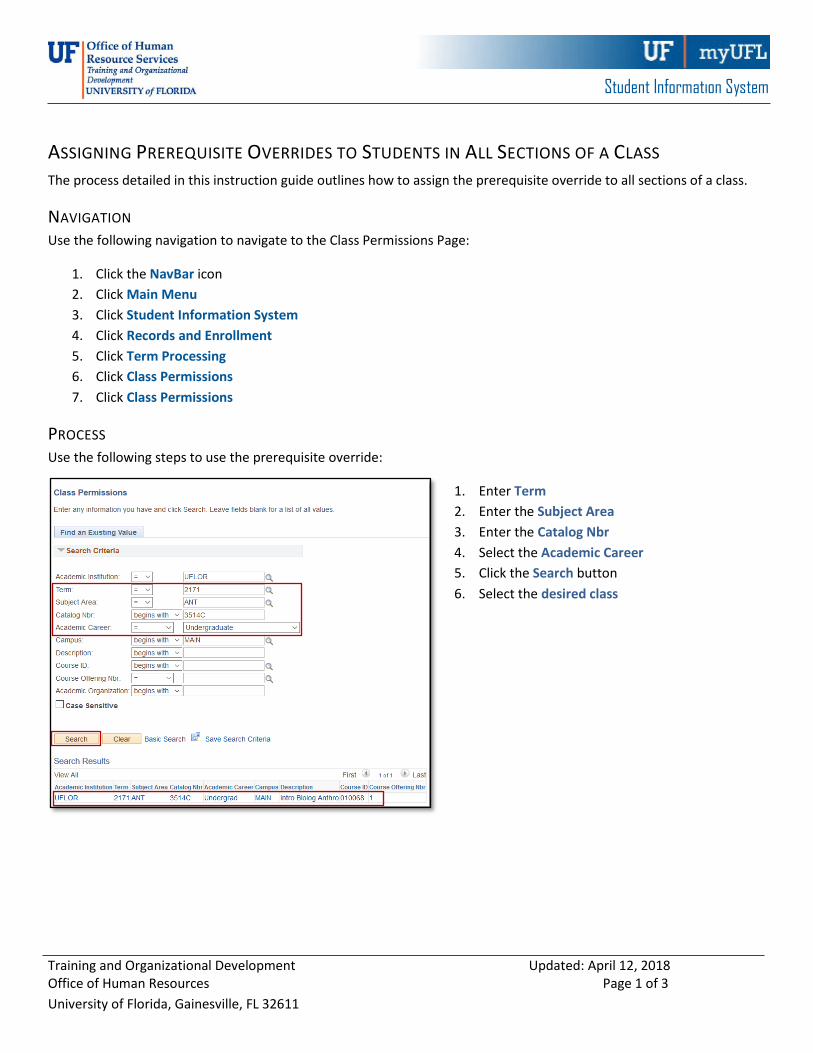
ASSIGNING PREREQUISITE OVERRIDES TO STUDENTS IN ALL SECTIONS OF A CLASS The process detailed in this instruction guide outlines how to assign the prerequisite override to all sections of a class.
NAVIGATION Use the following navigation to navigate to the Class Permissions Page:
1. Click the NavBar icon 2. Click Main Menu 3. Click Student Information System 4. Click Records and Enrollment 5. Click Term Processing 6. Click Class Permissions 7. Click Class Permissions
PROCESS Use the following steps to use the prerequisite override:
1. Enter Term 2. Enter the Subject Area 3. Enter the Catalog Nbr 4. Select the Academic Career 5. Click the Search button 6. Select the desired class

Training and Organizational Development Updated: April 12, 2018 Office of Human Resources Page 2 of 3 University of Florida, Gainesville, FL 32611
Student Information System
7. In the Class Permissions Data section, click the Permission tab
8. Check the box in the Requisites Not Met column
9. Click the Course Level Update tab
10. In the Add to All Sections section, enter the UFID of the student you wish to allow to enroll in class 11. When you are finished entering UFIDs, click the Synchronize and Override All Sections button
11111111
QUICK TIP! You can add additional students by clicking on the (+) Plus Sign and entering the UFID’s of other students.

Training and Organizational Development Updated: April 12, 2018 Office of Human Resources Page 3 of 3 University of Florida, Gainesville, FL 32611
Student Information System
12. You will see a warning message 13. Click the OK button
14. Click the Save button QUICK TIP! You also have the option to remove students from the requisite override by adding UFIDs in the Remove From All Sections section.
FOR ADDITIONAL ASSISTANCE Technical Issues The UF Computing Help Desk 352-392-HELP helpdesk.ufl.edu
Policies and Directives Office of the University Registrar 352-392-1374 registrar.ufl.edu

Training and Organizational Development Updated: March 26, 2018 Office of Human Resources Page 1 of 5 University of Florida, Gainesville, FL 32611
Student Information System
QUICK ENROLL A STUDENT: HOW TO SEARCH FOR ALL AVAILABLE CLASSES This instruction guide will walk you through the process of searching for all available classes via the Quick Enroll a Student page.
NAVIGATION Use the following navigation to navigate to the Quick Enroll a Student Page:
1. Click the NavBar icon 2. Click Main Menu 3. Click Student Information System 4. Click Records and Enrollment 5. Click Enroll Students 6. Click Quick Enroll a Student 7. Click Add New Value
PROCESS Use the following steps to enroll a student into a course:
1. Enter the student’s UFID 2. Enter the Academic Career 3. Enter the Term 4. Click the Add button
11111111

Training and Organizational Development Updated: March 26, 2018 Office of Human Resources Page 2 of 5 University of Florida, Gainesville, FL 32611
Student Information System
5. Click the Look up icon (magnifying glass) in the Class Nbr section
6. Click the OK button on the pop-up message
o Note: This message is just letting you know that you need to enter search criteria in order to see results
7. Click the select subject button

Training and Organizational Development Updated: March 26, 2018 Office of Human Resources Page 3 of 5 University of Florida, Gainesville, FL 32611
Student Information System
8. Click the Select link next to the desired subject
9. Click the OK button on the pop-up message
o Note: This message is just letting you know that you need to enter additional search criteria in order to see results

Training and Organizational Development Updated: March 26, 2018 Office of Human Resources Page 4 of 5 University of Florida, Gainesville, FL 32611
Student Information System
10. Enter the course number into the Course Number field 11. Click the Search button
12. All available classes will be listed. Choose the desired class by clicking the Select button
3414
Training and Organizational Development Updated: March 26, 2018 Office of Human Resources Page 5 of 5 University of Florida, Gainesville, FL 32611
Student Information System
13. Click the Submit button to enroll the student in the chosen class
14. You will now see the student is enrolled in the class
NOTE: You may see Messages rather than Success. If you see this, it means the enrollment action was posted successfully but there is additional information regarding the enrollment.
FOR ADDITIONAL ASSISTANCE Technical Issues The UF Computing Help Desk 352-392-HELP helpdesk.ufl.edu
Policies and Directives Office of the University Registrar 352-392-1374 registrar.ufl.edu

Training and Organizational Development Updated: May 29, 2018 UF Human Resources Page 1 of 2
Student Information System
QUICK ENROLL A STUDENT: WEEKLY SCHEDULE This instruction guide will walk you thought the process of accessing a student’s weekly schedule via the Quick Enroll a Student page.
NAVIGATION Use the following navigation to navigate to the Enrollment Request Page:
1. Click the NavBar icon 2. Click Main Menu 3. Click Student Information System 4. Click Records and Enrollment 5. Click Enroll Students 6. Click Quick Enroll a Student
PROCESS Use the following steps to navigate to a student’s weekly schedule from the Enrollment Request page:
1. Enter the student’s UFID 2. Enter the Academic Career 3. Enter the Term 4. Click the Add button
5. RIGHT CLICK the red arrow next to the student’s name 6. A menu will appear with available actions. Click Weekly Schedule

Training and Organizational Development Updated: May 29, 2018 UF Human Resources Page 2 of 2
Student Information System
The Weekly Schedule displays
FOR ADDITIONAL ASSISTANCE Technical Issues The UF Computing Help Desk 352-392-HELP helpdesk.ufl.edu
Policies and Procedures Office of the University Registrar 352-392-1374 registrar.ufl.edu

Training and Organizational Development Updated: February 26, 2018 Office of Human Resources Page 1 of 5 University of Florida, Gainesville, FL 32611
Student Information System
QUICK ENROLL A STUDENT: OTHER LINKS This instruction guide will highlight other pertinent links on the Quick Enroll a Student page.
NAVIGATION Use the following navigation to navigate to the Quick Enroll a Student Page:
1. Click the NavBar icon 2. Click Main Menu 3. Click Student Information System 4. Click Records and Enrollment 5. Click Enroll Students 6. Click Quick Enroll a Student 7. Click Add New Value
PROCESS Use the following steps to view other registration-related links for a student:
1. Enter the student’s UFID 2. Enter the Academic Career 3. Enter the Term 4. Click the Add button
11111111

Training and Organizational Development Updated: February 26, 2018 Office of Human Resources Page 2 of 5 University of Florida, Gainesville, FL 32611
Student Information System
5. Notice there are several links at the bottom of the page. In this instruction guide we will review View Enrollment Access, Enrollment Appointments, Student Services Center, and Study.
VIEW ENROLLMENT ACCESS 1. Click the View Enrollment Access link 2. Here, you can view your enrollment access 3. Click the Return button to return to the Quick Enroll
a Student page
Training and Organizational Development Updated: February 26, 2018 Office of Human Resources Page 3 of 5 University of Florida, Gainesville, FL 32611
Student Information System
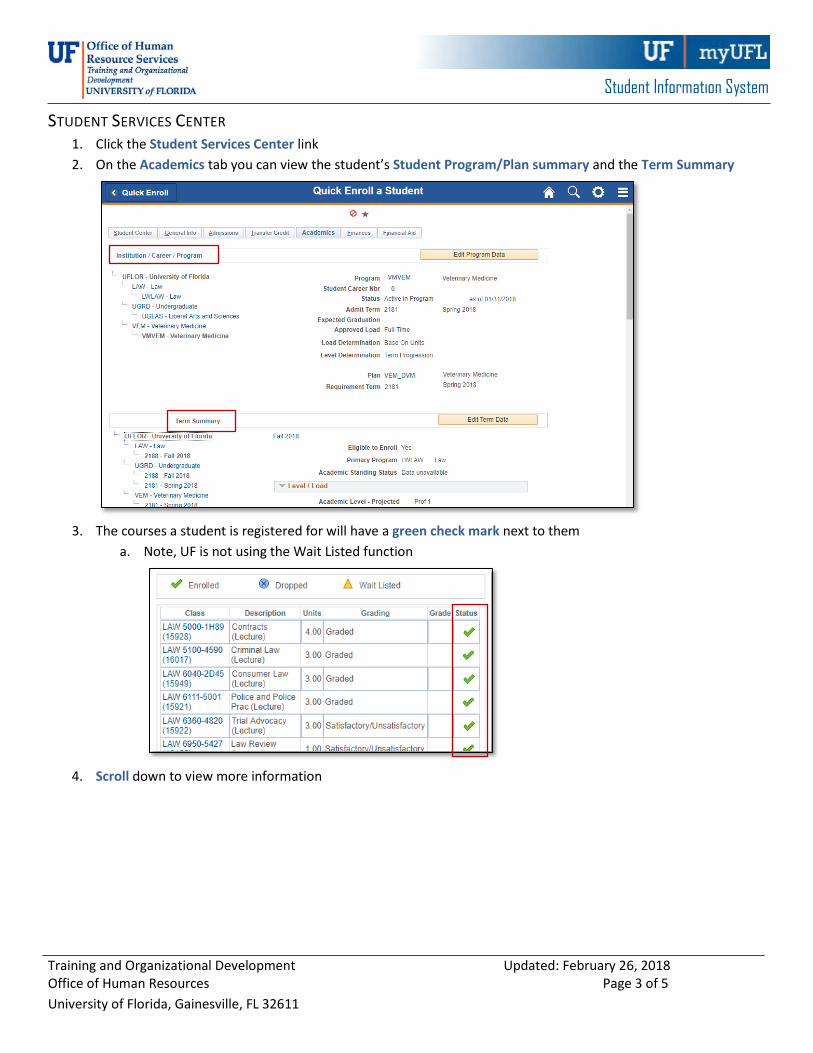
STUDENT SERVICES CENTER 1. Click the Student Services Center link 2. On the Academics tab you can view the student’s Student Program/Plan summary and the Term Summary
3. The courses a student is registered for will have a green check mark next to them
a. Note, UF is not using the Wait Listed function
4. Scroll down to view more information

Training and Organizational Development Updated: February 26, 2018 Office of Human Resources Page 4 of 5 University of Florida, Gainesville, FL 32611
Student Information System
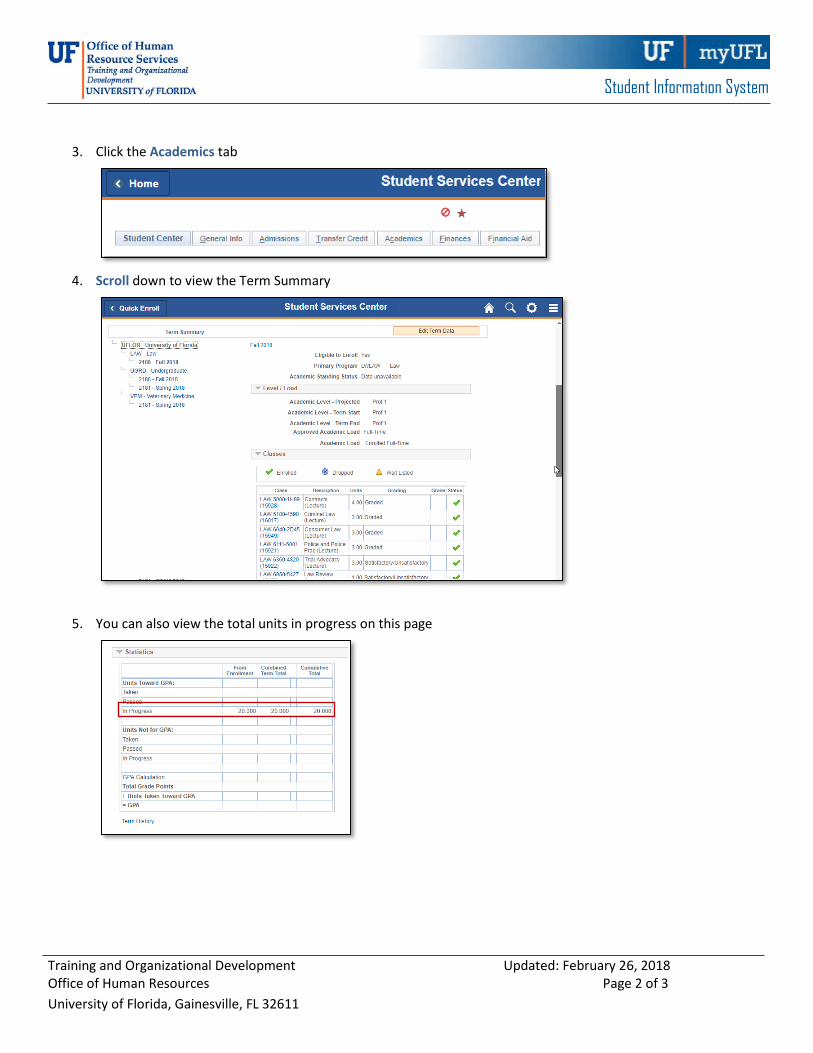
5. Here you can see the total number of units a student is currently taking. They will show as In Progress until a grade is entered.
6. Click the Quick Enrollment link to return to the Quick Enroll a Student page
ENROLLMENT APPOINTMENTS 1. Click the Enrollment Appointments link 2. Here, you can see the Students Enrollment Appointments
3. Click the Quick Enroll button at the top left of the screen to return to the search page
Training and Organizational Development Updated: February 26, 2018 Office of Human Resources Page 5 of 5 University of Florida, Gainesville, FL 32611
Student Information System
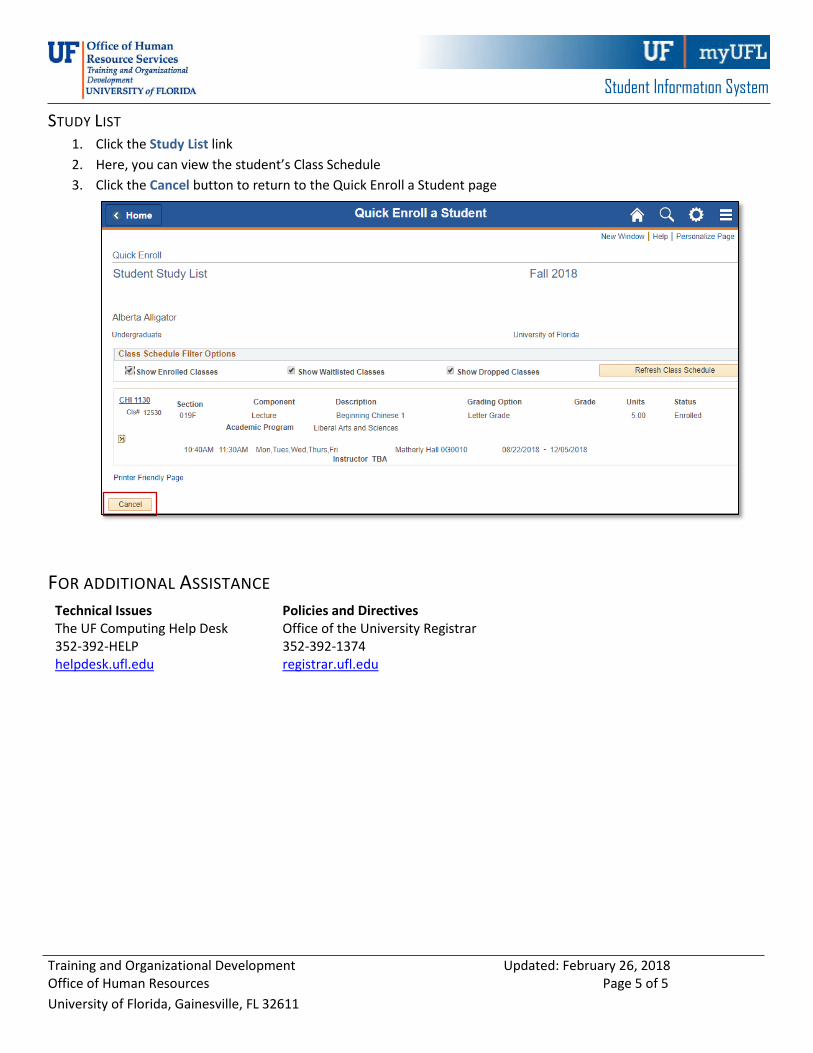
STUDY LIST 1. Click the Study List link 2. Here, you can view the student’s Class Schedule 3. Click the Cancel button to return to the Quick Enroll a Student page
FOR ADDITIONAL ASSISTANCE Technical Issues The UF Computing Help Desk 352-392-HELP helpdesk.ufl.edu
Policies and Directives Office of the University Registrar 352-392-1374 registrar.ufl.edu

Training and Organizational Development Updated: February 26, 2017 Office of Human Resources Page 1 of 2 University of Florida, Gainesville, FL 32611
Student Information System
REGISTRATION IN MYUFL: KEY TERMS QUICK REFERENCE GUIDE ENROLL Add a class to a student’s course load
DROP Remove a class from a student’s course load
ACTION DATE Allows for a staff member to take an action on a particular date other than today’s date. Usually used for retroactive course enrollments (enrolling students outside of the university’s scheduled enrollment window)
SUCCESS OR MESSAGES Both mean the action was completed successfully
MESSAGES When you see Messages as a status, it is because the system did something automatically
Generally, this is seen when enrolling students in courses that have a Writing Requirement Messages can also be seen when dropping a student from a course after the drop/add deadline
ERRORS Means the system was unable to process the transaction. Click the Errors link for more details on the error type and how to resolve it
REQUIREMENT DESIGNATION OVERRIDE Used to override a course’s requirement designation (used for designating whether a course meets a math or writing requirement)
CAREER OVERRIDE Allows the override of the required career that the student must be to enroll in this course. This override generally will not need to be used since cross-career enrollment should be allowed in the rules of Academic Structure.
APPOINTMENT OVERRIDE Allows an override of the student’s assigned appointment time. Used in cases where students should be enrolled in a certain class before their appointment time but not all classes (where changing their appointment times would be more appropriate)
UNIT LOAD OVERRIDE Allows an override of the student’s maximum class load capacity (usually 18 credits for undergraduate students)
TIME CONFLICT OVERRIDE Allows for a class to be put on the student’s schedule even if there is a class that meets at the same time already on their schedule

Training and Organizational Development Updated: February 26, 2017 Office of Human Resources Page 2 of 2 University of Florida, Gainesville, FL 32611
Student Information System
CLOSED CLASS OVERRIDE Allows for a class to be put on the student’s schedule even if the class is full (this will only allow up to 5% over the room capacity)
CLASS PERMISSION OVERRIDE Allows for a class to be put on the student’s schedule even if the class is departmentally controlled
REQUISITE OVERRIDE Allows for a class to be put on the student’s schedule even if the student has not completed a required perquisite course
UNIT TAKEN Allows you to specify the units necessary for a course

Training and Organizational Development Updated: February 26, 2018 Office of Human Resources Page 1 of 5 University of Florida, Gainesville, FL 32611
Student Information System
QUICK ENROLL A STUDENT: USING A REQUISITES OVERRIDE This instruction guide will walk you through the process of quick enrolling a student into a course with a requisites override.
NAVIGATION Use the following navigation to navigate to the Quick Enroll a Student Page:
1. Click the NavBar icon 2. Click Main Menu 3. Click Student Information System 4. Click Records and Enrollment 5. Click Enroll Students 6. Click Quick Enroll a Student 7. Click Add New Value
PROCESS Use the following steps to use the requisites override:
1. Enter the student’s UFID 2. Enter the Academic Career 3. Enter the Term 4. Click the Add button
11111111

Training and Organizational Development Updated: February 26, 2018 Office of Human Resources Page 2 of 5 University of Florida, Gainesville, FL 32611
Student Information System
5. Enter the class number in the Clas Nbr field 6. Press the tab key to see the course code populate 7. Click the Submit button
8. Note the status has changed from Pending to Errors 9. Click the Errors link to review the error message
10. This message means the student was not enrolled in the course because he or she has not completed a required perquisite
11. Click the Return button
11111111
11111111

Training and Organizational Development Updated: February 26, 2018 Office of Human Resources Page 3 of 5 University of Florida, Gainesville, FL 32611
Student Information System
12. Click the Class Overrides tab
13. Click the Show all columns icon
14. Scroll to the Requisite column and check the checkbox
11111111
11111111
11111111

Training and Organizational Development Updated: February 26, 2018 Office of Human Resources Page 4 of 5 University of Florida, Gainesville, FL 32611
Student Information System
15. Scroll back to the left 16. Click the Show tabs icon 17. Click the Submit button
18. Note the status has changed from Errors to Success
NOTE: You may see Messages rather than Success. If you see this, it means the enrollment action was posted successfully but there is additional information regarding the enrollment.
11111111
11111111

Training and Organizational Development Updated: February 26, 2018 Office of Human Resources Page 5 of 5 University of Florida, Gainesville, FL 32611
Student Information System
FOR ADDITIONAL ASSISTANCE Technical Issues The UF Computing Help Desk 352-392-HELP helpdesk.ufl.edu
Policies and Directives Office of the University Registrar 352-392-1374 registrar.ufl.edu

Training and Organizational Development Updated: February 26, 2018 Office of Human Resources Page 1 of 2 University of Florida, Gainesville, FL 32611
Student Information System
CLASS PERMISSIONS This instruction guide will walk you through the process of adding students to a Class Permissions list.
NAVIGATION Use the following navigation to navigate to the Class Permissions page:
1. Click the NavBar icon 2. Click Main Menu 3. Click Student Information System 4. Click Records and Enrollment 5. Click Term Processing 6. Click Class Permissions 7. Click Class Permissions
PROCESS Use the following steps to add a student to the Class Permissions list:
1. Enter the Academic Institution 2. Enter the Term 3. Enter the Subject Area 4. Enter the Catalog Nbr 5. Click the Search button
2181
Training and Organizational Development Updated: February 26, 2018 Office of Human Resources Page 2 of 2 University of Florida, Gainesville, FL 32611
Student Information System
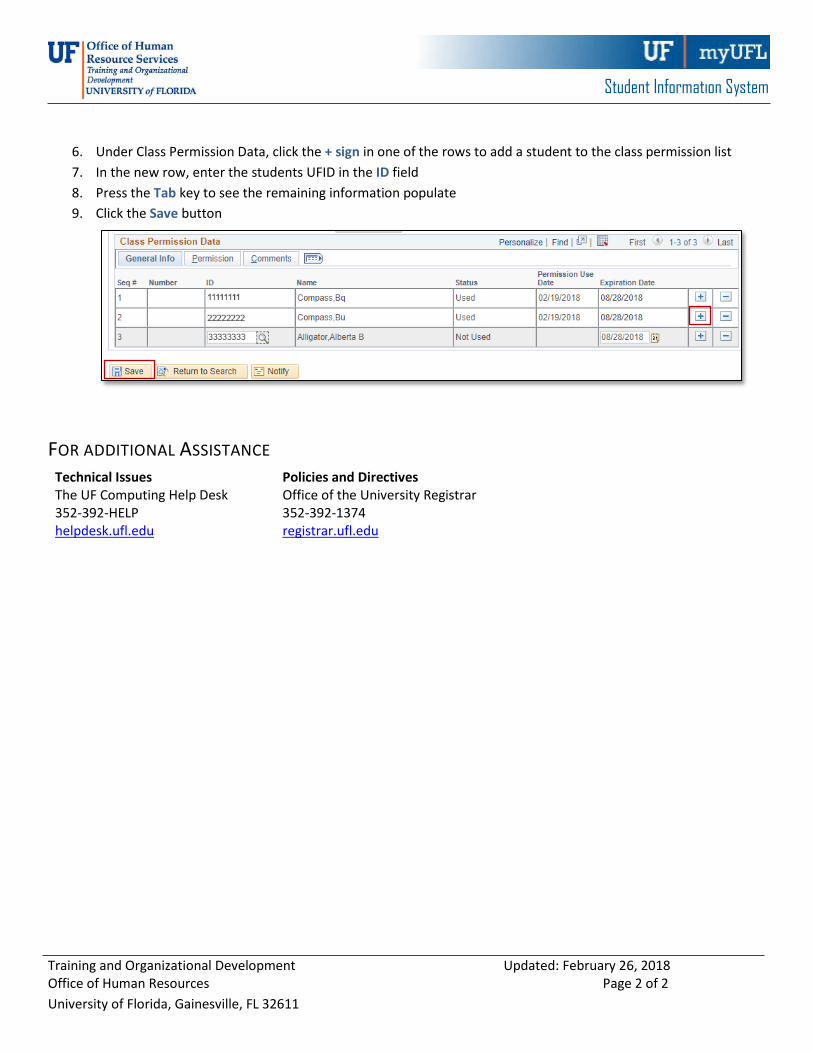
6. Under Class Permission Data, click the + sign in one of the rows to add a student to the class permission list 7. In the new row, enter the students UFID in the ID field 8. Press the Tab key to see the remaining information populate 9. Click the Save button
FOR ADDITIONAL ASSISTANCE Technical Issues The UF Computing Help Desk 352-392-HELP helpdesk.ufl.edu
Policies and Directives Office of the University Registrar 352-392-1374 registrar.ufl.edu

Training and Organizational Development Updated: February 26, 2018 Office of Human Resources Page 1 of 3 University of Florida, Gainesville, FL 32611
Student Information System
TERM SUMMARY This instruction guide will walk you through how to view a Term Summary via the Student Services Center.
NAVIGATION Use the following navigation to navigate to the Student Services Center:
1. Click the NavBar icon 2. Click Main Menu 3. Click Student Information System 4. Click Campus Community 5. Click Student Services Center
PROCESS Use the following steps to add a student to the Class Permissions list:
1. Enter the student’s UFID in the ID field 2. Click the Search button
11111111
Training and Organizational Development Updated: February 26, 2018 Office of Human Resources Page 2 of 3 University of Florida, Gainesville, FL 32611
Student Information System
3. Click the Academics tab
4. Scroll down to view the Term Summary
5. You can also view the total units in progress on this page

Training and Organizational Development Updated: February 26, 2018 Office of Human Resources Page 3 of 3 University of Florida, Gainesville, FL 32611
Student Information System
FOR ADDITIONAL ASSISTANCE Technical Issues The UF Computing Help Desk 352-392-HELP helpdesk.ufl.edu
Policies and Directives Office of the University Registrar 352-392-1374 registrar.ufl.edu

Training and Organizational Development Updated: February 26, 2018 Office of Human Resources Page 1 of 2 University of Florida, Gainesville, FL 32611
Student Information System
TERM ACTIVATE A STUDENT: UNIT LOAD This instruction guide will walk you through the process of adjusting a student’s maximum unit load via the Term Activate a Student page.
NAVIGATION Use the following navigation to navigate to the Term Activate a Student page:
1. Click the NavBar icon 2. Click Main Menu 3. Click Student Information System 4. Click Records and Enrollment 5. Click Enroll Students 6. Click Student Term Information 7. Click Term Activate a Student
PROCESS Use the following steps to adjust a student’s maximum unit load via the Term Activate a Student page:
1. Enter the student’s UFID in the Empl ID field 2. Enter UFLOR in the Academic Institution field 3. Select the Academic Career from the dropdown menu 4. Click the Search button
11111111

Training and Organizational Development Updated: February 26, 2018 Office of Human Resources Page 2 of 2 University of Florida, Gainesville, FL 32611
Student Information System
5. Click the Enrollment Limit tab
6. Check the Override Unit Limits checkbox 7. Enter the appropriate number of units in the Max Total Units field 8. Click the Save button
FOR ADDITIONAL ASSISTANCE Technical Issues The UF Computing Help Desk 352-392-HELP helpdesk.ufl.edu
Policies and Directives Office of the University Registrar 352-392-1374 registrar.ufl.edu

Training and Organizational Development Updated: March 22, 2018 Office of Human Resources Page 1 of 3 University of Florida, Gainesville, FL 32611
Student Information System
STUDENT SERVICES CENTER: VIEW A STUDENT’S ENROLLMENT APPOINTMENT TIME This instruction guide will walk you through how to view a Student’s Registration Appointment Time via the Student Services Center in myUFL.
NAVIGATION Use the following navigation to navigate to the Student Services Center:
1. Click the NavBar icon 2. Click Main Menu 3. Click Student Information System 4. Click Campus Community 5. Click Student Services Center
PROCESS Use the following steps to view a student’s Enrollment Appointment time:
1. Enter the student’s UFID in the ID field 2. Click the Search button
11111111

Training and Organizational Development Updated: March 22, 2018 Office of Human Resources Page 2 of 3 University of Florida, Gainesville, FL 32611
Student Information System
3. Scroll down to view the Enrollment Dates section 4. Click Details
5. Select the desired term 6. Click the Continue button

Training and Organizational Development Updated: March 22, 2018 Office of Human Resources Page 3 of 3 University of Florida, Gainesville, FL 32611
Student Information System
7. Here you can see the student’s Enrollment Appointment time
FOR ADDITIONAL ASSISTANCE Technical Issues The UF Computing Help Desk 352-392-HELP helpdesk.ufl.edu
Policies and Directives Office of the University Registrar 352-392-1374 registrar.ufl.edu

Training and Organizational Development Updated: February 26, 2018 Office of Human Resources Page 1 of 4 University of Florida, Gainesville, FL 32611
Student Information System
QUICK ENROLL A STUDENT: USING A TIME CONFLICT OVERRIDE This instruction guide will walk you through the process of quick enrolling a student into a course with a time conflict override.
NAVIGATION Use the following navigation to navigate to the Quick Enroll a Student Page:
1. Click the NavBar icon 2. Click Main Menu 3. Click Student Information System 4. Click Records and Enrollment 5. Click Enroll Students 6. Click Quick Enroll a Student 7. Click Add New Value
PROCESS Use the following steps to use the time conflict override:
1. Enter the student’s UFID 2. Enter the Academic Career 3. Enter the Term 4. Click the Add button
11111111

Training and Organizational Development Updated: February 26, 2018 Office of Human Resources Page 2 of 4 University of Florida, Gainesville, FL 32611
Student Information System
5. Enter the class number in the Clas Nbr field 6. Press the tab key to see the course code populate 7. Click the Submit button
8. Note the status has changed from Pending to Errors 9. Click the Errors link to review the error message
10. This message means the student was not enrolled in the course because the time of the class conflicts with another class the student is currently registered for
11. Click the Return button
11111111
11111111

Training and Organizational Development Updated: February 26, 2018 Office of Human Resources Page 3 of 4 University of Florida, Gainesville, FL 32611
Student Information System
12. Click the General Overrides tab
11111111
11111111

Training and Organizational Development Updated: February 26, 2018 Office of Human Resources Page 4 of 4 University of Florida, Gainesville, FL 32611
Student Information System
13. Check the Time Conflict checkbox 14. Click the Submit button
15. Note the status has changed from Errors to Success
NOTE: You may see Messages rather than Success. If you see this, it means the enrollment action was posted successfully but there is additional information regarding the enrollment.
FOR ADDITIONAL ASSISTANCE Technical Issues The UF Computing Help Desk 352-392-HELP helpdesk.ufl.edu
Policies and Directives Office of the University Registrar 352-392-1374 registrar.ufl.edu
11111111
11111111

Training and Organizational Development Updated: February 26, 2018 Office of Human Resources Page 1 of 4 University of Florida, Gainesville, FL 32611
Student Information System
QUICK ENROLL A STUDENT: USING A UNIT LOAD OVERRIDE This instruction guide will walk you through the process of quick enrolling a student into a course with a unit load override.
NAVIGATION Use the following navigation to navigate to the Quick Enroll a Student Page:
1. Click the NavBar icon 2. Click Main Menu 3. Click Student Information System 4. Click Records and Enrollment 5. Click Enroll Students 6. Click Quick Enroll a Student 7. Click Add New Value
PROCESS Use the following steps to use the unit load course override:
1. Enter the student’s UFID 2. Enter the Academic Career 3. Enter the Term 4. Click the Add button
11111111

Training and Organizational Development Updated: February 26, 2018 Office of Human Resources Page 2 of 4 University of Florida, Gainesville, FL 32611
Student Information System
5. Enter the class number in the Clas Nbr field 6. Press the tab key to see the course code populate 7. Click the Submit button
8. Note the status has changed from Pending to Errors 9. Click the Errors link to review the error message
10. This message means the student was not enrolled in the course because enrolling in the course would exceed more than 18 credit units (the maximum number of credit allowed per semester)
11. Click the Return button
11111111
11111111

Training and Organizational Development Updated: February 26, 2018 Office of Human Resources Page 3 of 4 University of Florida, Gainesville, FL 32611
Student Information System
12. Click the Show all columns icon
13. Scroll to the Unit Load column 14. Check the Unit Load checkbox
11111111
11111111

Training and Organizational Development Updated: February 26, 2018 Office of Human Resources Page 4 of 4 University of Florida, Gainesville, FL 32611
Student Information System
15. Scroll back to the left 16. Click the Show Tabs icon 17. Click Submit
18. Note the status has changed from Errors to Success
NOTE: You may see Messages rather than Success. If you see this, it means the enrollment action was posted successfully but there is additional information regarding the enrollment.
FOR ADDITIONAL ASSISTANCE Technical Issues The UF Computing Help Desk 352-392-HELP helpdesk.ufl.edu
Policies and Directives Office of the University Registrar 352-392-1374 registrar.ufl.edu
11111111
11111111

Training and Organizational Development Updated: February 26, 2018 Office of Human Resources Page 1 of 4 University of Florida, Gainesville, FL 32611
Student Information System
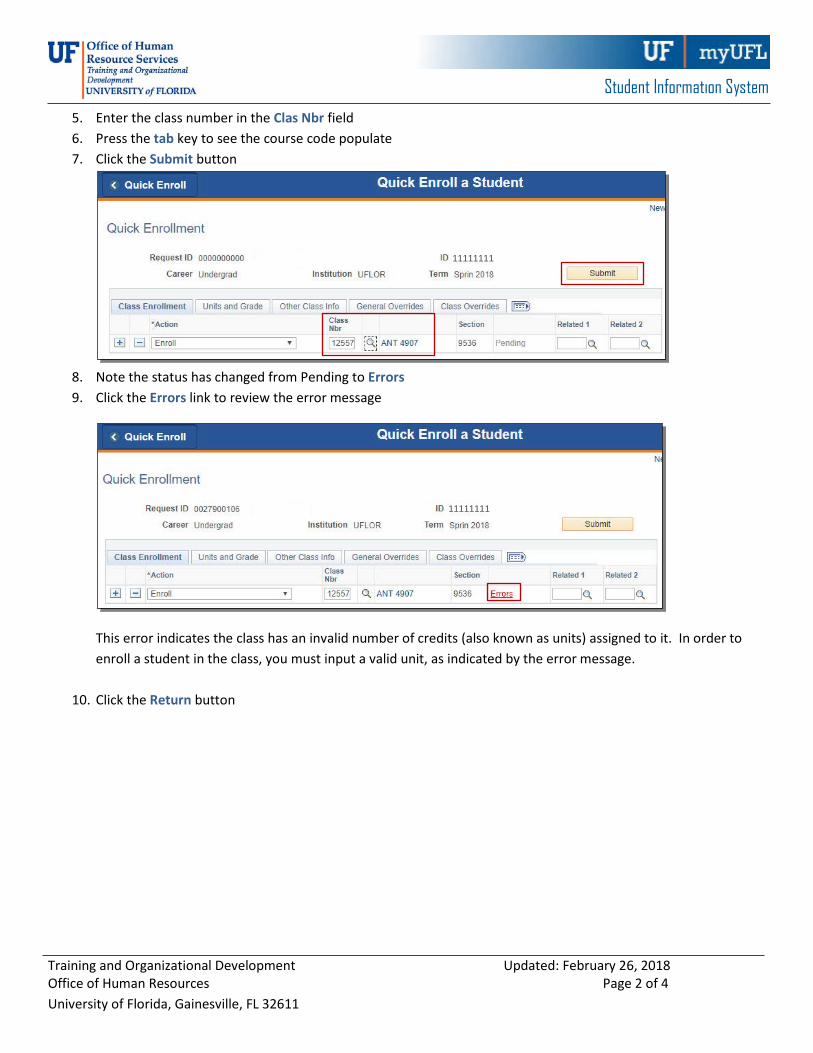
QUICK ENROLL A STUDENT: UPDATING UNITS TAKEN This instruction guide will walk you through the process of quick enrolling a student into a course and adjusting the units taken.
NAVIGATION Use the following navigation to navigate to the Quick Enroll a Student Page:
1. Click the NavBar icon 2. Click Main Menu 3. Click Student Information System 4. Click Records and Enrollment 5. Click Enroll Students 6. Click Quick Enroll a Student 7. Click Add New Value
PROCESS Use the following steps to use the unit taken override:
1. Enter the student’s UFID 2. Enter the Academic Career 3. Enter the Term 4. Click the Add button
11111111
Training and Organizational Development Updated: February 26, 2018 Office of Human Resources Page 2 of 4 University of Florida, Gainesville, FL 32611
Student Information System
5. Enter the class number in the Clas Nbr field 6. Press the tab key to see the course code populate 7. Click the Submit button
8. Note the status has changed from Pending to Errors 9. Click the Errors link to review the error message
This error indicates the class has an invalid number of credits (also known as units) assigned to it. In order to enroll a student in the class, you must input a valid unit, as indicated by the error message.
10. Click the Return button
11111111
11111111
Training and Organizational Development Updated: February 26, 2018 Office of Human Resources Page 3 of 4 University of Florida, Gainesville, FL 32611
Student Information System
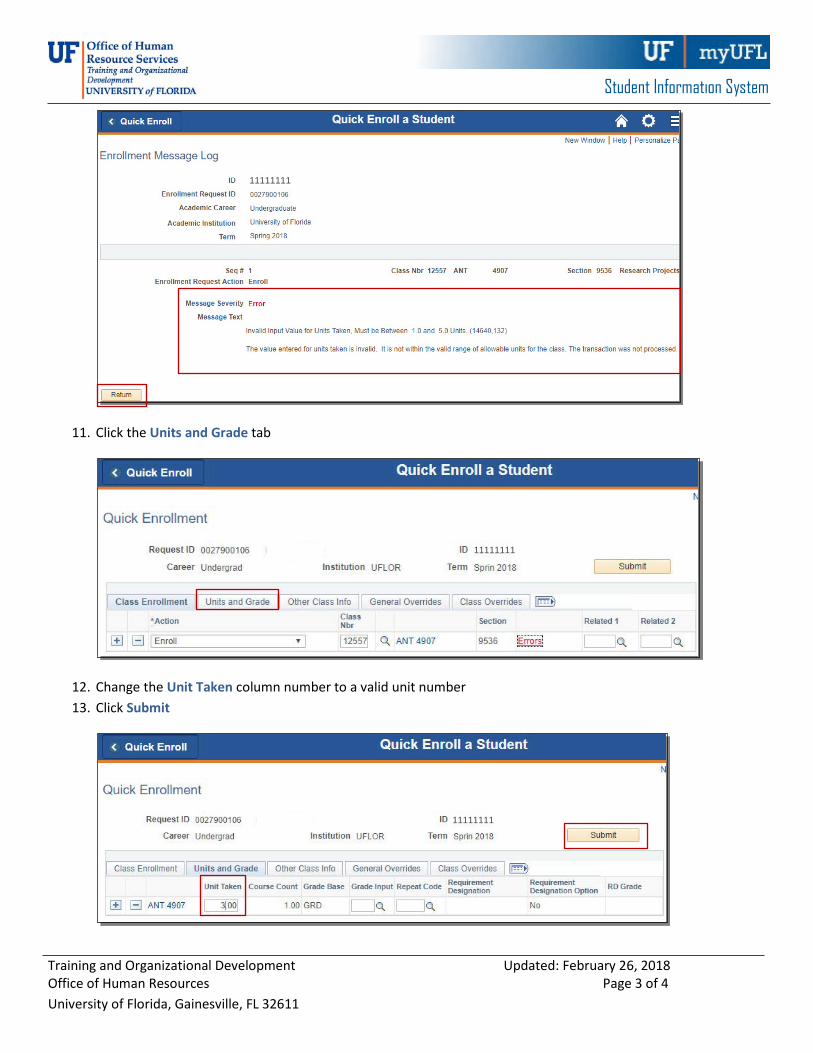
11. Click the Units and Grade tab
12. Change the Unit Taken column number to a valid unit number 13. Click Submit
11111111
11111111
11111111

Training and Organizational Development Updated: February 26, 2018 Office of Human Resources Page 4 of 4 University of Florida, Gainesville, FL 32611
Student Information System
14. Note the status has changed from Errors to Success
NOTE: You may see Messages rather than Success. If you see this, it means the enrollment action was posted successfully but there is additional information regarding the enrollment.
FOR ADDITIONAL ASSISTANCE Technical Issues The UF Computing Help Desk 352-392-HELP helpdesk.ufl.edu
Policies and Directives Office of the University Registrar 352-392-1374 registrar.ufl.edu
11111111

Training and Organizational Development 4/25/2018 Office of Human Resources Page 1 of 5 University of Florida, Gainesville, FL 32611
Student Information System
VIEW ENROLLMENT You can use the View Enrollment page to view a student’s enrollment information, including information on the last person who updated the student’s enrollment record.
NAVIGATION Use the following navigation to navigate to the View Enrollment page:
1. Click the NavBar icon 2. Click Main Menu 3. Click Student Information System 4. Click Records and Enrollment 5. Click Enroll Students 6. Click Enrollment
PROCESS Use the following steps to use the View Enrollment Page:
1. Enter a UFID or First Name and Last Name 2. Click the Search button
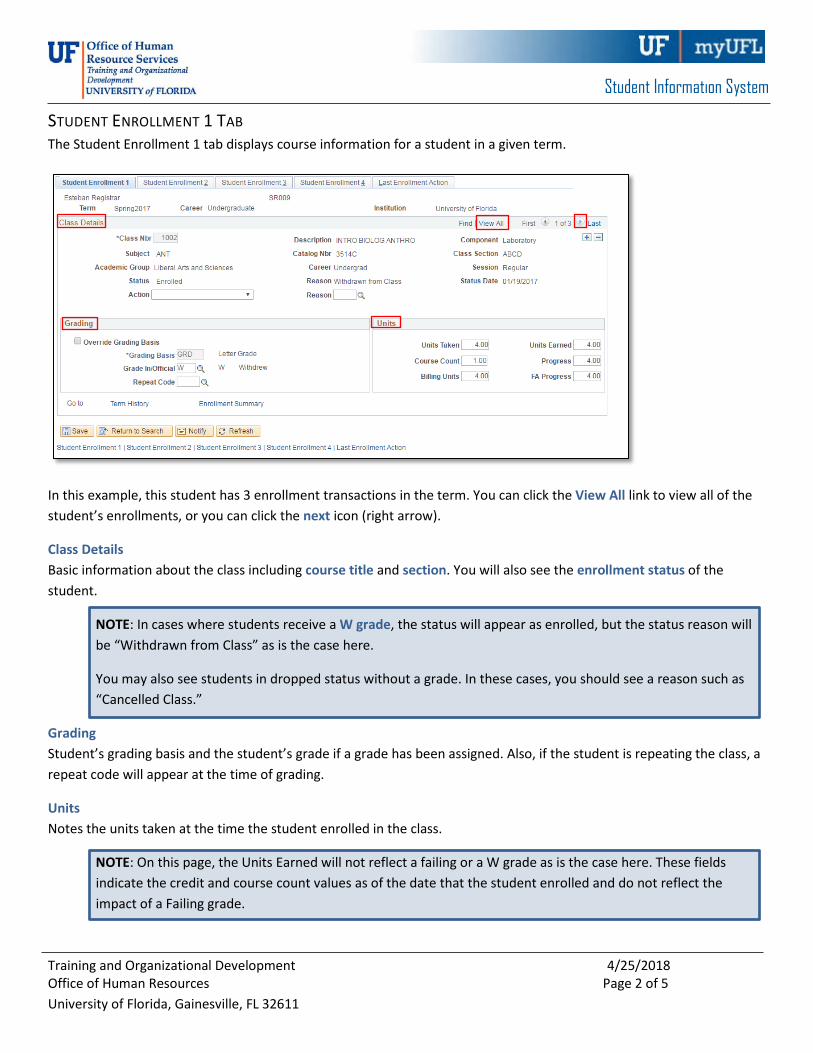
Training and Organizational Development 4/25/2018 Office of Human Resources Page 2 of 5 University of Florida, Gainesville, FL 32611
Student Information System
STUDENT ENROLLMENT 1 TAB The Student Enrollment 1 tab displays course information for a student in a given term.
In this example, this student has 3 enrollment transactions in the term. You can click the View All link to view all of the student’s enrollments, or you can click the next icon (right arrow).
Class Details Basic information about the class including course title and section. You will also see the enrollment status of the student.
NOTE: In cases where students receive a W grade, the status will appear as enrolled, but the status reason will be “Withdrawn from Class” as is the case here.
You may also see students in dropped status without a grade. In these cases, you should see a reason such as “Cancelled Class.”
Grading Student’s grading basis and the student’s grade if a grade has been assigned. Also, if the student is repeating the class, a repeat code will appear at the time of grading.
Units Notes the units taken at the time the student enrolled in the class.
NOTE: On this page, the Units Earned will not reflect a failing or a W grade as is the case here. These fields indicate the credit and course count values as of the date that the student enrolled and do not reflect the impact of a Failing grade.

Training and Organizational Development 4/25/2018 Office of Human Resources Page 3 of 5 University of Florida, Gainesville, FL 32611
Student Information System
STUDENT ENROLLMENT 2 TAB Dates On this page you can view when the class was added, dropped or graded. You can also view the student’s primary program in the term. If the student has been graded, you can view whether the grade assigned is included in the GPA.
STUDENT ENROLLMENT 3 TAB Transcript Notes If transcript notes were assigned, you can view those notes on this page.

Training and Organizational Development 4/25/2018 Office of Human Resources Page 4 of 5 University of Florida, Gainesville, FL 32611
Student Information System
STUDENT ENROLLMENT 4 TAB Requirement Designation If the class has a Writing or Math requirement, you will see that information on this page. Also, if a separate grade is required for the Math or Writing requirement, you can view that grade here.
NOTE: Independent Studies - Instructor ID is not being used at UF.
LAST ENROLLMENT ACTION TAB This page displays the last action taken on each class line and the UFID of the individual who performed the action.

Training and Organizational Development 4/25/2018 Office of Human Resources Page 5 of 5 University of Florida, Gainesville, FL 32611
Student Information System
FOR ADDITIONAL ASSISTANCE Technical Issues The UF Computing Help Desk 352-392-HELP helpdesk.ufl.edu
Policies and Procedures Office of the University Registrar 352-392-1374 registrar.ufl.edu

Training and Organizational Development Updated: May 15, 2018 Office of Human Resources Page 1 of 3 University of Florida, Gainesville, FL 32611
Student Information System
VIEWING A STUDENT’S WEEKLY SCHEDULE This instruction guide shows you how to view a student’s weekly schedule.
NAVIGATION Use the following navigation to navigate to the Student Services Center:
1. Click the NavBar icon 2. Click Main Menu 3. Click Student Information System 4. Click Campus Community 5. Click Student Services Center
PROCESS 1. Enter the student’s UFID
o Alternatively you can enter the student’s Last Name and/or First Name
2. Click the Search button
3. The Student Services Center displays for the selected student
4. In the Academics section, click Weekly Schedule

Training and Organizational Development Updated: May 15, 2018 Office of Human Resources Page 2 of 3 University of Florida, Gainesville, FL 32611
Student Information System
A calendar view of the student’s schedule displays.
NOTE! This is only the weekly view of the student’s schedule. This means if you are looking at the first or last week of the term you will only see items beginning on the start date of the term or ending on the last date of the term. In the example below, classes begin on 8/22/2018 therefore, only classes on or after 8/22/2018 will appear on the schedule.
Click the Next Week button to view the student’s schedule for a full week in the term.
Now you see the student’s entire weekly schedule.

Training and Organizational Development Updated: May 15, 2018 Office of Human Resources Page 3 of 3 University of Florida, Gainesville, FL 32611
Student Information System
NOTE! There are Display Options below the weekly schedule which you can use to show specific information on the schedule.
Click the Refresh Calendar button to apply your selections.
Click the Cancel button to return to the Student Services Center.
NOTE! If a class section does not have a meeting time in will appear in the Meeting information not available section, below the calendar.
FOR ADDITIONAL ASSISTANCE Technical Issues The UF Computing Help Desk 352-392-HELP helpdesk.ufl.edu
Policies and Directives Office of the University Registrar 352-392-1374 registrar.ufl.edu