So Sew Easy Baby changing mat clutch/satchel · PDF fileFind more great sewing patterns at So...
11
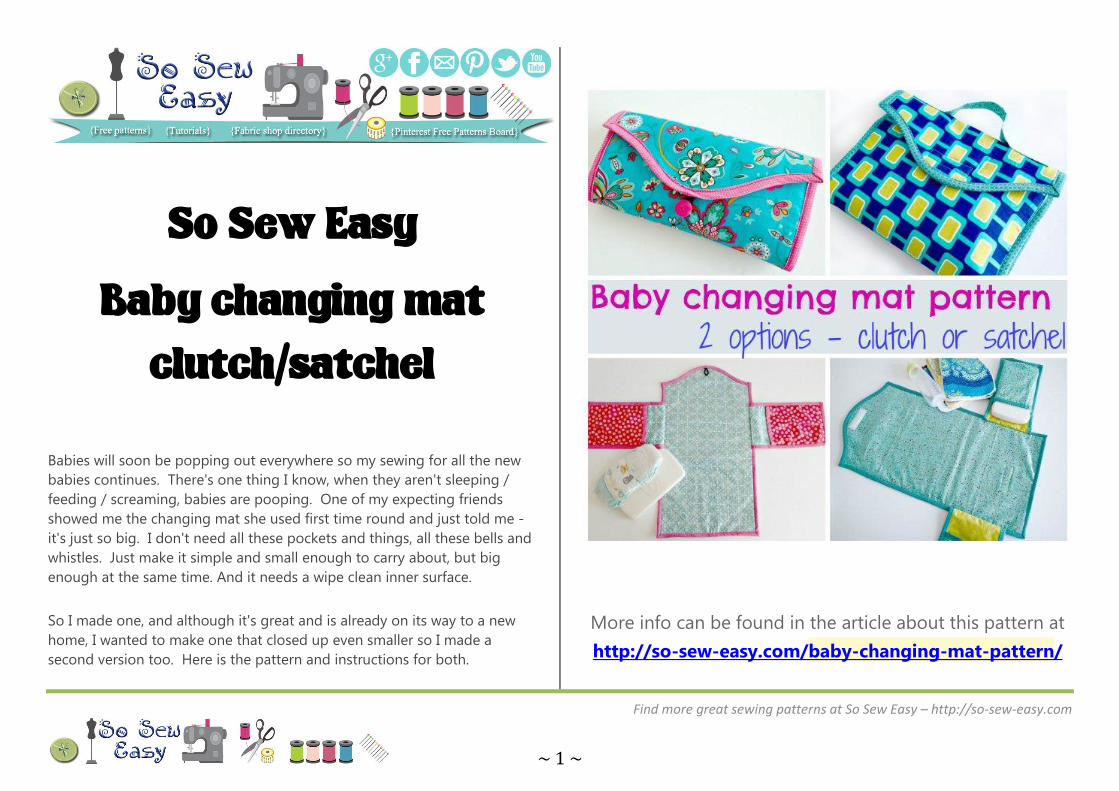
Find more great sewing patterns at So Sew Easy – http://so-sew-easy.com ~ 1 ~ So Sew Easy Baby changing mat clutch/satchel Babies will soon be popping out everywhere so my sewing for all the new babies continues. There's one thing I know, when they aren't sleeping / feeding / screaming, babies are pooping. One of my expecting friends showed me the changing mat she used first time round and just told me - it's just so big. I don't need all these pockets and things, all these bells and whistles. Just make it simple and small enough to carry about, but big enough at the same time. And it needs a wipe clean inner surface. So I made one, and although it's great and is already on its way to a new home, I wanted to make one that closed up even smaller so I made a second version too. Here is the pattern and instructions for both. More info can be found in the article about this pattern at http://so-sew-easy.com/baby-changing-mat-pattern/
Transcript of So Sew Easy Baby changing mat clutch/satchel · PDF fileFind more great sewing patterns at So...
Find more great sewing patterns at So Sew Easy – http://so-sew-easy.com
~ 1 ~
So Sew Easy
Baby changing mat
clutch/satchel
Babies will soon be popping out everywhere so my sewing for all the new
babies continues. There's one thing I know, when they aren't sleeping /
feeding / screaming, babies are pooping. One of my expecting friends
showed me the changing mat she used first time round and just told me -
it's just so big. I don't need all these pockets and things, all these bells and
whistles. Just make it simple and small enough to carry about, but big
enough at the same time. And it needs a wipe clean inner surface.
So I made one, and although it's great and is already on its way to a new
home, I wanted to make one that closed up even smaller so I made a
second version too. Here is the pattern and instructions for both.
More info can be found in the article about this pattern at
http://so-sew-easy.com/baby-changing-mat-pattern/
Find more great sewing patterns at So Sew Easy – http://so-sew-easy.com
~ 2 ~
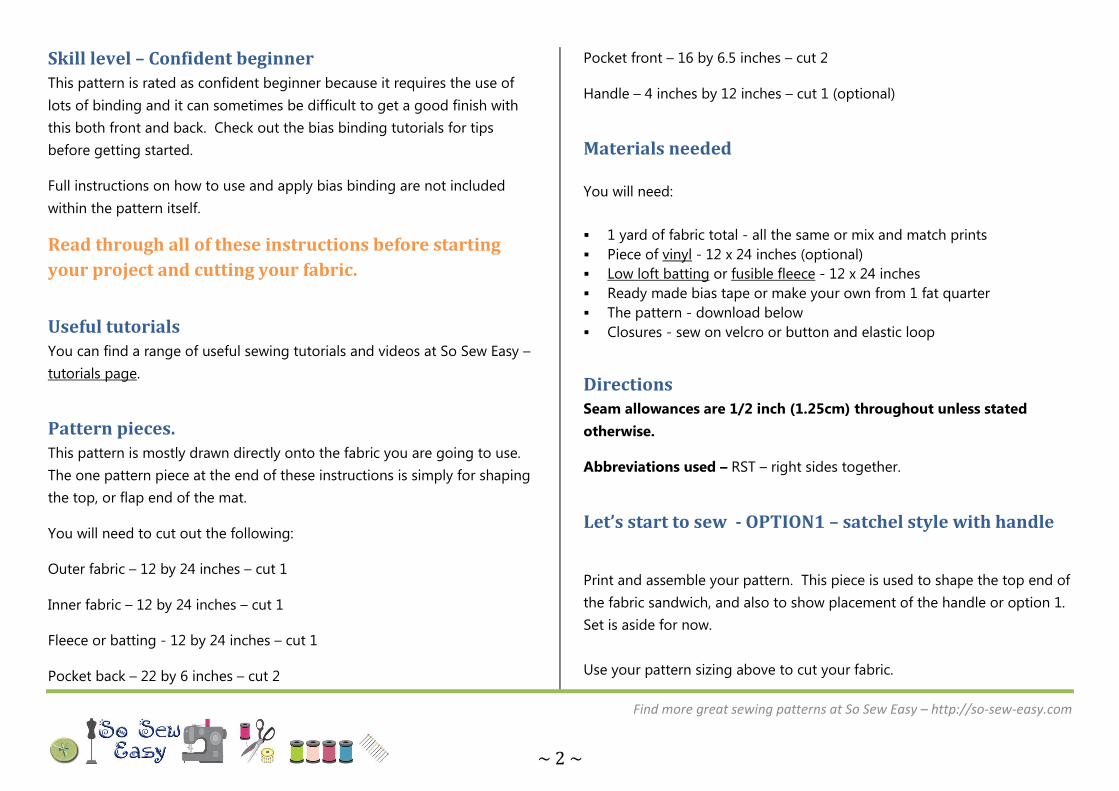
Skill level – Confident beginner This pattern is rated as confident beginner because it requires the use of
lots of binding and it can sometimes be difficult to get a good finish with
this both front and back. Check out the bias binding tutorials for tips
before getting started.
Full instructions on how to use and apply bias binding are not included
within the pattern itself.
Read through all of these instructions before starting
your project and cutting your fabric.
Useful tutorials You can find a range of useful sewing tutorials and videos at So Sew Easy –
tutorials page.
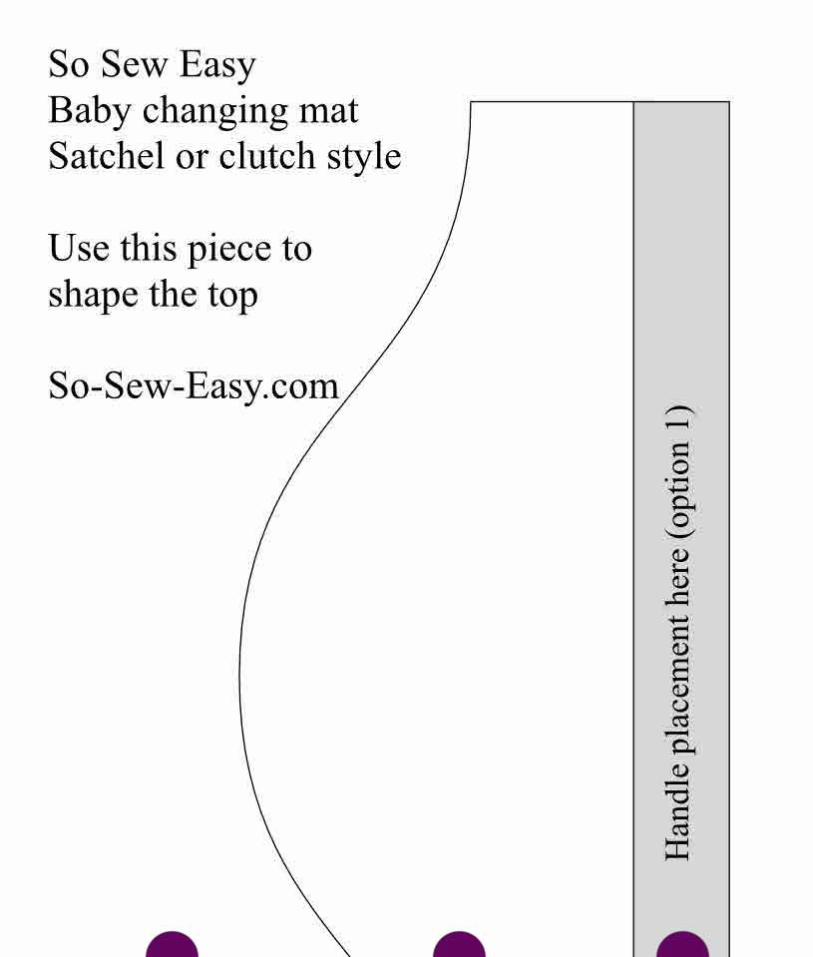
Pattern pieces. This pattern is mostly drawn directly onto the fabric you are going to use.
The one pattern piece at the end of these instructions is simply for shaping
the top, or flap end of the mat.
You will need to cut out the following:
Outer fabric – 12 by 24 inches – cut 1
Inner fabric – 12 by 24 inches – cut 1
Fleece or batting - 12 by 24 inches – cut 1
Pocket back – 22 by 6 inches – cut 2
Pocket front – 16 by 6.5 inches – cut 2
Handle – 4 inches by 12 inches – cut 1 (optional)
Materials needed
You will need:
1 yard of fabric total - all the same or mix and match prints
Piece of vinyl - 12 x 24 inches (optional)
Low loft batting or fusible fleece - 12 x 24 inches
Ready made bias tape or make your own from 1 fat quarter
The pattern - download below
Closures - sew on velcro or button and elastic loop
Directions Seam allowances are 1/2 inch (1.25cm) throughout unless stated
otherwise.
Abbreviations used – RST – right sides together.
Let’s start to sew - OPTION1 – satchel style with handle
Print and assemble your pattern. This piece is used to shape the top end of
the fabric sandwich, and also to show placement of the handle or option 1.
Set is aside for now.
Use your pattern sizing above to cut your fabric.
Find more great sewing patterns at So Sew Easy – http://so-sew-easy.com
~ 3 ~
If you are making your own bias binding tape - start with this. You will
need approx 4 yards if you use it efficiently. A little more is better. You can
find tutorials on how to estimate, make and use bias tape on the tutorials
page.
Start by assembling the pockets. Fold both pieces of fabric in half,
and press. On the smaller pieces, bind the folded edge with your bias
tape.
Match the raw edges of the smaller piece with the larger piece, at the
sides and bottom. The pocket front is slightly wider so at the center
bottom, create and pin a small pleat. Keep your pins away from the
edge so you can sew past them, and then add your binding along
the bottom and the two long sides. Repeat for the other pocket and
set them aside for now.
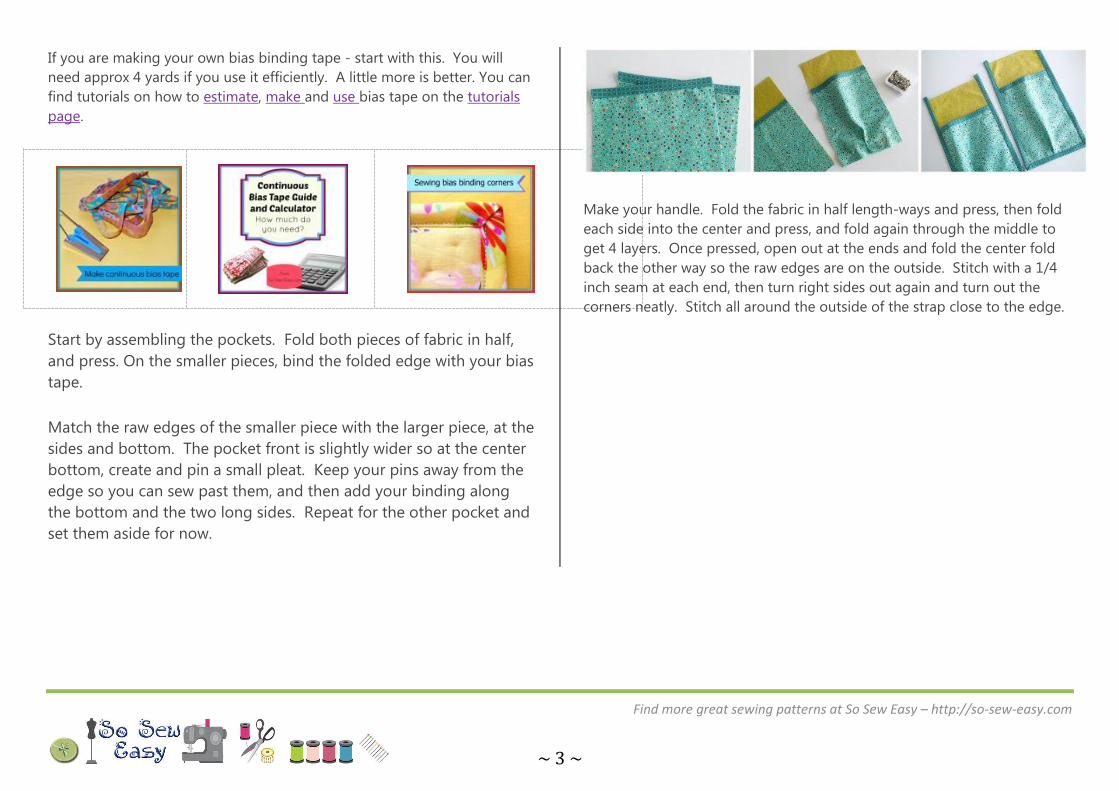
Make your handle. Fold the fabric in half length-ways and press, then fold
each side into the center and press, and fold again through the middle to
get 4 layers. Once pressed, open out at the ends and fold the center fold
back the other way so the raw edges are on the outside. Stitch with a 1/4
inch seam at each end, then turn right sides out again and turn out the
corners neatly. Stitch all around the outside of the strap close to the edge.
Find more great sewing patterns at So Sew Easy – http://so-sew-easy.com
~ 4 ~
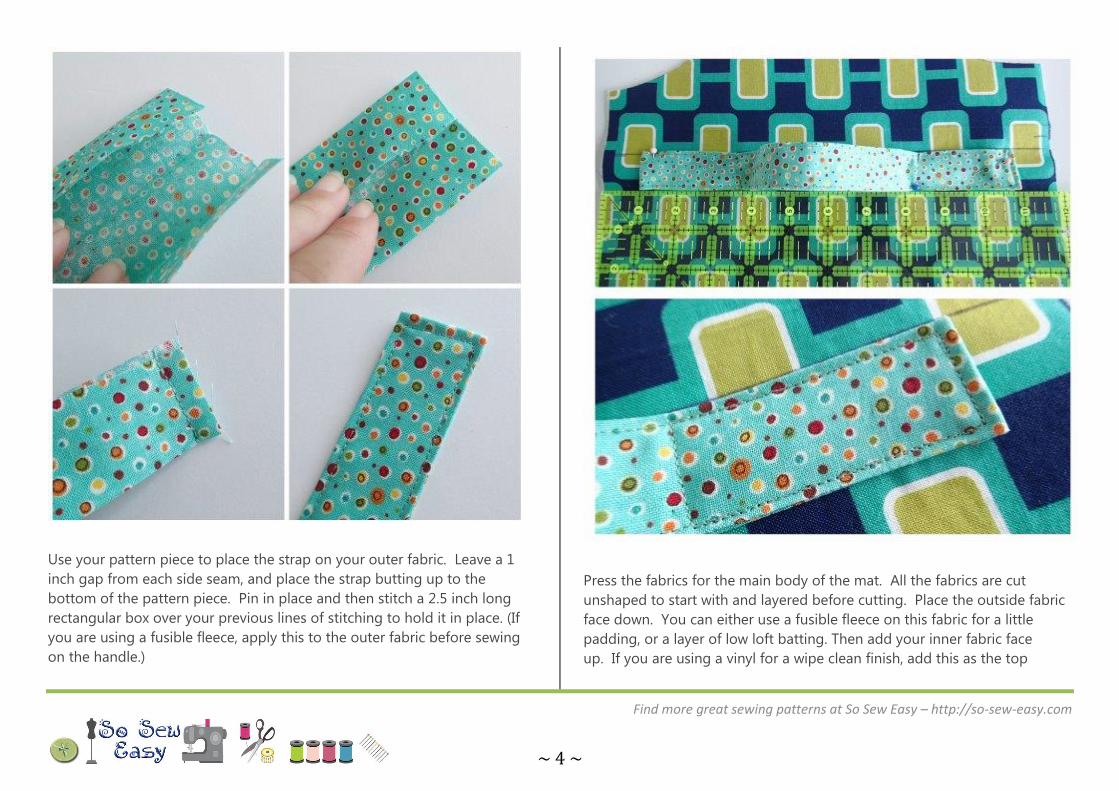
Use your pattern piece to place the strap on your outer fabric. Leave a 1
inch gap from each side seam, and place the strap butting up to the
bottom of the pattern piece. Pin in place and then stitch a 2.5 inch long
rectangular box over your previous lines of stitching to hold it in place. (If
you are using a fusible fleece, apply this to the outer fabric before sewing
on the handle.)
Press the fabrics for the main body of the mat. All the fabrics are cut
unshaped to start with and layered before cutting. Place the outside fabric
face down. You can either use a fusible fleece on this fabric for a little
padding, or a layer of low loft batting. Then add your inner fabric face
up. If you are using a vinyl for a wipe clean finish, add this as the top

Find more great sewing patterns at So Sew Easy – http://so-sew-easy.com
~ 5 ~
layer. Match up all the edges and either pin in place (within the seam
allowances so you don't pierce the vinyl), or use your Wonder Clips.
Use your pattern piece to shape the sandwich at one end. Place the
pockets now so they'll be sewn in with the binding. For option 1 - the
pockets were placed at 2 inches up from the bottom edge. Place them so
the pocket front (the short side) is face down on the mat when folded.
Apply your bias tape all around the edge of the mat, catching and
enclosing all raw edges and securing the pockets in place.
Once everything is sewn, its time to add your wipes and diapers and fold
up the mat. Once you are happy with how you have it folded and made
sure the handle is at the top, mark the placement of your velcro. Match up
the pattern in the fabric if you can for a cool look. Stitch it in place making
sure the soft fuzzy part is by baby's head and the rough scratchy side is on
the outside. Completed!

Find more great sewing patterns at So Sew Easy – http://so-sew-easy.com
~ 6 ~
Option 2 - the clutch style
Option 2 is almost the same, uses the same pattern etc, but has some small
variations. See which one you prefer.
Make the pockets the same.
Don't add the handle to the outside
Pin the pockets at 3 inches down from the TOP corners
When adding in the bias tape around the outside, make sure to slip a short
piece of elastic or a hair elastic at the center top underneath the
binding. Or, you can still close this one with Velcro - it's up to you.

Find more great sewing patterns at So Sew Easy – http://so-sew-easy.com
~ 7 ~
Add your wipes and diapers to the pockets and fold up the bag. With the
pockets in the upper position, it folds up much tighter and creates more of
a clutch. If using Velcro, mark where to sew on both pieces. If using the
elastic and button, mark where your button will go.
Sew on your velcro, or your button, close up your clutch and go. Oh, and
don't forget the baby.

Find more great sewing patterns at So Sew Easy – http://so-sew-easy.com
~ 8 ~
Thank you for downloading this Baby Changing Mat pattern and tutorial. I
hope you enjoyed making this project and remember that I love to share
your creations at So Sew Easy so drop me an email with a photo at
or upload your completed projects to the pattern page on Craftsy.
You might enjoy my other tutorials and sewing patterns at So Sew Easy,
including:
Wrap Dress
Gathered Summer
Skirt
Sew A Skirt beginner
tutorial series
Twist Front Top
Two Become One
Dress
Double Layer
Chiffon/Lace Blouse
Easy Summer Dress
Nautical Mug Rug 30 Minutes Easy Skirt
Summer Drape Top
Teeny Tiny Zipper
Pouch
Cheeky Panties
Custom Fit Skirt
Long arm oven
mitts
Custom fit leggings
Boxy Bag
Sew Simple
Leggings
Little Black Party Dress
Easy Cosmetics Bag
Easy Breezy Blouse On a Roll T-shirt
Super Simple Wallet
Padded bottle bag Slouchy Sweater
Classic Straight leg
knit pants
Cool It Can Cozy
Gathered front top
Make it Yours Clutch
Bag
Spring Mug Rug Waterfall top
Reversible Apron
Flirty Skirty Carry All Bag
Cowl Neck Top
Expanding Nautical
Tote Bag
Wear Everywhere
Dress
Find more great sewing patterns at So Sew Easy – http://so-sew-easy.com
~ 9 ~
Fab Felt Christmas
Tree
Sew Simple
Leggings
Easiest ever Felt tree
ornaments
Turning Japanese Bag
Flex frame glasses
case
Color Block Dress
Baby changing mat
Halloween Table
Runner and
placemats
Insulated Baby Bottle
Bag
Give me a Shrug Top
Sunshine Ribbon
Baby Toy
The Perfect Baby Burp
Cloth
The perfect maxi skirt
For the latest list of patterns available, pop on over to my designer page at
Craftsy.
This pattern graphic, the photos and the instructions are copy right
Deby Coles at So Sew Easy. Please do not copy, publish, sell,
redistribute or alter them in any way. Please don’t print and give to
your friends, or send it to anyone by email. Please do not rebrand this
work as your own and sell or give it away, even if altered. This is
intended for your personal use. If you would like to recommend these
instructions, please pass on the original download link at So Sew Easy.
Thank you for your understanding.
Usage – you ARE allowed to use this pattern to make things to sell on
a small handmade basis, such as for craft fairs and for your Etsy shop.
However it may not be used for larger scale commercial purposes
without a commercial licence.