6 Sew Easy to Make Christmas Ornamentsimg1.liveinternet.ru/images/attach/c/0/4145/4145802_2.pdf ·...
13
Transcript of 6 Sew Easy to Make Christmas Ornamentsimg1.liveinternet.ru/images/attach/c/0/4145/4145802_2.pdf ·...

6 Sew Easy to Make Christmas Ornaments eBook
4
6 Sew Easy Christmas Ornaments Table of Contents
Yo-Yo Fabric Ornaments ................................ 5
Fabric Stocking Ornament.............................. 6
Heart Felt Ornaments Tutorial ....................... 8
Quick Stitch Holiday Ornaments .................. 10
Iron-on Christmas Stocking .......................... 12
Yummy Cupcake Ornaments ....................... 13

6 Sew Easy to Make Christmas Ornaments eBook
5
Yo-Yo Fabric Ornaments
By: Coats & Clark
Use Christmas fabric scraps to create beautiful yo-yo bells for tree ornaments, gift toppers or wreath embellishments. These unique stuffed yo-yo are easy to create and very addictive!
Materials:
Dual Duty® Button & Carpet thread Art 250 or S950) Christmas Print Fabrics *: scraps or fat quarters Polyester fiberfill Jingle bells Template
* We used Hallmark Christmas fromFreeSpirit Fabrics.
Instructions:
1. For each ornament, cut circles 1through 4 from the assorted Christmasfabrics (see pattern). Sew a handrunning stitch around the edges of eachcircle for gathering. Place a smallamount of fiberfill in center of circle,then pull thread to gather edges.Secure thread.
2. Stack the yo-yos, having the largest atthe bottom and the smallest at the top.Starting at the top of the yo-yo tree,push threaded needle down throughthe center of all four yo-yos. Slip thebell over the needle and hold it at thebottom of the largest yo-yo. Bring theneedle back up through the center ofthe tree and take a stitch to secure. Donot cut thread.
3. Take another stitch leaving a 4" loop forhanging the ornament; take a stitch tosecure. Do not cut thread.
4. Cut a 15 inch piece of ribbon. Placecenter of ribbon over last stitch andtake a stitch through ribbon to hold inplace. Secure thread and cut. Tie a bowin the ribbon.
6 Sew Easy to Make Christmas Ornaments eBook
6
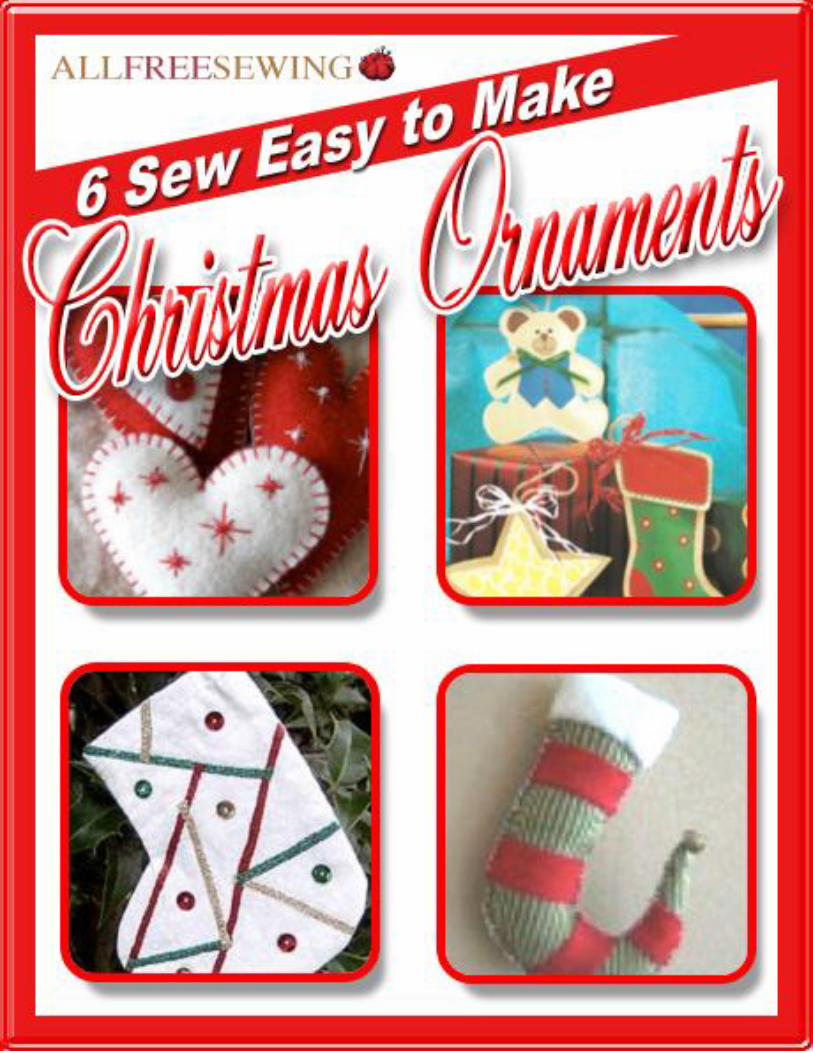
Fabric Stocking Ornament
By: Tina Wick for Greenpurse
This Christmas stocking ornament is easy to make and will jazz up your holiday decor! Recycle old fabrics to create truly unique designs for this ornament. They make fun homemade gifts too!
Materials:
Fabric - wool, felt or most any kind. Embroidery floss, color of your choice Batting or fiber fill for stocking top Jingle bell Template
Instructions:
1. Print pattern. Layout on the fabric youchoose. Cut two.
2. Cut four pieces of coordinating fabric, asshown, approximately 3/4" by 2", trimming as needed. Pin in place.
3. Start sewing the toe of the stocking firstand then stuff with batting or fiber fill. Recommend blanket stitch.

6 Sew Easy to Make Christmas Ornaments eBook
7
4. Continue sewing the rest of the stocking,leaving the top open for filling the remainder of the ornament. Fill as desired and close by whip stitching the top as indicated.
5. Cut a piece of batting or other fabric forthe top of the stocking to approximately 6" by 2 1/2", turning under the bottom edge 1/4".
6. Fold over the top of the stocking and thesides. Pin and sew in place. Be sure to sew the top portion to the stocking so it will not come off. Leave enough embroidery floss to loop as the hanger.
7. Sew on the jingle bell and you're done.

6 Sew Easy to Make Christmas Ornaments eBook
8
Heart Felt Ornaments Tutorial
By: Cheryl Patterson for FeltSewGood
These cute heart shaped ornaments make wonderful gifts or gift wrap accents. Follow this tutorial for easy Christmas crafts or unique Valentine crafts that use recycled wool sweaters.
Materials:
Felted wool sweater or wool felt Embroidery thread and needle Cotton or wool thread Assorted beads and buttons Stuffing Scissors, pins and tracing paper
Instructions:
1. Cut out hearts. To make a heart shapedpaper pattern, fold a piece of paper andstarting at the fold, cut out one side ofthe heart so that the fold is the centerof the heart. This way when you openthe paper you have a perfectlyproportioned heart. Try several shapesand sizes until you have the desiredheart shape. Then pin the paper to thewool and cut out two hearts for each
ornament you want to make. I also cut out some smaller hearts to make contrasting centers for some of my ornaments.
2. Embroider and embellish the hearts. Iused a contrasting color embroiderythread to sew simple stitches in starand swirl patterns on some of myhearts. Then I stitched on seed beads asembellishments. On other hearts I useda blanket stitch, or buttonhole stitch, toappliqué smaller hearts to the center,then added a button for embellishment.You will be using two pieces of wool foreach heart ornament. You can decorateone or both sides of the ornament.
3. Sew the hearts together. With wrongsides together, use a blanket stitch tosew around the outside edge of eachheart. When about a one inch opening

6 Sew Easy to Make Christmas Ornaments eBook
9
remains, fill the heart with stuffing, then finish stitching to close the opening.
4. Hang the heart. Thread a short length ofwool or cotton thread through the topedge of each heart to hang on your treeor tie to a package.

6 Sew Easy to Make Christmas Ornaments eBook
10
Quick Stitch Holiday Ornaments
By: Heidi Borchers of Inspired at Home
Use brown grocery bags and acrylic paint to sew up the cutest and most frugal Christmas ornaments. You will need a sewing machine for this quick ornament craft from Heidi Borchers of Inspired at Home.
Materials:
For each: batting White thread or clear monofilament Sewing machine Acrylic paint – assorted colors Paintbrushes – ¼” flat shader, fine-tip Aleene’s® Tacky Glue™ 7” length twine Scissors Templates
For stocking Brown grocery bag – 1 (2-1/4” x 3-3/4”) piece, 2 (5” x 10”) pieces Fine-tip permanent black marker Red raffia (or yarn or ribbon)
For bear 2 (6” x 8”) pieces brown grocery bag Fine-tip permanent black marker 10” length ¼” wide green picot edged ribbon
For star 2 (7-1/2”) squares brown grocery bag Iridescent fine glitter White raffia (or yarn or ribbon)
Instructions:
For stocking, cut 2-1/4” x 3-3/4” brown bag piece and round corners for cuff. Transfer pattern to 1 (5” x 10”) brown bag piece. For bear and star, transfer pattern to 1 brown bag piece each. For each, referring to photo, paint designs. Let dry. For stocking and bear, draw details with marker. For star, lightly sprinkle glitter onto wet paint. Let dry.

6 Sew Easy to Make Christmas Ornaments eBook
11
For stocking, bear and star, cut out design, adding ¼” all around. Transfer pattern to batting and cut out, cutting just inside marked line. Center and stack remaining brown bag piece, batting shape, and painted design right side up. Machine-stitch bag layers together, using ¼” seam allowance. Trim excess brown bag from design.
For stocking, glue cuff to top of stocking. Cut several (13”) lengths of raffia. Handling several strips as 1, tie strips into bow. Glue bow to stocking cuff. Let dry. For bear, tie ribbon in bow. Glue bow to bear. Let dry. For star, cut several (13”) lengths of raffia. Handling several strips as 1, tie strips into bow. Glue bow to star. Let dry.
For each, fold twine in half to form loop. Glue ends to top back of ornament for hanger. Let dry.

6 Sew Easy to Make Christmas Ornaments eBook
12
Iron-on Christmas Stocking
By: Nancy Billetdeaux for Kreinik
This is a fun way to make a quick fabric ornament that looks like it was crazy quilted. You can take it a step further and make it a ‘signature’ ornaments – having family or friends sign their names in the sections of the design. The iron-on threads give you a quick decorative thread embellishment.
Materials:
Iron-on 1/8” Ribbon in 6130 Red, 6225 Gold, 6350 Green 3” x 4” Kreinik Teflon Press Cloth Mini iron or household iron 4 1/2” X 4 1/2” white print fabric Sequins (small) 6 red, 4 green, 4 gold Sewing machine White all-purpose thread Iron and ironing board Fabric glue Template
Instructions:
1. Turn your iron onto the highest heatsetting and let it heat thoroughly.
2. Trace and cut out the stockingtemplate. Place template onto doubledwhite print fabric and cut out.
3. Referring to template for placement,iron the 1/8’ Ribbon; lay the thread at astarting point, cover with the Teflonpress cloth, and press for severalseconds until the thread adheres.Continue in this way, working thedesign in sections. Refer to the photofor color location.
4. Pin stocking right sides together andsew around stocking, leaving top open,using a 1/4” seam allowance. Turnunder 3/8” to inside of stocking andstitch around top of stocking 1/4” fromedge.
5. Cut a piece of 1/8” red Iron-on Ribbon 81/2” long, and fold in half. Iron the rawends to inside of stocking (always useyour Teflon press cloth).
6. Glue sequins to stocking using fabricglue; refer to photo for color andplacement.

6 Sew Easy to Make Christmas Ornaments eBook
13
Yummy Cupcake Ornaments
So cute, so sweet, such an adorable way to decorate for any holiday or even a birthday. Detail felt pieces with 3D paint for sweet success.
Materials: Tulip® 3D Fashion Paint
o 65000 Whiteo 65010 Pinko 65032 Leaf Greeno 65141 Bright Red
3” green cording Needle with large eye Felt, 1 sheet each pink, red Scissors 6” Pink ribbon, 1/8” wide Sewing thread, to match ribbon Embroidery floss, white, light pink Straight pins Paper towels Template
Instructions: 1. Cut out patterns. Cut felt in halfcrosswise then layer. Pin cupcake bottom pattern to red felt and top to pink felt. Cut out creating two for each cupcake.
2. Thread needle with a 24” length of whitefloss. Sew a basting stitch, about ¼” in from edge along three sides of bottom section of cupcake, leaving top open.
3. Thread needle with pink floss. Insertbottom section about a third of the way into top section then sew a basting stitch around edge through all layers.
4. To create hanger for ornament, foldribbon over and tie a knot in one end. Trim ends close to knot then sew in place on back of ornament.
5. Tie a knot in one end of cording then trimend close to knot, this will be used for stem of cherry. Trim stem to about 1-½” and set aside.

6 Sew Easy to Make Christmas Ornaments eBook
14
6. Start flow of 3D Paint on paper towelusing even pressure on bottle for smooth line.
7. To create cherry, squeeze a large dot ofBright Red where shown. Immediately insert end of stem into paint and add more paint if needed to fill in.
8. Detail cupcake as follows:Pink – small swirls on frosting Leaf Green – one small holly leaf from each swirl White: lines on bottom, wavy lines on top, highlight on cherries
9. Let dry then hang on tree.

6 Sew Easy Christmas Ornaments eBook
Included in this eBook:
Christmas Decorating Ideas
Hand-sewn Christmas Ornaments
Tips for Embroidering Ornaments