Sitecore E-Commerce Cookbook - Welcome to the Sitecore Developer
99
Sitecore E-Commerce Fundamental Edition 1.0.1 Sitecore E-Commerce Cookbook Rev: 2010-11-12 Sitecore® is a registered trademark. All other brand and product names are the property of their respective holders. The contents of this document are the property of Sitecore. Copyright © 2001-2010 Sitecore. All rights reserved. Sitecore E-Commerce Fundamental Edition 1.0.1 Sitecore E-Commerce Cookbook A marketer's guide to the Sitecore E-Commerce Fundamental Edition
Transcript of Sitecore E-Commerce Cookbook - Welcome to the Sitecore Developer
Sitecore E-Commerce Fundamental Edition 1.0.1 Sitecore E-Commerce Cookbook Rev: 2010-11-12
Sitecore® is a registered trademark. All other brand and product names are the property of their respective holders. The contents of this document are the property of Sitecore. Copyright © 2001-2010 Sitecore. All rights reserved.
Sitecore E-Commerce Fundamental Edition 1.0.1
Sitecore E-Commerce Cookbook A marketer's guide to the Sitecore E-Commerce Fundamental Edition
Sitecore E-Commerce Cookbook
Sitecore® is a registered trademark. All other brand and product names are the property of their respective holders. The contents of this document are the property of Sitecore. Copyright © 2001-2010 Sitecore. All rights reserved.
Page 2 of 99
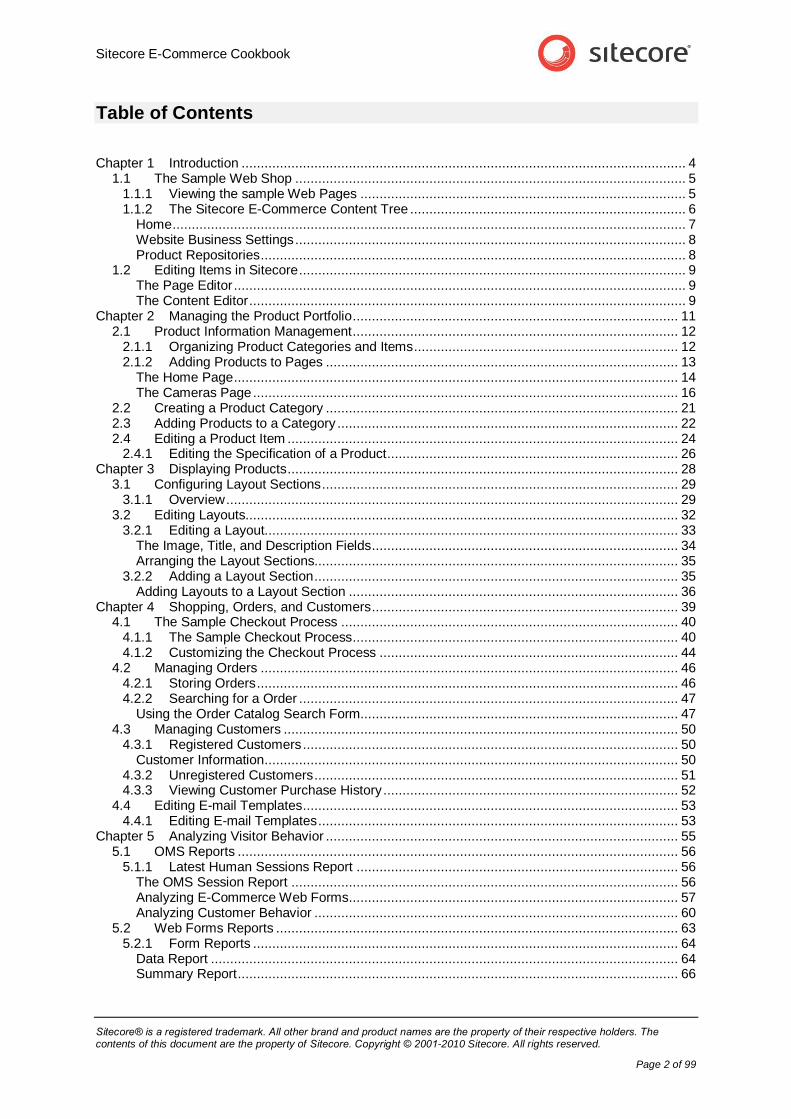
Table of Contents
Chapter 1 Introduction .................................................................................................................... 4 1.1 The Sample Web Shop ...................................................................................................... 5
1.1.1 Viewing the sample Web Pages ..................................................................................... 5 1.1.2 The Sitecore E-Commerce Content Tree ........................................................................ 6
Home ...................................................................................................................................... 7 Website Business Settings ...................................................................................................... 8 Product Repositories ............................................................................................................... 8
1.2 Editing Items in Sitecore ..................................................................................................... 9 The Page Editor ...................................................................................................................... 9 The Content Editor .................................................................................................................. 9
Chapter 2 Managing the Product Portfolio ..................................................................................... 11 2.1 Product Information Management ..................................................................................... 12
2.1.1 Organizing Product Categories and Items ..................................................................... 12 2.1.2 Adding Products to Pages ............................................................................................ 13
The Home Page .................................................................................................................... 14 The Cameras Page ............................................................................................................... 16
2.2 Creating a Product Category ............................................................................................ 21 2.3 Adding Products to a Category ......................................................................................... 22 2.4 Editing a Product Item ...................................................................................................... 24
2.4.1 Editing the Specification of a Product ............................................................................ 26 Chapter 3 Displaying Products ...................................................................................................... 28
3.1 Configuring Layout Sections ............................................................................................. 29 3.1.1 Overview ...................................................................................................................... 29
3.2 Editing Layouts................................................................................................................. 32 3.2.1 Editing a Layout............................................................................................................ 33
The Image, Title, and Description Fields ................................................................................ 34 Arranging the Layout Sections............................................................................................... 35
3.2.2 Adding a Layout Section ............................................................................................... 35 Adding Layouts to a Layout Section ...................................................................................... 36
Chapter 4 Shopping, Orders, and Customers ................................................................................ 39 4.1 The Sample Checkout Process ........................................................................................ 40
4.1.1 The Sample Checkout Process ..................................................................................... 40 4.1.2 Customizing the Checkout Process .............................................................................. 44
4.2 Managing Orders ............................................................................................................. 46 4.2.1 Storing Orders .............................................................................................................. 46 4.2.2 Searching for a Order ................................................................................................... 47
Using the Order Catalog Search Form................................................................................... 47 4.3 Managing Customers ....................................................................................................... 50
4.3.1 Registered Customers .................................................................................................. 50 Customer Information ............................................................................................................ 50
4.3.2 Unregistered Customers ............................................................................................... 51 4.3.3 Viewing Customer Purchase History ............................................................................. 52
4.4 Editing E-mail Templates .................................................................................................. 53 4.4.1 Editing E-mail Templates .............................................................................................. 53
Chapter 5 Analyzing Visitor Behavior ............................................................................................ 55 5.1 OMS Reports ................................................................................................................... 56
5.1.1 Latest Human Sessions Report .................................................................................... 56 The OMS Session Report ..................................................................................................... 56 Analyzing E-Commerce Web Forms ...................................................................................... 57 Analyzing Customer Behavior ............................................................................................... 60
5.2 Web Forms Reports ......................................................................................................... 63 5.2.1 Form Reports ............................................................................................................... 64
Data Report .......................................................................................................................... 64 Summary Report ................................................................................................................... 66
Sitecore E-Commerce Fundamental Edition 1.0.1
Sitecore® is a registered trademark. All other brand and product names are the property of their respective holders. The contents of this document are the property of Sitecore. Copyright © 2001-2010 Sitecore. All rights reserved.
Page 3 of 99
Dropout Report ..................................................................................................................... 67 Usability Report..................................................................................................................... 68 Save Failure Report .............................................................................................................. 69
5.2.2 Enabling Sitecore Analytics .......................................................................................... 70 5.3 Filtering Reports ............................................................................................................... 73
Chapter 6 E-Commerce and the Online Marketing Suite ............................................................... 74 6.1 Introduction to the OMS .................................................................................................... 75
6.1.1 Personas and the Web Shop ........................................................................................ 75 6.2 Profiling ............................................................................................................................ 76
6.2.1 Planning a Product Profile Strategy .............................................................................. 76 6.2.2 Assigning Profile Values to Items .................................................................................. 77
6.3 Goals ............................................................................................................................... 79 6.3.1 Creating and Assigning Goals....................................................................................... 80
Creating a Goal ..................................................................................................................... 80 Assigning a Goal to a Content Item ....................................................................................... 81 Assigning a Goal to a Web Form ........................................................................................... 81
6.4 Managing Campaigns....................................................................................................... 83 6.4.1 Online E-Commerce Campaigns .................................................................................. 83
How to Create an Online Campaign Item............................................................................... 83 6.4.2 Offline E-Commerce Campaigns .................................................................................. 85
Creating a Landing Page for an Offline Campaign ................................................................. 85 Creating an Offline Campaign Item ........................................................................................ 86
6.4.3 Campaign Reports........................................................................................................ 87 The Session Trail Report ....................................................................................................... 87 Campaign Details and Summary Reports .............................................................................. 88
6.5 Creating MV Tests............................................................................................................ 89 6.5.1 MV Tests and E-Commerce .......................................................................................... 89
How to Create an MV Test .................................................................................................... 89 MV Test Reports ................................................................................................................... 92
6.6 Creating Personalization .................................................................................................. 94 6.6.1 Personalization and E-Commerce................................................................................. 94
Personalizing Content ........................................................................................................... 94 Testing Personalization ......................................................................................................... 98
Sitecore E-Commerce Cookbook
Sitecore® is a registered trademark. All other brand and product names are the property of their respective holders. The contents of this document are the property of Sitecore. Copyright © 2001-2010 Sitecore. All rights reserved.
Page 4 of 99
Chapter 1
Introduction
The Sitecore E-Commerce Fundamental Edition is a fully functional webshop product that allows you to rapidly develop and deploy an end-to-end e-commerce solution.
This manual describes how marketer’s and webshop managers can manage their product catalog and organize the way in which products are displayed in their webshop.
The topics covered include managing your product catalog, creating and editing product categories, specifying how the products should be displayed in the webshop, tracking orders, managing campaigns, and analyzing the traffic on the webshop.
In this manual, we use a very basic sample webshop that sells photographic equipment to illustrate the functionality in Sitecore E-Commerce Fundamental Edition. This sample site consists of just a few simple pages.
This manual contains the following chapters:
Chapter 1 — Introduction This is a brief description of the manual, its aims, and its intended audience.
Chapter 2 — Managing the Product Portfolio This chapter describes how to manage, describe, and categorize the products in a webshop.
Chapter 3 — Displaying Products This chapter describes how to use Layouts to display products in a webshop.
Chapter 4 — Shopping, Orders, and Customers This chapter explains how to locate customers and orders.
Chapter 5 — Analyzing Visitor Behavior This chapter explains how to use Sitecore reports with Sitecore E-Commerce Fundamental Edition.
Chapter 6 — E-Commerce and the Online Marketing Suite This chapter explains how you can use OMS functionality with Sitecore E-Commerce Fundamental Edition.
Sitecore E-Commerce Fundamental Edition 1.0.1
Sitecore® is a registered trademark. All other brand and product names are the property of their respective holders. The contents of this document are the property of Sitecore. Copyright © 2001-2010 Sitecore. All rights reserved.
Page 5 of 99
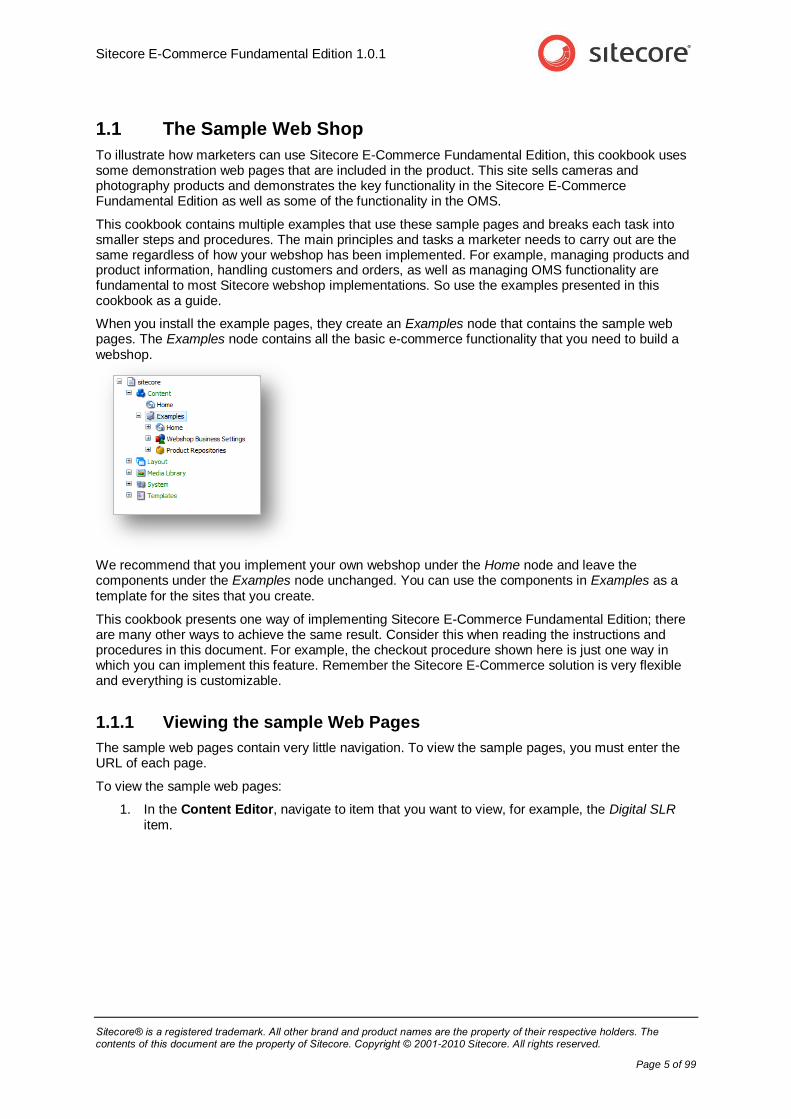
1.1 The Sample Web Shop
To illustrate how marketers can use Sitecore E-Commerce Fundamental Edition, this cookbook uses some demonstration web pages that are included in the product. This site sells cameras and photography products and demonstrates the key functionality in the Sitecore E-Commerce Fundamental Edition as well as some of the functionality in the OMS.
This cookbook contains multiple examples that use these sample pages and breaks each task into smaller steps and procedures. The main principles and tasks a marketer needs to carry out are the same regardless of how your webshop has been implemented. For example, managing products and product information, handling customers and orders, as well as managing OMS functionality are fundamental to most Sitecore webshop implementations. So use the examples presented in this cookbook as a guide.
When you install the example pages, they create an Examples node that contains the sample web pages. The Examples node contains all the basic e-commerce functionality that you need to build a webshop.
We recommend that you implement your own webshop under the Home node and leave the components under the Examples node unchanged. You can use the components in Examples as a template for the sites that you create.
This cookbook presents one way of implementing Sitecore E-Commerce Fundamental Edition; there are many other ways to achieve the same result. Consider this when reading the instructions and procedures in this document. For example, the checkout procedure shown here is just one way in which you can implement this feature. Remember the Sitecore E-Commerce solution is very flexible and everything is customizable.
1.1.1 Viewing the sample Web Pages
The sample web pages contain very little navigation. To view the sample pages, you must enter the URL of each page.
To view the sample web pages:
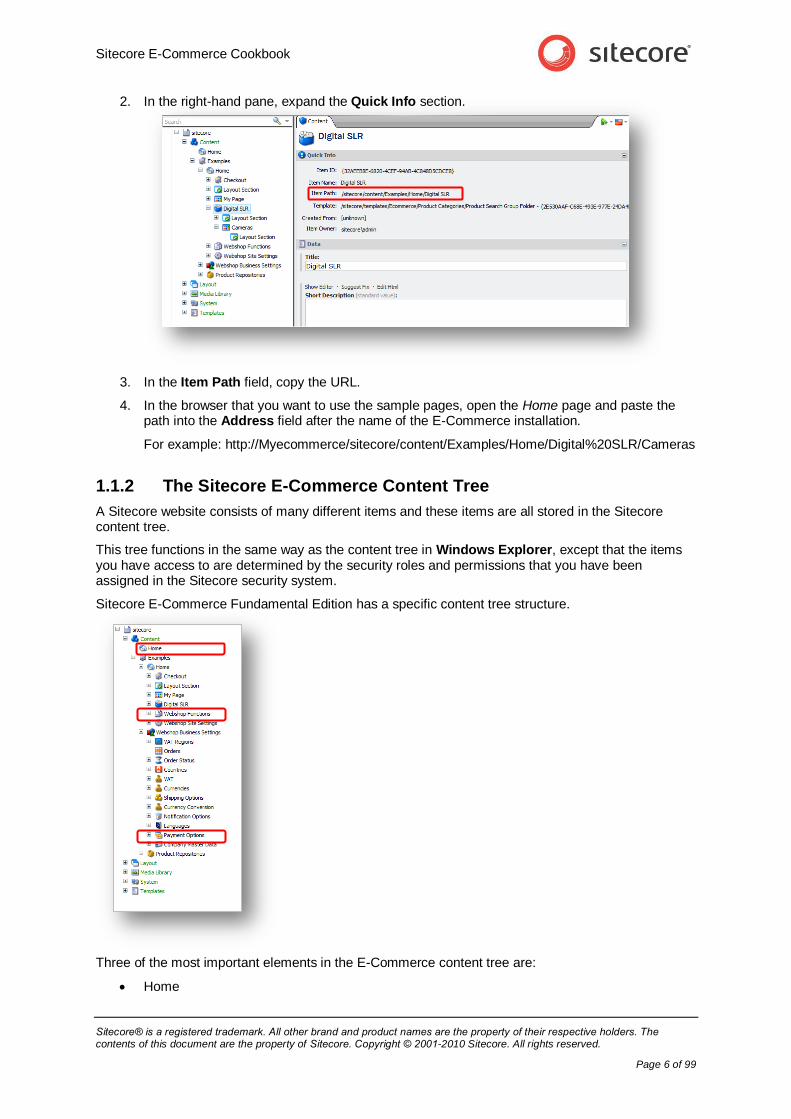
1. In the Content Editor, navigate to item that you want to view, for example, the Digital SLR item.
Sitecore E-Commerce Cookbook
Sitecore® is a registered trademark. All other brand and product names are the property of their respective holders. The contents of this document are the property of Sitecore. Copyright © 2001-2010 Sitecore. All rights reserved.
Page 6 of 99
2. In the right-hand pane, expand the Quick Info section.
3. In the Item Path field, copy the URL.
4. In the browser that you want to use the sample pages, open the Home page and paste the path into the Address field after the name of the E-Commerce installation.
For example: http://Myecommerce/sitecore/content/Examples/Home/Digital%20SLR/Cameras
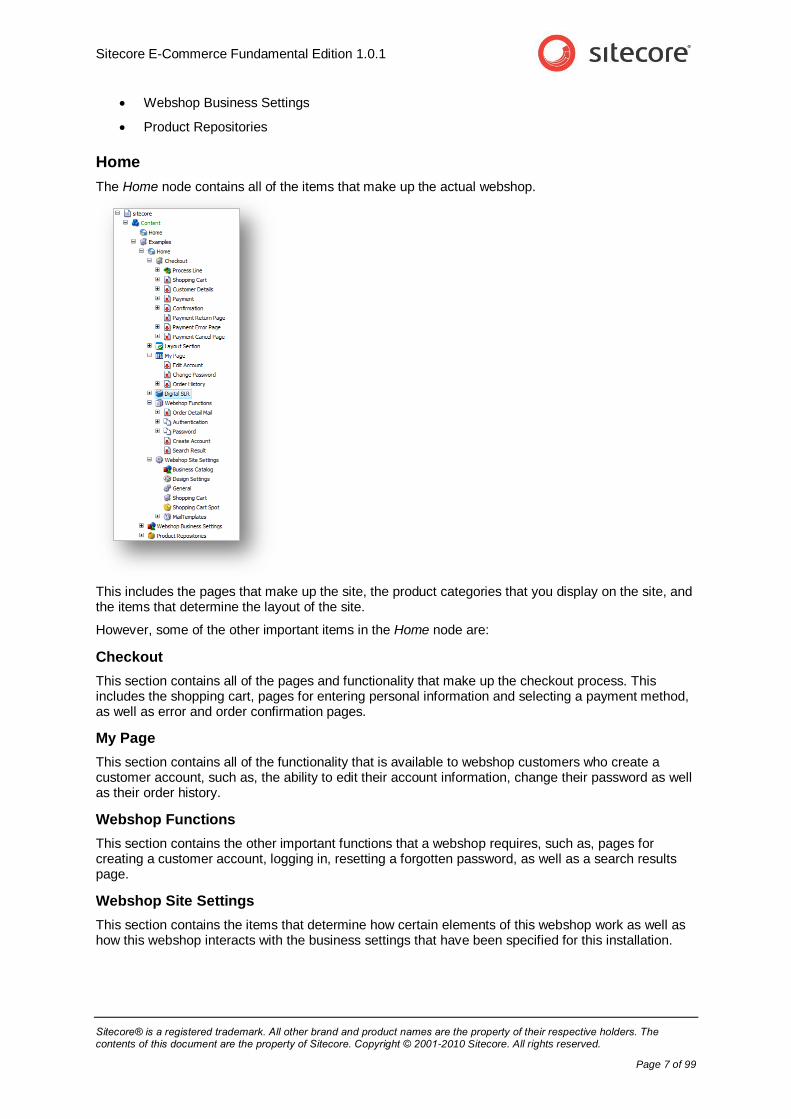
1.1.2 The Sitecore E-Commerce Content Tree
A Sitecore website consists of many different items and these items are all stored in the Sitecore content tree.
This tree functions in the same way as the content tree in Windows Explorer, except that the items you have access to are determined by the security roles and permissions that you have been assigned in the Sitecore security system.
Sitecore E-Commerce Fundamental Edition has a specific content tree structure.
Three of the most important elements in the E-Commerce content tree are:
Home
Sitecore E-Commerce Fundamental Edition 1.0.1
Sitecore® is a registered trademark. All other brand and product names are the property of their respective holders. The contents of this document are the property of Sitecore. Copyright © 2001-2010 Sitecore. All rights reserved.
Page 7 of 99
Webshop Business Settings
Product Repositories
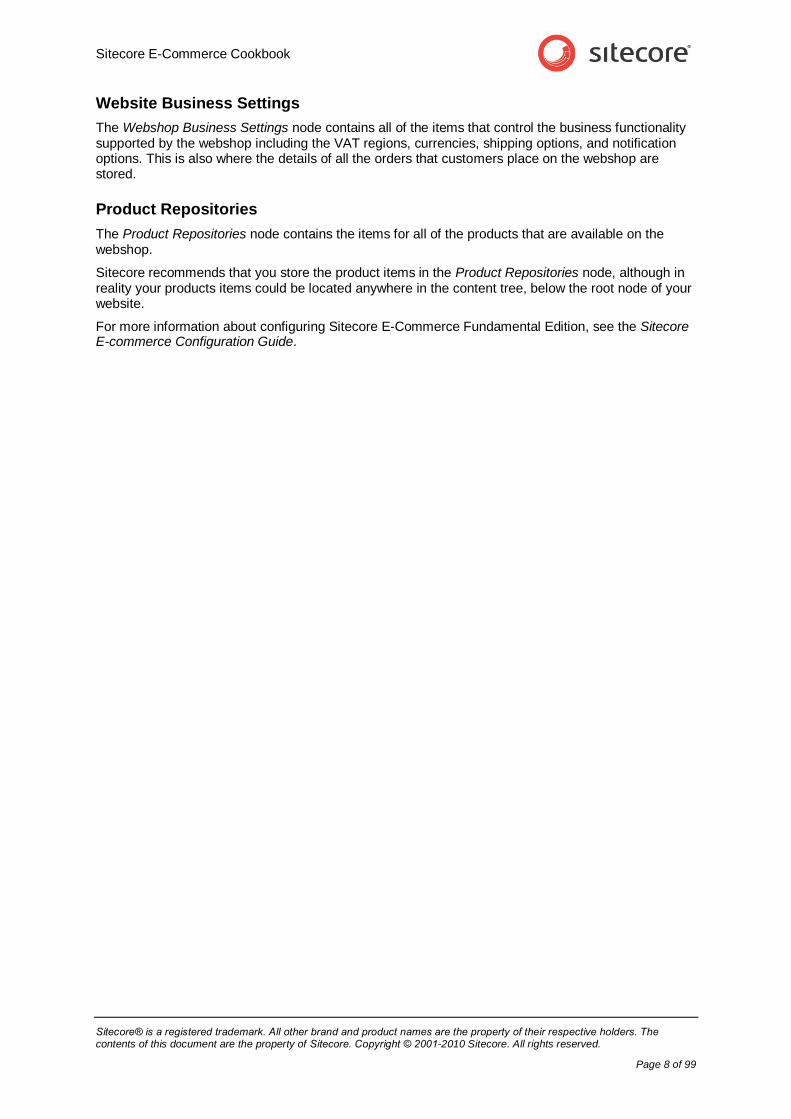
Home
The Home node contains all of the items that make up the actual webshop.
This includes the pages that make up the site, the product categories that you display on the site, and the items that determine the layout of the site.
However, some of the other important items in the Home node are:
Checkout
This section contains all of the pages and functionality that make up the checkout process. This includes the shopping cart, pages for entering personal information and selecting a payment method, as well as error and order confirmation pages.
My Page
This section contains all of the functionality that is available to webshop customers who create a customer account, such as, the ability to edit their account information, change their password as well as their order history.
Webshop Functions
This section contains the other important functions that a webshop requires, such as, pages for creating a customer account, logging in, resetting a forgotten password, as well as a search results page.
Webshop Site Settings
This section contains the items that determine how certain elements of this webshop work as well as how this webshop interacts with the business settings that have been specified for this installation.
Sitecore E-Commerce Cookbook
Sitecore® is a registered trademark. All other brand and product names are the property of their respective holders. The contents of this document are the property of Sitecore. Copyright © 2001-2010 Sitecore. All rights reserved.
Page 8 of 99
Website Business Settings
The Webshop Business Settings node contains all of the items that control the business functionality supported by the webshop including the VAT regions, currencies, shipping options, and notification options. This is also where the details of all the orders that customers place on the webshop are stored.
Product Repositories
The Product Repositories node contains the items for all of the products that are available on the webshop.
Sitecore recommends that you store the product items in the Product Repositories node, although in reality your products items could be located anywhere in the content tree, below the root node of your website.
For more information about configuring Sitecore E-Commerce Fundamental Edition, see the Sitecore E-commerce Configuration Guide.
Sitecore E-Commerce Fundamental Edition 1.0.1
Sitecore® is a registered trademark. All other brand and product names are the property of their respective holders. The contents of this document are the property of Sitecore. Copyright © 2001-2010 Sitecore. All rights reserved.
Page 9 of 99
1.2 Editing Items in Sitecore
Sitecore has two tools that you can use to edit the items displayed on your website:
The Page Editor
The Content Editor
The Page Editor
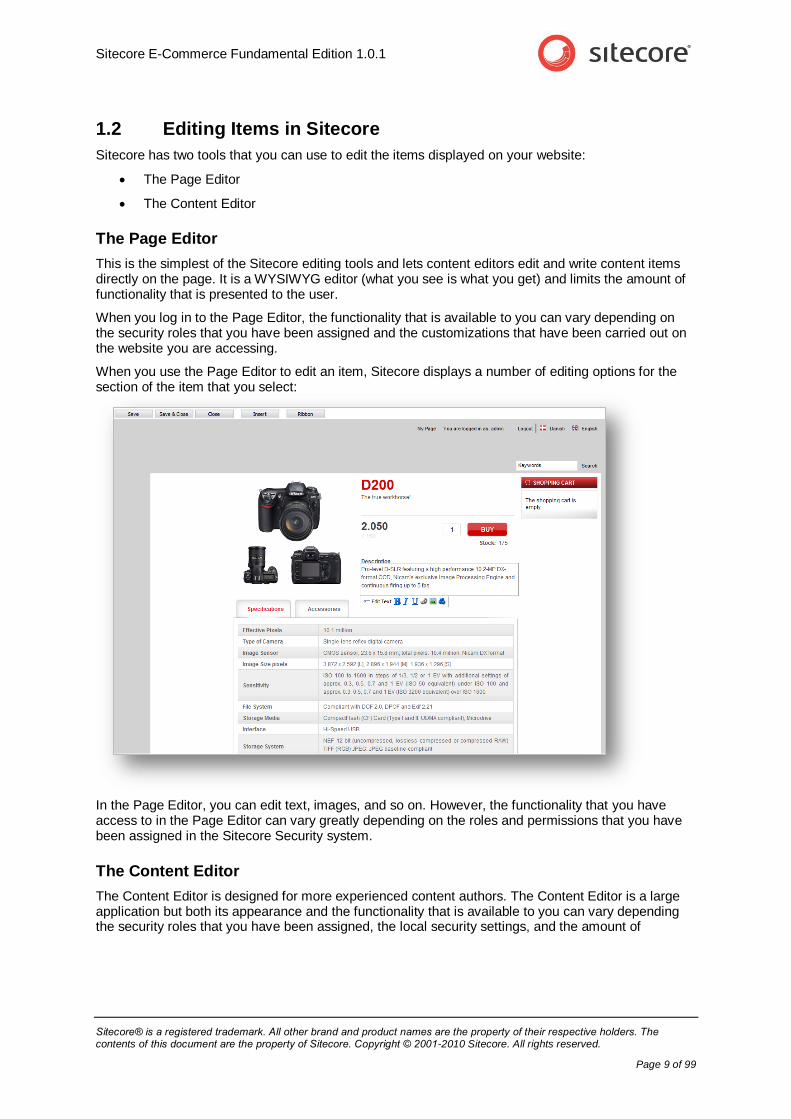
This is the simplest of the Sitecore editing tools and lets content editors edit and write content items directly on the page. It is a WYSIWYG editor (what you see is what you get) and limits the amount of functionality that is presented to the user.
When you log in to the Page Editor, the functionality that is available to you can vary depending on the security roles that you have been assigned and the customizations that have been carried out on the website you are accessing.
When you use the Page Editor to edit an item, Sitecore displays a number of editing options for the section of the item that you select:
In the Page Editor, you can edit text, images, and so on. However, the functionality that you have access to in the Page Editor can vary greatly depending on the roles and permissions that you have been assigned in the Sitecore Security system.
The Content Editor
The Content Editor is designed for more experienced content authors. The Content Editor is a large application but both its appearance and the functionality that is available to you can vary depending the security roles that you have been assigned, the local security settings, and the amount of
Sitecore E-Commerce Cookbook
Sitecore® is a registered trademark. All other brand and product names are the property of their respective holders. The contents of this document are the property of Sitecore. Copyright © 2001-2010 Sitecore. All rights reserved.
Page 10 of 99
customizations that have been carried out on your installation.
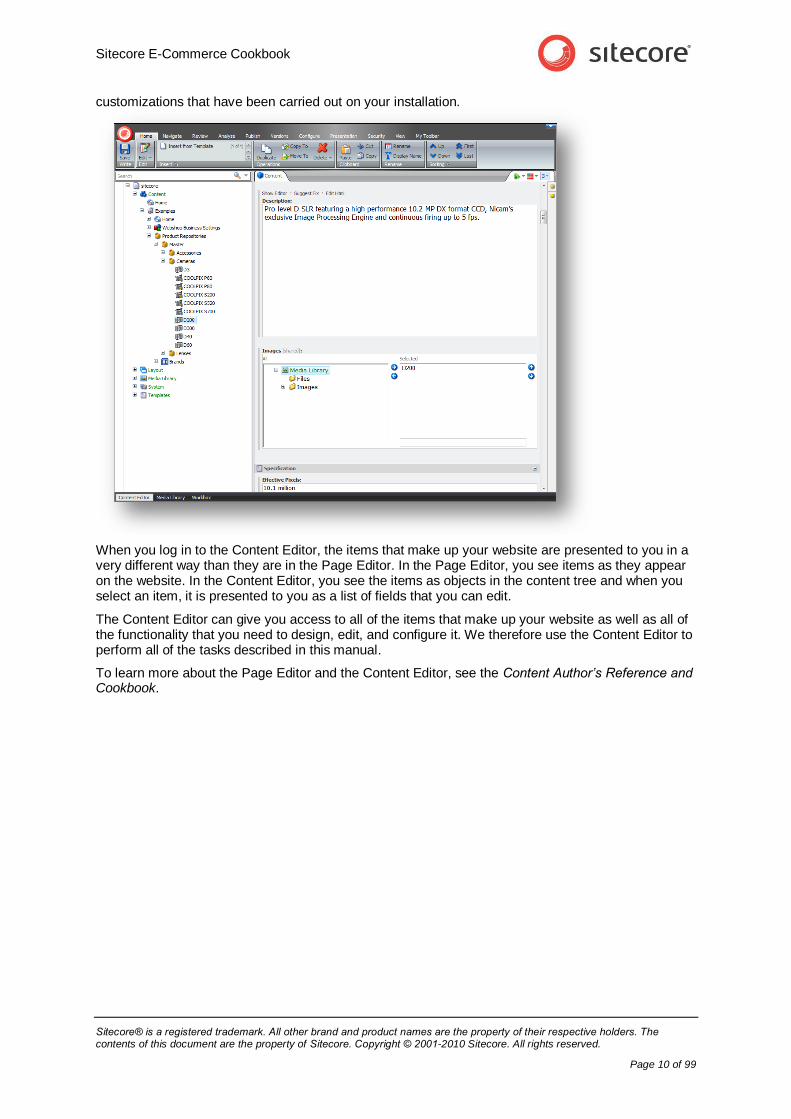
When you log in to the Content Editor, the items that make up your website are presented to you in a very different way than they are in the Page Editor. In the Page Editor, you see items as they appear on the website. In the Content Editor, you see the items as objects in the content tree and when you select an item, it is presented to you as a list of fields that you can edit.
The Content Editor can give you access to all of the items that make up your website as well as all of the functionality that you need to design, edit, and configure it. We therefore use the Content Editor to perform all of the tasks described in this manual.
To learn more about the Page Editor and the Content Editor, see the Content Author’s Reference and Cookbook.
Sitecore E-Commerce Fundamental Edition 1.0.1
Sitecore® is a registered trademark. All other brand and product names are the property of their respective holders. The contents of this document are the property of Sitecore. Copyright © 2001-2010 Sitecore. All rights reserved.
Page 11 of 99
Chapter 2
Managing the Product Portfolio
This chapter describes how to add products to Sitecore E-Commerce Fundamental Edition. You learn how to store the product information in Sitecore, as well as, how to categorize your products for display in a webshop, and how to edit the specification of individual products.
This chapter contains the following sections:
Product Information Management
Creating a Product Category
Adding Products to a Category
Editing a Product Item
Sitecore E-Commerce Cookbook
Sitecore® is a registered trademark. All other brand and product names are the property of their respective holders. The contents of this document are the property of Sitecore. Copyright © 2001-2010 Sitecore. All rights reserved.
Page 12 of 99
2.1 Product Information Management
Product Information Management or PIM refers to the processes and technologies that you use to manage the information about your products.
The Sitecore E-Commerce solution stores product information as items in the Sitecore content tree. You can add products manually or you can integrate the E-Commerce module with a back-end ERP system or data warehouse.
If you use a back-end system to manage your products, the way in which you add products depends largely on which back-end system you use. Explaining this integration is beyond the scope of this manual.
For more information about how to integrate Sitecore E-Commerce Fundamental Edition with your ERP system or data warehouse, consult you Sitecore partner.
2.1.1 Organizing Product Categories and Items
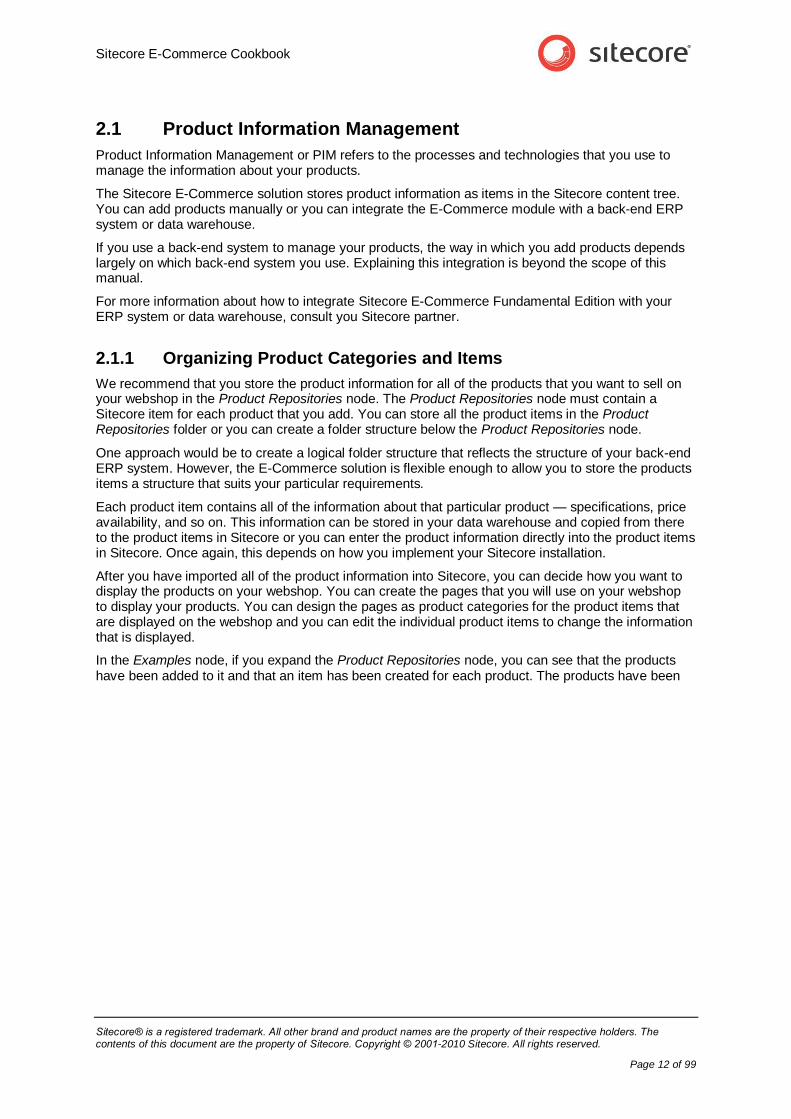
We recommend that you store the product information for all of the products that you want to sell on your webshop in the Product Repositories node. The Product Repositories node must contain a Sitecore item for each product that you add. You can store all the product items in the Product Repositories folder or you can create a folder structure below the Product Repositories node.
One approach would be to create a logical folder structure that reflects the structure of your back-end ERP system. However, the E-Commerce solution is flexible enough to allow you to store the products items a structure that suits your particular requirements.
Each product item contains all of the information about that particular product — specifications, price availability, and so on. This information can be stored in your data warehouse and copied from there to the product items in Sitecore or you can enter the product information directly into the product items in Sitecore. Once again, this depends on how you implement your Sitecore installation.
After you have imported all of the product information into Sitecore, you can decide how you want to display the products on your webshop. You can create the pages that you will use on your webshop to display your products. You can design the pages as product categories for the product items that are displayed on the webshop and you can edit the individual product items to change the information that is displayed.
In the Examples node, if you expand the Product Repositories node, you can see that the products have been added to it and that an item has been created for each product. The products have been
Sitecore E-Commerce Fundamental Edition 1.0.1
Sitecore® is a registered trademark. All other brand and product names are the property of their respective holders. The contents of this document are the property of Sitecore. Copyright © 2001-2010 Sitecore. All rights reserved.
Page 13 of 99
divided into three categories — Accessories, Cameras, and Lenses.
The Product Repositories node can contain any folder structure. You could replicate the structure of your back-end ERP system or create a completely different structure. Almost any type of configuration is possible.
2.1.2 Adding Products to Pages
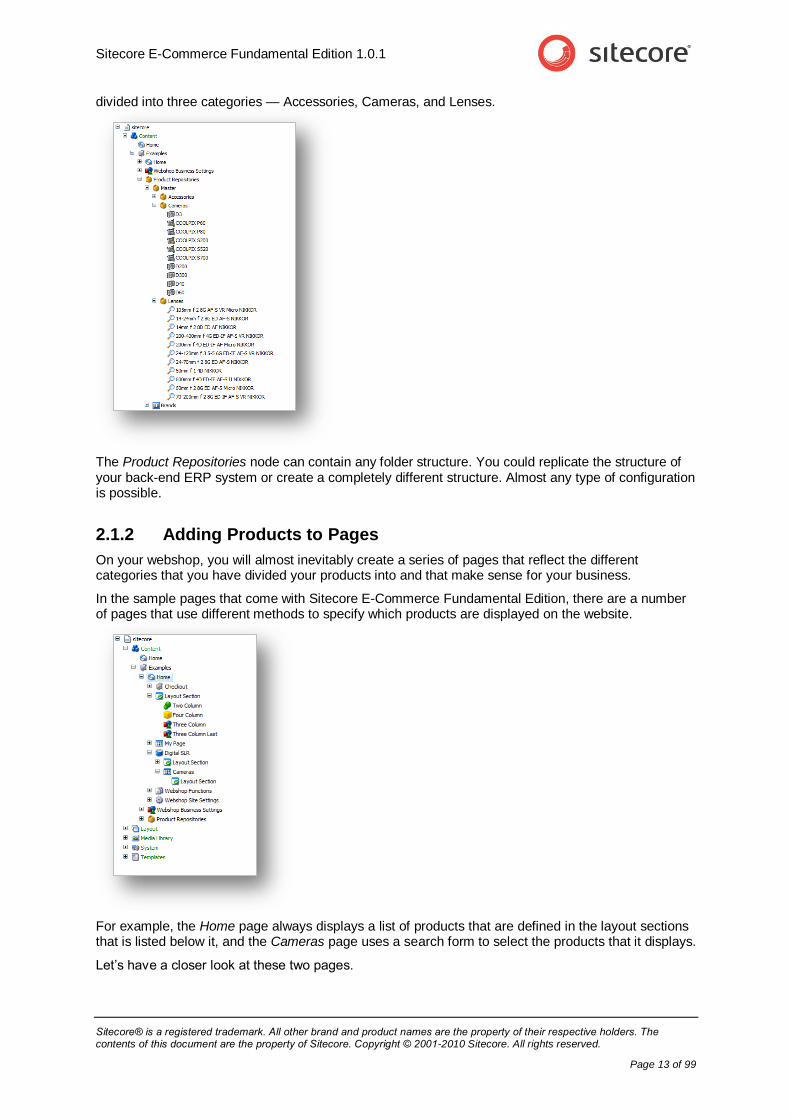
On your webshop, you will almost inevitably create a series of pages that reflect the different categories that you have divided your products into and that make sense for your business.
In the sample pages that come with Sitecore E-Commerce Fundamental Edition, there are a number of pages that use different methods to specify which products are displayed on the website.
For example, the Home page always displays a list of products that are defined in the layout sections that is listed below it, and the Cameras page uses a search form to select the products that it displays.
Let’s have a closer look at these two pages.
Sitecore E-Commerce Cookbook
Sitecore® is a registered trademark. All other brand and product names are the property of their respective holders. The contents of this document are the property of Sitecore. Copyright © 2001-2010 Sitecore. All rights reserved.
Page 14 of 99
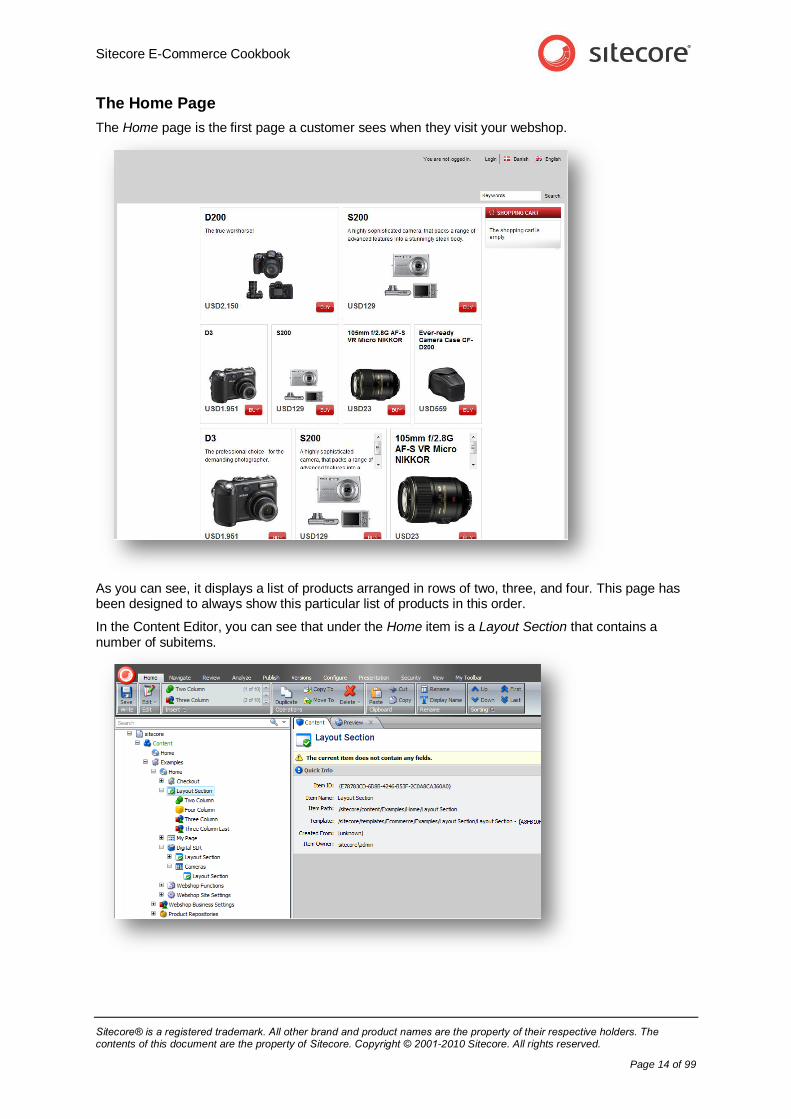
The Home Page
The Home page is the first page a customer sees when they visit your webshop.
As you can see, it displays a list of products arranged in rows of two, three, and four. This page has been designed to always show this particular list of products in this order.
In the Content Editor, you can see that under the Home item is a Layout Section that contains a number of subitems.
Sitecore E-Commerce Fundamental Edition 1.0.1
Sitecore® is a registered trademark. All other brand and product names are the property of their respective holders. The contents of this document are the property of Sitecore. Copyright © 2001-2010 Sitecore. All rights reserved.
Page 15 of 99
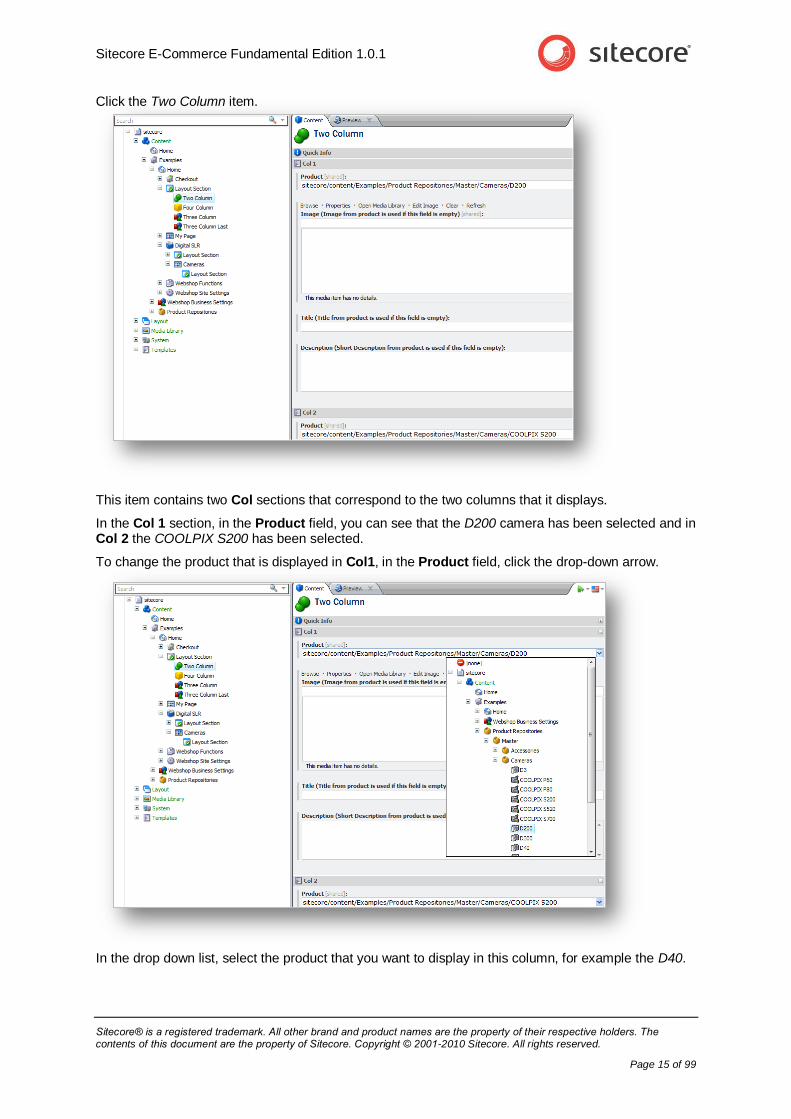
Click the Two Column item.
This item contains two Col sections that correspond to the two columns that it displays.
In the Col 1 section, in the Product field, you can see that the D200 camera has been selected and in Col 2 the COOLPIX S200 has been selected.
To change the product that is displayed in Col1, in the Product field, click the drop-down arrow.
In the drop down list, select the product that you want to display in this column, for example the D40.
Sitecore E-Commerce Cookbook
Sitecore® is a registered trademark. All other brand and product names are the property of their respective holders. The contents of this document are the property of Sitecore. Copyright © 2001-2010 Sitecore. All rights reserved.
Page 16 of 99
Note The drop-down can be configured to restrict access to specific nodes in the content tree. This might be applicable if a user only has responsibility for a particular line of products on a webshop.
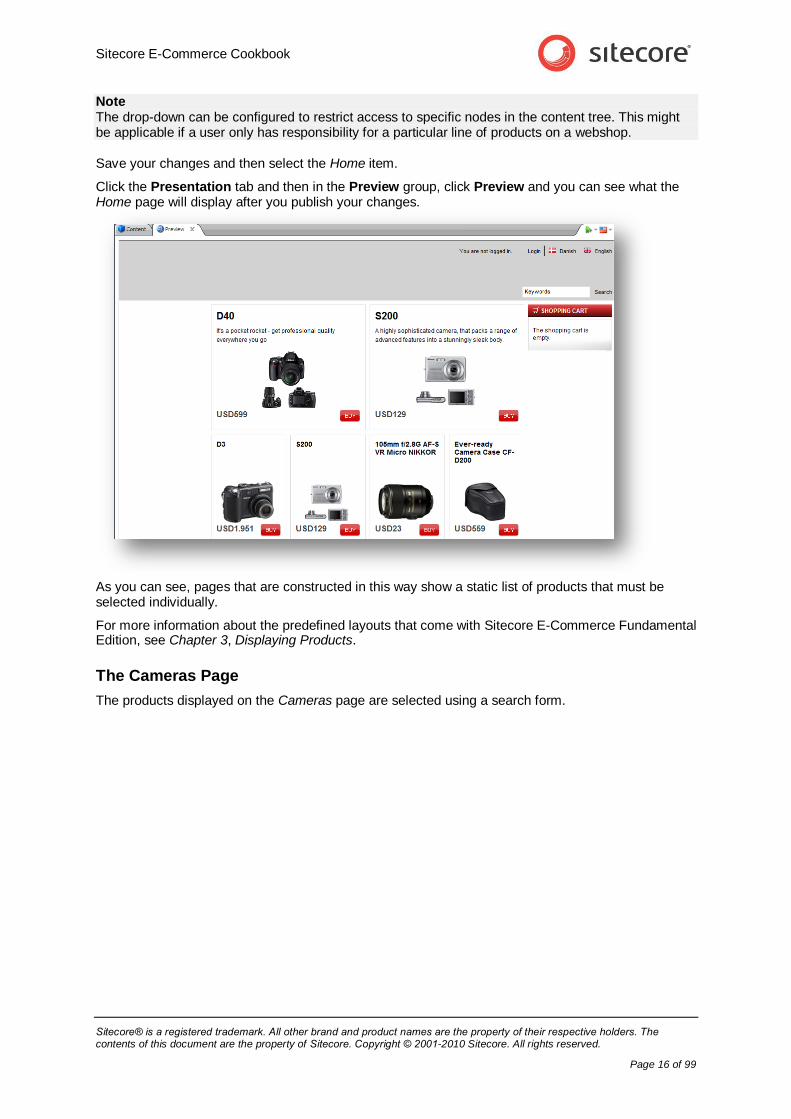
Save your changes and then select the Home item.
Click the Presentation tab and then in the Preview group, click Preview and you can see what the Home page will display after you publish your changes.
As you can see, pages that are constructed in this way show a static list of products that must be selected individually.
For more information about the predefined layouts that come with Sitecore E-Commerce Fundamental Edition, see Chapter 3, Displaying Products.
The Cameras Page
The products displayed on the Cameras page are selected using a search form.
Sitecore E-Commerce Fundamental Edition 1.0.1
Sitecore® is a registered trademark. All other brand and product names are the property of their respective holders. The contents of this document are the property of Sitecore. Copyright © 2001-2010 Sitecore. All rights reserved.
Page 17 of 99
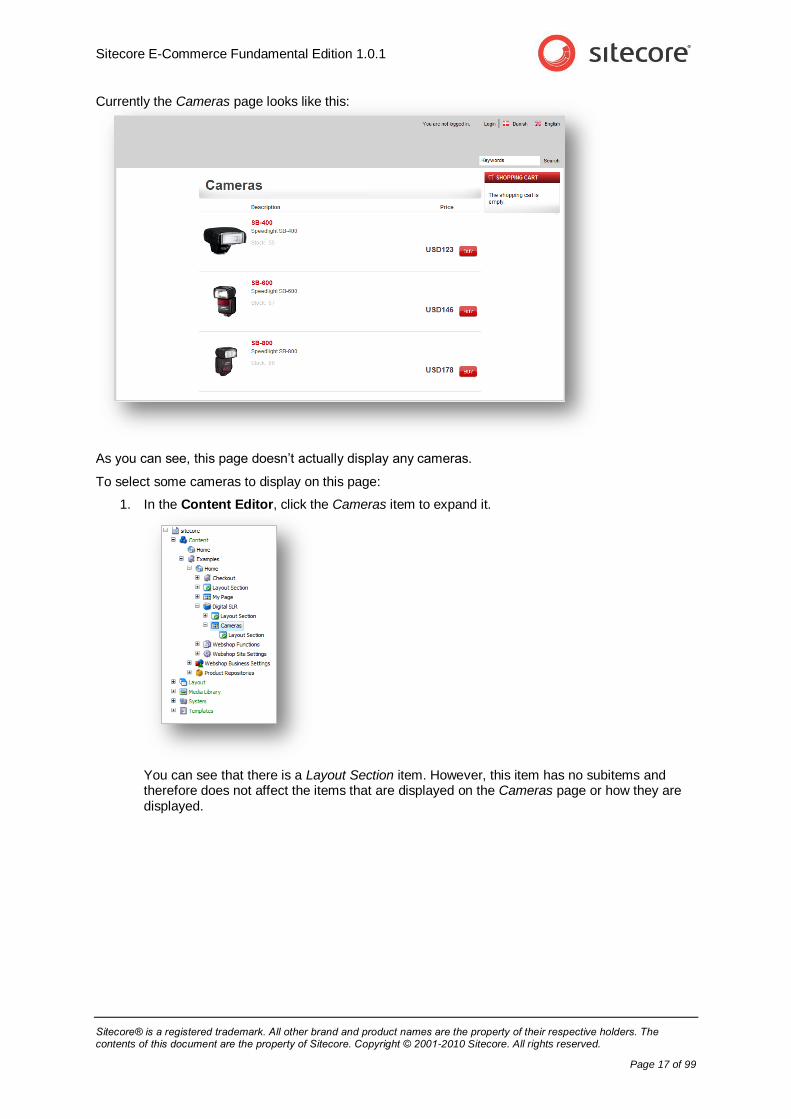
Currently the Cameras page looks like this:
As you can see, this page doesn’t actually display any cameras.
To select some cameras to display on this page:
1. In the Content Editor, click the Cameras item to expand it.
You can see that there is a Layout Section item. However, this item has no subitems and therefore does not affect the items that are displayed on the Cameras page or how they are displayed.
Sitecore E-Commerce Cookbook
Sitecore® is a registered trademark. All other brand and product names are the property of their respective holders. The contents of this document are the property of Sitecore. Copyright © 2001-2010 Sitecore. All rights reserved.
Page 18 of 99
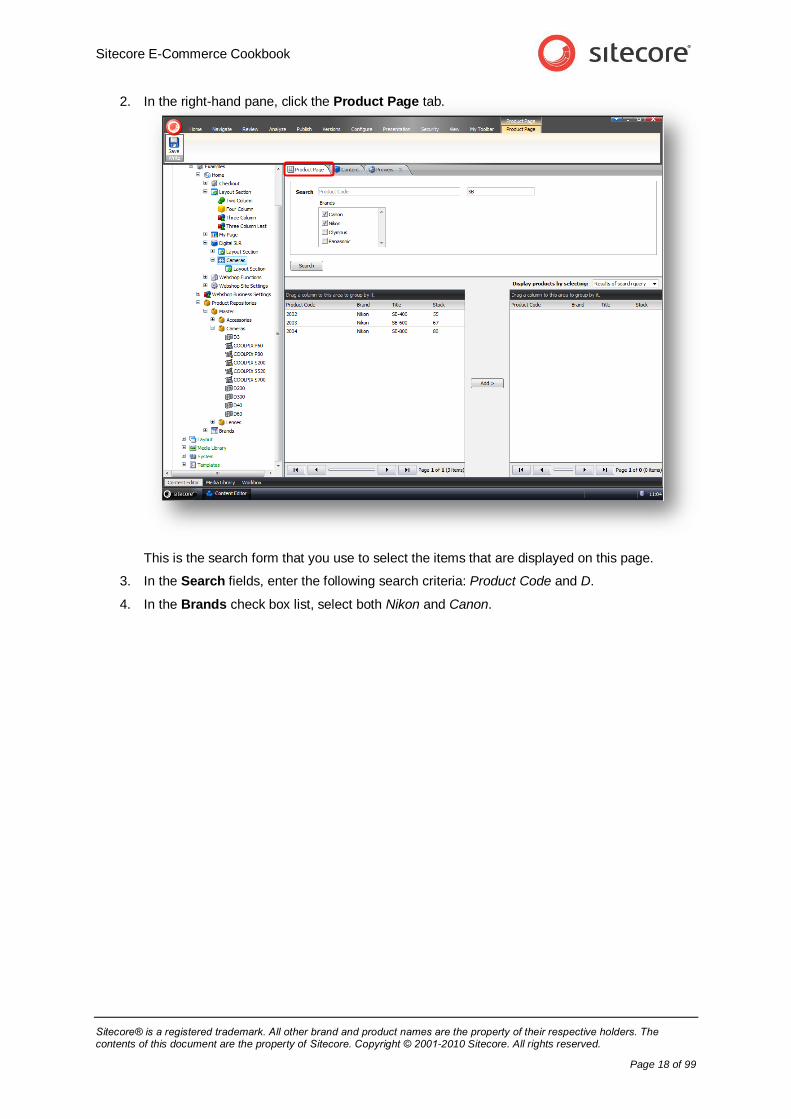
2. In the right-hand pane, click the Product Page tab.
This is the search form that you use to select the items that are displayed on this page.
3. In the Search fields, enter the following search criteria: Product Code and D.
4. In the Brands check box list, select both Nikon and Canon.
Sitecore E-Commerce Fundamental Edition 1.0.1
Sitecore® is a registered trademark. All other brand and product names are the property of their respective holders. The contents of this document are the property of Sitecore. Copyright © 2001-2010 Sitecore. All rights reserved.
Page 19 of 99
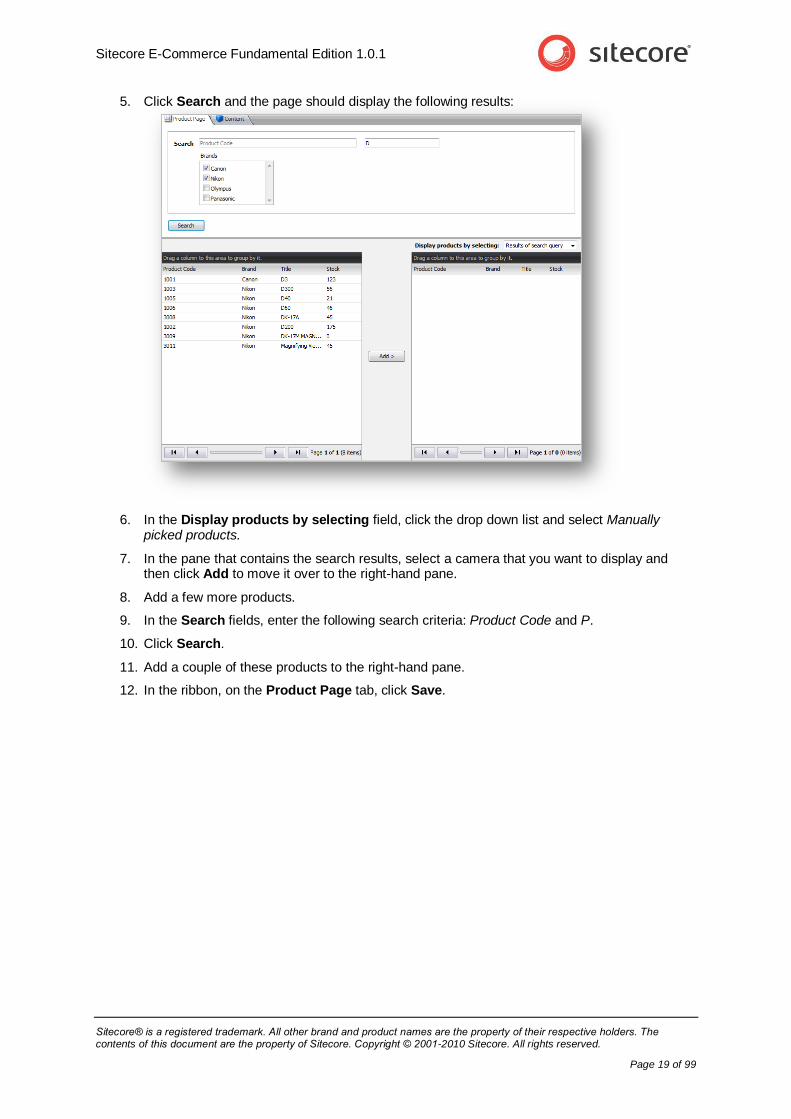
5. Click Search and the page should display the following results:
6. In the Display products by selecting field, click the drop down list and select Manually picked products.
7. In the pane that contains the search results, select a camera that you want to display and then click Add to move it over to the right-hand pane.
8. Add a few more products.
9. In the Search fields, enter the following search criteria: Product Code and P.
10. Click Search.
11. Add a couple of these products to the right-hand pane.
12. In the ribbon, on the Product Page tab, click Save.
Sitecore E-Commerce Cookbook
Sitecore® is a registered trademark. All other brand and product names are the property of their respective holders. The contents of this document are the property of Sitecore. Copyright © 2001-2010 Sitecore. All rights reserved.
Page 20 of 99
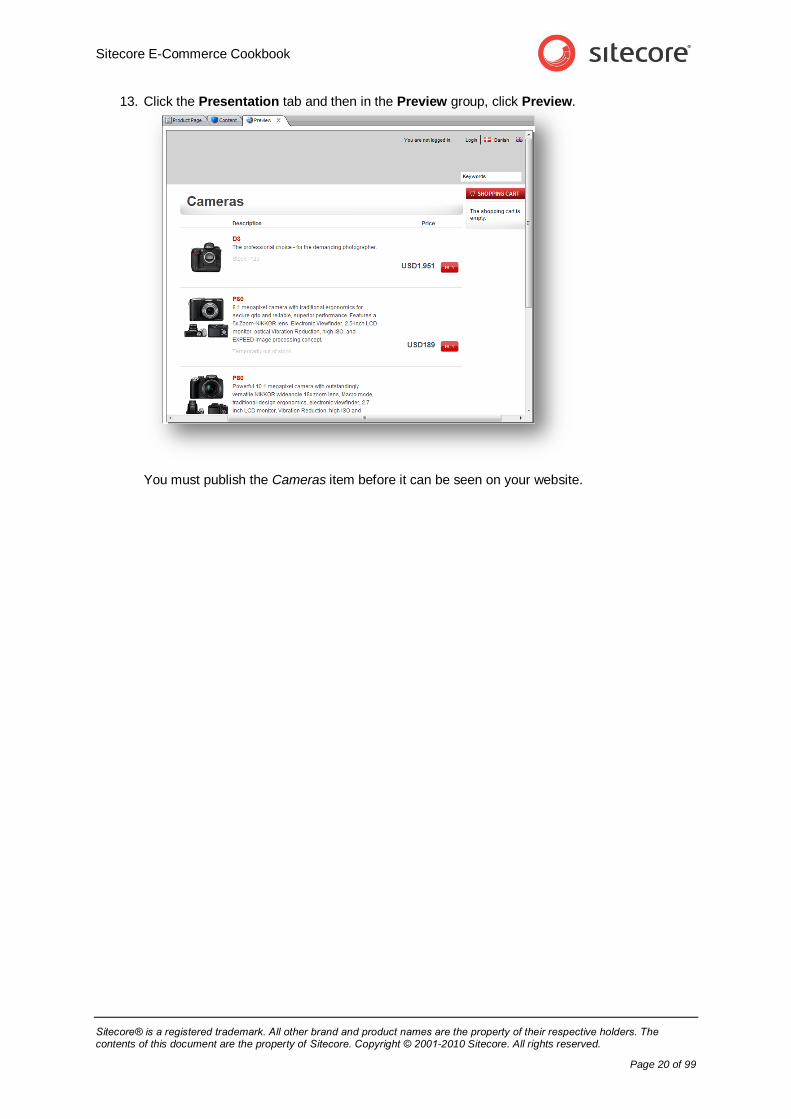
13. Click the Presentation tab and then in the Preview group, click Preview.
You must publish the Cameras item before it can be seen on your website.
Sitecore E-Commerce Fundamental Edition 1.0.1
Sitecore® is a registered trademark. All other brand and product names are the property of their respective holders. The contents of this document are the property of Sitecore. Copyright © 2001-2010 Sitecore. All rights reserved.
Page 21 of 99
2.2 Creating a Product Category
You will also need to create new product pages for your webshop. In this exercise, we have decided to add a new section to the webshop that highlights the products that are on special offer this month.
We therefore want to create a new category for these products.
To create a new product category:
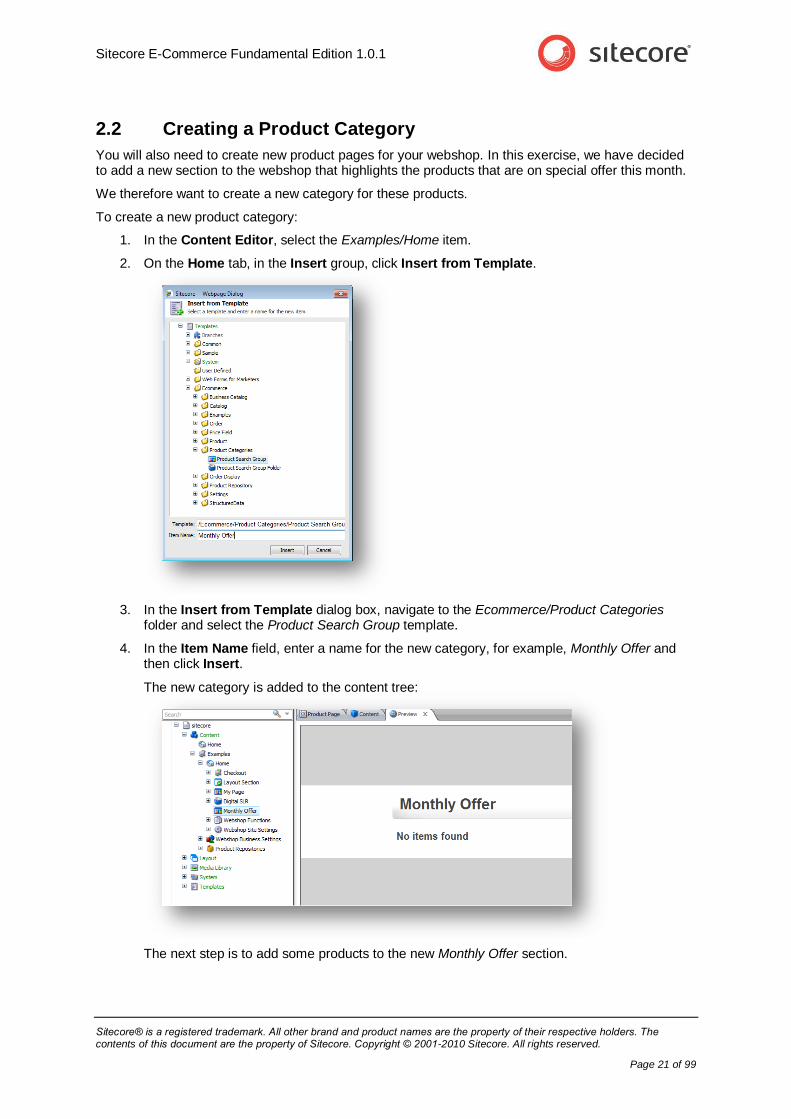
1. In the Content Editor, select the Examples/Home item.
2. On the Home tab, in the Insert group, click Insert from Template.
3. In the Insert from Template dialog box, navigate to the Ecommerce/Product Categories folder and select the Product Search Group template.
4. In the Item Name field, enter a name for the new category, for example, Monthly Offer and then click Insert.
The new category is added to the content tree:
The next step is to add some products to the new Monthly Offer section.
Sitecore E-Commerce Cookbook
Sitecore® is a registered trademark. All other brand and product names are the property of their respective holders. The contents of this document are the property of Sitecore. Copyright © 2001-2010 Sitecore. All rights reserved.
Page 22 of 99
2.3 Adding Products to a Category
In the Content Editor, you can see that the Monthly Offer product category contains a search form that you use to select the products to display in this category on your webshop.
To add products to the Monthly Offer category:
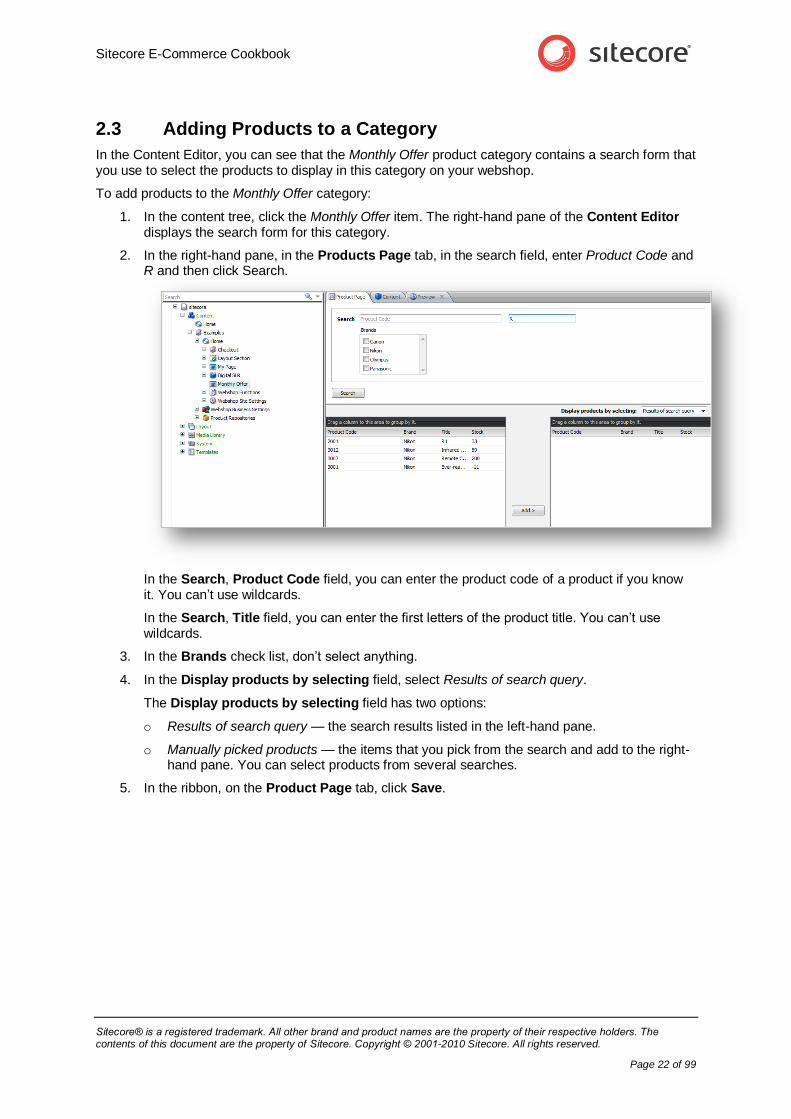
1. In the content tree, click the Monthly Offer item. The right-hand pane of the Content Editor displays the search form for this category.
2. In the right-hand pane, in the Products Page tab, in the search field, enter Product Code and R and then click Search.
In the Search, Product Code field, you can enter the product code of a product if you know it. You can’t use wildcards.
In the Search, Title field, you can enter the first letters of the product title. You can’t use wildcards.
3. In the Brands check list, don’t select anything.
4. In the Display products by selecting field, select Results of search query.
The Display products by selecting field has two options:
o Results of search query — the search results listed in the left-hand pane.
o Manually picked products — the items that you pick from the search and add to the right-hand pane. You can select products from several searches.
5. In the ribbon, on the Product Page tab, click Save.
Sitecore E-Commerce Fundamental Edition 1.0.1
Sitecore® is a registered trademark. All other brand and product names are the property of their respective holders. The contents of this document are the property of Sitecore. Copyright © 2001-2010 Sitecore. All rights reserved.
Page 23 of 99
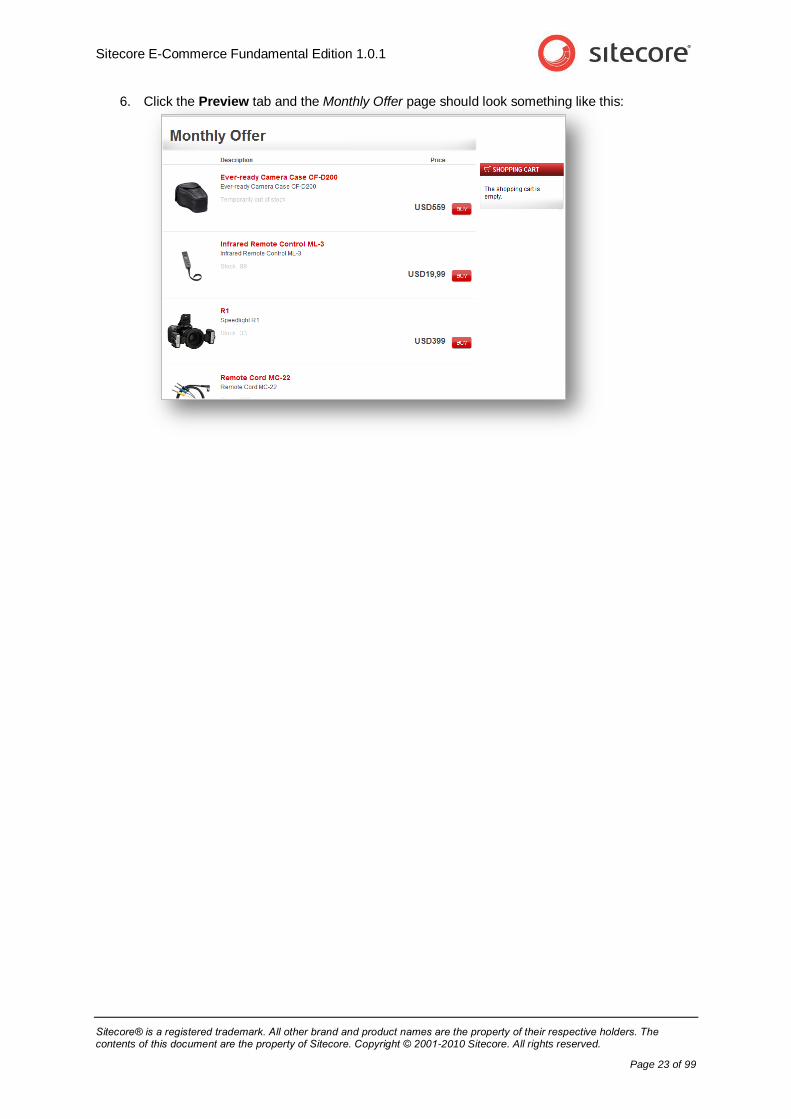
6. Click the Preview tab and the Monthly Offer page should look something like this:
Sitecore E-Commerce Cookbook
Sitecore® is a registered trademark. All other brand and product names are the property of their respective holders. The contents of this document are the property of Sitecore. Copyright © 2001-2010 Sitecore. All rights reserved.
Page 24 of 99
2.4 Editing a Product Item
After you import product information into the E-Commerce solution, you can edit the information contained in each product item. Each product item consists of several fields that contain information about the product. The sample pages contain cameras and photographic equipment and the fields that the product items contain reflect this.
In reality, the product item fields will vary from one implementation to another.
Note If you use a data warehouse or back-end system to manage the product information on your site you may not be able to edit the product items in Sitecore. This depends on how you have implemented your E-Commerce webshop and the level of integration security you have set.
To edit a product item:
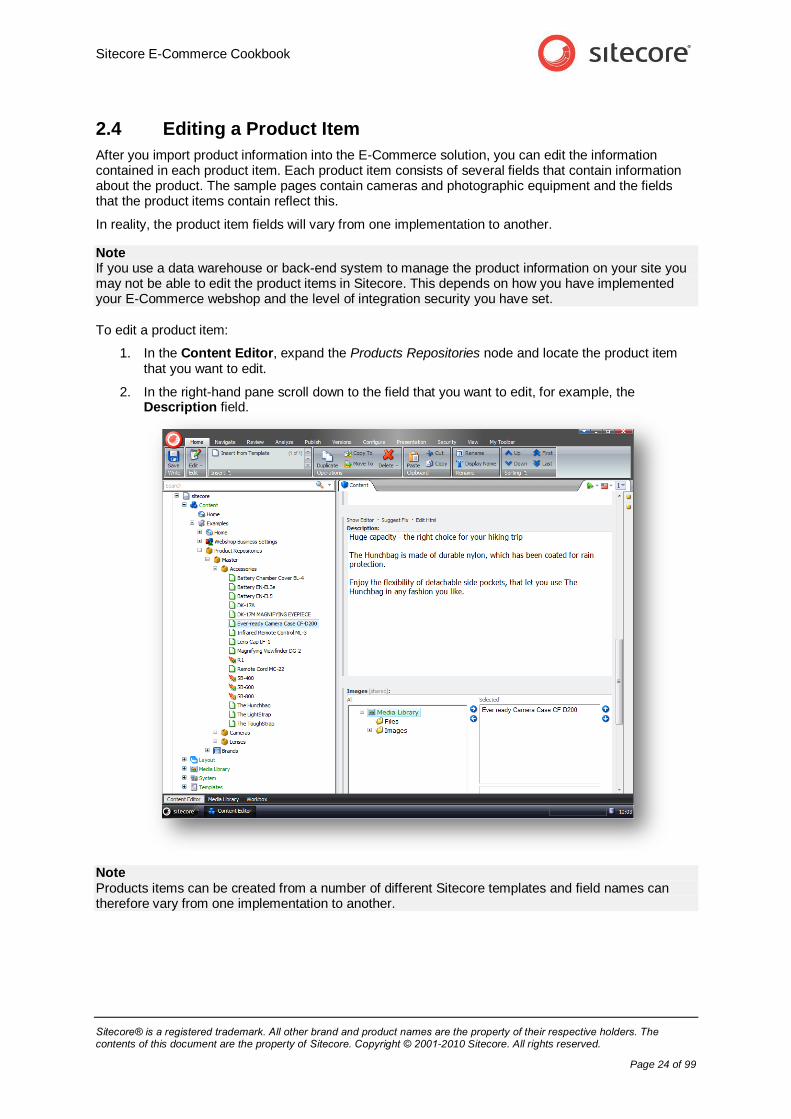
1. In the Content Editor, expand the Products Repositories node and locate the product item that you want to edit.
2. In the right-hand pane scroll down to the field that you want to edit, for example, the Description field.
Note Products items can be created from a number of different Sitecore templates and field names can therefore vary from one implementation to another.
Sitecore E-Commerce Fundamental Edition 1.0.1
Sitecore® is a registered trademark. All other brand and product names are the property of their respective holders. The contents of this document are the property of Sitecore. Copyright © 2001-2010 Sitecore. All rights reserved.
Page 25 of 99
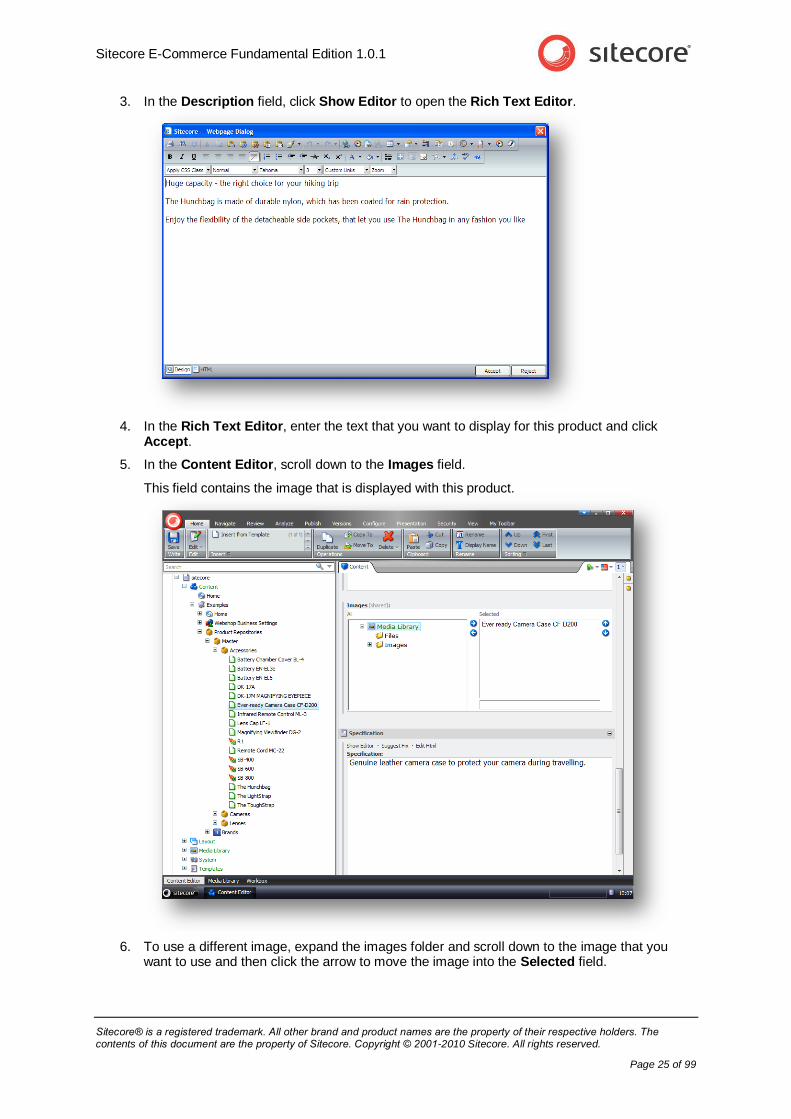
3. In the Description field, click Show Editor to open the Rich Text Editor.
4. In the Rich Text Editor, enter the text that you want to display for this product and click Accept.
5. In the Content Editor, scroll down to the Images field.
This field contains the image that is displayed with this product.
6. To use a different image, expand the images folder and scroll down to the image that you want to use and then click the arrow to move the image into the Selected field.
Sitecore E-Commerce Cookbook
Sitecore® is a registered trademark. All other brand and product names are the property of their respective holders. The contents of this document are the property of Sitecore. Copyright © 2001-2010 Sitecore. All rights reserved.
Page 26 of 99
This image must be available in the Media Library. If the image is not in the Media Library, you must upload it before you can display it in the product item.
To upload an image to the Media Library:
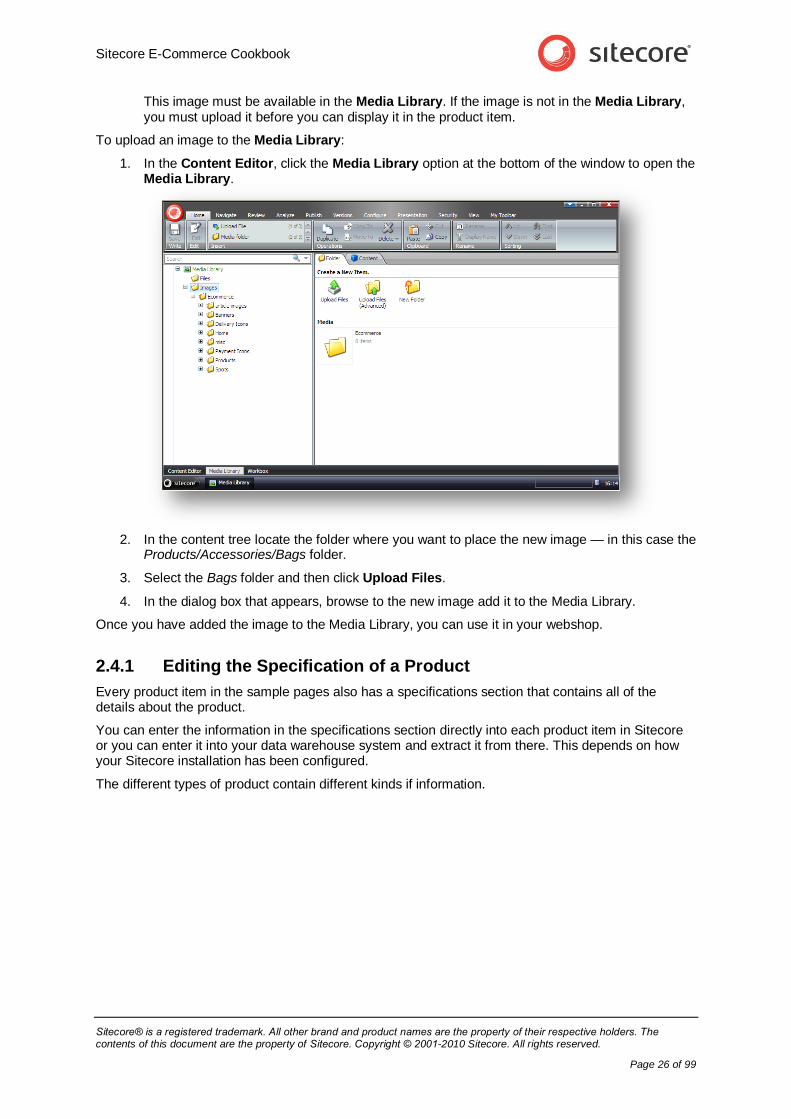
1. In the Content Editor, click the Media Library option at the bottom of the window to open the Media Library.
2. In the content tree locate the folder where you want to place the new image — in this case the Products/Accessories/Bags folder.
3. Select the Bags folder and then click Upload Files.
4. In the dialog box that appears, browse to the new image add it to the Media Library.
Once you have added the image to the Media Library, you can use it in your webshop.
2.4.1 Editing the Specification of a Product
Every product item in the sample pages also has a specifications section that contains all of the details about the product.
You can enter the information in the specifications section directly into each product item in Sitecore or you can enter it into your data warehouse system and extract it from there. This depends on how your Sitecore installation has been configured.
The different types of product contain different kinds if information.
Sitecore E-Commerce Fundamental Edition 1.0.1
Sitecore® is a registered trademark. All other brand and product names are the property of their respective holders. The contents of this document are the property of Sitecore. Copyright © 2001-2010 Sitecore. All rights reserved.
Page 27 of 99
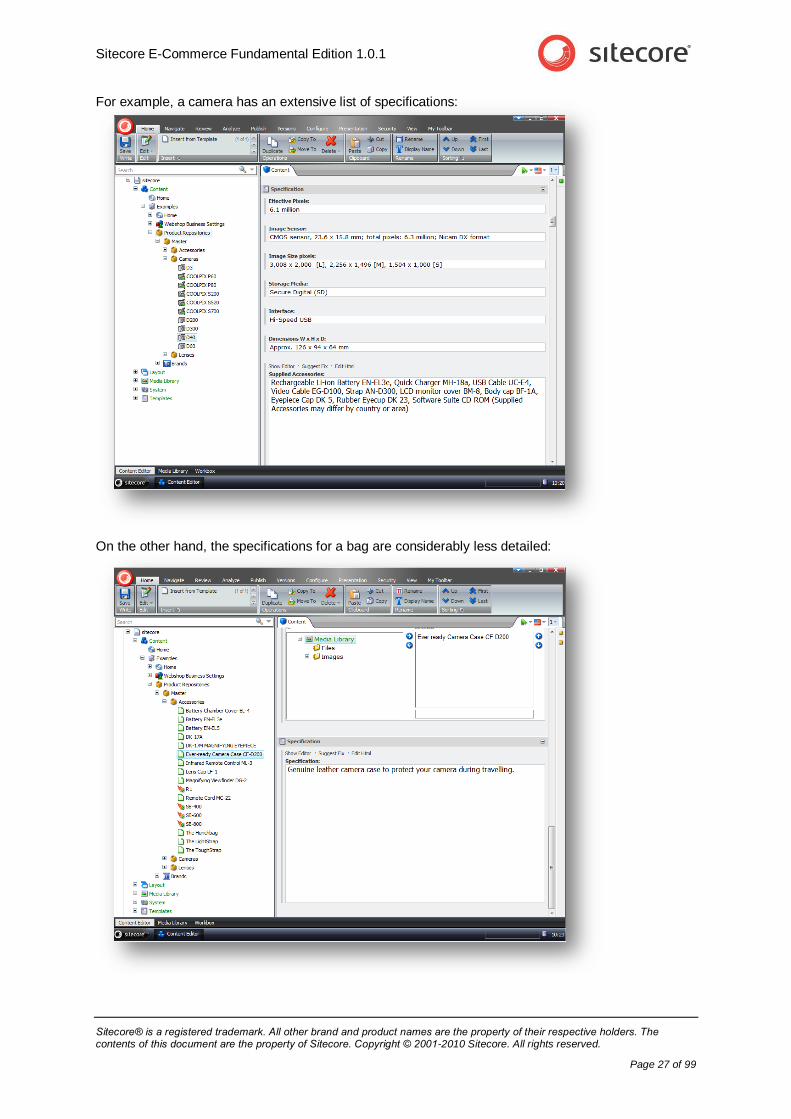
For example, a camera has an extensive list of specifications:
On the other hand, the specifications for a bag are considerably less detailed:
Sitecore E-Commerce Cookbook
Sitecore® is a registered trademark. All other brand and product names are the property of their respective holders. The contents of this document are the property of Sitecore. Copyright © 2001-2010 Sitecore. All rights reserved.
Page 28 of 99
Chapter 3
Displaying Products
This chapter gives you an overview of layout sections and explains how you can use them in Sitecore E-Commerce Fundamental Edition to display and promote your products. It also includes step-by-step instructions on how to add layouts to a webshop.
This chapter contains the following sections:
Configuring Layout Sections
Editing Layouts
Sitecore E-Commerce Fundamental Edition 1.0.1
Sitecore® is a registered trademark. All other brand and product names are the property of their respective holders. The contents of this document are the property of Sitecore. Copyright © 2001-2010 Sitecore. All rights reserved.
Page 29 of 99
3.1 Configuring Layout Sections
Sitecore E-Commerce Fundamental Edition comes with a standard way of presenting content called layouts. Layouts give you more control over how you display your products and product categories.
You can use layouts on the home page and in product categories to promote products using images and other media, such as Flash or rotating banners. If you are using the E-Commerce solution and the Sitecore OMS, you will find this functionality particularly powerful when creating campaigns to promote a particular range of products. For example, you can use layouts in MV tests to make campaign landing pages more effective or as a way of presenting end user personalization.
3.1.1 Overview
Layouts are Sitecore templates that give your products home page and product category sections a pre-defined appearance. Each layout template item has several fields containing text and images. In the sample pages there are several standard layouts that allow you to display two or more products together with some text on the same page.
On your webshop you can use as many layout sections as you like, create new layouts, and configure them in any way you choose. Layouts are flexible and fully customizable.
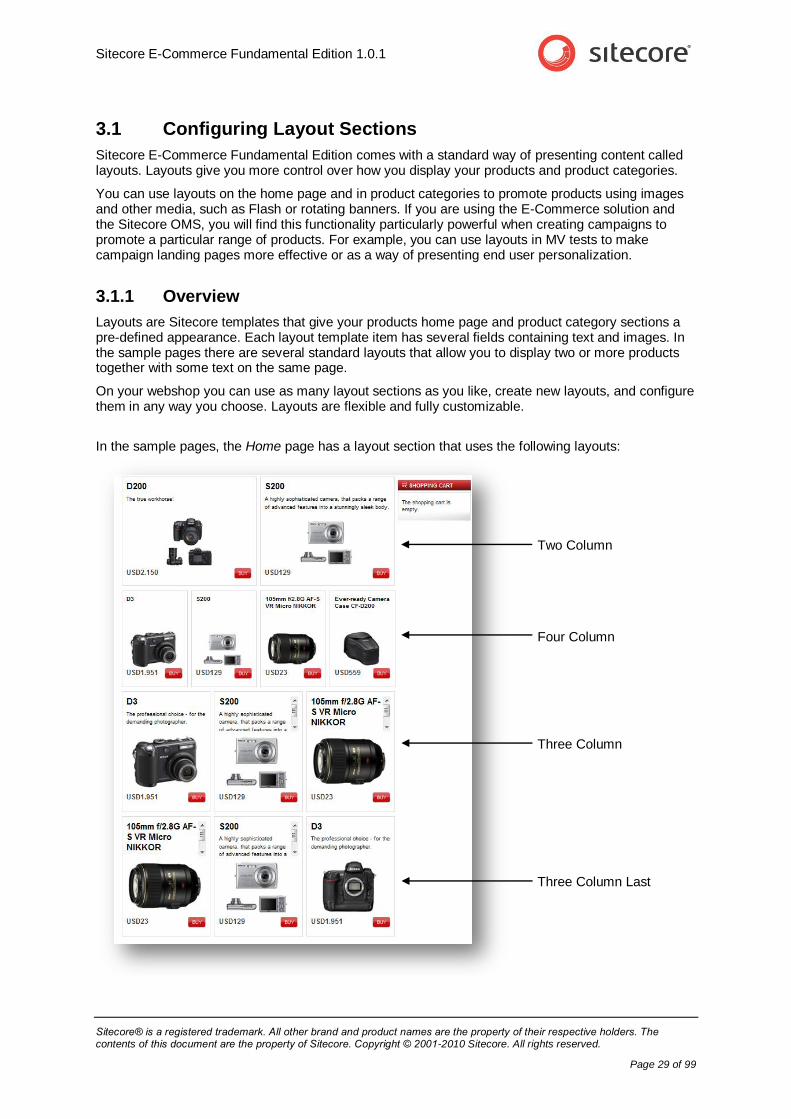
In the sample pages, the Home page has a layout section that uses the following layouts:
Two Column Four Column Three Column Three Column Last
Sitecore E-Commerce Cookbook
Sitecore® is a registered trademark. All other brand and product names are the property of their respective holders. The contents of this document are the property of Sitecore. Copyright © 2001-2010 Sitecore. All rights reserved.
Page 30 of 99
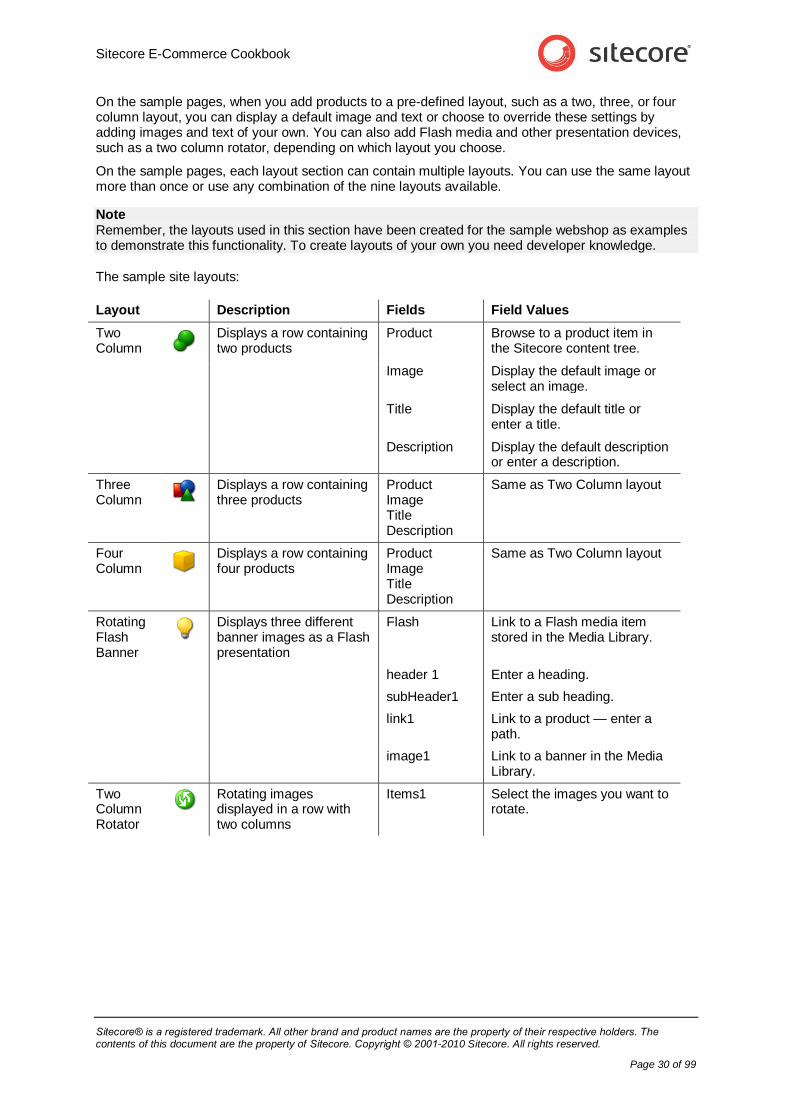
On the sample pages, when you add products to a pre-defined layout, such as a two, three, or four column layout, you can display a default image and text or choose to override these settings by adding images and text of your own. You can also add Flash media and other presentation devices, such as a two column rotator, depending on which layout you choose.
On the sample pages, each layout section can contain multiple layouts. You can use the same layout more than once or use any combination of the nine layouts available.
Note Remember, the layouts used in this section have been created for the sample webshop as examples to demonstrate this functionality. To create layouts of your own you need developer knowledge.
The sample site layouts:
Layout Description Fields Field Values
Two Column
Displays a row containing two products
Product Browse to a product item in the Sitecore content tree.
Image Display the default image or select an image.
Title Display the default title or enter a title.
Description Display the default description or enter a description.
Three Column
Displays a row containing three products
Product Image Title Description
Same as Two Column layout
Four Column
Displays a row containing four products
Product Image Title Description
Same as Two Column layout
Rotating Flash Banner
Displays three different banner images as a Flash presentation
Flash Link to a Flash media item stored in the Media Library.
header 1 Enter a heading.
subHeader1 Enter a sub heading.
link1 Link to a product — enter a path.
image1 Link to a banner in the Media Library.
Two Column Rotator
Rotating images displayed in a row with two columns
Items1 Select the images you want to rotate.
Sitecore E-Commerce Fundamental Edition 1.0.1
Sitecore® is a registered trademark. All other brand and product names are the property of their respective holders. The contents of this document are the property of Sitecore. Copyright © 2001-2010 Sitecore. All rights reserved.
Page 31 of 99
Layout Description Fields Field Values
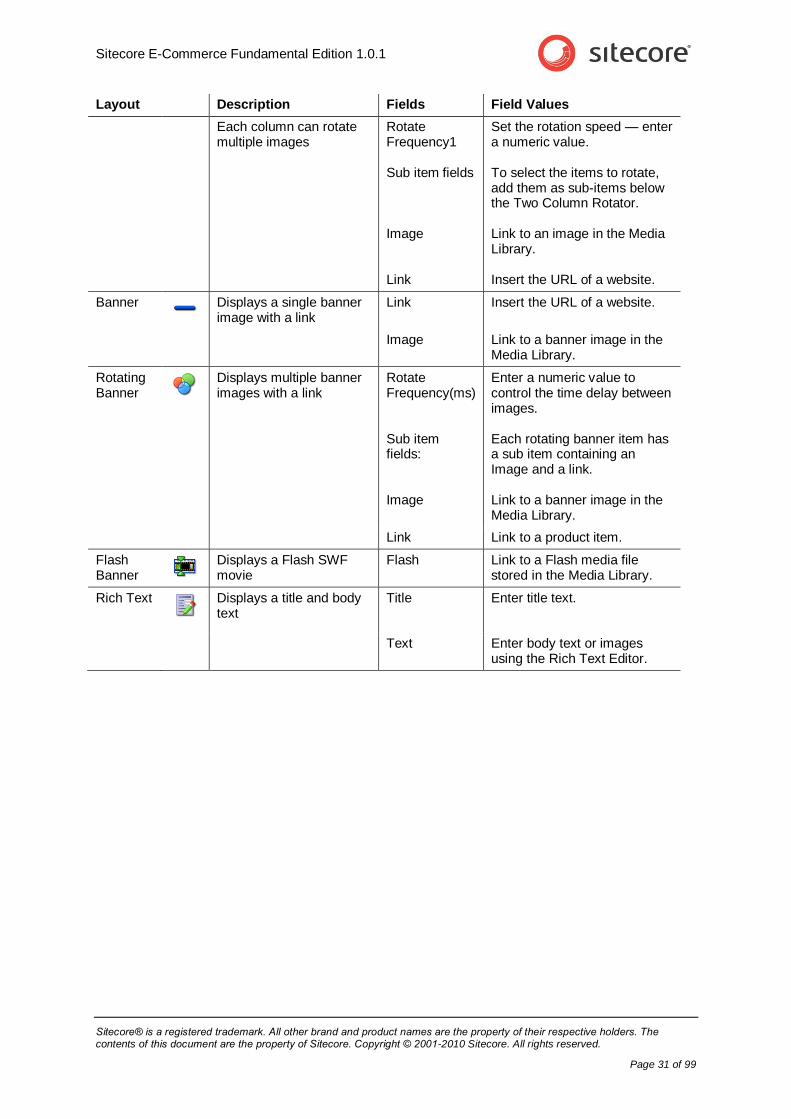
Each column can rotate multiple images
Rotate Frequency1 Sub item fields Image Link
Set the rotation speed — enter a numeric value. To select the items to rotate, add them as sub-items below the Two Column Rotator. Link to an image in the Media Library. Insert the URL of a website.
Banner
Displays a single banner image with a link
Link Insert the URL of a website.
Image Link to a banner image in the Media Library.
Rotating Banner
Displays multiple banner images with a link
Rotate Frequency(ms) Sub item fields: Image
Enter a numeric value to control the time delay between images. Each rotating banner item has a sub item containing an Image and a link. Link to a banner image in the Media Library.
Link Link to a product item.
Flash Banner
Displays a Flash SWF movie
Flash Link to a Flash media file stored in the Media Library.
Rich Text
Displays a title and body text
Title
Enter title text.
Text Enter body text or images using the Rich Text Editor.
Sitecore E-Commerce Cookbook
Sitecore® is a registered trademark. All other brand and product names are the property of their respective holders. The contents of this document are the property of Sitecore. Copyright © 2001-2010 Sitecore. All rights reserved.
Page 32 of 99
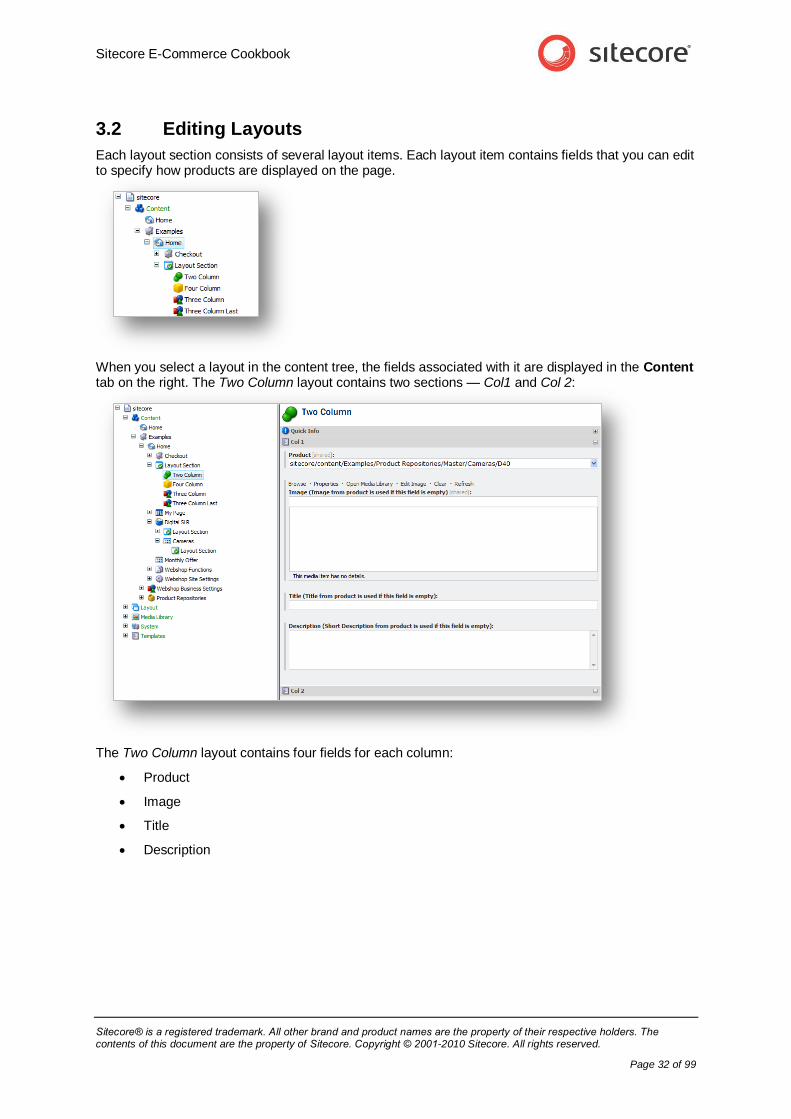
3.2 Editing Layouts
Each layout section consists of several layout items. Each layout item contains fields that you can edit to specify how products are displayed on the page.
When you select a layout in the content tree, the fields associated with it are displayed in the Content tab on the right. The Two Column layout contains two sections — Col1 and Col 2:
The Two Column layout contains four fields for each column:
Product
Image
Title
Description
Sitecore E-Commerce Fundamental Edition 1.0.1
Sitecore® is a registered trademark. All other brand and product names are the property of their respective holders. The contents of this document are the property of Sitecore. Copyright © 2001-2010 Sitecore. All rights reserved.
Page 33 of 99
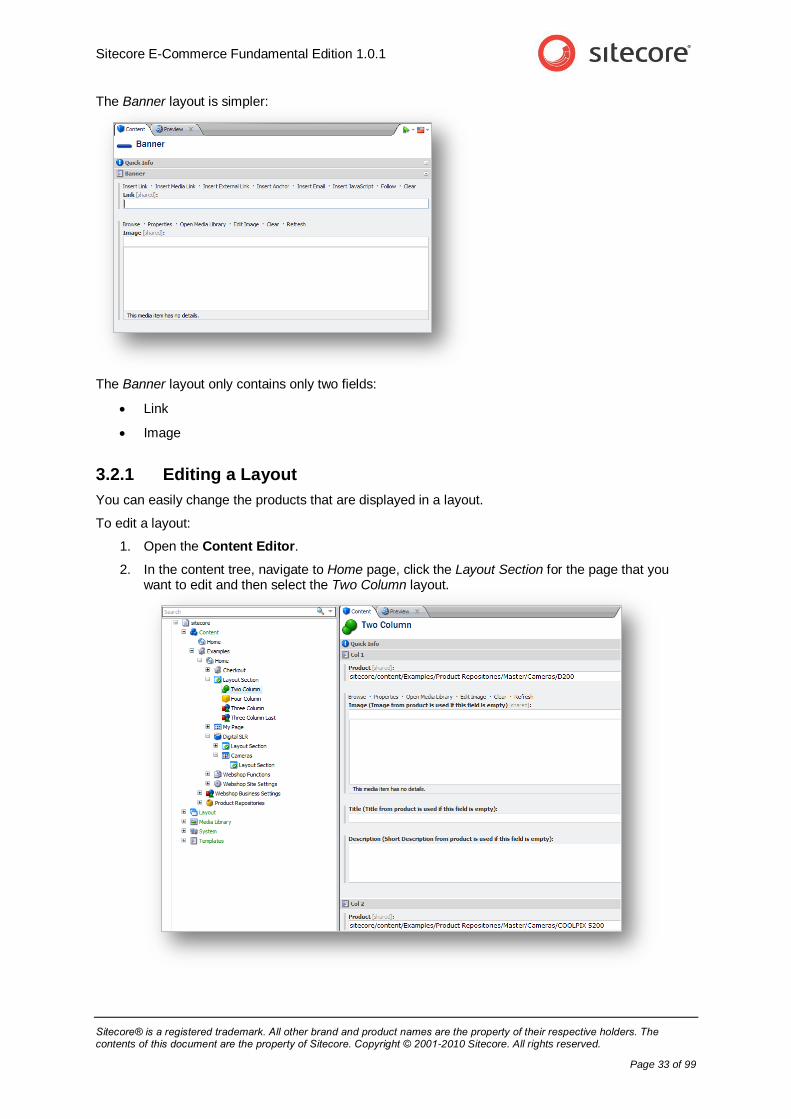
The Banner layout is simpler:
The Banner layout only contains only two fields:
Link
Image
3.2.1 Editing a Layout
You can easily change the products that are displayed in a layout.
To edit a layout:
1. Open the Content Editor.
2. In the content tree, navigate to Home page, click the Layout Section for the page that you want to edit and then select the Two Column layout.
Sitecore E-Commerce Cookbook
Sitecore® is a registered trademark. All other brand and product names are the property of their respective holders. The contents of this document are the property of Sitecore. Copyright © 2001-2010 Sitecore. All rights reserved.
Page 34 of 99
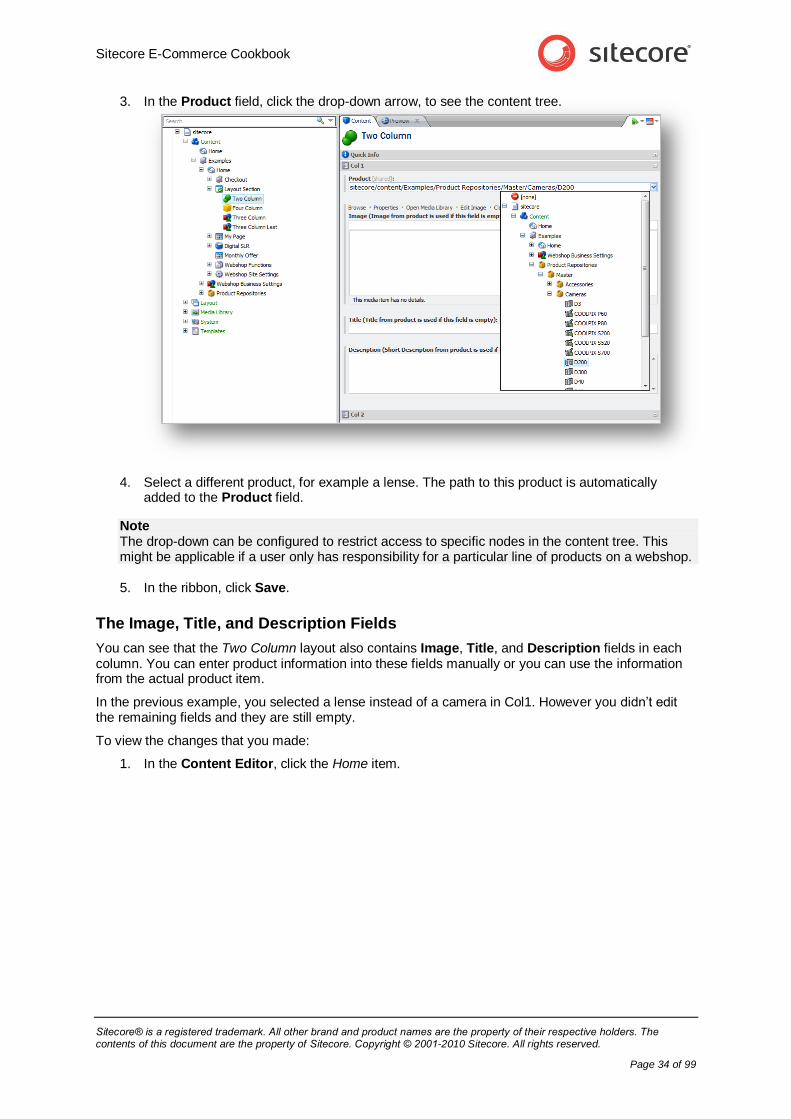
3. In the Product field, click the drop-down arrow, to see the content tree.
4. Select a different product, for example a lense. The path to this product is automatically added to the Product field.
Note The drop-down can be configured to restrict access to specific nodes in the content tree. This might be applicable if a user only has responsibility for a particular line of products on a webshop.
5. In the ribbon, click Save.
The Image, Title, and Description Fields
You can see that the Two Column layout also contains Image, Title, and Description fields in each column. You can enter product information into these fields manually or you can use the information from the actual product item.
In the previous example, you selected a lense instead of a camera in Col1. However you didn’t edit the remaining fields and they are still empty.
To view the changes that you made:
1. In the Content Editor, click the Home item.
Sitecore E-Commerce Fundamental Edition 1.0.1
Sitecore® is a registered trademark. All other brand and product names are the property of their respective holders. The contents of this document are the property of Sitecore. Copyright © 2001-2010 Sitecore. All rights reserved.
Page 35 of 99
2. Click the Presentation tab and then in the Preview group, click Preview.
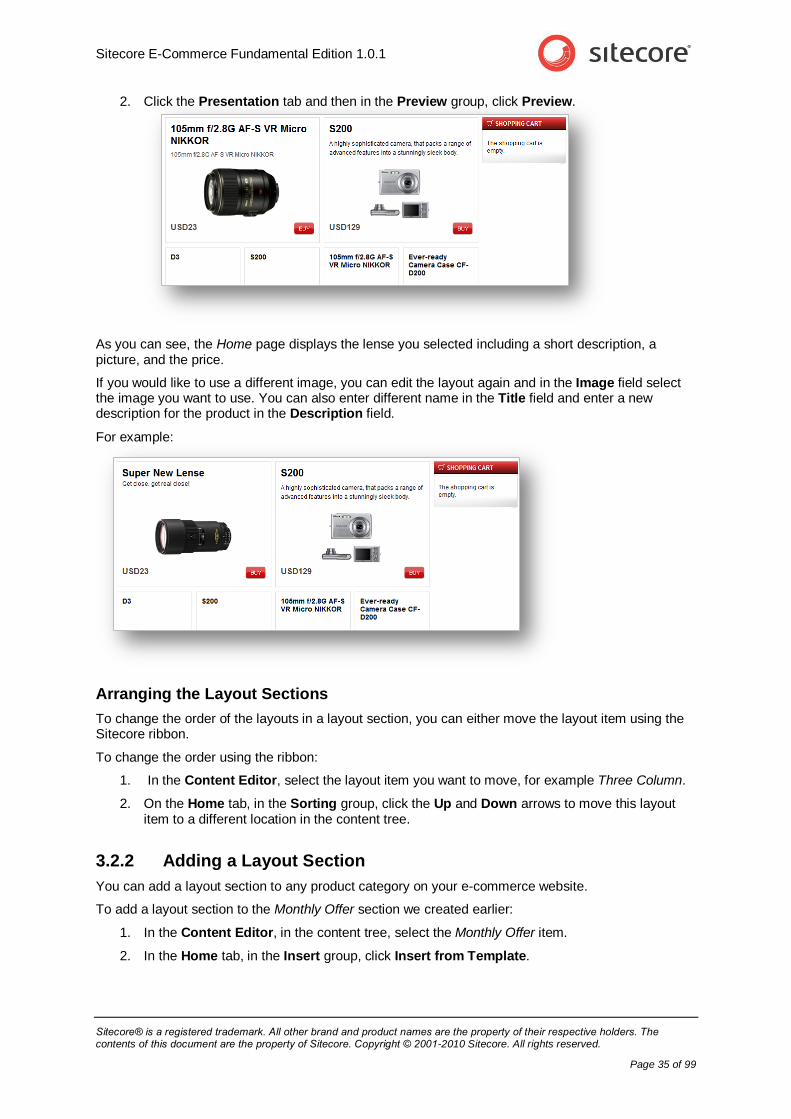
As you can see, the Home page displays the lense you selected including a short description, a picture, and the price.
If you would like to use a different image, you can edit the layout again and in the Image field select the image you want to use. You can also enter different name in the Title field and enter a new description for the product in the Description field.
For example:
Arranging the Layout Sections
To change the order of the layouts in a layout section, you can either move the layout item using the Sitecore ribbon.
To change the order using the ribbon:
1. In the Content Editor, select the layout item you want to move, for example Three Column.
2. On the Home tab, in the Sorting group, click the Up and Down arrows to move this layout item to a different location in the content tree.
3.2.2 Adding a Layout Section
You can add a layout section to any product category on your e-commerce website.
To add a layout section to the Monthly Offer section we created earlier:
1. In the Content Editor, in the content tree, select the Monthly Offer item.
2. In the Home tab, in the Insert group, click Insert from Template.
Sitecore E-Commerce Cookbook
Sitecore® is a registered trademark. All other brand and product names are the property of their respective holders. The contents of this document are the property of Sitecore. Copyright © 2001-2010 Sitecore. All rights reserved.
Page 36 of 99
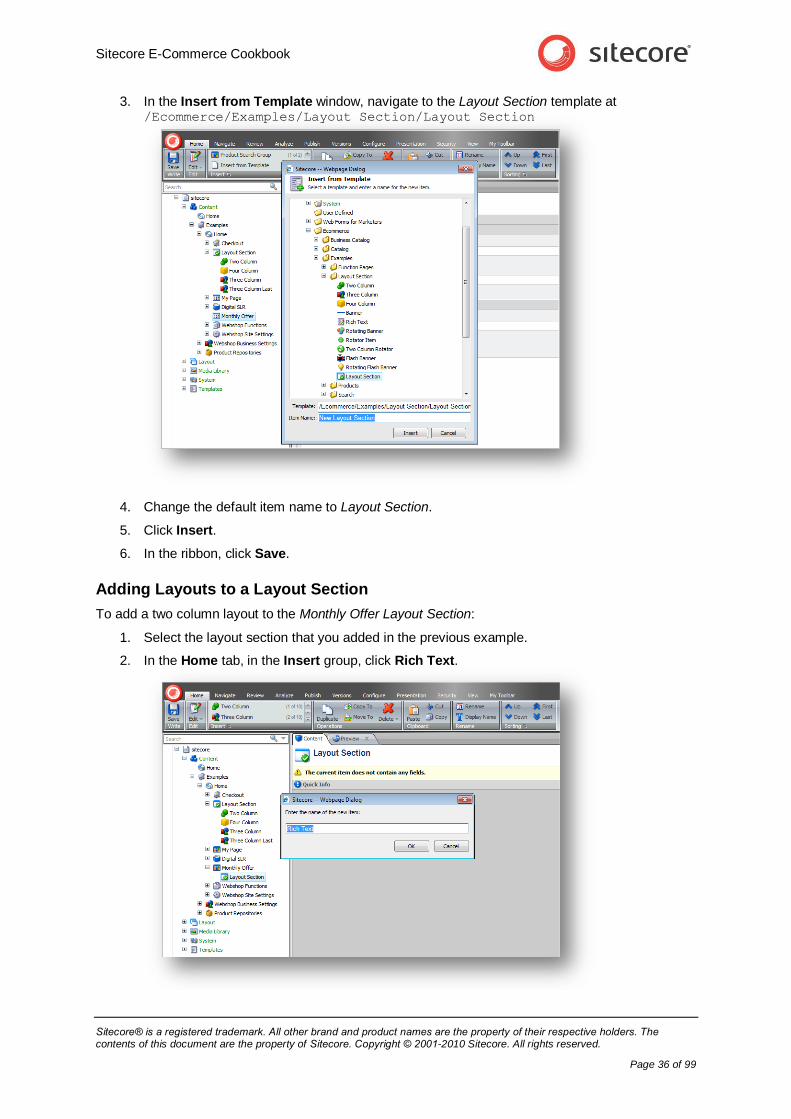
3. In the Insert from Template window, navigate to the Layout Section template at /Ecommerce/Examples/Layout Section/Layout Section
4. Change the default item name to Layout Section.
5. Click Insert.
6. In the ribbon, click Save.
Adding Layouts to a Layout Section
To add a two column layout to the Monthly Offer Layout Section:
1. Select the layout section that you added in the previous example.
2. In the Home tab, in the Insert group, click Rich Text.
Sitecore E-Commerce Fundamental Edition 1.0.1
Sitecore® is a registered trademark. All other brand and product names are the property of their respective holders. The contents of this document are the property of Sitecore. Copyright © 2001-2010 Sitecore. All rights reserved.
Page 37 of 99
In the E-Commerce solution, all of the available layout templates are displayed in the Insert group when you select a layout section.
3. Click OK to accept the default name Rich Text.
4. In the Title field of the Rich Text layout item, enter Monthly Offer.
5. In the Text field, enter the following text:
The Hunchbag is on special offer this month!
To take advantage of this offer, remember to create a new customer account.
Click here.
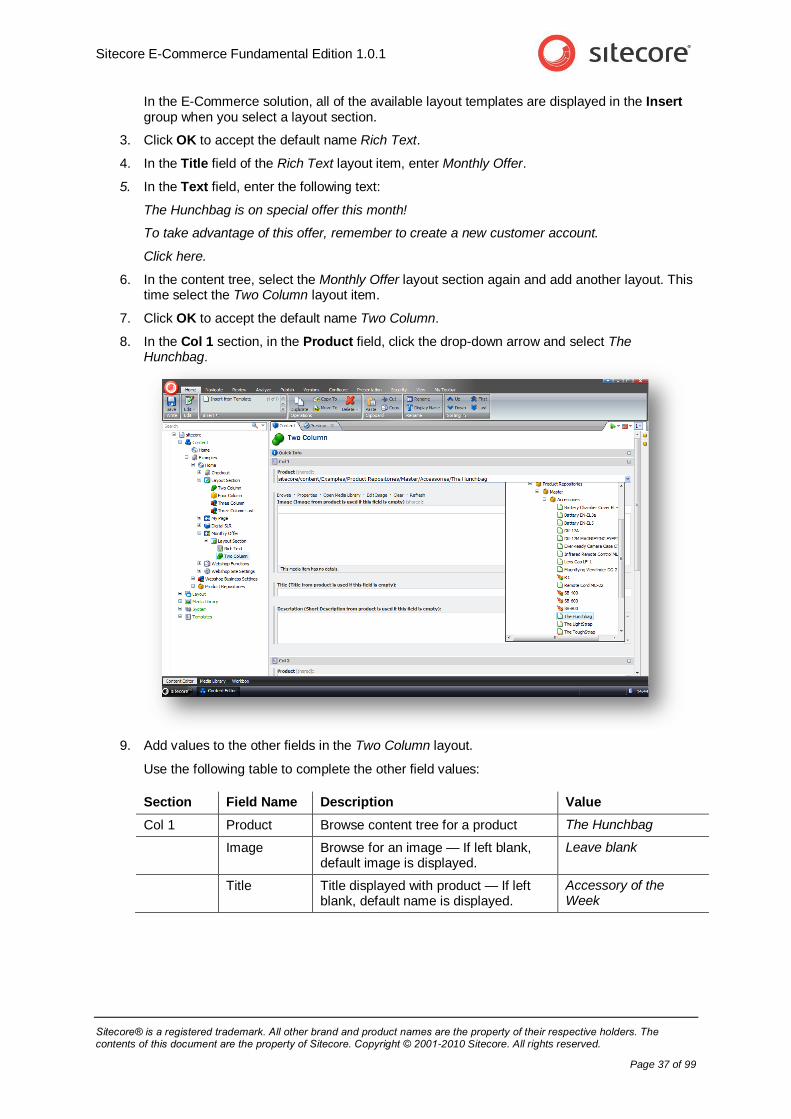
6. In the content tree, select the Monthly Offer layout section again and add another layout. This time select the Two Column layout item.
7. Click OK to accept the default name Two Column.
8. In the Col 1 section, in the Product field, click the drop-down arrow and select The Hunchbag.
9. Add values to the other fields in the Two Column layout.
Use the following table to complete the other field values:
Section Field Name Description Value
Col 1 Product Browse content tree for a product The Hunchbag
Image Browse for an image — If left blank, default image is displayed.
Leave blank
Title Title displayed with product — If left blank, default name is displayed.
Accessory of the Week
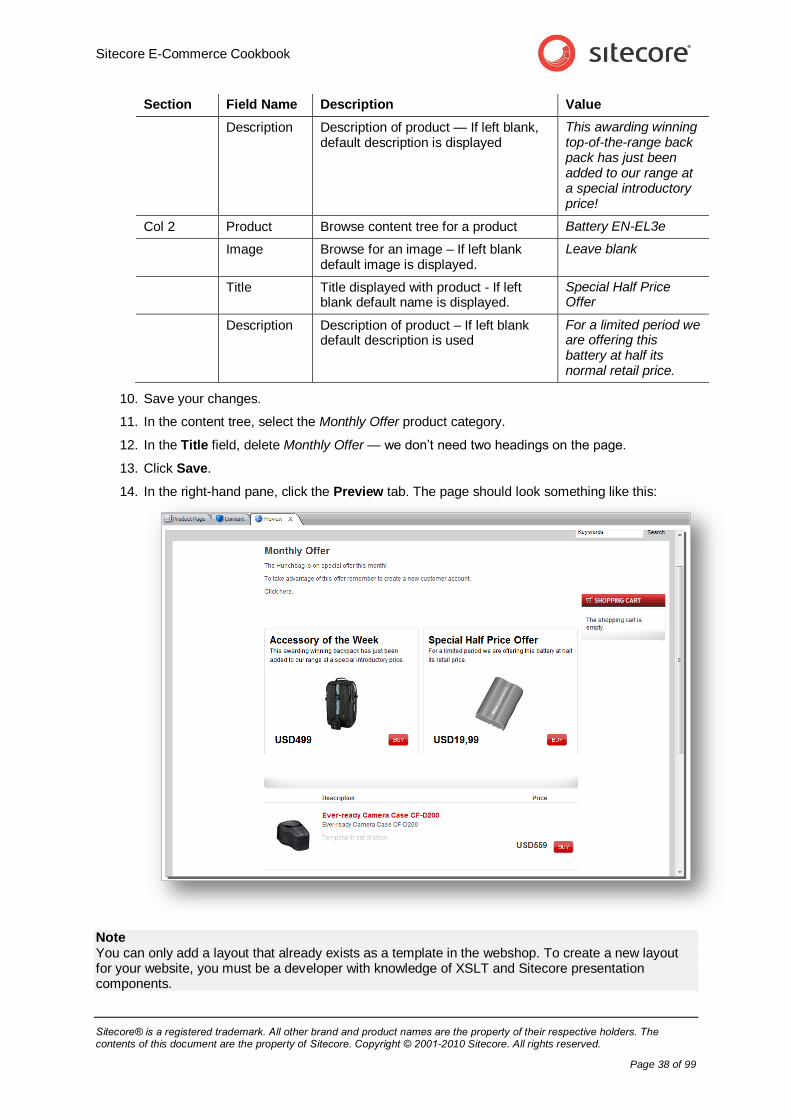
Sitecore E-Commerce Cookbook
Sitecore® is a registered trademark. All other brand and product names are the property of their respective holders. The contents of this document are the property of Sitecore. Copyright © 2001-2010 Sitecore. All rights reserved.
Page 38 of 99
Section Field Name Description Value
Description Description of product — If left blank, default description is displayed
This awarding winning top-of-the-range back pack has just been added to our range at a special introductory price!
Col 2 Product Browse content tree for a product Battery EN-EL3e
Image Browse for an image – If left blank default image is displayed.
Leave blank
Title Title displayed with product - If left blank default name is displayed.
Special Half Price Offer
Description Description of product – If left blank default description is used
For a limited period we are offering this battery at half its normal retail price.
10. Save your changes.
11. In the content tree, select the Monthly Offer product category.
12. In the Title field, delete Monthly Offer — we don’t need two headings on the page.
13. Click Save.
14. In the right-hand pane, click the Preview tab. The page should look something like this:
Note You can only add a layout that already exists as a template in the webshop. To create a new layout for your website, you must be a developer with knowledge of XSLT and Sitecore presentation components.
Sitecore E-Commerce Fundamental Edition 1.0.1
Sitecore® is a registered trademark. All other brand and product names are the property of their respective holders. The contents of this document are the property of Sitecore. Copyright © 2001-2010 Sitecore. All rights reserved.
Page 39 of 99
Chapter 4
Shopping, Orders, and Customers
This chapter explains how to manage customers and orders in Sitecore E-Commerce Fundamental Edition. The topics covered range from understanding the sample checkout process, to searching for and managing customers and orders.
This chapter contains the following sections:
The Sample Checkout Process
Managing Orders
Managing Customers
Editing E-mail Templates
Sitecore E-Commerce Cookbook
Sitecore® is a registered trademark. All other brand and product names are the property of their respective holders. The contents of this document are the property of Sitecore. Copyright © 2001-2010 Sitecore. All rights reserved.
Page 40 of 99
4.1 The Sample Checkout Process
The checkout process begins when a visitor decides to purchase the items they have added to their shopping cart. This process consists of several pages that lead the customer securely through the purchase process. Each page requires customers to provide some information, such as, shipping address, payment method, and so on.
If you use the E-Commerce solution in conjunction with the OMS and Web Forms for Marketers, you can monitor the effectiveness of your checkout process. For example, you can see which customers failed to complete the checkout process and how many purchased products successfully. In the session report, you can see all the actions taken by a customer, such as editing the shopping cart, changing quantity and when they moved to the next stage of the process.
All this information can help you to improve the checkout process for future customers. A simple and efficient checkout process ultimately leads to more satisfied customers and increased sales.
4.1.1 The Sample Checkout Process
The checkout process can be implemented in many different ways; the following example is just one way to process customer orders.
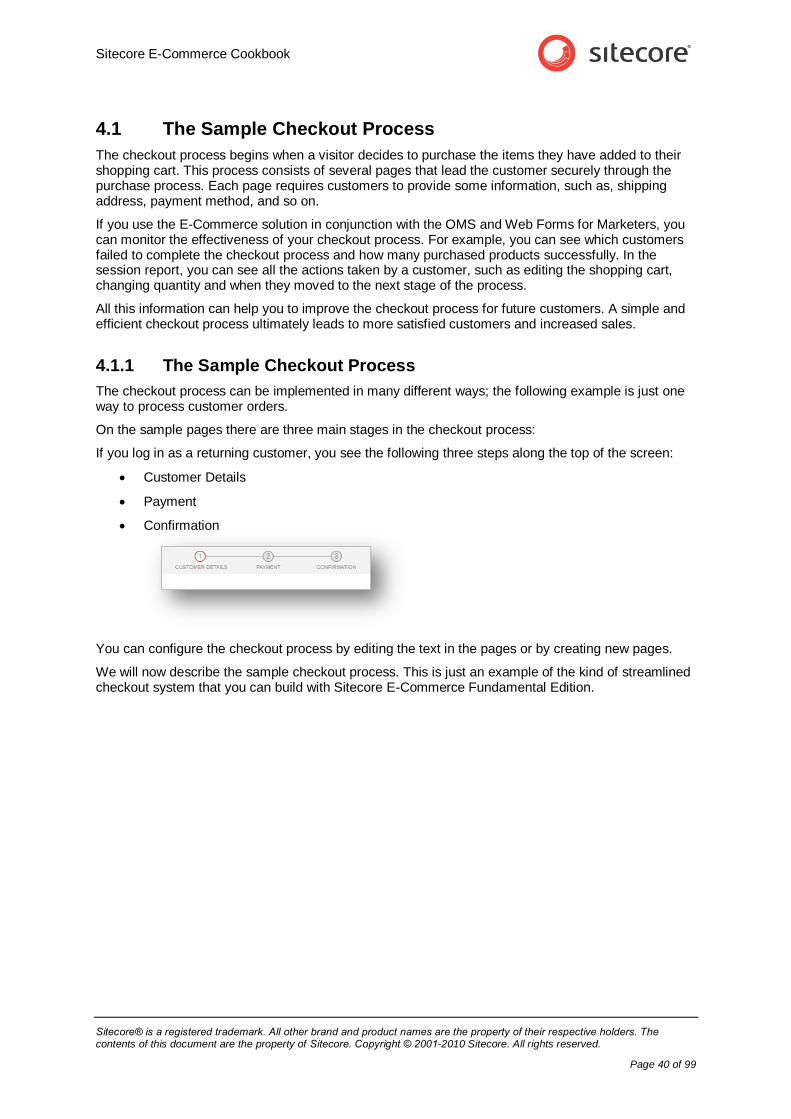
On the sample pages there are three main stages in the checkout process:
If you log in as a returning customer, you see the following three steps along the top of the screen:
Customer Details
Payment
Confirmation
You can configure the checkout process by editing the text in the pages or by creating new pages.
We will now describe the sample checkout process. This is just an example of the kind of streamlined checkout system that you can build with Sitecore E-Commerce Fundamental Edition.
Sitecore E-Commerce Fundamental Edition 1.0.1
Sitecore® is a registered trademark. All other brand and product names are the property of their respective holders. The contents of this document are the property of Sitecore. Copyright © 2001-2010 Sitecore. All rights reserved.
Page 41 of 99
To buy some products:
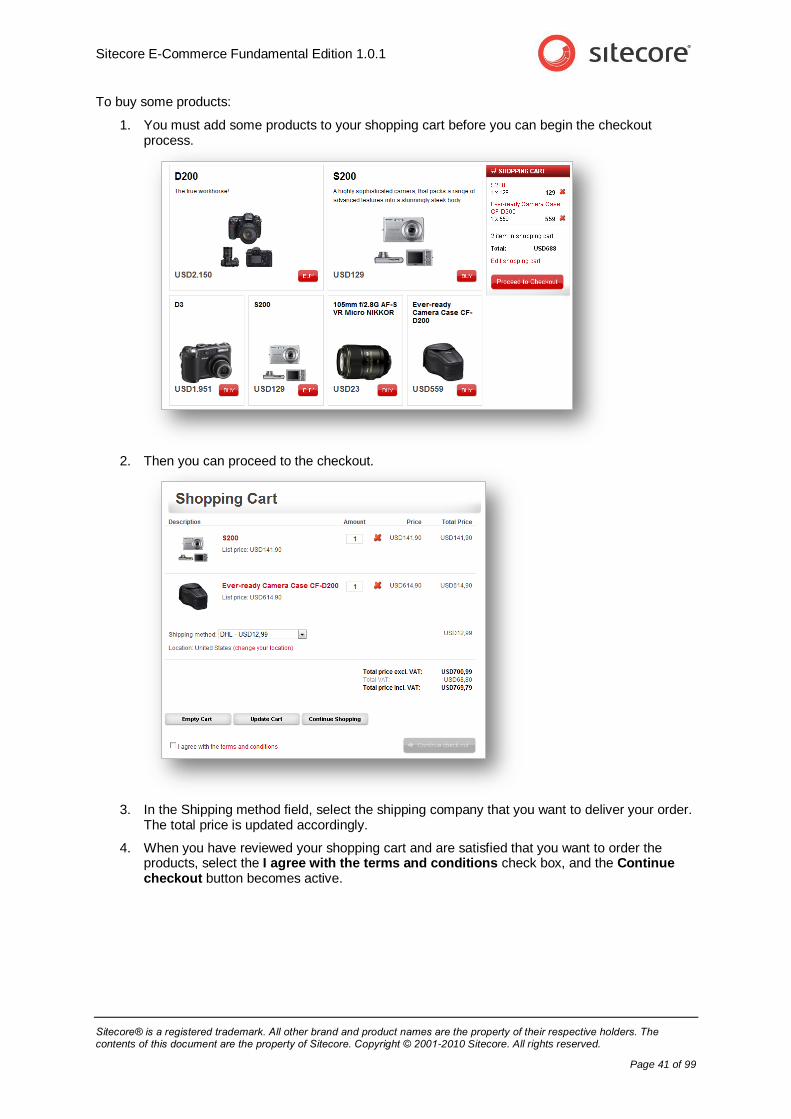
1. You must add some products to your shopping cart before you can begin the checkout process.
2. Then you can proceed to the checkout.
3. In the Shipping method field, select the shipping company that you want to deliver your order. The total price is updated accordingly.
4. When you have reviewed your shopping cart and are satisfied that you want to order the products, select the I agree with the terms and conditions check box, and the Continue checkout button becomes active.
Sitecore E-Commerce Cookbook
Sitecore® is a registered trademark. All other brand and product names are the property of their respective holders. The contents of this document are the property of Sitecore. Copyright © 2001-2010 Sitecore. All rights reserved.
Page 42 of 99
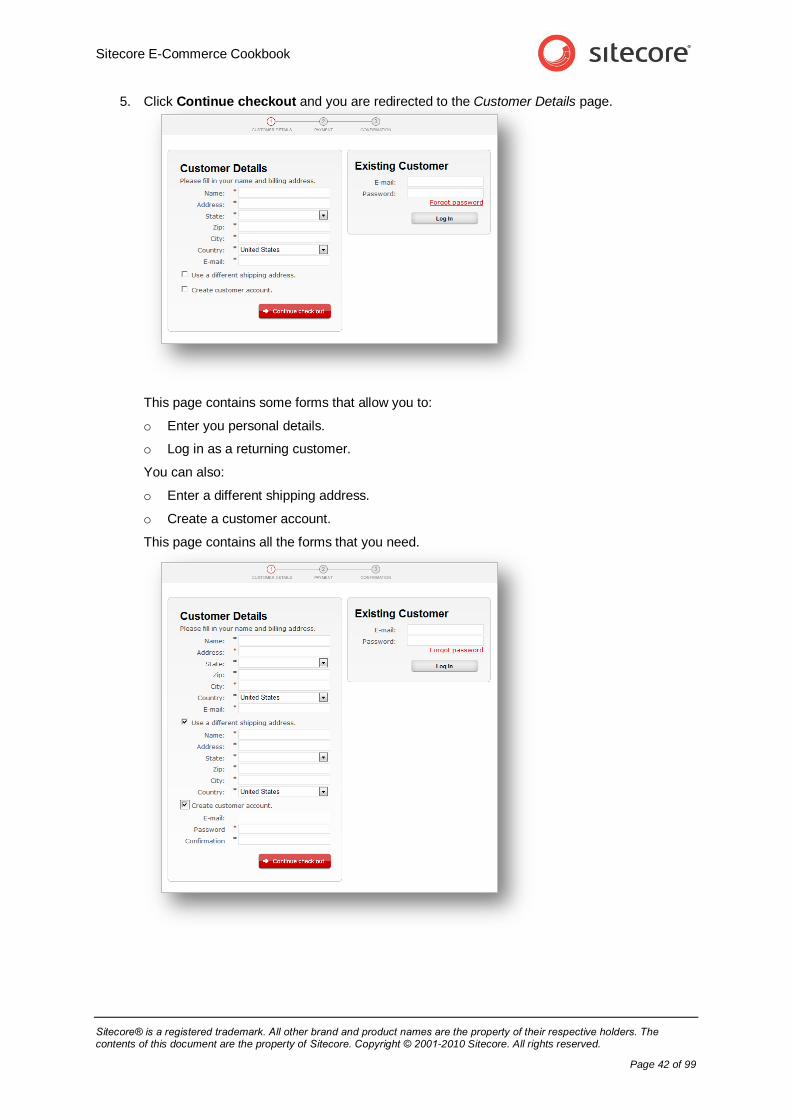
5. Click Continue checkout and you are redirected to the Customer Details page.
This page contains some forms that allow you to:
o Enter you personal details.
o Log in as a returning customer.
You can also:
o Enter a different shipping address.
o Create a customer account.
This page contains all the forms that you need.
Sitecore E-Commerce Fundamental Edition 1.0.1
Sitecore® is a registered trademark. All other brand and product names are the property of their respective holders. The contents of this document are the property of Sitecore. Copyright © 2001-2010 Sitecore. All rights reserved.
Page 43 of 99
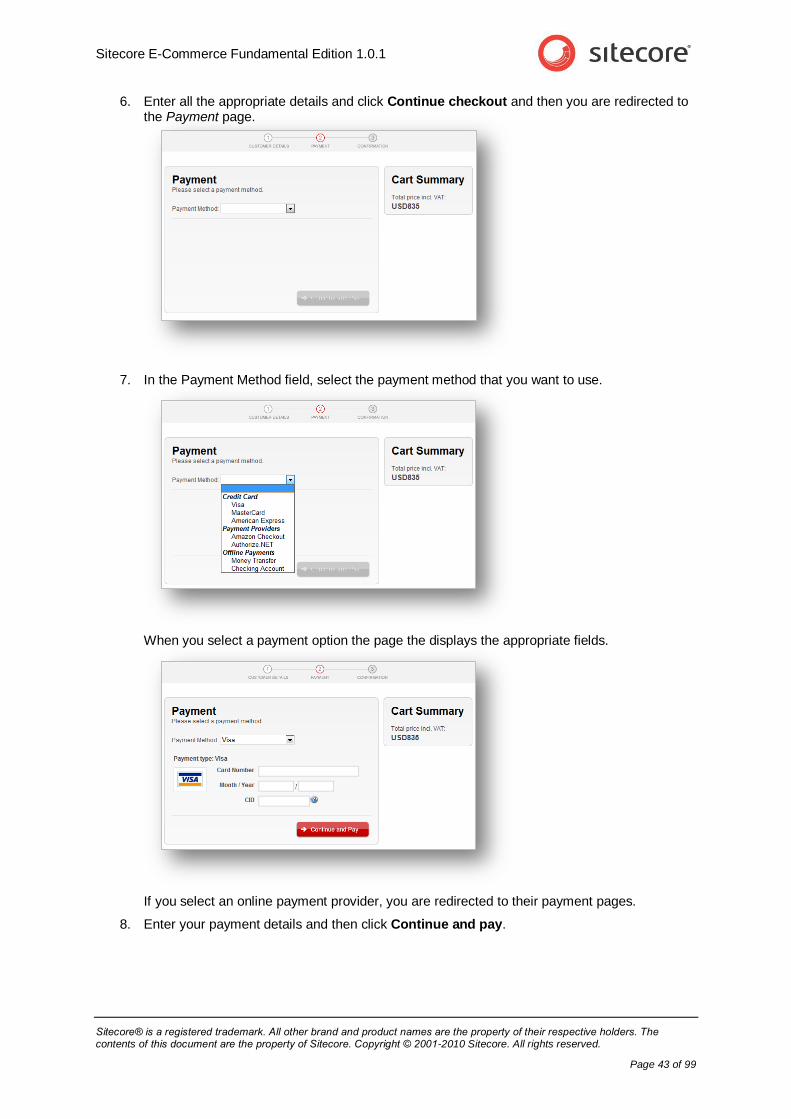
6. Enter all the appropriate details and click Continue checkout and then you are redirected to the Payment page.
7. In the Payment Method field, select the payment method that you want to use.
When you select a payment option the page the displays the appropriate fields.
If you select an online payment provider, you are redirected to their payment pages.
8. Enter your payment details and then click Continue and pay.
Sitecore E-Commerce Cookbook
Sitecore® is a registered trademark. All other brand and product names are the property of their respective holders. The contents of this document are the property of Sitecore. Copyright © 2001-2010 Sitecore. All rights reserved.
Page 44 of 99
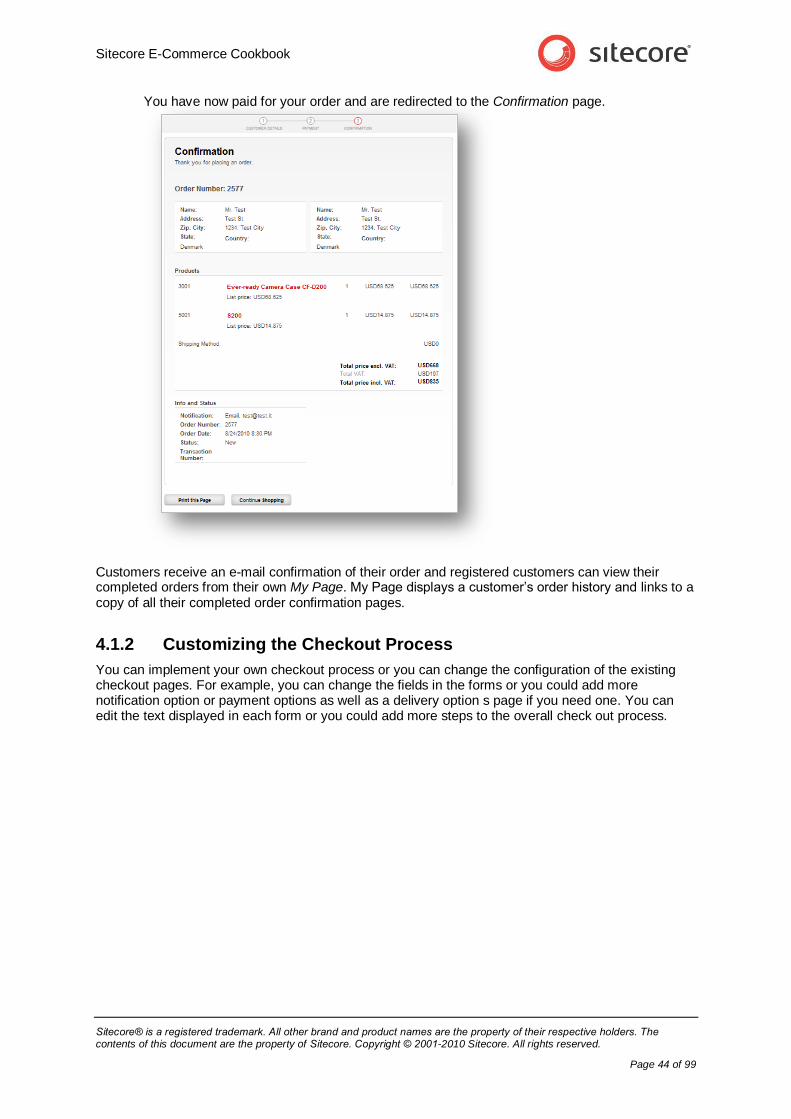
You have now paid for your order and are redirected to the Confirmation page.
Customers receive an e-mail confirmation of their order and registered customers can view their completed orders from their own My Page. My Page displays a customer’s order history and links to a copy of all their completed order confirmation pages.
4.1.2 Customizing the Checkout Process
You can implement your own checkout process or you can change the configuration of the existing checkout pages. For example, you can change the fields in the forms or you could add more notification option or payment options as well as a delivery option s page if you need one. You can edit the text displayed in each form or you could add more steps to the overall check out process.
Sitecore E-Commerce Fundamental Edition 1.0.1
Sitecore® is a registered trademark. All other brand and product names are the property of their respective holders. The contents of this document are the property of Sitecore. Copyright © 2001-2010 Sitecore. All rights reserved.
Page 45 of 99
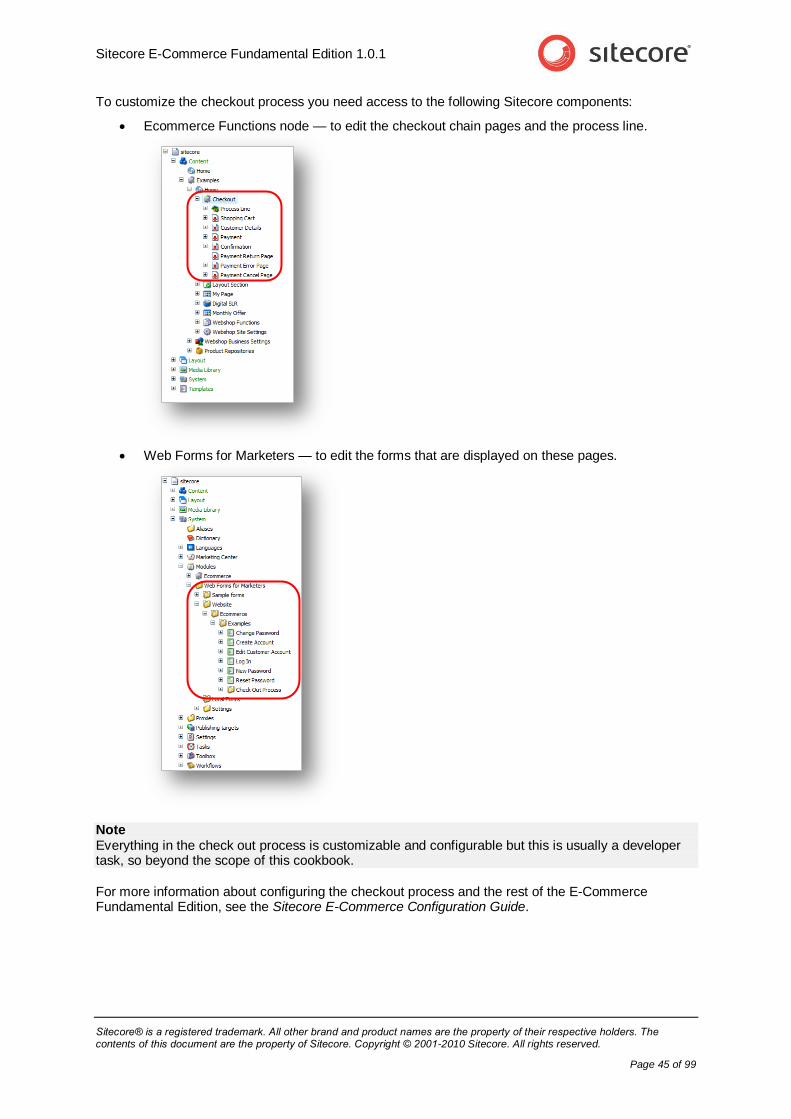
To customize the checkout process you need access to the following Sitecore components:
Ecommerce Functions node — to edit the checkout chain pages and the process line.
Web Forms for Marketers — to edit the forms that are displayed on these pages.
Note Everything in the check out process is customizable and configurable but this is usually a developer task, so beyond the scope of this cookbook.
For more information about configuring the checkout process and the rest of the E-Commerce Fundamental Edition, see the Sitecore E-Commerce Configuration Guide.
Sitecore E-Commerce Cookbook
Sitecore® is a registered trademark. All other brand and product names are the property of their respective holders. The contents of this document are the property of Sitecore. Copyright © 2001-2010 Sitecore. All rights reserved.
Page 46 of 99
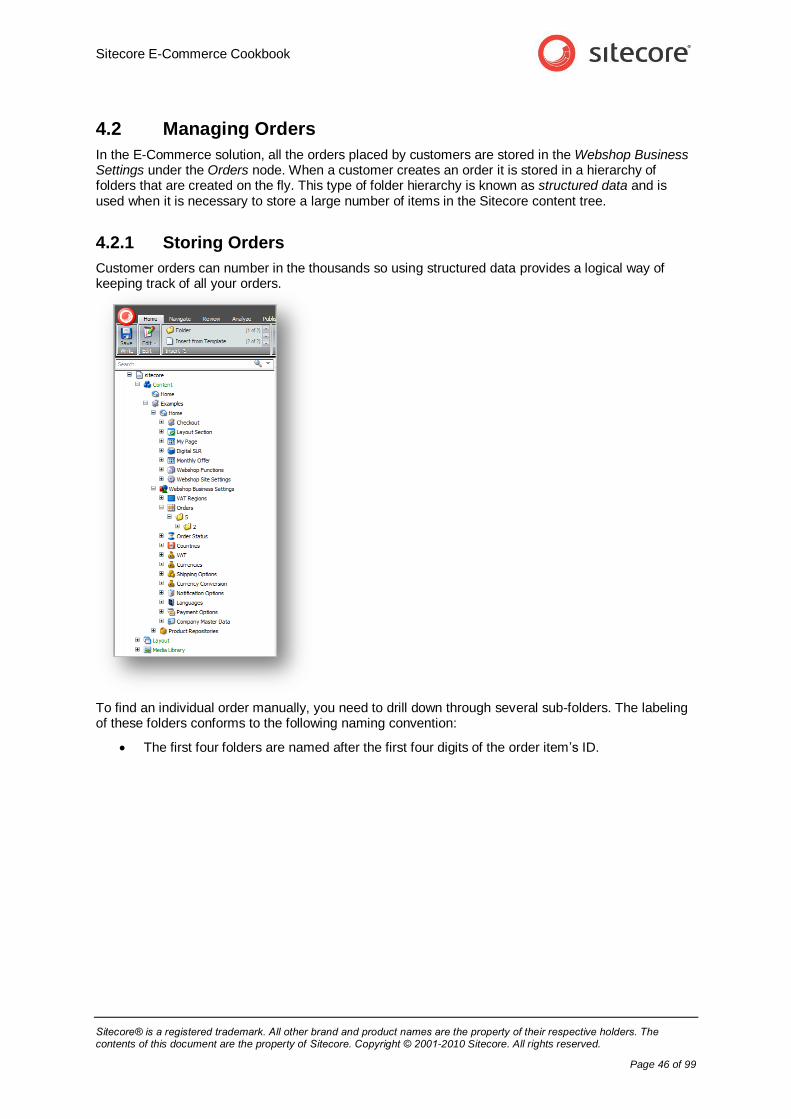
4.2 Managing Orders
In the E-Commerce solution, all the orders placed by customers are stored in the Webshop Business Settings under the Orders node. When a customer creates an order it is stored in a hierarchy of folders that are created on the fly. This type of folder hierarchy is known as structured data and is used when it is necessary to store a large number of items in the Sitecore content tree.
4.2.1 Storing Orders
Customer orders can number in the thousands so using structured data provides a logical way of keeping track of all your orders.
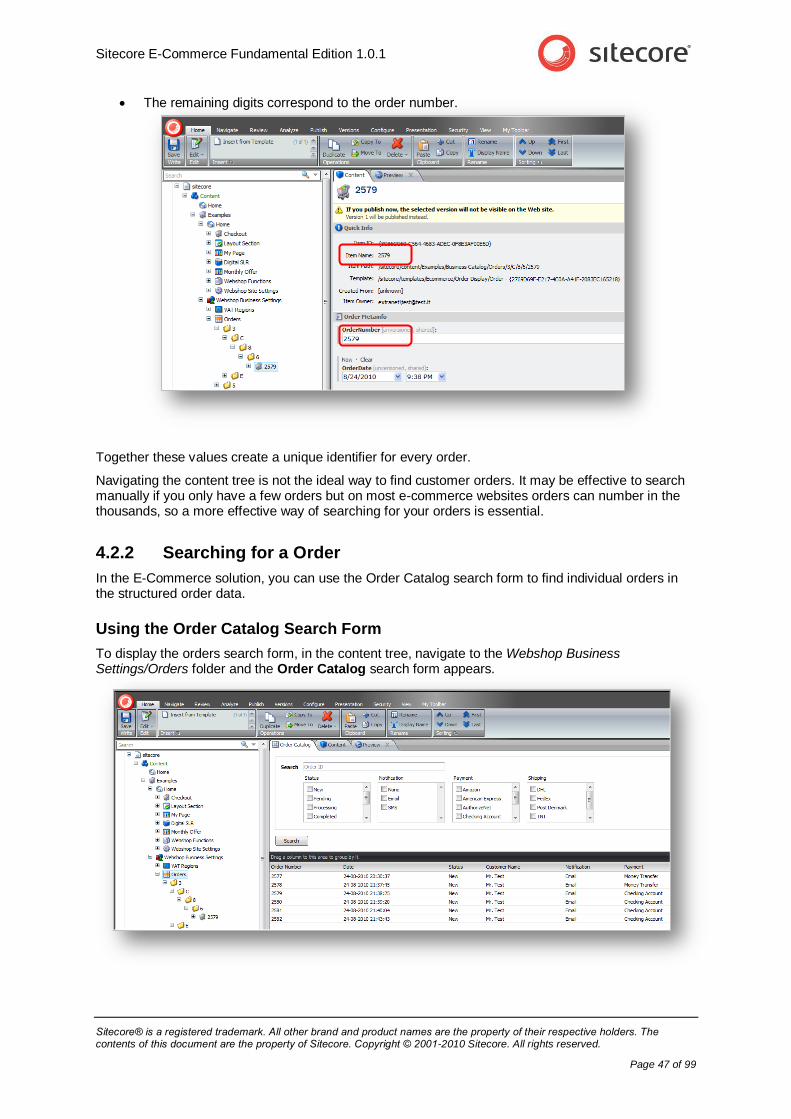
To find an individual order manually, you need to drill down through several sub-folders. The labeling of these folders conforms to the following naming convention:
The first four folders are named after the first four digits of the order item’s ID.
Sitecore E-Commerce Fundamental Edition 1.0.1
Sitecore® is a registered trademark. All other brand and product names are the property of their respective holders. The contents of this document are the property of Sitecore. Copyright © 2001-2010 Sitecore. All rights reserved.
Page 47 of 99
The remaining digits correspond to the order number.
Together these values create a unique identifier for every order.
Navigating the content tree is not the ideal way to find customer orders. It may be effective to search manually if you only have a few orders but on most e-commerce websites orders can number in the thousands, so a more effective way of searching for your orders is essential.
4.2.2 Searching for a Order
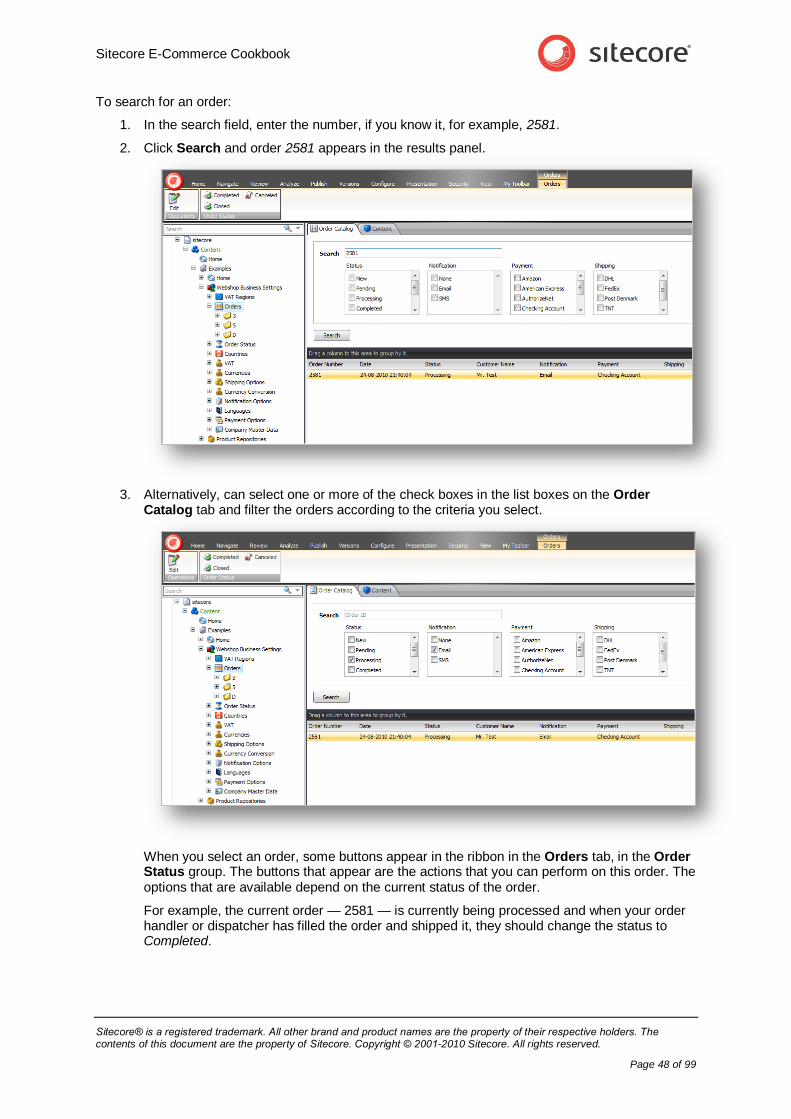
In the E-Commerce solution, you can use the Order Catalog search form to find individual orders in the structured order data.
Using the Order Catalog Search Form
To display the orders search form, in the content tree, navigate to the Webshop Business Settings/Orders folder and the Order Catalog search form appears.
Sitecore E-Commerce Cookbook
Sitecore® is a registered trademark. All other brand and product names are the property of their respective holders. The contents of this document are the property of Sitecore. Copyright © 2001-2010 Sitecore. All rights reserved.
Page 48 of 99
To search for an order:
1. In the search field, enter the number, if you know it, for example, 2581.
2. Click Search and order 2581 appears in the results panel.
3. Alternatively, can select one or more of the check boxes in the list boxes on the Order Catalog tab and filter the orders according to the criteria you select.
When you select an order, some buttons appear in the ribbon in the Orders tab, in the Order Status group. The buttons that appear are the actions that you can perform on this order. The options that are available depend on the current status of the order.
For example, the current order — 2581 — is currently being processed and when your order handler or dispatcher has filled the order and shipped it, they should change the status to Completed.
Sitecore E-Commerce Fundamental Edition 1.0.1
Sitecore® is a registered trademark. All other brand and product names are the property of their respective holders. The contents of this document are the property of Sitecore. Copyright © 2001-2010 Sitecore. All rights reserved.
Page 49 of 99
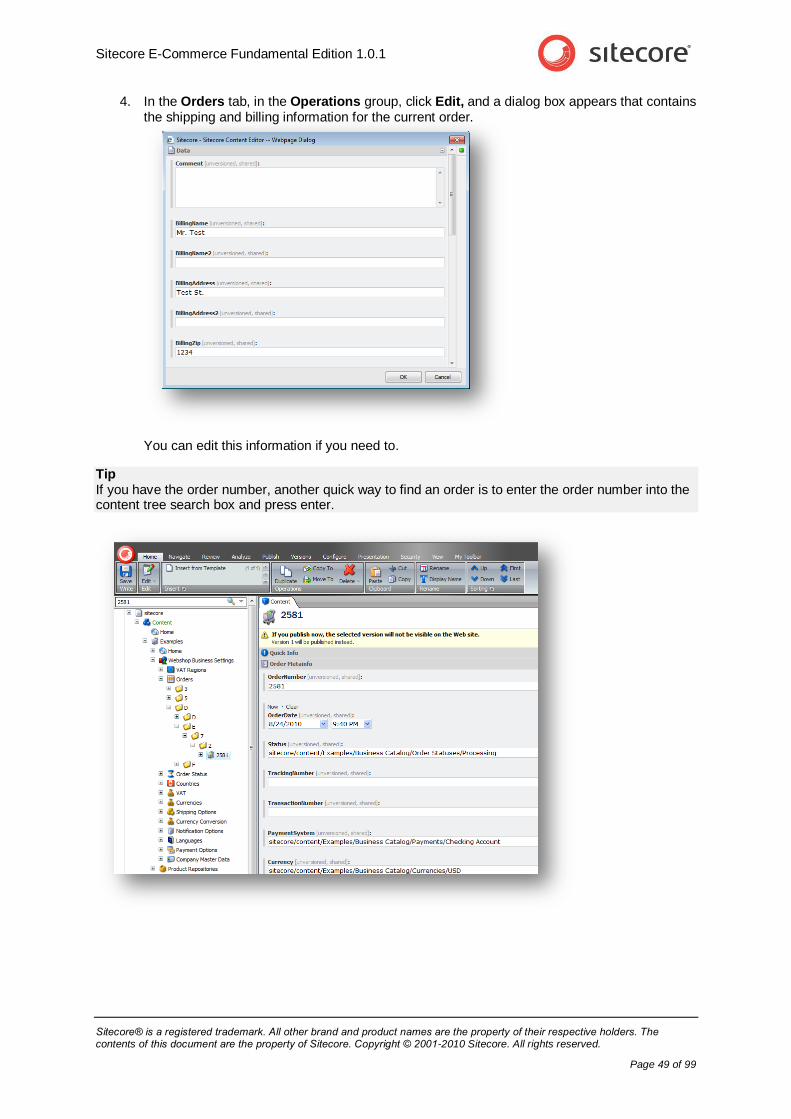
4. In the Orders tab, in the Operations group, click Edit, and a dialog box appears that contains the shipping and billing information for the current order.
You can edit this information if you need to.
Tip If you have the order number, another quick way to find an order is to enter the order number into the content tree search box and press enter.
Sitecore E-Commerce Cookbook
Sitecore® is a registered trademark. All other brand and product names are the property of their respective holders. The contents of this document are the property of Sitecore. Copyright © 2001-2010 Sitecore. All rights reserved.
Page 50 of 99
4.3 Managing Customers
In the E-Commerce Fundamental Edition, we have divided customers into two basic types:
Registered customers who have created a customer account.
Unregistered customers who just place an order.
The details of registered customers are stored in the Sitecore User Manager, while the details of unregistered customers are contained in the order that the customer placed on the webshop.
In the sample pages, a customer must first enter some details, such as their name, delivery address, and e-mail address before they can complete the checkout process. However, registration is not compulsory. On most e-commerce websites, customers can buy products without registering. Registration makes the checkout process quicker but is usually only presented to the customer as an option.
4.3.1 Registered Customers
Registered customers are site visitors who have created a customer account and provided their customer details. This makes the check out process quicker and easier for them.
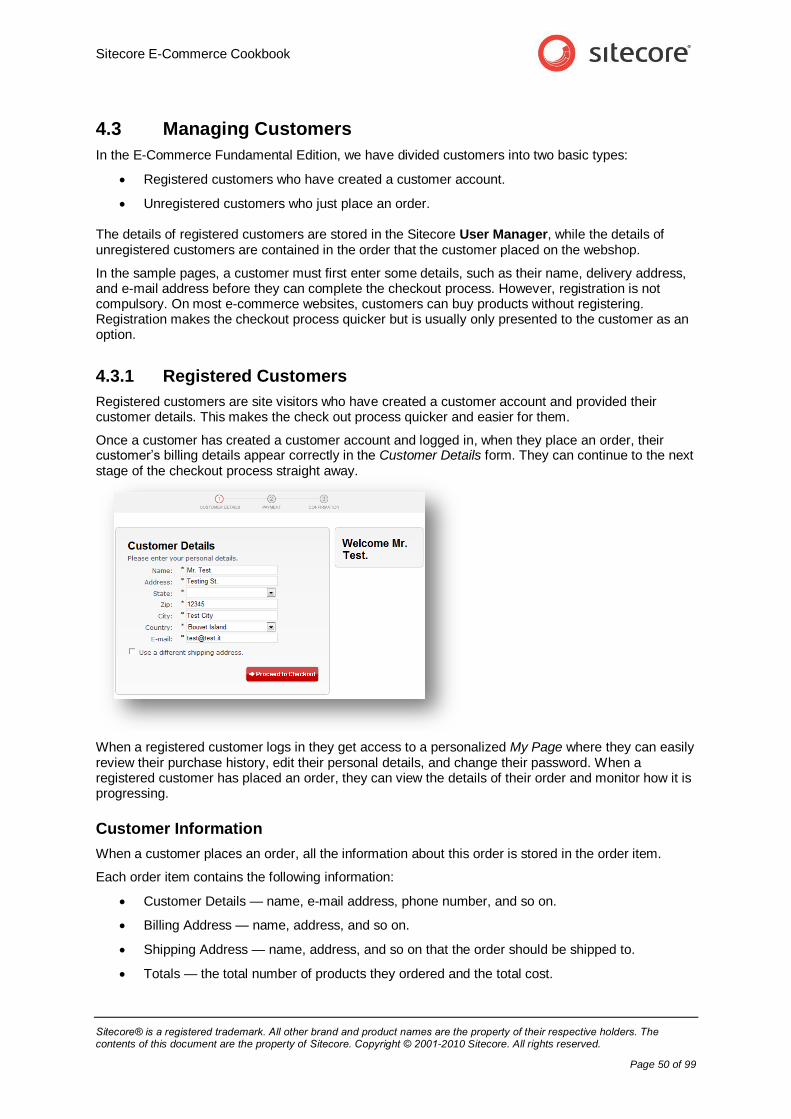
Once a customer has created a customer account and logged in, when they place an order, their customer’s billing details appear correctly in the Customer Details form. They can continue to the next stage of the checkout process straight away.
When a registered customer logs in they get access to a personalized My Page where they can easily review their purchase history, edit their personal details, and change their password. When a registered customer has placed an order, they can view the details of their order and monitor how it is progressing.
Customer Information
When a customer places an order, all the information about this order is stored in the order item.
Each order item contains the following information:
Customer Details — name, e-mail address, phone number, and so on.
Billing Address — name, address, and so on.
Shipping Address — name, address, and so on that the order should be shipped to.
Totals — the total number of products they ordered and the total cost.
Sitecore E-Commerce Fundamental Edition 1.0.1
Sitecore® is a registered trademark. All other brand and product names are the property of their respective holders. The contents of this document are the property of Sitecore. Copyright © 2001-2010 Sitecore. All rights reserved.
Page 51 of 99
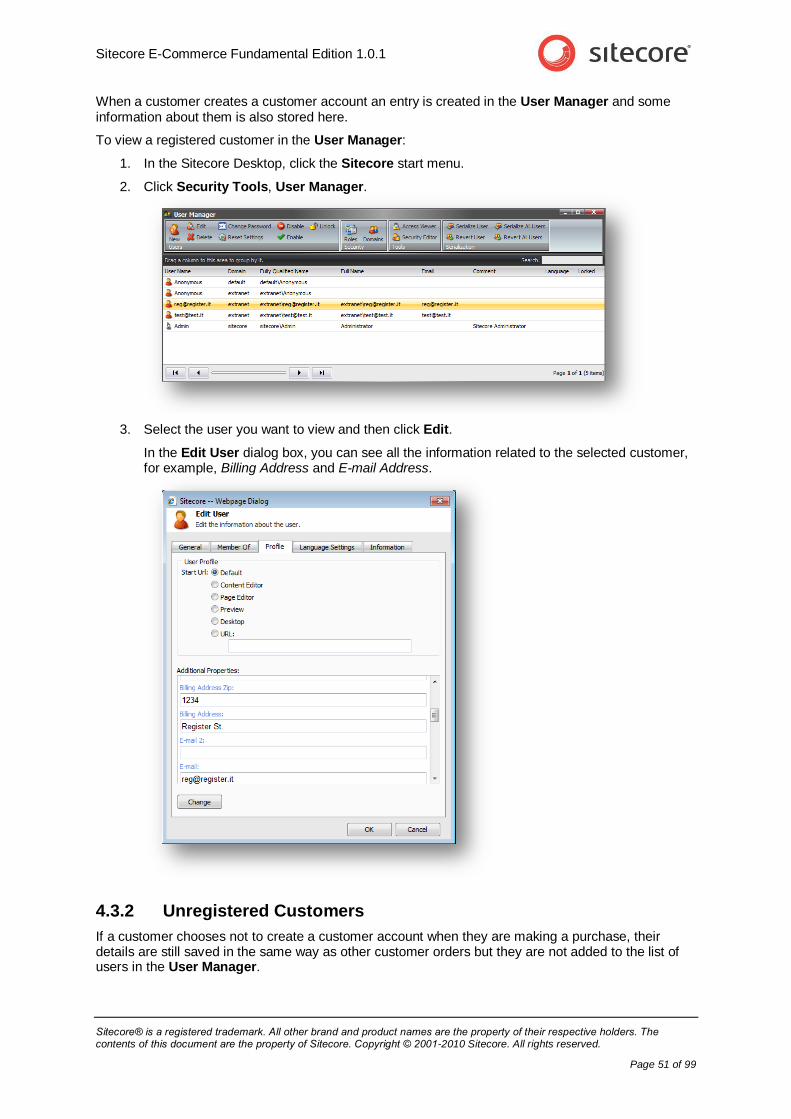
When a customer creates a customer account an entry is created in the User Manager and some information about them is also stored here.
To view a registered customer in the User Manager:
1. In the Sitecore Desktop, click the Sitecore start menu.
2. Click Security Tools, User Manager.
3. Select the user you want to view and then click Edit.
In the Edit User dialog box, you can see all the information related to the selected customer, for example, Billing Address and E-mail Address.
4.3.2 Unregistered Customers
If a customer chooses not to create a customer account when they are making a purchase, their details are still saved in the same way as other customer orders but they are not added to the list of users in the User Manager.
Sitecore E-Commerce Cookbook
Sitecore® is a registered trademark. All other brand and product names are the property of their respective holders. The contents of this document are the property of Sitecore. Copyright © 2001-2010 Sitecore. All rights reserved.
Page 52 of 99
The only place where their name is recorded is in the Billing Address section of the order item.
The default Order Catalog search page does not allow you to search on this field but you can configure the search form to include it.
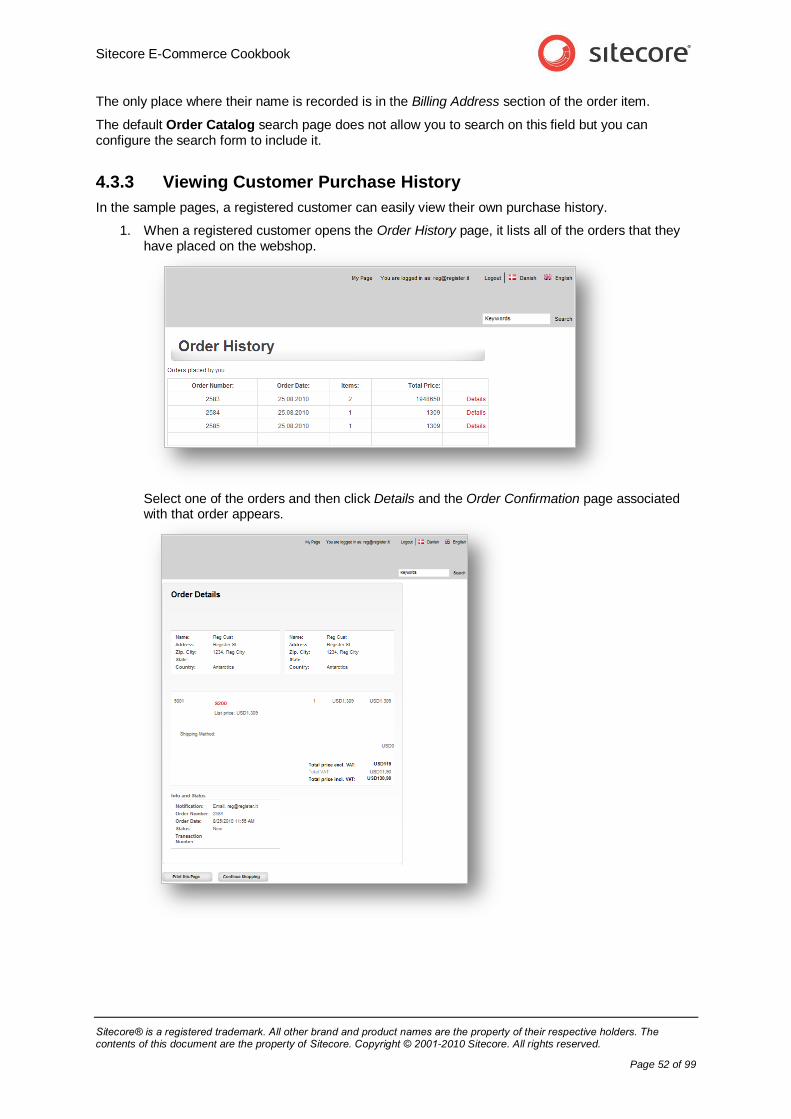
4.3.3 Viewing Customer Purchase History
In the sample pages, a registered customer can easily view their own purchase history.
1. When a registered customer opens the Order History page, it lists all of the orders that they have placed on the webshop.
Select one of the orders and then click Details and the Order Confirmation page associated with that order appears.

Sitecore E-Commerce Fundamental Edition 1.0.1
Sitecore® is a registered trademark. All other brand and product names are the property of their respective holders. The contents of this document are the property of Sitecore. Copyright © 2001-2010 Sitecore. All rights reserved.
Page 53 of 99
4.4 Editing E-mail Templates
On an e-commerce website, when a customer completes a desired action such as creating a customer account or confirming an order, a pre-defined e-mail message can be sent to the e-mail address the customer provided.
The Sitecore E-Commerce Fundamental Edition contains several predefined e-mail message templates. You can customize these templates or create your own e-mail message templates.
Sitecore E-Commerce Fundamental Edition contains the following e-mail templates:
E-mail Template Description
Contact Us Sent to the webshop from a visitor with a query.
New User Confirmation Sent to the customer after they create a customer account.
Order Mail To Admin Sent to the order processor after a customer places an order.
Order Mail To Customer Sent to the customer as confirmation of an order.
Your password has been changed Sent to the user after they have changed their password.
Your password has been reset Sent to the user informing them that their password has been reset.
Reset your password Sent to the user instructing them how to change their password.
To access the standard e-commerce e-mail templates, navigate to the following location in the Sitecore content tree: /Webshop Site Settings/MailTemplates
4.4.1 Editing E-mail Templates
If you have the appropriate access rights, you can edit the e-mail template messages.
To edit an e-mail template:
1. In the Content Editor, select an e-mail template, for example, New User Confirmation.
/Webshop Site Settings/MailTemplates /New User Confirmation
Sitecore E-Commerce Cookbook
Sitecore® is a registered trademark. All other brand and product names are the property of their respective holders. The contents of this document are the property of Sitecore. Copyright © 2001-2010 Sitecore. All rights reserved.
Page 54 of 99
2. In the New User Confirmation item, in the Subject field, enter the following text: Congratulations and welcome to our webshop, happy shopping!
3. In the Body field, click Show Editor and enter the following text in the rich text editor: Thank you for registering. Remember, if you spend more than 100 Euros you qualify for 10% off your next purchase!
4. In the ribbon, click Save.
Note It is easy to edit the display text in a standard e-mail message but creating new e-mail message templates is a developer task.
Sitecore E-Commerce Fundamental Edition 1.0.1
Sitecore® is a registered trademark. All other brand and product names are the property of their respective holders. The contents of this document are the property of Sitecore. Copyright © 2001-2010 Sitecore. All rights reserved.
Page 55 of 99
Chapter 5
Analyzing Visitor Behavior
This chapter explains how to use the Sitecore OMS reports with the Sitecore E-Commerce Fundamental Edition.
The OMS reports let you analyze the effectiveness of your e-commerce website and to track the shopping behavior of your customers.
This chapter contains the following sections:
OMS Reports
Web Forms Reports
Filtering Reports
Sitecore E-Commerce Cookbook
Sitecore® is a registered trademark. All other brand and product names are the property of their respective holders. The contents of this document are the property of Sitecore. Copyright © 2001-2010 Sitecore. All rights reserved.
Page 56 of 99
5.1 OMS Reports
In the E-Commerce solution, you can use the standard Sitecore Analytics OMS reports to track customer behavior.
Sitecore OMS lets you track a customer’s behavior as they navigate their way through the shopping process. The Latest Human Sessions report lists all the latest visitor sessions and all the pages visited during each session. This includes all the items added to the shopping cart and all the purchases made by each visitor. The session trail displays the visitor’s IP address and name of the organization they work for, but individual customer names are not included in the standard OMS session trail reports.
5.1.1 Latest Human Sessions Report
In Sitecore Analytics, under Recent Activity, the Latest Human Sessions report gives you detailed visitor information, a breakdown of the pages visited (the session trail), along with any information that they entered into the forms on your webshop.
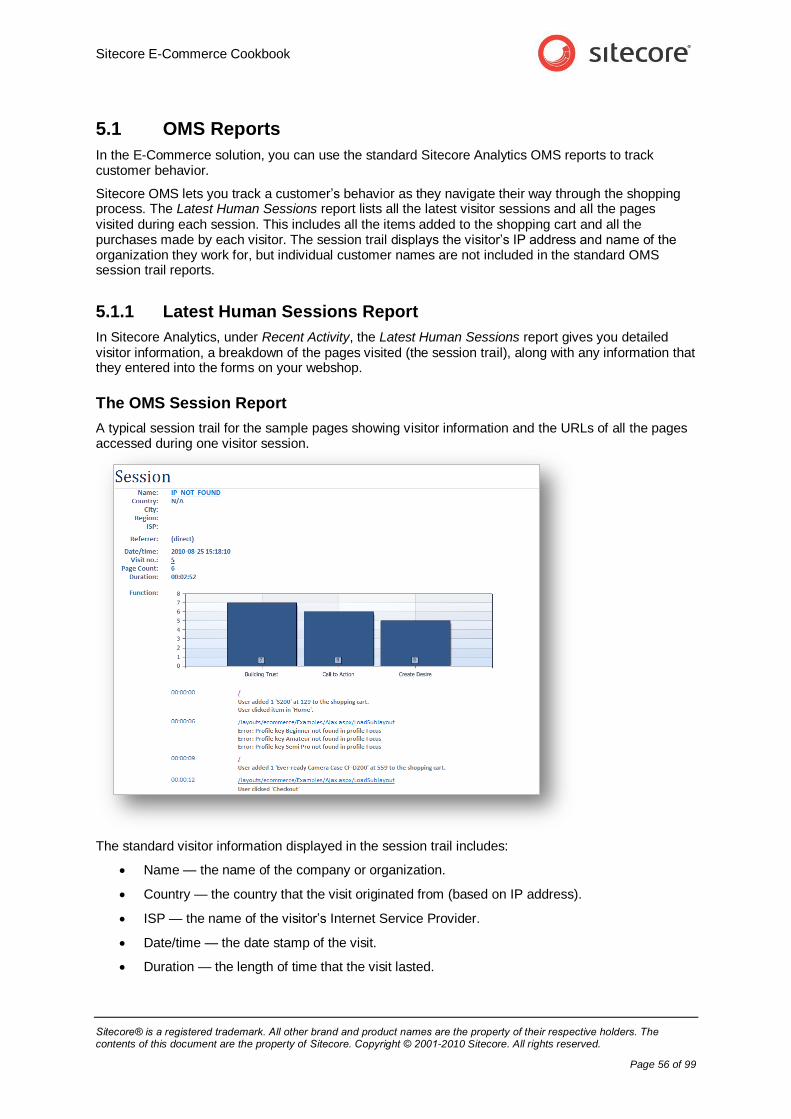
The OMS Session Report
A typical session trail for the sample pages showing visitor information and the URLs of all the pages accessed during one visitor session.
The standard visitor information displayed in the session trail includes:
Name — the name of the company or organization.
Country — the country that the visit originated from (based on IP address).
ISP — the name of the visitor’s Internet Service Provider.
Date/time — the date stamp of the visit.
Duration — the length of time that the visit lasted.
Sitecore E-Commerce Fundamental Edition 1.0.1
Sitecore® is a registered trademark. All other brand and product names are the property of their respective holders. The contents of this document are the property of Sitecore. Copyright © 2001-2010 Sitecore. All rights reserved.
Page 57 of 99
Profile values — bar charts illustrating the profile scores for each profile key that has been scored by this visitor.
When you use the E-Commerce solution with Sitecore OMS, the session report also includes useful additional information about the customer’s shopping activity such as the:
Products viewed.
Products added to the shopping cart.
Stages completed in the checkout process.
Forms accessed.
Information entered into form fields.
Changes made before submitting a form.
Form validation error messages.
For example, when a customer adds a product to the shopping cart, this appears in the session trail. If a customer adds a product to the shopping cart, this triggers a Sitecore page event. You can configure your e-commerce installation to show all the page events in the session trail or decide which ones you want to show.
Note If you decide to display all the Page Events in the Latest Human Session report, this can have consequences on the performance of your e-commerce website.
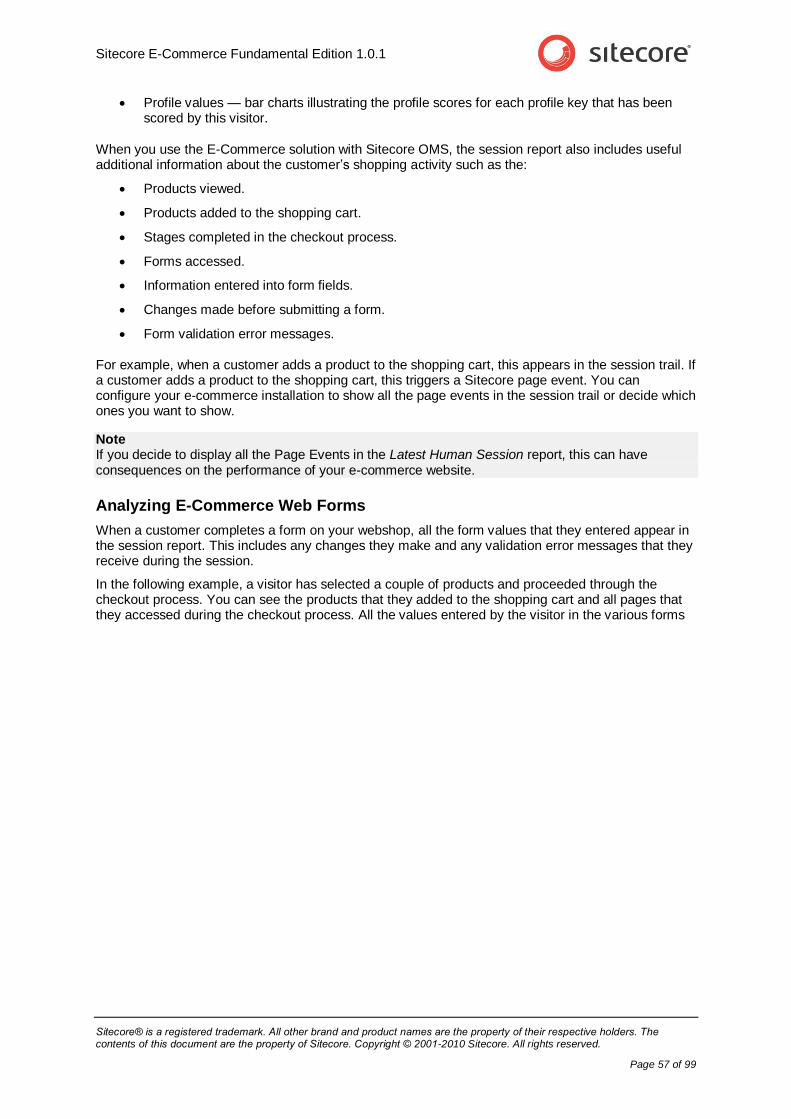
Analyzing E-Commerce Web Forms
When a customer completes a form on your webshop, all the form values that they entered appear in the session report. This includes any changes they make and any validation error messages that they receive during the session.
In the following example, a visitor has selected a couple of products and proceeded through the checkout process. You can see the products that they added to the shopping cart and all pages that they accessed during the checkout process. All the values entered by the visitor in the various forms
Sitecore E-Commerce Cookbook
Sitecore® is a registered trademark. All other brand and product names are the property of their respective holders. The contents of this document are the property of Sitecore. Copyright © 2001-2010 Sitecore. All rights reserved.
Page 58 of 99
appear in the session report, including a small change that the visitor made to the Address field.
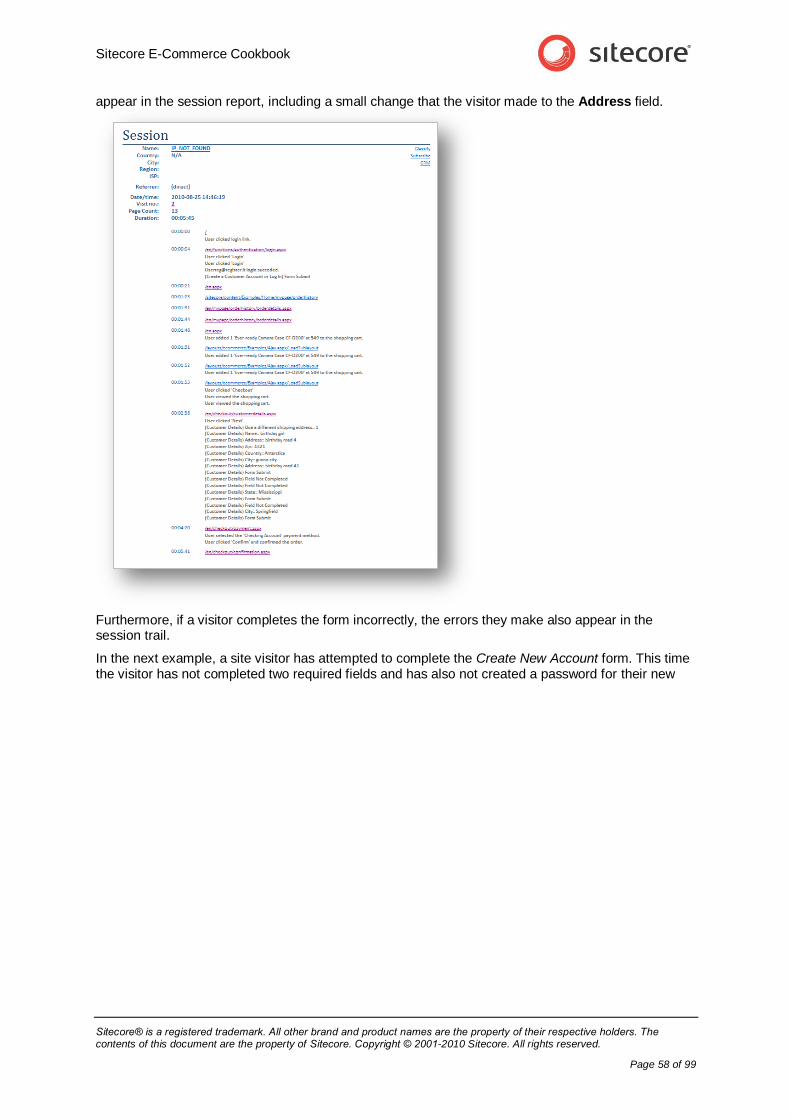
Furthermore, if a visitor completes the form incorrectly, the errors they make also appear in the session trail.
In the next example, a site visitor has attempted to complete the Create New Account form. This time the visitor has not completed two required fields and has also not created a password for their new
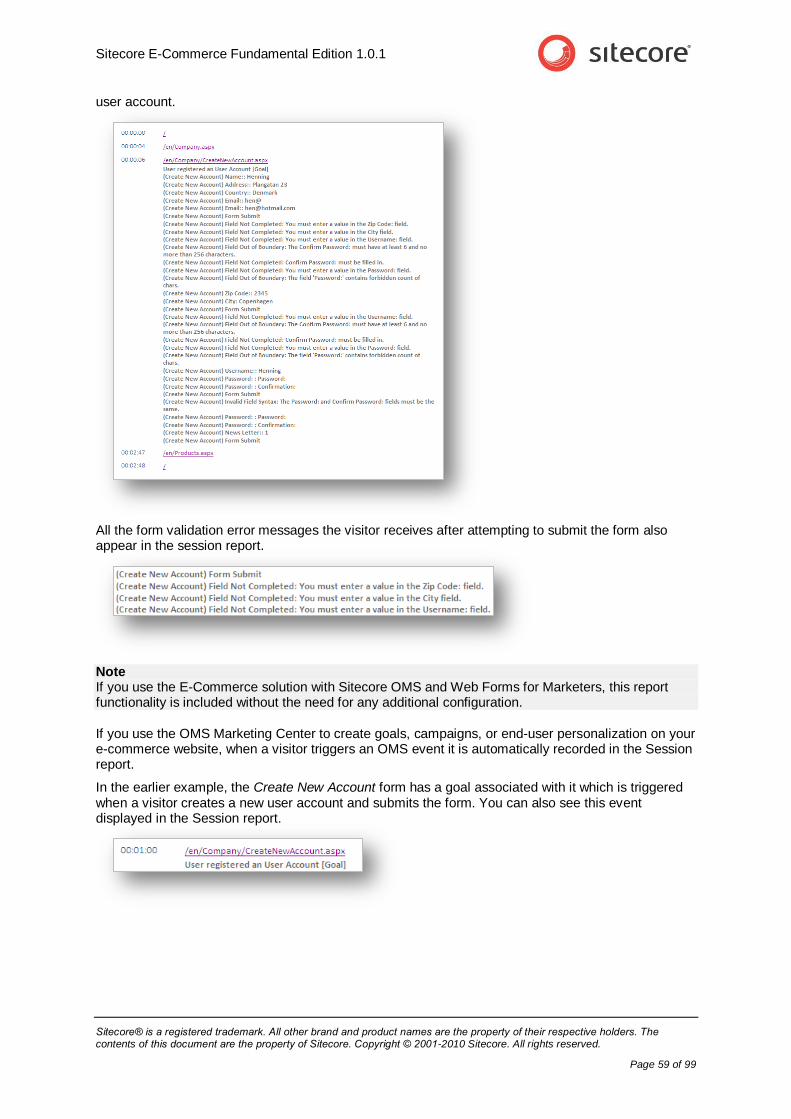
Sitecore E-Commerce Fundamental Edition 1.0.1
Sitecore® is a registered trademark. All other brand and product names are the property of their respective holders. The contents of this document are the property of Sitecore. Copyright © 2001-2010 Sitecore. All rights reserved.
Page 59 of 99
user account.
All the form validation error messages the visitor receives after attempting to submit the form also appear in the session report.
Note If you use the E-Commerce solution with Sitecore OMS and Web Forms for Marketers, this report functionality is included without the need for any additional configuration.
If you use the OMS Marketing Center to create goals, campaigns, or end-user personalization on your e-commerce website, when a visitor triggers an OMS event it is automatically recorded in the Session report.
In the earlier example, the Create New Account form has a goal associated with it which is triggered when a visitor creates a new user account and submits the form. You can also see this event displayed in the Session report.
Sitecore E-Commerce Cookbook
Sitecore® is a registered trademark. All other brand and product names are the property of their respective holders. The contents of this document are the property of Sitecore. Copyright © 2001-2010 Sitecore. All rights reserved.
Page 60 of 99
Analyzing Customer Behavior
If you combine the information provided in standard Sitecore OMS reports with web forms, you have a powerful tool to analyze the behavior of all the visitors and customers that come to your e-commerce website.
In a typical E-Commerce and OMS session report, you can see the:
Name of visitor organization.
Country of origin.
Duration of the visit.
Products viewed on the webshop.
Products purchased.
Forms completed.
Goals completed.
Campaigns.
Update the Shopping Cart
Empty the Shopping Cart
Change Delivery option.
Complete the Delivery page.
Complete the Payment page.
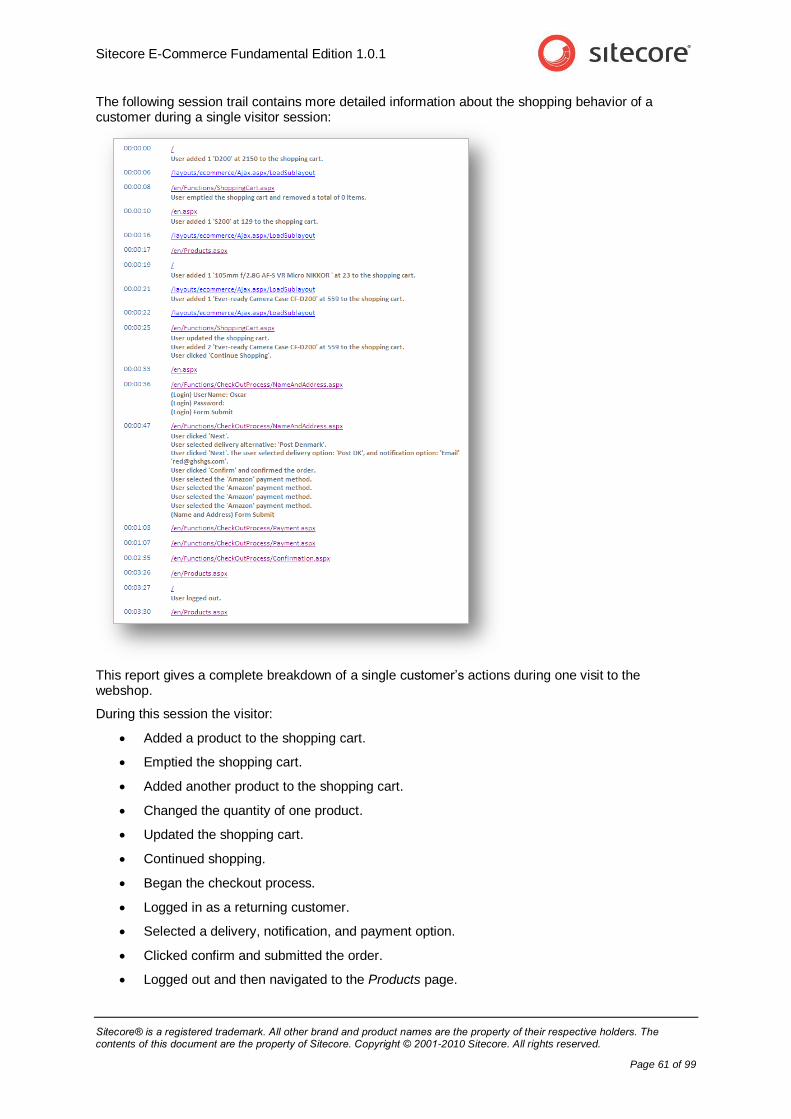
Sitecore E-Commerce Fundamental Edition 1.0.1
Sitecore® is a registered trademark. All other brand and product names are the property of their respective holders. The contents of this document are the property of Sitecore. Copyright © 2001-2010 Sitecore. All rights reserved.
Page 61 of 99
The following session trail contains more detailed information about the shopping behavior of a customer during a single visitor session:
This report gives a complete breakdown of a single customer’s actions during one visit to the webshop.
During this session the visitor:
Added a product to the shopping cart.
Emptied the shopping cart.
Added another product to the shopping cart.
Changed the quantity of one product.
Updated the shopping cart.
Continued shopping.
Began the checkout process.
Logged in as a returning customer.
Selected a delivery, notification, and payment option.
Clicked confirm and submitted the order.
Logged out and then navigated to the Products page.
Sitecore E-Commerce Cookbook
Sitecore® is a registered trademark. All other brand and product names are the property of their respective holders. The contents of this document are the property of Sitecore. Copyright © 2001-2010 Sitecore. All rights reserved.
Page 62 of 99
These events all appear as standard in the Recent Activity reports.
If you use all the information available in the Latest Human Sessions report, it can help you to:
Optimize your product range.
Adjust goals.
Optimize campaigns.
Improve the checkout process.
Make your e-commerce website more successful.
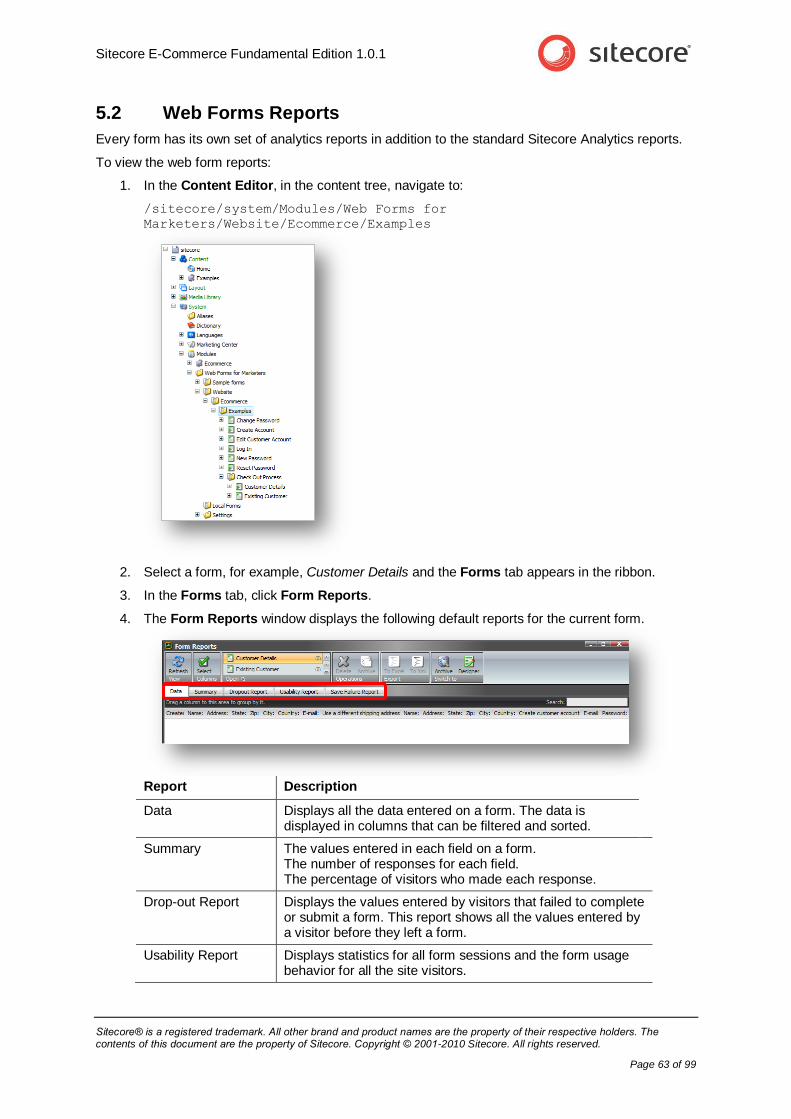
Sitecore E-Commerce Fundamental Edition 1.0.1
Sitecore® is a registered trademark. All other brand and product names are the property of their respective holders. The contents of this document are the property of Sitecore. Copyright © 2001-2010 Sitecore. All rights reserved.
Page 63 of 99
5.2 Web Forms Reports
Every form has its own set of analytics reports in addition to the standard Sitecore Analytics reports.
To view the web form reports:
1. In the Content Editor, in the content tree, navigate to:
/sitecore/system/Modules/Web Forms for
Marketers/Website/Ecommerce/Examples
2. Select a form, for example, Customer Details and the Forms tab appears in the ribbon.
3. In the Forms tab, click Form Reports.
4. The Form Reports window displays the following default reports for the current form.
Report Description
Data Displays all the data entered on a form. The data is displayed in columns that can be filtered and sorted.
Summary The values entered in each field on a form. The number of responses for each field. The percentage of visitors who made each response.
Drop-out Report Displays the values entered by visitors that failed to complete or submit a form. This report shows all the values entered by a visitor before they left a form.
Usability Report Displays statistics for all form sessions and the form usage behavior for all the site visitors.
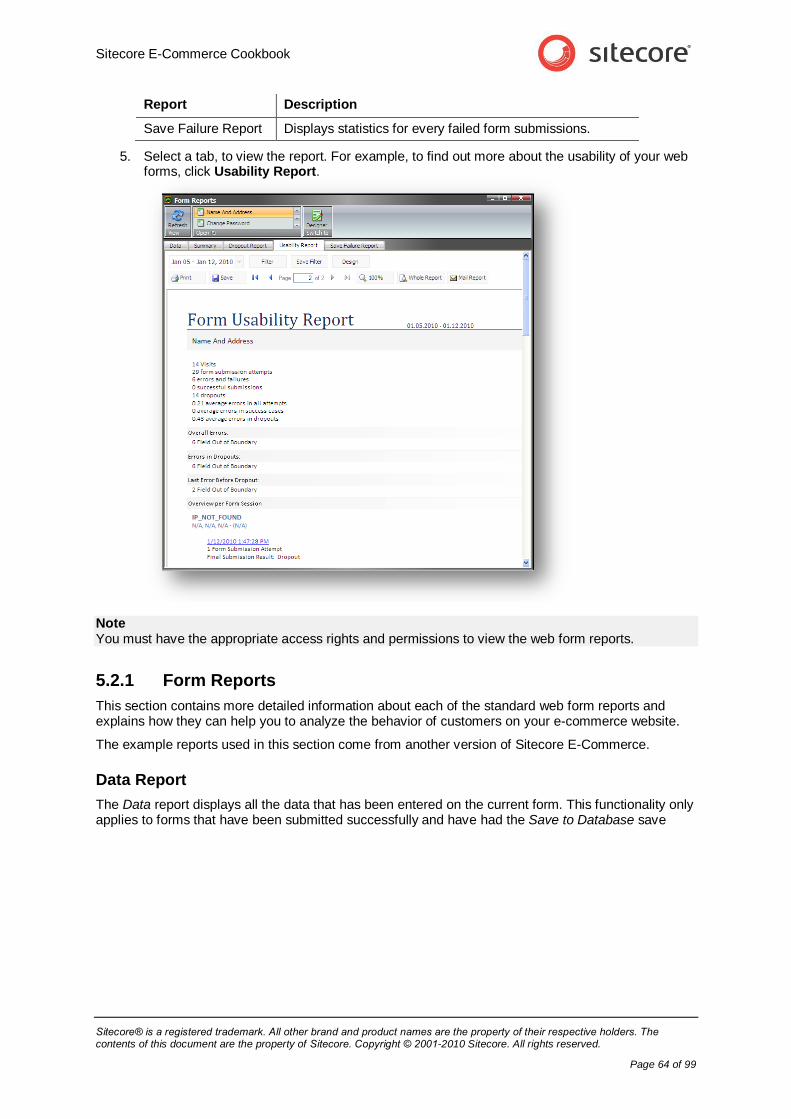
Sitecore E-Commerce Cookbook
Sitecore® is a registered trademark. All other brand and product names are the property of their respective holders. The contents of this document are the property of Sitecore. Copyright © 2001-2010 Sitecore. All rights reserved.
Page 64 of 99
Report Description
Save Failure Report Displays statistics for every failed form submissions.
5. Select a tab, to view the report. For example, to find out more about the usability of your web forms, click Usability Report.
Note You must have the appropriate access rights and permissions to view the web form reports.
5.2.1 Form Reports
This section contains more detailed information about each of the standard web form reports and explains how they can help you to analyze the behavior of customers on your e-commerce website.
The example reports used in this section come from another version of Sitecore E-Commerce.
Data Report
The Data report displays all the data that has been entered on the current form. This functionality only applies to forms that have been submitted successfully and have had the Save to Database save
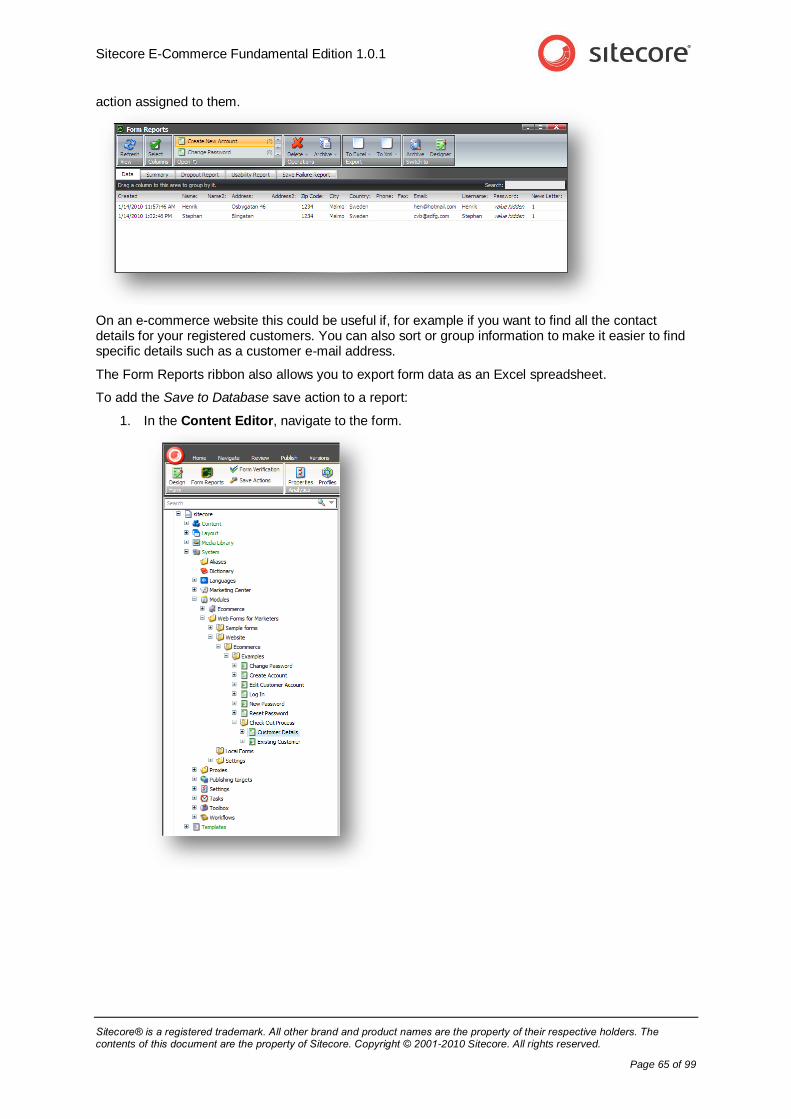
Sitecore E-Commerce Fundamental Edition 1.0.1
Sitecore® is a registered trademark. All other brand and product names are the property of their respective holders. The contents of this document are the property of Sitecore. Copyright © 2001-2010 Sitecore. All rights reserved.
Page 65 of 99
action assigned to them.
On an e-commerce website this could be useful if, for example if you want to find all the contact details for your registered customers. You can also sort or group information to make it easier to find specific details such as a customer e-mail address.
The Form Reports ribbon also allows you to export form data as an Excel spreadsheet.
To add the Save to Database save action to a report:
1. In the Content Editor, navigate to the form.

Sitecore E-Commerce Cookbook
Sitecore® is a registered trademark. All other brand and product names are the property of their respective holders. The contents of this document are the property of Sitecore. Copyright © 2001-2010 Sitecore. All rights reserved.
Page 66 of 99
2. Select the form and then in the Forms tab, in the Form group click Save Actions.
3. In the Save Actions dialog box, in the Save Actions field, select the Save to Database and then click Add.
Summary Report
The Summary report tab displays the values entered into each field on the current form. You can see all the values entered and the percentage of site visitors that made each response.
On an e-commerce website with multiple forms, this might help you get an overview of the responses made by the visitors who used this form.
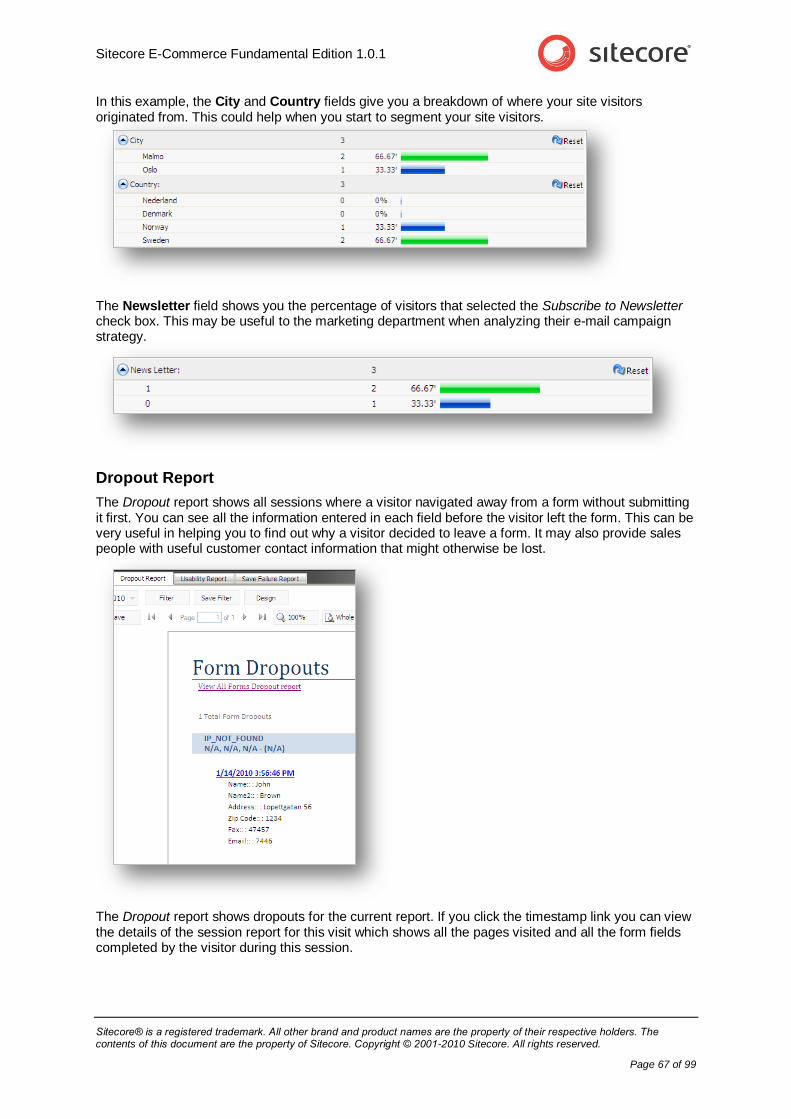
Sitecore E-Commerce Fundamental Edition 1.0.1
Sitecore® is a registered trademark. All other brand and product names are the property of their respective holders. The contents of this document are the property of Sitecore. Copyright © 2001-2010 Sitecore. All rights reserved.
Page 67 of 99
In this example, the City and Country fields give you a breakdown of where your site visitors originated from. This could help when you start to segment your site visitors.
The Newsletter field shows you the percentage of visitors that selected the Subscribe to Newsletter check box. This may be useful to the marketing department when analyzing their e-mail campaign strategy.
Dropout Report
The Dropout report shows all sessions where a visitor navigated away from a form without submitting it first. You can see all the information entered in each field before the visitor left the form. This can be very useful in helping you to find out why a visitor decided to leave a form. It may also provide sales people with useful customer contact information that might otherwise be lost.
The Dropout report shows dropouts for the current report. If you click the timestamp link you can view the details of the session report for this visit which shows all the pages visited and all the form fields completed by the visitor during this session.
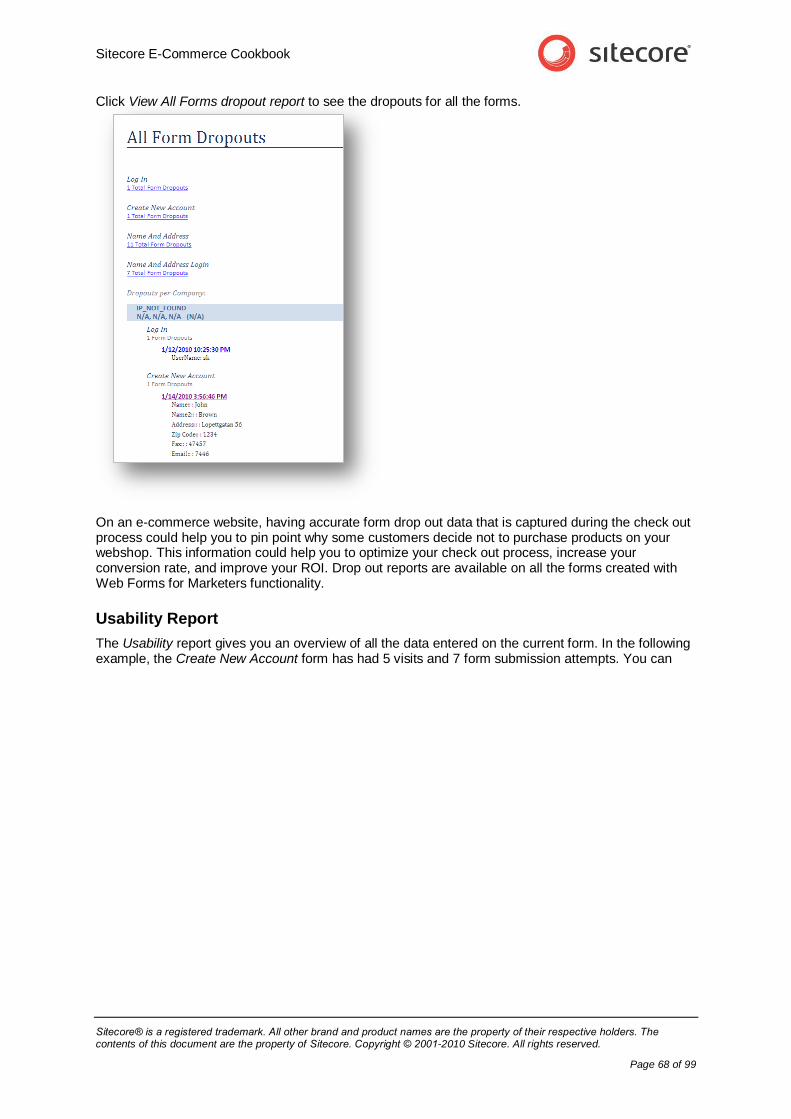
Sitecore E-Commerce Cookbook
Sitecore® is a registered trademark. All other brand and product names are the property of their respective holders. The contents of this document are the property of Sitecore. Copyright © 2001-2010 Sitecore. All rights reserved.
Page 68 of 99
Click View All Forms dropout report to see the dropouts for all the forms.
On an e-commerce website, having accurate form drop out data that is captured during the check out process could help you to pin point why some customers decide not to purchase products on your webshop. This information could help you to optimize your check out process, increase your conversion rate, and improve your ROI. Drop out reports are available on all the forms created with Web Forms for Marketers functionality.
Usability Report
The Usability report gives you an overview of all the data entered on the current form. In the following example, the Create New Account form has had 5 visits and 7 form submission attempts. You can
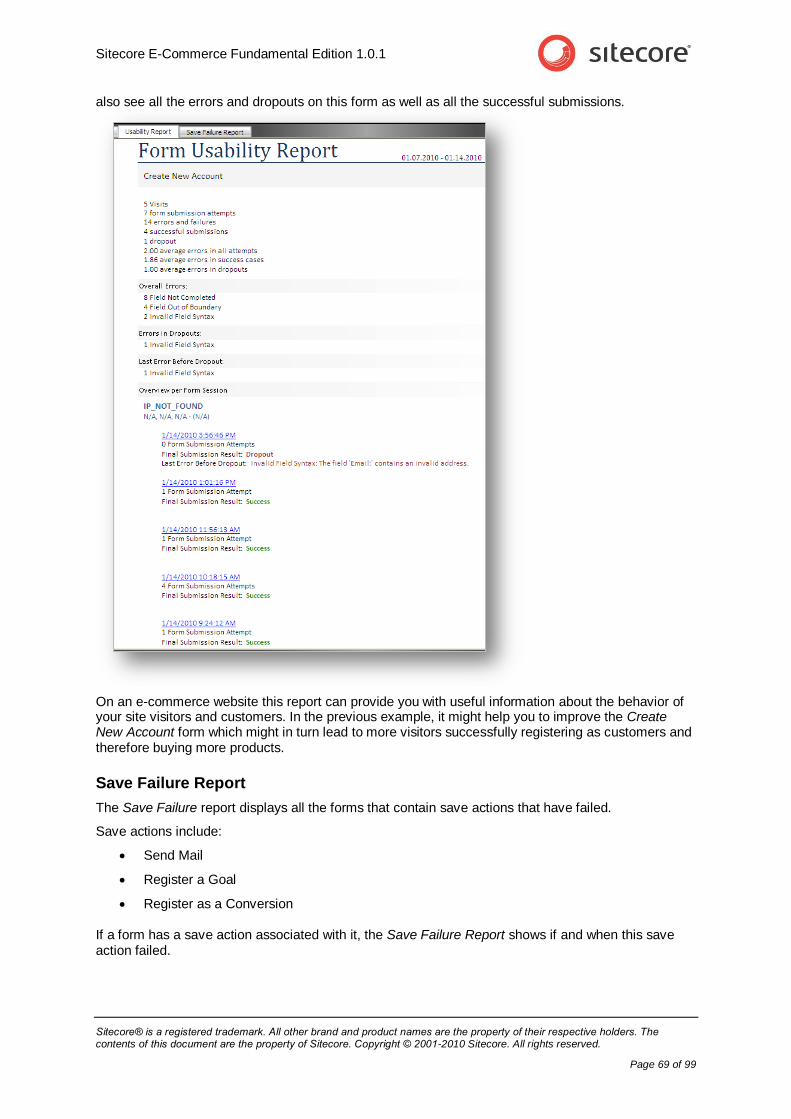
Sitecore E-Commerce Fundamental Edition 1.0.1
Sitecore® is a registered trademark. All other brand and product names are the property of their respective holders. The contents of this document are the property of Sitecore. Copyright © 2001-2010 Sitecore. All rights reserved.
Page 69 of 99
also see all the errors and dropouts on this form as well as all the successful submissions.
On an e-commerce website this report can provide you with useful information about the behavior of your site visitors and customers. In the previous example, it might help you to improve the Create New Account form which might in turn lead to more visitors successfully registering as customers and therefore buying more products.
Save Failure Report
The Save Failure report displays all the forms that contain save actions that have failed.
Save actions include:
Send Mail
Register a Goal
Register as a Conversion
If a form has a save action associated with it, the Save Failure Report shows if and when this save action failed.
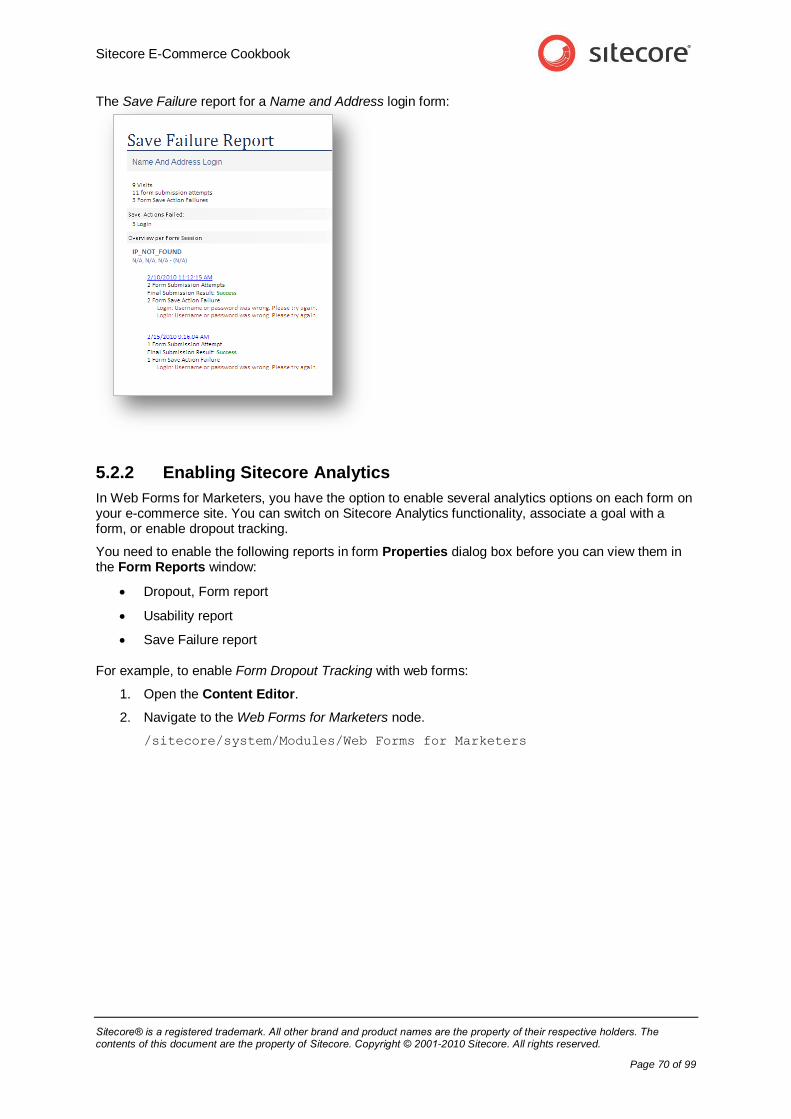
Sitecore E-Commerce Cookbook
Sitecore® is a registered trademark. All other brand and product names are the property of their respective holders. The contents of this document are the property of Sitecore. Copyright © 2001-2010 Sitecore. All rights reserved.
Page 70 of 99
The Save Failure report for a Name and Address login form:
5.2.2 Enabling Sitecore Analytics
In Web Forms for Marketers, you have the option to enable several analytics options on each form on your e-commerce site. You can switch on Sitecore Analytics functionality, associate a goal with a form, or enable dropout tracking.
You need to enable the following reports in form Properties dialog box before you can view them in the Form Reports window:
Dropout, Form report
Usability report
Save Failure report
For example, to enable Form Dropout Tracking with web forms:
1. Open the Content Editor.
2. Navigate to the Web Forms for Marketers node.
/sitecore/system/Modules/Web Forms for Marketers
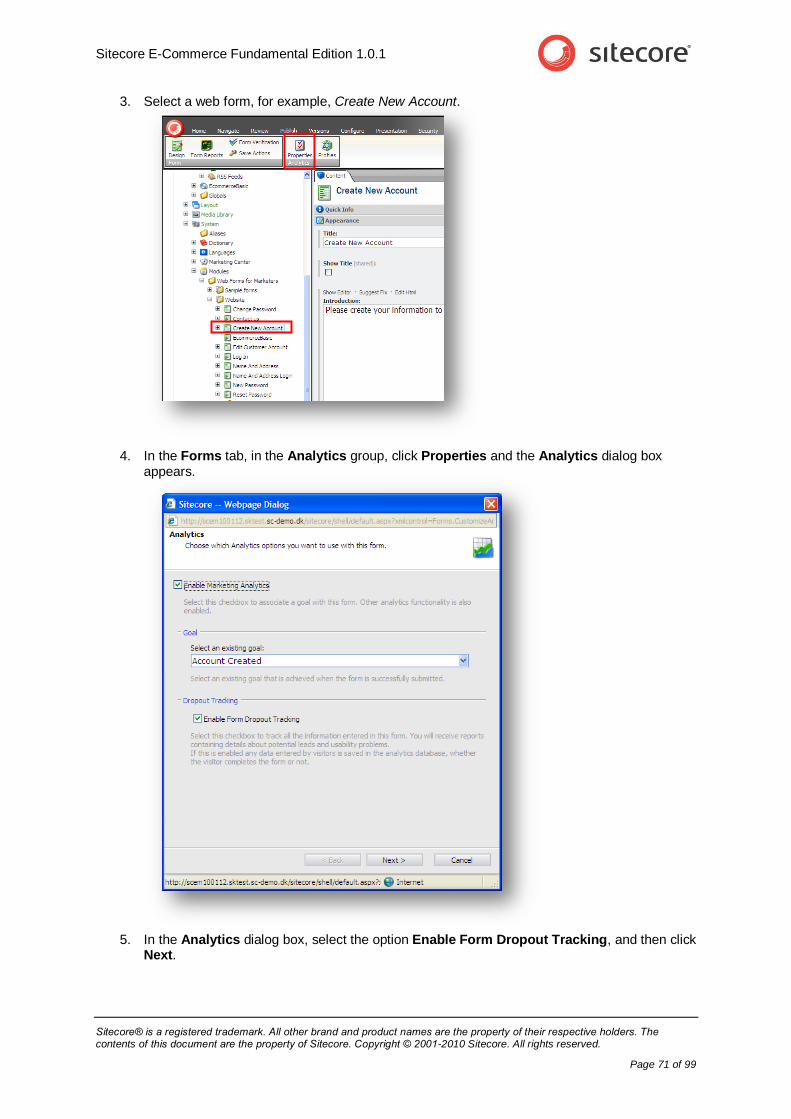
Sitecore E-Commerce Fundamental Edition 1.0.1
Sitecore® is a registered trademark. All other brand and product names are the property of their respective holders. The contents of this document are the property of Sitecore. Copyright © 2001-2010 Sitecore. All rights reserved.
Page 71 of 99
3. Select a web form, for example, Create New Account.
4. In the Forms tab, in the Analytics group, click Properties and the Analytics dialog box appears.
5. In the Analytics dialog box, select the option Enable Form Dropout Tracking, and then click Next.
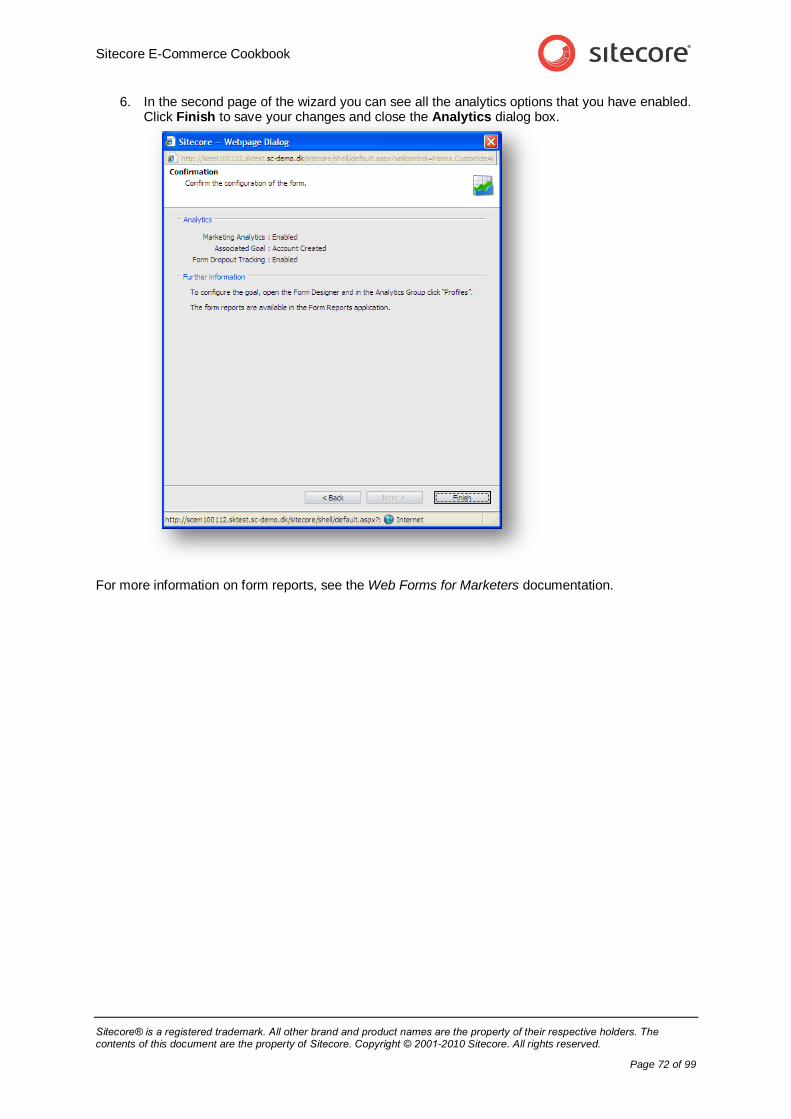
Sitecore E-Commerce Cookbook
Sitecore® is a registered trademark. All other brand and product names are the property of their respective holders. The contents of this document are the property of Sitecore. Copyright © 2001-2010 Sitecore. All rights reserved.
Page 72 of 99
6. In the second page of the wizard you can see all the analytics options that you have enabled. Click Finish to save your changes and close the Analytics dialog box.
For more information on form reports, see the Web Forms for Marketers documentation.
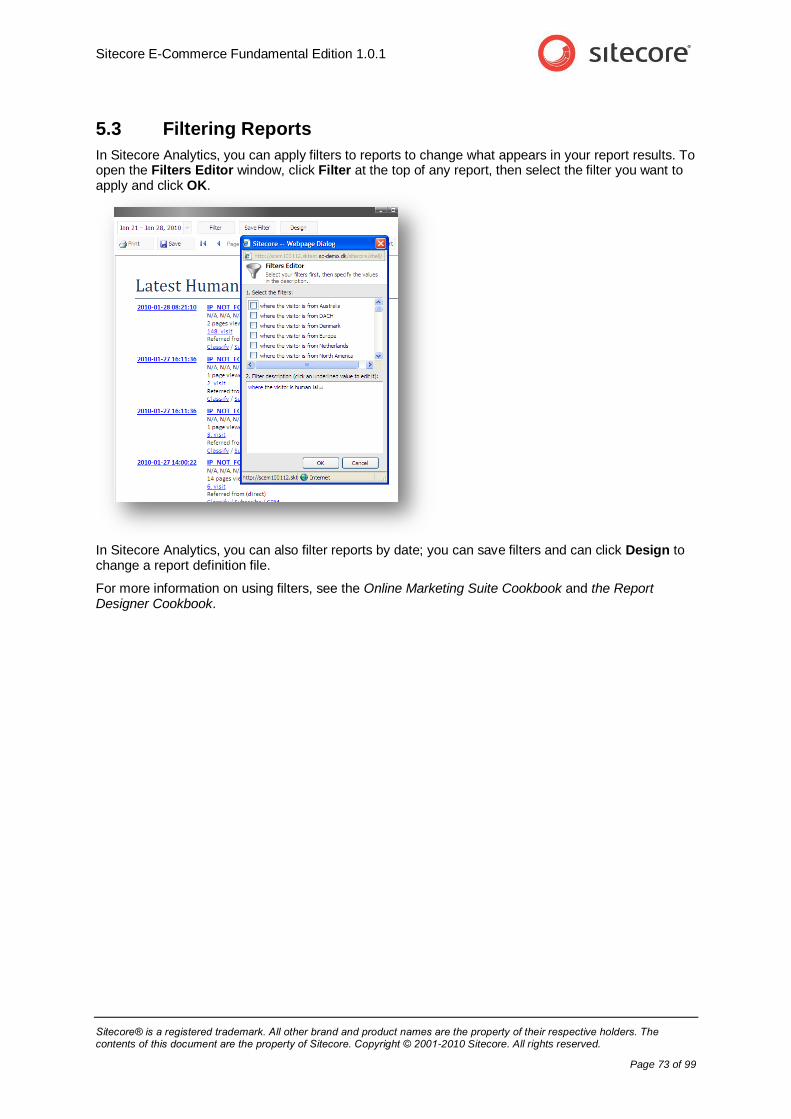
Sitecore E-Commerce Fundamental Edition 1.0.1
Sitecore® is a registered trademark. All other brand and product names are the property of their respective holders. The contents of this document are the property of Sitecore. Copyright © 2001-2010 Sitecore. All rights reserved.
Page 73 of 99
5.3 Filtering Reports
In Sitecore Analytics, you can apply filters to reports to change what appears in your report results. To open the Filters Editor window, click Filter at the top of any report, then select the filter you want to apply and click OK.
In Sitecore Analytics, you can also filter reports by date; you can save filters and can click Design to change a report definition file.
For more information on using filters, see the Online Marketing Suite Cookbook and the Report Designer Cookbook.
Sitecore E-Commerce Cookbook
Sitecore® is a registered trademark. All other brand and product names are the property of their respective holders. The contents of this document are the property of Sitecore. Copyright © 2001-2010 Sitecore. All rights reserved.
Page 74 of 99
Chapter 6
E-Commerce and the Online Marketing Suite
Combining Sitecore E-Commerce Fundamental Edition with the Sitecore Online Marketing Suite enables you to harness the power of a visitor experience database with web analytics on your e-commerce website. The Sitecore OMS integrates seamlessly with CMS 6 and Sitecore E-Commerce Fundamental Edition.
The OMS lets you track site visits and customers, accurately analyze their browsing behavior and purchase history and personalize content to match customer profiles. It also helps you gain a better understanding of your site visitors and customers and optimize your website to increase conversions and maximize ROI (return on investment).
This chapter contains the following sections:
Introduction to the OMS
Profiling
Goals
Managing Campaigns
Creating MV Tests
Creating Personalization

Sitecore E-Commerce Fundamental Edition 1.0.1
Sitecore® is a registered trademark. All other brand and product names are the property of their respective holders. The contents of this document are the property of Sitecore. Copyright © 2001-2010 Sitecore. All rights reserved.
Page 75 of 99
6.1 Introduction to the OMS
When you use the E-Commerce solution in combination with the Sitecore OMS, you can:
Profile your site visitors.
Record conversions and goals.
Create and optimize campaigns.
Configure MV tests.
Personalize website content.
To demonstrate some of these features we will use the monthly offer page that we made earlier. This page displays a selection of products at special discount prices. We will return to this example as we describe how to configure different features of the OMS combined with e-commerce functionality.
For more information on how to implement OMS functionality, see the Online Marketing Suite Cookbook.
6.1.1 Personas and the Web Shop
To utilize the full power of the OMS you should carefully plan the implementation of your profiling strategy. An important part of this is having a set of well thought through personas. Appropriate time and attention spent on this stage of your planning pays off later when your site is up and running.
You need to understand your customers and know your target groups. If necessary, start by carrying out more research to gather this information before creating your personas.
The sample webshop sells cameras and camera accessories to a wide range of potential customers from beginners to professional photographers. The personas that you create should reflect this fact. You could create profiles for these interest groups but your personas should overlap and reflect a broad range of visitor interests.
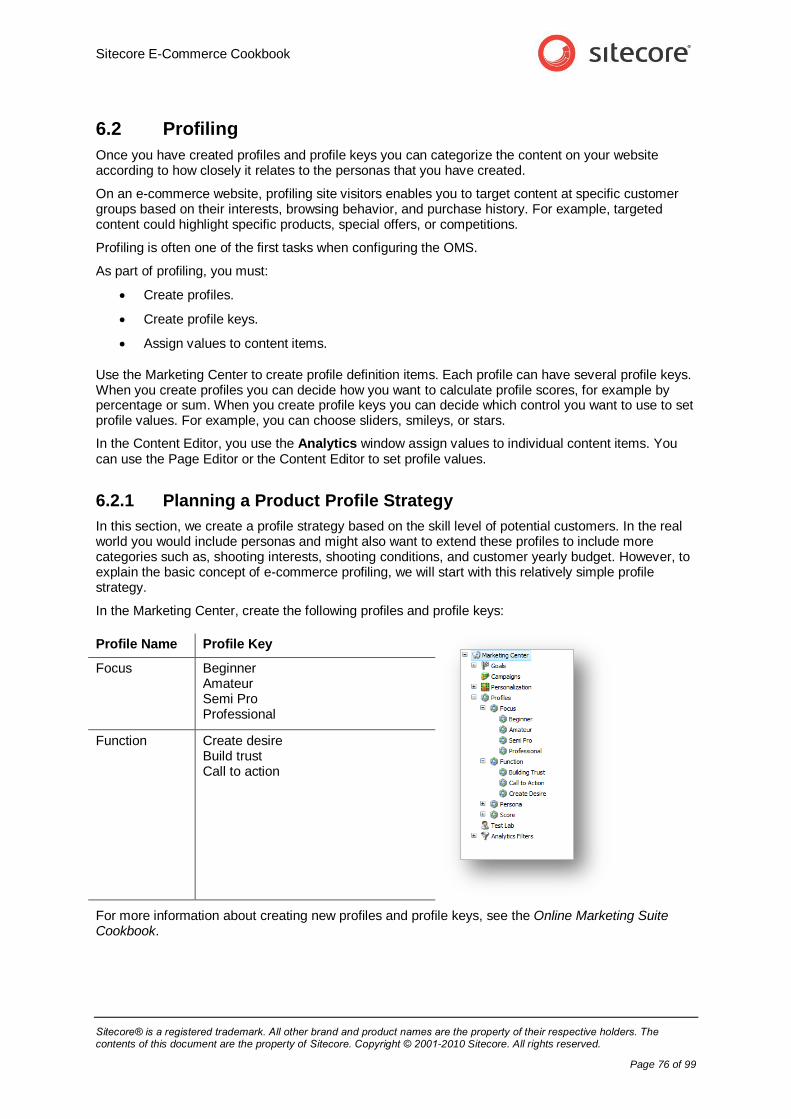
Sitecore E-Commerce Cookbook
Sitecore® is a registered trademark. All other brand and product names are the property of their respective holders. The contents of this document are the property of Sitecore. Copyright © 2001-2010 Sitecore. All rights reserved.
Page 76 of 99
6.2 Profiling
Once you have created profiles and profile keys you can categorize the content on your website according to how closely it relates to the personas that you have created.
On an e-commerce website, profiling site visitors enables you to target content at specific customer groups based on their interests, browsing behavior, and purchase history. For example, targeted content could highlight specific products, special offers, or competitions.
Profiling is often one of the first tasks when configuring the OMS.
As part of profiling, you must:
Create profiles.
Create profile keys.
Assign values to content items.
Use the Marketing Center to create profile definition items. Each profile can have several profile keys. When you create profiles you can decide how you want to calculate profile scores, for example by percentage or sum. When you create profile keys you can decide which control you want to use to set profile values. For example, you can choose sliders, smileys, or stars.
In the Content Editor, you use the Analytics window assign values to individual content items. You can use the Page Editor or the Content Editor to set profile values.
6.2.1 Planning a Product Profile Strategy
In this section, we create a profile strategy based on the skill level of potential customers. In the real world you would include personas and might also want to extend these profiles to include more categories such as, shooting interests, shooting conditions, and customer yearly budget. However, to explain the basic concept of e-commerce profiling, we will start with this relatively simple profile strategy.
In the Marketing Center, create the following profiles and profile keys:
Profile Name Profile Key
Focus Beginner Amateur Semi Pro Professional
Function Create desire Build trust Call to action
For more information about creating new profiles and profile keys, see the Online Marketing Suite Cookbook.
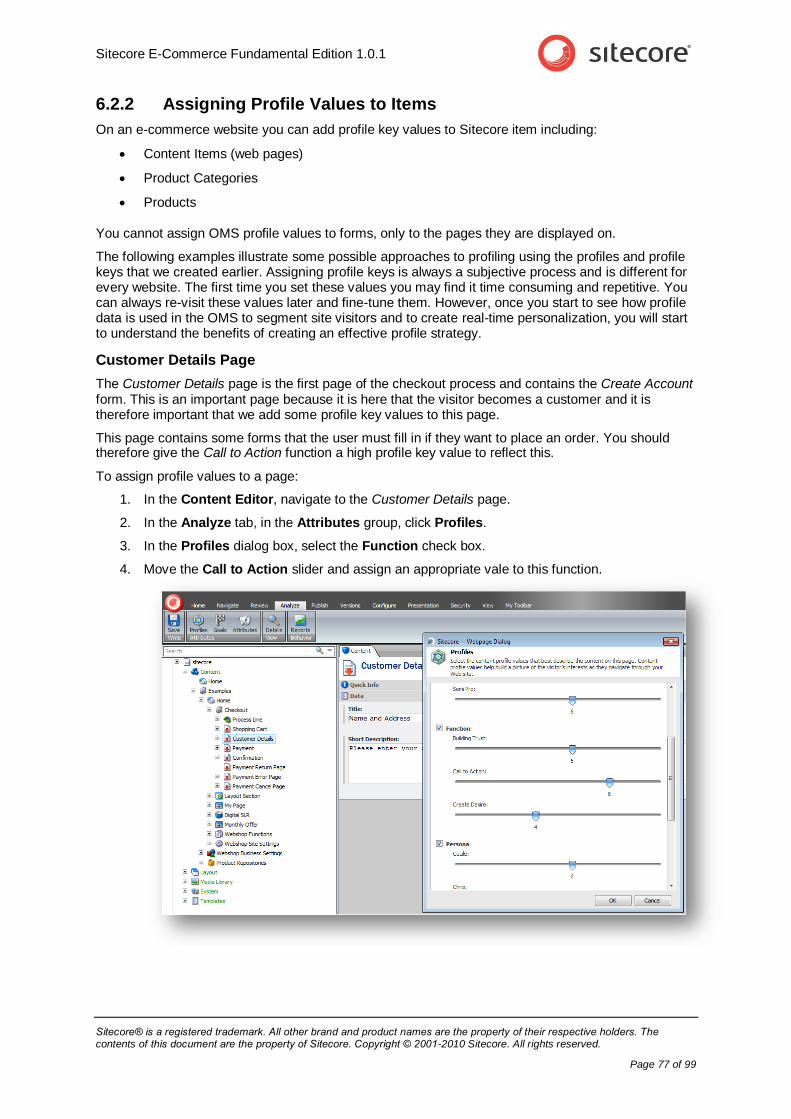
Sitecore E-Commerce Fundamental Edition 1.0.1
Sitecore® is a registered trademark. All other brand and product names are the property of their respective holders. The contents of this document are the property of Sitecore. Copyright © 2001-2010 Sitecore. All rights reserved.
Page 77 of 99
6.2.2 Assigning Profile Values to Items
On an e-commerce website you can add profile key values to Sitecore item including:
Content Items (web pages)
Product Categories
Products
You cannot assign OMS profile values to forms, only to the pages they are displayed on.
The following examples illustrate some possible approaches to profiling using the profiles and profile keys that we created earlier. Assigning profile keys is always a subjective process and is different for every website. The first time you set these values you may find it time consuming and repetitive. You can always re-visit these values later and fine-tune them. However, once you start to see how profile data is used in the OMS to segment site visitors and to create real-time personalization, you will start to understand the benefits of creating an effective profile strategy.
Customer Details Page
The Customer Details page is the first page of the checkout process and contains the Create Account form. This is an important page because it is here that the visitor becomes a customer and it is therefore important that we add some profile key values to this page.
This page contains some forms that the user must fill in if they want to place an order. You should therefore give the Call to Action function a high profile key value to reflect this.
To assign profile values to a page:
1. In the Content Editor, navigate to the Customer Details page.
2. In the Analyze tab, in the Attributes group, click Profiles.
3. In the Profiles dialog box, select the Function check box.
4. Move the Call to Action slider and assign an appropriate vale to this function.
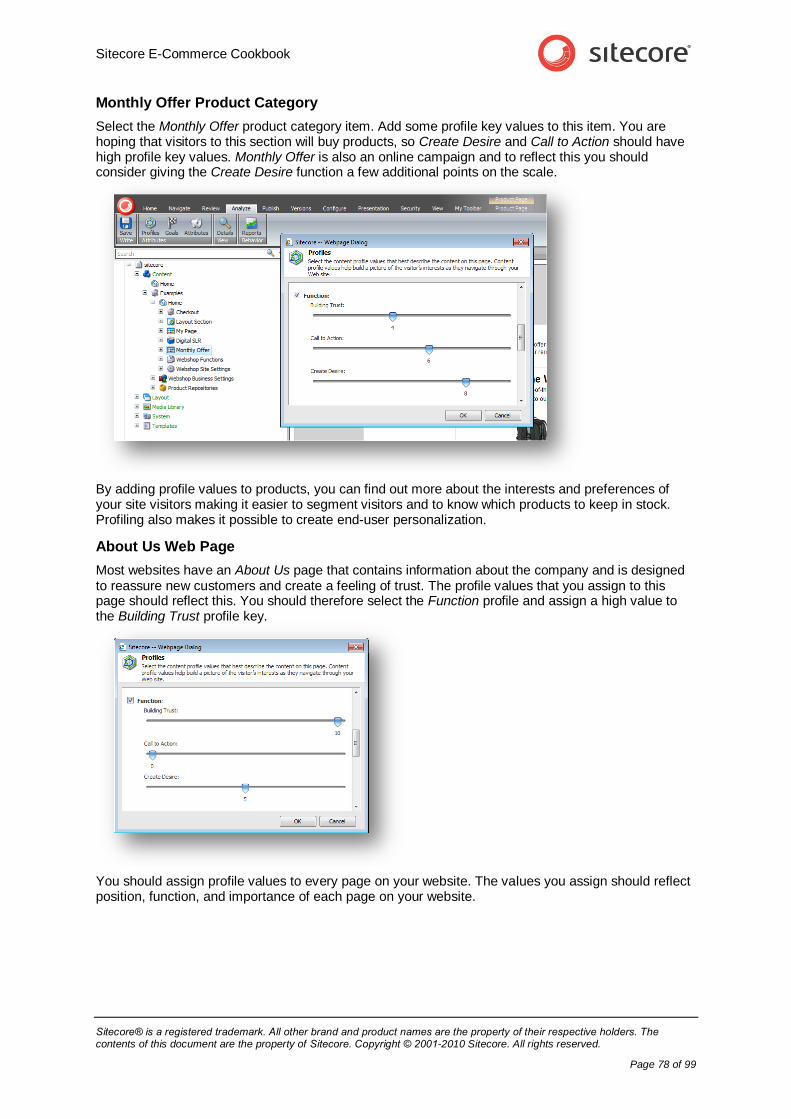
Sitecore E-Commerce Cookbook
Sitecore® is a registered trademark. All other brand and product names are the property of their respective holders. The contents of this document are the property of Sitecore. Copyright © 2001-2010 Sitecore. All rights reserved.
Page 78 of 99
Monthly Offer Product Category
Select the Monthly Offer product category item. Add some profile key values to this item. You are hoping that visitors to this section will buy products, so Create Desire and Call to Action should have high profile key values. Monthly Offer is also an online campaign and to reflect this you should consider giving the Create Desire function a few additional points on the scale.
By adding profile values to products, you can find out more about the interests and preferences of your site visitors making it easier to segment visitors and to know which products to keep in stock. Profiling also makes it possible to create end-user personalization.
About Us Web Page
Most websites have an About Us page that contains information about the company and is designed to reassure new customers and create a feeling of trust. The profile values that you assign to this page should reflect this. You should therefore select the Function profile and assign a high value to the Building Trust profile key.
You should assign profile values to every page on your website. The values you assign should reflect position, function, and importance of each page on your website.
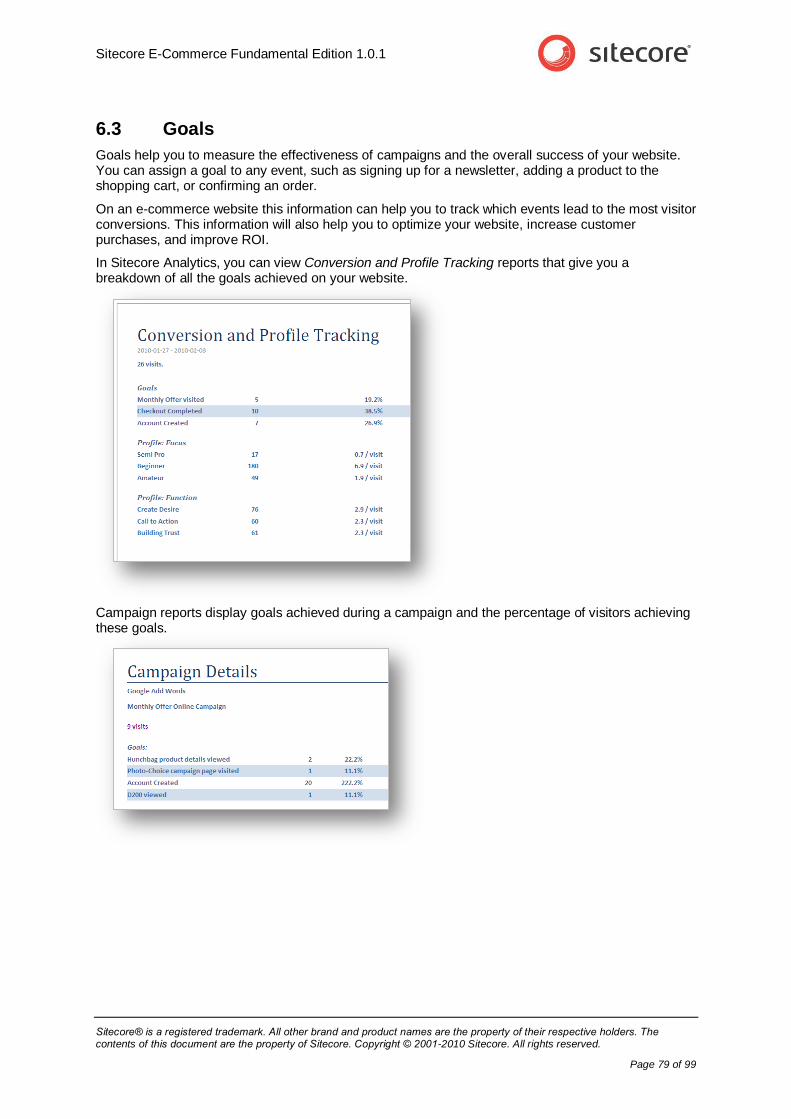
Sitecore E-Commerce Fundamental Edition 1.0.1
Sitecore® is a registered trademark. All other brand and product names are the property of their respective holders. The contents of this document are the property of Sitecore. Copyright © 2001-2010 Sitecore. All rights reserved.
Page 79 of 99
6.3 Goals
Goals help you to measure the effectiveness of campaigns and the overall success of your website. You can assign a goal to any event, such as signing up for a newsletter, adding a product to the shopping cart, or confirming an order.
On an e-commerce website this information can help you to track which events lead to the most visitor conversions. This information will also help you to optimize your website, increase customer purchases, and improve ROI.
In Sitecore Analytics, you can view Conversion and Profile Tracking reports that give you a breakdown of all the goals achieved on your website.
Campaign reports display goals achieved during a campaign and the percentage of visitors achieving these goals.

Sitecore E-Commerce Cookbook
Sitecore® is a registered trademark. All other brand and product names are the property of their respective holders. The contents of this document are the property of Sitecore. Copyright © 2001-2010 Sitecore. All rights reserved.
Page 80 of 99
Goals also appear in the session trail alongside other events recorded in the Latest Human Sessions report.
You create goals in the Marketing Center and assign them to content items.
6.3.1 Creating and Assigning Goals
On an e-commerce website, you can assign goals to the following types of items:
Content Items (web pages)
Product categories
Products
Web forms
To illustrate how to assign goals we will use the, Monthly Offer section.
For example, in the Marketing Center, you could create a goal called Monthly Offer Visited. To make this goal appear in your Sitecore reports, you must remember to select the IsGoal check-box.
Creating a Goal
The Monthly Offer Visited goal has not been created yet.
To create the Monthly Offer Visited goal:
1. In the Sitecore desktop, click Sitecore, Marketing Center.
2. In the Marketing Center, in the content tree, click Goals.
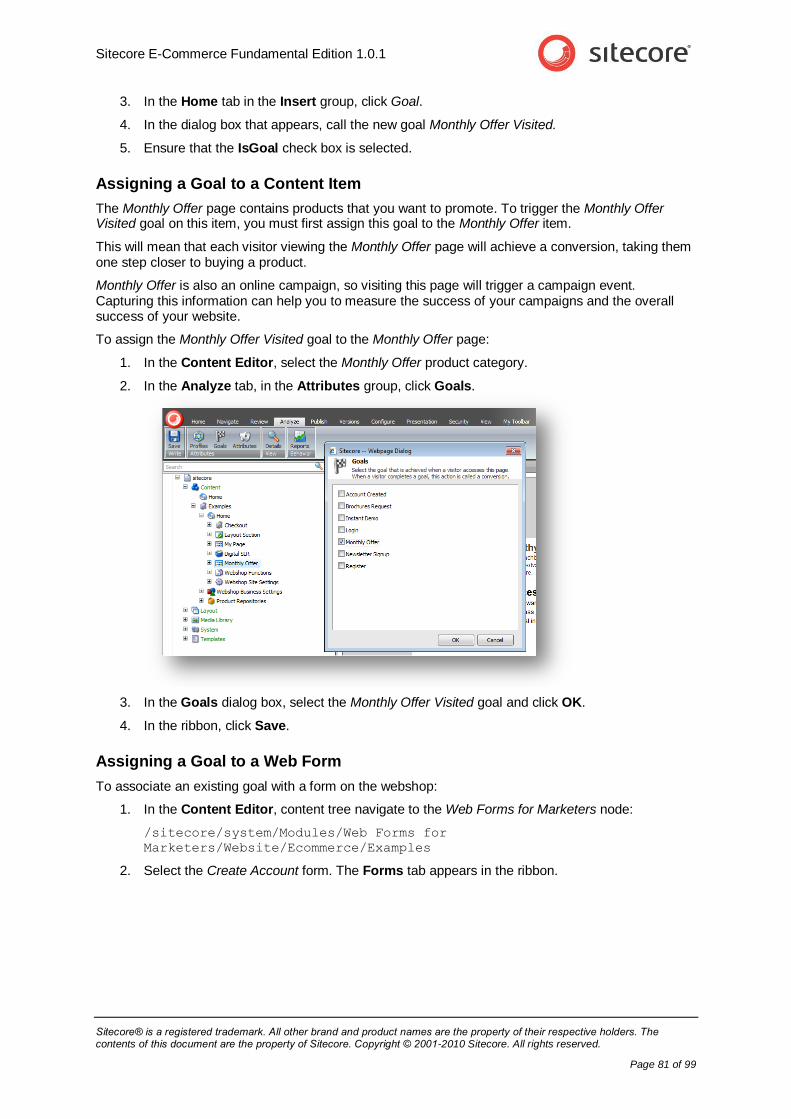
Sitecore E-Commerce Fundamental Edition 1.0.1
Sitecore® is a registered trademark. All other brand and product names are the property of their respective holders. The contents of this document are the property of Sitecore. Copyright © 2001-2010 Sitecore. All rights reserved.
Page 81 of 99
3. In the Home tab in the Insert group, click Goal.
4. In the dialog box that appears, call the new goal Monthly Offer Visited.
5. Ensure that the IsGoal check box is selected.
Assigning a Goal to a Content Item
The Monthly Offer page contains products that you want to promote. To trigger the Monthly Offer Visited goal on this item, you must first assign this goal to the Monthly Offer item.
This will mean that each visitor viewing the Monthly Offer page will achieve a conversion, taking them one step closer to buying a product.
Monthly Offer is also an online campaign, so visiting this page will trigger a campaign event. Capturing this information can help you to measure the success of your campaigns and the overall success of your website.
To assign the Monthly Offer Visited goal to the Monthly Offer page:
1. In the Content Editor, select the Monthly Offer product category.
2. In the Analyze tab, in the Attributes group, click Goals.
3. In the Goals dialog box, select the Monthly Offer Visited goal and click OK.
4. In the ribbon, click Save.
Assigning a Goal to a Web Form
To associate an existing goal with a form on the webshop:
1. In the Content Editor, content tree navigate to the Web Forms for Marketers node:
/sitecore/system/Modules/Web Forms for
Marketers/Website/Ecommerce/Examples
2. Select the Create Account form. The Forms tab appears in the ribbon.
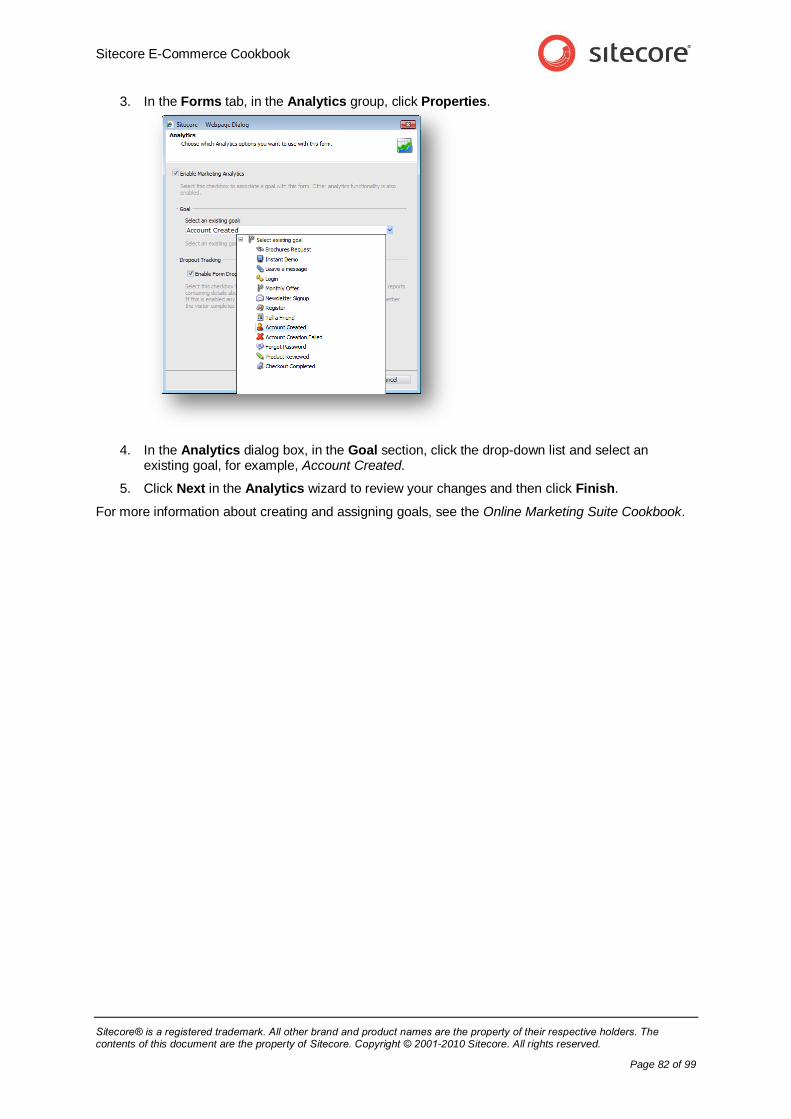
Sitecore E-Commerce Cookbook
Sitecore® is a registered trademark. All other brand and product names are the property of their respective holders. The contents of this document are the property of Sitecore. Copyright © 2001-2010 Sitecore. All rights reserved.
Page 82 of 99
3. In the Forms tab, in the Analytics group, click Properties.
4. In the Analytics dialog box, in the Goal section, click the drop-down list and select an existing goal, for example, Account Created.
5. Click Next in the Analytics wizard to review your changes and then click Finish.
For more information about creating and assigning goals, see the Online Marketing Suite Cookbook.

Sitecore E-Commerce Fundamental Edition 1.0.1
Sitecore® is a registered trademark. All other brand and product names are the property of their respective holders. The contents of this document are the property of Sitecore. Copyright © 2001-2010 Sitecore. All rights reserved.
Page 83 of 99
6.4 Managing Campaigns
You create campaigns to encourage visitors to come to your website and perform desired actions. On an e-commerce website, you probably want to encourage visitors to become customers and buy your products.
In the Sitecore OMS it is easy to create campaigns and use standard OMS reports to measure their effectiveness. You can fine tune and improve your campaigns over time.
There are two main types of campaigns that you can create:
Online campaigns — for example, a Google AdWords campaign that links to a specific page or section on a website.
Offline campaigns — for example, a magazine promotion with an offline landing page that can only be reached using an alias.
If you create an online or offline campaign in the OMS Marketing Center, when the campaign is triggered the campaign appears in the Sitecore Analytics session trail report.
Sitecore Analytics also contains standard campaign reports that display more detailed analytics data related to your campaigns.
You can also create e-mail campaigns using the Sitecore E-mail Campaign Manager. For more information about creating e-mail campaigns, see the Sitecore E-mail Campaign Manager Marketer’s Guide.
6.4.1 Online E-Commerce Campaigns
To illustrate how to create and evaluate an e-commerce campaign, we will again use the, Monthly Offer section. This section contains products that are on offer at special discount prices.
To promote your campaigns, you can use tools such as Google AdWords to ensure that potential customers reach your site from a Google search page. We will assume that most visitors first use Google to find photographic equipment they want to buy and then click the link that appears in their search results.
To configure and test an online campaign, you need to complete the following checklist of tasks:
Create a campaign item.
Create a campaign event.
Copy the campaign event URL to your Google AdWords administration page.
Visit the campaign page on your webshop.
View the Sitecore Analytics Session report.
View the Sitecore Analytics Campaign reports.
How to Create an Online Campaign Item
1. Click the Sitecore start menu and then click Marketing Center.
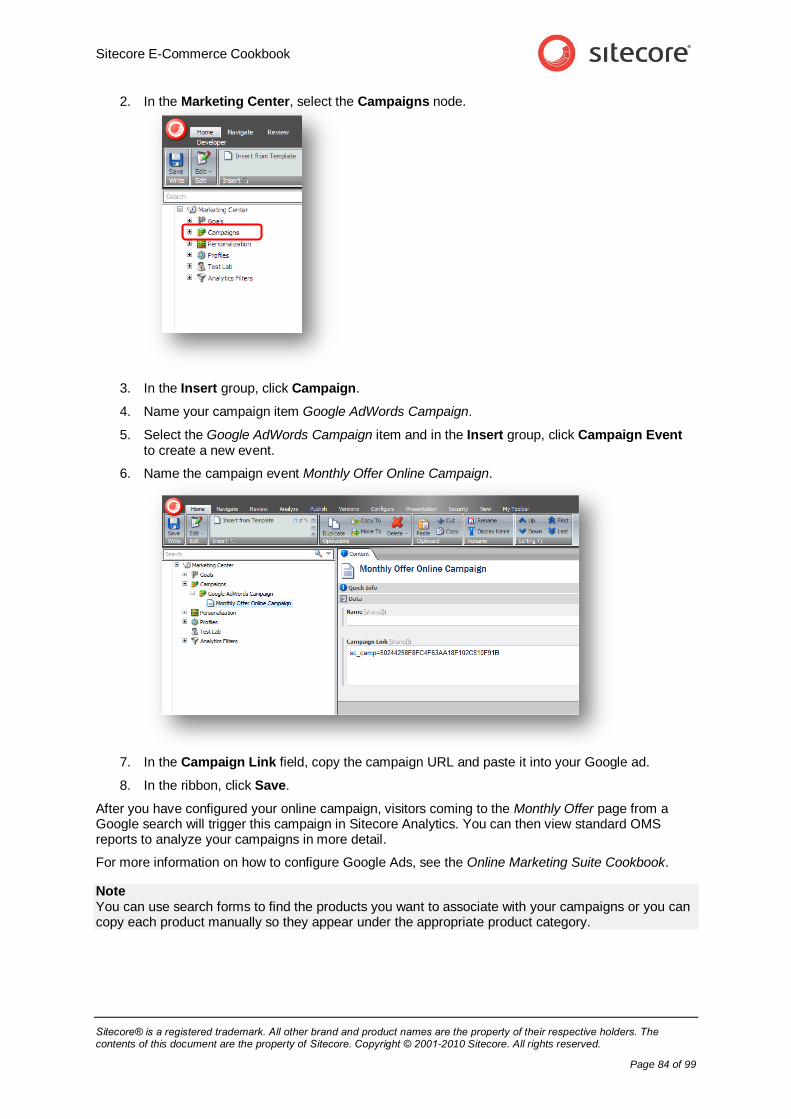
Sitecore E-Commerce Cookbook
Sitecore® is a registered trademark. All other brand and product names are the property of their respective holders. The contents of this document are the property of Sitecore. Copyright © 2001-2010 Sitecore. All rights reserved.
Page 84 of 99
2. In the Marketing Center, select the Campaigns node.
3. In the Insert group, click Campaign.
4. Name your campaign item Google AdWords Campaign.
5. Select the Google AdWords Campaign item and in the Insert group, click Campaign Event to create a new event.
6. Name the campaign event Monthly Offer Online Campaign.
7. In the Campaign Link field, copy the campaign URL and paste it into your Google ad.
8. In the ribbon, click Save.
After you have configured your online campaign, visitors coming to the Monthly Offer page from a Google search will trigger this campaign in Sitecore Analytics. You can then view standard OMS reports to analyze your campaigns in more detail.
For more information on how to configure Google Ads, see the Online Marketing Suite Cookbook.
Note You can use search forms to find the products you want to associate with your campaigns or you can copy each product manually so they appear under the appropriate product category.
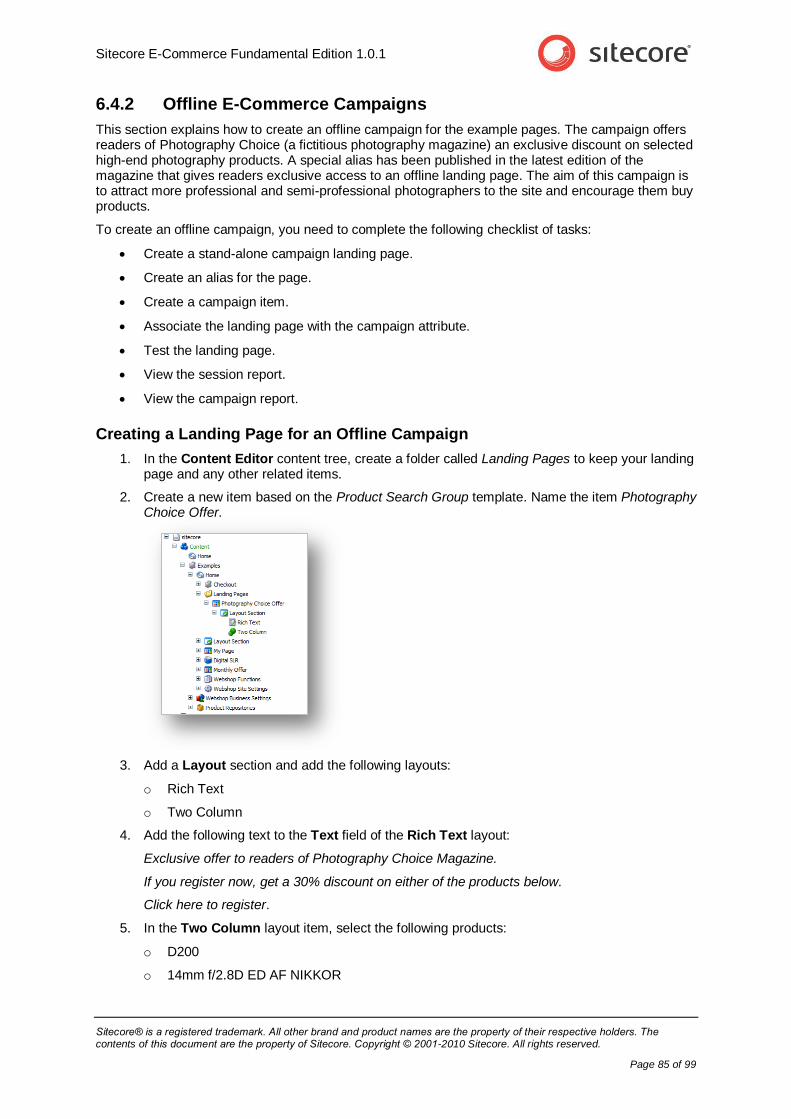
Sitecore E-Commerce Fundamental Edition 1.0.1
Sitecore® is a registered trademark. All other brand and product names are the property of their respective holders. The contents of this document are the property of Sitecore. Copyright © 2001-2010 Sitecore. All rights reserved.
Page 85 of 99
6.4.2 Offline E-Commerce Campaigns
This section explains how to create an offline campaign for the example pages. The campaign offers readers of Photography Choice (a fictitious photography magazine) an exclusive discount on selected high-end photography products. A special alias has been published in the latest edition of the magazine that gives readers exclusive access to an offline landing page. The aim of this campaign is to attract more professional and semi-professional photographers to the site and encourage them buy products.
To create an offline campaign, you need to complete the following checklist of tasks:
Create a stand-alone campaign landing page.
Create an alias for the page.
Create a campaign item.
Associate the landing page with the campaign attribute.
Test the landing page.
View the session report.
View the campaign report.
Creating a Landing Page for an Offline Campaign
1. In the Content Editor content tree, create a folder called Landing Pages to keep your landing page and any other related items.
2. Create a new item based on the Product Search Group template. Name the item Photography Choice Offer.
3. Add a Layout section and add the following layouts:
o Rich Text
o Two Column
4. Add the following text to the Text field of the Rich Text layout:
Exclusive offer to readers of Photography Choice Magazine.
If you register now, get a 30% discount on either of the products below.
Click here to register.
5. In the Two Column layout item, select the following products:
o D200
o 14mm f/2.8D ED AF NIKKOR
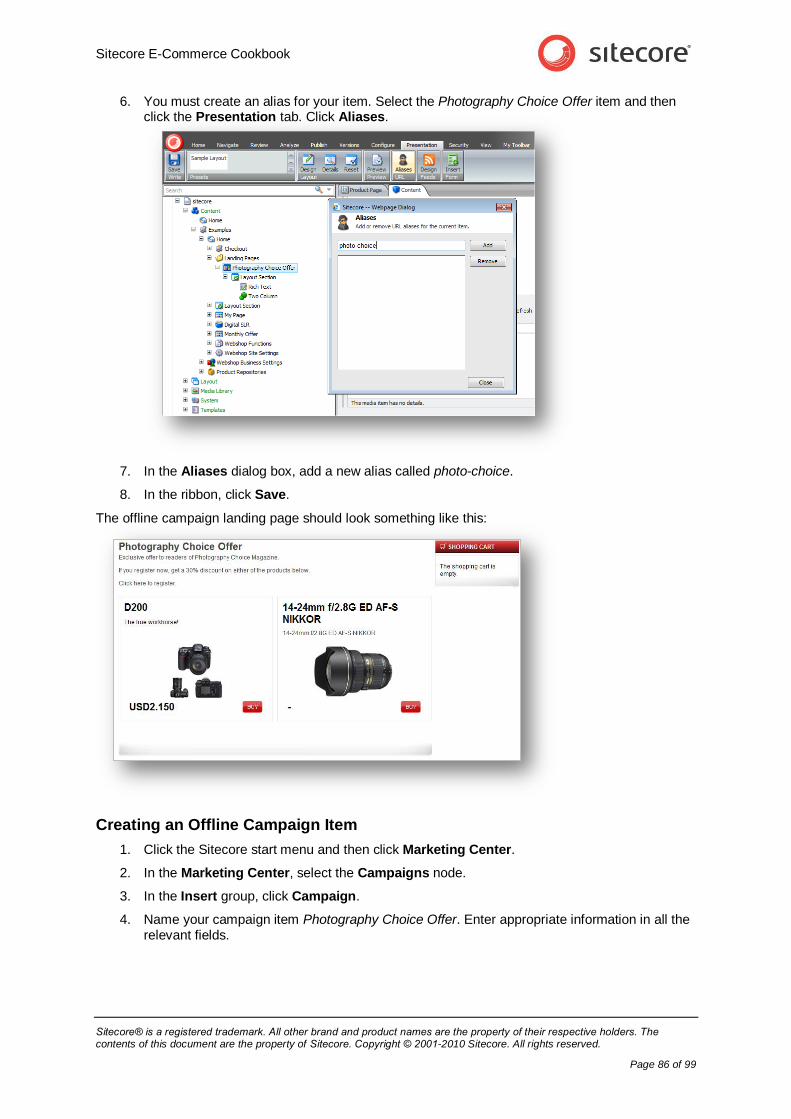
Sitecore E-Commerce Cookbook
Sitecore® is a registered trademark. All other brand and product names are the property of their respective holders. The contents of this document are the property of Sitecore. Copyright © 2001-2010 Sitecore. All rights reserved.
Page 86 of 99
6. You must create an alias for your item. Select the Photography Choice Offer item and then click the Presentation tab. Click Aliases.
7. In the Aliases dialog box, add a new alias called photo-choice.
8. In the ribbon, click Save.
The offline campaign landing page should look something like this:
Creating an Offline Campaign Item
1. Click the Sitecore start menu and then click Marketing Center.
2. In the Marketing Center, select the Campaigns node.
3. In the Insert group, click Campaign.
4. Name your campaign item Photography Choice Offer. Enter appropriate information in all the relevant fields.
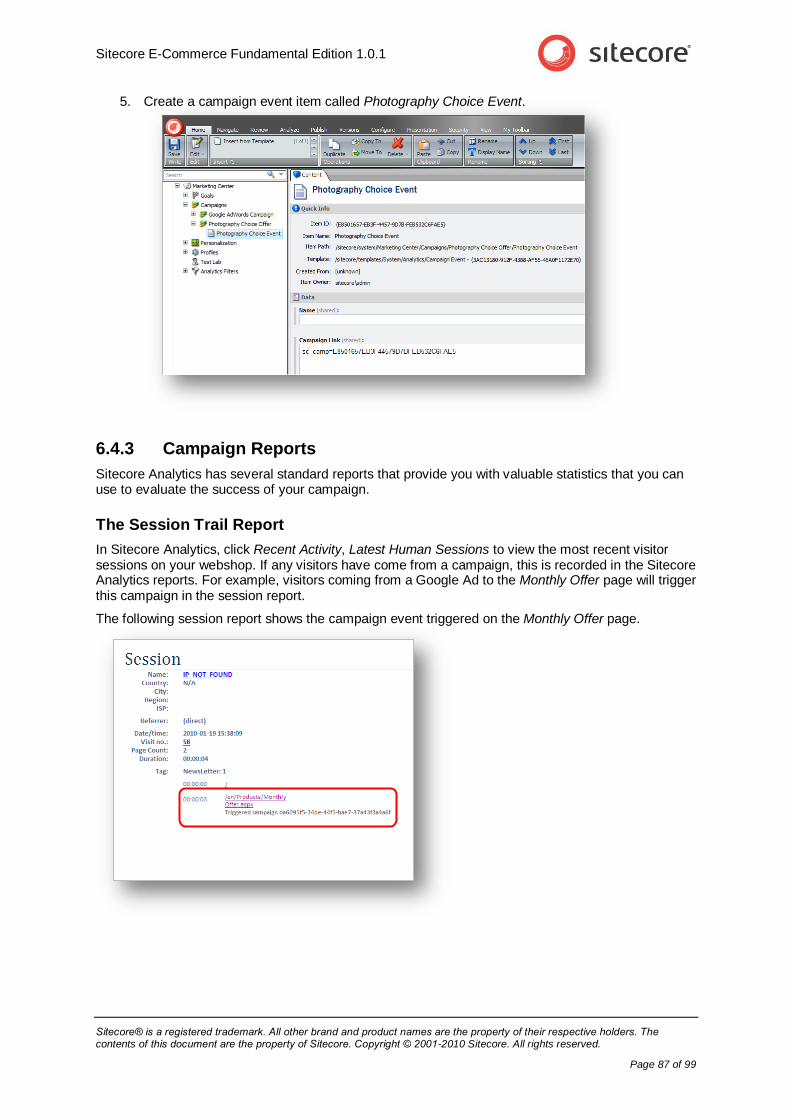
Sitecore E-Commerce Fundamental Edition 1.0.1
Sitecore® is a registered trademark. All other brand and product names are the property of their respective holders. The contents of this document are the property of Sitecore. Copyright © 2001-2010 Sitecore. All rights reserved.
Page 87 of 99
5. Create a campaign event item called Photography Choice Event.
6.4.3 Campaign Reports
Sitecore Analytics has several standard reports that provide you with valuable statistics that you can use to evaluate the success of your campaign.
The Session Trail Report
In Sitecore Analytics, click Recent Activity, Latest Human Sessions to view the most recent visitor sessions on your webshop. If any visitors have come from a campaign, this is recorded in the Sitecore Analytics reports. For example, visitors coming from a Google Ad to the Monthly Offer page will trigger this campaign in the session report.
The following session report shows the campaign event triggered on the Monthly Offer page.
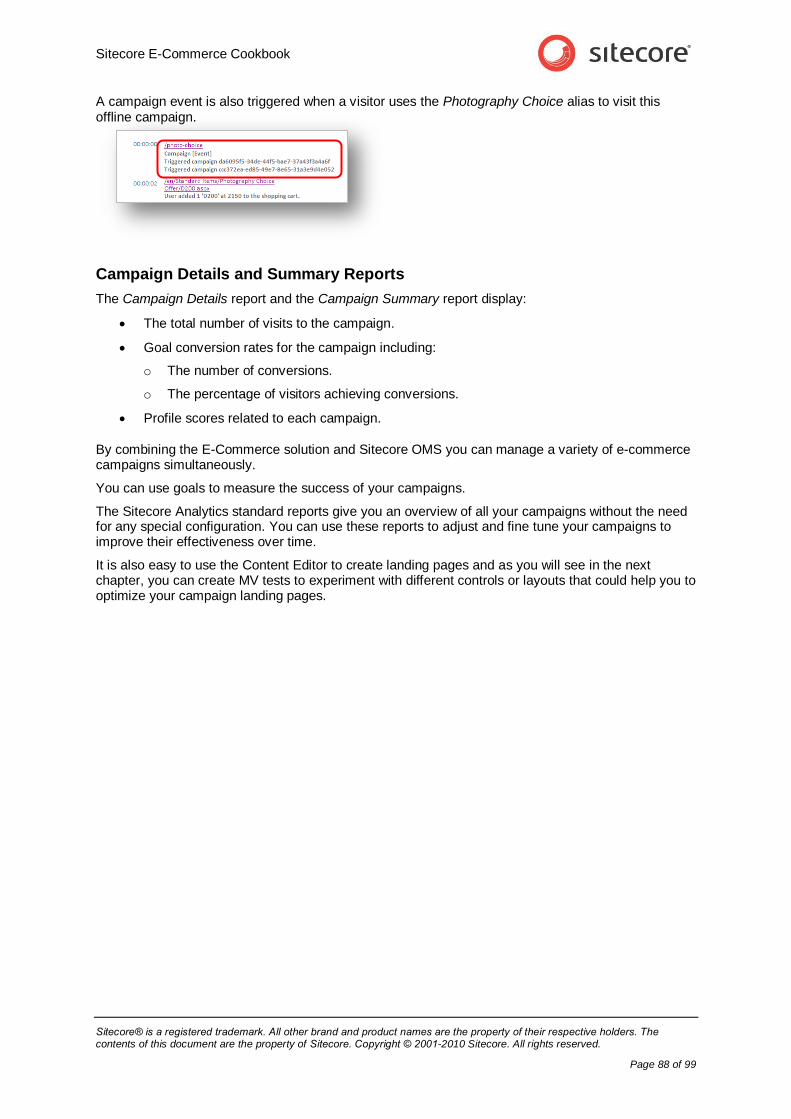
Sitecore E-Commerce Cookbook
Sitecore® is a registered trademark. All other brand and product names are the property of their respective holders. The contents of this document are the property of Sitecore. Copyright © 2001-2010 Sitecore. All rights reserved.
Page 88 of 99
A campaign event is also triggered when a visitor uses the Photography Choice alias to visit this offline campaign.
Campaign Details and Summary Reports
The Campaign Details report and the Campaign Summary report display:
The total number of visits to the campaign.
Goal conversion rates for the campaign including:
o The number of conversions.
o The percentage of visitors achieving conversions.
Profile scores related to each campaign.
By combining the E-Commerce solution and Sitecore OMS you can manage a variety of e-commerce campaigns simultaneously.
You can use goals to measure the success of your campaigns.
The Sitecore Analytics standard reports give you an overview of all your campaigns without the need for any special configuration. You can use these reports to adjust and fine tune your campaigns to improve their effectiveness over time.
It is also easy to use the Content Editor to create landing pages and as you will see in the next chapter, you can create MV tests to experiment with different controls or layouts that could help you to optimize your campaign landing pages.

Sitecore E-Commerce Fundamental Edition 1.0.1
Sitecore® is a registered trademark. All other brand and product names are the property of their respective holders. The contents of this document are the property of Sitecore. Copyright © 2001-2010 Sitecore. All rights reserved.
Page 89 of 99
6.5 Creating MV Tests
Multivariate testing is a powerful way of finding the most effective web controls to use on campaign landing pages or other pages on your website. For example, a web control could be a campaign slogan and banner, a button to purchase an item or a simple web form. MV Tests can help you to decide which combinations of images and text work best.
In Sitecore OMS it is quick and easy to create an MV test and to integrate it with your E-Commerce installation. Sitecore Analytics also includes a standard MV Test report which displays data on the percentage of visitors that use each control and the number of conversions that result from each test that you carry out.
6.5.1 MV Tests and E-Commerce
On an e-commerce website optimizing your web controls can make your campaigns more effective and result in increased sales and return on investment (ROI).
How to Create an MV Test
To illustrate this on the webshop, we will create two very different marketing slogans to encourage visitors to buy the products featured in the Monthly Offer campaign.
Use the following slogans or create some of your own:
Slogan 1 Slogan 2
Please buy the products on this page!
Two unique products on special offer this month!! Get a 30% discount if you buy now!!
Checklist of tasks:
Create content items containing two different slogans.
Create a test and some test variables.
Choose a test strategy.
Select a rendering.
Enable the MV test.
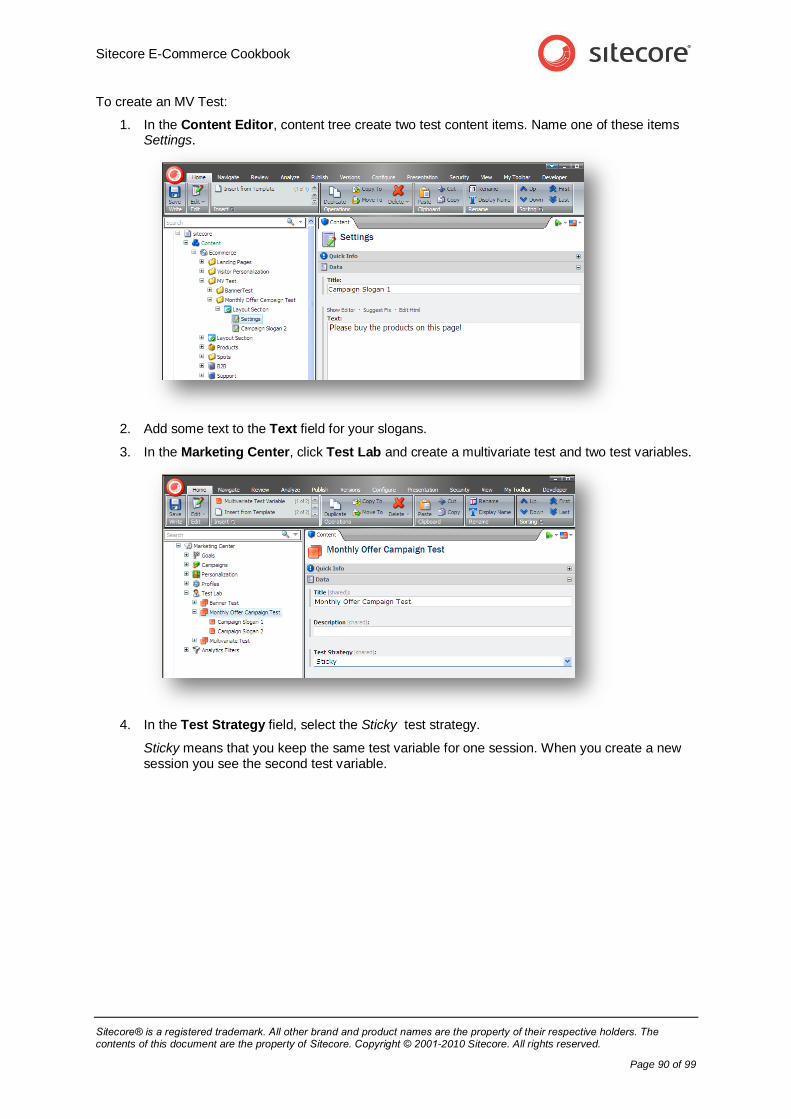
Sitecore E-Commerce Cookbook
Sitecore® is a registered trademark. All other brand and product names are the property of their respective holders. The contents of this document are the property of Sitecore. Copyright © 2001-2010 Sitecore. All rights reserved.
Page 90 of 99
To create an MV Test:
1. In the Content Editor, content tree create two test content items. Name one of these items Settings.
2. Add some text to the Text field for your slogans.
3. In the Marketing Center, click Test Lab and create a multivariate test and two test variables.
4. In the Test Strategy field, select the Sticky test strategy.
Sticky means that you keep the same test variable for one session. When you create a new session you see the second test variable.
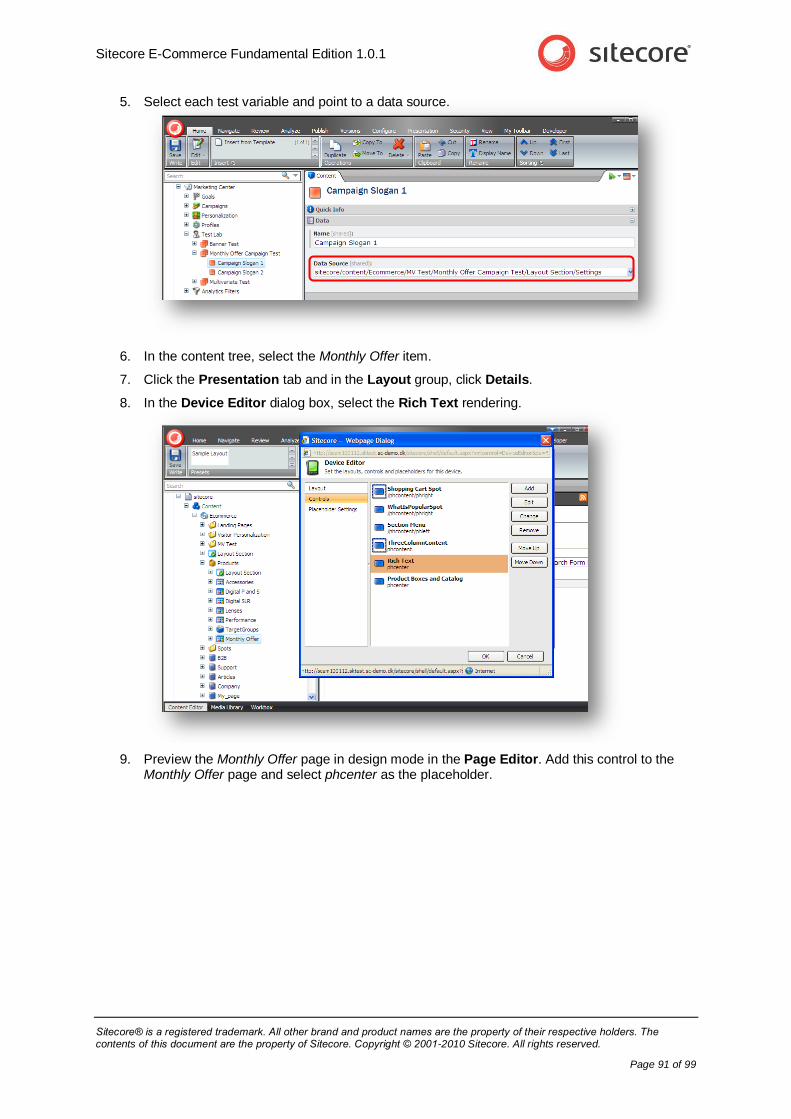
Sitecore E-Commerce Fundamental Edition 1.0.1
Sitecore® is a registered trademark. All other brand and product names are the property of their respective holders. The contents of this document are the property of Sitecore. Copyright © 2001-2010 Sitecore. All rights reserved.
Page 91 of 99
5. Select each test variable and point to a data source.
6. In the content tree, select the Monthly Offer item.
7. Click the Presentation tab and in the Layout group, click Details.
8. In the Device Editor dialog box, select the Rich Text rendering.
9. Preview the Monthly Offer page in design mode in the Page Editor. Add this control to the Monthly Offer page and select phcenter as the placeholder.
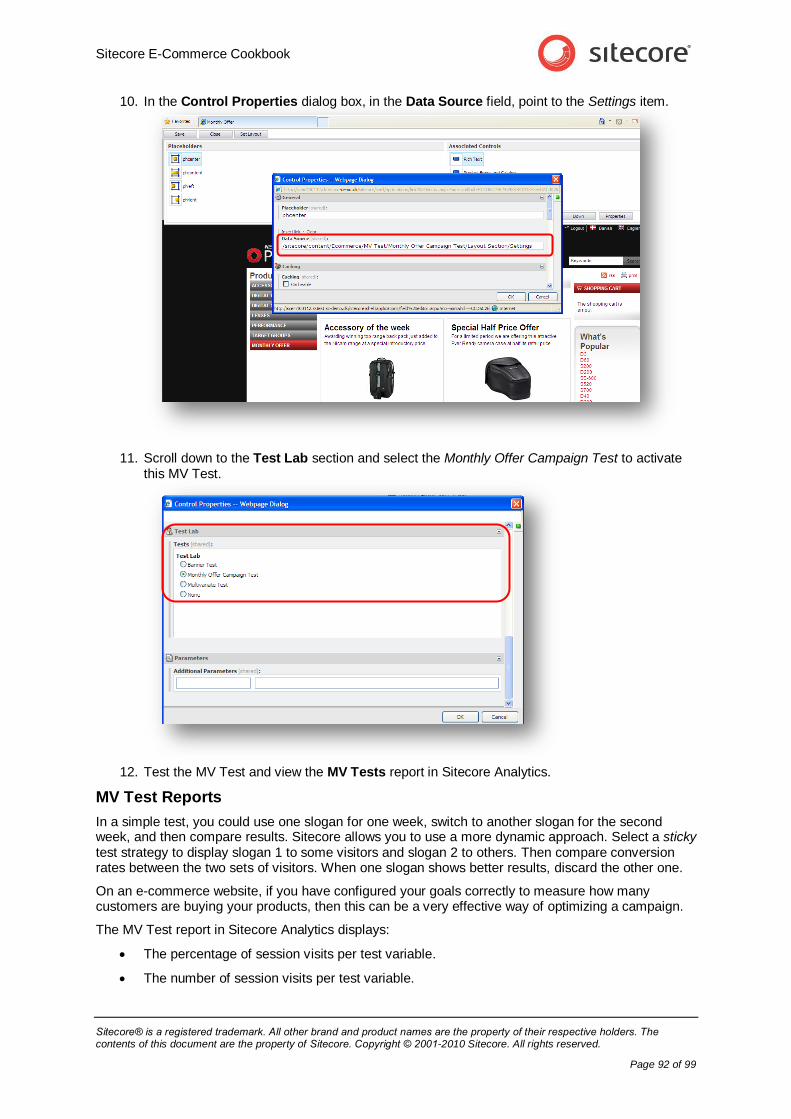
Sitecore E-Commerce Cookbook
Sitecore® is a registered trademark. All other brand and product names are the property of their respective holders. The contents of this document are the property of Sitecore. Copyright © 2001-2010 Sitecore. All rights reserved.
Page 92 of 99
10. In the Control Properties dialog box, in the Data Source field, point to the Settings item.
11. Scroll down to the Test Lab section and select the Monthly Offer Campaign Test to activate this MV Test.
12. Test the MV Test and view the MV Tests report in Sitecore Analytics.
MV Test Reports
In a simple test, you could use one slogan for one week, switch to another slogan for the second week, and then compare results. Sitecore allows you to use a more dynamic approach. Select a sticky test strategy to display slogan 1 to some visitors and slogan 2 to others. Then compare conversion rates between the two sets of visitors. When one slogan shows better results, discard the other one.
On an e-commerce website, if you have configured your goals correctly to measure how many customers are buying your products, then this can be a very effective way of optimizing a campaign.
The MV Test report in Sitecore Analytics displays:
The percentage of session visits per test variable.
The number of session visits per test variable.
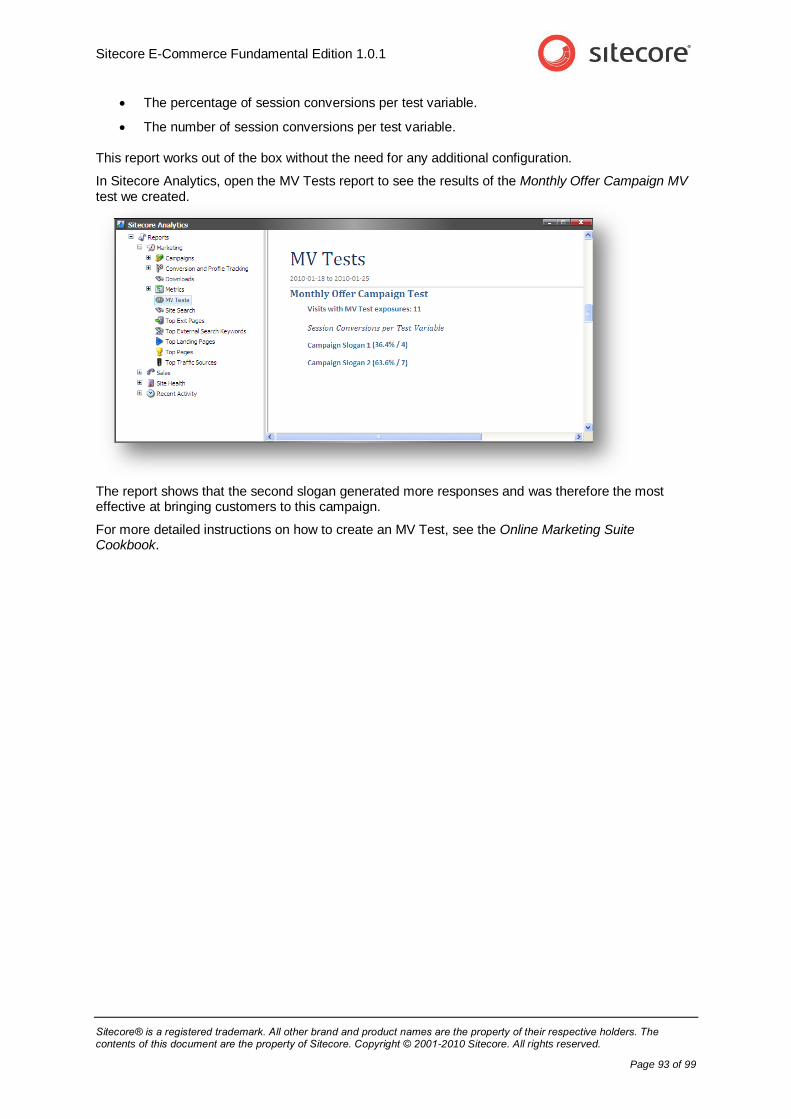
Sitecore E-Commerce Fundamental Edition 1.0.1
Sitecore® is a registered trademark. All other brand and product names are the property of their respective holders. The contents of this document are the property of Sitecore. Copyright © 2001-2010 Sitecore. All rights reserved.
Page 93 of 99
The percentage of session conversions per test variable.
The number of session conversions per test variable.
This report works out of the box without the need for any additional configuration.
In Sitecore Analytics, open the MV Tests report to see the results of the Monthly Offer Campaign MV test we created.
The report shows that the second slogan generated more responses and was therefore the most effective at bringing customers to this campaign.
For more detailed instructions on how to create an MV Test, see the Online Marketing Suite Cookbook.
Sitecore E-Commerce Cookbook
Sitecore® is a registered trademark. All other brand and product names are the property of their respective holders. The contents of this document are the property of Sitecore. Copyright © 2001-2010 Sitecore. All rights reserved.
Page 94 of 99
6.6 Creating Personalization
Personalization is one of the ultimate aims of any e-commerce website. In Sitecore OMS, you can create rules to target specific web content at different groups of site visitors.
In the Sitecore Marketing Centre, you can create personalization rules that you can apply to specific content items so that they are shown to particular groups of visitors. For example, you might want to push high-end products to professional photographers and push a different set of products to beginners.
To do this you could create a rule that only displays content to visitors that achieve a profile score higher than a specific value. This value can be set in your conditional rendering rules.
If you have a set of profile keys on your site for different skill levels, then you can create rules based on profile key scores. When a site visitor achieves a score that classifies them as a professional, they are shown appropriate products.
This is just one example and there are many other, more advanced types of personalization rules that you can create.
Before you can implement personalization on your site, you need the following pre-requisites:
A set of profiles and profile keys.
Content items to use as the data source for the conditional renderings.
A web control or rendering item.
6.6.1 Personalization and E-Commerce
On an e-commerce website personalization can help to increase conversions, ROI, and also helps to ensure that valuable sales opportunities are not lost.
Personalizing Content
The example pages that come with Sitecore E-Commerce Fundamental Edition are too limited to base a personalization exercise around. The following exercise explains how to implement personalization continues with the idea of a webshop that sells photographic equipment. You are therefore unable to copy this exercise.
To illustrate how to personalize content on the webshop, we assume that the webshop contains a books section. We will use the Recommended Books section and in particular the Nature Photography page.
The object of the exercise is to display ads for different cameras and accessories on the Nature Photography page to visitors with different levels of photographic skill.
Checklist of tasks:
Create content items to use as a data source.
Create personalization rules.
Choose a content item to personalize.
Choose a control or rendering.
Enable your personalization rules.
Test your personalization rules in a web browser.
You must create some rules that determine which content the visitor will see. These rules are based on the profile score that the visitors achieve when they visit the site. These scores reflect their level of
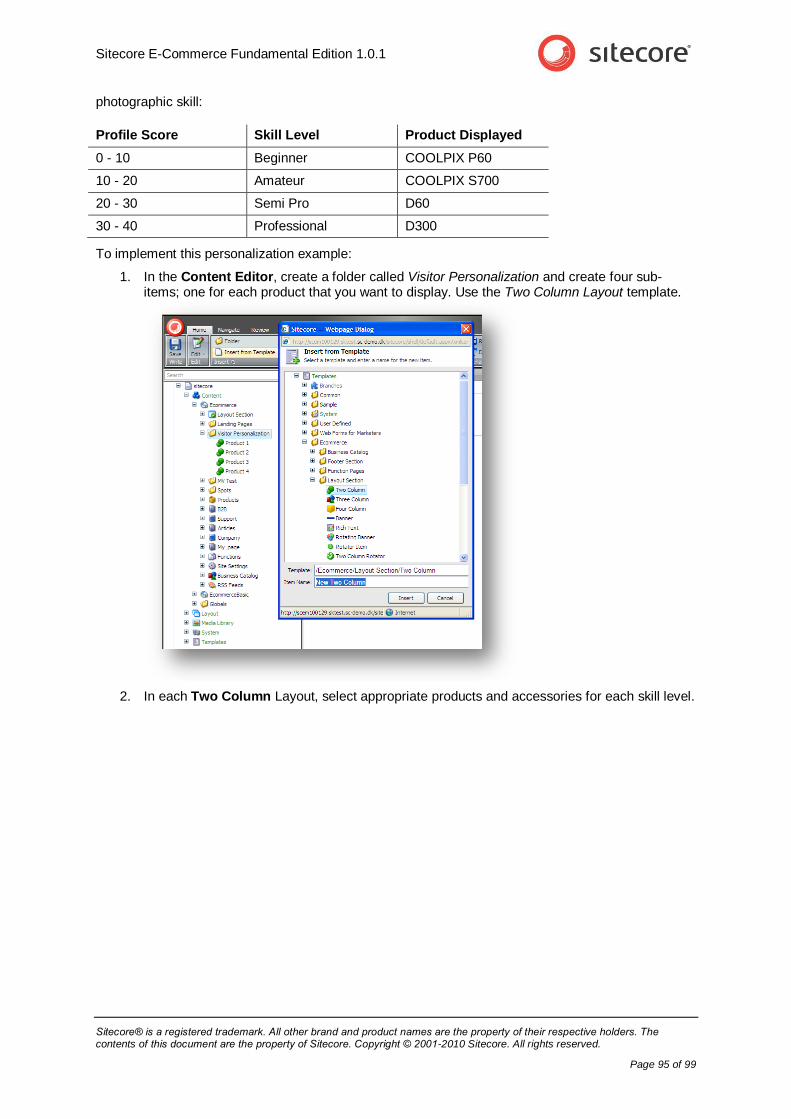
Sitecore E-Commerce Fundamental Edition 1.0.1
Sitecore® is a registered trademark. All other brand and product names are the property of their respective holders. The contents of this document are the property of Sitecore. Copyright © 2001-2010 Sitecore. All rights reserved.
Page 95 of 99
photographic skill:
Profile Score Skill Level Product Displayed
0 - 10 Beginner COOLPIX P60
10 - 20 Amateur COOLPIX S700
20 - 30 Semi Pro D60
30 - 40 Professional D300
To implement this personalization example:
1. In the Content Editor, create a folder called Visitor Personalization and create four sub-items; one for each product that you want to display. Use the Two Column Layout template.
2. In each Two Column Layout, select appropriate products and accessories for each skill level.
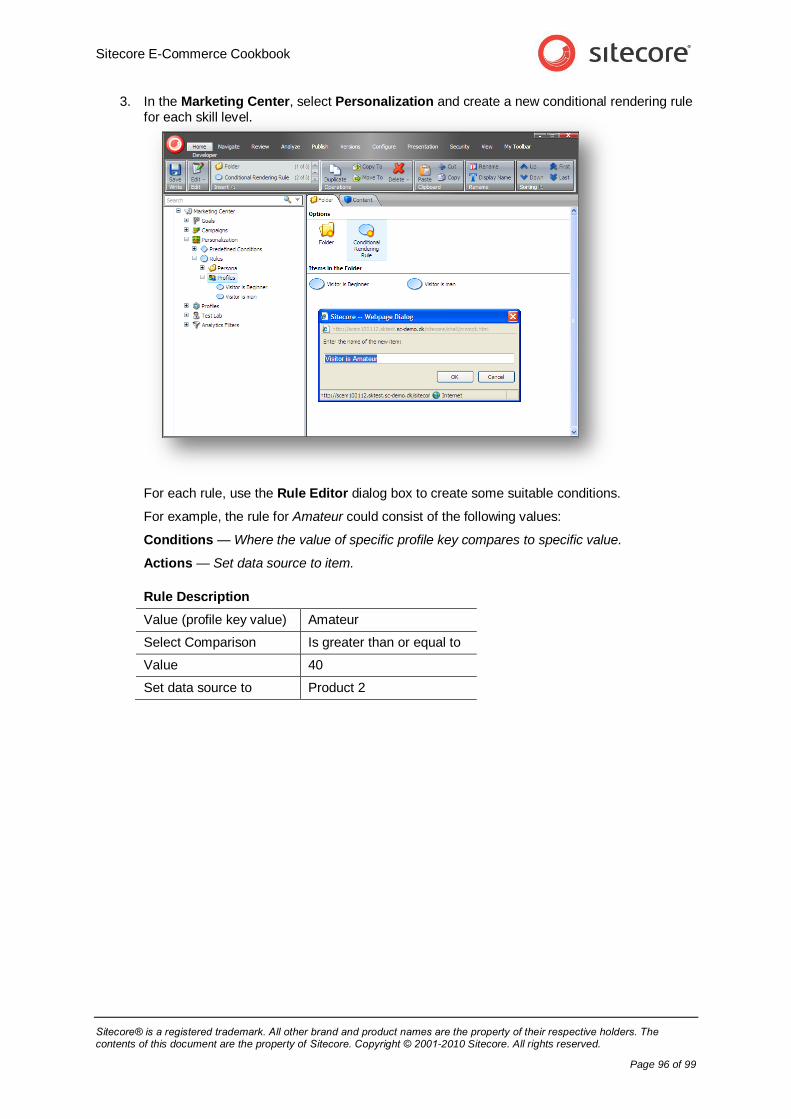
Sitecore E-Commerce Cookbook
Sitecore® is a registered trademark. All other brand and product names are the property of their respective holders. The contents of this document are the property of Sitecore. Copyright © 2001-2010 Sitecore. All rights reserved.
Page 96 of 99
3. In the Marketing Center, select Personalization and create a new conditional rendering rule for each skill level.
For each rule, use the Rule Editor dialog box to create some suitable conditions.
For example, the rule for Amateur could consist of the following values:
Conditions — Where the value of specific profile key compares to specific value.
Actions — Set data source to item.
Rule Description
Value (profile key value) Amateur
Select Comparison Is greater than or equal to
Value 40
Set data source to Product 2
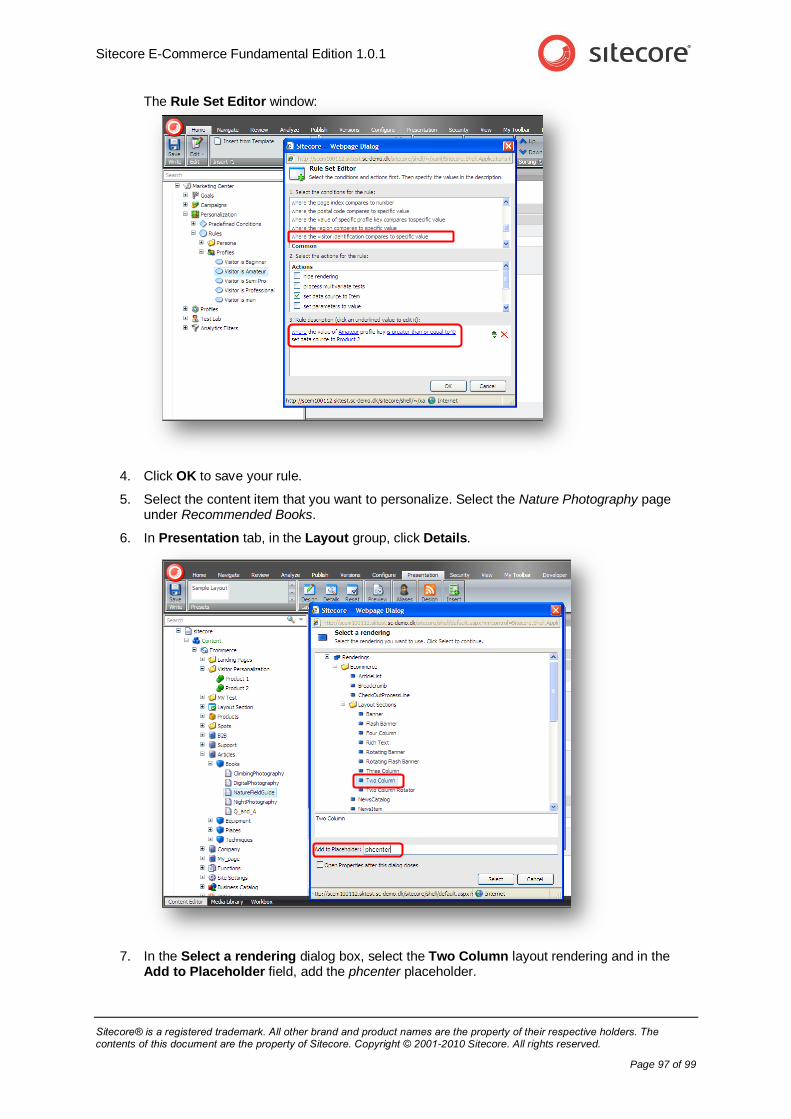
Sitecore E-Commerce Fundamental Edition 1.0.1
Sitecore® is a registered trademark. All other brand and product names are the property of their respective holders. The contents of this document are the property of Sitecore. Copyright © 2001-2010 Sitecore. All rights reserved.
Page 97 of 99
The Rule Set Editor window:
4. Click OK to save your rule.
5. Select the content item that you want to personalize. Select the Nature Photography page under Recommended Books.
6. In Presentation tab, in the Layout group, click Details.
7. In the Select a rendering dialog box, select the Two Column layout rendering and in the Add to Placeholder field, add the phcenter placeholder.
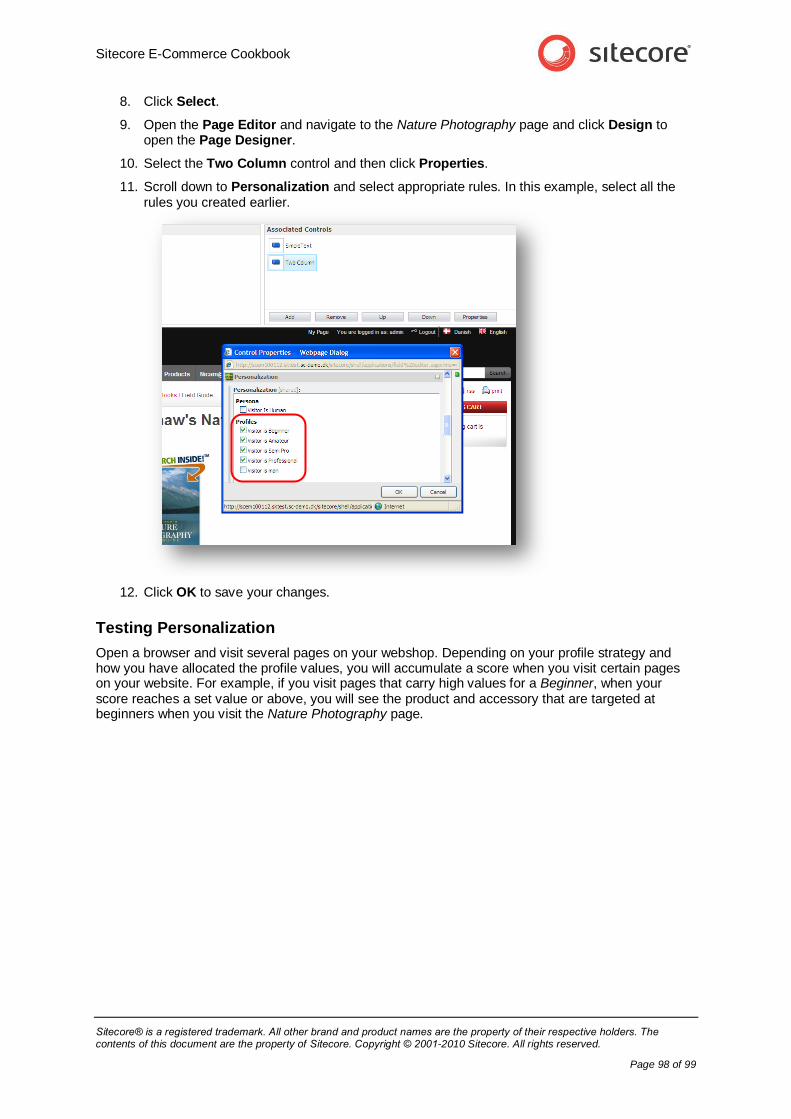
Sitecore E-Commerce Cookbook
Sitecore® is a registered trademark. All other brand and product names are the property of their respective holders. The contents of this document are the property of Sitecore. Copyright © 2001-2010 Sitecore. All rights reserved.
Page 98 of 99
8. Click Select.
9. Open the Page Editor and navigate to the Nature Photography page and click Design to open the Page Designer.
10. Select the Two Column control and then click Properties.
11. Scroll down to Personalization and select appropriate rules. In this example, select all the rules you created earlier.
12. Click OK to save your changes.
Testing Personalization
Open a browser and visit several pages on your webshop. Depending on your profile strategy and how you have allocated the profile values, you will accumulate a score when you visit certain pages on your website. For example, if you visit pages that carry high values for a Beginner, when your score reaches a set value or above, you will see the product and accessory that are targeted at beginners when you visit the Nature Photography page.
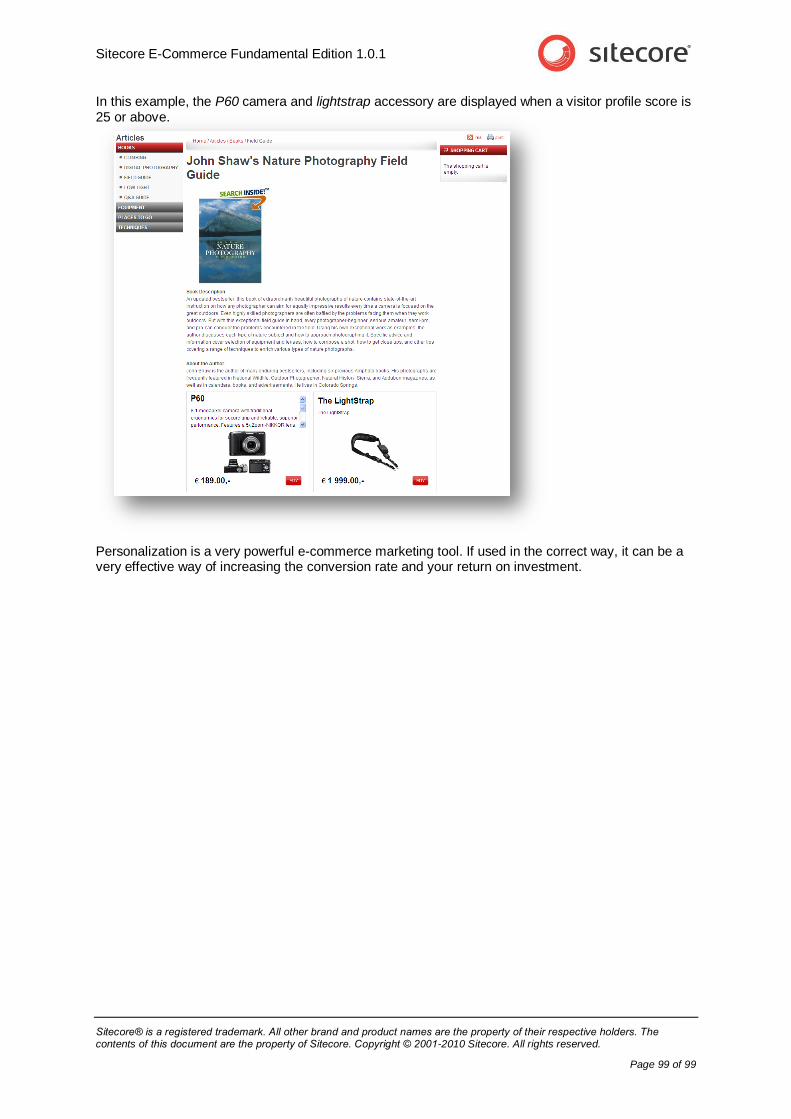
Sitecore E-Commerce Fundamental Edition 1.0.1
Sitecore® is a registered trademark. All other brand and product names are the property of their respective holders. The contents of this document are the property of Sitecore. Copyright © 2001-2010 Sitecore. All rights reserved.
Page 99 of 99
In this example, the P60 camera and lightstrap accessory are displayed when a visitor profile score is 25 or above.
Personalization is a very powerful e-commerce marketing tool. If used in the correct way, it can be a very effective way of increasing the conversion rate and your return on investment.