
Savannah 200 Manual - Columbia Nano Initiative · Table of Contents ©2009 Cambridge Nanotech Inc....
59
©2009 Cambridge Nanotech Inc. Confidential Rev 1.1 Draft Savannah 100, 200 & 300 Atomic Layer Deposition System Maintenance Manual
Transcript of Savannah 200 Manual - Columbia Nano Initiative · Table of Contents ©2009 Cambridge Nanotech Inc....

©2009 Cambridge Nanotech Inc. Confidential Rev 1.1 Draft
Savannah 100, 200 & 300 Atomic Layer Deposition System
Maintenance Manual

©2009 Cambridge Nanotech Inc. Confidential Rev 1.1 Draft
Cambridge NanoTech Inc. 68 Rogers Street
Cambridge, MA 02142 USA
www.cambridgenanotech.com
Notice
This is a Cambridge NanoTech Inc. publication which is protected by copyright. No part of this document may be photocopied, reproduced, translated to another language, or published on-line without the prior written consent
of Cambridge NanoTech Inc. The information contained in this publication is subject to change without notice.
Trademarks
Cambridge NanoTech Inc. and Savannah 100, 200 and 300 are trademarks of Cambridge NanoTech Inc.
Kalrez and Viton are registered trademarks of E.I. DuPont de Nemours & Co.
VCR is a registered trademark of Swagelok company.

Table of Contents
©2009 Cambridge Nanotech Inc. Confidential Rev 1.1 Draft
Savannah Maintenance Manual 3
Table of Contents
Section 1 Safety ........................................................................................................... 6
Introduction .................................................................................................... 6
Qualified Personnel ..................................................................................... 6
Intended Use ................................................................................................... 6
Regulations and Approvals ..................................................................... 6
Client Modifications .................................................................................... 6
Personal Safety .............................................................................................. 7
Electrical Safety ............................................................................................. 8
Chemical Safety ............................................................................................. 8
Section 2 System ......................................................................................................... 9
Environmental Specifications ...................................................... 10
General Maintenance ................................................................................ 11
Vacuum Pump Maintenance .................................................................. 11
Vacuum Gauge Maintenance ................................................................ 11
Changing the Vacuum Gauge ............................................................... 12
Quick Reactor Chamber and Lid Cleaning Procedure .............. 14
Reactor Chamber and Lid Cleaning Procedure ............................ 15
Pump Line and Stop Valve ..................................................................... 16
Cleaning the Stop Valve .......................................................................... 17
Pump Line and Trap .................................................................................. 18
O-Ring Maintenance .................................................................................. 19

Table of Contents
©2009 Cambridge Nanotech Inc. Confidential Rev 1.1 Draft
Savannah Maintenance Manual 4
O-Ring Replacement.................................................................................. 19
Section 4 Hardware Overview ............................................................................ 20
Reactor and O-ring .................................................................................... 20
Reactor Lid ..................................................................................................... 20
Pumping Line Assembly ......................................................................... 21
Edwards BOC Pressure Gauge ............................................................. 22
Precursor Manifold .................................................................................... 22
Precursor assembly in heater block: ................................................ 24
Carrier Gas/Pneumatic Gas Connection ......................................... 24
Heat Guard and Hook ............................................................................... 25
Electrical Connections ............................................................................. 25
Electrical Control Unit (E-Box) Description .................................... 26
Precursor Manifold Re-Build ................................................................ 28
Removing a Precursor Cylinder .......................................................... 28
Exploded View of ALD Gas Manifold ................................................ 31
Disassembly of ALD Manifold.............................................................. 32
Re-Assembly of ALD Manifold ............................................................ 32
Precursor Cylinder Assembly ............................................................... 35
Removal of Precursor Cylinder ........................................................... 37
Installing Precursor Cylinder ............................................................... 37
Section 5 Technical Specifications .............................................................. 38
Electrical Specifications .......................................................................... 38
Facilities Recommendations ................................................................. 38
Environmental Specifications ............................................................... 38

Table of Contents
©2009 Cambridge Nanotech Inc. Confidential Rev 1.1 Draft
Savannah Maintenance Manual 5
Section 6 Frequently Asked Questions .................................................... 39
Frequently Asked Questions (continued)....................................... 45
Section 7 Additional Hardware Components .............................................. 46
Ozone Delivery Using OL80F Generator ......................................... 46
How to Plumb Gaseous Precursor to the Savannah System . 50
ALD Shield Vapor Trap ............................................................................ 52
Configuration 1 ................................................................................... 53
Configuration 2 ................................................................................... 54
Appendix A - Consumable and Spare Parts ................................................. 56
End of Savannah Maintenance Manual ............................................ 59

Section 1 - Safety
©2009 Cambridge Nanotech Inc. Confidential Rev 1.1 Draft
Savannah Maintenance Manual 6
Section 1 Safety
Introduction
Qualified Personnel
Intended Use
Regulations and Approvals
Client Modifications
Read and follow these safety instructions. Task- and equipment-specific warnings, cautions, and instructions are included in equipment documentation where appropriate. Make sure all equipment documentation, including these instructions, is accessible to persons operating or servicing equipment. Equipment owners are responsible for making sure that Cambridge NanoTech Inc. equipment is installed, operated, and serviced by qualified personnel. Qualified personnel are those employees or contractors who are trained to safely perform their assigned tasks. They are familiar with all relevant safety rules and regulations and are physically capable of performing their assigned tasks. Use of Cambridge NanoTech Inc. equipment in ways other than those described in the documentation supplied with the equipment may result in injury to persons or damage to property. Some examples of unintended use of equipment include:
using incompatible materials
making unauthorized modifications
removing or bypassing safety guards or interlocks
using incompatible or damaged parts
using unapproved auxiliary equipment
operating equipment in excess of maximum ratings Make sure all equipment is rated and approved for the environment in which it is used. Any approvals obtained for Cambridge NanoTech Inc. equipment will be voided if instructions for installation, operation, and service are not followed. Modifications to the system including, but not limited to changes to vacuum hardware, electronics, and software, void all warranty and liability.

Section 1 - Safety
©2009 Cambridge Nanotech Inc. Confidential Rev 1.1 Draft
Savannah Maintenance Manual 7
Personal Safety
To prevent injury follow these instructions. • Do not operate or service equipment unless you are qualified and have fully read and understood the manual and warning labels on the system. Contact Cambridge NanoTech Inc. with any questions in case of uncertainties. • Do not operate equipment unless safety guards, doors, or covers are intact and automatic interlocks are operating properly. Do not bypass or disarm any safety devices. • Before adjusting or servicing equipment, or touching any of the parts, turn off the heaters in the software, wait until all temperature sensors are at room temperature, then shut off the power supply and unplug the main power and wait until all unmonitored parts have cooled down. Lock out power and secure the equipment. • Relieve (bleed off) pneumatic pressure before adjusting or servicing pressurized systems or components, such as gas cylinders. Never disconnect high pressure gas cylinders without specific knowledge. Refer to your supplier for instructions. • Obtain and read Material Safety Data Sheets (MSDS) for all materials used. Follow the manufacturer’s instructions for safe handling and use of materials, and use recommended personal protection devices. • To prevent injury, be aware of less-obvious dangers in the workplace that often can not be completely eliminated, such as hot surfaces, sharp edges, energized electrical circuits, and moving parts that can not be enclosed or otherwise guarded for practical reasons.

Section 1 - Safety
©2009 Cambridge Nanotech Inc. Confidential Rev 1.1 Draft
Savannah Maintenance Manual 8
Electrical Safety
Chemical Safety
Action in the Event of a
Malfunction
Disposal
To avoid electric shocks, follow these instructions. • At the time of installation the stainless steel system cabinet must be grounded by attaching the supplied ground wire to the facilities grounding loop. • Turn off and unplug the electronic control unit prior to connecting or disconnecting any sensor, heater, valve or other components. • Do not disconnect live electrical circuits while working with flammable materials. Shut off main power first to prevent sparking. To avoid chemical hazards, follow these instructions. • Know the nature of the precursors you are working with (read MSDS). Some precursors such as trimethylaluminum are pyrophoric, they burn upon exposure to air. Precursors should never be disconnected from the manual valve they were supplied with. Make sure that manual valve is closed before removing the precursor-valve combination from the system. Pump/purge the space between ALD valve and manual valve before disconnecting any precursor. Always wear proper protection equipment when removing precursors. Precursor replacement should only be conducted by qualified personnel. Read the section on precursor removal before proceeding. Cambridge NanoTech Inc. can be reached for safety assistance with precursor replacement/removal procedure, although the final responsibility lies with the user. If a system or any equipment in a system malfunctions, shut off the system immediately and perform the following steps: • Disconnect and lock out system electrical power. Close valves and relieve pressures. • Identify the reason of the malfunction and correct it before restarting the system. Dispose of equipment and materials used in operation and servicing according to local codes.

Section 2 - System
©2009 Cambridge Nanotech Inc. Confidential Rev 1.1 Draft
Savannah Maintenance Manual 9
Section 2 System
Electrical Requirements
Gas Connections
Exhaust connections
The following items are required for operation of your Savannah system and are not provided by Cambridge Nanotech. After reading this document, if you have questions regarding the installation of your Savannah system, contact support@cambridgenanotech.
Standard 115Vac power outlets, for reactor (10 Amp – S100, 15 Amp –S200, 20 Amp – S300), 10 Amp for pump. A 220 Vac-115Vac transformer will be supplied by Cambridge NanoTech Inc. if needed. Please specify in quote.
An uninterruptible power supply for the controller computer. (i.e. Part #660-0017 from Allied Electric www.alliedelec.com) Alternatively, a laptop with a working battery is sufficient.
Process Gas:
Recommended gas: Research grade N2 (99.9995%)
20-30psi (140-210 kPa) of pressure in stainless steel line delivery line with ¼” female VCR fitting
Actuation Gas:
60-80 psi (410-550 kPa) of air or N2 (preferred) for pneumatic actuation, terminated with ¼" PFA tubing
A metallic exhaust line from the pump to the exhaust
NW-25 fitting will be needed if using the Alcatel 2005I pump
(Optional - Exhausted cabinet option) flexible or hard connection, with clamps to a 4” duct at rear of the cabinet
All processes are run through the system pump. Each user’s environmental requirements are different due to the chemical processes being employed. Consult the MSDS sheets of the precursors and contact your local safety office for appropriate venting precautions.

Section 2 - System
©2009 Cambridge Nanotech Inc. Confidential Rev 1.1 Draft
Savannah Maintenance Manual 10
Mechanical Pump Oil
Computer System
Chemical Precursors
Environmental Specifications
Fomblin SV for Alcatel 2005I pump.
Other pumps may require specific mechanical oil – refer to the users manual of specific pumps for guidance) Note: Pumps do not ship with mechanical oil.
Computer with Windows 2000, XP or Vista with a clean harddisk and a freshly installed version of the operating system. (If not purchased from Cambridge Nanotech). Laptops are recommended with an internal battery. An uninterruptable power supply is recommended for tower/box computer systems. Savannah systems ship with one water cylinder (no valve) and with valved precursor cylinders populating the remainder of the precursor line. Common chemical precursors can be purchased directly from a number of Chemical Companies, for example Strem Chemicals or Sigma-Aldrich. http://www.sigmaaldrich.com/materials-science/micro-and-nanoelectronics/cvd-ald-precursors/precursors.html
http://www.strem.com/catalog/d/mocvd/ Trimethylaluminum (TMA) can be purchased from Sigma-Aldrich prepackaged in an appropriate cylinder, P/N # 66301. Operating Temperature .......................................... 15-40
oC(60-100
oF)
Humidity .............................................. Max 80% at 30 oC (50% at 40
oC)
Storage Humidity ................... 0-95% relative humidity, non-condensing Indoor use only. Pollution degree .................................................................................... 2 Installation category ............................................................................... II Operation Altitude ............................................................... Max 2000m

Section 3 - Maintenance
©2009 Cambridge Nanotech Inc. Confidential Rev 1.1 Draft
Savannah Maintenance Manual 11
Section 3
Maintenance
General Maintenance
Vacuum Pump Maintenance
Vacuum Gauge
Maintenance
Vacuum gauge with extensive film
buildup
Even when properly used, the Savannah system requires periodic maintenance to ensure stable, optimal operation. Most of the maintenance required on the Savannah system is due to the deposition of ALD film on areas other than the substrate. This section will outline some of the most common maintenance operations and provide a list of parts that are required for upkeep of the Savannah system over its lifetime. When employing Cambridge Nanotech’s ALD Shield Vapor Trap, regular maintenance on your vacuum pump is required. Such maintenance includes regular oil changes (if applicable) and periodic servicing. A variety of pumps are compatible with the Savannah systems. Please refer to the user manual for your specific pump for maintenance recommendations. Due to its location in the pumping system, the vacuum gauge is susceptible to deposition of ALD film. While the vacuum gauge is fairly robust, it will become increasingly inaccurate as the amount of precursor is deposited on it increases. The pressure read by the gauge will slowly rise over time as film builds up on the gauge. As the lifetime of the gauge is dependent on precursor overdosing, it is difficult to assign a lifetime on the vacuum gauge. Using minimal precursor overdoses is recommended for elongating the lifetime of your pump and gauge. Using an Alcatel 2005I pump, a typical base pressure of a new system ranges between 6 and 15 mtorr (6 X 10⁻² torr to 1.5 X 10⁻¹ torr). When the pressure on the gauge rises to, 60-80 mtorr, replacement of the gauge is recommended. As degraded performance of the vacuum pump and gauge go hand-in-hand, it is recommended to have a replacement gauge to verify the calibration of the in use gauge. This can be done by connecting the backup gauge to the pump to determine its base pressure.

Section 3 - Maintenance
©2009 Cambridge Nanotech Inc. Confidential Rev 1.1 Draft
Savannah Maintenance Manual 12
Changing the Vacuum
Gauge
Edwards APGX-H NW 16 Vacuum
Gauge
Edwards APGX-H NW 16 Tube Spare
The vacuum gauge is an: Edwards Vacuum APGX-H Active Linear Convection Gauge NW 16 ST/ST Item Number: D023-95-00 Replacements can be ordered from Cambridge Nanotech or via your local Edwards Vacuum distributor. Often the entire gauge does not need to be replaced. Only the gauge “tube” needs to be swapped out and fitted onto the electronics box. Details for the replacement gauge tube are: Edwards Vacuum APGX-H Active Linear Convection Gauge Tube Spare NW 16 ST/ST Item Number: D023-95-801 Changing the vacuum gauge
1. Turn off the heating jacket for the stopvalve/vacuum gauge. Turn off the heating line for the pump line bellows
2. Turn off the vacuum pump. 3. Disconnect the RJ-45 cable from the gauge. 4. Remove the NW16 clamp and remove the o-ring and
vacuum gauge from the t-flange.
Examine the vacuum gauge. If you can see sufficient buildup inside the gauge tube, it is time to replace the gauge. If replacing the entire tube, go to step 9.
5. Loosen the screws from the vacuum gauge electronic box.
6. Remove the tube by pulling it away from the electronics box.
7. Insert a new tube into the electronics box by matching up the port connections and the alignment tab.
8. Fasten the screws back into the electronics box.

Section 3 - Maintenance
©2009 Cambridge Nanotech Inc. Confidential Rev 1.1 Draft
Savannah Maintenance Manual 13
9. Remove the copper filter from the gauge by compressing the circular ring. If left in, the filter will quickly plug with deposited film and prevent the gauge from accurately reading the pressure. 10. Reconnect the vacuum gauge onto the pumping line using the O-ring, gasket and NW-16 clamp. A new NW-16 O-ring and gasket may be required if significant buildup has accumulated on the parts.

Section 3 - Maintenance
©2009 Cambridge Nanotech Inc. Confidential Rev 1.1 Draft
Savannah Maintenance Manual 14
Reactor Cleaning
Quick Reactor Chamber
and Lid Cleaning Procedure
The Savannah ALD system has a custom surface on it designed to have excellent adhesion of film as it accumulates during depositions. However, as regular maintenance is key to prolonging the lifetime of any system, Cambridge Nanotech recommends having the reactor chamber cleaned after 10 microns of film growth. The reactor may need to be cleaned sooner depending on the type of film grown or the conditions of use are abnormal. After a significant amount of deposition, film will begin to delaminate from the lid and reactor. When this condition occurs, it is time to clean the lid and reactor. This requires decommissioning the system and removing the reactor and lid. As a temporary measure, sometimes the reactor can be partially cleaned in order to extend the time between full reactor cleanings. Cool the reactor down to room temperature to avoid burns. Scrub the surface of the lid and/or reactor with a ScotchBrite product. Use a volatile solvent such as alcohol and/or water. Scrub the surface of the lid and reactor on spots where delamination is present in short circular motions. Remove any film that is liberated from the surface. Wipe the surface of the reactor with a large Laboratory wipe (Kimwipes) and DI water in order to remove any residual film. Repeat as needed. Give a final wipe with a lint-free clean room wipe. The reactor may have residual o-ring material near the edge of the lid. This is normal as long as the reactor seals to vacuum. Before returning to coating samples, condition the chamber with 500 cycles of a simple oxide, such as alumina.

Section 3 - Maintenance
©2009 Cambridge Nanotech Inc. Confidential Rev 1.1 Draft
Savannah Maintenance Manual 15
Reactor Chamber and Lid
Cleaning Procedure
When there is significant amount of delamination on the surface of the reactor and lid, it must be removed for a thorough cleaning. The following procedure outlines the recommended cleaning procedure for the reactor chamber and lid. These procedures are recommended for use by professional machine and/or vacuum repair shops and not the average user. Do not attempt these cleaning procedures if not properly trained or qualified to use the equipment described below. Follow local laws and guidelines for proper disposal of hazardous materials including cleaning media, material and films/particulate that have accumulated inside of the reactor chamber. Please note the procedure for cleaning the lid is different and follows the reactor chamber section. Cleaning medium: aluminum oxide glass bead Specs: 80 grit, 40 psi pressure max
- Before beginning the beadblast procedure, cap the KF & VCR fittings with a sacrificial O-ring or VCR gasket. Tape is not recommended as it can be extremely difficult to remove and residual organics may burn / outgas in the subsequent steps. It is critical to protect:
o Main reactor O-ring (kalrez) o VCR precursor input port o KF vacuum flange
- Cover the reactor in a heavy mil plastic covering, securing the plastic to the chamber via a ring designed to fit the reactor ID and OD. Sufficiently clamp the ring to secure it in place. Expose only the reactor surface by razor cutting the plastic away from the chamber surface.
- Begin glass bead blast of reactor surface using sweeps across surface while rotating the reactor to provide uniformity.
- Remove rings, seals, protective plastic
- Perform a light air-blow down on the chamber to remove loose beads.
Process for 10 to 15 min in a citric based metal cleaner bath (i.e Cita-sol)

Section 3 - Maintenance
©2009 Cambridge Nanotech Inc. Confidential Rev 1.1 Draft
Savannah Maintenance Manual 16
Reactor Chamber Cleaning
Procedure (con’t)
Reactor Lid Cleaning
Procedure
Pump Line and Stop Valve
- Rinse in DI water
- Clean via ultrasonication (ultrasonic cleaning) in DI water
- N2 blow dry; followed by a bake in flowing N2 at 105°C
The reactor has holes for the RTDs embedded into the underside of the reactor. Care must be taken to ensure that resurfacing the reactor does not penetrate through the reactor surface, exposing the RTD holes.
- Scrape any residual kalrez material from the reactor lid using a plastic instrument
- Install the lid onto a lathe;
- Turn the lathe while applying increasing grit of sandpaper until a 32 finish is achieved
- Rinse in DI water
- Clean via ultrasonication in DI water
- N2 blow dry; followed by a bake in flowing N2 at 105°C Sandblasting and nickel plating the reactor chamber and/or lid is not recommended by Cambridge Nanotech. If nicks, scrapes or burrs occur in the reactor chamber it is recommended that replacement parts be obtained from Cambridge Nanotech.
After extended use, the vacuum line between the reactor and the pump can accumulate a significant amount of ALD film. In particular, the stop valve and bellows can become severely coated if un-optimized recipes are being used. If the stopvalve will not open, ensure that there is actuation gas of sufficient pressure going to the solenoid 60-80 psi (410-550 kPa). Check the electrical connections and ensure that the solenoid is changing state when activated from the software (a red light on the solenoid will be visible when the solenoid is on). Otherwise, the stop valve may be coated and will require cleaning. Preventative maintenance will elongate the life of the stopvalve.

Section 3 - Maintenance
©2009 Cambridge Nanotech Inc. Confidential Rev 1.1 Draft
Savannah Maintenance Manual 17
Cleaning the Stop Valve
Remove the stopvalve from the pumping line by disconnecting the NW-25 wing nut clamp and centering O-ring. If the O-ring is coated with film or has been flattened, replace with a new O-ring. Examine the inlet and outlet side of the valve. If the inlet side of the valve is coated with film, check the inside of the stopvalve. Using a hexagonal key wrench, remove the four screws from the stopvalve. Disconnect the black plunger assembly from the silver body of the stopvalve. Coating on the silver body of the stopvalve can be mechanically cleaned or chemically cleaned using a chemical solution (see procedure below) Coating on the black plunger assembly should only be cleaned using a chemical solution (see procedure below). Remove the black o-ring from the base of the stopvalve and the white o-ring from the tip of the plunger before cleaning. Do not attempt to mechanically clean the plunger assembly. The fins are delicate. Take caution to not damage the fins. After cleaning, replace the o-rings to their original position. If they are knicked or scratched, obtain new o-rings from Cambridge NanoTech. Re-assemble the stopvalve and tighten the set screws with the hexagonal key wrench, incrementally. Test the stopvalve before re-assembly to the ALD system to ensure the valve will open and close. If the valve remains stuck, double check the solenoid and o-ring seals. A replacement stopvalve can be purchased from Cambridge NanoTech.

Section 3 - Maintenance
©2009 Cambridge Nanotech Inc. Confidential Rev 1.1 Draft
Savannah Maintenance Manual 18
Pump Line and Trap
The ALD Vapor Shield Trap accumulates film and particulate at a much higher rate than the reactor surface. Periodic cleaning of the trap is suggested with a concentrated basic solution. Consult appropriate MSDS sheets and take proper safety precautions before using caustic solution. Do not attempt to follow these cleaning procedures if not properly trained for handling such chemicals.
- Prepare a 25% by weight KOH etch solution. Ensure there is enough to fully submerge the trap. Heat the solution to 80°C.
- Place the trap in solution for 5 to 10 minutes
- Submerge the trap in DI rinse water
- Cleaning via ultrasonication is recommended if available
- Submerge the trap in fresh DI water again
- Blow dry internal matrix with N2
- (optional) Bake in flowing N2 at 105°C
- Thoroughly dry before reinstalling trap Adapter, bellows, stopvalve body and t-connection pieces can be cleaned via similar methods. Ensure all surfaces which accept o-ring gaskets are smooth and defect free before reinstallation. Re-polish surfaces if necessary.
The O-ring is the main sealing surface for the reactor. It can become damaged due to excessive heat cycling, attempting to open the lid below 80°C, excessive film accumulation or by scraping samples or metal across the sealing surface.
Note: Some deposition can occur on a small area of the o-ring that is exposed to the chamber. Heat cycling can cause this film to flake off. If this occurs, wipe the o-ring clean with a lint-free cleanroom wipe.
Section 3 - Maintenance
©2009 Cambridge Nanotech Inc. Confidential Rev 1.1 Draft
Savannah Maintenance Manual 19
O-Ring Maintenance
O-Ring Replacement
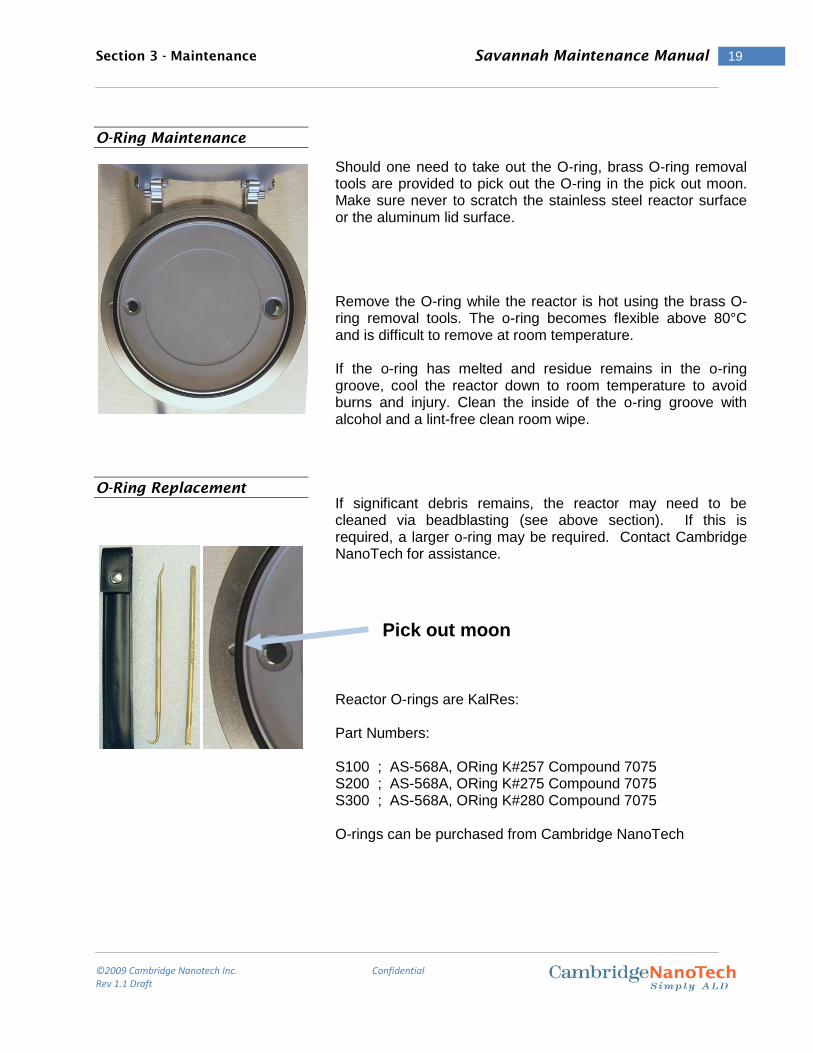
Should one need to take out the O-ring, brass O-ring removal tools are provided to pick out the O-ring in the pick out moon. Make sure never to scratch the stainless steel reactor surface or the aluminum lid surface. Remove the O-ring while the reactor is hot using the brass O-ring removal tools. The o-ring becomes flexible above 80°C and is difficult to remove at room temperature. If the o-ring has melted and residue remains in the o-ring groove, cool the reactor down to room temperature to avoid burns and injury. Clean the inside of the o-ring groove with alcohol and a lint-free clean room wipe. If significant debris remains, the reactor may need to be cleaned via beadblasting (see above section). If this is required, a larger o-ring may be required. Contact Cambridge NanoTech for assistance.
Reactor O-rings are KalRes: Part Numbers: S100 ; AS-568A, ORing K#257 Compound 7075 S200 ; AS-568A, ORing K#275 Compound 7075 S300 ; AS-568A, ORing K#280 Compound 7075 O-rings can be purchased from Cambridge NanoTech
Pick out moon

Section 4 - Hardware Overview
©2009 Cambridge Nanotech Inc. Confidential Rev 1.1 Draft
Savannah Maintenance Manual 20
Section 4 Hardware Overview
Reactor and O-ring
Reactor Lid
The following section gives an overview of the parts of the Savannah series reactors and assembly instructions. Insert the O-ring into the reactor O-ring groove. Should one need to take out the O-ring, brass O-ring removal tools are provided to pick out the O-ring in the pick out moon. Make sure never to scratch the stainless steel reactor surface or the aluminum lid surface. Note: Some deposition can occur on a small area of the o-ring that is exposed to the chamber. Heat cycling can cause this film to flake off. Just wipe the o-ring clean if this occurs. The aluminum lid is placed onto the reactor and hinged on the back.

Section 4 - Hardware Overview
©2009 Cambridge Nanotech Inc. Confidential Rev 1.1 Draft
Savannah Maintenance Manual 21
Pumping Line Assembly
All connections of the pumping line are made with Kwik Flange™ (KF) clamps (also called QF or NW by other manufacturers). Make sure that a properly sized (KF16 and KF25), clean Viton™ O-ring with a centering ring is used and clamps are securely tightened by hand. The pumping line assembly is shown to the right and is attached to the KF exit port of the reactor at the end of the procedure. The wing nut of the horizontal clamps should be facing right. The pressure gauge is attached to the left side of the tee with the RJ45 connection facing down. The nut of the clamp should be facing down. Lift the entire assembly (tee, gauge, stop valve, and hose) and attach the top KF16/25 connection of the tee to the KF16/25 exit port of the reactor using a wing nut clamp and a centering ring. Have the nut on the right hand side. The pressure gauge should be facing toward the cabinet door with the stop valve pointing towards the back of the cabinet. Wrap the tee heater around the entire top part of the pumping line, excluding the bellows, after having removed the solenoid from the stop valve actuator (leaving the tubing on the stop valve) and plug it into the electronics box. Reattach the solenoid to the stop valve and plug it in. Attach the bellows to the inlet of the pump. The bellows may need to be stretched a little in order to do so. Wrap the bellows hose heater around the bellows part of the pumping line and plug it into the electronics box. Attach the blue gauge cable and the pneumatic hose of the stop valve. Plug the stop valve in. Once all of these attachments have been made, the pump can be plugged in. Remember to use Fomblin oil in your b-prepped pump. Note: Always treat the KF connection flange faces with care and cover them with plastic caps if not in use, scratching can cause leaks. Replace each viton o-ring after use. The picture to the left shows the correct orientations of the top three KF clamps.

Section 4 - Hardware Overview
©2009 Cambridge Nanotech Inc. Confidential Rev 1.1 Draft
Savannah Maintenance Manual 22
Edwards BOC Pressure Gauge
Precursor Manifold
The stainless steel tube body of the gauge can be removed for cleaning or replacement. Cleaning of the body should be done very gently as to not break the filament. The gauge comes calibrated, but should calibration at atmosphere and/or vacuum be necessary, please refer to the instruction manual that is included in the Appendix. Note: We recommend not using the copper filter that is shown in the gauge manual. To keep the gauge clean it is important to heat the tee in the pumping line to 150°C, otherwise precursor can condense in the gauge. With the pumping line at 150°C, the gauge tube temperature will be around 60°C. It is also beneficial to keep the dose as low as possible. One can do this by lowering one precursor dose, until uniformity becomes worse, and then double that dose. Same for the other precursor. Precursor assembly parts are connected by metal face seal VCR™ fittings. A new metal gasket should be used every time a connection is made. Extra care should be taken in order to keep VCR connecting surfaces from scratches. Once disconnected, use plastic covers and plugs to protect polished VCR face surfaces.
Do not over tighten VCR fittings. Once connected, first
hand tighten and then tighten by a 45o
.
Two port precursor manifold.

Section 4 - Hardware Overview
©2009 Cambridge Nanotech Inc. Confidential Rev 1.1 Draft
Savannah Maintenance Manual 23
Precursor Manifold
Overview
ALD heat shield top Precursor manifold Actuation gas manifold ALD Valves Cartridge Heater ALD heat shield bottom
For specific instructions on assembly of the precursor manifold, see the following section “Precursor Manifold Rebuild”
Nitrogen Manifold
New VCR gaskets

Section 4 - Hardware Overview
©2009 Cambridge Nanotech Inc. Confidential Rev 1.1 Draft
Savannah Maintenance Manual 24
Heater Block for Valves:
Heater block for the ALD pulse valves consists of two sections; top and bottom and is secured by two screws near the top on one side. Place the precursor assembly into the bottom of the heater block. Thread the wire of the RTD through one of the holes as shown. Attach the top of the heater block, threading the ½” VCR fitting through the top and securing the block with the two screws provided.
Precursor assembly in heater block:
Take the two port precursor assembly in the oven and with a new ½” gasket attach it to the female ½” nut of the reactor. Hand tighten. Follow the same instructions for the larger precursor assemblies. When you are ready to tighten the fitting use a 1 1/16” and the short 15/16” wrench provided. The 1 1/16” wrench holds the ½” female fitting above the cabinet, while the 15/16” wrench tightens the nut inside the cabinet.
Carrier Gas/Pneumatic Gas Connection
Carrier gas (nitrogen, argon or other inert gas) is supplied through the provided mass flow controller (MFC). The supplied MFC is calibrated for nitrogen and a gas correction factor has to be used for other carrier gases. The MFC ¼” male VCR inlet pressure should be around 20 psi (pressure regulator is not provided). The MFC ¼” male VCR outlet is connected to the inert gas input of the 3-port ALD valve on the precursor(s) via a stainless steel nitrogen manifold with VCR connections. Insert the ¼” PFA tubing for the pneumatic gas into the bottom of the quick-connect tee. 80 psi of air or nitrogen (N2 preferred) is recommended.

Section 4 - Hardware Overview
©2009 Cambridge Nanotech Inc. Confidential Rev 1.1 Draft
Savannah Maintenance Manual 25
Heat Guard and Hook
Electrical Connections
To prevent burning by hot lid and reactor surfaces, a Savannah ALD system comes with a heat guard as a standard safety feature. It is very important to remember to place the heat guard over the reactor each time after loading/unloading the sample. When the heat guard is not in use, it can be hung on the hook mounted on the side of the cabinet. Note: The current heat guard is not compatible with the S300 system. Please contact Cambridge Nanotech for further information .
Plug all the connections into their appropriate locations on the electronic control unit (e-box), which is attached to the inside left wall of the cabinet,. Twenty-two 3-pin connectors in positions 0 through 21 are for 115V AC. Sixteen 2-pin connectors in position 6-21 are for RTDs, and positions 0-5 (2-pin connectors) are for 24V DC valves.

Section 4 - Hardware Overview
©2009 Cambridge Nanotech Inc. Confidential Rev 1.1 Draft
Savannah Maintenance Manual 26
Electrical Control Unit (E-Box) Description
Valve section:
# Pins Function
0 • •
•
Stop Valve
• • ALD Pulse Valve 0 – Plug in the valve (precursor) that you want to pulse first.
1 • •
•
• • ALD Pulse Valve 1
2 • •
•
• • ALD Pulse Valve 2
3 • •
•
• • ALD Pulse Valve 3
4 • •
•
• • ALD Pulse Valve 4
5 • •
•
• • ALD Pulse Valve 5
(Table is continued on the next page)
Power switch
DB-9 MFC Connector
Pressure Gauge Connector
Spare DB-15 Connector
USB Connector
Power Inlet
Fuses (replace with same type
and rating)
(!) 115 V on 3-pin connectors 0 -21

Section 4 - Hardware Overview
©2009 Cambridge Nanotech Inc. Confidential Rev 1.1 Draft
Savannah Maintenance Manual 27
Heater and RTD section:
6 • •
•
Bellows Heater
• • Bellows Heater RTD
7 • •
•
Tee/Valve Heater
• • Tee/Valve Heater RTD
8 • •
•
Outer Tubular Heater
• • Outer Tubular Heater RTD
9 • •
•
Center Disk Heater
• • Center Disk Heater RTD
10 • •
•
Valve Heater Block
• • Valve Heater Block RTD
11 • •
•
Precursor Heater Jacket
• • Precursor Heater Jacket RTD
12 • •
•
Precursor Heater Jacket
• • Precursor Heater Jacket RTD
13 • •
•
Precursor Heater Jacket
• • Precursor Heater Jacket RTD
14 • •
•
Precursor Heater Jacket
• • Precursor Heater Jacket RTD
15 • •
•
Precursor Heater Jacket
• • Precursor Heater Jacket RTD
16 • •
•
• •
17 • •
•
• •
18 • •
•
• •
19 • •
•
• •
20 • •
•
• •
21 • •
•
System Cabinet Cooling Fans
• •

Section 4 – Hardware Overview
©2009 Cambridge Nanotech Inc. Confidential Rev 1.1 Draft
Savannah Maintenance Manual 28
Precursor Manifold Re-Build
Tools Required
Allen wrench set – American standard Open wrench sizes 1 1/16 inch, 5/8 inch, 3/4 inch Adjustable wrench
Parts Required 12 VCR 1/4inch gaskets 2 VCR 1/2inch gasket
Removing a Precursor
Cylinder
Cylinder Head Space Purge Recipe
Instruction # Value
1 pulse X 0.5
2 wait 5
3 goto 1 10
4
This procedure will describe the steps required to rebuild a 6 valve Savannah precursor manifold, reinstall the manifold, and pressure test the manifold once installed. Over View of Steps to Perform
1. Remove Precursor Cylinders 2. Remove ALD Manifold from process chamber 3. Disassemble ALD Manifold 4. Reassemble ALD Manifold 5. Reconnect to processes chamber 6. Connect N2 carrier gas 7. Leak check system 8. Reinstall Precursor cylinders
Each precursor bottle must be close and purged prior to removing the bottle. It is very important to follow the procedure completely.
1. If the precursor cylinder is hot, use thermal resistant gloves to close the manual valve. Close the valve by turning the valve head in the direction indicated.
2. Purge the space between the manual valve and the ALD valve.
- Setup and run pulse-purge recipe shown to left (where X is the cylinder to be removed):
- Ensure that the pressure plot does not have any peaks for the last few pulses. If not, repeat the program to ensure the space is evacuated.
3. If applicable, turn off the power to the precursor heating jacket by setting the temperature value to 0. This can be done by using the heater command in a recipe or by putting the cursor in the appropriate heater box (i.e. #13-18) and entering 0.
4. When cool, remove the precursor heating jacket from the cylinder.

Section 4 - Hardware Overview
©2009 Cambridge Nanotech Inc. Confidential Rev 1.1 Draft
Savannah Maintenance Manual 29
Disconnect electrical and
gas to the ALD Manifold
5. Remove the cylinder by gripping the square of the manual valve with a 13/16” wrench and the ALD valve connection with a 3/4” wrench. Rotate the top 3/4” wrench counterclockwise. Do not twist the bottom connection to the precursor cylinder (labeled “A”) in figure. This will disconnect the manual valve from the precursor.
To remove the ALD manifold. All electrical connections must be disconnected from the e-box. Turn off e-box power then remove electrical connections. This includes the following red and black wires that control the ALD valves. e-box plugs #0, 1, 2, 3, 4, 5, 6 and the RTDs (resistance temperature detector).

Section 4 - Hardware Overview
©2009 Cambridge Nanotech Inc. Confidential Rev 1.1 Draft
Savannah Maintenance Manual 30
Disconnect electrical and
gas to the ALD Manifold
Disconnect ALD Manifold
from System
After disconnecting all electrical connections to the e-box. The N2 gas manifold (VCR fitting) and the CDA actuation gas (quick connect fitting) need to be disconnected. These connections are located at the right side at the back of the system. Discharge the CDA and process nitrogen gas pressure before disconnect the fittings.
The ALD manifold will be connected to the reactor at the VCR fitting below the top surface of the system (see figure above). Remove the ALD manifold by loosening the VCR fitting with a 1 1/16 inch wrench and the specialty wrench provided with the system at the ALD manifold. Loosen the VCR fitting above the Savannah surface. Be sure to support the ALD manifold during this procedure. The manifold is supported by the 0.5inch VCR fitting. After disconnecting this VCR fitting the ALD manifold can be removed from the Savannah system. Remove the manifold from the Savannah system to be disassembled.
CDA N2
VCR to ALD manifold
N2
CDA

Section 4 - Hardware Overview
©2009 Cambridge Nanotech Inc. Confidential Rev 1.1 Draft
Savannah Maintenance Manual 31
Exploded View of ALD Gas
Manifold
ALD heat shield top Precursor manifold Actuation gas manifold ALD Valves Cartridge Heater ALD heat shield bottom
Nitrogen Manifold
New VCR gaskets

Section 4 - Hardware Overview
©2009 Cambridge Nanotech Inc. Confidential Rev 1.1 Draft
Savannah Maintenance Manual 32
Disassembly of ALD
Manifold
Re-Assembly of ALD
Manifold
Before disassembling the ALD manifold review the exploded view of the ALD gas manifold diagram shown below.
1. Remove the insulated ALD heat shield by loosening the two Allen bolts. The top can be removed from the bottom heat shield. The heat shield can be removed from the ALD manifold without removing the cartridge heater. Be careful to leave the ALD manifold RTD in place.
2. Remove the actuation gas (plastic quick disconnect manifold) from the ALD valves.
3. Remove the Nitrogen manifold 4. Remove the individual ALD valves from the precursor
manifold. 5. Dispose of used VCR fittings. New VCR fitting are
required for reassembly. 6. The ALD manifold RTD (resistance temperature detector)
can be left in place for reassembly.
Before assembling the ALD manifold review the Exploded View of ALD Gas Manifold diagram shown below. Verify that are required parts are available. New VCR gaskets are required for reassembly and needed for each fitting. Inspect all sealing surfaces for scratches or debris, clean as required.
N2

Section 4 - Hardware Overview
©2009 Cambridge Nanotech Inc. Confidential Rev 1.1 Draft
Savannah Maintenance Manual 33
1. Install the ALD manifold RTD (resistance temperature detector) on a middle ALD valve.
2. Install the individual ALD valves onto the precursor manifold (finger tight only, do not compress the VCR gasket at this time).
3. Install the Nitrogen manifold (finger tight only, do not compress the VCR gasket at this time).
4. Install the bottom ALD heat shield to align the ALD valves, verify the position of the ALD manifold RTD (securely attached to the middle ALD valve).
5. Tighten all VCR fittings, compressing the gasket with approx. 90º turn of the female fitting. The male fitting should be held without rotating.
6. Wire the RTD through the bottom heat shield. 7. Reinstall the insulated top ALD heat shield by tightening
the two Allen bolts. The fit should be tight without any gaps between the top and bottom heat shields. The cartridge heater should be installed completely
8. Reinstall the actuation gas manifold (plastic quick disconnect manifold) with the CDA source oriented similar to the nitrogen manifold delivery point, as shown in the Exploded View of ALD gas manifold.
9. Install the assembled manifold to the Savannah process chamber using a new 0.5 inch VCR gasket as shown below. Be sure to support the ALD manifold during this procedure.
10. Tighten the 0.5 inch VCR gasket under the process chamber(1 1/16 inch wrench) by tightening female connection 90º degrees.
RTD
RTD

Section 4 - Hardware Overview
©2009 Cambridge Nanotech Inc. Confidential Rev 1.1 Draft
Savannah Maintenance Manual 34
Reconnect The N2 and CDA gas lines
Reconnect electrical connections ALD Manifold
Once the ALD Manifold has been attached to the chamber. The N2 gas manifold (VCR fitting) and the CDA actuation gas (quick connect fitting) need to be reconnected as shown. The N2 manifold will require a new VCR gasket to make the seal. These connections are located at the right side at the back of the system. Discharge the CDA and process nitrogen gas pressure before disconnect the fittings.
All electrical connections must be reconnected to the e-box. E-box power should be turned off before making connections. The ALD valves should be wired so that the first ALD valve, from the front of the system is labeled “0” with the red and black ALD solenoid valve electrical signal and plugged into the two wire “0” connection. The next ALD valve moving to the back of the system should be plug labeled and plugged into wire connection “1” and increasing with each additional ALD valve, plugs #0, 1, 2, 3, 4, 5, 6.
CDA
N2
CDA

Section 4 - Hardware Overview
©2009 Cambridge Nanotech Inc. Confidential Rev 1.1 Draft
Savannah Maintenance Manual 35
Precursor Cylinder
Assembly
PPrrooffeessssiioonnaallllyy FFiillll CCyylliinnddeerrss
A Cambridge NanoTech precursor cylinder assembly consists of the following items:
1) 50 mL Stainless steel cylinder with a female ¼” VCR fitting
2) One stainless steel Swagelok gasket, either: a. SS-4-VRC2 b. SS-4-VCR-2-GR (with retaining clip)
3) One manual valve: either one of the following: a. SS-4H-VCR (ball valve – rated to 220°C) b. SS-42GVCR4 (bellows valve – rated to
120°C) 4) One stainless steel Swagelok gasket (see above) 5) One endcap (not provided) for use when precursor is
stored outside the system. Manual Valve Selection The green headed ball valve (SS-4H-VCR) is a ball valve and can be heated to 220°C. The valve should be assembled with the arrow facing down into the cylinder. This configuration leaves a smaller dead space between the ALD valve and the manual valve and helps to minimize clogged lines once installed into the system. While Cambridge NanoTech systems ship with SS-4H-VCR ball valves, an optional bellows valve SS-42GVCR4 can also be used. These valves are not for use with precursors requiring heating over 130°C. Many ALD precursors are air sensitive and/or pyrophoric. Therefore, precursors should be filled by a certified Chemical Company. The MSDS sheets for each precursor will identify the precautions required for each chemical. Chemical suppliers, such as Strem Chemicals, Sigma-Aldrich, Rohm & Hass, Gelest, etc. can provide filling of empty precursor cylinders. Sigma-Aldrich sells some common precursors pre-packaged in cylinders. Strem Chemicals sells a compatible cylinder which can be custom filled. Insert a new gasket and re-attach the manual valves, using a 3/4” and a 5/8” wrench to turn the valve one half turn past finger tight.

Section 4 - Hardware Overview
©2009 Cambridge Nanotech Inc. Confidential Rev 1.1 Draft
Savannah Maintenance Manual 36
Correctly Incorrectly filled filled
Precursors should be professionally filled into the cylinder so that they are no more than half full (or 25cc of material). This allows sufficient room for the precursor to volatilize. As the precursor dose is based on the vapor phase in the cylinder, if the cylinder is filled more than half full the precursor dose may be smaller than expected. This may result in no film growing.

Section 4 - Hardware Overview
©2009 Cambridge Nanotech Inc. Confidential Rev 1.1 Draft
Savannah Maintenance Manual 37
Removal of Precursor
Cylinder
Recipe for Purging ALD Valve
Installing Precursor
Cylinder
6. If the precursor cylinder is hot, use thermal resistant
gloves to close the manual valve. Close the valve by turning the valve head in the direction indicated.
7. Purge the space between the manual valve and the ALD valve.
- Setup and run pulse-purge recipe as shown to the left (where X is the cylinder to be removed):
- Ensure that the pressure plot does not have any peaks for the last few pulses. If not, repeat the program to ensure the space is evacuated.
8. If applicable, turn off the power to the precursor heating jacket by setting the temperature value to 0. This can be done by using the heater command in a recipe or by putting the cursor in the appropriate heater box (i.e. #13-18) and entering 0.
9. When cool, remove the precursor heating jacket from the cylinder.
10. Remove the cylinder by gripping the square of the manual
valve with a 13/16” wrench and the ALD valve connection with a 3/4” wrench. Rotate the top 3/4” wrench clockwise. Do not twist the bottom connection to the precursor cylinder (labeled “A”) in figure. This will disconnect the manual valve from the precursor.
11. In the empty precursor port, add a new precursor cylinder with a new, genuine Swagelok gasket (SS-4-VCR-2) or (SS-4-VCR-2-GR) on top of the connection.
12. Tighten the cylinder by gripping the square of the manual valve with a 13/16” wrench and the ALD valve connection with a 3/4” wrench. Rotate the top 3/4” wrench counter-clockwise.
13. Purge the sample space between the ALD valve and the precursor cylinder by running the above recipe once more.
14. Open the manual valve.
15. Reinstall the precursor heating jacket (if applicable).
Instruction # Value
1 pulse X 0.5
2 wait 5
3 goto 1 10
4

Section 5 – Technical Specification
©2009 Cambridge Nanotech Inc. Confidential Rev 1.1 Draft
Savannah Maintenance Manual 38
Section 5
Technical
Specifications
Electrical Specifications
Electrical Supply ............................................... 110V, 10A Main supply voltage fluctuation not to exceed ±10% of the nominal supply voltage. Fuses ...................................................................... ¼”x1¼” Savannah S100 .................................................. 250V/10A Savannah S200 .................................................. 250V/15A Savannah S300 ..................................... Breaker 110V/40A
Facilities Recommendations
It is recommended to use a corrosion resistant (filled with PTFE oil, e.g. Fomblim™, preferably SV oil) rotary vane pump with a recommended pumping speed of 3.5 cfm. Use of an uninterruptible power supply for the control computer is strongly recommended. Alternatively one can use a notebook computer with a good battery as a back up power. A supply of high purity nitrogen through stainless steel tubing with a ¼” VCR female end connection and minimum pressure of 20 psi (see Mass Flow Controller specifications for maximum pressure ratings) is required. 80 psi of air or nitrogen (N2 preferred) for pneumatic actuation in ¼” PFA tubing. It is recommended to use a PC compatible computer with a fresh installation of Windows XP or Vista Operating System and an available USB port.
Environmental Specifications
Operating Temperature ...................... 15-40 oC(60-100 oF) Humidity ......................... Max 80% at 30 oC (50% at 40 oC) Storage Humidity 0-95% relative humidity, non-condensing Indoor use only. Pollution degree ............................................................... 2 Installation category .......................................................... II Operation Altitude ............................................Max 2000m

Section 6 – Frequently Asked Questions
©2009 Cambridge Nanotech Inc. Confidential Rev 1.1 Draft
Savannah Maintenance Manual 39
Section 6
Frequently
Asked Questions
What oil should I put in the
pump?
Dose Cambridge NanoTech
Inc. need to maintain the
Savannah system?
I can’t open the lid, it seems
to be stuck!
Please find some of the most frequently asked questions
for the Savannah ALD systems below. For an updated list
please check our website.
If you received a pump from Cambridge NanoTech, then
the pump is “B-prepped” also known as Fomblin prepped.
The pump must be filled with Fomblin which has to be
purchased by the customer for example from Inland
vacuum. We recommend Fomblin SV for its low vapor
pressure and inert nature. Ordinary oils are flammable
and should not be used. Inland will also clean your oil for
you.
In our experience, our customers can very well hook up
the Savannah ALD system and maintain the system
themselves, after reading the manual and consulting
with Cambridge NanoTech Inc. The required customer
supplied items can be found on the quote, or in a
detailed specifications document (inquire). It is very
important to read the manual; this can not be said
enough. It is also useful to contact Cambridge NanoTech
Inc. support if things are not clear.
It is often difficult to open the lid when the reactor is
cold. It is best to keep the system warm at all times. We
find that the lid opens very well at 80 °C and above. We
also provide optional Kalrez O-rings with a proprietary
coating which has anti-stick features. Please inquire if
needed. It is always good to have a spare O-ring, in case
something happens with the old O-ring although we find
that the Kalrez O-ring performs extremely well for more
than a year.

Section 6 – Frequently Asked Questions
©2009 Cambridge Nanotech Inc. Confidential Rev 1.1 Draft
Savannah Maintenance Manual 40
Frequently Asked Questions
(continued)
The base pressure sometimes
goes up, is there something
wrong with my gauge?
My software crashes and
shows 1e-7 on the gauge
readout and very large
numbers on the temperature
readout, what is the problem?
My system is quite dirty, how
should I clean it?
During deposition one usually overdoses the precursor
by a small amount in order to get uniform films and
good saturation of each cycle. This means that the
residual precursor goes into the pumping port and can
deposit all the way in the pump. The gauge consists of a
heated filament and temperature sensor. Over time, the
coating also deposits onto the filament, and one can
recalibrate the sensor to new calibration settings. One
needs to calibrate at atmospheric pressure, and at a
pressure lower than 1e-5 Torr. This means that once
every half a year one could take off the gauge and place
it on a turbo pump and recalibrate. Please refer to the
gauge manual PDF that was provided on your CD.
This has happened once where the USB cable was
mounted in close proximity to a turbo pump. The USB
communication was thus not stable. In another instance
it can happen if one unplugs one of the cables while the
system is running. Unplugging or plugging cables into
the electronics box should only be done with the
software stopped and the electronics box turned off. It is
best that the users call us to report if this problem
occurs.
Over time a thicker coating develops in the reactor and
pumping line. This can flake off, especially if the reactor
and other components are heat cycled. Heat cycling can
accelerate flaking because the difference of thermal
expansion of stainless steel and ceramics like Al2
O3
. It is
best to keep the heat cycling to a minimum. The cleaning
depends on the material deposited. The lid can be
resurfaced with a scotch brite sponge, however to
guarantee leak tightness, it would be better to send it
back to us for resurfacing. The reactor can be bead
blasted clean. The reactor can also be sent back to our
company for cleaning.

Section 6 – Frequently Asked Questions
©2009 Cambridge Nanotech Inc. Confidential Rev 1.1 Draft
Savannah Maintenance Manual 41
Frequently Asked Questions
(continued)
When I mount the nitrogen
manifold, it seems to torque
the whole precursor line
The NW O-rings in the
pumping line are dirty, should
I replace them?
The base pressure of the
systems seems to be high.
What spare parts do you
recommend purchasing?
How do I tighten the VCR
fittings?
When mounting the nitrogen manifold, make sure to NOT
turn the male nut on the manifold, and turn the Female
nut on the ALD valve 45 degrees (1/8th
of a turn) after
hand tightening them.
The NW O-rings in the pumping line are Viton O-rings. In
addition to a coating that can develop during extended
use, they can also flatten because of the high
temperature of the pumping line (compression set).
Because of these reasons, we recommend to always
replace the pumping line O-rings with a new O-ring
during re-assembly.
After extended use the pump fluid may have to be
replaced/cleaned or the pump may need to be sent out
for cleaning. One should take a look in the view port and
examine the cleanliness. This often happens after 6
months of extended use without a trap. It may also be an
indication that one is using too large of a dose. If too
much water mixes with the Fomblin pump oil it starts to
look milky and can affect the pumps ability to function.
We recommend a spare gauge, lid and VCR gaskets. If
budget allows we recommend a spare Kalrez O-ring,
pump and reactor. The pump will have to be sent out for
cleaning and for continued use a spare pump can come
in handy.
With VCR fittings in the pumping line, one always has to
replace the metal gasket with a new unused gasket. One
cannot mount it without a gasket. Hand tighten both
nuts and then a total of 45 degrees (1/8th
turn) further
tightening with two wrenches.

Section 6 – Frequently Asked Questions
©2009 Cambridge Nanotech Inc. Confidential Rev 1.1 Draft
Savannah Maintenance Manual 42
Frequently Asked Questions
(continued)
The lid doesn’t swing
smoothly
Should I mount all the
materials that I want to
deposit with a big manifold or
should I replace the precursor
cylinders every time?
Sometimes when the reactor is hot and the lid has been
open for more than 5 minutes, the lid will cool down. The
thermal expansion of the reactor makes the distance of
the reactor hinges wider than the distance of the lid
hinges and this can cause some friction. It is
recommended to open the lid only momentarily when
replacing a substrate. This is good not only for proper
rotation of the lid, it also prevents flaking of deposited
coating on the lid, and helps air from reaching the valves
against the flow of the nitrogen.
For systems with the blue pneumatic ALD valves, we
recommend the following: 1. If different materials are
deposited within the same run: then one needs to mount
them all at the same time. 2. If different materials are
deposited within two weeks but not in one run: best to
have separate ALD systems for different films, then
different materials can be run by different users at the
same time. If it is not possible to purchase separate
systems, then one can leave unused precursor lines
mounted with manual valve to the precursor cylinder
closed. 3. If different materials are not used within two
weeks: then it is best to use only the precursor lines for
the active materials (no unused lines/valves attached,
smallest manifold possible), and replace the cylinders +
manual valves and its associated ALD pulse valve. Make
sure to close the manual valve and degas the space
between manual valve and ALD valve (headspace)
extensively with the temperature of the precursor
cylinder and ALD valve section that is the same as would
be used during deposition. To avoid any cross
contamination or precursor residue in the ALD valve,
degas for example for an hour with 0.1-1 second pulse
time, and until no pulses are seen anymore. (Note1. Due
to the internal structure of the Parker solenoid valves, it
is better to remove the parker pulse valve along with the
cylinder + manual valve when replacing a precursor line).
Note 2. NEVER remove precursor cylinder with manual
valve open, and NEVER open manual valve in air when
there is precursor material in the cylinder.
Section 6 – Frequently Asked Questions
©2009 Cambridge Nanotech Inc. Confidential Rev 1.1 Draft
Savannah Maintenance Manual 43
Frequently Asked Questions
(continued)
What orientation should I put
the precursor line manual
valve?
Should I put a heating jacket
around a cylinder with TMA or
water?
What is the best plot time on
the gauge pressure graph?
What valve temperature
should I use?
If your are using a manual valve with a green round
handle, then the manual bellows valve should be
oriented with the arrow pointing in the direction of the
precursor cylinder. This is important because otherwise
the large area bellows is pointed towards the ALD valve,
which increases the purge out time, when one wants to
remove the precursor cylinder + manual valve. A special
note should be made to the chemical suppliers, that they
mount this valve in this proper orientation after filling
the cylinder. (Please see the manual.) If you are using a
manual valve with black handle then the orientation is
not critical, since it is a symmetric ball valve.
The vapor pressure of TMA and water is high enough at
room temperature, so it doesn’t need heating. In fact the
heating jackets should not even be mounted around the
TMA and water cylinder, because the TMA cylinder would
get hot through the temperature of the ALD valves. Any
precursors with such high vapor pressure do not need
heating jackets.
It is recommended to plot only several pulses, for
example 30 seconds or 1 minute total plot time. Setting
this value to 1 hour during a run can reduce delay
precision, because with a 1 hour plot time many data
points need to be refreshed, which consumes a lot of
processing resources. It is possible to set the plot time
to 1 hour to get an overview of pulse heights, but plot
times > 5 minutes are not recommended during a run.
Depending on the valves that are on the system (Parker
solenoid valves or Swagelok pneumatic ALD valves) we
recommend the following: The Parker valves should be
between heated to 80 °C. Do not heat the Parker valves
higher or keep them at a lower temperature. The
Swagelok valves can be heated up to 200 °C. We
recommend the Swagelok valves to be heated to 150 °C.
Please ask Cambridge NanoTech Inc. for settings for
your conditions before trying anything at random.

Section 6 – Frequently Asked Questions
©2009 Cambridge Nanotech Inc. Confidential Rev 1.1 Draft
Savannah Maintenance Manual 44
Frequently Asked Questions
(continued)
What is the dose that I should
use for the precursors?
Why is there nitrogen flow
and what is the recommended
setting?
We recommend to ask Cambridge NanoTech Inc. for a
recipe before any run since there are many parameters
interconnected (substrate material, precursor,
temperature, purge time etc.), that one general recipe
cannot be mentioned. One general guideline is that the
precursor pulse height should be about 1 Torr or less.
For TMA and other high vapor pressure materials, one
should not pulse for more than about 0.02 seconds,
unless Cambridge NanoTech advises otherwise. This is
to prevent premature contamination of the system. Also,
high vapor pressure materials should not be heated and
the heating jacket should be removed to prevent the
cylinder from getting hot from the valve heating block
above it.
Nitrogen (or argon) flow is used for various reasons. The
first reason is to quickly purge the system between each
pulse. It is important that between the precursor pulses,
there is no residue (except for the monolayer chemically
bonded to the substrate) of precursor in the reactor. The
presence of two precursors at the same time would
cause immediate reaction in vapor phase, which can lead
to CVD mode deposition (non-uniformity, thick coating,
powder formation). So the combination of temperature,
nitrogen flow and pump time between pulses prevents
two precursors from seeing each other in vapor phase.
At low reactor temperatures (e.g. 100 °C), the pump time
needs to be higher (e.g. 30 sec) than at high
temperatures (>150 °C, pump time e.g. 8 sec, for TMA).
The higher the temperature, thus the faster the cycles.
Another reason for nitrogen flow is to prevent flow of
precursor from one pulse valve into the other. It is
important that the pulse valves only see their own
precursor, thus each valve has a constant nitrogen flow.
The constant nitrogen flow out of each valve prevents
other precursors to enter, and thus prevents deposition
in each valve. A recommended nitrogen flow value is 20
sccm. During venting this is increased to 100 sccm, and
also while the reactor is open, this should be the
maximum flow value (100 sccm) to prevent air from
entering the valve regions. One should immediately close
the lid after inserting/removing the substrate and not
leave it open.

Section 6 – Frequently Asked Questions
©2009 Cambridge Nanotech Inc. Confidential Rev 1.1 Draft
Savannah Maintenance Manual 45
Frequently Asked Questions
(continued)
What is exposure (Expo) mode
and when should it be used?
When the system is not in use,
should I turn off all the
heaters?
Expo deposition means that prior to pulsing a precursor,
the stop valve (valve between reactor and pump) is
closed, then one precursor is injected, then the substrate
gets exposed during the expo time (for example if expo =
20 seconds, the stop valve opens after 20 seconds). This
mode is only used when one needs to coat very high
aspect ratio structures (>1:10). The disadvantage of
using expo runs is that since the precursor does not
simply flow very fast from cylinder through valve
through manifold over substrate into pump, instead, it
sits in the reactor for expo seconds, and some of the
precursor can migrate to all valves. This can cause some
deposition in the valves, especially if the expo time is
long. To reduce this effect, one could pulse two times in
expo mode (for very high aspect ratio structures) to
prevent the reactor pressure from getting too high
during the expo time. If one wants to get better
nucleation on hydrophobic substrates, we don’t
recommend expo mode deposition. Instead, one could
pulse two times the same precursor in multi dosing
deposition mode (expo=0 seconds), and this
would only be needed for say the first few cycles. This
may be especially useful for thin gate dielectrics.
If permitted by your facilities and safe in your lab as
judged by the owner or responsible individual, you may
leave the heaters on when not in use. The advantages
are: 1. no heat-up time between runs, 2. less flaking of
material from reactor walls due to differential expansion,
etc. We recommend that heaters for the bellows (#6), the
stop valve (#7) and the ALD valve oven (#10) are set to
150o
C, and reactor heater (#8) is normally set between
100o
C to 270o
C.

Section 7 – Additional Hardware Components
©2009 Cambridge Nanotech Inc. Confidential Rev 1.1 Draft
Savannah Maintenance Manual 46
Section 7 Additional Hardware Components
Ozone Delivery Using
OL80F Generator
Features of OL80F generator High frequency corona discharge O3 module; 100% sealed Quartz high voltage O3 cell; Linear ozone concentration regulation; 3” Cooling fan; Female Luer Lock panel fittings, color coded; EXT O3 Output Control Port; Technical data: 1. Size: 5.75 x 9.75 (11.00) x 4.00" (WxHxD); 2. Weight: 1.5kg / 3.5Lbs; 3. Power: 12VDC/1500mA. Each ozone generator is supplied with: universal 100-240VAC/12VDC (4.0Amp) + “Car adapter” ; 4. Ozone output: Each unit is calibrated separately; 5. 0-150 mg/l (µg/ml) // 0-1000 mg/hr; 6. Pressure: 0-3 psi ; 7. Warranty: 12 months limited warranty.
Variations of ozone output: The ozone production drift does not exceed +/- 5%, if the equipment is operated under or close to standard laboratory conditions outlined as follows: 1. Barometric pressure 97-103 kPa 2. Room temperature 20-23°C / 68-74°F 3. Relative humidity not exceeding 75% 4. Minimal sunlight and/or UV exposure Average ozone output produced by OL80
Flow [LPM] max µg/ml max %by weight
max mg/hr
1/32 142 10.00 285 1/16 116 8.11 466 1/8 90 6.29 675 1/4 56 3.92 840 1/2 33 2.31 990 3/4 24 1.68 1067 1 17 1.19 1002
Important notes: 1. Protect the equipment against excessive vibrations, heat, dust and humidity. 2. Protect the equipment against the back-flow of water and/or any other liquids & gases.

Section 7 - Additional Hardware Components
©2009 Cambridge Nanotech Inc. Confidential Rev 1.1 Draft
Savannah Maintenance Manual 47
3. Be very gentle with all fittings/connectors. Using excessive force will result in complications of removing or disconnecting the connectors or even breaking the connectors (not covered by the warranty).
Ozone delivery system connection diagram
The following is a diagram for setting up an ozone delivery source for a Savannah ALD system. List of parts Following parts are provided if an O3 delivery system is purchased from Cambridge NanoTech Inc. 1. Ultrahigh purity O2 cylinder; 2. One oxygen flow regulator with CGA540 fitting or CGA870 fitting (if used in UK); 3. One OL80F ozone generator; 4. Several 1/8” ID and 3/16” OD TeflonTM tubings; 5. One O3 resistant diaphragm check valve for 1/8” ID tubings; 6. One adapter for TeflonTM tubing to VCR connection; 7. One set of Luer Lock fittings; 8. One solenoid valve; 9. One power supply for ozone generator with modified connector. 10. One O3 destructor.
Savannah ALD system Check valve and O3 destructor
O3 generator
O2 O2+ O3
Ultrahigh purity O2
regulator with CGA540
regulator with CGA870

Section 7 - Additional Hardware Components
©2009 Cambridge Nanotech Inc. Confidential Rev 1.1 Draft
Savannah Maintenance Manual 48
Setup procedure 1. Mount 0.22mm O3 filters on both oxygen input and O3 output of the O3 generator. 2. Install the O2 flow regulator to the O2 cylinder. Make sure the flow regulator is set to “OFF”. Then attach oxygen tubing to the regulator with a male Luer lock fitting. 3. Connect a TeflonTM tubing with a male Luer lock fitting to O2 input of the generator. 4. Connect the TeflonTM tubing with a male Luer lock fitting to generator output and connect the other end to Branch “1” of a Kynar “Y” fitting. Connect a check valve to Branch “2”. Connect Branch “3” to a precursor port on the Savannah ALD system with a TeflonTM tubing and the provided Swagelok/VCR adapter. 5. Connect the check valve to the ozone destructor with a TeflonTM tubing.
1 2
3
O3
O3 to reactor
O3 to destruct
check valve

Section 7 - Additional Hardware Components
©2009 Cambridge Nanotech Inc. Confidential Rev 1.1 Draft
Savannah Maintenance Manual 49
Setup procedure (cont’d)
Operation procedure An example recipe with O3
6. Connect the solenoid valve between the O2 cylinder and the O3 generator with Swagelok reducing unions and O3 tubings. Connect the modified power cable to the AC/DC converter and connect the converter to the O3 generator. Plug the 3pin connector to #1 on the ebox. 1. Open the valve on the O2 cylinder and set the flow rate to 1/16. 2. Set “ozone duty cycle” dial on the generator to maximum (“10”), which leads to an O3 concentration of ca. 9% in weight. 3. Make sure the generator power switch is already at ON position. 4. To power on/off the generator in a run, use “line ac out 1, 1” or “line ac out 1, 0”. The example recipe is a film deposition process involving O3 (connected to ALD valve 3) and a metal organic precursor (connected to ALD valve 1). Details are the following: Line 0: turns on O2 flow and O3 generator; Line 1: waits 5 minutes for generator to reach full efficiency; Line 2-4: purges O3 line 10 times; Line 5-9: grows 500 layers of film; Line 10: turns off O2 flow and O3 generator.
Solenoid valve

Section 7 - Additional Hardware Components
©2009 Cambridge Nanotech Inc. Confidential Rev 1.1 Draft
Savannah Maintenance Manual 50
How to Plumb Gaseous
Precursor to the
Savannah System
Use of gaseous precursors such as oxygen, nitrogen dioxide, nitrogen or hydrogen may be required for certain ALD process. Such gasses can be plumbed directly into the ALD valve of the Savannah system.
Incompatible Gasses
CAUTION: Do not plumb oxygen and hydrogen into the Savannah system at the same time. CAUTION: Do not plumb hydrogen and ozone into the Savannah system at the same time. Contact Cambridge NanoTech for options on purchasing a hardware interlock if H2 and O3/O2 are desired. Before beginning installation of gases, consult MSDS sheets and follow appropriate safety precautions when dealing with compressed gasses. Be aware of gases that can cause asphyxiation, are toxic and/or reactive with atmosphere or chemical precursors installed in the system.
Recommended Plumbing Configuration Cambridge NanoTech recommends using the following configuration for plumbing a gas into the system: Gas source (ie.) cylinder with regulator >
Manual shutoff valve > Gas purifier >
Manual shutoff valve > Needle valve > ALD valve
Choose a gas source with an appropriate regulator for your system. Locate the gas source in a ventilated area. If using a gas that is toxic, reactive or one that may cause asphyxiation, it is recommended to use the exhausted rear panel for the Savannah (optional). High-purity gas (such as electronic grade 99.999+%) is recommended in order to prevent residual contaminates in the gas from being incorporated into the film. A two-stage regulator capable of delivering a low pressure of gas (i.e. <20psi) to the valve is recommended. Use a stainless steel hardline between the regulator and the ALD system in order to prevent gas leaks or ruptures. Use of a gas purifier is recommended in order to remove residual impurities which remain in the source gas or are introduced from the regulator of the bottle as well as to buffer the gas flow. For example, for purification of gaseous ammonia, we recommend using the following purifier: Manufacturer: Entegris Manganese Resinate Hydride Gas Purifier with ¼” VCR connections Part #: CE35KFSK4R Use of manual shutoff valves is recommended to prevent atmosphere from prematurely degrading the filter matrix. Shut off the valves when the filter is not in use.

Section 7 - Additional Hardware Components
©2009 Cambridge Nanotech Inc. Confidential Rev 1.1 Draft
Savannah Maintenance Manual 51
Calibrating Gas Flow in the System
Record the pressure of the system when the flow of the process gas (N2) is 20 sccm. Adjust the pressure of the system to the system by setting the flow to 30 sccm. Record the new pressure of the system and the difference in pressure from 20 sccm.
The regulator on the source gas should be opened only slightly to deliver a low pressure of gas to the system. Fine tune the needle valve so that the flow rate for a 1 second pulse is equal to ~10 sccm. Some recipes will require a larger rise in pressure or a longer pulse, i.e) a 5 second pulse. Adjust the flow as required.

Section 7 - Additional Hardware Components
©2009 Cambridge Nanotech Inc. Confidential Rev 1.1 Draft
Savannah Maintenance Manual 52
ALD Shield Vapor Trap
Installation Options
The ALD Shield Vapor Trap is designed to trap excess organometallic precursors before they reach the vacuum pump. The ALD Shield Vapor Trap has a heated, high surface area matrix suitable for the adsorption precursors while creating minimal pressure drop. It will help to elongate pump life by preventing oxide buildup inside of pumping line and pump. The ALD Shield Vapor Trap was not designed to prevent water or other gaseous products from entering the vacuum pump. Therefore, if an ALD Shield Vapor Trap is installed, regular pump maintenance is still required (i.e. oil changes, regular servicing, refurbishment). The ALD Shield Vapor Trap is not an emissions abatement device. It is the responsibility of the end user to ensure that the by-products from their ALD process are safely vented outside of the work area. ALD Trap kit part list: NW 16 to NW 25 adapter NW 25 passthrough to NW 16(side) 3 way T adapter 5 1/2” Flexible NW25 bellows 100 cpsi trap Heating jacket Trap Size: 11.6” long X 10” di Weight 3.4 lbs /1.54 kg Cell Density: 100 cpsi Connections: NW-25 stainless steel connectors Cool touch Heating Jacket rated to 200°C included The ALD Shield Vapor Trap can be installed in one of two configurations: Configuration 1:
Reactor > Trap > Pressure Gauge > Stopvalve > Bellows > Pump
Configuration 2:
Reactor > Pressure Gauge > Stopvalve > Trap > Bellows > Pump

Section 7 - Additional Hardware Components
©2009 Cambridge Nanotech Inc. Confidential Rev 1.1 Draft
Savannah Maintenance Manual 53
Configuration 1
Configuration 1 – trap before gauge and stopvalve
Installation Instructions
Configuration 1
This configuration is only recommended for use with direct flow through ALD depositions. This configuration is NOT RECOMMENDED for ALD deposition runs employing exposure mode as the trap is not separated from the reactor chamber, This creates an increased reactor volume and increased potential for precursor backstreaming. An benefit of Configuration 1 is that the vacuum gauge and stopvalve will have decreased precursor deposition and longer expected life expectancy compared to no trap or configuration 2. This configuration is not recommended for S100 systems as a NW16 to NW25 adapter is required to connect the reactor to the trap. This creates a cold spot which may accumulate unreacted precursors. Place the trap inside of the trap heating jacket. Wrap the trap with the heating jacket and secure the heater matrix by fastening the Velcro straps. Orientation of the trap is unimportant. Attach the NW25 passthrough T-adapter to one end of the trap using a NW-25 clamps and an O-ring gasket. Attach the Edwards Vacuum gauge to the NW-16 port of the T-adapter using NW-16 clamps and an O-ring gasket. Similarly, attach the stop valve to the bottom end of the NW-25 passthrough T-adapter with the black face of the stopvalve facing away from the trap. Attach the flexible bellows to the bottom of the stopvalve. Attach the entire assembly to the NW-25 port on the underside of the S200 or S300 reactor, inside the cabinet. Locate the Alcatel 2005I pump inside the cabinet and with the pump inlet port underneath the flexible bellows. The bellows will require stretching a small distance to reach the inlet port. Connect the bellows to the inlet port with another NW-25 clamp and O-ring set. Place the heater jacket around the stopvalve and pressure gauge and reconnect to the e-box.

Section 7 - Additional Hardware Components
©2009 Cambridge Nanotech Inc. Confidential Rev 1.1 Draft
Savannah Maintenance Manual 54
Configuration 2
Configuration 2 – trap located after stopvalve, pressure gauge
Finishing Trap Installation
Reactor > Pressure Gauge > Stopvalve > Trap > Bellows > Pump
This configuration is recommended for users who will use exposure mode or desire a smaller reactor surface (for example if using low volatility or rare/expensive precursors). Place the trap inside of the trap heating jacket. Wrap the trap with the heating jacket and secure the heater matrix by fastening the Velcro straps. Orientation of the trap is unimportant. Attach the stop valve to the NW-25 fitting on one end of the trap with the black face of the stopvalve towards the trap. Attach the flexible bellows to the bottom of the stopvalve. Attach the NW25 passthrough T-adapter to the other end of the stop valve using a NW-25 clamp and an O-ring gasket. Attach the Edwards Vacuum gauge to the NW-16 port of the T-adapter using NW-16 clamps and an O-ring gasket. Attach the flexible bellows to the NW-25 fitting on the open end of the trap. Attach the open side of the T-adapter and the entire assembly to the NW-25 port on the underside of the S200 or S300 reactor, inside the cabinet. Locate the Alcatel 2005I pump inside the cabinet and with the pump inlet port underneath the flexible bellows. The bellows will require stretching a small distance to reach the inlet port. Connect the bellows to the inlet port with another NW-25 clamp and O-ring set. Place the heater jacket around the stopvalve and pressure gauge and reconnect to the e-box. Plug the 3-pin molex connector and 2-pin rtd sensor cable into Port #6 on the E-box. The trap connections take the place of the heated bellows line that comes standard with the Savannah series. If locating your pump outside the cabinet, you can connect the heated bellows jacket to your bellows and power it by plugging it into an unused precursor heater jacket port (11-17).

Section 7 - Additional Hardware Components
©2009 Cambridge Nanotech Inc. Confidential Rev 1.1 Draft
Savannah Maintenance Manual 55
ALD Shield Vapor Trap
(con’t)
Note: The use of the trap is suggested with the Alcatel 2005I pump inside the Savannah cabinet. Other configurations may be possible but the conductance of the trap is optimized for the 2005I located inside the Savannah stainless steel cabinet with the provided bellows. A pump with a greater pumping speed may be required if the pump is placed in a location other than the Savannah cabinet. Note: Some provided recipes may require alteration with the inclusion of the ALD Shield Vapor Trap. Increased conductance of the vacuum pumping line with the trap may cause a longer precursor residence time and affect film growth. Films grown from highly volatile precursors such as trimethylaluminum and diethyl zinc have not exhibited the need for recipe alteration after installation of the trap.

Appendix A- Consumable and Spare Parts
©2009 Cambridge Nanotech Inc. Confidential Rev 1.1 Draft
Savannah Maintenance Manual 56
Appendix A - Consumable and Spare Parts Item Usage Location Vendor Part Number
Small VCR Gasket
Required for sealing of VCR connections
Precursor valve to ALD valve connection; Precursor manifold connections
Swagelok SS-4-VCR2-GR
Large VCR Gasket
Required for sealing of VCR connections
Connection of ALD manifold to Reactor
Swagelok SS-8-VCR2-GR
APGX-H Active Linear Convection Gauge NW 16 ST/ST
Reads pressure of ALD system
Connected to T-port in bellows line
Edwards Vacuum or Cambridge NanoTech
D023-95-00
Edwards APGX-H NW 16 Tube Spare
Replacement End for vacuum gauge
Connected to vacuum gauge electronics head
Edwards Vacuum or Cambridge NanoTech
D023-95-801
Kalres O-ring Reactor S100 (System specific)
Seals S100 reactor to lid
O-ring grove in reactor
Cambridge NanoTech
AS-568A O-Ring K#257 Compound: 7075
Kalres O-ring Reactor S200 (system specific)
Seals S200 reactor to lid
O-ring grove in reactor
Cambridge NanoTech
AS-568A O-Ring K#275 Compound: 7075
Kalres O-ring Reactor S300 (system specific)
Seals S300 reactor to lid
O-ring grove in reactor
Cambridge NanoTech
AS-568A O-Ring K#280 Compound: 7075
Wetted Spares Kit
Includes: Reducer T Stop Valve Assembly Vacuum Gauge 2 Wing Nut Clamp NW 16 2 Wing Nut Clamp NW 25 Centering Ring NW 16 Centering Ring NW 25 18" Stainless Flex Hose Reactor O-ring
Contains all consumable parts and o-rings for Savannah system
Cambridge NanoTech
Specify Wetted Spares Kit by reactor (S100, S200, S300)
3-way ALD Valve and solenoid
Introduces precursor into manifold
ALD manifold Cambridge NanoTech

Appendix A- Consumable and Spare Parts
©2009 Cambridge Nanotech Inc. Confidential Rev 1.1 Draft
Savannah Maintenance Manual 57
Item Usage Location Vendor Part Number
Solenoid for ALD valve
Actuates ALD valve
ALD valve MAC Or Cambridge NanoTech
MAC 34C-AAA-GDFC-1KT
Stop Valve and Solenoid
Closes off reactor from vacuum pump
Pumping line Cambridge NanoTech
Stop valve solenoid
Actuates stop valve with CDA
Pumping line on stop valve
MAC Or Cambridge NanoTech
34B-AAA-CAAA-1KC
Centering Ring NW-25
Seals NW-25 pumping line connections
Required between stopvalve-bellows and stopvalve-trap
SMC NW-25
Centering Ring NW-16
Seals NW-16 connections
Required between pump line Tee and gauge
SMC NW-16
Vacuum Oil Pump Oil for Alcatel 2005I
Oil reservoir in Alcatel 2005I
Inland Vacuum (U.S.)
Fomblin SV
Small Items Item Usage Location Vendor Part Number
¼” 10-32 brass quick connect fitting
Connects actuation gas to ALD solenoid
Actuation gas manifold; attached to ALD valve solenoid
SMC KQ2H07-32
PTFE ¼” Tubing
Connects actuation gas quick connects
Actuation gas manifold; stopvalve acutuation
¼” Quick connect Tee
Connects actuation tubing for ALD manifold
Actuation gas manifold - ALD valves
SMC KQ2T07-00
¼” Quick connect elbow
Connects actuation tubing for ALD manifold
Actuation gas manifold - ALD valves
SMC KQ2L07-00
Unequal Vacuum-Reducer Tee NW-25 to NW-16 (S200, S300)
Connects Reactor to stopvalve: output for vacuum gauge
Pumping Line

Appendix A- Consumable and Spare Parts
©2009 Cambridge Nanotech Inc. Confidential Rev 1.1 Draft
Savannah Maintenance Manual 58
Item Usage Location Vendor Part Number
Wing Nut Clamp NW-25
Mates NW-25 connections
Between stopvalve-bellows and stopvalve-trap
NW-25-CR-SV
Wing Nut Clamp NW-16
Mates NW-16 connections
Required between pump line Tee and gauge
NW-16-CR-SV
Cambridge Nanotech Savannah Options Item Usage Description Vendor Item Number
Water cylinder
For use with water, alcohols or other chemical precursors
50 cc Stainless cylinder with male VCR connection
Cambridge NanoTech
Precursor Cylinder with High Temperature Valve
For use with all precursors: Temp <300°C
50 cc Stainless cylinder; with SS-4H-VCR green handled bellows valve
Cambridge NanoTech
Precursor Cylinder with Low Temperature Valve
For use with high volatility precursors: Temp <100°C
50 cc Stainless cylinder; with SS-42G-VCR- black handled ball valve
Cambridge NanoTech
Precursor Cylinder (no valve)
50 cc Stainless cylinder
Cambridge NanoTech
S100 Dome Lid
Increases volume of S100 for 3-D samples
Cambridge NanoTech
S200 Dome Lid
Increases volume of S200 for 3-D samples
Cambridge NanoTech
Wafer cassette
Holds up to ten 4, 6 or 8" wafers for (S200)
4-post slotted cassette for 10 wafers
Cambridge NanoTech
S100 and S300 options available
ALD Shield Vapor Trap Kit
Helps trap unreacted precursor from depositing in vacuum pump
Adapter NW16 to 25 Flexible bellows Vapor Trap Heating Jacket 3-way T adapter
Cambridge NanoTech

Appendix A- Consumable and Spare Parts
©2009 Cambridge Nanotech Inc. Confidential Rev 1.1 Draft
Savannah Maintenance Manual 59
Page Intentionally Left Blank
End of Savannah Maintenance Manual