Ottomania crochet pattern English
15
1 Ottomania crochet pattern – English Ottomania is a fun and very playful pattern which can be used for many purposes. It can be used for a baby blanket, cushion, afghan etc. All options are available if you adjust the size of the pattern. This pattern was designed with the Mr. Cey cotton yarn I received as a gift from a Dutch yarn shop called : Pera & Pasha, which is owned by two lovely fellows – Oscar and Cey. Cey is better known as Mr. Cey the autor of numerous crochet books and the namesake of the cotton yarn. He has a Turkish background. So, when I received the yarn and was searching for inspiration to use it, many ideas came up. But I wanted a versatile stitch pattern that could be used in many ways. And so, I decided to experiment with this reversed bobble stitch. After a few Rows the result was so surprising and had a fun effect, I knew I had to continue. Besides that, I feel colors really lift this pattern up very much. The more the better. So, enjoy the pattern and visit Pera & Pasha online or in their physical store if you haven’t done yet to discover their amazing own yarn types like Mr. Cey cotton. Mark Roseboom a.k.a. theguywiththehook
Transcript of Ottomania crochet pattern English

1
Ottomania crochet pattern – English
Ottomania is a fun and very playful pattern which can be used for many purposes. It can be used for a
baby blanket, cushion, afghan etc. All options are available if you adjust the size of the pattern. This
pattern was designed with the Mr. Cey cotton yarn I received as a gift from a Dutch yarn shop called :
Pera & Pasha, which is owned by two lovely fellows – Oscar and Cey. Cey is better known as Mr. Cey
the autor of numerous crochet books and the namesake of the cotton yarn. He has a Turkish
background. So, when I received the yarn and was searching for inspiration to use it, many ideas came
up. But I wanted a versatile stitch pattern that could be used in many ways. And so, I decided to
experiment with this reversed bobble stitch. After a few Rows the result was so surprising and had a
fun effect, I knew I had to continue. Besides that, I feel colors really lift this pattern up very much. The
more the better. So, enjoy the pattern and visit Pera & Pasha online or in their physical store if you
haven’t done yet to discover their amazing own yarn types like Mr. Cey cotton.
Mark Roseboom a.k.a. theguywiththehook
2
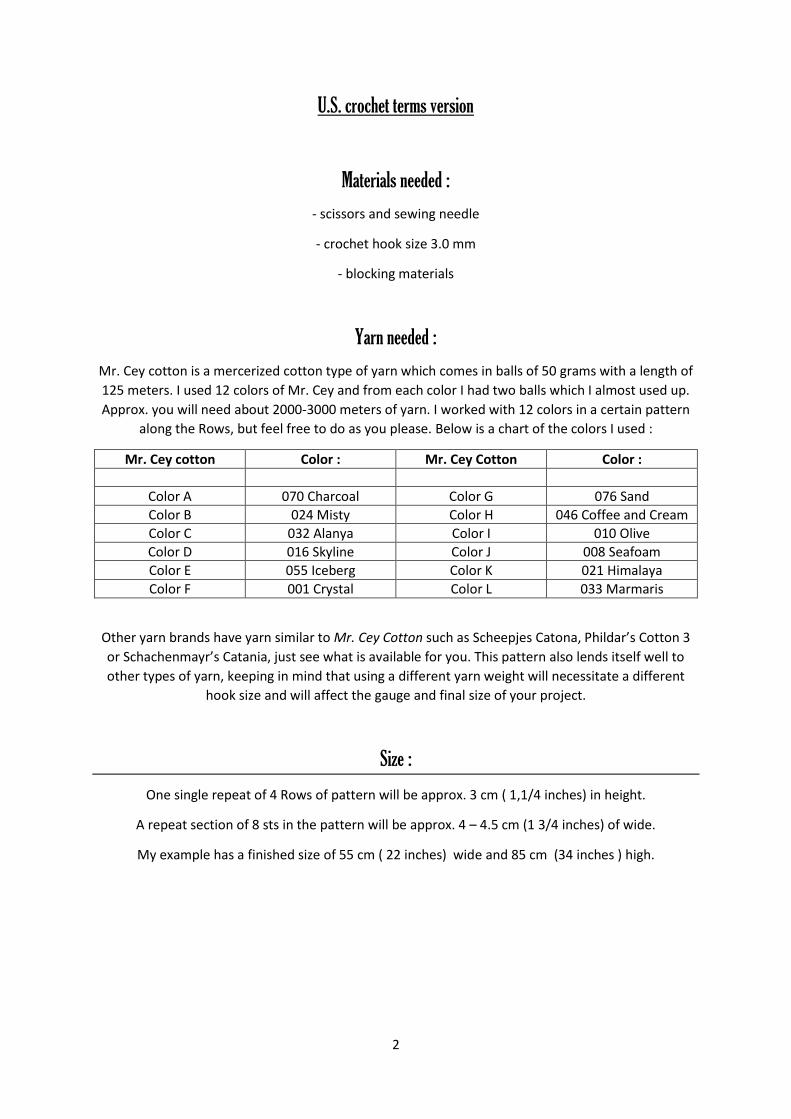
U.S. crochet terms version
Materials needed :
- scissors and sewing needle
- crochet hook size 3.0 mm
- blocking materials
Yarn needed :
Mr. Cey cotton is a mercerized cotton type of yarn which comes in balls of 50 grams with a length of
125 meters. I used 12 colors of Mr. Cey and from each color I had two balls which I almost used up.
Approx. you will need about 2000-3000 meters of yarn. I worked with 12 colors in a certain pattern
along the Rows, but feel free to do as you please. Below is a chart of the colors I used :
Mr. Cey cotton Color : Mr. Cey Cotton Color :
Color A 070 Charcoal Color G 076 Sand
Color B 024 Misty Color H 046 Coffee and Cream
Color C 032 Alanya Color I 010 Olive
Color D 016 Skyline Color J 008 Seafoam
Color E 055 Iceberg Color K 021 Himalaya
Color F 001 Crystal Color L 033 Marmaris
Other yarn brands have yarn similar to Mr. Cey Cotton such as Scheepjes Catona, Phildar’s Cotton 3
or Schachenmayr’s Catania, just see what is available for you. This pattern also lends itself well to
other types of yarn, keeping in mind that using a different yarn weight will necessitate a different
hook size and will affect the gauge and final size of your project.
Size :
One single repeat of 4 Rows of pattern will be approx. 3 cm ( 1,1/4 inches) in height.
A repeat section of 8 sts in the pattern will be approx. 4 – 4.5 cm (1 3/4 inches) of wide.
My example has a finished size of 55 cm ( 22 inches) wide and 85 cm (34 inches ) high.

3
Stitches used:
• SC – single crochet
• DC – double crochet
• BOBBLE – bobble stitch which is a special stitch – explained before you start the pattern
• CH – chain
• St – stitch
• [ ] – gives a total number of stitches after a row.
• ( ) – phrases between these brackets are either pattern instructions tht are repeated as
indicated, or they are helpful notes.
• RS – Right side
• WS – Wrong side
Pattern notes:
- The pattern is worked in Repeats of 4 Rows. You will turn work after every Row.
- When turning your work, the ch’s at the start of the next Row are your turning Ch. So, don’t make
an extra turning chain.
- Because I worked with different colors, I fastened off and attached yarn every 2 Rows of pattern. If
you work with one color or a gradient type of yarn you don’t need to fasten off and reattach every
time, which reduces the number of ends.
- In the pattern, you will crochet a bobble stitch. This special stitch is explained before the pattern
starts.
- Photos in the pattern might look a bit different because I crochet left-handed. Most of the time this
doesn’t cause any confusion, but I always mention this to be sure.
- There are no videos or charts available for this pattern.
- Stitches typed in “Caps lock” in the pattern are stitches you are making in the current Row. Stitches
typed in regular format always refer to stitches made in the previous Row.
- After completing a bobble stitch , pay close attention ! Do not skip the first stitch after a BOBBLE,
which is easily done because that first stitch is hidden by the bobble.

4
The Bobble Stitch :
In the pattern you are crocheting the bobble stitch, which gets reversed after it is made. It isn’t a
hard stitch to crochet, you just have to know how it’s done. Here is a step by step guide to crochet
this bobble stitch:
Step 1 : Crochet 9DC in the indicated stitch. It might look like there will be too many stitches, but
trust me, it will work.
Step 2 : Now we are going to finish these nine dc like you would finish a popcorn stitch. So,take the
hook out of the loop. (elongate the stitch a bit as pictural) and insert the hook in the top of the first
dc of nine made.

5
Step 3 : Now that the hook is inserted in the first dc, put the elongated loop back on the hook.
Step 4 : Now yarn over and pull the yarnover the loop through both loops on the hook. In this way,
you will have formed a big bobble with the nine dc. Once you’ve done this, crochet a ch to close it
off.

6
Step 5 : Now you can continue the pattern with stitches that come after the bobble stitch (remember
not to skip the first stitch directly after the bobble st). However, your bobble stitch isn’t done yet.
You have to flip down the bobble and fold it inside out so you it curl it. A flipped bobble will look like
this:

7
That’s it ! Once you have made a few you won’t even think about it anymore. There is no need to flip
each bobble as you make it, just crochet an entire Row and before moving to the next Row, flip all
the bobbles you just made.
A Row of Bobble sts made, but not yet flipped.
8
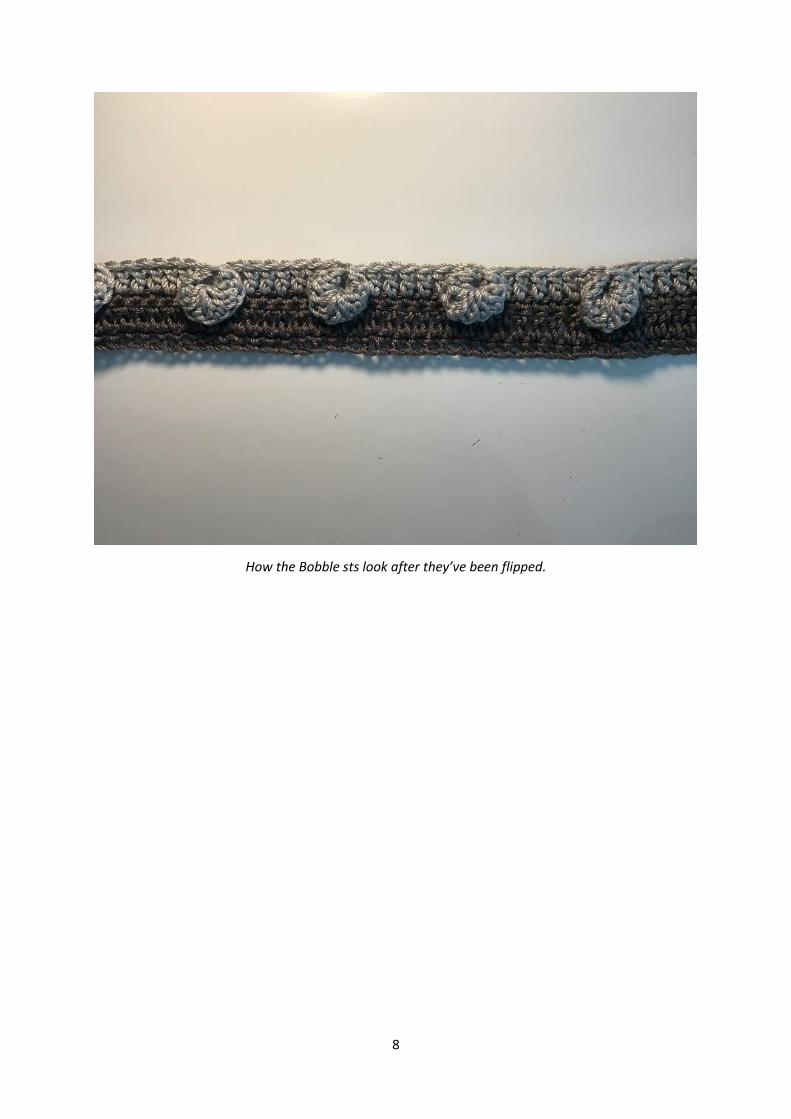
How the Bobble sts look after they’ve been flipped.

9
The Pattern :
The pattern can be easily adjusted when it comes to size. A pattern Repeat consists of 8 stitches. Just
add or remove as many repeats as you like to obtain yours desired width. The start must always have
8 stitches + 8 stitches for every repeat you add. To adjust height you just add or remove as many
Rows as you like. Gauge information is found on Page 2 of the pattern in the size section.
With a size 3.00mm crochet hook and Color A, CH105.
Row 1 (WS) : Make a SC in second ch from hook. 1SC in next 103ch. Turn work. [104SC]
Row 2 (RS) : CH3 (first DC), 1DC in each st of Row. Turn work. [104DC]
Row 3 (WS) : CH1 ( doesn’t count as st), 1SC in each st of Row. Fasten off Color A. Turn your work.
[104SC]
Photo above shows the result after you’ve made the first three Rows.

10
Row 4 (RS) : Take Color B and attach it in first st of Row with RS facing. CH3 (first DC), 1DC in next 3
sts, (1 BOBBLE ST in next st, 1DC in next 7 sts ) 12 times. 1 BOBBLE ST in next st, 1DC in next 3 sts.
Turn work. [91DC / 13 BOBBLE STS]
Top Photo shows Row 4 after you’ve finished crocheting it. Bottom photo shows the same Row after
you’ve flipped the bobble sts.

11
Row 5 (WS) : CH1 ( doesn’t count as st), 1SC in next 3 sts, 1SC through the eye of the bobble st, ( 1SC
in next 7 sts, 1SC through the eye of the bobble st ) 12 times, 1SC in next 4 sts. Fasten off Color B.
Turn your work.[104SC]
Here you see how to crochet through the eye of the bobble stitch. In this way you make sure the
bobble will not return to its original (un-flipped) form.
Backside view of the sc through the eye of the bobble stitch.

12
Front view of the sc through the eye of the bobble stitch.
View of Row 5 completed (RS facing).

13
Row 6 (RS) : Take Color C and attach it in first st of Row with RS facing. CH3 (first DC), 1DC in next 3
sts, (1DC in next 4 sts, 1 BOBBLE ST in next st, 1DC in next 3 sts ) 12 times. 1DC in next 4 sts. Turn
work. [92DC / 12 BOBBLE STS]
Row 7 (WS) : CH1 (doesn’t count as st), 1SC in next 4 sts, ( 1SC in next 3 sts, 1SC through eye of
bobble st, 1SC in next 4 sts) 12 times. 1SC in next 4 sts. Fasten off Color C. Turn Work. [104SC]

14
View of Row 7 completed (RS facing)
From this point on, continue repeating Rows 4 -7. Crochet till you have your desired length. I
repeated Rows 4 -7 for another 23 times.
Once you reach your desired length your blanket is ready. You can add some tassels to your top and
bottom edges but this is optional. I suggest adding the tassels in the stitches which lie in front of each
bobble stitch. If you don’t know how to knot a tassel – I have a tutorial up and running on my website
for it.
After you have worked in your ends and added your tassels, I suggest you block your work to get the
best result. Because the pattern is pretty tight, your project should not require aggressive blocking,
but the choice is yours.

15
A big thanks to my tester :
Anja Roseboom – www.instagram.com/dutchsilence
Designed by : the guy with the hook – 2020
https://theguywiththehook.com
https://www.instagram.com/theguywiththehook
https://www.ravelry.com/projects/theguywiththehook
https://www.ravelry.com/designers/mark-roseboom
https://www.facebook.com/theguywihthehook
All copyrights and terms of use are with me. Please do not copy, share or take advantage of this
pattern. Since the start of 2019 I have been using the international copyright rules and terms which
apply to countries all over the world. This also includes countries that didn’t agree to work with. Over
the last years it has become very common for crochet patterns and designs to be stolen away from
designers including myself, I have no other choice but to tighten up the copyright validation. If sharing
occurs in Telegram/WhatsApp groups, social media, secret groups or websites legal action will be
taken.
Feel free to sell finished items using this pattern. I would love it if you tag or make a reference to me
as the designer when showing your wip’s or finished projects. Please use the hashtag
#Ottomaniacrochetpattern on social media to share.
Last but not least, thank you so much for making this pattern. A lot of time, effort and creativity are in
this little piece of art, and every single thing that comes from this pattern makesall the work so
worthwhile.
Mark a.k.a. the guy with the hook