
Job Ticket Interface V2files.oceusa.com/media/Assets/PDFs/TSS/external/ReproStation/Jtref2.pdf8 Océ...
178
Programmer’s Manual Job Ticket Interface V2.0 Océ
Transcript of Job Ticket Interface V2files.oceusa.com/media/Assets/PDFs/TSS/external/ReproStation/Jtref2.pdf8 Océ...

Programmer’s Manual
Job Ticket Interface V2.0
Océ

Contents
Chapter 1IntroductionAbout Job Tickets 8
Design considerations 9
Chapter 2ConceptsJob 12Job ticket 13Block structure 14Logical images 16Pipelines and merging 17Coordinate system 19Physical representation 20
Chapter 3ProcessingIntroduction 22Order of processing 23Processing in each block 24Primary input construction 25
Input concatenation 25Input sizing 26Strip removal 27
Merging 28Transformations 29
Mirroring 30Rotating 30Zooming 31Shifting 31Immediate transformations 32Attach transformations 33
Output construction 37Machine handling 38
Media selection 39Adjustment transformations 39
Contents 1

Finishing 40Depositing 40
Chapter 4Syntax and grammarToken 44Line oriented 46EBNF grammar 47Keywords and arguments 48General specifications 50
Chapter 5Default MechanismIntroduction 54Levels 55
Example 1 56Example 2 56Example 3 57
Subsettings 59Example 1 59Example 2 59Example 3 60
Chapter 6Job ticket settingsIntroduction 64Structure settings 65
BeginTicket / EndTicket 65BeginBlock / EndBlock 66BeginOutput / EndOutput 66IncludeBlock 67MergeBlock 68
Identification and information settings 69Account 69Comment 70Copyright 70CreationAppl 70Distribution (version 1.2) 71JobName 71Notes 71
2 Océ Job Ticket Interface V2.0

UserName 72
General settings 73Unit 73Collate 73Copies 74JobCollate (version 1.2 only) 75JobCopies (version 1.2 only) 75
Language settings 77ASCII 77Calcomp 78HPGL, HPGL2 80Pens 81
Input settings 84InputType 84Type (version 1.2) 85OrigInputType 85InputEmulation 86Emulation (version 1.2) 86InputSegment 86InputDirectory 87Directory (version 1.2) 87OrigInputDirectory 87OrigDirectory (version 1.2) 88InputName 88Name (version 1.2) 88OrigInputName 88OrigName (version 1.2) 89InputSize 89RemoveStrip 90
Transformation settings 92Mirror 92AttachMirror 93Rotate 94AttachRotate 95AdjustRotate 96Zoom 99AttachZoom 101AdjustZoom 103Shift 104AttachShift 105AdjustShift 106
Output settings 107OutputType 107Type (version 1.2) 107OutputEmulation 108
3

Emulation (version 1.2) 108OutputDirectory 108Directory (version 1.2) 109OutputName 109Name (version 1.2) 109
Media settings 110MediaType 110MediaSource 111OutputSize (obsolete, version 1.2 only) 112MediaSize 112AddStrip 113MediaFeed 114MediaDeposit 116CutMethod 118CopyMatrix (version 1.2) 118
Finishing settings 120Punch 120Reinforce 120Fold 121
Other settings 123Stamp (version 1.2) 123JobFlagsheet (version 1.2 only) 125Matrix (obsolete, version 1.2 only) 126
Scan settings of version 1.3 127FileFormat 127Resolution 127Quality 128Orientation 128InputSize (version 1.3) 128Type (output, version 1.3) 129
Chapter 7Selecting the mediaIntroduction 132Media selection steps 133
Chapter 8Job tickets in a streamIntroduction 136Input segmentation 137Separator strings 138
4 Océ Job Ticket Interface V2.0

Chapter 9Summary of technical termsGlossary 142
Chapter 10ExamplesExample 1 144Example 2 145Example 3 146Example 4 148Example 5 150Example 6 151Example 7 152Example 8 153Example 9 154Example 10 155
Chapter 11Supported Océ Job Ticket keywordsOverview of supported keywords in subsequent versions 158Overview of supported keywords in the applications 160
Chapter 12Océ applicationsHandling print job tickets in Job Director/ Repro Station 164Scanning with Océ Scan Station 167
The application 167The scanning process 169‘Scan’ tickets for Océ Scan Station 170
Index 175
5

6 Océ Job Ticket Interface V2.0

Océ Job Ticket V 2.0
Programmer’s Manual
Chapter 1Introduction
7

s in s.
n y
JT)
s me s
ere f the f b
d one
e iver,
About Job Tickets
History The Océ Job Ticket interface was always intended to describe jobgeneral. Until version 1.2, however, it was only used to describe print job
The need for more scanning-specific keywords in the format evolved whethe first application started supporting 'scan tickets'. Keywords specificalldesigned for this purpose where added in version 1.3.
Version 2.0 is mainly an extension of the printing capabilities of the Job Ticket format.
Version 2.0 This document describes version 2.0 of the Océ Job Ticket (Ospecification. It replaces version 1.2. It contains a much more detailed description of the job ticket concepts than version 1.2. Version 2.0 containseveral settings which were not present in version 1.2, but also misses sosettings which were part of version 1.2. Where needed, these ‘old’ settingwere added to this document. These keywords are marked with the text “version 1.2” throughout the document. As far as possible version 2.0 is backward compatible with version 1.2.
There are a number of differences between versions 1.2/1.3 and 2.0. Whapplicable, a remark about the differences was added to the description okeyword. An overview of where these differences are and a description osome general differences can be found in chapter 11, ‘Supported Océ JoTicket keywords’ on page 157.
Purpose The purpose of a job ticket is to electronically send settings to a machine. The advantage of the Océ Job Ticket is that we are able to senjob ticket to different machines and that these machines understand the common functionality.
UI independency A job ticket instructs a machine on how to handle a job. Thspecific settings can be made by a user on a control panel or remotely (drapplication,...). The ticket can come from many sources. It does not reallymatter for the ticket how these settings are created. The user interface isindependent from the ticket specification. The Océ Job Ticket acts as a generic ASCII interface.
8 Océ Job Ticket Interface V2.0

é s no ket ther e
led he
. ribes
how
t ich in a les.
ons
ty.
[1] The Océ Job Ticket as a generic ASCII interface
The ticket specification should support all UI features, and the general Octicket specification should support all UI features of all Océ products, nowand in the (near) future. The UI and the job ticket are independent: there istrict one-to-one relationship between the UI and the job ticket. The job ticshould be able to handle everything you can specify in a UI, but not the oway around: not everything you can specify concerning job handling in thjob ticket can be handled by a UI.
And more important: not everything you can specify in a ticket can be handby a machine. You can specify duplex output in the ticket while some of tconnected printers only can handle simplex output.
Overview The Océ Job Ticket Programmer’s Manual contains 12 chaptersChapter 1 gives a short introduction to the Océ Job Ticket. Chapter 2 descjob ticket concepts like explaining what a job is, what a job ticket is, explaining the concept of blocks and logical images. Chapter 3 describes the job ticket processes logical images. Chapter 4 explains syntax and grammar, chapter 5 the default mechanism. Chapter 6 contains the exacspecifications of all the Océ Job Ticket settings, followed by chapter 7 whdescribes how the media selection works. Chapter 8 explains Job ticketsstream. Chapter 9 contains a glossary and chapter 10 gives some exampChapters 11 and 12 give an overview of supported features and applicatiusing job tickets.
Design considerations
The Océ Job Ticket was designed for flexibility, extensibility and readabili
Océ Job Ticket (generic ASCII interface)
controlpanel
job ticketgenerator
PCI
server
Océ printer
server
Océ printer Océ plotter Océ scanner Océ copier
Introduction 9

lity ible and
sign re.
nd:
lity
Flexibility The Océ Job Ticket has to support a super-set of the functionaof the Océ products, so it can be used by all products. This required a flexdesign of the format. The job ticket should be able to handle sets of inputsoutputs, to handle mounting of images on certain pages and handling of forms.
Extensibility In future products, working with new concepts, such as pageareas should be possible. It is not yet part of this specification, but the deshould be flexible enough to handle these kind of requirements in the futuThe Océ Job Ticket syntax allows for future extensions.
Readability On the other hand, a flexible design should not result in a veryverbose specification. In some situations a user types in a job ticket by haa simple specification should result in a simple job ticket. Also for readabia simple job ticket is desired.
10 Océ Job Ticket Interface V2.0

Océ Job Ticket V 2.0
Programmer’s Manual
Chapter 2Concepts
11

of of view ll as are
g r
ne
e
led
se
Job
Océ machines are used for copying, printing and scanning. For this type operation, the term job is being used. A simple copy job scans a number paper originals and produces one or more copies. From a users point of this is one job, although viewed on a lower level the machine scans as weprints. However, a user regards this as one job and doesn’t need to be awhow the machine handles it internally.
A typical copy job has paper input and paper output. A user specifies, usinthe buttons on the copier, how the input is used to produce the output, foinstance the number of copies, the zoom factor, etc.
A typical print job has digital input and paper output.
A typical scan job has paper input and digital output.
Multiple inputs In a more complex print job, a user could print more than ofile in one job.
Multiple output A print job can also have more than one output, for instancprinting the same file twice with different settings.
Types of inputs/outputs Inputs/outputs of jobs can be paper, microfilm or digital. Digital input/output has many types: file, part of a stream (also calsegment), URL, mailbox, etc.
Note: A job consists of one or more inputs and a recipe for processing theinputs into one or more outputs. This recipe is a job ticket.
12 Océ Job Ticket Interface V2.0

der s the e
e to
er en
Job ticket
A job ticket specifies:
n the input(s)n the output(s)n how the output(s) should look (i.e. the transformations)n identification informationn job handling (e.g. priority, hold mode)
For example for a copy job, the job ticket specifies the input (document feeor glass platen) and output (paper tray, output deposit,...). It also specifietransformations (scaling, binding offset,...). The job ticket further containsidentification information. Part of this information is used for processing thjob, part of it can be used for job logging or accounting.
Example Here is a simple example of a job ticket. It specifies a job with 1 input and 1 output:
BeginTicket 2.0
InputType file
InputDirectory "/usr/home/oce"
BeginOutput
InputName "report.ps"
EndOutput
EndTicket
Defaults This ticket is identified by the BeginTicket and EndTicket lines. It is a simple ticket. This is possible because not all the settings havbe specified. All the settings that are not specified have default values. For instance, the number of copies and the type of output are not specified. Pdefault the number of copies equals one and the output type is paper takfrom the default paper tray, etc. This is all handled by default values. Thedefault behaviour is described in a separate chapter.
Concepts 13

er with
t: we the ks.
bs k. next . A
n be lar
tput a arate
d in
Block structure
OJT has a block structure. A block structure is flexible: it gives control ovhow the outputs are constructed from the inputs, it allows us to have jobs more than one input and more than one output.
Also, the block structure gives control over each separate input and outpucan zoom the first input, shift the second input, staple the first output, sendsecond output to a file, etc. All these operations are described in the bloc
For simple jobs a job ticket could contain only one block. More complex johave more than one block, where one block is referenced by another blocThe blocks are chained, the output of one block becomes the input of the block. By chaining the blocks we can also control the intermediate resultsblock can reference more than one input.
Each block has one or more inputs and exactly one output. The blocks cacombined, the output of one block is the input of the next block, but circureferences are not allowed.
The separate blocks in the OJT specification correspond to the way the ouis constructed from one or more inputs. Each step can be represented byseparate block. Each block has its separate settings that specifies its sepprocessing.
[2] Example of block structure
Output X uses input A and B, output Y uses input B and C. Input B is useboth output blocks.
There are 3 types of blocks:
input A
input B
input C
output X
output Y
interm.block
outputblock
inputblock
inputblock
inputblock
outputblock
input Doutputblock output Z
14 Océ Job Ticket Interface V2.0

t, by
s
t
tify
is ,
n input blocksn intermediate blocksn output blocks
An input block is a block that specifies the job input. If a job has more thanone input, then it has more than one input block.
An output block specifies the job output. If a job has more than one outputhen it has more than one output block. An output block is not referencedother blocks.
An intermediate block gets its input or inputs from one or more other blockand its output goes to another block.
The output of a block is the input of the next block, the output of an outpublock is the output of the job.
Input blocks and intermediate blocks don’t have special keywords to identhem, they use:
BeginBlock / EndBlock
Output blocks do have special keywords:
BeginOutput / EndOutput
If a job ticket has only one block, then this must be an output block and italso used as an input block. A job ticket can consist of only output blockswhich are also used as input blocks.
Concepts 15

e
ed ng,
tmaps xtra,
ing it
es of
job and ays
Logical images
The input of a block consists of logical images. These logical images are conceptual, they don’t exist, they are not on paper, not stored in a file. Therefore they are called logical images.
The logical images that form the input of an input block are called native logical images. The job ticket specifies how these native logical images artransformed to the intermediate logical images and finally to the requested logical images. Even if no transformations are needed, a job ticket is needto reference the input, specify identification settings, specify paper handlietc.
The requested logical images are transferred to paper or are stored as biin a file. When transferring images to paper (or some other medium) an emachine dependent, transformation can take place. This machine handling can make use of information from the ticket and acts as an extra processblock. When storing bitmaps in a file, extra information can be stored with(staple setting, paper size to print on, etc.)
[3] Logical images
Each block has one or more inputs and only one output. Circular referencblocks are not allowed.
If the input comes from a scanner, the scanner will start scanning when theis executed. As long as the job is not executed, the scanner doesn’t startthere are no physical bitmaps. For scans, as well as for files, we don’t alwknow how many bitmaps will be generated and we don’t always know thesizes of these bitmaps in advance.
inputblock
outputblock
nativelogicalimages
logicalim ages
logicalim ages
requestedlogicalimages
machinehandling
joboutput
(file, physical paper,...)
interm ediateblock
16 Océ Job Ticket Interface V2.0

e.
the
ines
lock
Pipelines and merging
Conceptually, the logical images flow from the job input to the job output through one or more blocks. These blocks form a pipeline. The output (i.e. the logical images) of one block forms the input of the next block in the pipelinA job contains one or more of these pipelines.
Part of the processing of the input is done in each block in the pipeline insequence. Part of the processing, especially the processing dealing with output, can be done once at the end of the pipeline.
Sometimes the job input has to be merged with other input. Merging combthe logical images of 2 inputs. One of the inputs is the primary input , the other input (the merge input) is merged with this primary input. The pipelinecontaining the merge input does not end at the end of the job, but in the bwhere it is merged.
[4] Pipeline consisting of only one block
[5] Pipeline consisting of 3 blocks
[6] One primary pipeline and one merge pipeline
input/outputblock
end of pipeline
block block block
end of pipeline
block block block
block end of pipeline (for m erge input)
end of pipeline(for prim ary input)
Concepts 17
m
nput
put.
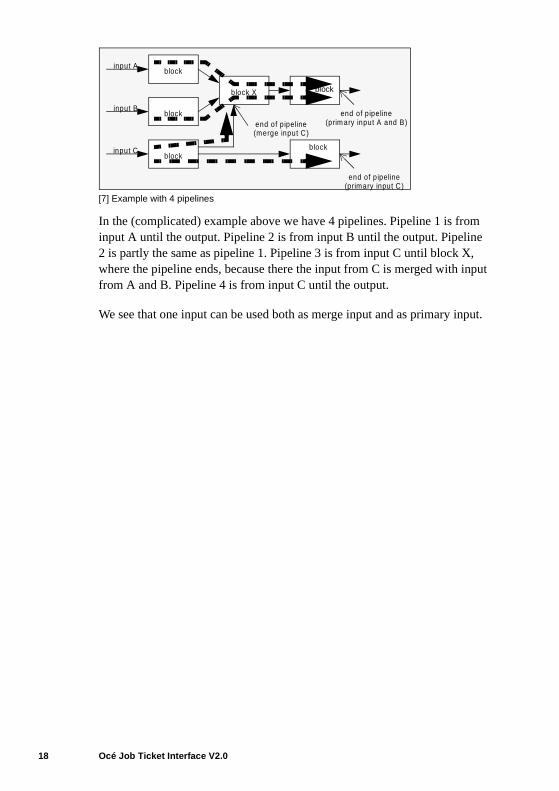
[7] Example with 4 pipelines
In the (complicated) example above we have 4 pipelines. Pipeline 1 is froinput A until the output. Pipeline 2 is from input B until the output. Pipeline2 is partly the same as pipeline 1. Pipeline 3 is from input C until block X,where the pipeline ends, because there the input from C is merged with ifrom A and B. Pipeline 4 is from input C until the output.
We see that one input can be used both as merge input and as primary in
block
block X
block
block
end of pipeline
input A
input B
input C
(merge input C)
end of pipeline(prim ary input A and B)
end of pipeline(primary input C)
block
block
18 Océ Job Ticket Interface V2.0
in
age
e can of in
Coordinate system
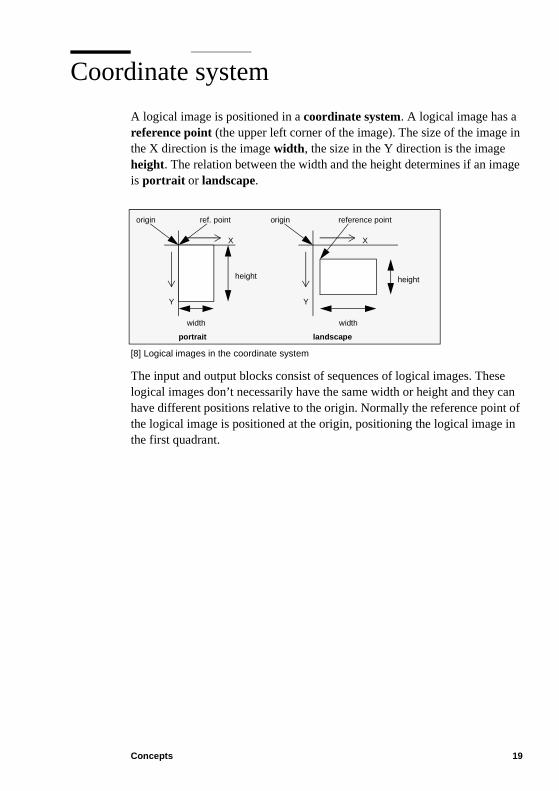
A logical image is positioned in a coordinate system. A logical image has a reference point (the upper left corner of the image). The size of the imagethe X direction is the image width , the size in the Y direction is the image height. The relation between the width and the height determines if an imis portrait or landscape.
[8] Logical images in the coordinate system
The input and output blocks consist of sequences of logical images. Theslogical images don’t necessarily have the same width or height and they have different positions relative to the origin. Normally the reference pointthe logical image is positioned at the origin, positioning the logical image the first quadrant.
X
Y
reference point
width
height
portrait landscape
������������������������������������������������������������������������������������������
X
Y
width
height
���������������������������������������������������������������������������
origin originref. point
Concepts 19

(the at these age tside
the
Physical representation
Media has a width and a height and is positioned with its reference point upper left corner of the media) at the origin of the coordinate system. Whhappens when requested logical images are transferred to media is that logical images are mapped to the media (the coordinate system of the imis mapped to the coordinate system of the media) and the part that falls outhe media is clipped.
[9] Mapping logical images on media
The logical images are positioned somewhere in the coordinate system. Operations can still be applied to those logical images. But when they aretransferred to media their positions matter, as is shown in figure 9.
There are settings that automatically rotate, scale and position images tomedia.
logical image resultmedia
clipped
20 Océ Job Ticket Interface V2.0

Océ Job Ticket V 2.0
Programmer’s Manual
Chapter 3Processing
21

thin
of
ed e an ges not
Introduction
Blocks are processed in the order in which they appear in the pipeline. Wia block, some settings have an immediate action, while other settings are attached to the images and are processed at the end of the pipeline.
Immediate settings are processed in the block itself. The logical images (conceptually) coming out of the block differ from the logical images goinginto the block. For example if a block contains the immediate setting Zoom 50 , then the output logical images have half the width and half the heightthe input logical images.
Attached settings can occur anywhere in the pipeline, but are not processin the block where they are specified (except when the block happens to boutput block). These settings are conceptually attached to the logical imawhen these logical images flow through the pipeline and the settings are processed until the end of the pipeline is reached, for example AttachZoom .
22 Océ Job Ticket Interface V2.0

e
the
lock ot
d
Order of processing
Immediate settings in different blocks are processed in the order in which thblocks appear in the pipeline. The order of blocks specifies the order of processing. In the next example, it does make a difference in which blockszooming and shifting are specified.
[10] Order of blocks determines order of transformations
The immediate settings in the pipeline combine. In the next example the totalzoom factor is 25 and the total number of copies is 6. The attached settings in the pipeline don’t combine. Here the rule last-one-wins applies.
[11] Combinations of settings
Immediate settings in one block have a fixed order of processing, independent from the order in which these settings are specified in that b(see ‘Transformation settings’ on page 92). In the next example, it does nmake any difference in which order the zooming and shifting are specifiewithin one block.
[12] Transformations inside one block have fixed order
Shift 10
Shift 10
Zoom 50
Zoom 50
shift 10
shift 5
Zoom 50 zoom 25Copies 2
Zoom 50Copies 3 copies 6
Shift 10
Zoom 50shift 10
shift 10
Shift 10
Zoom 50
Processing 23

ates
Processing in each block
Each block processes one or more inputs and creates one output. This processing is done in a predefined order:
n (primary) input constructionn mergingn transformationsn output construction
This chapter does not describe all the possibilities of a setting, it concentron the mechanisms.
[13] Processing steps within a block
input construction
merging
transformations
output construction
input
merge input
this is the constructed primary input
24 Océ Job Ticket Interface V2.0

ges one
are
Primary input construction
[14] Primary input construction
Each block has one or more primary inputs (an input block has only one). A primary input consists of a sequence of logical images. These logical imamay even have different sizes and orientations. If a block has more than primary input, then they are concatenated, resulting in one sequence of logical images. Other input, the merge input, can be merged with this primary input,resulting in a change of contents, but not resulting in change of number of logical images or change in size or orientation.
The input construction consists of:
n input concatenationn input sizingn strip removal
Input concatenation
There are 2 forms of primary input referencing: using the InputType setting (and related settings) or using the IncludeBlock setting.
Input blocks have only one primary input. The input comes from a file, a segment, a microfilm, a scanner, etc. The input can be referenced by theInputType setting. Depending on the value of this setting other settings also needed, e.g. InputName .
����������������������������������������������������������������������input construction
m erging
transformations
output construction
Processing 25

r
of
age
all
n. p)
zed e is
e
Example:
InputType File
InputName report.ps
Intermediate (and output) blocks can have more than one primary input. These inputs are referenced by the IncludeBlock setting. If there is more than one input referenced in an IncludeBlock setting, then the logical images of the inputs are concatenated in the same order in which they appeain the IncludeBlock setting.
Example:
BeginBlock X
IncludeBlock A B C
...
EndBlock
The resulting primary input of block X consists of a concatenation of the logical images of the input identified by A, followed by the logical images B and of C.
Input sizing
The size of the native logical image is either the size specified in the languitself or, if the latter is not present, it is the size of the bounding box. The bounding box is defined as the area limited by the rectangle surrounding the objects of a drawing.
The size of the native logical images is often unknown before rasterizatioTo improve the performance of the rasterizer for some PDL’s (e.g. Calcomand to allow transformations on large images which cannot be fully rasteriat once, it can be useful to let the machine know what size the input imagor will be.
The customer might also want to force the input image to a different size.
The size of the input can be set explicitly with the InputSize setting. It sets the size of the logical image to a specific value, independent from what thsize of the logical image was.
26 Océ Job Ticket Interface V2.0

g or
[15] Effect of input sizing
Strip removal
Strip removal makes the size of the input smaller. It removes some leadintrailing area from the image. When scanning, the leading and trailing edge are determined by the direction of the media transport in the scanner.
X
Y
InputSizeimage result
Processing 27

ages
in
Merging
[16] Merging
Merging consists in combining the logical images of 2 inputs. One of the inputs is the primary input , the other input, the merge input, is merged with this primary input. The InputType or IncludeBlock setting references the primary input .
The merge process does not change the number or size of the logical imin the primary input.
Note: In this version of the OJT specification, merging will not be specifiedfurther detail.
input construction��������������������������������������������������������������������
merging
transform ations
output construction
28 Océ Job Ticket Interface V2.0

f
gs bout
. e in t the
Transformations
[17] Transformations
There are 4 basic transformation types that change sizes and positions ological images. These transformations are applied in a specific processing order:
n mirroringn rotatingn zoomingn shifting
Each type of transformation can be used in 3 categories:
The first category is applied immediately in the block. The images that flow through the block are processed as specified by the transformation settinand then form the output of the block. These transformations do not care awhat happens after the block, they are only interested in the input.
The second category are attached settings and are applied at the end of the pipeline. These transformations can be specified anywhere in the pipelineThis attaching mechanism is useful to allow these specifications anywherthe pipeline and to have all these transformations processed only once a
input construction
merging����������������������������������������������������������������������
transform ations
output construction
attachtransformations
adjusttransformations
MirrorRotateZoomShift
AttachMirrorAttachRotateAttachZoomAttachShift
AdjustRotateAdjustZoomAdjustShift
immediatetransformations
Processing 29

d in
s, but
age
end of the pipeline. Attach transformations may need to know the destination in order to be processed.
The third category is related to the machine handling and is not processethe transformation part of the block (see ‘Machine handling’ on page 38).
This chapter describes the relations between these transformation settingfirst a description of the transformations is given.
Mirroring
The mirror transformation mirrors the logical image in the horizontal or vertical direction. The mirroring operation only affects the contents of the logical image.
[18] Mirroring
Rotating
The rotate transformation rotates (counterclockwise) a logical image. Therotate does not change the position of the reference point of the logical imin the coordinate system.
[19] Rotating
X
Y
m irror horizontal m irror vertical
ref. point ref. point
X
Y
rotate 90
rotate 90
ref. point
ref. pointref. point
30 Océ Job Ticket Interface V2.0

ft is 0%.
). ns.
e
Zooming
The zoom transformation scales the logical image to make it smaller or larger, it changes the width and/or height of a logical image.
[20] Zooming
In the examples the width (X direction) is zoomed 150%, the height (Y direction) is zoomed 50%.
Note: If a shifted image (shift done in a previous block) is zoomed, the shizoomed as well: the X position is changed by 150% and the Y position by 5This repositions the reference point of the logical image.
Shifting
A first form of shifting is shifting to a specific position (when merging or when aligning a requested logical image with a destination or with mediaThis form of shifting is applicable for output and adjustment transformatioThere are 9 alignment positions.
[21] Shifting to alignment positions
The second form of shifting is shifting the logical image in the X and/or Ydirection. The reference point of the image is repositioned. The size of thlogical image is not changed.
X
Y
Zoom 150 50
ref. point
upperleft upperrighttop left center bottomlowerleft lowerrightright
���������������������������������������������������������������������������
��������������������������������������������������������������������������������
��������������������������������������������������������������������������������
�������������������������������������������������������������������������������������
������������������������������������������������������������������������������������������
����������������������������������������������������������������������
���������������������������������������������������������������������������
��������������������������������������������������������������������������������
�������������������������������������������������������������������������������������
Processing 31

For u g
n
in
ut. s the
[22] Shifting a distance
Shifting an image is useful when you want to merge it with another image. instance, you want to precisely position a logo on another image. Here yoshift the merge input. Shifting the primary input is mainly useful for creatina margin shift on the output media.
Both forms of shifting can be combined: a shifting to an alignment positioand an offset from that position.
AttachShift upperleft 10 10
[23] Alignment shift + offset
Immediate transformations
The logical images may be transformed by the transformation settings Rotate , Mirror , Zoom and Shift . The result is again one output with thesame number of logical images, but these images may have different orientations, sizes and/or positions compared to the input. The next blockthe pipeline may again perform transformations.
The transformations only look at the input of a block and produce an outpThe output of one block is the input of the next block. The transformationdon’t care about what happens after the block, they are only interested ininput.
X
Y
ref. pointref. point
���������������������������������������������������������������������������������������������������������������������������������������������������������������������������������������������
X
Y
32 Océ Job Ticket Interface V2.0

a cks ne
The for d in ns.
hat
[24] Blocks form a pipeline
The transformations in one block are processed in a specific order:
1 Mirror2 Rotate3 Zoom4 Shift
Conceptually these transformations are processed one after the other. If different order is wanted, for instance first shift and then zoom, then 2 blocan be used, the first one containing the shift operation and the second ocontaining the zoom operation.
Attach transformations
The attached transformations are processed in a specific order at the end of the pipeline:
1 AttachMirror
2 AttachRotate
3 AttachZoom
4 AttachShift
These transformations use the size and orientation of the destination for automatic transformations. What the destination is depends on where the pipeline ends:
1 at the output of an output block2 at the merge input for merging
The output of an output block can be printed on paper, stored in a file, etc.requested media can be specified in the ticket. This forms the destinationthe attached transformations. The media size and orientation, as specifiethe MediaSize setting, are used for the automatic attached transformatio
The merge input of merging uses the same attached transformations. In tcase the primary input of merging forms the destination. The size and
Block AMirrorRotateZoomShift
MirrorRotateZoomShift
Block B
prim ary output A prim aryinput Binput A
output B
Processing 33

on. ges, to
For al
the
n
.
).
orientation of the images in the primary input are used for the automatic attached transformations.
There could be a mismatch between the logical images and the destinatiThe destination could be smaller or larger than the size of the logical imaor have a different orientation. The attached transformations can be usedtake care of this.
A larger requested logical page size may have been chosen deliberately.example, suppose we want to center a logical image on a requested logicpage that is larger. This requires an automatic transformation. This transformation needs information about the destination. This differs from immediate Rotate , Mirror , Zoom and Shift transformations. AttachRotate , AttachZoom and AttachShift may use the size and orientation of the destination for their processing (note that AttachMirror does not need this information).
The physical paper can again differ from the requested logical pages of aoutput block. This is taken care of in the Machine handling, with the adjustment transformations. (see ‘Machine handling’ on page 38).
These transformations take effect at the end of a pipeline. But these transformations can be specified anywhere in the pipeline. If they are specified more than once in a pipeline, the last one wins.
[25] AttachZoom specified twice in pipeline
AttachZoom is specified twice in the pipeline, but not in the output blockIn this case the last specification in the pipeline (AttachZoom 80 ) is applied at the end of the pipeline (see ‘Pipelines and merging’ on page 17
Input can also be concatenated:
AttachZoom 90 AttachZoom 80 ...
Block A Block B OutputBlock
zoom 80
34 Océ Job Ticket Interface V2.0

om nds
[26] AttachZoom specified in different pipelines
At the end of the pipeline images from block A are zoomed 90%, images frblock B are zoomed 80%. What happens with images from block C depeon what is specified as default for AttachZoom .
It is no problem if both Zoom and AttachZoom are specified in an input or intermediate block: the AttachZoom is not processed there. But what happens if Zoom is specified in an output block and AttachZoom is specified somewhere in the pipeline? The answer is that the Zoom setting overrules the AttachZoom setting. Even when both Zoom and AttachZoom are specified in the same output block, Zoom overrules AttachZoom .
Note: Immediate transformations in an output block overrule attached transformations.
[27] Combinations of Zoom and AttachZoom
Input from block A is zoomed 35% (zoom 50 followed by zoom 70). Inputfrom block B is zoomed 70% (Zoom overrules AttachZoom ). Input from block C is zoomed 42% (zoom 60 followed by zoom 70).
AttachMirror This setting is the same as Mirror , except that it is processed at the end of the pipeline.
AttachRotate AttachRotate is a super-set of Rotate . AttachRotate has the extra values same and opposite for positioning the images in the sameor opposite orientation as the destination.
AttachZoom 80
Block A
Block B OutputBlock
...
Block C
...
AttachZoom 90
Zoom 50
AttachZoom 80
Block A
Block B OutputBlock
Zoom 60
Block C
Zoom 70
AttachZoom 90
Processing 35

t
AttachZoom AttachZoom is a super-set of Zoom. AttachZoom has the extra value auto for (isomorphic) zooming the images to the size of the destination.
AttachShift AttachShift is a superset of Shift . AttachShift has an extra value for positioning the images according to one of the 9 alignmenpositions of the destination (see ‘Shift’ on page 104).
36 Océ Job Ticket Interface V2.0

t the f
Output construction
[28] Output construction
The Copies setting can double, triple,... the number of logical images thaform the output of a block. If the number of copies is larger than one, thenCollate setting specifies the order of the logical images that come out othe block.
inpu t construction
m erging
transfo rm ations��������������������������������������������������������������������
ou tpu t construction
Processing 37
ach ther
tely
hine. d
oom ia.
ing nts
Machine handling
The output of an output block consists of a sequence of logical images. Eimage has settings attached to it, which specify how the image is to be furhandled by the machine. The machine handling takes care of this.
There are two basic forms of output:
n Output on media (paper, transparent, etc.).n Output in digital form (file, etc.).
The handling for the first form is described below. For digital output the handling depends on the emulation that is used. This is described separafor each emulation.
The machine handling part consists of:
n media selection (based on size, color,...)n adjustment transformations (rotate, zoom, shift)n finishing (staple, fold,...)n depositing (belt, sorter bin,...)
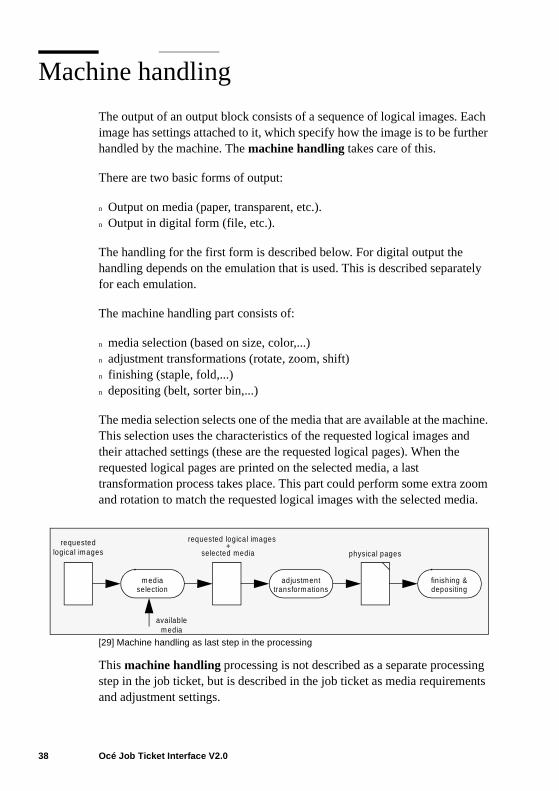
The media selection selects one of the media that are available at the macThis selection uses the characteristics of the requested logical images antheir attached settings (these are the requested logical pages). When therequested logical pages are printed on the selected media, a last transformation process takes place. This part could perform some extra zand rotation to match the requested logical images with the selected med
[29] Machine handling as last step in the processing
This machine handling processing is not described as a separate processstep in the job ticket, but is described in the job ticket as media requiremeand adjustment settings.
requestedlogical images
m ediaselection
adjustmenttransformations
finishing &depositing
requested logical images+
selected media physical pages
availablem edia
38 Océ Job Ticket Interface V2.0

y be ical g.
er,
nd n ble,
edia. a to
n
also
For example, if the paper output needs to be folded, an extra rotation maneeded. First the paper for folding is selected and then the requested logimages are rotated in such a way that their orientation is correct for foldin
Media have physical characteristics: they come from a roll or a sheetfeedhave a certain size (for rolls only in 1 dimension), a weight, a color, are pre-punched, etc.
Media selection
The MediaSource setting can specify a specific tray. A tray can also be selected based on the type of media and/or on a requested media size aorientation. The MediaFeed setting can be used to specify a fallback whethe media is not available. For instance, if the requested size is not availaa smaller or larger media size could be used instead.
The media selection process results in a choice of one of the available mIf none of the available media is acceptable, the machine will ask for medibe loaded (but this is machine dependent).
Adjustment transformations
The requested logical images may not have the same size and/or orientatioas the selected media. The machine handling part may have to perform someextra transformations to adjust the size and/or orientation. The transformations AdjustRotate , AdjustZoom and AdjustShift specify how these adjustments must be done. These transformations areprocessed in a specific order:
1 AdjustRotate2 AdjustZoom3 AdjustShift
Processing 39

es t is
ed
a.
in
mple:
y,
[30] Clipping when requested image and physical media don’t match
When there is a mismatch, the part of the requested logical image that donot fit on the physical media is clipped. The part of the physical media thanot covered by the requested logical image is empty. Adjustment transformations can be used to avoid this clipping.
The AdjustRotate setting adjusts the rotation to the physical media. If off is specified, no adjustment is done. If auto is specified, then rotation takes place if that would result in a better fit.
AdjustZoom off does not adjust. AdjustZoom noclip adjusts the size if no zooming would result in clipping of the image (based on the requestlogical image size). AdjustZoom tofit zooms when the physical mediais either smaller or larger than the requested logical image.
AdjustShift aligns the requested logical image with the physical medi
The AdjustRotate , AdjustZoom and AdjustShift transformations can be specified anywhere in the pipeline. They are executed in the machine handling part. When an adjust transformation is specified more than oncea pipeline, the last one wins.
Finishing
There are several settings that can be used to select the finishing. For exaStaple and Fold .
If the media that has been selected cannot be finished in the specified wathen there is a conflict. The media selection overrules the finishing setting.
Depositing
The MediaDeposit setting specifies where to put the resulting media.
requested logical im age resultphysical m edia
clipped
40 Océ Job Ticket Interface V2.0

t
und.
There can be a conflict between a finishing and a depositing setting. Whahappens is machine dependent: on some machines the finishing setting overrules the depositing setting, on other machines it is the other way aro
Processing 41

42 Océ Job Ticket Interface V2.0

Océ Job Ticket V 2.0
Programmer’s Manual
Chapter 4Syntax and grammar
The Océ Job Ticket is used either as a separate file or it is attached to an existing document. A job ticket consists of a number of job ticket specification lines between a begin and an end line.
43

Job
e n
line
the
ble pace
The
n
Token
If a document with a attached job ticket is sent to a printer without any jobticket processing, the printer should handle the job ticket specification ascomments: the printer should skip the job ticket. For this purpose the OcéTicket uses a token at the start of each line.
Variable token The Océ Job Ticket starts with the line containing the stringBeginTicket . This line and all the lines of the ticket start with a special token. A job from the Engineering Systems world may need a token that differs from a token used in the PostScript printing world and therefore thtoken string is not fixed. In principle, each Océ Job Ticket can have its owtoken string. However, one ticket has only one token. A ticket ends with a containing a token, followed by the string EndTicket .
For recognizing and reading a job ticket, the token is not needed. Using atoken is useful for easy recognition by a human reader or some other applications. Another purpose of having a token is that you can specify allticket lines as comments for a certain PDL. Different PDL’s have differentcomment syntaxes and therefore having a variable token string is useful.
Leading/trailing white space On some systems, characters on a specific position on a line have special meaning. The Océ Job Ticket allows variawhite space (spaces and/or tabs) before and after the token. This white scan also be used for indentation to improve the readability of the ticket.
Maximum token length The maximum token length is 50 characters. This is an arbitrary value, specified to make reading the ticket easier.
Token detection An application determines the token by scanning the first line of the ticket. This line should contain the string BeginTicket . If the job does not start with this line, then the job does not contain a job ticket. characters on the first line before the string BeginTicket form the token, except any leading or trailing white space. When the line starts with BeginTicket or when there is only white space before the keyword, thethe token is empty.
<whitespace><token><whitespace>BeginTicket 2.0
The job ticket ends with the line:
44 Océ Job Ticket Interface V2.0

r
<whitespace><token><whitespace>EndTicket
Embedded white space The token itself can contain embedded white space(spaces and/or tabs). The white space before and after the token can be variable, the white space inside a token is fixed.
Example of a job ticket for a PostScript environment with token %!Oce and some extra white space. Empty lines, lines containing only white space olines containing only the token are allowed.
%!OceBeginTicket 2.0
%!OceInputDirectory "/usr/home/oce"
%!Oce
%!OceBeginOutput
%!Oce InputName "report.ps"
%!Oce Copies 3
%!OceEndOutput
%!OceEndTicket
Syntax and grammar 45

ket turn
th
arts
the
ple ical
pt ther
e
the : in the
Line oriented
The Océ Job Ticket is an ASCII file consisting of lines. Each Océ Job Ticsetting is specified on a separate line. A line is terminated by a carriage recharacter (CR, octal 015), a new-line character (LF, octal 012), or a combination (CR/LF).
Maximum line length For easier handling of the ticket, a maximum line lengis specified. The maximum ticket line length is 255 characters (including the line termination characters).
Empty lines Empty lines inside a ticket are allowed.
Continuation lines If the maximum ticket line length is not enough for specifying a setting, a continuation line can be used. A continuation line stwith the token, followed by the + sign.
<token>Notes "This is a very long"
<token>+ " first notes line,\nfollowed by"
<token>+ " a second line."
In the example above, notes consists of 2 lines, which takes up 3 lines inticket. The continuation line can be used without actually reaching the maximum line length. This is useful for readability. In the example it wouldmake more sense to split the lines at the new-line character. But the examshows that new-line characters have to be inserted on purpose. The physend-of-line does not automatically add a new-line character.
Order of keywords The order of settings in the ticket is not important, excewhen the same keyword is used multiple times, or when it appears at anoblock level.
Multiple keywords If a settings appears multiple times at the same level, thlast occurrence is used. Therefore the last one wins.
Note: This mechanism was different in version 1.2/1.3. In version 1.2/1.3 ofOcé Job Ticket format the opposite was true in case of duplicate settingsthese versions the first setting on the same level ‘wins’. However, when asetting appears at different levels (e.g. in an input and in an output block),last one wins (like in version 2.0).
46 Océ Job Ticket Interface V2.0

Océ
the
the
nd
rds
EBNF grammar
EBNF is an acronym of the Extended Backus Naur Form (BNF) and is used for formally describing the syntax of a language. We use it to describe the Job Ticket settings.
EBNF has the following meta-symbols:
() brackets to indicate once (used to group alternatives together)[] brackets to indicate zero or once{} brackets to indicate zero or more| to separate alternatives
The easiest way to learn it is by looking at some examples. On the left areEBNF specifications, on the right are the possible combinations.
(A|B)(C|D) AC AD BC BD
A[B]C AC ABC
A{BC} A ABC ABCBC ABCBCBC ...
{A|B}C C AC BC AAC ABC BBC BAC ...
A{A} A AA AAA ... (one or more A’s)
The EBNF syntax has terminals and non-terminals. An example of a non-terminal is <digit>, representing the digits 0 to 9. The digits 0 to 9 areterminals. The non-terminal <digit> can be used in syntax descriptions instead of all the terminals. This makes the description more structured abetter readable.
Océ Job Ticket example:
<unit> ::= ( mm | cm | pt | inch )
In syntax descriptions where <unit> is specified, one of the 4 value keywois expected.
Syntax and grammar 47

Keywords and arguments
The job ticket settings consist of keywords and arguments. Examples:
InputName "report.ps"
MediaDeposit sorter 5
Setting A line that starts with the keyword name and has an argument.
Argument What comes after the keyword.
Subsetting Part of the argument for which a default can be set.
Keyword The name of the setting.
Subkeyword A keyword in the argument.
Value A string or a number.
[31] Example of keywords and arguments
<setting> ::= <keyword> <argument>
<argument> ::= <subsetting> { <subsetting> }
<subsetting> ::= ( <subkeyword> { <subkeyword> } ) |
( [ <subkeyword> ] <value> { <value> } )
<value> ::= ( <string> | <number> [<unit>] )
<number> ::= <integer> | <real>
ASCII fontsize 9 pt line wrap
argument
keyword
setting
fontsize 9 pt line wrapargument
subsetting
subsetting fontsize 9 pt
subsetting
value
value
subkeyword
48 Océ Job Ticket Interface V2.0

ts of f one
n.
g is
s).
he
A setting consists of one keyword and an argument. The argument consisone or more subsettings. Each subsetting consists of either a sequence oor more subkeywords or one or more values, possibly preceded by a subkeyword. Numeric values are optionally followed by a unit specificatio
The next example has 2 subsettings:
ASCII line wrap top 10.5 mm
This subsetting line wrap consists of 2 subkeywords. The next subsettinconsists of a subkeyword, a numeric value and a unit specification. Thereno fixed order for subsettings.
Zoom to 200 300 mm fromstandard
White space Keywords and values are separated by white space (any combination of space (octal 040) and horizontal tab (octal 011) character
Case sensitivity All keywords and subkeywords are case-insensitive. But ttoken and all non-keyword values are case-sensitive.
Syntax and grammar 49

General specifications
<digit> ::= 0 | 1 | 2 | 3 | 4 | 5 | 6 | 7 | 8 | 9
<integer> ::= [-] <digit> { <digit> }
<int> ::= <integer>
<real> ::= [-] <digit> { <digit> } [ . <digit> { <digit> } ]
Range of integers <int>-<int> specifies a range of integers.For example: 3-6 are the integers 3, 4, 5 and 6.
<x> <x> ::= <real>
<y> <y> ::= <real>
<width> <width> ::= <real>
<height> <height> ::= <real>
<unit> Specifies the units of a distance or size. The units are millimetres (mm), centimetres (cm), points (pt, 1/72 inch) or inches.
<unit> ::= ( mm | cm | pt | inch )
<alignment point>
<alignment point> ::= ( top | bottom |
left | center | right |
upperleft | ul |
upperright | ur |
lowerleft | ll |
lowerright | lr )
<standardsize> Specifies a standard size, but not an orientation.
<standardsize> ::= ( A0 | A1 | A2 | A3 | A4 | A5 |
B1 | B2 | B3 | B4 |
A | B | C | D | E |
A+ | B+ | C+ | D+ | E+ |
letter | legal | ledger |
postcard | executive |
50 Océ Job Ticket Interface V2.0

es ich
s sign.
le
ble a
lash
30inch | 500mm | 700mm | 707mm )
<orientation> Specifies the orientation of logical images or media.
<orientation> ::= ( portrait | landscape )
<size> Specifies the size and possibly also the orientation of logical imagor media. The 2 reals specify the width and height, but it is not specified whone is the width and which one is the height. That is determined by the optional orientation.
<size> ::= ( ( <real> <real> [<unit>] ) | <standardsize> ) [<orientation>]
Note: In OJT version 1.2 specifying the unit is mandatory!
<number specification> Numerical values can be integers or reals. For example the number of copies is specified as an integer, a scale factor isspecified either as an integer or as a real. Some values may have a minu
Examples:
Zoom 200.0 200
Shift 2 -3.4 inch
Pens number 1-9 width 0.15 mm
<string specification> Strings, e.g. file names, can be written between doubquotes or not. The use of double quotes is needed if there is white space and/or a backslash inside a string. When a string contains a double quote, this douquote is escaped by a backslash. The backslash itself is also escaped bybackslash.
Backslash A backslash is used for specifying 8-bit characters and also forspecifying a double quote or a new-line character inside a string. A backshas a special meaning if it is followed by:
n double quote (double quote inside string)n backslash (backslash inside string)n n (new-line inside string)n r (carriage return inside string)n t (horizontal tab inside string)n 3 octal digits (8-bit ISO Latin 1 ASCII character inside string)
Syntax and grammar 51

g ide a
7, :
-bit hin ring
7 bits ASCII The Océ Job Ticket is specified in 7-bits ASCII, except for strinvalues. For specification of 8-bit characters (e.g. accented characters insstring) the ISO Latin 1 (ISO-8859-1) encoding is used. This is a limited extension of 7-bit ASCII. In future versions of OJT Unicode should be supported.The 8-bit characters can be specified directly or in a 7-bit notation as a backslash followed by the octal value.
\ddd format The \ddd form may be used to include any 8-bit character constant in a string. One, two, or three octal digits may be specified with high-order overflow ignored. This means that for all characters above \37\400 is subtracted, to yield a result that is at most 255 decimal. Examples
"\a" the backslash is ignored, string "a"
"\\b" backslash escaped, string "\b"
"\\n" backslash escaped, string "\n" (no newline)
"Oc\351" string "Océ"
"\70abc" string "8abc" (\070 is "8")
"\470abc" string "8abc" (\470 becomes \070)
"\709abc" string "89abc" (9 is not octal)
This notation is required for specifying a character outside the supported 7ASCII character set for the job ticket contents. The notation itself stays witthe standard set and thereby avoids possible problems in transmitting, stoor editing the job ticket.
String examples:
InputName Océ
InputName "Oc\351"
InputName report.ps
InputName "report.ps"
Notes "Oc\351\tRepro Center\n"
Notes "Backslash \\ and double quote \" inside a string\n"
52 Océ Job Ticket Interface V2.0

Océ Job Ticket V 2.0
Programmer’s Manual
Chapter 5Default Mechanism
53

from ngs
not
Introduction
When a setting is used in a block, and is not specified there, it is obtained some other level. There is a strategy for obtaining the setting. Some settihave more than one subsetting, in that case this strategy applies to eachindividual subsetting.
This strategy uses levels. For instance, settings specified inside a block aresaid to be on block level. When a setting, or subsetting, is used and doesappear at block level, the next level is searched for.
54 Océ Job Ticket Interface V2.0

vels:
of
fault,
ere, is d.
at tarts
eline.
Levels
When a setting or subsetting is used, it can be obtained from one of six le
1 Block settingsSettings that appear in the block where the (sub)setting is used.
2 Attached image settingsSettings that are attached to the logical images of the primary input.
3 Job level settingsSettings that appear at the beginning of a ticket, before the first block.
4 Input settingsSettings that are contained in the input of an input block (e.g. the numbercopies in a PostScript file). Only input blocks use this level.
5 Machine settingsSettings that are stored in the machine. These settings have a factory debut mostly they can be changed.
6 Ticket defaultsThe default (sub)settings that are specified in this document.
When using a (sub)setting, the first level is searched for it. If it is present ththat (sub)setting is used. If it is not present, the next level is searched. Thsearch continues until level 5. If it is not found, the job ticket default is use
Start of search For (sub)settings that are used in a block, the search startsthe block level. For (sub)settings that are used at the job level, the search sat the job level.
Immediate vs. attached immediate settings overrule attached settings. For example, if an output block specifies both Zoom and AttachZoom , then the AttachZoom setting is ignored.
The transformations Rotate , Zoom and Shift should not be put as defaults, because then their values are processed in each block of the pipThese transformations combine. For defaults it is better to use AttachRotate , AttachZoom and AttachShift .
Default Mechanism 55

t fore ing
f
Example 1BeginTicket 2.0
InputType file
InputDirectory “e:\\plot”
Zoom 50
BeginBlock 1
InputName “f1”
EndBlock
BeginOutput X
IncludeBlock 1
EndOutput
EndTicket
Explanation Every block uses the zoom transformation, but block 1 has nospecified a zoom setting. The zoom setting is found at job level and thereZoom 50 is used in block 1. Output block X has not specified a zoom setteither, it is found at job level and also the output block uses Zoom 50 . The result is that the input is zoomed twice to 50%, resulting in a total zoom o25%. It is therefore not a good idea to specify Zoom at job level. Specifying InputType and InputDirectory as defaults at job level, on the other hand, is a good idea.
Example 2BeginTicket 2.0
InputType file
InputDirectory “e:\\plot”
AttachZoom 50
BeginBlock 1
InputName “f1”
EndBlock
BeginBlock 2
InputName “f2”
AttachZoom 80
EndBlock
BeginOutput X
IncludeBlock 1 2
56 Océ Job Ticket Interface V2.0

vel s good 0%.
ket
and r a
ck tting,
t
EndOutput
EndTicket
Explanation Block 1 uses a zoom setting, which is not specified at block leand also not at job level. The value at machine level or the ticket default iused. Specifying a zoom value other than 100% at machine level is not a idea, because it is a combination setting. Block 1 uses the normal zoom 10Block 2 has no zoom setting and also uses the machine level value or ticdefault value.
When the output block processes input block 1, there is no zoom setting the images have no attached zoom setting. The next level is searched foZoom or AttachZoom setting. The AttachZoom 50 is found and used for images from input block 1. When the output block processes input blo2, there is no zoom setting, but the images do have an attached zoom sewhich is used.
Example 3BeginTicket 2.0
InputType file
InputDirectory “e:\\plot”
Zoom 50
BeginBlock 1
InputName “f1”
EndBlock
BeginBlock 2
InputName “f2”
AttachZoom 80
EndBlock
BeginOutput X
IncludeBlock 1 2
EndOutput
EndTicket
Explanation Block 1 uses the Zoom 50 setting from job level. In the output block, the images from block 1 have no attached zoom setting. The outpublock also uses the Zoom 50 from the job level, resulting in images from input 1 to be zoomed 25%.
Default Mechanism 57

d e
Block 2 has no zoom setting and also uses the Zoom 50 setting from job level. But in the output block, the images from block 2 do have an attachezoom setting. Images from block 2 are zoomed twice, once 50% and onc80%, resulting in a total zoom of 40%.
58 Océ Job Ticket Interface V2.0

eral
rtain le
g, but a
Subsettings
Note that most settings have only a single subsetting, but some have sevsubsettings.
When a setting has only one subsetting, and the setting is present at a celevel, the setting in the next levels is never used. Example 1 shows a singsubsetting.
Example 1BeginTicket 2.0
Rotate portrait extra180
BeginOutput
Rotate portrait
EndOutput
EndTicket
Rotate has one subsetting. For portrait there are 2 possibilities:
n portraitn portrait extra180
In the output block, the subsetting for Rotate will be portrait . The job level setting is not used, not even the extra180 , because it is not a separatesubsetting.
Some settings have several subsettings. If one level does have the settinit does not specify the required subsetting, the subsetting is obtained fromnext level. Example 2 shows the setting ASCII .
Example 2BeginTicket 2.0
ASCII fontsize 9 pt
BeginBlock A
ASCII line wrap
Default Mechanism 59

cket
EndBlock
BeginOutput
IncludeBlock A
EndOutput
EndTicket
In this example, in block A, the subsetting with subkeyword line is specified. The subsetting for fontsize is not specified, and it is not in the primary input, thus the job level subsetting for fontsize is used.
Other subsettings for ASCII are obtained from the machine settings and tidefaults.
Example 3BeginTicket 2.0
MediaType paper
InputType file
BeginBlock A
InputName "image_1"
EndBlock
BeginBlock B
InputName "image_2"
MediaType transparant
EndBlock
BeginOutput
IncludeBlock A B
EndOutput
EndTicket
In the output block, the setting MediaType is needed and is searched for inthe six levels in this way:
For images from block A:
1 No block setting in the output block2 No setting in primary input3 Job level setting: paper
60 Océ Job Ticket Interface V2.0

For images from block B:
1 No block setting2 Setting in primary input: transparent
Default Mechanism 61

62 Océ Job Ticket Interface V2.0

Océ Job Ticket V 2.0
Programmer’s Manual
Chapter 6Job ticket settings
63

Introduction
A job ticket consists of structure and settings. In EBNF:
<ticket> ::= BeginTicket <version-number>
{ <setting> }
{ <block> | <output-block> }
EndTicket
<block> ::= BeginBlock <string>
{ <setting> }
EndBlock
<output-block> ::= BeginOutput [ <string> ]
{ <setting> }
EndOutput
The job ticket settings are split up in the following categories:
n Structure settingsn Identification and information settingsn General settingsn Language settingsn Input settingsn Transformation settingsn Output settingsn Media settingsn Finishing settings
64 Océ Job Ticket Interface V2.0

b
e
Structure settings
Structure settings are used for structuring the job ticket. We have the following structure settings:
n BeginTicket / EndTicketn BeginBlock / EndBlockn BeginOutput / EndOutputn IncludeBlockn MergeBlock
BeginTicket / EndTicket
The keyword BeginTicket indicates the start of the Océ Job Ticket, the keyword EndTicket indicates the end of the Océ Job Ticket.
Syntax
BeginTicket <version number>
EndTicket
Description Lines before the line with BeginTicket are ignored. The characters preceding BeginTicket (except leading and trailing white space) are interpreted as the token.
The BeginTicket keyword is followed by a version number. The versionnumber of the ticket described in this document is 2.0
Error handling Only lines with this token are recognized to contain valid joticket information. The BeginTicket keyword must have a matching EndTicket keyword. If this keyword is missing, the end of the job ticket filis implicitly treated as an end of the ticket.
Example %!OceBeginTicket 2.0
%!OceEndTicket
In the other ticket examples in this document an empty token is used.
Job ticket settings 65

a job
ore
d an
BeginBlock / EndBlock
The keyword BeginBlock indicates the start of an input or intermediate block. The block is ended with the EndBlock keyword.
Syntax
BeginBlock <string>
EndBlock
Description The block is identified by the string and can be referenced asvalue in an IncludeBlock or in a MergeBlock setting.
Error handling The BeginBlock keyword must have a matching EndBlock . The EndBlock keyword terminates a block. It does not have value. If this keyword is missing while a block is processed, the end of theticket file is implicitly treated as an EndBlock .
It is an error when the same name is used for more than one block.
BeginOutput / EndOutput
The keyword BeginOutput indicates the start of an output block. The block is ended with the EndOutput keyword.
Syntax
BeginOutput [<string>]
EndOutput
Description The keywords BeginOutput and EndOutput are very similar to the keywords BeginBlock and EndBlock . The first difference is that an output block can not be referenced by another block and therefthe string is optional. The string can be used for identification purposes.
The second difference is that these keywords identify an output block, anoutput block can contain settings which are not allowed in another block.
Every job ticket must have at least one output block.
66 Océ Job Ticket Interface V2.0
IncludeBlock
This setting specifies the inputs of an intermediate or output block.
Syntax
IncludeBlock <string> { <string> }
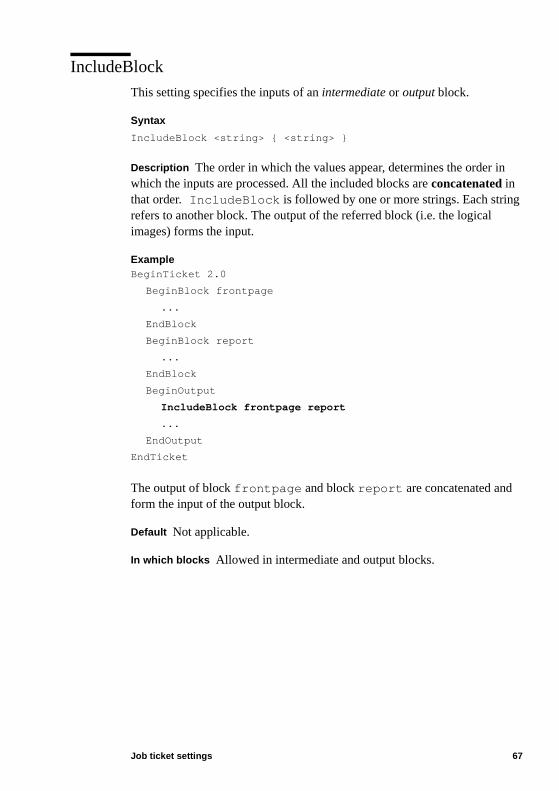
Description The order in which the values appear, determines the order inwhich the inputs are processed. All the included blocks are concatenated in that order. IncludeBlock is followed by one or more strings. Each stringrefers to another block. The output of the referred block (i.e. the logical images) forms the input.
Example BeginTicket 2.0
BeginBlock frontpage
...
EndBlock
BeginBlock report
...
EndBlock
BeginOutput
IncludeBlock frontpage report
...
EndOutput
EndTicket
The output of block frontpage and block report are concatenated and form the input of the output block.
Default Not applicable.
In which blocks Allowed in intermediate and output blocks.
Job ticket settings 67

t t.
Input concatenation The resulting input of a block can consist of the concatenation of two or more inputs. This is done with:
IncludeBlock A B
The logical images of the input identified by A are followed by the logical images of the input identified by B. Concatenation of the inputs of an inpublock is not possible, an input block has only one referenced primary inpu
It is possible to concatenate more than 2 inputs.
IncludeBlock A B C D
Concatenation extends the number of logical input images.
[32] Concatenation of inputs
MergeBlock
Not yet specified.
A1 A3
B2B1
X1 X2 X3 X5X4A2BeginBlock X
IncludeBlock A B
EndBlock
68 Océ Job Ticket Interface V2.0

r f the
s is nd
in the
Identification and information settings
The identification and information settings are (alphabetically):
n Accountn Commentn Copyrightn CreationAppln Distributionn JobNamen Notesn UserName
Account
A setting that specifies the account for (part of) the job.
Syntax
Account <string>
Description The string value indicates the account that can be billed. Thissetting can occur at job level where it indicates who has to be charged foprocessing this job. It can also appear in an output block so the recipient ooutput is asked to pay for it.If a job has several output blocks with different Account settings, then the handling is machine dependent.Account consists of some free text lines. The mapping of these text lineclient specific. A client can specify that the first line is the name, the secois the address and the third is the city. Or the first line is the department number and the second line is a project number. The lines are separated string by a new-line character.
Default Not applicable.
In which blocks Only allowed in output blocks.
Example Account "Oc\351 Technologies B.V.\nP.O. Box 101\n"
+ "5900 MA Venlo"
Job ticket settings 69

et. tents the
f rd.
t
Comment
A setting for adding comments to a job ticket.
Syntax Comment <any>
Description This setting is the normal way of adding remarks to the job tickThey can be used to clarify certain structures or settings and make the conbetter understandable. This setting has no influence on the processing ofticket.<any> is an arbitrary sequence of characters. This arbitrary sequence ocharacters starts after the first white space character following the keywo
Default Not applicable.
In which blocks Anywhere.
Copyright
The value is an arbitrary string indicating the origin of the job ticket. This setting does not affect the processing of the ticket.
Syntax
Copyright <string>
Default Not applicable.
In which blocks Not allowed in blocks, only at job level.
CreationAppl
The value is an arbitrary string specifying the name of the application thagenerated the job.
Syntax
CreationAppl <string>
Default Not applicable.
In which blocks Not allowed in blocks, only at job level.
70 Océ Job Ticket Interface V2.0

hom
ck,
Distribution (version 1.2)
The value contains information that is important for the distribution of theoutput that is produced by the job. It may contain a list of addressees to wcopies of the output must be sent, or information about off-line finishing requirements. This information may be printed on a banner page.
Syntax
Distribution <string>
In which blocks This keyword can appear at job-level when it contains information about the job as a whole. It can also be used in an output blowhere it only says something about the output of this block.
JobName
The value is an arbitrary string specifying the name of the job.
Syntax
JobName <string>
Default Not applicable.
In which blocks Not allowed in blocks, only at job level.
Notes
Remarks about the job.
Syntax
Notes <string>
Description The value of the Notes setting can be used to give extra instructions to an operator, which cannot be put in other settings.
Default Not applicable.
In which blocks Job level.
Job ticket settings 71

UserName
The value is an arbitrary string specifying the name of the user.
Syntax
UserName <string>
Default Not applicable.
In which blocks Not allowed in blocks, only at job level.
72 Océ Job Ticket Interface V2.0

d as
ns’
r
ies
General settings
Some settings do not fall in one of the other categories. They are groupegeneral settings. These settings are:
n Unitn Collaten Copies
Unit
Specifies which unit is used for measurements (see ‘General specificatioon page 50).
Syntax
Unit <unit>
Description When Unit is specified at the job level, then that unit is used foall measurements that don’t have their own unit specification. This makes it possible to specify Unit inch at the job level and have all the measurements for the whole ticket in inches.
Default
Unit mm
In which blocks Allowed in all blocks (most useful at job level).
Related settings All settings that use a unit.
Collate
Specifies the sorting method of the result of any block when multiple copare requested (see Copies ).
Syntax
Collate ( on | off )
Job ticket settings 73

er
Description Setting this value on means that the output pages are sorted byset. Setting this value off means that the output pages are sorted by page.
Default
Collate on
[33] Collate examples
In which blocks Allowed in all blocks.
Combination Yes, Collate is applied immediately in each block.
Related settings Collate has effect when Copies is more than 1, see theexample.
Copies
Specifies the number of copies that is generated by any block. The numbmust be larger than zero.
Syntax
Copies <int>
Default
Copies 1
In which blocks Allowed in all blocks.
A3
A1 A2 A3
B1 B2
BeginBlock C
IncludeBlock A BCopies 2Collate <value>
EndBlock
A2B1 B2
A1 A3A2B1 B2
A1
A3A2 A1 A2A1B2B1 B1 B2
A3
on
off
74 Océ Job Ticket Interface V2.0

job
3, B3
ny ero.
[34] Copies examples
Combination Yes, Copies settings combine. See example.
Related settings The Collate setting specifies the order of the copies.
JobCollate (version 1.2 only)
This setting is a version 1.2 setting only.
Syntax
JobCollate (on | off )
Description Specifies the collating sequence of the output blocks in a job.This is only useful if a job has more than 1 output block and the number ofcopies is greater than 1 (see JobCopies ).When on, the output blocks are processed in the order B1 B2 B3 B1 B2 Bfor example. When off, the blocks are processed in the order B1 B1 B2 B2B3. JobCollate off is similar to setting JobCopies 1 and Copies to the number of copies for all output blocks.
Default
JobCollate off
JobCopies (version 1.2 only)
This setting is a version 1.2 setting only.
Syntax
JobCopies <int>
Description Specifies the number of copies of a job. It determines how matimes each output block is processed. The number must be larger than zSee JobCollate .
A1 A2
BeginBlock BIncludeBlock ACopies 2
EndBlock
A2A1 A2A1 A2A1 A2A1A2A1 A2A1
BeginBlock CIncludeBlock BCopies 3
EndBlock
Job ticket settings 75

Default JobCopies 1
76 Océ Job Ticket Interface V2.0

sts s. If
t
end
mat. .
Language settings
The language settings contain information how to handle the input PDL (Printer Description Language). These language dependent settings are:
n ASCIIn Calcompn HPGL, HPGL2n Pens
ASCII
The ASCII setting specifies how ASCII files are handled. The value consiof a number of optional subsettings each followed by one or more settingno subsettings are present, this setting has no effect.
Syntax
ASCII
[ line ( wrap | trunc ) ]
[ eol ( cr | crlf | lf ) ]
[ pagesize <size> ]
[ fontsize <real> pt ]
[ top <real> [<unit>] ] [ bottom <real> [<unit>] ]
[ left <real> [<unit>] ] [ right <real> [<unit>] ]
Difference with version 1.2 Version 1.2 supports a subsetting orientation instead of pagesize . In OJT version 1.2 specifying the unit is mandatory.
Description
line: This subsetting indicates whether a line that extends beyond the righmargin is wrapped onto the next line, or is truncated.eol: The "end of line" subsetting specifies which character(s) indicates theof a line.pagesize: This subsetting specifies the size and orientation of the logical image that contains the ASCII text. If no orientation is specified, portrait isassumed. It can be described with width and height or with a standard forIn both cases, there is no relation with the media format used for printing
Job ticket settings 77

e
t
age
it
es
ich
ent
orientation: The orientation describes the direction of the ASCII text on thlogical image.portrait means that we can read the text when the logical image is portraioriented.landscape is the opposite from portrait. This subsetting is used when the psize is defined with a standardsize . When it is defined with width/length, the width is always the horizontal page size (X direction).A logical image can be rotated afterwards.
[35] A portrait and a landscape page
fontsize: This subsetting specifies the size of the used font in points. The unis fixed and is pt (1 point = 1/72 inch).top, bottom, left, right: These subsettings specify the margin along the edgof the page where no characters should be printed.Top is always at the top of the text, there is no relation with rotations or printing orientation.
Remark Currently no font type can be selected; the device determines whfont is used. Normally this is a Courier-like font.
Default Device dependent.
In which blocks Only allowed in input blocks.
Related settings
InputEmulation.
Calcomp
The Calcomp setting specifies how Calcomp files are handled. The argumconsists of a number of optional subsettings.
abc Here is a portrait abcpage size
Here is a landscapepage size
78 Océ Job Ticket Interface V2.0

l
r
ways
Syntax
Calcomp [ origin ( ul | upperleft |
ur | upperright |
ll | lowerleft |
lr | lowerright |
ce | center ) ]
[ checksum ( on | off ) ]
[ doublesync ( on | off ) ]
[ stepsize (100|200|400|500|1016|2032|4064) ]
[ eom <int> ]
[ sync <int> ]
[ merge ( on | off ) ]
Difference with version 1.2 Version 1.2 does not support the merge subsetting.
Description
origin: This subsetting determines the location of the reference point for alcoordinates that are used in the Calcomp file.checksum: This subsetting specifies whether the checksum is on or off.doublesync: This subsetting indicates whether a single synchronization character is used (off ) or two (on). stepsize: This subsetting determines in which "resolution" or accuracy the output must be generated. It is always expressed in steps per inch.eom: The end of message (eom) subsetting specifies which character terminates the drawing. The range for this value is [0..31].sync: This subsetting specifies the synchronization character. The range fothis value is [0..127].merge: This subsetting determines what happens when 2 or more colors intersect on a plot, at the crossing of vectors or filled polygons. If merge is on , all colors are merged together. If merge is off , the colors of the last vector orarea fill overwrite the colors at the same crossing area. White areas are alopaque.
Default
Calcomp origin ul checksum off doublesync on
+ stepsize 2032 eom 3 sync 2 merge on
In which blocks Only allowed in input blocks.
Job ticket settings 79

p.
gs
l
e
.
Related settings
InputEmulation, Pens.
Note: Currently it is not possible to specify separate pen settings for CalcomThe setting Pens is used for all vector file formats.
HPGL, HPGL2
The HPGL and HPGL2 settings specify how HP-GL and HP-GL/2 files are handled. The argument consists of a number of optional subsettings.
Syntax
( HPGL | HPGL2) [ plottertype <string> ]
[ origin ( ul | upperleft |
ur | upperright |
ll | lowerleft |
lr | lowerright |
ce | center ) ]
[ sp_eof ( on | off ) ]
[ merge ( on | off) ]
Difference with version 1.2 Version 1.2 does not support the merge subsetting.
Description
plottertype: This subsetting specifies for which plotter type the file was generated. The string in the ticket is passed to the interpreter. Which strinare supported depends on the interpreter.Examples for HPGL: HP-7440, HP-7475A, HP-7550A, HP-7570A, HP-7580A, HP-7580B, HP-7585B, HP-7586B, HP-7595A, HP-7596A, HP-7600, DesignJet.Examples for HPGL2: HP-7595A, HP-7596A, HP-7600, DesignJet, HP-DJ650C, HP-DJ750Corigin: This subsetting determines the location of the reference point for alcoordinates that are used in the file.sp_eof: This subsetting specifies whether selection of pen 0 in the file must btreated as an end-of-file (on) or not (off ).merge: This subsetting determines what happens when two or more colorsintersect on a plot, at the crossing of vectors or filled polygons. If merge is on , all colors are merged together. If merge is off , the colors of the last vector or area fill overwrite the colors specified at the same crossing area
80 Océ Job Ticket Interface V2.0

are
The the ones
he
ge. or n
HPGL remark There is no parameter to set the transparency: white areas always opaque.
HPGL2 remark The merge subsetting sets the default value for the instructionMC of the language, when the latter is not specified in the language itself. behaviour of white areas is determined by the TR instruction specified in language (TR0 means that white zones are opaque and TR1 that white zare transparent).Currently it is not possible to specify separate pen settings for HP-GL/2. Tsetting Pens is used for all vector file formats.
Default
HPGL origin ce sp_eof on merge on
HPGL2 origin ul sp_eof off merge off
In which blocks Only allowed in input blocks.
Related settings
InputEmulation, Pens.
Pens
With HPGL2, BGL, VDF and Calcomp, pens can be defined in the languaHowever, the user has the possibility to redefine the pens on the machineremotely (with a ticket). In the case of HP-GL, pens can only be defined othe device or remotely.
Syntax
Pens ( on | off | <custompens> )
<custompens> ::=
number ( <int> | <int>-<int> | all ) <pensetting>
<pensetting> ::=
[ width ( <real> [<unit>] | on | off ) ]
[ pattern ( <int> | on | off ) ]
[ color ( <int> <int> <int> | on | off ) ]
[ hide ( on | off ) ]
Difference with version 1.2 Version 1.2 does not support the color and hide subsettings. In OJT version 1.2 specifying the unit is mandatory.
Job ticket settings 81

ill
ast).
the
n file, are
Description
on: If Pens on is specified, the pen settings as defined on the device wbe active.off: When set to off , the pen settings as defined in the file itself are used.custompens: It is possible to define custom settings by defining for one or more pens the width, the pattern, the color and/or the hiding.number: Specifies the pen number or range of pen numbers (all pens: 1-lwidth: Specifies the width of the pen. If on is specified, the width of the specified pen(s) as defined on the device is chosen. If off is specified, the width in the language is taken.pattern: Specifies the pattern of the pen, <int> is in the range [1...40]. Seetable on the next page for the predefined pen patterns. If on is specified, the pattern of the specified pen(s) as defined on the device is chosen. If off is specified, the pattern in the language is taken.color: Gives the color of the pen as three values in the range [0...255], specifying the red, green and blue components. If on is specified, the color of the specified pen(s) as defined on the device is chosen. If off is specified, the color in the language is taken.hide: If on, the specified pen(s) are not printed, if off, the specified pen(s) areprinted.
Default
Pens off
Defaults for pensettings
width off pattern off color off hide off
In which blocks Only allowed in input blocks.
Related settings
HPGL, HPGL2, Calcomp.
Example In the following example, pen number 1 has a width as defined ithe file, but has color red and pattern number 1. Pen 2 is as defined in thebut has a width of 1 (if mm is the unit). For all other pens, the parameterstaken from the file.
Pens number 1 width off color 255 0 0 pattern 1 hide off
+ number 2 width 1.0 color off pattern off hide off
+ number 3-last width off color off pattern off hide off
82 Océ Job Ticket Interface V2.0
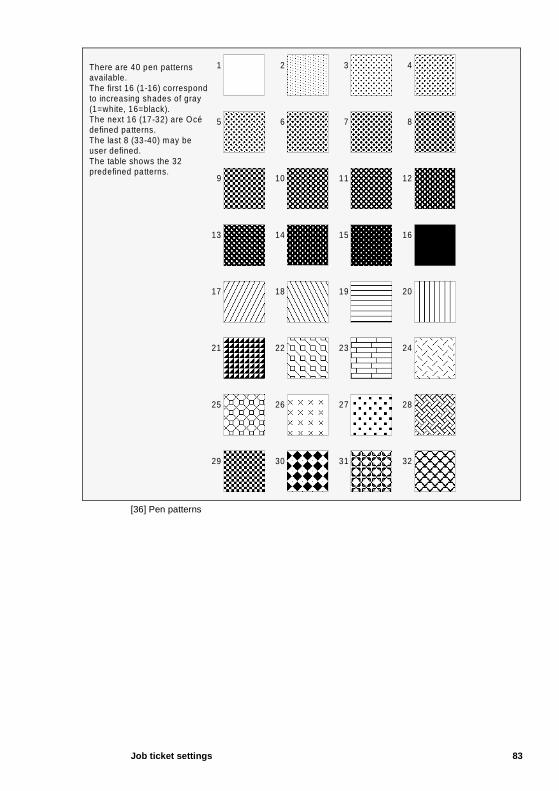
[36] Pen patterns
1 2 3 4
5 6 7 8
9 10 11 12
13 14 15 16
17 18 19 20
21 22 23 24
25 26 27 28
29 30 31 32
There are 40 pen patternsavailable.The first 16 (1-16) correspondto increasing shades of gray(1=white, 16=black).The next 16 (17-32) are Océdefined patterns.The last 8 (33-40) may beuser defined.The table shows the 32predefined patterns.
Job ticket settings 83

re:
r ange.
the
part mber.
Input settings
Input settings are those settings that deal with job input. These settings a
n InputType / OrigInputTypen InputEmulationn InputSegmentn InputDirectory / OrigInputDirectoryn InputName / OrigInputNamen InputSizen RemoveStrip
Transporting a job or file When a job or file is transported from one computeto another, then the values of the type, the directory and the name can chIf the value of the InputType setting is changed, the original value of theType setting is stored in OrigInputType (unless it was there already).OrigInputType , OrigInputName and OrigInputDirectory together specify the original data location.To construct the original directory, OrigInputDirectory is used. If this setting is not present, InputDirectory is used.To construct the original name, OrigInputName is used. If this setting is not present, InputName is used.
InputType
Specifies the type of input in an input block.
Syntax
InputType ( file | paper | microfilm | segment )
Description Specifies the type of input.file: Input comes from a file and the location of the file must be known (specified by InputDirectory and InputName ).paper: Input comes from a scanner, but other types of media can be put onscanner.microfilm: Input comes from a microfilm scanner.segment: Input data is appended after the ticket. More than one input data can be appended after the ticket, each input is identified by a segment nu
84 Océ Job Ticket Interface V2.0

ing
Default
InputType segment
In which blocks Only allowed in input blocks.
Related settings Depending on InputType , several other settings may be required and others may be ignored. For example, if the input type is file , then the InputName and InputDirectory setting are required and, on the other hand, an InputSegment setting is ignored.
Type (version 1.2)
When specified in an input block, this setting has exactly the same meanas InputType . However, this setting only supports file, paper, microfilm as input types.
OrigInputType
Specifies the original type of the input.
Syntax
OrigInputType ( file | paper | microfilm | segment )
Description OrigInputType is for informational purposes only. It can beviewed at the machine, to identify the data.
Default Not applicable.
In which blocks Only allowed in input blocks.
Job ticket settings 85

ing
to a
InputEmulation
Specifies the format of the input file.
Syntax
InputEmulation ( auto | ASCII | BGL | C4 | Calcomp |
CALS | DSREDS | HPGL | HPGL2 | HPRTL |
NIRS | PCL | PostScript| TIFF |
VDF | CGM | FOL | IPDS )
Description
auto: The device itself decides what the format of the input file is.
Default
InputEmulation auto
In which blocks Only allowed in input blocks.
Related settings This setting is used when InputType equals file or segment .
Emulation (version 1.2)
When specified in an input block, this setting has exactly the same meanas InputEmulation .
InputSegment
Specifies the number of the segment in an input stream.
Syntax
InputSegment <integer>
Description Segments in a stream are numbered starting from 1. To refer specific segment in a stream, InputSegment is used.
Default
InputSegment 1
In which blocks Only allowed in input blocks.
86 Océ Job Ticket Interface V2.0

te
ing
e
Related settings This setting is used when InputType equals segment .
InputDirectory
Specifies the directory where an input file can be found.
Syntax
InputDirectory <string>
Description The path should be accessible from the system where the jobticket is processed. Both the "\\" and "/" characters can be used to separadirectories: the meaning of the string is machine dependent.
Default Device dependent.
In which blocks Only allowed in input blocks.
Related settings This setting is used when InputType equals file .
Directory (version 1.2)
When specified in an input block, this setting has exactly the same meanas InputDirectory .
OrigInputDirectory
Specifies the original input directory.
Syntax
OrigInputDirectory <string>
Description OrigInputDirectory is for informational purposes only. It contains the original value of InputDirectory when a file is transported. It can be viewed at the machine, to identify the original input directory. Thmeaning of the string is machine dependent.
Default Not applicable.
In which blocks Only allowed in input blocks.
Job ticket settings 87

ing
ing
OrigDirectory (version 1.2)
When specified in an input block, this setting has exactly the same meanas OrigInputDirectory .
InputName
Specifies the name of the input data.
Syntax
InputName <string>
Description If the input type is file , then InputName specifies the name of the input file and is used, in combination with InputDirectory , to locate the file. For all other input types this setting is informational. For example, if the input type is paper or microfilm, the name specifies whichoriginal this is. The meaning of the string is machine dependent.
Default Not applicable.
In which blocks Only allowed in input blocks.
Related settings This setting is used when the input type equals file . This setting is used, in combination with InputDirectory , to locate the file. The complete filename is formed by concatenating InputDirectory and InputName . InputName can contain subdirectories.
Name (version 1.2)
When specified in an input block, this setting has exactly the same meanas InputName .
OrigInputName
Specifies the original input name.
Syntax
OrigInputName <string>
88 Océ Job Ticket Interface V2.0

is
ing
e,
ion. on
e rs
f
Description OrigInputName is for informational purposes only. It contains the original value of InputName when a file is transported. It can be viewed at the machine, to identify the data. The meaning of the string machine dependent.
In which blocks Only allowed in input blocks.
OrigName (version 1.2)
When specified in an input block, this setting has exactly the same meanas OrigInputName .
InputSize
The InputSize setting sets the size of the logical image to a specific valuindependent from what the size of the logical image was.
Syntax
InputSize ( auto | <size> )
<size>, see "General specifications" on page 50.
Description The size of the input image can be set explicitly, independentfrom what it was.auto: The value auto means the same size as the input image.<size>: The size (not the orientation) is either specified by 2 sizes (and anoptional unit) or by a standard size. This part does not specify an orientatAn optional orientation specifies if it is portrait or landscape. If the orientatiis not given, then the orientation of the logical image is used.When the specified InputSize is larger than the actual size, then part of thnew logical image does not have contents. The actual logical image coveonly part of the new image size and the rest is ‘white’.When the specified InputSize is smaller than the actual size, then part othe logical image is clipped. The InputSize is not a zoom operation. The part of the actual logical image that falls outside the new size is clipped.
Examples InputSize A4 landscape
InputSize 297 210 portrait
InputSize 297 210 mm
Job ticket settings 89

age.
Default
InputSize auto
Per default the input size and orientation is the size and orientation of thebounding box of the input logical image.
[37] Setting the input image size
In which blocks Only allowed in input blocks.
RemoveStrip
Specifies how much leading or trailing area must be removed from the im
Syntax RemoveStrip [ leading <real> [<unit>] ]
[ trailing <real> [<unit>]
Difference with version 1.2 In OJT version 1.2 specifying the unit is mandatory.
Description
leading <real> [<unit>]: This subsetting specifies the amount of edge to beremoved from the leading edge of the image.trailing <real> [<unit>]: This subsetting specifies the amount of edge to beremoved at the trailing edge of the image.
Default
RemoveStrip leading 0 trailing 0
In which blocks Only allowed in input blocks.
Related settings This setting is the opposite of AddStrip .
part of logical image that is clipped
part of logical image without contents
logical image image size result
90 Océ Job Ticket Interface V2.0

Remark RemoveStrip is applied after InputSize . When scanning, the leading and trailing edge are determined by the direction of the media transport in the scanner.
Job ticket settings 91

en
hed are
end
ings.
ck
Transformation settings
If you want to do immediate transformations, then use Mirror , Rotate , Zoom and Shift .
If attached transformations are needed, then use AttachMirror , AttachRotate , AttachZoom and AttachShift .
If you want to adjust the requested logical images to the physical media, thuse AdjustRotate , AdjustZoom and AdjustShift .
The immediate settings are processed anywhere in the pipeline, the attacsettings are processed at the end of the pipeline. The adjustment settingsprocessed in the machine handling part.
The transformations are processed in a specific order. If you have at the of the pipeline both immediate and attached transformations, then the immediate transformations overrule the attached transformations.
Note: Transformations are processed in a specific order.
Note: At the end of the pipeline, immediate settings overrule attached sett
The fixed order of transformation processing is:
n Mirror / AttachMirrorn Rotate / AttachRotaten Zoom / AttachZoomn Shift / AttachShift
n AdjustRotaten AdjustZoomn AdjustShift
Mirror
This setting is used to mirror an image. This mirroring is applied in the blowhere it is specified.
92 Océ Job Ticket Interface V2.0

e
Syntax
Mirror ( off | horizontal | vertical )
Description Mirroring is useful when printing on transparent media. Mirroring does not change the size or position of an image.off: No mirroring.horizontal: The image is mirrored horizontally.vertical: The image is mirrored vertically.
Default
Mirror off
In which blocks Allowed in all blocks.
[38] Mirroring an image
AttachMirror
Same as mirror, but used as attached setting, i.e. applied at the end of thpipeline.
Syntax
AttachMirror ( off |horizontal | vertical )
Description See Mirror .
Default
AttachMirror off
In which blocks Allowed in all blocks, but applied at the end of the pipeline.
Remark If the Mirror setting is specified in the output block, then this setting overrules the AttachMirror setting.
X
Y
mirror horizontal m irror vertical
Job ticket settings 93

d in
o get
Rotate
This setting is used to apply a rotation to an image. This rotation is appliethe block where it is specified.
Syntax Rotate ( 0 | 90 | 180 | 270 |
portrait [ extra180 ] |
landscape [ extra180 ] )
Difference with version 1.2 Version 1.2 does support portrait180 and landscape180 instead of the extra180 s ubsettings.
Description 0, 90, 180 and 270 are used to specify the angle by which theimage must be rotated. The angle is given in degrees and measured counter-clockwise.When portrait or landscape is chosen, the image is rotated if necessary ta portrait (width < length), respectively landscape (width > length) orientation. 270 degrees is used to rotate from portrait to landscape. 90 degrees is used to rotate from landscape to portrait.extra180: Adds an extra 180 degrees rotation.
[39] Rotate examples
Default Rotate 0
90 180 270
landscape portrait
landscape portrait
landscape portrait
landscape portrait
extra180extra180
extra180 extra180
94 Océ Job Ticket Interface V2.0

of tion
if
Combination Yes.
In which blocks Allowed in all blocks.
Related settings If Rotate is specified in an output block and AttachRotate is specified somewhere in the pipeline (incl. the output block), then there is a conflict. The immediate Rotate setting overrules: the attached AttachRotate setting is ignored.
See also AttachRotate and AdjustRotate .
AttachRotate
This setting specifies the rotation that is applied at the end of the pipeline. In some situations the rotation depends on the destination orientation.
Syntax AttachRotate ( 0 | 90 | 180 | 270 |
portrait [ extra180 ] |
landscape [ extra180 ] |
same [ extra180 ] |
opposite [ extra180 ] )
Description
0, 90, 180, 270: Same as for Rotate .portrait / landscape: Same as for Rotate .For same and opposite the destination orientation is used.If the image is being merged, the destination orientation is the orientationthe primary input. If the image is printed on media, the destination orientamay be specified by the MediaSize setting. If MediaSize does not specify the orientation, the destination orientation is undefined and no attached rotation takes place.same: The logical image must have at the end the same orientation as the destination. If the destination orientation is known, the image is rotated, ifneeded, to obtain the same orientation.If the destination orientation is undefined, the image is not rotated and the orientation remains undefined.opposite: The logical image must have at the end the opposite orientation as the destination. If the destination orientation is known, the image is rotatedneeded, to obtain an opposite orientation.If the destination orientation is undefined, the image is not rotated and the
Job ticket settings 95

ents
al
e n
. If egy
re,
orientation remains undefined.extra180 implies an extra rotation of 180 degrees.
Default AttachRotate 0
In which blocks Allowed in all blocks, but applied at the end of the pipeline.
Combination No, last one wins.
Related settings When the image is being put on media, the MediaSize setting may define the destination orientation, which is used for the argumsame and opposite .If the Rotate setting is specified in the output block, then this setting overrules the AttachRotate setting, the AttachRotate setting is ignored.The AdjustRotate setting can be used for adjusting the requested logicimages to the physical media.
Remark If the requested logical image or the destination is square, the arguments same and opposite are ignored.
AdjustRotate
This setting is used to adjust the requested logical image orientation to thchosen physical media orientation. This chosen physical media orientatiomay depend on:
n if it is allowed to rotate the logical image (auto ),n depend on the finishing (e.g. folding),n or on the printing productivity.
Syntax AdjustRotate ( off |
productive [ extra180 ] |
auto [ extra180 ] )
Description
off: The user explicitly does not want any additional rotation of the imagethere is no media present with the right orientation, then the fallback stratis applied (see ‘Media selection’ on page 39).productive: This value is used to achieve the highest productivity. Therefo
96 Océ Job Ticket Interface V2.0

ome s
ith
ing
ion,
if the two media orientations are available, the one which makes media cout the fastest is chosen and the logical image is rotated if necessary. It ipossible to do an extra 180 degrees rotation.
auto: The requested logical image may be rotated if the physical media wthis orientation is not available on the machine, but only with the other orientation.If the requested media orientation is not specified, then either physical media orientation can be chosen (avoiding clipping of the image).The requested logical image may be rotated when that is needed for foldor stapling. Rotation may be needed to have the legend on the top after folding. The value of the rotation depends on the image size and orientatthe folding method, the folder mechanism. This is machine dependent.It is possible to do an extra 180 degrees rotation.
Default
AdjustRotate off
In which blocks Allowed in all blocks, but applied in the machine handling.
Combination No, last one wins.
Related settings There is a relation between AdjustRotate auto and finishing settings. For AdjustRotate auto , to get the legend on top for folding in a reliable way, use (mostly defaults):
Zoom 100
AttachZoom off
AttachRotate same
MediaSource auto
MediaSize auto
MediaFeed exact
Job ticket settings 97
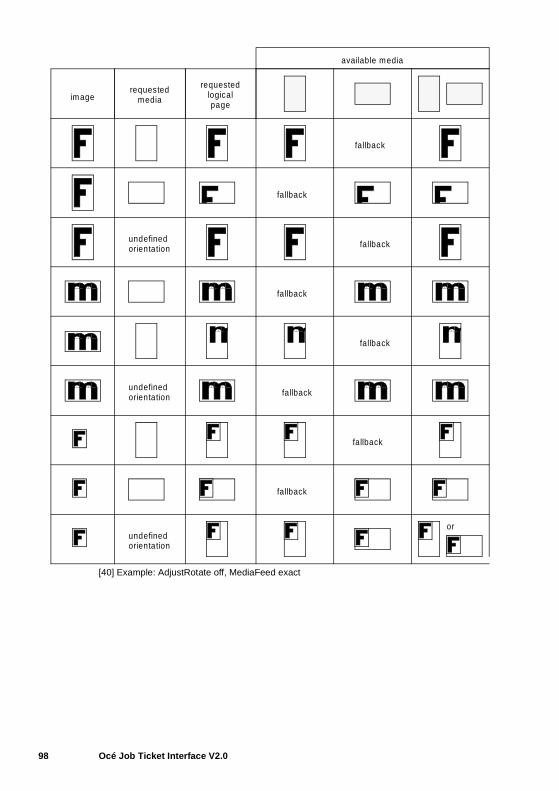
[40] Example: AdjustRotate off, MediaFeed exact
available media
imagerequestedrequested
media logicalpage
undefinedorientation
undefinedorientation
fallback
fallback
fallback
fallback
fallback
fallback
undefinedorientation
fallback
fallback
or
98 Océ Job Ticket Interface V2.0

is
[41] Example: AdjustRotate auto, MediaFeed exact
Zoom
Specifies a zoom factor to apply to the logical image in the block where itspecified.
available media
imagerequestedrequested
media logicalpage
undefinedorientation
undefinedorientation
undefinedorientation
or
Job ticket settings 99

on. hat
or is
r is
mally
very .
rd
rd
Syntax Zoom ( <x> [ <y> ] |
to ( <size1> <size2> [<unit>] | <standardsize> )
[ fromstandard ] )
Difference with version 1.2 Version 1.2 does not support Zoom to and fromstandard. Instead of using AttachZoom auto , version 1.2 supports Zoom auto .
Description
<x> [ <y> ]: This argument is used to specify a fixed zoom factor. The zooming in x direction is specified first. Optionally, the zooming in the y-direction can be given. By default, x-zooming is also used in the y-directiA value of 100 means a zooming of 100%. A value of 0 is not allowed, in tcase, it defaults to 100. The zoom can be non-isomorphic.to <size1> <size2> [<unit>]: The image is zoomed to the size specified by size1 and size2, the orientation is the same as the image. The zoom factisomorphic.to <standardsize>: The image is zoomed to the specified standard format,which is taken in the same orientation as the input image. The scale factoisomorphic.fromstandard: This argument is optional. If fromstandard is specified, then the nearest standard format is used to calculate the scale factor. Nora larger standard format is used, but if the size is very close to a smaller standard format, then this smaller standard format is used. What exactly close is, is machine dependent, but it is in the order of several millimetersIf fromstandard is not specified, the size of the input image is used.
Default
Zoom 100
Combination Yes. Zoom settings are processed in the order in which they occur in the pipeline.
In which blocks Allowed in all blocks.
Remarks Maximum and minimum zoom factors are machine dependent.Be careful with ANSI formats. For ISO formats, if the native plot is a standaone, with zoom to standard size the result will fit exactly in the specified standard format.For ANSI format, it is not the case because the ratio between two standaformats is non-isomorphic, so we can have a white band even if the native format was a standard one.
100 Océ Job Ticket Interface V2.0

)
ith hen
ge,
Examples The final result shows what happens if the zoomed (and shiftedimage is put on paper.
[42] Zoom examples
Remark When zooming to a standard size, the zoom factor is calculated wthe source image size and the standard image size. This zoom factor is tapplied to the shift. The zoom factor does not depend on the shift.
AttachZoom
This setting allows to specify a zoom factor to be applied to the logical imaat the end of the pipeline. For some arguments the destination size and orientation is used.
Zoom 150 50
Zoom 50 50
Zoom to A3
Zoom to A3 fromstandard
input image target size A3 zoom image final result
Zoom to A3
input image target size A3 zoom image final result (shift also zoomed)
standard sizeinput image zoom imagetarget size A3 final result
input image
input image
zoom image
zoom image
result
result
final result
final result(shift also zoomed)
Job ticket settings 101

ted
ll
s
Syntax AttachZoom ( <x> [ <y> ] |
to ( <size1> <size2> [<unit>] |
<standardsize> ) [fromstandard ]) |
auto [ fromstandard ])
Description
<x> [ <y> ]: Same definition as for Zoom.to <size1> <size2> [<unit>]: Same definition as for Zoom.to standardsize: Same definition as for Zoom.auto: An automatic and isomorphic zoom is performed towards the destination size and orientation. This destination size and orientation is thesize and orientation of the primary input when merging. If the image is prinon media, the destination size and orientation is specified by the MediaSize setting. If this setting does not specify the orientation, then the scaling wialways be done with the same orientation as the image.fromstandard: Same definition as for Zoom.
Default
AttachZoom 100
In which blocks Allowed in all blocks, but applied at the end of the pipeline.
Combination No, last one wins.
Related settings If the Zoom setting is specified in the output block, then thisetting overrules the AttachZoom setting.
Remark See the remark about ANSI formats in Zoom.
102 Océ Job Ticket Interface V2.0
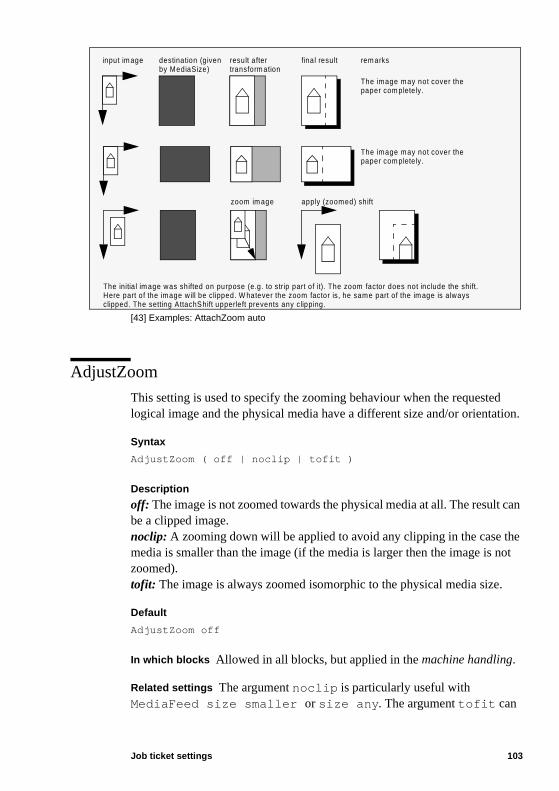
tion.
can
he ot
[43] Examples: AttachZoom auto
AdjustZoom
This setting is used to specify the zooming behaviour when the requestedlogical image and the physical media have a different size and/or orienta
Syntax
AdjustZoom ( off | noclip | tofit )
Description
off: The image is not zoomed towards the physical media at all. The resultbe a clipped image.noclip: A zooming down will be applied to avoid any clipping in the case tmedia is smaller than the image (if the media is larger then the image is nzoomed).tofit: The image is always zoomed isomorphic to the physical media size.
Default
AdjustZoom off
In which blocks Allowed in all blocks, but applied in the machine handling.
Related settings The argument noclip is particularly useful with MediaFeed size smaller or size any . The argument tofit can
input im age destination (given result after final resultby MediaSize) transform ation
rem arks
The image may not cover thepaper com pletely.
The image may not cover thepaper com pletely.
The initia l im age was shifted on purpose (e.g. to strip part of it). The zoom factor does not include the shift.Here part of the image will be clipped. W hatever the zoom factor is, he same part of the im age is alwaysclipped. The setting AttachShift upperleft prevents any clipping.
zoom im age apply (zoomed) shift
Job ticket settings 103

n. age
ce.
be
be useful with MediaFeed size larger or size any to zoom up if the media is larger.
Remark The arguments tofit and noclip are equivalent when the physical media is smaller than the image.To make sure that nothing is clipped, also use AdjustShift upperleft .
Shift
The shift transformation shifts the logical image in the X and/or Y directioThe reference point of the image is repositioned. The size of the logical imis not changed.
Syntax Shift ( <x> <y> [<unit>] )
<x> ::= <real>
<y> ::= <real>
Difference with version 1.2
Instead of using AttachShift/AdjustShift <alignment point> , version 1.2 supports Shift <alignment point> .In OJT version 1.2 specifying the unit is mandatory.
Description The values <x> and <y> are used to specify a fixed shift distanThe optional <unit> can be used to overrule the default unit specification.Shifting is only useful when merging or printing. Input to be merged may shifted to align it with the primary input. For instance, for precisely positioning a logo on another image. Shifting the primary input is mainly useful for creating a margin shift on the output media.
[44] Shift examples
Default Shift 0 0
Combination Yes. Shift settings are processed in the order in which they occur in the pipeline.
X
Y
Shift 20 10 Shift 10 -20
104 Océ Job Ticket Interface V2.0

es
tion
ize
int.
Related settings If an already shifted image is zoomed, the shift values arealso zoomed.
In which blocks Allowed in all blocks.
AttachShift
This setting shifts the logical image in the X and/or Y direction (just as theShift setting). The AttachShift setting has an additional argument foraligning the image with the destination.
Syntax AttachShift ( [ <alignment point> ]
[ <x> <y> [<unit>] ])
Description
<alignment point>: The output is shifted in such a way that the output imagalign with one of the alignment points of the destination. The destination size and orientation must be known. If the image is being merged, the destinasize and orientation is that of the primary input. If the image is printed on media, the destination size and (optionally the) orientation is set by MediaSize .But if there is no MediaSize setting, or if the MediaSize setting does not set the orientation, then the destination size and orientation may be unspecified. If the destination size and orientation are unspecified, then nooutput shifting takes place (except the upperleft alignment, for which no sor orientation information is needed).With AttachShift <alignment point> , all previous shift values are lost.<x> <y> [<unit>]: Same as for Shift . This shift can be combined with an alignment point shifting (first align and then apply an additional shift). AttachShift <x> <y> adds another shifting to the images, or if an alignment point is specified, it is the only shift away from the alignment po
[45] Attach shift examples
upperleft upperrighttop left center bottomlowerleft lowerrightright
Job ticket settings 105

.
at
[46] Combination of output shift upperright and an offset
Default
AttachShift 0 0 (i.e. keep previous shifts)
In which blocks Allowed in all blocks, but applied at the end of the pipeline.
Related settings If the Shift setting is specified in the output block, thenthis setting overrules the AttachShift setting.
AdjustShift
The AdjustShift setting shifts the logical image in the X and/or Y directionThis setting is used to adjust to the physical media.
Syntax AdjustShift ( [ <alignment point> ]
[ <x> <y> [<unit>] ])
Description
<alignment point>: The output logical images are shifted in such a way ththey align with one of the alignment points of the physical media. If an alignment point is specified, all previous shift values are lost.<x> <y> [<unit>]: Instead of, or in combination with an alignment point, anextra shift for the physical media can be specified.
Default
AdjustShift 0 0
In which blocks Allowed in all blocks, but applied in the machine handling.
X
Y
AttachShift upperright -10 10
106 Océ Job Ticket Interface V2.0

ted
ile
(or
ning
Output settings
The output settings deal with the output of a job (except for the media relasettings). These output settings are:
n OutputTypen OutputEmulationn OutputDirectoryn OutputName
OutputType
Specifies the type of output in an output block.
Syntax
OutputType ( file | paper )
Description Specifies the type of output.When file is specified, the output goes to a file and the location of the fmust be known (specified by OutputDirectory and OutputName ).Specification of paper means that the output is printed and goes to paper other media).
Default
OutputType paper
In which blocks Only allowed in output blocks.
Related settings Depending on OutputType , several other settings may berequired and others may be ignored. For example, if the output type is file , then the OutputName and OutputDirectory setting are required and, on the other hand these settings are ignored if the output type is paper .
Type (version 1.2)
When specified in an output block, this setting has exactly the same meaas OutputType .
Job ticket settings 107

ning
te
OutputEmulation
Specifies the format of the output file.
Syntax OutputEmulation ( ASCII | BGL | C4 | Calcomp |
CALS | DSREDS | HPGL | HPGL/2 | HPRTL |
NIRS | PCL | PostScript | TIFF |
VDF | CGM | FOL | IPDS )
Description Specifies in which format the output is written to a file.
Default Machine dependent.
In which blocks Only allowed in output blocks.
Related settings This setting is used when OutputType equals file .
Emulation (version 1.2)
When specified in an output block, this setting has exactly the same meaas OutputEmulation .
OutputDirectory
Specifies the directory where the output file should be stored.
Syntax
OutputDirectory <string>
Description The path should be accessible from the system where the jobticket is processed. Both the "\\" and "/" characters can be used to separadirectories; they are interpreted by the application that processes the job ticket.
Default Device dependent.
In which blocks Only allowed in output blocks.
Related settings This setting is used when OutputType equals file .
108 Océ Job Ticket Interface V2.0

ning
g
.
ning
Directory (version 1.2)
When specified in an output block, this setting has exactly the same meaas OutputDirectory .
OutputName
Specifies the name of the output data.
Syntax
OutputName <string>
Description If the output type is file , then OutputName specifies the name of the output file and is used, in combination with OutputDirectory , to locate the file. For all other output types this settinis informational.This setting is allowed in all blocks. It is therefore possible that part of theoutput of one output block goes to one file and another part to another file
Default Not applicable.
In which blocks Only allowed in output blocks.
Related settings Used together with OutputDirectory to locate a file.
Name (version 1.2)
When specified in an output block, this setting has exactly the same meaas OutputName .
Job ticket settings 109

ee
d, tion
Media settings
These settings deal with the physical media. These settings are:
n MediaTypen MediaSourcen MediaSizen AddStripn MediaFeedn MediaDepositn CutMethod
The relations between these settings are described in the next chapter (schapter 7, ‘Selecting the media’ on page 131).
MediaType
This setting allows to select the media type.
Syntax MediaType [ paper | transparent | polyester | vellum ]
[ weight <real> <weight_unit> ] [ <string> ]
<weight_unit> ::= (gm2 | lbs | mil)
gm2 is the normal unit,lbs is the imperial standard unit (US),mil is currently used with polyester.
Description paper , transparent , polyester and vellum are the most common types of media.weight: Enables to define the weight of the media. When this subsetting is not mentioned, all the weights are accepted.<string>: Permits to add free characteristics to the media. For instance: reyellow, Oce_logo. The mapping between this string and the physical locais done in the machine.
Default
MediaType paper
In which blocks Allowed in all blocks, but applied in the machine handling.
110 Océ Job Ticket Interface V2.0

ken.
the
nd
nd
nd
Combination No, last one wins.
Relation with other settings This setting is ignored if MediaSource is a fixed tray or roll. It is only for information if MediaSource is manual .
Remarks If the requested type is not available, another type is not taken instead.
MediaSource
This setting is used to choose a specific source from which the media is ta
Syntax MediaSource
( ( tray ( <int> | upper | middle | lower | bulk ) ) |
( roll ( <int> | upper | middle | lower) ) |
manual |
( auto [ rollfirst | rollonly |
trayfirst | trayonly ] ) )
Description
tray: This argument permits to select a specific tray. The mapping between<int> (or the pre-defined words) and the physical tray is machine dependent.roll: Same as tray, but for rolls.manual: The customer is asked to insert the media manually.auto: The roll or tray will be chosen automatically, according to the image amedia characteristics specified with MediaSize , MediaType and depending on the MediaFeed settings.If auto rollfirst is selected and the media is available on both roll atray (same size, type and orientation), then roll is chosen.If auto rollonly is selected, then one of the available rolls is chosen, the trays are ignored.If auto trayfirst is selected and the media is available on both roll atray (same size, type and orientation), then tray is chosen.If auto trayonly is selected, then one of the available trays is chosen, the rolls are ignored.
Default
MediaSource auto
rollfirst or trayfirst : the default is machine dependent.
Job ticket settings 111

is a
be
In which blocks Allowed in all blocks, but applied in the machine handling.
Combination No, last one wins.
Relation with other settings If a specific tray or roll or manual is selected, MediaFeed and MediaType are ignored. MediaType may however be kept as an informative value.If any tray or manual is selected, then CutMethod is forced to standard .If any tray or manual is selected, then AddStrip is ignored.
OutputSize (obsolete, version 1.2 only)
Specifies the size of the media on which the image has to be printed. Thisversion 1.2 setting only, and it is replaced by Mediasize in version 2.0.
Syntax
OutputSize ( auto | <standardsize> )
Description
auto: Media is chosen with the smallest size on which the image can be printed without clipping.<standardsize>: Media with the specified standard size is requested. This argument does not set the orientation.
Default
OutputSize auto
MediaSize
Specifies the size and orientation of the media on which the image has toprinted. There are 3 possibilities:
n both size and orientation unspecified (auto)n only size specifiedn size and orientation specified
112 Océ Job Ticket Interface V2.0

dia
Syntax MediaSize ( auto | <size> )
<size> ::= ( (<size1> <size2> [<unit>]) | <standardsize> )
[<orientation>]
Description
auto: Media is chosen with the smallest size on which the image can be printed without clipping.<size1> <size2> <unit>: Media of the specified size is requested. The argument does not set the orientation.<standardsize>: Media with the specified standard size is requested. This argument does not set the orientation.<orientation>: This optional argument sets the orientation.
Default MediaSize auto
In which blocks Allowed in all blocks, but applied at the end of the pipeline.
Combination No, last one wins.
Relation with other settings MediaSize is used when AttachZoom auto is applied. The orientation is used when AttachRotate same or opposite is specified.If this requested size is not present, the setting MediaFeed determines the fallback scenario.If the MediaSource setting is specified with a tray or roll argument, then the physical media may have a different size than the requested mesize. This setting does not change the size of the logical image (except when AttachZoom auto is specified).
AddStrip
Specifies how much white space must be added to the media.
Syntax AddStrip [ leading <real> [<unit>] ]
[ trailing <real> [<unit>] ]
Difference with version 1.2 In OJT version 1.2 specifying the unit is mandatory.
Job ticket settings 113

at
at
e
done
Description Adding a strip is only applied when using rolls.leading <real> [<unit>]: Specifies the amount of white space to be added the leading edge of the media.trailing <real> [<unit>]: Specifies the amount of white space to be added the trailing edge of the media.
[47] Example
Default
AddStrip leading 0 trailing 0
In which blocks Allowed in all blocks, but applied in the machine handling.
Combination No, the last one wins.
Related settings This setting can appear in combination with RemoveStrip . RemoveStrip is processed first and removes part of thimage (leading or trailing). AddStrip adds media afterwards.AddStrip is added in addition to the cut length: when CutMethod standard is used, AddStrip is used in addition to the standard format,therefore the resulting media size is not standard. The same processing isfor CutMethod synchro or CutMethod <real> .
Remark AddStrip is applied after all the transformations. The leading and trailing edge are determined by the direction of the media transport.
MediaFeed
This setting selects a fall back strategy when the requested media is not available.
Syntax MediaFeed ( exact | size (exact | larger | smaller | any ))
Difference with version 1.2 Version 1.2 supports only MediaFeed ( exact|larger|smaller|any ) , which is the same as using
leading edge
trailing edge
directionof the mediatransport
114 Océ Job Ticket Interface V2.0

ia t
til
til
r
e e to
ent
MediaFeed size... of version 2.0.Furthermore, version 1.2 supports MediaFeed manual which has the same meaning as using MediaSource manual of version 2.0.
Description
exact: When exact is chosen, printing must be done on the required med(for all its characteristics: size, type, weight,...). If it is not available on thedevice, the images cannot be printed until the operator mounts the correcmedia.For MediaFeed size there are several fall-back strategies:size exact: Printing must be done on the required media size. If it is not available on the device, the images cannot be printed until the operator mounts the correct media.size larger: If the required media size is not available, the closest larger format is looked for. If none is available, the images cannot be printed unthe operator mounts the correct media.size smaller: If the required media size is not available, the closest smaller format is looked for. If none is available, the images cannot be printed unthe operator mounts the correct media.size any: If the required media size is not available, any other format can be chosen to print the image. Whether a larger or smaller format is looked fofirst, is machine dependent.
Default MediaFeed exact
In which blocks Allowed in all blocks, but applied in the machine handling.
Combination No, last one wins.
Relation with other settings This setting has only effect if MediaSource is set to auto .If size larger or size any is used and a larger media is chosen, theAdjustZoom argument tofit allows to scale up the image to the new media size.If size smaller or size any is used and a smaller media is chosen, thAdjustZoom parameter noclip or tofit allows to scale down the imageto the new media size (it is the default), if the user does not want the imagbe scaled down to fit in the new media, noclip or tofit must not be chosen.
Remark This setting is structured to be extended in the future. For the momonly a fall-back strategy is specified for media size. All other media
Job ticket settings 115

e
hich
is
nd
er.ets.
he
dia
ect
characteristics must be exact.Currently exact and size exact have the same meaning, but in a futurrelease, it will no longer be the case.
MediaDeposit
Specifies the output destination for media.
Syntax MediaDeposit ( auto | <outputchoice> [<outputnum>] )
<outputchoice> ::= ( sorter | stacker | mixed | belt |
special | OEM | <string> )
<outputnum> ::= <int>
Description Most machines have several outputs where media (paper, transparencies, etc.) can be deposited. This setting selects one of them. Woutputs are available is machine dependent.The output specified by MediaDeposit is a logical output. The physical output can be different when a media output map is used. This mapping machine specific and maps logical outputs to physical outputs.
auto: The machine will select an output that is appropriate for the media afinishing settings that are used.sorter: A range of bins where individual sheets can be deposited.stacker: A tray where sets can be deposited.mixed: An output that accepts a mix of formats, but is not a sorter or stackbelt: An output with a belt that moves the media. Often used for folded shespecial: An output used for special (long, thick) media. Often it is where manually fed media and error output is deposited. For ES machines it is toutput for media that is too big to be handled by other outputs.OEM: Where an external on-line finisher is (or can be) connected.<string>: A user defined name for an output. The machine dependent memap should support this name.An optional numerical value <outputnum> can follow, which is used to selone of the outputs for the specified <outputchoice>.
Examples:MediaDeposit sorter 11 bin 11 of the sorterMediaDeposit stacker 2 second stacker MediaDeposit belt 1 first belt MediaDeposit "foo" 3 output "foo" with parameter 3
116 Océ Job Ticket Interface V2.0

est that be
ted
ve, media
it ll
n
is
send ing
ndle
<outputnum> 1 is always the first normal sorter bin, stacker, etc. The highusable <outputnum> depends on the machine. If an <outputnum> is usedis higher than what is available in the machine, another <outputnum> willused (machine dependent).If the <outputnum> is missing, and there are several outputs of the selectype, the machine will select an appropriate output number, based on themedia and finishing settings that are used.
Ticket default
MediaDeposit auto
In which blocks Allowed only in output blocks.
Error handling When an output is specified which the machine doesn't haanother output is used. Which one depends on the machine and the used and finishing.
Related settings When a setting for finishing conflicts with the MediaDepossetting, the MediaDeposit setting is often ignored, but some machines wiignore the finishing setting.
For example: a mixed output is selected and Staple on is specified. This is not possible for that machine, stapling is only possible for the stacker. Ithis case the MediaDeposit mixed is ignored and the media is put in thestacker, with a staple.
On another machine sorter 8 is selected and staple on is specified. This is not possible on this machine, the staple is ignored and the media deposited in bin 8 of the sorter.
When a certain media type or size is selected, it might not be possible to it to some of the output destinations. When there is a conflict, or "auto" isused, the machine will select another output. When other media is followin the same output block, the machine may decide to send it to the sameoutput, even though it would be possible to deposit it in the previous one.
For example, an A3 is printed and MediaDeposit stacker is selected (which only accepts A4), the A3 is deposited in the mixed output. If morepages in the same output block are following, they also go to the mixed output, even when they have size A4. Note that another machine might hathis differently.
Job ticket settings 117

ut
me) ter, tal
per
CutMethod
Specifies how to cut media from a roll.
Syntax CutMethod ( standard | synchro | <custom> )
<custom> ::= ( <real> [<unit>] )
Difference with version 1.2 In OJT version 1.2 specifying the unit is mandatory.
Description Used only for rolls. The value indicates whether the paper outpmust be cut at standard size, or at the size of the image (synchro ) or at some custom size.
Default
Cutmethod synchro
In which blocks Allowed in all blocks, but applied in the machine handling.
Combination No, last one wins.
Related settings When used in combination with AddStrip , the edges are added last, so standard does not necessarily mean that the output is a standard size.
CopyMatrix (version 1.2)
This is an array that maps all supported paper sizes to another (or the sapaper size. The original size of the image is the first part of each paramethe destination size is the second part. They are separated by a colon (oc072).
This setting only has effect when the media size is either automatically selected or not explicitly set to a paper size, and automatic zooming is selected.
The different paper sizes fall into 5 categories. This means that not all pasizes can be mixed.
The categories are:
118 Océ Job Ticket Interface V2.0

0: A0, E, E+, 700mm, 707mm, 30inch1: A1, D, D+, 500mm2: A2, C, C+3: A3, B, B+4: A4, A, A+, letter, legal
For example, when you want all A0 and A1 sizes to be printed on A1, andsmaller formats on the correct size, you specify
CopyMatrix A0:A1 A1:A1 A2:A2 A3:A3 A4:A4
Syntax CopyMatrix { <orgtocopy> }
<orgtocopy> ::= <papersize>:<papersize>
Default A one-to-one mapping of all paper sizes.
Job ticket settings 119

nt.
Finishing settings
These settings deal with finishing. These settings are:
n Punchn Reinforcen Fold
Punch
Specifies whether the output must be punched or not.
Syntax
Punch ( off | on )
Description
off: No punching of output.on: Output is punched. How the punching is done is machine dependent.
Default
Punch off
In which blocks Allowed in all blocks, but applied in the machine handling.
Combination No, last one wins.
Reinforce
Specifies whether the output must be reinforced or not.
Syntax Reinforce ( off | on )
Description
off: No reinforcing of output.on: Output is reinforced. How the reinforcing is done is machine depende
Default Reinforce off
120 Océ Job Ticket Interface V2.0

e
s
In which blocks Allowed in all blocks, but applied in the machine handling.
Combination No, last one wins.
Fold
Specifies whether the output must be folded or not.
Syntax Fold ( off | on | <customfold> )
<customfold> ::=
[ method ( standard | ericsson | afnor ) ]
[ size <width> <length> [<unit>] ]
[ orientation ( auto | portrait ) ]
[ edge <real> [<unit>] ]
[ type ( first | second ) ]
Difference with version 1.2 In OJT version 1.2 specifying the unit is mandatory.
Description
off: No folding of output.on: Output is folded in a standard way. How the folding is done is machindependent.method: Selects the type of folding to have the legend on top.size: Is followed by the fold width and then the fold length.orientation: Specifies how the image must be oriented before it is folded.edge: Specifies the width of the binding edge.type: Specifies if only a first fold should be done, or a fold in both direction(which is the default).
Default
Fold off
Defaults for custom fold Fold method standard size 210 297 mm orientation auto
edge 20 mm type second
In which blocks Allowed in all blocks, but applied in the machine handling.
Combination No, last one wins.
Job ticket settings 121

Related settings AdjustRotate auto and folding results in rotating to have the legend on top.
122 Océ Job Ticket Interface V2.0

he
aced,
ngs
the
Other settings
Stamp (version 1.2)
This keyword selects the stamp mechanism of the device. If the setting is off , no stamp is printed on the output. If on is selected, a printer stamp is put oneach output page or range of pages. The position, size, and contents of tstamp are determined by the device.
If a "custom" stamp is required, three types can be selected: a printer stamp (identified by a number), a text stamp (string), or an image stamp (identified by a number).
If selection of a specific printer stamp is required, at least the stamp number must be specified. The other parameters determine where the stamp is plwhat size and color it is.
If a text stamp is selected, by means of the text parameter, the position can be specified (9 possibilities) along with the fontname , fontstyle , shift , rotate , and size settings. The first value of shift indicates the x-shift, the second the y-shift. In the text you can specify several special keywords that automatically expanded with the appropriate job or file settiat print time:
$(Account) account string$(Date ) current date$(Distribution) distribution notes$(JobName) name of the job$(Notes) operator notes$(OrigDirectory) original directory name$(OrigName) original file name$(Time) current time$(UserName) the user name
The font selection is done by mapping the name on the available fonts insystem. The default font is Courier , and the default style is regular . When the size of the text stamp is small , normal , or large this corresponds to resp. 14 pt, 28 pt, or 56 pt fonts.
Job ticket settings 123
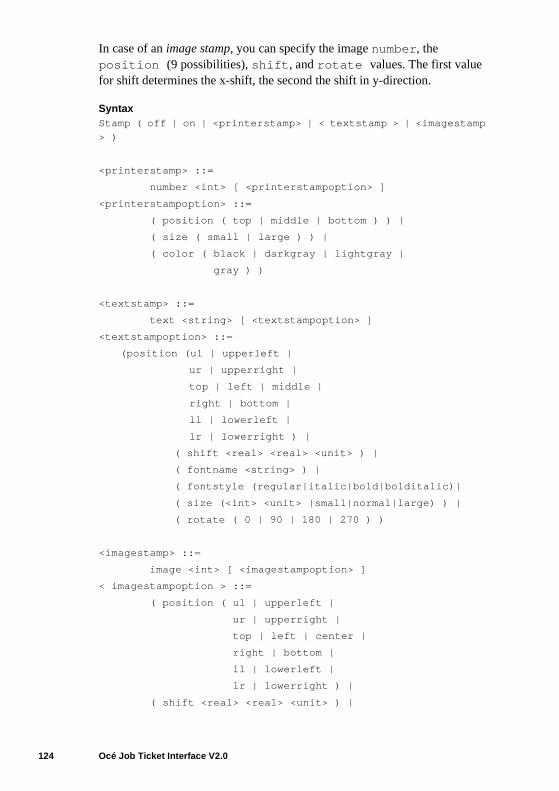
In case of an image stamp, you can specify the image number , the position (9 possibilities), shift , and rotate values. The first value for shift determines the x-shift, the second the shift in y-direction.
Syntax Stamp ( off | on | <printerstamp> | < textstamp > | <imagestamp
> )
<printerstamp> ::=
number <int> [ <printerstampoption> ]
<printerstampoption> ::=
( position ( top | middle | bottom ) ) |
( size ( small | large ) ) |
( color ( black | darkgray | lightgray |
gray ) )
<textstamp> ::=
text <string> [ <textstampoption> ]
<textstampoption> ::=
(position (ul | upperleft |
ur | upperright |
top | left | middle |
right | bottom |
ll | lowerleft |
lr | lowerright ) |
( shift <real> <real> <unit> ) |
( fontname <string> ) |
( fontstyle (regular|italic|bold|bolditalic)|
( size (<int> <unit> |small|normal|large) ) |
( rotate ( 0 | 90 | 180 | 270 ) )
<imagestamp> ::=
image <int> [ <imagestampoption> ]
< imagestampoption > ::=
( position ( ul | upperleft |
ur | upperright |
top | left | center |
right | bottom |
ll | lowerleft |
lr | lowerright ) |
( shift <real> <real> <unit> ) |
124 Océ Job Ticket Interface V2.0

flag
ither s.
he ery,
.
a
( rotate ( 0 | 90 | 180 | 270 ) )
In which blocks Only allowed in output blocks.
Default
stamp off
JobFlagsheet (version 1.2 only)
Specifies the flag sheet of a job. This setting is a version 1.2 setting only.
When multiple copies are printed all sets of the job can be provided with a sheet.
Syntax JobFlagsheet { <flagoption> }
<flagoption> ::=
{ <flagpos> } |
( name <string> } |
{ tray <int> } |
{ size <standardsize> } |
{ text <string> }
<flagpos> ::= header | trailer
Description Flag sheets (banners) are additional sheets to the job pages, ea header flag sheet in front or a trailer flag sheet at the end of a job, orboth. Flag sheets offer the possibility to display identification job attribute
When multiple copies are printed, all copies of the job are provided with tspecified flag sheets. With respect to stapling, binding, jogging, and delivflag sheets are part of the print job. A flag sheet is always simplex.
The name is used to select a flag sheet from a list of pre-defined bannersSize specifies the paper size for the banner, and tray indicates from which input tray this sheet has to be taken. To print some text on the flag sheet,specify the string with the text keyword. These parameters apply to the currently active type of flag sheet (header or trailer).
Example An example with an A4 header flag sheet containing a text, and trailer flag sheet from tray 2:JobFlagSheet trailer tray 2 header size A4 text "JOB X"
Job ticket settings 125

e "
Default No Flag sheets at front or end of the job. Default position is header .
Matrix (obsolete, version 1.2 only)
When this keyword is present in a version 1.2 job ticket, the ticket must binterpreted as a matrix job. When it does not occur, the job is an "ordinaryjob. The use of this setting can be application specific.
Syntax
Matrix
126 Océ Job Ticket Interface V2.0

d
on.
Scan settings of version 1.3
FileFormatSyntax Fileformat ( tiff [<tiffoption>] | cals [<calsoption>] )
<tiffoption> ::= [<forganisation>] [<fcompressionmethod>]
<forganisation> ::=
organisation( stripped | tiled | raw )
<fcompression> ::=
compression( group4 | group3-1D | none )
<calsoption> ::= ( type 1 | type 2 )
Description This setting indicates what kind of output file has to be createfor the scan. Therefore, it is an output block setting only.Optional parameters can be specified for file organisation and compressi
Default Fileformat tiff
+ organisation raw
+ compression none
In which blocks Only allowed in output blocks.
Examples Fileformat cals
Fileformat tiff
+ organisation stripped
+ compression group4
ResolutionSyntax
Resolution ( 200 | 300 | 400 )
Job ticket settings 127

ng.
Description This setting sets the resolution of the file that will be created.
Default Machine dependent.
In which blocks Only allowed in output blocks.
QualitySyntax
Quality( normal | superior )
Description This setting indicates the desired scanning quality: normal or superior. Selecting superior quality means no file (size) optimization is applied.
Default
Quality normal
In which blocks Only allowed in input blocks.
OrientationSyntax
Orientation( portrait | landscape )
Description This setting sets the feed orientation of the original for scanni
Default
Orientation portrait
In which blocks Only allowed in input blocks.
InputSize (version 1.3)Syntax Inputsize( <standardsize> | <customsize> )
<customsize> ::=<width> [<length> | auto] <unit>
Difference with 2.0 The first main difference between the inputsize keyword that can be used for version 1.3 scan tickets and the inputsize
128 Océ Job Ticket Interface V2.0

nly idth
ome
ile
r
he
d
keyword in version 2.0 is that there is no orientation subkeyword allowed in version 1.3, it must be specified using the separate orientation keyword. Furthermore, version 1.3 allows an automatic length detection o(see third example) instead of specifying an automatic detection of both wand length as in version 2.0.
Description This setting indicates the size of the input original.
Default
Inputsize A0
In which blocks Only allowed in input blocks.
Examples Inputsize E+
Inputsize 34 45 inch
Inputsize 847 auto mm
Type (output, version 1.3)
For input, this setting is the same as in version 1.2. For output, there are sdifferences:
Syntax
Type ( file | paper | info)
Description Specifies the type of output.When file is specified, the output goes to a file and the location of the fmust be known (specified by Directory and Name).Specification of paper means that the output is printed and goes to pape(or other media).When info is specified, the info output goes to a file and the location of tfile must be known (specified by Directory and Name in the block).
Default
Type paper
In which blocks Only allowed in output blocks.
Related settings Depending on Type , several other settings may be requireand others may be ignored.
Job ticket settings 129

130 Océ Job Ticket Interface V2.0

Océ Job Ticket V 2.0
Programmer’s Manual
Chapter 7Selecting the media
131

sical e ic , but and
rent ach
from
, nual set of
Introduction
The machine handling will select the physical media and generate the phyimage, using the attached settings of the requested image and media (threquested page). Since many settings depend on other settings, a speciforder is used. Most of these settings are the Media settings in this sectionsome other settings are also used. This is only used for output to paper (transparencies, vellum, etc.), not for output in digital form.
Each image can have a different size, and the Media settings can be diffefor each image. Therefore, the machine handling is done separately for erequested page.
If the ticket does not contain a setting for the requested media, the setting a PDL can be used.
The machine has a set of available media sources: rolls of different widthtrays with different media types, sizes and orientations, and possibly a mafeed. The settings that are attached to the image are used to reduce the usable media sources, until one is selected.
132 Océ Job Ticket Interface V2.0

d
f
dard
are
es
Media selection steps
1 The initial set of media sources that can be used is selected, using the MediaSource setting.n If a specific tray or auto trayonly is selected, only that media is put in
the set, with its size and orientation. Continue with step 4.n If a specific roll or auto rollonly is selected, only that media is put in
the set. The orientation is undefined. Continue with step 4.n If manual is selected, the set will contain all media that can be fed
manually.n Otherwise all available media in all trays and rolls that have the specifie
MediaType are put in the set.
2 If the MediaFeed setting is exact or size exact , all media that are not of the same size as the requested media size are removed from the set omedia. If MediaSize auto is attached, all media are removed that are smaller than the image size or larger than the smallest standard format inwhich the image completely fits.
If the MediaFeed size smaller setting is present, all media that are larger than the requested media size are removed from the set. If MediaSize auto is used, all media are removed that are larger than the smallest stansize in which the image size completely fits.
If the MediaFeed size larger setting is present, all media that are smaller than the requested media size are removed from the set. If MediaSize auto is used, all media that are smaller than the image size removed.
If the MediaFeed size any setting is used, then all media are kept.
3 If the AdjustRotate off setting is present, then media with the wrongorientation are removed from the set.
If the AdjustRotate productive setting is present, and at least one productive media orientation is available, the non-productive media sourcare removed from the set.
Selecting the media 133

f
ind etely, es,
eral
ize
ical is
.
ition
o the
If the AdjustRotate auto setting is present and folding is on, the set omedia is reduced to only media that make the legend appear in the right position after folding.
4 If the set of media is now empty, the operator is asked to supply the right kof media. Once this has been done, the machine handling restarts complbut now with the newly supplied media included. If there are several choicthe MediaSource auto rollfirst or MediaSource auto trayfirst setting is used to reduce the set of media. If there are still sevchoices, a machine dependent choice is made, based on not clipping theimage, productivity, etc.After these four steps the media that will be used is known. This media sand orientation are used in the following steps:
5 AdjustRotateWhen this setting specifies that rotation is allowed, and the requested logpage is in a different orientation than the selected media, the logical pagerotated.
6 AdjustZoomIf this setting is noclip or tofit , the image may be zoomed to avoid clipping, or to fit it on the selected media. This zoom is always isomorphic
7 AdjustShiftIf this setting is present, the requested page is shifted to the specified poson the selected media.
8 AddStripIf this setting is present and a roll is used, the specified amount is added tmedia size. The image is shifted by the specified leading amount.
134 Océ Job Ticket Interface V2.0

Océ Job Ticket V 2.0
Programmer’s Manual
Chapter 8Job tickets in a stream
135

the
w the nt for
re
re
Introduction
Job tickets and streams are 2 different concepts. This chapter describes mechanism how job tickets make use of the stream concept.
Job tickets can be part of a stream. One or more data segments can folloticket in the stream. An Océ Job Ticket can reference such a data segmeinput or output.
For segment input this is done by:
InputType segment
InputSegment <integer>
The InputType segment setting indicates that the input comes from asegment following the ticket in the stream. The data parts in the stream anumbered, starting from 1. The InputSegment setting specifies which datapart in the stream is used as input.
When the stream contains only one data segment, then the InputType and InputSegment settings can be omitted. In this case the default values ataken:
InputType segment
InputSegment 1
136 Océ Job Ticket Interface V2.0

the is
r
Input segmentation
The input stream or file consists of segments, the first segment containingjob ticket and the next segments containing data. The input stream or filesegmented, i.e. is split into separate parts. To make this segmentation possible, special separator strings separate the parts. There are 3 separatostrings:
*OceJobBegin begin of job
*OceJobEnd end of job
*OceJobData begin of data part
The general structure of a segmented stream or file is:
[48] Job ticket and data segments in a stream
*OceJobBegin
Océ Job T icket
data segm ent 1
*OceJobData
*OceJobEnd
data segm ent 2
*OceJobData
separator strings
Job tickets in a stream 137

n
nal.
by
oes
may
ator the
Separator strings
Syntax The syntax of the separator strings is (<ws> is a shorthand notatiofor <white space>, i.e. any combination of spaces and tabs):
[<token><ws>]*OceJobBegin[<ws><token>]<eol>
[<token><ws>]*OceJobData[<ws><token>]<eol>
[<token><ws>]*OceJobEnd[<ws><token>]<eol>
The square brackets indicate that the white space and the token are optioIf there is no token (or: the token is empty), then there is also no white space allowed.
Stream token As the syntax shows, the separator strings can be precededa stream token. This stream token is independent from the token used in the Océ Job Ticket (but they can be the same). There is one token for segmentation and another token for the OJT ticket.
The purpose of the stream token is twofold:
n to hide separator strings (e.g. handle them as PostScript comments)n to make the combination of token and separator string unique, that this
combination is not found in the data segments and that segmentation dnot accidentally split a data segment.
Varying token string The token string is fixed for one job: all the separator strings in a job are attached to the same token. But another stream or filehave a different token. This gives the possibility to make the combinationtoken/separator string unique for each job.
White space As the syntax shows, the token before the separator string may have trailing white space. The token after the separator string may have leading white space. This white space is ignored and may differ per separstring. If the token is empty, then no white space is allowed before or afterseparator string. The token itself may have embedded white space.
138 Océ Job Ticket Interface V2.0
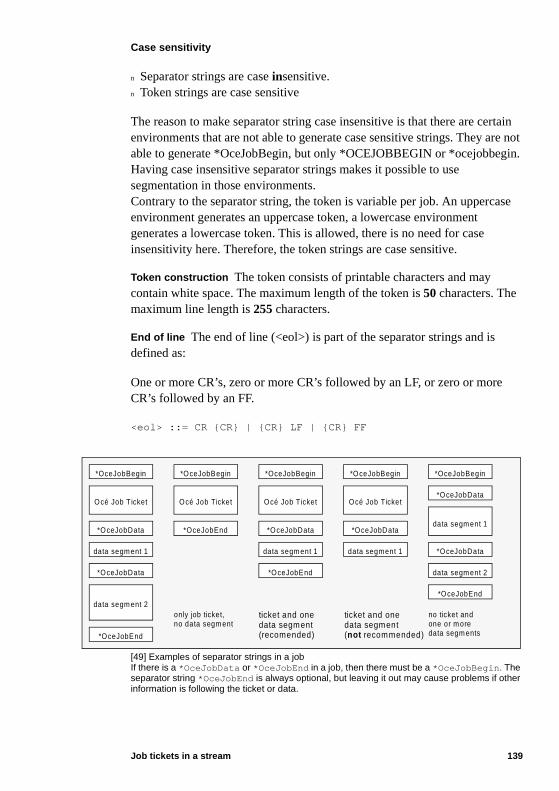
rtain re not in.
se
Case sensitivity
n Separator strings are case insensitive.n Token strings are case sensitive
The reason to make separator string case insensitive is that there are ceenvironments that are not able to generate case sensitive strings. They aable to generate *OceJobBegin, but only *OCEJOBBEGIN or *ocejobbegHaving case insensitive separator strings makes it possible to use segmentation in those environments.Contrary to the separator string, the token is variable per job. An uppercaenvironment generates an uppercase token, a lowercase environment generates a lowercase token. This is allowed, there is no need for case insensitivity here. Therefore, the token strings are case sensitive.
Token construction The token consists of printable characters and may contain white space. The maximum length of the token is 50 characters. The maximum line length is 255 characters.
End of line The end of line (<eol>) is part of the separator strings and is defined as:
One or more CR’s, zero or more CR’s followed by an LF, or zero or moreCR’s followed by an FF.
<eol> ::= CR {CR} | {CR} LF | {CR} FF
[49] Examples of separator strings in a jobIf there is a *OceJobData or *OceJobEnd in a job, then there must be a *OceJobBegin . The separator string *OceJobEnd is always optional, but leaving it out may cause problems if other information is following the ticket or data.
*OceJobBegin
Océ Job T icket
data segm ent 1
*OceJobData
*OceJobEnd
data segm ent 2
*OceJobData
*OceJobBegin
Océ Job Ticket
*OceJobEnd
*OceJobBegin
Océ Job T icket
data segm ent 1
*OceJobData
*OceJobEnd
only job ticket,no data segm ent
no ticket and
data segm ent 1
ticket and onedata segment
ticket and onedata segment
*OceJobBegin
*OceJobData
*OceJobEnd
one or m oredata segm ents
*OceJobData
data segm ent 2
*OceJobBegin
Océ Job Ticket
data segment 1
*OceJobData
(recomended) (not recommended)
Job tickets in a stream 139

e
.
f rts a
n and nt and
Start of job A segmented job starts when the *OceJobBegin string is recognized. This begin of job also specifies the token, which is fixed for threst of the job. When again a *OceJobBegin string is recognized (possibly with another valid token), then the next job starts. If there was not a recognized *OceJobEnd , then the previous job may have been truncated
Start of data The data starts after the *OceJobData separator string. Note that the (optional) token and the <eol> following the *OceJobData are part of the separator string and are not part of the data.Every data segment must be preceded by the *OceJobData separator string.
End of job The job ends after the *OceJobEnd separator string. Note that the (optional) token and the <eol> following the *OceJobEnd are part of the separator string and are not part of the next job.The *OceJobEnd separator string is not mandatory. If a new valid start ojob is found, then the segmentation process ends the current job and stanew job.Note that if there is a *OceJobData or *OceJobEnd in a job, then there must be a *OceJobBegin before it. The separator strings *OceJobData and *OceJobEnd are only recognized when the separator string *OceJobBegin is before it. The separator string *OceJobEnd is optional, but leaving it out may cause problems if other information is following the ticket or data.It is recommended having the *OceJobEnd separator string to avoid that data following the job, is appended to the last segment.
File versus stream A file has a specified begin and end. A stream is a continuous sequence of characters. For a file we do not really need a begiend separator string. But we want to have the segmented jobs independefrom the channel and therefore we don't make a distinction between a filea stream.
140 Océ Job Ticket Interface V2.0

Océ Job Ticket V 2.0
Programmer’s Manual
Chapter 9Summary of technical terms
141

ed ut f
ock.
. e
n
ck.
ory
e te
. See
ite ted
Glossary
Primary input Without merging, all job input would be primary input. This primary input is (possibly) modified by the settings in the job ticket and usas job output. Primary input is used as basis for merging. The primary inpdetermines the number of logical images and the sizes and orientations othese logical images. The pipeline of a primary input ends in an output bl
Merge input The merge input is job input that is merged with primary inputThe pipeline of a secondary input ends when it is merged in any block. Thsame job input may be used both as primary and as merge input.
Destination The destination is the requested logical image when printing othe media. The destination is the primary input when merging.
Pipeline A pipeline is the sequence of blocks from input to output. For merging, a pipeline is the sequence of blocks from input to the merge bloThe end of the pipeline is after the output block for primary input or when merging for the merge input.
Path separator A character that separates two directory names, or a directname and a file name. Often it is ‘/’ or ‘\’, but ‘:’ can also be used.
Portrait orientation A logical image or page is portrait oriented when the sizin the X direction is smaller than the size in the Y direction. See ‘Coordinasystem’ on page 19.
Landscape orientation A logical image or page is landscape oriented whenthe size in the X direction is greater than the size in the Y direction. See ‘Coordinate system’ on page 19.
Same orientation Two images, or an image and media, have the same orientation when both are portrait oriented or both are landscape oriented‘Rotate’ on page 94.
Opposite orientation Two images, or an image and media, have the opposorientation when one is portrait oriented and the other is landscape orien(or the other way around). See ‘Rotate’ on page 94.
Bounding box The bounding box is defined as the area limited by the rectangle surrounding all the objects of a drawing.
142 Océ Job Ticket Interface V2.0

Océ Job Ticket V 2.0
Programmer’s Manual
Chapter 10Examples
143

r ype
Example 1
A single copy of the data (print or plot) is printed on paper. The default foInputType is segment, the default for Segment is 1, the default for OutputTis paper, the default for Copies is 1.
BeginTicket 2.0
BeginOutput
EndOutput
EndTicket
144 Océ Job Ticket Interface V2.0

e size
Example 2
Files f1 and f2 (which are referenced) are forced to emulation HP-GL. Thfirst is printed on A0, the second on A1 paper. Both files are scaled to the of the paper. The files are printed in the following order: f1 f2 f1 f2.
BeginTicket 2.0
InputType file
InputDirectory "e:\\users\\acad\\plot"
InputEmulation HPGL
AttachZoom auto
BeginBlock 1
InputName f1
MediaSize A0
EndBlock
BeginBlock 2
InputName f2
MediaSize A1
EndBlock
BeginOutput
IncludeBlock 1 2
Copies 2
EndOutput
EndTicket
Examples 145

1, f the
Example 3
A matrix job with different recipients and different output paper sizes. Thefirst set (of 2 documents) is printed on the “correct” size, the second on Aand then 2 sets on A0 size. An automatic zoom is done towards the size opaper. Note that the emulation is automatically recognized.
[50] Example: Matrix job with different recipients and different output paper sizes
BeginTicket 2.0
InputType file
InputDirectory "e:\\users\\acad\\plot"
AttachZoom auto
BeginBlock 1
InputName f1
EndBlock
BeginBlock 2
InputName f2
EndBlock
BeginOutput
Comment AttachZoom auto + MediaSize auto results
+ in zoom 100%
IncludeBlock 1 2
EndOutput
BeginOutput
IncludeBlock 1 2
MediaSize A1
EndOutput
BeginOutput
IncludeBlock 1 2
MediaSize A0
Copies 2
InputType fileInputDirectory"e:\\users\\acad\\plot"
f1
f2InputType fileInputDirectory"e:\\users\\acad\\plot"
AttachZoom auto
AttachZoom autoMediaSize A1
Copies 2AttachZoom autoMediaSize A0
146 Océ Job Ticket Interface V2.0

ct the ates
EndOutput
EndTicket
The first output block generates f1 and f2 (with zoom 100%) on the corremedia size. The second output block generates f1 and f2 on A1 paper. If images are larger than A1, they are clipped. The third output block generf1 f2 f1 f2 on A0 paper.
Examples 147

mes aper.
Example 4
A matrix job with 3 input files f1, f2 and f3. The first output block prints f1 and f2 4 times on A4 paper. The second output block prints f1 and f3 10 tion A0 paper and folds them. All the images are scaled to the size of the p
[51] Example: Matrix job with 3 input files printed on different paper sizes
BeginTicket 2.0
InputType file
InputDirectory "e:\\users\\acad\\plot"
AttachZoom auto
BeginBlock 1
InputName f1
EndBlock
BeginBlock 2
InputName f2
EndBlock
BeginBlock 3
InputName f3
EndBlock
BeginOutput
IncludeBlock 1 2
Copies 4
MediaSize A4
EndOutput
BeginOutput
IncludeBlock 1 3
Copies 10
MediaSize A0
Fold method standard
EndOutput
InputType fileInputDirectory"e:\\users\\acad\\plot"
f1
f2
f3
InputType fileInputDirectory"e:\\users\\acad\\plot"
InputType fileInputDirectory"e:\\users\\acad\\plot"
Copies 10AttachZoom autoMediaSize A0Fold standard
Copies 4AttachZoom autoMediaSize A0
148 Océ Job Ticket Interface V2.0

EndTicket
Examples 149
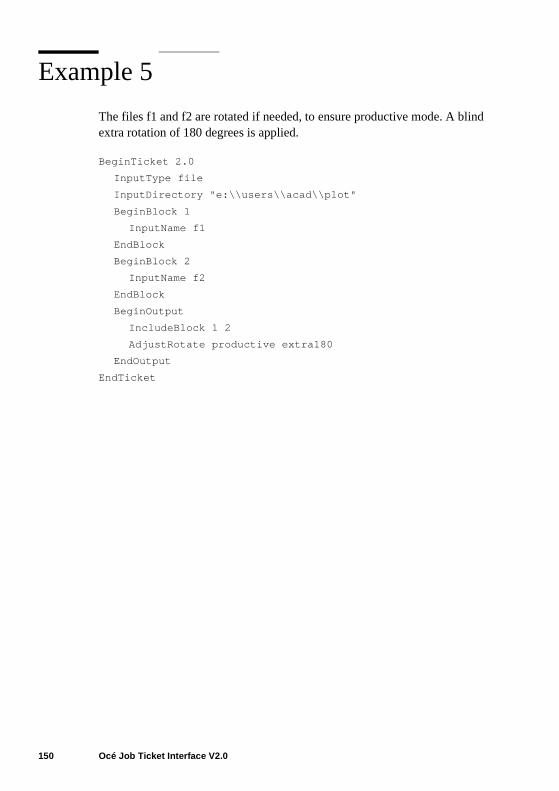
ind
Example 5
The files f1 and f2 are rotated if needed, to ensure productive mode. A blextra rotation of 180 degrees is applied.
BeginTicket 2.0
InputType file
InputDirectory "e:\\users\\acad\\plot"
BeginBlock 1
InputName f1
EndBlock
BeginBlock 2
InputName f2
EndBlock
BeginOutput
IncludeBlock 1 2
AdjustRotate productive extra180
EndOutput
EndTicket
150 Océ Job Ticket Interface V2.0

on
Example 6
The files f1 and f2 are scaled to fit A3 size. Then they are positioned to fitA2 paper.
BeginTicket 2.0
InputType file
InputDirectory "e:\\users\\acad\\plot"
BeginBlock 1
InputName f1
EndBlock
BeginBlock 2
InputName f2
EndBlock
BeginOutput
IncludeBlock 1 2
Zoom to A3
MediaSize A2 portrait
AttachShift center
EndOutput
EndTicket
Examples 151

d
Example 7
File f1 is printed from tray 2, file f2 is printed from roll 2. Both files are foldewith the standard method and are deposited on belt 1.
BeginTicket 2.0
InputType file
InputDirectory "e:\\users\\acad\\plot"
BeginBlock 1
InputName f1
MediaSource tray 2
EndBlock
BeginBlock 2
InputName f2
MediaSource roll 3
EndBlock
BeginOutput
IncludeBlock 1 2
Fold method standard
MediaDeposit belt 1
EndOutput
EndTicket
152 Océ Job Ticket Interface V2.0

ted
t
Example 8
Both files f1 and f2 are folded with the standard method. File f1 is deposion belt 1 and file f2 is deposited on belt 2. Note in this example that, as MediaDeposit can only be used in an outpublock, it is necessary to create 2 output blocks.
BeginTicket 2.0
InputType file
InputDirectory "e:\\users\\acad\\plot"
BeginBlock 1
InputName f1
EndBlock
BeginBlock 2
InputName f2
EndBlock
BeginOutput
IncludeBlock 1
MediaDeposit belt 1
Fold method standard
EndOutput
BeginOutput
IncludeBlock 2
MediaDeposit belt 2
Fold method standard
EndOutput
EndTicket
Examples 153

ket. 25%.
Example 9
This example refers to the files f1 and f2, which are appended after the ticThe images from f1 are zoomed 50%, the images from file 2 are zoomed
BeginTicket 2.0
InputType segment
Comment “The line above is the default, not mandatory”
InputEmulation HPGL
BeginOutput
InputSegment 1
Zoom 50
EndOutput
BeginOutput
InputSegment 2
Zoom 25
EndOutput
EndTicket
154 Océ Job Ticket Interface V2.0

lly cker.
Example 10
Another example of a job ticket in a stream. Here f1 is mirrored horizontaand both files are rotated 90 degrees. Then they are deposited in the staEmulation is forced to HP-GL.
[52] Example: f1 mirrored
BeginTicket 2.0
InputEmulation HPGL
BeginBlock 1
InputSegment 1
AttachMirror horizontal
Comment Mirroring is performed at end of pipeline
EndBlock
BeginBlock 2
InputSegment 2
EndBlock
BeginOutput
IncludeBlock 1 2
Rotate 90
MediaDeposit stacker
EndOutput
EndTicket
InputType segmentInputSegment 1AttachMirror horizontal
InputType segmentInputSegment 2
Rotate 90MediaDeposit stacker
attachedf1
f2
Examples 155

156 Océ Job Ticket Interface V2.0

Océ Job Ticket V 2.0
Programmer’s Manual
Chapter 11Supported Océ Job Ticket keywords
157

Overview of supported keywords in subsequent versions
Océ Job Ticket1.2 1.3 2.0
Structure KeywordsBeginBlock * * *BeginOutput * * *BeginTicket * * *EndBlock * * *EndOutput * * *EndTicket * * *IncludeBlock * * *Other KeywordsAccount * * *AddStrip * * *AdjustRotate *AdjustShift *AdjustZoom *ASCII * * *AttachMirror *AttachRotate *AttachShift *AttachZoom *CalComp * * *Collate * * *Comment * * *Copies * * *CopyMatrix * * *Copyright * * *CreationAppl * * *CutMethod * * *Directory * *Distribution * * *Emulation * *FileFormat *FlagSheet * * *Fold * * *HPGL * * *HPGL/2 * * *ImageSize *InputDirectory *InputEmulation *InputName *InputSegment *InputSize * *InputType *JobCollate * * *JobCopies * * *JobCovers * * *JobFlagsheet * * *JobName * * *
158 Océ Job Ticket Interface V2.0

Matrix * *MediaDeposit *MediaFeed * * *MediaSize *MediaSource *MediaType * * *Mirror * * *Name * *Notes * * *Orientation *OrigDirectory * *OrigInputDirectory *OrigInputName *OrigInputType *OrigName * *OutputDirectory *OutputEmulation *OutputName *OutputSize * *OutputType *Pens * * *Punch * * *Quality *Reinforce * * *RemoveStrip * * *Resolution *Rotate * * *Shift * * *Stamp * * *Type * *Unit *UserName * * *Zoom * * *
Supported Océ Job Ticket keywords 159

Overview of supported keywords in the applications
Repro Station
Scan Station9400
Scan Station9800
9600 9600
3.x 3.0 3.1 1.x 2.0Océ Job Ticketsupported version 1.2 1.3 1.3 2.0 2.0Structure KeywordsBeginBlock * * * * *BeginOutput * * * * *BeginTicket * * * * *EndBlock * * * * *EndOutput * * * * *EndTicket * * * * *IncludeBlock * 1 * 1 * 1 * 1 * 1
Other KeywordsAccount * * *AddStrip * * *AdjustRotate * *AdjustShift * *AdjustZoom * *ASCII * * *AttachMirror * *AttachRotate * *AttachShiftAttachZoom * *CalComp * * *Collate * * *Comment * * * * *Copies * * *CopyMatrix *Copyright * * *CreationAppl * * *CutMethod * * *Directory * * *Distribution *Emulation * * *FileFormat * *FlagSheetFold * * *HPGL * * *HPGL2 * * *ImageSizeInputDirectoryInputEmulation * *InputNameInputSegment * *InputSize *InputType segment segment
160 Océ Job Ticket Interface V2.0

his can
Note: 1The number of reference levels in these applications is limited to 1. Tmeans that blocks referenced (or 'included') by the layer of output blocks not reference other blocks again.
JobCollate *JobCopies *JobCovers *JobFlagsheet *JobName * * *Matrix *MediaDeposit *MediaFeed * size sizeMediaSize * *MediaSource * *MediaType * * *Mirror *Name * * *Notes * * *Orientation *OrigDirectory *OrigInputDirectoryOrigInputNameOrigInputTypeOrigName *OutputDirectoryOutputEmulationOutputNameOutputSize *OutputType Paper PaperPens * * *Punch * * *Quality * *Reinforce * * *RemoveStrip * * *Resolution * *Rotate *Shift *Stamp *Type * * *Unit * *UserName * * * * *Zoom *
Supported Océ Job Ticket keywords 161

162 Océ Job Ticket Interface V2.0

Océ Job Ticket V 2.0
Programmer’s Manual
Chapter 12Océ applications
163

/
ts
ces k et cé
ion.
d
Handling print job tickets in Job DirectorRepro Station
Ticket version 1.2 Océ Job Director/Repro Station release 3.x only supporOcé Job Tickets of version 1.2.
Writing job tickets Because the job ticket can be a separate file that refereninput files, it is sometimes difficult to move a job ticket without losing the linto the referenced files. Only when the information is appended to the tickthe coupling is straight forward (not supported by the current release of ORepro Station). For this reason, the Name/Directory and OrigName/OrigDirectory are used.
[53] Job Director and Repro Station
The diagram above shows two applications, Job Director and Repro StatJob Director creates a job ticket which contains a reference to file_a in directory A.
If this job ticket is saved (job ticket 1), both OrigDirectory and Directory will be "A". Also, both OrigName and Name will be "file_a".
If Job Director sends the job to Repro Station, a new job ticket will be createwith OrigDirectory "A" and OrigName "file_a" (job ticket 2). Job Director
file_a
directory A
file_x
directory Q
jobdirector
reprostation
w rite -read
w riteread
BeginTicket 1.2OrigDirectory AOrigName file_aDirectory QName file_x
EndTicket
BeginTicket 1.2 OrigDirectory A OrigName file_a Directory A Name file_a
EndTicket
job ticket 1 job ticket 2
164 Océ Job Ticket Interface V2.0

e,
lt k
t
ting her ess.
iles job.
ould will the
t e te
also copies file_a to directory Q and the file will be called "file_x". ThereforDirectory will be "Q" and Name will be "file_x".
If directory Q is not specified in the job ticket, Repro Station uses a defaudirectory (subdirectory PRFILES). When files are written across a networinto a directory, it is advised to not specify the Directory keyword. The two systems may refer to the same directory with a different name.
For example: Job Director on PC 1 writes print files to directory h:\inqueue, and Repro Station on PC 2 reads the data from directory g:\inqueue. Directory can only be used when it is absolutely sure that the recipienrefers to the directory in exactly the same way.
Unique job ticket file name When a job ticket is written to the Repro Stationqueue, it must have a unique file name. Otherwise it may overwrite an exisjob or print file that is present in the queue, or it may be overwritten by otfiles. The application that generates the job ticket must assure its uniquen
Also the print files that belong to the job must be unique (in the PRFILESdirectory). The application that copies these files should never overwrite fthat are present in the queue since they probably belong to another print
So the Job Director-like applications should make sure to use unique file names for both the job ticket as well as the associated print files. Also it shmake sure that print files are present in the queue directory, before the jobbe processed by Repro Station. A mechanism to achieve this is shown infollowing procedure:
t Ensuring unique job ticket file names
1 Determine an initial job name, e.g. user0000.2 Check if this name is already used by checking the existence of files
user0000.* in the queue.3 If files already exist, find a new unique name, let’s say user0043.4 Write an “empty” job ticket in the queue, i.e. a job ticket file user043.jt tha
does not yet contain the EndTicket keyword. This reserves the name in thqueue, so other applications will not use the same name anymore. It alsoprevents Repro Station from starting to print this job when it is not compleyet.
5 Copy all print files to the PRFILES directory and give them new names user0043.000, user0043.001, etc.
6 Fill in the remainder of the settings in the user0043.jt job ticket (includingreferences to the correct files) and add the EndTicket keyword. This is a signal for Repro Station that the job is complete and can be processed.
Océ applications 165

st nal
nd
Deleting job tickets When a job ticket has to be deleted, the application muknow if it can also remove the referenced files. The rule is that if the originame (plus directory) is equal to the name, the file may not be deleted. But if these names differ, the file has been copied especially for the job ticket acan be removed.
166 Océ Job Ticket Interface V2.0

se 800, nt the
.
n, .
if ed. they
on
estart
Scanning with Océ Scan Station
Océ has developed a number of software products for the Printroom. Theproducts aim at making productive use of Océ’s ES equipment, the Océ 99700, and 9400. The strength of these software products is that they acceproductive nature of our equipment. The products involved are:
- Océ Scan Station 9700/9800, R3.1 and higher
- Océ Scan Station 9400, R3.0 and higher
The application
Scan Station can operate in 2 modes: manual mode and automatic mode
Manual mode In manual mode, you have to start a scan job in Scan Statiomake settings in Scan Station, scan the originals, and then stop scanning
Automatic mode In automatic mode, Scan Station looks in the input queuethere are any scan jobs to process. When it finds a scan job, it is processWhen the job is finished it starts processing the next job until there are nomore jobs to process. You do not need to make settings in Scan Station; are taken from the scan job ticket.
You start Scan Station in automatic mode by specifying some parametersthe command line when you launch the application:
ocestf98 [ -Scantickets <directory> [ terminate ] ]
or: ocestf94 [ -Scantickets <directory> [ terminate ] ]
dependent of the machine that is used.
You can specify a separate icon or shortcut for Scan Station to start it in automatic mode. If you specify the keyword "terminate" on the command line, Scan Stationwill automatically close when it has processed all scan jobs that are in thequeue directory. If you do not specify this, then Scan Station will switch tomanual mode when the last scan job is processed. You have to exit and rScan Station to get back to automatic mode.
Océ applications 167

ady or the n to
job r in de.
scan ot
leted new
Scan al
start
The following diagram explains this "logic".
[54] Manual and automatic mode
In the main window of Scan Station in automatic mode, the Start button isinitially disabled. The Stop button is enabled because the application alrehas build up a connection to the scanner. No scan settings can be made fOcé 9700/9800. For the Océ 9400 original format related settings can bemade. The space is used to present an identification of the original to scathe user. This information includes the name of the original and the scan settings. Also a picture indicates the status of the machine. When a scanis being processed, you see a piece of paper moving through the scannethis window. Scanned files are shown in the list box just like in manual mo
The Skip button can be used to go to the next scan request (in the same job or the next scan job). You can use this when the original is presently navailable, and you want to continue processing the remainder of the job.
Note: These skipped scan requests are not remembered and the job is dewhen the last scan is made (or skipped). To scan the skipped originals, ascan job must be made.
You can choose Stop to quit processing the current jobs. This means that Station will not process the next job. It will either terminate or go into manumode.
When Scan Station has been stopped in the middle of a job, next time youScan Station in automatic mode in the same directory, it will ask you:
exit
(ready | Stop) & terminate
ocestf98 -Scantickets A
(ready | Stop) & not terminate
automatic mode
manual mode
ocestf98
168 Océ Job Ticket Interface V2.0

d (or
e enters era.
ed
y , ny the
-to start where it left off last time-start with the first job in the queue-skip the last uncompleted job, and continue with the next
If a scan job has been processed completely, i.e. when all files are scanneskipped), the job is deleted from the queue.
The scanning process
The picture below shows the scanning process.
[55] Scanning process
The scan job ticket (containing scan requests) originates from the EDM application. The EDM manager (EDM operator) has entered a number of references to drawings in the system which are only available on paper. Hselects one or more of them and specifies that they must be scanned. He the name of the original drawing, the requested file type, resolution, etcetThen he issues a scan ticket to the queue.
Scan Station monitors the queue and receives the scan ticket. The requirsettings are automatically sent to the scanner. The scanner operator is informed which drawing must be scanned. He does not need to make ansettings in Scan Station anymore. However, he can make settings on thescanner operator panel to determine several settings like light/dark, zoometcetera. He then makes the scan and checks the quality in the viewer. Aadditional hard copies are automatically generated, or are determined by
ScanStation
scannerprinter
EDMapplication
queue
scannedfile
infofile
scanticket
original
copies
Océ applications 169

d in
ts of can
et,
s
file,
operator. The scanned file is written to the disk with the name as specifiethe scan ticket. Also an information file can be generated which contains logging data for this scan.
The EDM system, or the EDM operator, can monitor the directory where scanned files are expected to appear. Alternatively, it can poll the contenthe info file(s) to determine if the scan is available. Then the scanned filesbe automatically archived (put in the vault).
The only manual actions are:
- The definition of the scan job - The feeding of the originals. - All other steps are automated.
Although here an EDM system is shown as the originator of the scan tickthis can be any application.
‘Scan’ tickets for Océ Scan Station
This chapter contains some scan job tickets from the Engineering Systemenvironment, to be used with Océ Scan Station.
Example 1 A scan job which scans one original and produces the scanneda chackplot, and an information file.
BeginTicket 1.3
...
Comment “Default settings”
Resolution 400
FileFormat TIFF organisation stripped
+ compression group4
Directory "d:\\MyOrganisation\\Scans"
...
BeginBlock 1
Comment “The original identification”
Type paper
Name "2372-rev 2.1"
EndBlock
BeginOutput
170 Océ Job Ticket Interface V2.0

Comment “The settings for the scanned file”
IncludeBlock 1
Type file
Name "Rev21Scan.tif"
Directory "d:\\MyOrganisation\\Cruise"
Resolution 200
FileFormat TIFF organisation stripped
+ compression group4
InputSize A0
Account "Railroad Company"
UserName "John Parker"
Quality superior
Orientation portrait
EndOutput
BeginOutput
Comment “The settings for the checkplot”
IncludeBlock 1
Type paper
Account "Railroad Company"
UserName "Rob Heemels"
EndOutput
BeginOutput
Comment: The settings for the information file
IncludeBlock 1
Type info
Name "Rev21Scan.inf"
EndOutput
EndTicket
Example 2 A scan job which scans several originals and produces only scanned files.
BeginTicket 1.3
Directory c:\\scans
UserName “S. Hogarth”
Resolution 400
FileFormat CALS type 1
Resolution 400
Océ applications 171

Quality superior
BeginBlock 1
Type paper
Name "drawing 7040628\n version 2"
EndBlock
BeginBlock 2
Type paper
Name "drawing 7040629\n version 3"
EndBlock
BeginBlock 3
Type paper
Name "drawing 7040632\n version 1"
EndBlock
BeginBlock 4
Type paper
Name "drawing 7040645\n version 12"
EndBlock
BeginBlock 5
Type paper
Name "drawing 7040646\n version 1"
EndBlock
BeginOutput
IncludeBlock 1
Type file
Name "7040628-02.tif"
EndOutput
BeginOutput
IncludeBlock 2
Type file
Name "7040629-03.tif"
EndOutput
BeginOutput
IncludeBlock 3
Type file
Name "7040632-01.tif"
EndOutput
BeginOutput
IncludeBlock 4
172 Océ Job Ticket Interface V2.0

Type file
Name "7040645-12.tif"
EndOutput
BeginOutput
IncludeBlock 5
Type file
Name "7040646-01.tif"
EndOutput
EndTicket
Océ applications 173

174 Océ Job Ticket Interface V2.0

Index
Aalignment point 31, 50
Bblock
block structure 14input block 15intermediate block 15output block 15
Cclipping 20
Ddefault
levels 54values 13
destination 33
Eend of a pipeline 34
Hheight 19
Iimages
requested logical images 16
inputconcatenation 26merge input 17, 25, 28primary input 17, 25, 28
Jjob 12job ticket 13job ticket, file names 165job ticket, writing 164
Llandscape 19last one wins 34logical images 16
Mmachine handling 16, 38
Ppipeline 17, 22
end of the pipeline 17portrait 19processing
attached processing 22combinations 23concatenation 68immediate processing 22processing order 29
Rreference point 19
Index 175

Ssettings
account 69addstrip 113adjustrotate 96adjustshift 106adjustzoom 103ascii 77beginblock 66beginoutput 66beginticket 65calcomp 78collate 73comment 70copies 74copymatrix (version 1.2) 118copyright 70creationappl 70cutmethod 118directory (version 1.2) 87, 109distribution (version 1.2) 71emulation (version 1.2) 108endblock 66endoutput 66endticket 65fileformat 127fold 121hpgl 80hpgl2 80includeblock 67inputdirectory 87inputemulation 86inputname 88inputsegment 86inputsize 89inputsize (version 1.3) 128inputtype 84jobcollate (version 1.2 only) 75jobcopies (version 1.2 only) 75jobflagsheet (version 1.2 only) 125jobname 71matrix (obsolete, version 1.2 only) 126mediadeposit 116mediafeed 114mediasize 112mediasource 111
mediatype 110mergeblock 68mirror 92name (version 1.2) 88, 109notes 71orientation 128origdirectory (version 1.2) 88originputdirectory 87originputname 88originputtype 85origname (version 1.2) 89outputdirectory 108outputemulation 108outputmirror 93outputname 109outputrotate 95outputshift 105outputsize (obsolete, version 1.2 only) 112outputtype 107outputzoom 101pens 81punch 120quality 128reinforce 120removestrip 90resolution 127rotate 94shift 104stamp (version 1.2) 123type (version 1.2) 85, 107type (version 1.3) 129unit 73username 72zoom 99
standard size 50
Wwidth 19
176 Océ Job Ticket Interface V2.0

Index 177