How to set up the iPAD for sharing data via Wifi with a...
24
How to set up the iPAD for sharing data via Wifi with a navigation program running on a computer. It is possible to set up the iPad with the iNavx application and a Windows computer in such a way that the NMEA 0183 data stream received by the PC navigation program via a COM port is also received by the iPad via Wifi. In most cases this can be achieved without purchasing any extra equipment. You may already have a Brookhouse NMEA 0183 multiplexer for combining data from a GPS, sailing instruments, AIS and other NMEA talkers to a single data stream to feed PC navigation programs such as Maxsea, Nobeltec, SOB, Maptech, WinGPS, Seaclear, Oziexplorer or one of the many others via a COM port or via USB. The multiplexer is not a prerequisite, but in order to feed the iPad via Wifi, all data needs to be available in the computer as a single combined data-stream received via a COM port, or a virtual COM port if the data is received via USB or bluetooth. The following instructions show how to share this data stream with an iPad via Wifi, thereby creating an extra navigation screen with features that come very close to a full- featured chart-plotter that can be used anywhere on the boat. Prerequisites are: • The (Windows) computer has to support Wifi. Most laptops do. If not, a low- cost Wifi USB dongle can be purchased for around $25.00. • Program VSPE (Virtual Serial Ports Emulator). This free program (the 32-bit version) is kindly made available by Eterlogic and can be downloaded from their website www.eterlogic.com . • An iPAD. As external GPS data will be used, the iPad Wifi only model suffices. The following assumptions are made: • The Windows version is XP. The procedures for other Windows versions may vary. • The wireless network card has already been installed and Windows is used for management of the wireless network. This is often referred to as WZC (Windows Zero Configuration)
Transcript of How to set up the iPAD for sharing data via Wifi with a...

How to set up the iPAD for sharing data via Wifi with a navigation
program running on a computer. It is possible to set up the iPad with the iNavx application and a Windows computer in such a way that the NMEA 0183 data stream received by the PC navigation program via a COM port is also received by the iPad via Wifi. In most cases this can be achieved without purchasing any extra equipment. You may already have a Brookhouse NMEA 0183 multiplexer for combining data from a GPS, sailing instruments, AIS and other NMEA talkers to a single data stream to feed PC navigation programs such as Maxsea, Nobeltec, SOB, Maptech, WinGPS, Seaclear, Oziexplorer or one of the many others via a COM port or via USB. The multiplexer is not a prerequisite, but in order to feed the iPad via Wifi, all data needs to be available in the computer as a single combined data-stream received via a COM port, or a virtual COM port if the data is received via USB or bluetooth. The following instructions show how to share this data stream with an iPad via Wifi, thereby creating an extra navigation screen with features that come very close to a full-featured chart-plotter that can be used anywhere on the boat. Prerequisites are:
• The (Windows) computer has to support Wifi. Most laptops do. If not, a low-cost Wifi USB dongle can be purchased for around $25.00.
• Program VSPE (Virtual Serial Ports Emulator). This free program (the 32-bit version) is kindly made available by Eterlogic and can be downloaded from their website www.eterlogic.com .
• An iPAD. As external GPS data will be used, the iPad Wifi only model suffices. The following assumptions are made:
• The Windows version is XP. The procedures for other Windows versions may vary.
• The wireless network card has already been installed and Windows is used for management of the wireless network. This is often referred to as WZC (Windows Zero Configuration)

Wireless networks settings on the PC Go to Control Panel and double-click on Network Connections. The following window appears.
Right-click on Wireless Networks and click Properties. The Wireless Network Connection Properties window appears. Select the General tab. Scroll to Internet Protocol (TCP/IP) and double-click this item. The Internet Protocol
(TCP/IP) Properties window appears (see below).

Tick the fields and enter the values as indicated. Click OK Back to the Wireless Network Connection Properties window Select the Wireless Networks tab. Tick Use Windows to configure my wireless network
Click Add
The Wireless network properties window appears (see below).

Select the Association tab. Choose a meaningful name for the Network name (SSID) and select other fields as indicated.
Optionally, select the Connection tab and tick Connect when this network is in range. This setting determines whether the network is automatically connected or on demand. Click OK
The newly named SSID NMEA 0183 Server will appear under Preferred Networks
(see below). Highlight NMEA 0183 Server and click Advanced at the bottom of the window. The Advanced window appears (see below)

Tick Computer-to-computer (ad hoc) networks only. Click Close
Back in the Wireless Network Connection Properties window, Select the Advanced tab. The Windows Firewall window appears (see below).

Under the General tab, tick On (recommended)
Select the Exceptions tab. Click Add Port (see below)

In the Add a Port window, enter the fields as indicated. Click Change Scope In the Change Scope window tick My network (subnet) only. Click OK in the Change Scope window. Click OK in the Add a Port window VSPE now appears under Programs and Services (see below).

Click OK in the Windows Firewall window. Click OK in the Wireless Network Connection Properties window. Back in the Network Connections window, where we started, right-click on Wireless
Network Connection again and now click View Wireless Netwoks. Under the available networks (Choose a wireless network) the “network” NMEA 0183 Server has appeared. (see below).

Later on, we will highlight NMEA 0183 Server and click on Connect. This is not useful at this stage yet, as we first have to prepare the server program and the iPad.

Prepare the TCP/IP server software (VSPE) First of all, we need to know which COM port (“real” serial COM port or virtual COM port) is being used for NMEA input in the navigation program. This COM-port number can be found in the navigation program’s setup or configuration section. If it is a virtual COM port for USB or bluetooth communication, make sure that the USB or bluetooth device is connected to the computer You can also check under Control panel > System > Hardware > Device Manager > Ports (COM and LPT). Any currently defined ports are listed here. In the following discussion, it is assumed that the COM port for NMEA 0183 input is COM4. If it is a different number, change all occurrences of COM4 accordingly. It is also assumed, that COM5 is non-existing. If this is not the case, change all occurrences of COM5 to a non-existing COM port number.
Program VSPE Start the earlier downloaded and installed program VSPE and in the main window, click on Device in the menu bar at the top of the window. A window with the title Specify
Device Type appears (see below).

In the drop-down menu Device type, select Splitter. Click Next

In the drop-down menu Virtual serial port select COM5 In the drop-down menu Data source serial port select COM4 Tick/untick other options as indicated. Click Settings Select the port settings as indicated. Click OK
Click Finish The main VSPE window now looks as follows:
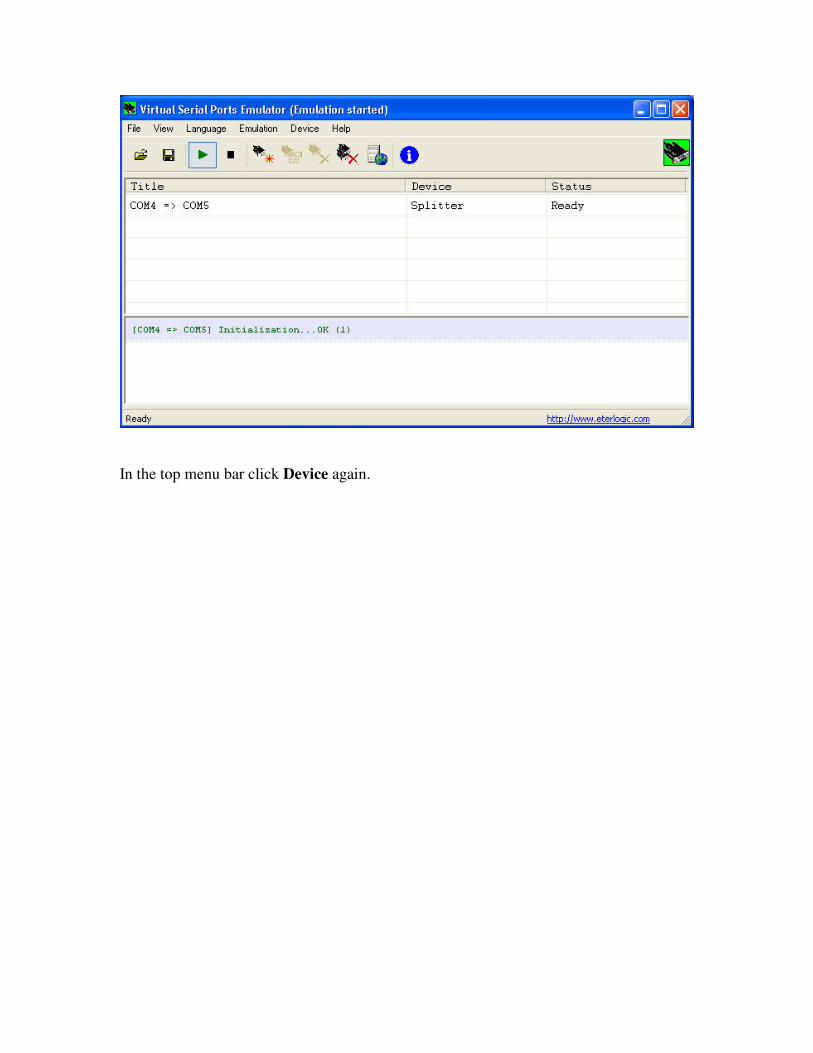
In the top menu bar click Device again.

In the Specify device type window, select TcpServer from the drop-down menu. Click Next
The Specify device characteristics window appears (see below)

Enter the value 5555 in the field for the Local TCP port and select COM5 from the drop down menu Source serial port (the virtual serial port from the earlier splitter definition above) Click settings and select the Serial port settings as indicated. Click OK
Click Finish
The main window now looks like this:

To save this configuration, click on File and select Save As

Name this configuration VSPE – NMEA 0183 Splitter Server and save it to the Desktop as indicated in the Save As window above. In the future, just clicking on the icon on the desktop will execute program VSPE and load the configuration defined above. To start VSPE automatically with this configuration each time the computer starts up, place a short-cut in the Windows Startup folder (recommended). Program VSPE can now be minimized and will continue running in the background.
Important:
The COM-port setting in the navigationprogram now has to be changed to
COM5 because from now on it will receive the NMEA data from the VSPE
splitter port.

The last step is the iPad configuration.
Setting up the iPad Power-on the iPad and go to Settings
Tap Wi-Fi Now go back to the computer to the Network Connections window. Right-click on Wireless Connection
Click View Wireless Netwoks
Click on NMEA 0183 Server and when highlighted click on Connect at the bottom of the window.
NMEA 0183 Server should now appear in the list under Choose a Network The iPad may still be connected to another work, as in the screenshot.
Tap op NMEA 0183 Server to connect.

At this point, the computer will also show status Connected for NMEA 0183 Server. Now start application iNavx on the iPad. It will load a chart automatically.

At the bottom of the screen, tap Instruments. The instruments screen appears.

Tap on Setup in the top-right corner. Ignore the displayed information, this screen shot was made with TCP/IP already
connected.
The Instruments setup window appears

Tap on TCP/IP in the left top corner. The TCP/IP NMEA client window appears

Enter the IP address and Port number for the host (server) as indicated. Tap on ON/OFF toggle field. iNavx should now connect to the server program and data will start streaming.

Data in this sample is just some GPS data. With GPS, instruments and AIS connected, the full NMEA data stream can be monitored here. Your iPad chart plotter is now ready and you can go back to the Chart or one of the other iNavx displays by tapping on one of the options at the bottom of the screen.