Grading Administration - Secondary School Report … “Report Card Template” takes a PDF template...
49
Genesis Student Information System User Documentation 6/12/2008 Page 1 of 49 GRADING – SECONDARY SCHOOL REPORT CARDS Table of Contents I Introduction to Secondary School Report Cards p. 2 II Report Card Templates p. 4 II A Anatomy of a Report Card Template p. 4 II B Create a Template p. 5 II C Modify a Report Card Template p. 6 II D Delete a Report Card Template p. 7 II E Copy a Report Card Template P. 8 II F Exporting and Importing Report Card Templates P. 9 III Placing Data into a Template: Field Definitions p. 11 V Report Cards p. 16 V A The Report Card List p. 16 V B Create a Report Card p. 18 V C Modify a Report Card p. 20 V D Delete a Report Card p. 20 VI Mass Generation of Report Cards p. 21 VIII Report Cards in the Parent Module p. 23 IX Messages on Report Cards p. 24 App A APPENDIX A: Report Card Macros p. 25
Transcript of Grading Administration - Secondary School Report … “Report Card Template” takes a PDF template...

Genesis Student Information System User Documentation
6/12/2008 Page 1 of 49
GRADING – SECONDARY SCHOOL REPORT CARDS Table of Contents I Introduction to Secondary School Report Cards p. 2 II Report Card Templates p. 4 II A Anatomy of a Report Card Template p. 4 II B Create a Template p. 5 II C Modify a Report Card Template p. 6 II D Delete a Report Card Template p. 7 II E Copy a Report Card Template P. 8 II F Exporting and Importing Report Card Templates P. 9 III Placing Data into a Template: Field Definitions p. 11 V Report Cards p. 16 V A The Report Card List p. 16 V B Create a Report Card p. 18 V C Modify a Report Card p. 20 V D Delete a Report Card p. 20 VI Mass Generation of Report Cards p. 21 VIII Report Cards in the Parent Module p. 23 IX Messages on Report Cards p. 24 App A APPENDIX A: Report Card Macros p. 25

Genesis Student Information System User Documentation
6/12/2008 Page 2 of 49
I. Introduction to Secondary School Report Cards
Secondary School Report Cards are those generated from the Genesis Grading Module for students typically in middle and high schools, and perhaps in the upper grades of elementary schools. This type of report card is available to any school where a Master Class Schedule has been set up to schedule, provide for Class Attendance and to create Genesis Gradebooks.
This document introduces the elements of the report card system and steps through its setup and maintenance. The key elements are Report Card Templates and Report Card Definitions and the document begins here with an overview of how these piece parts relate to produce finished report cards to send home to parents and guardians. The diagram illustrates the relationship between Report Card Templates, Report Card Definitions and the generated student Report Cards in PDF. A “Report Card Definition” links a Marking Period with a Report Card Template and Grading and Attendance Collections. The report card generation process uses a “Report Card Definition” for a selected Marking Period to take student grades and student attendance totals and, using the Report Card template that is linked to the Report Card Definition, create the finished report cards.
Report Cards Definitions vs. Report Card Templates A “Report Card Template” takes a PDF template for a report card and a set of “field definitions” which specify how to fill the template with student information, student grades and student attendance totals. The “Report Card Definition” is linked to a Report Card Template and pairs the template with information for creating physical report cards for a single Marking Period (or “mailing”/issuance). The Report Card Definition includes: the Marking Period it is to be used for (e.g. MP3), and the Grading and Attendance Collections to use in creating the physical report cards (that is: what student data to print on the cards).
Report Card Template
PDF template
Field Definitions . . .
Template source
Report Card Definition
MP: MP1 Grading Collections: MP1 FG Attendance Collections Type: MASS
Report Card Definition
MP: MP2 Grading Collections: MP1 MP2 ME FG Attendance Collections Type: MASS
Generate Report Cards
Student Grades
Student Attendanc
Student Report Cards
Grading Setup Collections: Grading and Attendance Collections: MP1, MP2, ME, MP3, MP4, FE, FG, IR1, IR2, IR3, IR4, ……

Genesis Student Information System User Documentation
6/12/2008 Page 3 of 49
A Report Card Template can be used by many different Report Card Definitions: it simply specifies the PDF template to use in creating physical report cards and how to paint the students’ information into the template to produce the physical reports cards.
A Report Card Definition is intended to be used once per school year: it is used to produce report cards for a single “mailing” or issuance. The PDF file containing the finished report cards is permanently stored with the Report Card Definition (for “Mass” Report Card Definitions). Mass Report Cards vs. Single Report Cards Two Report Card Definitions must be defined for each Marking Period: a “MASS” version which will be used to mass generate the students’ report cards (for mailing or other ‘hand out’ purposes) and a “SINGLE” version which is used to generate a report card for a single student (via the Student Data Student Report Card screen). The illustration below shows how a “SINGLE” Report Card Definition is used to generate the report cards that appear on the Student Data Student Report Card screen. The diagram illustrates the relationship between Report Card Templates, Report Card Definitions and the generated student Report Cards in PDF. A “Report Card Definition” links a Marking Period with a Report Card Template and Grading and Attendance Collections. The report card generation process uses a “Report Card Definition” for a selected Marking Period to take student grades and student attendance totals You will see the MASS and SINGLE Report Card Definition for each MP listed on the Grading Report Cards Report Cards List screen.
Std Data Std Report Card
Report Card Template
PDF template
Field Definitions . . .
Template source
Report Card Definition
MP: MP1 Grading Collections: MP1 FG Attendance Collections Type: SINGLE
Student Grades
Student Attendanc
Student Report Cards
Grading Setup Collections: Grading and Attendance Collections: MP1, MP2, ME, MP3, MP4, FE, FG, IR1, IR2, IR3, IR4, ……

Genesis Student Information System User Documentation
6/12/2008 Page 4 of 49
II. Report Card Templates
A. Anatomy of a Report Card Template Grading Report Cards Templates
Figure 1 – The Grading Report Cards Templates List screen lists all secondary school report cards
for all schools
Report Card Templates The screen lists all Secondary School Report Card Templates defined in Genesis. This is a ‘district’ level screen: it appears the same no matter which school is selected in the screen header. The screen contains a list of all secondary school report card templates.
The first 5 columns are informational:
1. ASCII/PDF – This indicates what form the report card is stored in. 2. Template Code – The internal code identifying this template 3. Name / Description – The name of the template 4. Author – User who uploaded the template 5. Seq – sorting control for this screen.
The remainder of the columns contain icons which provide functionality:

Genesis Student Information System User Documentation
6/12/2008 Page 5 of 49
6. PDF – Displays the PDF template for the report card “empty” – with no sample data. 7. Sample – Displays the PDF template for the report with its sample data plugged in. This is
used to debug the field placement. 8. Src – MS Word (or other) source file for this report card. 9. Modify – Icon brings up the “Modify Report Card Template” screen 10. Fields – This icon brings up a list of the field definitions for the report card. These specify
how and where information is to be ‘painted’ on to the report card form to produce the actual report cards.
11. Copy – Create a copy of the Report Card definition. 12. Delete – Remove the Report Card definition
Elements of the Template The template has four parts:
‐ The basic information about the template (code, name/description) ‐ The PDF template used to generate the report cards ‐ The field definitions which specify where to paint the data ‐ The MS‐Word “source code” for the template.
B. Create a Report Card Template Note that what you are uploading here is NOT what will be used to actually generate the report cards. This is a convenient place to store the file from which the PDF template was produced; that is, the “source file” for the template.
1. Navigate to the Grading Report Card Templates List screen. 2. Click on the “Add” fourth level tab. This brings up the “New Report Card Template” form:
3. You must fill in all fields:
a. Unique Code – A code which uniquely identifies this report card template. b. Name – name or description of the report card c. Select type: PDF or ASCII (plain text) d. Author – Name of the report card’s author e. Sequence – How to order this report card template in the list of templates. A
number will be generated to place this report card at the bottom of the list. You must change that number (to lower it) if you wish the new report card template to appear higher in the list.
Genesis Student Information System User Documentation
6/12/2008 Page 6 of 49
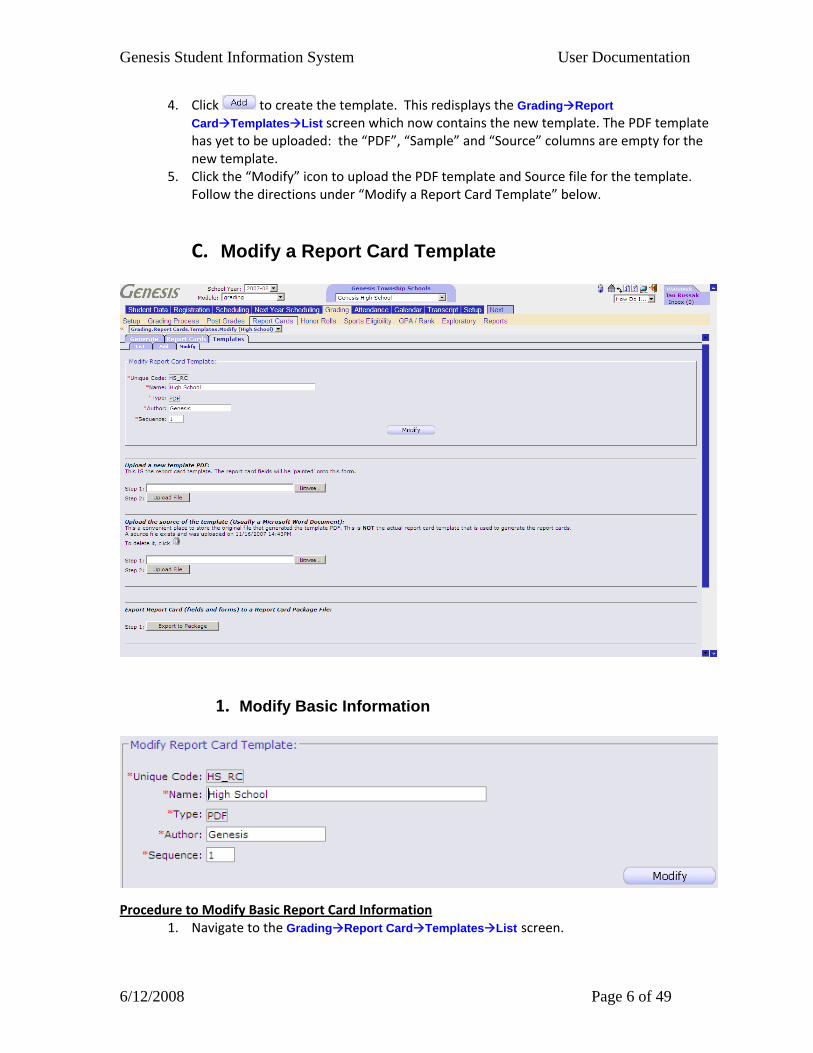
4. Click to create the template. This redisplays the Grading Report Card Templates List screen which now contains the new template. The PDF template has yet to be uploaded: the “PDF”, “Sample” and “Source” columns are empty for the new template.
5. Click the “Modify” icon to upload the PDF template and Source file for the template. Follow the directions under “Modify a Report Card Template” below.
C. Modify a Report Card Template
1. Modify Basic Information
Procedure to Modify Basic Report Card Information
1. Navigate to the Grading Report Card Templates List screen.

Genesis Student Information System User Documentation
6/12/2008 Page 7 of 49
2. Click on the Edit icon in the Modify column of the list. This brings up the Grading Report Card Templates Modify screen.
3. You may update three fields: f. Name – name of the report card g. Author – Name of the report card’s author h. Sequence – How to order this report card in the list of report cards.
4. Click to save your changes.
2. Upload a New Template
Procedure to Upload a PDF File
1. Navigate to the Grading Report Card Templates List screen. 2. Click on the Edit icon in the Modify column of the list. This brings up the
Grading Report Card Templates Modify screen. 3. Locate the “Upload a new template PDF” area in the middle of the screen. 4. Click the “Browse” button to bring up a normal file dialog
5. Select a file. 6. Click to upload the selected file.

Genesis Student Information System User Documentation
6/12/2008 Page 8 of 49
3. Upload the Source File for the PDF Template
Procedure to Upload a Source File for the Report Card Note that what you are uploading here is NOT what will be used to actually generate the report cards. This is a convenient place to store the file from which the PDF template was produced; that is, the “source file” for the template.
1. Navigate to the Grading Report Card Templates List screen. 2. Click on the Edit icon in the Modify column of the list. This brings up the
Grading Report Card Templates Modify screen. 3. Locate the “Upload the source of the template” area in the lower half of the screen. 4. Click the “Browse” button to bring up a normal file dialog 5. Select a file. 6. Click to upload the selected file.
It is a good idea to always attach the “source file” to the template. That way, if a change needs to be made to the report card, the source file can be easily located.
D. Delete a Report Card Template Procedure to Delete a Report Card Template
1. Navigate to the Grading Report Card Templates List screen. 2. Locate template you wish to remove 3. Click the corresponding delete trashcan icon. A confirmation dialog is displayed:
4. Click OK to delete the template and Cancel to abandon the operation.
E. Copy a Report Card Template Procedure to Copy a Report Card Template
1. Navigate to the Grading Report Card Templates List screen. 2. Locate template you wish to copy and click the copy icon. A “Copy” dialog box is
displayed:

Genesis Student Information System User Documentation
6/12/2008 Page 9 of 49
3. Enter a new unique code for the copy. 4. Click OK to copy the template and Cancel to abandon the operation. If you click OK, an
exact copy of the existing report card template is created and entered into the list of templates with the new code. The code will be the only difference between the new and the old copies. The Grading Report Card Templates List screen is redisplayed with the copy in place.
F. Exporting and Importing Report Card Templates Report Card Templates can be exported into “zip” archive packages and reloaded into other schools (or other school districts). This process is simple and it is described below. Procedure to Export Report Card Information
1. Navigate to the Grading Report Card Templates List screen. 2. Click on the Edit icon in the Modify column of the list. This brings up the
Grading Report Card Templates Modify screen. 3. Scroll to the bottom of the screen and locate the “Export Report Card Package” area:
4. Click to begin the export. This brings up a open/save file dialog:
5. Click to bring up a regular file dialog, name the package and save it. Procedure to Export Report Card Information

Genesis Student Information System User Documentation
6/12/2008 Page 10 of 49
1. Navigate to the Grading Report Card Templates List screen. 2. Locate the template that what you want to replace or load from a report card export. 3. Click on the Edit icon corresponding to that template. This brings up the
Grading Report Card Templates Modify screen. 4. Scroll to the bottom of the screen and locate the “Import Report Card Package” area:
5. Click to bring up a file dialog and locate a “report card package” that was previously
created by a report card export. 6. Click to begin the import. When the import completes the
Grading Report Card Templates List screen will be redisplayed.

Genesis Student Information System User Documentation
6/12/2008 Page 11 of 49
III. Placing Data into a Template: Field Definitions Defining the Template Fields
Defining the Fields to Place Data into the Report Card Template The “Fields” specify what data to place on the template to create the pass, and where on the template to place the data. What and Where: the Pass Template is typically an 8.5” x 11” piece of paper; Genesis needs to accurately place information on the page in order to generate a coherent, usable pass. The fields specify how to do this. The piece of paper that will become the pass – that is, on which the ‘template’ will be printed to make the pass ‐ is measured in “points” and there are 72 points to the inch. Data is placed onto the template (that is, eventually the printed piece of paper) at specific X, Y co‐ordinates based on the “points”. The bottom left corner of the page is location zero, zero (0,0). That is, if you place a piece of data at location 0,0, the data will be printed at the extreme bottom left corner of the page. The X coordinate increases to the right and the bottom right corner of the page is location (612,0). The 612 is arrived at by multiplying the 72 points per inch by the width of the page or 8.5 inches: 8.5 * 72 = 612. Similarly, the Y coordinate increases as you move up on the page, so that the top left corner of the page is location (0,792). 792=72*11”. The top right corner of the page is (612,792). The field definitions force you to specify exactly where on the page to place data. The Specifics of a Field Definition Each field definition consists of 10 fields:
From left to right, these fields are:
• The Field – that is, the macro for the data to place in the specified location. More on macros below.
• The “Copy” of the field – If the same piece of data, that is, the same macro, is going to be printed on the template more than once, you must indicate that by using the Copy field to indicate which copy of the field this is. For example, if the student’s name were to appear twice (or more) on the printed report card, the first time the STUDENT_NAME macro is used to plug in the name, the Copy is set to 1. The second time the STUDENT_NAME macro is used,
0,792 612,792
Template – maximum
and minimum locations 0,0 612,0 Y
X
The top right corner of an 8”x11” page in portrait mode is x=612, y=792. In landscape mode, the top right corner is x=792, y=612. Bottom right is x=721, y=0 in landscape mode.

Genesis Student Information System User Documentation
6/12/2008 Page 12 of 49
you must set Copy to 2, etc. This count does not occur automatically: you must up the count each time you plug in the same macro in multiple places.
• The Font to use for when printing this copy of the field. There are three built‐in fonts: Helvetica, Courier, and Times Roman. Helvetica is the default. Additional fonts can be loaded by your System Administrator if you need them.
• The font Size. Most font sizes are available. Typical font sizes include 9, 10, 11, 12. 9 is used as the default.
• The X coordinate for the lower left corner of the field. In portrait mode, 0, as described above, is the left edge of the page and 612 is the right edge of the page. You must determine where, horizontally, on the page the field should start and use that as the X coordinate. In landscape mode (the mode in which many report cards are printed), X ranges from 0 (left edge of the paper) to 721 (right edge of the paper).
• The Y coordinate for the lower left corner of the field. 0, as described above, is the bottom edge of the page and 792 is the top edge of the page. You must determine where, vertically, on the page the field should start and use that as the Y coordinate. In landscape mode (the mode in which many report cards are printed), Y ranges from 0 (bottom of the paper) to 612 (top of the paper).
• The maximum Width of the field. This is the maximum length of the field in points. It does not matter if the field is “too large” – it will not prevent other data items from printing properly. However if the field is too small, not all of the data will appear – you might see only half of the student’s name, for example.
• The Alignment for the field – whether to place the data in the field starting at the left edge of the field, the right edge of the field or whether to center the data in the field. The width of the field is important if the Alignment is not “Left”. “Left” is the default and will cause the data to be painted into the field starting at the specified X and Y coordinates.
• The Sequence number just orders this list of fields: it does not control where or how the data is placed into the template. The list of fields is sorted by their Sequence numbers.
• The Option is used to pass formatting information to Genesis. This is used to format a date or time. It is usually not needed.
• The Sample contains “sample data” for the field. This is printed into the template when the “sample template” is viewed. It will give you something to look at.
• The P field specifies the “page” of the transcript. E.g. a “1” in the P field means the information will appear on page 1 of the transcript.
• The Rotate field specifies whether or not to rotate the information. A 0 in this field means not to rotate the information. A “90” in this field means to rotate the information 90 degrees (i.e. print it vertically, not horizontally). 180 will print the information upside down.

Genesis Student Information System User Documentation
6/12/2008 Page 13 of 49
A. Add a Field Procedure to Add a Field Definition Before you begin, determine where the field will be located on the printed page – at least approximately.
1. Navigate to the Setup Schools School Parameters Student Passes screen. Locate the “add” fields
The left side of the “Add” fields are:
2. Enter the Field or macro for the data to be printed into the template. See Section III
below. 3. Enter the copy count for how many times this macro has been used. Usually: 1 4. Select the Font for this piece of data. The default is Helvetica.
The right side of the Field definitions:
5. Select the font Size – the default is 9. 6. Specify the X coordinate for the information. 7. Specify the Y coordinate for the information. 8. Specify the Width of the field. If you are using the default Left alignment, this can be any
“big enough” number (e.g. 100). If you are using either Center or Right alignment this must be the actual and exact width of the field in points. Measure the field and multiply the width (in inches) by 72. E.g. if the field is 1.5 inches long, the width is 1.5 * 72 = 108 points.
9. Select the field’s Alignment. The default is Left. 10. Specify the Seq number for the field (where it will appear in the list of fields). 11. Specify any Option information. 12. Provide some Sample data (e.g. if the macro is STUDENT_NAME, you might use “Hank
Aaron” or “Babe Ruth”). 13. Click the button to add the field.
B. Delete a Field or Fields Procedure to Delete a Field Definition
1. Navigate to the Grading Report Card Templates screen. 2. Click on the “Fields” icon for the report card template you wish to modify. 3. Locate the field you wish to remove and click the delete button corresponding to it.
Procedure to Delete Multiple Fields
1. Navigate to the Grading Report Card Templates screen. 2. Click on the “Fields” icon for the report card template you wish to modify.

Genesis Student Information System User Documentation
6/12/2008 Page 14 of 49
3. Check the checkbox corresponding to each field you wish to delete.
4. Click the button at the bottom of the screen. This deletes any checked fields.
C. Modify Field Definitions
Procedure to Modify Multiple Field Definitions 1. Navigate to the Grading Report Card Templates screen. 2. Click on the “Fields” icon for the report card you wish to modify. 3. Locate the field you wish to update. 4. Update each field based upon the parameters described above. 5. Click the button at the bottom of the screen. This will save all changes.
D. Sort the Field Definitions
To make it easier to work with the list of report card fields, the list can be sorted or re‐sorted at any time. The choices for sorting include:
‐ Seq – sort by the sequence numbers for the fields. This puts the fields in “numerical order”. ‐ X – sort by the X coordinate. This shows how the fields are distributed across the page. ‐ Y – sort by the Y coordinate. This shows how the fields are distributed vertically. ‐ Field – Sort alphabetically by the macro names.
Procedure to Sort the Multiple Field Definitions
1. Navigate to the Grading Report Card Templates screen. 2. Click on the “Fields” icon for the report card you wish to modify. 3. Locate the “Sort Screen By” control at the top of the list of fields:
4. Select the sort you wish to use. The screen should refresh automatically and display the
new sort.
E. Clone Field Definitions Field definitions can be copied or “cloned” to enable you to easy duplicate groups of fields so that you can make small changes after the copy.
Procedure to Clone Field Definitions 1. Navigate to the Grading Report Card Templates screen. 2. Click on the “Fields” icon for the report card you wish to modify. 3. Locate each of the fields you wish to clone and check the checkbox corresponding to each
of them. 4. Now locate the “Clone selected fields; start new seq at” control at the bottom of the list of
fields. Select a starting sequence number for the cloned fields.
5. Click to clone the checked fields and assign each a new sequence number.

Genesis Student Information System User Documentation
6/12/2008 Page 15 of 49
F. View a Sample Report Card
Procedure to View a Sample of a Report Card
1. Navigate to the Grading Report Card Templates screen. 2. Click on the PDF icon in the “Sample” column for the report card template you wish to
view. This will bring up the report card with the “sample” data filled in. 3. Click the browser back button to return to Genesis.

Genesis Student Information System User Documentation
6/12/2008 Page 16 of 49
IV. Report Cards
A. The List of Report Cards Unlike the list of templates screen, the screen is specific to a single school: report cards are only displayed for the school selected in the Genesis screen header. To view another school’s report card definitions, you must change the school selected in the drop down.
Figure 2 – A portion of the list of Report Cards on the Grading Report Cards Report Cards List screen Report Card Definitions The list of report card definitions for the selected school is displayed when you bring up the Grading Report Cards Report Cards List screen. Typically there will be a “MASS” and “SINGLE” report card definition for each Marking Period and each Interim Reporting Period.
Most columns are informational:
1. Code – The unique code for this Report Card definition. Typically, it matches the Marking Period the report card will be used for (e.g. MP1)
2. Name / Description – The name of the report card definition or a description of its use. 3. Template – The name of the template used to generate the actual report cards for students 4. MP – The Marking Period this report card will be used for. Report Cards – unlike Report Card
Templates – are 1 to 1 with Marking Periods. 5. Grade / Attendance Collections – The list of Grading and Attendance collections that will
be printed on the generated report cards. 6. Type – MASS or SINGLE report card definitions. 7. View – If the report card definition has been “run” – if it has been used to mass generate
report cards, the PDF icon here will bring up the contents of the run (i.e. a PDF file containing the actual, generated report cards).
8. Last Run – Time of the last run. 9. Seq – sorting control for this screen. 10. Modify icon – Click to edit the Report Card definition 11. Delete icon – Click to delete this Report Card definition
Report Cards and Marking Periods A Report Card definition is linked to a single Marking Period. There must be at least one Report Card definition for each Marking Period in order to generate actual report cards for that Marking Period. Report Cards and Grading Collections Each Report Card definition is linked not only to a single, specific Marking Period but to a specific set of Grade and Attendance collections. Grade and, if desired, Attendance Collections are defined in the

Genesis Student Information System User Documentation
6/12/2008 Page 17 of 49
Grading module on the Grading Setup Collections screen. Each collection specifies the information that is to be collected from teachers during a “Grade Posting” (e.g. such as the ‘grade posting’ at the end of Marking Period 2). The graphic below is an excerpt from the “MP” and “Grade/Att Collections” columns on the screen. Note that each Marking Period typically adds to the set of Grade and Attendance Collections to place on a report card:
MP1 prints only MP1 & FG info MP2 prints MP1, MP2, Mid Term & FG information. MP3 adds MP3 info and MP4 adds MP4 and Final Exams.

Genesis Student Information System User Documentation
6/12/2008 Page 18 of 49
B. Create a Report Card
Figure 3 – New Report Card Definition Screen
Procedure to Create a Report Card Definition
1. Navigate to the Grading Report Cards Report Cards List screen. 2. Click on the “Add” fourth level tab. This brings up the “New Report Card Definition” form. 3. You must fill in all fields:
a. Code – A code which uniquely identifies this report card. b. Name – name or description of the report card c. Select temple: Select the Report Card template d. Marking Period – Which one MP is this for? e. Type – Single or Mass f. Message 1 – First message field on report card g. Message 2 – Contents to place in second message field on report card h. Sequence – How to order this report card in the list of report cards. A number will
be generated to place this report card at the bottom of the list. You must change that number (to lower it) if you wish the new report card to appear higher in the list.
i. Grading Collections: Check all the grading collections that should be “painted” onto this report card. More about this below.

Genesis Student Information System User Documentation
6/12/2008 Page 19 of 49
j. Attendance Collections – Which Attendance totals should be painted on to the report card?
4. Click to create the report card. This redisplays the Grading Report Card Report Cards List screen which now contains the new report card.

Genesis Student Information System User Documentation
6/12/2008 Page 20 of 49
C. Modify a Report Card Procedure to Modify a Report Card Definition
1. Navigate to the Grading Report Cards Report Cards List screen. 2. Locate the Report Card you wish to modify. Click the edit icon for it. This brings up the
“Modify Report Card Definition” form (Grading Report Cards Report Cards Modify). 3. You can update all fields except the “Code” field:
a. Name – name or description of the report card b. Select temple: Select the Report Card template c. Marking Period – Which one MP is this for? d. Type – Single or Mass e. Message 1 – First message field on report card f. Message 2 – Contents to place in second message field on report card g. Sequence – How to order this report card in the list of report cards. A number will
be generated to place this report card at the bottom of the list. You must change that number (to lower it) if you wish the new report card to appear higher in the list.
h. Grading Collections: Check all the grading collections that should be “painted” onto this report card. More about this below.
i. Attendance Collections – Which Attendance totals should be painted on to the report card?
4. Click to create the report card. This redisplays the Grading Report Card Report Cards List screen.
D. Delete a Report Card
Procedure to Delete a Report Card Definition
1. Navigate to the Grading Report Cards Report Cards List screen. 2. Locate the Report Card you wish to delete. Click the corresponding delete trashcan
icon. A confirmation dialog is displayed:
3. Click OK to delete the Report Card and Cancel to abandon the operation.

Genesis Student Information System User Documentation
6/12/2008 Page 21 of 49
V. Mass Generation of Report Cards Grading Report Cards Generate
Procedure to Mass Generate Report Cards
1. Navigate to the Grading Report Cards Generate screen. This screen contains a form which must be filled out in order to generate the report cards.
2. If you are including attendance information on your report card, you will want to update the attendance totals. At the top of the screen, locate the “Update Marking Period Attendance Summary”.
3. Select the Report Card definition you are going to use to generate the actual report cards. 4. Click “Accept”. Wait for the process to complete. A running count of students will be
shown:
5. Once the attendance update completes (or you do not need to run it), select the report
card to run. 6. Select either “All Students” or a specific student list. If you are using a student list, you
will of course have had to have previously created it. 7. Select a sort order in which the report cards should be generated. Various sort orders are
available. The report cards can be re‐run multiple times in varying sort orders depending on what you will do with the resulting report cards (e.g. mail them or hand them out to

Genesis Student Information System User Documentation
6/12/2008 Page 22 of 49
the individual guidance counselors or hand them out to homeroom teachers to give out to the students, etc.):
8. Select the options on the run:
a. ‐ Only print a single report card for each student, addressed to their Legal Residence (LR) address. Yes/No.
b. ‐ Print a report card for all addresses that flagged to receive report cards except for the Legal Residence address. Yes/No.
c. ‐ If a course does not have a grade and comments, suppress it (do not print it on the report card). Yes/No
d. ‐ If a report card will not show any courses (see C above) then suppress the entire card.
e. ‐ If a child has unpaid fines (i.e. “OPEN fines”), suppress their report card. They will not receive a report card unless the fine is paid.
9. Select a Date to print on the Report Card 10. Enter the number of times to print the top report card – E.g.if the top report card is to be
used as a cover page. 11. ‐ The checkbox
for this should be left unchecked if you wish to print report cards for students who are no longer active but to whose address(es) you wish to send report cards.
12. Click to start the report card generation. A running count of report cards generated will be displayed:
When the process has run to completion the PDF file containing the generated report cards will be displayed:
You must click the browser “Back” button to return to Genesis.

Genesis Student Information System User Documentation
6/12/2008 Page 23 of 49
Procedure to View a Previously Run Set of Mass Generated Report Cards 1. Navigate to the Grading Report Cards List screen. Locate the Report Card the last run
of which you wish to view (and e.g. print). Report Cards that have ever been run will have a PDF icon in the “View” column and “Last Run” information:
2. Click the PDF icon in the “View” column. This brings up the PDF file containing the report
cards.
VI. Report Cards in the Parent Access Module
The Report Card to display in the Parents Module is controlled by the Report Card / Interim Display in Parents Module control on the Parents Setup Settings screen:
Procedure to set the Report Card to Display for your School in the Parent Access Module 1. Navigate to the Parents Setup Settings screen. This screen contains setup/display
information for the Parent Access module. 2. Locate the Report Card / Interim Display in Parents Module control in the middle of the
screen. Find the entry for your school:
3. Select the report card to display. Choose the report card for which grading has most
recently been completed. See below. 4. Scroll to the very bottom of the screen and click the button to store the
change. The selected report card(s) are IMMEDIATELY available in the Parent module: there is no delay.
Choosing Report Cards to Display in the Parent Access Module When a report card is selected via the screen to be displayed for parents In the Parent Access module those cards become immediately available. You must have completed grading for the selected card: grade posting by teachers must be closed and guidance counselors should, as much as practicable, have completed any necessary grade changes. If grade posting is open for a card when it is displayed, parents will see grades changing in real time and this is usually not desirable. Display a card in the Parent Access module only when that report card is about to be mailed home or distributed to students.

Genesis Student Information System User Documentation
6/12/2008 Page 24 of 49
VII. Messages on Report Cards There are two message fields that are included on each Report Card Definition (See Section IV above). These fields are used to add Marking Period specific messages to the report cards generated for the Marking Period. These two fields are optional – however they provide a mechanism to include adjustable message data on report cards.
The illustration below shows how the message information is setup to be printed on report cards. The setup to print messages includes:
‐ Leave space for the messages on the PDF report card templates. No space: no place to put the messages.
‐ Include “MESSAGE1” and “MESSAGE2” in the field definitions for the report card: this is what actually plugs the messages in the actual report cards.
‐ Fill in the “Message 1” and “Message 2” fields on the Grading Report Cards Report Cards Modify screen. The procedure below the illustration explains how to do this.
Procedure to Modify the Messages in a Report Card Definition Use this procedure before Mass generating report cards to update the Message information you wish to appear on the report cards generated for a specific Marking Period.
1. Navigate to the Grading Report Cards Report Cards List screen. 2. Locate the Report Card you wish to modify. Click the edit icon for it. This brings up the
“Modify Report Card Definition” form. 3. Update the messages *you may edit additional fields as well, see Section IV above):
a. Message 1 – Contents of the First message field on report card b. Message 2 – Contents to place in second message field on report card
4. Click to create the report card. This redisplays the Grading Report Card Report Cards List screen.
Std Data Std Report Card Report Card Template
PDF template [ ] [ ]
Field Definitions .
${MESSAGE1} ${MESSAGE2}
.
.
Report Card Definition
MP: MP1 Grading Collections: MP1 FG Attendance Collections Type: SINGLE MESSAGE1: Welcome… MESSAGE2: …..
MP1 Report Card
[Welcome…] [… ]
Grading Setup Collections: Grading and Attendance Collections: MP1, MP2, ME, MP3, MP4, FE, FG, IR1, IR2, IR3, IR4, ……

Genesis Student Information System User Documentation
6/12/2008 Page 25 of 49
APPENDIX A: Report Card Macros
Report Card Field Reference Guide An updated Report Card Field Reference Guide can always be obtained by clicking the icon on the Grading Report Cards Templates Fields screen.
Report Card Form Fields
A form field is a piece of data that is drawn onto the Report Card Form when the the Report Card is rendered for a student. To see all of the fields on a report card, navigate to the Grading ? Report Cards ? Templates ? Fields screen. This screen will show you all of the fields that are to be rendered for the current school.
A report card form field is comprised of 13 parameters. They are:
Field
The field (also known as a macro) describes the data that is to be printed. The following section contains a list of all of the available fields that can be printed. Examples of fields are SCHOOL_NAME and STUDENT_NAME.
Copy
If you wish to display a field on a report card more than once, you will need to make another copy. If STUDENT_NAME were to appear twice on the form, you would make two entries with the field parameter set to STUDENT_NAME and the copy parameters set to 1 and 2. Normally fields only appear once on a form.
Font
Select from one of the 3 built in fonts (Helvetica, Times-Roman and Courier) or a custom True Type Font. To load custom True Type Fonts onto your Genesis Server, navigate to the Core ? Fonts screen.
Size
The desired size of the font represented in points. The most common sizes are 9, 11 and 14.
X and Y
The desired location to render the field relative to the bottom left corner of the page in points. (0, 0 is the bottom left)
W (Width)
The width of the field in points. If the value to be printed cannot fit in this width, the value will be truncated to fit.

Genesis Student Information System User Documentation
6/12/2008 Page 26 of 49
Align (Alignment)
How to align the text within the width of the field. The values are Left, Right and Center.
Seq (Sequence)
A number used to set the order in which the field is displayed in the list of fields on the Fields screen.
Option
Some fields (macros) have options that are associated with them. Refer to the field (macro) reference to see what values may be required here.
Sample
Sample text that is displayed when you are looking at a sample output of the Report Card.
Page
The page of the report card the field will print.
Rotate
You can rotate the text 0,90,180,or 360 degrees.
Setup Fields
Setup fields are fields that are not printed on the report card; but are instead used to provide hints to the report card engine.
SECTIONS_PER_PAGE
It is used to tell the report card engine how many courses can fit on one page of the report card. The default value is 99.
Option: Integer value that represents the number of sections that can fit on one page of the report card.
Sample Output: Database Column: Bean Property:
COMMENT_CODES_FILTER
This field will limit which categories of Comment Codes will appear on the report card. All other comment codes will be suppressed. If this option is blank or not included on the report card; then all comment codes will be eligible to printed.

Genesis Student Information System User Documentation
6/12/2008 Page 27 of 49
Option: Comma separated list of comment category codes that are allowed to be printed on the report card.
Sample Output: Database Column: Bean Property:
GPA_{GPA_CODE}
This will print the GPA if #.0000 format for the specified gpa code. An example of this is GPA_CUM.
Option: Sample Output: Database Column: Bean Property:
RANK_{GPA_CODE}
This will print the rank of a student for a specific GPA. An example of this is RANK_CUM.
Option: Sample Output: 1 Database Column: Bean Property:
RANK_SIZE_{GPA_CODE}
This will print the class size for a specified GPA code. An example of this is RANK_SIZE_CUM.
Option: Sample Output: 320 Database Column: Bean Property:
Normal Fields
ADDRESS_BLOCK Option:
Sample Output: Parent/Guardian of John Doe 1001 Forge Ave. Apartment 9b Forgeville, NJ 07080
Database Column:

Genesis Student Information System User Documentation
6/12/2008 Page 28 of 49
Bean Property:
ADDRESS_BLOCK2
The name printed is pulled from the ?Home? contact number record for the corresponding address record.
Option: Sample Output: Mr. John Doe 1001 Forge Ave. Apartment 9b Forgeville, NJ 07080Database Column: Bean Property:
ADDRESS_BLOCK2B
The name printed is pulled from the ?Home? contact number record for the corresponding address record. The second name is the student?s name.
Option:
Sample Output: Mr. John Doe John Doe 1001 Forge Ave. Apartment 9b Forgeville, NJ 07080
Database Column: Bean Property:
ADDRESS_BLOCK3
The name is the student?s name.
Option:
Sample Output: Parent/Guardian of John Doe 1001 Forge Ave. Apartment 9b Forgeville, NJ 07080
Database Column: Bean Property:
ADDRESS_BLOCK4
The name is the student?s name.
Option: Sample Output: John Doe 1001 Forge Ave. Apartment 9b Forgeville, NJ 07080 Database Column: Bean Property:

Genesis Student Information System User Documentation
6/12/2008 Page 29 of 49
ADDRESS_BLOCK5
The name is the student?s name.
Option: Sample Output: 1001 Forge Ave. Apartment 9b Forgeville, NJ 07080 Database Column: Bean Property:
ADDRESS_BLOCK6
The name is the Address record?s name.
Option: Sample Output: Mr. John Doe 1001 Forge Ave. Apartment 9b Forgeville, NJ 07080Database Column: Bean Property:
CASE_MANAGER_NAME Option: Sample Output: CZ Database Column: STUDENTS.CASE_MANAGERBean Property: Student.caseManager
COUNSELOR_CODE Option: Sample Output: CZ Database Column: STUDENTS. COUNSELOR_IDBean Property: Student. counselorID
COUNSELOR_HOME_PHONE Option: Sample Output: 908-222-2202 Database Column: DISTRICT_TEACHERS.TEACHER_HOME_PHONE Bean Property: DistrictTeacher.homePhone
COUNSELOR_NAME
District Teacher record where the counselorid = student.counselorid.
Option:

Genesis Student Information System User Documentation
6/12/2008 Page 30 of 49
Sample Output: Mrs. Jane Smith Database Column: DISTRICT_TEACHERS.TEACHER_NAMEBean Property: DistrictTeacher.name
COUNSELOR_VOICE_MAIL
District Teacher record where the counselorid = student.counselorid.
Option: Sample Output: 7776 Database Column: DISTRICT_TEACHERS.TEACHER_VOICE_MAIL Bean Property: DistrictTeacher.voicemail
GRADE_LEVEL Option: Sample Output: 12 Database Column: STUDENTS.GRADE_LEVELBean Property: Student.gradeLevel
HOMEROOM Option: Sample Output: 101 Database Column: STUDENTS. HOMEROOMBean Property: Student.homeroom
HOMEROOM_TEACHER_NAME
The homeroom teacher is determined by looking up School Teacher where the current homeroom = the student?s homeroom. The District Teacher is then looked up from the school teacher.
Option: Sample Output: Mrs. Jane Smith Database Column: DISTRICT_TEACHERS.TEACHER_NAMEBean Property: DistrictTeacher.name
HONOR_ROLL_MESSAGE
The message is ?Congratulation on archieving the {HonorRollName}?. The name of the highest honor roll achieved is the one printed.
Option: Sample Output: Congratulations on achieving the High Honor Roll.

Genesis Student Information System User Documentation
6/12/2008 Page 31 of 49
Database Column: Bean Property: HonorRollDefinition.name
HONOR_ROLL_NAME
The message is ?{HonorRollName}?. The name of the highest honor roll achieved is the one printed.
Option: Sample Output: Congratulations on achieving the High Honor Roll.Database Column: Bean Property: HonorRollDefinition.name
MARKING_PERIOD_END_DATE
The end date is determined by looking up the end date from the School Attendance Cycle that has the same code as the Report Card Definition?s marking period.
Option: Sample Output: 06/30/2009 Database Column: Bean Property:
MARKING_PERIOD_START_DATE
The start date is determined by looking up the start date from the School Attendance Cycle that has the same code as the Report Card Definition?s marking period.
Option: Sample Output: 09/30/2009 Database Column: Bean Property:
MESSAGE1
There are 2 available messages per report card definitions. You can put different messages on the single and the mass print report cards with this feature.
Option: Sample Output: Call guidance at 1-800-mys-chool for more information. Database Column: REPORT_CARD_DEFINITIONS.MESSAGE1 Bean Property: ReportCardDefinition.message1

Genesis Student Information System User Documentation
6/12/2008 Page 32 of 49
MESSAGE2
There are 2 available messages per report card definitions. You can put different messages on the single and the mass print report cards with this feature.
Option: Sample Output: Call guidance at 1-800-mys-chool for more information. Database Column: REPORT_CARD_DEFINITIONS.MESSAGE2 Bean Property: ReportCardDefinition.message2
PAGE_NUMBER
Outputs the current page number.
Option: Sample Output: 2 Database Column: Bean Property:
REPORT_CARD_DATE
For mass printing of report cards; the date is typed in by the operator on the generate screen. On singles (The report card tab on the Student Data screen); the date is the current date.
Option: Sample Output: 09/30/2005 Database Column: Bean Property:
REPORT_CARD_LONG_DATE
For mass printing of report cards; the date is typed in by the operator on the generate screen. On singles (The report card tab on the Student Data screen); the date is the current date.
Option: Sample Output: September 09,2005Database Column: Bean Property:
REPORT_CARD_MP Option: Sample Output: MP1 Database Column: REPORT_CARD_DEFINITIONS.MARKING_PERIOD_CODE

Genesis Student Information System User Documentation
6/12/2008 Page 33 of 49
Bean Property: ReportCardDefinition.markingPeriodCode
REPORT_CARD_MP_LONG
The school attendance cycle is looked up by using the marking period code of the report card definition.
Option: Sample Output: Marking Period 1 Database Column: SchoolAttendanceCycle.description
Bean Property: SCHOOL_ATTENDANCE_CYCLES. ATTENDANCE_CYCLE_DESCRIPTION
REPORT_CARD_SHORT_DATE
For mass printing of report cards; the date is typed in by the operator on the generate screen. On singles (The report card tab on the Student Data screen); the date is the current date.
Option: Sample Output: 09/05/05 Database Column: Bean Property:
REPORT_PERIOD
Displays the start and end dates of the report card marking period. The dates are picked off of the School Attendance Cycle that has the same code as the Report Card Definition.
Option: Sample Output: 09/30-06/30 Database Column: Bean Property:
REPORT_PERIOD2
Displays the start and end dates of the report card marking period. The dates are picked off of the School Attendance Cycle that has the same code as the Report Card Definition.
Option: Sample Output: 09/30/2009-06/30/2009Database Column: Bean Property:

Genesis Student Information System User Documentation
6/12/2008 Page 34 of 49
SCHOOL_ADDRESS_BLOCK Option: Sample Output: Genesis High School1001 High School Rd.Forge Valley, NJ 07080
Database Column:
SCHOOL.SCHOOL_NAME, SCHOOL_ADDRESS1, SCHOOL_ADDRESS2, SCHOOL_CITY, STATE_CODE, SCHOOL_ZIPCODE
Bean Property:
School.schoolName, schoolAddress1, schoolAddress2, schoolAddressCity, schoolAddressState, schoolAddressZip
SCHOOL_NAME
The school is determined by the student?s current school.
Option: Sample Output: Genesis High School Database Column: SCHOOL.SCHOOL_NAMEBean Property: School.schoolName
SCHOOL_PRINCIPAL_NAME
The school is determined by the student?s current school.
Option: Sample Output: Genesis High SchoolDatabase Column: SCHOOL.principal Bean Property: School.principal
SCHOOL_PHONE_NUMBER
The school is determined by the student?s current school.
Option: Sample Output: 908-222-2202 Database Column: SCHOOL. SCHOOL_OFFICE_PHONEBean Property: School. schoolOfficePhone
SCHOOL_YEAR Option: Sample Output: 2009-10 Database Column: Bean Property:

Genesis Student Information System User Documentation
6/12/2008 Page 35 of 49
STUDENT_DOB Option: Sample Output: 11/15/1994 Database Column: STUDENTS. Bean Property: Student.DateOfBirth
STUDENT_GENDER_CODE Option: Sample Output: M Database Column: STUDENTS.GENDER_CODEBean Property: Student.genderCode
STUDENT_HOME_NAME
The name is taken from LR/Home record.
Option: Sample Output: John B. Fresh Database Column: CONTACT_NUMBERS.CONTACT_NAMEBean Property: ContactNumber.contactName
STUDENT_HOME_TELEPHONE
The contact number is taken from LR/Home record.
Option: Sample Output: 908-222-2202 Database Column: CONTACT_NUMBERS.CONTACT_NUMBERBean Property: ContactNumber.contactNumber
STUDENT_ID Option: Sample Output: 200501023 Database Column: STUDENTS.STUDENT_IDBean Property: Student.studentID
STUDENT_NAME Option: Sample Output: Deckard Cain Database Column: STUDENTS.STUDENT_NAME

Genesis Student Information System User Documentation
6/12/2008 Page 36 of 49
Bean Property: Student.studentName
STUDENT_VOC_PROG Option: Sample Output: 11/15/1994 Database Column: STUDENTS.vocational_ed_programBean Property: m_vocProgramCode
TEXT Option: Text to print Sample Output: My Report CardDatabase Column: Bean Property:
USER_FLAG_{USER_FLAG_CODE}
Option: Semicolon delimitated list with positive;negative response (e.g. TRUE;FALSE). Blank list returns Yes and No
Sample Output: Yes
Database Column: STUDENT_USER_FLAGS
Bean Property: studentUserFlag
see the SETUP>>DISTRICTS>>MASTER DISTRICT PARAMETERS>>USER FLAGS for list of codes
USER_FLAG_WITH_DESCRIPTION_{USER_FLAG_CODE}
Option: Semicolon delimitated list with positive;negative response (e.g. TRUE;FALSE). Blank list returns Yes and No
Sample Output: Yes
Database Column: STUDENT_USER_FLAGS
Bean Property: studentUserFlag
Unique Comment Fields
These fields are used to build a legend of all of the different comment codes that are displayed on the report card. The list contains only the comment codes that are actually being printed on the report card. The list is generated by examining the fields that are being displayed; and then loading in the individual comment code descriptors for those fields.

Genesis Student Information System User Documentation
6/12/2008 Page 37 of 49
The list is sorted by the SEQ field of the comment codes.
In the field name; replace the text {N} with a number starting at 1. For example; the field name of the 5th unique comment code would be UNIQUE_COMMENT_CODE_5.
UNIQUE_COMMENT_ABBREV_{N} Option: Sample Output: C12 Database Column: GRADING_COMMENT_CODES .GRADING_COMMENT_ABBREVBean Property: GradingCommentCode.code
UNIQUE_COMMENT_CODE_{N} Option: Sample Output: C12 Database Column: GRADING_COMMENT_CODES .GRADING_COMMENT_CODEBean Property: GradingCommentCode.code
UNIQUE_COMMENT_CODE_DESCRIPTION_{N} Option: Sample Output: Needs improvement Database Column:
GRADING_COMMENT_CODES .GRADING_COMMENT_DESCRIPTION
Bean Property: GradingCommentCode.description
Student Schedule and Grade Fields
An internal list of the student?s schedule is generated before the report card is printed. The courses are then sorted by the print period of the first subsection of that course.
Field name macros:
{N} N is a number starting at 1 and represents the Nth course in the student?s schedule.
{IC} IC is the Item Code as found in the Grading Collections screen. For example; the MP1 grading collection may contain 1 grade (GR) and 2 comment codes (C1 and C2). IC is that code (GR,C1 or C2)
{Y} Y is a sub index number. For example to print the 5th comment code description for the 3rd course; it would be COURSE_CURRENT_COMMENT_DESC_3_5
{MP} A collection code (usually MP1, MP2, FE, FG etc..) that a grade or comment is stored in.
COURSE_CLASSES_MISSED_{MP}_{N} Option:

Genesis Student Information System User Documentation
6/12/2008 Page 38 of 49
Sample Output: 2 Database Column: STUDENT_CLASS_ATTENDANCE. TOTAL_ABSENCES Bean Property: StudentClassAttendance.totalAbsences
COURSE_ALPHA_GRADE_{MP}_{N} Option: Sample Output: A+ Database Column: STUDENT_GRADE_HISTORY.ALPHA_GRADE Bean Property: StudentGradeHistory.alphaGrade
COURSE_CODE_{N} Option: Sample Output: 8192 Database Column: SCHOOL_CURRICULUM. COURSE_CODEBean Property: CurriculumCourse.courseCode
COURSE_SECTION_{N} Option: Sample Output: 1 Database Column: SCHOOL_CURRICULUM. COURSE_SECTIONBean Property: CurriculumCourse.courseSection
COURSE_CODE_AND_SECTION_{N} Option: Sample Output: 8192-1 Database Column: SCHOOL_CURRICULUM. COURSE_CODE and COURSE_SECTIONBean Property: CurriculumCourse.courseCode - courseSection
COURSE_CURRENT_ABSENCES_{N} Option: Text to appear after the number Sample Output: 2 Absences (Absences would be the option) Database Column: STUDENT_CLASS_ATTENDANCE. UNEXCUSED_ABSENCESBean Property: StudentClassAttendance.unexcusedAbsences
COURSE_CURRENT_ALPHA_GRADE_{N} Option: Sample Output: A+ Database Column: Bean Property:

Genesis Student Information System User Documentation
6/12/2008 Page 39 of 49
COURSE_CURRENT_UNWEIGHTED_GRADE_{N} Option: Sample Output: 98 Database Column: Bean Property:
COURSE_CURRENT_EARNED_CREDITS_{N}
Prints the earned credits off of the FG (Final Grade) if one exists. If the FG does not exist; nothing is printed.
Option: Sample Output: 2.125 Database Column: Bean Property:
COURSE_CURRENT_ATTEMPTED_CREDITS_{N}
Prints the attempted credits off of the FG (Final Grade) if one exists. If the FG does not exist; nothing is printed.
Option: Sample Output: 2.125 Database Column: Bean Property:
TOTAL_ATTEMPTED_CREDITS Option: Sample Output: 2.125 Database Column: Bean Property:
COURSE_DESCRIPTION_{N}
Option: SUBSECTION = Will pull the description from the first subsection; if there is no description there; the curriculum description will be used.
Sample Output: Math 2R
Database Column: SCHOOL_CURRICULUM. COURSE_DESCRIPTION
Bean Property: CurriculumCourse.courseDescription

Genesis Student Information System User Documentation
6/12/2008 Page 40 of 49
COURSE_SHORT_DESCRIPTION_{N} Option: Sample Output: Math Database Column: SCHOOL_CURRICULUM.COURSE_SHORT_DESCRIPTIONBean Property: CurriculumCourse.courseShortDescription
COURSE_PERIOD_{N}
The period of the course is calculated by looking at the first subsection of the section in the schedule; and then looking up the PrintPeriod for the From and Thru period fields on the subsection.
Option: Sample Output: 9 Database Column: Bean Property:
COURSE_SEMESTER_{N} Option: Sample Output: FY Database Column: Bean Property: CouseSection.semester
COURSE_TEACHER_CODE_{N}
The teacher?s code as it appears on the STUDENT_GRADE_HISTORY record.
Option: Sample Output: Mrs. Smith Database Column: Bean Property:
COURSE_TEACHER_NAME_{N}
The teacher?s name is pulled from the STUDENT_GRADE_HISTORY record. If a teacher name is not on that record; each subsection starting at the last subsection is searched for a teacher id; if one is found; the district teacher record is looked up and that name is used. YOU CAN ADD THE WORD LASTONLY to the option box to display the teachers last name only
Option: Sample Output: Mrs. Smith Database Column: Bean Property:

Genesis Student Information System User Documentation
6/12/2008 Page 41 of 49
COURSE_WEIGHTED_NUMERIC_GRADE_{MP}_{N}
If the weighted grade is empty; and there is an alpha grade available; the alpha grade will be printed instead.
Option: Sample Output: 75 Database Column: STUDENT_GRADE_HISTORY. WEIGHTED_NUMERIC_GRADEBean Property: StudentGradeHistory.weightedNumericGrade
COURSE_UNWEIGHTED_NUMERIC_GRADE_{MP}_{N}
If the unweighted grade is empty; and there is an alpha grade available; the alpha grade will be printed instead.
Option: Sample Output: 75 Database Column: STUDENT_GRADE_HISTORY. UNWEIGHTED_NUMERIC_GRADEBean Property: StudentGradeHistory.unweightedNumericGrade
TOTAL_EARNED_CREDITS
Prints a total of all earned credits from any FG (Final Grade) grade records that are printed on this report card.
Option: Sample Output: 35.000 Database Column: STUDENT_GRADE_HISTORY. UNWEIGHTED_NUMERIC_GRADEBean Property: StudentGradeHistory.unweightedNumericGrade
TOTAL_EARNED_CREDITS_FOR_INCLUDED_GPAS
Prints a summed total of all earned credits from all GPAS passed in on the OPTION field.
Option: GPA1,GPA2,GPA3 Sample Output: 135.000 Database Column: Bean Property:
COURSE_COMMENT_ABBREV_{MP}_{N}_{Y}
Print the y?th comment abbreviation for course {n} in marking period {MP}
Option:

Genesis Student Information System User Documentation
6/12/2008 Page 42 of 49
Sample Output: Good Database Column: Bean Property:
COURSE_COMMENT_CODE_{MP}_{N}_{Y}
Print the y?th comment code for course {n} in marking period {MP}
Option: Sample Output: C1 Database Column: Bean Property:
COURSE_CURRENT_COMMENT_ABBRVS_{N}
Print all of the comment abbreviations graded in the current marking period (as defined in the ReportCardDefinition.markingPeriodCode field) for a particular course separated by a space.
Option: Start at index X. For example; to skip the first comment code, the option could be set to a 2 so that only 2 and 3 would be displayed.
Sample Output: 1 2 3
Database Column: Bean Property:
COURSE_CURRENT_COMMENT_ABBRV_{N}_{Y}
Print the comment code?s abbreviation field for comment code {Y} for course {N}. Only comments codes graded in the current marking period (as defined in the ReportCardDefinition.markingPeriodCode field) are printed.
Option: A comma separated list of comment category codes that are allowed to be printed. If blank; all comments are available to be printed.
Sample Output: C2
Database Column: Bean Property:

Genesis Student Information System User Documentation
6/12/2008 Page 43 of 49
COURSE_CURRENT_COMMENT_ABBRV2_{N}_{IC}
Print the comment code?s abbreviation field for comment code {IC} for course {N}. Only comments codes graded in the current marking period (as defined in the ReportCardDefinition.markingPeriodCode field) are printed.
Option: Sample Output: C2 Database Column: Bean Property:
COURSE_CURRENT_COMMENT_ABBRV3_{MP}_{N}_{IC}
Print the comment code?s abbreviation field for comment code {IC} for course {N} in marking period {MP}.
Option: Sample Output: Good Database Column: Bean Property:
COURSE_CURRENT_COMMENT_CODE_{N}_{Y}
Print the comment code for comment code {Y} in course {N}.
Option: A comma separated list of comment category codes that are allowed to be printed. If blank; all comments are available to be printed.
Sample Output: C1 C2 C3
Database Column: Bean Property:
COURSE_CURRENT_COMMENT_CODES_{N}
Print all of the comment codes graded in the current marking period (as defined in the ReportCardDefinition.markingPeriodCode field) for a particular course separated by a space.
Option: Start at index X. For example; to skip the first comment code, the option could be set to a 2 so that only C2 and C3 would be displayed.
Sample Output: C1 C2 C3
Database

Genesis Student Information System User Documentation
6/12/2008 Page 44 of 49
Column: Bean Property:
COURSE_CURRENT_COMMENT_CODE_{N}_{IC}
Print comment code {IC}?s code for course {N}. Only comment codes from the current marking period (as defined in the ReportCardDefinition.markingPeriodCode field) are printed.
Option: Sample Output: C1 Database Column: Bean Property:
COURSE_CURRENT_COMMENT_DESC_{N}_{Y}
Print comment code {Y}?s description for course {N}. Only comment codes from the current marking period (as defined in the ReportCardDefinition.markingPeriodCode field) are printed.
Option: A comma separated list of comment category codes that are allowed to be printed. If blank; all comments are available to be printed.
Sample Output: Shows good effort.
Database Column: Bean Property:
Attendance Fields
All of the attendance totals in the following fields are calculated from the StudentMPAttendance bean (STUDENT_MP_ATTENDANCE table). These totals are updated when the ?Update MP Attendance Totals? function is run from the Grading -> Report Cards -> Generate screen.
ATTENDANCE_ALL_ABSENCES_{MP}
Show all (excused and unexcused) absences for the marking period.
Option: Sample Output: 2 Database Column: Bean Property:

Genesis Student Information System User Documentation
6/12/2008 Page 45 of 49
ATTENDANCE_ALL_TARDIES_{MP}
Show all (excused and unexcused) tardies for the marking period.
Option: Sample Output: 3 Database Column: Bean Property:
ATTENDANCE_ALL_ABSENCES_FOR_CODES_{MP}
Show all Absences for Attendance Codes passed in comma separated list. This DOES NOT write out to STUDENT_MP_ATTENDANCE table.
Option: 1,2,3 Sample Output: 3 Database Column: Bean Property:
ATTENDANCE_ALL_ABSENCES_FOR_CODES_TOTAL
Show all Absences for Attendance Codes passed in comma separated list. This DOES NOT write out to STUDENT_MP_ATTENDANCE table.
Option: 1,2,3 Sample Output: 3 Database Column: Bean Property:
ATTENDANCE_ALL_ABSENCES_TOTAL
Show all (excused and unexcused) absences for all marking periods displayed on the report card.
Option: Sample Output: 7 Database Column: Bean Property:
ATTENDANCE_ALL_TARDIES_TOTAL
Show all (excused and unexcused) tardies for all marking periods displayed on the report card.
Option:

Genesis Student Information System User Documentation
6/12/2008 Page 46 of 49
Sample Output: 7 Database Column: Bean Property:
ATTENDANCE_EXCUSED_ABSENCES_TOTAL
Show all excused absences for all marking periods displayed on the report card.
Option: Sample Output: 7 Database Column: Bean Property:
ATTENDANCE_EXCUSED_TARDIES_TOTAL
Show all excused tardies for all marking periods displayed on the report card.
Option: Sample Output: 7 Database Column: Bean Property:
ATTENDANCE_UNEXCUSED_ABSENCES_TOTAL
Show all unexcused absences for all marking periods displayed on the report card.
Option: Sample Output: 7 Database Column: Bean Property:
ATTENDANCE_UNEXCUSED_TARDIES_TOTAL
Show all unexcused tardies for all marking periods displayed on the report card.
Option: Sample Output: 7 Database Column: Bean Property:
ATTENDANCE_ALL_ABSENCES_CURRENT_MP
Show all absences for current marking period of report card.

Genesis Student Information System User Documentation
6/12/2008 Page 47 of 49
Option: Sample Output: 7 Database Column: Bean Property:
ATTENDANCE_ALL_TARDIES_CURRENT_MP
Show all tardies for current marking period.
Option: Sample Output: 7 Database Column: Bean Property:
ATTENDANCE_ALL_TARDIES_FOR_MONTH_{MONTH}
Show all tardies for the month
Option: ?EXCUSED?, ?UNEXCUSED?. No option (leave blank) will give both.Sample Output: 7 Database Column: Bean Property:
ATTENDANCE_ALL_ABSENCES_FOR_MONTH_{MONTH}
Show all absences for the month
Option: ?EXCUSED?, ?UNEXCUSED?. No option (leave blank) will give both.Sample Output: 7 Database Column: Bean Property:
POSSIBLE_DAYS_{MP}
Print number of possible days for the marking period.
Option: Sample Output: 35 Database Column: Bean Property:
Genesis Student Information System User Documentation
6/12/2008 Page 48 of 49
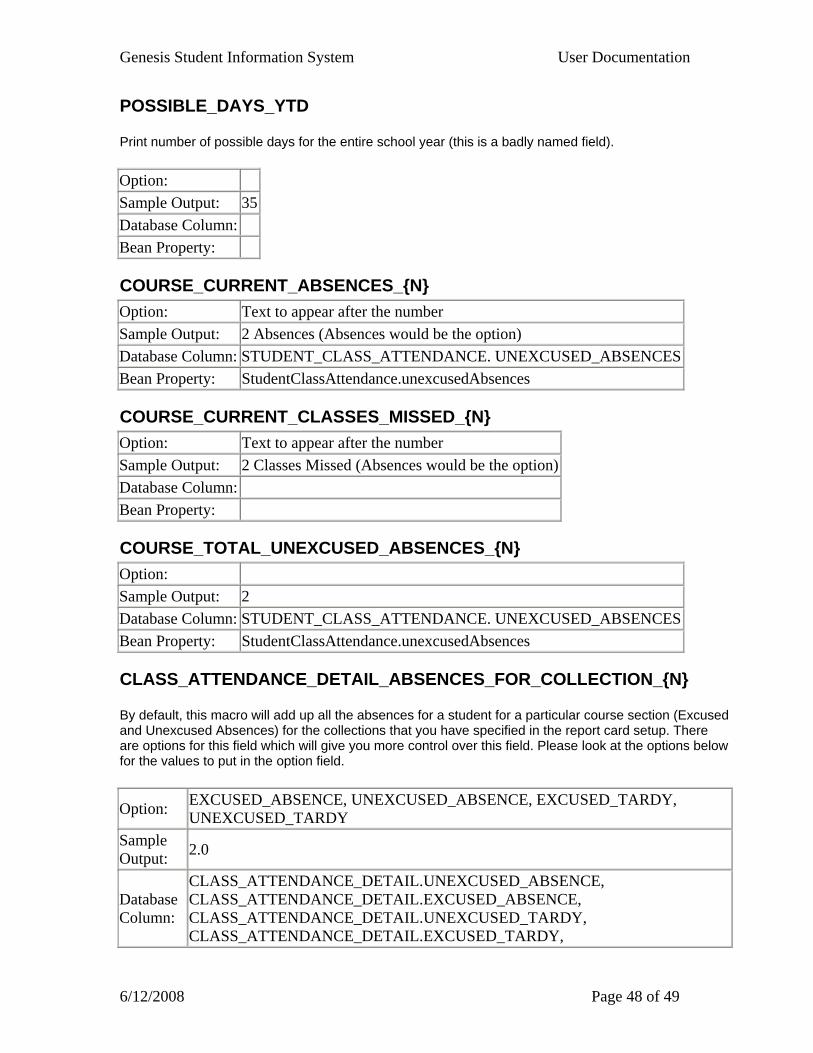
POSSIBLE_DAYS_YTD
Print number of possible days for the entire school year (this is a badly named field).
Option: Sample Output: 35 Database Column: Bean Property:
COURSE_CURRENT_ABSENCES_{N} Option: Text to appear after the number Sample Output: 2 Absences (Absences would be the option) Database Column: STUDENT_CLASS_ATTENDANCE. UNEXCUSED_ABSENCESBean Property: StudentClassAttendance.unexcusedAbsences
COURSE_CURRENT_CLASSES_MISSED_{N} Option: Text to appear after the number Sample Output: 2 Classes Missed (Absences would be the option)Database Column: Bean Property:
COURSE_TOTAL_UNEXCUSED_ABSENCES_{N} Option: Sample Output: 2 Database Column: STUDENT_CLASS_ATTENDANCE. UNEXCUSED_ABSENCESBean Property: StudentClassAttendance.unexcusedAbsences
CLASS_ATTENDANCE_DETAIL_ABSENCES_FOR_COLLECTION_{N}
By default, this macro will add up all the absences for a student for a particular course section (Excused and Unexcused Absences) for the collections that you have specified in the report card setup. There are options for this field which will give you more control over this field. Please look at the options below for the values to put in the option field.
Option: EXCUSED_ABSENCE, UNEXCUSED_ABSENCE, EXCUSED_TARDY, UNEXCUSED_TARDY
Sample Output: 2.0
Database Column:
CLASS_ATTENDANCE_DETAIL.UNEXCUSED_ABSENCE, CLASS_ATTENDANCE_DETAIL.EXCUSED_ABSENCE, CLASS_ATTENDANCE_DETAIL.UNEXCUSED_TARDY, CLASS_ATTENDANCE_DETAIL.EXCUSED_TARDY,

Genesis Student Information System User Documentation
6/12/2008 Page 49 of 49
Bean Property:
ClassAttendanceDetail.unexcusedAbsences, ClassAttendanceDetail.excusedAbsences, ClassAttendanceDetail.unexcusedTardies, ClassAttendanceDetail.excusedTardies,
CLASS_ATTENDANCE_DETAIL_ABSENCES_FOR_{MP}_{N}
By default, this macro will add up all the absences for a student for a particular course section (Excused and Unexcused Absences) for the Marking Period {MP} entered in the macro. There are options for this field which will give you more control over this field. Please look at the options below for the values to put in the option field.
Option: EXCUSED_ABSENCE, UNEXCUSED_ABSENCE, EXCUSED_TARDY, UNEXCUSED_TARDY
Sample Output: 2.0
Database Column:
CLASS_ATTENDANCE_DETAIL.UNEXCUSED_ABSENCE, CLASS_ATTENDANCE_DETAIL.EXCUSED_ABSENCE, CLASS_ATTENDANCE_DETAIL.UNEXCUSED_TARDY, CLASS_ATTENDANCE_DETAIL.EXCUSED_TARDY,
Bean Property:
ClassAttendanceDetail.unexcusedAbsences, ClassAttendanceDetail.excusedAbsences, ClassAttendanceDetail.unexcusedTardies, ClassAttendanceDetail.excusedTardies,