
Expense Reports - ExpenseAnywhere approve expense reports electronically ... Safari or Google Chrome...
41
1 Updated August 24, 2017 Expense Reports Introduction: ExpenseAnywhere is a web-based expense management system that Greystar® has contracted with for employees to fill out, submit and approve expense reports electronically and receive reimbursement payments via direct deposit. All corporate team members are eligible to utilize the automated expense system. Onsite team members use the property expense report form found on the Team Member Portal under the operations tab in the travel information section. System Requirements: You must have Internet Explorer version 7.0 or higher, Firefox, Safari or Google Chrome to utilize the ExpenseAnywhere System. For optimum results, turn off the system’s pop-up blocker. Request a New User: Requesting a new user is a two help desk ticket process: Before a new user can be set up in ExpenseAnywhere, the user must be assigned a Yardi vendor code. TEAM MEMBER YARDI VENDOR CODE SETUP: Submit a setup request using the Internal Request Form, a link is available on the Supplier Support Portal page, and can be accessed by visiting the Team Member Portal > Home > Jump To > Supplier Support > Question and Support Section at the bottom of the page, under the Compliance Depot header. Complete each section providing the information as indicated. Select your Location, and complete your information as the submitter, whether submitting the request for yourself or on behalf of someone else. Indicate the request is a New Setup for a Corporate Team Member Vendor Code. Select the Next button to move to the next section.
Transcript of Expense Reports - ExpenseAnywhere approve expense reports electronically ... Safari or Google Chrome...

1 Updated August 24, 2017
Expense Reports Introduction: ExpenseAnywhere is a web-based expense management system that Greystar® has contracted with for employees to fill out, submit and approve expense reports electronically and receive reimbursement payments via direct deposit. All corporate team members are eligible to utilize the automated expense system. Onsite team members use the property expense report form found on the Team Member Portal under the operations tab in the travel information section. System Requirements: You must have Internet Explorer version 7.0 or higher, Firefox, Safari or Google Chrome to utilize the ExpenseAnywhere System. For optimum results, turn off the system’s pop-up blocker. Request a New User: Requesting a new user is a two help desk ticket process: Before a new user can be set up in ExpenseAnywhere, the user must be assigned a Yardi vendor code. TEAM MEMBER YARDI VENDOR CODE SETUP:
Submit a setup request using the Internal Request Form, a link is available on the Supplier Support Portal page, and can be accessed by visiting the Team Member Portal > Home > Jump To > Supplier Support > Question and Support Section at the bottom of the page, under the Compliance Depot header.
Complete each section providing the information as indicated. Select your Location, and complete your information as the submitter, whether submitting the request for yourself or on behalf of someone else. Indicate the request is a New Setup for a Corporate Team Member Vendor Code. Select the Next button to move to the next section.

2 Updated August 24, 2017
Select Team Member Reimbursement to view more detailed instructions related to this request category, if needed. Select primary Request Category as Reimbursement. Select the sub-category as Team Member Reimbursement. Then select the Location Type as Corporate. No additional Forms or Documents are required. NOTE: If called away during the submission process, select the Save and Resume Later option, and an e-mail will be sent to you directly allowing you to resume submission at a later time, starting from where you left off.
If the submitter’s location was selected as Corporate, and the Team Members’ location is Corporate, select No to the first question shown on the Supplier Information page (Was the work performed at a different location than the submitter’s location?) Enter the Team Member’s name as it is listed in Outlook’s Global Address List. At least two forms of contact must be provided. A fax number is optional. Use the Notes/Comments sections, if needed to include any additional instructions or information. Select the Submit Form button to submit the request.

3 Updated August 24, 2017
The following message will appear as confirmation the request was submitted successfully.
The submitter will receive a “request in process” email when the request is actively being worked. All requests are processed in the order submitted. Please allow 1-3 business days for initial setup. The submitter will receive a final “request complete” email after basic setup in Compliance Depot is complete. The team member is assigned an “Exempt” status in Compliance Depot for compliance, usage, and system integration purposes. The 6-digit Compliance Depot Vendor ID will be provided to the submitter in the setup completion email. Allow an additional 1-2 business days for the information to integrate from Compliance Depot into Yardi. Proceed to Part Two of the process, providing the Compliance Depot Vendor ID in the ticket. The Expense Anywhere Administrator will then locate the Yardi Code, in Yardi directly or in Compliance Depot using the Vendor ID provided in the ticket.
TEAM MEMBER EXPENSEANYWHERE SETUP: For the second ticket, fill in all required fields by selecting the drop down menu choices as shown in the sample below. Four pieces of information are required to set up an ExpenseAnywhere user. Do not submit this ticket without complete information in the request detail box.
1. Compliance Depot Vendor ID 2. Greystar email address (the new team member’s email must be active before you can request EA access) 3. Default Cost Code – this is the Yardi code for either the city office or functional team the employee will be working for.
Please contact your regional accounting director to confirm if you are unsure of the appropriate code 4. Approver – this is the individual that will be approving the user’s expenses, i.e. direct supervisor

4 Updated August 24, 2017
Once the information is complete, you may submit the ticket. When the account is set up, the user will receive a system generated welcome email from ExpenseAnywhere with introductory information and login credentials. Corporate ID: The Greystar corporate ID is gs10215. From the ExpenseAnywhere homepage, you will need to select the ‘Customer Log In’ button and enter this code in order to be directed to the appropriate user login screen.

5 Updated August 24, 2017
FIRST TIME USERS – You must complete the next 5 steps before you can use Expense Anywhere to submit expenses:
1. Login using the login ID, temporary password and web link provided in the welcome email. Update your password as prompted.
2. Go to the ‘My Profile’ tab

6 Updated August 24, 2017
3. Choose the ‘Bank Info’ option and enter your bank account information for direct deposit.
Enter your banking information using the example below on where information appears on a check.
NOTE: Banking information MUST be entered 1-2 days prior to submitting an expense report. You may enter expenses immediately, but will not be able to submit your report until the banking information has been in the system 1-2 days.

7 Updated August 24, 2017
4. Choose the ‘My Cost Codes’ option and choose from the drop-down menu all property codes you charge or bill back
expenses to. You must add the property code in this section in order to be able to choose it from the drop down list within an expense report for bill back items when creating your expense report. As your portfolio changes, you can add and delete properties from your “bill back list” using this ‘My Cost Codes’ tab. It is now possible to add up to 100 property codes to your list of cost codes.
(OPTIONAL) COMPLETE ONLY IF SOMEONE ELSE ENTERS YOUR EXPENSES: If you would like to authorize someone else to either enter expenses on your behalf or enter & submit expenses on your behalf, choose the ‘Set Proxy’ option and select the individual(s) and type of authorization you would like them to have.
If you would like to authorize someone to enter/submit your expenses but do not see their name listed as an option to select, please log a help desk ticket requesting they be granted proxy rights.

8 Updated August 24, 2017
Creating and Submitting Expense Reports: At a minimum, Team Members should submit expense reports monthly so corporate financials are accurate. Please consolidate expense reports when reasonably possible as each report submitted has a cost to the Company from ExpenseAnywhere. Multiple trips maybe be included on one report. Frequent travelers may submit weekly or bi-weekly. Select ‘Create Expense Report’ from the ‘My Reports’ tab.
Enter a meaningful title, purpose and date range where indicated. The purpose here is for the sole benefit of you and your approver. Choose the ‘out of pocket’ option and click the ‘CREATE’ button. PLEASE NOTE: You cannot enter any expenses outside of this date range so please make sure the date range you input covers all of the expenses you need to enter.

9 Updated August 24, 2017
Enter your first expense by selecting the transaction date, a category, sub-category, amount and then clicking ‘save’.
** Please note: if you enter an entertainment-dining expense you will be prompted for and required to enter at least one attendee.

10 Updated August 24, 2017
Mileage: When you select Mileage from the Category drop down menu, a new window will pop up. Please make sure the MapQuest option is selected, check the “Round Trip” box if applicable, enter your beginning and ending addresses (you may enter multiple addresses you traveled to on any given day by clicking the ‘Add another location’ box) and then click “Get Miles”. The system will return directions and the number of miles. Please note: Greystar follows the IRS guideline that only mileage in excess of one’s daily work commute are reimbursable, therefore, you should enter your “Home to Office Miles” in the field provided and the system will deduct these miles. Click “OK” to continue submitting your expenses. You do not have to provide any additional backup when you use the ‘MapQuest’ option. If you use the ‘Manual’ option for some reason, you must attach a mileage log or support printed from an online map search engine with your receipts. Please note: you can enter an airport code and the system will find the address for you. The system will also remember addresses you have previously submitted so after submitting an address the first time, the system will automatically populate your address once you start typing it in.
Troubleshooting Mileage: When you select the Mileage category, a window will pop up like the example below. If you do not see this window, check your browser settings to make sure pop-ups aren’t blocked. EA works best with Internet Explorer, so be sure to switch browsers if you are using Chrome or Firefox.

11 Updated August 24, 2017
Trip Field (Optional): The ‘Trip’ field is an optional field. When used, it allows you as well as your approver to review expenses subtotaled by specific trips. Simply type the exact same name into the ‘Trip’ field for every expense related to that trip and the system subtotals them in the ‘List View’. It is recommended that you copy the text after typing the first time and paste it into the trip field on additional expenses to ensure they are an exact match. All expenses where the ‘Trip’ field is left blank will be lumped together and subtotaled.

12 Updated August 24, 2017
Billbacks: If an item is to be billed back to a property, put a checkmark next to the ‘billable’ box and choose the property to bill the item back to from the ‘Charge To’ drop down menu. If you do not check the billable box, the item will be expensed to your default charge code.
Guidelines to remember:
**Please make sure all items that you check as billable are client-approved items. ** Expenses should not be submitted for suppliers we would typically pay through our accounts payable group (landscaping invoices, maintenance supplies and contractors, etc.). Suppliers should be setup in Compliance Depot and invoices submitted for payment. **For your own protection, and that of the company, team members are not authorized to pay suppliers with their own personal funds and seek reimbursement.
Troubleshooting Billbacks: If you need to bill something back to a property but the property code does not appear as an option in the drop down menu – go to the ‘My Cost Codes’ tab under ‘My Profile’ and add the property code to your list. If the property is not listed under ‘My Cost Codes’ submit a help desk ticket under the ExpenseAnywhere category.

13 Updated August 24, 2017
If an expense needs to be split by two or more properties, choose “--------SPLIT--------“ from the drop down menu then enter the number of splits; a window will pop up where you can choose the properties to allocate to and you can change the dollar amount or % to allocate to each. Click ‘Save Splits’ when finished.
Troubleshooting Splits: If you get a message indicating “Cannot Split Transaction”, review your drop down menu to see if you have more than one property code to choose from. If you only see one, your default cost center, go to the ‘My Cost Codes’ tab under ‘My Profile’ and add to your list all of the properties you have items to bill back to.

14 Updated August 24, 2017
Itemize Bill Option: Select ‘Yes’ if you have an expense that needs to be allocated to two or more expense codes, i.e. you have a hotel charge for $399 that needs to be split between lodging, parking, and meals. Enter the total amount of the charge ($399 in this example) in the ‘Bill Amount (USD)’ field. Proceed with selecting the transaction date, category, sub-category, and amount for the lodging piece only and clicking ‘save’. You will see the remainder of the charge to allocate in the ‘Balance (USD)’ field. Repeat steps as necessary for the parking and meals until you have allocated out the entire balance.
Required Comments: The system will require you to enter a comment for every expense. It is very important that you enter detailed comments in the box provided for this information to pull into Yardi correctly. Expense reports submitted without all required information as detailed in the examples below will be rejected and returned to you for modification which could cause a delay in receiving your reimbursement. Please use the following guidelines for entering comments:

15 Updated August 24, 2017
Cell Phones/Home Office Telephone/Fax: You must include the pages from your bill showing the service dates and costs for all telephone related expenses. EXAMPLES: 08/05-09/04 Cellular Services 08/02-09/01 Home Office Phone Travel Expenses: For all travel expenses including airfare, lodging, taxi, parking, mileage, etc… please include the date(s) and destination travelled to in your comment. EXAMPLES: 07/21 Seattle Parking 11/5-11/8 Dallas Mileage 09/10 Tolls 05/15 Houston Taxi All Other Expenses: Please type a brief comment that includes the date, place, event or description. EXAMPLES: 05/25 Lunch w/VP’s 08/11 Holiday Lunch Deposit 10/28 Flowers for John Smith Baby
GIG/GDG Options: These job costing fields are for GIG/GDG use only. Please leave default of “NONE” if this does not apply to you. GIG/GDG Team Members – Selecting the GIG/GDG ONLY category will allow you to select a balance sheet account under the Sub Category field; this should be utilized if an item you are submitting is related to a job that is being tracked. Please also select the appropriate job category and job cost code from the drop down menus for any expenses that relate to a project that is being tracked.

16 Updated August 24, 2017
Repeat steps above for each expense you have to submit. When finished, click ‘View Report’.
Attaching Receipts: Users can manage receipts in their unique ‘receipt store’ which can be accessed by clicking the E-RECEIPTS button from any in-process report.
Receipts can be scanned to a PDF and uploaded to a user’s receipt store, or a user can print a fax cover page and fax receipts directly to their receipt store. Additionally, users can have vendors email receipts directly to the Expense Anywhere servers where they will be converted to a PDF document and stored in the user’s online receipt store.

17 Updated August 24, 2017
To use the email functionality, a user first needs to set up a unique Expense Anywhere email account. To do so, go to the ‘My Profile’ tab, choose the ‘Personal Profile’ link…
Choose your unique name and click save email. The system will provide a message if the email address is available. After an available address is found, click save email again. Note: email addresses must be unique to the entire Expense Anywhere population so if you have a common name, you may need to add a middle initial, numbers, etc… Be sure to make it something you can easily remember.

18 Updated August 24, 2017
All receipts that are emailed to your Expense Anywhere email address are automatically saved in your receipt store and are ready to be attached to your next expense report. And YES!... you can take pictures of receipts with your smart phone and email them to your EA address.
To attach one or more of these receipts to the report you are currently working on, simply check the box in the upper left hand corner and then click the ATTACH button.
19 Updated August 24, 2017
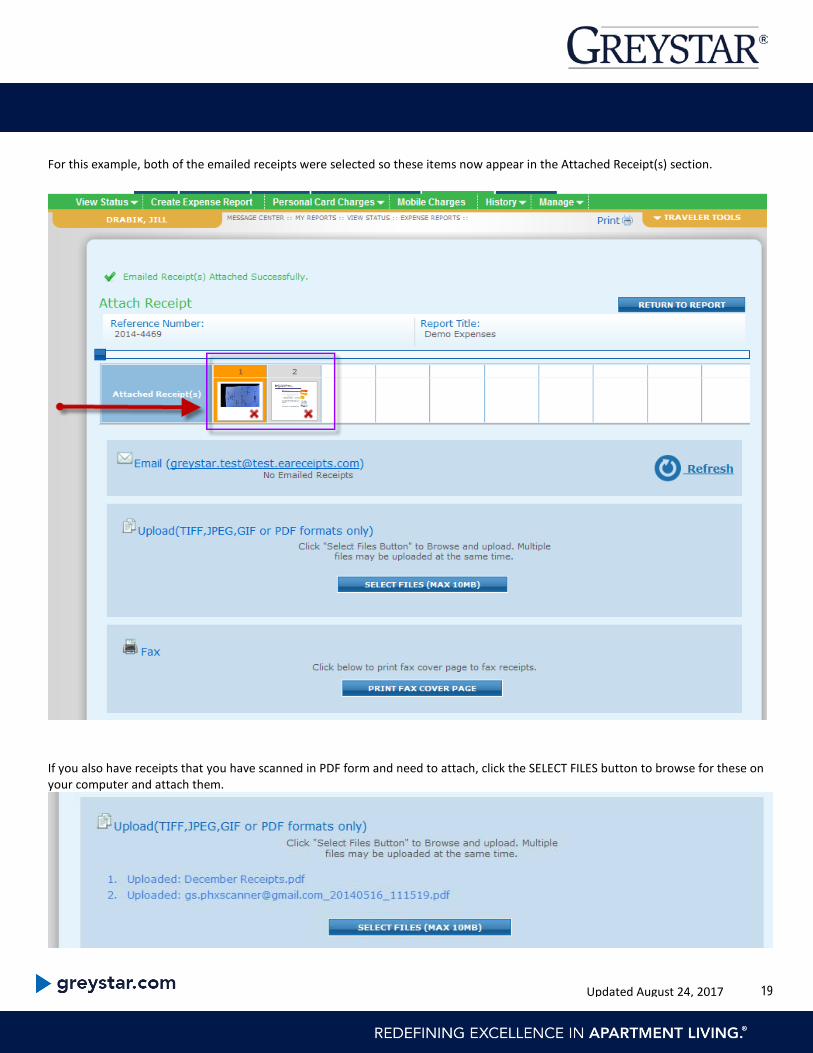
For this example, both of the emailed receipts were selected so these items now appear in the Attached Receipt(s) section.
If you also have receipts that you have scanned in PDF form and need to attach, click the SELECT FILES button to browse for these on your computer and attach them.

20 Updated August 24, 2017
The system has a helpful indicator that lets you know the progress of your receipts being attached (this can take several minutes).
When all of the receipts show in the Attached Receipt(s) section, click the RETURN TO REPORT button to continue working on your report.

21 Updated August 24, 2017
The system attempts to automatically match each amount to a receipt. If the system is able to match the amount of an item to a
receipt, you will see a in the ‘Receipt’ column. If the system could not find a match, you will see a .
Items that the system was unable to automatically match as identified with a require you to provide a manual match. Go to the Receipt View by selecting the magnifying glass icon in the upper right corner.

22 Updated August 24, 2017
To perform a manual match for a item, scroll through your uploaded receipts by using the left or right arrows to find the receipt related to this transaction. All receipts appear in the same window regardless of how they arrived in your receipt store or how many you uploaded.
Once you find the receipt, click anywhere in the ACTION column next to the unmatched expense. The area will become green and three action items will populate.
The three action items can be used in the following ways:
1. Click on the icon for action item #1 and then use your mouse to highlight the amount on the associated receipt which completes the task of manually matching the transaction to the receipt (see example that follows).
2. Action item #2 restarts the automatic matching process. If the system was unable to automatically match your receipt to a transaction, you can restart the process and they system will try to match it again.
3. The third and final action item can serve two purposes. First, click this icon if you made an error manually matching a receipt. The system will unmatch the image and allow you to start the manual process over again. Secondly, you can use this icon if you believe the system auto matched your transaction to an incorrect image.

23 Updated August 24, 2017
As an example, if your goal is to manually match the $10.74 item, first find the corresponding receipt which shows $10.74 and click on the icon for the first action item (dotted square with an arrow)…
Next, use your mouse to outline where the amount appears on the receipt. You will notice the area you are dragging your mouse over will turn grey.
Once you let go of your mouse, the amount now has a highlighted box around it making it extremely easy for your supervisor and accounting reviewer to locate the manual match. The item also now reflects a which represents a manual match was performed.

24 Updated August 24, 2017
Continue this process eliminating every . If you accidentally highlight the wrong amount or the wrong receipt, you can use the ‘Delete Matching’ icon to erase it and start over.

25 Updated August 24, 2017
Once you have finished manually matching all of the items, you can select the SUBMIT button to submit your expense report to your supervisor for approval.
Note: Each time you enter an expense into an expense report and click “save” it is saved until you submit the expense report or delete it. If you run out of time and cannot complete an expense report - you can log in at a later time and add to or modify an in-process expense report. Once you are satisfied with your report, select the SUBMIT button. You should receive a message that your expense report submission was successful.

26 Updated August 24, 2017
Lost Receipts: If you lose a receipt, which should be rare, please attach any proof of payment (i.e. credit card bill) along with a signed and approved “Addendum for Special Circumstances”. Approvers will be responsible to determine if reimbursement should be granted. The form can be found on the Team Member Portal in the Greystar forms library.
Modifying an Expense Report: Each time you enter an expense into an expense report and click “save” it is saved until you submit the expense report or delete it. If you run out of time and cannot complete an expense report, you can log in at a later time and add to or modify an in-process expense report.
Go to ‘View Status’ on the ‘My Reports’ tab, locate the in-process report you wish to modify, click to open it and then add or modify as you wish. You can only modify expense reports with a ‘Not Submitted’ status. Once you have submitted the expense report you can re-open it to attach receipts to it but you cannot modify it in any other way.

27 Updated August 24, 2017
Disapproved Expenses: If your supervisor or accounting disapproves one or more expenses you submit on an expense report you will receive an email notification that your expense report has been disapproved. To open the disapproved expense report go to ‘View Status’ on the ‘My Reports’ tab.
Then open the expense report that has been disapproved:

28 Updated August 24, 2017
If you move your curser over the associated yellow note pad in the comments field, you will see any comments your supervisor or accounting has made regarding why an expense was disapproved.

29 Updated August 24, 2017
If the issue was that no receipt was provided, as in the example illustrated here, you can attach receipts from this screen by clicking on ‘E-Receipts’.
If the amount is off, coding is incorrect, or you need to delete altogether, you can open the item in question by clicking on the transaction date and modify as needed and then re-submit.

30 Updated August 24, 2017
Importing Charges from a Credit Card (Optional): Expense Anywhere allows you to import charges from your credit card. This can save you valuable time from a data entry standpoint as well as help ensure you have submitted everything you have paid for, but, this does not eliminate the need to provide a receipt for each expense. Greystar policy requires you provide a receipt for every expense you submit whether you pay with cash or a credit card. If you would like to import expenses from a credit card – first export the expenses to a .QBO file from your bank’s website. Please note: you will most likely not be able to open the .qbo file on your computer but you should be able to save the file to your computer in order to complete the import. Under the ‘My Reports’ tab – choose the ‘Personal Card Charges’ option. Use the browse button to locate the .QBO file on your computer and then click ‘IMPORT’.

31 Updated August 24, 2017
Select the charges you want to import from your credit card by placing a checkmark in the ‘Import’ column and then click “IMPORT”. The imported expenses are now available to be attached to an expense report.
You must now choose an expense report to attach the credit card expense to. If you mistakenly import a personal charge you can use the ‘MARK PERSONAL’ button. Otherwise, choose the expense report, select the expenses with a checkmark, and click ‘ADD’.

32 Updated August 24, 2017
Once you have added the credit card expenses, you must ‘allocate’ them, i.e. you must code them as you would an out of pocket expense. One by one, select each of the imported charges by clicking on the underlined vendor description on the ‘Vendor’ column. Several of the fields will be pre-populated with the imported information. Choose the appropriate category and sub-category, populate the ‘billable’ and ‘Charge To’ fields if applicable and then click SAVE. Repeat step until all credit card charges have been “allocated”.
33 Updated August 24, 2017
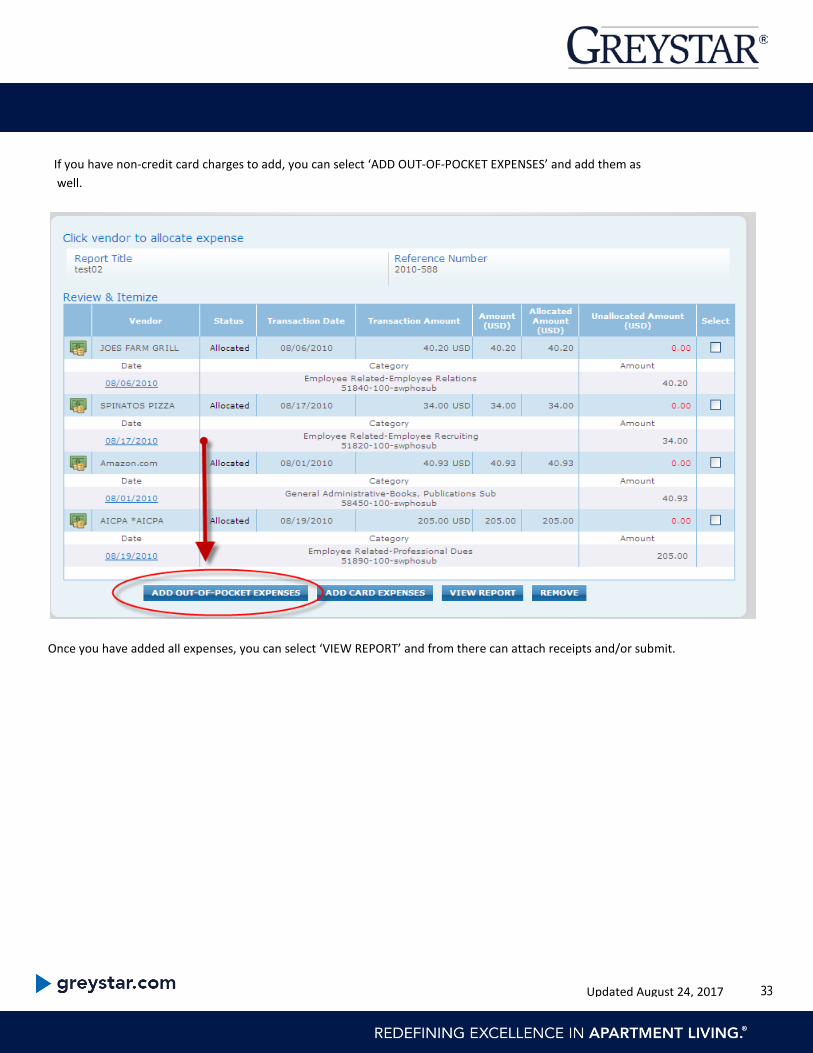
If you have non-credit card charges to add, you can select ‘ADD OUT-OF-POCKET EXPENSES’ and add them as well.
Once you have added all expenses, you can select ‘VIEW REPORT’ and from there can attach receipts and/or submit.

34 Updated August 24, 2017
Checking Expense Report Status: You can determine the status of the expense reports you have entered at any time by selecting the ‘View Status’ option from the ‘My Reports’ tab.
Payments: Direct deposit payments will be made three times per month. Expense reports must be approved by one’s supervisor and verified by accounting by midnight Eastern time on the dates listed on the Expense Anywhere Calendar to be included in a specific batch. In most cases, employees can expect the direct deposit to hit their bank account 3 to 5 days prior to the date listed on the Expense Anywhere calendar.

35 Updated August 24, 2017
Approving Expenses: If you are responsible for approving expenses for one or more employees, you will have an ‘Employee Reports’ tab in addition to the ‘My Reports’ and ‘My Profile’ tabs. To approve expenses, go to this tab and choose ‘Expense Approval’.
Choose an expense report to review by selecting either the ‘List View’ or ‘Receipt View’ option.

36 Updated August 24, 2017
From either view option, you can view all of the details of an expense (i.e. coding, site(s) being billed back, attendees, etc…) by hovering your mouse over the information icon in the Info column. If any of the information is incorrect, you can disapprove the expense with a note explaining what needs to be corrected. List View: You can review receipts, approve or disapprove expenses and add comments. Click the to approve an item or the to disapprove an item. When you disapprove an item the entire expense report is returned to the originator for revision. Please type an explanation for why you are disapproving the expense(s) in the ‘Approver Comment’ field. Additional space is provided in the ‘Approver Additional Comments’ section if needed.

37 Updated August 24, 2017
Receipt View: This option has the same functionality as the list view but you can view receipts in the same window.
While reviewing reports, you can click on the or for each item and the system will not only advance directly to the page the receipt appears on but will also highlight the amount and date it was able to automatically match.
No matter which view you select, once you are done select ‘Save Changes’ and the expense report will either be forwarded to accounting for further review/processing or returned to the originator for revision.

38 Updated August 24, 2017
Scheduling an Alternate Approver: If you are going to be out of the office for an extended period of time you can reassign your approver duties to another designated approver. To do so, choose ‘Alternate Manager’ from the ‘Employee Reports’ tab and select the date range and the alternate manager from the drop down menu.
If you receive an email notification requesting you approve expenses for an employee that no longer reports to you or was mistakenly assigned as your employee, please log a help desk ticket under the Expense Anywhere option on the Team Member Portal and request the approver duties for the individual be reassigned.

39 Updated August 24, 2017
Miscellaneous Tools:
If you forget your password you can have it reset and a new temporary password emailed to you from the login page.
Smart Word Recognition: The system uses Smart Word technology which will flag any expenses that do not conform to company policy and may not be reimbursable. To verify what is considered out of policy, click on the red flag. The Smart Word technology will highlight those non-reimbursable expenses in red on your receipt. In this example, you will notice that there are two charges for wine and the tax for liquor highlighted. If you overlooked these items when entering your receipts and need to delete them, click on the blue hyperlink in the transaction date column of that expense. This will take you back to the ‘Add Transactions page’ where you can make changes to this transaction. When you have completed your changes, be sure to hit SAVE.

40 Updated August 24, 2017
There are three different views that you can choose from when working on an expense report: list view, grid view, and receipt view. All have the same functionality, so you may choose your preference.
You can print out a hard copy of your expense report by clicking the printer icon.

41 Updated August 24, 2017
You can search for a specific expense report using the History option on the ‘My Reports’ tab.
Expense reports are kept here for you to access indefinitely.
Problems/Issues/Questions: If you need additional information or assistance with the program or have any questions or issues, please log a help desk ticket and someone will respond as quickly as possible.


![Tabe of Contents - FNF Intranet Login · [7] Mileage Expenses With Mileage Expenses you will need to enter the date of travel, Expense Type (you have two choices for Expense Type](https://static.fdocuments.us/doc/165x107/5b16e1027f8b9a596d8e7b9a/tabe-of-contents-fnf-intranet-login-7-mileage-expenses-with-mileage-expenses.jpg)


