CONSTRUCTION MANUAL 2019€¦ · Sample Final Acceptance Letter B-3 Sample Buy America...
135
APPENDIX B EXAMPLE LETTERS, NOTICES, AND FORMS CONSTRUCTION MANUAL 2019
Transcript of CONSTRUCTION MANUAL 2019€¦ · Sample Final Acceptance Letter B-3 Sample Buy America...

APPENDIX B EXAMPLE LETTERS,
NOTICES, AND FORMS
CONSTRUCTION MANUAL
2019

[PAGE INTENTIONALLY BLANK]

FOREWORD The CDOT Construction Manual is an operational manual of the Colorado Department of Transportation (CDOT). It defines the criteria and procedures to be used by engineering personnel in the administration of construction contracts.
The Manual was prepared and is maintained by the Project Development Branch under the authority of, and at the direction of, the Chief Engineer.
Although the Manual follows the general outline of the Standard Specifications, it is not a specification and should not be interpreted as such. Any section references are specific to this Manual unless otherwise noted.
Suggestions and/or comments for improvement, clarification, correction, and/or inclusion of material in the Manual are welcome. Please forward your comments to your Area Engineer in the Contracts and Market Analysis Branch.
The instructions and procedures in this Manual are written and intended for use by Project Engineers and Project Inspectors.
GENDER USAGE Titles used in this manual having a masculine gender, such as “workmen”, and the pronouns “he” and “his”, are used for the sake of brevity and are intended to refer to persons of either sex.

TRADEMARKS AASHTOWare® is a registered trademark of the American Association of Highway and Transportation Officials (AASHTO). It is a suite of software for transportation projects.
Preconstruction is a commonly used name for AASHTOWare Project PreconstructionTM.
SiteManager is a commonly used name for AASHTOWare Project SiteManager.
Adobe and Acrobat are either registered trademarks or trademarks of Adobe Systems Incorporated in the United States and other countries.
MicroStation® is a registered trademark of Bentley Systems, Incorporated.
ProjectWise® is a registered trademark of Bentley Systems, Incorporated.
REVISIONS The Manual will be revised as methods, materials, policies, procedures, specifications, and the industry change. CDOT will revise the Manual available at
https://www.codot.gov/business/designsupport/bulletins_manuals/ cdot-construction-manual
It is the Manual holder’s responsibility to keep the Manual current.

Appendix B 2019
EXAMPLE LETTERS, NOTICES, AND FORMS
Appendix B presents examples of the most common letters, notices, and forms (i.e., CDOT Forms, FHWA Forms) Project Engineers and Project Inspectors will be involved with on a day-to-day basis. The Contractor may be responsible for submitting some items. The completion of other items will be the responsibility of either the Project Inspector or the Project Engineer. Regardless, the Project Engineer is responsible for ensuring the items are properly reviewed and distributed.
Completion instructions are provided for each form example presented in Appendix B. See Appendix C for guidance on preparing change orders (i.e., Form 90 and Form 94).
Most of the forms are self-explanatory. Computer generated forms will be accepted if they contain the exact verbiage and statute references.
CDOT Forms are available on the CDOT Forms Catalog Web Site https://www.codot.gov/library/forms, and FHWA Forms are available at
https://www.fhwa.dot.gov/eforms/.
Document Page Sample Final Acceptance Letter B-3 Sample Buy America Certification B-4 Sample Summary of Buy America Quantities B-6 Sample Buy America Certification with Exceptions B-8 Sample Stockpiled Material Letter of Vested Interest B-11 Sample Prompt Payment Notice B-13 Sample Prompt Payment Law Notice B-14 Form 7 – Weekly Report on Miscellaneous Pay Items B-15 Form 10 – Inspector’s Report for Force Account Work (Prime & Sub) B-19 Form 10 (Prime Contractor) B-21 Form 10 (Subcontractor) B-22 Billing Example Contractor Bill to CDOT B-23 Billing Example Subcontractor Bill to Contractor B-24 Form 17 – Contractor DBE Payment Certification B-25 Form 46 – Concrete Truck Mixer Inspection Certification B-27 Form 103 – Project Diary B-29 Form 105 – Speed Memo B-32 Form 200 – OJT Training Questionnaire B-36 Form 205B – Sublet Permit Application B-37 Form 262 – Weekly Time Count Report – Work Days B-45 Form 263 – Weekly Time Count Report – Calendar Days B-49 Form 266 – Inspector’s Progress Report B-53 Form 279 – Inspector’s Report of Reinforcing Steel Placed B-57 Form 280 – EEO and Labor Compliance Verification B-60 Form 282 – Asphalt Paving Inspector’s Daily Report B-63

Appendix B 2019
Document Page Form 568 – Authorization and Declaration of Temporary Speed Limits B-67 Form 580 – Equipment Rental Rate Determination Request B-72 Form 713 – Contractor DBE Subcontractor, Supply and Service Contract Statement B-76 Form 715 – Certificate of Proposed Underutilized DBE (UDBE) Participation B-78 Form 832 – Trainee Status and Evaluation B-81 Form 838 – OJT Trainee/Apprentice Record B-84 Form 859 – Project Control Data B-87 Form 1186 – Contract Funding Increase/Decrease and Approval Letter B-97 Form 1212 – Final Acceptance Report B-100 Form 1318 – Dispute and Claim Status Report B-103 FHWA Form 1391 – Federal-Aid Highway Construction Contractors Annual EEO Report B-107 Form 1401 – Block Faced MSE Wall Submittal Checklist B-109 Form 1402 – Panel Faced MSE Wall Submittal Checklist B-111 Piling Form B-115 Traffic Control Review Form B-116 Project Final Submittal Checklist B-123 Final Materials Submittal Checklist B-126 CPM Schedule Review Checklists B-128 Checklist 1 – Schedule Submittal B-129 Checklist 2 – Preliminary and Baseline Schedule B-130 Checklist 3 – Project Schedule Update B-132 Checklist 4 – Revise and Resubmit B-134 Checklist 5 – Schedule Risk Analysis B-135

Appendix B 2019

Appendix B 2019
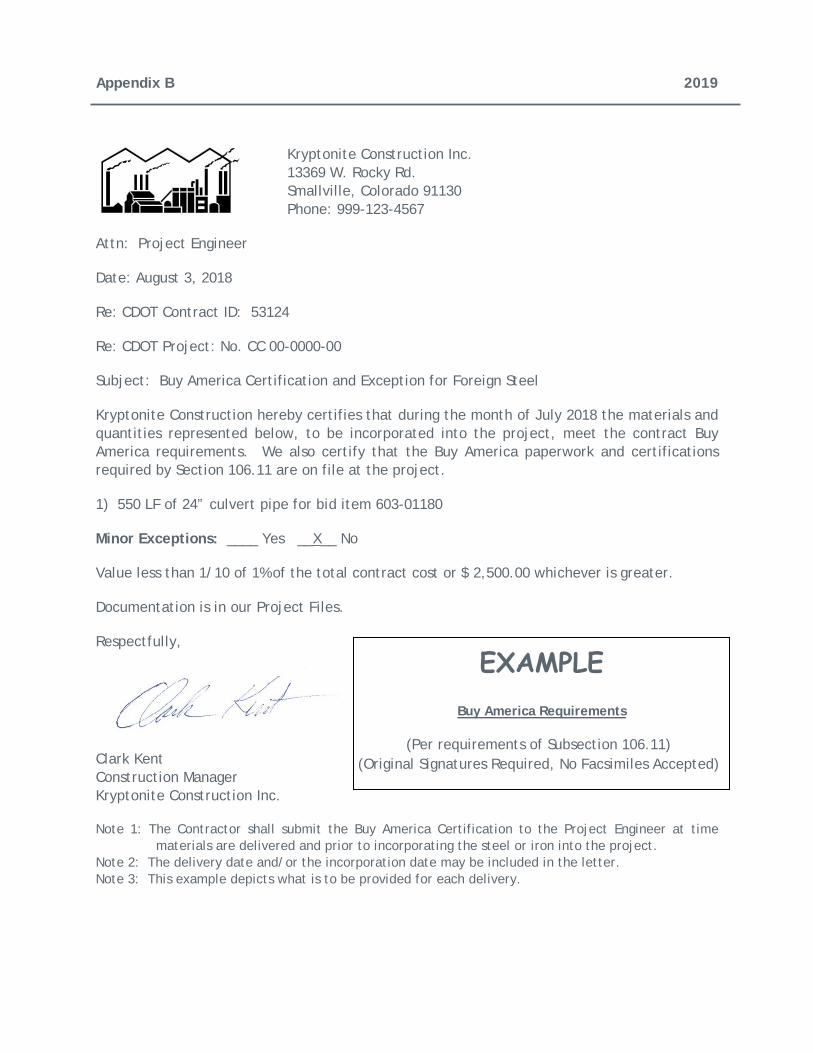
Sample Buy America Certification
The specification requires the Contractor to certify that he has obtained all the correct certifications from the manufacturers and suppliers and maintain the certifications on file at the project. These Buy America certifications are to be received and approved by CDOT before the materials are incorporated into the project. Once the Contractor receives the Buy America certification from manufacturers and suppliers, the Contractor shall provide CDOT with a Buy America certification such as the example below. CDOT does not accept blanket Buy America letters covering all materials.
Appendix B 2019
Kryptonite Construction Inc. 13369 W. Rocky Rd. Smallville, Colorado 91130 Phone: 999-123-4567
Attn: Project Engineer
Date: August 3, 2018
Re: CDOT Contract ID: 53124
Re: CDOT Project: No. CC 00-0000-00
Subject: Buy America Certification and Exception for Foreign Steel
Kryptonite Construction hereby certifies that during the month of July 2018 the materials and quantities represented below, to be incorporated into the project, meet the contract Buy America requirements. We also certify that the Buy America paperwork and certifications required by Section 106.11 are on file at the project.
1) 550 LF of 24” culvert pipe for bid item 603-01180
Minor Exceptions: ____ Yes __X__ No
Value less than 1/10 of 1% of the total contract cost or $ 2,500.00 whichever is greater.
Documentation is in our Project Files.
Respectfully,
Clark Kent Construction Manager Kryptonite Construction Inc.
Note 1: The Contractor shall submit the Buy America Certification to the Project Engineer at time materials are delivered and prior to incorporating the steel or iron into the project.
Note 2: The delivery date and/or the incorporation date may be included in the letter. Note 3: This example depicts what is to be provided for each delivery.
EXAMPLE Buy America Requirements
(Per requirements of Subsection 106.11) (Original Signatures Required, No Facsimiles Accepted)

Appendix B 2019
Sample Summary of Buy America Quantities
This is a suggested format for the reconciliation of the Buy America Certification quantities with Installed Quantities. The Contractor shall submit this summary on a monthly basis to the Project Engineer for material incorporated during the previous month. The Project Engineer will verify the information in the Summary and all Buy America certifications provided by the Contractor. Before approving a progress payment, the Resident Engineer will verify that the quantities in the Contractor’s summary document match the quantities in the progress payment.

Appendix B 2019
Note: This example depicts what is to be provided monthly summarizing delivery and installation.
Cons
truc
tion
Man
ager
Au
gust
3,
2018

Appendix B 2019
Sample Buy America Certification with Exceptions
The specification requires the Contractor to document the project delivered costs of any foreign steel or iron permanently incorporated into the project. This is an example of the requirement.

Appendix B 2019
Kryptonite Construction Inc. 13369 W. Rocky Rd. Smallville, Colorado 91130 Phone: 999-123-4567
Attn: Project Engineer
Date: October 4, 2018
Re: CDOT Contract ID: 53124 Re: CDOT Project No.: CC 00-0000-00
Subject: Buy America Certification & Exception for Foreign Steel
Kryptonite Construction hereby certifies that during the month of September 2018 the materials and quantities represented below, to be incorporated into the project, meet the contract Buy America requirements. We also certify that the Buy America paperwork and certifications required by Section 106.11 are on file at the project.
1) 150 LF of 24” culvert pipe for bid item 603-01180
Minor Exceptions: __X__ Yes ____ No
Value less than 1/10 of 1% of the total contract cost or $ 2,500.00 whichever is greater.
Documentation is in our Project Files.
1) 16 panels of ADA Truncated Domes which were imported from China were incorporated into the project. The total contract cost to date of imported steel or iron is $1,831.66.
Respectfully,
Clark Kent Construction Manager Kryptonite Construction Inc.
Note 1: The Contractor shall submit the Buy America Certification to the Project Engineer at time materials are delivered and prior to incorporating the steel or iron into the project.
Note 2: The delivery date and/or the incorporation date may be included in the letter. Note 3: This example depicts what is to be provided for each delivery.
EXAMPLE Buy America Requirements
(Per requirements of Subsection 106.11) (Original Signatures Required, No Facsimiles Accepted)

Appendix B 2019
Note: This example depicts what is to be provided monthly summarizing delivery and installation.
Cons
truc
tion
Man
ager
O
ctob
er 4
, 20
18

Appendix B 2019
Sample Stockpiled Material Letter of Vested Interest
To Whom It May Concern:
Re: Stockpiled Material Letter of Vested Interest
It is hereby understood that the Colorado Department of Transportation fully intends to reimburse
(Contractor – Purchaser)
for materials owned by said Contractor – Purchaser and intended for incorporation into Colorado Department of Transportation Project No.
Said materials, as described below, are now stored on property owned by
and leased by (if applicable)
Said storage property is located as follows:
(Address and/or Description of Property)
Said stored materials are described as follows:
(Detailed Description of Materials)
It is hereby recognized that once reimbursement has been accomplished, the Colorado Department of Transportation will have a vested interest in the materials. Access to and possession of the materials will be granted to the Colorado Department of Transportation upon demand and providing that acceptable proof is offered substantiation that reimbursement to the named Contractor – Purchaser was in fact, accomplished.
Owner Phone Number Lessee (if applicable) Phone Number
Owner Phone Number Lessee (if applicable) Phone Number
Attachments: (when existing)
Warehouse Receipt of Contract for Storage
This letter is a legal document, must be original, and must clearly identify the materials wither in the body or by specifically identifiable attachments.

Appendix B 2019

Appendix B 2019

Appendix B 2019
Form 7 – Weekly Report on Miscellaneous Pay Items Completion Instructions
Use Form 7 to document daily quantities for miscellaneous pay items such as dozing, blading, roller, wetting, flagging, traffic control supervision, pilot car, and trainee. See Section 120 and Section 121.2.1 of this Manual for additional information. Complete Form 7 as follows:
1. Project No., Project Code (SA#), and Location. Fill in as appropriate.
2. Week Ending. Enter month, day, and year of the last day represented by the Form 7 being completed.
3. Calendar Day. Enter the month and day for each day of the week represented by the Form 7 being completed.
4. Reference No. and Item No. Enter the appropriate Computer Reference Number and Item Number for the items not listed on Form 7.
5. Description. Enter a description of the added item.
6. Unit. Enter the unit of measurement for the added item.
7. Daily Quantities. Enter the item quantity for each day. The person that is preparing Form 7 will determine the daily quantities. The following additional information may be useful in determining quantities:
a. Traffic Control Supervision Diaries, b. Form 20 – Daily Water Report, and c. Project Diaries.
8. Weekly Total. The weekly total is the sum of the daily quantities.
9. Previous Total. Provide the total to date from the previous Form 7.
10. Total to Date. The total to date is the sum of the weekly total (#8) and the previous total (#9).
11. Remarks. Note any unusual or special conditions that may clarify this week’s quantities. Additional space is available on the second page of Form 7.
12. Signature and Title. Signature and title of the person completing Form 7.

Appendix B 2019
13. Checked By. Must be signed or initialed and dated by the person who checked the calculations and quantities on Form 7. This check must be performed by an individual other than the person who determined the quantities. This check should be completed in accordance with Section 121 of this Manual.
14. Posted By. Must be signed or initialed and dated by the person who transferred the total quantity from Form 7 to Daily Work Report in SiteManager®.
15. Contractor’s Representative Signature. The Contractor is not required to sign and date the completed Form 7, but it is a best management practice to get the Contractor to agree to the quantities on a weekly basis.
16. Sequential No. Enter the sequential number of the Form 7. Start with number one and continue sequentially numbering each Form 7 throughout the project.

Appendix B 2019

Appendix B 2019
=

Appendix B 2019
Form 10 – Inspector’s Report for Force Account Work Completion Instructions
The documentation requirements presented in Section 120 of this Manual should be reviewed before using Form 10. Complete Form 10 as follows:
1. Project No., Project Code (SA#), and CMO or F/A No. Enter the project number, project code, and CMO or F/A number.
2. Contractor’s Name, Subcontractor’s Name, and Description of Work. Enter the Contractor and subcontractor names, and provide a description of the work.
3. Date. Enter the dates when the force account work was performed. The dates need not be consecutive.
4. Employee Name, Occupation, and Hours. Enter the employee name, occupation, and number of hours worked. The Project Inspector must check the payrolls against the billing and Form 10 data and then sign and date the Form 10.
5. Equipment Code No. and Rate. Equipment code numbers and rental rates shall be as listed on Form 580 – Equipment Rental Rate Determination Request. Completion instructions for Form 580 are included in Appendix B.
The Contractor must submit a certified invoice for rental equipment.
If the rental equipment was used for bid item work as well as force account work, the portion of the rental cost that will be paid for on force account shall be determined by prorating the total number of hours the equipment was operated to the number of hours it was operated on the force account work.
If the rental agreement does not include operating costs, hourly operating costs shall be calculated in accordance with the Rental Rate Blue Book for Construction Equipment. The Blue Book hourly operating costs will be paid for the actual hours that the equipment was used on the force account work. The hourly operating cost calculation can be shown on the rental invoice.
In accordance with subsection 109.04 of the Standard Specifications, an additional 10 percent of the total rental cost, including operating cost, will be added to the Contractor’s payment.
6. Material. List all material used for the force account work.

Appendix B 2019
7. Contractor/Subcontractor Initials. The Contractor representative shall initial the Form 10 daily. For subcontract work, the initials of the subcontractor who performed the force account work and the Prime Contractor’s initials must be shown.
8. Sinature and Title. The Project Inspector of the force account work must sign and date the Form 10.
Other items that require review include:
a. Use of correct wage rates and fringe benefits per payrolls.
i. If a State-funded project, the Contractor will need to furnish a copy of the payroll for rate verification.
ii. If a specialty firm, a certified invoice that may include wages, etc., is required.
b. 67 percent loading applied to wage rates including fringe benefits when paid directly to the employee.
c. Check the mathematics. Minor errors can be corrected. Copy the Contractor on corrected billings.
d. Materials invoices must be certified in accordance with Section 120 of this Manual.
e. The Contractor’s force account billings must be reviewed and approved by the Project Engineer prior to authorizing payments and submittal to the Region for final checking. Sample billings follow the Form 10 example.

Appendix B 2019

Appendix B 2019

Appendix B 2019
BILLING EXAMPLE CONTRACTOR BILL TO CDOT
CONTRACTOR LETTERHEAD
To: Colorado Department of Transportation Re: NH1111-111/ 99999 4201 East Arkansas Avenue CMO #2 Denver, CO 80222 Repair Bridge Approach
Attn: Alex White Project Engineer
Billing for force account work performed on 10/21/13 through 10/25/13:
Labor: Foreman 12 hrs @ 480.00/wk $144.00 Operator 14 hrs @ 14.10 197.40 Truck driver 4 hrs @ 13.36 53.44 Labor 10 hrs @ 10.50 105.00 Total Labor $499.84
Equipment: Hyd. Tamper rental @invoice $112.90 Plus Rental Rate Overhead (10% of 112.90) 11.29 Tandem 04429 4 hrs @ 34.65 138.60 04850 2 hrs @ 5.95 11.90 04862 3 hrs @ 8.45 25.35 Total Equipment $300.04
Fringe Benefits: Operator 14 hrs @ 3.2 $44.80 Truck driver 4 hrs @ 2.64 10.56 Labor 10 hrs @ 2.59 25.90 Total Fringe Benefits $81.26 Summary (Total this billing) Labor $499.84 +67% Labor 334.89 Equipment 300.04 Fringe Benefits 81.26 +67% Fringe Benefits 54.44 Billings from Subcontractor 3,540.97
Admin. Loading per 109.04(e) 227.05 TOTAL BILLING $5,038.49
Attachments: Billing and invoice from Subcontractor Certified invoices (materials and equipment rentals)

Appendix B 2019
BILLING EXAMPLE SUBCONTRACTOR BILL TO CONTRACTOR
SUBCONTRACTOR LETTERHEAD
To: Contractor Re: NH1111-111/ 99999 CMO #1 Repair Bridge Approach The following is our bill for doing work in October 2013:
Labor: Operator 8 hrs @ 14.10 $112.80 Operator 2 hrs @ 21.15 42.30 Labor 2 employees @ 8 hrs @ 10.50 168.00 Labor 2 employees @ 2 hrs @ 15.75 63.00 Truck driver 4 hrs @ 13.36 53.44 Truck driver 2 hrs @ 20.04 40.08 Total Labor $479.62
Equipment: Demo saw @ $2.00 (small tool rate) 4 hrs $8.00 Tandem 01284 10 hrs @ $38.80 388.00 Backhoe 04294 6 hrs @ $73.25 439.50 Carbon steel saw blade @ agreed 50% invoice 175.00 Loading on fast-use expendable parts (109.04(c)9) $17.50 Total Equipment $1028.00
Material: Asphalt, 42 tons @ invoice of $32.00/ton 1,344.00 Total Material $1,344.00
Fringe Benefits: Operator 10 hrs @ 3.20 $32.00 Labor 20 hrs @ 2.59 51.80 Truck driver 6 hrs @ 2.64 15.84 Total Fringe Benefits 99.64
Summary (Total this billing)
Labor $479.62 +67% Labor 321.35 Equipment 1.028.00 Material 1,344.00 +15%Material 201.60 Fringe Benefits 99.64 +67% Fringe Benefits 66.76 TOTAL BILLING $3,540.97

Appendix B 2019
Form 17 – Contractor DBE Payment Certification
Completion Instructions
Form 17 is required even when no Disadvantaged Business Enterprises are used. Complete Form 17 as follows:
1. Project No. and Project Code (SA#). Fill in as appropriate.
2. Amount. Amount paid to the tier 1 Disadvantaged Business Enterprise firm by the Prime Contractor.
3. Amount. Amount paid to the tier 2 Disadvantaged Business Enterprise firm by the tier 1 subcontractor.
4. Amount. Amount paid to the Disadvantaged Business Enterprise supplier
subcontractor.
5. Tier. This is the tier number of the Disadvantaged Business Enterprise subcontractor.
6. Tier. A tier number is not required for supplier subcontractors.
7. Section II. Section II must be completed if the amount paid was 10% or greater less than the amount shown on Form 715.
8. Signature. Add the Prime Contractor’s Name, sign and date the form.

Appendix B 2019
2
1
3
4
5
6
7
8

Appendix B 2019
Form 46 – Concrete Truck Mixer Inspection Certification
Completion Instructions
Form 46 is used to document inspection and certification of the concrete supplier’s truck mixers for compliance with subsection 601.07(c) of the Standard Specifications. Form 46 should be completed by the concrete supplier and returned to the Project Engineer prior to delivery of concrete to the project site. Each mixer hauling to the project site is required to be inspected. Complete Form 46 as follows:
1. Project No., Date, Project Code (SA#), Project Location, and Concrete Company. Enter the project number, date, project code, project location, and concrete supplier’s name in the appropriate cells of Form 46.
2. Unit Number. Enter the unit number of each mixer truck delivering to the project.
3. Inspection Requirements. Each unit hauling to the project must be inspected for the requirements listed on Form 46.
4. Inspected By. The employee of the concrete supply company that performed the
inspection must initial Form 46 in these cells.
5. Concrete Company Principal Executive Signature. The principle executive of the concrete supply company signs this cell to certify the inspection of the listed concrete truck mixers.
6. Batch Plant. The Project Inspector enters the batch plant certifier’s name, date of certification, and date of meter certification and then signs the form.

Appendix B 2019

Appendix B 2019
Form 103 – Project Diary
Completion Instructions
Form 103 may be used to log the project diary. A project diary contains general information that the Project Engineer deems to be relevant to the project. Complete Form 103 as follows:
1. Project No. and Date. Fill in as appropriate.
2. Time, Employee, and Weather Information. Enter the total days charged to date, elapsed days, hours worked, approximate number of employees, supervisory personnel, time lost and reason, weather condition, and temperature range.
3. Diary Entry. The following are suggested topics that the diary entry should address:
a. changes in weather conditions during working hours;
b. type of work performed;
c. location where work was performed;
d. materials delivered to the project;
e. equipment deliveries, breakdowns, and equipment stored on the project;
f. access to site or work area;
g. traffic incidents, detour shifts, etc.;
h. visitors to the project site;
i. conversations with and directives to the Contractor;
j. potential or developing problems; and
k. any other topic deemed important by the Project Engineer.
4. Additional space is provided on the second page of Form 103.
5. Signing and Barricading and Traveled Roadway Condition. Fill in as appropriate.
6. Signature and Title. Form 103 is signed and dated in these cells.

Appendix B 2019

Appendix B 2019

Appendix B 2019
Form 105 – Speed Memo
Completion Instructions
Form 105 may be used for intradepartmental correspondence or to provide timely or immediate written communication between the Project Engineer and the Contractor. The following instructions apply when the form is used for communicating with the Contractor (i.e., construction distribution):
1. Project No., Project Code (SA#), and Location. Enter the appropriate project number, project code, and location.
2. Contractor Information and Date. Enter the name of the Contractor’s designated Superintendent, the Contractor’s name, and the date.
3. Subject and Message. Form 105 may be used for any of the following purposes:
a. issue direction to the Contractor; b. accept, approve, or reject submittals; c. document an agreed unit price, method of measurement, or basis of payment
for extra work; d. accept or reject specific work items; e. delete bid items; f. document verbal agreements; and g. document Region preapproval for change orders.
See Section 120 of this Manual to determine when a change order is required.
4. CDOT Personnel Signature and Title. The Project Engineer, or assigned designee, should sign Form 105 at this location.
5. Contractor Personnel Signature and Title. The Contractor’s Superintendent should sign and date the Form 105 to document receipt. If the Contractor’s Superintendent refuses to sign the Form 105, the Project Engineer should write the following information on the bottom half of the form and give the Superintendent a copy:
a. “Contractor’s Superintendent refused to sign,” and b. date and time.
6. Reply. The lower half of Form 105 allows for a reply by the Contractor’s Superintendent.

Appendix B 2019
7. Contractor Personnel Signature and Title. The Contractor’s Superintendent or other individual replying to the memo should sign and date the Form 105.
8. Distribution. When communicating with the Contractor, retain the original Form 105 with the Contractor’s signature in the project file.
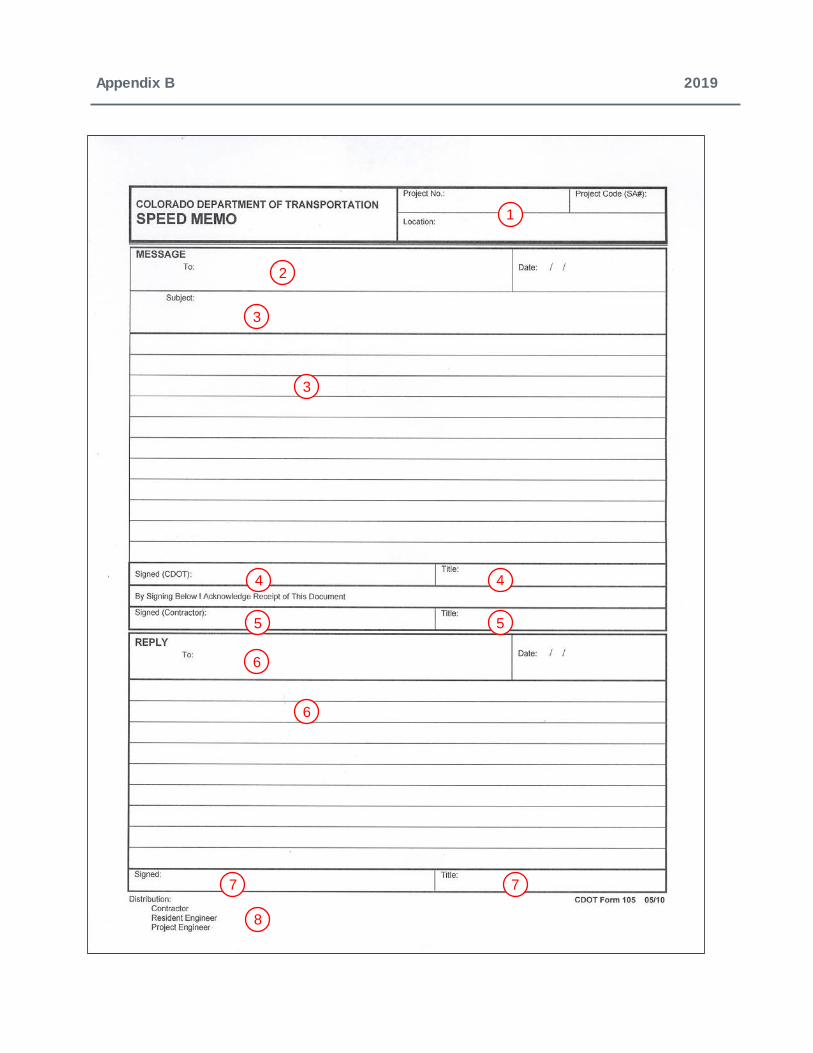
Appendix B 2019
2
1
3
4
5
6
7
3
4
5
6
7
8

Appendix B 2019
Form 200 – OJT Training Questionnaire
Completion Instructions
Form 200 is used to monitor the Contractor’s compliance with the Training Special Provision by interviewing the trainee. It is normally completed by project personnel or by the Region Civil Rights Office. Upon completion, it is forwarded to the Civil Rights and Business Resource Center and placed in the labor interview file.

Appendix B 2019

Appendix B 2019
Form 205B – Sublet Permit Application
Completion Instructions

Appendix B 2019

Appendix B 2019

Appendix B 2019

Appendix B 2019

Appendix B 2019

Appendix B 2019

Appendix B 2019

Appendix B 2019
Form 262 – Weekly Time Count Report – Work Days
Completion Instructions
Form 262 is used to record project time charges when the Contract specifies a working day basis. Time charges should be made in accordance with the Project Special Provisions or subsection 108.08 of the Standard Specifications. A Form 103 – Project Diary should substantiate the daily assessment of Contract time. An automated version of Form 262 is available in SiteManager®. See Section 120 of this Manual for additional information on Contract time and Form 262. One Form 262 will be completed by the Project Engineer and should be signed by the Contractor weekly as follows:
1. Project #. Fill in as appropriate.
2. Project Code (SA#). Fill in as appropriate.
3. No. Enter the sequential number. Begin with number one and continue numbering sequentially throughout the project.
4. To. Enter the Contractor name.
5. Date. Enter the date the form was generated.
6. Week Ending. Enter the month and date of the last day of the week the Form 262 represents.
7. Date. Enter the date for each weekday.
8. Day. Enter the Day of the week.
9. Weather, weather conditions or other causes. Describe the weather conditions for each day of the week. Also document any cause that explains why you charged or did not charge time. This is important to document if a dispute about time occurs.
10. Workable days. Mark each day the Contractor could prosecute work.
11. Unworkable Days (weather). Mark each day that adverse weather conditions prevented the Contractor from performing work.
12. Days not chargeable other causes. Mark each day that is not chargeable or the Contractor did not work due to other causes such as weekends, holidays, free time, or time suspension.
Appendix B 2019
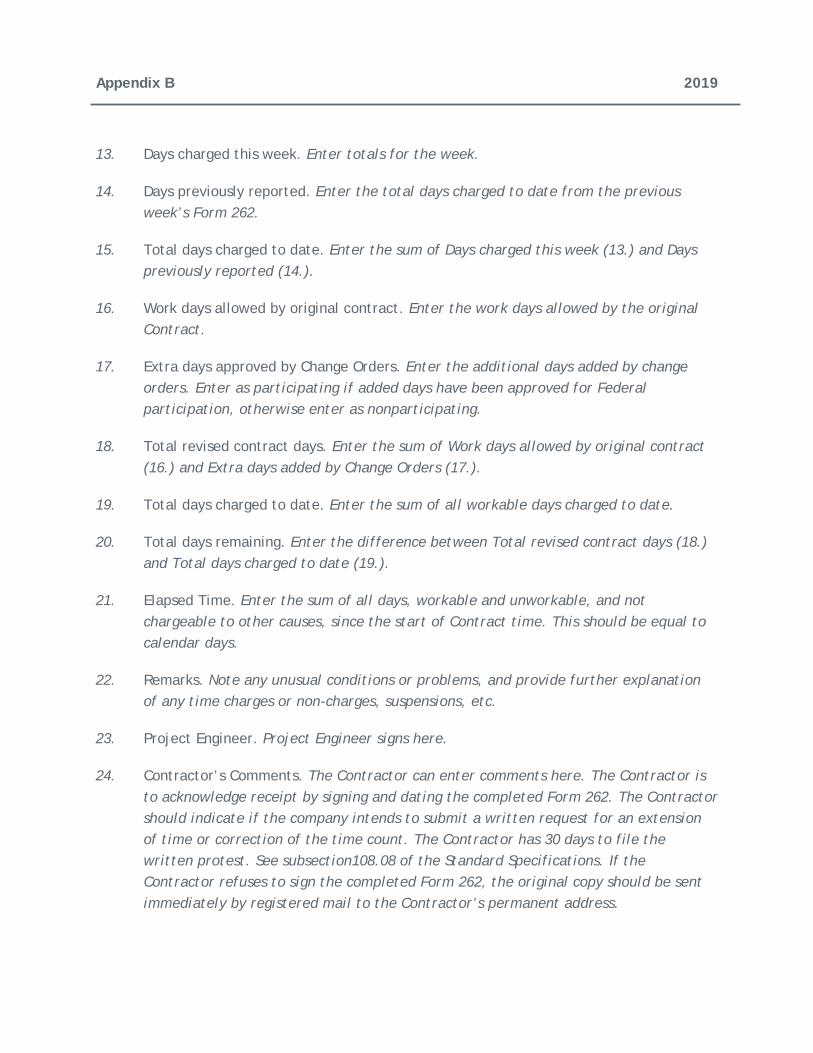
13. Days charged this week. Enter totals for the week.
14. Days previously reported. Enter the total days charged to date from the previous week’s Form 262.
15. Total days charged to date. Enter the sum of Days charged this week (13.) and Days previously reported (14.).
16. Work days allowed by original contract. Enter the work days allowed by the original Contract.
17. Extra days approved by Change Orders. Enter the additional days added by change orders. Enter as participating if added days have been approved for Federal participation, otherwise enter as nonparticipating.
18. Total revised contract days. Enter the sum of Work days allowed by original contract (16.) and Extra days added by Change Orders (17.).
19. Total days charged to date. Enter the sum of all workable days charged to date.
20. Total days remaining. Enter the difference between Total revised contract days (18.) and Total days charged to date (19.).
21. Elapsed Time. Enter the sum of all days, workable and unworkable, and not chargeable to other causes, since the start of Contract time. This should be equal to calendar days.
22. Remarks. Note any unusual conditions or problems, and provide further explanation of any time charges or non-charges, suspensions, etc.
23. Project Engineer. Project Engineer signs here.
24. Contractor’s Comments. The Contractor can enter comments here. The Contractor is to acknowledge receipt by signing and dating the completed Form 262. The Contractor should indicate if the company intends to submit a written request for an extension of time or correction of the time count. The Contractor has 30 days to file the written protest. See subsection108.08 of the Standard Specifications. If the Contractor refuses to sign the completed Form 262, the original copy should be sent immediately by registered mail to the Contractor’s permanent address.

Appendix B 2019
1 3
6
7
4
9 10
11 12
13 14
15 16
17
18 19
20 21
22
24
2 5
8
23

Appendix B 2019
Form 263 – Weekly Time Count Report – Calendar Days
Completion Instructions
Form 263 is used to record project time charges when the Contract specifies a calendar day basis. Calendar day, as defined in subsection 101.09 of the Standard Specifications, is defined as follows: “Each and every day shown on the calendar, beginning and ending at midnight.” All time charges should be made in accordance with the Project Special Provisions or subsection 108.08 of the Standard Specifications. Form 103 – Project Diary should substantiate the daily assessment of Contract time. An automated version of Form 263 is available in SiteManager®. See Section 120 of this Manual for additional information on Contract time count and Form 263. One Form 263 will be completed by the Project Engineer and should be signed by the Contractor weekly as follows:
1. Project #. Fill in as appropriate.
2. Project Code (SA#). Fill in as appropriate.
3. No. Enter the sequential number. Begin with number one and continue numbering sequentially throughout the project.
4. To. Enter the name of the Contractor.
5. Date. Enter the date the Form 263 was generated.
6. Week Ending. Enter the month and date of the last day of the week the Form 263 represents.
7. Date. Enter the date for each weekday.
8. Day. Enter the Day of the week.
9. Weather, weather conditions, or other causes. Describe the weather conditions for each day of the week. Also document any cause that explains no time was charged. This is important to document if a dispute about time occurs.
10. Calendar Days. Mark each day that is classified as a calendar day.
11. Worked/Not Worked. Mark each day the Contractor worked with “W” and each day no work was performed with “NW.”
12. Days not chargeable other causes. Mark each day not charged.

Appendix B 2019
13. Days charged this week. Enter totals for the week.
14. Days previously reported. Enter the total days charged to date from the previous week’s Form 263.
15. Total days charged to date. Enter the sum of Days charged this week (13.) and Days previously reported (14.).
16. Calendar days allowed by original contract. Enter the calendar days allowed by the original Contract.
17. Extra days approved by Change Orders. Enter the additional days added by change orders. Enter as participating if added days have been approved for Federal participation, otherwise enter as nonparticipating.
18. Total revised contract days. Enter the sum of Work days allowed by original Contract (16.) and Extra days added by Change Orders (17.).
19. Total days charged to date. Enter the sum of all workable days charged to date.
20. Total days remaining. Enter the difference between Total revised Contract days (18.) and Total days charged to date (19.).
21. Elapsed Time. Enter the sum of all days, workable and unworkable, and not chargeable to other causes, since the start of Contract time. This should be equal to calendar days.
22. Remarks. Note any unusual conditions or problems, and provide further explanation of any time charges or non-charges, suspensions, etc.
23. Project Engineer. Project Engineer signs here.
24. Contractor’s Comments. The Contractor can enter comments here. The Contractor is to acknowledge receipt by signing and dating the completed Form 263. The Contractor should indicate if the company intends to submit a written request for an extension of time or correction of the time count. The Contractor has 30 days to file the written protest. See subsection108.08 of the Standard Specifications. If the Contractor refuses to sign the completed Form 263, the original copy should be sent immediately by registered mail to the Contractor’s permanent address.

Appendix B 2019
1 3
6
7
4
9 10
11 12
2 5
8
13 14
15 16
17
18 19
20 21
22
24
23

Appendix B 2019
Form 266 – Inspector’s Progress Report
Completion Instructions
Form 266 is used for source documentation of interim and final quantities. Form 266 must contain the required data for the pay item being documented. For documentation requirements of individual Contract pay items and further information on Form 266, see Section 120 of this Manual. The following describes how to complete Form 266:
1. Project No., Project Code (SA#), Date, No. of Workers, and Equipment. Enter the project number, project code, date (must not be later than date of project acceptance), number of workers, and the equipment utilized by the Contractor to complete the work.
2. Location, Comments, and Supporting Calculations. Information to be provided in this section of Form 266 includes location of the work, quantity calculations, and total quantity being paid on Form 266. The second page of Form 266 may be used for additional calculations and sketches, as appropriate, to support the pay quantity. Additional supporting documents may be attached to the form. The total pay quantity should be rounded to the appropriate significant figures as discussed in Section 121 of this Manual. All calculations should be checked and a mark placed next to each checked value.
3. Interim/Final. Check the appropriate box for interim measurement or final measurement for that pay quantity or portion of the item.
4. Calculated By. This cell of Form 266 should be signed or initialed by the person who performed the calculations.
5. Measured By. This cell of Form 266 should be signed or initialed by the person who performed the field measurements or counted the item.
6. Posted By. This cell of Form 266 should be signed or initialed by the person who transferred the total quantity from the Form 266 to the Item Summary Report.
7. Checked By. This cell of Form 266 should be signed or initialed by the individual who checked the calculations and quantities on the Form 266. This check must --be performed by an individual other than the person who determined the quantity. This check should be completed in accordance with Section 121 of this Manual.

Appendix B 2019
8. Reference and Item Number. Enter the computer reference number and the item number for the pay item. Entering the computer reference number is optional as determined by the Region.
9. Item Description. Enter the description of the item. The description should match the description on the Summary of Approximate Quantities on the plans, if appropriate. The location may be entered if it is not shown in the location, comments, and supporting calculations section of Form 266.
10. Quantity. Enter the total quantity this Form 266 represents.
11. Unit. Enter the appropriate unit of measurement for the item.
12. Signed and Title. The signature and title cells are for the individual who is responsible for the inspection and documentation of the pay item. This is usually performed by the person completing the Form 266.
13. No. Enter the sequential number of the Form 266 in the series of source documents for the pay items. This is usually performed by the person who posted the quantity.

Appendix B 2019

Appendix B 2019

Appendix B 2019
Form 279 – Inspector’s Report of Reinforcing Steel Placed Completion Instructions
Form 279 is an optional form that may be used for source documentation of interim and final quantities of reinforcing steel or for revisions to plan quantities. See Section 121.2.1 of this Manual for additional information on requirements for Basis of Payment Documentation. The following describes how to complete Form 279:
1. Project No., Project Code (SA#), and Date. Enter the project number, project code, and date. The date must not be later than date of project acceptance.
2. Equipment and No. of Workers. Enter the equipment utilized by the Contractor to complete the work and the number of workers.
3. Station, Structure, and Portion. Enter the station, left or right, structure number, and portion of structure, if applicable (e.g., deck, abutment, structure wall, approach slab).
4. Mark, Bar No., and Length. Enter the mark, bar number, and length. If the plans or supplier’s bar list or bending diagram do not designate a mark (e.g., 401, 523), show the shape of the bar. Inspection should be made to ensure compliance with the plans.
5. No. of Bars. Enter the number of bars of this type placed for this Form 279.
6. Total Length, Weight per Unit Length, Total Weight. Enter the total length, weight per unit length, and total weight. Be sure to use the correct unit of measurement. Either multiply bar length times weight per foot for each bar or add the total length for each size and then multiply by the proper weight per foot.
7. Space and Clear. Enter the plan bar space and clearance. This information may be used to inspect the in-place rebar.
8. Total. Enter the total quantity this Form 279 represents.
9. Remarks. Any comments or information supporting the item may be made in this section. Additional supporting documents, calculations, or sketches may be attached to the Form 279.
10. Interim/Final. Check the appropriate box for an interim or a final measurement for the portion of the pay item represented by this Form 279.

Appendix B 2019
11. Calculated By, Measured By, Posted By, and Checked By. These cells must be signed or initialed by the individual who performed the functions.
12. Computer Reference No. Enter the computer reference number for the item. This is an optional entry.
13. No. Enter the sequential number of the Form 279 in the series of source documents for the pay item. This is usually performed by the person posting the quantity.

Appendix B 2019

Appendix B 2019
Form 280 – EEO and Labor Compliance Verification Completion Instructions
Form 280 is used to interview employees of Contractors and subcontractors to verify that employees are aware of each company’s Equal Employment Opportunity (EEO) requirements and that they are receiving the correct wages for the classification in which they are working. Form 280 should be completed by CDOT project site personnel as addressed in Section 107.1.3 of this Manual and when labor or EEO violations are suspected. The Region EEO/Civil Rights Specialists may also use this form during compliance reviews and investigations. Complete Form 280 as follows:
1. Project No., Project Code (SA#), Project Location, and Contractor Name. Fill in as appropriate. Note if the name is for a subcontractor.
2. Employee Name and Job Classification. Enter the name of the employee interviewed and the worker’s job classification.
3. Equal Employment Opportunity. The Equal Employment Opportunity section of Form 280 includes the questions that should be asked of the employee regarding his knowledge of the equal employment policies and procedures of his employer.
4. Labor Compliance. The Labor Compliance section of Form 280 includes questions that should be asked of the employee regarding wage rate, fringe benefit plan, and pay frequency. It allows the interviewer to verify the type of work being performed by the employee. The employee is requested to look over the interview and sign and date the form.
5. Verification Section. The interviewer completes the verification section by referring to the appropriate payroll for information on the hourly rate and classification of the employee and verifying from the Contract wage decision that the employee is paid correctly. Errors in classification, hourly wage, or fringe benefit must be corrected and back wages calculated as necessary. The interviewer completes the form with the individual’s signature and date.
Should interviews reveal a pattern or lack of knowledge by employees, the Region’s EEO/Civil Rights Specialist should be notified immediately.
Employer requests to review interviews should be referred to the Contracts and Market Analysis Branch.

Appendix B 2019

Appendix B 2019
Form 282 – Asphalt Paving Inspector’s Daily Report Completion Instructions
Form 282 may be used to document daily asphalt paving operations. Its use is optional in lieu of other acceptable recording methods, as determined by the Project Engineer, to record loads delivered, location placed, spread yield, and asphalt temperatures. Complete Form 282 as follows:
1. Weather, Air Temperature, and Date. Enter the date and enter the weather conditions and maximum and minimum air temperatures for that date.
2. Project No. and Project Code (SA#). Fill in as appropriate.
3. Load No. Record the load number from the Contractor’s load ticket. The load number will indicate the sequential loading order from the plant. If a load arrives to the project site out of sequence according to the load number, the truck may have been substantially delayed and the Hot Bituminous Pavement temperature should be checked against allowable minimum temperature, as per specification.
4. Ticket No. Enter the ticket number from the Contractor’s load ticket for each load delivered to the project.
5. Ticket Weight. Enter the net weight (tons) from the load ticket of each load.
6. Cumulative Weight. Enter the cumulative weight of asphalt by adding the net weight for each ticket to the previous cumulative total.
7. Station to Station. Record the beginning and ending station of the placement location for each load of asphalt.
8. Location. Enter the lane and direction being paved.
9. Paver Pass. Record the thickness (inches) and width (feet) of asphalt being placed.
10. Course. Check the appropriate box for bottom or top lift.
11. Spread Yield. Any method to calculate spread yield is acceptable as long as the calculation results in an accurate comparison between the actual application rate and the plan application rate.
The following method provides a relative comparison of actual-to-plan application rates. A calculated result over 1.00 indicates that the actual application rate is exceeding the plan

Appendix B 2019
application rate. For example, a spread yield rate of 1.05 indicates that the plan quality is being overrun by five percent for the asphalt quantity placed.
First determine the correct plan application rate factor as follows:
( )yard/inch arepounds/squ Raten ApplicatioPlan 92,000×
The plan application rate can be found in the General Notes of the plans. In this example, use 112 pounds/square yard/inch.
Factor = 160.7112
92,000=
×
Calculations can be completed for a single load, any portion of the day, or the entire day’s run as follows:
Length Station - StationWidthThicknessTons ActualFactor ×
Single Load: 10.1=755.12288.12×7.160
Partial Day: ( ) ( ) 1.0252,160-52,68012.5226.83-109.04160.7 =×
Entire Day: ( ) 1.0352,000-52,91512.52146.1160.7 =×
12. Mix Temp. Record the delivered mix temperature.
13. Remarks. Provide any appropriate remarks.
14. Signed and Title. The Form 282 needs to be signed by the person who completed the form.

Appendix B 2019

Appendix B 2019
Form 568 – CDOT Temporary Speed Limit Reduction Completion Instructions
A Form 568 must be completed, approved, and signed whenever the speed limit is reduced on a construction project, even if the speed limit reduction is shown on the plans.
The Project Engineer is responsible for initiating and completing the Form 568 when a reduced speed limit is appropriate.
Fill in the appropriate project information such as city, reduced speed limit, regular speed limit, and direction of traffic.
The Chief Engineer shall delegate signature authority to the Region Traffic Engineers or designee to determine appropriate temporary speed limits.
See instructions on the Form 568.

Appendix B 2019

Appendix B 2019

Appendix B 2019

Appendix B 2019

Appendix B 2019
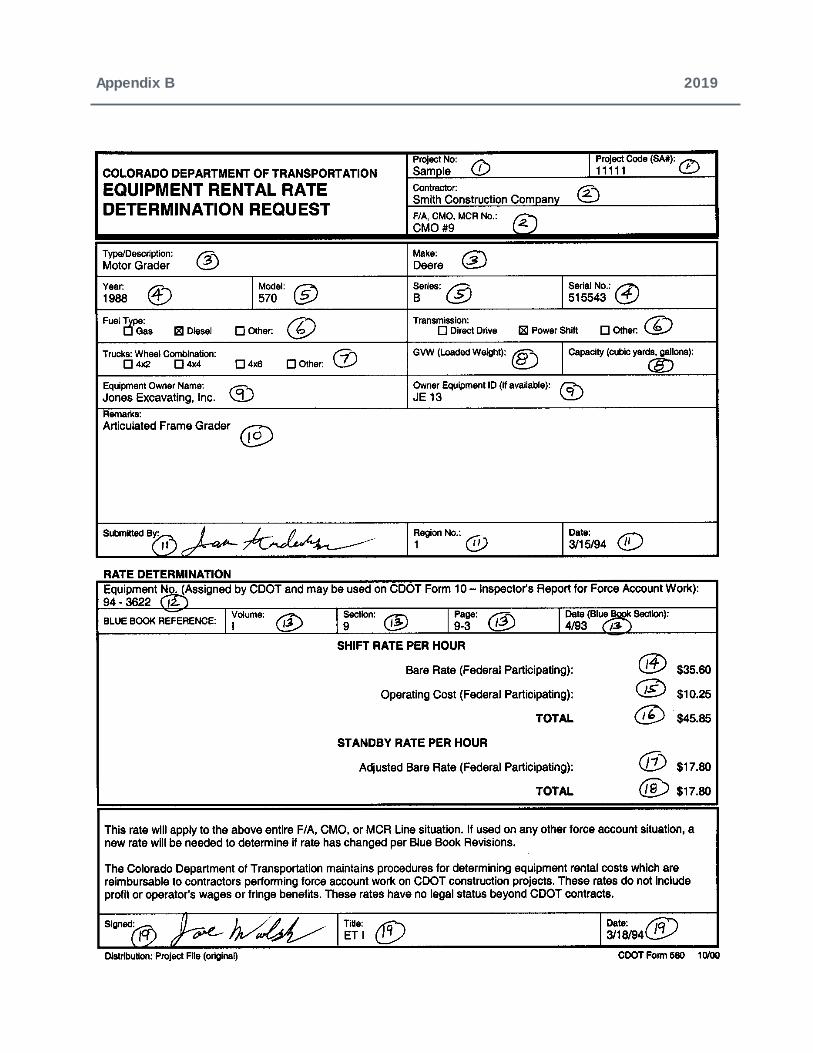
Form 580 – Equipment Rental Rate Determination Request Completion Instructions
Form 580 is used when an hourly rate for Contractor owned equipment is required for payment under force account or for performing a force account analysis of a Contractor’s proposed unit price for extra work for a change order price justification. Equipment rental rates and standby rates are calculated on the Form 580 using the current Rental Rate Blue Book for Construction Equipment. The Project Engineer completes the top half of the form and, generally, the Region Finals Engineer completes the bottom portion. The information is used for force account billings. Form 580 should be prepared as follows:
1. Project No. and Project Code (SA#). Fill in the project number and project code as appropriate.
2. Contractor and F/A, CMO, MCR No. Enter the Contractor’s name and the force account, contract modification order, or minor Contract revision number.
3. Type/Description and Make. Describe the equipment as completely and accurately as possible. (e.g., there is a difference between a backhoe and a hydraulic excavator). Also enter the equipment make.
4. Year and Serial No. The year of manufacture is important. If this information is not available, the serial number should be recorded because this can aid in determining the age of the equipment.
5. Model and Series. Enter the model number and series. Often the model number and series are contained in the same number (e.g., Model 570B). For this piece of equipment, the model number is 570 and the series is B.
6. Fuel Type and Transmission. Indicate the type of fuel the equipment uses and the transmission type.
7. Trucks: Wheel Combination. For all pickups, semis, dump trucks, etc., indicate the type of wheel power used. Wheel power is defined as the number of wheels times the number of wheels powered. Dual wheels are counted as single wheels.

Appendix B 2019
Examples of some common usages are shown below:

Appendix B 2019
8. Gross Vehicle Weight (GVW) and Capacity. For dump trucks, belly dumps, pups, water, and other liquid-haul trucks, enter the correct gross vehicle weight and capacity.
9. Equipment Owner Name and Equipment Owner ID. Enter the equipment owner’s name and equipment owner ID, if available.
10. Remarks. Enter any needed remarks that describe the equipment.
11. Submitted By, Region No., and Date. Sign the Form 580 and enter the Region number and date.
12. Equipment No. The Region will assign an equipment number to be used to identify the specific piece of equipment and its hourly rates.
13. Blue Book Reference. Enter the volume, section, page, and date from the current Rental Rate Blue Book for Construction Equipment.
14. Bare Rate. See subsection 109.04(c) of the Standard Specifications for information on calculating the bare rate and the adjusted bare rate.
15. Operating Cost. The hourly operating cost is taken directly from the appropriate column in the Rental Rate Blue Book for Construction Equipment for the specific piece of equipment.
16. Total Shift Rate Per Hour. Enter the sum of the bare rate (#14) and the operating cost (#15).
17. Adjusted Bare Rate. The adjusted bare rate per hour for standby is calculated as 50 percent of the shift bare rate per hour calculated in #14 above.
18. Standby Rate Per Hour. The standby rate per hour is the adjusted bare rate as determined in #17 above.
19. Signed, Title, and Date. The person who calculated the rates signs and dates the Form 580.
Appendix B 2019

Appendix B 2019
Form 713 – Contractor DBE Subcontractor, Supply and Service Contract Statement Completion Instructions
Form 713 is an Equal Employment Opportunity form. Form 713 is used to report the actual dollars that are sublet to Disadvantaged Business Enterprise subcontractors on a project. It is also used to report Disadvantaged Business Enterprise suppliers, manufacturers, and service contracts. Form 713 is completed by the Contractor and must be attached to Form 205 – Sublet Permit Application, if Form 205 is for a Disadvantaged Business Enterprise. Form 713 is confidential and should be placed in an envelope.

Appendix B 2019

Appendix B 2019
Form 715 – Certificate of Proposed Underutilized DBE (UDBE) Participation Completion Instructions
If the Contractor is meeting the contract goal, a Form 715 is to be filled out by the low bidder and turned in to the Business Programs Office for each UDBE used to meet the contract goal. If the Contractor is not meeting the contract goal, he must submit a Form 715 for each UDBE he is using toward the goal when he submits his Good Faith Efforts documentation.
The dollar amount of the DBE's subcontract is confidential, and should be treated appropriately. It is acceptable, however, to tell people which DBEs are listed on Form 715s and the type of work they will be doing. This form is due in the Business Programs Office by 4:30 p.m. the day following bid opening. The Business Programs Office will send project personnel a copy of the Form 719 and all 715s for the project. The Form 719 summarizes the Form 715s, lists the project's UDBE goal and lists the Contractor's total UDBE commitment. If an original is inadvertently received by project personnel, please notify the Business Programs Office at 303-757-9234, and forward the original form, sealed appropriately to preserve confidentiality, to them immediately.

Appendix B 2019

Appendix B 2019

Appendix B 2019
Form 832 – Trainee Status and Evaluation Completion Instructions
Form 832 is used to monitor the project progress and status of both standard and pilot program trainees. Every month the Contractor shall complete and submit to the Project Engineer a Form 832 for every active trainee. The Contractor shall also submit a Form 832 when any change in the employment status of a trainee occurs while the trainee is working on a project. The Project Engineer will not accept incomplete forms.
Form 832 provides space for listing the hours of on-the-job training received by a trainee on several projects. This permits CDOT to monitor the hours of trainees enrolled in the pilot program. The Project Engineer should pay only for the hours a trainee worked on the project. Trainee hours can be verified, if necessary, by comparison with certified payrolls.
The Contractor shall complete Form 832 as follows:
1. Type of Program. Indicate the type of program.
2. Contractor’s Name, Project Number and Project Code (SA#). Fill in as appropriate.
3. Reporting Month. Enter the month being reported.
4. Trainee’s Name, Classification, and Social Security Number. Enter the trainee’s name, work classification, and the last four digits of his social security number.
5. Date Enrolled in Program and Hourly Rate. Enter the date the trainee enrolled in the program and the trainee’s hourly rate.
6. Percent of Journeyman Scale. Enter the trainee’s hourly rate as a percentage of the journeyman scale.
7. Total Hours Required in Program. Enter the total hours required in the program.
8. Status of Trainee. Indicate the status of the trainee.
9. Days and Hours Worked by Trainee this Month. Enter the hours the trainee worked each day, broken down per CDOT project. Round the hours to the nearest half-hour.
10. Non-CDOT Project Descriptions. Enter the hours, if any, the trainee worked on non-CDOT projects.
11. Total Training Hours Worked this Month. Enter the total hours worked by the trainee this month.

Appendix B 2019
12. Previous Training Hours Worked. Enter the total hours completed in the program prior to this Form 832. Include any hours credited for previous experience.
13. Total Training Hours Worked to Date. Enter the total hours completed in the program including this Form 832 and any credit for previous experience.
14. Trainee’s Primary Job Duties. Provide a description of the trainee’s primary job duties this month.
15. Trainee’s Overall Job Performance. Indicate the trainee’s job performance this month.
16. Supervisor’s Comments. This entry reflects any comments the trainee’s supervisor provides.
17. Trainee’s Signature. If available, the trainee should sign in this cell.
18. Supervisor’s Signature. The trainee’s supervisor should sign in this cell.
19. Contractor’s Certification.
20. Project Engineer’s Certification.

Appendix B 2019
1
2
4
5
3
6 7
8
9
10
11 12 13
14
15 16
17
2 2
4
4 5
10
18
19
20

Appendix B 2019
Form 838 – OJT Trainee/Apprentice Record Completion Instructions
Form 838 provides demographic data about individual trainees. The Contractor shall complete and submit Form 838 to the Project Engineer. The Project Engineer will not accept an incomplete Form 838. The Project Engineer will forward the Form 838 to the Region EEO/Civil Rights Specialist for review and approval. The Region EEO/Civil Rights Specialist will return an approved copy to the Project Engineer. The Project Engineer should not make payment for trainee hours until an approved Form 838 has been received from the Region EEO/Civil Rights Specialist.
After the Project Engineer receives an approved copy from the Region EEO/Civil Rights Specialist, the Contractor is eligible for reimbursement under the on-the-job training force account item, for each hour of training the approved trainee receives on the project. It is important that the Contractor provide information on all previous experience in the field for the trainee’s previous construction work experience.
The Contractor shall complete Form 838 as follows:
1. Type of Program. Indicate the type of program.
2. Contractor’s Name, Project No., Location, and Project Code (SA#). Fill in as appropriate.
3. Name and Title of Trainee’s Supervisor.
4. Trainee Information. Enter the following information for the trainee:
a. name, b. date, c. job classification, d. wage decision number, e. sex, f. last four digits of social security number, g. veteran status, h. education status, i. training hours credited, and j. ethnic or racial background.
5. Previous Construction Work Experience. It is important that the Contractor provide information on all the trainee’s previous work experience.

Appendix B 2019
6. Employment Dates. Enter the date the trainee was first employed by your company and the date you anticipate employment through.
7. Anticipated Employment Time. Enter the length of time anticipated.
8. Trainee’s Beginning Wage Rate. Indicate the trainee’s beginning wage rate.
9. Trainee’s Preference to Travel. Indicate whether or not the trainee is willing to travel to continue employment.
10. Signature of Authorized Contractor Representative. Signature of Contractor or Designee.
11. Region Civil Rights Manager Signature. Signature and approval decision of the Region Civil Rights Manager.

Appendix B 2019
2
1
5
3
6 7
8 910
11
2 2
4
2

Appendix B 2019
Form 859 – Project Control Data Completion Instructions
Review Section 108.8 of this Manual and the current Standard Specification Subsection 108.08, Determination and Extension of Contract Time before completing Form 859. Distribution of Form 859 should be completed two weeks prior to the scheduled advertisement date. The first page of Form 859 lists features for consideration when determining contract time. Complete the first page of Form 859 as follows:
1. Project No., Project Code (SA#), Location, and Region. Enter the project number, project code, location, and Region number.
2. Date. Enter the date that information on the Form 859 is considered accurate. Any changes made after this date must be re-approved by the Program Engineer.
3. Advertisement Period. Enter the advertisement period, with three weeks being typical. The advertisement period may be adjusted to suit individual project requirements; however, the Chief Engineer must approve advertisement periods of less than three weeks.
4. CDOT Personnel. Enter the names of the individuals associated with the project.
5. Floating Start Date. Typically, this is No. If the project is to have a floating start date, select yes and enter the appropriate period in this cell.
6. Lead Time. Enter the lead time period in calendar days from the award date to the date shown on the Notice to Proceed Letter. This is typically 20 days, however, additional lead time may be allowed for individual project considerations such as material fabrication and delivery (e.g., traffic signals, luminaires, and steel fabrication), obtaining permits, and development of Contractor material sources, or scheduling partnering sessions. If a lead time is necessary, it will be included in the Project Special Provisions.
7. Time Specification Considerations. You will always select Yes for Critical Path. Check the applicable boxes for time considerations relative to contract time to be used on the project.
8. Work Items that may Impact Contract Time. Provide information in this section on the work items that may impact contract time. For example, ensure that the following issues are considered:
Appendix B 2019
a. Lead time for construction survey work, b. Utility relocations completed during construction, c. Seasonal considerations including winter months, or winter shutdown, d. Local events and traffic issues, e. Temporary detour installation and removal, and f. Planting season limitations.
9. Flagging and Traffic Control. Enter the estimate for flagging and traffic control management quantities after completing a CPM schedule (see description below).
10. Construction Type, Special Requirements, and Comments. Describe the type of construction and any special construction requirements or comments in this section of Form 859. This information is included to document the thought process for developing the contract Time.
11. Days or Fixed Completion Date. Enter the number of contract days determined from a CPM Schedule or indicate the fixed completion date as appropriate.
12. Months’ Time Not Charged. Subsection 108.08 of the Standard Specifications does not allow free time. Any time period that time is not to be charged must be indicated in this cell and addressed in the Contract.
13. Minor Contract Revisions. Enter the estimated dollar amount of minor Contract revisions to be reflected with project plan force accounts.
14. Region Program Engineer Signature and Date. Form 859 will be signed and dated by the Region Program Engineer in these cells.
15. Resident Engineer Signature and Date. Form 859 will be signed and dated by the Resident Engineer in these cells.

Appendix B 2019
Instructions for Completing a CPM Schedule
A Critical Path Method (CPM) schedule will be used to determine the contract time and attached to the Form 859. Microsoft Project is the software CDOT uses to develop the CPM schedule. The example below is a widening and Hot Mastic Asphalt overlay project. The following items of work are included in the project. The schedule begins when the Notice to Proceed is issued to the Contractor.
Bid Item Quantities:
a. Construction Signing (ground mounted) 20 each b. Construction Surveying lump sum c. Clearing and Grubbing 10 acres d. Erosion Control installation 2 days # e. Utility Work (relocate power lines) 1 week f. Minor Structures (pipe extensions) 800 linear feet g. Unclassified Excavation (CIP) 40,000 cubic yards h. HMA (Grading SX)(100)(64-22) 15,000 tons i. Emulsified Asphalt (slow setting) 2,000 gallons j. Aggregate Base Course (Class 6) 6,000 tons k. Guardrail 5,000 linear feet l. Topsoil (H) 5,000 cubic yards m. Seeding (Native) 10 acres n. Mulching 10 acres o. Flagging * hours p. Traffic Control Management * days q. Traffic Control Inspection * days r. Pavement Marking Paint 170 gallons
# While Erosion Control Installation is not a bid item, it is included to determine how it affects the Contract time.
*To be determined by the Resident Engineer and entered on Form 859.
1. List the items of work to be prosecuted. Listing these items of work in the logical sequence in which they must be performed will assist with completion of the CPM schedule.
a. Utility Locates b. Mobilization and Construction Signing c. Construction Surveying

Appendix B 2019
d. Clearing and Grubbing e. Utility Work f. Minor Structures g. Unclassified Excavation h. HMA (Emulsified asphalt can be omitted, because it is controlled by HMA) i. ABC (ABC is for shouldering) j. Guardrail k. Topsoil l. Seeding (Mulching can be omitted, because it is controlled by seeding) m. Pavement Marking Paint.
Flagging, Traffic Control Management and Traffic Control Inspection are concurrent with the other work and do not affect project completion.
2. Determine which items are anticipated to be controlling items of work. A controlling item of work and a salient feature are not synonymous. A controlling item of work is an item of work that may extend the overall completion of the project if the duration of this item is increased. A salient feature is an item of work that may be of special interest in coordinating the project schedule because of the volume, complexity, or nature of the work, but may not affect the overall completion of the project.
In order to produce the schedule, the project should be constructed in theory to determine the sequence of the work, especially when phasing is required. Items of work can often be constructed concurrently which will also impact the duration of the project. Creating the CPM schedule will determine which items are controlling items of work for the project.
In this example, the following items are predicted to be controlling items of work:
a. Utility Locates b. Construction Signing c. Construction Surveying d. Clearing and Grubbing e. Erosion Control Installation f. Minor Structures g. Unclassified Excavation h. HMA i. ABC j. Guardrail

Appendix B 2019
k. Topsoil l. Seeding and Mulching m. Striping n. Punch List Construction signing is included as a controlling item to consider time for initial installation of ground-mounted advance warning signs, as indicated by the Traffic Control Plan. The construction signing work item is ongoing throughout the life of the project; however, initial placement of advance warning construction signs and required devices will be necessary prior to beginning construction surveying and other bid item work. In this example, mobilization is presumed to be completed in conjunction with construction signing and; therefore, time is not specifically addressed. Lead time to initiate Construction Survey work should be considered to allow for checking of monuments and benchmarks and for slope staking to begin in advance of earthwork operations. The remaining items are the primary work items required for completion of the project. The utility work is anticipated to take five working days and is required to be completed in conjunction with unclassified excavation work, as the lines to be relocated are under ground. However, the utility company must be notified and the relocation completed in a timely manner to avoid delays. Therefore, these items are not controlling items of work, but rather are salient features. Final Striping (Pavement Marking Paint) can be completed while placing ABC, Topsoil, Seeding and Mulching.
3. Determine durations for items of work. Determine an estimated daily production rate for each controlling item of work, considering any factors that will impact completion as indicated on the first page of Form 859.
The estimated daily production rates used in the example below are specific only to this project and are not to be used for actual projects. Actual project production rates will vary based on location, accessibility, weather restrictions, working hour limitations, and traffic conditions.

Appendix B 2019
To determine the number of work days required to complete each controlling item of work, divide the quantity of work for each item by the estimated daily production rate. Production rate calculations should be documented in the notes for each activity in the Microsoft Project file.
Computing Work Days for Controlling Items of Work
Item Quantity Estimated Daly Production Rate** Work Days
Utility Locates 1 day
Construction Signing 20 signs 10 signs/ day 2 days
Construction Surveying 15 days
Clearing and Grubbing 10 acres 1 acre/ day 10 days
Erosion Control Installation 2 days
Minor Structures
(pipe ext. w/ end sections)
800 linear feet 50 linear feet/ day 16 days
Unclassified Excavation 40,000 cubic yards 2,000 cubic yards/ day 20 days
HMA 15,000 tons 1,000 tons/ day 15 days
ABC 6,000 tons 600 tons/ day 10 days
Guardrail 5,000 linear feet 300 linear feet/ day 17 days
Topsoil 5,000 cubic yards 500 cubic yards/ day 10 days
Seeding 10 acres 5 acres/ day 2 days
Striping 1 day
Punch List 3 days

Appendix B 2019
**Notes on Production Rates:
a. One work day for Utility Locates is considered reasonable. b. Fifteen days for Construction Surveying is considered reasonable, with three
days lead time provided for checking of control monuments and initial slope stake placement in advance of clearing and grubbing, minor structure, and earthwork operations.
c. Determination of the Construction Surveying duration and appropriate lead-time for actual projects will be based on survey complexity, engineering judgment, and experience with actual progress of survey work.
d. Two days is considered reasonable for installing the first set of Erosion Control items.
e. One work day is reasonable to perform final striping of the project. f. Three days is typical for completing Punch List items.
4. Create a CPM schedule. Create a new project in MS Project and enter the items of work as tasks. Adding the Notice to Proceed and Project Acceptance as milestones is helpful. Next add the estimated production rates and quantities in the notes, and the calculated durations in the appropriate box for each task. Finally add relationships between activities. If using relationships other than Finish to Start with zero lag, note the reasoning for using the different relationships and lags. All tasks or activities will have predecessor and successor activities except for the first activity (no predecessor), and the last activity (no successor).
5. It is helpful to create a summary activity that includes all project activities to calculate the number of days required to complete all project work.
6. The completed CPM Schedule shows that the contract time for this project should be 79 working days. Enter 79 working days in the proper box on the first page of Form 859.
7. In accordance with Section 630, a Traffic Control Management (TCM) day is paid for every calendar day on which there is active traffic control. In this example, the appropriate number of TCM days is 79 days. The elapsed time for the project which starts April 14, 2014 and ends August 7, 2014 is 117 days. In order to determine the Traffic Control Inspection (TCI) days, subtract the TCM days from the Elapsed time. In this example the difference is 38 days. Enter the TCM and TCI days in the comments section on the first page of Form 859.

Appendix B 2019
8. To estimate the number of Flagging hours that will be required, estimate how many hours that will be required each day and multiply by the number of working days.
9. In this example, it was estimated that 948 hours of flagging would be required. Enter this amount on the first page of Form 859.

Appendix B 2019
1
2
5
6
4
7
8
9
10
11 12 13
14 15
1
4
1
1
3
4 4
9 9
11
14 15

Appendix B 2019
Note: Page 2 of Form 859, when printed from SiteManager®, is marked “Do Not Use.” As per the instructions, a Critical Path Method (CPM) schedule will be used instead of the second page of Form 859 to determine the Contract time. Microsoft Project is the software used to develop the CPM schedule.

Appendix B 2019
Form 1186 – Contract Funding Increase/Decrease and Approval Letter Completion Instructions
Form 1186 must be submitted and approved prior to payment of any interim estimate that will cause the cumulative total of Contractor payments to exceed the project commitment amount. Form 1186 must be coordinated through the Region Business Office. See Section 120 of this Manual for additional information on when it is necessary to submit a Form 1186. Complete Form 1186 as follows:
1. Contracts/Situations. Indicate the contracts or situations that are applicable (e.g., CDOT construction, sum of contract modification orders, utility/railroad, underestimated total cost).
2. Section 1 Information. Enter the date, project code, project number, Region, office address of the requesting Business Office or residency, and the phone number and fax number of a contact person who can provide additional information concerning the request to increase or decrease funding.
3. Vendor Information. Enter the vendor’s name, vendor’s address, SAP vendor number, and the Contract routing number. The Contract routing number can be obtained from a copy of the signed Contract.
4. SAP Purchase Order Number, Fund, Functional Area:, GL Account Number, WBS Element or Functional Center. All information regarding SAP coding can be obtained from the Contract.
5. Original Contract Amount. Enter the original Contract amount, which can be obtained from the Contract.
6. Budget Request Processing. Indicate whether or not a budget request has been made through OFMB to cover the increased amount.
7. Previous Funding Letter(s) Total. Enter the previous funding letter(s) total, which is available from the project file.
8. Funding Letter Total. Enter the amount of this request.
9. Adjusted Contract Amount. Enter the adjusted Contract amount, which is the original Contract amount, plus any previous funding letters, plus this funding letter.
10. Contract Administrator’s/Business Manager’s Approval. The Region Business Manager must sign and list a phone number.

Appendix B 2019
11. CDOT Designee Approval. The CDOT designee approval is no longer necessary.
12. Local Agency Approval. If it is a Local Agency Contract, the Region determines if the Local Agency approves.
The original must be sent to Accounting before the funds will be encumbered. Retain a copy of Form 1186 for the project file.
The Controller will sign and make the distribution as requested by the Region.

Appendix B 2019
1
5
3
6
7
8
9
10
11
4
2
12

Appendix B 2019
Form 1212 – Final Acceptance Report Completion Instructions
Form 1212 is used to document the final inspection of the project by the Resident Engineer, as required by FHWA on all Federal-Aid projects. The final inspection of the project should be completed in advance of project acceptance to permit any necessary corrective work to be completed before the Contractor vacates the project site. To facilitate coordination of the final inspection prior to project acceptance, the Resident Engineer will use transaction ZJ11 in SAP to complete items in Form 1212. SAP will execute the workflow and email a pdf copy to the Resident Engineer and the Finals Administrator. See Section 100 of this Manual for additional information on the use of Form 1212.
1. Project No., Project Code (SA#), and County. Fill in as appropriate.
2. Federal Oversight. Check the appropriate response indicating whether or not the project has Federal-Aid oversight.
3. Contractor’s Name. Enter the Contractor’s name.
4. Location. Enter the project location.
5. Original Contract Amount. Enter the original Contract amount.
6. Description of Improvement as Advertised. Provide a description of the project improvement as advertised.
7. Inspection Date. Show the date that the project inspection was completed.
8. Acceptance Date. Enter the project acceptance date.
9. Percent Time Elapsed. Enter the percent of authorized Contract time elapsed as of the project acceptance date.
10. Original Contract Time. Input the number of original Contract days or the Contract completion date for the original Contract time.
11. Checklist. The Resident Engineer must check each box after verifying that the listed items are completed and correct. If any of the items on the checklist are not required for the project, the box should be left blank and an explanation entered on the form as to why the item was not required. In addition to the listed items that are discussed below, dollar amounts and time extensions associated with the claim resolutions may also be indicated as remarks.

Appendix B 2019
12. Name, Title, Signature, and Date. The Resident Engineer’s name and signature and the date are required.
A hard copy with original signature must be forwarded to the FHWA via the Region Final’s Engineer and a copy included in the project files even when using the electronic version of the form.

Appendix B 2019
1
5 3
6
7 8 9 10
11
4
2
1 1
12 12

Appendix B 2019
Form 1318 – Dispute and Claim Status Report Completion Instructions
The Project Engineer is responsible for completing the Dispute and Claim Status Report. See Section 105.22 of this Manual for additional information on claims. Complete the Claims Status Report as follows:
1. Date of Report. Date of first instance.
2. Claim No. Number consecutively on the project. Enter both claim number and dispute number as per the example. You may have had four disputes on the project, but this is the first dispute that went to claim status; the Claim No. would be “1-D4” to tie the claim to the dispute.
3. Project No., Project Code (SA#), and Project Description. Fill in as appropriate.
4. Final Acceptance Date. Date the project was accepted.
5. Contractor Information. Fill in as appropriate.
6. CDOT Contacts. Fill in as appropriate.
7. Work Category. As instructed, enter the Standard Specification which addresses the disputed item (i.e. 203.06 Embankment.)
8. Primary Basis of Dispute. Enter the primary reason for the dispute (i.e. CDOT and the Contractor could not agree on time allowance, cost, interpretation of plans, etc.).
9. Brief Description of Dispute. Fill in as appropriate.
10. Amount of Contractor’s Dispute. If amount of dispute is unknown at the time of notice, put “unknown” until amount is determined. Amount of Contractor’s dispute must be determined when their Request for Equitable Adjustment (REA) is submitted.
11. Amount of Contractor’s Dispute. If time of dispute is unknown at the time of notice, put “unknown” until the number of days is determined. Amount of time related to Contractor’s dispute must be determined when their Request for Equitable Adjustment (REA) is submitted.
12. Event. Fill in the dates as each item transpires. The days listed after each line item denote the time frame when that line item is due based on the preceding process completed. Schedule of dispute is critical; dispute may be granted or denied is CDOT

Appendix B 2019
or the Contractor fail to follow the schedule outlined in subsection 105.22 of the Standard Specifications.
13. Level. Level denotes the level the dispute/claim was resolved.
14. Comments. Fill in as appropriate.

Appendix B 2019
2 1
3
4
5
6
7 8
9
10 11
12

Appendix B 2019
13
14

Appendix B 2019
FHWA Form 1391 – Federal-Aid Highway Construction Contractors Annual EEO Report
Completion Instructions
A blank copy of FHWA Form 1391 is presented on the next page for reference and at this link FHWA Form 1391.
An electronic version of the Form FHWA 1391 (Rev. 09-13) Excel workbook is embedded here:
FHWA 1391.xlsx

Appendix B 2019

Appendix B 2019
Form 1401 – Block Faced MSE Wall Submittal Checklist
A blank copy of Form 1401 is presented.

Appendix B 2019

Appendix B 2019
Form 1402 – Panel Faced MSE Wall Submittal Checklist
A blank copy of Form 1402 is presented.

Appendix B 2019

Appendix B 2019
Piling Form Completion Instructions
Complete the Piling Form as follows:
1. Project No. and Project Code (SA#). Fill in as appropriate.
2. Date. Enter the date the piling was driven into the ground.
3. Piling Site No. Make a copy of the piling layout from the plans. The sites of the piling will be numbered beginning with Abutment 1, continuing to Pier 2. Write the piling site number corresponding to the piling to be driven.
4. Pile No. Record a number if a cutoff is being spliced to the pile. The pile number to be used will be the piling site number followed by an “A” of the site it was cut from.
5. Heat No. Enter the heat number. The heat number is the number recorded on the piling.
6. Linear Feet. Enter the data for linear feet as follows:
a. In Lead. The length of the piling that has been driven. b. Cut Off. The length of the piling that has been cut off. c. In Place (a). The lead length minus the cutoff length.
7. Splices. Enter the data for splices as follows:
a. No. Enter the total number of splices on the piling. Check the specifications for the total number of splices allowed for payment.
b. X. Enter the length allowed for splices per the Standard Specifications. c. Linear Feet (b). Enter the number of splices multiplied by the X length.
8. Item 502 Total Linear Feet (c). Enter the sum of column (a) and column (b).
9. Item 900 *Cutoff L ≤ 10 feet. Enter the cutoff length not used that is less than or equal to 10 feet. Add a new item to the Contract. The unit price for the new item is based on using 80% of the Contract unit price per subsection 502.13 of the Standard Specifications.
10. Calculated By. The initials of the Project Inspector who is documenting the piling quantities are entered in this column.

Appendix B 2019
11. Checked By. The initials of the Project Inspector who checks the piling quantities are entered in this column.

Appendix B 2019

Appendix B 2019
Traffic Control Review Form
An example of Traffic Control Review Form is presented.
The seven-page printed version that follows is a sample. The fillable Excel spreadsheet is embedded below.
Master TCR - wTeamWeighting.xls

Appendix B 2019

Appendix B 2019

Appendix B 2019

Appendix B 2019

Appendix B 2019

Appendix B 2019

Appendix B 2019

Appendix B 2019
Project Final Submittal Checklist
An example of the Project Final Submittal Checklist is presented.
Project Final Submittal Checklist.p

Appendix B 2019

Appendix B 2019

Appendix B 2019
Final Materials Submittal Checklist
An example of the Final Materials Submittal Checklist is presented.
Final Materials Submittal Checklist.p

Appendix B 2019

Appendix B 2019
CPM Schedule Review Checklists
Use these checklists to assist in reviewing project CPM schedules.
Checklist 1 - Schedule Submittal checklist will help ensure that a schedule submittal is complete. The best response to each item in the checklist is “yes”.
Checklist 2 – Preliminary and Baseline Schedule checklist will help determine topics for the Schedule Review meeting and the items the Contractor needs to address. It is possible that not all of the items listed apply to every project. The best response to each item in the checklist is “yes”. If a statement applies and you cannot answer yes, decide if you should respond approve or require corrections and resubmit.
Checklist 3 – Project Schedule Update checklist will help determine topics for the Schedule Review meeting and the items the Contractor needs to address. It is possible that not all of the items listed apply to every project. The best response to each item in the checklist is “yes”. If statement applies, and you cannot answer “yes,” decide if you should respond Approve-as-noted, require corrections and resubmit, or require a Revised Schedule.
Checklist 4 – Revise and Resubmit Schedule checklist lists issues that require revision of the Schedule. When these items are answered “yes,” consider requiring corrections (respond with Approve-as-Noted) and requiring the contractor to resubmit the submittal.
Checklist 5 - Schedule Risk Analysis checklist offers points to consider when analyzing schedule risk and help determine if a schedule consultant is needed.
CPM Schedule Review Checklists.pd

Appendix B 2019

Appendix B 2019

Appendix B 2019

Appendix B 2019

Appendix B 2019

Appendix B 2019

Appendix B 2019