CAMS User Guide for Company and Affiliate Maintenance · 2.3.12 Data Universal Numbering System ......
169
Succ Customer and Asset Management System (CAMS) User Guide for Company and Affiliate Maintenance Version 1.4 2016 ISO New England Inc.
-
Upload
trinhkhanh -
Category
Documents
-
view
212 -
download
0
Transcript of CAMS User Guide for Company and Affiliate Maintenance · 2.3.12 Data Universal Numbering System ......

Succ
Customer and Asset Management System
(CAMS)
User Guide for Company and Affiliate
Maintenance
Version 1.4
2016
ISO New England Inc.

CAMS User Guide for Company and Affiliate Maintenance Page 2 of 169
Version 1.4 2016 ISO New England Inc
ISO-NE Public
About this user guide The Customer and Asset Management System (CAMS) User Guide is grouped into independent sections arranged by topic and user role. It is not necessary to read the guide from beginning to end.
You may:
Select a topic from the How to: list on page 9
Start with an Overview on page 9
Select a CAMS Roles from the table of contents or from the list on page 132

CAMS User Guide for Company and Affiliate Maintenance Page 3 of 169
Version 1.4 2016 ISO New England Inc
ISO-NE Public
CAUTION
Company names and any numerical values are fictitious and not to be associated with any actual market customer.
Though we strive to maintain this guide current, the screen views in this guide
may not fully reflect the current production environment.

CAMS User Guide for Company and Affiliate Maintenance Page 4 of 169
Version 1.4 2016 ISO New England Inc
ISO-NE Public
Change Summary
Revision Date Comments Version 1.0 August 3, 2012 Initial release
Version 1.1 October 23, 2013
Updated screen shots for CAMS 2013 upgrade; removed the Index section; added application and role descriptions for NX Application in the Reference Tables.
Version 1.2 March 7, 2014 Added Subaccount section. Made other revisions to describe new functionality in CAMS, particularly the Export Person Detail Report function.
Version 1.3 August 28, 2015 Additional updates made to the Subaccount information section.
Version 1.4 July 29, 2016 Added Banking Information section. Added Asset Ownership Share Transfers section.

CAMS User Guide for Company and Affiliate Maintenance Page 5 of 169
Version 1.4 2016 ISO New England Inc
ISO-NE Public
Table of contents
1 What is CAMS? 8
2 How to: 9
2.1 Get started 9 2.1.1 Overview 9 2.1.2 Accessing CAMS 11 2.1.3 CAMS user interface 13
2.2 Manage your company’s persons 14 2.2.1 Overview 14 2.2.2 Adding persons to CAMS 15 2.2.3 Granting a person access to CAMS or another ISO application 17 2.2.4 Removing or modifying a person’s access to an application 20 2.2.5 Granting a person access to File Shares 23 2.2.6 Managing MIS Accounts 29 2.2.7 Viewing persons 33 2.2.8 Deleting persons 34 2.2.9 Update person’s information 35 2.2.10 Retrieving your company’s person detail report 37
2.3 Manage your company’s information 40 2.3.1 Overview 40 2.3.2 Customer 42 2.3.3 Addresses 44 2.3.4 History 57 2.3.5 Applications 58 2.3.6 File Share 60 2.3.7 Corporate Family 61 2.3.8 Contacts 63 2.3.9 Committees 70 2.3.10 Governance 75 2.3.11 Change Log 76 2.3.12 Data Universal Numbering System (DUNS) 77 2.3.13 Trading information 80 2.3.14 Subaccount information 83 2.3.15 Asset Ownership Share Transfers 95 2.3.16 Banking information 106
2.4 Manage your company’s Affiliates Information 111 2.4.1 Overview of affiliates 111 2.4.2 Summary of the affiliate process 112 2.4.3 States of company relationship revision 114 2.4.4 Search for and view a company relationship revision 115 2.4.5 View company relationship revision information 116 2.4.6 Add a company relationship revision 118 2.4.7 View a company relationship 122 2.4.8 View a corporate family 123 2.4.9 View a company path detail 124 2.4.10 Update a company relationship revision change request 124
2.5 Manage your company’s minimum eligibility criteria information 127

CAMS User Guide for Company and Affiliate Maintenance Page 6 of 169
Version 1.4 2016 ISO New England Inc
ISO-NE Public
2.5.1 Overview of minimum eligibility criteria 127 2.5.2 Add minimum eligibility criteria information 127 2.5.3 View minimum eligibility criteria information 130
3 CAMS Roles 132
3.1 Security Administrator 132 3.2 External Customer Maintainer 132 3.3 External Customer Viewer 133 3.4 External Person Maintainer 133 3.5 External Person Viewer 133 3.6 External Resource Maintainer 134 3.7 External Resource Viewer 134 3.8 External Demand Asset Maintainer 134 3.9 External Demand Asset Viewer 135 3.10 External Host Participant Viewer 135 3.11 External Meter Reader Viewer 136 3.12 External MEC Maintainer 136 3.13 External MEC Viewer 136
4 Customer Support 137
4.1 By Internet 137 4.2 By Telephone 137 4.3 By Email 138 4.4 By Fax 138 4.5 Ask ISO 138 4.6 NEPOOL Membership Questions 139 4.7 Financial Assurance Questions 139 4.8 Membership Application Process 140
5 Links 141
5.1 ISO New England Home Page 141 5.2 ISO New England Training Page 141 5.3 ISO New England FAQ Page 141 5.4 SMD Site for ISO Applications 141 5.5 SMD Site for ISO Sandbox Applications 141 5.6 ISO New England Glossary and Acronyms 141
6 Reference Tables 142
6.1 Table 1: CAMS Roles and Permissions 142 6.2 Table 2: ISO Applications and Groups 145 6.3 Table 3: Control Room Operations Window Outage Scheduler Roles 148 6.4 Table 4: Demand Resource Market User Interface Roles 150 6.5 Table 5: Enhanced Energy Scheduling Roles 151 6.6 Table 6: Financial Transmission Rights Application Roles 152 6.7 Table 7: Bids and Offers (eMarket) Roles 153 6.8 Table 8: Settlement Market System (SMS) Applications and Roles 155 6.9 Table 9: Demand Response Audit and Testing Tool Roles 156 6.10 Table 10: NX Application (NX-9 & NX-12D) Typical User Types and Role
Descriptions 157

CAMS User Guide for Company and Affiliate Maintenance Page 7 of 169
Version 1.4 2016 ISO New England Inc
ISO-NE Public
6.11 Table 11: Other Application Roles 161 6.12 Table 12: Contact Types 164

CAMS User Guide for Company and Affiliate Maintenance Page 8 of 169
Version 1.4 2016 ISO New England Inc
ISO-NE Public
1 What is CAMS?
The Customer and Asset Management System (CAMS) is ISO New England’s administrative database of record. It stores, maintains and manages all customer data and facilitates the registration of Demand Assets and Resources.
CAMS is available to customers as an internet-based tool for:
Managing your company contacts (see “Contacts” on page 63)
Managing your committee representation (see “Committees” on page 70) Granting users access to other ISO internet-based applications (see “Granting a person access to
CAMS or another ISO application” on page 17)
Updating your company information (see “Manage your company’s information” on page 40)
Managing your company’s subaccounts (see “Subaccount information” on page 83)

CAMS User Guide for Company and Affiliate Maintenance Page 9 of 169
Version 1.4 2016 ISO New England Inc
ISO-NE Public
2 How to:
2.1 Get started
2.1.1 Overview
2.1.1.1 CAMS Security Administrators
To use CAMS, a company must first designate at least one individual to be a CAMS Security
Administrator (SA).
This section applies to the following CAMS roles:
All roles
This section covers the following topics:
Overview (page 9)
Accessing CAMS (page 11)
CAMS user interface (page 13)

CAMS User Guide for Company and Affiliate Maintenance Page 10 of 169
Version 1.4 2016 ISO New England Inc
ISO-NE Public
Designating an SA is normally completed during the membership application process to ISO New
England.
o If your company does not have an SA, or would like to designate another SA, complete, notarize and return the ISO New England Security Administrator Signatory Page located on
ISO New England’s website at:
http://www.iso-ne.com/static-
assets/documents/support/custsvc/forms/iso_ne_security_admin_sig_page.pdf.
The form must be signed by a company officer and notarized. Incomplete forms will not be processed. The original form, including notary stamp or seal, must be mailed
to the following address:
Customer Support
ISO New England
One Sullivan Rd.
Holyoke, MA 01040
An SA is responsible for assigning roles in CAMS and issuing digital certificates to users. For
details see the “Manage your company’s persons” section on page 14.
o For details on the SA role see “Security Administrator” on page 132.
o For details on all roles in CAMS see “Table 1: CAMS Roles and Permissions” on page 142.
2.1.1.2 CAMS Persons and Roles
Users are known in CAMS as “Persons”.
To access CAMS, a person must first be entered into the CAMS database by an SA. See “Adding
persons to CAMS” on page 15.
The person must then be assigned at least one role and issued a digital certificate by the
company’s SA.
o A role is a defined set of allowable activities in CAMS or another ISO New England application.
o A digital certificate is an electronic key to the ISO New England websites that host CAMS and other applications. A person cannot access any ISO application without a digital certificate.
o Digital certificates are automatically issued the first time a person is assigned a role or is given access to an ISO application or file share group that requires a certificate.
For details on assigning roles and issuing digital certificates by Security
Administrators, see “Manage your company’s persons” on page 14.
Digital certificates must be renewed annually.
For further details including issuing, renewing, and installing digital certificates, see the CAMS User Guide for Digital Certificates which is available by contacting ISO-
NE Customer Support or your SA.
For details on all roles in CAMS see “Table 1: CAMS Roles and Permissions” on page 142.
For details on roles in other ISO applications see “Table 2: ISO Applications and Groups” on
page 145.

CAMS User Guide for Company and Affiliate Maintenance Page 11 of 169
Version 1.4 2016 ISO New England Inc
ISO-NE Public
2.1.1.3 Online CAMS Frequently Asked Questions
See the “Customer and Asset and Management System (CAMS)” section on ISO New England’s
website FAQ page, located at http://www.iso-ne.com/participate/support/faq.
2.1.1.4 ISO New England Glossary and Acronyms
For a full list of ISO New England terms and acronyms, see the Glossary and Acronyms listing on ISO New England’s website at:
http://www.iso-ne.com/participate/support/glossary-acronyms.
2.1.2 Accessing CAMS
I have a CAMS role and have installed my digital certificate. How do I access CAMS?
1. Navigate to the ISO SMD Applications Home Page at: https://smd.iso-ne.com/.
2. Click on “Customer and Asset Management System”:

CAMS User Guide for Company and Affiliate Maintenance Page 12 of 169
Version 1.4 2016 ISO New England Inc
ISO-NE Public
3. The CAMS homepage displays:
4. See the “How to:” list on page 9 for details on the task you want to perform.
I do not have a CAMS role or have not installed a digital certificate. How do I access CAMS?
To get a CAMS role and digital certificate: 1. Contact your company’s CAMS Security Administrator (SA) to request access to CAMS.
a. To learn who at your company is an SA, contact ISO New England Customer Support at (413) 540-4220 or via email at [email protected].
2. Your SA will assign you at least one specific role in CAMS. See the “CAMS Roles” section on page 132 for details of each CAMS role.
3. Your SA will issue you a digital certificate if you do not already have one.
4. ISO New England will email you instructions for installing the certificate on your computer.
a. See “Install a digital certificate” in the CAMS User Guide for Digital Certificates which is available by contacting ISO-NE Customer Support or your SA.
b. You will need the “PIN #” or “Pickup Password” from your SA to complete the installation process.
5. After you have installed your digital certificate, go to the “Accessing CAMS” section on page 11.

CAMS User Guide for Company and Affiliate Maintenance Page 13 of 169
Version 1.4 2016 ISO New England Inc
ISO-NE Public
2.1.3 CAMS user interface
The CAMS interface uses a hierarchical menu structure.
o Click on a top-level menu to reveal a second-level menu options.
o Click on a second-level menu option to reveal more choices or tab groups, depending on the task you want to perform.
o Action buttons appear as needed.
All menu selections are based on your individual user role or roles in CAMS.
Menus and functionality that do not pertain to your role(s) will not be displayed.
For details on the different CAMS roles, see the “CAMS Roles” section on page 132.
Why does CAMS sometimes log me out? For security reasons, your CAMS session will timeout after a period of inactivity. Close and
launch the browser again to log back in.
IMPORTANT
It may take up to two hours for the system to implement a new CAMS role.

CAMS User Guide for Company and Affiliate Maintenance Page 14 of 169
Version 1.4 2016 ISO New England Inc
ISO-NE Public
2.2 Manage your company’s persons
2.2.1 Overview
A “person” in CAMS is defined as:
o an individual who is associated with a company
o an individual who has been granted access to CAMS, another ISO application or a file sharing group
To perform any task related to a person, whether making the person a contact for your company or granting access to an ISO application, the person must first be entered into the CAMS database
(see “Adding persons to CAMS” on page 15).
Only a Security Administrator (SA) can add a person to CAMS.
Only an SA can grant a person access to CAMS, file shares, or another ISO application.
Only an SA can create MIS accounts.
An External Person Maintainer can perform all other tasks related to managing persons in CAMS
(see the list of topics, above).
This section applies to the following CAMS roles:
Security Administrator
External Person Maintainer External Person Viewer
This section covers the following topics:
Overview (page 14)
Adding persons to CAMS (page 15)
Granting a person access to CAMS or another ISO application (page 17)
Removing or modifying a person’s access to an application (page 20)
Granting a person access to File Shares (page 23)
Managing MIS Accounts (page 29)
Viewing persons (page 33)
Deleting persons (page 34)
Update person’s information (page 35)
Retrieving your company’s person detail report (page 37)

CAMS User Guide for Company and Affiliate Maintenance Page 15 of 169
Version 1.4 2016 ISO New England Inc
ISO-NE Public
What if a person who is registered in CAMS leaves my company or is terminated?
The SA must take the following steps in the following order:
1. If applicable, remove the person’s access to any ISO New England application.
See “Removing or modifying a person’s access to an application” on page 20. You do not need to take any action regarding the person’s digital certificate.
2. If applicable, remove the person’s contact listing. See “Delete contact information” on page 67.
3. If the person is a primary committee member, remove the committee and then add it again with
the replacement primary committee member. See “Delete a committee” on page 73.
4. If the person is an alternate committee member, remove the person’s name from the committee.
See “Update a committee” on page 72.
5. Delete the person from CAMS. See “Deleting persons” on page 34.
2.2.2 Adding persons to CAMS
Role that can perform this task:
o Security Administrator
1. Launch the CAMS interface. See the “Accessing CAMS” section on page 11.
2. Click on the top-level “Persons” tab or on the second-level “Persons” tab if it is open.
3. The “Person Listing” screen displays:
4. Click the “Add” button.

CAMS User Guide for Company and Affiliate Maintenance Page 16 of 169
Version 1.4 2016 ISO New England Inc
ISO-NE Public
5. The “Person Insert -- Basic information” screen displays:
6. Enter the person’s information. First name, last name and an email address are required.
7. Click “Next”.
8. The “Person Insert -- Insert information” screen displays:
9. Choose an existing company address for the person from the drop-down box, or enter a new address by selecting the “Enter a new address” radio button.
10. If you want to grant the person access to CAMS or another ISO application, click “Next” and continue with the “Granting a person access to CAMS or another ISO application” section on page 17.
11. If you want to add the person without assigning an application role, click “Finish”.
12. Review the information summary and click “Submit”.
CAMS User Guide for Company and Affiliate Maintenance Page 17 of 169
Version 1.4 2016 ISO New England Inc
ISO-NE Public
2.2.3 Granting a person access to CAMS or another ISO application
Only a Security Administrator (SA) can grant a person access to ISO applications.
An SA must assign the person at least one role in the application.
o To view the available roles for CAMS see “Table 1: CAMS Roles and Permissions” on page 142.
o To view other available ISO applications see “Table 2: ISO Applications and Groups” on page 145.
o A person may have more than one role in an application, though there are some mutually exclusive roles.
The person must have a digital certificate installed on his or her computer to access the site that
hosts the particular ISO application.
Digital certificates are automatically issued the first time a person is granted access to an ISO
application or file share group.
o See “Issue a digital certificate” in the CAMS User Guide for Digital Certificates which is available by contacting ISO-NE Customer Support or your SA.
o See “Install a digital certificate” in the CAMS User Guide for Digital Certificates which is available by contacting ISO-NE Customer Support or your SA.
To grant a user access to CAMS or another ISO application
Role that can perform this task:
o Security Administrator
1. Launch the CAMS interface. See the “Accessing CAMS” section on page 11.
2. Click on the top-level “Persons” tab or on the second-level “Persons” tab if it is open.
IMPORTANT
To grant a person access to an ISO application the person must first be entered
into the CAMS database. See “Adding persons to CAMS” on page 15.

CAMS User Guide for Company and Affiliate Maintenance Page 18 of 169
Version 1.4 2016 ISO New England Inc
ISO-NE Public
3. The “Person Listing” page displays:
4. Click on the name of the person to whom you are granting access.
a. If the person has not yet been entered into CAMS, and therefore does not appear in the list, you must first add the person by clicking “Add”. See “Adding persons to CAMS” on page 15.
5. The “Person View” screen displays:
6. Click on the “Application Groups” tab.
7. The “Person Application Group Listing” screen displays.
8. Click “Update” in the right corner of the screen.

CAMS User Guide for Company and Affiliate Maintenance Page 19 of 169
Version 1.4 2016 ISO New England Inc
ISO-NE Public
9. The “Person Application Group Update” screen displays:
10. From the “Unassigned Groups” list box on the left, select the application group or groups you want to assign to the person. You may multi-select by holding down the shift key or the ctrl key while you click.
11. The CAMS roles are listed as “Customer Asset Management System / [role]”.
a. For details on roles for other ISO New England applications, see “Table 2: ISO Applications and Groups” on page 145.
b. For details on CAMS roles, see “Table 1: CAMS Roles and Permissions” on page 142.
12. Click the -> arrow between the two boxes to move your selections to the “Assigned Groups” box.
13. Click “Update”.
14. Enter the date you want the assignment(s) to take effect. The default is for the assignment(s) to be effective on the current day.
15. Click “Update”.
16. The “Application Groups” tab displays showing the new assignments.
17. If the person has not already been issued a digital certificate, the new assignment(s) will initiate the process on the effective date entered. On that date, the person will receive an email from ISO New England with instructions for installing a digital certificate on his or her computer.
a. As the Security Administrator, you will receive an email from ISO New England with a “PIN #” or “Pickup Password” for that person’s digital certificate.
b. The user or person will need the “PIN #” or “Pickup Password” to complete the certificate installation.
c. For details on installing a digital certificate see “Install a digital certificate” in the CAMS User Guide for Digital Certificates which is available by contacting ISO-NE Customer Support or your SA.

CAMS User Guide for Company and Affiliate Maintenance Page 20 of 169
Version 1.4 2016 ISO New England Inc
ISO-NE Public
18. If the person has a valid certificate installed, instruct the person to navigate to the ISO New England site that hosts the application.
a. For CAMS, go to https://smd.iso-ne.com/.
b. For other applications, check “Table 2: ISO Applications and Groups” on page 145 for the URL.
2.2.4 Removing or modifying a person’s access to an application
To remove or modify a person’s role and access to an application
Role that can perform this task:
o Security Administrator
1. Launch the CAMS interface. See the “Accessing CAMS” section on page 11.
2. Click on the top-level “Persons” tab or on the second-level “Persons” tab if it is open.
IMPORTANT
It may take up to two hours for the system to implement a new access and/or
role(s).
A person may have more than one role in a given application.
Some roles are mutually exclusive, therefore granting greater access (i.e., to read/write or maintainer) or reducing access (i.e., to read-only or viewer) may require two steps: a removal of the current role and a subsequent addition of the
new one.

CAMS User Guide for Company and Affiliate Maintenance Page 21 of 169
Version 1.4 2016 ISO New England Inc
ISO-NE Public
3. The “Person Listing” page displays:
4. Click on the name of the person whose role you want to modify.
5. The “Person View” screen displays:
6. Click on the “Application Groups” tab.
7. The “Person Application Group Listing” screen displays.
8. Click “Update” in the right corner of the screen.

CAMS User Guide for Company and Affiliate Maintenance Page 22 of 169
Version 1.4 2016 ISO New England Inc
ISO-NE Public
9. The “Person Application Group Update” screen displays:
10. From the “Assigned Groups” list box on the right, select the application group or groups that you want to remove. You may multi-select by holding down the shift key or the ctrl key while you click.
11. Click the <- arrow between the two boxes to remove your selections from the “Assigned Groups” box to the “Unassigned Groups” box.
12. Click “Update”.
13. Enter the date you want the removal to take effect under the “Date Expires” column. The default is for the assignment to expire on the current day.
14. Click “Update”.
15. The “Application Groups” tab displays, showing the revised assignments.
IMPORTANT
It may take up to two hours for the system to implement the removal.
The person’s digital certificate is not affected by the removal of any role/access.
You may add access and roles in the future.

CAMS User Guide for Company and Affiliate Maintenance Page 23 of 169
Version 1.4 2016 ISO New England Inc
ISO-NE Public
2.2.5 Granting a person access to File Shares
File shares are collections of ISO New England files or data that have been made available to customers over the internet. To access a file share, the person must be registered in CAMS and
have a valid digital certificate.
Current ISO New England file share groups are:
o Critical Energy Infrastructure Information File Group/Transmission System Info
Access to file shares is restricted and controlled by a company’s Security Administrator (SA).
Only an SA can grant a person access to a file share group.
The person must have a digital certificate installed on his or her computer to access the site that
hosts the file share: https://smd.iso-ne.com/.
Digital certificates are automatically issued the first time a person is granted access to an ISO
application or file share group.
o For details on issuing a digital certificate see “Issue a digital certificate” in the CAMS User Guide for Digital Certificates which is available by contacting ISO-NE Customer Support or
your SA.
o For details on installing a digital certificate see “Install a digital certificate” in the CAMS
User Guide for Digital Certificates which is available by contacting ISO-NE Customer Support or your SA.
To grant a person access to a file share group
Role that can perform this task:
o Security Administrator
1. Launch the CAMS interface. See the “Accessing CAMS” section on page 11.
IMPORTANT
To grant a person access to file shares the person must first be added to CAMS.
See “Adding persons to CAMS” on page 15.
In addition to the Security Administrator, individuals with the External Person Maintainer role or the External Person Viewer role can access the File Shares
information from the “Persons” tab in CAMS.

CAMS User Guide for Company and Affiliate Maintenance Page 24 of 169
Version 1.4 2016 ISO New England Inc
ISO-NE Public
2. Click on the “Company” tab and then on the second-level “Persons” menu. You may also click on the “File Share” tab for the individual person. See “Viewing persons” on page 33.
3. Click on the name of the person you want to assign to the file share group.
a. If the person has not been entered into the CAMS database, you must first add the person by clicking “Add”. See “Adding persons to CAMS” on page 15.
4. The “Person View” screen displays:
5. Click on the “File Shares” tab.

CAMS User Guide for Company and Affiliate Maintenance Page 25 of 169
Version 1.4 2016 ISO New England Inc
ISO-NE Public
6. The “Person File Sharing Listing” screen displays:
7. Click the “Update” button. The “Person File Share Update” screen displays:
8. Select the file share group from the “No Access” box on the left and click the “Grant Access” button in the center.
9. Click the “Update” button.
10. If the person has not already been issued a digital certificate, he or she will receive an email from ISO New England with instructions for installing a digital certificate on his or her computer.
a. As the Security Administrator, you will receive an email from ISO New England with a “PIN #” or “Pickup Password” for that person’s digital certificate. See “Issue a Digital Certificate” in the CAMS User Guide for Digital Certificates which is available by contacting ISO-NE Customer Support or your SA.
b. You must give the person the “PIN #” or “Pickup Password” to complete the certificate installation.
c. For details on installing a digital certificate see “Install a digital certificate” in the CAMS User Guide for Digital Certificates which is available by contacting ISO-NE Customer Support or your SA.

CAMS User Guide for Company and Affiliate Maintenance Page 26 of 169
Version 1.4 2016 ISO New England Inc
ISO-NE Public
11. If the person has a valid certificate installed, instruct the person to navigate to the ISO New England site that hosts the file share: https://smd.iso-ne.com/.
12. The “Transmission System Information” link is located on the left side of the screen:
IMPORTANT
It may take up to two hours for the system to implement a new file share access.
If you click on the File Shares tab of the main CAMS screen, you will see a list
of persons currently granted access to the file share group.
o To grant a new person access you must first select the person from the “Person Listing” tab, which displays when you click on the top
“Person” tab.

CAMS User Guide for Company and Affiliate Maintenance Page 27 of 169
Version 1.4 2016 ISO New England Inc
ISO-NE Public
Removing a person from a file share group
Role that can perform this task:
o Security Administrator
1. Launch the CAMS interface. See the “Accessing CAMS” section on page 11.
2. Click on the “Company” tab and then on the second-level “Persons” menu. (You may also click on the “File Share” tab for the individual person. See “Viewing persons” on page 33.)
3. Click on the name of the person you want to remove from the file share group.
4. The “Person View” screen displays.
5. Click on the “File Shares” tab:

CAMS User Guide for Company and Affiliate Maintenance Page 28 of 169
Version 1.4 2016 ISO New England Inc
ISO-NE Public
6. The “Person File Sharing Listing” screen displays:
7. Click the “Update” button.
8. The “Person File Share Update” screen appears:
9. From the “Assigned Access” box on the right, select the file share groups you want to remove for the person.
10. Click the “Deny Access” button.
11. Click the “Update” button.
12. The “Person View” tab displays, showing revised assignments.

CAMS User Guide for Company and Affiliate Maintenance Page 29 of 169
Version 1.4 2016 ISO New England Inc
ISO-NE Public
2.2.6 Managing MIS Accounts
Market Information Server (MIS) accounts are secure FTP repositories for company settlement reports, financial information, forecast and operational information, tariff reports and World Wide
Web reports. For details see http://www.iso-ne.com/support/tech/rpt_descriptions/.
Companies needing MIS accounts to retrieve reports will be provided access during the
membership registration process.
The “MIS Accounts” feature in CAMS enables a company to create accounts for their FTP sites.
New customers should see their mentoring letter from ISO New England for the FTP account
location.
Other customers should contact Customer Support at ISO New England for more information
about MIS accounts.
Customers are asked to limit the number of MIS accounts and establish a repository for reports
internal to their companies.
Prior to granting access to transmission reports, please refer to your company’s policies on access
to transmission-related information.
IMPORTANT
It may take up to two hours for the system to implement the removal.
The person’s digital certificate is not affected by the removal from the file
share group. You may add files shares back in the future.

CAMS User Guide for Company and Affiliate Maintenance Page 30 of 169
Version 1.4 2016 ISO New England Inc
ISO-NE Public
2.2.6.1 To create a user ID and password for an MIS account
Role that can perform this task: o Security Administrator
1. Launch the CAMS interface. See the “Accessing CAMS” section on page 11.
2. Click on the “Company” tab to expose the second-level menu.
3. Click on the “MIS Accounts” tab:
4. The “MIS Accounts Listing” page displays:
NOTE: If your company has access to transmission reports the “MIS Accounts Listing” screen will also include a “Transmission Reports Access” column.
5. The “MIS – Account Insert” page displays:
6. Enter the date you want the MIS Account to become active and click “Add”.
NOTE: If your company has access to transmission reports, the “MIS – Account Insert” page will include a “Transmission Reports Access” check box: a. When enabled, the following transmission reports are available:

CAMS User Guide for Company and Affiliate Maintenance Page 31 of 169
Version 1.4 2016 ISO New England Inc
ISO-NE Public
Real Time Energy / Regulation (RTHS)
Special Real Time Metering Domain Report (RTUNMET)
Losses and External Tie Line Metering (OCLMETER)
Meter Adjustments (METERADJ)
Meter Domain (MTDOMAIN)
b. If you do not want this account to view transmission reports, leave the “Transmission Reports Access” check box clear.
7. The “MIS Accounts Listing” page displays with the new accounts and passwords.
8. Distribute the user ID and password to staff at your company who require access to the MIS Accounts per your company’s IT guidelines or policies.
2.2.6.2 Delete a MIS account
Role that can perform this task:
o Security Administrator
1. Launch the CAMS interface. See the “Accessing CAMS” section on page 11.
2. Click on the “Company” tab to expose the second-level menu.
3. Click on the “MIS Accounts” tab:
CAUTION
Transmission reports contain sensitive data that only authorized and appropriate
personnel at your company should view.
Prior to granting access to transmission reports, please refer to your company’s
policies on access to transmission-related information.
Once reports are deleted from a MIS account, they cannot be readily retrieved without having to be restored by ISO IT staff. Customers are encouraged to store copies of the reports and develop mechanisms to distribute the reports to all staff
requiring access.

CAMS User Guide for Company and Affiliate Maintenance Page 32 of 169
Version 1.4 2016 ISO New England Inc
ISO-NE Public
4. In the “MIS Accounts Listing” page, click on the ‘X’ icon in the “Action” column for the appropriate user ID and password that needs to be deleted.
5. The “MIS – Account Delete” page displays.
6. Enter an expiration date for the user ID and password.
7. Click the “Delete” button.
8. The “MIS Accounts Listing” page displays with the expiration date.
2.2.6.3 To change the password for an existing MIS account
Role that can perform this task:
o Security Administrator
1. Launch the CAMS interface. See the “Accessing CAMS” section on page 11.
2. Click on the “Company” tab to expose the second-level menu.
3. Click on the “MIS Accounts” tab:
4. In the “MIS Accounts Listing” page, click on the “Change Password” button in the Action
column for the appropriate user ID and password that needs to be modified.
5. The “MIS – Account Change Password” page displays.
6. Click “Update”.
7. The “MIS Accounts Listing” page displays with the new system-generated password for the selected account.
8. Distribute the new password to appropriate staff at your company per your company’s IT guidelines or policies.
IMPORTANT
You can revise the expiration date by clicking on the pencil icon in the “Action”
column for the selected user ID.
CAMS User Guide for Company and Affiliate Maintenance Page 33 of 169
Version 1.4 2016 ISO New England Inc
ISO-NE Public
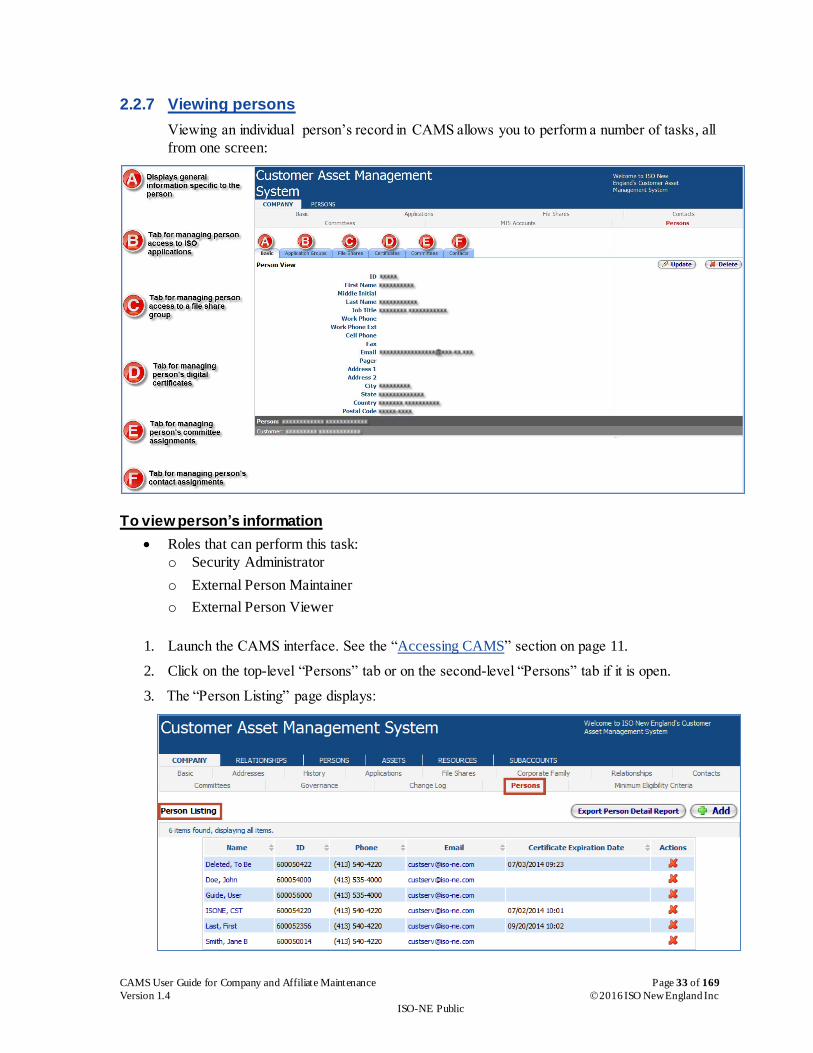
2.2.7 Viewing persons
Viewing an individual person’s record in CAMS allows you to perform a number of tasks, all
from one screen:
To view person’s information
Roles that can perform this task:
o Security Administrator
o External Person Maintainer
o External Person Viewer
1. Launch the CAMS interface. See the “Accessing CAMS” section on page 11.
2. Click on the top-level “Persons” tab or on the second-level “Persons” tab if it is open.
3. The “Person Listing” page displays:

CAMS User Guide for Company and Affiliate Maintenance Page 34 of 169
Version 1.4 2016 ISO New England Inc
ISO-NE Public
4. Click on the name of the individual person whose record you wish to view.
2.2.8 Deleting persons
A person in CAMS cannot be deleted if any of the following are true:
o The person has an Application Group role in CAMS.
To remove the person’s role see “Removing or modifying a person’s access to an
application” on page 20.
o The person is a member of a committee in CAMS.
To remove the committee assignment, see “Delete a committee” on page 73.
o The person is listed as a contact in CAMS.
To remove the person’s contact listing, see “Delete contact information” on page 67.
Security Administrators are encouraged to review key contacts when deleting a
person to ensure continuity in ISO communications.
To delete a person from CAMS
Roles that can perform this task:
o Security Administrator
o External Person Maintainer
1. Launch the CAMS interface. See the “Accessing CAMS” section on page 11.
2. Click on the top-level “Persons” tab or on the second-level “Persons” tab if it is open.
3. The “Person Listing” page displays.
4. Click on the name of the person you want to delete.

CAMS User Guide for Company and Affiliate Maintenance Page 35 of 169
Version 1.4 2016 ISO New England Inc
ISO-NE Public
5. The “Person View” screen displays:
6. Click the “Delete” button.
7. The system confirms the deletion and displays an updated “Person Listing” screen.
2.2.9 Update person’s information
Role that can perform this task:
o Security Administrator
1. Launch the CAMS interface. See the “Accessing CAMS” section on page 11.
2. Click on the top-level “Persons” tab or on the second-level “Persons” tab if it is open.

CAMS User Guide for Company and Affiliate Maintenance Page 36 of 169
Version 1.4 2016 ISO New England Inc
ISO-NE Public
3. The “Person Listing” page displays:
4. Click on the name of the person you want to delete.
5. The “Person View” screen displays:
6. Click the “Update” button.
CAMS User Guide for Company and Affiliate Maintenance Page 37 of 169
Version 1.4 2016 ISO New England Inc
ISO-NE Public
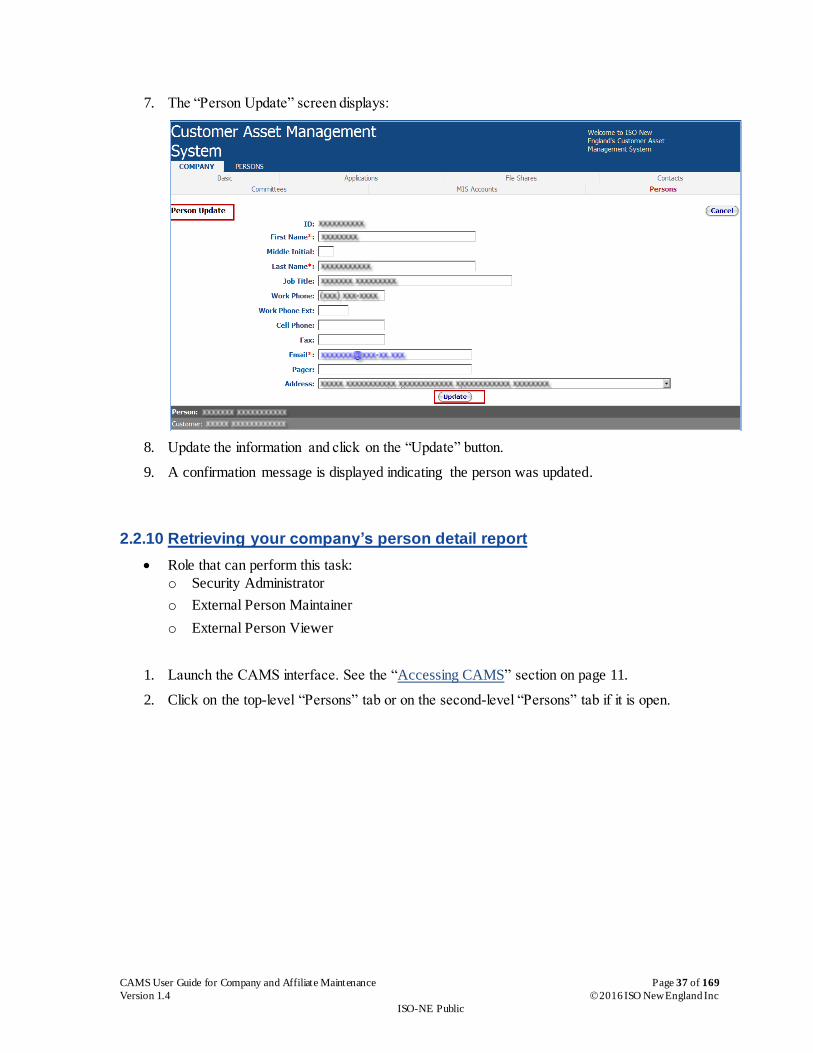
7. The “Person Update” screen displays:
8. Update the information and click on the “Update” button.
9. A confirmation message is displayed indicating the person was updated.
2.2.10 Retrieving your company’s person detail report
Role that can perform this task:
o Security Administrator
o External Person Maintainer
o External Person Viewer
1. Launch the CAMS interface. See the “Accessing CAMS” section on page 11.
2. Click on the top-level “Persons” tab or on the second-level “Persons” tab if it is open.

CAMS User Guide for Company and Affiliate Maintenance Page 38 of 169
Version 1.4 2016 ISO New England Inc
ISO-NE Public
3. The “Person Listing” page displays:
4. Click on the “Export Person Detail Report” button.

CAMS User Guide for Company and Affiliate Maintenance Page 39 of 169
Version 1.4 2016 ISO New England Inc
ISO-NE Public
5. You will be prompted to open or save the Person Detail Report. The Person Detail report is in XML format.

CAMS User Guide for Company and Affiliate Maintenance Page 40 of 169
Version 1.4 2016 ISO New England Inc
ISO-NE Public
2.3 Manage your company’s information
2.3.1 Overview
Company information stored and maintained in CAMS is grouped into the following categories:
General customer information
o Attributes about your company and its relationship to ISO New England
Only the phone number can be modified
o Found on the “Basic” tab
o See “Update phone information” on page 42.
This section applies to the following CAMS roles:
External Customer Maintainer
External Customer Viewer
Security Administrator
This section covers the following topics: Overview (page 40)
Customer (page 42)
Addresses ( page 44)
History (page 57)
Applications (page 58)
File Share (page 60)
Corporate Family (page 61)
Contacts (page 63)
Committees (page 70)
Governance (page 75)
Change Log (page 76)
Data Universal Numbering System (DUNS) (page 77)
Trading information (page 80)
Subaccount information (page 83)

CAMS User Guide for Company and Affiliate Maintenance Page 41 of 169
Version 1.4 2016 ISO New England Inc
ISO-NE Public
DUNS information
o Your company’s Data Universal Numbering System (DUNS) with Dun and Bradstreet
Can be modified
o Found on the “Basic” tab
See “Update DUNS information” on page 79.
Trading
o Your company’s public trading information
Can be modified
o Found on the “Basic” tab
o See “Trading information” on page 80.
Addresses
o Your company’s main office, billing addresses
Can be modified
o Found on the “Addresses” tab
o See “Update company address” on page 47.
Contacts
o See “Contacts” on page 63.
Committees
o See “Committees ” on page 70.
Corporate Family
o See “Corporate Family” on page 61.
External Customer Maintainers and External Customer Viewers have access to the following:
History
o The “History” tab displays a list of time periods in the past. Each period is a snapshot of company information as it appeared in CAMS at that time. A new snapshot increment is
created each time your company information is updated or changed.
o Click on the “History” tab, and then click on the selected time period. Your company
information as of that time period is displayed.
File Shares (see “Granting a person access to File Shares” on page 23).
Change Log
o The Customer Change Log is an audit trail showing what company information was changed, when and by whom.
Governance
o The “Governance” tab displays any governance relationships your company has with other
companies in CAMS.

CAMS User Guide for Company and Affiliate Maintenance Page 42 of 169
Version 1.4 2016 ISO New England Inc
ISO-NE Public
2.3.2 Customer
2.3.2.1 View customer information
Roles that can perform this task:
o External Customer Maintainer
o External Customer Viewer
o Security Administrator
1. Launch the CAMS interface. See the “Accessing CAMS” section on page 11.
2. Click on “Company” in the top-level menu.
3. The “Customer View” screen displays:
2.3.2.2 Update phone information
Role that can perform this task:
o External Customer Maintainer
1. Launch the CAMS interface. See the “Accessing CAMS” section on page 11.
2. Click on “Company” in the top-level menu.

CAMS User Guide for Company and Affiliate Maintenance Page 43 of 169
Version 1.4 2016 ISO New England Inc
ISO-NE Public
3. The “Customer View’ screen displays:
4. Click the “Basic” tab if the “Customer View” screen is not already displayed.
5. Click the “Update” button.
6. The “Customer Update” screen displays:
7. Update the Phone Number and click on “Update”.

CAMS User Guide for Company and Affiliate Maintenance Page 44 of 169
Version 1.4 2016 ISO New England Inc
ISO-NE Public
8. A confirmation message displays:
2.3.3 Addresses
IMPORTANT
Your company’s “Main Office” (headquarters) address is initially entered
into CAMS during the membership application process.
Your company must always have one accurate “Main Office” address
designated in CAMS.
Your company can only have one “Main Office” address.

CAMS User Guide for Company and Affiliate Maintenance Page 45 of 169
Version 1.4 2016 ISO New England Inc
ISO-NE Public
2.3.3.1 Add company address
Role that can perform this task:
o External Customer Maintainer
1. Launch the CAMS interface. See the “Accessing CAMS” section on page 11.
2. Click on “Company” in the top-level menu.
3. The “Customer View” screen displays:
4. Click on the “Addresses” tab in the second-level menu.
5. The “Company Address Listing” screen displays:

CAMS User Guide for Company and Affiliate Maintenance Page 46 of 169
Version 1.4 2016 ISO New England Inc
ISO-NE Public
6. Click the “Add” button.
7. The “Company Address Insert” screen displays:
8. Enter the address and related information in the fields provided. Address, city, state, country, and postal code are required.
9. Click the “Add” button.

CAMS User Guide for Company and Affiliate Maintenance Page 47 of 169
Version 1.4 2016 ISO New England Inc
ISO-NE Public
10. A confirmation message displays:
2.3.3.2 Update company address
Role that can perform this task:
o External Customer Maintainer
1. Launch the CAMS interface. See the “Accessing CAMS” section on page 11.
2. Click on “Company” in the top-level menu.
IMPORTANT
There can be only one Billing address and one Main Office address for the
company.

CAMS User Guide for Company and Affiliate Maintenance Page 48 of 169
Version 1.4 2016 ISO New England Inc
ISO-NE Public
3. The “Customer View” screen displays:
4. Click on the “Addresses” tab in the second-level menu.
5. The “Company Address Listing” screen displays:
6. Locate the record you want to update and click on the Pencil icon in the “Action” column for the address for that row:

CAMS User Guide for Company and Affiliate Maintenance Page 49 of 169
Version 1.4 2016 ISO New England Inc
ISO-NE Public
7. The “Company Address Update” screen displays:
8. Enter the address and related information in the fields provided. Address, city, state, country, and postal code are required.
9. Click “Update”.
IMPORTANT
Main Office address and the Billing Address can be updated.

CAMS User Guide for Company and Affiliate Maintenance Page 50 of 169
Version 1.4 2016 ISO New England Inc
ISO-NE Public
10. The confirmation message displays:
2.3.3.3 Delete company address
Role that can perform this task:
o External Customer Maintainer
1. Launch the CAMS interface. See the “Accessing CAMS” section on page 11.
2. Click on “Company” in the top-level menu.
IMPORTANT
You cannot delete an address if it is associated with any person.
Main Office address and the Billing Address can be deleted if they are not
associated to any person.

CAMS User Guide for Company and Affiliate Maintenance Page 51 of 169
Version 1.4 2016 ISO New England Inc
ISO-NE Public
3. The “Customer View” screen displays:
4. Click on the “Addresses” tab in the second-level menu.
5. The “Company Address Listing” screen displays.
6. Locate the record you want to delete and click the “X” icon in the “Action” column for that row:

CAMS User Guide for Company and Affiliate Maintenance Page 52 of 169
Version 1.4 2016 ISO New England Inc
ISO-NE Public
7. A pop up message is displayed asking for user confirmation to delete or not.
8. Click “OK” to delete.
9. A confirmation message displays:
IMPORTANT
Your company must always have one accurate “Main Office” address designated
in CAMS.

CAMS User Guide for Company and Affiliate Maintenance Page 53 of 169
Version 1.4 2016 ISO New England Inc
ISO-NE Public
2.3.3.4 View persons associated to a company address
Roles that can perform this task:
o External Customer Maintainer
o External Customer Viewer
1. Launch the CAMS interface. See the “Accessing CAMS” section on page 11.
2. Click on “Company” in the top-level menu.
3. The “Customer View” screen displays:
4. Click on the “Addresses” tab in the second-level menu.
5. The “Company Address Listing” screen displays.
6. Locate the address for the person associations you want to view.

CAMS User Guide for Company and Affiliate Maintenance Page 54 of 169
Version 1.4 2016 ISO New England Inc
ISO-NE Public
7. Click on the binocular icon in the “Action” column for that row:
8. The “Company User Address Listing” screen displays.
2.3.3.5 View company address listing
Roles that can perform this task:
o External Customer Maintainer
o External Customer Viewer
1. Launch the CAMS interface. See the “Accessing CAMS” section on page 11.
2. Click on “Company” in the top-level menu.
IMPORTANT
You will not be able to view the individual record of the persons listed. Only a Security Administrator, External Person Maintainer or External Person Viewer has access to Person details.

CAMS User Guide for Company and Affiliate Maintenance Page 55 of 169
Version 1.4 2016 ISO New England Inc
ISO-NE Public
3. The “Customer View” screen displays:
4. Click on the “Addresses” tab in the second-level menu.
5. The “Company Address Listing” screen displays:
2.3.3.6 View company address information
Roles that can perform this task:
o External Customer Maintainer
o External Customer Viewer
1. Launch the CAMS interface. See the “Accessing CAMS” section on page 11.
2. Click on “Company” in the top-level menu.

CAMS User Guide for Company and Affiliate Maintenance Page 56 of 169
Version 1.4 2016 ISO New England Inc
ISO-NE Public
3. The “Customer View” screen displays:
4. Click on the “Addresses” tab in the second-level menu.
5. The “Company Address Listing” screen is displayed:
6. Click on the hyperlink in the “Address 1” column to view the address information.
CAMS User Guide for Company and Affiliate Maintenance Page 57 of 169
Version 1.4 2016 ISO New England Inc
ISO-NE Public
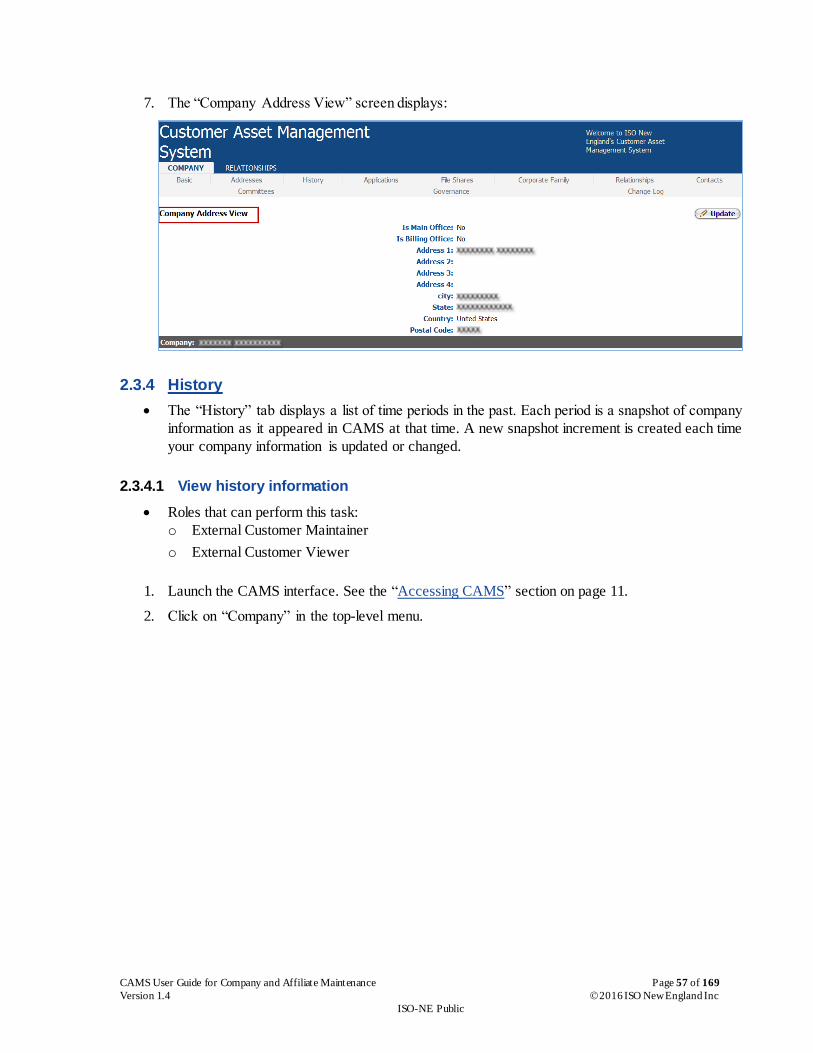
7. The “Company Address View” screen displays:
2.3.4 History
The “History” tab displays a list of time periods in the past. Each period is a snapshot of company
information as it appeared in CAMS at that time. A new snapshot increment is created each time
your company information is updated or changed.
2.3.4.1 View history information
Roles that can perform this task:
o External Customer Maintainer
o External Customer Viewer
1. Launch the CAMS interface. See the “Accessing CAMS” section on page 11.
2. Click on “Company” in the top-level menu.

CAMS User Guide for Company and Affiliate Maintenance Page 58 of 169
Version 1.4 2016 ISO New England Inc
ISO-NE Public
3. The “Customer View” screen displays:
4. Click on the “History” tab in the second-level menu.
5. The “Customer History Listing” screen displays:
6. Click on a time period. Your company information as of that selected time period displays.
2.3.5 Applications
2.3.5.1 View customer application information
Roles that can perform this task:
o External Customer Maintainer
o External Customer Viewer
o Security Administrator

CAMS User Guide for Company and Affiliate Maintenance Page 59 of 169
Version 1.4 2016 ISO New England Inc
ISO-NE Public
1. Launch the CAMS interface. See the “Accessing CAMS” section on page 11.
2. Click on “Company” in the top-level menu.
3. The “Customer View” screen displays.
4. Click on the “Applications” tab in the second-level menu.
5. “Customer Application Listing” screen displays:
6. Click on the hyperlink in the “Application” column to view which person has access to a particular application.
7. “Customer Application User Listing” screen is displayed:

CAMS User Guide for Company and Affiliate Maintenance Page 60 of 169
Version 1.4 2016 ISO New England Inc
ISO-NE Public
2.3.6 File Share
File shares are collections of ISO New England files or data that have been made available to customers over the internet. To access a file share, the person must be registered in CAMS and
have a valid digital certificate.
Current ISO New England file share groups are:
o Critical Energy Infrastructure Information File Group/Transmission System Info
Access to file shares is restricted and controlled by a company’s Security Administrator (SA).
2.3.6.1 View file share information
Roles that can perform this task:
o External Customer Maintainer
o External Customer Viewer
o External Person Maintainer
o External Person Viewer
o Security Administrator
1. Launch the CAMS interface. See the “Accessing CAMS” section on page 11.
2. Click on “Company” in the top-level menu.
3. The “Customer View” screen displays.
4. Click on the “File Shares” tab in the second-level menu.
IMPORTANT
A digital certificate is an electronic key to the ISO New England websites that host CAMS and other applications. A user cannot access any ISO application
without a digital certificate.

CAMS User Guide for Company and Affiliate Maintenance Page 61 of 169
Version 1.4 2016 ISO New England Inc
ISO-NE Public
5. “Customer File Share Listing” screen displays:
6. The list shows all file share groups your company may view.
7. Click on a file share group to display the persons assigned to that group.
8. If you want to add a person to the group, see “Granting a person access to File Shares” on page 23.
2.3.7 Corporate Family
A customer’s corporate family consists of direct and indirect relationships from the ultimate
parent to the ultimate child.
2.3.7.1 View corporate family information
Roles that can perform this task:
o External Customer Maintainer
o External Customer Viewer
1. Launch the CAMS interface. See the “Accessing CAMS” section on page 11.
2. Click on “Company” in the top-level menu.

CAMS User Guide for Company and Affiliate Maintenance Page 62 of 169
Version 1.4 2016 ISO New England Inc
ISO-NE Public
3. The “Customer View” screen displays:
4. Click on the “Corporate Family” tab in the second-level menu.
5. “Corporate Family View” screen displays:

CAMS User Guide for Company and Affiliate Maintenance Page 63 of 169
Version 1.4 2016 ISO New England Inc
ISO-NE Public
2.3.7.2 View company path information
Roles that can perform this task:
o External Customer Maintainer
o External Customer Viewer
1. Launch the CAMS interface. See the “Accessing CAMS” section on page 11.
2. Click on the “Corporate Family” tab in the second-level menu.
3. The “Corporate Family View’ screen displays.
4. Click on “View Path” in the Actions column for the company to be viewed.
5. The “Path Details” screen displays:
NOTE: The “Path Details” pop-up is displayed on top of the Corporate Family View screen.
2.3.8 Contacts
A “contact” is an individual or an entity (such as a “Service Desk” or distribution list) authorized to receive notifications and correspondence from ISO New England relevant to the specific
“contact type”.
“Contact types” are ISO New England-defined groupings based on the information and
communication needs of the activity.
Your company’s contact types in CAMS should be kept up-to-date at all times. ISO New England distributes important information to contacts. If a person at your company is no longer the appropriate contact, update CAMS as soon as possible with the new individual.
“Contact types” do not give the assigned person any additional privileges or roles. To add permissions and roles for CAMS or another application, see “Granting a person access to CAMS or another ISO application” on page 17.
See “Table 12: Contact Types” on page 164 for a list of contact types and their description.
A company may designate multiple contacts for each contact type.

CAMS User Guide for Company and Affiliate Maintenance Page 64 of 169
Version 1.4 2016 ISO New England Inc
ISO-NE Public
2.3.8.1 Add contact information
Roles that can perform this task:
o External Customer Maintainer
o External Customer Viewer
o Security Administrator
1. Launch the CAMS interface. See the “Accessing CAMS” section on page 11.
2. Click on “Company” in the top-level menu.
3. The “Customer View” screen displays.
4. Click on the “Contacts” tab in the second-level menu:
CAUTION
Keep your company’s contact types up-to-date in CAMS at all times. ISO New
England distributes important and time-sensitive information to contacts.
IMPORTANT
You may add a contact through the second-level “Contacts” menu (as described below) or by selecting an individual person from the “Persons” menu tab and then
clicking the “Contacts” tab that appears.

CAMS User Guide for Company and Affiliate Maintenance Page 65 of 169
Version 1.4 2016 ISO New England Inc
ISO-NE Public
5. The “Customer Contact Listing” page displays:
6. Click the “Add” button.
7. The “Customer Contact Insert” screen displays:
8. Select the “Contact Type” from the drop-down box.
9. Select the name of the person you want to designate as the contact for that type.
10. Enter an “override” email address for the contact (not required).
If no email is entered, CAMS will send correspondence to that person’s default email (found on the “Basic” tab for the person’s record). See “Viewing persons” on page 33.
If an email is entered, it will be used instead of the person’s default email address. The contact type email field is used to supply CAMS with an email distribution list, allowing multiple people at your company to receive correspondence related to the specific type of contact.
11. Click the “Add” button.
2.3.8.2 Update contact information
Roles that can perform this task:
o External Customer Maintainer
o External Customer Viewer
o Security Administrator

CAMS User Guide for Company and Affiliate Maintenance Page 66 of 169
Version 1.4 2016 ISO New England Inc
ISO-NE Public
1. Launch the CAMS interface. See the “Accessing CAMS” section on page 11.
2. Click on “Company” in the top-level menu.
3. The “Customer View” screen displays.
4. Click on the “Contacts” tab in the second-level menu:
5. The “Customer Contact Listing” page displays.
6. Find the name of the person whose contact information you want to update.
7. Click the pencil icon in the “Action” column:
8. The “Contact Update” screen displays:
9. Modify either the contact type, the person assigned and/or the email address.

CAMS User Guide for Company and Affiliate Maintenance Page 67 of 169
Version 1.4 2016 ISO New England Inc
ISO-NE Public
10. Click “Update” button.
11. “Contact type was updated” message is displayed:
2.3.8.3 Delete contact information
Roles that can perform this task:
o External Customer Maintainer
o External Customer Viewer
o Security Administrator
1. Launch the CAMS interface. See the “Accessing CAMS” section on page 11.
2. Click on “Company” in the top-level menu.
3. The “Customer View” screen displays.
IMPORTANT
The contact’s email in the “Person” profile is the default email address when a
contact type is used.
The contact email in the screen above allows users to override the default email address with a different email address. For example, this may be used when for a given contact type the individual prefers communication to go to a different mailbox
or distribution list.

CAMS User Guide for Company and Affiliate Maintenance Page 68 of 169
Version 1.4 2016 ISO New England Inc
ISO-NE Public
4. Click on the “Contacts” tab in the second-level menu:
5. The “Customer Contact Listing” page displays.
6. Find the name of the person you want to delete as a contact.
7. Click the “X” icon in the “Action” column.
8. A pop up message is displayed asking for user confirmation to delete or not.
9. Click “OK” button to delete the record.

CAMS User Guide for Company and Affiliate Maintenance Page 69 of 169
Version 1.4 2016 ISO New England Inc
ISO-NE Public
10. Message is displayed confirming the contact type was deleted:
2.3.8.4 View contact information
Roles that can perform this task:
o External Customer Maintainer
o External Customer Viewer
o External Person Maintainer
o External Person Viewer
o Security Administrator
1. Launch the CAMS interface. See the “Accessing CAMS” section on page 11.
2. Click on “Company” in the top-level menu.
3. The “Customer View” screen displays.
4. Click on the “Contacts” tab in the second-level menu:

CAMS User Guide for Company and Affiliate Maintenance Page 70 of 169
Version 1.4 2016 ISO New England Inc
ISO-NE Public
5. The “Customer Contact Listing” page displays:
2.3.9 Committees
ISO New England has formed specialized committees to assist in ensuring fair and efficient wholesale electricity markets and a reliable bulk power generation and transmission system for
the region.
To learn more about the different committees, see the ISO New England website at
http://www.iso-ne.com/committees/index.html.
In CAMS, a company may designate one primary and one alternate member for each committee.
Persons must first be entered into the CAMS database before being added to a committee. See
“Adding persons to CAMS” on page 15.
2.3.9.1 Add committee membership
Roles that can perform this task:
o External Customer Maintainer
o External Customer Viewer
o Security Administrator
1. Launch the CAMS interface. See the “Accessing CAMS” section on page 11.
CAUTION
Individuals listed in CAMS as your company’s committee members will
also be listed on ISO New England’s website at:
http://www.iso-ne.com/participate/participant-asset-listings/directory.

CAMS User Guide for Company and Affiliate Maintenance Page 71 of 169
Version 1.4 2016 ISO New England Inc
ISO-NE Public
2. Click on “Company” in the top-level menu.
3. The “Customer View” screen displays.
4. Click on the “Committees” tab in the second-level menu:
5. The “Customer Committee Listing” page displays.
6. Click “Add” button.
7. The “Committee Member Insert” screen displays:
8. Select the committee you want from “Committee Name” drop-down box.
9. For an explanation of the different committees, see ISO New England’s website at http://www.iso-ne.com/committees/comm_wkgrps/index.html.
10. Select the person you want to assign as the committee member from the drop-down box.
11. If the person has not yet been added to CAMS, you must first see “Adding persons to CAMS” on page 15.
12. Select an alternate person for the committee (not required).
13. Click the “Add” button.

CAMS User Guide for Company and Affiliate Maintenance Page 72 of 169
Version 1.4 2016 ISO New England Inc
ISO-NE Public
2.3.9.2 Update a committee
Roles that can perform this task:
o External Customer Maintainer
o External Customer Viewer
o Security Administrator
1. Launch the CAMS interface. See the “Accessing CAMS” section on page 11.
2. Click on “Company” in the top-level menu.
3. The “Customer View” screen displays.
4. Click on the “Committees” tab in the second-level menu:
5. The “Customer Committee Listing” page displays.
6. Find the committee you wish to modify in the list.
7. Click the pencil icon in the “Action” column for that row:
8. The “Committee Member Update” screen displays.
9. Use the drop-down box to select a different alternate.
IMPORTANT
To modify the primary committee member you must first remove the committee record (see “Delete a committee” on page 73) and add the committee record again.
To modify the alternate, see “Update a committee” below.

CAMS User Guide for Company and Affiliate Maintenance Page 73 of 169
Version 1.4 2016 ISO New England Inc
ISO-NE Public
2.3.9.3 Delete a committee
Roles that can perform this task:
o External Customer Maintainer
o Security Administrator
NOTE: This action will delete the committee entirely. You can add it again at any time.
1. Launch the CAMS interface. See the “Accessing CAMS” section on page 11.
2. Click on “Company” in the top-level menu.
3. The “Customer View” screen displays.
4. Click on the “Committees” tab in the second-level menu:
5. The “Customer Committee Listing” page displays.
6. Locate the committee you wish to delete.
7. Click on the “X” icon in the “Action” column for that row:
IMPORTANT
To change the primary committee member you must first remove the committee record (see “Delete a committee” below) and add the committee again with the new
primary member.

CAMS User Guide for Company and Affiliate Maintenance Page 74 of 169
Version 1.4 2016 ISO New England Inc
ISO-NE Public
8. A pop up message is displayed asking for user confirmation to delete or not.
9. Click “OK” button to delete the record.
10. Message is displayed confirming the contact type was deleted:
2.3.9.4 View committee listings
Roles that can perform this task:
o External Customer Maintainer
o External Customer Viewer
o External Person Maintainer
o External Person Viewer
o Security Administrator
1. Launch the CAMS interface. See the “Accessing CAMS” section on page 11.
2. Click on “Company” in the top-level menu.
3. The “Customer View” screen displays.
4. Click on the “Committees” tab in the second-level menu:

CAMS User Guide for Company and Affiliate Maintenance Page 75 of 169
Version 1.4 2016 ISO New England Inc
ISO-NE Public
5. The “Customer Committee Listing” page displays:
6. The “Customer Committee Listing” shows any committees in which your company currently has membership.
7. For additional actions see:
o “Add committee membership” on page 70
o “Update a committee” on page 72
o “Delete a committee” on page 73
2.3.10 Governance
The “Governance” tab displays any governance relationships your company has with other companies in CAMS.
2.3.10.1 View Governance Listing
Roles that can perform this task:
o External Customer Maintainer
o External Customer Viewer
o External Person Maintainer
o External Person Viewer
o Security Administrator
1. Launch the CAMS interface. See the “Accessing CAMS” section on page 11.
2. Click on “Company” in the top-level menu.
3. The “Customer View” screen displays.
4. Click on the “Governance” tab in the second-level menu.

CAMS User Guide for Company and Affiliate Maintenance Page 76 of 169
Version 1.4 2016 ISO New England Inc
ISO-NE Public
5. “Governance Listing” and “Governed By List” displays:
2.3.11 Change Log
The Change Log is an audit trail showing what company information was changed, when and by
whom.
2.3.11.1 View change log listing
Roles that can perform this task:
o External Customer Maintainer
o External Customer Viewer
o External Person Maintainer
o External Person Viewer
o Security Administrator
1. Launch the CAMS interface. See the “Accessing CAMS” section on page 11.
2. Click on “Company” in the top-level menu.
3. The “Customer View” screen displays.
4. Click on the “Change Log” tab in the second-level menu.

CAMS User Guide for Company and Affiliate Maintenance Page 77 of 169
Version 1.4 2016 ISO New England Inc
ISO-NE Public
5. “Customer Change Log” screen displays:
2.3.12 Data Universal Numbering System (DUNS)
See the Dun and Bradstreet website for details on DUNS numbers at http://www.dnb.com/.
2.3.12.1 Add DUNS information
Role that can perform this task:
o External Customer Maintainer
1. Launch the CAMS interface. See the “Accessing CAMS” section on page 11.
2. Click on “Company” in the top-level menu.

CAMS User Guide for Company and Affiliate Maintenance Page 78 of 169
Version 1.4 2016 ISO New England Inc
ISO-NE Public
3. The “Customer View” screen displays in the Basic tab:
4. Click the “Add DUNS” button above the “Tariff Billing ID” table.
5. The “DUNS Insert” screen displays:
6. Enter the required fields. For an explanation see http://www.dnb.com/.
7. Click “Add” button.

CAMS User Guide for Company and Affiliate Maintenance Page 79 of 169
Version 1.4 2016 ISO New England Inc
ISO-NE Public
2.3.12.2 Update DUNS information
Role that can perform this task:
o External Customer Maintainer
1. Launch the CAMS interface. See the “Accessing CAMS” section on page 11.
2. Click on “Company” in the top-level menu.
3. The “Customer View” screen displays in the Basic tab.
4. Locate the entry you want to update in the “Tariff Billing ID” table.
5. Click the pencil icon in the “Action” column for that row:
6. The “DUNS Update” screen displays.
7. Enter the new DUNS Type and/or DUNS Name.
8. Click the “Update” button.
2.3.12.3 Delete DUNS information
Role that can perform this task:
o External Customer Maintainer
1. Launch the CAMS interface. See the “Accessing CAMS” section on page 11.
2. Click on “Company” in the top-level menu.
3. The “Customer View” screen displays in the Basic tab.
IMPORTANT
Customers can only modify the DUNS Type and/or DUNS Name in their Tariff Billing ID section. If the Primary DUNS number must be modified, contact
Customer Support.

CAMS User Guide for Company and Affiliate Maintenance Page 80 of 169
Version 1.4 2016 ISO New England Inc
ISO-NE Public
4. Locate the entry you want to update in the “Tariff Billing ID” table.
5. Click the “X” icon in the “Action” column for that row:
6. The “DUNS Delete” screen displays.
7. Enter expiration date (must be in the future).
8. Click “Delete”.
2.3.13 Trading information
2.3.13.1 Add trading information
Role that can perform this task:
o External Customer Maintainer
1. Launch the CAMS interface. See the “Accessing CAMS” section on page 11.
2. Click on “Company” in the top-level menu.
3. The “Customer View” screen displays in the Basic tab.
4. Click on the “Add Trading Info” button in the “Trading Info” section:
5. The “Trading Info Insert” screen displays:
6. Enter the required fields.
7. Click “Add” button.

CAMS User Guide for Company and Affiliate Maintenance Page 81 of 169
Version 1.4 2016 ISO New England Inc
ISO-NE Public
2.3.13.2 Delete trading information
Role that can perform this task:
o External Customer Maintainer
1. Launch the CAMS interface. See the “Accessing CAMS” section on page 11.
2. Click on “Company” in the top-level menu.
3. The “Customer View” screen displays in the Basic tab.
4. Locate the entry you want to delete in the “Trading Info” table.
5. Click the “X” icon in the “Action” column for that row:
6. The “Trading Info Delete” screen displays:
7. Enter a comment to substantiate the deletion.
8. Click on “Submit” to delete the selected trading information.
2.3.13.3 View trading information
Roles that can perform this task: o External Customer Maintainer
o External Customer Viewer
1. Launch the CAMS interface. See the “Accessing CAMS” section on page 11.
2. Click on “Company” in the top-level menu.

CAMS User Guide for Company and Affiliate Maintenance Page 82 of 169
Version 1.4 2016 ISO New England Inc
ISO-NE Public
3. The “Customer View” screen is displayed:
4. The “Trading Info” section displays the trading information.

CAMS User Guide for Company and Affiliate Maintenance Page 83 of 169
Version 1.4 2016 ISO New England Inc
ISO-NE Public
2.3.14 Subaccount information
Divisional accounting allows customers to assign market activity to a subaccount or division for settlement reporting. Assets or “entities”, such as generators, load assets, asset-related demand (ARD), demand assets, resources, and network loads can be assigned to a subaccount and have the charges and credits of those entities separated by subaccount in the settlement reporting. Customers
are not required to enable subaccount reporting (see “Enable subaccount settlement reporting” on page 92); however, every customer is automatically given a “default” subaccount with the ID and Name of “Default”. When subaccount reporting is enabled, any entity or market activity that is not assigned to a subaccount is reported in the default subaccount.
Market activities that are not associated with assets, such as demand bidding and internal bilateral tranactions, can be assigned to a subaccount at the activity entry point. A subaccount created in CAMS will be available for selection in the Bids & Offers (eMarket) and the Internal Transactions applications for Operating Days where the subaccounts are effective, independent of the subaccount
reporting status (see “Enable subaccount settlement reporting” on page 92 for instructions for changing the subaccount reporting status).
2.3.14.1 Create subaccount
Role that can perform this task:
o External Customer Maintainer
1. Launch the CAMS interface. See the “Accessing CAMS” section on page 11.
2. Click on “Subaccounts” in the top-level menu.
3. The “Subaccount Search” screen displays:
4. Click on “Create Subaccount” in the second-level menu.

CAMS User Guide for Company and Affiliate Maintenance Page 84 of 169
Version 1.4 2016 ISO New England Inc
ISO-NE Public
5. The “Create Subaccount” screen displays:
6. Enter the required fields.
o “Date Effective” must be the first day of a month.
NOTE: A subaccount will be available for selection in the eMarket and Internal
Transactions applications on this effective date. If this is the initial use of the subaccount functionality, the start date should be set far enough in the future to allow for successful testing of eMarket and Internal Transactions
communications in the corresponding sandbox environments. Because data in the sandbox environment generally mirrors the production environment, please contact ISO New England Customer Support at (413) 540-4220 or via email at
[email protected] to make arrangements for testing your communication processes.
o “Subaccount ID” may have between 1 and 20 alpha-numeric characters, hyphens and underscores. Spaces are not allowed.
o “Subaccount Name” may contain between 1 and 50 characters. Spaces are allowed.
o Each subaccount created must have a unique ID and Name. Duplicate subaccounts are not
allowed.
7. Click “Submit” button.
8. A pop up confirmation message is displayed when the action is successful:
2.3.14.2 Edit subaccount information
Roles that can perform this task:
o External Customer Maintainer
1. Launch the CAMS interface. See the “Accessing CAMS” section on page 11.

CAMS User Guide for Company and Affiliate Maintenance Page 85 of 169
Version 1.4 2016 ISO New England Inc
ISO-NE Public
2. Click on “Subaccounts” in the top-level menu.
3. The “Subaccount Search” screen displays:
4. Enter subaccount search criteria, click “Search” button.
5. Select the subaccount to be edited, shown in the Search Results section at the bottom of the screen.
6. The “View Subaccount” screen displays:
7. Click on the “Edit” button.

CAMS User Guide for Company and Affiliate Maintenance Page 86 of 169
Version 1.4 2016 ISO New England Inc
ISO-NE Public
8. The “Update Subaccount” screen displays:
9. Enter the required fields.
o “Date Effective” must be the first day of a month.
o “Subaccount ID” may have between 1 and 20 alpha-numeric characters, hyphens and
underscores. Spaces are not allowed.
o “Subaccount Name” may contain between 1 and 50 characters. Spaces are allowed.
o Each subaccount created must have a unique ID and Name. Duplicate subaccounts are not allowed.
10. Click “Submit” button.
11. A pop up confirmation message is displayed when the update is successful:
2.3.14.3 Delete subaccount
Roles that can perform this task:
o External Customer Maintainer
1. Launch the CAMS interface. See the “Accessing CAMS” section on page 11.
2. Click on “Subaccounts” in the top-level menu.

CAMS User Guide for Company and Affiliate Maintenance Page 87 of 169
Version 1.4 2016 ISO New England Inc
ISO-NE Public
3. The “Subaccount Search” screen displays:
4. Enter subaccount search criteria, click “Search” button.
5. Select the subaccount to be deleted, shown in the Search Results section at the bottom of the screen.
6. The “View Subaccount” screen displays:
7. Enter “Date Effective”, then click on the “Delete” button.

CAMS User Guide for Company and Affiliate Maintenance Page 88 of 169
Version 1.4 2016 ISO New England Inc
ISO-NE Public
8. A pop up message is displayed asking the user to confirm the deletion or not:
9. Click the“Yes” button to delete the subaccount.
2.3.14.4 Map Entity to subaccount
Roles that can perform this task:
o External Customer Maintainer
1. Launch the CAMS interface. See the “Accessing CAMS” section on page 11.
2. Click on “Subaccounts” in the top-level menu.
CAUTION
The delete subaccount feature is meant to help with initial setup of subaccounts in the event an error is made during setup.
CAMS restricts deletion of a subaccount under certain conditions, one
being if the subaccount has a history of activity.

CAMS User Guide for Company and Affiliate Maintenance Page 89 of 169
Version 1.4 2016 ISO New England Inc
ISO-NE Public
3. The “Subaccount Search” screen is displayed:
4. Enter subaccount search criteria, click “Search” button,
5. Select the applicable subaccount, shown in the Search Results section at the bottom of the screen.
6. The “View Subaccount” screen displays:
7. Click on the “Map” button.

CAMS User Guide for Company and Affiliate Maintenance Page 90 of 169
Version 1.4 2016 ISO New England Inc
ISO-NE Public
8. The “Map Entities”screen is displayed:
9. Enter the effective date, then click the check box in the “Select” column, or the “Select All” button shown beneath, to map the selected entity to this subaccount.
10. Click the “Submit” button.
11. The “View Subaccount” screen displays as of the date selected, with the list of entity mappings at the bottom of the screen:
12. The “History” tab displays the actions taken pertaining to the selected subaccount.
2.3.14.5 Search for a subaccount
Roles that can perform this task:
o External Customer Maintainer
o External Customer Viewer
1. Launch the CAMS interface. See the “Accessing CAMS” section on page 11.
2. Click on “Subaccounts” in the top-level menu.

CAMS User Guide for Company and Affiliate Maintenance Page 91 of 169
Version 1.4 2016 ISO New England Inc
ISO-NE Public
3. The “Subaccount Search” screen displays:
4. Enter subaccount search criteria, click “Search” button,
5. The “Subaccount Search” screen displays the search results at the bottom of the screen.
2.3.14.6 Search for Entity Relationship
Roles that can perform this task:
o External Customer Maintainer
o External Customer Viewer
1. Launch the CAMS interface. See the “Accessing CAMS” section on page 11.
2. Click on “Subaccounts” in the top-level menu.
3. The “Subaccount Search” screen displays:

CAMS User Guide for Company and Affiliate Maintenance Page 92 of 169
Version 1.4 2016 ISO New England Inc
ISO-NE Public
4. Click on “Entity Relationship Search” in the second-level menu.
5. The “Entity Relationship Search” screen displays:
6. Refine the search by entering an Entity ID, Entity Name, Entity Type, As Of date, Subaccount ID, or Subaccount Name.
7. Click the “Search” button.
8. The “Entity Relationship Search” results are displayed at the bottom of the screen.
2.3.14.7 Enable subaccount settlement reporting
Roles that can perform this task:
o External Customer Maintainer
1. Launch the CAMS interface. See the “Accessing CAMS” section on page 11.
2. Click on “Subaccounts” in the top-level menu.

CAMS User Guide for Company and Affiliate Maintenance Page 93 of 169
Version 1.4 2016 ISO New England Inc
ISO-NE Public
3. The “Subaccount Search” screen displays:
4. Click on “Reporting” in the second-level menu.
5. The “Subaccount Reporting” screen displays:
6. To enable settlement subaccount reporting, click the “Yes” radio button, then the “Update” button.
7. To disable settlement subaccount reporting, click the “No” radio button, then the “Update” button.

CAMS User Guide for Company and Affiliate Maintenance Page 94 of 169
Version 1.4 2016 ISO New England Inc
ISO-NE Public
8. A pop up confirmation message is displayed when the selected action is successful:
NOTE: A subaccount remains active and available for selection in the eMarket and Internal Trasactions applications until the subaccount’s status is changed to “Inactive” in CAMS. In order to suspend all divisional accounting activity, all subaccounts should be changed to “Inactive” status in conjunction with the disabling of subaccount reporting. Individual subaccount status changes can only be done on a future monthly boundary.

CAMS User Guide for Company and Affiliate Maintenance Page 95 of 169
Version 1.4 2016 ISO New England Inc
ISO-NE Public
2.3.15 Asset Ownership Share Transfers
2.3.15.1 Contact type and asset registration role assignment
1. Assign the “Responsible for Asset Registration Form Submittal” contact type
a. Launch the CAMS interface. See the “Accessing CAMS” section.
b. Refer to the “Contacts” section of this guide for the detailed process steps to add contacts.
c. Assign the “Responsible for Asset Registration Form Submittal” contact type to
designate the persons that will receive asset registration-related email notifications.
2. Assign the asset registration application group roles
a. Refer to the “Granting a person access to CAMS or another ISO application” section of
this guide for the detailed process steps to add application access to a user.
b. Assign asset registration roles as needed. Refer to the “Customer and Asset management
System Application Group Roles” document for descriptions of the asset registration
application group roles which include:
i. External Asset Registration Approver
ii. External Asset Registration Submitter
iii. External Asset Registration Viewer
2.3.15.2 View asset registration dashboard (Lead Participants and Owners)
Roles that can perform this task:
o External Asset Registration Approver
o External Asset Registration Submitter
o External Asset Registration Viewer
1. Launch the CAMS interface. See the “Accessing CAMS” section.
2. Click on “Asset Registration” in the top-level menu.
3. The display will default to the “Dashboard” screen consisting of two sections.
a. The “My Tasks” section which displays registrations that are pending submission or
pending approval..
b. The “In Flight Registrations” section which displays registrations that are pending
submission or pending approval, registration submittals pending actions to be performed
by other participants or the ISO, or registrations that are approved by all parties but have
not yet gone into effect.
a. In both sections the “Asset ID” column contains an active link to asset information and
“Registration ID” column contains an active link to registration details.

CAMS User Guide for Company and Affiliate Maintenance Page 96 of 169
Version 1.4 2016 ISO New England Inc
ISO-NE Public
4. The “External Asset Registration Approver” role is able to view both the “My Tasks” and the “In
Flight Registrations” sections.
5. The “External Asset Registration Submitter” role is able to view both the “My Tasks” for
Pending Submission registrations and the “In Flight Registrations” sections.
6. The “External Asset Registration Viewer” role is able to view only the “In Flight Registrations”
section.
2.3.15.3 Create and submit an asset registration (Lead Participants)
1. Roles that can perform this task:
o External Asset Registration Approver
o External Asset Registration Submitter
1. Launch the CAMS interface. See the “Accessing CAMS” section.
2. Click on “Asset Registration” in the top-level menu.
3. The display will default to the “Dashboard” screen.
4. Click on “Asset Search”.
5. Enter the asset ID, name, asset type, asset status, the company relationship to the asset (LP or
owner), or a combination of these filters.
6. Enter an as-of date if the desired search is for a date other that the current day.
7. Click “Search”.
8. Click the active link in the “Asset ID” column that corresponds with the asset to be processed.

CAMS User Guide for Company and Affiliate Maintenance Page 97 of 169
Version 1.4 2016 ISO New England Inc
ISO-NE Public
9. The “Asset Information” screen displays consisting of two sections, the “Entitlement” section and
the “Registration History” section.
a. The “Entitlement” section displays the current percentage of ownership share for the
asset.
b. The “Registration History” section displays the ownership history for the asset.
10. Click on “Create Registration”.
11. The “Create Registration” screen displays.
12. In the “Effective Date” field type or select the effective date of the ownership transfer. This date
must be at least two business days in the future and up to thirty days into the future.

CAMS User Guide for Company and Affiliate Maintenance Page 98 of 169
Version 1.4 2016 ISO New England Inc
ISO-NE Public
13. Click the down arrow next to the “Customer” field to display the customer dropdown menu.
14. Select the market participant who will be receiving ownership share for the asset.
15. Click on “Add Customer”.
16. In the “New %” field enter the new ownership share percentage up to four decimal places. .
17. Click on “Update” or click the enter key on your keyboard.
18. Repeat the “Add Customer” steps for additional owners of the asset.
19. If an incorrect customer has been selected click on “Remove Customer” to remove the customer
from the registration.

CAMS User Guide for Company and Affiliate Maintenance Page 99 of 169
Version 1.4 2016 ISO New England Inc
ISO-NE Public
20. Adjust existing customer ownership share in the “New %” field for customer with existing
ownership share.
a. If an existing customer will no longer be an owner of the asset enter zero.
21. The registration may now be submitted or saved for later submission.
a. To immediately submit the registration check to see that the ownership share totals 100%,
and then click on “Submit Registration”. A success message will be displayed. The
registration status is set to pending submission and a registration ID number is assigned.
b. To save the registration for later submittal click on the “Save Registration” button. A
success message will be displayed. The registration status is set to pending submission
and a registration ID number is assigned.
i. The registration may be submitted after saving from the Update Registration
screen. Click on the “Submit for Approvals” button, or
ii. The registration may be submitted at a later time by searching for it from the
Dashboard screen. Refer to the “Search for and view an asset registration”
section to locate the registration after leaving the Update Registration screen.
Click on the “Submit for Approvals” button to submit the registration.
22. When the registration has been submitted it is assigned the Pending Approval status until all
ownership changes are approved by the affected owners.
23. If the lead participant user submitting the registration has the approver role the lead participant
approval step is simultaneous with the submittal of the registration and no further steps are
required of the lead participant.
24. Persons with the Responsible for Asset Registration Form Submittal contact type will be notified
via email that an ownership share transfer has been submitted for their company.
CAMS User Guide for Company and Affiliate Maintenance Page 100 of 169
Version 1.4 2016 ISO New England Inc
ISO-NE Public
2.3.15.4 Search for and view an asset registration (Lead Participants and Owners)
Roles that can perform this task:
o External Asset Registration Approver
o External Asset Registration Submitter
o External Asset Registration Viewer
1. Launch the CAMS interface. See the “Accessing CAMS” section.
2. Click on “Asset Registration” in the top-level menu.
3. The display will default to the “Dashboard” screen.
4. To locate an asset registration
o Approvers and Submitters may locate the registration in the “My Tasks” section. Click
on the registration ID hotlink to access the registration that is pending submission, or
o Approvers, Submitters, and Viewers may click on the ‘Registration Search” button to
access the registration search screen.
Refine your search by entering an asset ID, asset name, asset type, registration
ID, registration status, or an effective date range
Click the “Search” button to view registrations meeting the search criteria
Click on the registration ID hotlink to access the registration or
IMPORTANT
Only one registration may be “In Flight” for an asset at any given time. To make the asset available for a new ownership transfer registration:
o In Flight Registrations in “Pending approval” status - the LP processes the
cancellation in CAMS.
o In Flight Registrations in “Approved” status - the LP submits a request to customer service for the Asset and Registration Department to process a “Revert” action at least two business days prior to the effective date.

CAMS User Guide for Company and Affiliate Maintenance Page 101 of 169
Version 1.4 2016 ISO New England Inc
ISO-NE Public
Click “Reset” to enter new search values
5. The asset registration ID hotlink will bring the Registration Details screen to view which consists
of two sections
o The registration details section displays information specific to this asset registration
o The entitlement section displays ownership share
Lead participants are able to see the asset ownership share for all owners
Owners will see only the ownership share assigned to their company
2.3.15.5 Approve submitted registration (Lead Participants and Owners)
Roles that can perform this task:
o External Asset Registration Approver
1. Launch the CAMS interface. See the “Accessing CAMS” section.
2. Click on “Asset Registration” in the top-level menu.

CAMS User Guide for Company and Affiliate Maintenance Page 102 of 169
Version 1.4 2016 ISO New England Inc
ISO-NE Public
3. The display will default to the “Dashboard” screen.
4. The “My Tasks” section will list asset registrations requiring approval.
5. Registrations requiring multiple approvals may be reviewed and approved by owners and the lead
participant in any order. Approvals are not sequential.
6. Click on the asset registration ID hotlink to view the Registration Details screen.
a. Lead participant actions:
i. If the registration was submitted by a lead participant user with the submitter role
a lead participant user with the External Asset Registration Approver role must
approve the submitted registration by clicking on the “LP Approve” button. If
the registration was submitted by an LP user with the approver role this step was
completed when the registration was submitted.
An “LP Approval” dialog box will display when the approval decision is saved.

CAMS User Guide for Company and Affiliate Maintenance Page 103 of 169
Version 1.4 2016 ISO New England Inc
ISO-NE Public
ii. Lead participants may also have ownership share. If the registration required the
LP approval step above the ownership transfer listed in the entitlement section
must also be approved by the LP user with the approver role. Click on the
“Approve” button to approve the ownership transfer. An “AO Approval” dialog
box will display when the approval decision is saved. If the registration was
submitted by an LP user with the approver role this step was completed when the
registration was submitted.
iii. The LP user may also choose to cancel the registration by clicking the “Cancel
Registration” button. The “Cancel” button located at the bottom of the screen
returns to the previous screen. It does not cancel the registration.
b. Asset owner actions:
i. Click on the “Approve” button in the entitlement section to approve the
ownership transfer.
ii. Asset owners do not have the option to cancel the registration and must contact
the lead participant directly to correct the registration. The contact information
for the LP submitter is located in the Registration Detail section of the screen in
the “Submitted By” box or “LP Approval By” box.
iii. The “Cancel” button located at the bottom of the screen returns to the previous
screen. It does not cancel the registration. Only the “Cancel registration” button
viewed by the lead participant cancels a registration.

CAMS User Guide for Company and Affiliate Maintenance Page 104 of 169
Version 1.4 2016 ISO New England Inc
ISO-NE Public
7. When all owner and lead participant approvals are complete the registration moves to the
“Pending ISO Approval” state.
8. Persons with the Responsible for Asset registration Form Submittal contact type will be notified
via email that all external approvals for the ownership share transfer have been submitted.
2.3.15.6 ISO Review
1. Launch the CAMS interface. See the “Accessing CAMS” section.
2. Click on “Asset Registration” in the top-level menu.
3. The display will default to the “Dashboard” screen.
4. Registrations in the “Pending ISO review” status may be viewed on the dashboard in the “In
Flight Registrations” section of the screen.
IMPORTANT
If all approvals are not performed at least two full business days prior to the
effective date of the ownership transfer the asset registration will be rejected.

CAMS User Guide for Company and Affiliate Maintenance Page 105 of 169
Version 1.4 2016 ISO New England Inc
ISO-NE Public
5. The ISO Asset and Registration Auditing department will review the registration and may
approve or reject in the pending ISO review status.
6. If the registration has been approved but has not yet reached the effective date the ISO Asset
Registration and Auditing Department may revert the registration. The Lead Participant must
place a call or submit an issue to customer service to make the request up to two business days
prior to the effective date. This action will remove the registration from the In Flight Registration
section of the dashboard and the asset is made available to process a new registration.
7. Persons with the Responsible for Asset registration Form Submittal contact type will be notified
via email of the ISO action taken on the registration.
CAMS User Guide for Company and Affiliate Maintenance Page 106 of 169
Version 1.4 2016 ISO New England Inc
ISO-NE Public
2.3.16 Banking information
2.3.16.1 Contact type and banking role assignment
2. New applicants will be assigned the “Billing – Primary Contact” contact type and the “External
Banking Admin” application group role during the application process.
a. For most market participant applications, the primary contact provided in the New
Member Credit Application is used to assign the “Billing – Primary Contact” contact type
and the “External Banking Admin” application group role in CAMS.
b. Some application types, such as the Data-Only member, must provide the contact via
email to the billing department and the membership coordinator during the application
process.
3. Active market participants may update the “Billing – Primary Contact” contact type in CAMS
c. Launch the CAMS interface. See the “Accessing CAMS” section.
d. Refer to the “Contacts” section of this guide for the detailed process steps to add contacts.
e. Assign the “Billing – Primary Contact” contact type to the individual that will be notified
when new banking information has been submitted.
i. Only one primary billing contact is allowed.
ii. If a primary contact is already assigned, you must delete the existing contact first
by clicking on the red “X” next to the existing contact.
iii. The Primary Billing Contact Delete screen is displayed.
iv. Select the new “Billing – Primary Contact” from the Person drop down by
clicking the down arrow.
v. Enter an email override, if applicable. Refer to the add “Contacts” information
section of this guide for details about the optional “Email (overrides default e-
mail) field.
vi. Click submit to replace the existing “Billing – Primary Contact” with the new
contact.
f. The person(s) assigned the “Billing – Primary Contact” contact type or the “External
Banking Admin” application group role will receive automated banking-related email
notifications from CAMS.
4. Assign the banking application group roles
g. Refer to the Granting a person access to CAMS or another ISO application section
of this guide for the steps to add application access to a user.
h. Assign banking roles as needed. Refer to the Customer and Asset management System
Application Group Roles document for descriptions of the banking application group
roles.
i. External Banking Admin (only one person may have this role assigned)
ii. External Banking Viewer

CAMS User Guide for Company and Affiliate Maintenance Page 107 of 169
Version 1.4 2016 ISO New England Inc
ISO-NE Public
2.3.16.2 View the Banking tab
Roles that can perform this task:
o External Banking Admin
o External Banking Viewer
7. Launch the CAMS interface. See the “Accessing CAMS” section.
8. Click on the “Banking” tab in the top-level menu.
9. The Customer Banking Listing screen is displayed containing two sections, the Current Details
section and the History Details section.
10. The External Banking Viewer role may view the details in each section by clicking on the
binoculars icon. The bank account number will be partially masked.
11. The External Banking Admin role may view the details in each section by clicking on the
binoculars icon. The bank account number will be fully displayed.
IMPORTANT
Banking information must be maintained directly in CAMS by the person assigned the External Banking Admin application group role.
ISO personnel cannot process banking changes submitted via email, phone, or fax
and do not have access to maintain banking data on behalf of customers.

CAMS User Guide for Company and Affiliate Maintenance Page 108 of 169
Version 1.4 2016 ISO New England Inc
ISO-NE Public
2.3.16.3 Submit new banking information
Roles that can perform this task:
o External Banking Admin
1. Launch the CAMS interface. See the “Accessing CAMS” section.
2. Click on the “Banking” tab in the top-level menu.
3. The Customer Banking Listing screen is displayed.
4. To add new banking information the person assigned the External Banking Admin role clicks the
“Add” button.
5. The Customer Banking Insert screen is displayed.
6. The External Banking Admin must provide the data identified with a red asterisk.
a. The effective date must be in the future. Effective dates must be a minimum of two
business days in the future or a maximum of ten business days in the future.
b. The Wire ABA Routing Number is a numeric field and must be nine digits.
c. The Wire Account Number is an alpha numeric field with a minimum of four digits and a
maximum of thirty-four digits with no special characters or spaces.
d. The Additional Transfer Instruction field is optional with a maximum of three hundred
characters.
e. The ACH ABA Routing Number is a numeric field and must be nine digits. If unable to
accept ACH due to bank account requiring additional transfer instructions, must use all
nines for ABA number.
f. The ACH Account Number is an alpha numeric field with a minimum of four digits and a
maximum of thirty-four digits with no special characters or spaces. If unable to accept
ACH due to bank account requiring additional transfer instructions, must use all nines for
Account number.
g. The Comments field is optional.

CAMS User Guide for Company and Affiliate Maintenance Page 109 of 169
Version 1.4 2016 ISO New England Inc
ISO-NE Public
7. When the required banking information has been provided click “Submit.”
8. A success message is displayed or an error message with details is provided.
9. A successful banking information submittal moves to the “Pending ISO Review” status.
10. An automated email notification is sent from the CAMS to the person assigned the “Billing –
Primary Contact” contact type that new banking information has been submitted.
11. If an error is returned correct the information in the submittal and click “Submit.”
2.3.16.4 ISO review
1. The ISO may approve or reject banking information submittals in the “Pending ISO review”
status.
2. Changes that are approved become effective as of the submitted effective date and an automated
email notification is sent to the person assigned the External Banking Admin role.
3. Changes that are rejected are moved to the ‘Pending Customer Action” status and an automated
email notification is sent to the person assigned the External Banking Admin role.

CAMS User Guide for Company and Affiliate Maintenance Page 110 of 169
Version 1.4 2016 ISO New England Inc
ISO-NE Public
a. The person assigned the External Banking Admin must access CAMS to edit the banking
information and resubmit.
b. The effective date field is not editable.
c. The reason for the rejection will display in the Comments field.
IMPORTANT
If the banking information is not resubmitted by the two business day minimum before the effective date the banking submission moves to the “Terminated” status
and a new banking information submittal must be generated.

CAMS User Guide for Company and Affiliate Maintenance Page 111 of 169
Version 1.4 2016 ISO New England Inc
ISO-NE Public
2.4 Manage your company’s Affiliates Information
2.4.1 Overview of affiliates
Market Participants use CAMS to update their participant affiliation information mandated by the
Federal Energy Regulatory Commission (FERC) Order 741, Credit Reforms in Organized
Wholesale Electric Markets, and described in the ISO New England Financial Assurance Policy. The Customer Support department collects and maintains affiliate information on all active customers of ISO New England. The affiliate information is used for:
o NEPOOL’s determination of Participant voting responsibilities
o Determination of financial assurance
o Day-Ahead Net Commitment Period Compensation (NCPC) settlements
o ISO New England Code of Conduct compliance
Section 1.3.5 of the Transmission, Markets and Services Tariff (Tariff) requires each Market Participant to:
o Regularly review its corporate family on an ongoing basis
o Promptly update CAMS with any additions, expirations, and/or corrections to corporate
family.
This section applies to the following CAMS roles:
External Customer Maintainer External Customer Viewer
This section covers the following topics:
Overview of affiliates (page 111)
Summary of the affiliate process (page 112)
States of company relationship revision (page 114)
Search for and view a company relationship revision (page 115)
View company relationship revision (page 116)
Add a company relationship revision (page 118)
View a company relationship (page 122)
View a corporate family (page 123)
View a company path detail (page 124)
Update a company relationship revision change request (page 124)

CAMS User Guide for Company and Affiliate Maintenance Page 112 of 169
Version 1.4 2016 ISO New England Inc
ISO-NE Public
Affiliates reporting will support the following functions:
o The Financial Assurance Policy:
Limits the amount of unsecured credit extended to Participants and their affiliates Places restrictions on the provision of letters of credit from a bank that is an affiliate
o Market Rule 1 allocates NCPC using affiliate information.
o Code of Conduct provisions prohibits the ISO directors, officers, and employees from having
a financial interest in a Market Participant or its affiliates.
o Participants Agreement governance arrangements entitle Participants and their related
persons to join only one sector and have only one vote on each principal committee.
Roles that can access this information:
o External Customer Maintainer - Allows upload and viewing capabilities.
o External Customer Viewer - Allows for viewing capabilities only.
2.4.2 Summary of the affiliate process
The applicant provides affiliation information to Customer Support via the Membership or Market Participant registration processes.
Customer Support will review the current customer as listed in CAMS or new customer
information and query external sources (i.e., Hoover’s Dun and Bradstreet) for the direct affiliates in identifying the corporate family tree.
The new corporate family tree is compared to the current corporate family tree. Customer Support
may review the information and choose to accept it or query the applicant for more information if
needed. If the applicant needs to modify a relationship in the corporate family tree, changes are entered by
the participant directly in CAMS along with supporting documentation. Customer Support will re-evaluate the relationship in the corporate family tree at that time.
When the applicant is approved as an ISO New England customer, the corporate family will be used in market transactions, reporting Participant affiliates, financial assurance and reporting for
corporate code of conduct.

CAMS User Guide for Company and Affiliate Maintenance Page 113 of 169
Version 1.4 2016 ISO New England Inc
ISO-NE Public
Once the relationship change is approved by ISO New England, the status changes back to
Customer Review. Once the status changes to Customer Review, approved changes will take
place. Additional changes to the corporate family must be submitted as a separate request. Actions during Customer Review:

CAMS User Guide for Company and Affiliate Maintenance Page 114 of 169
Version 1.4 2016 ISO New England Inc
ISO-NE Public
2.4.3 States of company relationship revision

CAMS User Guide for Company and Affiliate Maintenance Page 115 of 169
Version 1.4 2016 ISO New England Inc
ISO-NE Public
2.4.4 Search for and view a company relationship revision
Roles that can perform this task:
o External Customer Maintainer
o External Customer Viewer
1. Launch the CAMS interface. See the “Accessing CAMS” section on page 11.
2. Click on the “Relationships” tab in the top-level menu.
3. The “Company Relationship Revision Search” screen displays:
4. Select the “Revision Status” option (Approved, Customer Review, ISO Review, or Rejected) from the drop-down menu and click “Go”:
IMPORTANT
When a company relationship revision change request is submitted before the company relationship revision is “Approved”, the change request is processed to Customer Review, while the previous relationship revision is processed as
“Superseded”.

CAMS User Guide for Company and Affiliate Maintenance Page 116 of 169
Version 1.4 2016 ISO New England Inc
ISO-NE Public
5. The “Company Relationship Revision Search Results” screen displays:
2.4.5 View company relationship revision information
Roles that can perform this task:
o External Customer Maintainer
o External Customer Viewer
1. Launch the CAMS interface. See the “Accessing CAMS” section on page 11.
2. Click on the “Relationships” tab in the top-level menu.
3. The “Company Relationship Revision Search” screen displays:
4. Select the “Revision Status” option from the drop-down menu and click “Go”.

CAMS User Guide for Company and Affiliate Maintenance Page 117 of 169
Version 1.4 2016 ISO New England Inc
ISO-NE Public
5. The “Company Relationship Revision Search Results” screen:
6. To view the details of the revision, click on “View Revision Detail” in the “Actions” column.
7. The “Company Relationship Revision Detail” screen displays:
IMPORTANT
The “Approval Date” is the As of Date needed to view the corporate
family in its revised state.

CAMS User Guide for Company and Affiliate Maintenance Page 118 of 169
Version 1.4 2016 ISO New England Inc
ISO-NE Public
2.4.6 Add a company relationship revision
Roles that can perform this task:
o External Customer Maintainer
1. Launch the CAMS interface. See the “Accessing CAMS” section on page 11.
2. Click on the “Relationships” tab in the top-level menu.
3. The “Company Relationship Revision Search” screen displays.
4. Click the “Add New Company Relationship Revision” button:
5. The “New Company Relationship Revision Request” screen displays:
6. To search and select a parent or a child company ID, click “Search” in the “Parent Company” or “Child Company” section.

CAMS User Guide for Company and Affiliate Maintenance Page 119 of 169
Version 1.4 2016 ISO New England Inc
ISO-NE Public
7. The “Company Search for a Parent Company” or “Company Search for a Child Company” screen displays:
8. Search by ID, name, address, or DUNS in the “Company/Address Attributes” and click “Search”.

CAMS User Guide for Company and Affiliate Maintenance Page 120 of 169
Version 1.4 2016 ISO New England Inc
ISO-NE Public
9. The list of companies displays:
10. Select a company from the “Select Company” listing and click “Submit for Parent Company” or “Submit for Child Company”.
11. The selected company is displayed in the “Parent Company” or “Child Company” section.

CAMS User Guide for Company and Affiliate Maintenance Page 121 of 169
Version 1.4 2016 ISO New England Inc
ISO-NE Public
12. Add the date the relationship became effective, a comment describing the reason for the change, and upload a document supporting the existence of the relationship. Click “Submit”.
IMPORTANT
Only the following file-type extensions are allowed to be attached as supporting documents:
o .doc o .docx o .xls o .xlsx o .zip o .zipx
o .pdf

CAMS User Guide for Company and Affiliate Maintenance Page 122 of 169
Version 1.4 2016 ISO New England Inc
ISO-NE Public
13. A confirmation message displays and the relationship change request moves to ISO Review Status:
2.4.7 View a company relationship
Roles that can perform this task:
o External Customer Maintainer
o External Customer Viewer
1. Launch the CAMS interface. See the “Accessing CAMS” section on page 11.
2. Click on the “Company” tab in the top-level menu.
3. Click on the “Relationships” tab in the second-level menu.

CAMS User Guide for Company and Affiliate Maintenance Page 123 of 169
Version 1.4 2016 ISO New England Inc
ISO-NE Public
4. The “Company Relationships” screen displays:
2.4.8 View a corporate family
Roles that can perform this task:
o External Customer Maintainer
o External Customer Viewer
1. Launch the CAMS interface. See the “Accessing CAMS” section on page 11.
2. Click on the “Corporate Family” tab in the second-level menu.
3. The “Corporate Family View” screen displays:
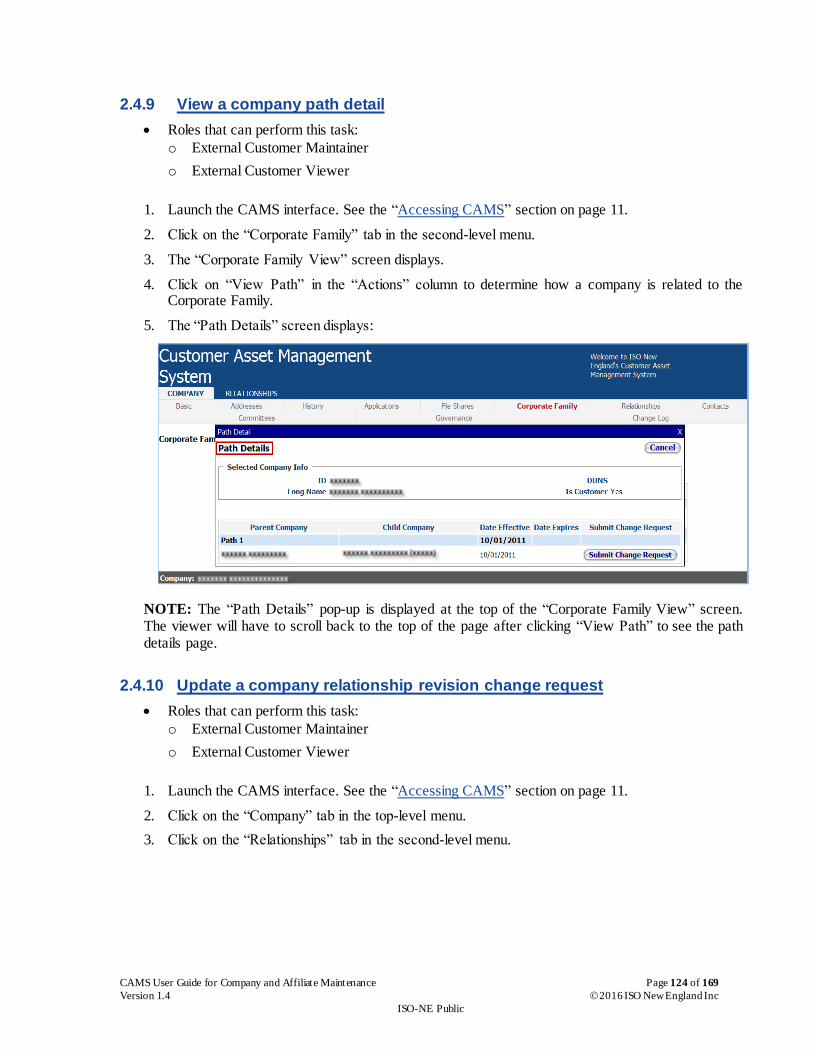
CAMS User Guide for Company and Affiliate Maintenance Page 124 of 169
Version 1.4 2016 ISO New England Inc
ISO-NE Public
2.4.9 View a company path detail
Roles that can perform this task:
o External Customer Maintainer
o External Customer Viewer
1. Launch the CAMS interface. See the “Accessing CAMS” section on page 11.
2. Click on the “Corporate Family” tab in the second-level menu.
3. The “Corporate Family View” screen displays.
4. Click on “View Path” in the “Actions” column to determine how a company is related to the Corporate Family.
5. The “Path Details” screen displays:
NOTE: The “Path Details” pop-up is displayed at the top of the “Corporate Family View” screen. The viewer will have to scroll back to the top of the page after clicking “View Path” to see the path details page.
2.4.10 Update a company relationship revision change request
Roles that can perform this task:
o External Customer Maintainer
o External Customer Viewer
1. Launch the CAMS interface. See the “Accessing CAMS” section on page 11.
2. Click on the “Company” tab in the top-level menu.
3. Click on the “Relationships” tab in the second-level menu.

CAMS User Guide for Company and Affiliate Maintenance Page 125 of 169
Version 1.4 2016 ISO New England Inc
ISO-NE Public
4. The “Company Relationships” screen displays:
5. Click on “Submit Change Request” in the “Actions” column of the “Approved Company Relationships” section.
6. The “Company Relationship Revision Update Change Request - Update Attributes Relationship” screen displays:
7. Update the “Relationship Details” and click “Submit”.

CAMS User Guide for Company and Affiliate Maintenance Page 126 of 169
Version 1.4 2016 ISO New England Inc
ISO-NE Public
8. A confirmation message is displayed:

CAMS User Guide for Company and Affiliate Maintenance Page 127 of 169
Version 1.4 2016 ISO New England Inc
ISO-NE Public
2.5 Manage your company’s minimum eligibility criteria
information
2.5.1 Overview of minimum eligibility criteria
Market Participants must use CAMS to update their minimum eligibility requirements mandated
by the Federal Energy Regulatory Commission (FERC) Order 741, Credit Reforms in Organized
Wholesale Electric Markets, and described in the ISO New England Financial Assurance Policy. CAMS provides customers with the functionality to upload Minimum Eligibility Criteria (MEC)
documentation. Effective February 29, 2012, customers are required to submit the following documentation to
ISO New England via CAMS:
o Communications and Risk Management Officer’s Certificate
o Information Disclosure
2.5.2 Add minimum eligibility criteria information
Role that can perform this task:
o External MEC Maintainer
1. Launch the CAMS interface. See the “Accessing CAMS” section on page 11.
This section applies to the following CAMS roles:
External MEC Maintainer External MEC Viewer
This section covers the following topics:
Overview of minimum eligibility criteria (page 127 )
Add minimum eligibility criteria information (page 127)
View minimum eligibility criteria information (page 130)

CAMS User Guide for Company and Affiliate Maintenance Page 128 of 169
Version 1.4 2016 ISO New England Inc
ISO-NE Public
2. The “Customer View” screen displays:
3. Click on the “Minimum Eligibility Criteria” tab in the second-level menu.
4. The “Minimum Eligibility Criteria Listing: screen displays:
5. Click on the “Add” button.

CAMS User Guide for Company and Affiliate Maintenance Page 129 of 169
Version 1.4 2016 ISO New England Inc
ISO-NE Public
6. The “Minimum Eligibility Criteria Insert” screen displays:
7. Select the “Information type”, browse through the document that needs to be submitted and click on “Add” button to upload new MEC documentation.
IMPORTANT
Information Type section is the type of document that is uploaded. Only the following file-type extensions are allowed to be attached as supporting
documents: o .doc o .docx, o .xls o .xlsx o .zip o .zipx o .pdf
To upload multiple documents of the same information type, zip the documents into a single file.
The Year defaults to the current year.

CAMS User Guide for Company and Affiliate Maintenance Page 130 of 169
Version 1.4 2016 ISO New England Inc
ISO-NE Public
8. A confirmation message displays when the Minimum Eligibility Criteria is created successfully:
2.5.3 View minimum eligibility criteria information
Roles that can perform this task:
o External MEC Maintainer
1. Launch the CAMS interface. See the “Accessing CAMS” section on page 11.
2. Click on the “Company” tab in the top-level menu.
3. Click on the “Minimum Eligibility Criteria” tab in the second-level menu.
IMPORTANT
The current year’s submittals are displayed under the Current Submittal section.
All documents for each year are seen under the Submittal History section.
The Information Type column displays the most recent document for each
Information Type.
The Submitted Date column displays the most recent document for each
Submitted Date.

CAMS User Guide for Company and Affiliate Maintenance Page 131 of 169
Version 1.4 2016 ISO New England Inc
ISO-NE Public
4. The “Minimum Eligibility Criteria Listing” screen displays:
5. Click on hyperlink under the Document column to view the documents.

CAMS User Guide for Company and Affiliate Maintenance Page 132 of 169
Version 1.4 2016 ISO New England Inc
ISO-NE Public
3 CAMS Roles
3.1 Security Administrator
A Security Administrator (SA) is a person authorized by your company to manage users in
CAMS.
The SA is responsible for creating users in CAMS, granting users access rights to ISO New England’s Standard Market Design (SMD) Applications, and managing committee assignments,
contacts, file shares and MIS accounts.
o For additional information, see the following sections in this user guide:
“Get Started” (page 9)
“Manage your company’s persons” (page 14)
“Issue a digital certificate” (see the CAMS User Guide for Digital Certificates which is available by contacting ISO-NE Customer Support or your SA)
“Install a digital certificate” (see the CAMS User Guide for Digital Certificates
which is available by contacting ISO-NE Customer Support or your SA)
A company must have at least one SA to use CAMS.
Designation of an SA is normally completed as part of a company’s membership application
process to ISO New England.
If your company does not have an SA—or would like to designate another SA, complete, notarize and return the ISO New England Security Administrator Signatory Page located on the ISO website at: http://www.iso-ne.com/static-
assets/documents/support/custsvc/forms/iso_ne_security_admin_sig_page.pdf
o The form must be signed by a company officer and notarized. Incomplete forms will not be processed. The original form, including notary stamp or seal, must be mailed to the following address:
Customer Support
ISO New England
One Sullivan Rd Holyoke, MA 01040
3.2 External Customer Maintainer
An External Customer Maintainer has read/write access to your company’s general information
stored in CAMS.
For companies that are a Demand Designated Entity (DDE), the External Customer Maintainer
manages the RTU-to-Demand Resource mappings.
This role does not have access to any “persons” information.
o For additional information see the following sections in this user guide:
“Get Started” (page 9)
“Manage your company’s information” (page 40)
CAMS User Guide for Company and Affiliate Maintenance Page 133 of 169
Version 1.4 2016 ISO New England Inc
ISO-NE Public
DDE companies only: “Manage your Demand Resources and Demand Assets” (see
the CAMS User Guide for Asset and Resource Maintenance)
“Install a digital certificate” (see the CAMS User Guide for Digital Certificates
which is available by contacting ISO-NE Customer Support or your SA)
A company may have multiple External Customer Maintainers.
Only a Security Administrator may assign the External Customer Maintainer role to a person.
3.3 External Customer Viewer
An External Customer Viewer has read-only access to the company’s general information stored
in CAMS. This role does not have access to any “persons” information.
o For additional information see the following sections in this user guide:
“Get Started” (page 9)
“Manage your company’s information” (page 40)
DDE Companies only: “Manage your Demand Resources and Demand Assets” (see
the CAMS User Guide for Asset and Resource Maintenance)
“Install a digital certificate” (see the CAMS User Guide for Digital Certificates
which is available by contacting ISO-NE Customer Support or your SA)
A company may have multiple External Customer Maintainers.
Only a Security Administrator may assign the External Customer Maintainer role to a person.
3.4 External Person Maintainer
An External Person Maintainer has read and write access to the company’s Persons section in CAMS.
An External Person Maintainer can update existing person information, but cannot add a person to the CAMS database or grant access or roles to existing persons in the database. Only a Security Administrator can add persons and grant persons access to ISO applications.
o For additional information see the following sections in this user guide:
“Get Started” (page 9)
“Manage your company’s persons” (page 14)
“Install a digital certificate” (see the CAMS User Guide for Digital Certificates
which is available by contacting ISO-NE Customer Support or your SA)
A company may have multiple External Person Maintainers.
Only a Security Administrator may assign the External Person Maintainer role to a person.
3.5 External Person Viewer
An External Person Viewer has read-only access to the company’s Persons section in CAMS.
o For additional information see the following sections in this user guide:

CAMS User Guide for Company and Affiliate Maintenance Page 134 of 169
Version 1.4 2016 ISO New England Inc
ISO-NE Public
“Get Started” (page 9)
“Manage your company’s persons” (page 14)
“Install a digital certificate” (see the CAMS User Guide for Digital Certificates
which is available by contacting ISO-NE Customer Support or your SA)
A company may have multiple External Person Viewers.
Only a Security Administrator may assign the External Person Viewer role to a person.
3.6 External Resource Maintainer
An External Resource Maintainer is responsible for managing the company’s Demand Resource
information and resource mappings.
o For additional information see the following section in this user guide:
“Get Started” (page 9)
“Manage your Demand Resources and Demand Assets” (see the CAMS User Guide
for Asset and Resource Maintenance)
“Install a digital certificate” (see the CAMS User Guide for Digital Certificates which is available by contacting ISO-NE Customer Support or your SA)
A company may have multiple External Resource Maintainers.
Only a Security Administrator may assign the External Resource Maintainer role to a person.
3.7 External Resource Viewer
An External Resource Viewer has read-only access to the company’s Demand Resource
information in CAMS.
o For additional information see the following sections in this user guide:
“Get Started” (page 9)
“Manage your Demand Resources and Demand Assets” (see the CAMS User Guide for Asset and Resource Maintenance)
“Install a digital certificate” (see the CAMS User Guide for Digital Certificates
which is available by contacting ISO-NE Customer Support or your SA)
A company may have multiple External Resource Viewers.
Only a Security Administrator may assign the External Resource Viewer role to a person.
3.8 External Demand Asset Maintainer
An External Demand Asset Maintainer is responsible for managing the company’s Demand
Assets in CAMS, including:
o enrolling measures
o maintaining measure information
o creating and maintaining asset information

CAMS User Guide for Company and Affiliate Maintenance Page 135 of 169
Version 1.4 2016 ISO New England Inc
ISO-NE Public
o mapping assets to resources
For additional information see the following sections in this user guide:
o “Get Started” (page 9)
o “Manage your Demand Resources and Demand Assets” (see the CAMS User Guide for Asset and Resource Maintenance)
o “Install a digital certificate” (see the CAMS User Guide for Digital Certificates which is available by contacting ISO-NE Customer Support or your SA)
A company may have multiple External Demand Asset Maintainers.
Only a Security Administrator may assign the External Demand Asset Maintainer role to a
person.
3.9 External Demand Asset Viewer
An External Demand Asset Viewer has read-only access to the company’s Demand Asset
information.
o For additional information see the following section in this user guide:
“Get Started” (page 9)
“Manage your Demand Resources and Demand Assets” (see the CAMS User Guide
for Asset and Resource Maintenance)
“Install a digital certificate” (see the CAMS User Guide for Digital Certificates which is available by contacting ISO-NE Customer Support or your SA)
A company may have multiple External Demand Asset Viewers.
Only a Security Administrator may assign the External Demand Asset Viewer role to a person.
3.10 External Host Participant Viewer
An External Host Participant Viewer has read-only access to information and mappings for all
Demand Assets that have been registered within the Host Participant’s metering domain.
o See the following section in this user guide:
“Get Started” (page 9)
“Manage your Demand Resources and Demand Assets” (see the CAMS User Guide for Asset and Resource Maintenance)
“Install a digital certificate” (see the CAMS User Guide for Digital Certificates
which is available by contacting ISO-NE Customer Support or your SA)
A company may have multiple External Host Participant Viewers.
Only a Security Administrator may assign the External Host Participant Viewer role to a person.

CAMS User Guide for Company and Affiliate Maintenance Page 136 of 169
Version 1.4 2016 ISO New England Inc
ISO-NE Public
3.11 External Meter Reader Viewer
An External Meter Reader Viewer has read-only access to information and mappings for Demand Assets assigned to the company.
o The role grants the user access to CAMS metering information for Demand Assets to which the company has been assigned.
This role should not be confused with the “LRP Meter Reader” contact type , which provides the user with email correspondence, notifications, and service notes about any Demand Assets that are assigned to the company.
o For additional information see the following section in this user guide:
“Get Started” (page 9)
“Manage your Demand Resources and Demand Assets” (see the CAMS User Guide
for Asset and Resource Maintenance)
“Install a digital certificate” (see the CAMS User Guide for Digital Certificates which is available by contacting ISO-NE Customer Support or your SA)
A company may have multiple External Meter Reader Viewers.
Only a Security Administrator may assign the External Meter Reader Viewer role to a person.
3.12 External MEC Maintainer
An External Minimum Eligibility Criteria (MEC) Maintainer has read and write access to their
company’s Minimum Eligibility Criteria information stored in CAMS.
o For additional information see the following sections in this user guide:
“Overview of Minimum Eligibility Criteria” on page 127
“Add minimum eligibility criteria information” on page 127
“View minimum eligibility criteria information” on page 130
A company may have multiple External MEC Maintainers.
Only a Security Administrator may assign the External Minimum Eligibility Criteria Maintainer
role to a person.
3.13 External MEC Viewer
An External Minimum Eligibility Criteria (MEC) Viewer has read-only access to the Minimum
Eligibility Criteria information stored in CAMS.
o For additional information see the following sections in this user guide:
“Overview of Minimum Eligibility Criteria” on page 127
“Add minimum eligibility criteria information” on page 127
“View minimum eligibility criteria information” on page 130
A company may have multiple External MEC Viewers.
Only a Security Administrator may assign the External Minimum Eligibility Criteria Viewer role to a person.

CAMS User Guide for Company and Affiliate Maintenance Page 137 of 169
Version 1.4 2016 ISO New England Inc
ISO-NE Public
4 Customer Support
4.1 By Internet
http://www.iso-ne.com/support/index.html
4.2 By Telephone
During Regular Business Hours, Monday through Friday:
8:00 A.M. to 5:00 P.M. Eastern Time: (413) 540-4220
Days of Operation
The Customer Support Hotline is NOT staffed on the following days:
New Year's Day
Martin Luther King Day
Presidents’ Day
Memorial Day
Independence Day
Labor Day
Thanksgiving Day
Day after Thanksgiving
Christmas Eve Afternoon (12:00 P.M. to 5:00 P.M.)
Christmas Day
For emergency inquiries by pager: (877) 226-4814

CAMS User Guide for Company and Affiliate Maintenance Page 138 of 169
Version 1.4 2016 ISO New England Inc
ISO-NE Public
4.3 By Email
4.4 By Fax
(413) 535-4156
4.5 Ask ISO
Ask ISO is available to market participants who have a valid digital certificate and who have
been assigned the role of “Ask ISO / External User” by their Security Administrator. Ask ISO is located at https://smd.iso-ne.com/.
See “Granting a person access to CAMS or another ISO application” on page 17.

CAMS User Guide for Company and Affiliate Maintenance Page 139 of 169
Version 1.4 2016 ISO New England Inc
ISO-NE Public
4.6 NEPOOL Membership Questions
On the web:
http://www.iso-ne.com/participate/support/faq/membership
Inquiries related to NEPOOL membership may be directed to:
4.7 Financial Assurance Questions
Financial Assurance margin call (80%, 90%, 100% Notices) inquires may be directed to:
(413) 540-4400

CAMS User Guide for Company and Affiliate Maintenance Page 140 of 169
Version 1.4 2016 ISO New England Inc
ISO-NE Public
4.8 Membership Application Process
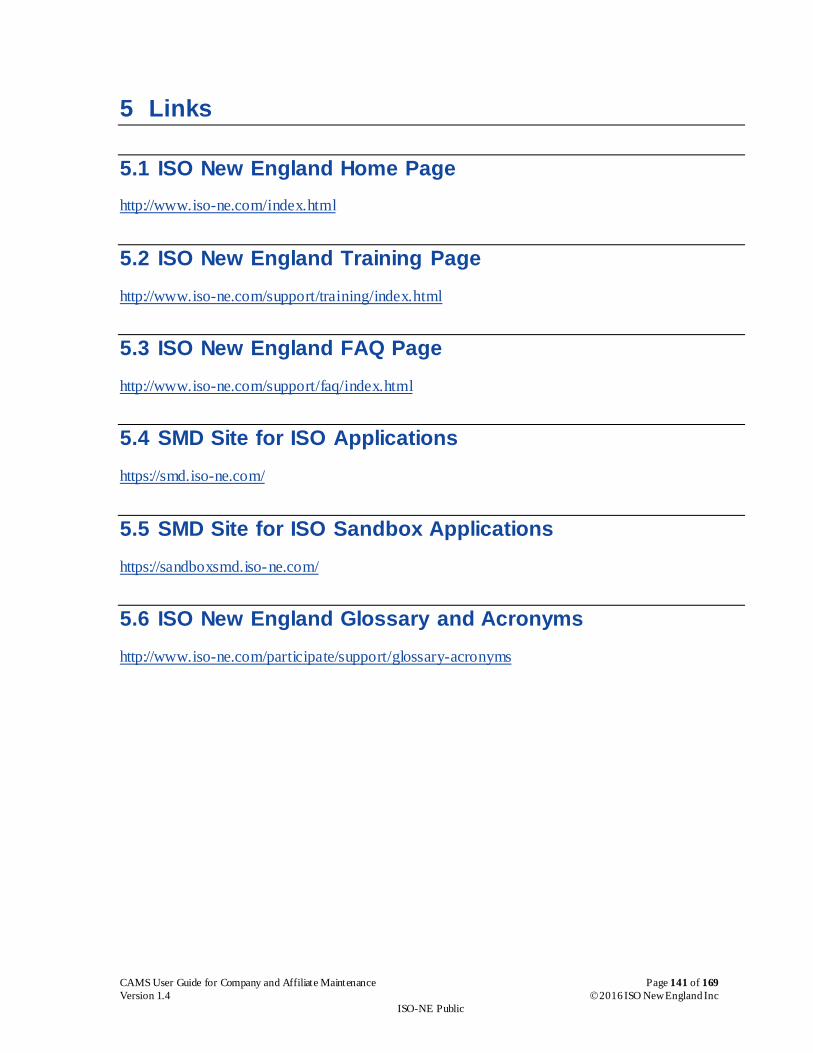
CAMS User Guide for Company and Affiliate Maintenance Page 141 of 169
Version 1.4 2016 ISO New England Inc
ISO-NE Public
5 Links
5.1 ISO New England Home Page
http://www.iso-ne.com/index.html
5.2 ISO New England Training Page
http://www.iso-ne.com/support/training/index.html
5.3 ISO New England FAQ Page
http://www.iso-ne.com/support/faq/index.html
5.4 SMD Site for ISO Applications
https://smd.iso-ne.com/
5.5 SMD Site for ISO Sandbox Applications
https://sandboxsmd.iso-ne.com/
5.6 ISO New England Glossary and Acronyms
http://www.iso-ne.com/participate/support/glossary-acronyms

CAMS User Guide for Company and Affiliate Maintenance Page 142 of 169
Version 1.4 2016 ISO New England Inc.
ISO-NE Public
6 Reference Tables
These reference tables are updated periodically as the content in the User Guide changes and a new version is published. A table of the applications and groups, along with role descriptions, is published on the ISO New England website (www.iso-ne.com) under Participate >
Support > User Guides. The document is titled “Customer Asset Management System Application Group Roles.”
6.1 Table 1: CAMS Roles and Permissions
CAMS Role Activities Allowed Pertinent Sections in User Guide
Security
Administrator
Create users and assign roles in
CAMS and in other ISO New England
applications
Issue, re-issue, renew and reject digital
certificates
Enter and maintain company’s person
information
“Manage your company’s persons” (page 14)
“Retrieving your company’s person detail report” (page 37)
“Issue a digital certificate” (see the CAMS User Guide for Digital Certificates which
is available by contacting ISO-NE Customer Support or your SA)
“Install a digital certificate” (see the CAMS User Guide for Digital Certificates
which is available by contacting ISO-NE Customer Support or your SA)
“Get started” (page 9)
External Customer
Maintainer
Enter and maintain company and
Affiliate information
Map Demand Resource to RTU (DDE
companies only)
Add and manage subaccount
information and entity mappings
“Manage your company’s information” (page 40)
“Subaccount information” (page 83)
“Manage your company’s Affiliates Information” (page 111)
“Manage your Demand Resources and Demand Assets” (see the CAMS User Guide
for Asset and Resource Maintenance)
“Install a digital certificate” (see the CAMS User Guide for Digital Certificates
which is available by contacting ISO-NE Customer Support or your SA)
“Get started” (page 9)

CAMS User Guide for Company and Affiliate Maintenance Page 143 of 169
Version 1.4 2016 ISO New England Inc.
ISO-NE Public
CAMS Role Activities Allowed Pertinent Sections in User Guide
External Customer
Viewer
View only access to company and
Affiliate information
“Manage your company’s information” (page 40)
“Install a digital certificate” (see the CAMS User Guide for Digital Certificates
which is available by contacting ISO-NE Customer Support or your SA)
“Get started” (page 9)
External Person
Maintainer
Enter and maintain company’s person
information
Can NOT add a person
Can NOT assign user roles or perform
any digital certificate functions
“Manage your company’s persons” (page 14)
“Retrieving your company’s person detail report” (page 37)
“Install a digital certificate” (see the CAMS User Guide for Digital Certificates
which is available by contacting ISO-NE Customer Support or your SA)
“Get started” (page 9)
External Person
Viewer
Read-only access to person
information
“Manage your company’s persons” (page 14)
“Retrieving your company’s person detail report” (page 37)
“Install a digital certificate” (see the CAMS User Guide for Digital Certificates
which is available by contacting ISO-NE Customer Support or your SA)
“Get started” (page 9)
External Resource
Maintainer
Map Demand Resources
View Demand Resource information
“Manage your Demand Resources and Demand Assets” (see the CAMS User Guide
for Asset and Resource Maintenance)
“Install a digital certificate” (see the CAMS User Guide for Digital Certificates
which is available by contacting ISO-NE Customer Support or your SA)
“Get started” (page 9)
External Resource
Viewer
Read-only access to Demand Resource
mappings and information
“Manage your Demand Resources and Demand Assets” (see the CAMS User Guide
for Demand Asset and Demand Resource Maintenance)
“Install a digital certificate” (see the CAMS User Guide for Digital Certificates
which is available by contacting ISO-NE Customer Support or your SA)
“Get started” (page 9)

CAMS User Guide for Company and Affiliate Maintenance Page 144 of 169
Version 1.4 2016 ISO New England Inc.
ISO-NE Public
CAMS Role Activities Allowed Pertinent Sections in User Guide
External Demand
Asset Maintainer
Map Demand Resources
Enroll and Map Demand Assets
View Demand Resource information
View Demand Asset information
“Manage your Demand Resources and Demand Assets” (see the CAMS User Guide
for Demand Asset and Demand Resource Maintenance)
“Install a digital certificate” (see the CAMS User Guide for Digital Certificates
which is available by contacting ISO-NE Customer Support or your SA)
“Get started” (page 9)
External Demand
Asset Viewer
Read-only access to Demand Asset
and Demand Resource mappings and
information
“Manage your Demand Resources and Demand Assets” (see the CAMS User Guide
for Demand Asset and Demand Resource Maintenance)
“Install a digital certificate” (see the CAMS User Guide for Digital Certificates
which is available by contacting ISO-NE Customer Support or your SA)
“Get started” (page 9)
External Host
Participant Viewer
Read-only access to Demand Asset
mappings and information for all
assets in the Host Participant’s
territory
“Manage your Demand Resources and Demand Assets” (see the CAMS User Guide
for Demand Asset and Demand Resource Maintenance)
“Install a digital certificate” (see the CAMS User Guide for Digital Certificates
which is available by contacting ISO-NE Customer Support or your SA)
“Get started” (page 9)
External Meter
Reader Viewer
Read-only access to Demand Asset
mappings and information for all
assets assigned to the company
“Manage your Demand Resources and Demand Assets” (see the CAMS User Guide
for Demand Asset and Demand Resource Maintenance)
“Install a digital certificate” (see the CAMS User Guide for Digital Certificates
which is available by contacting ISO-NE Customer Support or your SA)
“Get started” (page 9)
External MEC
Maintainer
Enter and maintain Minimum
Eligibility Criteria
“Overview of minimum eligibility criteria” (page 127)
“Add minimum eligibility criteria information” (page 127)
“Install a digital certificate” (see the CAMS User Guide for Digital Certificates
which is available by contacting ISO-NE Customer Support or your SA)
“Get started” (page 9)

CAMS User Guide for Company and Affiliate Maintenance Page 145 of 169
Version 1.4 2016 ISO New England Inc.
ISO-NE Public
CAMS Role Activities Allowed Pertinent Sections in User Guide
External MEC
Viewer
Read-only access to Minimum
Eligibility Criteria
“Overview of minimum eligibility criteria” (page 127)
“Add minimum eligibility criteria information” (page 127)
“Install a digital certificate” (see the CAMS User Guide for Digital Certificates
which is available by contacting ISO-NE Customer Support or your SA)
“Get started” (page 9)
6.2 Table 2: ISO Applications and Groups
Application or Group Description For details on available roles and
URLs see:
ISO New England Badge Access Badge access to the ISO New England facility in Holyoke, MA is limited to
those individuals identified in CAMS as voting members and alternates of
the following NEPOOL committees : Participants Committee, Markets
Committee, Reliability Committee, and Transmission Committee.
N/A
Customer and Asset Management
System
The Customer and Asset Management System (CAMS) is ISO New
England’s system of record for asset and customer data, the management of
customer file share and application access.
Table 1: CAMS Roles and Permissions
CROW Outage Scheduler The Control Room Operations Window (CROW) Outage Scheduler is used
by Local Control Centers (LCC) to submit transmission outage requests and
by Transmission Owners to view the transmission outages that impact their
equipment.
Table 3: Control Room Operations
Window Outage Scheduler Roles
External Transactions The Enhanced Energy Scheduling (EES) application is used to submit
External Transactions to the Day-Ahead Energy Market and Real-Time
Energy Market.
Table 5: Enhanced Energy Scheduling
Roles
Financial Transmission Rights Financial Transmission Rights (eFTR) application is used to participate in
the Financial Transmission Rights (FTR) Market and view FTR Auction
results.
Table 6: Financial Transmission Rights
Application Roles

CAMS User Guide for Company and Affiliate Maintenance Page 146 of 169
Version 1.4 2016 ISO New England Inc.
ISO-NE Public
Application or Group Description For details on available roles and
URLs see:
Bids & Offers The Bids & Offers (eMarket) application is used to submit bids and offers to
the Day-Ahead Energy Market and Real-Time Energy Markets.
Table 7: Bids and Offers (eMarket) Roles
Financial Assurance Management The Financial Assurance Management (FAM) application maintains each
customer's financial position, including requirements for financial assurance
and market obligations.
Table 11: Other Application Roles
Forward Capacity Auction The Forward Capacity Auction application is for Lead Participants of
qualified capacity resources to participate in the Forward Capacity Auction
(FCA) for specific Capacity Commitment Periods.
Table 11: Other Application Roles
Forward Capacity Market CSO
Bilateral Contracts
Forward Capacity Market CSO Bilateral Contracts application is for Lead
Participants of qualified capacity resources to transfer or acquire Capacity
Supply Obligation for specific Forward Capacity Market (FCM) Capacity
Commitment Periods.
Table 11: Other Application Roles
Forward Capacity Market
Reconfiguration Auction
Forward Capacity Market Reconfiguration Auction application is for Lead
Participants with resources having qualified MW in the Forward Capacity
Auction (FCA) for specific Capacity Commitment Periods to participate in
the Forward Capacity Market Reconfiguration Auctions.
Table 11: Other Application Roles
Forward Capacity Tracking
System
The Forward Capacity Tracking System is for Participants to manage
resource data related to the Forward Capacity Market (FCM).
Table 11: Other Application Roles
Supplemental Availability
Designation
The Supplemental Availability Designation user interface is for Lead
Participants to designate resources as Supplemental Capacity Resources in
the Forward Capacity Market.
Table 11: Other Application Roles
PowerGADS The Generating Availability Data System (GADS) is used to submit
Generation Resource GADS data following North American Electric
Reliability Council (NERC) submission formats.
Table 11: Other Application Roles
Satellite Information Read-only access for Local Control Centers to view restricted Satellite
Information on the ISO-NE website.
Table 11: Other Application Roles

CAMS User Guide for Company and Affiliate Maintenance Page 147 of 169
Version 1.4 2016 ISO New England Inc.
ISO-NE Public
Application or Group Description For details on available roles and
URLs see:
Local Control Center Content
Management System (LCC CMS)
Local Control Center access to upload Satellite information to the ISO-NE
website.
Table 11: Other Application Roles
Transmission System Information Read access allows individuals with a valid digital certificate to view system
diagrams classified as Critical Energy Infrastructure Information.
Table 11: Other Application Roles
Settlement Market System (SMS)
applications include:
—Internal Transactions
—Submit Meter Reading
—Submit Peak Contribution
—Submit Network Load
—Forward Reserve Market
Auction
—Forward Reserve Assignment
Each of these unique applications is used to submit data for the settlement of
various markets.
Table 8: Settlement Market System (SMS)
Applications and Roles
Demand Resource Market User
Interface
The Demand Resource Market User Interface (DR MUI) is used to submit
availability and telemetry data for Demand Resources in the Forward
Capacity Market.
Table 4: Demand Resource Market User
Interface Roles
DR Audit and Testing Tool The DR Audit and Testing Tool is used for the submittal, scheduling, and
maintenance of Demand Resource seasonal audits.
Table 9: Demand Response Audit and
Testing Tool Roles
NX Application The NX Application (NX9 & NX-12D) is a web-based application that
supports the processes associated with the administration and maintenance
of the NX-9 and NX12D forms.
Table 10: NX Application (NX-9 & NX-
12D) Typical User Types and Role
Descriptions
Ask ISO Ask ISO is a user interface for market participants to submit questions,
requests and registration forms, (all classified as Issues in Ask ISO) directly
to Customer Support.
Table 11: Other Application Roles

CAMS User Guide for Company and Affiliate Maintenance Page 148 of 169
Version 1.4 2016 ISO New England Inc.
ISO-NE Public
6.3 Table 3: Control Room Operations Window Outage Scheduler Roles
Web Location Application Group Role Description
ISO New England SMD
Applications Home Page
https://smd.iso-ne.com/
CROW LCC Role View All Read access for LCC to view all the long term transmission outage request data
in CROW.
CROW LCC Role Access Using
Web Services
Read/write access for LCC to use web services to upload transmission outage
requests to CROW. User must also have been granted the role of View All or
View All Sub LCC and have a valid digital certificate.
CROW LCC Role View All Sub
LCC
Read/write access for LCC allows user to submit and view all transmission
outage requests in CROW.
CROW Participant
Role
View Only Read-only access for Transmission Operator to view the transmission outages in
the CROW Outage Scheduler that impact their equipment.
CROW Participant
Role
View Sub Only Read/write access for Transmission Operator to submit and view the
transmission outage data in CROW that impacts their equipment.
CROW Participant
Role
Access Using
Web Services
Read/write access for Transmission Operator to use web services to upload
transmission outage requests to CROW. User must also have the role of View
All or View Sub Only and have a valid digital certificate.
ISO New England SMD
Applications Sandbox Home
Page:
https://sandboxsmd.iso-ne.com/
CROW Gen User
Role
View Only Read-only access for Lead Market Participant to view the generation outages
that impact their equipment in the CROW Outage Scheduler application.
CROW Gen User
Role
View Submit
Only
Read/write access for Lead Market Participant to submit and view the
generation outages that impact their equipment in the CROW Outage Scheduler
application.
CROW Gen User
Role
Access Using
Web Services
Read/write access for Lead Market Participant to use web services to upload
generation outage requests to the CROW Outage Scheduler application. User
must also have the role of View All or View Submit Only and have a valid
digital certificate.
CROW Gen User
Role SBOX
View Only Read-only access for Lead Market Participant to view the generation outages in
the CROW Outage Scheduler Sandbox application without having any

CAMS User Guide for Company and Affiliate Maintenance Page 149 of 169
Version 1.4 2016 ISO New England Inc.
ISO-NE Public
Web Location Application Group Role Description
operations or settlement implications.
CROW Gen User
Role SBOX
View Submit
Only
Read/write access for Lead Market Participant to submit and view the
generation outages in the CROW Outage Scheduler Sandbox application
without having any operations or settlement implications.
CROW Gen User
Role SBOX
Access Using
Web Services
Read/write access for Lead Market Participant to use web services to upload
generation outage requests to the CROW Outage Scheduler Sandbox
application. User must also have the role of View All or View Submit Only and
have a valid digital certificate.
CROW LCC Role
Sbox
Access Using
Web Services
Read/write access for LCC to use web services to upload transmission outage
requests to CROW in the Sandbox without having any operations or settlement
implications. User must also have been granted the role of View All or View
All Sub LCC and have a valid digital certificate.
CROW LCC Role
Sbox
View All Sub
LCC
Read/write access for LCC allows user to submit and view all transmission
outages to the CROW Sandbox application without having any operations or
settlement implications.
CROW LCC Role
Sbox
View All Read access for LCC to view all transmission outage request data in the CROW
Sandbox application without having any operations or settlement implications.
CROW Participant
Role Sbox
View Only Read-only access for Transmission Operator to view the transmission outages in
the CROW Sandbox application that impact their equipment without any
operational or settlement implications.
CROW Participant
Role Sbox
View Sub Only Read/write access for Transmission Operator to submit or view transmission
outage request data in the CROW Sandbox application without any operational
or settlement implications.
CROW Participant
Role Sbox
Access Using
Web Services
Read/write access for Transmission Operator to use web services to upload
transmission outage requests to the CROW Outage Scheduler Sandbox
application. User must also have the role of View All or View Sub Only and
have a valid digital certificate.
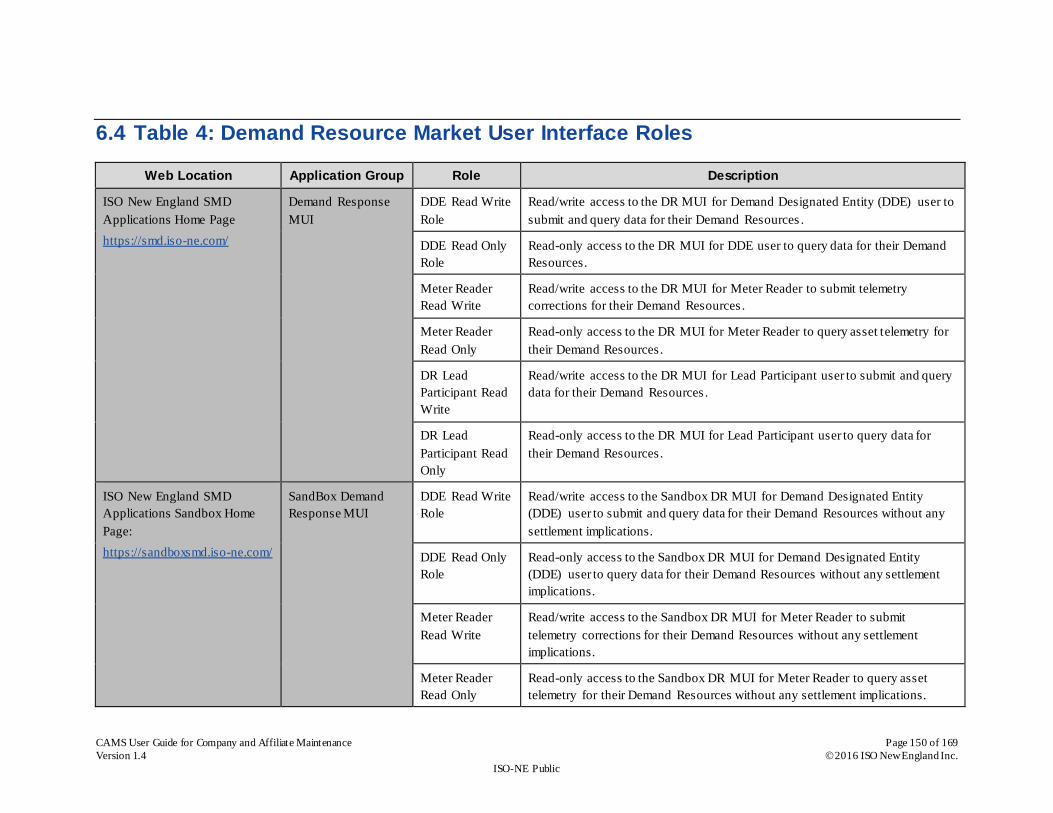
CAMS User Guide for Company and Affiliate Maintenance Page 150 of 169
Version 1.4 2016 ISO New England Inc.
ISO-NE Public
6.4 Table 4: Demand Resource Market User Interface Roles
Web Location Application Group Role Description
ISO New England SMD
Applications Home Page
https://smd.iso-ne.com/
Demand Response
MUI
DDE Read Write
Role
Read/write access to the DR MUI for Demand Designated Entity (DDE) user to
submit and query data for their Demand Resources .
DDE Read Only
Role
Read-only access to the DR MUI for DDE user to query data for their Demand
Resources.
Meter Reader
Read Write
Read/write access to the DR MUI for Meter Reader to submit telemetry
corrections for their Demand Resources .
Meter Reader
Read Only
Read-only access to the DR MUI for Meter Reader to query asset telemetry for
their Demand Resources.
DR Lead
Participant Read
Write
Read/write access to the DR MUI for Lead Participant user to submit and query
data for their Demand Resources .
DR Lead
Participant Read
Only
Read-only access to the DR MUI for Lead Participant user to query data for
their Demand Resources.
ISO New England SMD
Applications Sandbox Home
Page:
https://sandboxsmd.iso-ne.com/
SandBox Demand
Response MUI
DDE Read Write
Role
Read/write access to the Sandbox DR MUI for Demand Designated Entity
(DDE) user to submit and query data for their Demand Resources without any
settlement implications.
DDE Read Only
Role
Read-only access to the Sandbox DR MUI for Demand Designated Entity
(DDE) user to query data for their Demand Resources without any settlement
implications.
Meter Reader
Read Write
Read/write access to the Sandbox DR MUI for Meter Reader to submit
telemetry corrections for their Demand Resources without any settlement
implications.
Meter Reader
Read Only
Read-only access to the Sandbox DR MUI for Meter Reader to query asset
telemetry for their Demand Resources without any settlement implications.

CAMS User Guide for Company and Affiliate Maintenance Page 151 of 169
Version 1.4 2016 ISO New England Inc.
ISO-NE Public
Web Location Application Group Role Description
DR Lead
Participant Read
Write
Read/write access to the Sandbox DR MUI for Lead Participant user to submit
and query data for their Demand Resources without any settlement implications.
DR Lead
Participant Read
Only
Read-only access to the Sandbox DR MUI for Lead Participant user to query
data for their Demand Resources without any settlement implications.
6.5 Table 5: Enhanced Energy Scheduling Roles
Web Location Application Group Role Description
ISO New England SMD
Applications Home Page
https://smd.iso-ne.com/
EES
Read/Write Read/write access to the EES application allows user to submit and modify their
company’s External Transactions.
Read Only Read-only access to the EES application for user to view their company’s
External Transactions.
ISO New England SMD
Applications Sandbox Home
Page:
https://sandboxsmd.iso-ne.com/
EES Sandbox Read/Write Read/write access to the EES Sandbox application allows user to submit and
modify their company’s External Transactions without any operational or
settlement implications.
Read Only Read-only access to the EES Sandbox application allows user to view their
company’s External Transactions without any operational or settlement
implications.

CAMS User Guide for Company and Affiliate Maintenance Page 152 of 169
Version 1.4 2016 ISO New England Inc.
ISO-NE Public
6.6 Table 6: Financial Transmission Rights Application Roles
Web Location Application Group Role Description
ISO New England SMD
Applications Home Page
https://smd.iso-ne.com/
eFTR Read/Write Read/write access to the Public and Private Web Pages in the eFTR application
for user to actively participate in the FTR Market and view FTR Auction results.
Read Only Read-only access to the Public and Private Web Pages in the eFTR application.
ISO New England SMD
Applications Sandbox Home
Page:
https://sandboxsmd.iso-ne.com/
eFTR Sandbox Read/Write Read/write access to the Public and Private Web Pages in the eFTR Sandbox
application allows user to submit data to the eFTR Sandbox application without
having any FTR Market or settlement implications.
Read Only Read-only access to the Public and Private Web Pages in the eFTR Sandbox
application.
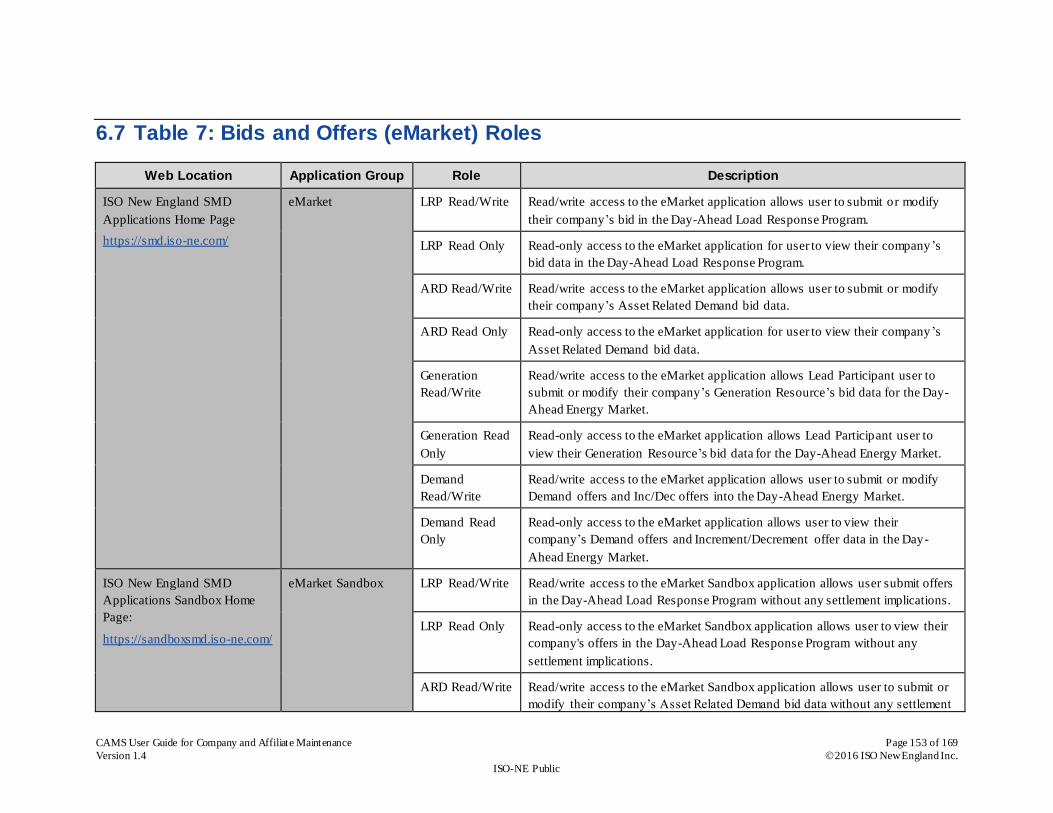
CAMS User Guide for Company and Affiliate Maintenance Page 153 of 169
Version 1.4 2016 ISO New England Inc.
ISO-NE Public
6.7 Table 7: Bids and Offers (eMarket) Roles
Web Location Application Group Role Description
ISO New England SMD
Applications Home Page
https://smd.iso-ne.com/
eMarket LRP Read/Write Read/write access to the eMarket application allows user to submit or modify
their company’s bid in the Day-Ahead Load Response Program.
LRP Read Only Read-only access to the eMarket application for user to view their company ’s
bid data in the Day-Ahead Load Response Program.
ARD Read/Write Read/write access to the eMarket application allows user to submit or modify
their company’s Asset Related Demand bid data.
ARD Read Only Read-only access to the eMarket application for user to view their company ’s
Asset Related Demand bid data.
Generation
Read/Write
Read/write access to the eMarket application allows Lead Participant user to
submit or modify their company’s Generation Resource’s bid data for the Day-
Ahead Energy Market.
Generation Read
Only
Read-only access to the eMarket application allows Lead Participant user to
view their Generation Resource’s bid data for the Day-Ahead Energy Market.
Demand
Read/Write
Read/write access to the eMarket application allows user to submit or modify
Demand offers and Inc/Dec offers into the Day-Ahead Energy Market.
Demand Read
Only
Read-only access to the eMarket application allows user to view their
company’s Demand offers and Increment/Decrement offer data in the Day-
Ahead Energy Market.
ISO New England SMD
Applications Sandbox Home
Page:
https://sandboxsmd.iso-ne.com/
eMarket Sandbox LRP Read/Write Read/write access to the eMarket Sandbox application allows user submit offers
in the Day-Ahead Load Response Program without any settlement implications.
LRP Read Only Read-only access to the eMarket Sandbox application allows user to view their
company's offers in the Day-Ahead Load Response Program without any
settlement implications.
ARD Read/Write Read/write access to the eMarket Sandbox application allows user to submit or
modify their company’s Asset Related Demand bid data without any settlement

CAMS User Guide for Company and Affiliate Maintenance Page 154 of 169
Version 1.4 2016 ISO New England Inc.
ISO-NE Public
Web Location Application Group Role Description
implications.
ARD Read Only Read-only access to the eMarket Sandbox application for user to view their
company’s Asset Related Demand bid data without any settlement implications.
Generation
Read/Write
Read/write access to the eMarket Sandbox application allows Lead Participant
to submit or modify their company’s Generation Resource bid data without any
settlement implications.
Generation Read
Only
Read-only access to the eMarket Sandbox application allows Lead Participant to
view their Generation Resource bid data without any settlement implications.
Demand
Read/Write
Read/write access to the eMarket Sandbox application allows user to submit
Demand Bids, Inc/Dec Bids, and Load Response Offer data without any
settlement implications.
Demand Read
Only
Read-only access to the eMarket Sandbox application for user to view their
Demand offers and Inc/Dec offer data without any settlement implications.

CAMS User Guide for Company and Affiliate Maintenance Page 155 of 169
Version 1.4 2016 ISO New England Inc.
ISO-NE Public
6.8 Table 8: Settlement Market System (SMS) Applications and Roles
Name Web Location Application
Group Role Description
Internal Transactions ISO New England SMD
Applications Home Page
https://smd.iso-ne.com/
SMS Contract Read/write access to the Internal Transactions SMS application
for submittal of internal bilateral transactions to the Day-Ahead
Energy Market and Real-Time Energy Market.
Submit Meter Reading
Submit Peak Contributions
ISO New England SMD
Applications Home Page
https://smd.iso-ne.com/
SMS Metering and
Daily Tag
Two roles are combined for read/write access to the Submit
Meter Reading SMS application for submittal of daily meter
readings, and the Submit Peak Contribution SMS application for
submittal of monthly peak load contribution data.
Submit Network Load ISO New England SMD
Applications Home Page
https://smd.iso-ne.com/
SMS Network Load
Submitters
Read/write access to the Submit Network Load SMS application
for Network Customers to submit monthly Network Load
values.
Submit Network Load ISO New England SMD
Applications Home Page
https://smd.iso-ne.com/
SMS Network Load
Viewers
Read-only access to the Submit Network Load SMS application
for Network Customers to view their monthly Network Load
values.
Forward Reserve Market
Auction
ISO New England SMD
Applications Home Page
https://smd.iso-ne.com/
SMS FR Bid
Submitter
Personnel
Read/write access to the Forward Reserve Market Auction SMS
application allows user to submit bids in the Forward Reserve
Market Auction.
Forward Reserve Market
Auction
ISO New England SMD
Applications Home Page
https://smd.iso-ne.com/
SMS FR Bid Viewer
Personnel
Read-only access to the Forward Reserve Market Auction SMS
application to review a company’s Forward Reserve Market
Auction data.
Forward Reserve
Assignment
ISO New England SMD
Applications Home Page
https://smd.iso-ne.com/
SMS FR Asset
Assign
Submitter
Personnel
Read/write access to the Forward Reserve Assignment SMS
application allows user to submit Resource specific assignment
of Forward Reserve obligations.
Forward Reserve ISO New England SMD SMS FR Asset
Assign Viewer
Read-only access to the Forward Reserve Assignment SMS
application to view Resource specific assignment of Forward

CAMS User Guide for Company and Affiliate Maintenance Page 156 of 169
Version 1.4 2016 ISO New England Inc.
ISO-NE Public
Name Web Location Application
Group Role Description
Assignment Applications Home Page
https://smd.iso-ne.com/
Personnel Reserve obligations.
6.9 Table 9: Demand Response Audit and Testing Tool Roles
Web Location Application Group Role Description
ISO New England SMD
Applications Home Page
https://smd.iso-ne.com/
DR Audit and Testing
Tool
LP Maintainer Read/write access allows Lead Participant to assign users who can view, submit
and edit audit requests and review asset results information.
LP Read Only Read-only access allows users to view the relevant audit requests and asset results
data.
DDE Read Only Read-only access allows the DDE of a Demand Resource to view pertinent audit
requests and results information in support of their role as the DDE for a resource.

CAMS User Guide for Company and Affiliate Maintenance Page 157 of 169
Version 1.4 2016 ISO New England Inc.
ISO-NE Public
6.10 Table 10: NX Application (NX-9 & NX-12D) Typical User Types and Role
Descriptions
The NX Application (NX-9 & NX-12D) is a web-based application that supports the processes associated with the administration and maintenance of the NX-9
and NX12D forms. This table has two major sections: the first section lists various typical user types and the application roles that are needed for access. The
second section lists the individual roles and a detailed description of the functions of that role. Security Administrators can decide whic h roles to assign users
based on their company’s controls and policies and the functions supported by the users.
Role selection for typical user types: The actual roles required are assigned by your company’s Security Administrator (SA). The SA is able to assign multiple roles for a user with multiple
responsibilities, allowing them access to all of the appropriate data and the ability to receive any desired notifications.
User Type Application Roles Functions Available
Participant NX-9 Administrator
NX ExtNX9Admin
NX ExtNotifyNXAppv
Edit and submit NX-9 data forms for their company’s equipment
View their company’s NX-9 data in any state of completion
View their company’s approved NX-12D data
Receive email notification when their company’s NX-9 and NX-12D forms
are approved
Monitor and submit Annual NX-9 Certification
Receive email notifications associated with Annual NX-9 Certification
Participant NX-12D Administrator
NX Ext12DAdmin
NX ExtNotifyNXAppv
Edit and submit NX-12D data forms for their company’s equipment
View their company’s NX-12D data in any state of completion
View their company’s approved NX-9 data
Receive email notification when their company’s NX-9 and NX-12D forms
are approved
Participant NX-9 Administrator who is
also a Planning Department employee
or Base Case Working Group member
of a major transmission owner
NX ExtNX9Admin
NX AppvReadOnly
NX NotifyNXApproved
Edit and submit NX-9 data forms for their company’s equipment
View their company’s NX-9 data any state of completion
View approved NX-9 and NX-12D data for all New England equipment
Receive email notification when NX-9 and NX-12D forms for all New
England equipment are approved.
Monitor and submit Annual NX-9 Certification

CAMS User Guide for Company and Affiliate Maintenance Page 158 of 169
Version 1.4 2016 ISO New England Inc.
ISO-NE Public
User Type Application Roles Functions Available
Receive email notifications associated with Annual NX-9 Certification
Participant NX-9 or NX-12D support
staff (ex: engineering department
employees who assist in the
determination of data supplied on the
NX forms)
NX ExtReadOnly
View their company’s NX-9 data in any state of completion
View their company’s NX-12D data in any state of completion
Local Control Center Users
NX AppvReadOnly
NX NotifyNXApproved
NX NotifyInEMS
View approved NX-9 and NX-12D data for all New England equipment
Receive email notification when NX-9 and NX-12D forms for all New
England equipment are approved
Receive email notification when NX-9 and NX-12D forms for all New
England equipment are implemented in the ISO EMS
Planning Department employee or
Base Case Working Group member of
a major transmission owner
NX AppvReadOnly
NX NotifyNXApproved
View approved NX-9 and NX-12D data for all New England equipment
Receive email notification when NX-9 and NX-12D forms for all New
England equipment are approved
Participant Compliance Officer
NX ExtNX9Compliance
Monitor and submit Annual NX-9 Certification
Receive email notifications associated with Annual NX-9 Certification
View their company’s approved NX-9 and NX-12D data
Role Descriptions:
Below is a list of the roles available for the NX Application.
Web Location Application Group Role Description
ISO New England SMD
Applications Home Page
https://smd.iso-ne.com/
NX Application*
NX ExtReadOnly Provides read only access to NX-9 and NX-12D forms that are
in any stage of creation, review or approval. Users can only
see data for their company’s equipment.
NX ExtAppvReadOnly Provides read only access to approved NX-9 and NX-12D
forms. Users can only see data for their company’s equipment.

CAMS User Guide for Company and Affiliate Maintenance Page 159 of 169
Version 1.4 2016 ISO New England Inc.
ISO-NE Public
Web Location Application Group Role Description
* When assigning the
appropriate roles in CAMS,
Security Administrators will
see the name of the NX
Application represented
differently, based on their
organization’s needs and
function. Consequently, not
all of the roles listed here
will be available for
selection. The application
name in CAMS will be one
of the following:
NX912D Major TO
NX912D Other Cust
NX ExtNX9Admin User responsible for the entry and submission of NX-9 data and
annual certification of NX-9 data.
NX ExtNX9Compliance User who monitors the status of, or submits, the annual
certification of NX-9 data.
NX AppvReadOnly Provides read only access to approved NX-9 and NX-12D
forms. Users can see data for all New England equipment.
This role available only to employees of ISO, LCCs, or Major
Transmission Owners.
NX ExtNotifyNXAppv User receives email notification when their company’s NX-9
and NX-12D forms are approved by ISO.
NX NotifyNXApproved Provides email notification when NX-9 and NX-12D forms are
approved by ISO. Notifications are sent for all New England
equipment. This role available only to employees of ISO,
LCCs, or Major Transmission Owners.
NX ExtNotifyInEMS User receives email notification when data associated with their
company’s NX-9 forms are implemented in the ISO EMS.
NX NotifyInEMS Provides email notification when data associated with NX-9
forms are implemented in the ISO EMS. Notifications are sent
for all New England equipment. This role available only to
employees of ISO, LCCs, or Major Transmission Owners.
NX ExtNX12DAdmin User responsible for the entry and submission of NX-12D data.
ISO New England SMD
Applications Sandbox
Home Page
https://sandboxsmd.iso-
ne.com/
NX Application Sandbox*
* When assigning the
appropriate roles in CAMS,
NX ExtReadOnly Provides read only access to NX-9 and NX-12D forms that are
in any stage of creation, review or approval. Users can only
see data for their company’s equipment.
NX ExtAppvReadOnly Provides read only access to approved NX-9 and NX-12D
forms. Users can only see data for their company’s equipment.
NX ExtNX9Admin User responsible for the entry and submission of NX-9 data and

CAMS User Guide for Company and Affiliate Maintenance Page 160 of 169
Version 1.4 2016 ISO New England Inc.
ISO-NE Public
Web Location Application Group Role Description
Security Administrators will
see the name of the NX
Application represented
differently, based on their
organization’s needs and
function. Consequently, not
all of the roles listed here
will be available for
selection. The application
name in CAMS will be one
of the following:
NX912D Major TO
Sandbox
NX912D Other Cust
Sandbox
annual certification of NX-9 data.
NX ExtNX9Compliance User who monitors the status of, or submits, the annual
certification of NX-9 data.
NX AppvReadOnly Provides read only access to approved NX-9 and NX-12D
forms. Users can see data for all New England equipment.
This role available only to employees of ISO, LCCs, or Major
Transmission Owners.
NX ExtNotifyNXAppv User receives email notification when their company’s NX-9
and NX-12D forms are approved by ISO.
NX NotifyNXApproved Provides email notification when NX-9 and NX-12D forms are
approved by ISO. Notifications are sent for all New England
equipment. This role available only to employees of ISO,
LCCs, or Major Transmission Owners.
NX ExtNotifyInEMS User receives email notification when data associated with their
company’s NX-9 forms are implemented in the ISO EMS.
NX NotifyInEMS Provides email notification when data associated with NX-9
forms are implemented in the ISO EMS. Notifications are sent
for all New England equipment. This role available only to
employees of ISO, LCCs, or Major Transmission Owners.
NX ExtNX12DAdmin User responsible for the entry and submission of NX-12D data.
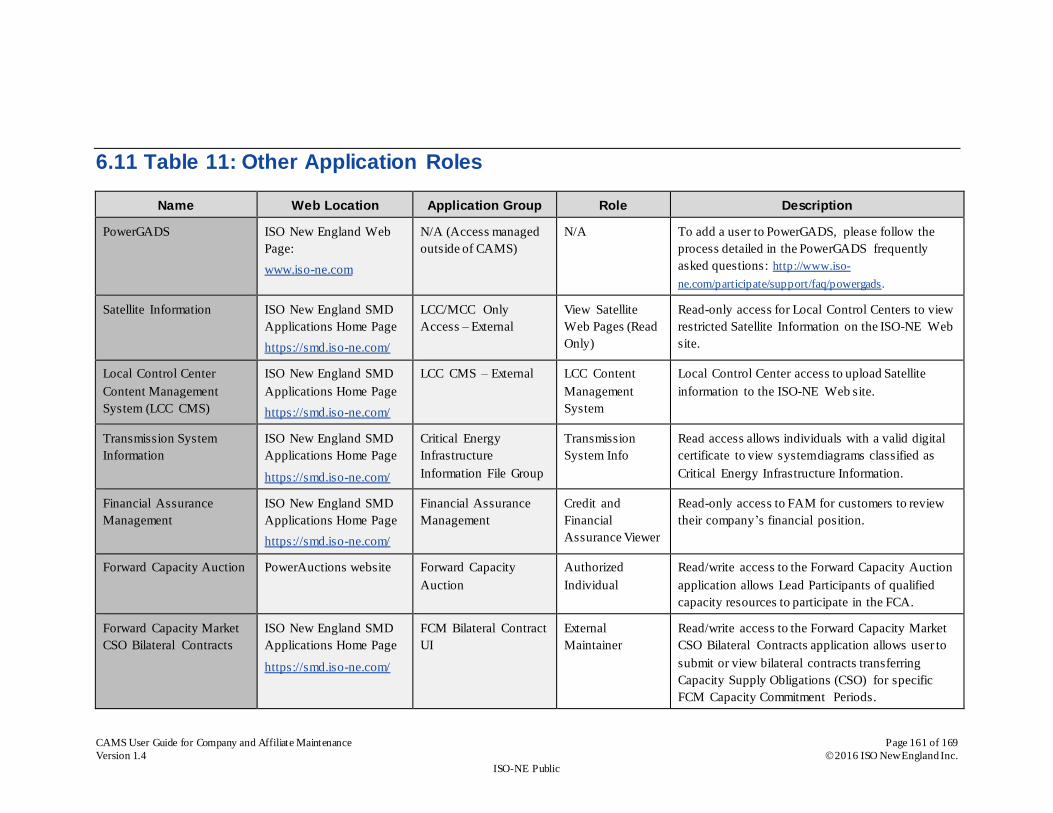
CAMS User Guide for Company and Affiliate Maintenance Page 161 of 169
Version 1.4 2016 ISO New England Inc.
ISO-NE Public
6.11 Table 11: Other Application Roles
Name Web Location Application Group Role Description
PowerGADS ISO New England Web
Page:
www.iso-ne.com
N/A (Access managed
outside of CAMS)
N/A To add a user to PowerGADS, please follow the
process detailed in the PowerGADS frequently
asked questions: http://www.iso-
ne.com/participate/support/faq/powergads.
Satellite Information ISO New England SMD
Applications Home Page
https://smd.iso-ne.com/
LCC/MCC Only
Access – External
View Satellite
Web Pages (Read
Only)
Read-only access for Local Control Centers to view
restricted Satellite Information on the ISO-NE Web
site.
Local Control Center
Content Management
System (LCC CMS)
ISO New England SMD
Applications Home Page
https://smd.iso-ne.com/
LCC CMS – External LCC Content
Management
System
Local Control Center access to upload Satellite
information to the ISO-NE Web site.
Transmission System
Information
ISO New England SMD
Applications Home Page
https://smd.iso-ne.com/
Critical Energy
Infrastructure
Information File Group
Transmission
System Info
Read access allows individuals with a valid digital
certificate to view system diagrams classified as
Critical Energy Infrastructure Information.
Financial Assurance
Management
ISO New England SMD
Applications Home Page
https://smd.iso-ne.com/
Financial Assurance
Management
Credit and
Financial
Assurance Viewer
Read-only access to FAM for customers to review
their company’s financial position.
Forward Capacity Auction PowerAuctions website
Forward Capacity
Auction
Authorized
Individual
Read/write access to the Forward Capacity Auction
application allows Lead Participants of qualified
capacity resources to participate in the FCA.
Forward Capacity Market
CSO Bilateral Contracts
ISO New England SMD
Applications Home Page
https://smd.iso-ne.com/
FCM Bilateral Contract
UI
External
Maintainer
Read/write access to the Forward Capacity Market
CSO Bilateral Contracts application allows user to
submit or view bilateral contracts transferring
Capacity Supply Obligations (CSO) for specific
FCM Capacity Commitment Periods.

CAMS User Guide for Company and Affiliate Maintenance Page 162 of 169
Version 1.4 2016 ISO New England Inc.
ISO-NE Public
Name Web Location Application Group Role Description
Forward Capacity Market
CSO Bilateral Contracts
ISO New England SMD
Applications Home Page
https://smd.iso-ne.com/
FCM Bilateral Contract
UI
External Viewer Read-only access to the Forward Capacity Market
CSO Bilateral Contracts application for users to
review their company’s bilateral contract
information for specific FCM Capacity
Commitment Periods.
Forward Capacity
Reconfiguration Auction
ISO New England SMD
Applications Home Page
https://smd.iso-ne.com/
FCM Reconfiguration
Auction Bidding
External
Maintainer
Read/write access to the Forward Capacity Market
Reconfiguration Auction application allows user to
submit bids and offers in the Forward Capacity
Reconfiguration Auction process.
Forward Capacity
Reconfiguration Auction
ISO New England SMD
Applications Home Page
https://smd.iso-ne.com/
FCM Reconfiguration
Auction Bidding
External Viewer Read-only access to the Forward Capacity Market
Reconfiguration Auction application allows user to
review their company’s Forward Capacity
Reconfiguration Auction data.
Forward Capacity Tracking
System
ISO New England SMD
Applications Home Page
https://smd.iso-ne.com/
Forward Capacity
Tracking System
External Forward
Capacity
Maintainer
Read/write access to the Forward Capacity
Tracking System application allows user to enter
and modify their company’s resource data related to
the FCM.
Forward Capacity Tracking
System
ISO New England SMD
Applications Home Page
https://smd.iso-ne.com/
Forward Capacity
Tracking System
External Forward
Capacity Viewer
Read-only access to the Forward Capacity Tracking
System application allows user to review their
company’s resource data related to the FCM.
Supplemental Availability
Designation
ISO New England SMD
Applications Home Page
https://smd.iso-ne.com/
FCM Supplemental
Availability
Designation UI
External
Maintainer
Read/write access to the Supplemental Availability
Designation user interface for the Lead Participant
user to submit, update or deleted their resource’s
designation as a Supplemental Capacity Resource.
Supplemental Availability
Designation
ISO New England SMD
Applications Home Page
https://smd.iso-ne.com/
FCM Supplemental
Availability
Designation UI
External Viewer Read-only access to the Supplemental Availability
Designation user interface for the Lead Participant
user to view the Supplemental Capacity Resource
designations for their resources.

CAMS User Guide for Company and Affiliate Maintenance Page 163 of 169
Version 1.4 2016 ISO New England Inc.
ISO-NE Public
Name Web Location Application Group Role Description
Ask ISO ISO New England SMD
Applications Home Page
https://smd.iso-ne.com/
Ask ISO External User Read/write access to Ask ISO allows the user to
submit Issues to Customer Support through the Ask
ISO user interface. The view is limited to the issues
the user submitted, not all issues for the company.

CAMS User Guide for Company and Affiliate Maintenance Page 164 of 169
Version 1.4 2016 ISO New England Inc.
ISO-NE Public
6.12 Table 12: Contact Types
Contact Type Description
Alternate NEPOOL Application Contact Alternate person(s) at your company ISO New England will contact regarding
the application process to NEPOOL.
Note: This contact type applies only during the NEPOOL application
process.
Billing – Alternate Contact(s) Alternate person(s) at your company ISO New England will contact regarding
billing issues, including settlement and bill payment.
Note: ISO New England will only discuss billing issues with individuals
at your company who are listed in CAMS as either a “Billing – Primary
Contact” or “Billing – Alternate Contact.”
Note: this contact is created during the application process. It must be
kept current to ensure timely resolution of any billing issues.
Billing – Primary Contact Primary person(s) at your company ISO New England will contact regarding
billing issues, including settlement and bill payment.
Note: ISO New England will only discuss billing issues with individuals
at your company who are listed in CAMS as either a “Billing – Primary
Contact” or “Billing – Alternate Contact.”
Note: this contact is created during the application process. It must be
kept current to ensure timely resolution of any billing issues.
Committee Update Contact ISO New England internal use only.
Customer mentor ISO New England internal use only.
Day-Ahead Market Demand Bid Person(s) at your company ISO New England will contact regarding your
demand bids.
Note: This contact person(s) should be available 365-days a year
during normal business hours.

CAMS User Guide for Company and Affiliate Maintenance Page 165 of 169
Version 1.4 2016 ISO New England Inc.
ISO-NE Public
Contact Type Description
Day-Ahead Market Generation Offer Person(s) at your company ISO New England will contact regarding your
generation offers.
Note: This contact person(s) should be available 365-days a year
during normal business hours.
Day-Ahead Market Incs and Decs Person(s) at your company ISO New England will contact regarding your
Increments and Decrements .
Note: This contact person(s) should be available 365-days a year
during normal business hours.
DR Audit and Testing General Contacts Representatives of the Lead Participant at your company authorized to receive
correspondence and information related to seasonal Demand Response audits
and/or events.
Note: This contact will receive automated emails from the Audit and
Testing Tool regarding audits of your company’s resources.
DR Data Quality Contacts Representatives of the Lead Participant at your company authorized to receive
correspondence and information relating to data quality issues , information or
notices.
DR under FCM – Asset Cutover Readiness Contact ISO New England internal use only.
DR under FCM – DDE/Communications Readiness Contact ISO New England internal use only.
Emergency IT Contact ISO New England internal use only.
EXT Contract Person(s) at your company responsible for entering External Transaction data in
the Enhanced Energy Scheduling application.
Financial Assurance Person(s) at your company responsible for all Financial Assurance matters.
Note: this contact is established at the start of the application process,
but must be kept current.

CAMS User Guide for Company and Affiliate Maintenance Page 166 of 169
Version 1.4 2016 ISO New England Inc.
ISO-NE Public
Contact Type Description
FTR Bidder or FTR Holder Primary Contact Primary person(s) at your company responsible for submitting bids for the FTR
auction.
FTR Bidder or FTR Holder Secondary Contact Secondary person(s) at your company responsible for submitting bids for the
FTR auction.
Generation Compliance Contact Primary Primary person(s) at your company responsible for communicating all generation
compliance information to ISO New England.
Note: ISO New England directs all compliance inquiries to Market
Participants exclusively through their self-identified Compliance
Contacts. This contact should be kept current.
Generation Compliance Contact Secondary Secondary person(s) at your company responsible for communicating all
generation compliance information to ISO New England.
Note: ISO New England directs all compliance inquiries to Market
Participants exclusively through their self-identified Compliance
Contacts. This contact should be kept current.
Host Participant ISO New England internal use only.
Legal Representation Legal counsel representative(s) at your company.
Load Response Enrolling Participant Representatives of the Lead Participant who register and maintain the portfolio
of demand response assets, measures, and resources.
LRP – IBCS Provider Contact For ISO New England internal use only.

CAMS User Guide for Company and Affiliate Maintenance Page 167 of 169
Version 1.4 2016 ISO New England Inc.
ISO-NE Public
Contact Type Description
LRP – Meter Reader Person(s) at your company authorized to receive correspondence and
notifications regarding meter reading activities for any Demand Assets to which
the company has been assigned.
Note: This contact must be kept current to ensure your company will
receive correspondence and notifications regarding any Demand Assets
to which your company has been assigned.
Note: this contact type should not be confused with the “External Meter
Reader Viewer” user role. The role grants the user access to CAMS
metering data for Demand Assets to which the company has been
assigned. The “LRP Meter Reader” contact type provides the user with
email correspondence, notifications and service notes about any
Demand Assets that are assigned to the company.
Market Monitoring and Mitigation Contact Person(s) at your company authorized to address any market monitoring
mitigation issues.
NX - 12 Prepared by Person(s) at your company authorized to prepare and submit the NX - 12 to ISO
New England.
NX - 9 Primary Contact for all NX - 9 Data Primary technical or engineering person(s) at your company responsible for NX -
9 Data as defined by ISO New England Operating Procedure No. 16,
Transmission System Data (OP 16) (see http://www.iso-
ne.com/rules_proceds/operating/isone/index.html).
NX - 9 Secondary Contact for all NX - 9 Data Secondary technical or engineering person(s) at your company responsible for
NX - 9 Data as defined by ISO New England Operating Procedure No. 16,
Transmission System Data (OP 16) (see http://www.iso-
ne.com/rules_proceds/operating/isone/index.html).
Primary NEPOOL Application Contact Primary contact person(s) at your company for issues regarding the application
process to NEPOOL.
Note: This contact type applies only during the NEPOOL application
process.

CAMS User Guide for Company and Affiliate Maintenance Page 168 of 169
Version 1.4 2016 ISO New England Inc.
ISO-NE Public
Contact Type Description
Projects – Field Engineering Contact Primary ISO New England internal use only.
Projects – Field Engineering Contact Secondary ISO New England internal use only.
Projects – Planning Engineering Contact Primary ISO New England internal use only.
Projects – Planning Engineering Contact Secondary ISO New England internal use only.
Projects – Project Management Contact Primary ISO New England internal use only.
Projects – Project Management Contact Secondary ISO New England internal use only.
Responsible for Asset Registration Form Submittal Person(s) at your company authorized to submit Asset Registration Forms to ISO
New England for generator, load, and/or tie line assets.
RTU Control Room Contact Control room phone number ISO New England can contact during non-business
hours.
RTU IT Contact Main point of contact at your company for RTU configuration and performance
issues.
Note: this contact should be able to engage required integrators and
vendors to resolve identified issues.
Security Administrator (SA) Person(s) at your company who will receive all Security Administrator emails
from ISO New England related to setting up digital certificates.
Note: this contact is set up at the start of the membership application
process. It must be kept current.
Note: adding this contact type to a person in CAMS does not make that
person a Security Administrator. This contact type only receives emails
regarding digital certificate matters at your company. To assign the SA
role to a person see the “Getting Started” overview on page 9.
Suspend – Unsuspend Notification Contact ISO New England internal use only.
Training ISO New England internal use only.

CAMS User Guide for Company and Affiliate Maintenance Page 169 of 169
Version 1.4 2016 ISO New England Inc.
ISO-NE Public
Contact Type Description
Transmission Compliance Contact Primary Primary person(s) at your company responsible for communicating all
transmission compliance information to ISO New England.
Note: ISO New England directs all compliance inquiries to Market
Participants exclusively through their self-identified Compliance
Contacts.
Transmission Compliance Contact Secondary Secondary person(s) at your company responsible for communicating all
transmission compliance information to ISO New England.
Note: ISO New England directs all compliance inquiries to Market
Participants exclusively through their self-identified Compliance
Contacts.
Web Services Contact After registering for ISO Express, the Web Services Contact type must be
assigned to an individual for access to web services, or data feeds, of public data
through ISO Express.