Actix CellRef Procedure
12
UMTS Foundation Training 148 Importing cell site data using the Network Explorer The Network Explorer allows you to import network element data, creating a cell plan file called cellrefs.txt. It also lets you browse and edit this network information once it has been loaded. The Automatic Import feature provides an automated method of updating cell site information as changes are made to the network. This section describes how to import delimited data, and how to configure the Automatic Import tool. Importing Network Data The important thing to remember about the network data import process is that the process requires two files: 1 A delimited text file that contains unformatted data arranged in tabular form, with one row for each individual sector in a network. 2 A blank file, containing only Actix header information, to be populated with formatted data. Obtaining Site Data in tabular format In order to import cell site data from your own network, you will need to obtain a delimited text file containing the data listed in the table below. To maximize the benefit your Actix Software can bring to UMTS network analysis, the parameters listed in bold in the table on the following page are REQUIRED for cell data to function with logged data in the main workspace. All other parameters are optional. The data may come from a network database or a planning tool configuration file. As long as the data is in a tabular format with one row for each sector, you will be able to import the data.
Transcript of Actix CellRef Procedure
UMTS Foundation Training
148
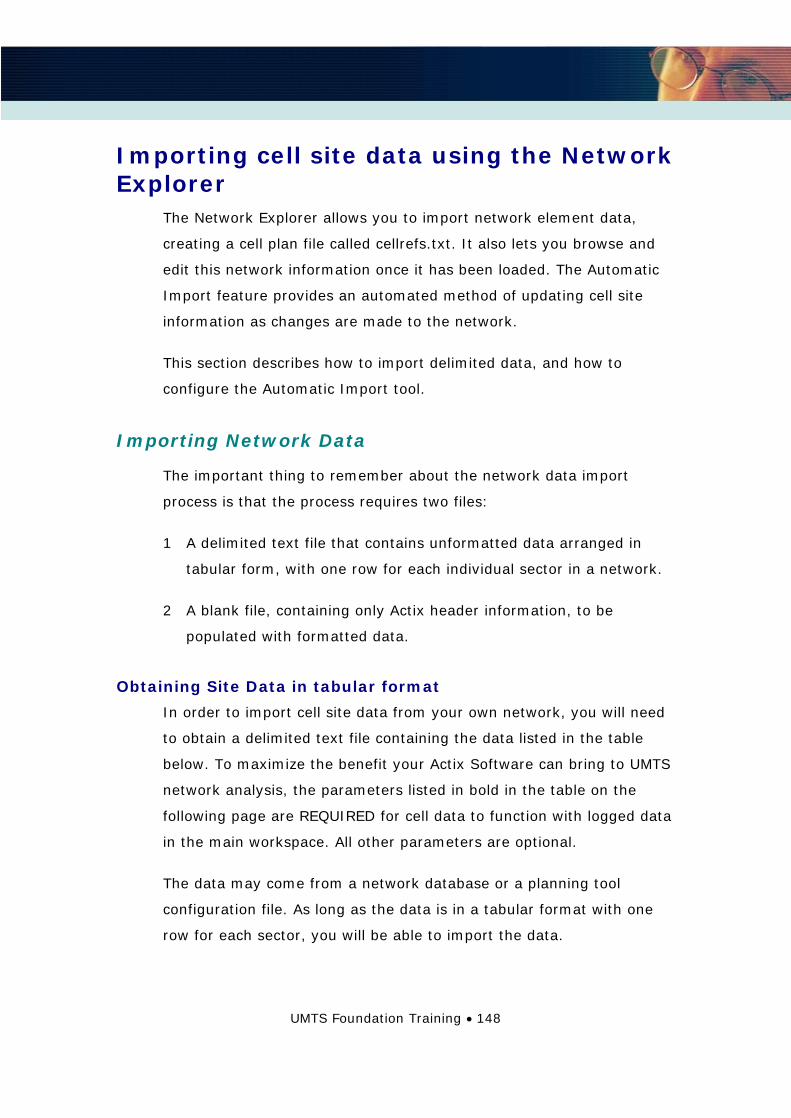
Importing cell site data using the Network Explorer
The Network Explorer allows you to import network element data,
creating a cell plan file called cellrefs.txt. It also lets you browse and
edit this network information once it has been loaded. The Automatic
Import feature provides an automated method of updating cell site
information as changes are made to the network.
This section describes how to import delimited data, and how to
configure the Automatic Import tool.
Importing Network Data
The important thing to remember about the network data import
process is that the process requires two files:
1 A delimited text file that contains unformatted data arranged in
tabular form, with one row for each individual sector in a network.
2 A blank file, containing only Actix header information, to be
populated with formatted data.
Obtaining Site Data in tabular format
In order to import cell site data from your own network, you will need
to obtain a delimited text file containing the data listed in the table
below. To maximize the benefit your Actix Software can bring to UMTS
network analysis, the parameters listed in bold in the table on the
following page are REQUIRED for cell data to function with logged data
in the main workspace. All other parameters are optional.
The data may come from a network database or a planning tool
configuration file. As long as the data is in a tabular format with one
row for each sector, you will be able to import the data.

UMTS Foundation Training
149
UMTS Cell Site Parameters for Import:
Parameter Actix Group Actix Name Purpose
Site Name WCDMA_Site SiteName Text description of the site for display on map.
Site Number
WCDMA_Site SiteID Numeric identifier for the site.
Latitude WCDMA_Site Latitude Locates site icons on map.
Longitude WCDMA_Site Longitude Locates site icons on map.
Sector Number
WCDMA_Cell Sector ID Sector-specific information useful for display on maps (can be alpha or numeric)
Azimuth WCDMA_Cell Azimuth Orients the sector icons on the map.
Beamwidth WCDMA_Cell Beamwidth Governs the shape of the sector wedge icon to reflect the beamwidth of antenna deployed at the site.
Scrambling Code
WCDMA_Cell SC Used for cell site identification and to calculate lines to cells.
EIRP WCDMA_Cell EIRP Equivalent Isotropic Radiated Power for informational purposes only
Mobile Country Code
WCDMA_Cell MCC Mobile Country Code for informational purposes only
Mobile Network Code
WCDMA_Cell MNC National Domain Code for informational purposes only
Location Area Code
WCDMA_Cell LAC Location Area Code for informational purposes only
Cell Identity WCDMA_Cell WCDMA_CI Cell Identity for informational purposes only
BSIC WCDMA_Cell BSIC Legacy parameter unused
Neighbor List
WCDMA_Cell WCDMANeighborList
Used to define a pre-defined neighbor list for each cell. Used during neighbor list recommendations analysis.
UMTS Foundation Training
150
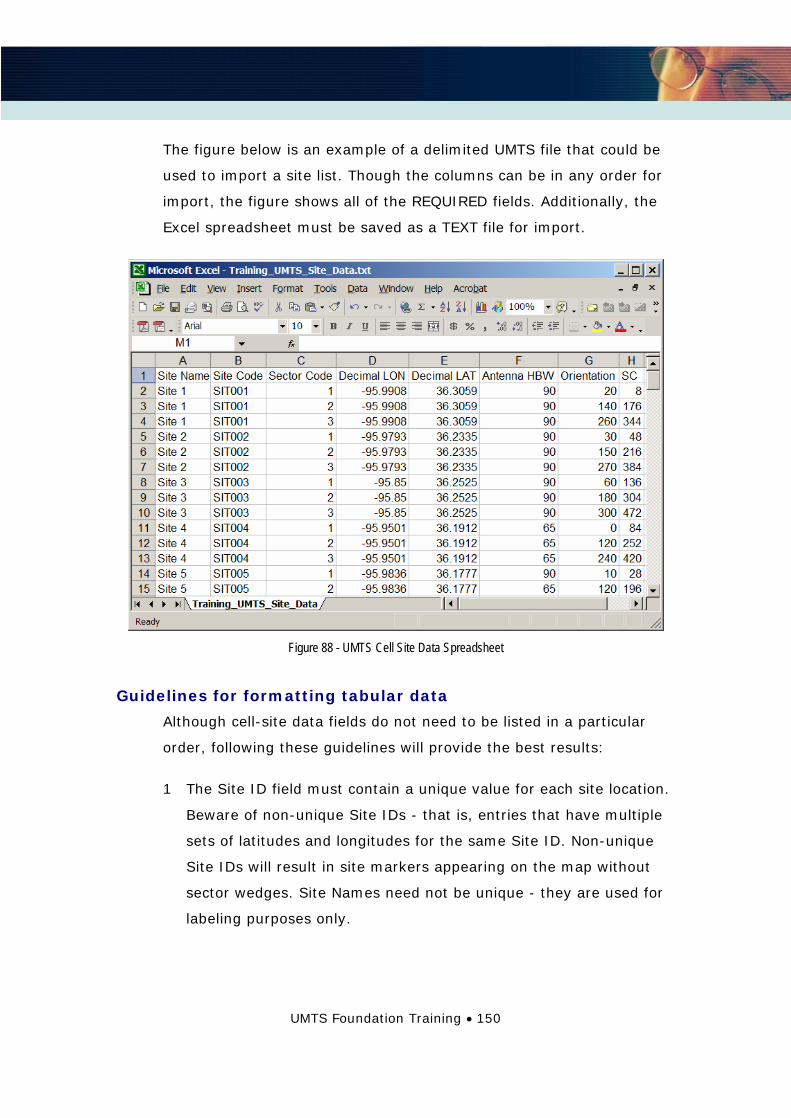
The figure below is an example of a delimited UMTS file that could be
used to import a site list. Though the columns can be in any order for
import, the figure shows all of the REQUIRED fields. Additionally, the
Excel spreadsheet must be saved as a TEXT file for import.
Figure 88 - UMTS Cell Site Data Spreadsheet
Guidelines for formatting tabular data
Although cell-site data fields do not need to be listed in a particular
order, following these guidelines will provide the best results:
1 The Site ID field must contain a unique value for each site location.
Beware of non-unique Site IDs - that is, entries that have multiple
sets of latitudes and longitudes for the same Site ID. Non-unique
Site IDs will result in site markers appearing on the map without
sector wedges. Site Names need not be unique - they are used for
labeling purposes only.

UMTS Foundation Training
151
2 Position information must be accurate to display sites in the correct
location on the map. Longitudes that have a 'West' notation should
be represented as a negative decimal, as should latitudes with a
'South' notation. Sites will appear skewed on the map if the latitude
and longitude fields are transposed.
Obtaining the file to be populated with formatted data
Before importing new cells, ensure that your Actix Software is pointing
to a valid cell site database.
A valid cell site database is a text file in which the first line
contains the text below:
; #NetworkData datafile
Every installation comes with a clean file called cellrefs.txt
located in the folder:
C:\Documents and Settings\All Users\Application
Data\Actix\Analyzer\Bin\Cellrefs
The file to be populated need not be named cellrefs.txt . We
recommend renaming this file with a meaningful name in order
to prevent the file from being overwritten during reinstallation.
To point your Actix Software to the file that you wish to populate with
the new cell site data, use the File Location line in the Tools
Preferences dialog. See the section on Loading Cell Site Data for
more details.
Importing the data
Once you have obtained your cell site database in delimited format
and have referenced a valid cellrefs file, you are ready to open the
Network Explorer and import the site information.
UMTS Foundation Training
152
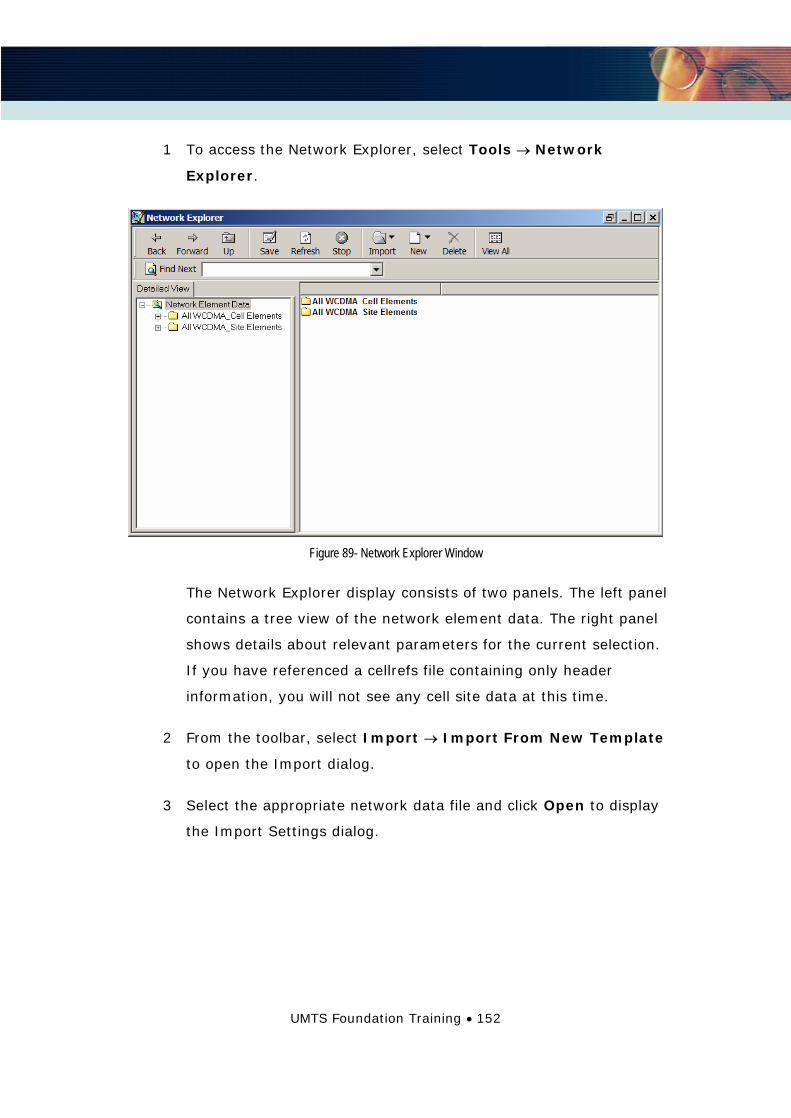
1 To access the Network Explorer, select Tools
Network
Explorer.
Figure 89- Network Explorer Window
The Network Explorer display consists of two panels. The left panel
contains a tree view of the network element data. The right panel
shows details about relevant parameters for the current selection.
If you have referenced a cellrefs file containing only header
information, you will not see any cell site data at this time.
2 From the toolbar, select Import
Import From New Template
to open the Import dialog.
3 Select the appropriate network data file and click Open to display
the Import Settings dialog.
UMTS Foundation Training
153
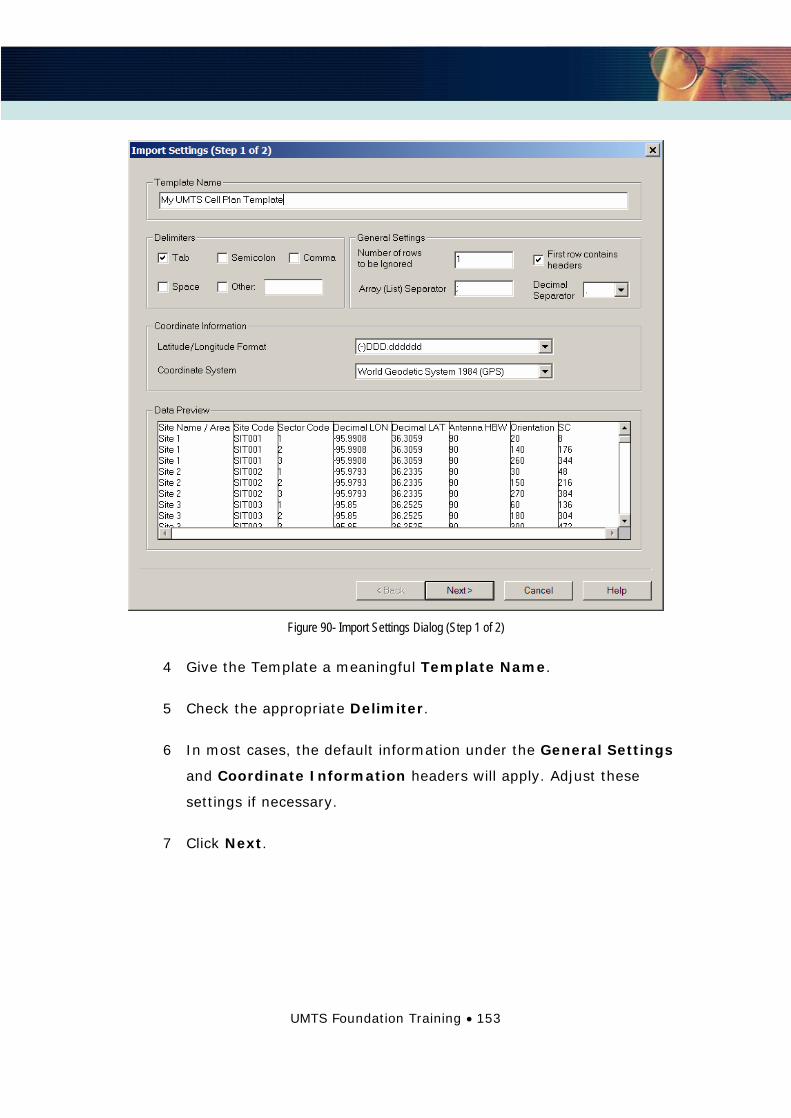
Figure 90- Import Settings Dialog (Step 1 of 2)
4 Give the Template a meaningful Template Name.
5 Check the appropriate Delimiter.
6 In most cases, the default information under the General Settings
and Coordinate Information headers will apply. Adjust these
settings if necessary.
7 Click Next.

UMTS Foundation Training
154
Figure 91 - Settings (Step 2 of 2) Assign WCDMA_Site Data
8 Expand the WCDMA_Site data node. Click in the Column field
next to the Site_Name parameter. Select the parameter name
from your site database that corresponds to the Site_Name
parameter. Repeat for each of the required fields in the
WCDMA_Site data node, based on the table below:
Field Mapping required for proper operation?
Site_Name Optional, but this field is frequently used for the site label.
SiteID Required, and this field must be unique for each site in the database.
Latitude Required
Longitude Required
UMTS Foundation Training
155
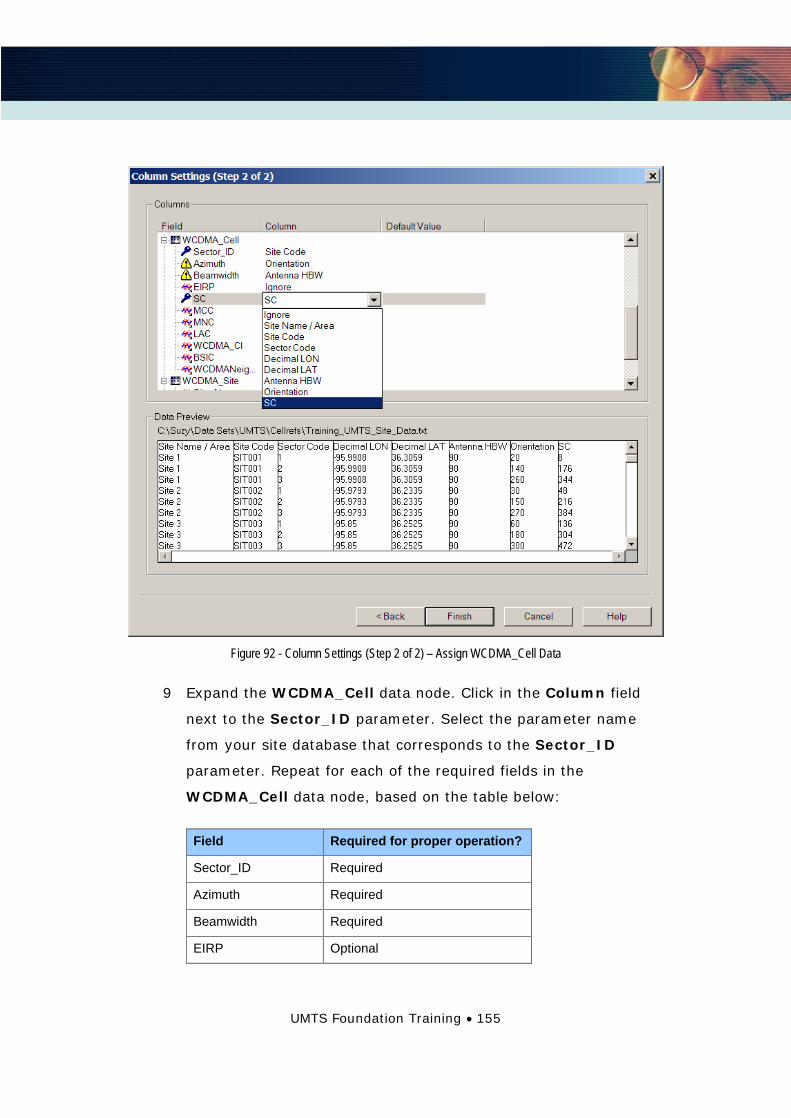
Figure 92 - Column Settings (Step 2 of 2) Assign WCDMA_Cell Data
9 Expand the WCDMA_Cell data node. Click in the Column field
next to the Sector_ID parameter. Select the parameter name
from your site database that corresponds to the Sector_ID
parameter. Repeat for each of the required fields in the
WCDMA_Cell data node, based on the table below:
Field Required for proper operation?
Sector_ID Required
Azimuth Required
Beamwidth Required
EIRP Optional

UMTS Foundation Training
156
Field Required for proper operation?
SC Required
MCC Optional
MNC Optional
LAC Optional
WCDMA_CI Optional
BSIC Unused
WCDMANeighborList
Optional
10 Click Finish when all the columns have been assigned. If the
current workspace contains existing site data, you will be asked
whether you want to remove existing data before importing new
data. Select Yes to overwrite existing data. Select No to append to
existing data.
11 If any errors occur during the import, a pop-up message will
indicate that an error log has been created. The error log specifies
the cause of each error encountered and can be found in:
C:\Documents and Settings\All Users\Application
Data\Actix\Analyzer\Bin\Cellrefs\ImportErrors.log
12 Inspect the cell data in the Network Explorer by expanding the
All_WCDMA_Site_Elements folder in the left-hand pane of the
Network Explorer.
13 Double-click on any site name in the right hand pane. The Name,
Location and ID of the site will appear, as well as a folder
containing WCDMA Cell Elements. Drill into the WCDMA Cell
Elements folder and examine the values corresponding to each
sector.
14 To save the formatted site information, select the Save button.
UMTS Foundation Training
157
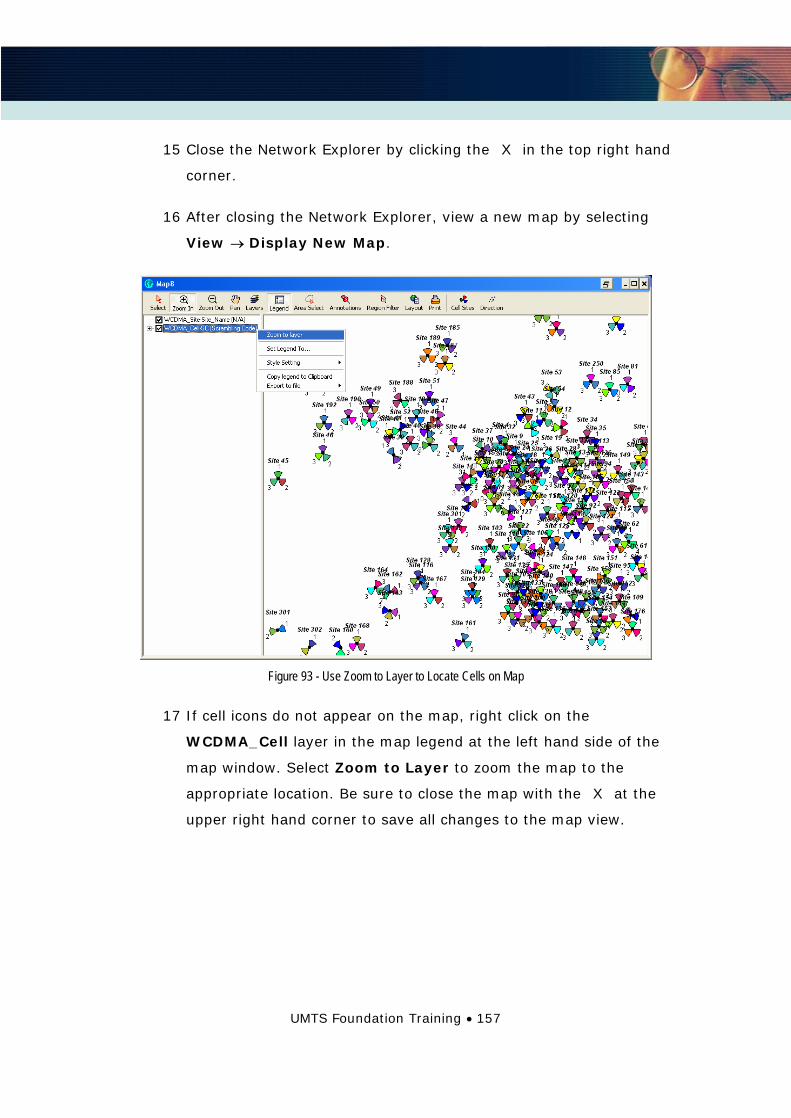
15 Close the Network Explorer by clicking the X in the top right hand
corner.
16 After closing the Network Explorer, view a new map by selecting
View
Display New Map.
Figure 93 - Use Zoom to Layer to Locate Cells on Map
17 If cell icons do not appear on the map, right click on the
WCDMA_Cell layer in the map legend at the left hand side of the
map window. Select Zoom to Layer to zoom the map to the
appropriate location. Be sure to close the map with the X at the
upper right hand corner to save all changes to the map view.

UMTS Foundation Training
158
Updating Cell Site Data
There are two convenient ways to update cell plan information:
Minor cell plan changes (a few azimuths, SCs, etc.) can be
modified directly from the Network Explorer. Simply browse to
find the site and sector of interest and double click on a single
parameter to activate the text. Be sure to save the
modifications before exiting the Network Explorer!
If the cellplan file is updated (multiple sites added, complete
frequency retune), use the Automatic Import feature to detect
changes to an existing cell plan and import the updated cell site
file. Instructions for using the Automatic Import feature follow.
Automatic import of Cell Site Data
The Automatic Import feature detects changes to cell plan data and
updates the configured site data every time you open your Actix
Software.
To use the Automatic Import feature
1 From the main menu, select Tools
Preferences.
2 Expand the Automatic Import option under Cellrefs and select
the Enable Automatic Import option.
3 Select the Automatic Import Input File. This text file contains
your delimited site data.
4 Select the Automatic Import Template. Once a template has
been created, a new workspace must be started in order for that
template to appear in this list. To use a template created on
another computer, copy the template of interest from this folder:

UMTS Foundation Training
159
C:\Documents and Settings\All Users\Application
Data\Actix\Analyzer\Bin\Cellrefs\Templates
to the same directory on your machine.
5 Click OK to exit the Change Preferences dialog. A message will
appear that Automatic Import has been enabled and that your
currently loaded cellrefs will be overwritten the next time you
restart your Actix Software.
Figure 94 - Automatic Import Setup
Once Automatic Import is configured, any changes to the Automatic
Import Input File will be detected, and will be changed accordingly in
your cell site file each time you start your Actix Software.