
z/OSMF Hands-on Labs: Choose Your Own z/OSMF · PDF filez/OSMF Incident Log – Hands On...
42
SHARE in Seattle – March 2-6, 2015 © Copyright IBM Corp.2015 Page 1 of 42 Materials may not be reproduced in whole or in part without the prior written permission of IBM. Insert Custom Session QR if Desired. z/OSMF Hands-on Labs: Choose Your Own z/OSMF Incident Log – Hands On Lab Estimated Lab Time: 15-20 minutes Greg Daynes [email protected] IBM z/OS Installation and Deployment Architect Session 16655 © Copyright IBM Corporation 2015 Lab Exercise: z/OSMF Incident Log Session ID: Part of 16655, 16940, and 16656 Estimated Lab Time: 15-20 minutes Abstract: The z/OS Management Facility (z/OSMF) provides a web-based graphical interface for system programmers on z/OS. This hand on lab will give an opportunity to learn about the functions and features in z/OSMF first hand. Attendees can navigate through the z/OSMF Incident Log task to see how it can help them manage incidents that occurred on their system, or assist in sending diagnostic data to a vendor (IBM or ISV). This session will be useful to systems programmers and their managers who will be using (or are considering using) the z/OS Management Facility.
Transcript of z/OSMF Hands-on Labs: Choose Your Own z/OSMF · PDF filez/OSMF Incident Log – Hands On...

SHARE in Seattle – March 2-6, 2015
© Copyright IBM Corp.2015 Page 1 of 42
Materials may not be reproduced in whole or in part without the prior written permission of IBM.
InsertCustomSessionQR ifDesired.
z/OSMF Hands-on Labs: Choose Your Ownz/OSMF Incident Log – Hands On LabEstimated Lab Time: 15-20 minutes
Greg Daynes
IBM z/OS Installation and Deployment Architect
Session 16655
© Copyright IBM Corporation 2015
Lab Exercise: z/OSMF Incident Log
Session ID: Part of 16655, 16940, and 16656
Estimated Lab Time: 15-20 minutes
Abstract:
The z/OS Management Facility (z/OSMF) provides a web-based graphical interface forsystem programmers on z/OS. This hand on lab will give an opportunity to learn about thefunctions and features in z/OSMF first hand. Attendees can navigate through thez/OSMF Incident Log task to see how it can help them manage incidents that occurred ontheir system, or assist in sending diagnostic data to a vendor (IBM or ISV).
This session will be useful to systems programmers and their managers who will be using(or are considering using) the z/OS Management Facility.

Incident Log Hands-On Lab Exercises Guide
Page 2 of 42 © Copyright IBM Corp. 2015
Course materials may not be reproduced in whole or in part without the prior written permission of IBM.
Introduction to z/OSMF Incident Log:
When a problem occurs on a z/OS system, you might need to determine what happenedand why, and then find the fix or report the problem to IBM or an independent softwarevendor (ISV). Typically, you need to get to the root of the problem quickly, but the task ofgathering diagnostic data and sending it to a support team can be very time-consuming.To assist you with diagnosing and reporting the problem, z/OSMF offers a problem datamanagement solution, the Incident Log task.
The Incident Log task streamlines and automates time-consuming and manual parts of theproblem data management process. Specifically, the Incident Log task gathers anddisplays system-detected and user-initiated incidents, collects associated logs and dumpsat the time of the problem, and facilitates sending that data to IBM or another vendor forfurther diagnostics. Using the Incident Log task reduces the possibility of errors whileobtaining, aggregating and sending the collection of diagnostic data to IBM or an ISV.
Key features of the z/OSMF Incident Log Task
With the Incident Log task, you can:
Manage the incidents that occurred on a system or in a sysplex. The IncidentLog task provides a consolidated view of all incidents occurring on all participatingsystems in the sysplex (those that communicate through the same sysplex dumpdirectory).
Browse the logs collected for an incident. When an incident occurs, the IncidentLog task collects and saves the associated SVC dumps and diagnostic logsnapshots. You can browse the error log, error log summary, and operations log.
Allow the next dump of an incident with the same MVS symptom string. TheIncident Log task provides the ability to update the DAE data set, so that you cancapture the next instance of an SVC dump being suppressed by DAE.
Send diagnostic data and attachments to IBM or another vendor for furtherdiagnostics. The Incident Log task provides a wizard that you can use to senddiagnostic data and additional attachments to IBM or another vendor. You can sendfiles using standard FTP or using the z/OS Problem Documentation Upload Utility(PDUU), which supports parallel FTP and encryption. For more information aboutPDUU, see z/OS MVS Diagnosis: Tools and Service Aids.
Associate the incident with problems recorded in other problem managementsystems. The Incident Log task allows you to correlate an incident with an IBMproblem number, an ISV problem number, or with a problem record in yourinstallation's problem management system.
Track additional information with an incident. The Incident Log task allows youto specify additional information that you want to track about an incident, such aswho is assigned to resolve the issue, which business applications are impacted,which component is the source of the issue, and which solution has beenimplemented.

SHARE in Seattle – March 2-6, 2015
© Copyright IBM Corp.2015 Page 3 of 42
Materials may not be reproduced in whole or in part without the prior written permission of IBM.
Monitor the status of an FTP job. An FTP job is created when you senddiagnostic data to IBM or another vendor. The Incident Log task allows you tobrowse or cancel FTP jobs and view or delete the status of FTP jobs.

Incident Log Hands-On Lab Exercises Guide
Page 4 of 42 © Copyright IBM Corp. 2015
Course materials may not be reproduced in whole or in part without the prior written permission of IBM.
Incident log LabThis lab consists of 6 tasks, plus 2 additional optional tasks.
1. Log on to z/OSMF2. View all the incidents across all the systems in your sysplex3. Customize your view of these incidents4. View the details of an user incident5. FTP the diagnostic data captured for an incident to your service provider6. View the status of the FTP for that incident
Optional tasks if you have time and interest
7. View FTP destinations8. View firewall proxy
It is recommended that you execute these tasks in the order listed above. As you getfamiliar with the Incident Log, you will be able to work directly with the task you need toaccomplish.
As with all the labs in this session, all the teams will be working with the same z/OSMFinstance. Each team will be given a unique id to work with. However, you must rememberthat as you work with a given incident, that incident is also available to the other teams towork with. When you are working with updating an incident please make sure you workwith the user defined incident assigned to your team to avoid confusing the other teams.
© Copyright IBM Corporation 2015 3
Lab Hints and Tips
• At any time you can use the Help facilities by clicking on thelink in the upper right hand corner of the screen
• You are encouraged to follow the instructions provided, butyou can use the new views and reports on any definedsoftware instance– Please note that the closer you follow the instructions, the easier it
will be to assist you if you go astray
– The handout contains screen captures and guidance to lead youthrough the lab
• Do NOT use the Browser BACK button to go to the priorscreen!!!– Use z/OSMF “breadcrumbs” instead
• Also note that if you change the browser display size (Ctrl/+,or Ctrl/-) then what you see may not exactly match thehandout.

SHARE in Seattle – March 2-6, 2015
© Copyright IBM Corp.2015 Page 5 of 42
Materials may not be reproduced in whole or in part without the prior written permission of IBM.
Exercise instructions
Here are the steps you will perform in this lab:
__ 1. Logon to z/OSMF
__ a. Launch the Mozilla Firefox browser
__ b. Point Browser to z/OSMF – enter the following URLhttps://mvs1.centers.ihost.com/zosmf/
__ c. Enter the User ID (SHARAnn) and password assigned to your workstation.
__ 2. View all the incidents across all the systems in your sysplex
__ a. Expand the Problem Determination Category in the Left Navigation Tree
__ b. Click on Incident Log
__ 3. Customize your view of these incidents
__ a. Filter columns
__ b. Sort columns
__ c. Configure the columns
__ d. Rearrange the order of the columns as you would like to see them
__ 4. View the details of an user initiated incident
__ a. Select a user initiated incident with the same suffix as your User ID.
__ b. View Diagnostic Details of the incident
__ c. Update the incident with tracking information and notes
__ d. Browse diagnostic data
__ 5. FTP the diagnostic data captured for an incident to your service provider
__ a. Select a user initiated incident with the same suffix as your User ID.
__ b. Send Diagnostic Data for the incident
__ c. Select the FTP Server (destination)
__ d. Specify Security Settings
__ e. Select FTP Profile
__ f. Define Job Settings
__ g. Review FTP Information
__ h. Submit FTP Jobs
__ 6. View the status of the FTP for that incident
__ a. Select FTP Job Status for the incident that you just sent

Incident Log Hands-On Lab Exercises Guide
Page 6 of 42 © Copyright IBM Corp. 2015
Course materials may not be reproduced in whole or in part without the prior written permission of IBM.
1. Logon to zOSMF
© Copyright IBM Corporation 2015 4
• Launch the Mozilla Firefox browser
– Note: If browser asks to add exception for certificate, do so
• Point Browser to z/OSMF – enter the following url
– https://mvs1.centers.ihost.com/zosmf/
– Note: Ignore and close the warning message
• IZUG809W Unsupported Web browser version or level found:"3.6.13 (.NET CLR 3.5.30729)" . Some z/OSMF functionsmight not be available if you continue.
• Login with SHARE userid/pw as provided by the lab instructor
– Each workstation has been assigned a unique z/OS User ID
• SHARxnn (where x is either A, B, or C; and nn is 01 - 30)
• Password: to be provided
• Each User ID has been authorized to all the z/OSMF applications(Plug-ins)
Step 1: Log in to z/OSMF
Note: All screen captures in the handout show the ID SHARA20, your browser will beslightly different to reflect the User ID that you were given.
© Copyright IBM Corporation 2015 5
Step1c: Log in to z/OSMF …
To log in you will need a z/OS user ID that has been defined and enabled for z/OSMF
Secure connection to z/OS hosthttps://mvs1.centers.ihost.com/zosmf/
Secure authentication to z/OS host usingregular z/OS User ID and password. Enter the
user ID and password that you were given

SHARE in Seattle – March 2-6, 2015
© Copyright IBM Corp.2015 Page 7 of 42
Materials may not be reproduced in whole or in part without the prior written permission of IBM.
2. View all incidents across the systems in your sysplex
Step 2a: Expand the Problem Determination Category in the Left Navigation Tree
© Copyright IBM Corporation 2015 6
Expand Problem Determination
Step 2a: Invoke Incident Log
Step 2b: Click on Incident Log
© Copyright IBM Corporation 2015 7
Click on Incident Log
You can also click on About or a “Learn More” topic
Step 2b: Invoke Incident Log
Incident Log Hands-On Lab Exercises Guide
Page 8 of 42 © Copyright IBM Corp. 2015
Course materials may not be reproduced in whole or in part without the prior written permission of IBM.
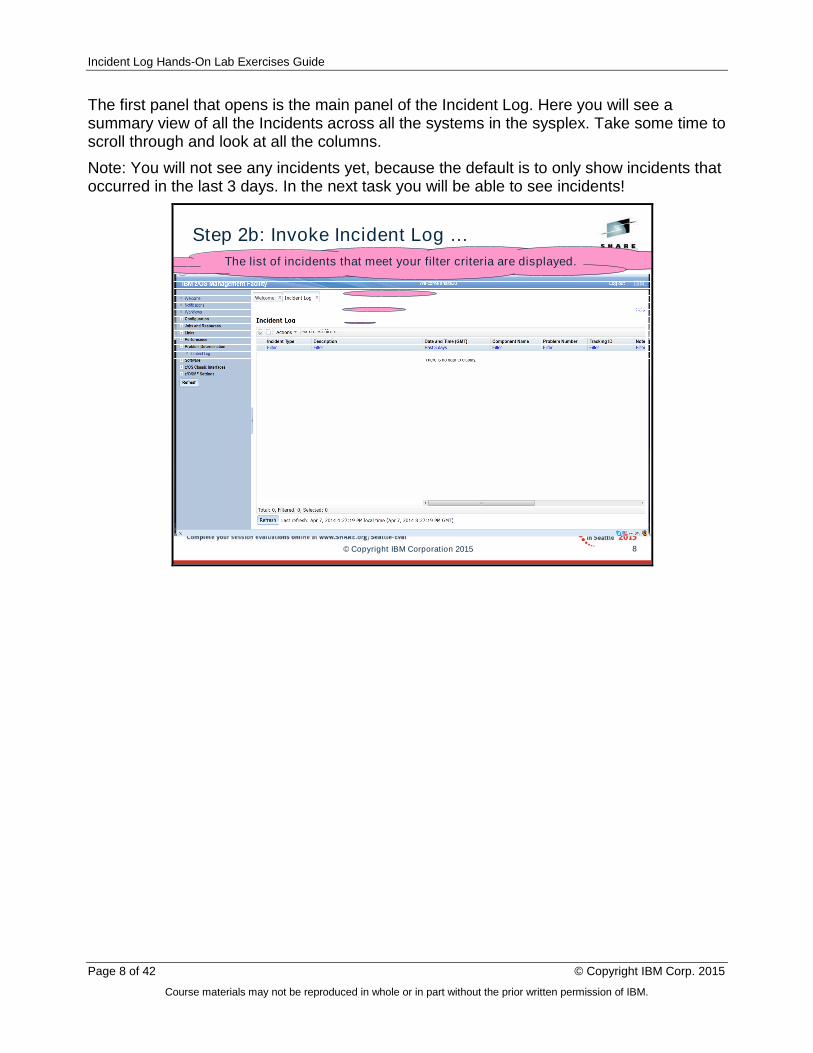
The first panel that opens is the main panel of the Incident Log. Here you will see asummary view of all the Incidents across all the systems in the sysplex. Take some time toscroll through and look at all the columns.
Note: You will not see any incidents yet, because the default is to only show incidents thatoccurred in the last 3 days. In the next task you will be able to see incidents!
© Copyright IBM Corporation 2015 8
Step 2b: Invoke Incident Log …
The list of incidents that meet your filter criteria are displayed.

SHARE in Seattle – March 2-6, 2015
© Copyright IBM Corp.2015 Page 9 of 42
Materials may not be reproduced in whole or in part without the prior written permission of IBM.
3. Customize Your View of These Incidents
You have the ability to control what data you see in terms of configuring what columns aredisplayed and the order of those columns. You can also control the data you see, which isyou can filter on different columns. You can also sort the columns to view the data indifferent sort orders. You can sort on up to 3 columns at a time!
Remember that all customizations are saved on a per user basis.
Step 3a: Change the Date Filter
By default you will get all the incidents that have occurred in the last 3 days. You canchange this. Click on the filter displayed under a column header to change the filter. Forthis example, let us say we want to look at incidents from the last 1000 days.
© Copyright IBM Corporation 2015 9
Step 3a: Change the Date Filter
Click on Filter under Dateand Time (GMT)

Incident Log Hands-On Lab Exercises Guide
Page 10 of 42 © Copyright IBM Corp. 2015
Course materials may not be reproduced in whole or in part without the prior written permission of IBM.
© Copyright IBM Corporation 2015 10
Step 3a: Change the Date Filter …
Change Amount to 1000
Then click OK
© Copyright IBM Corporation 2015 11
Now the list of 42 incidents are displayed on a table
Step 3a: Change the Date Filter …

SHARE in Seattle – March 2-6, 2015
© Copyright IBM Corp.2015 Page 11 of 42
Materials may not be reproduced in whole or in part without the prior written permission of IBM.
Step 3b: Sort the Columns
You can sort the columns in the table display by clicking on the column header of thecolumn you want to sort on. The first time you click on it, it will sort it in ascending order,the second time in descending order and the third time it will clear the sort. In this exerciseyou will create an ascending sort based on Description and a descending sort based onthe Date and Time column. Notice the arrows that show up for ascending and down fordescending. Also, notice that the sort order numbers that show up on the column headers.
© Copyright IBM Corporation 2015 12
Step 3b: Sort the ColumnsNow you will sort the columns in the table
Click once on the Description column toput the incidents in ascending order

Incident Log Hands-On Lab Exercises Guide
Page 12 of 42 © Copyright IBM Corp. 2015
Course materials may not be reproduced in whole or in part without the prior written permission of IBM.
© Copyright IBM Corporation 2015 13
Step 3b: Sort the Columns …
Click twice on the Date and Time (GMT) column toarrange that column in descending order
© Copyright IBM Corporation 2015 14
Step 3b: Sort the Columns …Now the columns have a primary based on Description (ascending) and asecondary sort on Date and Time (descending). Note: If you click Date and
Time a third time that column’s sort will be removed.

SHARE in Seattle – March 2-6, 2015
© Copyright IBM Corp.2015 Page 13 of 42
Materials may not be reproduced in whole or in part without the prior written permission of IBM.
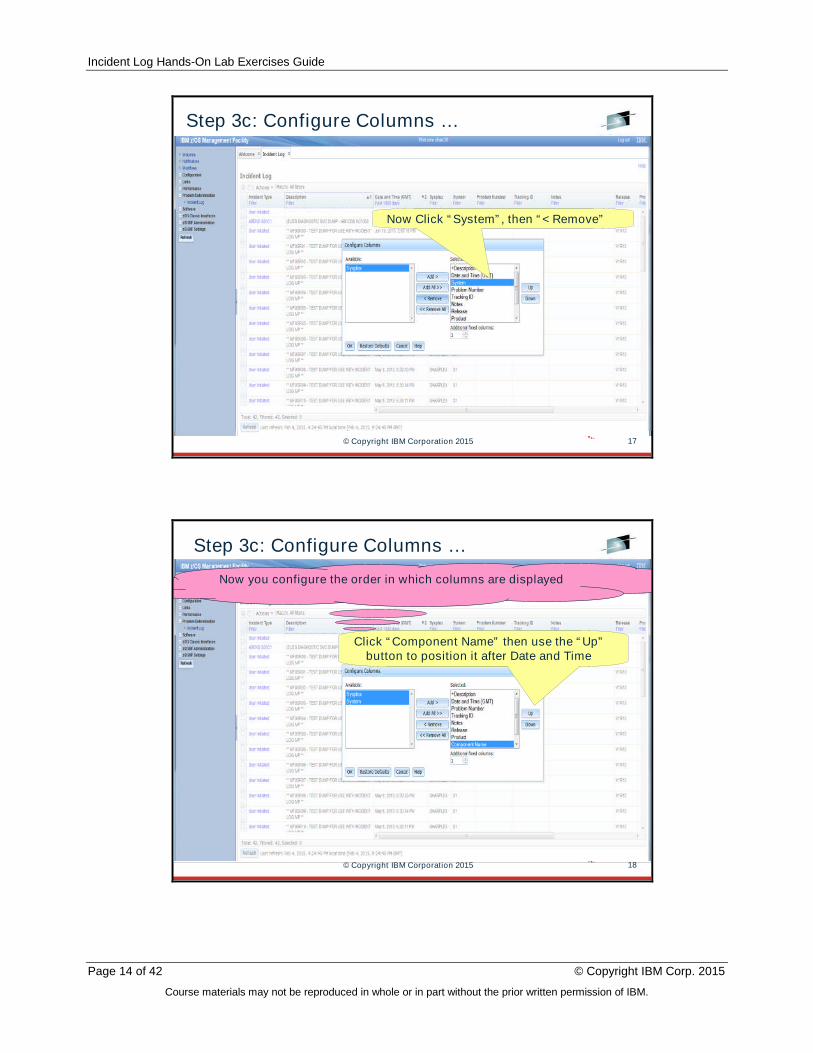
Step 3c: Configure the columns as you would like to see them
You can configure which columns are displayed and the order in which they are presented.In this exercise, you will remove the Sysplex and System columns. The lab environment isa monoplex, so all incidents were taken on the same system in the same sysplex (not veryinteresting and therefore for this lab you can remove them). You will also rearrange thecolumns to move the ‘Component Name’ column next to the Date and Time column.
© Copyright IBM Corporation 2015 15
Step 3c: Configure Columns …Now you will see how z/OSMF lets you reconfigure the columns that
are displayed. First we will configure which columns are displayed.
Click Actions, then Configure Columns
© Copyright IBM Corporation 2015 16
Step 3c: Configure Columns …
Click “Sysplex”, then “< Remove”
Incident Log Hands-On Lab Exercises Guide
Page 14 of 42 © Copyright IBM Corp. 2015
Course materials may not be reproduced in whole or in part without the prior written permission of IBM.
© Copyright IBM Corporation 2015 17
Step 3c: Configure Columns …
Now Click “System”, then “< Remove”
© Copyright IBM Corporation 2015 18
Step 3c: Configure Columns …
Click “Component Name” then use the “Up”button to position it after Date and Time
Now you configure the order in which columns are displayed

SHARE in Seattle – March 2-6, 2015
© Copyright IBM Corp.2015 Page 15 of 42
Materials may not be reproduced in whole or in part without the prior written permission of IBM.
© Copyright IBM Corporation 2015 19
Step 3c: Configure Columns …
Then click OK
© Copyright IBM Corporation 2015 20
Step 3c: Configure Columns …Now you can see that the Sysplex and System columns are no
longer displayed and the component name column appearsafter Incident Type, Description, and Date and Time
You have successfully customized your workspace! You are only viewing the columns youwant, in the order you want, for a range of data that you filtered, in the sort order that youwant.

Incident Log Hands-On Lab Exercises Guide
Page 16 of 42 © Copyright IBM Corp. 2015
Course materials may not be reproduced in whole or in part without the prior written permission of IBM.
4. View the details of an user initiated incident
Now that you’ve customized your workspace, let us dive deeper into an individual Incident.
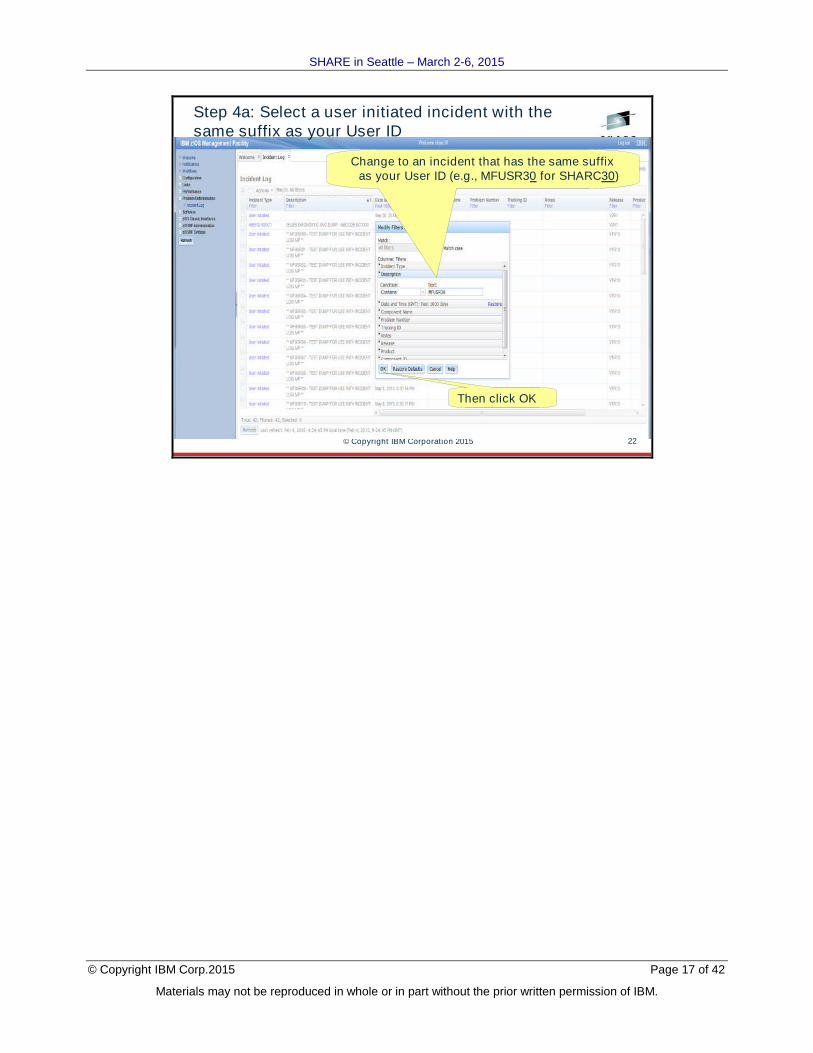
Step 4a: Select a User Initiated Incident with the Same Suffix as Your User ID
You will need to filter the Description column to display only incidents that have the samesuffix as your User ID (for example, “** MFUSR30 – TEST DUMP FOR USE WITHINCIDENT LOG IVP” if your User ID is SHARC30).
© Copyright IBM Corporation 2015 21
Step 4a: Select a user initiated incident with thesame suffix as your User ID
Now you will view details of a user initiated incident. Unique incidentshave been created for each user ID. You will use the filter to view
incidents with the same suffix as your user ID
Click on Filter underDescription
SHARE in Seattle – March 2-6, 2015
© Copyright IBM Corp.2015 Page 17 of 42
Materials may not be reproduced in whole or in part without the prior written permission of IBM.
© Copyright IBM Corporation 2015 22
Step 4a: Select a user initiated incident with thesame suffix as your User ID
Change to an incident that has the same suffixas your User ID (e.g., MFUSR30 for SHARC30)
Then click OK

Incident Log Hands-On Lab Exercises Guide
Page 18 of 42 © Copyright IBM Corp. 2015
Course materials may not be reproduced in whole or in part without the prior written permission of IBM.
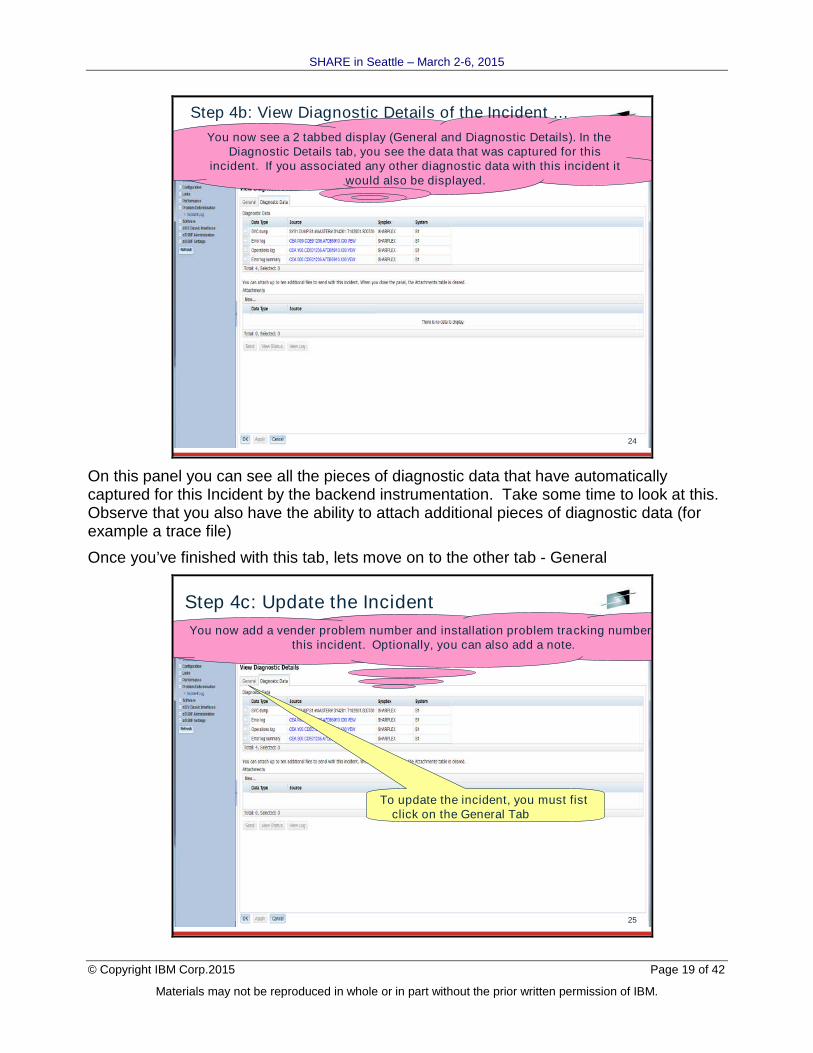
Step 4b: View Diagnostic Details of a User Initiated Incident
The incident with the same suffix as your user ID is now displayed. To view the details youcan either:
Click on “User Initiated” in the Incident Type column; Click on the selection box, then select Actions, followed by View Diagnostic Data;
or Right click on “User Initiated” in the Incident Type column to view a context
sensitive list of Actions, then select View Diagnostic Data.
For this exercise, it is recommended that you use the first option.
© Copyright IBM Corporation 2015 23
Step 4b: View Diagnostic Details of the Incident
The incident(s) with the same suffix as your user ID is now displayed. Toview the details you can either click on User Initiated; or click on the
selection box and then select Actions, View Diagnostic Details; orright click on User Initiated and select View Diagnostic Details
We’ll start with the easiest option, soclick on “User Initiated”
SHARE in Seattle – March 2-6, 2015
© Copyright IBM Corp.2015 Page 19 of 42
Materials may not be reproduced in whole or in part without the prior written permission of IBM.
© Copyright IBM Corporation 2015 24
You now see a 2 tabbed display (General and Diagnostic Details). In theDiagnostic Details tab, you see the data that was captured for this
incident. If you associated any other diagnostic data with this incident itwould also be displayed.
Step 4b: View Diagnostic Details of the Incident …
On this panel you can see all the pieces of diagnostic data that have automaticallycaptured for this Incident by the backend instrumentation. Take some time to look at this.Observe that you also have the ability to attach additional pieces of diagnostic data (forexample a trace file)
Once you’ve finished with this tab, lets move on to the other tab - General
© Copyright IBM Corporation 2015 25
You now add a vender problem number and installation problem tracking number tothis incident. Optionally, you can also add a note.
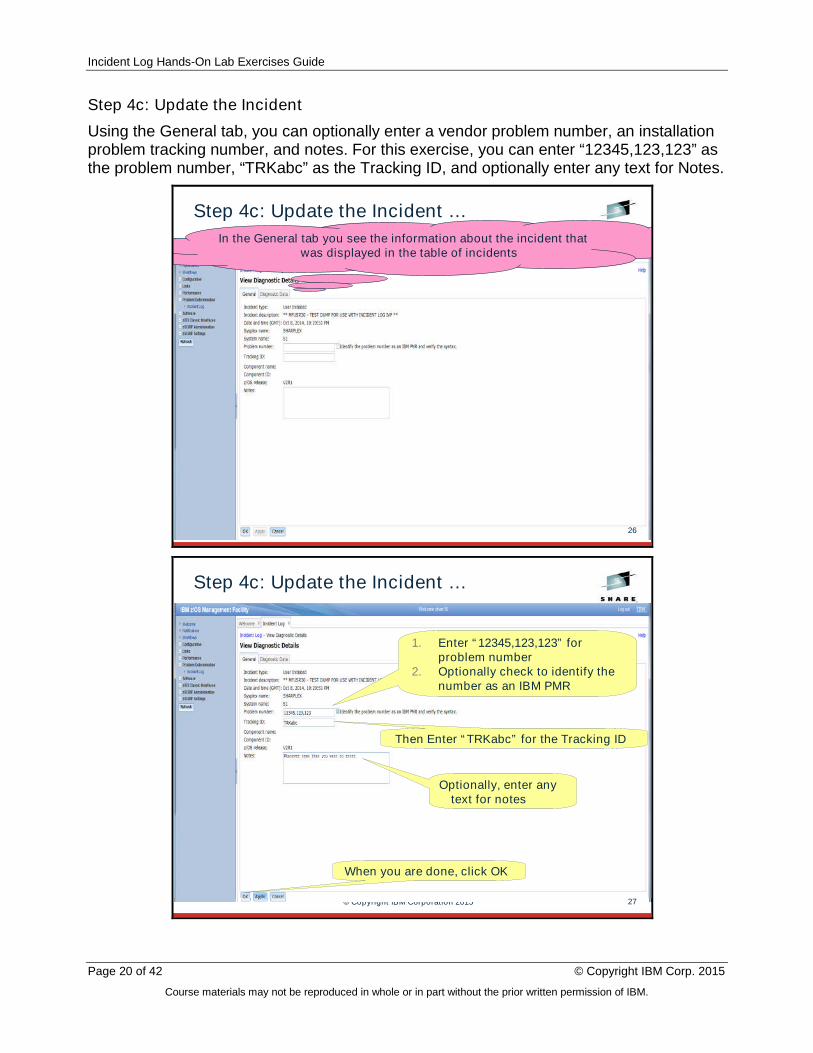
Step 4c: Update the Incident
To update the incident, you must fistclick on the General Tab
Incident Log Hands-On Lab Exercises Guide
Page 20 of 42 © Copyright IBM Corp. 2015
Course materials may not be reproduced in whole or in part without the prior written permission of IBM.
Step 4c: Update the Incident
Using the General tab, you can optionally enter a vendor problem number, an installationproblem tracking number, and notes. For this exercise, you can enter “12345,123,123” asthe problem number, “TRKabc” as the Tracking ID, and optionally enter any text for Notes.
© Copyright IBM Corporation 2015 26
Step 4c: Update the Incident …
In the General tab you see the information about the incident thatwas displayed in the table of incidents
© Copyright IBM Corporation 2015 27
Step 4c: Update the Incident …
When you are done, click OK
Optionally, enter anytext for notes
Then Enter “TRKabc” for the Tracking ID
1. Enter “12345,123,123” forproblem number
2. Optionally check to identify thenumber as an IBM PMR

SHARE in Seattle – March 2-6, 2015
© Copyright IBM Corp.2015 Page 21 of 42
Materials may not be reproduced in whole or in part without the prior written permission of IBM.
Once you have entered the problem number and tracking ID and clicked OK, you can nowsee those values in the table of incidents.
© Copyright IBM Corporation 2015 28
Step 4c: Update the Incident …
You now see the additional information in the table display

Incident Log Hands-On Lab Exercises Guide
Page 22 of 42 © Copyright IBM Corp. 2015
Course materials may not be reproduced in whole or in part without the prior written permission of IBM.
Step 4d: Browse Diagnostic Data
Since z/OSMF V1.13, you can browse the logs captured for an Incident. z/OSMF ISPFBrowse is used for this, so this feature only will work if your installation has setup andconfigured z/OSMF ISPF.
To select browse snapshots of diagnostic data, you must first view diagnostic detailsagain. This time, since the incident with your suffix is already selected, you should tryclicking Actions then View Diagnostic Data to bring up the diagnostic data.
You will see the diagnostic data elements captured for that Incident. Note the Sourcename of the data element. It is a hyperlink.
In this exercise, you will browse the Operation Log snapshot.
© Copyright IBM Corporation 2015 29
Step 4d: Browse Diagnostic Data
To browse diagnostic data, you must first view the details of yourincident again.
This time you will select Actions,then View Diagnostic Details

SHARE in Seattle – March 2-6, 2015
© Copyright IBM Corp.2015 Page 23 of 42
Materials may not be reproduced in whole or in part without the prior written permission of IBM.
Clicking on the Source name will enable you to browse that data element. For example,clicking on the Operations Log Source will cause z/OSMF to application link to ISPF insideof z/OSMF to enable you to browse the snapshot of SYSLOG data. You will see that itopens and ISPF tab if you didn’t already have one open, and invoke browse in context foryou.
© Copyright IBM Corporation 2015 30
Step 4d: Browse Diagnostic Data …
Click on the Operations log source
Note: If you do not already have a z/OSMF ISPF session running, you will get promptedfor the TSO Sign-on parameters.
© Copyright IBM Corporation 2015 31
Step 4d: Browse Diagnostic Data …
If you are the first user with this User ID to enter ISPF, then you will seethe following default z/OSMF ISPF User Settings.

Incident Log Hands-On Lab Exercises Guide
Page 24 of 42 © Copyright IBM Corp. 2015
Course materials may not be reproduced in whole or in part without the prior written permission of IBM.
If you are the first person to use this ID to enter ISPF, then you will see the z/OSMF ISPFUser Setup panel with default values. Please ensure that the logon procedure is set toSHARE and the Account number is set to SHR.
Optionally check box on top that will not open settings panel every time. If changes needto be made at a later time, you can click on 'Settings' on top right.
Click OK after entering the new values.
© Copyright IBM Corporation 2015 32
Step 4d: Browse Diagnostic Data …
When you are done, click OK
Then Enter “SHR” forAccount number
Enter “SHARE” for thelogon procedure

SHARE in Seattle – March 2-6, 2015
© Copyright IBM Corp.2015 Page 25 of 42
Materials may not be reproduced in whole or in part without the prior written permission of IBM.
You will ultimately find yourself using ISPF Browse on the diagnostic data element thatyou had clicked on from the Incident Log!!
© Copyright IBM Corporation 2015 33
Step 4d: Browse Diagnostic Data …You are then brought to an ISPF Browse tab for the snapshot of the
Operations Log. You can now perform normal ISPF commands tosearch the operations log.

Incident Log Hands-On Lab Exercises Guide
Page 26 of 42 © Copyright IBM Corp. 2015
Course materials may not be reproduced in whole or in part without the prior written permission of IBM.
5. FTP the diagnostic data captured for an incident to yourservice provider
© Copyright IBM Corporation 2015 34
Step 5: FTP the Diagnostic DataNow you will ftp the diagnostic data for the incident that you’ve been viewing.
First, click on the Incident Log tab
© Copyright IBM Corporation 2015 35
Step 5: FTP the Diagnostic Data
Now you will be brought back to the Incident Log task.
Then click OK

SHARE in Seattle – March 2-6, 2015
© Copyright IBM Corp.2015 Page 27 of 42
Materials may not be reproduced in whole or in part without the prior written permission of IBM.
© Copyright IBM Corporation 2015 36
Step 5a: Select an Incident
Now you will be brought back to the Incident Log task list of incidents. Ensurethat the user initiated incident that you’ve been viewing is selected in the table.
You will now be able to work with a wizard that will guide you through the steps to FTP thediagnostic data for that incident.
© Copyright IBM Corporation 2015 37
Step 5b: Send Diagnostic Data for theIncident
1. Right click on “User Initiated” inthe Incident Type column
2. Then click on Send DiagnosticData … in the context sensitivelist of actions

Incident Log Hands-On Lab Exercises Guide
Page 28 of 42 © Copyright IBM Corp. 2015
Course materials may not be reproduced in whole or in part without the prior written permission of IBM.
The first panel you see is the Welcome page. Notice that it has the steps you will beguided through on its left pane. It shows you what steps have been completed and whichone is your current one
The welcome page has the details about the Incident you are working with, plus it lists thepieces of diagnostic data that is going to be sent.
It also shows you the problem number associated with the Incident. If the incident doesnot have one already associated, it allows you to set one here. The problem number isrequired to help identify the FTP-ed files at the destination.
Click on Next once you are done.
© Copyright IBM Corporation 2015 38
Step 5b: Send Diagnostic Data for the Incident …Now you are presented a wizard to guide you through the process of sending
diagnostic data.
After reviewing, click Next

SHARE in Seattle – March 2-6, 2015
© Copyright IBM Corp.2015 Page 29 of 42
Materials may not be reproduced in whole or in part without the prior written permission of IBM.
The next page in the wizard allows you to select where you want to sendthese files/datasets. For this exercise, select the first one in the list and clickon Next.
© Copyright IBM Corporation 2015 39
Step 5c: Select the FTP Server
The first “real” step in the wizard is to select the FTP server. Notice that sftpservers are now included in the list.
Note: Next is not enabled until an FTP server is selected
© Copyright IBM Corporation 2015 40
Step 5c: Select the FTP Server …
Click on the IBM-ecurep-mvs entry
Then click Next
Note: Once an FTP server is selected, Next is enabled

Incident Log Hands-On Lab Exercises Guide
Page 30 of 42 © Copyright IBM Corp. 2015
Course materials may not be reproduced in whole or in part without the prior written permission of IBM.
This is where you can enter the userid/password needed to access the FTP Destinationserver you selected in the previous step. In this exercise, we will use the anonymous signon. Click on Next to move on.
© Copyright IBM Corporation 2015 41
Step 5d: Specify Security Settings
Just click Next
The next step is to specify the security settings. For this server you can use ananonymous user id, which is the default.
This is where you can specify your firewall or proxy information if needed. In this exercise,we do not have a firewall. Make sure that the No firewall or proxy option is selected in thedrop down, and then click on Next.
© Copyright IBM Corporation 2015 42
Step 5e: Select FTP ProfileThe next step is to select an FTP Profile. Here you could specify a Proxy. For
this server you can specify No Firewall or Proxy, which is the default.
Just click Next

SHARE in Seattle – March 2-6, 2015
© Copyright IBM Corp.2015 Page 31 of 42
Materials may not be reproduced in whole or in part without the prior written permission of IBM.
At this stage you have the ability to edit/specify the job card information for the FTP Jobthat is being built in the background.
You can make changes if you’d like. The default entries will work for our lab session, soyou can also just click on Next.
© Copyright IBM Corporation 2015 43
Step 5f: Define Job SettingThe next step is to specify a JCL Job card. For this lab, you can just use what
has been previously defined.
Just click Next

Incident Log Hands-On Lab Exercises Guide
Page 32 of 42 © Copyright IBM Corp. 2015
Course materials may not be reproduced in whole or in part without the prior written permission of IBM.
The wizard has walked you through collecting all the information needed to FTP thediagnostic data to your service provider. This page allows you to review all the data thatyou have provided.
© Copyright IBM Corporation 2015 44
Step 5g: Review the FTP Information
The next step is to review the information that was previously entered. If youwanted to change anything you would use the < Back button on the bottom of
the page
Optionally you can view the JCL
Optionally, you can view or edit the JCL. We do not recommend changing the JCL.
© Copyright IBM Corporation 2015 45
Step 5g: Review the FTP Information
After reviewing, click Close
If you chose to view the JCL you will now see a multi-tabbed display.

SHARE in Seattle – March 2-6, 2015
© Copyright IBM Corp.2015 Page 33 of 42
Materials may not be reproduced in whole or in part without the prior written permission of IBM.
When you are ready to submit the FTP jobs, click on Finish. This will submit jobs to ftp theselected pieces of diagnostic data over to the selected FTP Destination.
© Copyright IBM Corporation 2015 46
Step 5g: Review the FTP Information …
The last step is to click Finish which will submit the ftp jobs.
Click Finish
Once you click on the Finish button in the above step, z/OSMF will submit the jobs. Youwill get a confirmation window.
© Copyright IBM Corporation 2015 47
Step 5g: Review the FTP Information …
A pop-up window is displayed with messages identifying the jobs that weresubmitted. Optionally you can click on the message to see the message
description.
Click Close

Incident Log Hands-On Lab Exercises Guide
Page 34 of 42 © Copyright IBM Corp. 2015
Course materials may not be reproduced in whole or in part without the prior written permission of IBM.
This page shows you the job status for all the FTP jobs submitted for this incident. Youcan click on the Refresh button to update the status of the jobs.
Note: If a log snapshot does not have any entries, the job might fail
© Copyright IBM Corporation 2015 48
Step 6a: FTP Job Status
1. Right click on “User Initiated” in theIncident Type column
2. Then click on FTP Job Status in thecontext sensitive list of actions
© Copyright IBM Corporation 2015 49
Step 6a: FTP Job Status …
The job status is displayed.
Note: The jobs during the lab will fail, on your system they should complete successfully.
After reviewing, click Close

SHARE in Seattle – March 2-6, 2015
© Copyright IBM Corp.2015 Page 35 of 42
Materials may not be reproduced in whole or in part without the prior written permission of IBM.
Optional Exercises
__ 7. View FTP Destinations
__ 8. View FTP the diagnostic data captured for an incident to your service provider

Incident Log Hands-On Lab Exercises Guide
Page 36 of 42 © Copyright IBM Corp. 2015
Course materials may not be reproduced in whole or in part without the prior written permission of IBM.
Optional Exercise – View FTP Servers
© Copyright IBM Corporation 2015 50
Step 7: View FTP Servers
To get started, click on the Welcome tab
© Copyright IBM Corporation 2015 51
Step 7: View FTP Servers …
Expand z/OSMF Settings

SHARE in Seattle – March 2-6, 2015
© Copyright IBM Corp.2015 Page 37 of 42
Materials may not be reproduced in whole or in part without the prior written permission of IBM.
© Copyright IBM Corporation 2015 52
Step 7: View FTP Servers …
Select FTP Servers
© Copyright IBM Corporation 2015 53
Step 7: View FTP Servers …A list of defined FTP servers is displayed. The z/OSMF Administrator can add,
modify, or remove an FTP Server. Servers in this list are displayed whenselecting a FTP server during the Send Diagnostic Data wizard

Incident Log Hands-On Lab Exercises Guide
Page 38 of 42 © Copyright IBM Corp. 2015
Course materials may not be reproduced in whole or in part without the prior written permission of IBM.
© Copyright IBM Corporation 2015 54
Step 7: View FTP Servers …
Then, click Actions, followed by View
First select theIBM-ecurep-mvsFTP Server
© Copyright IBM Corporation 2015 55
Step 7: View FTP Servers …The properties of the FTP Server are displayed.
After reviewing, click Close

SHARE in Seattle – March 2-6, 2015
© Copyright IBM Corp.2015 Page 39 of 42
Materials may not be reproduced in whole or in part without the prior written permission of IBM.
© Copyright IBM Corporation 2015 56
Step 8: View FTP Profiles
Click Actions, then FTP Profiles
© Copyright IBM Corporation 2015 57
Step 8: View FTP Profiles …
Click on No Firewall or Proxy inthe Name column

Incident Log Hands-On Lab Exercises Guide
Page 40 of 42 © Copyright IBM Corp. 2015
Course materials may not be reproduced in whole or in part without the prior written permission of IBM.
© Copyright IBM Corporation 2015 58
Step 8: View FTP Profiles …The properties of the FTP Profile is displayed.
After reviewing, click Close
© Copyright IBM Corporation 2015 59
Finish the labThe Incident Log exercises are complete
To close the tabs, click the “X” in each tab for:• Incident Log• ISPF• FTP Servers
End of exercise

SHARE in Seattle – March 2-6, 2015
© Copyright IBM Corp.2015 Page 41 of 42
Materials may not be reproduced in whole or in part without the prior written permission of IBM.
Exercise Review and Wrap-Up
© Copyright IBM Corporation 2015 60
Exercise Review and Wrap-Up
You now know how to:
• Log on to z/OSMF
• Filter and configure tables within z/OSMF
• View incidents
– View details of incidents
• Send diagnostic data to a vendor
And possibly how to:
• View information on FTP Servers
• View information on FTP Profiles
© Copyright IBM Corporation 2015 616161
Thank You
Incident Log Hands-On Lab Exercises Guide
Page 42 of 42 © Copyright IBM Corp. 2015
Course materials may not be reproduced in whole or in part without the prior written permission of IBM.
Additional Information
© Copyright IBM Corporation 2015 636363
Additional information
• z/OS Management Facility website– http://www-03.ibm.com/systems/z/os/zos/features/zosmf/index.html
• IBM z/OS Management Facility Browser Compatibility– http://www-
03.ibm.com/systems/z/os/zos/features/zosmf/browser_notes.html
• z/OS Management Facility Publications
– http://www-03.ibm.com/systems/z/os/zos/features/zosmf/moreinfo/
• Program Directory for z/OS Management Facility (GI11-9847)
• IBM z/OS Management Facility Configuration Guide (SA38-0657)
• IBM z/OS Management Facility Programming (SA32-1066)
• z/OS Management Facility Resource Requirements
– http://www-03.ibm.com/support/techdocs/atsmastr.nsf/WebIndex/WP101779
• z/OS Management Facility Downloads– http://www-03.ibm.com/systems/z/os/zos/features/zosmf/downloads/
© Copyright IBM Corporation 2015 646464
Trademarks
Notes:
Performance is in Internal Throughput Rate (ITR) ratio based on measurements and projections using standard IBM benchmarks in a controlled environment. The actualthroughput that any user will experience will vary depending upon considerations such as the amount of multiprogramming in the user's job stream, the I/O configuration, thestorage configuration, and the workload processed. Therefore, no assurance can be given that an individual user will achieve throughput improvements equivalent to theperformance ratios stated here.
IBM hardware products are manufactured from new parts, or new and serviceable used parts. Regardless, our warranty terms apply.
All customer examples cited or described in this presentation are presented as illustrations of the manner in which some customers have used IBM products and the resultsthey may have achieved. Actual environmental costs and performance characteristics will vary depending on individual customer configurations and conditions.
This publication was produced in the United States. IBM may not offer the products, services or features discussed in this document in other countries, and the informationmay be subject to change without notice. Consult your local IBM business contact for information on the product or services available in your area.
All statements regarding IBM's future direction and intent are subject to change or withdrawal without notice, and represent goals and objectives only.
Information about non-IBM products is obtained from the manufacturers of those products or their published announcements. IBM has not tested those products and cannotconfirm the performance, compatibility, or any other claims related to non-IBM products. Questions on the capabilities of non-IBM products should be addressed to thesuppliers of those products.
Prices subject to change without notice. Contact your IBM representative or Business Partner for the most current pricing in your geography.
* Registered trademarks of IBM Corporation
The following are trademarks or registered trademarks of other companies.
* All other products may be trademarks or registered trademarks of their respective companies.
Adobe, the Adobe logo, PostScript, and the PostScript logo are either registered trademarks or trademarks of Adobe Systems Incorporated in the United States, and/orother countries.Firefox is a trademark of Mozilla FoundationCell Broadband Engine is a trademark of Sony Computer Entertainment, Inc. in the United States, other countries, or both and is used under license there from.Java and all Java-based trademarks are trademarks of Sun Microsystems, Inc. in the United States, other countries, or both.Microsoft, Windows, Windows NT, and the Windows logo are trademarks of Microsoft Corporation in the United States, other countries, or both.Internet Explorer is a trademark of Microsoft CorpInfiniBand is a trademark and service mark of the InfiniBand Trade Association.Intel, Intel logo, Intel Inside, Intel Inside logo, Intel Centrino, Intel Centrino logo, Celeron, Intel Xeon, Intel SpeedStep, Itanium, and Pentium are trademarks or registeredtrademarks of Intel Corporation or its subsidiaries in the United States and other countries.UNIX is a registered trademark of The Open Group in the United States and other countries.Linux is a registered trademark of Linus Torvalds in the United States, other countries, or both.ITIL is a registered trademark, and a registered community trademark of the Office of Government Commerce, and is registered in the U.S. Patent and Trademark Office.IT Infrastructure Library is a registered trademark of the Central Computer and Telecommunications Agency, which is now part of the Office of Government Commerce.
The following are trademarks of the International Business Machines Corporation in the United States and/or other countries.IBM*IBM (logo)RACF*
ServerPac*WebSphere*z/OS*
See url http://www.ibm.com/legal/copytrade.shtml for a list of IBM trademarks.