wa1921 Programming For Android Using Android Studio · Part 8 - Installing Android Studio ......
32
WA1921 Programming for Android Using Android Studio This setup and software is used on WA1921, WA1965 and WA1966 Classroom Setup Guide Web Age Solutions Inc. 1
-
Upload
trinhthien -
Category
Documents
-
view
260 -
download
2
Transcript of wa1921 Programming For Android Using Android Studio · Part 8 - Installing Android Studio ......

WA1921 Programming for AndroidUsing Android Studio
This setup and software is used on WA1921, WA1965 and WA1966
Classroom Setup Guide
Web Age Solutions Inc.
1

Table of ContentsPart 1 - Minimum Hardware Requirements ...................................................................3Part 2 - Minimum Software Requirements ....................................................................3Part 3 - Software Provided..............................................................................................4Part 4 - Instructions.........................................................................................................5Part 5 - Privileges to Users..............................................................................................5Part 6 - Installing Apache HTTP Server 2.2.14...............................................................9Part 7 - Modify File Permissions (Windows Vista, Windows 7, Windows Server 2008, or Windows 8)...............................................................................................................13Part 8 - Installing Android Studio 3.0.10......................................................................20Part 9 - Summary..........................................................................................................32
2

Part 1 - Minimum Hardware Requirements
NOTE: this software used in this course cannot be run in a virtual machine. It also requires a supported Intel CPU. AMD CPU's are not supported.
● CPU - an Intel® processor with support for Intel® VT-x, Intel® EM64T (Intel® 64) and Execute Disable (XD) Bit functionality.
● Hardware virtualization support enabled in the BIOS.
● 3GB RAM minimum, 4 GB recommended
● 10 GB in the hard disk
● Sound card
● Speakers (or earphones/headset)
● Connectivity to the Internet
○ If an HTTP Proxy is required, students must have details of how to configure this proxy
Part 2 - Minimum Software Requirements
● Windows 7 (Professional, Enterprise, or Ultimate)
● Apache Web Server 2.2.14 *
● Android Studio 3.0.10 and Android SDK (includes JDK 8)*
* - indicates software provided as part of the courseware.
3

Part 3 - Software Provided
List of ZIP files required for this course and used in next steps on this document:
WA1921_REL_6_0.ZIP
Note. This setup and software is used on WA1921, WA1965 and WA1966.
Send an email to [email protected] in order to obtain a copy of the software for this course if you haven't receive it yet.
All other software listed under Minimum Software Requirements is either commercially licensed software that you must provide or software that is freely available off the Internet.
4

Part 4 - Instructions
__1. Make sure the account that you are using to install the software has administrative privileges and if the students won't use the same account then add privileges in the Apache folder (you will install it later). During the class the student has to access to the Apache location and do changes there.
__2. Extract the ZIP file to C:\
__3. Review that the following folders were created:
• C:\LabFiles
• C:\Software\
• C:\Software\Android
• C:\Software\Apache
Part 5 - Privileges to Users
During the labs students will require privileges on several directories. They will need to be able to write, read, and modify files in these directories for the labs. Although the directions below are provided as an example, this may differ depending on Windows version. The important thing is to make sure students have full permissions on the folders below or they may not be able to accomplish some labs.
• C:\Software
• C:\LabFiles
• C:\Workspace
__1. Create the user that the students will use during the class.
__2. Give the student user account administrative rights. During the labs the student requires this to install software.
__3. Open Windows Explorer.
__4. Right click C:\Software and select Properties.
5

__5. Click the Security tab.
__6. Click Advanced.
__7. Click Change Permissions.
6

__8. Select the Authenticated Users entry and click Edit…
Note. If you don't have a domain in your environment the select Users instead Authenticated Users.
__9. Check the Allow checkbox to the right of Full Control and click OK.
__10. Select the checkbox for Replace all child permissions with inheritable permissions from this objects and then click OK.
7

__11. A Windows Security dialog will open. Click Yes.
__12. Wait until Windows finishes updating security.
__13. Back in the Advanced Security Settings dialog, click OK.
__14. Back in the Properties dialog, click OK.
__15. Do the same steps to the C:\LabFiles folder.
__16. Create a folder called C:\Workspace if its not already created.
__17. Do the same steps to the C:\Workspace folder.
8

Part 6 - Installing Apache HTTP Server 2.2.14
__1. Login as the administrative ID created for the class.
__2. Run apache_2.2.14-win32-x86-no_ssl.msi from the C:\Software\Apache folder.
__3. In the Welcome screen, click Next.
__4. Accept the License Agreement and click Next.
__5. In the Read This First page, click Next.
__6. Enter localhost for Network Domain and Server Name. Enter webmaster@localhost for Administrator’s E-mail Address as shown below.
9

__7. Click the Next button.
__8. Select Typical installation and click Next.
__9. Click the Change button to change the destination folder.
10
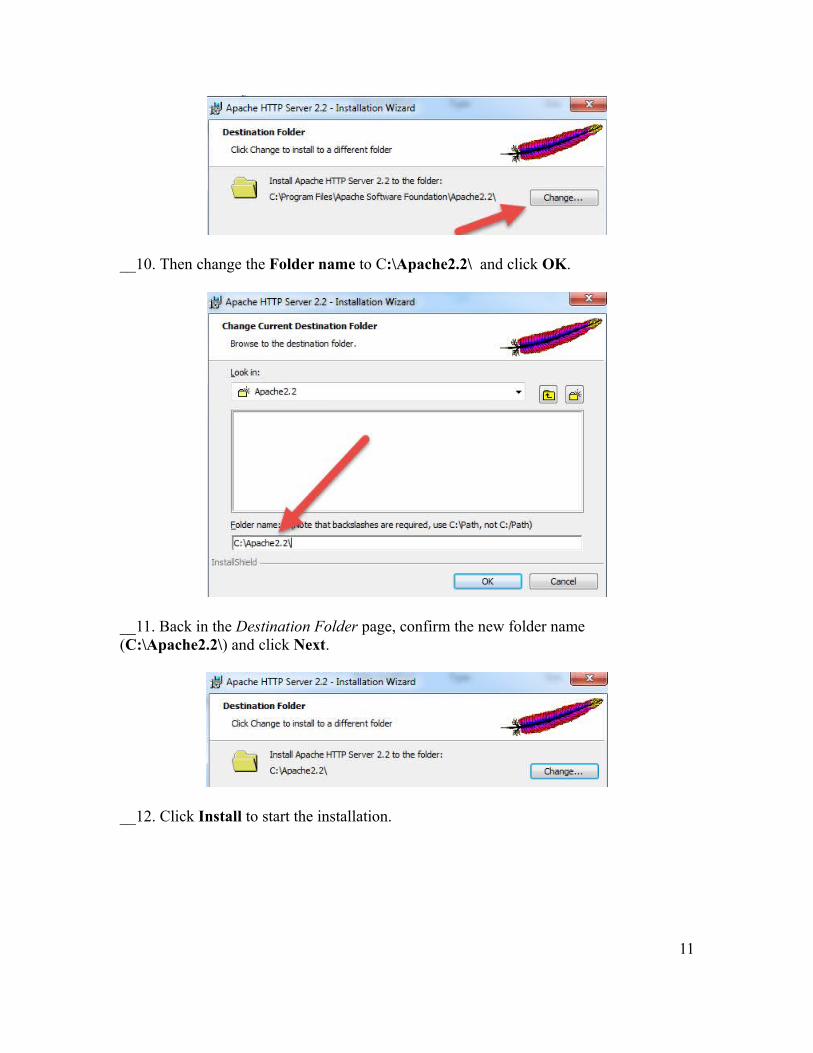
__10. Then change the Folder name to C:\Apache2.2\ and click OK.
__11. Back in the Destination Folder page, confirm the new folder name (C:\Apache2.2\) and click Next.
__12. Click Install to start the installation.
11
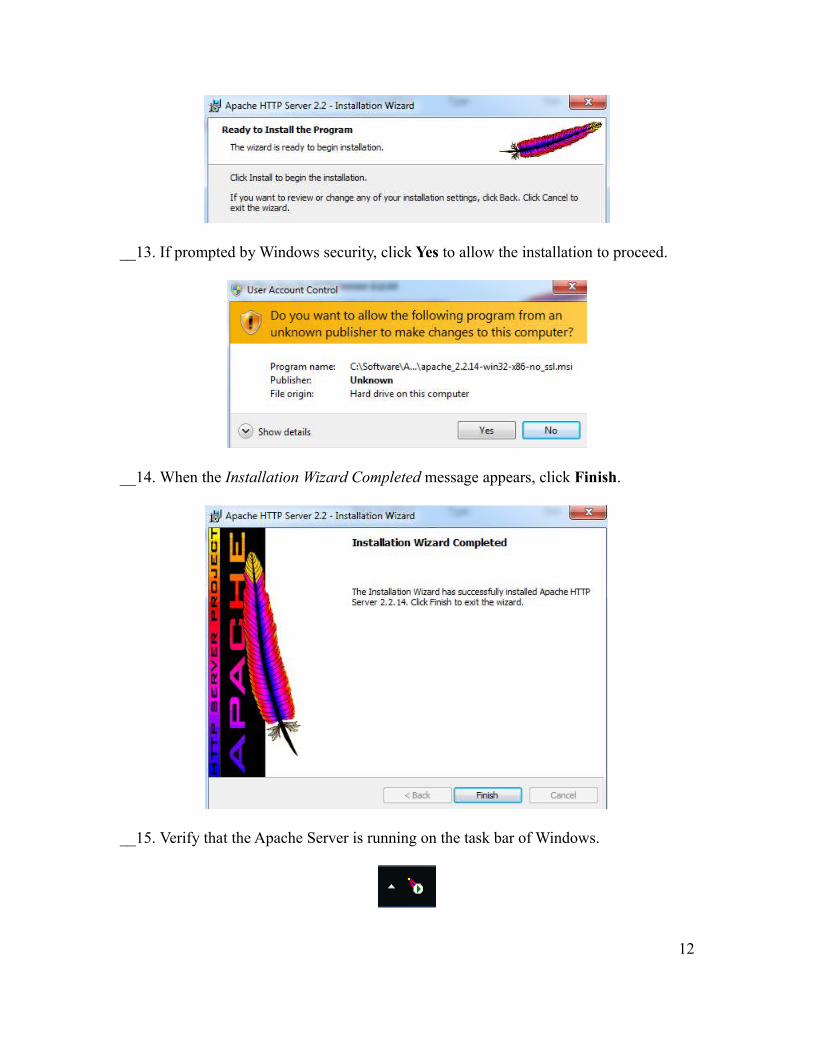
__13. If prompted by Windows security, click Yes to allow the installation to proceed.
__14. When the Installation Wizard Completed message appears, click Finish.
__15. Verify that the Apache Server is running on the task bar of Windows.
12

__16. Open a browser and type:
http://localhost
__17. Verify you see the message: It works!
Apache HTTP Server 2.2.14 is installed.
Part 7 - Modify File Permissions (Windows Vista, Windows 7, Windows Server 2008, or Windows 8)
Note: If installing on Windows Vista, Windows 7, Windows Server 2008, or Windows 8 perform this section. Failure to follow these additional steps will lead to an unusable installation. These steps allow full access to the directories used by the Apache Web Server install. This is required so that students can write to the document root.
__1. Open Windows Explorer.
__2. Right click C:\Apache2.2 and select Properties.
__3. Click the Security tab.
__4. Click Advanced.
13

__5. Click Change Permissions.
__6. Select the Users entry (add one if not present).
14
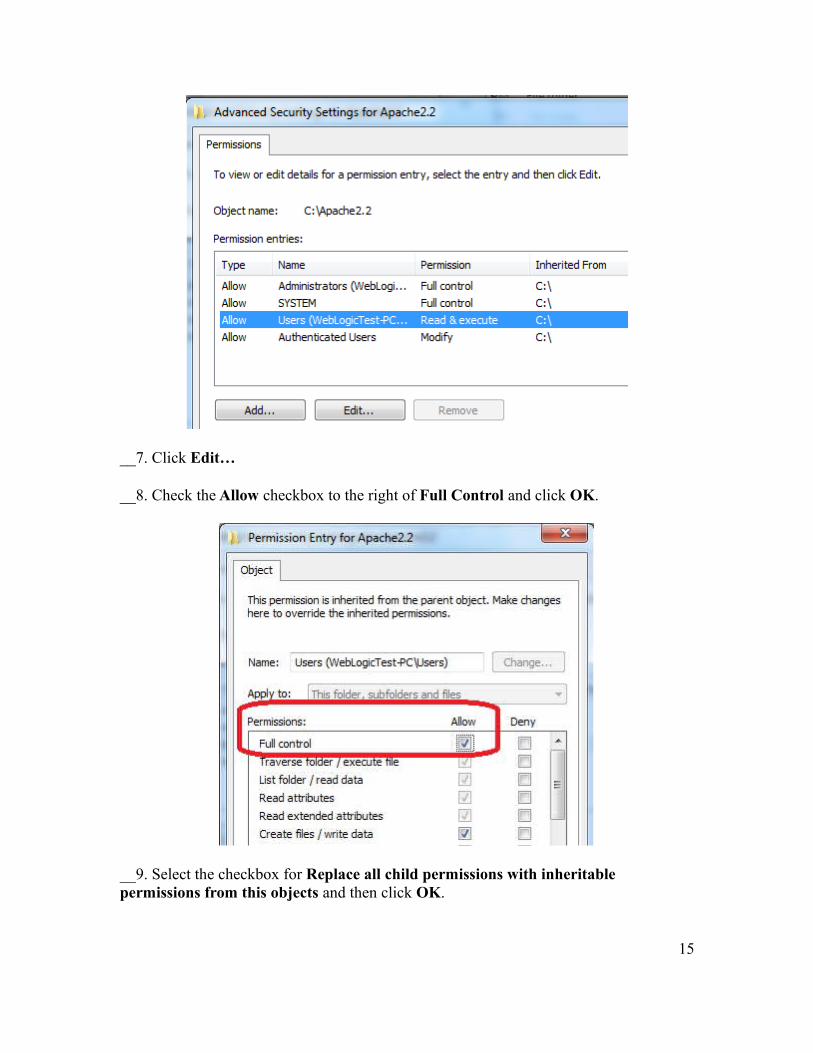
__7. Click Edit…
__8. Check the Allow checkbox to the right of Full Control and click OK.
__9. Select the checkbox for Replace all child permissions with inheritable permissions from this objects and then click OK.
15

__10. Click OK to continue.
__11. A Windows Security dialog will open. Click Yes.
__12. Wait until Windows finishes updating security.
__13. Back in the Advanced Security Settings dialog, click OK.
__14. Back in the Apache2.2 Properties dialog, click OK.
__15. Right click C:\Apache2.2 and select Properties.
__16. Uncheck the Read-only checkbox so files can be written to the directory.
16

__17. Click OK.
__18. In the Confirm Attribute Changes dialog, click OK, so the change will be applied to this folder, subfolder, and any files.
__19. Restart the computer and log in with the user that the student will use to do the labs.
17

__20. Make sure the user has full access to the C:\Apache2.2\conf and C:\Apache2.2\htdocs folders.
__21. Right click the task bar and select Open Apache Monitor.
__22. The Open Apache Monitor window will open then click Stop.
__23. Enter the admin password if it is required and click Yes.
18
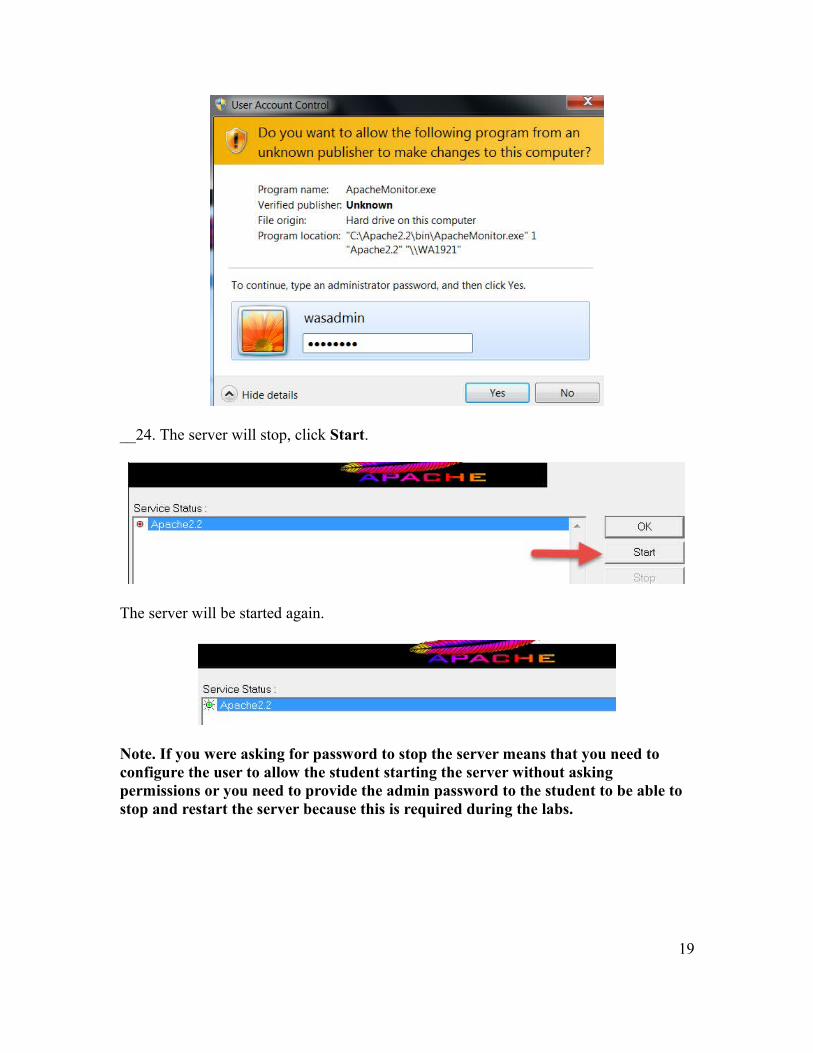
__24. The server will stop, click Start.
The server will be started again.
Note. If you were asking for password to stop the server means that you need to configure the user to allow the student starting the server without asking permissions or you need to provide the admin password to the student to be able to stop and restart the server because this is required during the labs.
19
Part 8 - Installing Android Studio 3.0.10
Android Studio also MUST be installed as the same user that will perform the labs. If required, create a local administrative account to perform installation and have the student login as that account to do the class labs.
__1. From the C:\Software\Android directory run the following file:
Android-studio-ide-171.4443003.windows.exe
Note: If prompted by a security prompt allow the installation to continue.
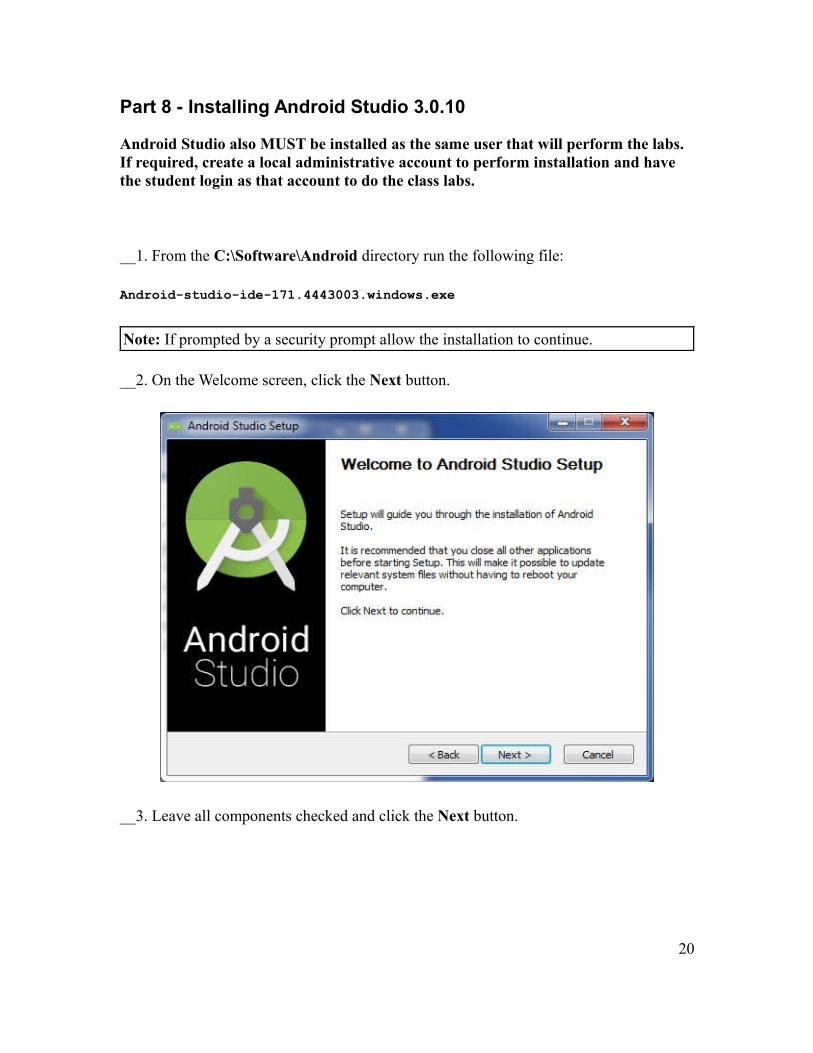
__2. On the Welcome screen, click the Next button.
__3. Leave all components checked and click the Next button.
20

Note: You may not see the same options.
__4. On the Install locations screen leave the location of Android Studio as the default and click the Next button.
__5. Click the Install button in the 'Choose Start Menu Folder' window.
21

__6. Click the Next button in the 'Installation Complete' window.
__7. Click Finish.
22
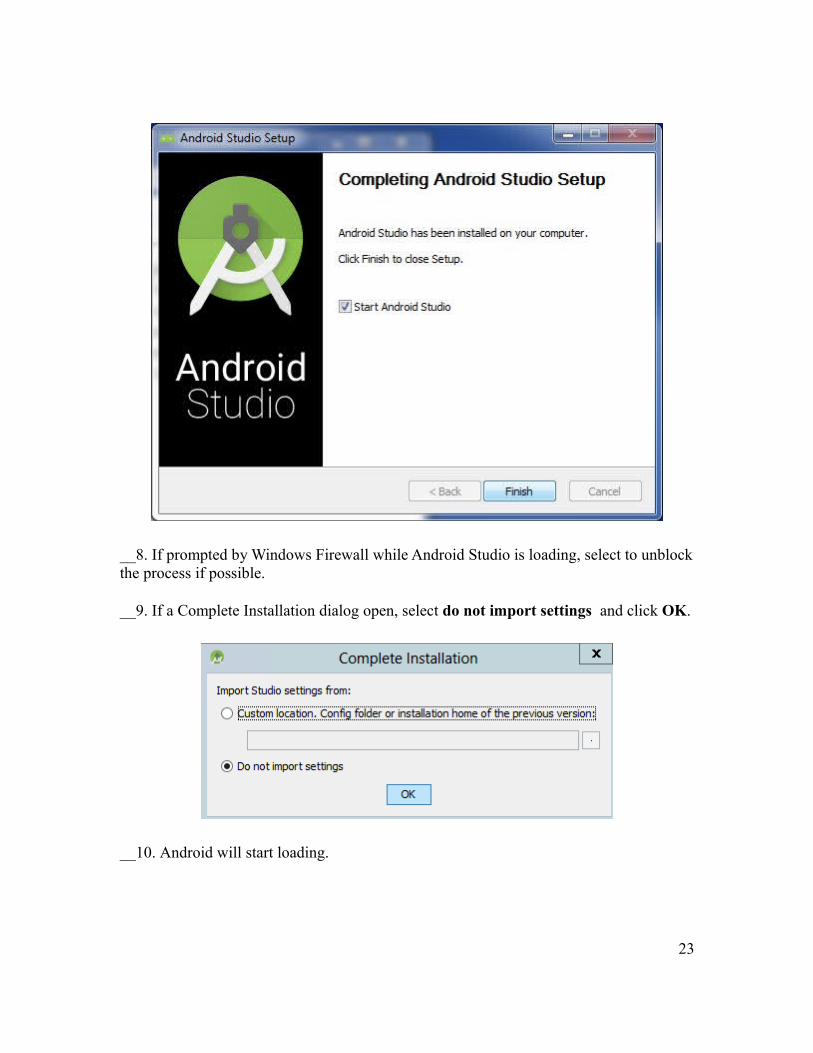
__8. If prompted by Windows Firewall while Android Studio is loading, select to unblock the process if possible.
__9. If a Complete Installation dialog open, select do not import settings and click OK.
__10. Android will start loading.
23

__11. In the 'Welcome' window, click Next.
__12. On the 'Install Type' window select Custom and click Next.
24

__13. Leave IntelliJ selected and click the Next button.
__14. Select Android Virtual Device.
25
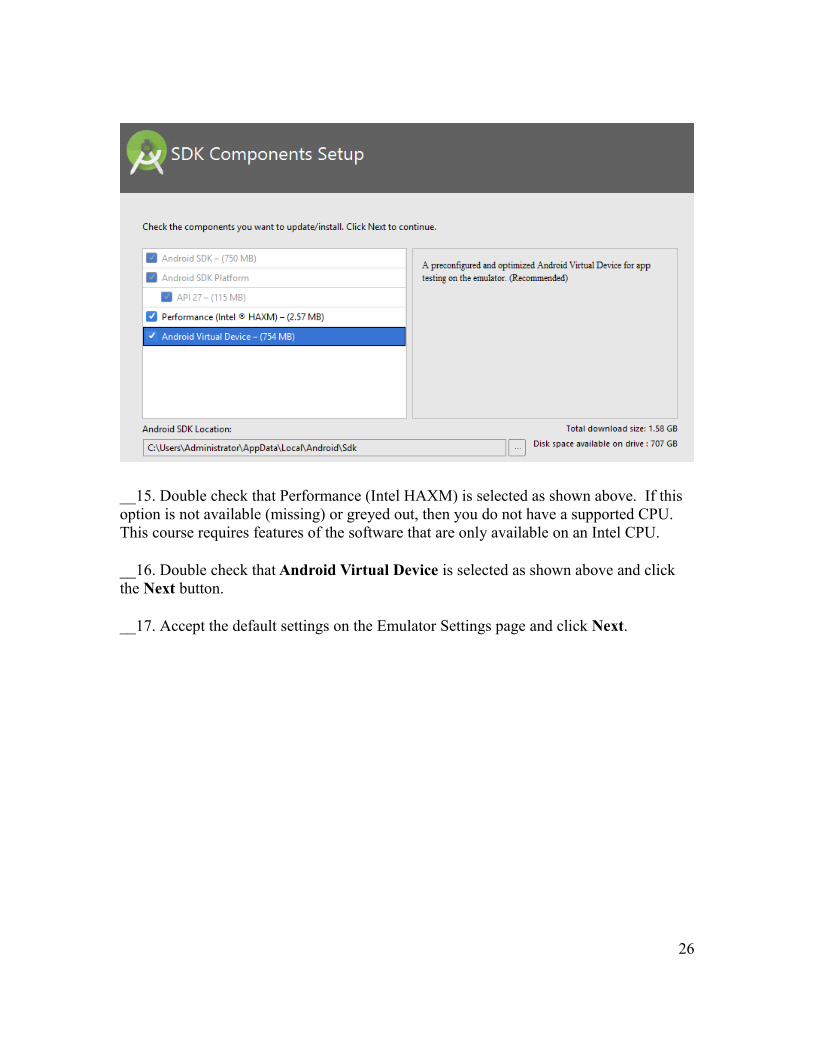
__15. Double check that Performance (Intel HAXM) is selected as shown above. If this option is not available (missing) or greyed out, then you do not have a supported CPU. This course requires features of the software that are only available on an Intel CPU.
__16. Double check that Android Virtual Device is selected as shown above and click the Next button.
__17. Accept the default settings on the Emulator Settings page and click Next.
26
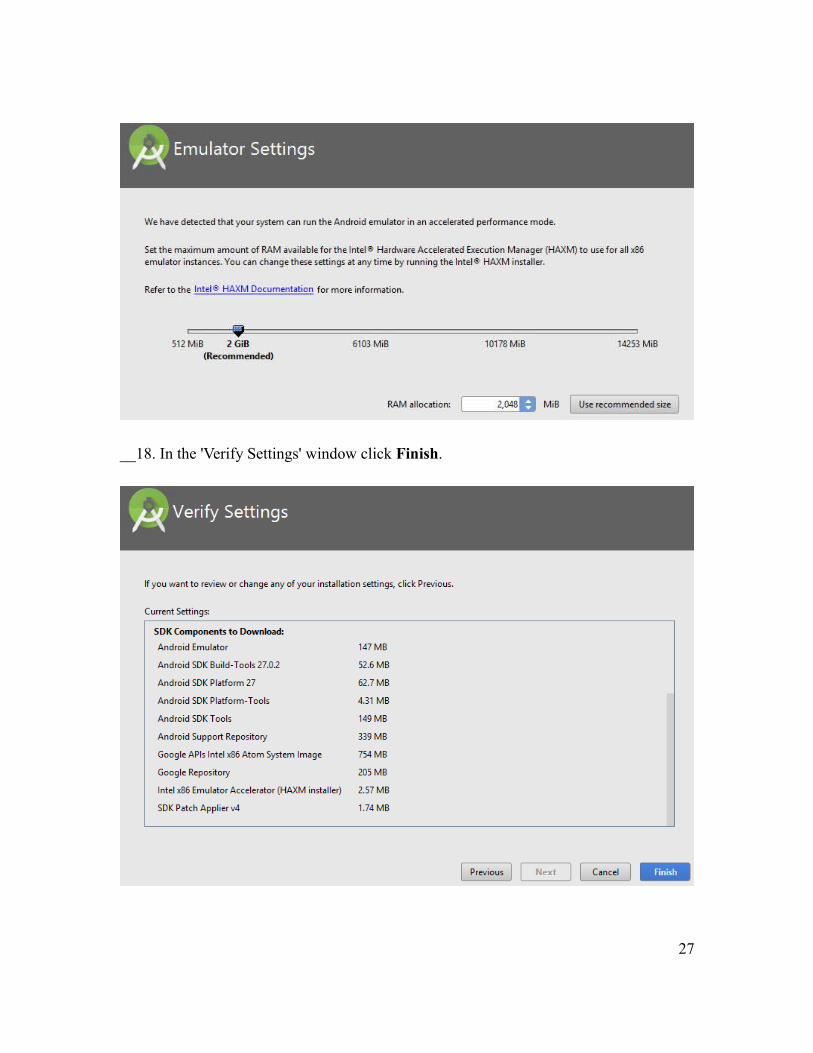
__18. In the 'Verify Settings' window click Finish.
27

__19. In the 'Downloading Components' window, click the button at the left top to watch the downloaded files.
__20. After a while all downloading files will be completed, VERIFY that it says “Intel HAXM installed successfully”. This is a critical component and sometimes the install fails due to a bug. If Intel HAXM does not install correctly, you will need to uninstall and reinstall Intel HAXM.
To uninstall, you will need to open SDK manager (see step 23 below) and on the SDK tools tab, uncheck Intel HAXM. Click apply. Then recheck the Intel HAXM package and Apply again. Make sure that you receive the “Intel HAXM installed successfully” message as below.
__21. click Finish.
__22. Android Studio will open.
28
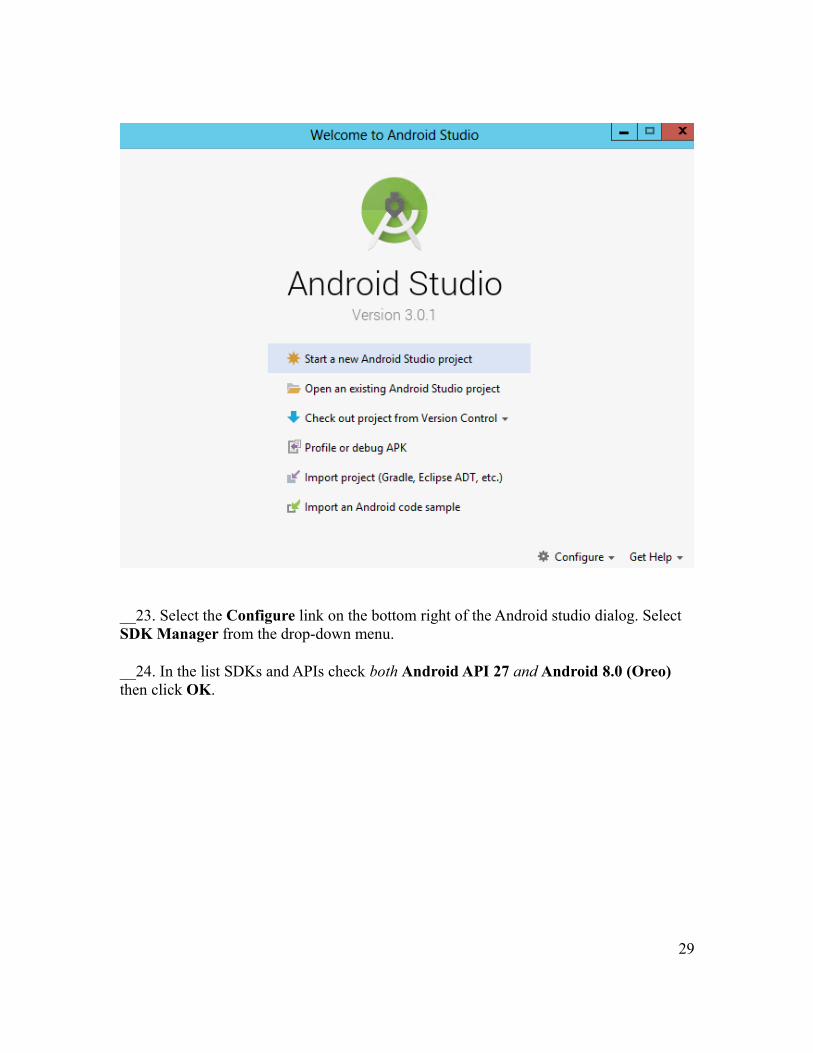
__23. Select the Configure link on the bottom right of the Android studio dialog. Select SDK Manager from the drop-down menu.
__24. In the list SDKs and APIs check both Android API 27 and Android 8.0 (Oreo) then click OK.
29

__25. On the 'Confirm Change' dialog click OK.
__26. On the License Agreement dialog, select Accept and click Next.
30

__27. When the Component Installer has finished installing click Finish.
31

__28. Close Android.
Part 9 - Summary
You have successfully installed the software for this course!
If you have any question please contact us by email at [email protected]
From US and Canada call: 1-877-812-8887 ext. 26
International call: 416-406-3994 ext. 26
32