Visual Basics New - Unit 1
11
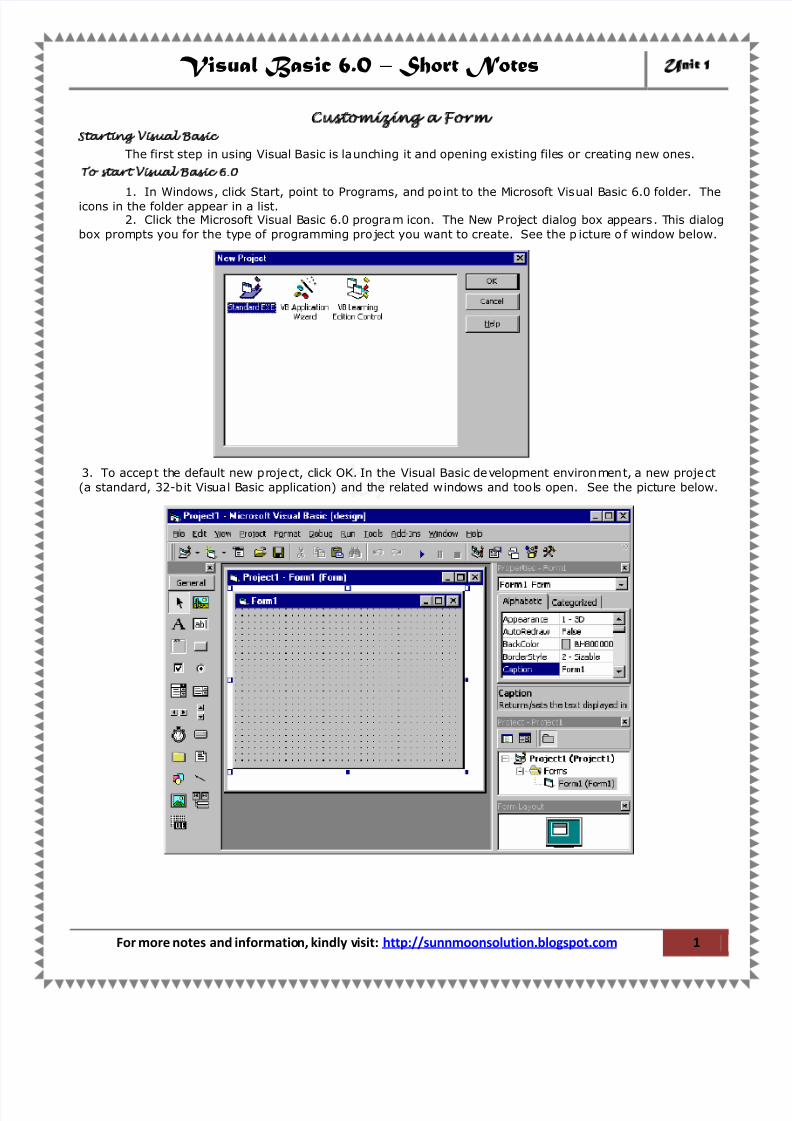
Visual Basic 6.0 – Short Notes Unit 1 For more notes and informatio n, kindly visit: http://sunnmoonsolution.blogspot.com 1 Customi zing a Form Starting Visual Basic The first step in using Visual Basic is la unc hing it and opening existing files or cre ating new ones. To star t Vis ual Basic 6.0 1. In Windows , clic k Start, point to Programs, and po int to the Microsoft Vis ual B asic 6.0 folder. The icons in the folder appear in a list. 2. Click the Microsoft Visual B asic 6.0 progra m icon. The Ne w P roj ect dialog box a ppears . T his dialog box prompts you for the ty pe of progr amming pro j ect you want to create. See the p ictur e o f win dow below. 3. To accep t th e default new p r oje ct, cl ick OK. In the Visual Basic de v elopment environ men t, a new proje ct (a standard, 32-b it Visua l B asic application) and t he rel ated wind ows and too l s open. See the pict ure below.
-
Upload
rahul-baskar -
Category
Documents
-
view
218 -
download
0
Transcript of Visual Basics New - Unit 1
8/3/2019 Visual Basics New - Unit 1
http://slidepdf.com/reader/full/visual-basics-new-unit-1 1/11
Visual Basic 6.0 – Short Notes Unit 1
For more notes and information, kindly visit: http://sunnmoonsolution.blogspot.com 1
Customizing a FormStarting Visual Basic
The first step in using Visual Basic is launching it and opening existing files or creating new ones.
To start Visual Basic 6.0
1. In Windows, click Start, point to Programs, and point to the Microsoft Visual Basic 6.0 folder. Theicons in the folder appear in a list.2. Click the Microsoft Visual Basic 6.0 program icon. The New Project dialog box appears. This dialog
box prompts you for the type of programming project you want to create. See the p icture of window below.
3. To accept the default new project, click OK. In the Visual Basic development environment, a new project
(a standard, 32-bit Visual Basic application) and the related windows and tools open. See the picture below.

8/3/2019 Visual Basics New - Unit 1
http://slidepdf.com/reader/full/visual-basics-new-unit-1 2/11
Visual Basic 6.0 – Short Notes Unit 1
For more notes and information, kindly visit: http://sunnmoonsolution.blogspot.com 2
The Visual Basic development environment contains these programming tools and windows, with
which you construct your Visual Basic programs:
Menu bar
Toolbars Form window
Properties window Project Explorer
Immediate window
Form Layout window,
Loading and Running a Program:
Before you can work with a Visual Basic program, you need to load the program into memory, just as
you would load a word processing document in a word processor for editing.
To load a Visual Basic program into memory and run it.
1. On the File menu, click Open Project. The Open Project dialog box appears. With this dialog box, you
can open any existing Visual Basic program on your hard disk, attached network drive, CD-ROM, orfloppy disk.
2. On the Visual Basic Standard toolbar, click Start to run the program. The toolbox and several of
the other windows disappear, and the Visual Basic program starts to run.
3. On the toolbar, click End when you want to exit the program .
Visual Basic Resources
Programming Tools: The location and purpose of the Visual Basic 6.0 programming tools are described in
the following.
Menu bar: Located at the top of the screen, the menu bar provides access to the commands that
control the Visual Basic programming environment. Menus and commands work according to standardconventions used in all Windows-based programs. You can use these menus and commands by using
keyboard commands or the mouse.
Toolbars: Located below the menu bar, toolbars are collections of buttons that serve as shortcuts for
executing commands and controlling the Visual Basic development environment. You can open special-
purpose toolbars by using the View menu Toolbars command.

8/3/2019 Visual Basics New - Unit 1
http://slidepdf.com/reader/full/visual-basics-new-unit-1 3/11
Visual Basic 6.0 – Short Notes Unit 1
For more notes and information, kindly visit: http://sunnmoonsolution.blogspot.com 3
Windows taskbar: This taskbar is located along the bottom of the screen. You can use the taskbar
to switch between Visual Basic forms as your program runs and to activate other Windows-based programs.
Toolbox Controls: You use special tools, called controls, to add elements of a program user
interface to a form. You can find these resources in the toolbox, which is typically located along the left sideof the screen.
(If the toolbox is not open, display it by using the Toolbox command on the View menu.) By usingtoolbox controls, you can add these elements to the user interface:
Artwork
Labels and text boxes
Buttons List boxes
Scroll bars File system controls
Timers Geometric shapes
Data and OLE controls.

8/3/2019 Visual Basics New - Unit 1
http://slidepdf.com/reader/full/visual-basics-new-unit-1 4/11
Visual Basic 6.0 – Short Notes Unit 1
For more notes and information, kindly visit: http://sunnmoonsolution.blogspot.com 4

8/3/2019 Visual Basics New - Unit 1
http://slidepdf.com/reader/full/visual-basics-new-unit-1 5/11
Visual Basic 6.0 – Short Notes Unit 1
For more notes and information, kindly visit: http://sunnmoonsolution.blogspot.com 5
Form WindowWhen you start Visual Basic, a default form (Form1)
with a standard grid (a w indow consisting o f regularly spaced
dots) appears in a pane called the Form window. You can usethe Form window grid to create the user interface and to line
up interface elements.
Adjusting Form Size: You can adjust the size of the
form by using the mouse — the form can take up part or theentire screen.
Controlling Form Placement: To control the
placement of the form when you run the program, adjust theplacement of the form in the Form Layout window.
Properties WindowWith the Properties window, you change the characteristics (property
settings) of the user interface elements on a form. A property setting is acharacteristic of a user interface object.
For example, you can change the text displayed by a text box control to adifferent font, point size, or alignment. (With Visual Basic, you can display text in
any font installed on your system, just as you can in Microsoft Excel or MicrosoftWord.)
Displaying the Properties Window: To display the Properties window,
click the Properties Window button on the toolbar.
Changing Property Settings: You can change property settings by using
the Properties w indow while you design the user interface or by using program
code to make changes while the program runs.
Project Explorer
A Visual Basic program consists of several files that are linked together to make the program run.
The Visual Basic 6.0 includes a Project window to help you switch back and forth between these componentsas you work on a project.
Project Window Components:The Project window lists all the files used in the
programming process and provides access to them with two specialbuttons: View Code and View Object.
Displaying the Project Window:To display the Project window, click the Project Explorer
button on the Visual Basic toolbar.

8/3/2019 Visual Basics New - Unit 1
http://slidepdf.com/reader/full/visual-basics-new-unit-1 6/11
Visual Basic 6.0 – Short Notes Unit 1
For more notes and information, kindly visit: http://sunnmoonsolution.blogspot.com 6
Form Layout Window
The Form Layout window is a visual design tool. With it, you can
control the placement of the forms in the Windows environment whenthey are executed. When you have more than one form in your
program, the Form Layout w indow is especially useful — you can
arrange the forms onscreen exactly the way you want.
To position a form in the Form Layout window, simply drag theminiature form to the desired location in the window.
Writing a Simple ProgramA Visual Basic program is a Windows-based application that you create in the Visual Basic.
1. Planning the Program :The first step in programming is determining exactly what you want your program to accomplish.
One part of the planning process might be creating an ordered list of programming steps, called analgorithm.
2. Building the ProgramBuilding a Windows-based application with Visual Bas ic involves three programming steps: creating
the user interface, setting the properties, and writing the code. And, of course, your project must be saved.
3. Testing, Compiling and Distributing the ProgramAfter you create a working version of your program, you need to test it carefully to verify that it
works correctly. If you wish to distribute your program, you also need to compile it into an executable
program (a stand-alone Windows-based program) and give it to your users.
Creating ControlsTo draw a control us ing the Toolbox
1. Click the tool for the control you choose to draw — in this case, the text box.
2. Move the pointer onto your form. The pointer becomes a cross hair.3. Place the cross hair where you want the upper-left corner of the control.
4. Drag the cross hair until the control is the size you want.5. Release the mouse button. The control appears on the form.

8/3/2019 Visual Basics New - Unit 1
http://slidepdf.com/reader/full/visual-basics-new-unit-1 7/11
Visual Basic 6.0 – Short Notes Unit 1
For more notes and information, kindly visit: http://sunnmoonsolution.blogspot.com 7
Another simple way to add a control to a form is to double-click the button for that control in the
Toolbox. This creates a default-size control located in the center of the form; then you can move the control
to another location on the form.
Resizing, Moving, and Locking Controls:
Notice that small rectangular boxes called sizing handles appear at the corners of the control; you'lluse these s izing handles in the next step as you resize the control. You can also use the mouse, keyboard,and menu commands to move controls, lock and unlock control positions, and adjust their positions.
To resize a control:
1. Select the control you intend to resize by clicking it with the mouse. Sizing handles appear on the
control.2. Position the mouse po inter on a sizing handle, and drag it until the control is the s ize you choose.
The corner handles resize controls horizontally and vertically, while the side handles resize in only onedirection.
3. Release the mouse button –or– Use SHIFT with the arrow keys to resize the selected control.
To move a control:
Use the mouse to drag the control to a new location on the form –or– use the Properties window to
change the Top and Left properties. When a control is selected, you can use the CTRL key with the arrowkeys to move the control one grid unit at a time. If the grid is turned off, the control moves one pixel at atime.
,,
To lock all control positions:
From the Format menu, choose Lock Controls –or– click the Lock Controls Toggle button on the Form
Editor Toolbar. This will lock all controls on the form in their current positions so that you don't inadvertentlymove them once you have them in the desired location. This will lock controls only on the selected form;
controls on other forms are untouched. This is a toggle command, so you can also use it to unlock controlpositions.
The Name Property
The Name property determines the name Visual Basic uses for the event procedures you
write to make the control respond to the user. Picking meaningful names for the controls makes easier todebug the program.
If we have five command buttons in our program, it is hard to find the exact commandbutton while debugging. It would be easier to write like this,
Private Sub cmdLeft_Click()
*********
End Sub
Instead of,
Private Sub Command3_Click()
**********End Sub
Naming Rules:
The name must begin with a letter.
After that, we can use any combination of letters, digits and underscores. No spaces are allowed in a control’s name.
The name cannot be longer than 40 characters.

8/3/2019 Visual Basics New - Unit 1
http://slidepdf.com/reader/full/visual-basics-new-unit-1 8/11
Visual Basic 6.0 – Short Notes Unit 1
For more notes and information, kindly visit: http://sunnmoonsolution.blogspot.com 8
Command Button: The Command Button control to create buttons with a variety of uses
on a form. A command button is the most basic way to get user input while a program is
running. By clicking a command button, the user requests that a specific action be taken in theprogram. Here are some command buttons that you’d typically find in a program:
OK:- Accepts a list of options and indicates that the user is ready to proceed.
Cancel:- Discards a list of options.Quit:- Exits an open dialog box or program.
Command Button Properties:
Appearance:- Selects 3-D or flat appearance. Caption:- String to be displayed on button.
Font: Sets font type, style, size.
Changing Command Button Properties:
You can change command button properties (like those of all objects) in two ways:
By adjusting property settings in the Properties w indow.
By changing properties with program code.
Access keyIn addition to clicking on a button to invoke its event, you can also press its access key (no need for
a mouse). The access key is pressed in conjunction with the Alt key. The ampersand (&) precedes a
button's access key.
Example: Caption: E&xit In this example, x is the access key. By pressing ALT + x, we invoke theevent.
The Image Control: An image box is very similar to a picture box in that it allows you to
place graphics information on a form. Image boxes are more suited for static situations - that is,
cases where no modifications will be done to the displayed graphics. Image box graphics can beresized by us ing the Stretch property.
Image Box Properties:
Picture:- Establishes the graphics file to display in the image box.Stretch:- If False, the image box res izes itself to fit the graphic. If True, the graphic resizes to fit
the control area.
The image box does not support any methods, however it does use the LoadPicture function. It isused in exactly the same manner as the picture box uses it.
And image boxes can load the same file types: bitmap (.bmp), icon (.ico), metafiles (.wmf), GIF files
(.gif), and JPEG files (.jpg). With Stretch = True, all three graphic types will expand to fit the image box
area.
Textbox : A Textbox is used to display information entered at design time, by a user atrun-time, or assigned within code. The displayed text may be edited. This control performs two
functions:
Displaying output (such as operating instructions or the contents of a file) on a form.Receiving text (such as names and phone numbers) as user input.

8/3/2019 Visual Basics New - Unit 1
http://slidepdf.com/reader/full/visual-basics-new-unit-1 9/11
Visual Basic 6.0 – Short Notes Unit 1
For more notes and information, kindly visit: http://sunnmoonsolution.blogspot.com 9
Text Box Properties:Appearance:- Selects 3-D or flat appearance.
BorderStyle:- Determines type of border.Font:- Sets font type, style, size.
MaxLength:- Limits the length of displayed text (0 value indicates unlimited length).MultiLine:- Specifies whether text box displays single line or multiple lines.
PasswordChar:- Hides text with a single character.ScrollBars:- Specifies type of displayed scroll bar(s).
SelLength:- Length of selected text (run-time only).
SelStart:- Starting position of selected text (run-time only).SelText:- Selected text (run-time only).
Tag:- Stores a string expression.Text:- Displayed text.
Setting properties to a TextBox:
1. Text can be entered into the text box by assigning the necessary string to the text property of the
control.2. If the user needs to display multiple lines of text in a TextBox, set the MultiLine property to True
3. To customize the scroll bar combination on a TextBox, set the ScrollBars property.
4. Scroll bars will always appear on the TextBox when it's MultiLine property is set to True and itsScrollBars property is set to anything except None(0)
If you set the MultilIne property to True, you can set the alignment using the Alignment property.
The test is left-justified by default. If the MultiLine property is set to False, then setting the Alignmentproperty has no effect.
Label Button: Label, the simplest control in the Visual Basic toolbox, displays formatted
text on a user interaction. Typical uses for the Label control include:
Help text
Formatted output, such as names, times, and dates
Descriptive labels for other objects, including text boxes and list boxes.
Label Properties:
Alignment:- Aligns caption within border.
Appearance:- Selects 3-D or flat appearance.AutoSize:- If True, the label is res ized to fit the text specifed by the caption property. If False, the
label will remain the size defined at design time and the text may be clipped.BorderStyle:- Determines type of border.
Caption:- String to be displayed in box.Font:- Sets font type, style, size.
WordWrap:- Works in conjunction with AutoSize property. If AutoSize = True, WordWrap = True,
then the text will wrap and label will expand vertically to fit the Caption. If AutoSize = True, WordWrap =False, then the text will not wrap and the label expands horizontally to fit the Caption. If AutoSize = False,
the text will not wrap regardless of WordWrap value.
Creating Labels in Program:The program codes below, when command1 button is clicked, will set the caption of label1 as
―Welcome‖ and label2 as ―Please enter your name below:‖
Private Sub Command1_Click ()
Label1.Caption = "Welcome"Label2.Caption = "Please enter your name below:"
End Sub

8/3/2019 Visual Basics New - Unit 1
http://slidepdf.com/reader/full/visual-basics-new-unit-1 10/11
Visual Basic 6.0 – Short Notes Unit 1
For more notes and information, kindly visit: http://sunnmoonsolution.blogspot.com 10
The Message Box
One of the best functions in Visual Bas ic is the message box. The message box displays a message,optional icon, and selected set of command buttons. The user responds by clicking a button.
The statement form of the message box returns no value (it simply displays the box):
MsgBox Message, Type, TitleMessage Box Example:
MsgBox “This is an example of a message box”,
VariablesVariables are the memory locations which are used to store values temporarily. A defined naming
strategy has to be followed while naming a variable. A variable name must begin with an alphabet letter andshould not exceed 255 characters. It must be unique within the same scope. It should not contain any special
character like %, &, !, #, @ or $.
There are many ways of declaring variables in Visual Basic. Depending on where the variables are
declared and how they are declared, we can determine how they can be used by our application.
Explicit Declaration:
Declaring a variable tells Visual Basic to reserve space in memory. It is not must that a variable
should be declared before using it. Automatically whenever Visual Basic encounters a new variable, it assignsthe default variable type and value. This is called implicit declaration.
Though this type of declaration is easier for the user, to have more control over the variables, it is
advisable to declare them explicitly. The variables are declared with a Dim statement to name the variableand its type. The As type clause in the Dim statement allows to define the data type or object type of the
variable. This is called explicit declaration.
Syntax:
Dim variable [As Type]
For example:
Dim strName As String
Dim intCounter As Integer
Data TypesBy default Visual Basic variables are of variant data types. The variant data type can store numeric,
date/time or string data. When a variable is declared, a data type is supplied for it that determines the kind
of data they can store.
The fundamental data types in Visual Basic including variant are integer, long, single, double, string,
currency, byte and boolean. Visual Basic supports a vast array of data types. Each data type has limits to the
kind of information and the minimum and maximum values it can hold. A list of Visual Basic's simple datatypes are given below.

8/3/2019 Visual Basics New - Unit 1
http://slidepdf.com/reader/full/visual-basics-new-unit-1 11/11
Visual Basic 6.0 – Short Notes Unit 1
For more notes and information, kindly visit: http://sunnmoonsolution.blogspot.com 11
1. Numeric
Byte Store integer values in the range of 0 - 255
Integer Store integer values in the range of (-32,768) - (+ 32,767)
Long Store integer values in the range of (- 2,147,483,468) - (+ 2,147,483,468)
Single Store floating point value in the range of (-3.4x10-38) - (+ 3.4x1038)
Double Store large floating value which exceeding the single data type value
Currency Store monetary values. It supports 4 digits to the right of decimal point and 15 digits
2. StringUse to store alphanumeric values. A variable length string can store approximately 4 billion
characters
3. DateUse to store date and time values. A variable declared as date type can store both date and time
values and it can store date values 01/01/0100 up to 12/31/9999.4. Boolean
Boolean data types hold either a true or false value. These are not stored as numeric values and
cannot be used as such. Values are internally stored as -1 (True) and 0 (False) and any non-zero value isconsidered as true.
5. VariantStores any type of data and is the default Visual Basic data type. In Visual Basic if we declare a
variable without any data type by default the data type is assigned as default.
Proverb: He who has learned how to obey will know how to command