Version 3 - Thomson Reuters Canada Book...
137
Version 3
Transcript of Version 3 - Thomson Reuters Canada Book...

Version 3

Carswell Customer Service
Customer Service (Billing/Accounts) Helpline Email Customer Service a question Call: (416) 609-3800 (Toronto) 1-800-387-5164 (Toll free) Select option 1 Hours: 8:30am – 5:00pm Monday – Friday ET
Software Solutions Support Email Product Support a question Call: 1-855-784-5636 (Toll free)
Technical Support Email Technical Support a question Call: (416) 609-3800 (Toronto) 1-800-387-5164 (Toll free) Select option 2 Hours: 8:30am – 8:00pm Monday – Friday ET
Customer Learning Email Customer Learning a question Call: (416) 609-3800 (Toronto) 1-800-387-5164 (Toll free)
Select option 3 Hours: 8:30am – 5:00pm Monday – Friday ET Visit: www.carswell.com/learning/case-notebook to access the Quick Reference Card.
About This Guide
In this guide, the graphics and step-by-step instructions are based on using Westlaw Case Notebook. Because of the evolving nature of this technology, there may be changes to interfaces and functionality that are not reflected in this documentation. Information in this guide is current through April 2012 (version 3.0). KeyCite, Westlaw Case Notebook, West Find&Print, and Westlaw are registered trademarks and West Case Timeline is a trademark of West Publishing Corporation. LEF, LiveNote, LiveNote Evidence Format, LiveNote Repository, and LiveNote Stream are trademarks of LiveNote, Inc. is a trademark of LiveNote, Inc. and West Publishing Corporation. RealLegal is a registered trademark of RealLegal, LLC. Internet Explorer, Microsoft, Outlook, PowerPoint, Windows, and Windows Media are registered trademarks of Microsoft Corporation. Corel and WordPerfect are registered trademarks of Corel Corporation. © 2012 Thomson Reuters. All rights reserved. Carswell, a Thomson Reuters business 2075 Kennedy Road Toronto ON M1T 3V4

i
Contents
Introduction ..................................................................................................................... 1 File Types for Importing Transcripts ............................................................................ 1 File Types for Importing Documents and Pleadings .................................................... 2 Getting Help ................................................................................................................. 3
1: Managing Cases ......................................................................................................... 4 Creating a New Local Case ......................................................................................... 4
CREATING A NEW CASE FROM AN OPEN CASE....................................................................... 5 Opening a Local Case ................................................................................................. 5 Importing a Case ......................................................................................................... 5 Opening a RealLegal Binder Case .............................................................................. 5 Accessing Secure Cases ............................................................................................. 6
ACCESSING SECURE CASES THROUGH WESTLAW CASE NOTEBOOK RAS .............................. 8 Viewing a List of Favorite Secure Cases ..................................................................... 8 Replicating Cases Offline and to the Network ............................................................. 9
REPLICATING A CASE OFFLINE .............................................................................................. 10 REPLICATING A CASE TO THE NETWORK .............................................................................. 11 REPLICATING MULTIPLE CASES OFFLINE ............................................................................... 11 REPLICATING MULTIPLE CASES TO THE NETWORK .............................................................. 12
Changing Replication Options ................................................................................... 13 Viewing Case Comments .......................................................................................... 13 Creating a Case Report ............................................................................................. 14
2: Managing Transcripts ................................................................................................ 16 Importing a Transcript ................................................................................................ 16 Opening an Existing Transcript .................................................................................. 17 Creating a Transcript Summary ................................................................................. 18
CREATING A TRANSCRIPT SUMMARY REPORT ..................................................................... 19 Saving a Transcript Summary Report ................................................................................ 20
OPENING A TRANSCRIPT SUMMARY ITEM ........................................................................... 20 DELETING A TRANSCRIPT SUMMARY ITEM .......................................................................... 21
Closing a Transcript ................................................................................................... 21 Deleting a Transcript ................................................................................................. 21 Printing a Transcript with Annotations ....................................................................... 21 Printing Headers and Footers in Transcripts ............................................................. 23 Printing Exhibits Linked to Transcripts ....................................................................... 25 Viewing Transcript Properties .................................................................................... 26

ii
3: Updating Transcripts ................................................................................................. 27 Starting the Updating Process ................................................................................... 27 Updating with a PTX or EXE File ............................................................................... 27 Updating with an ASCII File ....................................................................................... 28 Updating with a PTF File ........................................................................................... 28 Updating with a LEF File............................................................................................ 29
4: Managing Documents ............................................................................................... 30 Importing a Document ............................................................................................... 30 Importing Multiple Documents ................................................................................... 32 Importing Load Files .................................................................................................. 33 Sending Documents to Westlaw Case Notebook Using Windows Explorer .............. 35 Sending Documents to Westlaw Case Notebook from Microsoft Outlook ................. 36 Opening an Existing Document ................................................................................. 37 Using the Document List............................................................................................ 37
SORTING DOCUMENTS ......................................................................................................... 38 ADDING AND REMOVING COLUMNS .................................................................................... 38 FREEZING THE FIRST COLUMN .............................................................................................. 38 DELETING SINGLE AND MULTIPLE DOCUMENTS .................................................................. 38
Viewing Document Properties ................................................................................... 39 Closing a Document .................................................................................................. 39
5: Managing Pleadings .................................................................................................. 40 Importing a Pleading .................................................................................................. 40 Sending Pleadings to Westlaw Case Notebook Using Windows Explorer ................. 42 Sending Pleadings to Westlaw Case Notebook from Microsoft Outlook .................... 42 Opening an Existing Pleading .................................................................................... 44 Viewing Pleading Properties ...................................................................................... 44 Deleting a Pleading ................................................................................................... 44 Closing a Pleading ..................................................................................................... 44
6: Managing Research .................................................................................................. 45 Searching Westlaw Canada ...................................................................................... 45
USING FIND & PRINT ............................................................................................................. 47 SENDING A WESTLAW CANADA SEARCH RESULT TO WESTLAW CASE NOTEBOOK ............. 47
Updating KeyCite Information .................................................................................... 49 Sending Research Documents to Westlaw Case Notebook Using Windows Explorer ..................................................................................................................... 50 Importing Research Documents ................................................................................ 51

iii
7: Managing Key Facts .................................................................................................. 53 Creating a Key Fact ................................................................................................... 53 Creating a Key Facts Report ..................................................................................... 55 Editing a Key Fact ..................................................................................................... 56 Deleting a Key Fact ................................................................................................... 57 Closing the Key Facts Tab ......................................................................................... 57 Sending Key Facts to Microsoft Word or Corel WordPerfect ..................................... 57 Sending Key Facts to West Case Timeline ................................................................ 57
SAVING KEY FACTS AS A WEST CASE TIMELINE FILE ............................................................. 58
8: Managing Characters ................................................................................................ 59 Adding Characters ..................................................................................................... 59
ADDING CHARACTERS MANUALLY ....................................................................................... 59 ADDING CHARACTERS AUTOMATICALLY .............................................................................. 61
Importing Transcripts, Documents, and Pleadings ........................................................... 62 ADDING CHARACTERS FROM A SMART TAGS LIST ............................................................... 62
Working with Aliases ................................................................................................. 64 Retrieving a Character’s Profile from Westlaw .......................................................... 65 Creating a Characters Report .................................................................................... 66 Exporting Characters to a File ................................................................................... 68 Editing a Character .................................................................................................... 68 Deleting a Character .................................................................................................. 68 Closing the Characters Tab ....................................................................................... 68
9: Managing Outlines .................................................................................................... 69 Creating an Outline .................................................................................................... 69 Inserting Information into an Outline .......................................................................... 70
TYPING TEXT IN THE OUTLINE ............................................................................................... 70 INSERTING TEXT FROM A DOCUMENT ................................................................................. 70 INSERTING A REPORT ............................................................................................................ 70 INSERTING POTENTIAL EXHIBITS........................................................................................... 71 INSERTING TRANSCRIPT QUESTIONS .................................................................................... 72
Inserting Transcript Questions Using the Insert Feature .................................................. 72 Inserting Transcript Questions Using the Send Feature ................................................... 73
INSERTING A WESTLAW DOCUMENT ................................................................................... 73 Viewing Documents in an Outline .............................................................................. 76 Printing an Outline ..................................................................................................... 76 Opening an Existing Outline ...................................................................................... 78 Deleting an Outline .................................................................................................... 78 Closing an Outline ..................................................................................................... 78

iv
10: Working with Properties .......................................................................................... 79 Using the Overview Tab ............................................................................................ 80 Editing Details ............................................................................................................ 80 Adding Doc-Level Issues ........................................................................................... 80 Adding Dates ............................................................................................................. 82 Add Documents to a Group ....................................................................................... 83 Adding Doc-Level Notes ............................................................................................ 83
11: Working with Issues ................................................................................................ 86 Creating Issues .......................................................................................................... 86
CREATING SUB-ISSUES .......................................................................................................... 87 Adding Issues to the Toolbar ..................................................................................... 88 Importing Issues ........................................................................................................ 88 Exporting Issues ........................................................................................................ 89 Creating an Issues Report ......................................................................................... 89
12: Working with Annotations ........................................................................................ 91 Adding an Annotation Using the Apply Issue Mode Button........................................ 91 Adding an Annotation Using the Annotation Properties Dialog Box ........................... 92
ADDING A NOTE TO AN ANNOTATION ................................................................................. 93 ADDING AN ISSUE TO AN ANNOTATION ............................................................................... 93 ADDING A KEY FACT TO AN ANNOTATION ........................................................................... 93 ADDING AN ATTACHMENT TO AN ANNOTATION ................................................................. 93 ASSOCIATING VIDEO WITH AN ANNOTATION ...................................................................... 94
Transferring Annotations ........................................................................................... 94 Sending Annotations to Instant Messages................................................................. 94 Editing Annotations .................................................................................................... 95 Deleting Annotations ................................................................................................. 95 Viewing an Annotation Attachment ............................................................................ 95 Creating an Annotations Report ................................................................................ 95
CREATING AN ANNOTATIONS REPORT FOR THE DOCUMENT YOU ARE VIEWING .............. 95 CREATING AN ALL ANNOTATIONS REPORT .......................................................................... 96 CREATING A VERBATIM DIGEST REPORT .............................................................................. 98 CREATING A NOTES REPORT ................................................................................................. 98 CREATING AN ATTACHMENTS REPORT ................................................................................ 98
13: Working with Full Text Search ................................................................................. 99 Creating a Full Text Search ....................................................................................... 99 Formatting a Full Text Search ................................................................................. 101
USING THE ROOT EXPANDER .............................................................................................. 101

v
USING THE UNIVERSAL CHARACTER ................................................................................... 101 USING CONNECTORS........................................................................................................... 101
Creating a Search Report ........................................................................................ 102
14: Working with Auto Tags ........................................................................................ 103 Creating Auto Tags .................................................................................................. 103 Managing Auto Tags ............................................................................................... 104
SHOWING AND HIDING AUTO TAGS ................................................................................... 104 DELETING AUTO TAGS ......................................................................................................... 104
Creating an Auto Tag Report ................................................................................... 104
15: Working with Data Groups .................................................................................... 106 Creating a Data Group............................................................................................. 106 Editing Data Groups ................................................................................................ 107 Using Data Groups in Reports ................................................................................. 107 Using Data Groups in Full Text Searches................................................................ 107 Sorting by Data Groups ........................................................................................... 108
16: Transferring Document Text .................................................................................. 109 Transferring Text of a Transcript ............................................................................. 109 Transferring Text of a Document or Pleading .......................................................... 110 Transferring Text of a Westlaw Canada Document ................................................. 110
17: Using the Word Index ............................................................................................ 111 Selecting Word Index Display Options..................................................................... 111
18: Connecting to Realtime ......................................................................................... 113 Connecting with a Serial Connection ....................................................................... 113 Using LiveNote Stream ............................................................................................ 114
ACCESSING LIVENOTE STREAM THROUGH WESTLAW CASE NOTEBOOK ........................... 114 ACCESSING LIVENOTE STREAM THROUGH INTERNET EXPLORER ...................................... 115 ACCESS TO FEATURES IN LIVENOTE STREAM ..................................................................... 115
Using Live Note Local Stream ................................................................................. 116
19: Working with a Transcript in Realtime ................................................................... 118 Starting and Stopping Text ...................................................................................... 118 Using Quick Marks .................................................................................................. 119 Quick Marks Report ................................................................................................. 119 Using Issue Marks ................................................................................................... 121
20: Working with Annotations and Video in Transcripts .............................................. 123 Playing Annotation Video Segments ....................................................................... 123 Creating Annotation Video Segments ...................................................................... 123

vi
CREATING A VIDEO SEGMENT FROM A SINGLE ANNOTATION .......................................... 123 CREATING MULTIPLE VIDEO SEGMENTS FROM AN ANNOTATIONS REPORT..................... 123 EDITING VIDEO SEGMENTS ................................................................................................. 124
Transferring Annotations to Microsoft PowerPoint ................................................... 124 CREATING A POWERPOINT PRESENTATION FROM A SINGLE ANNOTATION ..................... 125 CREATING A POWERPOINT PRESENTATION FROM AN ANNOTATIONS REPORT ............... 125 SAVING POWERPOINT FILES WITH THE SAME NAME ........................................................ 125
: Appendix ................................................................................................................... 126 Converting RealLegal Binder Cases to Westlaw Case Notebook Cases ................ 126 Prompts and Messages for Video and PowerPoint ................................................. 127 Connecting to a Simulated Realtime Transcript ....................................................... 128 Trial Version of Westlaw Case Notebook ................................................................ 129

Introduction 1
Introduction Westlaw Case Notebook is an electronic organizer and discovery tool for saving and working with important documents, research, and transcripts. With Westlaw Case Notebook you can:
• track key facts and their related issues • track the parties involved in the litigation • import and convert key documents to text-searchable formats using optical character
recognition (OCR) technology • send research documents from Westlaw Canada to a case file • check KeyCite status • create outlines and transcript summaries • build issues databases by creating categories and highlighting text • summarize issues by running reports • copy text from a Westlaw Canada document and paste the text along with the citation
into a word-processing document • connect to a deposition transcript in real time
Note: Some of the features described in this User Guide are optimized for usage in the United
States. For instance, at the time of writing, video transcripts are not commonly available for Canadian Examinations for Discovery. Additionally, some types of data accessed from Westlaw (e.g. public records) do not have Canadian equivalents in Westlaw Canada. Nonetheless, we have retained the usage information in this guide so that you will know how to use these features in the event that Canadian functionality does develop. In the meantime, we have flagged these extraneous features in the appropriate section as a reminder.
File Types for Importing Transcripts
You can import the following types of transcript files into Westlaw Case Notebook: • E-Transcript files (PTX or EXE)—transcript only format provided by court reporters; may
include court reporter’s signature • ASCII (text only) files—transcript only format • Portable Transcript (PTF) files—used to move a transcript with annotations to another
program that will accept that file type or another Westlaw Case Notebook computer

Introduction 2
• LiveNote Evidence Format™ (LEF™) files—contain the transcript with linked exhibit files; may contain synchronized video
• Publisher Bundle (bundle.xml) files—contain the transcript with linked exhibit files; may contain synchronized video
• E-Transcript Bundle (PTZ) files—created with West Publisher version 5 or later; contain the transcript with linked exhibit files; may contain synchronized video
• Extensible Markup Language (XML) files—contain the transcript with linked exhibit files; may contain synchronized video
• CT Summation (TRN) files • Timaro Technologies Post-Production Time-Stamp (PTS) files
File Types for Importing Documents and Pleadings
You can import the following types of files for documents and pleadings into Westlaw Case Notebook: • Images:
• TIF/TIFF (Tagged Image File Format) • BMP (Bitmap) • JPE/JPG/JPEG (Joint Photographic
Experts Group) • GIF (Graphic Interchange Format) • PNG (Portable Network Graphics) • JFX
• PDF (Portable Document Format) • DOC/DOCX (Microsoft Word file) • WP/WPD (Corel WordPerfect file) • MSG (Microsoft Outlook file) • HTM/HTML (Hypertext Markup Language) • PEX (LiveNote document file) • TXT (plain text file) • RTF (Rich Text Format)
• Document review load files: • CaseCentral ASCII Load File (TXT) • Concordance ASCII Load File (DAT) • IPRO ASCII Load File (LFP) • Lextranet ASCII Load File (TXT) • Opticon ASCII Load File (OPT) • Summation ASCII Load File (TXT)
Note: If your load file is not one of the types listed, you still may be able to import it using the Custom options or by using conversion tools available for free on the Internet.
An administrator can designate who can access the case file documents.

Introduction 3
Getting Help
Online Help is available in Westlaw Case Notebook to assist you. Simply click Contents on the Help menu, click Online Lessons to display the West eLearning Centre page.

Managing Cases 4
1: Managing Cases Creating a New Local Case
Cases in Westlaw Case Notebook can be created for one person to use (local cases), or they can be created through the West LiveNote Administration module to be available on a network so they can be shared (secure cases). To create a new case, follow these steps:
1. Access Westlaw Case Notebook to display the Open Case dialog box (Figure 1-1).
2. Click New to display the Save As dialog box. 3. Select the location to use for storage of the case; type the file name, e.g., smithvjones;
and click Save. The New Case Properties dialog box is displayed. 4. Type the name of the case, e.g., Smith v Jones, into the Name text box. 5. Click OK. The case window, which lists all the documents for the case, is displayed
(Figure 1-2).
Main Menu toolbar
Figure 1 - 2: Case window
Figure 1 - 1: Open Case dialog box

Managing Cases 5
CREATING A NEW CASE FROM AN OPEN CASE
To create a new case from an open case, complete these steps: 1. Click the New arrow on the Main Menu toolbar and choose Case from the menu. The
Save As dialog box is displayed. 2. Select the location to use for storage of the case; type the file name, e.g., smithvjones;
and click Save. The New Case Properties dialog box is displayed. 3. Type the name of the case, e.g., Smith v Jones, into the Name text box. 4. Click OK.
Opening a Local Case
To open a case, choose Open Case from the File menu to display the Open Case dialog box. Select your case from the list and click OK. Importing a Case
To import a case, complete these steps: 1. Click the New arrow, and then choose Case (from File) from the menu. The Open dialog
box is displayed. 2. Select your case and click Open. The Save As dialog box is displayed. 3. Type a name for the file into the File name text box. 4. Click Save. The message Would you like to add the new case to your case list? is
displayed. Click Yes. The case is displayed in the case window. Opening a RealLegal Binder Case
You can open a RealLegal Binder case, version 5 or later, in Westlaw Case Notebook. To open a RealLegal Binder case, complete these steps:
1. Choose Open Case from the File menu to display the Open Case dialog box. 2. Click Add. The Open dialog box is displayed. 3. Select the RealLegal Binder Case (PXL) file you want to import and click Open. 4. The message This case was created with RealLegal Binder. It must be imported before it
can be used. Do you want to continue? is displayed. Click Yes. The Save As dialog box is displayed.
5. Type a name for the file into the File name text box and click Save. The case is listed in the Open Case dialog box.
6. Select the case and click OK.
Managing Cases 6
Note: The RealLegal Binder case opens as a local case with no assigned users. For further information on the conversion of RealLegal Binder cases to Westlaw Case Notebook cases, see Appendix B.
Accessing Secure Cases
Note: • If you are working on a secure case with other users, all users must use the same
version of Westlaw Case Notebook. For example, if a secure case is upgraded to Westlaw Case Notebook version 2.5, all users working on the case must use Westlaw Case Notebook version 3.0.
• If you are working in a Westlaw Case Notebook 3.0 case, then revert to using Westlaw Case Notebook version 1.0, you must manually rebuild the search index for the case. To rebuild the search index, choose Advanced, Rebuild Search Index from the Tools menu.
To access a secure case, complete these steps:
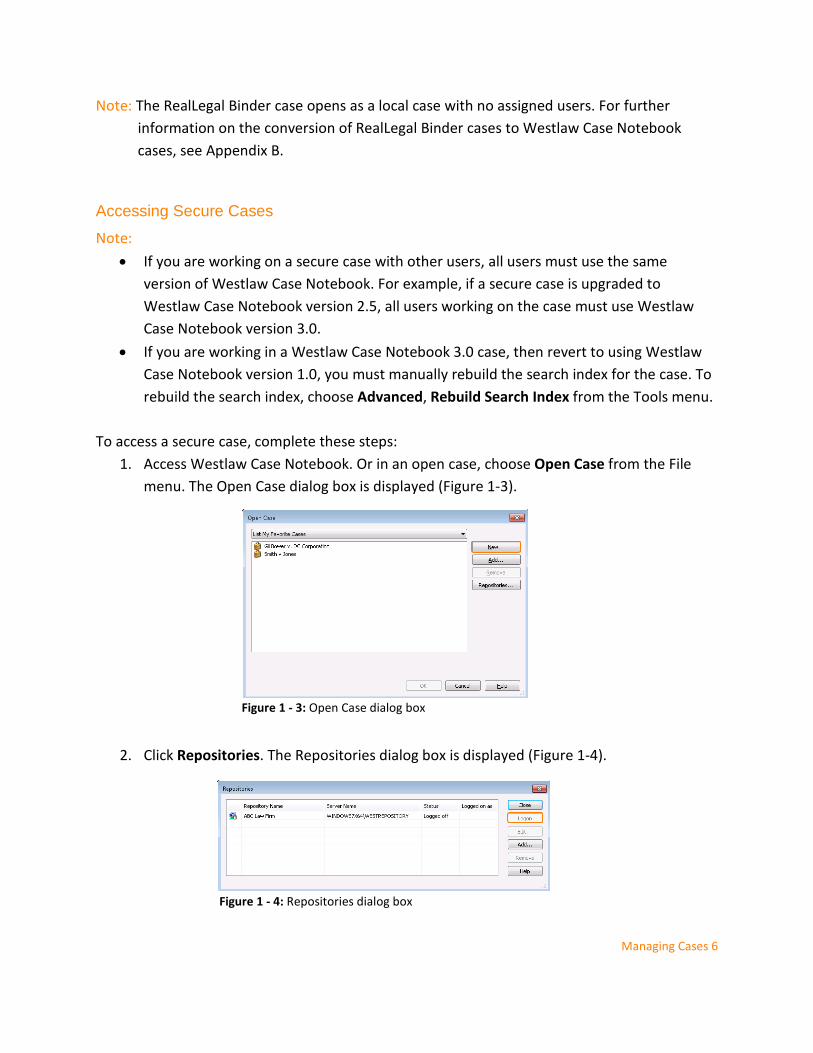
1. Access Westlaw Case Notebook. Or in an open case, choose Open Case from the File menu. The Open Case dialog box is displayed (Figure 1-3).
2. Click Repositories. The Repositories dialog box is displayed (Figure 1-4).
Figure 1 - 3: Open Case dialog box
Figure 1 - 4: Repositories dialog box

Managing Cases 7
3. Select the repository that you want to log on to and click Logon. The Logon to [Repository Name] dialog box is displayed (Figure 1-5).
4. Type the username and the password that is assigned to you in Westlaw Case Notebook Administration into the Username and Password text boxes.
5. Select the Remember my logon settings checkbox if you want Westlaw Case Notebook to remember your username and password.
6. Click OK. The Repositories dialog box is redisplayed (Figure 1-6).
7. Click Close. The Open Case dialog box is redisplayed with a list of the cases to which you are assigned (Figure 1-7).
Figure 1 - 5: Logon to [Repository Name] dialog box
Figure 1 - 6: Repositories dialog box
Figure 1 - 7: Open Case dialog box

Managing Cases 8
Note: Two types of case icons may be displayed: • A brown case icon ( ) indicates a local case or a secure case that is currently being
accessed through the network. • A brown and blue case icon ( ) indicates a secure case that was replicated offline
and is currently being accessed locally.
To view only secure cases, choose List Cases by Repository from the drop-down list at the top of the dialog box, then click the plus symbol (+) next to the repository containing the cases you want to view.
8. Select your case and click OK.
ACCESSING SECURE CASES THROUGH WESTLAW CASE NOTEBOOK RAS
Westlaw Case Notebook RAS (remote access server) provides remote access to your Westlaw Case Notebook cases via the Internet. When you access a case remotely, most of the features in Westlaw Case Notebook are available. When you finish working on a case, your changes are saved to the server. After you close a remote case, you must log on to another remote session to access the case again. When you use West LiveNote RAS, you cannot:
• copy a case • administer remote cases using Westlaw Case Notebook Administration • connect to LiveNote Realtime Note: To connect to LiveNote Realtime in a case you access through RAS, you must replicate
the case offline.
To access a secure case through RAS, complete steps 1 through 8 above. Viewing a List of Favorite Secure Cases
When you access secure cases in Westlaw Case Notebook, all of the cases to which you are assigned are listed in the Open Case dialog box. You can add one or more of these cases to your list of favorite cases, then view only those cases when you access Westlaw Case Notebook.

Managing Cases 9
To view your list of favorite cases, complete these steps: 1. Access secure cases. The Open Case dialog box is displayed with the list of the cases to
which you are assigned (Figure 1-8).
2. Right-click the case you want to add to your list of favorite cases, e.g., Clelland v Anderson, and click Add to My Favorite Cases.
3. Choose List My Favorite Cases from the drop-down list at the top of the dialog box. Your list of favorite cases is displayed (Figure 1-9).
Replicating Cases Offline and to the Network
Note: If you replicate a case offline on one computer and want to access the case via the network on a different computer, you must have a separate username assigned to you in the repository for each computer.
Figure 1 - 8: Open Case dialog box
Figure 1 - 9: List of favorite cases

Managing Cases 10
REPLICATING A CASE OFFLINE
You can work on a secure case off the network by replicating the case offline in Westlaw Case Notebook. To replicate a secure case that you are currently working on offline, complete these steps:
1. Choose Replicate Case Offline from the File menu. The Replication Wizard–Case Data dialog box is displayed (Figure 1-10).
2. Select the document type and data you want to replicate offline. 3. Click Groups to add the data you selected to a data group. The Data Groups dialog box is
displayed. Select the group to which you want to add the data and click OK. Note: You can use data groups to organize data in categories, which are displayed as
folders under data categories in the left pane. For more information on data groups, see “Working with Data Groups” on page 106.
4. Click Finish. The Cases Replicated to Offline dialog box is displayed, informing you that the case was successfully replicated offline.
5. Click one of the following: • Open Case. The case is displayed in the left pane. • Close. The case is closed.
Figure 1 - 10: Replication Wizard – Case Data dialog box

Managing Cases 11
REPLICATING A CASE TO THE NETWORK
To replicate a case you are currently working on to the network, complete these steps: 1. Choose Replicate Case Online from the File menu. The Cases Replicated to Network
dialog box is displayed. 2. Click one of the following:
• Open Case. The case is displayed in the left pane. • Close. The case is closed.
REPLICATING MULTIPLE CASES OFFLINE
To replicate multiple cases offline, you must first change your replication options, then close Westlaw Case Notebook and select the cases you want to replicate offline. To replicate multiple cases offline, complete these steps:
1. Choose Options from the Tools menu. The Options dialog box is displayed. 2. On the Confirmation tab, select the Replicate offline on closing Westlaw Case
Notebook checkbox, then click OK. 3. Close Westlaw Case Notebook. The Replication Wizard–Cases dialog box is displayed
(Figure 1-11).
4. Select the cases you want to replicate offline. 5. Click Next. The Replication Wizard–Case Data dialog box for the first case you selected is
displayed.
Figure 1 - 11: Replication Wizard – Cases dialog box

Managing Cases 12
6. Select the document types and data you want to replicate offline. 7. Click Groups to add the data you selected to a data group. The Data Groups dialog box
is displayed. Select the group to which you want to add the data and click OK. Note: You can use data groups to organize data in categories, which are displayed as
folders under data categories in the left pane. For more information on data groups, see “Working with Data Groups” on page 106.
8. Click Next. If you selected more than one case, the Replication Wizard–Case Data dialog box for the next case you selected is displayed.
9. Repeat steps 6–8 for each case you want to replicate offline. 10. When you have finished selecting the document types for all the cases you want to
replicate offline, click Finish. The Cases Replicated to Offline dialog box is displayed, informing you that the cases were successfully replicated offline.
11. Click Close. Westlaw Case Notebook is closed.
REPLICATING MULTIPLE CASES TO THE NETWORK
1. If you replicated cases offline, the next time you access Westlaw Case Notebook, the Replication Wizard–Offline Cases dialog box is displayed (Figure 1-12).
2. By default, all the cases that you replicated offline are selected. To exclude a case from being replicated to the network, clear its checkbox.
3. Click Finish. The Cases Replicated to Network dialog box is displayed (Figure 1-13).
Figure 1 - 12: Replication Wizard – Offline Cases dialog box

Managing Cases 13
4. Select a case, then click one of the following: • Open Case. The case is displayed in the left pane. • Close. The case is closed.
Changing Replication Options
Westlaw Case Notebook has replication options that prompt you to replicate the case offline when you close Westlaw Case Notebook or replicate the case to the network when you open Westlaw Case Notebook. To change these options, complete these steps:
1. Choose Options from the Tools menu. The Options dialog box is displayed (Figure 1-13).
2. Select the Replicate offline on closing Westlaw Case Notebook checkbox, if desired. 3. Clear the Replicate to the network on opening Westlaw Case Notebook checkbox, if
desired. 4. Make your selection the default, if desired. 5. Click OK.
Viewing Case Comments
You can view a summary of your case contents in the Case Properties dialog box, shown outlined in Figure 1-14. To access the Case Properties dialog box, click Case Properties on the File menu.
Figure 1 - 13: Options dialog box

Managing Cases 14
While viewing the dialog box, you can copy the summary data and past it into another application. To copy the summary data, right-click at the top of the dialog box and click Copy Summary Data on the menu.
Creating a Case Report
This report includes the names of documents and any comments about the documents. To create a Case report, complete these steps:
1. Click the Report button ( ) on the Main Menu toolbar, and then choose Case from the menu. The Case Report Properties dialog box is displayed (Figure 1-14). By default, all document types and data are selected. To exclude a document type from the report, clear its checkbox. To exclude particular data from the report, click the document type containing the data, and then clear the checkboxes for the data you want to exclude.
Figure 1 - 14: Case Properties dialog box

Managing Cases 15
2. Click Groups to include only the data in a data group in your report. Select the group you want to include in your report and click OK. For further information on data groups, see “Working with Data Groups” on page 106.
3. Click the Display tab to view a list of display options. Type a title for the report in the Title text box, if desired. Then select or clear the appropriate checkboxes.
4. Clear the Include cover page when printing or saving checkbox, if desired. 5. Click OK. The Case report is listed under Report in the left pane and the text of the
report is displayed on the Report tab in the right pane.
Figure 1 - 15: Case Report Properties dialog box

Managing Transcripts 16
2: Managing Transcripts Importing a Transcript
To import a transcript, complete these steps: 1. Click the New arrow on the Main Menu toolbar and choose Transcript (from File) from
the menu. The Import Wizard–Transcript File dialog box is displayed. 2. Click Browse to display the Browse for Transcript Files dialog box. 3. Choose a file type from the Files of type drop-down list. Then select your transcript and
click Open. The Import Wizard–Transcript File dialog box is redisplayed. 4. Click Next. A message warning that the transcript has not been signed electronically
may be displayed. Click Continue. The Import Wizard–Transcript Properties dialog box is displayed (Figure 2-1).
5. In the Doc-Level Notes box, type a note, if desired. The note will be displayed in the transcript’s annotations folder in the left pane and on the Overview and Doc-level Notes tabs in the Transcript Properties dialog box. Additionally, you can include the note text in a search. For further information, see “Adding Doc-Level Notes” on page 83.
6. Click Groups to add the transcript to a data group. The Data Groups dialog box is displayed. Select the group to which you want to add the data and click OK. The Import Wizard–Transcript Properties dialog box is redisplayed. Note: You can use data groups to organize data in categories, which are displayed as
folders under data categories in the left pane. For more information on data groups, see “Working with Data Groups” on page 106.
Figure 2 - 1: Import Wizard – Transcript Properties dialog box

Managing Transcripts 17
7. Click Finish. The Import Wizard–Import Summary dialog box is displayed. To import another transcript, click Again. If you do not want to import another transcript, click Close. The transcript is listed under Transcripts in the left pane and the text of the transcript is displayed in the right pane (Figure 2-2).
Note: If you see next to the transcript, the transcript has been signed. Westlaw Case Notebook automatically adds characters in the transcript to the list of characters in the case. If characters are added when you import the transcript, the Characters tab is also displayed after you import the transcript. Opening an Existing Transcript
To open a transcript, complete these steps: 1. If necessary, click Transcripts in the left pane to display a list of all transcripts in the
case. 2. Double-click the transcript you want to open. The text of the transcript is displayed in
the right pane.
Figure 2 - 2: Imported transcript

Managing Transcripts 18
Creating a Transcript Summary
The Transcript Summary feature allows you to summarize portions of a transcript and create a report of the transcript summary items. To create a transcript summary, complete these steps:
1. Open the transcript you want to summarize. 2. Click the New arrow on the Main Menu toolbar and choose Transcript Summary from
the menu. The Summary Item section is displayed below the transcript in the right pane, shown outlined in Figure 2-3.
3. The arrows in the left margin of the transcript designate the start and end positions of the transcript summary item. By default, page 1, line 1 is the start position and page 1, line 2 is the end position of the first summary item. To change the start position:
• Type a new page and line number, e.g., 13:25, into the Start Position text box on the toolbar in the Summary Item section.
• Click the arrow next to the Start Position text box and choose a page and line number from the drop-down list.
To change the end position: • Type a new page and line number, e.g., 15:9, into the End Position text box. • Click the arrow next to the End Position text box and choose a page and line
number from the drop-down list. • Click a page and line number in the left margin of the transcript.
Note: You can set start and end positions only for portions of the transcript that you have not summarized previously.
Figure 2 - 3: Summary Items Section

Managing Transcripts 19
4. Type a name for the transcript summary item, e.g., Current employment, into the Subject text box, if desired.
5. In the Subject section, type a summary of the portion of the transcript you selected, if desired. Note: You can also copy transcript text and paste it into the summary item, if desired. 6.
6. To check the spelling in a summary item, click the Spell check ( ) button on the toolbar.
7. To create a new transcript summary item, click the New Summary Item ( ) button on the toolbar.
8. To view consecutive summary items, click the Previous Item button ( ) or the Next Item button ( ) on the toolbar.
9. Click the click the Close button ( ) to close the Summary Item section. All summary items are saved automatically when you click the New Summary Item button or close the Summary Item section. They are listed in the Summary Items folder under the transcript in the left pane. Note: Once you save a summary item, you cannot change its page and line numbers. CREATING A TRANSCRIPT SUMMARY REPORT
This Transcript Summary report lists the page and line numbers, the subject, and the text of all transcript summary items. To create a Transcript Summary report, complete these steps:
1. Click the Transcript Summary Report button ( ) on the toolbar in the Summary Item section or click the Report button ( ) on the main menu toolbar and choose Transcript Summaries from the menu. The Transcript Summary Report Properties dialog box is displayed.
2. All of the transcripts in the case are selected on the Data tab by default. To remove a transcript from the report, clear its checkbox.
3. Click Groups to include the data in a data group in your outline. The Data Groups dialog box is displayed. Select the group you want to include in the outline and click OK. The Transcript Summary Report Properties dialog box is redisplayed.
4. Click the Display tab to view a list of display options. Type a title for the report into the Title text box, if desired. Then select or clear the appropriate checkboxes.
5. Click OK. The Transcript Summary report is listed under Report in the left pane and the text of the report is displayed on the Report tab in the right pane (Figure 2-4).

Managing Transcripts 20
When viewing the report, you can:
• Click the Hit arrows in the left pane to view the next or previous summary in the report. • Click the Sort by arrow in the left pane to sort your report.
Saving a Transcript Summary Report To save a transcript summary report, complete these steps:
1. Click Save As on the toolbar above the report in the right pane. The Save As dialog box is displayed.
2. Select a location for the file. 3. Type a name for the file into the File name text box. 4. Choose a file type from the Save as type drop-down list. 5. Click Save.
Printing a Transcript Summary Report To print a transcript summary report, click Print on the toolbar above the report in the right pane to display the Print dialog box and then click Print. OPENING A TRANSCRIPT SUMMARY ITEM
1. If necessary, click Transcripts in the left pane to display a list of all transcripts in the case.
2. Double-click the transcript containing the summary item you want to open. The text of the transcript is displayed in the right pane.
3. Double-click the Summary Items folder under the transcript in the left pane to view a list of summary items.
Figure 2 - 4: Transcript Summary report

Managing Transcripts 21
4. Double-click the summary item you want to open. The item is displayed in the Summary Item section below the transcript in the right pane.
DELETING A TRANSCRIPT SUMMARY ITEM
To delete a summary item, right-click the summary item in the left pane and click Delete. The message Permanently delete the selected summary item? is displayed. Click Yes. Closing a Transcript
To close a transcript so that it is no longer displayed in the right pane, click the Close button on the transcript’s tab.
Deleting a Transcript
To delete a transcript, right-click the transcript in the left pane and choose Delete from the menu. The message Permanently delete the selected Transcript and all associated Annotations? is displayed. Click Yes. Printing a Transcript with Annotations
You can display annotations, Quick Marks, and Issue Marks in printed transcripts. For condensed transcripts, you can also print annotations, including notes and author information, in the footer of the document. To print a transcript with annotations in the footer of the document, complete these steps:
1. Open the transcript you want to print. 2. Click the Print arrow on the toolbar above the transcript and choose Print Preview
Condensed from the menu. The Print Preview dialog box is displayed. 3. Click the Properties icon ( ) to display the Page Setup–Condensed Transcript dialog box
(Figure 2-4). 4. Click the Annotations tab (Figure 2-5).

Managing Transcripts 22
5. Select the Display Annotations checkbox, if necessary. 6. To include or exclude annotations associated with specific issues from the printed
transcript, click Select Issues. The Select Issues dialog box is displayed. Issues will be listed in this dialog box only if they have previously been created. See “Working with Issues” on page 86.
7. Select or clear the checkboxes next to the issues you want to include or exclude and click OK. The Page Setup–Condensed Transcript dialog box is redisplayed.
8. Clear the Include Quick Marks checkbox, if desired. 9. Clear the Include Annotations with no Issues checkbox, if desired. 10. Select the Display annotations in footer checkbox. 11. Choose how you want the annotations displayed in the transcript text from the Display
drop-down list. 12. Click OK. The transcript with its annotations is displayed (Figure 2-6).
Figure 2 - 5: Page Setup – Condensed Transcript dialog box – Annotations tab

Managing Transcripts 23
Note: Overlapping annotations are highlighted in gray. The annotation Range available in the footer to help you determine the length of the overlapping annotations.
13. Click the Print icon ( ) to print the transcript.
Printing Headers and Footers in Transcripts
You can add a header and footer to each page of a printed transcript, which can help you view transcript information when printing selected pages. For example, to add a header, complete these steps:
1. Open the transcript you want to print. 2. Click the Print arrow on the toolbar above the transcript and click Print Preview Full-
Sized or Print Preview Condensed on the menu. The Print Preview dialog box is displayed.
3. Click the Properties icon ( ) to display the Page Setup dialog box. 4. Click the Page tab (Figure 2-7).
Figure 2 - 6: Preview of transcript with annotations

Managing Transcripts 24
5. Select the Print header and footer checkbox. 6. Click a different font and size in the Font and Size lists and select the Bold checkbox, if
desired. 7. Click Edit Text. The Header and Footer dialog box is displayed. 8. Click Header 1. The Top Header Line dialog box is displayed (Figure 2-8).
9. Type your information into the boxes. To add field data to a box, e.g., case matter information, click Insert Field and click a field in the menu (Figure 2-8).
10. Click OK. The Header and Footer dialog box is redisplayed.
Figure 2 - 7: Page setup dialog box – Page tab
Figure 2 - 8: To Header Line dialog box

Managing Transcripts 25
11. Click Close. The Page Setup dialog box is redisplayed. 12. Click OK. The transcript with the header is displayed (Figure 2-9).
13. Click the Print icon to print the transcript. Printing Exhibits Linked to Transcripts
The Batch Print feature allows you to print multiple documents at one time, including exhibits that are linked to transcripts. To print exhibits that are linked to transcripts, complete these steps:
1. Click Batch Print on the File menu. The items to Print dialog box is displayed (Figure 2-10).
2. Select the Transcripts checkbox in the left pane. By default, all transcripts are selected in the right pane. To exclude a transcript from being printed, clear its checkbox.
3. Select the Print Exhibits linked to Transcripts checkbox. 4. Click Print.
Figure 2 - 9: Preview of transcript with header
Figure 2 - 10: Items to Print dialog box

Managing Transcripts 26
Viewing Transcript Properties
To view the properties for a transcript, right-click the transcript name in the left pane and click Properties on the menu. For further information on properties, see “Working with Properties” on page 79.

Updating Transcripts 27
3: Updating Transcripts Westlaw Case Notebook transcripts can be updated using the following types of files:
• E-Transcript (PTX or EXE) files—files containing transcript text and, if the transcript is signed, the signature details
• ASCII (text only) files—files containing transcript text, usually received from the court reporter
• Portable Transcript (PTF) files—files containing transcript text and annotations, usually received from another Westlaw Case Notebook user
• LiveNote Evidence Format (LEF) files—files containing transcripts, exhibits, exhibit links, and possibly synchronized video
Note: You can also import CT Summation (TRN) files and Timaro Technologies Post-Production Time-Stamp (PTS) files.
Any annotations, including Quick Marks and Issue Marks, are automatically transferred to the updated transcript. No work product will be lost because all annotations are linked to the transcript text, not to the page and line references. Therefore, annotations made in the old transcript are simply transferred to the same text location in the updated transcript.
Starting the Updating Process
To update a transcript, you must first assign draft status to the transcript. To assign draft status to a transcript, complete these steps:
1. Click the Transcript Properties button ( ) on the toolbar above a transcript in the right pane to display the Transcript Properties dialog box.
2. Choose Draft from the Status drop-down list. 3. Click OK.
Updating with a PTX or EXE File
1. Click the Update Transcript button ( ) on the toolbar above a transcript in the right pane. The Update Transcript–Transcript File dialog box is displayed.
2. Click Browse to display the Browse for Transcript Files dialog box. 3. Select the PTX or EXE file that was sent to you and click Open. The Update Transcript–
Transcript File dialog box is redisplayed.

Updating Transcripts 28
4. Click Next. A message warning that the transcript has not been signed electronically may be displayed. Click Continue. The Update Transcript–Transcript Properties dialog box is displayed.
5. Click Finish. The Update Transcript–Update Completed dialog box is displayed. 6. Click Close. Updating with an ASCII File
1. Click the Update Transcript button ( ) on the toolbar above a transcript in the right pane. The Update Transcript–Transcript File dialog box is displayed.
2. Click Browse to display the Browse for Transcript Files dialog box. 3. Select the ASCII file that was sent to you and click Open. (Different CAT systems create
different extensions on ASCII files.) The Update Transcript–Transcript File dialog box is redisplayed.
4. Click Next. A message warning that the transcript has not been signed electronically may be displayed. Click Continue. The Update Transcript–Import Details dialog box is displayed.
5. Click Next. The Update Transcript–Import Confirm dialog box is displayed. 6. Click Next. The Update Transcript–Transcript Properties dialog box is displayed. 7. Click Finish. The Update Transcript–Update Completed dialog box is displayed. 8. Click Close. Updating with a PTF File
Use this method when you want to merge two sets of annotations into one transcript when replication is not available:
1. Click the Update Transcript button ( ) on the toolbar above a transcript in the right pane. The Update Transcript–Transcript File dialog box is displayed.
2. Click Browse to display the Browse for Transcript Files dialog box. 3. Select the PTF file and click Open. The Update Transcript–Transcript File dialog box is
displayed. 4. The Replace existing text with new text checkbox is automatically selected. If there are
no changes to the text and you want to only merge annotations, clear the checkbox. 5. The Import Annotations checkbox is automatically selected. If you want to only replace
text and not merge annotations, clear the checkbox. 6. In the Import Annotations section, Add to existing annotations is automatically
selected. This is the correct selection for merging annotations. Select Replace existing Annotations if you want to replace one set of annotations with another set.

Updating Transcripts 29
7. Click Next. A message warning that the transcript has not been signed electronically may be displayed. Click Continue. The Update Transcript–Transcript Properties dialog box is displayed.
8. Click Finish. The Update Transcript–Update Completed dialog box is displayed. 9. Click Close.
Updating with a LEF File
LEF files may contain the transcript with exhibit files and links to exhibit references in the transcript, the transcript with exhibit files and links to exhibit references in the transcript and synchronized video, or the transcript with synchronized video but no exhibits or exhibit links.
1. Click the Update Transcript button ( ) on the toolbar above a transcript in the right pane. The Update Transcript–Transcript File is displayed.
2. Click Browse to display the Browse for Transcript Files dialog box. 3. Select the LEF file and click Open. The Update Transcript-Transcript File dialog box is
redisplayed. 4. The Replace existing text with new text checkbox is automatically selected. If there are
no changes to the transcript text, clear the checkbox. 5. The Import exhibits checkbox is automatically selected. If you do not want to import
exhibits, clear the checkbox. 6. The Import Annotations checkbox is automatically selected. If you do not want to
import annotations, clear the checkbox. 7. In the Import Annotations section, Add to existing Annotations is automatically
selected. This is the correct selection for merging the annotations. Select Replace existing Annotations if you want to replace one set of annotations with another set.
8. Click Next. A message warning that the transcript has not been signed electronically may be displayed. Click Continue. The Update Transcript–Transcript Properties dialog box is displayed.
9. Click Finish. The Update Transcript–Update Completed dialog box is displayed. 10. Click Close.

Managing Documents 30
4: Managing Documents You can add key documents to Westlaw Case Notebook to quickly categorize and search. Importing a Document
To import a document, complete these steps: 1. Click the New arrow on the Main Menu toolbar and choose Document (from File) from
the menu. The Data Import Wizard–Document Files dialog box is displayed. 2. Click Add to display the Open dialog box. 3. Select your document and click Open. The Data Import Wizard–Document Files dialog
box is redisplayed. 4. Click Groups to add the document to a data group. The Data Groups dialog box is
displayed. Select the group to which you want to add the data and click OK. The Data Import Wizard–Document Properties dialog box is redisplayed. Note: You can use data groups to organize data in categories, which are displayed as
folders under data categories in the left pane. For more information on data groups, see “Working with Data Groups” on page 106.
5. Click Next. The Data Import Wizard–Document Properties dialog box is displayed (Figure 4-1).
6. By default, the title of the document is entered for you into the Title box. Type a different name for the document, if desired.
7. Select a document type from the Type drop-down list, if desired.
Figure 4 - 1: Data Import Wizard-Document Properties dialog box

Managing Documents 31
8. Type the author’s name into the Author text box or choose the name from the drop-down list, if desired.
9. Type the recipient’s name into the Recipient text box or choose the name from the drop-down list, if desired.
10. Type a number in the Bates range and Through text boxes, if desired. 11. Select the Document Date checkbox, if desired. When you select this checkbox, the
current day’s date is entered in the text box automatically. Click the arrow to select another date.
12. The OCR checkbox is automatically selected if the document is an image file or PDF file. 13. Type a note into the Doc-Level Notes box, if desired. The note will be displayed in the
document’s Annotations folder in the left pane and on the Overview and Doc-Level Notes tabs in the Document Properties dialog box. Additionally, you can include the note text in a search. For further information, see “Adding Doc-Level Notes” on page 83.
14. Click Finish. The Import Completed dialog box with a list of the documents that you imported is displayed. Note: If Westlaw Case Notebook fails to import a document, an error message is
displayed in the dialog box. You can record the error by clicking Copy to Clipboard and pasting the message into another application.
15. Click OK. The document is listed under Documents in the left pane and the text of the document is displayed in the right pane (Figure 4-2).
Figure 4 - 2: Imported documents

Managing Documents 32
Importing Multiple Documents
To import multiple documents, complete these steps: 1. Click the New arrow on the Main Menu toolbar and choose Document (from File) from
the menu. The Data Import Wizard–Document Files dialog box is displayed. 2. Click Add to display the Open dialog box (Figure 4-3).
3. Select your documents and click Open. The Data Import Wizard–Document Files dialog box is redisplayed (Figure 4-4).
Note: For most file types, each file is imported as a separate document. For image files, you have the option of importing each file as a separate document or merging multiple files into one document. To merge multiple image files, make sure the Batch Import, each file is separate document checkbox is clear. To import each file as a separate document, select the checkbox.
Figure 4 - 3: Open dialog box
Figure 4 - 4: Data Import Wizard-Document Files dialog box

Managing Documents 33
4. Click Groups to add the documents to a data group. The Data Groups dialog box is displayed. Select the group to which you want to add the data and click OK. The Data Import Wizard–Document Properties dialog box is redisplayed. Note: You can use data groups to organize data in categories, which are displayed as
folders under data categories in the left pane. For more information on data groups, see “Working with Data Groups” on page 106.
5. Click Finish. The Import Completed dialog box with a list of the documents that you imported is displayed. Note: If Westlaw Case Notebook fails to import a document, an error message is
displayed in the dialog box. You can record the error by clicking Copy to Clipboard and pasting the message into another application.
7. Click OK. The documents are listed under Documents in the left pane and the text of the first document is displayed in the right pane.
Importing Load Files
To import a load file, complete these steps: 1. Click the New arrow on the Main Menu toolbar and choose Document (from File) from
the menu. The Data Import Wizard–Document Files dialog box is displayed. 2. Click Load File to display the Open dialog box. 3. Select your document and click Open. The Data Import Wizard–Document Files dialog
box is redisplayed. 4. Click Groups to add the documents to a data group. The Data Groups dialog box is
displayed. Select the group to which you want to add the data and click OK. The Data Import Wizard–Document Properties dialog box is redisplayed. Note: You can use data groups to organize data in categories, which are displayed as
folders under data categories in the left pane. For more information on data groups, see “Working with Data Groups” on page 106.
5. Click Next. The Data Import Wizard–Load Files: Select the Load File Field Delimiter dialog box is displayed (Figure 4-5).

Managing Documents 34
6. Choose the file type for the load file from the File Type drop-down list. The field delimiter, row delimiter, and text qualifier are automatically entered for you. The First row contains field names checkbox is selected, if appropriate. Note: If your load file is not listed in the File Type drop-down list, choose Custom from
the list. Then choose the appropriate field delimiter, row delimiter, and text qualifier from the drop-down lists.
7. Click Next. The Data Import Wizard–Load Files: Select the Load File Field Mappings dialog box is displayed (Figure 4-6).
8. Assign a title to each field in the file by mapping the field. For example, to map the first field, which contains Bates Numbers, in Figure 4-6, select the field by clicking [none] at
Figure 4 - 5: Data Import Wizard-Load Files: Select the Load File Field Delimiter dialog box
Figure 4 - 6: Data Import Wizard-Load Files: Select the Load Files Field Mapping dialog box

Managing Documents 35
the top of the first column. Then choose Bates Number from the Mapping drop-down list. Repeat this process for each field you want to map. Note: You must map the Doc-Level Notes, Doc-Level Issues, and Data Groups fields
multiple times, allowing you to assign more than one column to the same field. Therefore, if the load file contains multiple columns with notes, coding, or other metadata, you can map all of them to the Doc-Level Notes, Doc-Level Issues, and Data Groups fields, and then include that data in searches and reports.
9. If you do not want to import a field, select the field and then select the Do not import field (Skip) checkbox.
10. If a field indicates that the load file contains a row for each page of a document, select the field. Then select the Field indicates start of new document when checkbox and choose an option from the drop-down list.
11. Click Finish. The Import Completed dialog box with a list of the documents that you imported is displayed. Note: If Westlaw Case Notebook fails to import a document, an error message is
displayed in the dialog box. You can record the error by clicking Copy to Clipboard and pasting the message into another application.
12. Click OK. The documents are listed under Documents in the left pane. Sending Documents to Westlaw Case Notebook Using Windows Explorer
You can send documents that are saved on your computer to Westlaw Case Notebook using Windows Explorer. To send a document using Windows Explorer, complete these steps:
1. Locate the document you want to send. 2. Right-click the document, then choose Send To, and click Case Notebook as Document
from the menu (Figure 4-7). The Data Import Wizard–Document Properties dialog box is displayed. Figure 4 - 7: Windows Explorer menu

Managing Documents 36
3. Fill in the text boxes as appropriate. 4. Click Finish. The Import Completed dialog box with a list of the documents that you
imported is displayed. Note: If Westlaw Case Notebook fails to import a document, an error message is
displayed in the dialog box. You can record the error by clicking Copy to Clipboard and pasting the message into another application.
5. Click OK. The document is listed under Documents in the left pane and the text of the document is displayed in the right pane.
Sending Documents to Westlaw Case Notebook from Microsoft Outlook
You can send e-mail and attached documents to Westlaw Case Notebook directly from Microsoft Outlook. When you install Westlaw Case Notebook, a Westlaw Case Notebook menu is automatically displayed in Microsoft Outlook (Figure 4-8). To send an e-mail and an attached document from Microsoft Outlook, complete these steps:
1. Access Microsoft Outlook. 2. You can do one of the following:
• Click the email you want to send, and then click Send as Document on the Case Notebook menu.
• Right-click the email and click Send to Case Notebook as Document on the menu.
The Load Files dialog box is displayed. 3. Click Groups to add the sent documents to a data group. The Data Groups dialog box is
displayed. Select the group to which you want to add the document and click OK. Note: You can use data groups to organize data in categories, which are displayed as
folders under data categories in the left pane. For more information on data groups, see “Working with Data Groups” on page 106.
4. Click Finish. The Import Completed dialog box with a list of the documents that you imported is displayed. Note: If Westlaw Case Notebook fails to import a document, an error message is
displayed in the dialog box. You can record the error by clicking Copy to Clipboard and pasting the message into another application.
Figure 4 - 8: Westlaw Case Notebook menu in Microsoft Outlook

Managing Documents 37
5. Click OK. The e-mail and attachment are listed under Documents in the left pane and the text of the e-mail is displayed in the right pane (Figure 4-9).
Note: You can also send documents to Case Notebook from Westlaw CaseLogistix. For further
information, see Westlaw CaseLogistix online Help. Opening an Existing Document
To open a document, complete these steps: 1. If necessary, click Documents in the left pane to display a list of all documents in the
case. 2. Double-click the document you want to open. The text of the document is displayed in
the right pane.
Using the Document List
When you click Documents in the left pane, the list of documents is displayed as a table in the right pane that includes document properties, e.g., Bates numbers, Date, Notes, and Issues (Figure 4-10).
Figure 4 - 9: Email and attached document

Managing Documents 38
SORTING DOCUMENTS
To sort documents in the table, click a column header. ADDING AND REMOVING COLUMNS
To add or remove a column in the table, click Columns on the toolbar above the table, and then click a column on the menu. FREEZING THE FIRST COLUMN
To freeze the first column of the table, right-click the first column header and then click Freeze First Column on the menu. DELETING SINGLE AND MULTIPLE DOCUMENTS
• To delete a single document, right-click the document in the table and click Delete on the menu.
• To delete multiple documents, press the Ctrl or Shift key to select the documents, then right-click the selection and click Delete on the menu.
When you click Delete on the menu, the message Permanently delete the selected Document and all associated Annoations? is displayed. Click Yes.
Figure 4 - 10: Documents table

Managing Documents 39
Viewing Document Properties
To view the properties of a document, right-click the document name in the left pane and click Properties on the menu. For further information on properties, see “Working with Properties” on page 79. Closing a Document To close a document so that it is no longer displayed in the right pane, click the Close button ( ) on the document’s tab.

Managing Pleadings 40
5: Managing Pleadings Westlaw Case Notebook allows you to add pleadings to categorize and search. Importing a Pleading
To import a pleading, complete these steps: 1. Click the New arrow on the Main Menu toolbar and choose Pleading (from File) from
the menu. The Data Import Wizard–Pleading Files dialog box is displayed. 2. Click Add to display the Open dialog box. 3. Select your pleading and click Open. The Data Import Wizard–Pleading Files dialog box is
redisplayed. 4. To add the pleading to a data group, click Groups. The Data Groups dialog box is
displayed. Select the group to which you want to add the pleading and click OK. The Data Import Wizard–Pleading Properties dialog box is redisplayed. Note: You can use data groups to organize data in categories, which are displayed as
folders under data categories in the left pane. For more information on data groups, see “Working with Data Groups” on page 106.
5. Click Next. The Data Import Wizard–Pleading Properties dialog box is displayed (Figure 5-1).
6. By default, the title of the pleading is entered for you in the Title box. Type a different title for the pleading, if desired.
Figure 5 - 1: Data Import Wizard-Pleading Properties dialog box

Managing Pleadings 41
7. Click a type from the Type drop-down list, if desired. Note: Many Canadian types (such as, Statement of Claim, Reply and factum), will not initially appear in the Type drop-down list. However, when you manually create a type in the Type field, it will also thereafter be added in the drop-down for future Pleading classifications.
8. Type the author’s name in the Author text box or choose the name from the drop-down list, if desired.
9. Type the recipient’s name in the Recipient text box or choose the name from the drop-down list, if desired.
10. Select the Document Date checkbox, if desired. When you select this checkbox, the current day’s date is entered in the text box automatically. Click the arrow to select another date.
11. The OCR checkbox is automatically selected if the pleading is an image file or PDF file. 12. Type a note in the Doc-Level Notes box, if desired. The note will be displayed in the
pleading’s Annotations folder in the left pane and on the Overview and Doc-Level Notes tabs in the Pleadings Properties dialog box. Additionally, you can include the note text in a search. For further information, see “Add Doc-Level Notes” on page 84.
13. Click Finish. The Import Completed dialog box with a list of the pleadings that you imported is displayed. Note: If Westlaw Case Notebook fails to import a pleading, an error message is
displayed in the dialog box. You can record the error by clicking Copy to Clipboard and pasting the message into another application.
14. Click OK. The pleading is listed under Pleadings in the left pane and the text of the pleading is displayed in the right pane (Figure 5-2).
Figure 5 - 2: Imported pleading

Managing Pleadings 42
Sending Pleadings to Westlaw Case Notebook Using Windows Explorer
You can send pleadings that are saved on your computer to Westlaw Case Notebook using Windows Explorer. To send a pleading using Windows Explorer, complete these steps:
1. Locate the pleading you want to send. 2. Right-click the pleading, then choose Send To, an click Case Notebook as Pleading from
the menu. The Data Import Wizard–Pleading Properties dialog box is displayed.
3. Fill in the text boxes as appropriate. 4. Click Finish. The Import Completed dialog box with a list of the pleadings that you
imported is displayed. Note: If Westlaw Case Notebook fails to import a pleading, an error message is
displayed in the dialog box. You can record the error by clicking Copy to Clipboard and pasting the message into another application.
5. Click OK. The pleading is listed under Pleadings in the left pane and the text of the pleading is displayed in the right pane.
Sending Pleadings to Westlaw Case Notebook from Microsoft Outlook
You can send email and attached pleadings to Westlaw Case Notebook directly from Microsoft Outlook. When you install Westlaw Case Notebook, a Westlaw Case Notebook menu is automatically displayed in Microsoft Outlook (Figure 5-4).
Figure 5 - 3: Windows Explorer menu
Figure 5 - 4: Westlaw Case Notebook menu in Microsoft Outlook

Managing Pleadings 43
To send an e-mail and an attached pleading from Microsoft Outlook, complete these steps: 1. Access Microsoft Outlook. 2. You can do one of the following:
• Click the email you want to send, then on the Case Notebook menu, click Send as Pleading.
• Right-click the email and click Send to Case Notebook as Pleading on the menu. The Load Files dialog box is displayed.
3. Click Groups to add the sent pleadings to a data group. The Data Groups dialog box is displayed. Select the group to which you want to add the pleading and click OK. Note: You can use data groups to organize data in categories, which are displayed as
folders under data categories in the left pane. For more information on data groups, see “Working with Data Groups” on page 106.
4. Click Finish. The Import Completed dialog box with a list of the pleadings that you imported is displayed. Note: If Westlaw Case Notebook fails to import a pleading, an error message is
displayed in the dialog box. You can record the error by clicking Copy to Clipboard and pasting the message into another application.
5. Click OK. The e-mail and attachment are listed under Pleadings in the left pane and the text of the e-mail is displayed in the right pane (Figure 5-6).
Note: You can also send pleadings to Westlaw Case Notebook from Westlaw CaseLogistix. For further information, see Westlaw CaseLogistix online help.
Figure 5 - 5: Email and attached pleading

Managing Pleadings 44
Opening an Existing Pleading
To open a pleading, complete these steps: 1. If necessary, click Pleadings in the left pane to display a list of all pleadings in the case. 2. Double-click the pleading you want to open. The text of the pleading is displayed in the
right pane. Viewing Pleading Properties
To view the properties of a pleading, right-click the pleading name in the left pane and click Properties on the menu. For further information on properties, see “Working with Properties” on page 79. Deleting a Pleading
To delete a pleading, right-click the pleading in the left pane and choose Delete from the displayed menu. The message Permanently delete the selected Pleading and all associated Annotations? is displayed. Click Yes. Closing a Pleading
To close a pleading so that it is no longer displayed in the right pane, click the Close button ( ) on the pleading’s tab.

Managing Research 45
6: Managing Research If you are conducting research on Westlaw Canada, you can send your search result to Westlaw Case Notebook. From Westlaw Case Notebook, you can quickly update KeyCite information and access Westlaw Canada to conduct further research. Searching Westlaw Canada
To search Westlaw Canada, complete these steps: 1. Choose Westlaw Search from the Search menu in Westlaw Case Notebook. The Search
Westlaw: Westlaw Search Options dialog box is displayed (Figure 6-1).
2. By default, Search Westlaw is selected. To search Westlaw Canada, select Search Westlaw Canada. Click Save. The Search Westlaw dialog box is displayed (Figure 6-2). Note: When you click Save, your preference is stored as a cookie in your browser. To
view the options again, you must first delete cookies from your browser, then repeat step 1.
Figure 6 - 1: Search Westlaw: Westlaw Search Options dialog box

Managing Research 46
3. By default, the Terms and Connectors tab is displayed. Type your Terms and Connectors query, e.g., wrongful! /5 terminat! , into the Terms text box.
4. In the Source box, type a database identifier or choose a database, e.g., Canadian All Cases (CAN-ALLCASES), from the drop-down list.
5. Click Search Westlaw. The Westlaw Canada sign-on page is displayed. 6. Type your OnePass username, password, and client identifier into the text boxes. 7. Click Sign On. The result list for your search is displayed in the left frame with the full
text of your first hit in the right frame (Figure 6-3).
Figure 6 - 2: Search Westlaw dialog box
Figure 6 - 3: Westlaw Canada results

Managing Research 47
USING FIND & PRINT
You can use the Find & Print feature on Westlaw Canada to retrieve documents by citation and send them directly to Westlaw Case Notebook. To send documents to Westlaw Case Notebook, complete these steps:
1. Click Find & Print at the top of any Westlaw Canada page to display the Find a Document page (Figure 6-4).
2. Type one or more citations into the Enter Citation(s) text box in the right frame. You can type up to 20 citations; separate them with a semicolon or hard return.
3. Select Export to Westlaw Case Notebook in the Select Delivery Options section. 4. Click Send Request. The Export to Westlaw Case Notebook dialog box is displayed. 5. Complete steps 2–10 below to view the documents in Westlaw Case Notebook.
SENDING A WESTLAW CANADA SEARCH RESULT TO WESTLAW CASE NOTEBOOK
After conducting your research on Westlaw Canada, you can send the result list or selected documents to Westlaw Case Notebook. To send the result list or selected documents to Westlaw Case Notebook, complete these steps:
1. To send the result list, click the Export to Case Notebook icon ( ) in the upper-right corner. To send specific documents in the result list, select the checkbox next to each document you want to send and then click the Export to Case Notebook icon. The Export to Westlaw Case Notebook page is displayed (Figure 6-5).
Figure 6 - 4: Find a Document page

Managing Research 48
2. Make certain the matter number corresponds to the client-matter number for the case in Westlaw Case Notebook. (To view the client-matter number for the case, choose Case Properties from the File menu in Westlaw Case Notebook.)
3. Choose an issue from the Recent Categories drop-down list, if desired. 4. Type a comment into the Comments text box, if desired. 5. Click Save. The Download Confirmation dialog box is displayed. 6. Click Complete Download. The File Download dialog box is displayed. 7. Click Open. The Data import Wizard–Research Files dialog box is displayed. 8. To add the document to a data group, click Groups. The Data Groups dialog box is
displayed. Select the group to which you want to add the document and click OK. The Data Import Wizard–Research Files dialog box is redisplayed. Note: You can use data groups to organize data in categories, which are displayed as
folders under data categories in the left pane. For more information on data groups, see “Working with Data Groups” on page 106.
9. Click Finish. The Import Completed dialog box with a list of the documents that you imported is displayed. Note: If Westlaw Case Notebook fails to import a document, an error message is
displayed in the dialog box. You can record the error by clicking Copy to Clipboard and pasting the message into another application.
10. Click OK. The Westlaw Canada result list or documents you selected are listed under Research in the left pane and the result list or the text of the first document is displayed in the right pane (Figure 6-6).
Figure 6 - 5: Export to Westlaw Case Notebook page

Managing Research 49
Updating KeyCite Information
You can quickly update KeyCite information for a Westlaw Canada document in Westlaw Case Notebook. To update KeyCite information, complete these steps:
1. Choose Update KeyCite Flags from the Tools menu in Westlaw Case Notebook. The Update KeyCite Login dialog box is displayed (Figure 6-7).
2. Type your OnePass username and password into the text boxes and click OK. 3. The Update KeyCite Report is listed under Report in the left pane and the text of the
report is displayed in the right pane (Figure 6-8).
Figure 6 - 6: Imported Westlaw document
Figure 6 - 7: Update KeyCite Login dialog

Managing Research 50
Note: Research items with a changed status will be highlighted in yellow. Sending Research Documents to Westlaw Case Notebook Using Windows Explorer
You can send research documents that are saved on your computer to Westlaw Case Notebook using Windows Explorer. To send a research document using Windows Explorer, complete these steps:
1. Locate the research document you want to send. 2. Right-click the research document, then choose Send To, and click Westlaw Case
Notebook as Research from the menu (Figure 6-9). The Data Import Wizard–Research Properties dialog box is displayed.
3. Fill in the text boxes as appropriate. 4. Click Finish. The Import Completed dialog box with a list of the documents that you
imported is displayed.
Figure 6 - 8: Update KeyCite Report
Figure 6 - 9: Windows Explorer menu

Managing Research 51
Note: If Westlaw Case Notebook fails to import a document, an error message is displayed in the dialog box. You can record the error by clicking Copy to Clipboard and pasting the message into another application.
5. Click OK. The research document is listed under Research in the left pane and the text of the research document is displayed in the right pane.
Importing Research Documents
You can import other research documents into Westlaw Case Notebook. To import a research document, complete these steps:
1. Click the New arrow on the Main Menu toolbar and choose Research (from File) from the menu. The Data Import Wizard–Research Files dialog box is displayed.
2. Click Add to display the Open dialog box. 3. Select your research document and click Open. The Data Import Wizard–Research Files
dialog box is redisplayed. 4. To add the document to a data group, click Groups. The Data Groups dialog box is
displayed. Select the group to which you want to add the document and click OK. The Data Import Wizard–Research Files dialog box is redisplayed. Note: You can use data groups to organize data in categories, which are displayed as
folders under data categories in the left pane. For more information on data groups, see “Working with Data Groups” on page 106.
5. Click Next. The Data Import Wizard–Research Properties dialog box is displayed (Figure 6-10).
Figure 6 - 10: Data Import Wizard – Research Properties dialog box

Managing Research 52
6. By default, the title of the document is entered into the Title box. Type a different title, if desired.
7. Choose a document type from the Type drop-down list, if desired. 8. Choose an author from the Author drop-down list, if desired. 9. Select the Research Date checkbox, if desired. When you select this checkbox, the
current day’s date is entered in the text box automatically. Click the arrow to select another date.
10. The OCR checkbox is automatically selected if the document is an image file or PDF file. 11. Type a note into the Doc-Level Notes box, if desired. The note will be displayed in the
research document’s Annotations folder in the left pane and on the Overview and Doc-Level Notes tabs in the Research properties dialog box. Additionally, you can include the note text in a search. For further information, see “Adding Doc-Level Notes” on page 83.
12. Click Finish. The Import Completed dialog box with a list of the documents that you imported is displayed. Note: If Westlaw Case Notebook fails to import a document, an error message is
displayed in the dialog box. You can record the error by clicking Copy to Clipboard and pasting the message into another application.
13. Click OK. The research document is listed under Research in the left pane and the text of the document is displayed in the right pane.

Managing Key Facts 53
7: Managing Key Facts Westlaw Case Notebook allows you to create key facts to quickly and easily organize, view, and share the most important facts in the litigation. Creating a Key Fact
To create a key fact, complete these steps: 1. Click the New arrow on the Main Menu toolbar and choose Key Fact from the menu.
The Key Fact Properties dialog box is displayed (Figure 7-1).
2. On the Details tab: • Type a name for the key fact, e.g., Investigation Report, into the Title text box. • Select the Start Date checkbox, if desired. If you have not previously created any
key facts, the current day’s date is entered in the text box automatically. Otherwise, the start date of the last key fact you created is entered. Type a new start date or click the arrow to select another start date.
• Select the Set Time checkbox, if desired. If you have not previously created any key facts, 12:00PM is entered in the text box automatically. Otherwise, the start time of the last key fact you created is entered. Type a different start time, if desired.
• Select the End Date checkbox, if desired. If you have not previously created any key facts, the current day’s date is entered into the text box automatically. Otherwise, the end date of the last key fact you created is entered. Type a new end date or click the arrow to select another end date.
Figure 7 - 1: Key Fact Properties dialog box

Managing Key Facts 54
• Select the Set Time checkbox, if desired. If you have not previously created any key facts, 12:00PM is entered into the text box automatically. Otherwise, the end time of the last key fact you created is entered. Type a different end time, if desired.
• Type a description, e.g., Request for investigation made by supervisor, into the Description text box.
• Clear the Undisputed checkbox, if desired. 3. Click the Issues tab and select one or more issues, if desired. Issues will be listed on this
tab only if they have previously been created. See “Working with Issues” on page 86. 4. Click the Sources tab and select one or more sources, if desired. Sources will be listed on
this tab only if annotations have previously been created. See “Working with Annotations” on page 91.
5. Click the Characters tab and select one or more characters, if desired. Characters will be listed on this tab only if they have previously been created. See “Managing Characters” on page 60.
6. Click the Overview tab to review your selections, if desired (Figure 7-2). Note: You can click any item on the Overview tab to display the appropriate tab, where
you can edit the information.
7. Click OK. The key fact is listed under Key Facts in the left pane and displayed on the Key Facts tab in the right pane (Figure 7-3).
Figure 7 - 2: Key Fact Properties dialog box – Overview tab

Managing Key Facts 55
Creating a Key Facts Report
To create a Key Facts report, complete these steps: 1. Click the Report button ( ) on the Main Menu toolbar, and then choose Key
Facts from the menu. The Key Facts Report Properties dialog box is displayed (Figure 7-4).
2. All of the key facts in the case are selected on the Data tab by default. To remove a key fact from the report, clear its checkbox.
3. Clear the Include disputed facts checkbox if you want to exclude disputed facts from the report and create an undisputed facts report.
Figure 7 - 3: Key Facts tab
Figure 7 - 4: Key Facts Report Properties dialog box

Managing Key Facts 56
4. Clear the Include undisputed facts checkbox if you want to exclude undisputed facts from the report and create a disputed facts report.
5. Clear the Group by undisputed facts checkbox if you do not want to group undisputed facts in the report to create a report with undisputed and disputed facts grouped together.
6. Click the Display tab to view a list of display options. You can: • Type a title for the report into the Title box, if desired. • By default, the key facts are sorted by Title in the report; click Date in the Sort By
list, if desired. • Select or clear the appropriate checkboxes under Key Facts. • Select the Include cover page when printing or saving checkbox, if desired.
7. Click OK. The Key Facts report is listed under Report in the left pane and the text of the report is displayed on the Report tab in the right pane.
When viewing the report, you can:
• Click the heading next to a key fact icon in the report to go to the key fact on the Key Facts tab.
• Click the Hit arrows in the left pane to view the next or previous key fact in the report. Editing a Key Fact
To edit a key fact, right-click the key fact and choose Properties from the menu. The Key Fact Properties dialog box is displayed. Make the appropriate changes and click OK.
Figure 7 - 5: Key Facts report

Managing Key Facts 57
Deleting a Key Fact
To delete a key fact, right-click the key fact and choose Delete from the menu. The message Permanently delete the selected Key Fact? is displayed. Click Yes. Closing the Key Facts Tab
To close the Key Facts tab so that it is no longer displayed in the right pane, click the Close button on the tab. Sending Key Facts to Microsoft Word or Corel WordPerfect
You can send key facts to Microsoft Word or Corel WordPerfect and then work with them in that word-processing program. To send key facts to a Microsoft Word or Corel WordPerfect, select the checkboxes next to the key facts you want to send. Click Send on the toolbar above the key facts in the right pane and then choose Word or WordPerfect from the menu. The program you selected opens and the key facts are displayed in a document. Sending Key Facts to West Case Timeline
You can send key facts to West Case Timeline and use them to create a chart. For more information on West Case Timeline, refer to the Case Timeline User Guide, which can be downloaded at www.westlawcanada.com/support/reference.htm. To send key facts to West Case Timeline, complete these steps:
1. Select the checkboxes next to the key facts you want to send. 2. Click Send on the toolbar above the key facts in the right pane, and then choose Case
Timeline from the menu. 3. The message Would you like to view import results? is displayed. Click Yes if you want to
display a dialog box summarizing the results of the import. 4. If you clicked Yes in step 3, the Import_log.txt–Notepad dialog box is displayed. Click the
Close button. The key facts are displayed as events on the Event Entry tab in Case Timeline.
Note: • If West Case Timeline is not open when you send the key facts, West Case Timeline
opens automatically and creates a new timeline file for you. If you are working in one or more timelines when you send the key facts, the key facts are displayed in the last timeline you accessed.

Managing Key Facts 58
• If you modify a key fact in Westlaw Case Notebook, you must resend the key fact to West Case Timeline to update the event. Only the modified information in the key fact is sent from Westlaw Case Notebook.
SAVING KEY FACTS AS A WEST CASE TIMELINE FILE
If desired, you can also save your key facts as a West Case Timeline (TAB) file and then import the file into West Case Timeline. To create a West Case Timeline file, complete these steps:
1. Choose Save As above the key facts in the right frame. The Save As dialog box is displayed.
2. Select a location for the West Case Timeline file. 3. Type a file name into the File name text box. 4. Choose West Case Timeline (*.tab) from the Save as type drop-down list. 5. Click Save.

Managing Characters 59
8: Managing Characters With Westlaw Case Notebook, you can easily keep track of all the characters in the litigation, such as parties, lawyers, experts, and witnesses, and their contact information. Adding Characters
You can add characters to a case manually, set Westlaw Case Notebook to add characters automatically, or add characters from a smart tags list. To add characters manually, you can:
• Create a character. • Import characters from a comma separated value (CSV) file.
Westlaw Case Notebook can add characters automatically when you:
• Enter or change the properties in a transcript, document, pleading, or outline. • Import transcripts, documents, or pleadings.
ADDING CHARACTERS MANUALLY
Creating a Character To create a character, complete these steps:
1. Click the New arrow on the Main Menu toolbar and choose Character from the menu. The Character Properties dialog box is displayed (Figure 8-1).
Figure 8 - 1: Character Properties dialog box
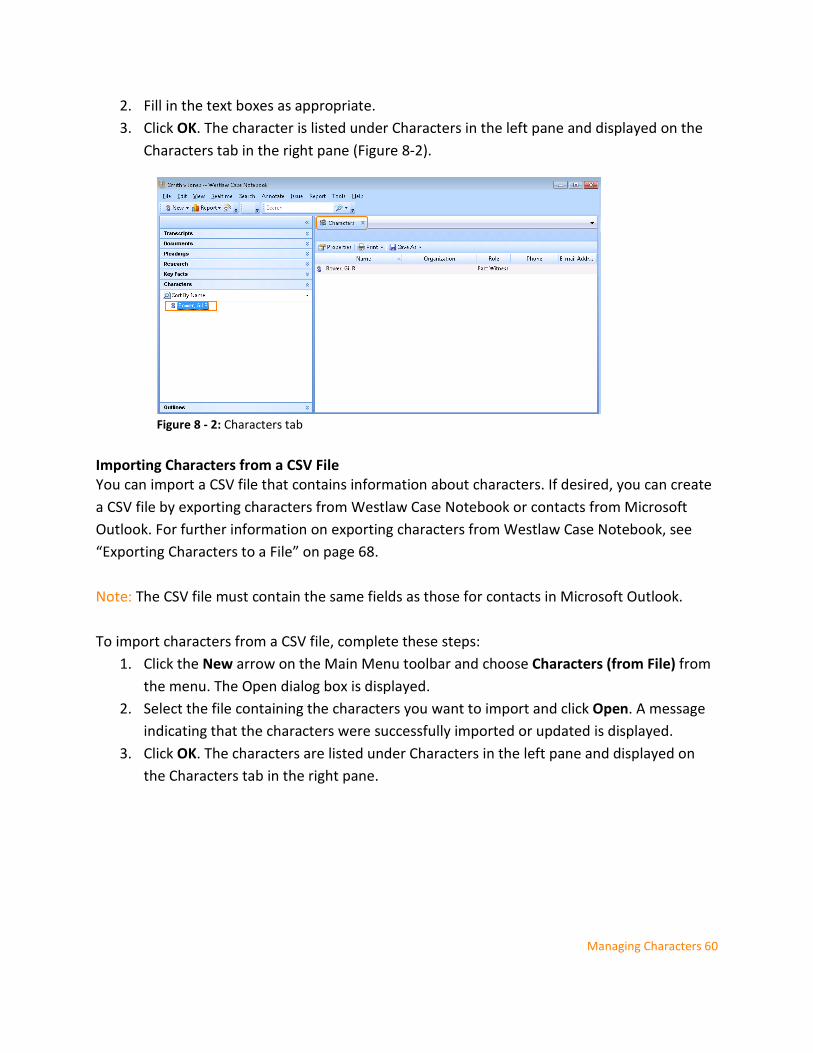
Managing Characters 60
2. Fill in the text boxes as appropriate. 3. Click OK. The character is listed under Characters in the left pane and displayed on the
Characters tab in the right pane (Figure 8-2). Importing Characters from a CSV File You can import a CSV file that contains information about characters. If desired, you can create a CSV file by exporting characters from Westlaw Case Notebook or contacts from Microsoft Outlook. For further information on exporting characters from Westlaw Case Notebook, see “Exporting Characters to a File” on page 68. Note: The CSV file must contain the same fields as those for contacts in Microsoft Outlook. To import characters from a CSV file, complete these steps:
1. Click the New arrow on the Main Menu toolbar and choose Characters (from File) from the menu. The Open dialog box is displayed.
2. Select the file containing the characters you want to import and click Open. A message indicating that the characters were successfully imported or updated is displayed.
3. Click OK. The characters are listed under Characters in the left pane and displayed on the Characters tab in the right pane.
Figure 8 - 2: Characters tab

Managing Characters 61
ADDING CHARACTERS AUTOMATICALLY
Changing the Properties of Transcripts, Documents, Pleadings, and Outlines Westlaw Case Notebook automatically adds characters when you add or change the name of a deponent in a transcript or outline or the author or recipient in a document or pleading. To change the deponent, author, or recipient information, complete these steps:
1. Right-click the transcript, document, pleading, or outline you want to change in the left pane and then click Properties from the displayed menu. The Properties dialog box is displayed.
2. Click the Details tab. 3. Make the changes in the appropriate text boxes. 4. Click OK. The character is listed under Characters in the left pane.
If you do not want Westlaw Case Notebook to add a character when you change the information in a transcript, document, pleading, or outline, complete these steps:
1. Choose Options from the Tools menu. The Options dialog box is displayed. 2. Click the Characters tab (Figure 8-3).
3. In the Automatically Create Characters from Properties section, clear the appropriate checkbox.
4. Click OK.
Figure 8 - 3: Options dialog box – Characters tab

Managing Characters 62
Importing Transcripts, Documents, and Pleadings When you import a transcript, document, or pleading, Westlaw Case Notebook scans the text and identifies the words that appear to be the names of persons or companies. You can set Westlaw Case Notebook to automatically add those names as characters to a case. To set Westlaw Case Notebook to automatically add characters when you import a transcript, document, or pleading, complete these steps:
1. Choose Options from the Tools menu. The Options dialog box is displayed. 2. Click the Characters tab (Figure 8-3).
3. Under Automatically Create Characters from Full Text, select the Create new characters from full text of transcripts, documents, and pleadings checkbox.
4. Click OK. ADDING CHARACTERS FROM A SMART TAGS LIST
When you import a transcript, document, or pleading, Westlaw Case Notebook uses character recognition software to identify words that appear to be the names of persons or companies. It then adds smart tags to those names and generates a list of the smart tags. You can use the list to find references to additional witnesses and specify the characters you want to add to the case.
Figure 8 - 4: Options dialog box-Characters tab

Managing Characters 63
Characters with smart tags are underlined with a blue dotted line, shown outlined in Figure 8-4. You can right-click a smart tag to:
• Modify a character’s information. • Delete the smart tag. • Create a Character report. • Retrieve a character’s profile on Westlaw.
Note:
• You cannot delete or modify smart tags when you replicate the case offline. • Smart tags are displayed in the transcript, document, or pleading only when the
characters are displayed on the Characters tab. To add characters to a case from smart tags list, complete these steps:
1. Click the New arrow on the Main Menu toolbar and choose Character (from Smart Tags) from the menu. The Character Smart Tags Wizard dialog box is displayed (Figure 8-6).
2. By default, all of the characters are selected. To exclude a character, clear its checkbox.
Figure 8 - 5: Smart tag
Figure 8 - 6: Character Smart Tags Wizard dialog box

Managing Characters 64
3. Click Finish. The characters are listed under Characters in the left pane and the smart tags are displayed in the transcript, document, or pleading you imported.
To set Westlaw Case Notebook to automatically add the characters to the case when you import a transcript, document, or pleading, see “Importing Transcripts, Documents, and Pleadings” on page 63.
Working with Aliases
When you import a transcript, document, or pleading, Westlaw Case Notebook scans the text for both the names of individuals and companies and the variations, or aliases, of those names. Westlaw Case Notebook then creates a list of the aliases. For example, if Westlaw Case Notebook identifies the character Joseph Adams, it may create the alias Joe. You can associate aliases with a character to include all references to the character in a Characters report. To associate an alias with a character, complete these steps:
1. Click Characters in the left pane to display the Characters tab in the right pane, if necessary.
2. Right-click the character with which you want to associate an alias, e.g., Cole, John, and choose Properties from the displayed menu. The Character Properties dialog box is displayed.
3. 3. Click the Aliases tab (Figure 8-7). Figure 8 - 7: Character Properties dialog box

Managing Characters 65
4. In the Other Aliases and Characters section, select the aliases, e.g., Cole and John, you
want to associate with the character. 5. Click the left arrow to move the aliases to the Aliases for Displayed Name section. 6. Click OK. The message Changes to aliases will not be reflected in Character Smart Tags
until you rebuild the Character Smart Tag index. Do you want to rebuild it now? is displayed.
7. Click Yes.
Retrieving a Character’s Profile from Westlaw
Note: This functionality does not typically contain Canadian-source content. Access will incur Westlaw database access charges.
Character profiles on Westlaw provide background information on individuals and companies including assets; civil filings; criminal records; lawsuit records; corporate records; connections between individuals and companies; and links to cases, jury trials, and settlements in which an lawyer, judge, or expert witness has participated. To retrieve a character’s profile from Westlaw, complete these steps:
1. Click Characters in the left pane to display the Characters tab in the right pane, if necessary.
2. In the right pane, right-click the character for whom you want to retrieve a profile and choose Profile on Westlaw from the displayed menu. Then choose one of the following from the submenu:
• PeopleMap (public records) to search public records using the tabbed PeopleMap page.
• Expert Library to search expert materials at the tabbed Expert Center page. • Person and Company Library to search materials for people and companies at
the tabbed Person and Company Investigator page. • Attorneys and Judges to search the Profiler–Profiles of Lawyer and Judges
database (PROFILERWLD), which includes the profiles of lawyers and judges from all 50 states, Puerto Rico, the Virgin Islands, the District of Columbia, Canada, England, and Europe).
• Arbitrators to search the Profiler–Profiles of Arbitrators database (PROFILER-ARB), which includes the profiles of arbitrators identified in securities, labor, and international arbitration awards and other Westlaw resources.

Managing Characters 66
Note: Some sources may not be included in your Westlaw Canada subscription. 3. At the Westlaw sign-on page, type your username, password, and client identifier into
the text boxes and click Sign On. 4. Depending on the source you selected in step 2, the appropriate tabbed page or Search
page is displayed. Note: For further information on searching public records on Westlaw Canada,
download a free copy of Searching Public Records on Westlaw or Westlaw PeopleMap at west.thomson.com /support/user-guide/westlaw/records.aspx.
5. After you retrieve a character’s profile, click the Export to Case Notebook icon ( ) in the upper-right corner of the profile. The Export to Westlaw Case Notebook page is displayed.
6. Make certain the matter number corresponds to the client-matter number for the case in Westlaw Case Notebook. (To view the client-matter number for the case, choose Case Properties from the File menu in Westlaw Case Notebook.)
7. Choose an issue from the Recent Categories drop-down list, if desired. 8. Type a comment in the Comments text box, if desired. 9. Click Save. The Download Confirmation dialog box is displayed. 10. Click Complete Download. The File Download dialog box is displayed. 11. Click Open. The Data import Wizard–Research Files dialog box is displayed. 12. Click Finish. The character’s profile is listed under Research in the left pane and the text
of the profile is displayed in the right pane. Creating a Characters Report
When you import data, Westlaw Case Notebook automatically links the names you list under Characters with references to those names in the text of transcripts, documents, or pleadings. This report lists every instance where a character appears in the data. To create a Characters report, complete these steps:
1. Click the Report button ( ) on the Main Menu toolbar, and then choose Characters from the menu. The Characters Report Properties dialog box is displayed (Figure 8-8).

Managing Characters 67
2. All of the characters in the case are selected on the Characters tab by default. To remove a character from the report, clear its checkbox.
3. Click the Data tab to display a list of all document types and data. By default, all document types and data are selected. To exclude a document type from the report, clear its checkbox. To exclude particular data from the report, click the document type containing the data, and then clear the checkboxes for the data you want to exclude.
4. Click the Display tab to view a list of display options. You can: • Type a title for the report into the Title text box, if desired. • Click an option in the Sort By list, if desired. By default, the characters are sorted by
Title in the report. • Select or clear the appropriate checkboxes. • Select the Include cover page when printing or saving checkbox, if desired.
5. Click the Context tab to display a list of context options. Select or clear the appropriate checkboxes.
6. Click OK. The Characters report, which includes the lines you marked and the surrounding questions and answers, is listed under Report in the left pane and the text of the report is displayed on the Report tab in the right pane.
Figure 8 - 8: Characters Report Properties dialog box

Managing Characters 68
Exporting Characters to a File
To generate a list of characters to use apart from Westlaw Case Notebook or to import into another Westlaw Case Notebook case, you can export the characters to a file. To export characters to a file, complete these steps:
1. Click Characters in the left pane, if necessary, to display the Characters tab in the right pane.
2. Click the Save As arrow on the toolbar above the characters in the right pane and choose Save All from the menu, or, if you selected individual characters on the Characters tab, choose Save Selected from the menu. The Save As dialog box is displayed.
3. Select a location for the file. 4. Type a name for the file into the File name text box. 5. Choose a file type from the Save as type drop-down list.
Note: If you want to import the characters into a different Westlaw Case Notebook case, you must save the list as a CSV file.
6. Click Save. Editing a Character
To edit the information for a character, right-click the character and choose Properties from the menu. The Character Properties dialog box is displayed. Make the appropriate changes and click OK. Deleting a Character
To delete a character, right-click the character and choose Delete from the menu. The message Permanently delete the selected Character? is displayed. Click Yes. Closing the Characters Tab
To close the Characters tab so that it is no longer displayed in the right pane, click the Close button ( ) on the tab.

69 Managing Outlines
9: Managing Outlines You can use the Outlines feature in Westlaw Case Notebook to gather materials in one place to prepare for events such as trials, discovery, arbitrations, or client interviews. For example, you can type an outline for a discovery and then insert links to potential exhibits, language from key documents, questions from transcripts, and Westlaw Canada research into the outline. All relevant materials are organized and displayed under Outlines in the left pane for easy access and printing. Creating an Outline
To create an outline, complete these steps: 1. Click the New arrow on the Main Menu toolbar and choose Outline from the menu. The
Create New Outline dialog box is displayed (Figure 9-1).
2. In the Deponent section: • Type a last name and first name into the Last and First text boxes. Note: After you create the outline, the deponent is added as a character in the case. • Choose a type of witness from the Type drop-down list.
3. In the Outline section: • Type a title for the outline into the Title box. • Choose the type from the Type drop-down list.
4. Type text in the Comments text box, if desired. 5. Click OK. 6. The outline is listed under Outlines in the left pane and displayed on a tab in the right
pane (Figure 9-2).
Figure 9 - 1: Create New Outline dialog box

Managing Outlines 70
Inserting Information into an Outline
To add information to an outline, you can type text in the outline or you can insert: • text from a document • a report • potential exhibits • transcript questions • a Westlaw Canada document
TYPING TEXT IN THE OUTLINE
You can type text directly into an outline. To format the text, use the icons on the toolbar above the outline or right-click in the outline and choose Format from the displayed menu. INSERTING TEXT FROM A DOCUMENT
You can copy text from a document in Westlaw Case Notebook and paste it into an outline. For further information, see “Transferring Document Text” on page 109. INSERTING A REPORT
You can insert an Annotations report, Issues report, Characters report, Full Text Search report, or Auto Tags report into an outline.
Figure 9 - 2: Outline tab

71 Managing Outlines
To insert a report into an outline, complete these steps:
1. Create a report. 2. Click Send on the toolbar above the report in the right pane and choose Outline from
the menu. The Select Outline dialog box is displayed. Note: To insert only the questions from the report in the outline, if available, choose Outline (Questions only) from the menu.
3. Select the outline in which you want to insert the report. 4. Click OK. The report is displayed in the outline. To view the outline, click its tab in the
right frame, if necessary (Figure 9-3). INSERTING POTENTIAL EXHIBITS
To insert links to potential exhibits in the outline, complete these steps: 1. Click in the outline where you want to insert the exhibits. 2. Click the Insert button ( ) on the toolbar above the outline and choose Insert
Potential Exhibits from the menu. The Insert Potential Exhibits dialog box is displayed (Figure 9-4).
Figure 9 - 3: Outline with report
Figure 9 - 4: Insert Potential Exhibits dialog box

Managing Outlines 72
3. Select a document type, and then select the checkboxes next to the documents you want to include in the outline.
4. Click Groups to include the data in a data group in your outline. The Data Groups dialog box is displayed. Select the group you want to include in the outline and click OK. The Insert Potential Exhibits dialog box is redisplayed.
5. Click OK. A reference to each document is listed under the outline in the left pane and a link to each document is displayed in the outline in the right pane (Figure 9-5).
INSERTING TRANSCRIPT QUESTIONS
You can insert transcript questions into an outline using the Insert feature or directly from a transcript using the Send feature. Inserting Transcript Questions Using the Insert Feature To insert transcript questions into an outline using the Insert feature, complete these steps:
1. Click the Insert button ( ) on the toolbar above the outline and choose Insert Transcript Questions from the menu. The Insert Transcript Questions dialog box is displayed (Figure 9-6).
Figure 9 - 5: Outline with exhibits
Figure 9 - 6: Insert Transcript Questions dialog box

73 Managing Outlines
2. Select the transcript containing the questions you want to include in the outline. 3. Select the Include answers checkbox, if desired. 4. Click OK. A link to the transcript and the transcript questions are displayed in the outline
(Figure 9-7). Inserting Transcript Questions Using the Send Feature To insert transcript questions into an outline using the Send feature, complete these steps:
1. Access the transcript containing the questions you want to send to the outline. 2. Click the arrow next to the Annotate Mode button ( ) on the toolbar above the
transcript in the right pane, and then choose the Copy button ( ) from the menu. 3. Select the text in the transcript that includes questions you want to send to the outline. 4. Right-click the selected text and choose Send, Outline (Questions only) from the menu.
The Select Outline dialog box is displayed. 5. Select the outline to which you want to send the transcript questions and click OK. A link
to the transcript and the transcript questions are displayed in the outline. INSERTING A WESTLAW DOCUMENT
You can retrieve a document from the Witness Examination Outlines database (OUTLINES-ALL) on Westlaw and insert it into the outline on Westlaw Case Notebook. Note: This feature is available to Canadian subscribers. Much of the content is international in
scope (e.g. Checklist of questions when cross-examining different types of professionals in tort proceedings.)
Figure 9 - 7: Outline with transcript questions

Managing Outlines 74
To insert a document from Westlaw, complete these steps: 1. Click in the outline where you want to insert the Westlaw document. 2. Click the Insert button ( ) on the toolbar above the outline and choose Insert
Westlaw Outline from the menu. The Search Westlaw dialog box is displayed (Figure 9-8).
3. By default, the table of contents for OUTLINES-ALL is displayed on the Outlines tab. To search the OUTLINES-ALL database: • Browse the table of contents by clicking the plus (+) and minus (–) symbols, and then
select the checkbox next to the document you want to retrieve. • Click Template to display a search template, then type your search terms into the
text boxes. For further information on formulating a search, see “Working with Full Text Search” on page 99.
4. Click Search Westlaw. The Westlaw sign-on page is displayed. 5. Type your username and password into the text boxes. The client-matter information
for the Westlaw Case Notebook case is entered for you into the Client ID text box. (To view the client-matter number for the case, choose Case Properties from the File menu in Westlaw Case Notebook.)
6. Click Sign On to display the Westlaw search result.
Figure 9 - 8: Search Westlaw dialog box-Outlines tab

75 Managing Outlines
7. To send a document to Westlaw Case Notebook, click the Export to Westlaw Case Notebook icon ( ) in the upper-right corner. The Export to Case Notebook page is displayed (Figure 9-9).
8. Click the Show arrow to add or remove a document element. Select or clear the checkboxes for the elements you want to add or remove, then click the Hide arrow.
9. Make certain the matter number corresponds to the client-matter number for the case in Westlaw Case Notebook.
10. By default, the title of the document is entered for you into the Title box. Type a different title, if desired.
11. Choose an issue from the Recent Categories drop-down list, if desired. 12. Type a comment into the Comments text box, if desired. 13. Click Save. The Download Confirmation dialog box is displayed. 14. Click Complete Download. The File Download dialog box is displayed. 15. Click Open. The Data Import Wizard–Research Files dialog box is displayed. 16. Click Finish. The Select Outline dialog box is displayed. 17. Select the outline in which you want to insert the document and click OK. The document
you selected is listed under Outlines in the left pane and the text of the document is displayed in the outline in the right pane (Figure 9-10).
Figure 9 - 9: Export to Westlaw Case Notebook dialog box

Managing Outlines 76
Viewing Documents in an Outline
To view a list of the documents that you inserted into an outline, click Outlines in the left pane, and then double-click the outline containing the documents. To jump to the place in the outline where you inserted a document, double-click the document in the left pane. To view the source document, click the link for the document in the outline. The document is displayed in the right pane. Printing an Outline
When you print an outline, you can also easily print the exhibits listed in the outline. To print an outline with listed exhibits, complete these steps:
1. Click the Print icon ( ) on the toolbar above the outline. The Print dialog box is displayed (Figure 9-11).
Figure 9 - 10: Outline with Westlaw document

77 Managing Outlines
2. Choose a printer from the Name drop-down list. 3. To print the exhibits listed in your outline with annotations, type a number in the
Number of Copies text box under Exhibits–Annotated Work Product. Note: You must select the Display Annotations checkbox on the Annotations tab if you
want to print annotations in exhibits. For further information, see steps 9–15 below.
4. Clear the Include blank page between exhibits checkbox, if desired. 5. Clear the Include header checkbox, if desired. 6. To print unannotated exhibits, type a number into the Number of Copies text box under
Exhibits–Originals. 7. Select the Include blank page between exhibits checkbox, if desired. 8. Click the Data tab to display all document types and data included in the outline. By
default, all document types and data are selected. To exclude a document type from being printed, clear its checkbox. To exclude particular data from being printed, select the document type containing the data, and then clear the checkboxes for the data you want to exclude.
9. Click the Annotations tab. 10. By default, the Display Annotations checkbox is selected. This must be selected if you
want to print annotations in the exhibits. 11. To include or remove annotations associated with specific issues from the printed
documents, click Select Issues. The Select Issues dialog box is displayed. (Issues will be listed in this dialog box only if they have previously been created. See “Working with Issues” on page 86.) Select or clear the checkboxes next to the issues you want to include or remove and click OK. The Print dialog box is redisplayed.
12. Clear the Include Annotations with no Issues checkbox, if desired.
Figure 9 - 11: Print dialog box

Managing Outlines 78
13. Clear the Display Annotations in footer checkbox, if desired. 14. Choose how you want the annotations displayed in the transcript text from the Display
drop-down list. 15. Click OK.
Opening an Existing Outline
To open an outline, complete these steps: 1. If necessary, click Outlines in the left pane to display a list of all outlines in the case. 2. Double-click the outline you want to open. The text of the outline is displayed in the
right pane. Deleting an Outline
To delete an outline, right-click the outline in the left pane and choose Delete from the menu. The message Permanently delete the selected outline? is displayed. Click Yes. Closing an Outline
To close an outline so that it is no longer displayed in the right pane, click the Close button ( ) on the outline’s tab.

79 Working with Properties
10: Working with Properties The Properties dialog box for a transcript, document, pleading, or research document allows you to:
• view all properties at a single glance • customize details • add doc-Level issues • add date and time values (document and pleading only) • add the document to a data group • add Doc-Level Notes
To access a Properties dialog box for a data type, right-click the document in the left pane and click Properties on the menu. By default, the Overview tab is displayed (Figure 10-1). You can quickly move to the next or previous item by clicking the Go to next or Go to previous arrow above the tabs, shown outlined in Figure 10-1.
Figure 10 - 1: Overview tab

Working with Properties 80
Using the Overview Tab
The Overview tab in the Properties dialog box displays key Case Notebook properties pertaining to the document, including its details, Doc-Level Notes, issues, and data groups. When you click an item on the Overview tab, the appropriate tab is displayed where you can edit the information. To add a Doc-Level Note on the Overview tab, click Add a Doc-Level Note. The Doc-Level Notes tab is displayed. For further information, see “Adding Doc-Level Notes” on page 83. Editing Details
When you import a transcript, document, pleading, or research document, you can enter details, such as the title, during the import process. To edit the details, click the Details tab in the Properties dialog box (Figure 10-2). Type the information in the appropriate boxes, and then click OK. Adding Doc-Level Issues
Case Notebook allows you to apply issues to: • Selected text when you create an annotation. For further information, see “Working
with Annotations” on page 91.
Figure 10 - 2: Details tab

81 Working with Properties
• The entire transcript, document, pleading, or research document when you create a Doc-Level Issue using the Properties dialog box.
• In addition to allowing you to apply issues as a document property, Doc-Level Issues also provide a method of transferring issues applied to documents in other software products, such as Westlaw CaseLogistix. Therefore, when you import documents with issue coding from other products, those issues can be transferred into Case Notebook as Doc-Level Issues. To add an issue to your entire document, click the Doc-Level Issues tab (Figure 10-3), and then select the checkbox for an issue in the dialog box or Manage Issues to add or edit issues. For further information on managing issues, see “Working with Issues” on page 86. Doc-Level Issues are displayed in the following locations:
• The Overview tab in the Properties dialog box under Doc-Level Issues and Annotations Issues, shown outlined in Figure 10-4.
Figure 10 - 3: Doc-Level Issues tab
Figure 10 - 4: Doc-Level Issue on Overview tab

Working with Properties 82
• The Doc-Level folder in the Annotations folder for the document, shown outlined in Figure 10-5. Double-click the issue to display the Doc-Level Issues tab in the Properties dialog box.
Adding Dates
Click the Dates tab in the Properties dialog box to apply a variety of dates to your document or pleading (Figure 10-6). Select the checkboxes for the type of date you want to add to your properties. By default, the current date is entered for you. Type a different date in the box or click the arrow to display a calendar and click a date, if desired.
Figure 10 - 5: Doc-Level Issue in the Doc-Level folder
Figure 10 - 6: Dates tab

83 Working with Properties
When you select a date checkbox, you can add a time to the box by selecting the Set Time checkbox, if desired. By default, 12:00PM is entered for you. Type a different time, if desired. Add Documents to a Group
You can quickly add your transcript, document, pleading or research document to a data group using the Properties dialog box. To add a data type to a group, click the Data Groups tab, then select the checkbox for a group in the box (Figure 10-7). To add or edit a data group, click Manage Groups. For further information, see “Working with Data Groups” on page 106. Adding Doc-Level Notes
Westlaw Case Notebook allows you to add notes to: • Selected text when you create an annotation. For further information, see “Working
with Annotations” on page 91. • The entire transcript, document, pleading, or research document when you create Doc-
Level Note using the Properties dialog box. In addition to allowing you to apply a note as a document property, Doc-Level Notes also provide a method of transferring notes applied to documents in other software products, such
Figure 10 - 7: Data Groups tab

Working with Properties 84
as Westlaw CaseLogistix. Therefore, when you import documents with notes from other products, those notes can be transferred into Westlaw Case Notebook as Doc-Level Notes. Note: You can include note text when you run a Full Text Search. To add a Doc-Level Note using the Properties dialog box, complete these steps:
1. Click the Doc-Level Notes tab (Figure 10-8).
2. Click New. The New Doc-Level Note dialog box is displayed (Figure 10-9).
Figure 10 - 8: Doc-Level Notes tab
Figure 10 - 9: New Doc-Level Note dialog box

85 Working with Properties
3. Type a note in the box, and then click OK. Doc-Level Notes are displayed in the following locations:
• The Doc-Level Notes tab in the Properties dialog box. • The Overview tab in the Properties dialog box under Doc-Level Notes. • The Doc-Level folder in the Annotations folder for the document in the left pane,
shown outlined Figure 10-10. Double-click a note to display the Edit Doc-Level note dialog box.
Figure 10 - 10: Doc-Level Notes in the Doc-Level folder

Working with Issues 86
11: Working with Issues An issue is a type of annotation that relates to a particular subject. Westlaw Case Notebook allows you to apply issues to:
• Selected text when you create an annotation. For further information, see “Working with Annotations” on page 91.
• An entire transcript, document, pleading, or research document. For further information, see “Adding Doc-Level issues” on page 80.
Categorizing documents or annotations in a case by issue makes it easy to retrieve all information on a specific subject when you need it. Issues are created for each case and are the same for all users of that case. When creating new issues, it is important to not duplicate previous issues. Although the issues in a case are the same for all users, each user can choose the issues to display on the Main Menu toolbar. The Main Menu toolbar enables you to access issues quickly when creating annotations. You can display up to 10 issues on the Main Menu toolbar. Creating Issues
To create an issue, complete these steps: 1. Click the Manage Issues button ( ) on the Main Menu toolbar. The Manage Issues
dialog box is displayed (Figure 11-1). 2. Click New to display the New Issue dialog box. 3. Type the name of the issue, e.g., Work history, in the Issue text box. 4. Click the Color arrow to select a color for the issue, if desired. 5. Click Repeat if you are creating multiple issues. 6. When you finish creating issues, click OK in the New Issue dialog box. The issues are
listed under All Issues in the Manage Issues dialog box. Figure 11 - 1: Manage Issues dialog box

87 Working with Issues
CREATING SUB-ISSUES
You can create sub-issues, which are a subset of existing issues. You can add up to two levels of sub-issues. To create a sub-issue, complete these steps:
1. Click the Manage Issues button ( ) on the Main Menu toolbar. The Manage Issues dialog box is displayed.
2. Click the # button ( ), if it is not already selected, to display numbers next to the issues (Figure 11-2).
3. Select the issue, e.g. Work history, for which you want to create a sub-issue in the All Issues section. Note: If you do not select an issue, the sub-issue is added to the bottom of the list.
4. Click New to display the New Issue dialog box. 5. Type the name of the issue, e.g., Missed work, in the Issue text box. 6. Click the Color arrow to select a color for the issue, if desired. 7. Click Repeat if you are creating multiple sub-issues. 8. When you finish creating sub-issues, click OK in the New Issue dialog box. The sub-issues
are listed under the issue you selected. 9. Select the sub-issue, if necessary, and then click the Increase Indent button ( ). The
sub-issue is indented under the issue and the sub-issue number becomes sequential to the issue number.
To remove the sub-issue from under the issue, click the Decrease Indent button ( ).
Figure 11 - 2: Manage Issues dialog box

Working with Issues 88
Adding Issues to the Toolbar
To prioritize an issue or sub-issue and add it to the Main Menu toolbar, complete these steps: 1. Click the Manage Issues button on the Main Menu toolbar. The Manage Issues dialog
box is displayed. 2. Select an issue or sub-issue from the All Issues section, e.g., Work history. 3. Click the left arrow to move the issue or sub-issue to the My Top Issues section. 4. Repeat steps 2 and 3 for each issue or sub-issue you want to prioritize and add to the
Main Menu toolbar. You can prioritize up to 10 issues and sub-issues (Figure 11-3). 5. To reprioritize an issue or sub-issue and change its order on the Main Menu toolbar,
select the issue or sub-issue from the My Top Issues section and click the up arrow or down arrow.
6. Click OK when you finish prioritizing the issues or sub-issues. Importing Issues
You can create a list of issues in any word-processing program that can save files as XML (Extensible Markup Language) files. To import issues and sub-issues from a file, complete these steps:
1. Click the New arrow on the Main Menu toolbar, and then choose Issues (from File) from the menu. The Open dialog box is displayed.
2. Select the file containing the issues you want to import and click Open. 3. The message Issues were successfully imported from the chosen file is displayed. Click
OK.
Figure 11 - 3: Prioritizing issues
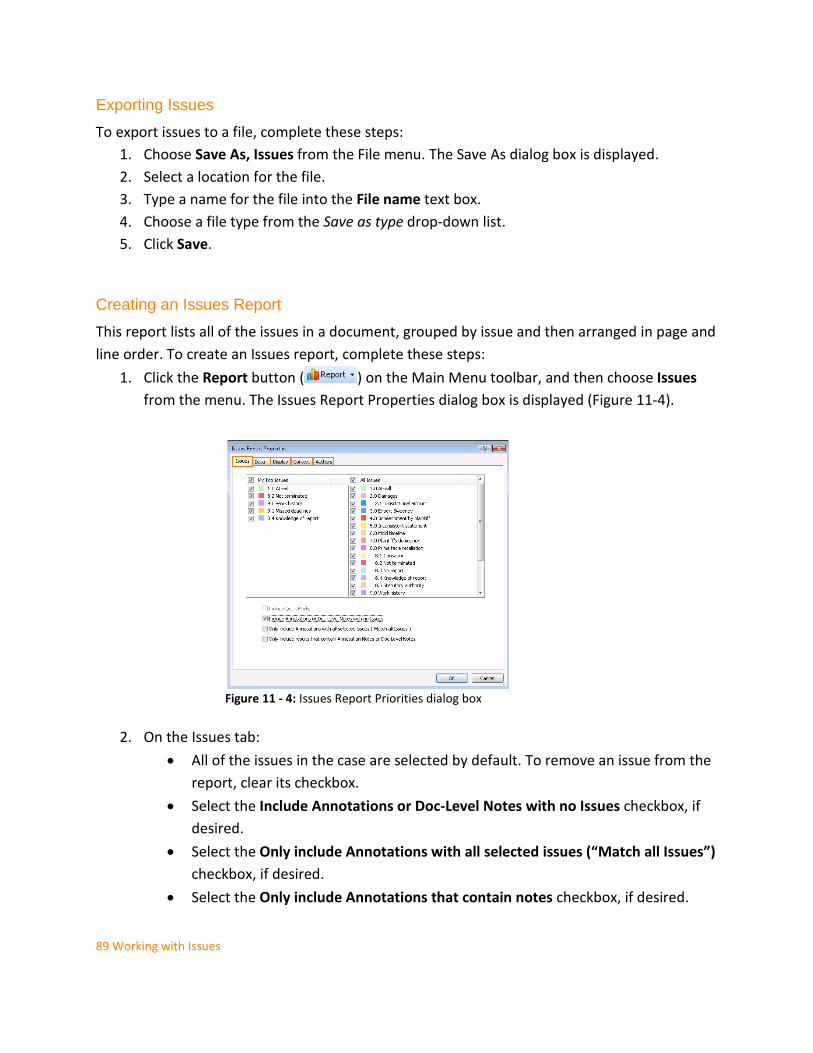
89 Working with Issues
Exporting Issues
To export issues to a file, complete these steps: 1. Choose Save As, Issues from the File menu. The Save As dialog box is displayed. 2. Select a location for the file. 3. Type a name for the file into the File name text box. 4. Choose a file type from the Save as type drop-down list. 5. Click Save.
Creating an Issues Report
This report lists all of the issues in a document, grouped by issue and then arranged in page and line order. To create an Issues report, complete these steps:
1. Click the Report button ( ) on the Main Menu toolbar, and then choose Issues from the menu. The Issues Report Properties dialog box is displayed (Figure 11-4).
2. On the Issues tab: • All of the issues in the case are selected by default. To remove an issue from the
report, clear its checkbox. • Select the Include Annotations or Doc-Level Notes with no Issues checkbox, if
desired. • Select the Only include Annotations with all selected issues (“Match all Issues”)
checkbox, if desired. • Select the Only include Annotations that contain notes checkbox, if desired.
Figure 11 - 4: Issues Report Priorities dialog box

Working with Issues 90
3. Click the Data tab to display a list of all document types and data. By default, all document types and data are selected. To exclude a document type from the report, clear its checkbox. To exclude particular data from the report, click the document type containing the data, and then clear the checkboxes for the data you want to exclude.
4. Click the Display tab to view a list of display options. You can: • Type a title for the report into the Title text box, if desired • Click an option in the Sort By list. • Select or clear the appropriate checkboxes • Select the Include cover page when printing or saving checkbox, if desired.
5. Click the Context tab to display a list of context options. Select or clear the appropriate checkboxes.
6. Click the Authors tab to display a list of annotation authors. If you are working in a secure case on a network, a list of all annotation authors is displayed. If you are working in the case offline, just LocalUser is displayed. Select or clear the appropriate checkboxes.
7. Click OK. The Issues report, which includes the lines you marked and the surrounding questions and answers, is listed under Report in the left pane and the text of the report is displayed on the Report tab in the right pane (Figure 11-5).
When viewing the report, you can:
• Click the heading next to a document icon in the report to go to the location in the document where the issue appears.
• Click the Hit arrows in the left pane to view the next or previous issue in the report. • Click the Sort by arrow in the left pane to sort your report.
Figure 11 - 5: Issues report

91 Working with Annotations
12: Working with Annotations An annotation is a highlighted portion of document text. It may be associated with an issue; a note (a comment associated with an annotation); or an attachment, e.g., a document or image. Annotations are contained in the Annotations folder under the document in the left pane (Figure 12-1). Click the plus (+) and minus (-) symbols to view the annotations. Double-click an annotation to jump to the annotation in the transcript. By default, annotations are grouped by issue, as shown in Figure 12-1. To change how annotations are displayed, click Display Options on the View menu. On the General tab in the Display Options dialog box, clear the Group Annotations by Issue checkbox. Adding an Annotation Using the Apply Issue Mode Button
To add an annotation associated with an issue using the Apply Issue Mode button on the Main menu toolbar, complete these steps:
1. Make certain the Apply Issue Mode button ( ) is displayed on the toolbar above the document in the right pane. To display the Apply Issue Mode button, click the Annotate Mode button ( ) on the toolbar above the document, then click Apply Issue Mode on the menu. Note: The Annotate Mode button is the default button.
2. Click the issue button on the Main Menu toolbar to select the issue and assign it to the annotation you are adding.
Figure 12 - 1: Annotations

Working with Annotations 92
3. Select the text you want to annotate. The text is highlighted with the colour of the issue you selected (Figure 12-2). The issue will be assigned to every annotation you create until you cancel its selection on the Main Menu toolbar.
Note: You can select more than one issue on the Main Menu toolbar. Annotated text will be
highlighted with the colour of the last issue that you select.
Adding an Annotation Using the Annotation Properties Dialog Box
You can use the Annotation Properties dialog box to add an annotation associated with a note, issue, key fact, attachment, or a combination of these. To view the Annotation Properties dialog box, make certain the Annotate Mode button ( ) is displayed on the toolbar above the document in the right pane. Next, select the text in the document you want to annotate. The Annotation Properties dialog box is displayed (Figure 12-3).
Figure 12 - 2: Annotated text
Apply Issue Mode button
Figure 12 - 3: Annotation Properties dialog box

93 Working with Annotations
ADDING A NOTE TO AN ANNOTATION
The Note tab is the default tab in the Annotation Properties dialog box. To add a note to the annotated text, type the note into the Note text box and click OK. ADDING AN ISSUE TO AN ANNOTATION
To associate an issue with an annotation, complete these steps: 1. Click the Issues tab in the Annotation Properties dialog box. A list of prioritized issues
(those that appear on the Main Menu toolbar) is displayed in the My Top Issues section and a list of all issues is displayed in the All Issues section.
2. To assign one or more issues to the annotation, select the appropriate checkboxes. Note that the checkboxes for any issues you previously selected on the Main Menu toolbar are already selected.
3. Click OK. The annotated text is highlighted with the color of the issue you selected. ADDING A KEY FACT TO AN ANNOTATION
To assign a key fact to an annotation, click the Key Facts tab in the Annotation Properties dialog box, select the key fact you want to assign to the annotation, and click OK. ADDING AN ATTACHMENT TO AN ANNOTATION
To add an attachment to an annotation, complete these steps: 1. Click the paper clip icon ( ) in the Annotation Properties dialog box. The Edit
Attachment dialog box is displayed. 2. Click Browse to display the Open dialog box is. Select your document and click Open.
The Edit Attachment dialog box is redisplayed. 3. Click OK. 4. Click OK again in the Annotations Properties dialog box. For transcripts, a paper clip icon
appears next to the annotation (Figure 12-4). To view the attachment, click the paper clip icon.
Figure 12 - 4: Paperclip icon in a transcript

Working with Annotations 94
ASSOCIATING VIDEO WITH AN ANNOTATION
You can associate video with an annotation if the transcript has been synchronized with video footage. For further information, see “Working with Annotations and Video in Transcripts” on page 123. Transferring Annotations
You can transfer an annotation to another application such as Microsoft Word, Corel WordPerfect, or TrialDirector using either of the following methods:
• Click Send in the Annotation Properties dialog box, then choose the application from the menu.
• Right-click in the annotation, choose Send from the menu, and then choose the application from the submenu.
To transfer an annotation that is associated with a video to PowerPoint, see “Transferring Annotations to Microsoft PowerPoint” on page 125. Sending Annotations to Instant Messages
To send an annotation to a team member during an instant messaging session, complete these steps:
1. Click Send in the Annotation Properties dialog box, then choose Realtime Chat from the menu.
2. Click OK. The annotation is displayed in the Annotation text box in the Stream section in the left pane.
3. Click Send to send the annotation to your chat group. Or choose an individual from the Send To drop-down list and click Send.
4. Repeat steps 1–3 for each annotation you want to send (Figure 12-5). Figure 12 - 5: Sending an annotation to an instant message
Click Send to send the
annotation to your chat
group

95 Working with Annotations
Editing Annotations
To change the information associated with an annotation, right-click in the annotation and choose Edit Annotation from the menu. The Annotation Properties dialog box is displayed. Make the appropriate changes and click OK. Deleting Annotations
To delete an annotation, right-click in the annotation and choose Delete Annotation from the menu. The message Permanently delete the selected Annotation? is displayed. Click Yes. Viewing an Annotation Attachment
To view an annotation attachment, right-click in the annotation and choose Open Attachment from the menu. Creating an Annotations Report CREATING AN ANNOTATIONS REPORT FOR THE DOCUMENT YOU ARE VIEWING
You can generate a report that includes a list of all the annotations in a document, arranged in page and line order. It also includes the surrounding questions and answers. To create an Annotations report for the document you are viewing, right-click the Annotations folder in the left pane and click Report. The report is listed in the Report section in the left pane and the text of the report is displayed on the Report tab in the right pane (Figure 12-6).
Figure 12 - 6: Annotations report

Working with Annotations 96
When viewing the report, you can: • Click the heading next to a document icon in the report to go to the location in the
document where the annotation appears. • Click the Hit arrows in the left pane to view the next or previous annotation in the
report. • Click the Sort by arrow in the left pane to sort your report.
CREATING AN ALL ANNOTATIONS REPORT
To create an Annotations report for one or more documents, complete these steps: 1. Click the Report button ( ) on the Main Menu toolbar, and then choose All
Annotations from the menu. The All Annotations Report Properties dialog box is displayed (Figure 12-7).
2. On the Issues tab: • All of the issues in the case are selected by default. To exclude an issue from the
report, clear its checkbox. • Clear the Include Quick Marks checkbox, if desired. • Clear the Include Annotations or Doc-Level Notes with no Issues checkbox, if
desired.
Figure 12 - 7: All Annotations Report Properties dialog box

97 Working with Annotations
• Select the Only include Annotations with all selected issues (“Match all Issues”) checkbox, if desired.
• Select the Only include results that contain Annotations Notes or Doc-Level Notes checkbox, if desired.
3. Click the Data tab to display a list of all document types and data. By default, all document types and data are selected. To exclude a document type from the report, clear its checkbox. To exclude particular data from the report, click the document type containing the data, and then clear the checkboxes for the data you want to exclude.
4. Click the Display tab to view a list of display options. You can: • Type a title for the report into the Title text box, if desired. • Click an option in the Sort By list. • Select or clear the appropriate checkboxes. • Select the Include cover page when printing or saving checkbox, if desired.
5. Click the Context tab to display a list of context options. Select or clear the appropriate checkboxes.
6. Click the Authors tab to display a list of annotation authors. If you are working in a secure case on a network, a list of all annotation authors is displayed. If you are working in the case offline, just LocalUser is displayed. Select or clear the appropriate checkboxes.
7. Click OK. The Annotations report, which includes the lines you marked and the surrounding questions and answers, is listed in the Report section in the left pane and the text of the report is displayed on the Report tab in the right pane.
Figure 12 - 8: All Annotations Report

Working with Annotations 98
When viewing the report, you can: • Click the heading next to a document icon in the report to go to the location in the
document where the annotation appears. • Click the Hit arrows in the left pane to view the next or previous annotation in the
report. • Click the Sort by arrow in the left pane to sort your report.
CREATING A VERBATIM DIGEST REPORT
This is an Annotations report that includes only highlighted document text. To create a Verbatim Digest report, first create an Annotations report. Then click the Properties button ( ) on the toolbar above the report in the right pane to display the All Annotations Report Properties dialog box. Click the Display tab and clear all checkboxes in the Annotations section. Then, click the Context tab. In the Transcripts section, select the Show annotated text checkbox and clear the Additional context checkbox, then click OK. CREATING A NOTES REPORT
This report lists all of the annotations in a document that have a note, arranged in page and line order. To create a Notes report, first create an Annotations report. Then click the Properties button ( ) on the toolbar above the report in the right pane to display the All Annotations Report Properties dialog box. On the Issues tab, select the Only include Annotations that contain notes checkbox and click OK. CREATING AN ATTACHMENTS REPORT
This report lists all of the annotations in a document that have an attachment, arranged in page and line order. To create an Attachments report, first create an Annotations report. Then click the Properties button ( ) on the toolbar above the report in the right pane to display the All Annotations Report Properties dialog box. On the Issues tab, clear the Include Quick Marks checkbox. Then click the Display tab. Clear all checkboxes in the Annotations section except the Attachments checkbox, then click OK.

99 Working with Full Text Search
13: Working with Full Text Search The Full Text Search feature enables you to search one or more documents in the open case for specific terms. Creating a Full Text Search
You can enter a search that consists of key terms from your issue and connectors specifying the relationship between those terms. To create a search, complete these steps:
1. Choose Full Text Search from the Search menu. The Full Text Search Properties dialog box is displayed (Figure 13-1).
2. Formulate your search by choosing search terms significant to your issue and deciding which connectors to place between your terms. To retrieve variations of terms, use the root expander (!) and the universal character (*). To retrieve a phrase, place quotations marks (“ ”) around the phrase. For more information on creating a search, see “Formatting a Full Text Search” on page 102.
3. Type your search, e.g., document /20 handwritten, into the Terms text box. Or choose a search from the Recent drop-down list.
4. Click the Data tab to display all document types and data. By default, all document types and data are selected. To exclude a document type from the search, clear its checkbox. To exclude particular data from your search, click the document type containing the data, and then clear the checkboxes for the data you want to exclude.
Figure 13 - 1: Full Text Search Properties dialog box

Working with Full Text Search 100
5. Click Groups to include a group to your search, if desired. 6. Click OK. Information about the search is displayed under Search Results in the left pane
(Figure 13-2). To work with your search result, you can:
• Click a line in the result list to display that place in the result. • Click Edit ( ) to edit your search. • Click Report ( ) to create a report for your search result. • Click the Term ( ) arrows to view the next or previous search term in your result. • Click the Sort by arrow to sort your search result (Figure 13-3).
Figure 13 - 2: Full Text Search result
Figure 13 - 3: Sort By list

101 Working with Full Text Search
Formatting a Full Text Search USING THE ROOT EXPANDER
Use the root expander (!) to retrieve words with variant endings. The root expander must always be placed at the end of a term. For example, Type To retrieve contribut! contribute contributed contributor contributing contribution contributory
Plurals and possessive forms are automatically retrieved without a root expander. USING THE UNIVERSAL CHARACTER
Use the universal character (*) to represent one variable character. You can place the universal character anywhere in a term except at the beginning. For example,
Type To retrieve gr*w grew
grow Note: When you place one or more universal characters at the end of a term, you specify the
maximum length of that term. USING CONNECTORS
Use connectors to specify the relationships that should exist between search terms in your retrieved documents.
Type To search for documents that contain & (AND) both terms a space (OR) either term or both terms /n terms within n terms of each other (where n is a number) +n the first term preceding the second by n terms (where n is a number) “ ” terms appearing in the same order as in the quotation marks

Working with Full Text Search 102
Type To exclude documents that contain % (BUT NOT) the terms following the percent symbol
Creating a Search Report
This report lists the result retrieved when you run a search using the Full Text Search feature. To create a Search report, click the Report button ( ) on the Main Menu toolbar, then choose Full Text Search from the menu. See “Working with Full Text Search” on page 99 for information on running searches.

103 Working with Auto Tags
14: Working with Auto Tags Use Auto Tags to automatically highlight words or phrases as they appear in a document. Creating Auto Tags
To create an Auto Tag, complete these steps: 1. Choose Auto Tags from the Annotate menu. The Auto Tags dialog box is displayed
(Figure 14-1).
2. Click New. Then type the word or phrase you want to add to the Auto Tags list. 3. Select the Show Auto Tags checkbox to highlight Auto Tags in the document. 4. Click the Color arrow to select a color, if desired. 5. Click OK to save your changes. Your Auto Tags will be highlighted automatically
throughout the document (Figure 14-2).
Figure 14 - 1: Auto Tags dialog box
Figure 14 - 2

Working with Auto Tags 104
Managing Auto Tags SHOWING AND HIDING AUTO TAGS
If you choose not to show Auto Tags when you create them, you can show them by choosing Auto Tags from the Annotate menu. The Auto Tags dialog box is displayed. Select the Show Auto Tags checkbox and click OK. To hide Auto Tags, clear the Show Auto Tags checkbox. DELETING AUTO TAGS
To delete an Auto Tag, complete these steps: 1. From the Annotate menu, choose Auto Tags to display the Auto Tags dialog box. 2. Select the Auto Tag you want to remove and click Delete. 3. Repeat step 2 for each Auto Tag you want to delete. 4. Click OK to save your changes.
Creating an Auto Tag Report
This report lists all occurrences of the words and phrases in a transcript for which Auto Tags were created, arranged in page and line order. To create an Auto Tag report, complete these steps:
1. Click the Report button ( ) on the Main Menu toolbar, and then choose Auto Tags from the menu. The Auto Tag Report Properties dialog box is displayed (Figure 14-3).
Figure 14 - 3: Auto Tag Report Properties dialog box

105 Working with Auto Tags
2. Click the Data tab to display a list of all document types and data. By default, all document types and data are selected. To exclude a document type from the report, clear its checkbox. To exclude particular data from the report, click the document type containing the data, and then clear the checkboxes for the data you want to exclude.
3. Click the Display tab to view a list of display options. You can: • Type a title for the report into the Title text box, if desired. • Click an option in the Sort By list. • Select or clear the appropriate checkboxes. • Clear the Highlights checkboxes, if desired. • Select the Include cover page when printing or saving checkbox, if desired.
4. Click the Context tab to display a list of context options. Select or clear the appropriate checkboxes.
5. Click OK. The Auto Tag report, which includes the lines with the Auto Tags and the surrounding questions and answers, is listed in the Report section in the left pane and the text of the report is displayed on the Report tab in the right pane (Figure 14-4).
When viewing the report, you can:
• Click the heading next to a document icon in the report to go to the location in the document where the Auto Tag appears.
• Click the Hit arrows in the left pane to view the next or previous Auto Tag in the report. • Click the Sort by arrow in the left pane to sort your report.
Figure 14 - 4: Auto Tag report

Working with Data Groups 106
15: Working with Data Groups You can organize document types and data into groups. For example, you can create groups based on the different types of witnesses in a case, such as character witnesses and expert witnesses. When you assign data to a group, the data is displayed under the group folder in the left pane (Figure 15-1). You can also select a group when you are preparing reports or creating searches to ensure all the document types and data you need are included. Creating a Data Group
To create a data group, complete these steps: 1. Click the New arrow on the Main Menu toolbar, and then choose Data Group from the
menu. The Data Group Properties dialog box is displayed (Figure 15-2).
Figure 15 - 1: Documents organized into data groups
Figure 15 - 2: Manage Data Groups dialog box

107 Working with Data Groups
2. Click the New button on the toolbar. 3. Type the name of the group, e.g., Character witnesses.
Note: To create a sub-group for a group, click the group name, then click the New button on the toolbar and type the name for the sub-group under the group.
4. Click a data type in the centre pane, and then select the checkboxes for the data you want to include in the group or sub-group. If you select the checkbox for the data type, all data items are automatically selected.
5. Click OK.
Editing Data Groups
To add document types and data to a group or remove them from a group, complete these steps:
1. Choose Manage Data Groups from the Tools menu. The Data Groups dialog box is displayed.
2. Select the group you want to edit and click Edit. The Data Group Properties dialog box is displayed.
3. Select or clear the appropriate checkboxes and click OK. 4. Click OK again in the Data Groups dialog box.
Using Data Groups in Reports
To create a report using data groups, complete these steps: 1. Click the Report button ( ) on the Main Menu toolbar, and then choose the type
of report you want to create, e.g., Issues. 2. In the dialog box that is displayed, click the Data tab, and then click Groups. The Data
Groups dialog box is displayed. 3. Select the group or groups you want to include in the report and click OK. 4. Click OK again to create the report.
Using Data Groups in Full Text Searches
You can run full text searches using data groups. To conduct a search using data groups, complete these steps:
1. Choose Full Text Search from the Search menu. The Full Text Search Properties dialog box is displayed.

Working with Data Groups 108
2. Type a search into the Terms text box, or choose a search from the Recent drop-down list.
3. Click the Data tab, and then click Groups. The Data Groups dialog box is displayed. 4. Select the group or groups you want to include in the search and click OK. The Full Text
Search Properties dialog box is redisplayed. 5. Click OK to run the search.
See “Working with Full Text Search” on page 99 for more information on using the Full Text Search feature.
Sorting by Data Groups
Use the Sort by Data Groups feature to view transcripts, documents, pleadings, and research documents sorted by data groups. For example, to view documents listed in the data groups, click Documents in the left pane, then click the Sort By Title drop-down list and then click Sort By Data Groups on the menu. The documents are listed in the data group folders to which they were assigned.

109 Transferring Document Text
16: Transferring Document Text
You can copy text or a portion of a document and paste it into an outline in Westlaw Case Notebook or other applications. For each document type, you will need to make certain that the appropriate button used for copying text is displayed. To display the button, click the arrow next to the Annotate Mode button ( ) on the toolbar above the document in the right pane, then choose the appropriate button from the menu (Figure 16-1), as discussed below. The menu choices will vary depending on the document type you are viewing. Transferring Text of a Transcript
When viewing a transcript, you can transfer the transcript citation with the text, which includes the following details:
• The name of the transcript. • Page number (or numbers if copied text spans more than one page). • Line numbers. • Date of the transcript.
To transfer transcript text with page and line numbers, complete these steps:
1. Make certain the Copy (with Page and Line) button ( ) is displayed. 2. Select the text you want to copy. 3. Open an outline in Westlaw Case Notebook or open another application and paste the
text you have copied. For example, to paste the text into Microsoft Word, press Ctrl+V or choose Paste from the Edit menu in Word (Figure 16-2).
Figure 16 - 1: Copy buttons
Figure 16 - 2: Transcript text with citation in Word

Transferring Document Text 110
Transferring Text of a Document or Pleading
To transfer the text of a document or pleading that is a word-processing document, complete these steps:
1. Make certain the Copy button ( ) is displayed. 2. Select the text you want to copy. 3. Open an outline in Westlaw Case Notebook or open another application and paste the
text you have copied. For example, to paste the text into Microsoft Word, press Ctrl+V or choose Paste from the Edit menu in Word.
If you are viewing a document or pleading that is an image file or PDF file, you can transfer a portion of the document or pleading. To transfer a portion of a document or pleading, complete the following steps: 1. Make certain the Select Mode button ( ) is displayed. 2. Select the portion of the document you want to copy. 3. Choose Copy from the Edit menu. 4. Open an outline in Westlaw Case Notebook or open another application and paste the
text you have copied. For example, to paste the text into Microsoft Word, press Ctrl+V or choose Paste from the Edit menu in Word.
Transferring Text of a Westlaw Canada Document
If you are viewing a Westlaw Canada document, you can transfer the citation with the text. To transfer text with its citation, complete these steps:
1. Make certain the Copy (with Citation) ( ) button is displayed. 2. Select the text you want to copy. 3. Open an outline in Westlaw Case Notebook or open another application and paste the
text you have copied. For example, to paste the text into Microsoft Word, press Ctrl+V or choose Paste from the Edit menu in Word.

111 Using the Word Index
17: Using the Word Index The Word Index contains an index of words and numbers in a document along with their corresponding page and line numbers (Figure 17-1). When you are connected to Realtime, the Word Index is updated every 15 seconds. Use the Word Index to search for a term in the document. Type the term into the text box to the right of the document to display the pages and lines where the term is found in the document. To see the term in context, point to the page and line reference. The question and answer in which the term appears is displayed. Note: If you do not see the question and answer in which the term appears, you must change
the Word Index display options. For further information, see “Selecting Word Index Display Options” below.
To display the term in the document, click the page and line reference. Selecting Word Index Display Options
To select Word Index display options, choose Display Options from the View menu to display the Display Options dialog box (Figure 17-2). Click the Word Index tab. You can specify:
• Whether you want to see your term in context when you point to the page and line reference in the Word Index.
• How much document text you want displayed when viewing a term in context in the Word Index. If you select QA Pair, the entire question and answer in which the term appears is displayed. Alternatively, you can designate the number of lines to be displayed above and below the term.
• The types of documents in which to display the Word Index.
Figure 17 - 1: Word Index
Type the term you want to search for in the Word Index text
box.
Point to the page and line reference to see your term in context.

Using the Word Index 112
Click OK to save the Word Index display options.
Figure 17 - 2: Display Options dialog box

113 Connecting to Realtime
18: Connecting to Realtime You can connect to a LiveNote Realtime session using:
• A serial connection. • LiveNote Stream via Westlaw Case Notebook or Microsoft Internet Explorer. • Your local network using an Ethernet cable or wireless connection.
Connecting with a Serial Connection
Note: This functionality does not have significant application in Canada at the time of writing.
If you want to connect to LiveNote Realtime using serial cables, your computer must have a serial port. If you have only a USB port available, you will need to provide a USB to serial adapter. (For information about serial adapters, download a free copy of Connecting to Realtime: West Westlaw Case Notebook/West LiveNote at http://store.westlaw.com/support/user-guide/livenote-case-notebookaspx .) Contact the court reporter to schedule the session. To connect to LiveNote Realtime using serial cables, complete these steps:
1. Click the New arrow on the Main Menu toolbar, and then choose Realtime Transcript from the menu. The Connect to Realtime dialog box is displayed (Figure 18-1). Figure 18 - 1: Connect to Realtime dialog box

Connecting to Realtime 114
2. Select Serial. The court reporter will give you the necessary settings for connecting to the reporter’s CAT (computer–aided transcription) system. You will need to know the required serial port setting.
3. Click Connect. Using LiveNote Stream
LiveNote Stream allows you to connect to LiveNote Realtime via the Internet. You can access LiveNote Stream through Westlaw Case Notebook software or through Microsoft Internet Explorer. The court reporter must schedule the session 24 hours in advance if you want to use LiveNote Stream to view transcript text or 72 hours in advance to view video and text. LiveNote Central will send you an e-mail with the required username and password. Note: In order to view the video segment, you must use Internet Explorer and Windows Media
Player 9 or later. You must also unblock pop-up windows. ACCESSING LIVENOTE STREAM THROUGH WESTLAW CASE NOTEBOOK
To connect to Realtime using LiveNote Stream through Westlaw Case Notebook, complete these steps:
1. Click the New arrow on the Main Menu toolbar, and then choose Realtime Transcript from the menu. The Connect to Realtime dialog box is displayed (Figure 18-2).
Figure 18 - 2: Connect to Realtime dialog box

115 Connecting to Realtime
2. Select LiveNote Stream. 3. Select the Play live video (if available) checkbox. 4. Click Connect. The LiveNote Stream Login dialog box is displayed. 5. Type the username and password sent to you by LiveNote Central and click OK. The
connect to LiveNote Stream dialog box is displayed. 6. Select the session you want to attend and click OK.
ACCESSING LIVENOTE STREAM THROUGH INTERNET EXPLORER
You do not need West Westlaw Case Notebook software to access LiveNote Stream through Internet Explorer. To access LiveNote Stream through Internet Explorer, complete these steps:
1. Go to www.livenote.com/stream. 2. Type the username and password sent to you by LiveNote and click Go to display a list
of your sessions. 3. Select the session you want to attend and click Go. The Realtime transcript text and
video are displayed (Figure 18-3). ACCESS TO FEATURES IN LIVENOTE STREAM
When you view LiveNote Stream using Internet Explorer, you are able to hear the audio and see the video and streaming transcript text. You can also stop and start the transcript text. When you access LiveNote Stream using Westlaw Case Notebook software, you have access to all the tools in Westlaw Case Notebook. Below is a chart showing the features available with LiveNote Stream.
Figure 18 - 3: LiveNote Stream session via Internet Explorer

Connecting to Realtime 116
Westlaw Case Notebook Features
LiveNote Stream Through Internet Explorer
LiveNote Stream Through Westlaw Case Notebook
Audio Video Instant messaging Streaming transcript text Start and stop text Word Index Saved transcript Quick Marks Issue Marks Annotations Auto Tags Full Text Search Reports
Using Live Note Local Stream
Case Notebook provides the ability to connect to LiveNote Realtime using an Ethernet cable or a wireless router. The court reporter will provide a username, password, and server IP address for each participant to log in to the session. To connect to LiveNote Stream using your local network, complete these steps:
1. Click the New arrow on the Main Menu toolbar, and then click Realtime Transcript on the menu. The Connect to LiveNote Realtime dialog box is displayed (Figure 18-4).
Figure 18 - 4: Connect to LiveNote Stream dialog box

117 Connecting to Realtime
2. Select LiveNote Local Stream. 3. Type the server IP address provided by the court reporter into the IP Server box.
Note: You can click Find to retrieve the server IP address once the session has started, if necessary.
4. Type the server port number into the Server Port box. 5. Click Connect. The LiveNote Stream Login dialog box is displayed. 6. Type the username and password provided by the court reporter in the appropriate
boxes. 7. Click OK.

Working with a Transcript in Realtime 118
19: Working with a Transcript in Realtime Note: This functionality does not have significant application in Canada at the time of writing.
Westlaw Case Notebook provides you with tools that are easy to use even when you are working with a transcript in Realtime. You can stop and start the scrolling text, annotate the text, and do quick word searches at the same time that you are listening to what the deponent or witness is saying. You can also annotate and search existing transcripts. Starting and Stopping Text
To stop the scrolling transcript (Figure 19-1): • click Pause on the toolbar above the transcript • press the Esc key
To browse the text of the transcript:
• use the scroll bar on the right • press the Page Up and Page Down keys • press the arrow keys • press Ctrl+Home to go to the top of the text • press Ctrl+End to go to the end of the text
To restart the scrolling transcript:
• click Pause • press the Esc key
Figure 19 - 1: Starting and stopping transcript text
To stop the scrolling text, click Pause or press the Esc key. To restart the scrolling text, click
Pause or press the Esc key again.
Use the scroll bar to browse the text of the transcript.

119 Working with a Transcript in Realtime
Using Quick Marks
Quick Marks are marks at the line number in the margin of a transcript. They are the simplest form of annotation in Westlaw Case Notebook and are displayed as a solid bar in the default Quick Mark color. You can use them as place markers in the text for which you can run searches and generate reports. To insert a Quick Mark (Figure 19-2):
• press the spacebar on your keyboard • click a line number
Quick Marks are located in the Unassigned folder within the Annotations folder under the transcript in the left pane. Click the plus symbol (+) next to the transcript to view the Annotations folder, and then click the plus symbol next to the Unassigned folder to view the Quick Marks. Double-click a Quick Mark reference in the folder to jump to the Quick Mark in the transcript. To delete a Quick Mark, click it in the margin of the transcript. Quick Marks Report
This report lists all Quick Marks and Issue Marks in a transcript, arranged in page and line order. To create a Quick Marks report for the transcript you are viewing, click the Quick Mark Report button ( ) on the toolbar above the transcript in the right pane. The report is displayed on the Report tab in the right pane.
Figure 19 - 2: Quick Mark
Press the spacebar or click a line number to place a
Quick Mark in the margin of the transcript.
Double-click a Quick Mark reference to jump to its
location in the transcript.

Working with a Transcript in Realtime 120
To create a Quick Marks report for one or more transcripts, complete these steps: 1. Click the Report button ( ) on the Main Menu toolbar, and then choose Quick
Marks. The Quick Mark Report Options dialog box is displayed (Figure 19-3).
2. All of the issues in the case are selected on the Issues tab by default. To exclude an issue from the report, clear its checkbox.
3. Click the Data tab to display a list of transcripts. By default, all transcripts are selected. To exclude a transcript from the report, clear its checkbox.
4. Click the Display tab to view a list of display options. You can: • Type a title for the report into the Title text box, if desired. • Click an option in the Sort By list. • Select or clear the appropriate checkboxes. • Select the Include cover page when printing or saving checkbox, if desired.
5. Click the Context tab to display a list of context options. Select or clear the appropriate checkboxes.
6. Click the Authors tab to display a list of annotation authors. If you are working in a secure case on a network, a list of all annotation authors is displayed. If you are working in the case offline, just LocalUser is displayed. Select or clear the appropriate checkboxes.
7. Click OK. The Quick Marks report, which includes the lines you marked and the surrounding questions and answers, is displayed on the Report tab in the right pane (Figure 19 – 4).
Figure 19 - 3: Quick Mark Report Options dialog box

121 Working with a Transcript in Realtime
When viewing the report, you can: • Click the heading next to a document icon in the report to go to the location in
the document where the Quick Mark appears. • Click the Hit arrows in the left pane to view the next or previous Quick Mark in
the report. • Click the Sort by arrow in the left pane to sort your report.
Using Issue Marks
An Issue Mark is a mark at the page and line number in the margin of a transcript that corresponds to a particular issue on the Main Menu toolbar. The Issue Mark color is the same as the color of the issue. To insert an Issue Mark, click an issue button on the Main Menu toolbar, then click a line number (Figure 19-5). Issue Marks are displayed with their associated issue in the Annotations folder in the left pane. Click the plus symbol (+) next to the transcript to view the Annotations folder, and then click the plus symbol next to the issue to view the Issue Mark. Double-click an Issue Mark reference in the folder to jump to the Issue Mark in the transcript.
Figure 19 - 4: Quick Mark report

Working with a Transcript in Realtime 122
To delete an Issue Mark, click it in the margin of the transcript.
Figure 19 - 5: Issue Mark
Double-click an Issue Mark reference to jump to its
location in the transcript.
Click an Issue button on the Main Menu toolbar, and
then click a line number to place an Issue Mark in the margin of the transcript.

123 Working with Annotations and Video in Transcripts
20: Working with Annotations and Video in Transcripts Note: This functionality does not have significant application in Canada at the time of writing.
Playing Annotation Video Segments
If the transcript you are viewing has a video associated with it, you can view the portion of the video that is synchronized with an annotation. To view the video, right-click anywhere in the transcript, and the click Play Video. To play a video segment that is associated with an annotation, right-click the annotation and then click Play Video Segment on the menu. Creating Annotation Video Segments
If a transcript has been synchronized with video, you can convert the transcript text to a video segment and save it. You can create a single video segment from a single annotation or create multiple video segments from an Annotations report. CREATING A VIDEO SEGMENT FROM A SINGLE ANNOTATION
To create a single video segment from an annotation, complete these steps: 1. Double-click an annotation in the left pane. The highlighted text of the annotation is
displayed in the right pane. 2. Right-click in the annotation, point to Send on the menu, and then click Video File. The
save As dialog box is displayed. 3. Click a location for the file. 4. Type a different file name into the File name text box, if desired. 5. Click Save. The message Would you like to view the new video clip now? is displayed. 6. Click Yes to view the video segment.
CREATING MULTIPLE VIDEO SEGMENTS FROM AN ANNOTATIONS REPORT
To create multiple video segments from an Annotations report, complete these steps: 1. In the left pane, right-click the Annotations folder, then click Report. The Annotations
report is displayed on the Report tab in the right pane. 2. Click Send at the top of the report, and then choose Video File from the menu. The Save
As dialog box is displayed. 3. Select a location for the file.

Working with Annotations and Video in Transcripts 124
4. Type a different file name into the File name text box, if desired. 5. Click Save. The message Video files saved successfully. Would you like to open the
containing folder now? is displayed. 6. Click Yes to open the folder in which the video segments are stored. The page and line
ranges are added to the video segments. EDITING VIDEO SEGMENTS
To edit the start and end time for a video segment that is associated with an annotation, right-click the annotation and click Edit Annotation on the menu. The Annotations Properties dialog box is displayed. Click the Video tab, make your changes in the appropriate boxes, and then click OK (Figure 20-1). Transferring Annotations to Microsoft PowerPoint
You can transfer annotations and video segments to Microsoft PowerPoint and have them embedded in PowerPoint slides. Each annotation creates a separate slide. You can create a slide from a single annotation or multiple slides from an Annotations report. Note: It is recommended that you use short annotations for each PowerPoint slide. If you need
a longer excerpt, transfer multiple annotations from a report to create a single PowerPoint presentation with a slide for each annotation.
Also, when you transfer annotations to PowerPoint from transcripts with associated videos, you have the option of saving both the PowerPoint file (PPT) and the video clip (WMV). If you want to share the PowerPoint presentation with someone else, you must include the associated WMV file for the embedded video to play.
Figure 20 - 1: Annotations Properties-Video tab

125 Working with Annotations and Video in Transcripts
CREATING A POWERPOINT PRESENTATION FROM A SINGLE ANNOTATION
To create a PowerPoint presentation from an annotation, complete these steps: 1. Double-click an annotation in the left pane. The highlighted text of the annotation is
displayed in the right pane. 2. Right-click in the annotation and choose Send from the menu and PowerPoint from the
submenu. The Save As dialog box is displayed. 3. Select a location for the file. 4. Type a different file name into the File name text box, if desired. 5. Click Save. The message Would you like to open the presentation now? is displayed. 6. Click Yes to view the PowerPoint presentation. To create another PowerPoint
presentation, close PowerPoint. CREATING A POWERPOINT PRESENTATION FROM AN ANNOTATIONS REPORT
To create a PowerPoint presentation from an Annotations report, complete these steps: 1. In the left pane, right-click the Annotations folder, then click Report. The Annotations
report is displayed on the Report tab in the right pane. 2. Click Send at the top of the report, and then choose PowerPoint from the menu. The
Save As dialog box is displayed. 3. Select a location for the file. 4. Type a different name for the file into the File name text box, if desired. 5. Click Save. The message Would you like to open the presentation now? is displayed. 6. Click Yes to view the PowerPoint presentation. To create another PowerPoint
presentation, close PowerPoint. SAVING POWERPOINT FILES WITH THE SAME NAME
If you save a PowerPoint file with a name that already exists, the Existing PowerPoint File dialog box is displayed. Select Append slides to existing presentation to add slides to the existing presentation.

Appendix 126
: Appendix Converting RealLegal Binder Cases to Westlaw Case Notebook Cases
When you open a RealLegal Binder case in Westlaw Case Notebook, the properties for the case may or may not be converted. The following chart describes how the RealLegal Binder case properties are converted. ITEMS THAT ARE CONVERTED ITEMS THAT ARE NOT CONVERTED Transcripts
• Transcript text • Transcript properties: Type, Status, Last,
First, Volume, Date, Title, Taking Attorney, For, Comment
• Links to documents from transcripts • Signature for signed transcripts (version
7.0 and later) • Video sync information
Transcripts • Transcript properties: Time, Plaintiff,
Defendant
Documents • Document contents • Document properties: Type, Author,
Recipient, Bates Range, Date, OCR information
Documents • Document properties: Title • Exhibit checkbox data, exhibit number,
exhibit prefix
Annotations • All annotations • Issues, including name and colour • Attachment URLs are preserved • Comments converted to notes
Annotations • Chronology date • Active issue properties • Annotations authors only converted
when imported into a secure case
Search group • Search groups converted to data groups • Search group name converted to data
group title • Transcripts and documents from the
search group converted to data group
Search group • Preprogrammed search groups that
come with RealLegal Binder • Saved reports

127 Appendix
Prompts and Messages for Video and PowerPoint
You may receive the following warnings and error messages when transferring files as video or to PowerPoint: The file [PowerPoint file name] already exists. Do you want to append slides to existing presentation [or] overwrite existing file? In most cases you will want to append or add slides to the existing PowerPoint presentation. Refer to “Transferring Annotations to Microsoft PowerPoint” on page 118 for more information. The file is open in PowerPoint. Please close PowerPoint and retry. PowerPoint needs to be closed when you are creating a presentation or appending slides to an existing presentation. The folder already contains file named [video file name]. Would you like to replace this file? This error usually occurs when you try to transfer the same annotation twice or when you try to save over an existing PowerPoint presentation. If you do not want to replace the file, you can cancel the transfer, review the annotation to make sure nothing has changed and then resave the file, or you can save the file to a different folder. Synchronized video is not associated with this transcript. The video has not been synchronized with the transcript. A synchronized video is a video that plays in sync with the transcript; i.e., as the person in the video speaks, the transcript scrolls and highlights the spoken text. A utility (e.g., RealLegal Publisher) must be used to synchronize the video with the transcript; otherwise, the video plays but the transcript does not scroll. Video does not exist for this transcript. No video is associated with the transcript. You can transfer an annotation to PowerPoint, but not video. Cannot create clip from annotation that spans more than one file. This is a catchall error message designed for unsupported scenarios. Please contact West LiveNote Customer Technical Support 1-800-290-9378 and describe what you were doing when this error occurred.

Appendix 128
Video clips can only be created from MPEG and WMV video files. Westlaw Case Notebook only supports specific types of video files. For example, you cannot create video clips from RM (Real) or AVI (Audio Video Interleave) files. Failed to create temporary PowerPoint template file! Error code %d. This error may occur when your hard drive is full or if you do not have access rights to the hard drive where you are attempting to transfer the file. In order to create PowerPoint slides, you must first install PowerPoint on this computer. PowerPoint must be installed before you can transfer annotations to PowerPoint. Connecting to a Simulated Realtime Transcript
When Westlaw Case Notebook is installed, it provides you with a demonstration case, which includes sample discovery transcripts, exhibits, preset issues, and simulation of a real-time deposition. You can use the simulated transcript to practice using the basic tools of Westlaw Case Notebook. To access the simulation, complete these steps:
1. Access Westlaw Case Notebook. 2. When the Open Case dialog box is displayed, select Gil Bower v. DC Corporation and
click OK. The case window is displayed. 3. Click the New arrow on the Main Menu toolbar, and then choose Realtime Transcript
from the menu. The Connect to Realtime dialog box is displayed (Figure 1).
Figure 1: Connect to Realtime dialog box

129 Appendix
4. Select Simulation, and then click Connect. The deposition automatically begins transcribing in the right pane.
Note: The transcript is titled Realtime by default and listed in the Transcripts section in the left pane. To change the title of the transcript, right-click it and choose Properties from the menu. The Transcript Properties dialog box is displayed. Click the Details tab and type a different title for the transcript into the Title text box and click OK.
Trial Version of Westlaw Case Notebook
Westlaw Case Notebook offers a trial version of its software. In the trial version, you can: • connect to 15 Realtime sessions • add up to three transcripts, 10 documents, five pleadings, 10 research files, 25 key facts,
and 10 characters • create Issue Marks, Quick Marks, and annotations • use the Word Index, Auto Tags, and Full Text Search (not available for some file formats
added to the trial version) • insert exhibits, transcript questions, and Westlaw Canada documents into an outline • send key facts to West Case Timeline, Microsoft Word, or Corel WordPerfect • generate reports
In the trial version, you cannot:
• update transcripts, documents, pleadings, and research files • create outlines • delete any items from the demonstration case • save transcripts as ASCII files • create a new case • close the current case and open another case • export cases • connect to the West LiveNote Repository
Notes • A transcript printed from the trial version includes a Demo watermark. • Optical character recognition (OCR) technology is not available in the trial version of
Westlaw Case Notebook.