TOPS iQ ACCOUNT MANAGER MANUAL - …reader.topssoft.com/hubfs/product/iQ/Manuals/TOPS iQ -...
17
TOPS iQ ® ACCOUNT MANAGER MANUAL By TOPS Software, LLC Clearwater, FL
Transcript of TOPS iQ ACCOUNT MANAGER MANUAL - …reader.topssoft.com/hubfs/product/iQ/Manuals/TOPS iQ -...

TOPS iQ®
ACCOUNT MANAGER MANUAL
By
TOPS Software, LLC
Clearwater, FL

2
Document History Version
Edition Date Document Software
Version 1 09-01-2015 TOPS-AM 09-01-15 TOPS iQ
Trademark The names of actual companies and products mentioned herein may
be the trademarks of their respective owners.
Copyright Without limiting the rights under copyright, no part of this document
may be reproduced, translated to another language, stored in, or
introduced into a retrieval system, or transmitted in any form or by
any means (electronic, mechanical photocopying, recording or
otherwise), for any purpose, without the express written permission
of TOPS Software, LLC.
Unless otherwise noted, the example companies, organizations, products, domain names, e-mail
addresses, logos, people, places and events depicted herein are fictitious, and no association with
any real company, organization, product, domain name, e-mail address, logos, person, place and
event is intended or should be inferred.
Copyright © 2012 – TOPS Software, LLC, Printed in the United States of America.
Disclaimer
This guide is provided by TOPS Software, LLC as a reference and help tool for using the TOPS
iQ Account Manager. Illustrations used in this guide may display windows with modules,
features, and or functions that may not be part of the TOPS iQ™ version you are currently
running or available as add-ons or as plug-ins to an interface to third party products.
Additionally, the most recent updates may not be reflected in this guide.
It is neither the intent nor purpose of TOPS Software, LLC, to provide accounting, wage, or tax
advice. For specific information regarding accounting methods, procedures, tax rates,
deductions, or earnings calculation speak to your company accountant or contact the appropriate
Federal or State agency.
It is also assumed that the user of this guide is familiar with basic windows functionality and
navigation tools. Refer questions regarding the use of Windows Explorer to your system
administrator.
3
Account Manager
INTRODUCTION
Account Manager in TOPS iQ replaces the TOPS Pro “Users and Passwords” that is used to create user accounts, passwords, groups and community assignments. Account Manager has some exciting features that were not available previously. The new features include:
• The ability to add titles, notes, and phone numbers to user accounts.
• Send emails using TOPS iMail to users through the Account Manager.
• View and assign communities by user names.
• View and add multiple users to a Community.
• We have also added the option to disable grids from opening, depending on how you want to use TOPS iQ.
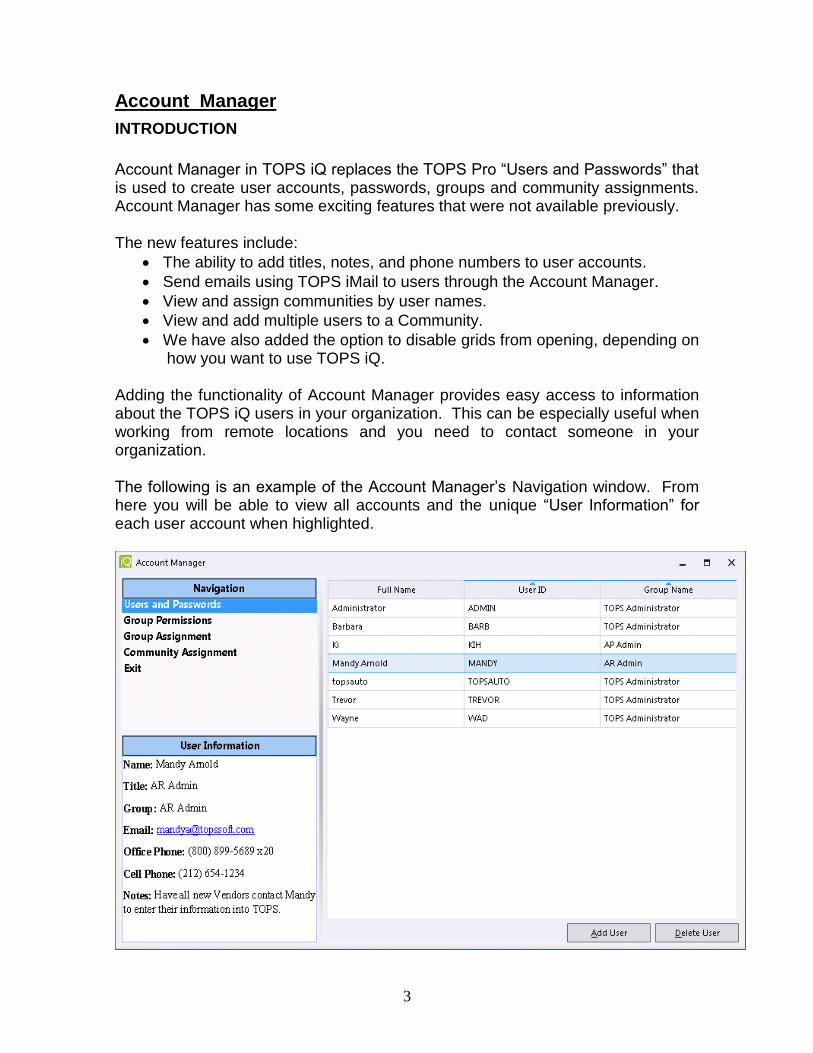
Adding the functionality of Account Manager provides easy access to information about the TOPS iQ users in your organization. This can be especially useful when working from remote locations and you need to contact someone in your organization. The following is an example of the Account Manager’s Navigation window. From here you will be able to view all accounts and the unique “User Information” for each user account when highlighted.
4
Using Account Manager
If you are currently using “Users and Passwords” for account management, you will need to review ALL Group Permissions to ensure the accuracy of the permissions and restrictions. TOPS iQ was designed with more features than TOPS Pro and the layout of the software does not match TOPS Pro. Therefore some of the permissions and restrictions were not matching accurately when switching to TOPS iQ. Account Manager is accessed from the File Menu under Administration. From here you can add, delete and update the information about a user, add groups, create group permissions, add users to specific groups and assign communities to users. When first setting up account management for users, you will want to establish groups for the members of your teams.
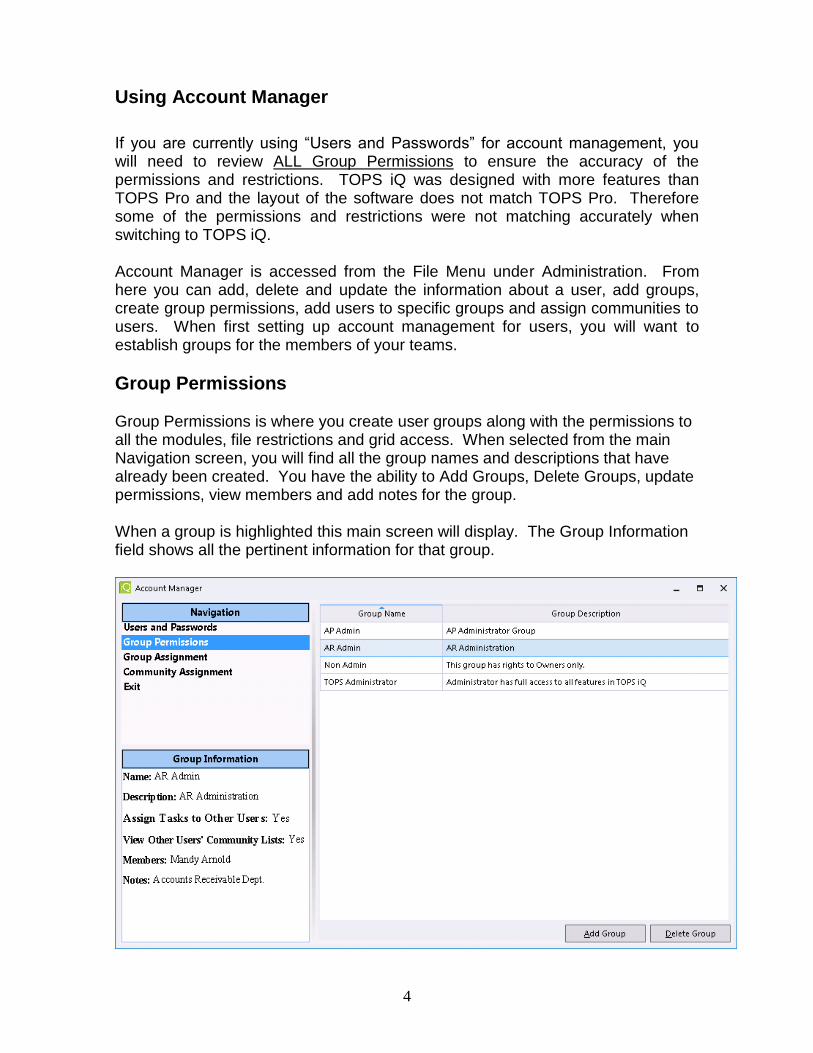
Group Permissions Group Permissions is where you create user groups along with the permissions to all the modules, file restrictions and grid access. When selected from the main Navigation screen, you will find all the group names and descriptions that have already been created. You have the ability to Add Groups, Delete Groups, update permissions, view members and add notes for the group. When a group is highlighted this main screen will display. The Group Information field shows all the pertinent information for that group.
5
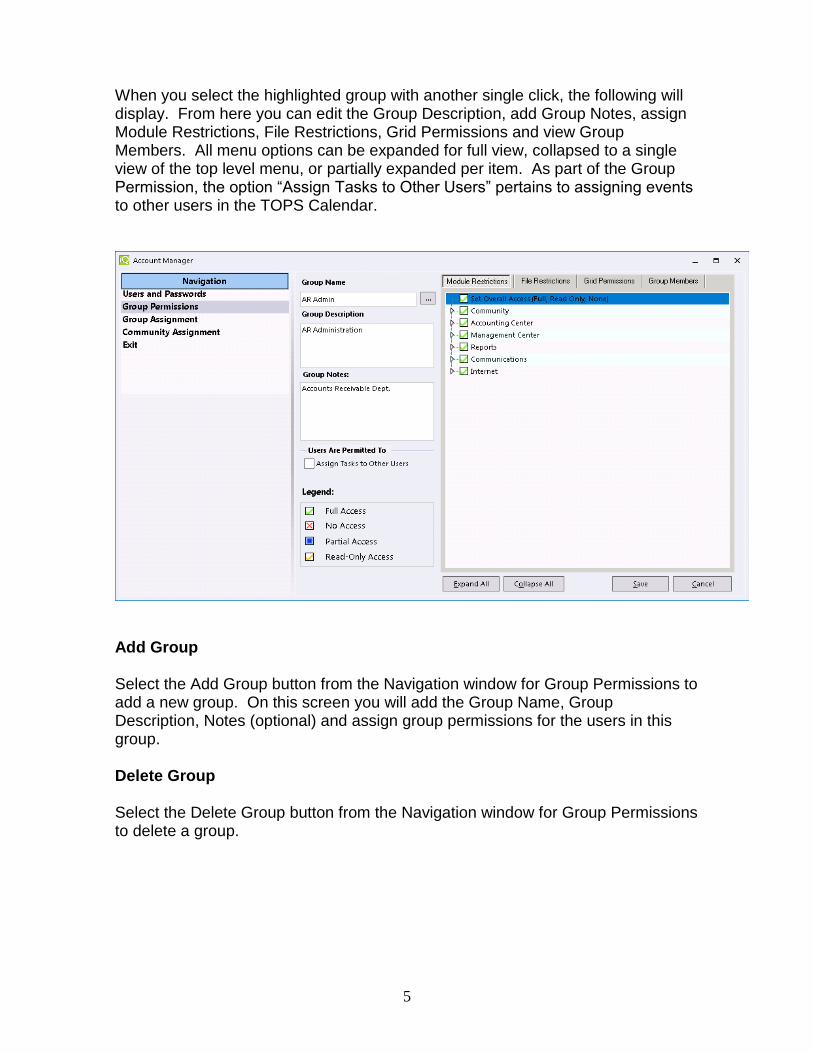
When you select the highlighted group with another single click, the following will display. From here you can edit the Group Description, add Group Notes, assign Module Restrictions, File Restrictions, Grid Permissions and view Group Members. All menu options can be expanded for full view, collapsed to a single view of the top level menu, or partially expanded per item. As part of the Group Permission, the option “Assign Tasks to Other Users” pertains to assigning events to other users in the TOPS Calendar.
Add Group Select the Add Group button from the Navigation window for Group Permissions to add a new group. On this screen you will add the Group Name, Group Description, Notes (optional) and assign group permissions for the users in this group. Delete Group Select the Delete Group button from the Navigation window for Group Permissions to delete a group.
6
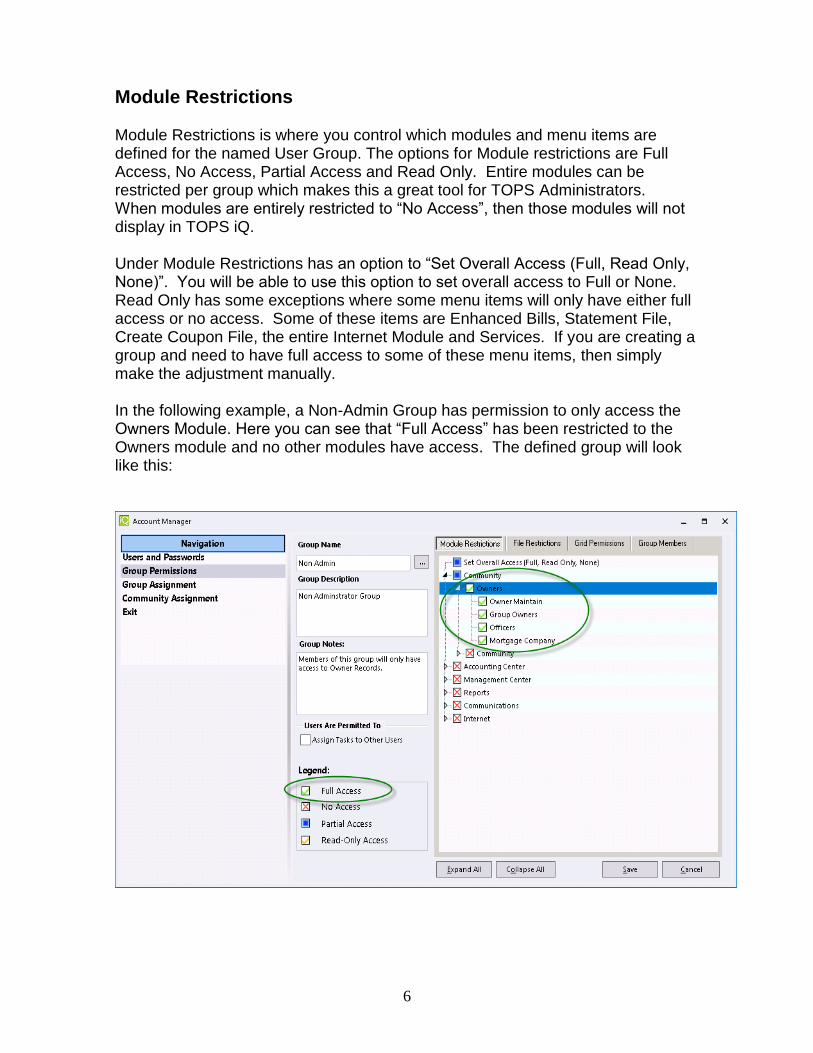
Module Restrictions Module Restrictions is where you control which modules and menu items are defined for the named User Group. The options for Module restrictions are Full Access, No Access, Partial Access and Read Only. Entire modules can be restricted per group which makes this a great tool for TOPS Administrators. When modules are entirely restricted to “No Access”, then those modules will not display in TOPS iQ. Under Module Restrictions has an option to “Set Overall Access (Full, Read Only, None)”. You will be able to use this option to set overall access to Full or None. Read Only has some exceptions where some menu items will only have either full access or no access. Some of these items are Enhanced Bills, Statement File, Create Coupon File, the entire Internet Module and Services. If you are creating a group and need to have full access to some of these menu items, then simply make the adjustment manually. In the following example, a Non-Admin Group has permission to only access the Owners Module. Here you can see that “Full Access” has been restricted to the Owners module and no other modules have access. The defined group will look like this:
7
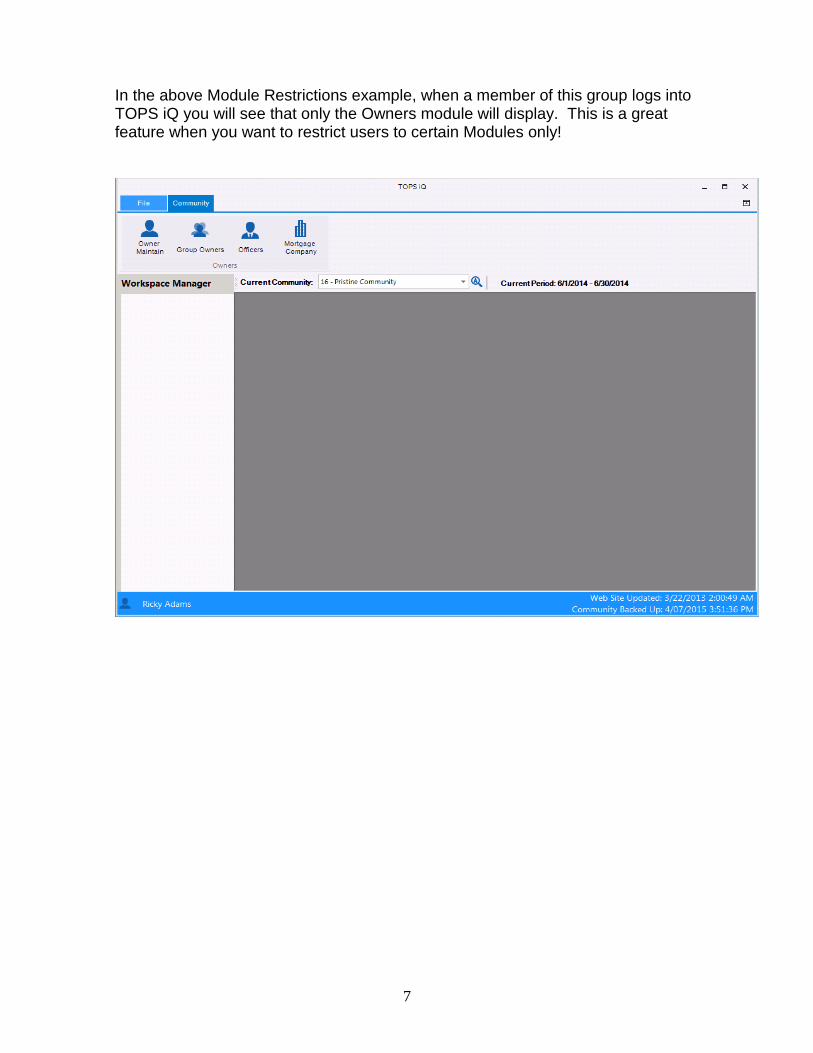
In the above Module Restrictions example, when a member of this group logs into TOPS iQ you will see that only the Owners module will display. This is a great feature when you want to restrict users to certain Modules only!
8
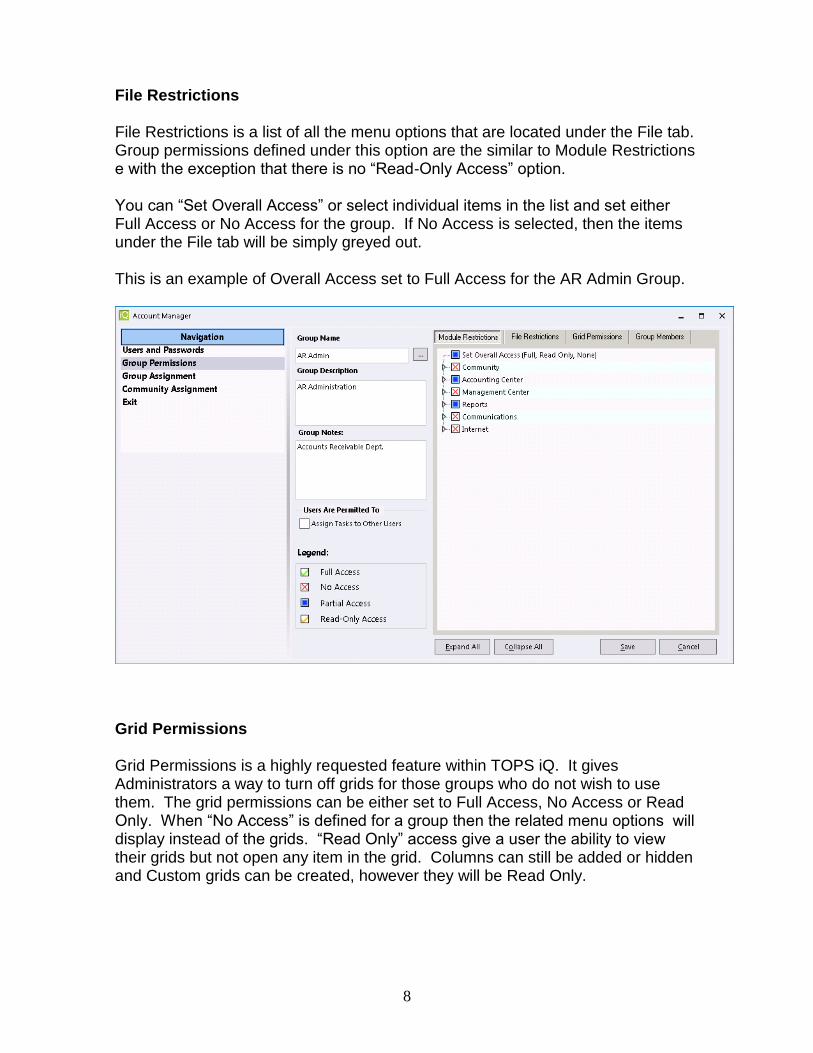
File Restrictions File Restrictions is a list of all the menu options that are located under the File tab. Group permissions defined under this option are the similar to Module Restrictions e with the exception that there is no “Read-Only Access” option. You can “Set Overall Access” or select individual items in the list and set either Full Access or No Access for the group. If No Access is selected, then the items under the File tab will be simply greyed out. This is an example of Overall Access set to Full Access for the AR Admin Group.
Grid Permissions
Grid Permissions is a highly requested feature within TOPS iQ. It gives Administrators a way to turn off grids for those groups who do not wish to use them. The grid permissions can be either set to Full Access, No Access or Read Only. When “No Access” is defined for a group then the related menu options will display instead of the grids. “Read Only” access give a user the ability to view their grids but not open any item in the grid. Columns can still be added or hidden and Custom grids can be created, however they will be Read Only.

9
The following is the Grid Permissions settings screen:
Group Members When this option is selected and expanded, you will be able to view all members of all groups.
10
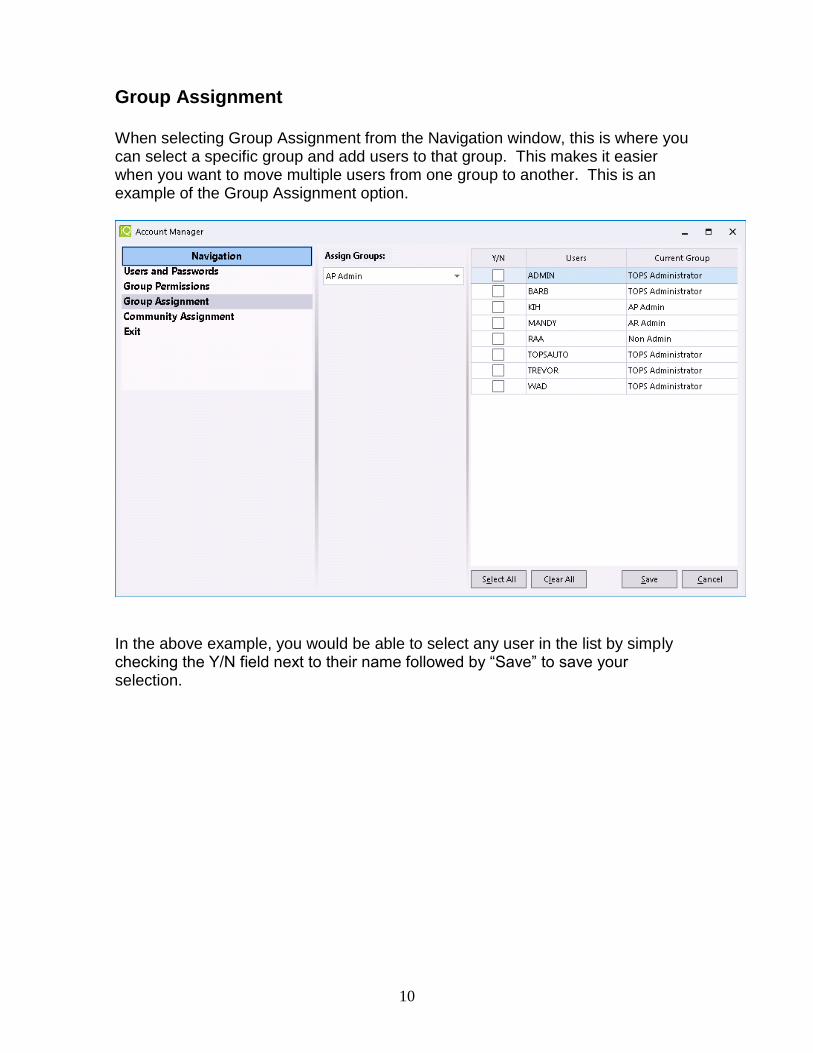
Group Assignment When selecting Group Assignment from the Navigation window, this is where you can select a specific group and add users to that group. This makes it easier when you want to move multiple users from one group to another. This is an example of the Group Assignment option.
In the above example, you would be able to select any user in the list by simply checking the Y/N field next to their name followed by “Save” to save your selection.
11
Users and Passwords
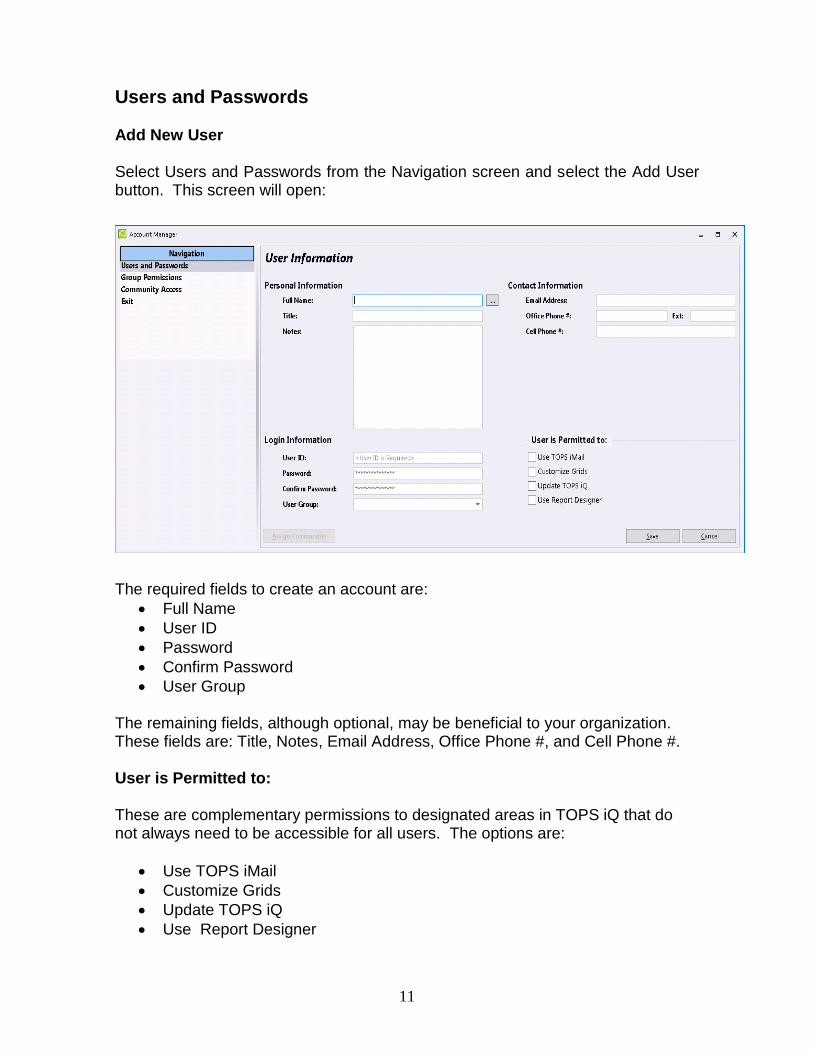
Add New User Select Users and Passwords from the Navigation screen and select the Add User button. This screen will open:
The required fields to create an account are:
• Full Name
• User ID
• Password
• Confirm Password
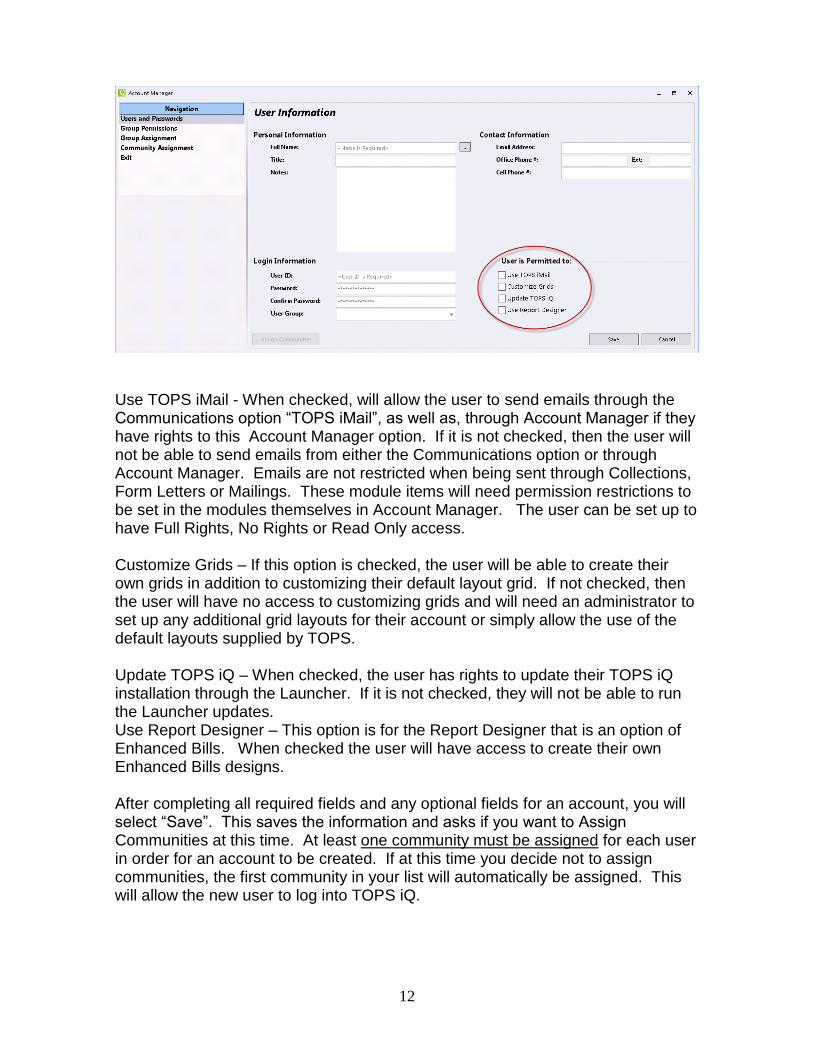
• User Group The remaining fields, although optional, may be beneficial to your organization. These fields are: Title, Notes, Email Address, Office Phone #, and Cell Phone #. User is Permitted to: These are complementary permissions to designated areas in TOPS iQ that do not always need to be accessible for all users. The options are:
• Use TOPS iMail
• Customize Grids
• Update TOPS iQ
• Use Report Designer
12
Use TOPS iMail - When checked, will allow the user to send emails through the Communications option “TOPS iMail”, as well as, through Account Manager if they have rights to this Account Manager option. If it is not checked, then the user will not be able to send emails from either the Communications option or through Account Manager. Emails are not restricted when being sent through Collections, Form Letters or Mailings. These module items will need permission restrictions to be set in the modules themselves in Account Manager. The user can be set up to have Full Rights, No Rights or Read Only access. Customize Grids – If this option is checked, the user will be able to create their own grids in addition to customizing their default layout grid. If not checked, then the user will have no access to customizing grids and will need an administrator to set up any additional grid layouts for their account or simply allow the use of the default layouts supplied by TOPS. Update TOPS iQ – When checked, the user has rights to update their TOPS iQ installation through the Launcher. If it is not checked, they will not be able to run the Launcher updates. Use Report Designer – This option is for the Report Designer that is an option of Enhanced Bills. When checked the user will have access to create their own Enhanced Bills designs. After completing all required fields and any optional fields for an account, you will select “Save”. This saves the information and asks if you want to Assign Communities at this time. At least one community must be assigned for each user in order for an account to be created. If at this time you decide not to assign communities, the first community in your list will automatically be assigned. This will allow the new user to log into TOPS iQ.
13
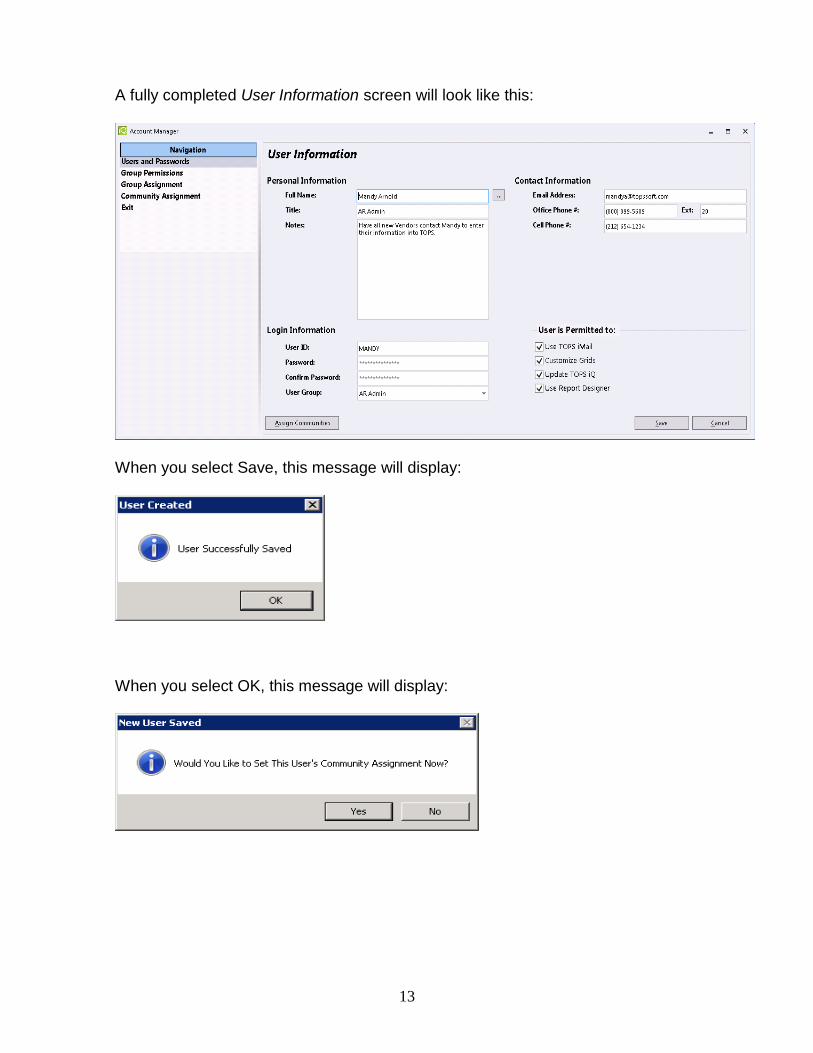
A fully completed User Information screen will look like this:
When you select Save, this message will display:
When you select OK, this message will display:
14
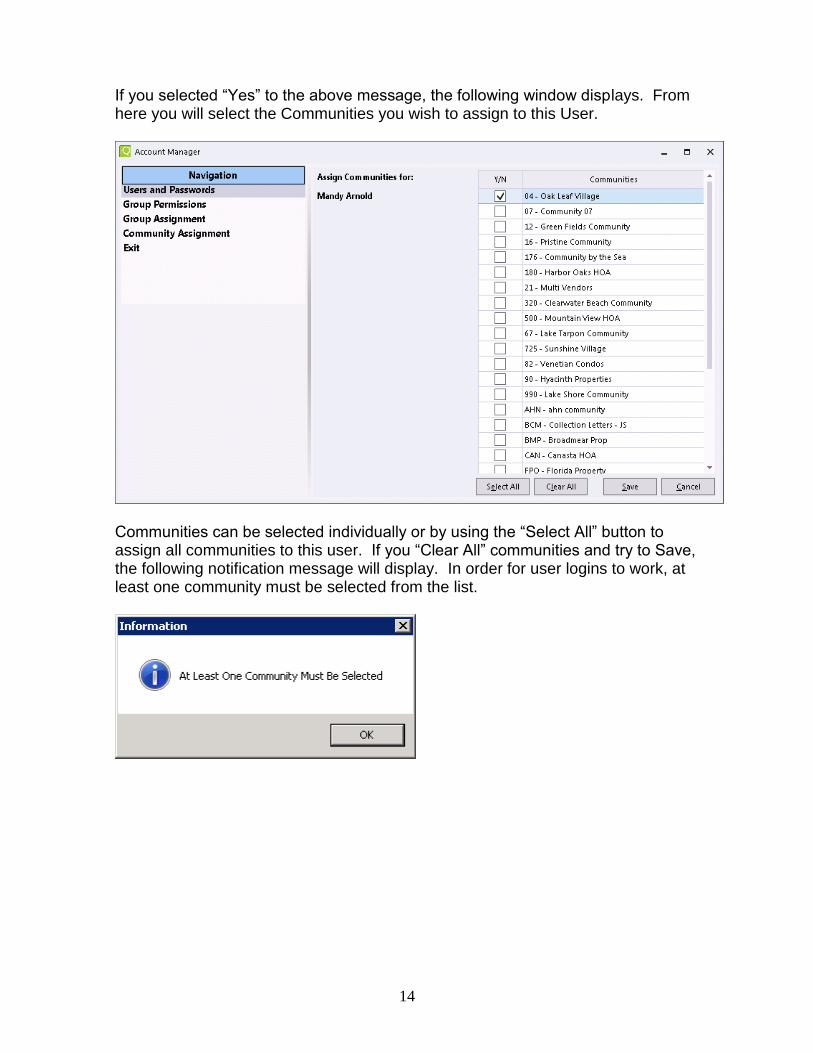
If you selected “Yes” to the above message, the following window displays. From here you will select the Communities you wish to assign to this User.
Communities can be selected individually or by using the “Select All” button to assign all communities to this user. If you “Clear All” communities and try to Save, the following notification message will display. In order for user logins to work, at least one community must be selected from the list.
15
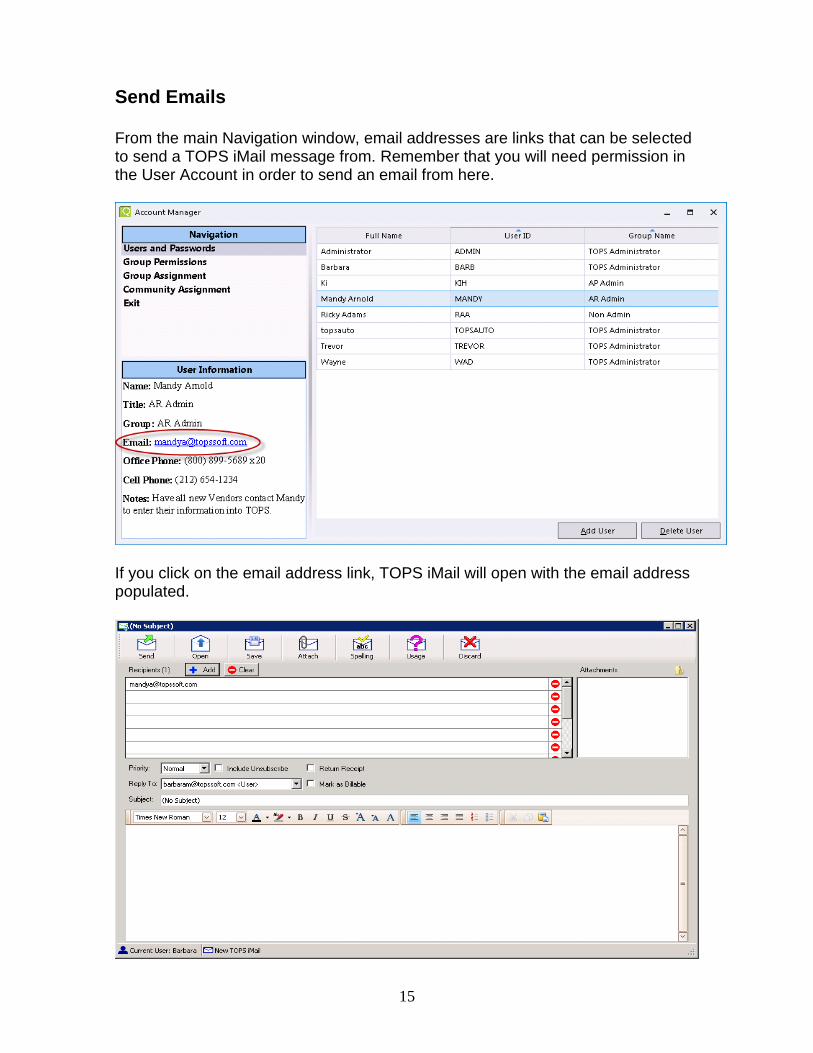
Send Emails From the main Navigation window, email addresses are links that can be selected to send a TOPS iMail message from. Remember that you will need permission in the User Account in order to send an email from here.
If you click on the email address link, TOPS iMail will open with the email address populated.
16
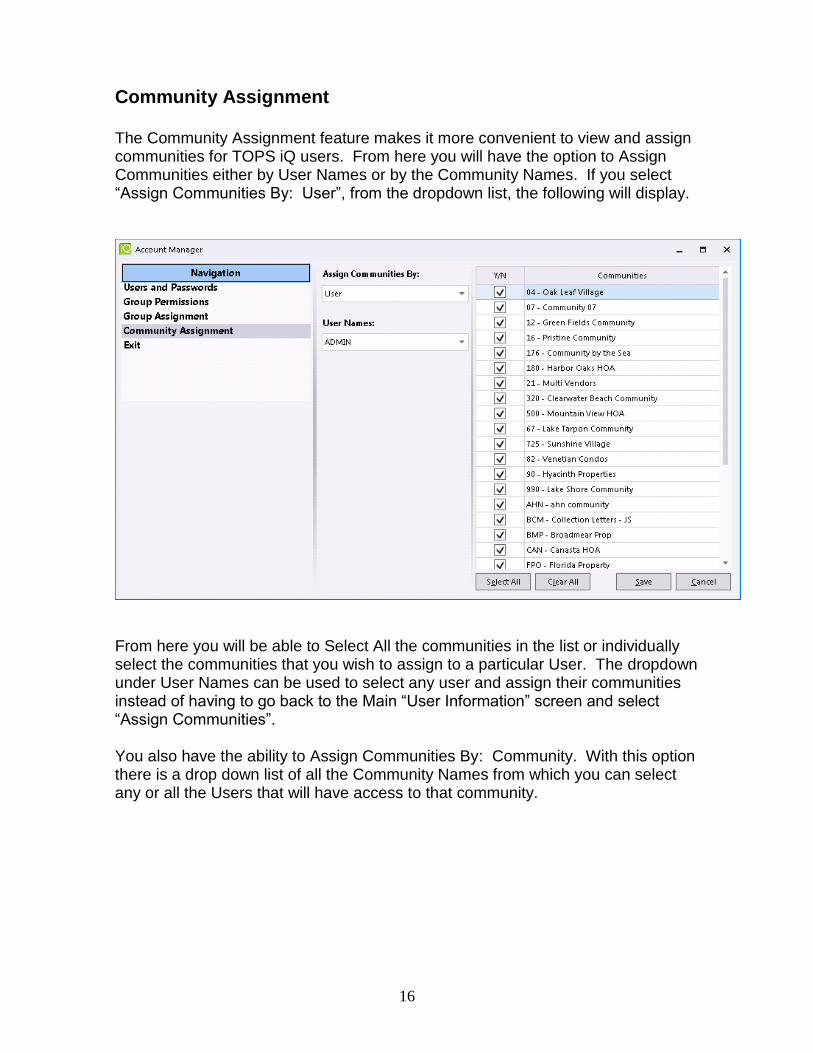
Community Assignment The Community Assignment feature makes it more convenient to view and assign communities for TOPS iQ users. From here you will have the option to Assign Communities either by User Names or by the Community Names. If you select “Assign Communities By: User”, from the dropdown list, the following will display.
From here you will be able to Select All the communities in the list or individually select the communities that you wish to assign to a particular User. The dropdown under User Names can be used to select any user and assign their communities instead of having to go back to the Main “User Information” screen and select “Assign Communities”. You also have the ability to Assign Communities By: Community. With this option there is a drop down list of all the Community Names from which you can select any or all the Users that will have access to that community.
17
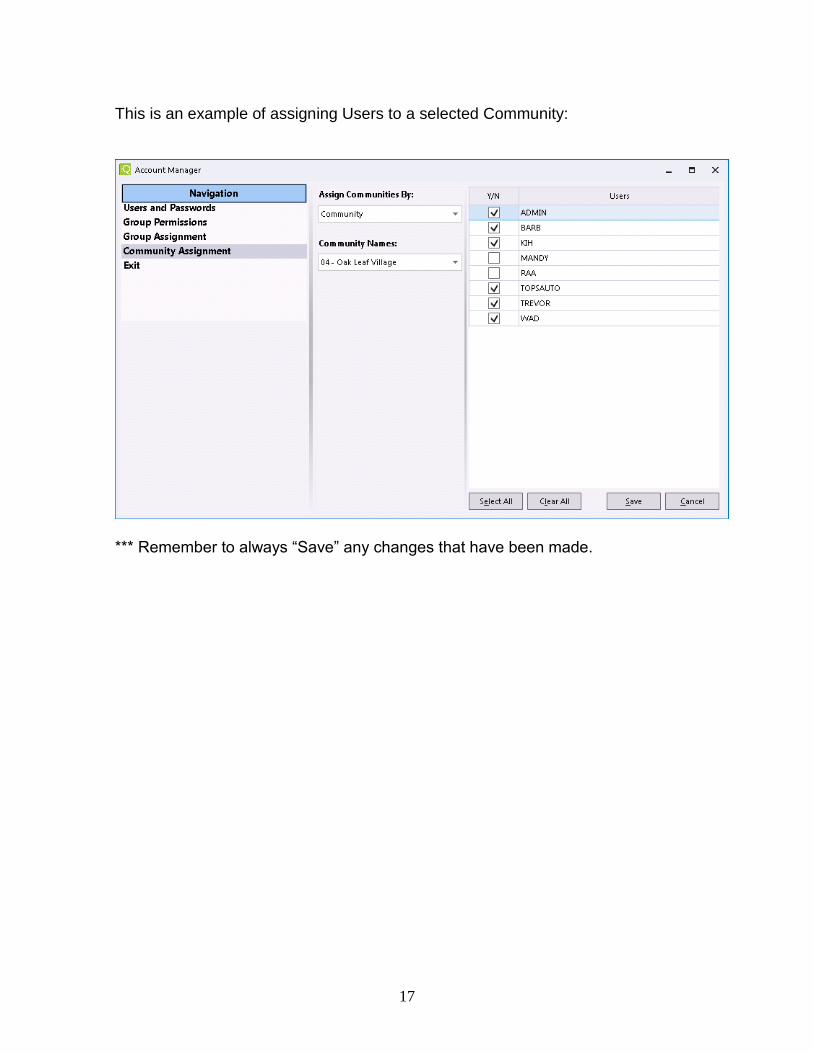
This is an example of assigning Users to a selected Community:
*** Remember to always “Save” any changes that have been made.