Time and Expense Approver User's Guide 6-2013 · PDF fileTime and Expense Approver...
52
Time and Expense Approver User’s Guide
Transcript of Time and Expense Approver User's Guide 6-2013 · PDF fileTime and Expense Approver...
Time and Expense
Approver User’s Guide
ii
Important Notice
The information contained herein constitutes confidential and proprietary information
and/or a trade secret of Allegis Group, Inc. Such information shall be used solely for
the benefit of and furtherance of the business of Allegis Group, Inc, and its affiliates.
Any other use, disclosure, reproduction, modification, transfer, or transmittal of this
information for any other purpose, in any other form or by any other means is strictly
prohibited without the prior written consent of Allegis Group, Inc.
Copyright 2009 by Allegis Group, Inc. All rights reserved, including the right to reproduce this
document or any part of it.
Allegis Group is a service mark of Allegis Group, Inc.
All other product and company names are trademarks of their respective owners.
General Information
May 2009
For user support questions, contact the Consolidated Service Desk at 1-866-483-5411
iii
Table of Contents Overview 1
Understand Buttons, Icons, and Links 3
View Messages 6
System Options 7
Log into Time & Expense 8
View Time & Expense Terms and Conditions 10
Set up Your Account 11
Set up Your E-mail Preferences 12
Approver Set up Options 12
Request a New Password for Time & Expense 13
Change Your Password 15
Log Out of Time & Expense 16
System Features 17
Use the Home Link 18
Use the Status Summary Page 21
View All Time Cards 24
View, Approve, or Reject Time cards 27
View All Expense Reports 30

iv
View Expense Details 33
View an Expense Report 35
View, Approve, or Reject Expense Reports 38
Reject an Expense Item 41
View Your Reports 44
View a Training Simulation 45
View, Approve, or Reject Timecard by project 46

1
Overview Time & Expense is a web based automated time and expense collection system. Allegis Group Users
utilize Time & Expense to enter their hours and expenses into the system on a weekly basis. Approvers
and Expense Auditors (expenses only) must approve the hours and expenses that the users submit before
they can receive compensation and reimbursement. The hours and expenses approved in Time &
Expense load into PeopleSoft OASIS. If any one of these roles rejects the hours or expenses then the user
must update and resubmit his or her time card or expense report to receive compensation or
reimbursement.
The information that displays when you log into Time & Expense depends on your job role. Users,
Approvers, Authorized Viewers, Field Support (for example CSAs), Operations Support Group (OSG),
and Expense Auditors access the system for different reasons. Time & Expense uses your user
identification to log you into the system to access the functionality that you need to enter or validate hours
and expenses to receive or pay the appropriate compensation or reimbursement.
The following table identifies the information that displays when you log into Time & Expense depending
on your job role:
Job Role Description
User
The time card page displays. Depending when you access the
system one of the following week ending dates displays:
• If you log into the system Sunday, Monday, or
Tuesday then the time card for the previous week
ending date displays.
• If you log into the system Wednesday, Thursday,
Friday, or Saturday then the time card for the current
week ending date displays.
Refer to Access and Update the Time card for further details.
Final Manager
The Pending Approval Time cards and Pending Approval
Expense Reports page displays. You must approve or reject
the time cards and expense reports listed to pay and reimburse
the users appropriately.
Depending on the customer for whom the user works, either
one level or two levels of approval is required. Once the
Primary Manager approves the time card or expense report,
Time & Expense routs the time card or expense report to the
Final Manager. The Final Manager must approve the time
card or expense report to compensate or reimburse the user.

2
Job Role Description
Primary Manager (optional)
The Pending Approval Time cards and Pending Approval
Expense Reports page displays. You must approve or reject
the time cards and expense reports listed to pay and reimburse
the Users appropriately.
The Primary Manager level is optional. Depending on the
customer for whom the user works, either one level or two
levels of approval is required. Once the Primary Manager
approves the time card or expense report, Time & Expense
routs the time card or expense report to the Final Manager.
The Final Manager must approve the time card or expense
report to compensate or reimburse the user.
Authorized Viewers
The time cards and Expense Reports lists display the
approved time cards and expense reports for the Users who
work for the customer you are authorized to view. You can
view the details for any of the time cards or expense reports
that display.

3
Understand Buttons, Icons and Links
When you access Time & Expense there are various buttons, icons and links that you can click to perform
different functions throughout the system. Review the table below to better understand these features in
Time &Expense.
Button Description
To view one of the following:
• A time card or expense report.
• Additional details for an expense item
To select a date.
Users and Field Support only.
To print the list of time cards or expense reports to the
printer that you specify
To display the list of time cards or expense reports in an
Excel spreadsheet. Use this feature to update and save the
information as necessary.
To display the Status Summary (Dashboard) page.
Field Support and System Administrators only.
To display the Status Summary page.
Field Support and System Administrators only.
To long into Time & Expense
To save the e-mail settings that you prefer. Approvers and
Users Only.
To save the information you inserted.
Users and Field Support only.
To save the updates you inserted to a time card.
Users Only.
To save the expense information you inserted.
Users and Field Support only.
To insert the hours worked and the user-defined fields, if
applicable, on your time card.
To change the information you inserted.
Users, Approvers, and Field Support only.
To update the User-Defined Field (UDF) values that display.
Approvers only.
To copy the information you inserted. You can use this
button on your time card to copy information from one date
and insert the same information for another date within the
same week.
To remove the information that displays.
To edit the information you inserted.
Users and Field Support only.
To continue performing the action.
To cancel or stop performing the action.
4
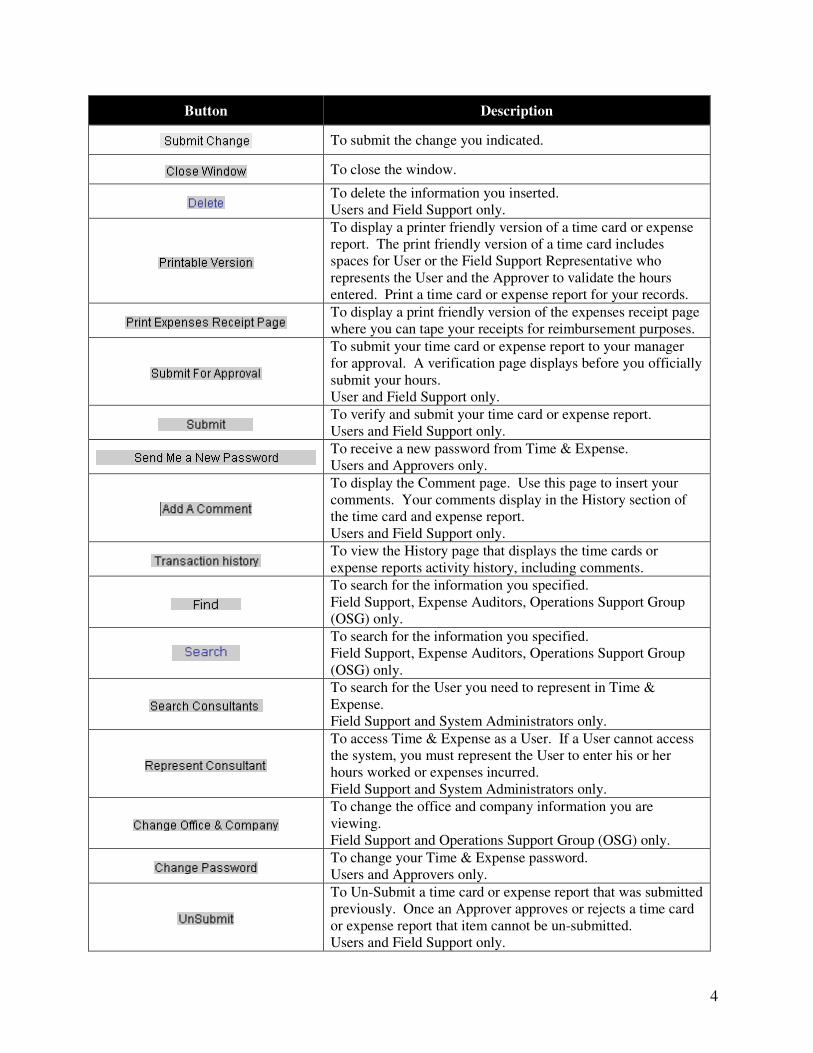
Button Description
To submit the change you indicated.
To close the window.
To delete the information you inserted.
Users and Field Support only.
To display a printer friendly version of a time card or expense
report. The print friendly version of a time card includes
spaces for User or the Field Support Representative who
represents the User and the Approver to validate the hours
entered. Print a time card or expense report for your records.
To display a print friendly version of the expenses receipt page
where you can tape your receipts for reimbursement purposes.
To submit your time card or expense report to your manager
for approval. A verification page displays before you officially
submit your hours.
User and Field Support only.
To verify and submit your time card or expense report.
Users and Field Support only.
To receive a new password from Time & Expense.
Users and Approvers only.
To display the Comment page. Use this page to insert your
comments. Your comments display in the History section of
the time card and expense report.
Users and Field Support only.
To view the History page that displays the time cards or
expense reports activity history, including comments.
To search for the information you specified.
Field Support, Expense Auditors, Operations Support Group
(OSG) only.
To search for the information you specified.
Field Support, Expense Auditors, Operations Support Group
(OSG) only.
To search for the User you need to represent in Time &
Expense.
Field Support and System Administrators only.
To access Time & Expense as a User. If a User cannot access
the system, you must represent the User to enter his or her
hours worked or expenses incurred.
Field Support and System Administrators only.
To change the office and company information you are
viewing.
Field Support and Operations Support Group (OSG) only.
To change your Time & Expense password.
Users and Approvers only.
To Un-Submit a time card or expense report that was submitted
previously. Once an Approver approves or rejects a time card
or expense report that item cannot be un-submitted.
Users and Field Support only.
5
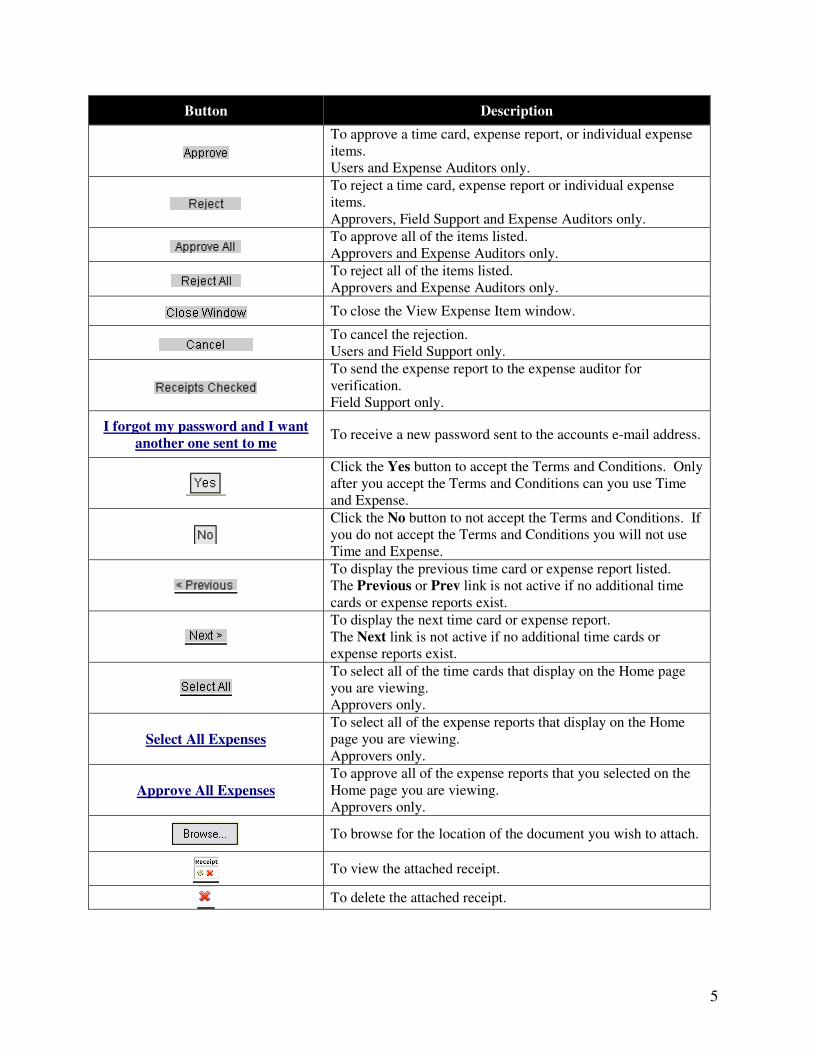
Button Description
To approve a time card, expense report, or individual expense
items.
Users and Expense Auditors only.
To reject a time card, expense report or individual expense
items.
Approvers, Field Support and Expense Auditors only.
To approve all of the items listed.
Approvers and Expense Auditors only.
To reject all of the items listed.
Approvers and Expense Auditors only.
To close the View Expense Item window.
To cancel the rejection.
Users and Field Support only.
To send the expense report to the expense auditor for
verification.
Field Support only.
I forgot my password and I want
another one sent to me To receive a new password sent to the accounts e-mail address.
Click the Yes button to accept the Terms and Conditions. Only
after you accept the Terms and Conditions can you use Time
and Expense.
Click the No button to not accept the Terms and Conditions. If
you do not accept the Terms and Conditions you will not use
Time and Expense.
To display the previous time card or expense report listed.
The Previous or Prev link is not active if no additional time
cards or expense reports exist.
To display the next time card or expense report.
The Next link is not active if no additional time cards or
expense reports exist.
To select all of the time cards that display on the Home page
you are viewing.
Approvers only.
Select All Expenses
To select all of the expense reports that display on the Home
page you are viewing.
Approvers only.
Approve All Expenses
To approve all of the expense reports that you selected on the
Home page you are viewing.
Approvers only.
To browse for the location of the document you wish to attach.
To view the attached receipt.
To delete the attached receipt.

6
View Messages
When using Time & Expense, you may receive messages while using the system. Read the information
that displays to understand the situation and take action as necessary.
7
System Options
As you use Time & Expense, you must understand how to access the system, to enter time and expenses
(Users Only) or to review the time cards and expense reports saved in the system.
Time & Expense is a secure site. Before you can access any of these features, you must understand how
to log into and logout of the system appropriately. If you are a User, Approver, or Authorized Viewer,
you must also agree to the terms and conditions, setup your account, and verify e-mail preferences before
you can use Time & Expense. You can redefine your e-mail preferences and password at anytime while
using the system.
Use this chapter to understand how to:
• Log into Time & Expense
• Logout of Time & Expense
• View Terms and Conditions
• Setup your account
• Change your password
8
Log into Time & Expense
You must log into Time & Expense to enter, view, and approve hours and expenses in the system. When
Approvers and Authorized Viewers are set up in Time & Expense, the system sends you a temporary
username and password. If you did not receive a username and password, contact the Consolidated
Services Desk.
Time & Expense Login Rules:
• Users – can continue to access the system for 28 days after their requisition ends.
• Approvers – can continue to access the system as long as they are active in PeopleSoft.
• Authorized Viewers – can no longer access the system after 180 consecutive days of non-use.
As an Approver or Authorized Viewer, your username and password is not dependent on the customer or
requisition with which you work. Use the same username and password that you used previously to
access the system. If you do not remember your password, you can request a new one. Refer to Request
a New Password for Time & Expense for further details.
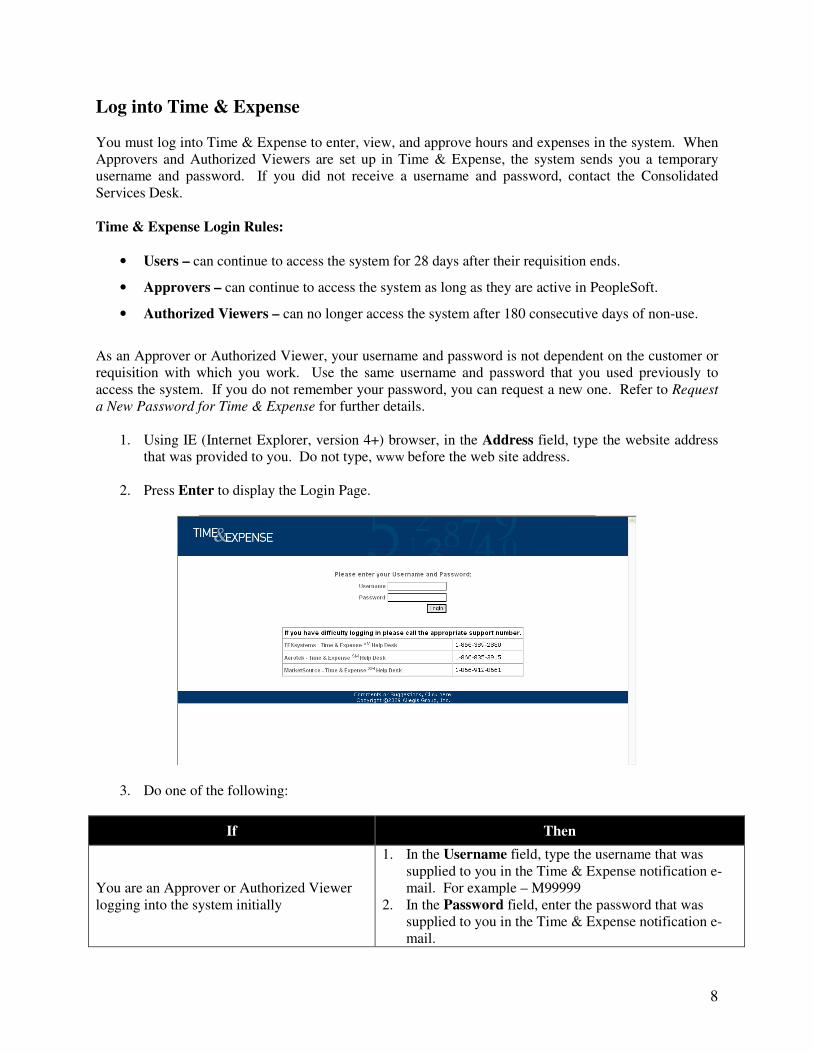
1. Using IE (Internet Explorer, version 4+) browser, in the Address field, type the website address
that was provided to you. Do not type, www before the web site address.
2. Press Enter to display the Login Page.
3. Do one of the following:
If Then
You are an Approver or Authorized Viewer
logging into the system initially
1. In the Username field, type the username that was
supplied to you in the Time & Expense notification e-
mail. For example – M99999
2. In the Password field, enter the password that was
supplied to you in the Time & Expense notification e-
mail.

9
You are an Approver, or Authorized Viewer
who has logged into the system previously
1. In the Username field, type the e-mail address you
specified previously. Your e-mail address is your
username.
2. In the Password field, type the password you specified
previously
If you do not remember your password, you can request a
new one. Refer to Request a New Password for Time &
Expense for further details.
4. Click the Login button to log into Time & Expense. If you are an Approver or Authorized
Viewer and this is your initial login you must setup your Time & Expense account. Refer to
Setup Your Time & Expense Account for further details.

10
View Time & Expense Terms and Conditions
While using Time & Expense you can view the terms you accepted when you accessed the system
initially.
1. To review the Terms and Conditions, Click the View Terms link to display the User Terms and
Conditions Page.
2. Read the User Terms and Conditions page to review the terms and conditions.
3. If this is the first time you have accessed Time & Expense, you must click the Yes button to
accept the Terms and Conditions to access the system.
11
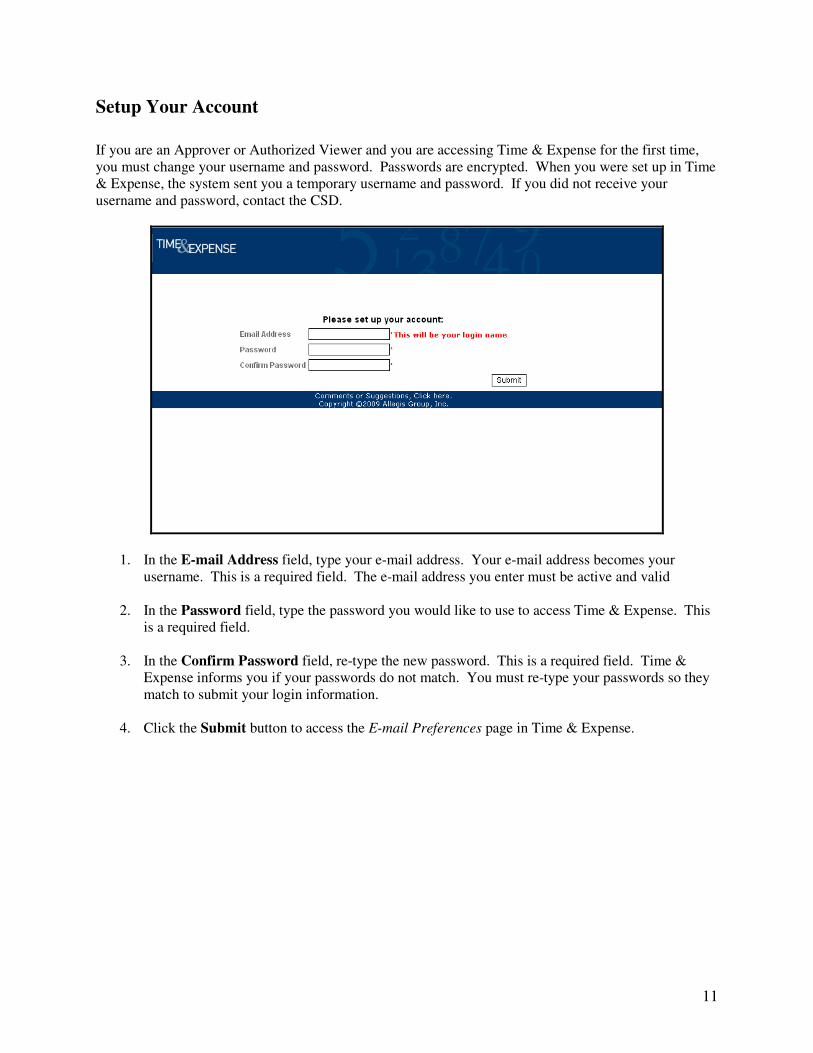
Setup Your Account
If you are an Approver or Authorized Viewer and you are accessing Time & Expense for the first time,
you must change your username and password. Passwords are encrypted. When you were set up in Time
& Expense, the system sent you a temporary username and password. If you did not receive your
username and password, contact the CSD.
1. In the E-mail Address field, type your e-mail address. Your e-mail address becomes your
username. This is a required field. The e-mail address you enter must be active and valid
2. In the Password field, type the password you would like to use to access Time & Expense. This
is a required field.
3. In the Confirm Password field, re-type the new password. This is a required field. Time &
Expense informs you if your passwords do not match. You must re-type your passwords so they
match to submit your login information.
4. Click the Submit button to access the E-mail Preferences page in Time & Expense.

12
Setup Your E-mail Preferences
Once you setup your account, Time & Expense displays the e-mail preferences page. Use this page to
indicate if you want to receive messages from Time & Expense.
Once you have saved your e-mail preferences, click the Setup Options Link from your left menu to update
your preferences when necessary.
In the Change my e-mail address/username field, type the e-mail address of where you want Time &
Expense to send your notifications. This is your username (if you change your e-mail address you are
changing your username).
Approver Setup Options
1. Select any of the following checkboxes. If the checkboxes display a check then you will receive
e-mail notifications.
• Send me an e-mail whenever a Time card is submitted for my approval – To receive time
card notifications from Time & Expense when it receives a time card from one of your Users.
Default is checked.
• Send me an e-mail whenever an Expense Report is submitted for my approval – To
receive expense report notifications from Time and Expense when it receives an expense
report from one of our Users. Default is checked.
• Send me an e-mail whenever threshold for Time cards submitted for last Week Ending
Date is reached – To receive notifications from Time & Expense when it receives the
percentage of time cards that you indicated for the previous week ending date in the Send me
an e-mail when percentage of Time cards submitted for approval equals: dropdown box.
2. In the Send me an e-mail when percentage of Time cards submitted for approval equals:
field, select the percentage of time cards that you want to receive before Time & Expense sends
you an e-mail. If you use this feature, you must deselect the first two check boxes and select the
Send me an e-mail whenever threshold for Time cards submitted for last Week Ending Date
is reached checkbox.

13
Request a New Password for Time & Expense
If you forget your password for Time & Expense, you can have the system send you a new one.
1. From the login page I forgot my password and I want a new one sent to me link.
2. In the E-mail Address field, type your e-mail address. Your e-mail address is your username.
You must type the e-mail address you entered when you set up your account.
3. Click the Send Me a New Password button for Time & Expense to send your password to the e-
mail address you entered. You must be able to receive e-mails at the e-mail address you entered
to receive your new password. Time & Expense sends your password immediately.

14
Change Your Password
While using Time & Expense your passwords never expire. However, you can change your password at
any time.
1. From the left menu, click the Change Password link, to display the Change Password page.
2. In the Old Password field, type your current password.
3. In the New Password field, type your new password.
4. In the Confirm New Password field, re-type your password.
5. Click the Change Password button to change your password.

15
Log Out of Time & Expense
Log out of Time & Expense when you finish working in the system.
From the left menu, click the Logout link to display the Login page. When the Login page displays, you
are logged out of Time and Expense successfully.
16
System Features
Once you access the system, Time & Expense offers you a variety of features to help you enter time and
expenses as well as keep track of your time cards and expense reports. The information that displays
when you log into Time & Expense depends on your job role. When you access the system, the
following information displays for the following roles:
• Approvers – Displays a list of the time cards and expense reports you must approve to pay or
reimburse your Users appropriately.
• Authorized Viewers – Displays a list of the most current time cards and expense reports that
have been approved for the previous seven days.
• Users – Displays the current time card to ensure that hours are logged so that compensation can
be received.
Once you log into the system, you can click any of the links in the left menu to access additional
information. As you use the system, Time & Expense stores a history of your actions and offers
resources to help you use the system. Use the information in this chapter to understand how to use Time
& Expense.

17
Use the Home Link
The Home Page displays a list of the time cards and expense reports that need your approval. Use the
Find feature to display a list of time cards and expense reports for a specific User or week ending date.
1. From the Left Menu, click the Home link to display the list of pending time cards and expense
reports. This page displays when you first log into the system.
2. When you long into the Home Page, your information sorts by week ending date in descending
order and employee name in ascending order. Click any of the column heading links to sort the
information by the column you selected. An arrow displays to indicate that the column is sorted
by ascending or descending order.
3. If necessary, use any of the following search features to display information you need:
Note: You do not need to complete each field to perform a search.
18
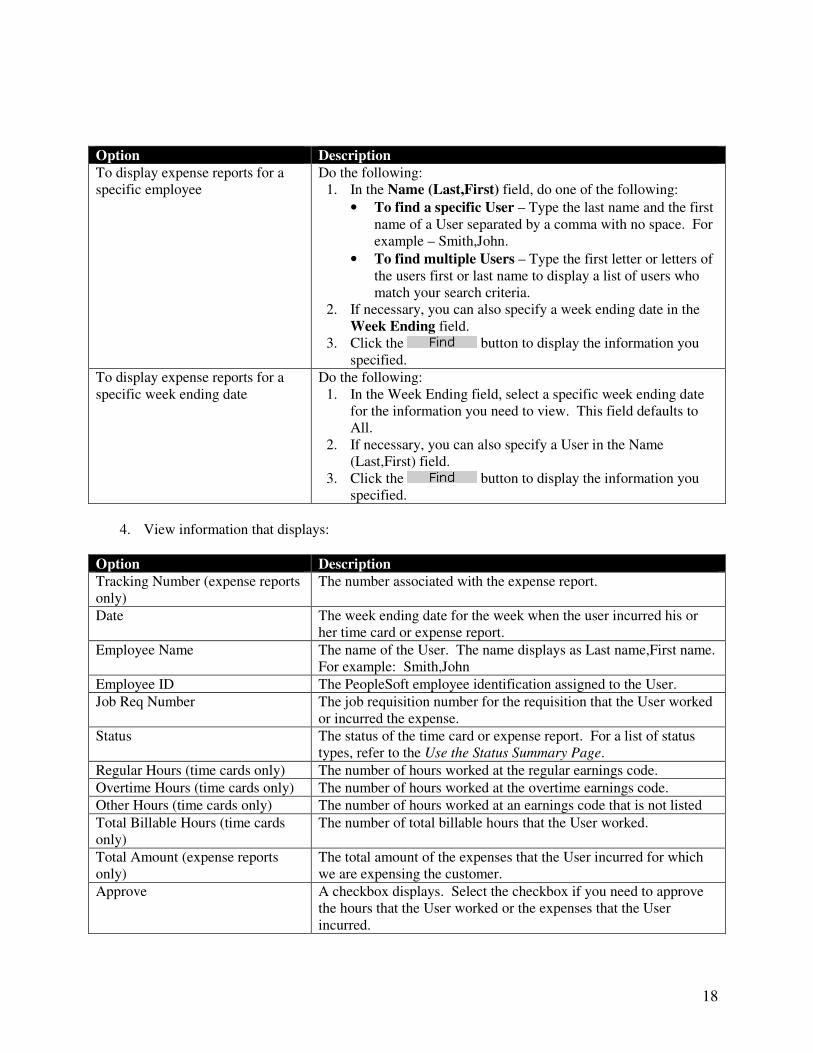
Option Description
To display expense reports for a
specific employee
Do the following:
1. In the Name (Last,First) field, do one of the following:
• To find a specific User – Type the last name and the first
name of a User separated by a comma with no space. For
example – Smith,John.
• To find multiple Users – Type the first letter or letters of
the users first or last name to display a list of users who
match your search criteria.
2. If necessary, you can also specify a week ending date in the
Week Ending field.
3. Click the button to display the information you
specified.
To display expense reports for a
specific week ending date
Do the following:
1. In the Week Ending field, select a specific week ending date
for the information you need to view. This field defaults to
All.
2. If necessary, you can also specify a User in the Name
(Last,First) field.
3. Click the button to display the information you
specified.
4. View information that displays:
Option Description
Tracking Number (expense reports
only)
The number associated with the expense report.
Date The week ending date for the week when the user incurred his or
her time card or expense report.
Employee Name The name of the User. The name displays as Last name,First name.
For example: Smith,John
Employee ID The PeopleSoft employee identification assigned to the User.
Job Req Number The job requisition number for the requisition that the User worked
or incurred the expense.
Status The status of the time card or expense report. For a list of status
types, refer to the Use the Status Summary Page.
Regular Hours (time cards only) The number of hours worked at the regular earnings code.
Overtime Hours (time cards only) The number of hours worked at the overtime earnings code.
Other Hours (time cards only) The number of hours worked at an earnings code that is not listed
Total Billable Hours (time cards
only)
The number of total billable hours that the User worked.
Total Amount (expense reports
only)
The total amount of the expenses that the User incurred for which
we are expensing the customer.
Approve A checkbox displays. Select the checkbox if you need to approve
the hours that the User worked or the expenses that the User
incurred.
19
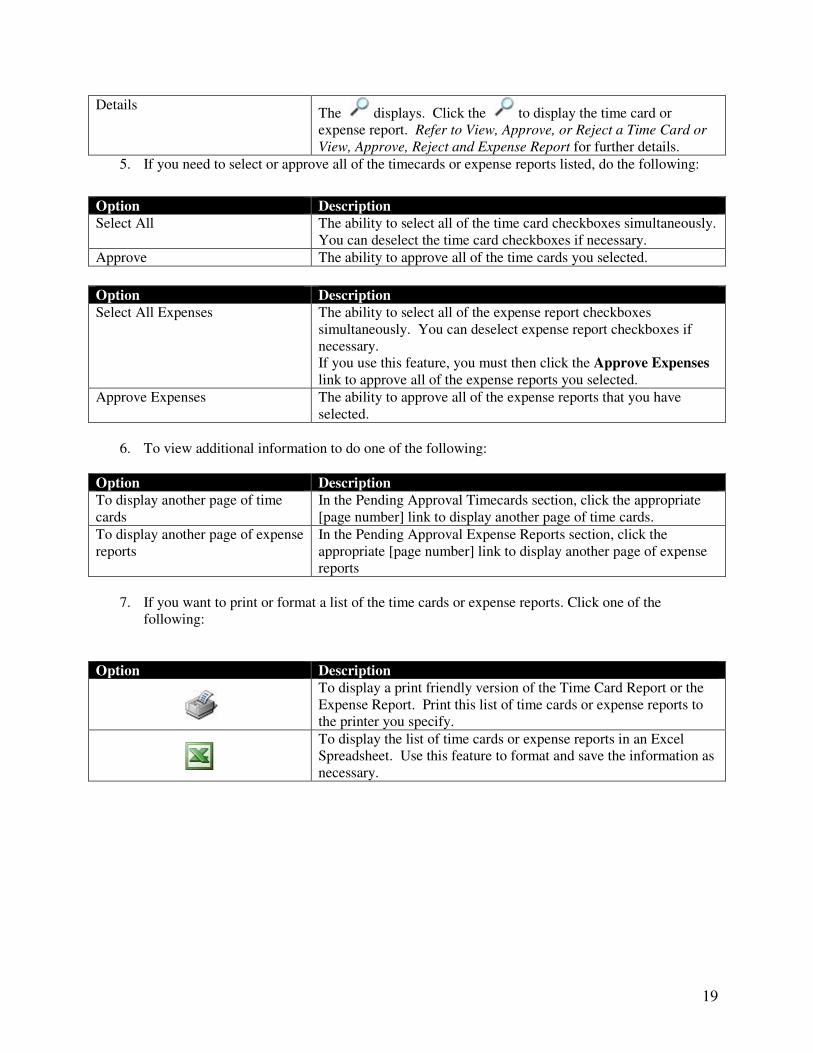
Details The displays. Click the to display the time card or
expense report. Refer to View, Approve, or Reject a Time Card or
View, Approve, Reject and Expense Report for further details.
5. If you need to select or approve all of the timecards or expense reports listed, do the following:
6. To view additional information to do one of the following:
Option Description
To display another page of time
cards
In the Pending Approval Timecards section, click the appropriate
[page number] link to display another page of time cards.
To display another page of expense
reports
In the Pending Approval Expense Reports section, click the
appropriate [page number] link to display another page of expense
reports
7. If you want to print or format a list of the time cards or expense reports. Click one of the
following:
Option Description
To display a print friendly version of the Time Card Report or the
Expense Report. Print this list of time cards or expense reports to
the printer you specify.
To display the list of time cards or expense reports in an Excel
Spreadsheet. Use this feature to format and save the information as
necessary.
Option Description
Select All The ability to select all of the time card checkboxes simultaneously.
You can deselect the time card checkboxes if necessary.
Approve The ability to approve all of the time cards you selected.
Option Description
Select All Expenses The ability to select all of the expense report checkboxes
simultaneously. You can deselect expense report checkboxes if
necessary.
If you use this feature, you must then click the Approve Expenses
link to approve all of the expense reports you selected.
Approve Expenses The ability to approve all of the expense reports that you have
selected.
20
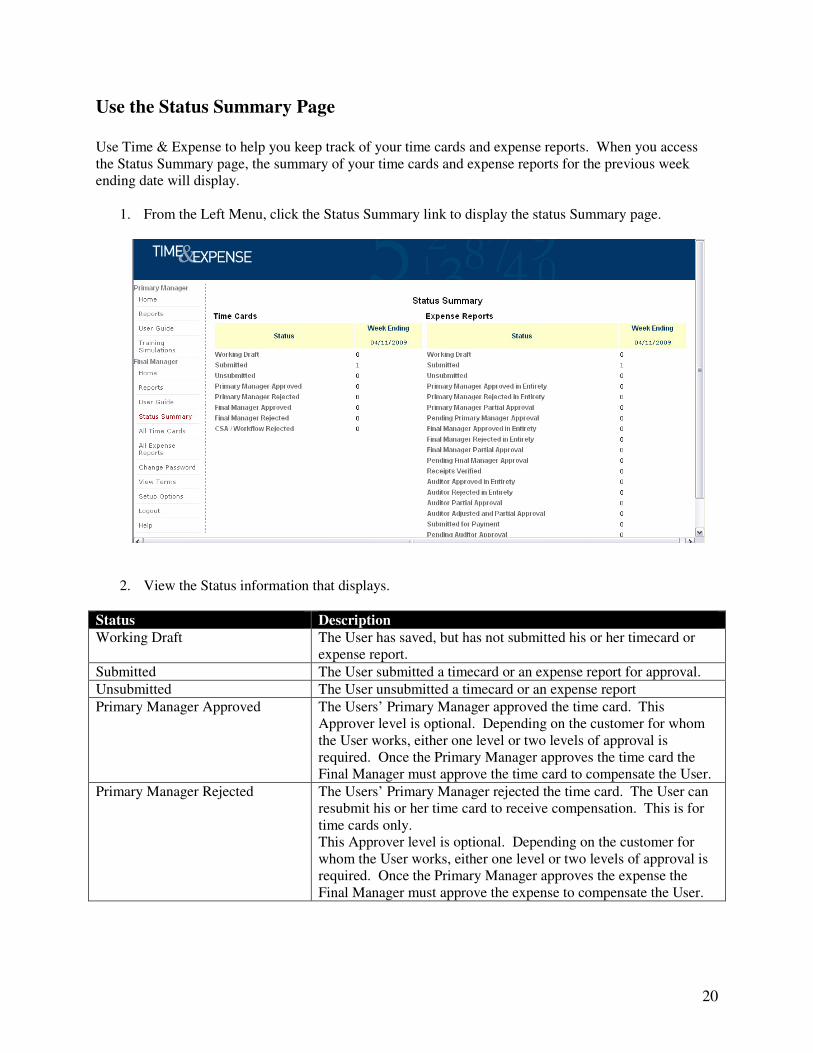
Use the Status Summary Page
Use Time & Expense to help you keep track of your time cards and expense reports. When you access
the Status Summary page, the summary of your time cards and expense reports for the previous week
ending date will display.
1. From the Left Menu, click the Status Summary link to display the status Summary page.
2. View the Status information that displays.
Status Description
Working Draft The User has saved, but has not submitted his or her timecard or
expense report.
Submitted The User submitted a timecard or an expense report for approval.
Unsubmitted The User unsubmitted a timecard or an expense report
Primary Manager Approved The Users’ Primary Manager approved the time card. This
Approver level is optional. Depending on the customer for whom
the User works, either one level or two levels of approval is
required. Once the Primary Manager approves the time card the
Final Manager must approve the time card to compensate the User.
Primary Manager Rejected The Users’ Primary Manager rejected the time card. The User can
resubmit his or her time card to receive compensation. This is for
time cards only.
This Approver level is optional. Depending on the customer for
whom the User works, either one level or two levels of approval is
required. Once the Primary Manager approves the expense the
Final Manager must approve the expense to compensate the User.
21
Status Description
Final Manager Approved The Users’ Final Manager approved the time card. This Final
Manager level must approve a Users’ time card for the User to
receive compensation. Time cards only.
Final Manager Rejected The User’s Final Manager rejected the time card. This Final
Manager must approve a Users’ timecard for the User to receive
compensation. The User can resubmit his or her timecard. Time
cards only.
CSA\Workflow Rejected The Customer Support Associate (CSA or Field Support
Representative) or Workflow application rejected the time card.
The Workflow application validates that the time card passes all
business rules. The User must resubmit the time card for
compensation. Time cards only.
Primary Manager Approved in
Entirety
This User’s Primary Manager approved the entire expense report.
This Approver level is optional. Depending on the customer for
whom the User works, either one level or two levels of approval is
required. Once the Primary Manager approves the time card the
Final Manager must approve the time card to compensate the User.
Primary Manager Rejected in
Entirety
The Users’ Primary Manager rejected the entire expense report.
This approval level is optional. Depending on the customer for
whom the User works, either one level or two levels of approval is
required. Once the Primary Manager approves the time card the
Final Manager must approve the time card to compensate the User.
Primary Manager Partial Approval The Primary Manager approved a portion of the User’s expense
report. This approval level is optional. Depending on the customer
for whom the User works, either one level or two levels of approval
is required. Once the Primary Manager reviews the expense report
the Final Manager must review the expense report to reimburse the
User. Both manager levels must approve the same portion of an
expense report for the User to receive any reimbursement. A User
can resubmit the reject portion of an expense report. Expense
reports only.
Pending Primary Manager
Approval
The Primary Manager needs to validate the expense report. This
approval level is optional. Depending on the customer for whom
the User works, either one level or two levels of approval is
required. Once the Primary Manager reviews the expense report
the Final Manager must review the expense report to reimburse the
User. Both manager levels must approve the same portion of an
expense report for the User to receive any reimbursement. A User
can resubmit the reject portion of an expense report. Expense
reports only.
Final Manager Approved in
Entirety
The Users’ Final Manager approved the entire expense report. This
Final Manager level must approve a Users expense report for the
User to receive reimbursement. Expense reports only.
Final Manager Rejected in Entirety The Users’ Final Manager rejected the entire expense report. This
Final Manager must approve a Users’ expense report for the User to
receive reimbursement. The User can resubmit the expense report.
Expense reports only.

22
Status Description
Final Manager Partial Approval The Final Manager approved a portion of the expense report. This
Final Manager level must approve a Users’ expense report for the
User to receive reimbursement. If a Final Manager gives partial
approval, then the User only receives partial reimbursement. The
User can resubmit the rejected expense items to receive
reimbursement. Expense reports only.
Pending Final Manager Approval The Final Manager needs to validate the expense report. This
approval level must approve a Users’ expense reports for the User
to receive reimbursement. Expense reports only.
Receipts Verified The receipts for the expense report have been verified. Expense
reports only.
Auditor Approved in Entirety The Expense Auditor approved the entire expense report. Expense
reports only.
Auditor Rejected in Entirety The Expense Auditor rejected the entire expense report. The User
will not receive reimbursement. The User can resubmit his or her
expense report to receive reimbursement. Expense reports only.
Auditor Partial Approval The expense Auditor approved a portion of the expense report to
receive partial reimbursement. A User can resubmit the rejected
portion of the expense report to receive full reimbursement.
Expense reports only.
Auditor Adjusted and Partial
Approval
The Expense Auditor approved a portion of the expense report and
reduced the amount of an expense submitted by the User. A User
can resubmit the rejected portion of an expense report. Expense
reports only.
Submitted for Payment PeopleSoft OASIS processed the expense report successfully.
Expense reports only.
Pending Auditor Approval The Expense Auditor needs to validate the expense report. The
Expense Auditor must approve a User’s expense report for the User
to receive reimbursement. Expense reports only.
3. In the Week Ending column, view the number of time cards or expense reports that were
calculated for the previous week ending date. Click the numeral links to display the Time Cards
or Expense Reports page.
23
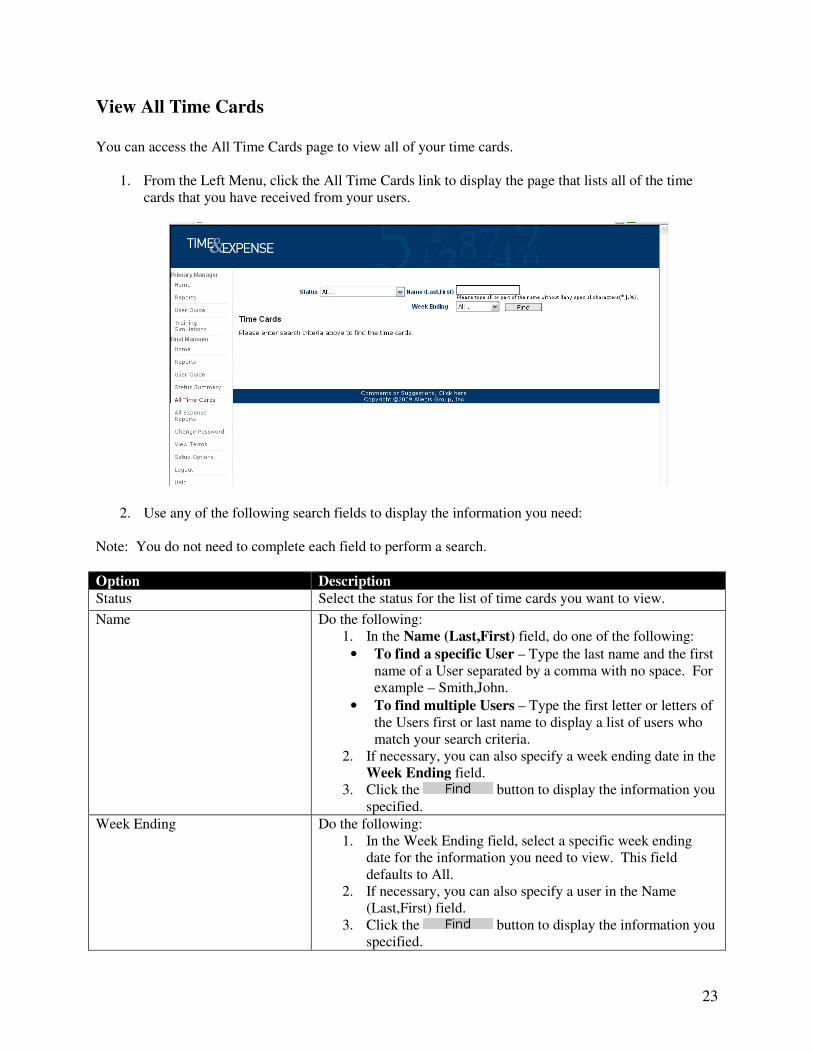
View All Time Cards
You can access the All Time Cards page to view all of your time cards.
1. From the Left Menu, click the All Time Cards link to display the page that lists all of the time
cards that you have received from your users.
2. Use any of the following search fields to display the information you need:
Note: You do not need to complete each field to perform a search.
Option Description
Status Select the status for the list of time cards you want to view.
Name Do the following:
1. In the Name (Last,First) field, do one of the following:
• To find a specific User – Type the last name and the first
name of a User separated by a comma with no space. For
example – Smith,John.
• To find multiple Users – Type the first letter or letters of
the Users first or last name to display a list of users who
match your search criteria.
2. If necessary, you can also specify a week ending date in the
Week Ending field.
3. Click the button to display the information you
specified.
Week Ending Do the following:
1. In the Week Ending field, select a specific week ending
date for the information you need to view. This field
defaults to All.
2. If necessary, you can also specify a user in the Name
(Last,First) field.
3. Click the button to display the information you
specified.
24
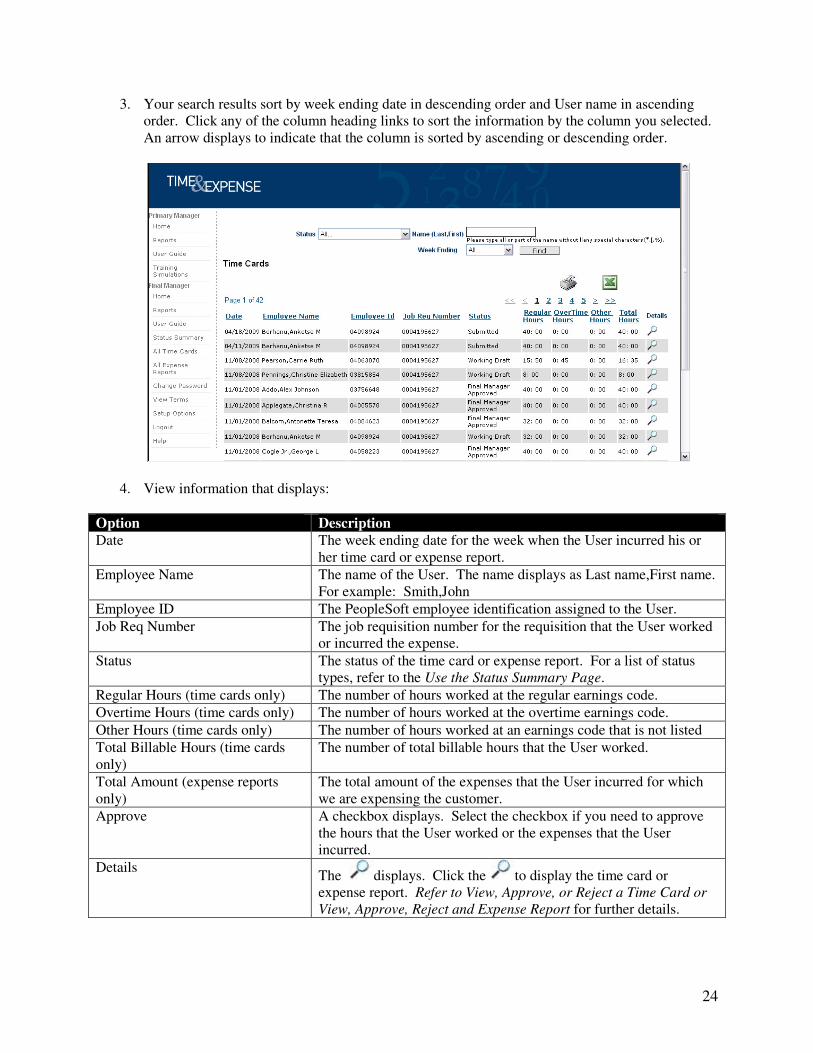
3. Your search results sort by week ending date in descending order and User name in ascending
order. Click any of the column heading links to sort the information by the column you selected.
An arrow displays to indicate that the column is sorted by ascending or descending order.
4. View information that displays:
Option Description
Date The week ending date for the week when the User incurred his or
her time card or expense report.
Employee Name The name of the User. The name displays as Last name,First name.
For example: Smith,John
Employee ID The PeopleSoft employee identification assigned to the User.
Job Req Number The job requisition number for the requisition that the User worked
or incurred the expense.
Status The status of the time card or expense report. For a list of status
types, refer to the Use the Status Summary Page.
Regular Hours (time cards only) The number of hours worked at the regular earnings code.
Overtime Hours (time cards only) The number of hours worked at the overtime earnings code.
Other Hours (time cards only) The number of hours worked at an earnings code that is not listed
Total Billable Hours (time cards
only)
The number of total billable hours that the User worked.
Total Amount (expense reports
only)
The total amount of the expenses that the User incurred for which
we are expensing the customer.
Approve A checkbox displays. Select the checkbox if you need to approve
the hours that the User worked or the expenses that the User
incurred.
Details The displays. Click the to display the time card or
expense report. Refer to View, Approve, or Reject a Time Card or
View, Approve, Reject and Expense Report for further details.

25
5. To view additional information, click the appropriate [page number] link to display another page
of timecards.
6. To print or format the list of time cards that displays, click on one of the following:
Option Description
To display a print friendly version of the Time Card Report or the
Expense Report. Print this list of time cards or expense reports to
the printer you specify.
To display the list of time cards or expense reports in an Excel
Spreadsheet. Use this feature to format and save the information as
necessary.
7. Click on the to display an individual timecard.
8. View the time card and history information that displays.
9. Click on any of the following:
Option Description
The link To display the previous time card in your list of time cards.
The link To display the next time card in your list of time cards.
The All Time Cards link from the
left menu.
To return to the Search Time Cards page.
26
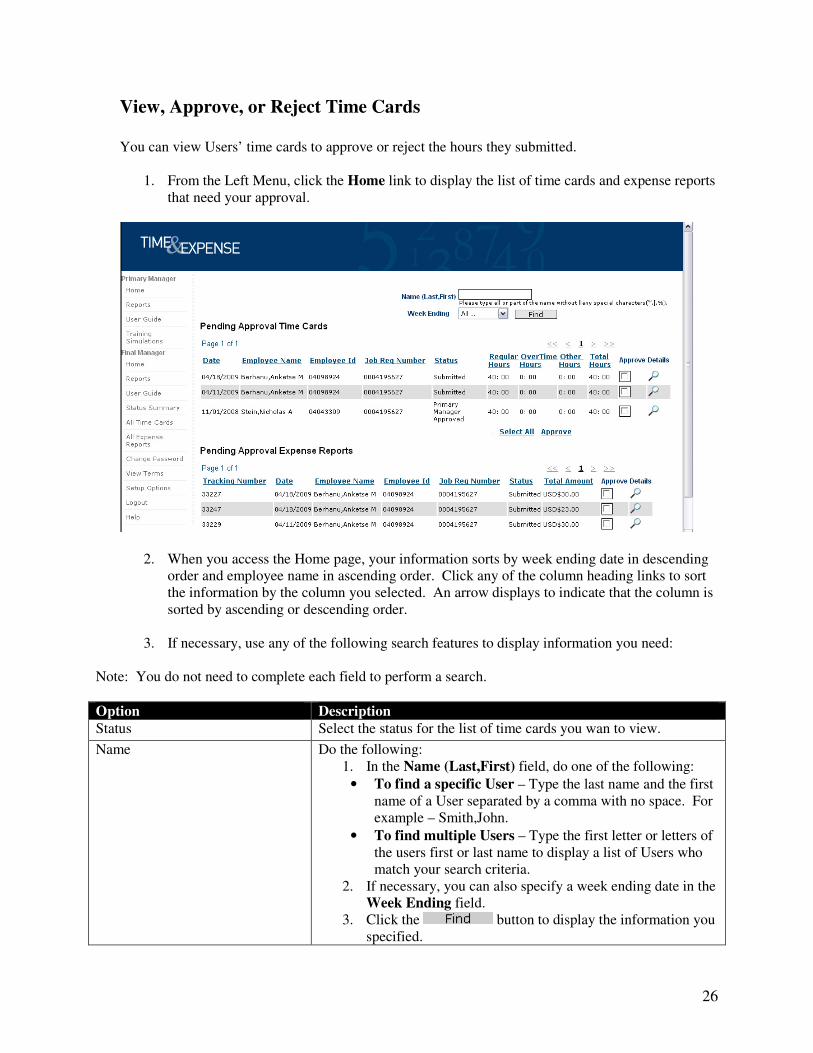
View, Approve, or Reject Time Cards
You can view Users’ time cards to approve or reject the hours they submitted.
1. From the Left Menu, click the Home link to display the list of time cards and expense reports
that need your approval.
2. When you access the Home page, your information sorts by week ending date in descending
order and employee name in ascending order. Click any of the column heading links to sort
the information by the column you selected. An arrow displays to indicate that the column is
sorted by ascending or descending order.
3. If necessary, use any of the following search features to display information you need:
Note: You do not need to complete each field to perform a search.
Option Description
Status Select the status for the list of time cards you wan to view.
Name Do the following:
1. In the Name (Last,First) field, do one of the following:
• To find a specific User – Type the last name and the first
name of a User separated by a comma with no space. For
example – Smith,John.
• To find multiple Users – Type the first letter or letters of
the users first or last name to display a list of Users who
match your search criteria.
2. If necessary, you can also specify a week ending date in the
Week Ending field.
3. Click the button to display the information you
specified.

27
Week Ending Do the following:
1. In the Week Ending field, select a specific week ending
date for the information you need to view. This field
defaults to All.
2. If necessary, you can also specify a User in the Name
(Last,First) field.
3. Click the button to display the information you
specified.
4. Click on the to display an individual timecard.
5. Verify the information that displays.
6. If you need to update a UDF value that displays, click the Edit UDFs button to display the
UDF fields for the date you indicated.
Update the UDF field(s) as necessary. The UDF values displays as follows:
Option Description
Verify the UDF that displays. This type of UDF is read only. You
cannot update this type of UDF. Contact the field support
representative (for example: CSA) in necessary to update the value
that displays.
Select the UDF value that should display.
If the appropriate UDF value does not display, contact the field
support representative (for example: CSA) in necessary to update
the value(s).
7. Click the Save Changes to save your updates. The time card display with your updates.
28
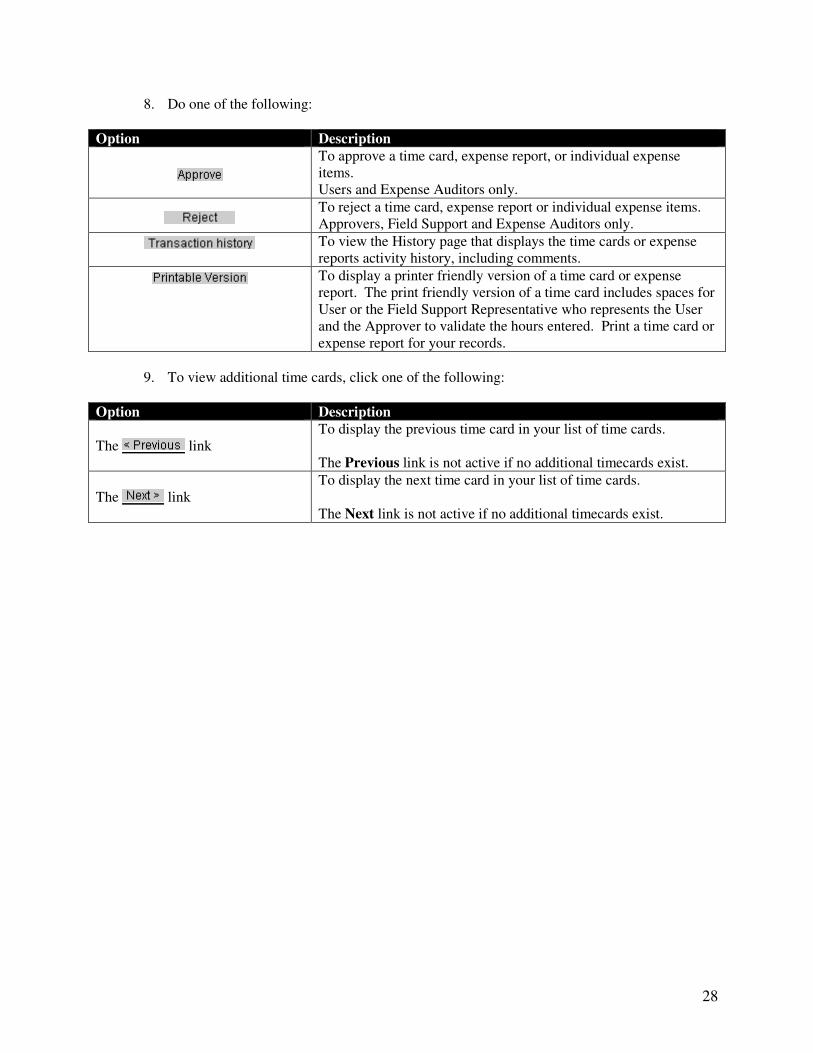
8. Do one of the following:
Option Description
To approve a time card, expense report, or individual expense
items.
Users and Expense Auditors only.
To reject a time card, expense report or individual expense items.
Approvers, Field Support and Expense Auditors only.
To view the History page that displays the time cards or expense
reports activity history, including comments.
To display a printer friendly version of a time card or expense
report. The print friendly version of a time card includes spaces for
User or the Field Support Representative who represents the User
and the Approver to validate the hours entered. Print a time card or
expense report for your records.
9. To view additional time cards, click one of the following:
Option Description
The link
To display the previous time card in your list of time cards.
The Previous link is not active if no additional timecards exist.
The link
To display the next time card in your list of time cards.
The Next link is not active if no additional timecards exist.

29
View All Expense Reports
You can access the Expense Reports page to view all of your expense reports.
1. From the Left Menu, click the All Expense Reports link to display the Expense Reports
page.
2. Use any of the following search fields to display the information you need:
Note: You do not need to complete each field to perform a search.
Option Description
Status Select the status for the list of time cards you wan to view.
Name Do the following:
1. In the Name (Last,First) field, do one of the following:
• To find a specific User – Type the last name and the first
name of a User separated by a comma with no space. For
example – Smith,John.
• To find multiple Users – Type the first letter or letters of
the Users first or last name to display a list of Users who
match your search criteria.
2. If necessary, you can also specify a week ending date in the
Week Ending field.
3. Click the button to display the information you
specified.

30
Week Ending Do the following:
1. In the Week Ending field, select a specific week ending
date for the information you need to view. This field
defaults to All.
2. If necessary, you can also specify a User in the Name
(Last,First) field.
3. Click the button to display the information you
specified.
3. Your search results sort by week ending date in descending order and User name in ascending
order. Click any of the column heading links to sort the information by the column you
selected. An arrow displays to indicate that the column is sorted by ascending or descending
order.
4. View information that displays:
Option Description
Tracking Number (expense reports
only)
The number associated with the expense report.
Date The week ending date for the expense that the User Submitted
Employee Name The name of the User. The name displays as Last name,First name.
For example: Smith,John
Employee ID The PeopleSoft employee identification assigned to the User.
Job Req Number The job requisition number for the requisition that the User worked
or incurred the expense.
Status The status of the time card or expense report. For a list of status
types, refer to the Use the Status Summary Page.
Total Amount The total amount of the expenses that the User incurred for which
we are expensing the customer.
Details The displays. Click the to display the time card or
expense report. Refer to View, Approve, or Reject a Time Card or
View, Approve, Reject and Expense Report for further details.

31
5. To view additional information, click the appropriate [page number] link to display another
page of expense reports.
6. To print or format the list of expense reports that displays, click one of the following:
Option Description
To display a print friendly version of the Time Card Report or the
Expense Report. Print this list of time cards or expense reports to
the printer you specify.
To display the list of time cards or expense reports in an Excel
Spreadsheet. Use this feature to format and save the information as
necessary.

32
View Expense Details
You can view expense items to see more details about the expense.
1. From the Home page, click to access the appropriate expense report.
2. Click the to view a detail relating to the expense. The View Expense Item window displays.
3. View the information that displays.

33
4. If you need to update a UDF value associated with the expense item, click to select the
appropriate UDF value from the selection window. You cannot update UDF values that are read-
only.
Note: If the appropriate value does not display, contact the field support representative (for example, the
CSA).
5. Click one of the following buttons:
Button Description
To close the window and return to the expense report.
To close the window and update the expense report appropriately.
34
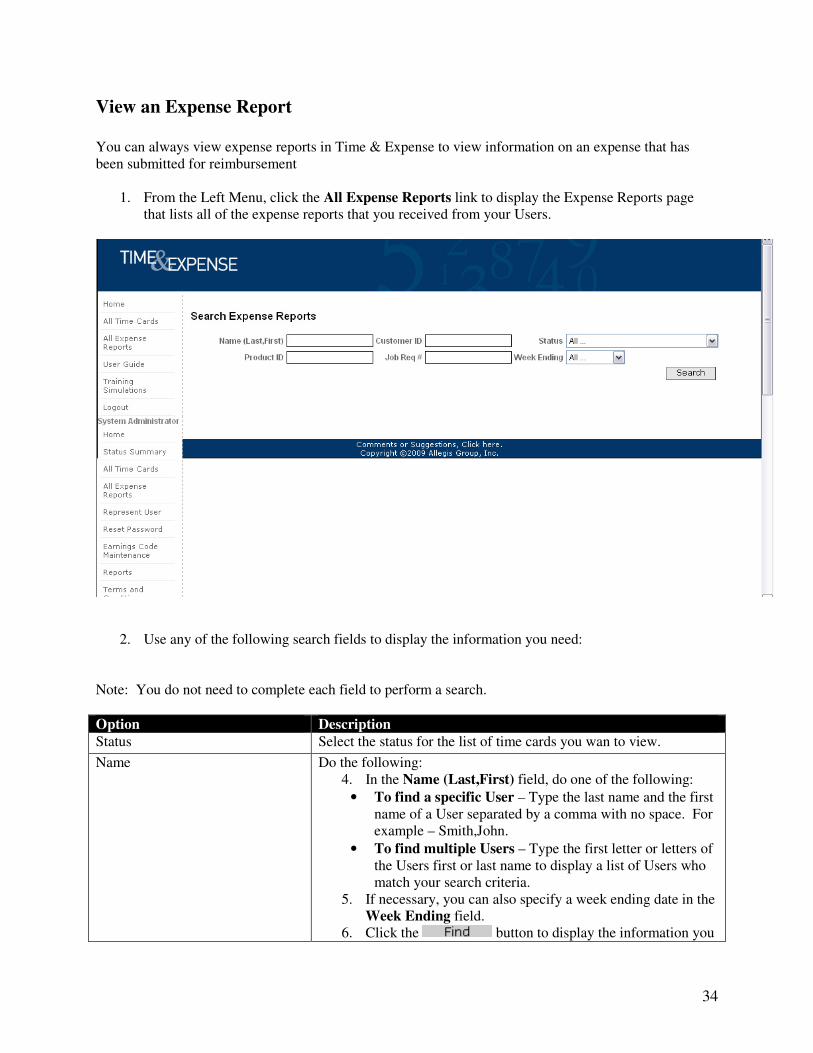
View an Expense Report
You can always view expense reports in Time & Expense to view information on an expense that has
been submitted for reimbursement
1. From the Left Menu, click the All Expense Reports link to display the Expense Reports page
that lists all of the expense reports that you received from your Users.
2. Use any of the following search fields to display the information you need:
Note: You do not need to complete each field to perform a search.
Option Description
Status Select the status for the list of time cards you wan to view.
Name Do the following:
4. In the Name (Last,First) field, do one of the following:
• To find a specific User – Type the last name and the first
name of a User separated by a comma with no space. For
example – Smith,John.
• To find multiple Users – Type the first letter or letters of
the Users first or last name to display a list of Users who
match your search criteria.
5. If necessary, you can also specify a week ending date in the
Week Ending field.
6. Click the button to display the information you

35
specified.
Week Ending Do the following:
4. In the Week Ending field, select a specific week ending
date for the information you need to view. This field
defaults to All.
5. If necessary, you can also specify a User in the Name
(Last,First) field.
6. Click the button to display the information you
specified.
7. Your search results sort by week ending date in descending order and user name in ascending
order. Click any of the column heading links to sort the information by the column you
selected. An arrow displays to indicate that the column is sorted by ascending or descending
order.
8. If you need to display another page of expense reports, click the appropriate [page number]
link to display another page of expense reports.
9. View information that displays:
Field Description
Tracking Number (expense reports
only)
The number associated with the expense report.
Date The week ending date for the expense that the User Submitted
Employee Name The name of the User. The name displays as Last name,First name.
For example: Smith,John
Employee ID The PeopleSoft employee identification assigned to the User.
Job Req Number The job requisition number for the requisition that the User worked
or incurred the expense.
Status The status of the time card or expense report. For a list of status
types, refer to the Use the Status Summary Page.
Total Amount The total amount of the expenses that the User incurred for which
we are expensing the customer.
Details The displays. Click the to display the time card or
expense report. Refer to View, Approve, or Reject a Time Card or
View, Approve, Reject and Expense Report for further details.

36
10. Click on any one of the following:
Option Description
The link To display the previous time card in your list of expense reports.
The link To display the next time card in your list of expense reports.
The All Expense Reports link
from the left menu.
To return to the Search Expense Reports page.
37
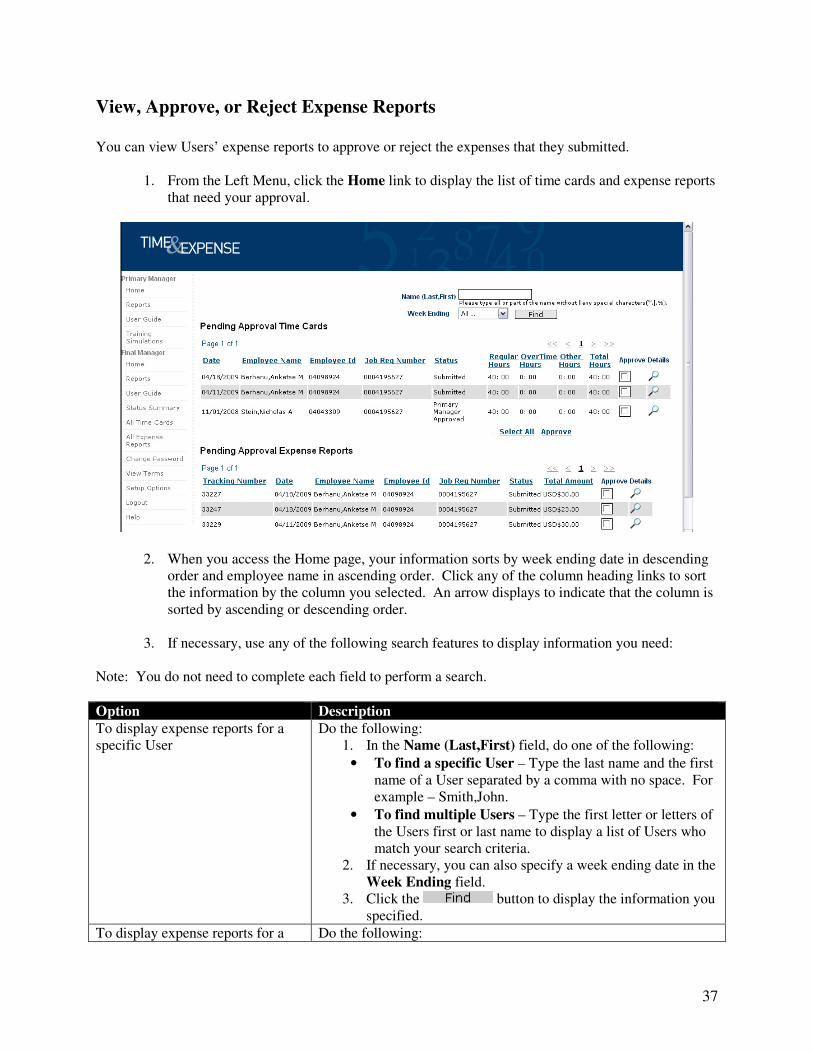
View, Approve, or Reject Expense Reports
You can view Users’ expense reports to approve or reject the expenses that they submitted.
1. From the Left Menu, click the Home link to display the list of time cards and expense reports
that need your approval.
2. When you access the Home page, your information sorts by week ending date in descending
order and employee name in ascending order. Click any of the column heading links to sort
the information by the column you selected. An arrow displays to indicate that the column is
sorted by ascending or descending order.
3. If necessary, use any of the following search features to display information you need:
Note: You do not need to complete each field to perform a search.
Option Description
To display expense reports for a
specific User
Do the following:
1. In the Name (Last,First) field, do one of the following:
• To find a specific User – Type the last name and the first
name of a User separated by a comma with no space. For
example – Smith,John.
• To find multiple Users – Type the first letter or letters of
the Users first or last name to display a list of Users who
match your search criteria.
2. If necessary, you can also specify a week ending date in the
Week Ending field.
3. Click the button to display the information you
specified.
To display expense reports for a Do the following:
38
specific week ending 1. In the Week Ending field, select a specific week ending
date for the information you need to view. This field
defaults to All.
2. If necessary, you can also specify a User in the Name
(Last,First) field.
3. Click the button to display the information you
specified.
To display another page of expense
reports
Click the appropriate page number link to display another page of
expense reports.
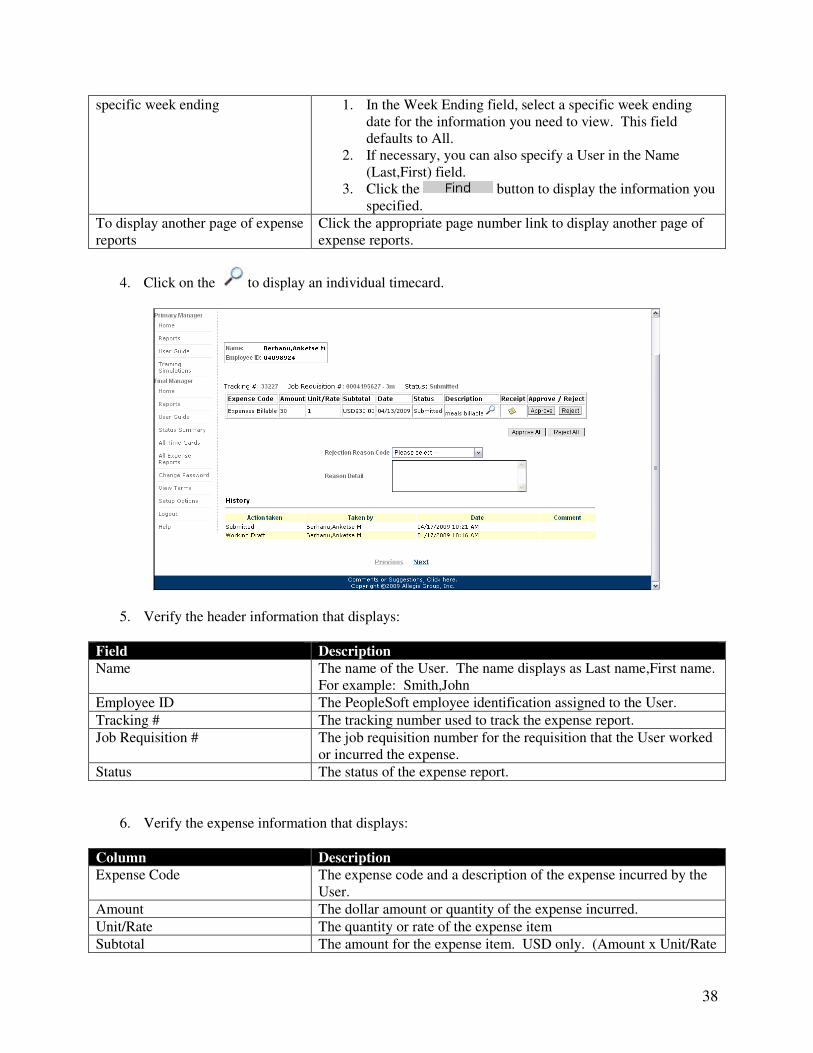
4. Click on the to display an individual timecard.
5. Verify the header information that displays:
Field Description
Name The name of the User. The name displays as Last name,First name.
For example: Smith,John
Employee ID The PeopleSoft employee identification assigned to the User.
Tracking # The tracking number used to track the expense report.
Job Requisition # The job requisition number for the requisition that the User worked
or incurred the expense.
Status The status of the expense report.
6. Verify the expense information that displays:
Column Description
Expense Code The expense code and a description of the expense incurred by the
User.
Amount The dollar amount or quantity of the expense incurred.
Unit/Rate The quantity or rate of the expense item
Subtotal The amount for the expense item. USD only. (Amount x Unit/Rate

39
= Subtotal)
Date The date when the User incurred the expense.
Receipt The document attached by the User.
Description An explanation of the expense. You must click to view
additional details about the expense including the User Defined
Fields (UDF’s) associated with the expense item. Refer to View
Expense Details for further information.
7. Do one of the following:
Option Description
To approve the expense that the User submitted.
Repeat steps 4-6 for each expense that you need to approve.
To reject the expense that the User submitted.
Once you reject an expense, you must do the following:
1. In the Rejection Reason Code field, you must select the
reason code that identifies why you rejected the expense.
2. In the Reason Detail field, type the reason why you
rejected the expense.
To approve all of the items listed.
To reject all of the items listed.
Once you reject an expense, you must do the following:
1. In the Rejection Reason Code field, you must select the
reason code that identifies why you rejected the expenses.
2. In the Reason Detail field, type the reason why you
rejected the expenses.
8. To view additional expense reports, click one of the following:
Option Description
The link
To display the previous time card in your list of expense reports.
The Previous link is not active if no additional expense reports
exist.
The link To display the next time card in your list of expense reports.
The Next link is not active if no additional expense reports exist.

40
Reject an Expense Item
You must reject an expense item when incorrect information displays.
1. From the Left Menu, click the Home link to display the list of pending time cards and expense
reports.
2. In the Pending Approval Expense Reports section, click the to view the appropriate expense
report.

41
3. Verify the header information that displays.
Field Description
Tracking # The tracking number used to track the expense report.
Job Requisition # The job requisition number for the requisition that the User worked
or incurred the expense.
Status The status of the expense report.
4. View the expense information that displays.
Column Description
Expense Code The expense code and a description of the expense incurred by the
User.
Amount The dollar amount or quantity of the expense incurred.
Unit/Rate The quantity or rate of the expense item
Subtotal The amount for the expense item. USD only. (Amount x Unit/Rate
= Subtotal)
Date The date when the User incurred the expense.
Receipt The document attached by the User.
Description An explanation of the expense. You must click to view
additional details about the expense including the User Defined
Fields (UDF’s) associated with the expense item. Refer to View
Expense Details for further information.
5. Click on one of the following:
Option Description
To reject an item in the expense report. Continue with Step 6.
To reject all of the expenses that display.
6. Verify the information that displays.

42
7. In the Rejection Reason Code field, select the reason code that indicates why you rejected the
expense. This is a required field.
8. In the Reason Detail field, type the reason why you rejected the expense. This is a required field.
9. Do one of the following:
Option Description
To cancel the rejection.
To reject an item in the expense report.

43
View Your Reports
Use the Reports section to view the report information for the week ending date you specify.
1. From the Left Menu, click the Reports link to display the Reports page.
2. In the Week Ending Date field, select the date for the information you need to view.
3. Understand the list of reports that display:
• Invoice Tracking - A list of the billable hours reported and approved by a Manager in
Time & Expense. Access is provided to Approvers, Field Support Representatives,
System Administrators, Corporate Associates and Expense Auditors.
• Project Tracking – A list of billable hours reported and approved by a Manager in
Time & Expense with UDF values listed.
44
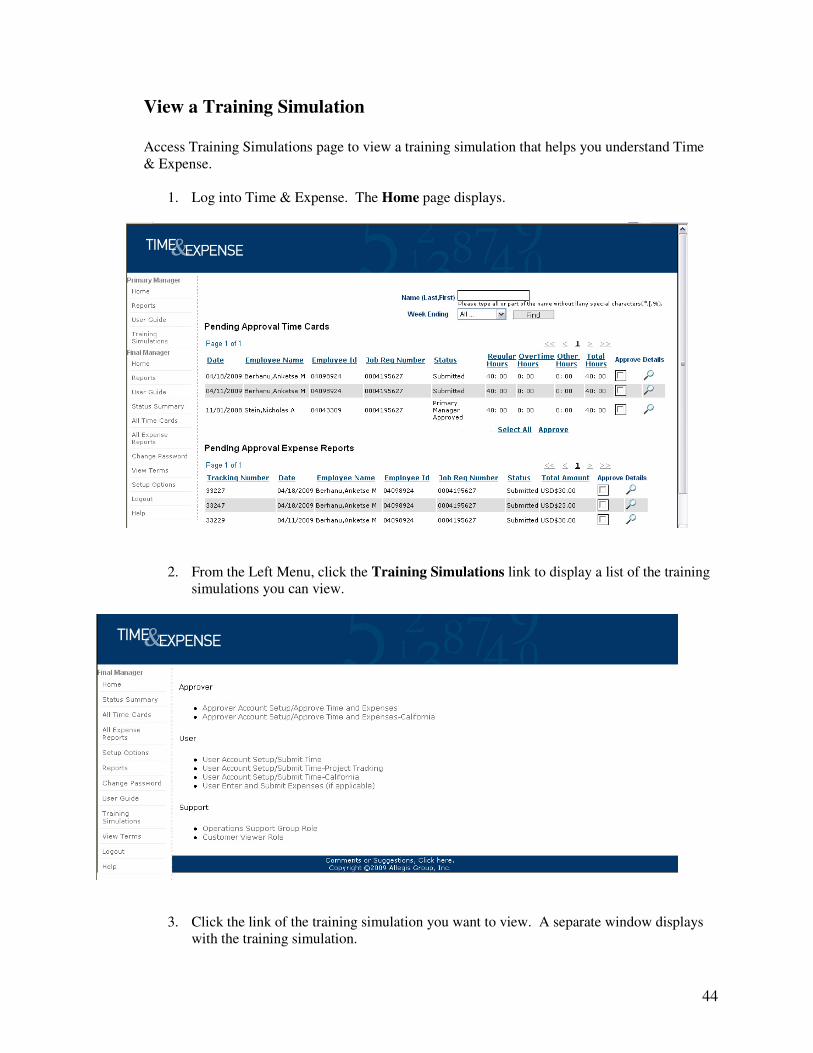
View a Training Simulation
Access Training Simulations page to view a training simulation that helps you understand Time
& Expense.
1. Log into Time & Expense. The Home page displays.
2. From the Left Menu, click the Training Simulations link to display a list of the training
simulations you can view.
3. Click the link of the training simulation you want to view. A separate window displays
with the training simulation.

45
View, Approve, or Reject Time Cards by Project
You can view Users’ time cards to approve or reject the hours they submitted.
1. From the Left Menu, click the Home link to display the list of time cards and expense reports
that need your approval.
2. The View by Project link appears on the right hand side of the manager home page.
3. Select View by Project to view hours submitted for projects that are assigned to you for
approval.

46
4. Pending Approval Time by Project displays by the current weekending. If you would like to
see pending project information by a previous weekending date select the date option.
5. Click on the project name to view/approve the names and hours of consultants working on the
selected project.
6. Choose select all to approve all timecards in your view.
7. Choose approve selected to approve all selected values
8. To update User Defined Fields or approve at a timecard level click the magnifying glass.
9. If a consultant has hours on multiple projects within the same weekending, the approve
option is not available. The “Approve” checkbox is not available for consultants who also
reported time on other projects. To approve the time for those consultants, please click the
link to view “Details” where all of the hours they reported are shown, and an approve
option is available.
Lewis

47
Update User Defined Fields
Update the UDF field(s) as necessary. The UDF values displays as follows:
Option Description
Verify the UDF that displays. This type of UDF is read only. You
cannot update this type of UDF. Contact the field support
representative (for example: CSA) in necessary to update the value
that displays.
Select the UDF value that should display. If the appropriate UDF value does not display, contact the field
support representative (for example: CSA) in necessary to update
the value(s).
10. Click the Save Changes to save your updates. The time card display with your updates.
11. Do one of the following:
Option Description
To approve a time card, expense report, or individual expense
items. Users and Expense Auditors only.
To reject a time card, expense report or individual expense items. Approvers, Field Support and Expense Auditors only.
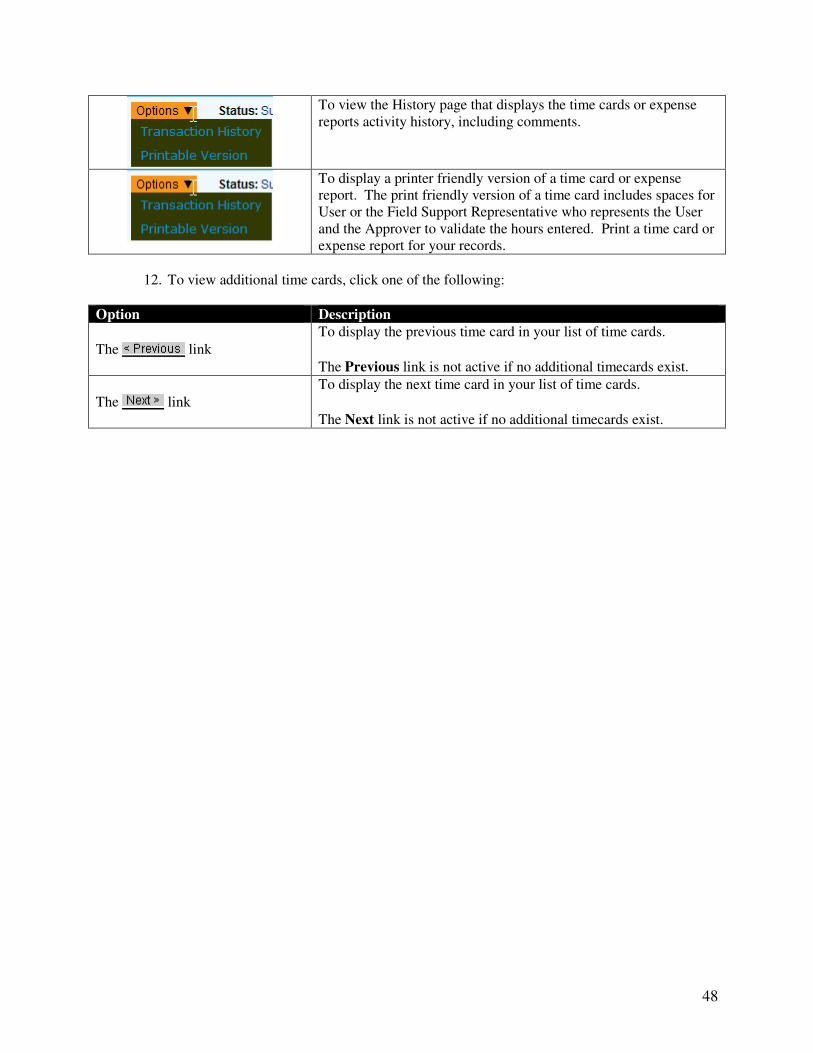
48
To view the History page that displays the time cards or expense
reports activity history, including comments.
To display a printer friendly version of a time card or expense
report. The print friendly version of a time card includes spaces for
User or the Field Support Representative who represents the User
and the Approver to validate the hours entered. Print a time card or
expense report for your records.
12. To view additional time cards, click one of the following:
Option Description
The link To display the previous time card in your list of time cards. The Previous link is not active if no additional timecards exist.
The link To display the next time card in your list of time cards. The Next link is not active if no additional timecards exist.