TimeClock Plus Web Edition (TCPWE) Features of TCP Web Edition
Upload
vuongtuyenCategory
view
252download
1
THE CS TIMECLOCK
WEB INTERFACE
Document Date: May 2011
Document Status: Version 1.10
Program Status: Implemented in CS TimeClocks version 1.22e and later.
© 2012 by CapeSoft Software

CS TimeClock Web Interface Manual
________________________________________________________________________
________________________________________________________________________
Last updated 08/02/2012 Page 2 of 78
TABLE OF CONTENTS
INTRODUCTION................................................................................................................................ 5
User Types ....................................................................................................................... 5
Standard Web Interface Buttons / Links ............................................................................ 5
ACCESSING THE WEB INTERFACE .............................................................................................. 6
THE MENUS ........................................................................................................................................ 9
The Browse Menu ............................................................................................................ 9
Filtering Browse Information ................................................................................................. 9
Sorting Browse Information ................................................................................................ 10
The Send To Button ............................................................................................................. 10
Employees ............................................................................................................................ 12
Clockings .............................................................................................................................. 18
Cards or Pins ........................................................................................................................ 22
Daily Hours ........................................................................................................................... 26
Payroll Hours ....................................................................................................................... 27
Leave .................................................................................................................................... 28
Payroll Export....................................................................................................................... 30
The My Time Menu ........................................................................................................ 31
My Details ............................................................................................................................ 31
My Clockings ........................................................................................................................ 32
My Cards .............................................................................................................................. 32
My Daily Hours .................................................................................................................... 33
My Payroll Hours ................................................................................................................. 33
My Leave .............................................................................................................................. 34
The Setup Menu ............................................................................................................. 35
Backup ................................................................................................................................. 35
Clock Setup .......................................................................................................................... 36
Departments ........................................................................................................................ 37
Network ............................................................................................................................... 38

CS TimeClock Web Interface Manual
________________________________________________________________________
________________________________________________________________________
Last updated 08/02/2012 Page 3 of 78
Set Clock Time ..................................................................................................................... 39
Setup Payroll Extracts .......................................................................................................... 39
Sirens ................................................................................................................................... 43
World Time zones ................................................................................................................ 45
Web Update ......................................................................................................................... 45
The Processing Menu ..................................................................................................... 47
Concepts .............................................................................................................................. 47
Global Settings ..................................................................................................................... 49
Global Settings (Adv) ........................................................................................................... 50
Global Translations .............................................................................................................. 51
Employee Schedules ............................................................................................................ 53
Leave Types ......................................................................................................................... 56
Holidays ............................................................................................................................... 57
The Hardware Menu ...................................................................................................... 58
Clock Menu Options ............................................................................................................ 58
Clock Submenu Options....................................................................................................... 59
Child Clocks .......................................................................................................................... 60
Peer Clocks ........................................................................................................................... 65
Scripts .................................................................................................................................. 65
Set Clock Time ..................................................................................................................... 66
Sirens ................................................................................................................................... 66
The Access Control Menu ............................................................................................... 67
Areas .................................................................................................................................... 67
Access Time Zones ............................................................................................................... 68
Employee Access Rights....................................................................................................... 69
The Job Costing Menu .................................................................................................... 70
Jobs ...................................................................................................................................... 71
ADVANCED PROCESSING OF EMPLOYEE HOURS ................................................................ 72
Enabling Advanced Processing ............................................................................................ 72
Daily Hours ........................................................................................................................... 73
Payroll Hours ....................................................................................................................... 76

CS TimeClock Web Interface Manual
________________________________________________________________________
________________________________________________________________________
Last updated 08/02/2012 Page 4 of 78
THE MOBILE DEVICE PAGES ..................................................................................................... 77
Accessing and using the Mobi pages ................................................................................... 77

CS TimeClock Web Interface Manual
________________________________________________________________________
________________________________________________________________________
Last updated 08/02/2012 Page 5 of 78
INTRODUCTION
The CS TimeClock web interface allows users to manage employees and the CS TimeClock
remotely via a web browser.
USER TYPES
There are 4 types of CS TimeClock users:
1. Administrator: The administrator can access all the menus on the CS TimeClock.
Only an administrator can access the Setup menu. This includes the clock’s network
settings, setting the time and time zones, setting sirens and updating the clock
firmware.
2. Supervisor: A supervisor can change information for ALL the employees on the
clock, but has no access to the device setup.
3. User: A user only has access to his / her own information and also has the ability to
change that information.
4. A user with no web access: This user can clock, but is not allocated a web interface
password and therefore has no access to the web interface.
STANDARD WEB INTERFACE BUTTONS / LINKS
The blue triangle will enable you to change the record in the same line
The red cross will give the option to delete a record in the same line or indicates a deleted record
The Insert button will allow one to add a record in the relevant browse screen
The Save button will save any changes made to a record
The Cancel button will ignore any changes made to a record and will return to the previous window
This link will return the user to the main browse window
This link will show the record in the main browse window prior to the one currently viewed

CS TimeClock Web Interface Manual
________________________________________________________________________
________________________________________________________________________
Last updated 08/02/2012 Page 6 of 78
This link will show the next record in the main browse window
This button will open a calendar from which the user can select a date
The Apply button will apply any changes made to a date range
The Delete button will confirm the deletion of a record
The Send To button will export all the information in the current view to a *.CSV file
Start searching for a value entered in the “Search for” field. This will filter the records returned in your browse window.
Reset your “Search for” view filter to show information for ALL your employees in the browse windows.
The Logout link in the top right corner of the screen will log the user out of the web interface
ACCESSING THE WEB INTERFACE
Once you have connected the CS TimeClock to your network, and given the clock an IP
address, open a web browser and type in the IP address in the address bar as follows:
In the above screenshot, replace “192.168.2.130” with the IP address of your clock.

CS TimeClock Web Interface Manual
________________________________________________________________________
________________________________________________________________________
Last updated 08/02/2012 Page 7 of 78
If you are not sure what the IP address is of your clock, please walk up to the clock, and
proceed as follows to find the IP address:
On the keypad, press # to enter the keypad menu. Press 2 (‘Enquiry’) and 2 again (‘Clock
Status’). Press # twice to see the clock’s IP address.
This will show you the IP address of the clock on the display.
Save this address as a Favourite, so you do not have to remember the IP address.
Once you have typed in the IP address of your clock in the address bar of a web browser,
the following login screen will appear:
The default login is: 9970. The default password is: password
Type in the login and password, and click Login.

CS TimeClock Web Interface Manual
________________________________________________________________________
________________________________________________________________________
Last updated 08/02/2012 Page 8 of 78
The following window appears:
The above window shows you a list of all employees. If no users have been entered on the
clock, only the information for the Demo User will appear.
CS TimeClock Web Interface Manual
________________________________________________________________________
________________________________________________________________________
Last updated 08/02/2012 Page 9 of 78
THE MENUS
THE BROWSE MENU
From the Browse menu on the left hand side you can select:
Employees
Clockings
Cards or Pins
Daily hours
Payroll hours
Leave
Payroll Export
Note that when you select any of these options from the left hand side menu, a window will
be displayed with your selection. The details for ALL employees will be listed.
FILTERING BROWSE INFORMATION
You will notice the following section at the bottom of each browse window:
To see on which fields in the browse window you can apply a view filter, click on All fields.
Then enter the search criteria for that specific field.
Example: If you only want to view the clockings for a specific employee in the Browse
Clockings window, you can enter their employee number, select No and click on Search.
See example screenshot on next page.
If you wish to view information for all the employees again, click on the Reset button.

CS TimeClock Web Interface Manual
________________________________________________________________________
________________________________________________________________________
Last updated 08/02/2012 Page 10 of 78
SORTING BROWSE INFORMATION
Information in your browse window can also be sorted in ascending or descending order by
clicking on the field (column) header. Example: to sort employees by their last name in the
Browse Employees window, click on . A before the column header indicates
that the information has been sorted in ascending order and a indicates a descending sort
order.
Let’s have a look at the different windows in more detail.
THE SEND TO BUTTON
The Send To button in the “Browse” windows allows you to export the information that
your are viewing on screen to a *.csv file. A *.csv file is a comma separated value file that
can be opened in spreadsheet software like Microsoft Excel.
CS TimeClock Web Interface Manual
________________________________________________________________________
________________________________________________________________________
Last updated 08/02/2012 Page 11 of 78
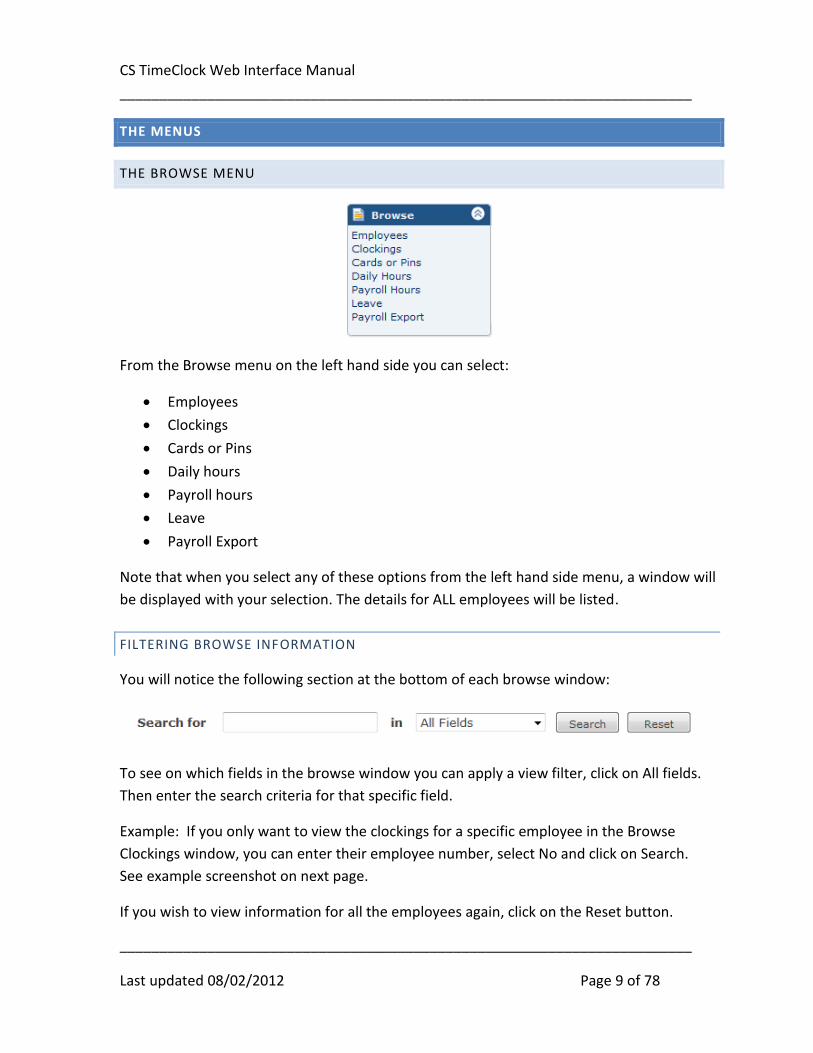
When clicking on the button some web browsers may prompt you to either open or save
the file e.g. Mozilla FireFox:
Select the preferred option and click on Ok.
You may receive the following or a similar message to the one below, if you open the file.
In this case, if you click on “Yes” the file will be opened as a read only file. You would need
to save the file with a different name to be able to edit it. If you click on “No”, Microsoft
Excel will create and open a copy of the file which you can edit.

CS TimeClock Web Interface Manual
________________________________________________________________________
________________________________________________________________________
Last updated 08/02/2012 Page 12 of 78
EMPLOYEES
Browse Employees is the first window to appear when you are logging in to the clock (see
screenshot below).
You can filter your view to only show non-terminated employees, all employees or show
only terminated employees. See page 16 for a definition of a terminated employee. To do
this, click on the drop down menu above the Browse Employees heading and select the
desired option:
If you only want to look at the details (eg. Clockings / Cards or Pins / Daily Hours / Leave or
Employee Details) for a particular employee, you can select one of the little picture icons
listed before the name of the employee you want to see the details for.

CS TimeClock Web Interface Manual
________________________________________________________________________
________________________________________________________________________
Last updated 08/02/2012 Page 13 of 78
The clock icon will list the clockings for that employee
The calendar icon will list the daily hours for that employee
The card icon will list the cards or pins for that employee
The smiley face icon will list the leave records for that employee
Further information available from this browse window includes the current status arrows:
indicates that the employee’s last clocking was In, and indicates that that the
employee’s last clocking was Out.
If you hover your mouse pointer over the employee’s status arrow, a popup will appear
with the last clocking time and date:

CS TimeClock Web Interface Manual
________________________________________________________________________
________________________________________________________________________
Last updated 08/02/2012 Page 14 of 78
ADDING AN EMPLOYEE
You can add an employee by clicking on “Insert” button at the bottom of the “Browse
Employee” window. The following window will appear:
Employee Number: This number must be unique for each employee. The CS
TimeClock allows an alphanumeric number to the maximum of 10 characters.
First Name and Last Name: Enter the employee’s name in these fields.
Paynumber: Enter the employee’s payroll number if it is different from the
employee number.
Supervisor: Give the employee supervisor status (see page 5 for the definition of a
supervisor).
Administrator: Give the employee administrator status (see page 5 for the definition
of an administrator).
Password: Set the web interface password for the employee if they must have
access to the web interface or has supervisor and/or administrator rights on the
clock.
CS TimeClock Web Interface Manual
________________________________________________________________________
________________________________________________________________________
Last updated 08/02/2012 Page 15 of 78
Department: Select the employee’s department from the list of departments
defined under Device Setup by an administrator.
Payroll Type: Select the payroll export used for this employee. If a payroll type is
left on Unassigned, no payroll balancing will be done on the employee’s payroll
hours.
Terminated On: If applicable, enter the employee’s termination date. After this
date the employee will no longer be able to clock or access the web interface. The
employee’s clocking and hours history will be kept on the clock and the employee
can be reinstated again by changing or removing the termination date.
Current Area: This field is used in access control and one can set the initial area
when adding an employee.
Current status: This is one on one related to the clockings of the employee. If the
employee is in the building, and clocked on the clock, the current status will be IN. If
the employee has left for the day, or did not clock at all, the current status will show
OUT. We recommend not to touch the current status here, but rather add an IN or
OUT clocking for this employee as the “current status” field does not reflect the
actual situation.
Click on “Save” to save the employee details or “Cancel” to return to the employee list.

CS TimeClock Web Interface Manual
________________________________________________________________________
________________________________________________________________________
Last updated 08/02/2012 Page 16 of 78
CHANGING AN EMPLOYEE RECORD
You’ll see the following windows when changing an employee record:
In this window you can change:
Employee number.
First name.
Last name.
Pay Number: If the employee has a different number in your payroll and you are
using the Payroll Extract Option, enter their payroll number here.
Nominate an employee as a supervisor (see page 5 for the definition of a
supervisor).
Nominate an employee as an administrator (see page 5 for the definition of an
administrator).
Give the employee a password, so they can log on to the web interface.
Allocate a department to an employee.
Select a payroll export to be used for this employee.
Enter a termination date. The day after the termination date the employee’s card /
pin number will be deactivated and will be available to reassign to a different

CS TimeClock Web Interface Manual
________________________________________________________________________
________________________________________________________________________
Last updated 08/02/2012 Page 17 of 78
employee. A terminated employee’s details and clocking history will remain on the
clock’s database and the employee can be reinstated again by changing or removing
the termination date.
Change the current area the employee is in.
Change the current status of the employee. We recommend not to touch the
current status here, but rather add an IN or OUT clocking for this employee as the
“current status” field does not reflect the actual situation.
REMOVING AN EMPLOYEE
Clicking on the red cross next to the employee name will open the following window:
Note that the only option on this window is to click delete or cancel.
When you select DELETE, ALL details for this employee will be removed from the clock. Depending on the amount of data the clock has stored for the employee, the delete process may take a couple of seconds to complete.

CS TimeClock Web Interface Manual
________________________________________________________________________
________________________________________________________________________
Last updated 08/02/2012 Page 18 of 78
CLOCKINGS
VIEWING CLOCKINGS
At the top of the screen, you can select a From Date and a To Date.
There is a little calendar icon next to the date fields: this will bring up a calendar, where
you can select a date, by clicking on the correct date field:
Alternatively you can type the date manually.
After you have changed the dates, you will have to click “Apply” to search for the clockings
within the date range you selected.

CS TimeClock Web Interface Manual
________________________________________________________________________
________________________________________________________________________
Last updated 08/02/2012 Page 19 of 78
The clockings are listed in date order, with the most current date at the top of the screen.
You can sort the clockings by any of the fields listed by clicking on the column header e.g.
Surname.
You may see the following icons to the left of some of your clockings:
The hand icon indicates that the clocking was changed or is a manual added clocking
The red cross indicates that the clocking was marked as deleted
ADDING A CLOCKING
Click “Insert” to add a clocking for an employee.
Date: Enter the clocking date manually or select it from the calendar.
Time: Enter the time of the clocking. It is not necessary to enter the colons (:), but
one has to enter at least 4 digits e.g. entering 1500 will register as 15:00:00.
Employee: Select the employee from the drop down list.
Type: Any clocking added via the web interface will register as a manual clocking.
Reader S/no: Optional and for reference purposes only.
Reader No: Optional and for reference purposes only.
Area: The access area in which the clocking was made.
Status: Select the direction of the clocking.

CS TimeClock Web Interface Manual
________________________________________________________________________
________________________________________________________________________
Last updated 08/02/2012 Page 20 of 78
Click on “Add” to save the clocking or “Cancel” to return to the “Browse Clockings” window
without saving.
CHANGING A CLOCKING
If you want to change a clocking, click on the blue triangle at the end of the line the clocking
is listed on.
In this window, you can change the date, time, and status (direction).
Do not worry about reader S/no or Reader no – these are the connections to the clock, and
informs you where the clocking was initially done. Changing this will not affect the
calculation of times.

CS TimeClock Web Interface Manual
________________________________________________________________________
________________________________________________________________________
Last updated 08/02/2012 Page 21 of 78
REMOVING A CLOCKING
If you want to remove a clocking, click on the red cross at the end of the line the clocking is
listed on.
As you can see, the only option on this window is to press the delete button or to cancel the
removal of the clocking you have selected.
A deleted clocking is not completely removed, but rather marked as deleted. Deleted
clockings can be “undeleted” by changing the clocking and saving it.

CS TimeClock Web Interface Manual
________________________________________________________________________
________________________________________________________________________
Last updated 08/02/2012 Page 22 of 78
CARDS OR PINS
This option will list all card numbers and pin numbers that have been entered on the clock.
The default user 9970 is preset in the clock. In this case, the employee number and the card
number is the same.
Note that the CS TimeClock does not limit a user to one card /or pin number. An employee can therefore clock using more than one number and the clockings will be recorded under the employee number linked to the card / pin number.

CS TimeClock Web Interface Manual
________________________________________________________________________
________________________________________________________________________
Last updated 08/02/2012 Page 23 of 78
ADD A CARD OR PIN NUMBER
Click on “Insert”.
Enter the card number and if applicable, the employee number to assign it to. For more
information on the Biometric Information settings please see the next section: Changing a
Card or PIN Number.

CS TimeClock Web Interface Manual
________________________________________________________________________
________________________________________________________________________
Last updated 08/02/2012 Page 24 of 78
CHANGING A CARD OR PIN NUMBER
Click on the blue triangle next to the card number you want to change.
If the clock has a fingerprint reader, you can change the security and the verification
settings of an employee’s biometric information enrolled to the specific card or PIN
number.
Fingerprint Security Level: Options are Low, Normal, High, Highest.
Reader Required:
o Fingerprint Required
o Fingerprint Required, but accept clocking if finger fails.
o Any Fingerprint Required, always accept clocking.
o PIN, Prox. Or Finger acceptable.
o PIN not acceptable, Prox. Or Finger acceptable.
Biometric Data: an image of a fingerprint will be displayed if a finger has been
enrolled to the card or PIN. Please note: This image is not an image of the actual
enrolled fingerprint.
After you have made the changes, click Save.
CS TimeClock Web Interface Manual
________________________________________________________________________
________________________________________________________________________
Last updated 08/02/2012 Page 25 of 78
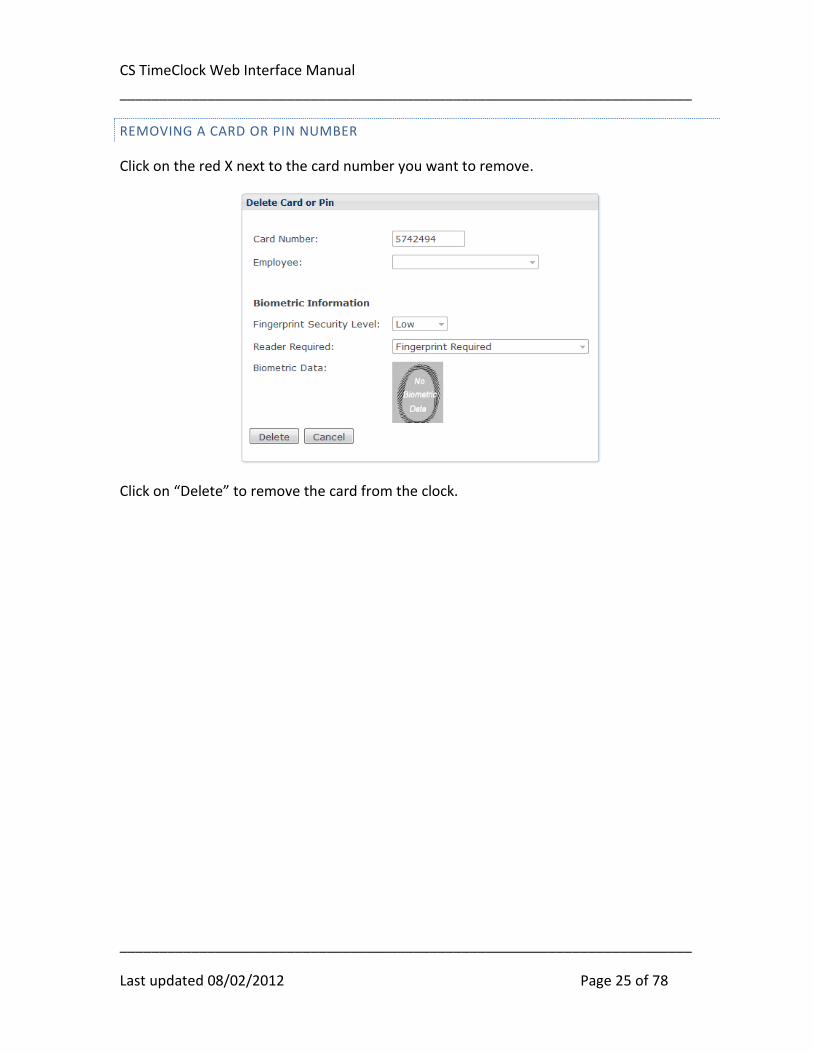
REMOVING A CARD OR PIN NUMBER
Click on the red X next to the card number you want to remove.
Click on “Delete” to remove the card from the clock.

CS TimeClock Web Interface Manual
________________________________________________________________________
________________________________________________________________________
Last updated 08/02/2012 Page 26 of 78
DAILY HOURS
Please note that the screen shot in this section were take on a clock where Advanced
Processing is disabled. The section below still applies to both processing options.
When you select the “Daily hours” option from the menu on the left hand side, the above
window appears.
You can change the From Date and the To Date, to reflect the period you want to look at.
In the same way as you can change the dates on the clocking screen, you can select the
calendar picture option, or type in the date.
After you have made the change, click “Apply”.
As you can see in the above window, the details are listed in employee number order, and
for each date the employee has clocked the clockings are listed, as well as the calculated
number of hours.

CS TimeClock Web Interface Manual
________________________________________________________________________
________________________________________________________________________
Last updated 08/02/2012 Page 27 of 78
Please Note:
1. The clockings as well as the hours are listed in hours and minutes. You can change
the setup of the web interface to display decimal hours. See page 36.
2. If an employee has clocked OUT after midnight, the hours worked are listed on the
day (date) of the IN clocking.
If you would like to print the selection that you see on the screen, click on the “Send To”
button at the bottom of the window.
PAYROLL HOURS
Please note that the screen shot in this section were take on a clock where Advanced
Processing is disabled. The section below still applies to both processing options.
When you select this option from the left hand side menu, the details for ALL employees are
displayed on the screen.
In this window, the date selection is important.
CS TimeClock Web Interface Manual
________________________________________________________________________
________________________________________________________________________
Last updated 08/02/2012 Page 28 of 78
Since the clock does not “know” what your pay period is it will add all the daily hours
together within the selected period.
Therefore, if you select a date from Monday to Sunday, the total hours will be generated up
until the Sunday. If you select dates from Monday to Friday, the total hours will be
generated up until the Friday. That also means, that if people worked on the weekend, and
these hours need to be included in your payroll hours, they will not be taken into account in
a selection from Monday to Friday only.
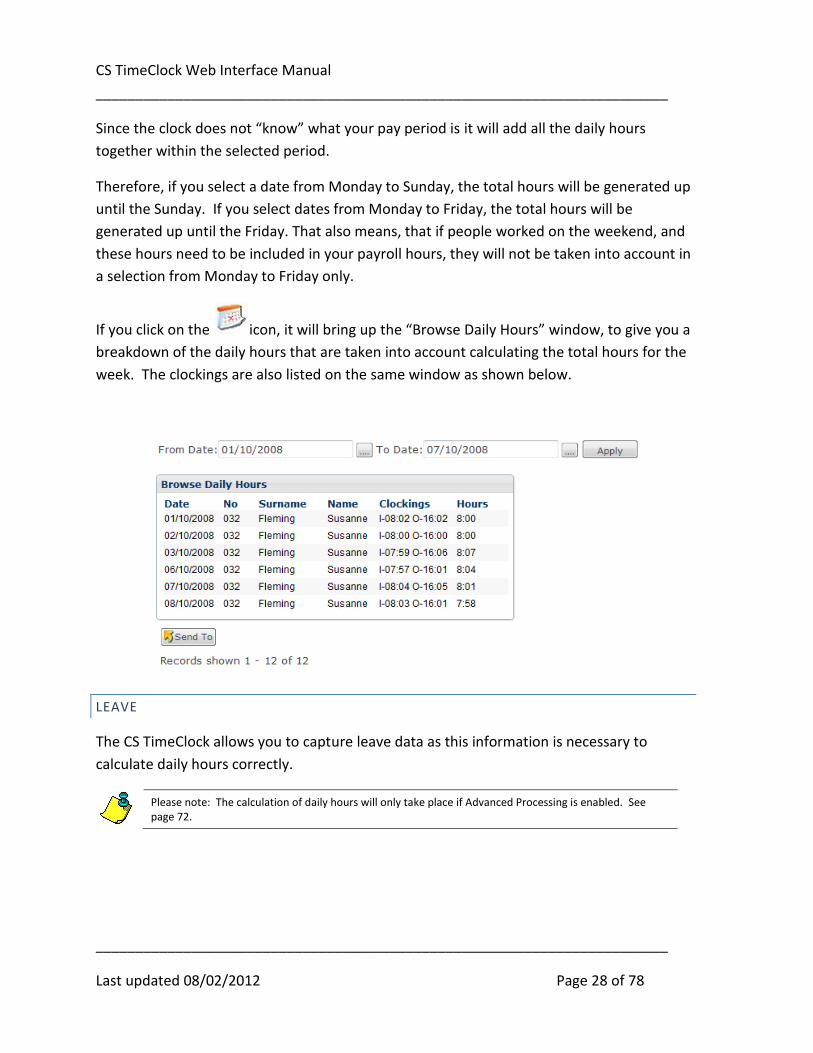
If you click on the icon, it will bring up the “Browse Daily Hours” window, to give you a
breakdown of the daily hours that are taken into account calculating the total hours for the
week. The clockings are also listed on the same window as shown below.
LEAVE
The CS TimeClock allows you to capture leave data as this information is necessary to
calculate daily hours correctly.
Please note: The calculation of daily hours will only take place if Advanced Processing is enabled. See page 72.
CS TimeClock Web Interface Manual
________________________________________________________________________
________________________________________________________________________
Last updated 08/02/2012 Page 29 of 78
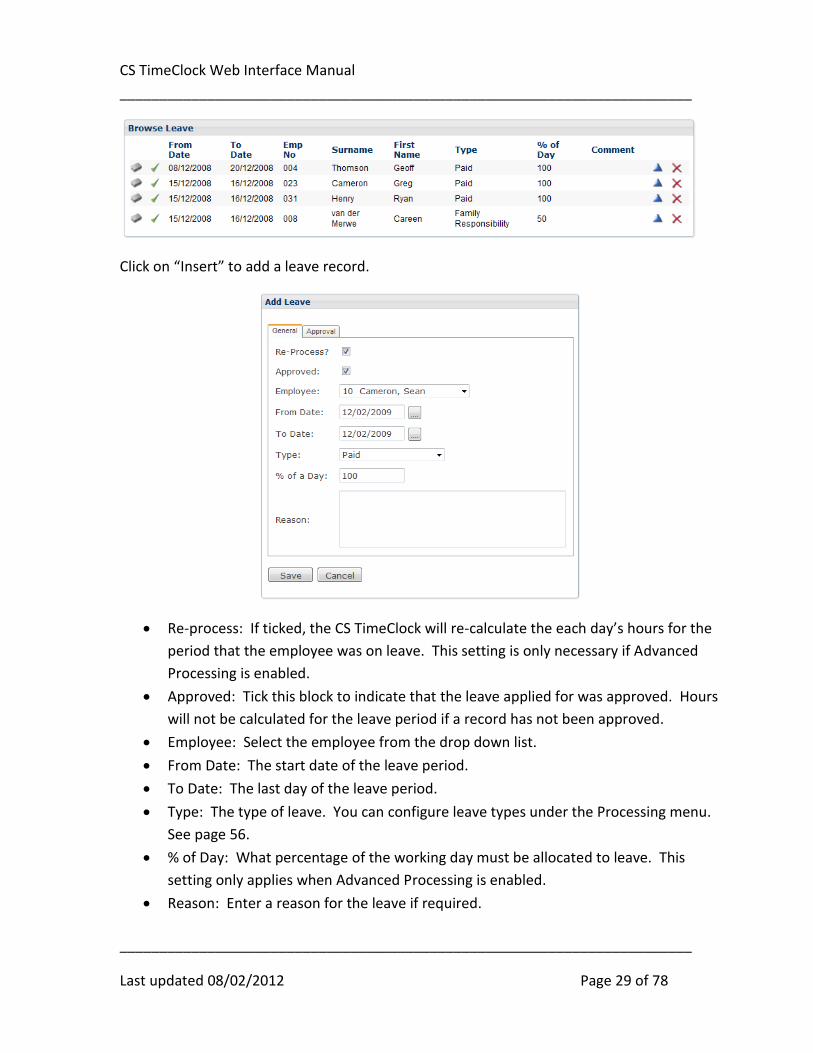
Click on “Insert” to add a leave record.
Re-process: If ticked, the CS TimeClock will re-calculate the each day’s hours for the
period that the employee was on leave. This setting is only necessary if Advanced
Processing is enabled.
Approved: Tick this block to indicate that the leave applied for was approved. Hours
will not be calculated for the leave period if a record has not been approved.
Employee: Select the employee from the drop down list.
From Date: The start date of the leave period.
To Date: The last day of the leave period.
Type: The type of leave. You can configure leave types under the Processing menu.
See page 56.
% of Day: What percentage of the working day must be allocated to leave. This
setting only applies when Advanced Processing is enabled.
Reason: Enter a reason for the leave if required.
CS TimeClock Web Interface Manual
________________________________________________________________________
________________________________________________________________________
Last updated 08/02/2012 Page 30 of 78
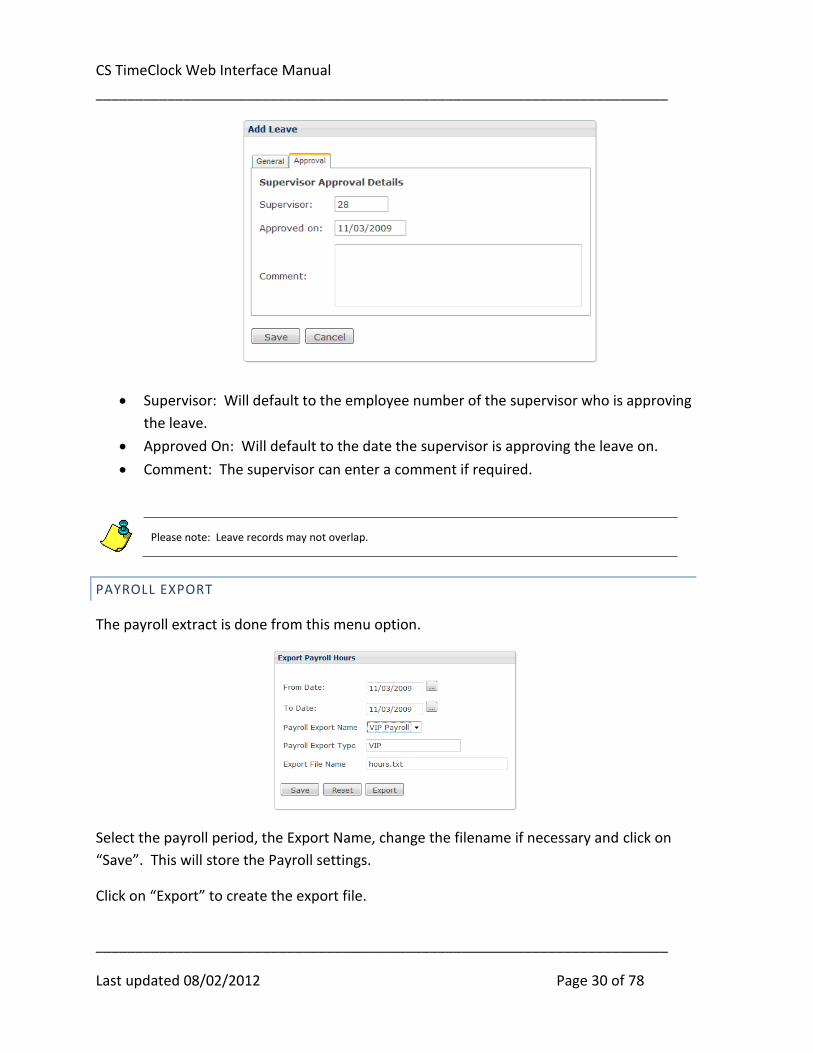
Supervisor: Will default to the employee number of the supervisor who is approving
the leave.
Approved On: Will default to the date the supervisor is approving the leave on.
Comment: The supervisor can enter a comment if required.
Please note: Leave records may not overlap.
PAYROLL EXPORT
The payroll extract is done from this menu option.
Select the payroll period, the Export Name, change the filename if necessary and click on
“Save”. This will store the Payroll settings.
Click on “Export” to create the export file.
CS TimeClock Web Interface Manual
________________________________________________________________________
________________________________________________________________________
Last updated 08/02/2012 Page 31 of 78
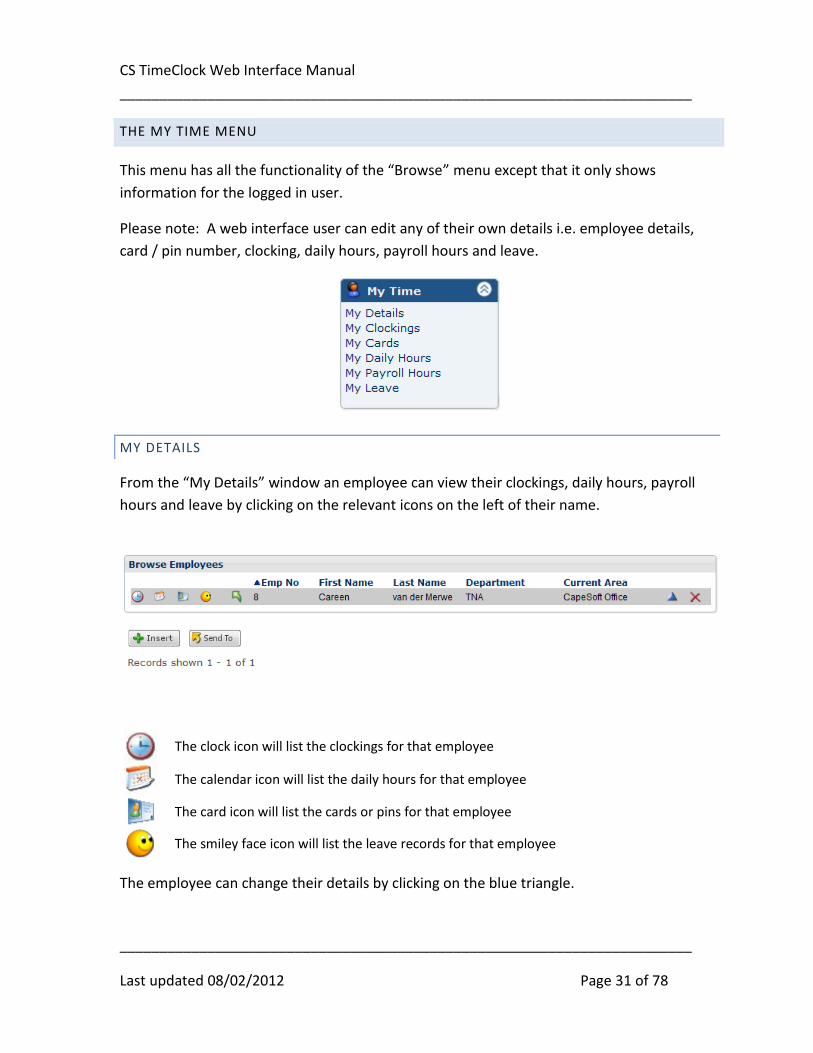
THE MY TIME MENU
This menu has all the functionality of the “Browse” menu except that it only shows
information for the logged in user.
Please note: A web interface user can edit any of their own details i.e. employee details,
card / pin number, clocking, daily hours, payroll hours and leave.
MY DETAILS
From the “My Details” window an employee can view their clockings, daily hours, payroll
hours and leave by clicking on the relevant icons on the left of their name.
The clock icon will list the clockings for that employee
The calendar icon will list the daily hours for that employee
The card icon will list the cards or pins for that employee
The smiley face icon will list the leave records for that employee
The employee can change their details by clicking on the blue triangle.

CS TimeClock Web Interface Manual
________________________________________________________________________
________________________________________________________________________
Last updated 08/02/2012 Page 32 of 78
MY CLOCKINGS
The “My Clockings” menu will only show the clockings for the logged in user
The employee can add, change or remove clockings their own clockings.
MY CARDS
The logged in user can add, change or remove the card / pin number from the “My cards”
menu.

CS TimeClock Web Interface Manual
________________________________________________________________________
________________________________________________________________________
Last updated 08/02/2012 Page 33 of 78
MY DAILY HOURS
The logged in user can view and export their daily hours from the “My Daily Hours” menu.
MY PAYROLL HOURS
The logged in user can view and export their payroll hours from the “My Payroll Hours”
menu.

CS TimeClock Web Interface Manual
________________________________________________________________________
________________________________________________________________________
Last updated 08/02/2012 Page 34 of 78
MY LEAVE
The logged in user can add or change their leave from the “My Leave” calendar.
Use the “Number of Months to Display” drop down list to view leave for 1, 2, 3, 4, 6 or 12
months. To change the viewing period, use the “Previous Year”, “Previous Month”, “Next
Month” and “Next Year” buttons.
You can select to only view a certain type of leave by clicking on the leave type in the list on
the left.
To edit a leave record, click on any of the highlighted days for that leave record.
To add a new leave record, click on any of the available dates. The “Add Leave” window will
appear on which the leave details can be entered.
Hovering your mouse over any of the highlighted days, will activate a tooltip with the day’s
information: .

CS TimeClock Web Interface Manual
________________________________________________________________________
________________________________________________________________________
Last updated 08/02/2012 Page 35 of 78
THE SETUP MENU
NOTE : Only employees who are listed as administrators will have access to this menu.
BACKUP
Backups are essential for any electronic data system. Please backup your clock database
regularly.
Your browser will prompt you to select whether to Save or Open the backup file. Please
Save the file to a location on your computer or network. The *.db can at this stage only be
restored from a USB thumb drive on the clock. Please see the “CS TimeClock Backup
Procedure” for instructions on restoring a database.

CS TimeClock Web Interface Manual
________________________________________________________________________
________________________________________________________________________
Last updated 08/02/2012 Page 36 of 78
CLOCK SETUP
Enabled: If this option is not selected, the clock will display: “Device Not Enabled” on
the clock display and the red led will be on. It will not accept any clockings or input
from the keypad. Changing this option will require the clock to be rebooted.
Hours Shown in Decimal: Select this option if you wish to view daily or payroll hours in
decimal format, i.e. 8.50 hours instead of 08:30.
Enable Advanced Hardware Options: This will enable the Clock Menu Options, Clock
Submenu Options, Child Clocks and Peer Clocks menu options.
Enable Access Control Options: Enable the Access Control Menu for configuration of
Areas, Access Time Zones and Employee Access Rights.
Enable Job Control Options: Enables the Job Costing menu where the user can add jobs
and sequences.
History Days: The number of the days the clock will store clockings in it’s database for
e.g. if this value is set to 90, the clock will delete any clockings in it’s database older
than 90 days. The default setting, 0, means that clockings will be stored indefinitely.
Date Format: Select the date format to be used in the web interface.
Default Sequence: Assign which bundy script to run at bootup. By default this may be
Unassigned or -100 Default Script. New scripts can be loaded in the Hardware Menu.

CS TimeClock Web Interface Manual
________________________________________________________________________
________________________________________________________________________
Last updated 08/02/2012 Page 37 of 78
Time Server: the web address from which your clock will update it’s date and time.
Clock Server IP and Ports: The Server IP and port numbers in the above window are default
values for the device, and have been pre-configured before the clock is installed on your
network. The default clock server port is 5123. Please speak with you IT department to
setup the device on the network.
DEPARTMENTS
As in the previous windows, “Insert” will allow you to add a department, the blue triangle to
change a department and the red cross to delete a department.
You can assign a department to an employee when you change the employee’s details
under the “Browse Employee” window.

CS TimeClock Web Interface Manual
________________________________________________________________________
________________________________________________________________________
Last updated 08/02/2012 Page 38 of 78
NETWORK
Please speak with you IT department for the correct setup of these parameters.
DHCP: If this option is ticked, the network will automatically assign an IP address to
the clock. You can determine the IP address assigned to the clock by physically going
to the clock and typing 920#.
IP: If not using DHCP set the IP address of the clock here.
Subnet mask: Also has to do with the settings of your local network, and determines
the “handout” of an IP address.
Broadcast IP: This is automatically filled and is used to synchronise employee
directions between multiple clocks on the network.
Gateway: Has to do with the connection to the “outside” world. This must be set to
enable access to the internet. This will allow a user to access the web interface
remotely, enable the clock to update it’s time from an internet time server and allow
an administrator to update the firmware from the internet.
Name Server 1 – 4: Enter the IP addresses of your name servers (DNS) here. Leaving
these fields blank will default the clock to pre-defined DNS servers.
CS TimeClock Web Interface Manual
________________________________________________________________________
________________________________________________________________________
Last updated 08/02/2012 Page 39 of 78
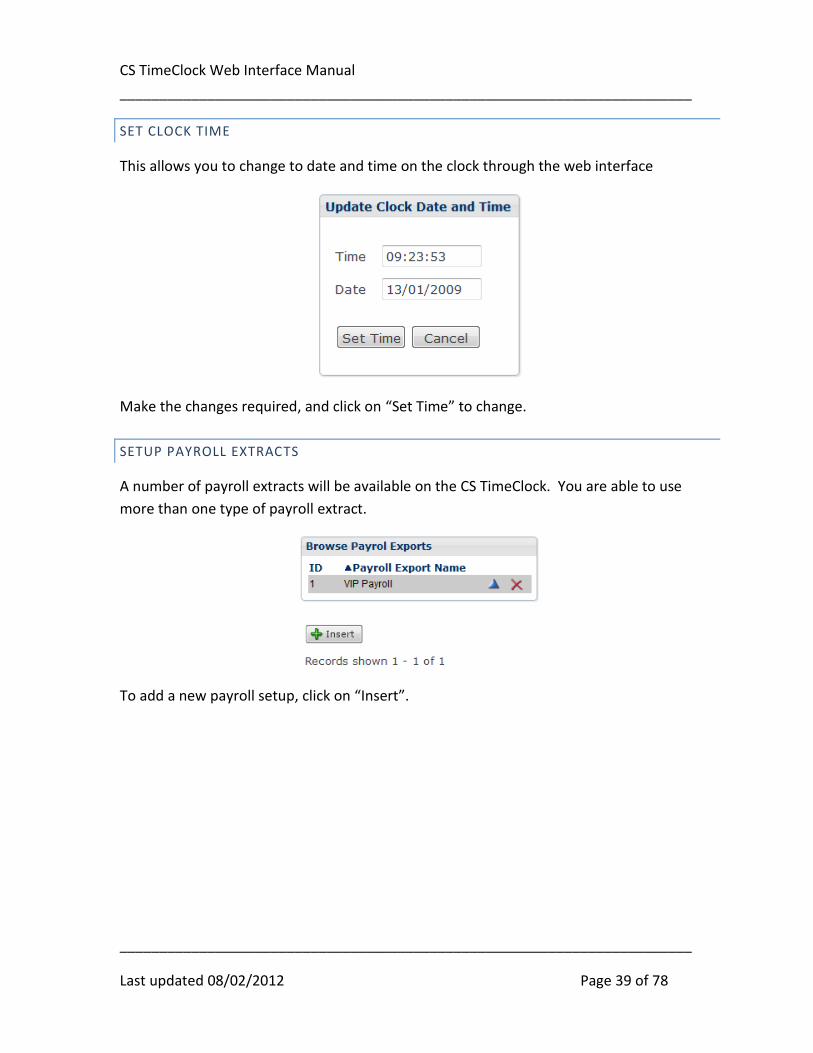
SET CLOCK TIME
This allows you to change to date and time on the clock through the web interface
Make the changes required, and click on “Set Time” to change.
SETUP PAYROLL EXTRACTS
A number of payroll extracts will be available on the CS TimeClock. You are able to use
more than one type of payroll extract.
To add a new payroll setup, click on “Insert”.

CS TimeClock Web Interface Manual
________________________________________________________________________
________________________________________________________________________
Last updated 08/02/2012 Page 40 of 78
General Tab:
o Default export: This layout will be used for all employees by default unless another
extract has been assigned in the employee details.
o Name: The description of the export.
o Payroll Export Type: Select the payroll export type you wish to use from the drop
down list.
o Export File Name: Enter the default filename you want to export to.
o Site Code: Enter the Payroll site code if required.

CS TimeClock Web Interface Manual
________________________________________________________________________
________________________________________________________________________
Last updated 08/02/2012 Page 41 of 78
Export Options Tab:
o Export: Select the time categories to be exported.
o Payroll Code: Enter the transaction or payroll code for the time category
o Override Export Hours: Always export a fixed number of hours for the selected
category.
The Balancing Tabs:
o Balance Hours Total: The total number of hours the employee are expected to work
in the payroll period.

CS TimeClock Web Interface Manual
________________________________________________________________________
________________________________________________________________________
Last updated 08/02/2012 Page 42 of 78
o Include These Hours in Total: The time categories that makes up the Hours Total
e.g. Payroll Hours Total = Normal + Holiday + Paid + Sick.
o Get Hours in Order From: Select the time categories hours must be taken from to
fill Normal time with if the Payroll Hours Total is less than the Balance Hours Total.
o Send Hours in Excess of Total To: If the Payroll Hours Total is more the value in
Balance Hours Total any excess hours will be moved into the specified category.
Example: Say an employee has the following hours at the end of his 7-day payroll period: Normal: 08:00 Overtime: 02:00 Saturday: 06:30 Holiday: 08:00 Paid: 16:00
According to the setup in the picture above: Payroll Hours Total = 08:00 (Normal) + 08:00 (Holiday) + 16:00 (Paid Leave) = 32:00 The employee is short 8 hours. During payroll balancing any hours found in Overtime is moved to Normal. Since the Total is still less than 40:00 after doing so, it will move any hours found in Saturday to Normal. Now you have: Payroll hours Total = 32:00 + 02:00 + 06:30 = 40:30 This exceeds 40:00 so 00:30 will be moved into Overtime. The end result after payroll balancing is: Normal: 08:00 Overtime: 00:30 Saturday: 00:00 Holiday: 08:00 Paid: 16:00
Click on “Save” to save the payroll extract.
Payroll balancing will be applied on the employee payroll hours if the payroll extract has
been assigned to that employee i.e. no payroll balancing will be applied if the employee
payroll extract type is Unassigned. See Page 14.

CS TimeClock Web Interface Manual
________________________________________________________________________
________________________________________________________________________
Last updated 08/02/2012 Page 43 of 78
SIRENS
Sirens can be connected to the clock. For more information on how to physically connect a
siren, please contact your supplier.
ADDING A SIREN TIME
Click on “Insert” on the “Browse Sirens” window (see picture above). The following options
are shown (see picture on the next page):
Time: enter the time in 24 hour format at which the siren must be triggered.
Select the days of the week on which the siren must go off on at the above time.
If the siren must not be triggered from all clocks, select the child clock which must
trigger this specific siren from the dropdown list.
Select the Relay on the clock to which the siren is connected. Selecting “Buzzer” will
trigger the clock’s built-in buzzer at that time.
Enter the duration of the siren in seconds.
Enter an optional description to identify the siren in the web interface.
Enter optional text to display on the LCD when the siren goes off.

CS TimeClock Web Interface Manual
________________________________________________________________________
________________________________________________________________________
Last updated 08/02/2012 Page 44 of 78
Once you have updated the details, click “Save” to keep the changes.
CHANGING A SIREN TIME
Click on the blue triangle next to the siren time to edit any of the siren parameters.

CS TimeClock Web Interface Manual
________________________________________________________________________
________________________________________________________________________
Last updated 08/02/2012 Page 45 of 78
REMOVING A SIREN
Click on the red cross next to the siren time to open the “Delete Siren Time” window.
Clicking on the delete button will remove the siren time from the clock.
WORLD TIME ZONES
When the clock is first installed, you will need to set the TimeZone to the correct time
World Time Zone the clock is located in.
This setting is necessary if the clock is connected to the internet. The clock will update it’s
time automatically every minute from an internet time server or when it is rebooted.
WEB UPDATE
This function will automatically schedule an upgrade of the firmware on the clock.

CS TimeClock Web Interface Manual
________________________________________________________________________
________________________________________________________________________
Last updated 08/02/2012 Page 46 of 78
Click “View Log” if you wish to see a log of the last firmware update. Click on “Proceed” to
continue with the firmware upgrade or click on “Force” to update the clock regardless of
whether it is on the latest version or not.
If the clock is running the latest version of firmware it will display the following message
after a few seconds:
If the clock is unable to connect to the update site, you’ll see the following message:
Please check your gateway and firewall settings if you receive this message.
CS TimeClock Web Interface Manual
________________________________________________________________________
________________________________________________________________________
Last updated 08/02/2012 Page 47 of 78
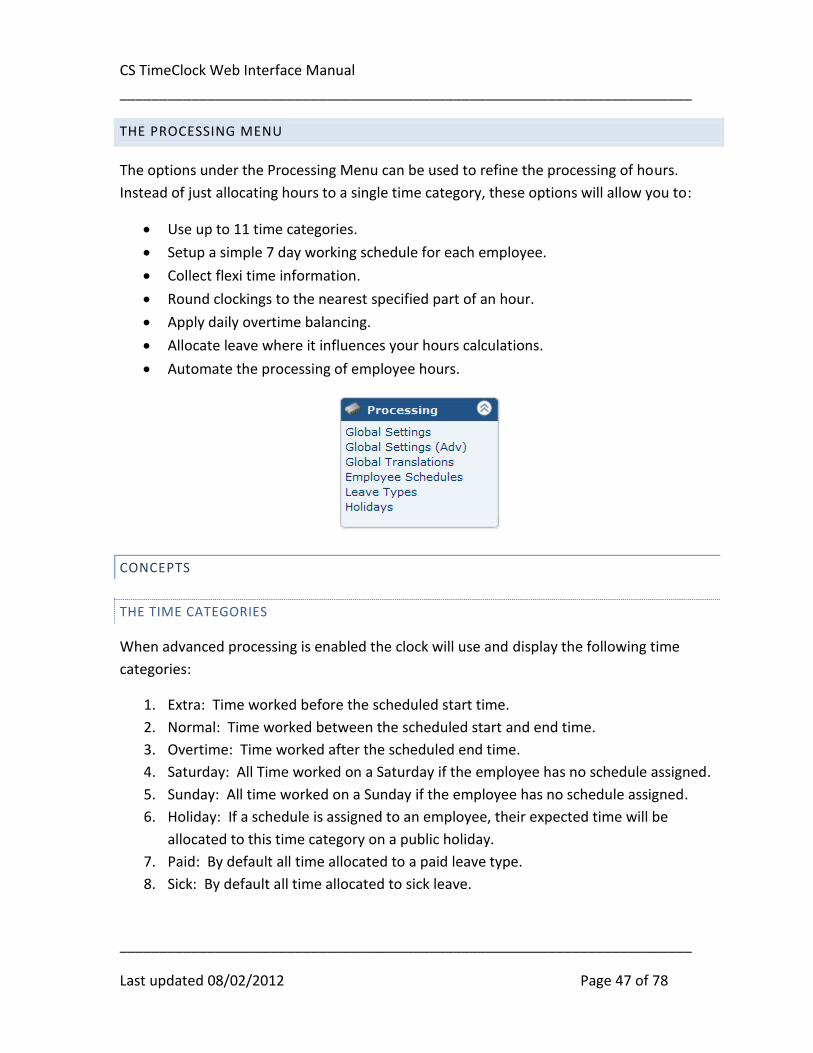
THE PROCESSING MENU
The options under the Processing Menu can be used to refine the processing of hours.
Instead of just allocating hours to a single time category, these options will allow you to:
Use up to 11 time categories.
Setup a simple 7 day working schedule for each employee.
Collect flexi time information.
Round clockings to the nearest specified part of an hour.
Apply daily overtime balancing.
Allocate leave where it influences your hours calculations.
Automate the processing of employee hours.
CONCEPTS
THE TIME CATEGORIES
When advanced processing is enabled the clock will use and display the following time
categories:
1. Extra: Time worked before the scheduled start time.
2. Normal: Time worked between the scheduled start and end time.
3. Overtime: Time worked after the scheduled end time.
4. Saturday: All Time worked on a Saturday if the employee has no schedule assigned.
5. Sunday: All time worked on a Sunday if the employee has no schedule assigned.
6. Holiday: If a schedule is assigned to an employee, their expected time will be
allocated to this time category on a public holiday.
7. Paid: By default all time allocated to a paid leave type.
8. Sick: By default all time allocated to sick leave.

CS TimeClock Web Interface Manual
________________________________________________________________________
________________________________________________________________________
Last updated 08/02/2012 Page 48 of 78
9. Variance: Variance time contains either a positive or negative amount equal to
Normal + Overtime + Sat + Sun + Holiday + Paid + Sick – Expected Normal Hours.
Note that Extra time is not included here.
10. Lunch: If a deduction is specified for an employee in their schedule, then this
deduction is made, from normal time, regardless of the time spent at work, or the
time of the clockings. The supervisor can override the lunch deduction for any
employee for the day. The lunch deduction is made before daily balancing occurs for
the day.
11. Running Total: This column keeps a running total of the Variance time category and
is only visible if enabled in the Global Processor Settings.
While these names can be modified in the Global Translations menu, the meaning is fixed.
ROUNDING
If activated, all clockings are rounded as per the time set in the global setting.
Rounding is deemed to be “half half”. In other words, if the rounding period is set to 15
minutes, then each clocking will be rounded to the “nearest quarter hour”. Example:
for a rounding period of 15 minutes, a clocking time of 08:07 will be rounded to 08:00 and a
clocking time of 08:08 will be rounded to 08:15.
The global rounding unit can be overridden for an employee in the setup of the employee
schedules.
OVERTIME BALANCING
By default, if an employee is linked to a working schedule, any time after the expected shift
end will be allocated to the Overtime time category. If however, an employee is expected
to earn their Expected Normal Hours each day, no overtime will be allocated until this
amount of time is earned. Equally, time worked in excess of the Expected Normal Hours is
automatically sent to “After end of day”.
Overtime balancing can be enabled in the global settings and overridden in the employee
schedules.
Overtime balancing only occurs between the Normal and one Overtime category.

CS TimeClock Web Interface Manual
________________________________________________________________________
________________________________________________________________________
Last updated 08/02/2012 Page 49 of 78
GLOBAL SETTINGS
In the Global Settings menu you can setup the global processing defaults.
Enable Auto Process: If selected, the CS TimeClock will calculate employee hours
according to the settings under the Processing Menu and all the time categories will be
displayed. If this option is not selected advanced hours processing will be disabled.
Enable Auto Reset Clocking Direction: If an employee did not clock out by midnight, the
clock will automatically adjust the employee’s clocking direction to Out.
Enable Auto End Day: If an employee did not clock out for a shift by the day end, the
processor will calculate hours up to the End Time of the schedule. The day end is
calculated to be at the opposite of the expected midpoint of the employee schedule.
For example, if the expected In is 4 pm, and the expected out is 12 midnight, then the
day runs from 8am to 8am.
Enable Balancing: Daily overtime balancing will be enabled for all employees (with the
exception if it is disabled in an employee’s schedule). For an explanation of overtime
balancing, see page 48.

CS TimeClock Web Interface Manual
________________________________________________________________________
________________________________________________________________________
Last updated 08/02/2012 Page 50 of 78
Leave Approved by Default: If enabled, leave records captured are by default marked
as approved and hours will automatically be calculated and allocated. If disabled, a
leave record must be approved first before hours will be calculated.
Rounding Unit (min): All clockings will be rounded to this value. For an explanation of
rounding, see page 48.
Enable Running Totals: This will enable running totals in the Daily Hours window. See
the definition of Running Totals on page 48.
Last Process Date: The last date on which the clock automatically reprocessed hours. If
you change this date to a date prior to today, the clock will reprocess all the hours
records from that date.
Click on “Save” for these settings to be applied.
GLOBAL SETTINGS (ADV)
The Advanced Global Processor Settings allows you to map the default processor categories
to others.

CS TimeClock Web Interface Manual
________________________________________________________________________
________________________________________________________________________
Last updated 08/02/2012 Page 51 of 78
The image above left shows the default time category mapping. In the image above right,
all time calculated before shift start will be added to the Overtime Category, and all Holiday
hours will be added to the Sunday time category.
Time Category Thresholds allows you to set a minimum that must be worked before the
employee will be allocated time for a time category. For example: if the Overtime
threshold is set to 00:15 and an employee have worked 7 minutes later than their expected
out time, the employee will not be allocated any overtime. If however the employee
worked 20 minutes later than their expected out time, they will receive 00:20 overtime.
(This example assumes that daily balancing and rounding does not apply.)
GLOBAL TRANSLATIONS
In this menu you can rename your first nine time categories as well as the week day names.

CS TimeClock Web Interface Manual
________________________________________________________________________
________________________________________________________________________
Last updated 08/02/2012 Page 52 of 78
Change the descriptions and click on “Save” to apply.

CS TimeClock Web Interface Manual
________________________________________________________________________
________________________________________________________________________
Last updated 08/02/2012 Page 53 of 78
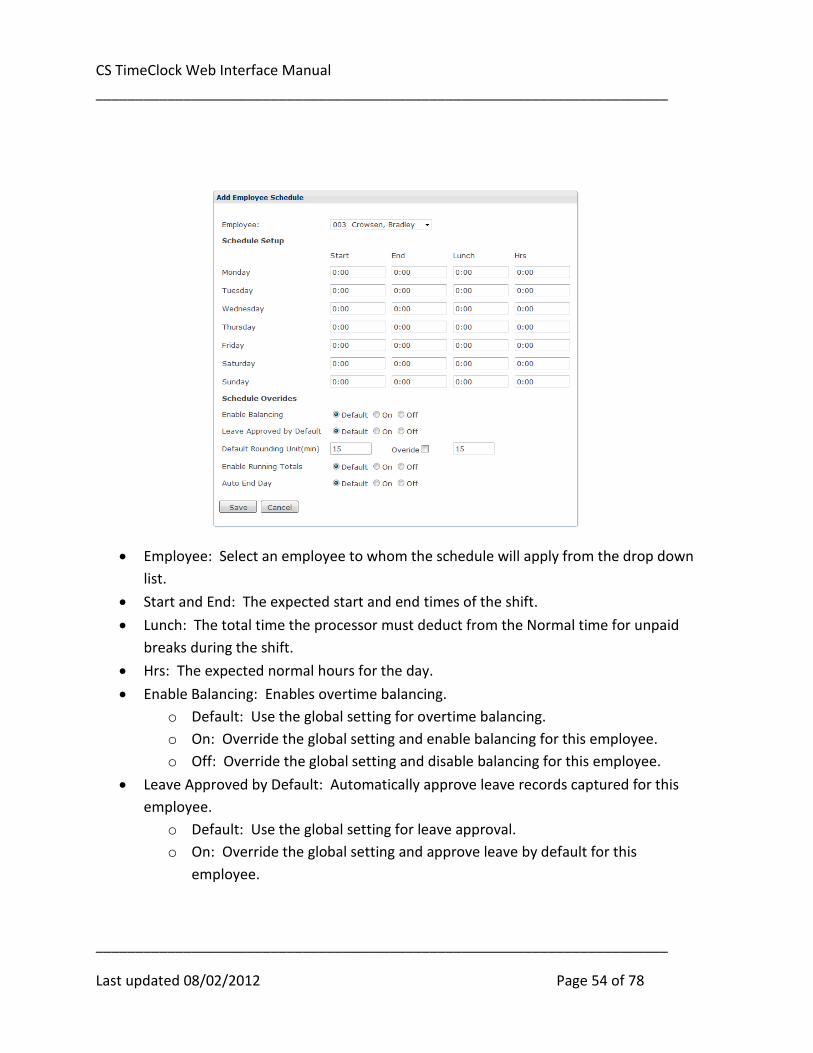
EMPLOYEE SCHEDULES
An employee schedule is required to calculate overtime, flexi time, holiday time and paid
leave.
To add an employee schedule, click on “Insert”.
Once a schedule exists for one employee, you can copy it to another employee. Using the
above picture as an example, select the employee whose schedule you want to copy next to
“Copy the schedule of employee:” - in the picture above it is “41 Paulse, Granville”. Then
select the employee you want to copy it to from the drop down list next to “to employee:”,
in the picture above it is “2 Johnson, Bruce” and click on the “Copy” button. As you can see
below a duplicate schedule is created for “2 Johnson, Bruce”.
CS TimeClock Web Interface Manual
________________________________________________________________________
________________________________________________________________________
Last updated 08/02/2012 Page 54 of 78
Employee: Select an employee to whom the schedule will apply from the drop down
list.
Start and End: The expected start and end times of the shift.
Lunch: The total time the processor must deduct from the Normal time for unpaid
breaks during the shift.
Hrs: The expected normal hours for the day.
Enable Balancing: Enables overtime balancing.
o Default: Use the global setting for overtime balancing.
o On: Override the global setting and enable balancing for this employee.
o Off: Override the global setting and disable balancing for this employee.
Leave Approved by Default: Automatically approve leave records captured for this
employee.
o Default: Use the global setting for leave approval.
o On: Override the global setting and approve leave by default for this
employee.

CS TimeClock Web Interface Manual
________________________________________________________________________
________________________________________________________________________
Last updated 08/02/2012 Page 55 of 78
o Off: Override the global setting and do not approve leave by default for this
employee.
Default Rounding Unit (min): Shows the default unit used to round the employee’s
clockings. To change, mark “Override” and enter the new rounding unit on the right.
Enable Running Totals: Enables running totals for this employee.
o Default: Use the global setting for running totals.
o On: Override the global setting and enable running totals for this employee.
o Off: Override the global setting and disable running totals for this employee.
Auto End Day: Enables Auto End Day. See page 49 for the definition.
o Default: Use the global setting.
o On: Override the global setting and enable for this employee.
o Off: Override the global setting and disable for this employee.
Click on “Save” to save the employee schedule.
To change an employee schedule, click on the blue triangle. To remove an employee
schedule, click on the red cross.

CS TimeClock Web Interface Manual
________________________________________________________________________
________________________________________________________________________
Last updated 08/02/2012 Page 56 of 78
LEAVE TYPES
The CS TimeClock has five default leave types which can be changed or removed. More
leave types can be added for processing.
To add a leave type, click on “+ Add Leave Type”.
Description: The Leave type description.
Paid: If a schedule is assigned to an employee, their expected hours will be allocated
to the selected time category.
Flexi: If a schedule is assigned to an employee, their expected hours will be
allocated to the selected time category, but the leave hours will be deducted from
the Variance column.
CS TimeClock Web Interface Manual
________________________________________________________________________
________________________________________________________________________
Last updated 08/02/2012 Page 57 of 78
Time Category: Select the time category hours must be allocated to for paid leave.
Click on “Save” to save the new leave type.
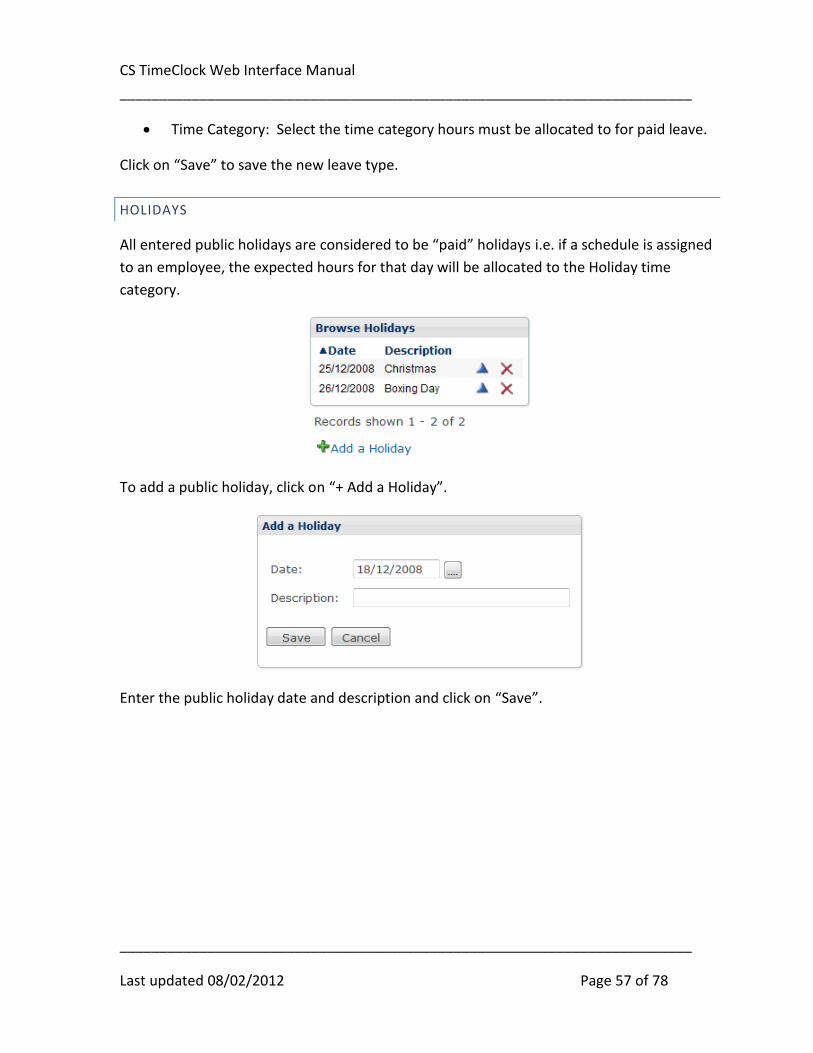
HOLIDAYS
All entered public holidays are considered to be “paid” holidays i.e. if a schedule is assigned
to an employee, the expected hours for that day will be allocated to the Holiday time
category.
To add a public holiday, click on “+ Add a Holiday”.
Enter the public holiday date and description and click on “Save”.

CS TimeClock Web Interface Manual
________________________________________________________________________
________________________________________________________________________
Last updated 08/02/2012 Page 58 of 78
THE HARDWARE MENU
The Hardware Menu will only be visible if “Advanced Hardware Options” have been enabled
in the “Clock Setup” menu option under the “Setup” menu.
CLOCK MENU OPTIONS
This menu allows you to change the description of the clock keypad menu options. You can
disable menu items and add new menu items.
To add a menu option, click on “Insert”.

CS TimeClock Web Interface Manual
________________________________________________________________________
________________________________________________________________________
Last updated 08/02/2012 Page 59 of 78
Enter a new category number and description and click on “Save”.
To change a menu item, click on the blue triangle next to the menu item.
Make your changes and click on “Save”. A disabled menu item will not appear on the clock
keypad menu.
Click on the red cross next to the item if you wish to remove it.
CLOCK SUBMENU OPTIONS
You can change, add or remove the clock keypad submenu options from this menu item.
To remove a submenu, click on the red cross next to it.

CS TimeClock Web Interface Manual
________________________________________________________________________
________________________________________________________________________
Last updated 08/02/2012 Page 60 of 78
To add a new submenu, click on “+ Add Submenu Item”.
Main Menu Option: Select the main menu option the submenu must be linked to.
Sub Menu Number: Give the menu item a number.
Description: The menu item name.
Sequence: Link the menu item to a bundy script. Scripts can be added from the
Hardware menu in the web interface.
Disabled: Disable a submenu item. Disabled menu items will not appear on the
clock keypad menu.
Click on “Save” to add the new menu.
To change a submenu item, click on the blue triangle next to it and change any of the above
listed items. Click on “Save” to implement your changes.
CHILD CLOCKS
Clocks will automatically be added to this list when they’re connected and it should
therefore not be necessary to add them manually.
CS TimeClock Web Interface Manual
________________________________________________________________________
________________________________________________________________________
Last updated 08/02/2012 Page 61 of 78
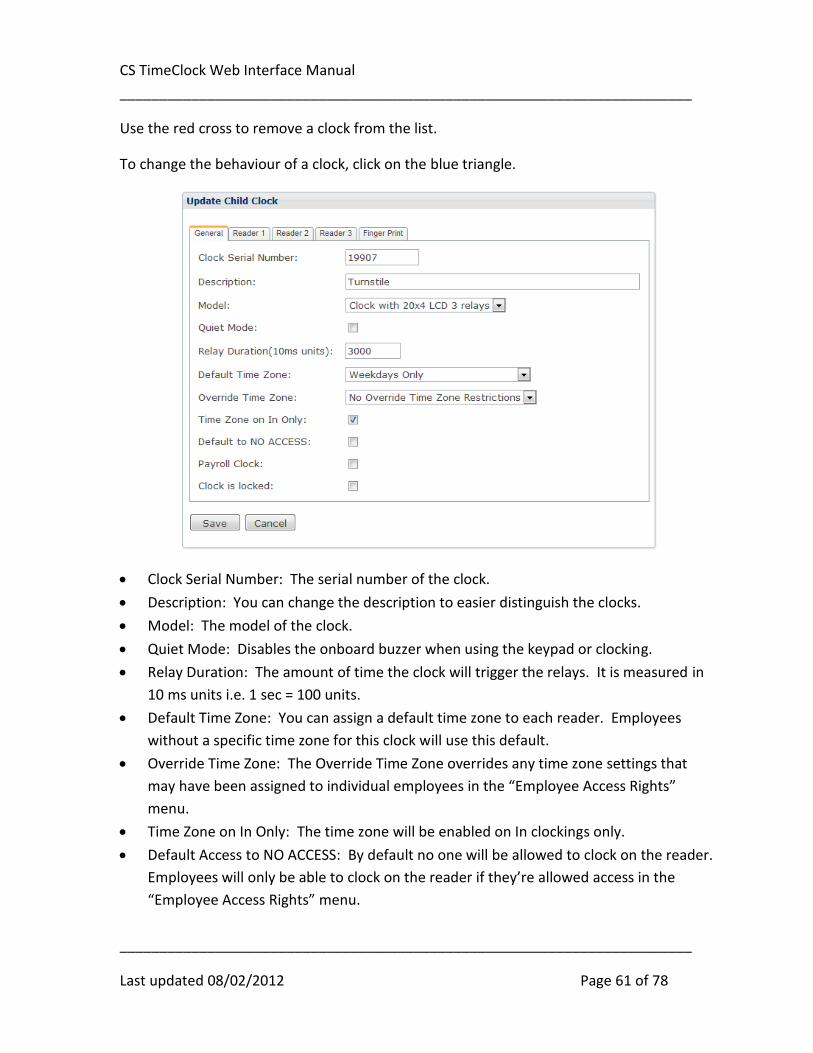
Use the red cross to remove a clock from the list.
To change the behaviour of a clock, click on the blue triangle.
Clock Serial Number: The serial number of the clock.
Description: You can change the description to easier distinguish the clocks.
Model: The model of the clock.
Quiet Mode: Disables the onboard buzzer when using the keypad or clocking.
Relay Duration: The amount of time the clock will trigger the relays. It is measured in
10 ms units i.e. 1 sec = 100 units.
Default Time Zone: You can assign a default time zone to each reader. Employees
without a specific time zone for this clock will use this default.
Override Time Zone: The Override Time Zone overrides any time zone settings that
may have been assigned to individual employees in the “Employee Access Rights”
menu.
Time Zone on In Only: The time zone will be enabled on In clockings only.
Default Access to NO ACCESS: By default no one will be allowed to clock on the reader.
Employees will only be able to clock on the reader if they’re allowed access in the
“Employee Access Rights” menu.

CS TimeClock Web Interface Manual
________________________________________________________________________
________________________________________________________________________
Last updated 08/02/2012 Page 62 of 78
Payroll Clock: This clock is used to capture payroll clockings.
Clock is Locked: There are times when the clock needs to be “off” with regard to
people clocking. When the clock is locked employees cannot clock IN, and the clock will
not trigger any of the doors or turnstiles to open. Employees can clock OUT, and the
doors will work for people clocking OUT.
Reader 1, 2, 3 and Fingerprint Reader: The CS TimeClock supports 3 readers of which
reader 1 is the integrated keypad, reader 2 is the integrated proximity reader and
reader 3 is an external reader. The settings which follow can be setup for each of these
readers.
Description: Enter a description for the reader.
Type: Select the type of reader from the drop down list.
TNA Direction: Sets the TNA effect when employees clocks on the reader. Options are:
CS TimeClock Web Interface Manual
________________________________________________________________________
________________________________________________________________________
Last updated 08/02/2012 Page 63 of 78
o None: Clockings will not be recorded as Payroll clockings i.e. the TNA direction will
not be affected.
o In: The TNA direction will always be set to In.
o Out: The TNA direction will always be set to Out.
o Toggle: The clock will automatically toggle between In and Out for an employee.
Access effect: Sets the Access effect when employees clocks on the reader. Options
are:
o None: Clockings on this reader will have no access effect i.e. the employee’s
current area will not change.
o In (Into In): Sets the employee’s area to the In Area.
o Out (Into Out): Sets the employee’s area to the Out Area.
o Toggle: Toggle the area when an employee clocks.
o TNA: Toggle the area to the TNA direction.
Area going In Restriction: Configure anti-passback and pathing.
o Must not be in TO Area (APB): Enable anti-passback on this reader. The goal of
anti-passback is to prevent an employee passing his card to another person, who is
outside, while the employee is inside, thus allowing another person to enter on the
same card.
o Must be in FROM Area (Pathing): Enable Pathing AND anti-passback on this reader.
With pathing an employee is required to be in the In area before they can clock to
the Out area, or they must be in the Out area before they can go to the In area.
Payroll going In Restriction: Restrict employees according to their TNA direction.
o Must be In: An employee must be clocked In to be able to clock on this reader.
o Must be Out: An employee must be clocked Out to be able to clock on this reader.
In Area: Assign an Area name, defined in the Areas menu, into which an employee will
move when they clock In on the reader.
Out Area: Assign an Area name, defined in the Areas menu, into which an employee will
move when they clock Out on the reader.
TNA In Relay: Select the options the clock should trigger on an TNA In clocking.
TNA Out Relay: Select the options the clock should trigger on an TNA Out clocking.
Area In Relay: Select the options the clock should trigger if an employee clocks into the
In Area.
Area Out Relay: Select the options the clock should trigger if an employee clocks into
the Out Area.
CS TimeClock Web Interface Manual
________________________________________________________________________
________________________________________________________________________
Last updated 08/02/2012 Page 64 of 78
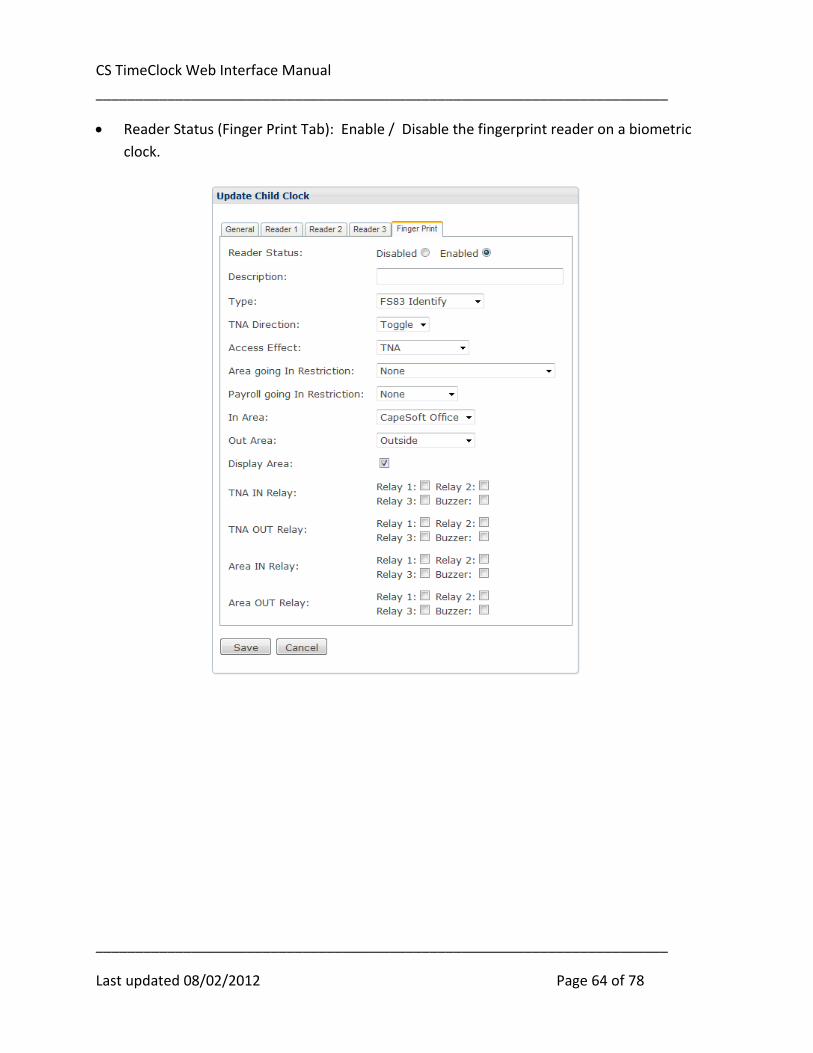
Reader Status (Finger Print Tab): Enable / Disable the fingerprint reader on a biometric
clock.

CS TimeClock Web Interface Manual
________________________________________________________________________
________________________________________________________________________
Last updated 08/02/2012 Page 65 of 78
PEER CLOCKS
If there are more than one CS TimeClock Parent on your network, you can set them up to
replicate employee areas and directions (in other words an employee can clock in on one
clock and out on another) and synchronize their time and date.
To add another CS TimeClock Parent, click on “Insert”. To change a peer’s details, click on
the blue triangle. To remove a peer, click on the red cross.
Enter the IP Address and Port number for the new device and click on “Save”.
SCRIPTS
A script is a small program written in “Bundy” which dictates the behavior of the clock.
You can create your own scripts and upload it to the clock from the “Scripts” menu.

CS TimeClock Web Interface Manual
________________________________________________________________________
________________________________________________________________________
Last updated 08/02/2012 Page 66 of 78
To add a sequence, click on “+ Add Sequence”.
Please contact your clock supplier for more information on the “Bundy” language.
SET CLOCK TIME
See page 39 for more information.
SIRENS
See page 43 for more information.

CS TimeClock Web Interface Manual
________________________________________________________________________
________________________________________________________________________
Last updated 08/02/2012 Page 67 of 78
THE ACCESS CONTROL MENU
The CS TimeClock has a number of functions available to you that are helpful in limiting
access to your premises. To implement Access Control effectively you will need to make
use of the Web Interface, or external software. Access control functionality cannot be
managed exclusively from the keypad.
This menu option will only be visible if “Enable Access Control Options” has been selected in the Clock Setup menu.
AREAS
Area descriptions are required for the setup of access control. If an employee clocks on the
clock they’re moving from one area to another. Say, for example, the clock is located at the
entrance of the building with one reader on the inside of the building and one on the
outside. Employees will therefore move into area “Inside” when they clock on the outside
reader and they will move into area “Outside” when clocking on the reader on the inside of
the building.
Click on “+ Add an Area” to add an area description. These area descriptions can be
assigned to readers in the “Child Clocks” Menu option.
CS TimeClock Web Interface Manual
________________________________________________________________________
________________________________________________________________________
Last updated 08/02/2012 Page 68 of 78
Clicking on the blue triangle will allow you to change the area description and clicking on
the red cross next to an area description will delete it.
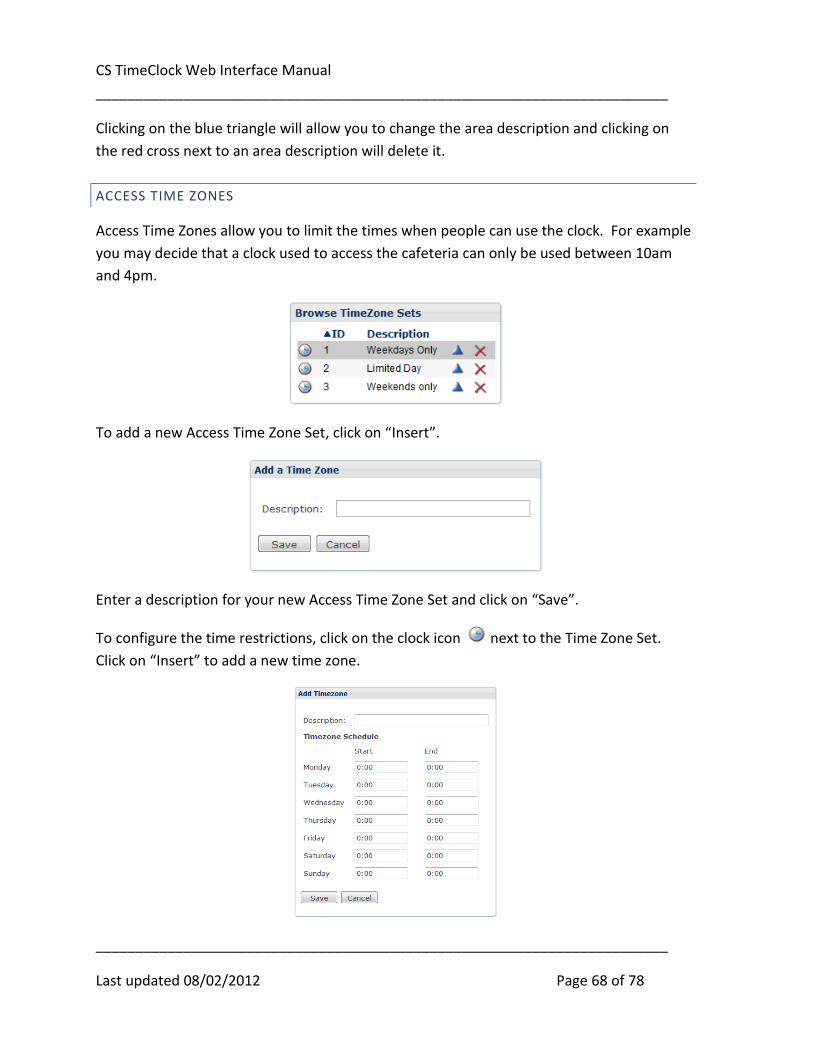
ACCESS TIME ZONES
Access Time Zones allow you to limit the times when people can use the clock. For example
you may decide that a clock used to access the cafeteria can only be used between 10am
and 4pm.
To add a new Access Time Zone Set, click on “Insert”.
Enter a description for your new Access Time Zone Set and click on “Save”.
To configure the time restrictions, click on the clock icon next to the Time Zone Set.
Click on “Insert” to add a new time zone.
CS TimeClock Web Interface Manual
________________________________________________________________________
________________________________________________________________________
Last updated 08/02/2012 Page 69 of 78
Enter a description for the new time zone and the start and end times for each day of the
week. Employees will be allowed to clock between the start and end time. The end time
can be smaller than the start time where the time zone stretches across midnight.
To change a time zone click on the blue triangle next to it. To remove a time zone click on
the inline red cross.
Link a time zone set to the clock from the “Setup”, “Child Clocks” menu.
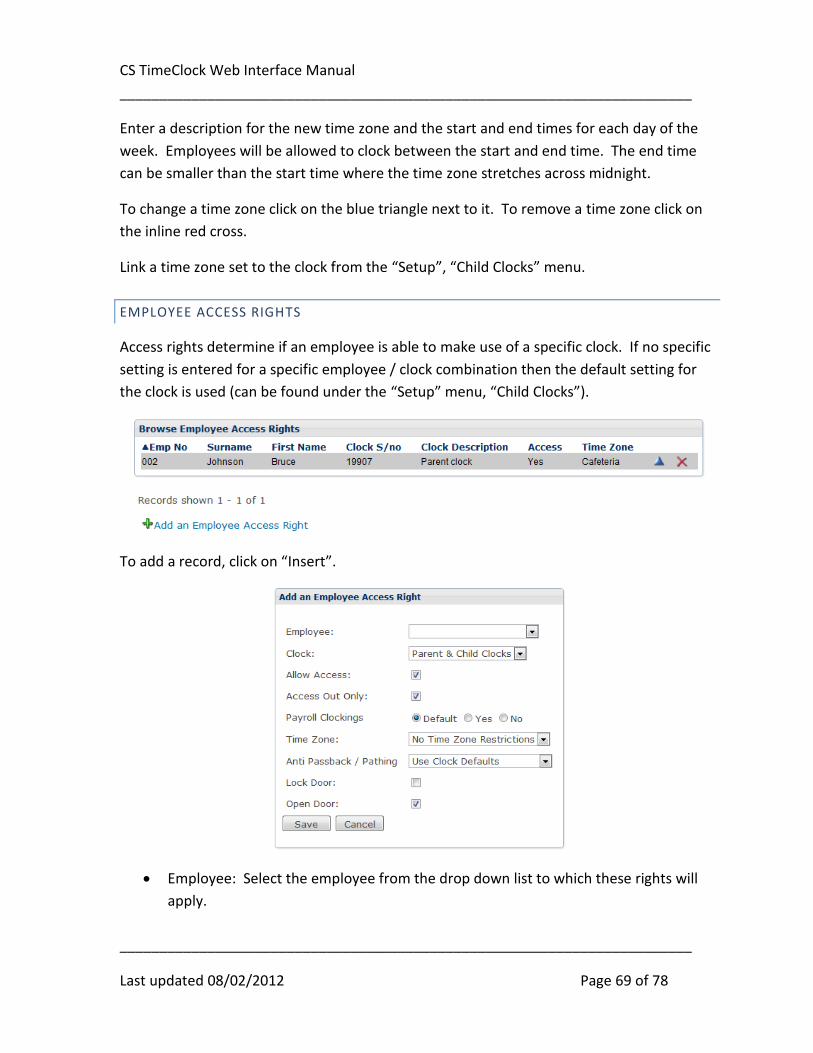
EMPLOYEE ACCESS RIGHTS
Access rights determine if an employee is able to make use of a specific clock. If no specific
setting is entered for a specific employee / clock combination then the default setting for
the clock is used (can be found under the “Setup” menu, “Child Clocks”).
To add a record, click on “Insert”.
Employee: Select the employee from the drop down list to which these rights will
apply.

CS TimeClock Web Interface Manual
________________________________________________________________________
________________________________________________________________________
Last updated 08/02/2012 Page 70 of 78
Clock: Select the clocks these rights will be applied on.
Allow Access: Tick to allow access. An unticked box will deny access to the selected
employee.
Access Out Only: The employee will only be able to clock Out on the device.
Payroll Clockings:
o Default: Use the clock setting to determine whether the clockings on that
device is payroll or access clockings.
o Yes: Clockings on this device will be payroll clockings.
o No: Clockings on this device will be access clockings.
Time Zone: You can link a Time Zone override to the employee for the selected
clocks.
Anti Passback / Pathing:
o Use Clock Defaults: Apply anti passback and pathing on this employee
according to the clock setup.
o Anti Passback Enabled: Enable and apply anti passback on In and Out.
o Anti Passback on Out Only: Apply anti only when clocking Out.
o Anti Passback on In Only: Apply anti passback only when clocking In.
o Pathing Enabled: Enable Pathing and apply on the In and Out clocking.
o Pathing on Out Only: Apply pathing only when clocking Out.
o Pathing on In Only: Apply pathing only when clocking In.
Lock Door: Lock the door when this employee clocks Out.
Open Door: Trigger the relays to open the door is the employee clocks on this
device.
Click on “Save” to apply the changes.
To change a record, click on the blue triangle. To remove a record, click on the red cross
next to the record.
THE JOB COSTING MENU
The CS TimeClock Web Interface currently has very limited support for Job Costing. You can
only add jobs and change the clock’s behavior using the “Sequences” menu. For the
calculation of Job Hours you require the TNA software package.

CS TimeClock Web Interface Manual
________________________________________________________________________
________________________________________________________________________
Last updated 08/02/2012 Page 71 of 78
JOBS
You can add, change or remove jobs from the “Jobs” menu.
To add a job, click on “Add Job”, enter the job description and click on “Save”.
To change a job description, click on the blue triangle next to the job. To remove a job, click
on the red cross next to the job you wish to remove.
CS TimeClock Web Interface Manual
________________________________________________________________________
________________________________________________________________________
Last updated 08/02/2012 Page 72 of 78
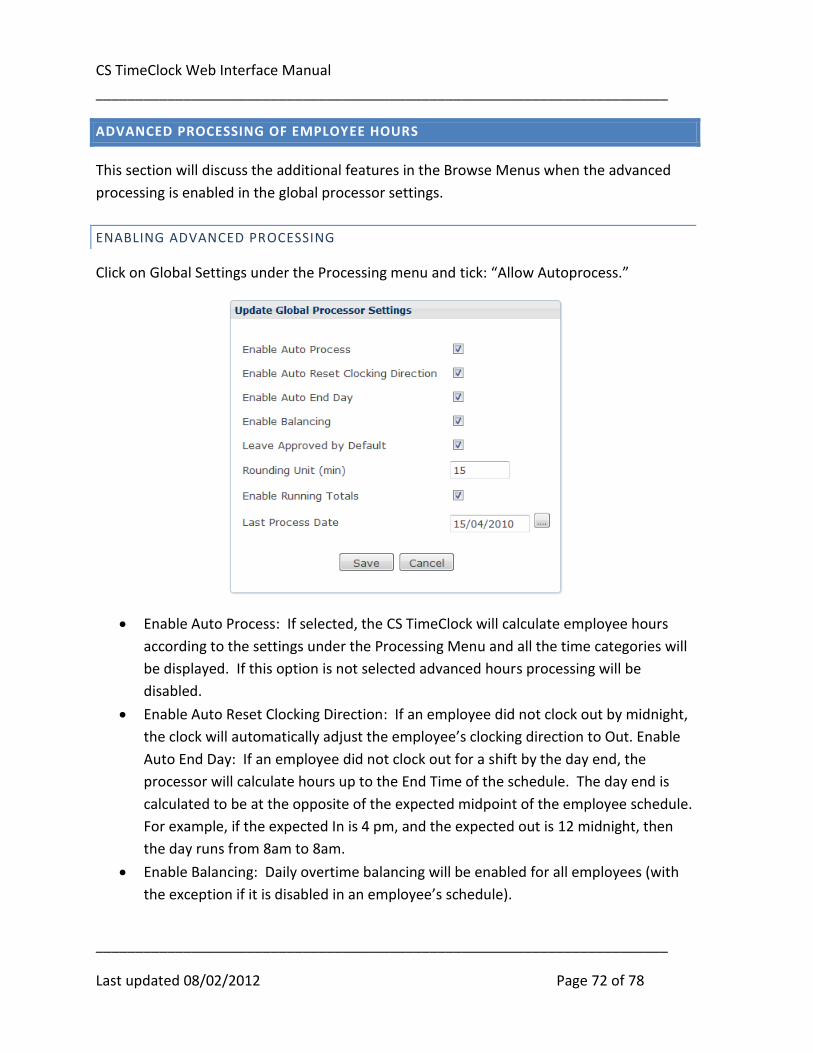
ADVANCED PROCESSING OF EMPLOYEE HOURS
This section will discuss the additional features in the Browse Menus when the advanced
processing is enabled in the global processor settings.
ENABLING ADVANCED PROCESSING
Click on Global Settings under the Processing menu and tick: “Allow Autoprocess.”
Enable Auto Process: If selected, the CS TimeClock will calculate employee hours
according to the settings under the Processing Menu and all the time categories will
be displayed. If this option is not selected advanced hours processing will be
disabled.
Enable Auto Reset Clocking Direction: If an employee did not clock out by midnight,
the clock will automatically adjust the employee’s clocking direction to Out. Enable
Auto End Day: If an employee did not clock out for a shift by the day end, the
processor will calculate hours up to the End Time of the schedule. The day end is
calculated to be at the opposite of the expected midpoint of the employee schedule.
For example, if the expected In is 4 pm, and the expected out is 12 midnight, then
the day runs from 8am to 8am.
Enable Balancing: Daily overtime balancing will be enabled for all employees (with
the exception if it is disabled in an employee’s schedule).

CS TimeClock Web Interface Manual
________________________________________________________________________
________________________________________________________________________
Last updated 08/02/2012 Page 73 of 78
Leave Approved by Default: If enabled, leave records captured are by default
marked as approved and hours will automatically be calculated and allocated. If
disabled, a leave record must be approved first before hours will be calculated.
Rounding Unit (min): All clockings will be rounded to this value.
Enable Running Totals: This will enable running totals in the Daily Hours window.
Last Process Date: The last date on which the clock automatically reprocessed
hours. If you change this date to a date prior to today, the clock will reprocess all
the hours records from that date.
Click on “Save”.
DAILY HOURS
Instead of just one time category, up to 11 time categories are displayed in the “Browse
Daily Hours” window.
The “Day” column shows the weekday name (which can be renamed in the “Global
Translations” menu option) or the leave type description or the public holiday description.
The “Expected” column will display the schedule information for the day. For example:
“I- 8:00 O-16:00 L- 0:30” translates into: “I- 8:00” is the shift start time; “O-16:00” is the
shift end time; and “L- 0:30” is the unpaid break time.
Next to the window heading the system display the number of records in the processing
queue. Hours will automatically be reprocessed if:
1. Clocking changes are made.
2. Approved leave records are added.

CS TimeClock Web Interface Manual
________________________________________________________________________
________________________________________________________________________
Last updated 08/02/2012 Page 74 of 78
A record that is pending for processing is indicated by .
indicates that the employee was absent i.e. the employee were scheduled to work, but
there were no clockings for the day.
To view the employee’s expected clockings, hover your mouse over the employee’s
clockings. A tooltip will appear: .
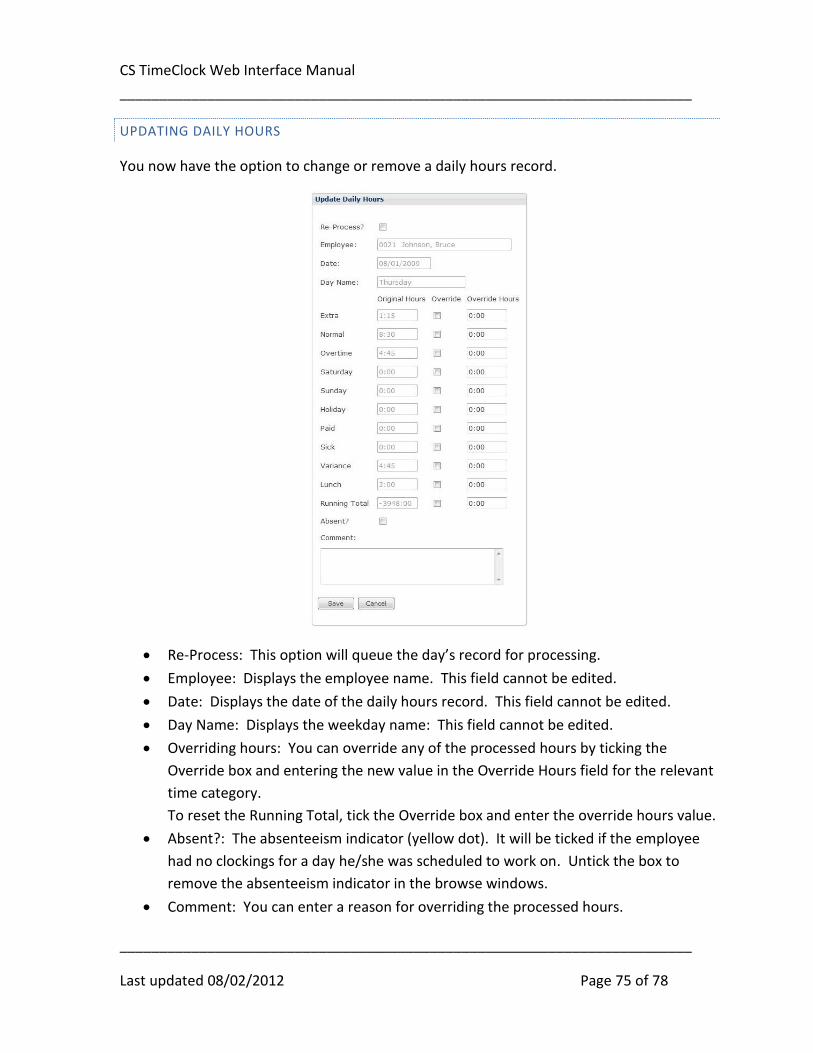
CS TimeClock Web Interface Manual
________________________________________________________________________
________________________________________________________________________
Last updated 08/02/2012 Page 75 of 78
UPDATING DAILY HOURS
You now have the option to change or remove a daily hours record.
Re-Process: This option will queue the day’s record for processing.
Employee: Displays the employee name. This field cannot be edited.
Date: Displays the date of the daily hours record. This field cannot be edited.
Day Name: Displays the weekday name: This field cannot be edited.
Overriding hours: You can override any of the processed hours by ticking the
Override box and entering the new value in the Override Hours field for the relevant
time category.
To reset the Running Total, tick the Override box and enter the override hours value.
Absent?: The absenteeism indicator (yellow dot). It will be ticked if the employee
had no clockings for a day he/she was scheduled to work on. Untick the box to
remove the absenteeism indicator in the browse windows.
Comment: You can enter a reason for overriding the processed hours.

CS TimeClock Web Interface Manual
________________________________________________________________________
________________________________________________________________________
Last updated 08/02/2012 Page 76 of 78
Click on “Save” to save your changes or “Cancel” to discard them. An overridden hours
record will be indicated with an purple circle in the “Browse Daily Hours” window.
PAYROLL HOURS
In this window, the date selection is important.
Since the clock does not “know” what your pay period is it will add all the daily hours
together within the selected period.
Therefore, if you select a date from Monday to Sunday, the total hours will be generated up
until the Sunday. If you select dates from Monday to Friday, the total hours will be
generated up until the Friday. That also means, that if people worked on the weekend, and
these hours need to be included in your payroll hours, they will not be taken into account in
a selection from Monday to Friday only.
Click on the “Send To” button the export the selected period’s payroll hours.

CS TimeClock Web Interface Manual
________________________________________________________________________
________________________________________________________________________
Last updated 08/02/2012 Page 77 of 78
THE MOBILE DEVICE PAGES
The clock’s web interface includes pages which has been optimized for use on mobile
devices. The “mobi” pages can be used to clock IN or OUT and view clockings for up to 7
days.
ACCESSING AND USING THE MOBI PAGES
The mobile device must be capable of browsing the internet and the clock’s web interface
must be accessible from the Internet.
Open the mobile device’s internet browser and type in the clock address (get this from your
IT department) e.g. http://clock.mycompanyname.com. Add “/myday.php” to the end of
this (as per our example the full address would be:
http://clock.mycompanyname.com/myday.php) and select to go to that page.

CS TimeClock Web Interface Manual
________________________________________________________________________
________________________________________________________________________
Last updated 08/02/2012 Page 78 of 78
Enter your employee number and password and select Login.
Any clockings for the current date will be displayed on screen.
Clock In & Clock Out buttons: clock IN or OUT by clicking on the relevant button.
Last 7 Days, Yesterday & Today: View clockings for the last 7 days, yesterday or
today.
Close the browser window after use.