SunEyes V Series IP Camera P2P CMS user manualcd.suneyes.hk/VNew/en/doc/SunEyes V P2P CMS User...
40
Page 1 ON page 40 SunEyes V Series IP Camera P2P CMS user manual Version: 2.0 Date: July. 2015 This document is applicable to all series devices in our company.
Transcript of SunEyes V Series IP Camera P2P CMS user manualcd.suneyes.hk/VNew/en/doc/SunEyes V P2P CMS User...

Page 1 ON page 40
SunEyes V Series IP Camera P2P CMS user manual
Version: 2.0
Date: July. 2015
This document is applicable to all series devices in our company.

SunEyes V Series P2P CMS
Page 2 ON page 40
foreword The HiP2P client of IP Camera is used to realize all front-end network video
monitoring devices(including network video server, IP camera) centralized
monitoring, storage, management and control. The management software can
manage Max 96 front-end network monitoring devices; can set and control any
device, and other functions; can support 1/4/6/8/9/16/25/36 pictures display
on one screen, and two-way voice talk back, logs retrieval, and other functions.
With powerful function, friendly interface, and simple operation, it is convenient
for users to realize networking applications for large-scale remote network
monitoring system.
Statement 1. The contents described in this manual may exits some difference with the
vesion you are using. If you have some questions can not be solved, please contact
our technical support department or products supplier.
2. The contents in this manual will update irregularly, our company reserves the
rights without prior notice.

SunEyes V Series P2P CMS
Page 3 ON page 40
content
1. Installtion instructions ................................................................................................................. 5
1.1. Installation requirements ................................................................................................... 5
1.2. Installation step .................................................................................................................. 5
2. CMS detailed instruction............................................................................................................... 6
2.1. log in and instruction ......................................................................................................... 6
2.2. software interface instruction ............................................................................................ 7
2.3. Device management ........................................................................................................ 10
2.3.1. Add device ............................................................................................................. 10
2.3.2. Group management ............................................................................................. 12
2.4. Image preview ................................................................................................................ 14
2.4.1. non cycle switching preview.................................................................................. 15
2.4.2. cycle switching preview ......................................................................................... 17
2.5. PTZ Control...................................................................................................................... 18
2.5.1. PTZ Control ............................................................................................................ 18
2.5.2. Preset setting......................................................................................................... 19
2.5.3. Cruise setting ......................................................................................................... 20
2.5.4. Image Color setting .............................................................................................. 21
2.6. Record management....................................................................................................... 21
2.6.1. plan of record ....................................................................................................... 21
2.6.2. Alarm record.......................................................................................................... 23
2.6.3. Manual record ....................................................................................................... 23
2.7. Linkage alarm ................................................................................................................... 24
2.7.1. Enable the linkage alarm ....................................................................................... 24
2.7.2. Alarm type ............................................................................................................. 24
2.7.3. Linkage Alarm ........................................................................................................ 25
2.8. Local playback .................................................................................................................. 25
2.8.1. playback by time searching ................................................................................... 25

SunEyes V Series P2P CMS
Page 4 ON page 40
2.8.2. Playback by searching file .................................................................................... 27
2.9. Remote playback .............................................................................................................. 27
2.9.1. Remote playback plan of record............................................................................ 27
2.9.2. SD card record playback ........................................................................................ 29
2.10. Electronic Map ............................................................................................................... 30
2.10.1. Add Map .............................................................................................................. 30
2.10.2. Edit Map .............................................................................................................. 30
2.10.3. Delete Map.......................................................................................................... 30
2.11. Parameter settings ......................................................................................................... 31
2.11.1. Color .................................................................................................................... 31
2.11.2. Video ................................................................................................................... 32
2.11.3. Audio ................................................................................................................... 32
2.11.4. OSD...................................................................................................................... 32
2.11.5. Network .............................................................................................................. 33
2.11.6. Motion Detection ................................................................................................ 33
2.11.7. PTZ....................................................................................................................... 34
2.11.8. System ................................................................................................................. 34
2.11.9. WIFI ..................................................................................................................... 35
2.12. User management ....................................................................................................... 35
2.12.1. Add User .............................................................................................................. 36
2.12.2. Delete User .......................................................................................................... 36
2.12.3. Modify user permissions ..................................................................................... 36
2.12.4. Modify user password ......................................................................................... 37
2.13. Logs................................................................................................................................ 37
2.13.1. Log retention time............................................................................................... 37
2.13.2. Log query............................................................................................................. 37
2.13.3. Log backup .......................................................................................................... 37
2.14. Other settings................................................................................................................. 38
2.15. Split screen .................................................................................................................... 40

SunEyes V Series P2P CMS
Page 5 ON page 40
1. Installtion instructions 1.1. Installation requirements Hardware enviroment:
1、Pentium IV series, CPU basic frenquency more than 2.0G
2、more than 2G memory
3、Hard disk 120G or higher
4、display resolution 1024 x 768 or higher
Software environment:
Windows2000/Windows XP/Windows2003/Windows Vista/Windows
7,Windows2000/WindowsXP/Windows2003/Windows Vista/Windows
7/Windows8
1.2. Installation step Double-click the installation package, it will pop up below interface:
Select the installation path, click “Next”, then installation finished.
After installation, it will show below icon on desktop:

SunEyes V Series P2P CMS
Page 6 ON page 40
In the program bar will show following interface:
2. CMS detailed instruction 2.1. log in and instruction
【Log in】 When log in, the default user name is admin and password is empty ,
click “OK”to enter into CMS Main interface.
【Exit】 Only the users with admin permissions can exit from CMS, user and
guest can not exit from CMS.
When exit from CMS, you need to input the admin permissions’s user name
and password.

SunEyes V Series P2P CMS
Page 7 ON page 40
2.2. software interface instruction
The software interface as shown in above, mainly divided to 6 sections:
1 System button bar 2 tab bar 3 device tree
4 real-time preview 5 PTZ control 6 Alarm information list
◆System button bar
Help button, click it to open CMS instruction
Hidden button, click it then software hide into system tray
Exit button, click it then software pop up Exit reminder
◆Tab bar
Logo information
Click it then switch to image preview interface

SunEyes V Series P2P CMS
Page 8 ON page 40
Click it then switch to recording playback interface
Click it then switch to remote recording playback interface
Click it then switch to map operation interface
Click it then switch to setting interface
Click it then switch to logo operation interface
logout user and switch user
Click it then exit CMS
◆Device tree:
【List mode】 According to user configuration listing level to show area,setting,and
channel
【Group mode】 According to user configuration grouping level to show group and
channel
【Current screen】 show current connected device on screen, only shows in list
mode
◆Real-time preview
electronic zoom button, click it and use mouse to draw a area on the screen,
then area magnification can be realized
SunEyes V Series P2P CMS
Page 9 ON page 40
Voice talkback button, choose the window need to open talkback, then click
talkback button, window statu bar will show , talkback can be realized,
only can open talkback of one device at the same time.
voice monitoring button, click it to open voice monitoring, window statu bar
will show , click it again to close voice monitoring, it can open voice
monitoring of multiple devices at the same time.
recording button, choose the window need to recording, click recording
button to open recording manually, window statu bar will show , click it
again to close recording manually.
picture capture button, choose the window need to capture picture, click
capture button to realize picture capture, if click capture button continuously,
1 second can capture 2 pictures at most.
Multi-image choosing button, click it to choose multi-image display,
1,4,6,8,9,16 image options.
Full screen display button, click it then real-time preview area will be full
screen displaying.
Last group button, in Grouping cycle switching,click it then back to window
display of last group
Next group button, in Grouping cycle switching, click it then skip to window
display of next group
cycle switching button, click it to open grouping cycle switching, click again to
stop grouping cycle switching.
voice broadcast button

SunEyes V Series P2P CMS
Page 10 ON page 40
Device tree shrink or extend button, click it that device tree shrink, click again
then device tree extend
Alarm message list shrink or extend button, click it that alarm message list
shrink, click again then alarm message list extend.
2.3. Device management
2.3.1. Add device
Before using the CMS, you need to add device and configuration. Click
“setting” button in tab bar, enter into device management page.
【Add list tree】
◆ When run software initially, default list tree is empty. Click “add area”button,
pop-up “add area”dialog box. After filling in name in area name column, click
ok to add a area in list tree. Because of the added area is the first area, so this
area do not exist belongs area, the area is empty.
Note: List tree can add Max 128 areas at present.
Add area into device tree
Modify the name of selected area
Delete the selected area
Add device manually, click it to pop up dialog
box of add device
click it, then pop-up
dialog box of editing device
Delete the selected device
add the searched devices to selected area
click it to search the devices in LAN
SunEyes V Series P2P CMS
Page 11 ON page 40
choose all devices in searching list
【Add device】
◆Search to add device in LAN: Clicking search button, the CMS will search out all devices in LAN,then select
the device needed to add in search list, and select area, click button to
add device, thus you can add selected device to this area.
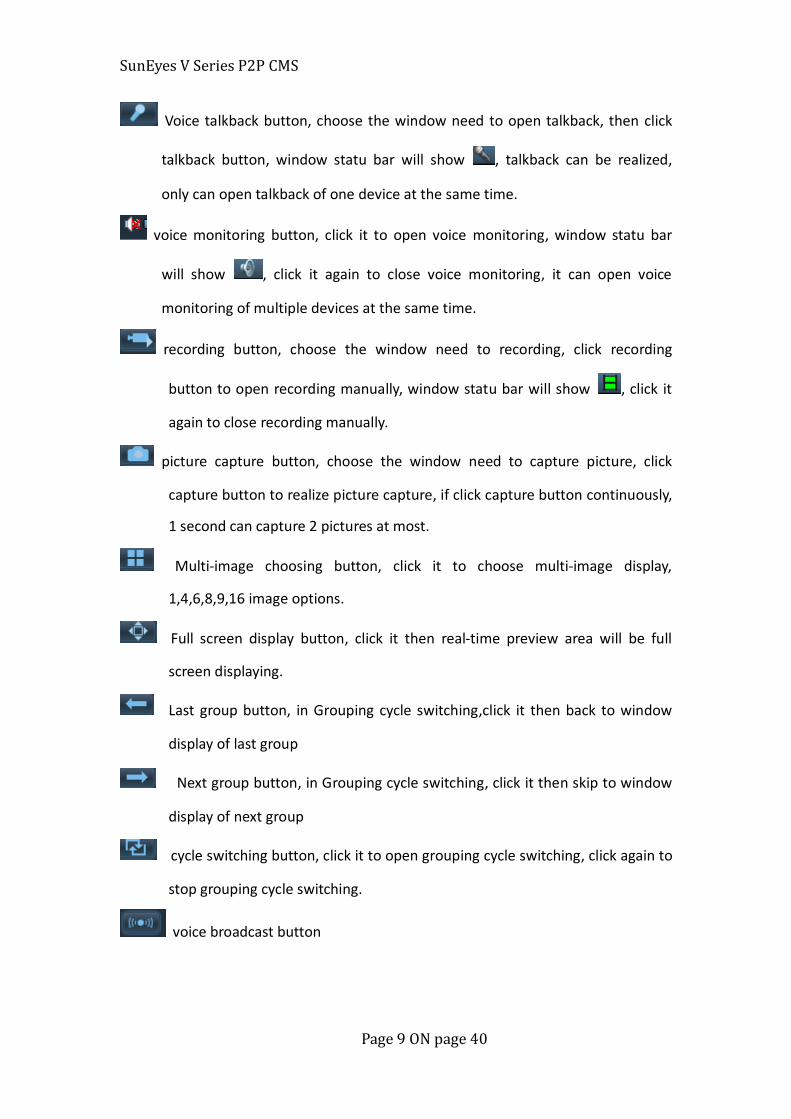
◆ add device manually
Click button , it will pop-up below dialog box of add device, as
shown in below:
【Name】 name of the device, it is user-defined. Max 15 chinese
characters. (Note: After enter name, the device tree in preview
window only display device name, don’t display device IP
Address. )
【UID】 P2P UID of the device
【User name】 login user name of the device, default is admin
【password】 login password of the device, default is admin
【Area】 displaying area of the device
After filling in all required information, click ok to finish device adding.

SunEyes V Series P2P CMS
Page 12 ON page 40
Note: If using manufacturer’s DDNS, just input manufacturer’s DDNS in IP or
domain text box, using default port 80. You don’t need to modify port number.
Modify IP Address of the device:
Clicking the "search" button, the CMS will search all devices in LAN
automatically. Then select the corresponding device (the IP and other information
of this device will in highlight status), and enter the new IP address, subnet mask,
gateway, HTTP port and other information in corresponding text box, clicking
"Setting" button, it will pop-up "check information” dialog box. Then input the
user name and Password, and click "OK", it will prompt "success"
Note: The camera will restart after modified HTTP port.
2.3.2. Group management
◆add group:
Select button,
it will pop-up dialog box of add group,
then input name in grouping name, and click OK
Note: It can add Max 20 names in grouping name.

SunEyes V Series P2P CMS
Page 13 ON page 40
◆configuration group:
After adding group, you can do group setting.
Group setting methods: select group, click UID of the device, then click
button to add device channel into group.
Note: Each group can set Max 16 pictures displaying.
Add device into grouping channel
Remove device from grouping device channel
Adjust device diaplaying sequence in grouping, the selected device
and front device change position.
Adjust device diaplaying sequence in grouping, the selected device
and behind device change position.
Modify the name of grouping and division, then the group will be
empty, you need to reset group.
Delete group and devices in group

SunEyes V Series P2P CMS
Page 14 ON page 40
2.4. Image preview After configured device, clicking “preview”button in Tab bar,then back to main
interface of monitoring, the default display way of device tree is list tree. You can
switch displaying group and list information by clicking “group” and “list” in device
tree. The default display images is 4 image segmentation, support Max 36 pictures.
When maximum image segmentation, it has 16/25/36 image mode optional. The
higher the picture, the performance of host also need to be promoted. If 25 or 36
images displaying, we suggest use more than i3 CPU and independent video card.
Display image instruction:
:indicates this channel do not connect any device. If connected, OSD
information will be displayed on device.

SunEyes V Series P2P CMS
Page 15 ON page 40
:talk back stutus, when the icon becomes , it means this channel is talk
back, otherwise the channel do not open talk back.
:Listening status, when the icon becomes , it means this channel is
listening, otherwise it does not open listening.
:Alarm status, when the icon becomes , it means this channel is alarm,
otherwise it does not alarm.
:Recording status, when the icon becomes , it means it is recording,
otherwise without record.
2.4.1. non cycle switching preview
In list mode, clicking the IP of
the device or “+” in front of the name, double
click Channel 01 or drag Channel 01 to windows,
then it can display image.
After device connected, it will show a blue triangle
on Channel 01; if shows , means device
do not connnect. If shows , means it will have alarm message.
Right-click any area, it will pop-up the picture as shown on the right:
【Connected all】 Connect devices in selected area
【start manual record of area】 Open manual record in
selected area
【Stop manual record of area】Stop manual record in
selected area
【Auto adjust all】 The device adjust image display ratio automatically in select
area
【Full display all】The device display images in select area as the size of
segmentation picture

SunEyes V Series P2P CMS
Page 16 ON page 40
【Check time all】 The time of all device in selected area synchronize to PC time
Note: After connected device, it’s not certain to display image on the
window. If needed, please double click Channel 01 or drag Channel 01 to
window.
Right-click any device, it will pop-up the picture as shown on the right:
【connected device】
all channel connected to selected device
【Disconnected device】 all channel disconnected to
selected device
【start manual record of device】 Open manual record for selected device 【Stop manual record of device】 Stop manual record for selected area 【main stream device】 Using main stream to connect selected device
【Sub stream device】 Using sub stream to connect selected device
【third stream device】 Using third stream to connect selected device
【 Auto adjust device 】 The selected device adjust image display ratio
automatically
【Full display device】The selected device display image as the size of
segmentation picture
【check time device】 The time of selected device synchronize to PC time
Choose any device, click Channel 1,
it will pop-up the picture on the right:
【Disconnect】 Connect one channel of the
device, the device only have Channel 01 at present
【start manual record】Start manual record for
selected channel, after selected, the tag will
turn to stop manual record automatically

SunEyes V Series P2P CMS
Page 17 ON page 40
【Full display】The selected device display image as the size of segmentation
picture
【check time】 the time of selected channel synchronize to PC time
Click the window of Image preview, then pop-up the picture
as shown on the right:
【Full screen】 After choosing full screen, the CMS will
display full screen, if need a single window to display
full sreen, double click the corresponding window again.
【auto adjust】 Tick means the selected window display as image ratio, cancel
the tick means display image as the size of picture segmentation
【photo】 Capture pictures from selected window and save to hard disk, the
default picture format is JPG.
【Record】 Start manual record for selected window, after started record, the
record tag will tick automatically
【Stop display】 Stop the image display in selected window
【Display status bar】display the status of window, including: listening, talk back,
alarm, record and so on.
Note: When images stop displaying, the device is still in connection status. If the
device has started record function, it still keep recording after stop
displaying.
2.4.2. cycle switching preview
When switching to group
list, you can only use cycle switching
way to display image. Before open
cycle switching, you must set group
SunEyes V Series P2P CMS
Page 18 ON page 40
first. Please check “device group” for
specific settings. Click button to open
cycle switching, click again to suspend it.
When using group cycle switching, if need to set cycle time, please modify in
“setting”—“record management”, default is 10 seconds. The scope is 5s to 60s
adjustable.
2.5. PTZ Control
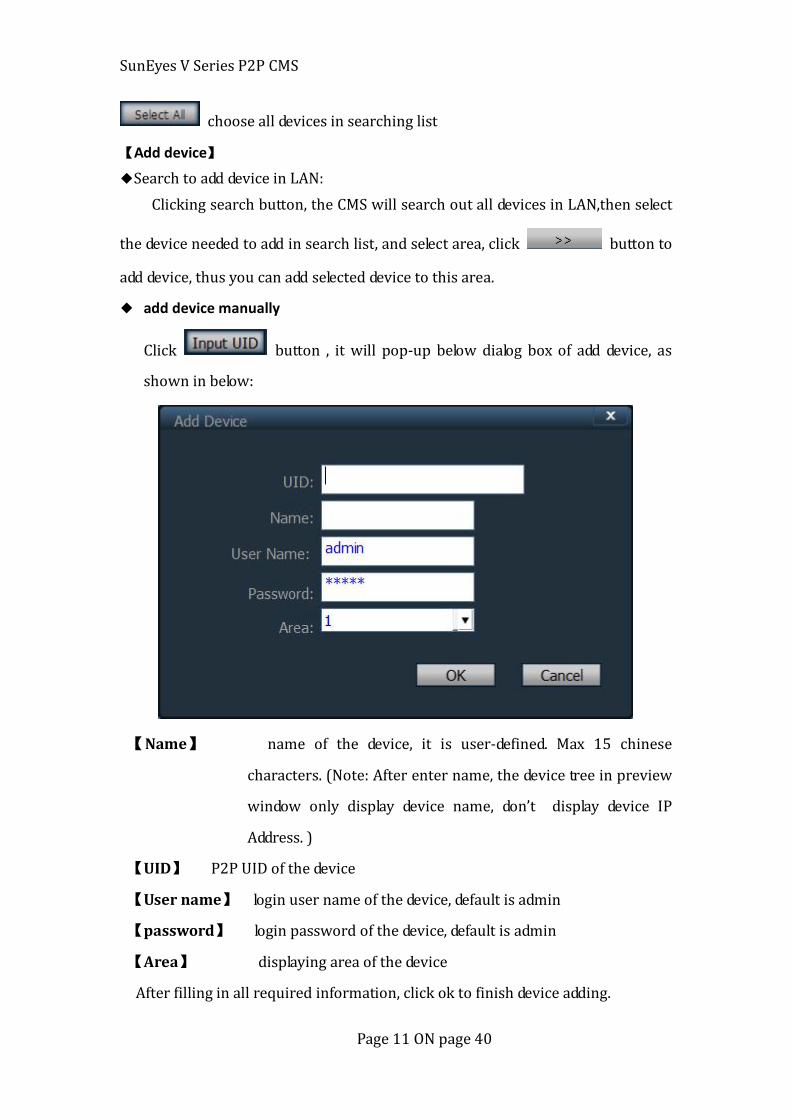
2.5.1. PTZ Control
You can control PTZ of eight directions rotation by direction key, and
choose PTZ rotate speed by drag slider, “-” means PTZ rotate speed slow down,
“+” means PTZ rotate speed up.
Iris ehlarge button, need the lens of camera support
Iris shrink button, need the lens of camera support
Zoom in button, need the lens of camera support
Zoom out button, need the lens of camera support
Focus in button, need the lens of camera support
Focus out button, need the lens of camera support
Light on button, click it to open the light of camera, need camera support
Light off button, click it to close the light of camera, need camera support
Wiper on button, click it to open wiper function of camera, need camera
support
Wiper off button, click it to close wiper function of camera, need camera
support
SunEyes V Series P2P CMS
Page 19 ON page 40
start cruise button,click it to start camera’s cruise function, only part of
camera can support. It can adjust rotation speed (drag speed adjustment to
corresponding positon, then click )
stop cruise button, click it to stop camera’s cruise function, only part of
camera can support.
start horizontal scan range, drag speed strip to adjust rotation speed, need
camera support
Call out PTZ control panel, click the image you previewing, click ,
then it can call out control panel. Please refer to chapter 2.5.5 of scan range.
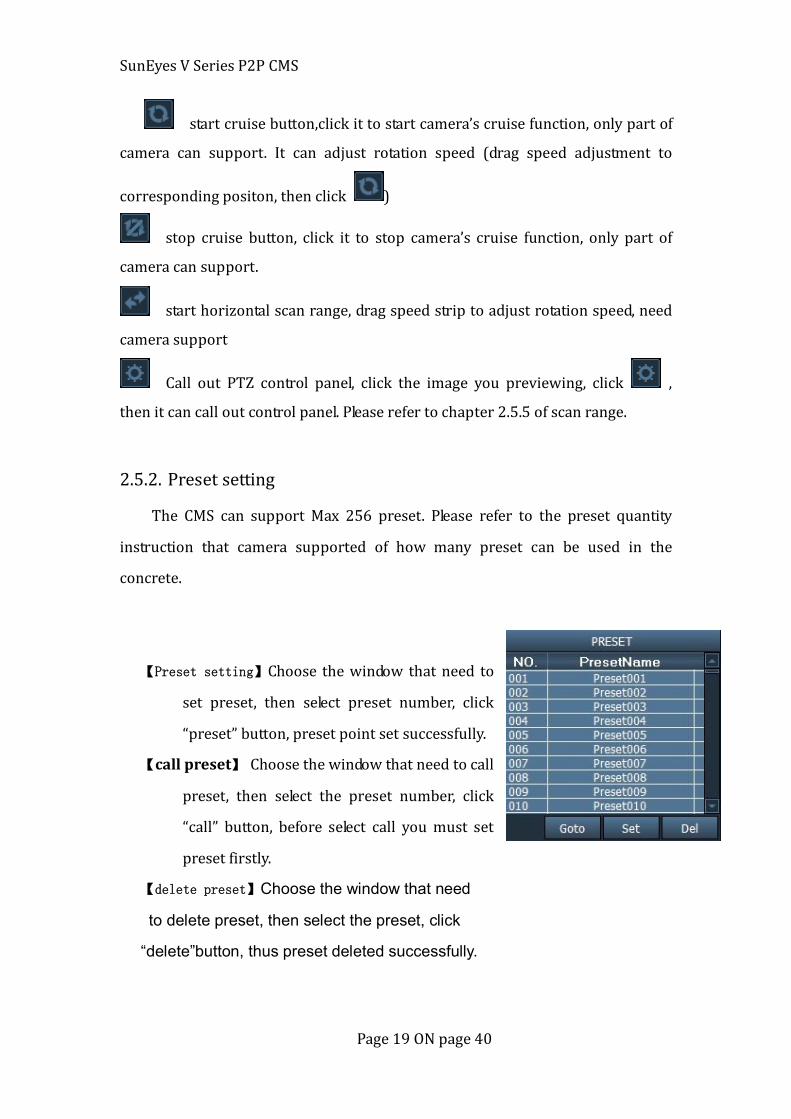
2.5.2. Preset setting
The CMS can support Max 256 preset. Please refer to the preset quantity
instruction that camera supported of how many preset can be used in the
concrete.
【Preset setting】Choose the window that need to
set preset, then select preset number, click
“preset” button, preset point set successfully.
【call preset】 Choose the window that need to call
preset, then select the preset number, click
“call” button, before select call you must set
preset firstly.
【delete preset】Choose the window that need
to delete preset, then select the preset, click
“delete”button, thus preset deleted successfully.

SunEyes V Series P2P CMS
Page 20 ON page 40
2.5.3. Cruise setting
Note: Cruise function need PTZ supporting.
It can set maximum 4 groups preset cruise
(Setting as the PTZ instruction. Please
refer to the protocal in PTZ user manual
for detailed information)
Click “cruise” button,it display cruise control panel. Different PTZ calls different
preset cruise. For example: PTZ call preset 101 to start cruise group 1. You can
save the corresponding preset position of 【cruise 1】button. If need to start the
cruise, click 【cruise 1】. Cruise button setting as below:
Cruise button setting:
Enter into “setting” -- “other settings”-- “cruise set”. As shown in below:
After setting cruise button, the system will save the PTZ parameter of this
channel.
Note: Preset 101 call cruise 1; preset 102 call cruise 2; and so on.

SunEyes V Series P2P CMS
Page 21 ON page 40
2.5.4. Image Color setting
Click “color” button, it will display image color adjustment dialog box.
Image brightness adjustment
Image saturation adjustment
Image contrast adjustment
mage color adjustment
Image color restore factory Settings
button, after clicking, the image color will restore to factory Settings.
2.6. Record management
2.6.1. plan of record
In the tab bar to choose “setting”-- “record management”—“Enable the plan of record”, as shown in above: SUN – SAT means one week,based on the count of day ; 0 – 23 means one day,
based on the unit of half an hour.
【Enable the plan of record】 Choose channel, then click the left mouse to drag a
green blocks in the schedule, as shown in above; green area is
the time bucket that enabled plan of record. After setting time
bucket, click save.
SunEyes V Series P2P CMS
Page 22 ON page 40
【close the plan of record】 Cancel the tick in enable plan of record, click save; or
cancel green block in schedule and click save. The method of
cancel green block: only need to click left mouse and drag mouse,
the green block can be canceled.
Note: If the plan of record time for all devices are the same, you only need to set one
device, then click copy and save, then all devices enabled plan of record.
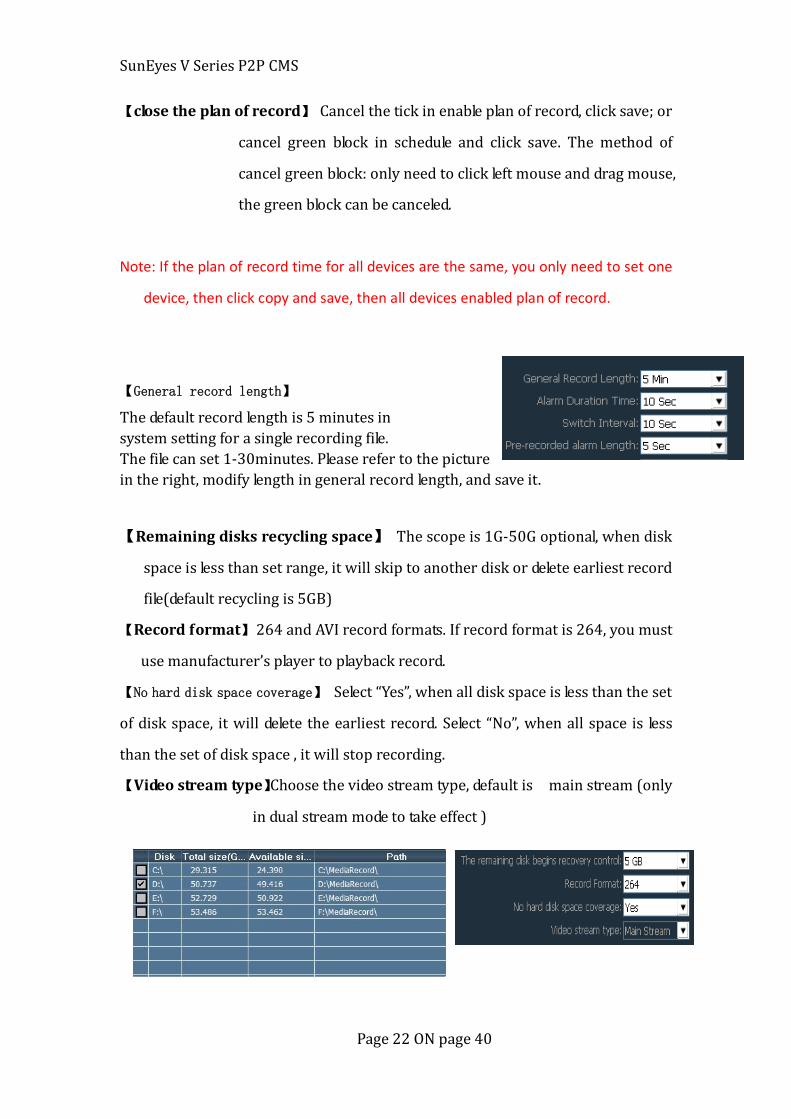
【General record length】
The default record length is 5 minutes in system setting for a single recording file. The file can set 1-30minutes. Please refer to the picture in the right, modify length in general record length, and save it.
【Remaining disks recycling space】 The scope is 1G-50G optional, when disk
space is less than set range, it will skip to another disk or delete earliest record
file(default recycling is 5GB)
【Record format】 264 and AVI record formats. If record format is 264, you must
use manufacturer’s player to playback record.
【No hard disk space coverage】 Select “Yes”, when all disk space is less than the set
of disk space, it will delete the earliest record. Select “No”, when all space is less
than the set of disk space , it will stop recording.
【Video stream type】Choose the video stream type, default is main stream (only
in dual stream mode to take effect )
SunEyes V Series P2P CMS
Page 23 ON page 40
【Record path】 After installed CMS, CMS will test the hard disk in device
automatically, and display in the list, default to D disk.
Note: The CMS can support Max 24 drives, namely memory storage can
connect Max 24 hard disk.
2.6.2. Alarm record 【Alarm duration time】 Alarm duration time, default is 10 seconds, selecting range is
5-60 seconds 【Pre-recorded alarm Length】 Pre-recording's length on alarm, default is 5
seconds, selecting range is 1-15 seconds.
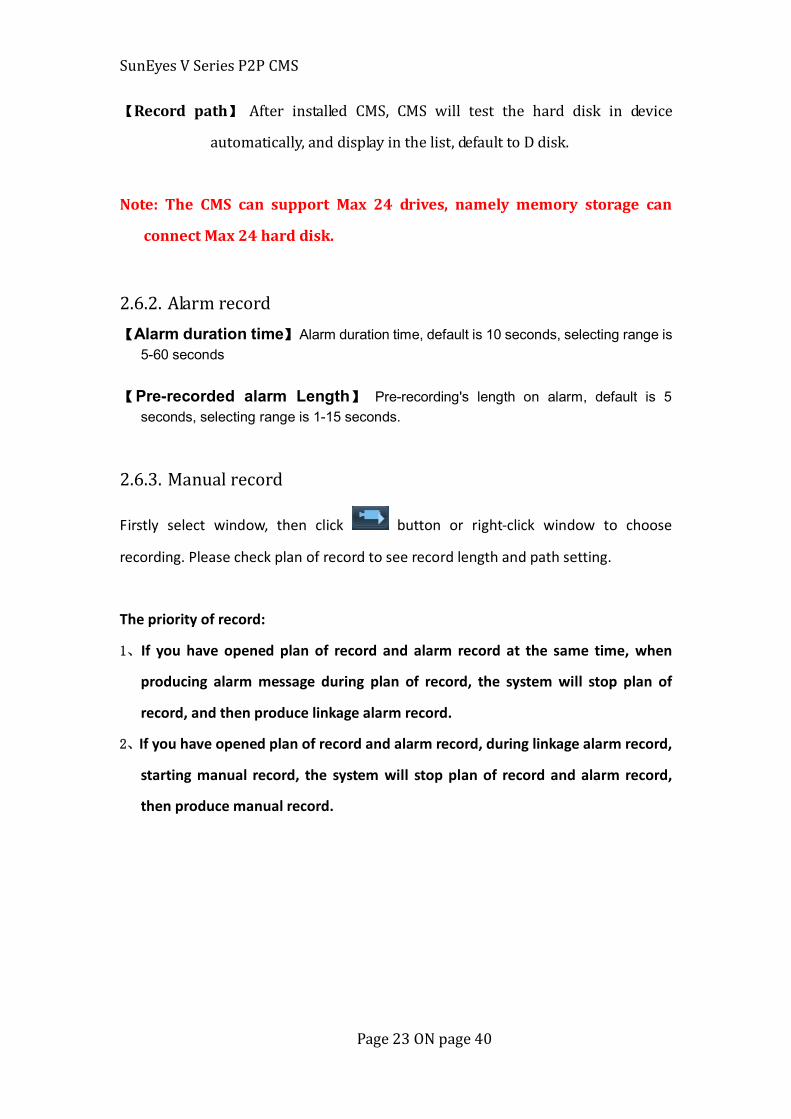
2.6.3. Manual record
Firstly select window, then click button or right-click window to choose
recording. Please check plan of record to see record length and path setting.
The priority of record:
1、If you have opened plan of record and alarm record at the same time, when
producing alarm message during plan of record, the system will stop plan of
record, and then produce linkage alarm record.
2、If you have opened plan of record and alarm record, during linkage alarm record,
starting manual record, the system will stop plan of record and alarm record,
then produce manual record.

SunEyes V Series P2P CMS
Page 24 ON page 40
2.7. Linkage alarm
2.7.1. Enable the linkage alarm
In the tab bar to choose “setting”-- “Linkage record”—“Enable the linkage alarm”, as shown in above: SUN – SAT means one week,based on the count of day ; 0 – 23 means one day,
based on the unit of half an hour.
【Enable the linkage alarm】 Choose channel, then click the left mouse to drag a
green blocks in the schedule, as shown in above; green area is
the time bucket that enabled the linkage alarm.
【Close linkage alarm】Cancel the tick in enable the linkage alarm, click save; or
cancel green block in schedule and click save. The method of
cancel green block: only need to click left mouse and drag mouse,
the green block can be canceled.
2.7.2. Alarm type
【Motion detection】 the device opening motion
detection
【 Input alarm】 Alarm produced by the device opening
Input alarm
【 Lost connect】Alarm produced by the device disconnected
【Hard disk full】 Alarm produced by hard disk full
【Hard disk error】 Alarm produced by hard disk error

SunEyes V Series P2P CMS
Page 25 ON page 40
2.7.3. Linkage Alarm
【 Pop up Video Window】 Tick means after the device producing
alarm, it will Pop up window
【Electron Map Alarm】 Tick means after the device producing
alarm, the device icon will flash on Electronic Map
【Linkage Record】Tick means after the device producing alarm,
it will record to local disk.
【Sound Alarm】Tick means after the device producing alarm, the device will send
out sound alarm.
2.8. Local playback
2.8.1. playback by time searching
Recording play button, when recording playback finished, click it continue
to play.
stop playing button, when play recording, click it to stop playing.
Frame button, when play recording, click it to single frame play, click one
time, it play one frame image.
Image capture button, choose play window, click it to capture images to
disk.
Electronic zoom in button, select the button in the process of play
recording , then draw the magnified image region in the window.
Full screen button, choose this button, the window area will display on
full screen, if need to display a single window on full screen, double click the
window
When playback record, please select play speed through drop-down
box, default is normal speed.

SunEyes V Series P2P CMS
Page 26 ON page 40
Voice button, you can choose whether open voice during playing record,
default is closed.
Jump button, after selected time point, clicking during
record playback, the image will jump to the set time directly, then start playing.
【record playback retrieval】
Step 1: choose the Record file format and search time Step 2: select the windows that need to playback, and select channel in list tree. Step 3: If there has files match the condition in
time scope, it will display on time line panel.
Step 4: double-click the device channel to playback
record.
Plan of record: Alarm record: Manual record:
Note: when the mouse moves on the time line, the time line panel will display the
current location of the time point, clicking to know the precise position of the
record; Right click the time line panel, the time line panel will display from 24
hours to 2hours, enlarging the time point effectively.

SunEyes V Series P2P CMS
Page 27 ON page 40
2.8.2. Playback by searching file Step 1: Choose the record file format and device channel Step 2: Select the search time and click “search” button, the system will display the eligible record file in the device tree. Step 3: Select playback window and double click record file to playback record.
File playback support the same record file playback in four windows at the same
time.
2.9. Remote playback
2.9.1. Remote playback plan of record
The client must support remote playback. Please refer to 2.1.4 remote playback
setting of opening remote paly back.
Remote playback can play videos from other CMS, the specific operation as below:
Click to enter remote playback interface, right-click the mouse on the left
list, it will appear management server menu, as shown in picture, then click the
management server button, enter into remote server Settings menu.
Double click any column, enter into the editing server items.

SunEyes V Series P2P CMS
Page 28 ON page 40
Input the address of the server, the user name and password.
*The setting of port, user name and
password must keep the same as the server
Settings. (the default port is 9000, user name
and password are the same as CMS account
and password)
Click OK, then back
to the left list, you can see a new server.
Right click the corresponding server,
choose “connect to the server” to log in.
After login server successfully,
it will appear device list on server, choosing
the date on server, then right click the device,
choosing “search file” to start the recording.
If appearing the above reminder, it indicates there is no relevant recordings on
server in this day. If no reminder, you can drag the device into channel to play by
time.
Playing by time
with the same way as playing by time in
above. In sequence: login server – search server
file – drag or double click the file to play.
Playing by file only can play one file, after
completion of play, it can not play the next file.

SunEyes V Series P2P CMS
Page 29 ON page 40
2.9.2. SD card record playback
It can remote playback the timing
recording or alarm recording in SD Card.
Input the address or domain of the camera, user
name and password.
* The setting of port, user name and password must
keep the same as the camera Settings. (port, user name and password are the
same as the camera)
Click OK, then back
to the left list, you can see a new server. Right
click the corresponding server, choose “connect to
the server” to log in.
After login server sucessfully,
it will appear device list on server, choosing the date on server, then right click the
device, choosing “search file” to start retrieving the recordings on server.
Playing by time with the same way as playing
by time in above.

SunEyes V Series P2P CMS
Page 30 ON page 40
2.10. Electronic Map
2.10.1. Add Map
Step 1: click "add map" in the map page or right-click mouse to choose "add a new
map"
Step 2: input name in the pop-up dialog box “map name”, and then import the
map
Step 3: click "OK", the map is added to the CMS
2.10.2. Edit Map
Step 1: click the "edit map" button on the map, or right-click to choose edit maps
Step 2: drag the device channel to the map, the device will display on the
map, double-click this icon can see device image (note: if you want to to see the
camera image on the map, the camera must be connected in the preview)
Step 3: after editing the map, click “stop editing " button
After editing the map, you need to open the “Electronic map alarm” function in
device linkage alarm, otherwise will not flash when device alarm.
2.10.3. Delete Map
Choosing the map name, then click "delete map" button to delete the map

SunEyes V Series P2P CMS
Page 31 ON page 40
2.11. Parameter settings Before modifying device parameters, please click the device that need to modify
parameter in the parameter setting page. Double click the channel in device tree,
then it can display images in right image frame.
2.11.1. Color
【Brightness】 Drag the slider can change the
brightness of the image
【Saturation】Drag the slider can change the image
of the saturation
【Contrast】Drag the slider can change the contrast
of the image
【Hue】Drag the slider can
change the hue of the image
【Default】Click the default button, color image will restore to default
【Flip】 After ticking, the image will flip(device support required)
【Mirror】 After ticking, it will have mirroring image(device support required)
【Scene】 White balance: auto, indoor and outdoor three modes, the default is
auto white balance (equipment support required)
【Infrared】 Night vision: automatic on, manual on two modes, the default is auto
on (device support required)
Note: if the device does not support these function, the corresponding function
cannot be modified

SunEyes V Series P2P CMS
Page 32 ON page 40
2.11.2. Video
【Stream type】The stream type has main
stream and sub stream
【Resolution】 Different models have different
resolution
【Frequency】 Frequency is 50 HZ and 60 HZ,
the default is 50 HZ
【Bit rate】Different models have different bit
rate
【Frame rate】For NTSC system machine or 60
HZ machine, the frame is 1 ~ 30 fps; For PAL system machine or 50 HZ machine,
the frame is 1 ~ 25 fps.
【I frame Spaced】 the image interval between two I frame
【Rate control】The Rate control has VBR and CBR.
【Rate quality】 The Rate quality has 6 grades, the smaller the grade, the better
the image quality; the bigger the grade, the worse the image quality.
2.11.3. Audio
【Stream Type】
The stream type has main stream and sub
stream
【Audio Capture】 On and off
【Audio Type】G.726 and G.711
【Input Mode】 Mike input and linear input
2.11.4. OSD

SunEyes V Series P2P CMS
Page 33 ON page 40
【Camera Name】Ticking means overlay name on screen display
【Time OSD】 Ticking means overlay time on screen display
【OSD Name】 Inputting OSD name and clicking “apply”to modify the OSD name.
OSD name can support maximum nine Chinese characters.
2.11.5. Network
Please configure network
parameters according to the actual situation. No matter the device opened set the
IP manually or obtain IP by DHCP, the CMS only shows the current IP of this
device.
2.11.6. Motion Detection
Set the motion detection:
Step 1: Ticking in front of the Area, it will display a
green box on the left image.
Step 2: drag the green box to the fitable position, and
set up the size of green box
Step 3: set the sensitivity of alarm area, the range is 0 ~ 100, default is 50. The
greater the sensitivity value, the higher the sensitivity; the smaller the sensitivity
value, the lower the sensitivity
Step 4: click "linkage alarm" and select the type of alarm
(pop up video Window, electronic alarm, linkage record and sound alarm)
Step 5: open the linkage alarm of the corresponding device, if you do not open
alarm linkage function of the device, it will not be able to generate linkage alarm

SunEyes V Series P2P CMS
Page 34 ON page 40
2.11.7. PTZ
Different PTZ with different protocol, address and baud
rate. You can control the PTZ to rotate after setting correct
protocol, address and baud rate.
2.11.8. System
After choosing time, click the "set time" button, you can
change the time
【Sync with computer time】 Ticking and clicking “set
time”,
then the time of this device will synchronization with
computer time.
【Reboot】 After clicking the reboot button, the device will
restart
【Restore】 After clicking Restore button, the device will restore to factory
setting. You need to restart configuration IP of the device to reconnection.

SunEyes V Series P2P CMS
Page 35 ON page 40
2.11.9. WIFI
the step of setting WIFI:
Step 1: Select enable WIFI, click search WIFI signal
Step 2: Double-click the SSID of WIFI using
Step 3: Input WIFI password key
Step 4: Click “setting” button, then click check WIFI, restart the device
2.12. User management The factory default administrator user of the device is admin, password
is empty. After log in by administrator, he can add user, delete user and set user
permission. User permission has three types: admin, user, guest.
Admin permission: can undertake device management, user management,
video surveillance, record playback, map Settings, log query, switch users and exit
from the client

SunEyes V Series P2P CMS
Page 36 ON page 40
User permission: can undertake video surveillance, video playback, map
Settings, log view, switch users and modify password
Guest permission: can undertake video surveillance, switch user and modify
password.
2.12.1. Add User Step 1: After log in by admin permission, select "Settings" in the TAB bar -- "user management" Step 2: Click "add" button, enter the user name, password and select user permission Step 3: Click "save" button, the user added successfully
2.12.2. Delete User
Step 1: After log in by admin permission, select "Settings" in the TAB bar -- "user
management"
Step 2: Choose to delete the user, and click “delete” button
2.12.3. Modify user permissions
Step 1: After log in by admin permission, select "Settings" in the TAB bar -- "user
management"
Step 2: Select the user and click "edit" button
Step 3: Select the user permission and click "save" button

SunEyes V Series P2P CMS
Page 37 ON page 40
2.12.4. Modify user password Step 1: In the TAB bar, select the "Settings" -- "user management" Step 2: Select the user and click "edit" button
Step 3: Enter a new password and click "save" button
2.13. Logs
Log type
【All logs】 Record all information of system
【System log】 Record the user login, exit, and user configuration, etc 【Operation log】 Record all operation information from users 【Alarm log】 Recording device alarm information
2.13.1. Log retention time
Step 1: In the tab bar, select the "Settings" -- "other Settings"
Step 2: Select time in log retention time, one month, two month,three month, six
month optional, and click “save” button
2.13.2. Log query
Step 1: Select a log type and sub log type
Step 2: Choose the device to view log, default is all devices
Choose the start time and end time of querying log and click "search" button
2.13.3. Log backup
Step1: Select a log type and sub log type Step 2: Choose the device to view log, default is all devices Step 3: Choose the start time and end time of querying log and click "search"
button

SunEyes V Series P2P CMS
Page 38 ON page 40
Step 4: Click the "export" button, and choose the path of backup
Note: 1. When backup log, you must search log firstly, then backup. 2. The export log format is Excel format. 3. Each excel table only can save 5000 pieces log, if the quantity exceed 5000,
the left log will form another excel table, and so on.
2.14. Other settings
【Check time】Ticking means the CMS check time for all connected devices on
CMS in specific time, namely device time synchronization to PC time
【Log retention time】It has a month, two months, three months, six months
four options, the CMS logs in the set period of time can not be deleted.
【Capture format】It refers to the CMS captured image format, capture format:
JPG and BMP available. You can set the format when popup image preview during
capturing.
【Image capture path】It refers to the CMS capture save path

SunEyes V Series P2P CMS
Page 39 ON page 40
【Overlay OSD】Overlay the channel name of the camera to display on the left
bottom corner
【Booting the system automatically run program】When start Windows, it
uploads monitoring software automatically. If you don’t choose, it doesn’t start.
【Single screen number】It can set maximum number of single screen: 16
pictures, 25 pictures, 36 pictures (need to restart the software to work)
【Multi-picture display second stream,the main stream zoom】You can
monitor multi-picture after selected this option. 1 and 4 image segmentation
show the main stream; When in 6 and 8 image segmentation, only the first picture
shows the main stream, other shows sub stream (the largest image segmentation
is the first picture); when double-click to magnify a picture, it shows the main
stream
【Show only the connection of each video stream】After selecting this option,
no matter how many image segmentation on CMS, all connecting main stream or
sub stream or third stream
【Save】Modify the parameters, then click “save” button, thus can take effect.
【Export parameters】 Export all set parameters from CMS (backup all
configuration parameters)
【Import parameters】import all exported setting parameters to another CMS,
restore all configuration parameters (the version of two CMS must keep the same,
otherwise it may occur exception.)
【Rebuild video index】Delete the video database index file, rebuild video database
index file
【 Cruise set】set the preset position of starting cruise
【Remote playback port】the remote playback port of the device. You need to start
the port when remote playback (the default port is 9000)

SunEyes V Series P2P CMS
Page 40 ON page 40
2.15. Split screen
The CMS support standalone PC connecting four display screen, one main
display screen and three sub display screen
The main screen display main interface of the CMS; sub screen can display
“playback”, “electronic map”, “log”; before setting the sub display screen, you
need to set the video card displaying multi-screen on PC
After setting split screen, click save, then restarting the CMS, the Settings can
take effect;