FILL THE FRIDGE < TOP SHELF < MIDDLE SHELF < BOTTOM SHELF < DRAWERS < OR STORE IN THE DOOR ?
Upload
artstor-sharedshelfCategory
view
183download
0
Shared Shelf Admin Tools:
Training

— Introduction to the Admin Tools website
— Creating new projects
— Customizing metadata schemas
— Creating cataloging screens
— Creating new users; permissions, restrictions, and user roles
— Setting up publishing targets; mapping project fields to publishing targets
Training outline:
SHARED SHELF ADMIN TOOLS

Navigate to the Admin Tools website for your Shared Shelf trial:
http://catalog.sharedshelf.demo.artstor.org/admin.html
Log in with the email and password you’ve been using for your Shared
Shelf trial.
Part one: Introduction to the Admin Tools Website
SHARED SHELF ADMIN TOOLS

Part one: Introduction to the Admin Tools Website
SHARED SHELF ADMIN TOOLS
all projects at your institution
tabs to navigate the Admin Tools
land on the Statistics tab

Part Two: Creating new projects
SHARED SHELF ADMIN TOOLS
Select “new project” or “copy project”

Part Two: Creating new projects
SHARED SHELF ADMIN TOOLS
To create a new project, select “new project”.
Give your project a name, and select your own institution from the drop-down menu.
Choose a metadata schema
template to work from,
if you would like:

Part Two: Creating new projects
SHARED SHELF ADMIN TOOLS
To copy a project, select the project you’d like to copy, then click “copy project.”
Give your new project a name:
Copying a project will copy all fields, field types, controlled lists, cataloging screens,
and publishing targets from the existing project.
It will not carry over user permissions and links to authorities (internal and external).

Part three: Customizing metadata schemas
SHARED SHELF ADMIN TOOLS
navigate to the “Fields” tab
Add new fields, or highlight a field and to edit or delete.

Add new fields:
Part three: Customizing metadata schemas
SHARED SHELF ADMIN TOOLS
Provide a field label.
Choose a field type:• Text field
• Number field
• Date field
• Text area
• Controlled List
• Boolean (checkbox)
• Linked Field
• Linked Work Field (this is for future work record development)
Description: this will appear as hover text for your field.
Position: This number will control where the field appears in your list of fields; numbers can range from 1 to 1000, and the default is 0.

Edit fields to change the field properties, to link sources, or to add controlled list
values.
Part three: Customizing metadata schemas
SHARED SHELF ADMIN TOOLS

Link sources by selecting a field that has been set with the “Linked Field” type and
then opening it to edit.
Select “edit sources” at the bottom of the pop-up box:
Part three: Customizing metadata schemas
SHARED SHELF ADMIN TOOLS
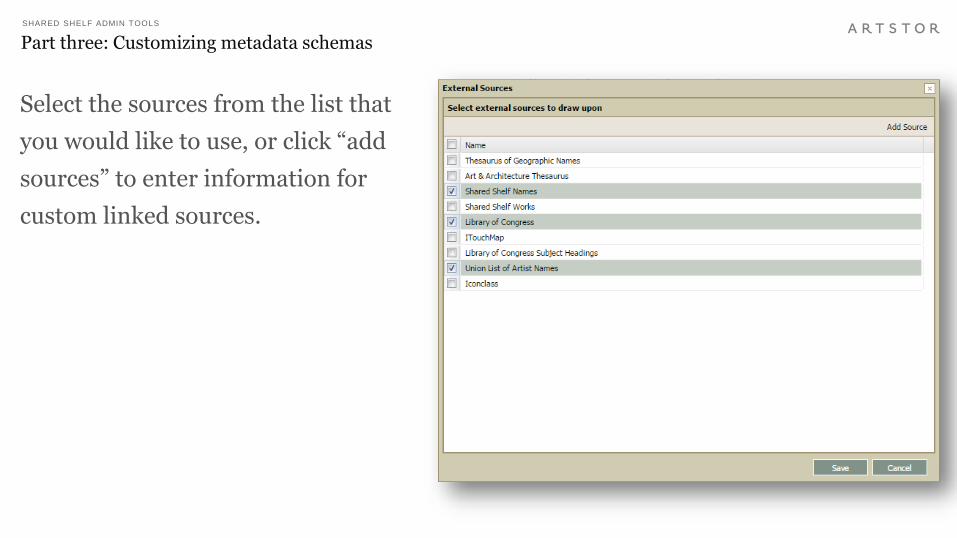
Select the sources from the list that
you would like to use, or click “add
sources” to enter information for
custom linked sources.
Part three: Customizing metadata schemas
SHARED SHELF ADMIN TOOLS

Edit controlled lists by selecting a field that has been set with the “Controlled List”
field type and then opening it to edit.
Select “edit controlled values” at the bottom of the pop-up box:
Part three: Customizing metadata schemas
SHARED SHELF ADMIN TOOLS

Add or delete values from
the list.
Part three: Customizing metadata schemas
SHARED SHELF ADMIN TOOLS

Part four: Creating cataloging screens
SHARED SHELF ADMIN TOOLS
navigate to the “Cataloging Screens” tab
Add or delete cataloging screens.

Select “Add”, and give your new cataloging screen a name:
Select a cataloging screen to edit and choose “Add fields”:
Part four: Creating cataloging screens
SHARED SHELF ADMIN TOOLS

Select the fields on your project that you would like to appear on this
cataloging screen:
Part four: Creating cataloging screens
SHARED SHELF ADMIN TOOLS

On your list of selected fields for this cataloging screen, highlight a field
and choose “Edit”:
Part four: Creating cataloging screens
SHARED SHELF ADMIN TOOLS

In the Edit window, you have the
option to change the field label and
description, to decide whether this
field is editable or not (by unchecking
“Editable” you make the field read
only), and to decide on the number of
fields per row that will display beside
each other on your cataloging screen.
Part four: Creating cataloging screens
SHARED SHELF ADMIN TOOLS
(note: if you set a field at 2 per row, ensure that two consecutive fields are 2 per row; likewise, if you choose 3 per row, three consecutive fields should be
set at 3 per row. Otherwise the display of your cataloging screen will be skewed.)

• Set up new users in Artstor
• Grant Shared Shelf access permissions to Artstor users
• Define publishing and cataloging screen permissions in the Shared
Shelf admin tools
Part five: Creating new users; permissions, restrictions, and user roles
SHARED SHELF ADMIN TOOLS

Part five: Creating new users; permissions, restrictions, and user roles
SHARED SHELF ADMIN TOOLS
Navigate to the Admin Tools website for the demo environment of the
Artstor Workspace:
http://admin.library.demo.artstor.org/satools/admin.html
Log in with the email and password you’ve been using for your Shared
Shelf trial.
Part five: Creating new users; permissions, restrictions, and user roles
SHARED SHELF ADMIN TOOLS
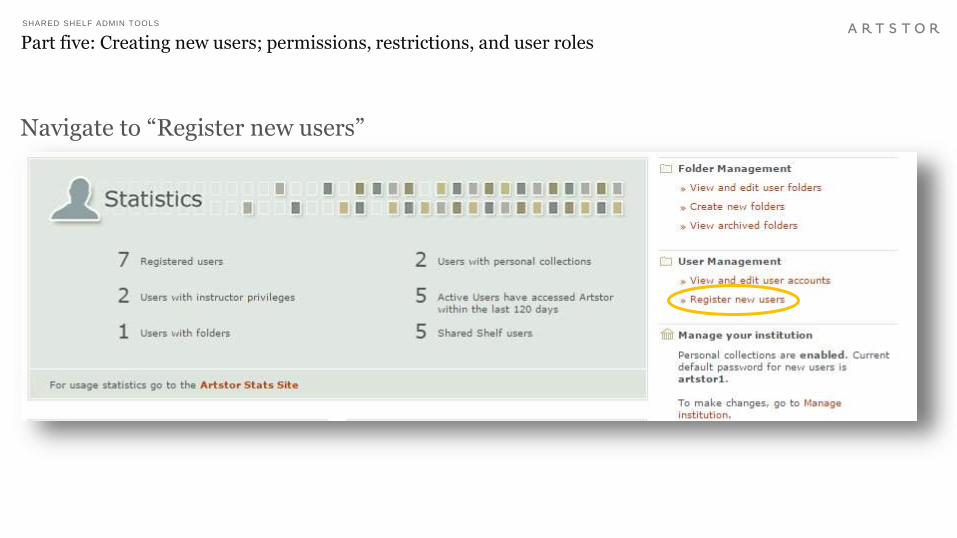
Navigate to “Register new users”

Part five: Creating new users; permissions, restrictions, and user roles
SHARED SHELF ADMIN TOOLS
Follow the wizard to
create new user accounts.
Separate multiple email
addresses with a comma.
Part five: Creating new users; permissions, restrictions, and user roles
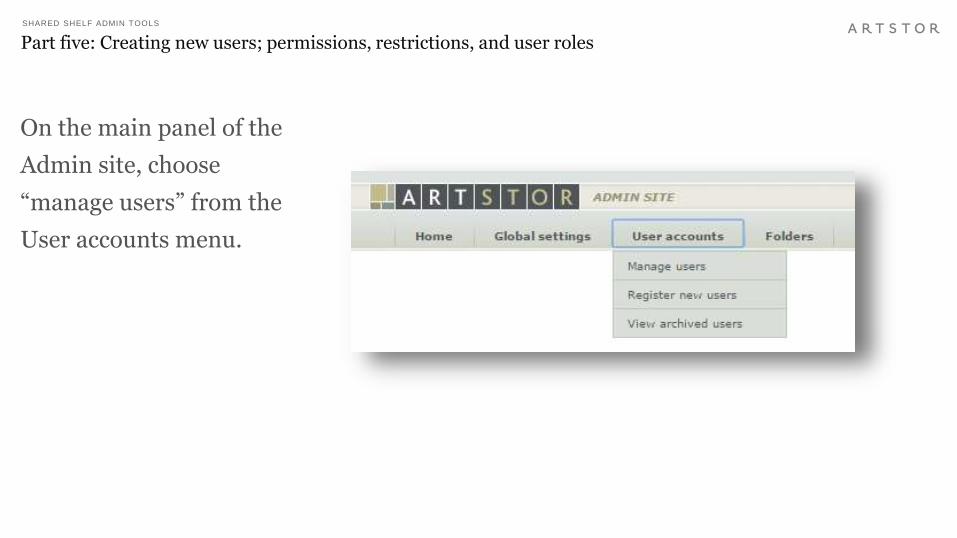
SHARED SHELF ADMIN TOOLS
On the main panel of the
Admin site, choose
“manage users” from the
User accounts menu.

Part five: Creating new users; permissions, restrictions, and user roles
SHARED SHELF ADMIN TOOLS
Select a user to
permission.
Double-click to edit.

Part five: Creating new users; permissions, restrictions, and user roles
SHARED SHELF ADMIN TOOLS
Check “Shared Shelf” to
give this user access to the
Shared Shelf cataloging
platform.
Check “Shared Shelf
Administrator” to give this
user access to the Shared
Shelf Admin Tools site.

Part five: Creating new users; permissions, restrictions, and user roles
SHARED SHELF ADMIN TOOLS
Add new users to this project, or edit existing user accounts
Return to the Shared Shelf Admin Tools website.
navigate to the “Permissions” tab

Part five: Creating new users; permissions, restrictions, and user roles
SHARED SHELF ADMIN TOOLS
Select the user to
permission from your
drop-down menu. Select
multiple users at once if
you would like to give
them the same
permissions.

Part five: Creating new users; permissions, restrictions, and user roles
SHARED SHELF ADMIN TOOLS
Assign permissions for the account:
The Administrator role allows this user to see, edit, and delete all item records in this
project, to see all cataloging screens in this project, and to publish to any of the
publishing targets.
The Cataloger role allows you to choose which cataloging screens this user sees and
which publishing targets they have access to. A Cataloger can only delete records they
have created. You may also assign a base filter to a cataloger – allowing them to only
see records they have created, or record they have created that no one else has edited

Part six: setting up publishing targets; mapping fields to publishing targets
SHARED SHELF ADMIN TOOLS
navigate to the “Targets” tab
Select “new” to create a new publishing target
Choose the type of
publishing target you
would like to create.

Part six: setting up publishing targets; mapping fields to publishing targets
SHARED SHELF ADMIN TOOLS
Choose to publish from
this project to an existing
publishing target, or set
up a new one.
For new targets, provide a
Collection Name and
Collection Description.

Part six: setting up publishing targets; mapping fields to publishing targets
SHARED SHELF ADMIN TOOLS
On the following screen,
set a Maximum Download
Size, as well as a
Collection Rights
Statement that will be
applied to all items
published to this target.
Leave “Export KVP”
checked.

Part six: setting up publishing targets; mapping fields to publishing targets
SHARED SHELF ADMIN TOOLS
Map metadata fields from your project to your publishing target, to make them
appear on the published frontend.
In the main Targets tab, highlight a project and select “Manage Mappings”.

Part six: setting up publishing targets; mapping fields to publishing targets
SHARED SHELF ADMIN TOOLS
In the “Edit Publishing Target
Field Mapping” screen that
now appears, drag green icons
for unmapped fields onto blue
icons for target fields.
It is possible to map multiple
fields to one target field.
Map custom fields to the
“KVP” target field.

Part six: setting up publishing targets; mapping fields to publishing targets
SHARED SHELF ADMIN TOOLS
Double-click a field to edit
its published mapping
configuration.
For multiple fields mapped
to one target field, you may
wish to give each field a
Prefix.
Choose whether this field is
displayable, searchable,
and/or required.

— Introduction to the Admin Tools website
— Creating new projects
— Customizing metadata schemas
— Creating cataloging screens
— Creating new users; permissions, restrictions, and user roles
— Setting up publishing targets; mapping project fields to publishing targets
A summary of what we’ve learned:
SHARED SHELF ADMIN TOOLS

Contact us with questions: [email protected] 212-500-2416
Shared Shelf help site: http://help.artstor.org/sshelp
Artstor help site: http://help.artstor.org/
Shared Shelf admin tools help site: http://help.artstor.org/ssadmin
Admin tools training videos: https://www.youtube.com/artstor (“How to Use Shared
Shelf” series)
Stay in touch
SHARED SHELF ADMIN TOOLS