
Sell-Side Platform User Guide - Ooyala Help...
30
Sell-Side Platform User Guide Version 1.89 Copyright Notice....................................................................................................... 2 Introduction.............................................................................................................. 3 Log in.................................................................................................................................3 User Interface Overview......................................................................................................3 CRM.......................................................................................................................... 5 Accounts - Publishers........................................................................................................ 5 Basic............................................................................................................................................5 Pricing.........................................................................................................................................5 Accounts - Advertisers....................................................................................................... 6 Channels and Apps.................................................................................................... 7 Basic............................................................................................................................................7 Pricing.........................................................................................................................................8 Placements.................................................................................................................................9 Ad Tags.....................................................................................................................................10 Exclusion................................................................................................................................... 11 Network Buyers....................................................................................................... 12 Creating a connection.......................................................................................................12 Basic.......................................................................................................................................... 12 Creative.....................................................................................................................................13 Goal............................................................................................................................................ 13 RTB (Real Time Bidding/Buyers).............................................................................. 17 Programmatic Buyers.......................................................................................................17 Create a Direct Deal..................................................................................................................17 Create a Marketplace Deal.......................................................................................................21 Creative Approval.............................................................................................................22 Set up Creative approval strategy...........................................................................................22 Set Creative Approval for RTB Campaigns and Creatives....................................................23 Reporting................................................................................................................ 24 Dashboards......................................................................................................................24 Creating a Dashboard..............................................................................................................24 Adding a Widget.......................................................................................................................25 Customising a Widget..............................................................................................................25 Removing a Widget..................................................................................................................26 Scheduling Reports..........................................................................................................26 Appendix................................................................................................................. 28 Macros.............................................................................................................................28 v 1.89 1
Transcript of Sell-Side Platform User Guide - Ooyala Help...

Sell-Side Platform User GuideVersion 1.89
Copyright Notice.......................................................................................................2
Introduction..............................................................................................................3Log in.................................................................................................................................3User Interface Overview......................................................................................................3
CRM..........................................................................................................................5Accounts - Publishers........................................................................................................5
Basic............................................................................................................................................5Pricing.........................................................................................................................................5
Accounts - Advertisers.......................................................................................................6
Channels and Apps....................................................................................................7Basic............................................................................................................................................7Pricing.........................................................................................................................................8Placements.................................................................................................................................9Ad Tags.....................................................................................................................................10Exclusion...................................................................................................................................11
Network Buyers.......................................................................................................12Creating a connection.......................................................................................................12
Basic..........................................................................................................................................12Creative.....................................................................................................................................13Goal............................................................................................................................................13
RTB (Real Time Bidding/Buyers)..............................................................................17Programmatic Buyers.......................................................................................................17
Create a Direct Deal..................................................................................................................17Create a Marketplace Deal.......................................................................................................21
Creative Approval.............................................................................................................22Set up Creative approval strategy...........................................................................................22Set Creative Approval for RTB Campaigns and Creatives....................................................23
Reporting................................................................................................................24Dashboards......................................................................................................................24
Creating a Dashboard..............................................................................................................24Adding a Widget.......................................................................................................................25Customising a Widget..............................................................................................................25Removing a Widget..................................................................................................................26
Scheduling Reports..........................................................................................................26
Appendix.................................................................................................................28Macros.............................................................................................................................28
v 1.89 1

Copyright NoticeCopyright Ooyala 2008-2016
Ooyala, Backlot, Ooyala Actionable Analytics, the Ooyala logo, and other Ooyala logos and product andservice names are trademarks of Ooyala, Inc. (“Ooyala Marks”). Company agrees not to remove any Ooyala Marks that are contained within and/or affxed to the Services as provided to Company. Except with respect to the foregoing, Company agrees not to display or use in any manner the Ooyala Marks without Ooyala’s prior written permission. All contents of the Ooyala website and Services are: Copyright 2008-2016. Ooyala, Inc. All rights reserved. Ooyala and Backlot are registered trademarks of Ooyala, Inc. in the United States, Japan, and European Community. All rights reserved.
For complete information on terms of service, see: http://www.ooyala.com/tos
All other trademarks are the property of their respective companies.
This content was last updated on 2016-11-02.
v 1.89 2
IntroductionOoyala Pulse SSP is Ooyala's sell-side programmatic trading platform, which allows broadcasters and premium publishers to tap into a new set of opportunities through programmatic trading. Pulse SSP provides a holistic way of incorporating this new source of revenue.
This guide is targeted at sales administrators, with a basic technical background, knowledge of how programmatic trading works, and how to optimize sales in a programmatic trading environment.
Log inTo log into Ooyala Pulse SSP, browse to pulse-ssp.ooyala.com, and fll in your login details:
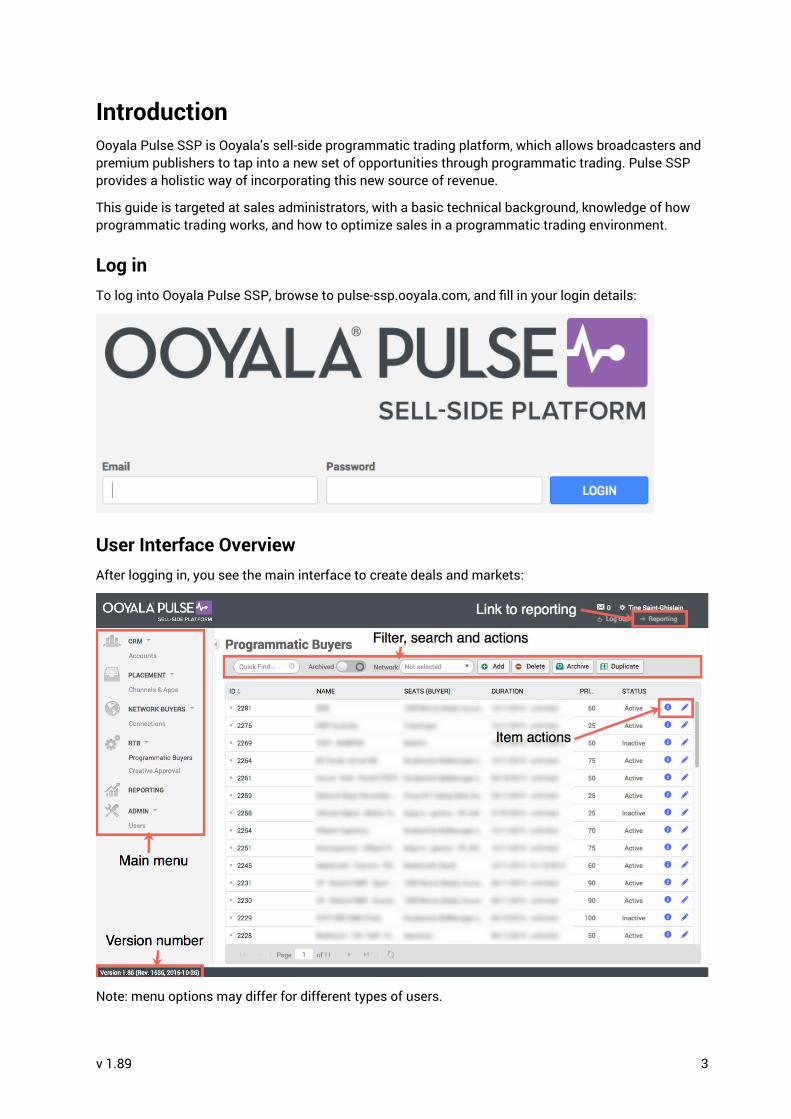
User Interface OverviewAfter logging in, you see the main interface to create deals and markets:
Note: menu options may differ for different types of users.
v 1.89 3

From the main interface, you can open the Reporting interface, either from the main menu or using the quick link in the top right corner. The reporting interface allows you to build up dashboards to graphically view aggregated data for your account, and to create reports based on the dashboards to automatically distribute the information at set intervals.
v 1.89 4

CRMThe Ooyala Pulse SSP Customer Relationship Management (CRM) tab is where you defne and manage your company and its customers.
Accounts - PublishersA Publisher is an individual or company that owns a space on which ad space is offered for sale. In thepublisher account, you defne:
• Basic information: Name, transparent or semitransparent
• Pricing: currency, VAT, Ooyala Pulse SSP platform revenue share
• Exclusion: Buyers black or whitelists
• Network
• Offces and Contacts
• Channels: Inventory packages
• Ad Tags: Generate the channel's VAST tag to Ooyala Pulse SSP, the publisher site with Ooyala Pulse SSP
• Passbacks
• Files
• History
How do you create a publisher account in Ooyala Pulse SSP?
In CRM go to Accounts tab, click on the add new account button and choose Publisher
Basic
Add the general information about the publisher and select your network in the Network tab
Pricing
Business terms
Defne your account’s general economic settings: currency and VAT
Platform revenue share
There are 3 different options that defne publisher fees for the Ooyala Pulse SSP platform. This will be set by your Account Manager upon account creation.
• Percentage: % share of total revenue.
v 1.89 5

• Fixed CPM (Network): Fixed CPM tech fee to Ooyala Pulse SSP
• Fixed CPM (Publisher): Fixed CPM paid to publisher
Accounts - AdvertisersAn Advertiser is an individual or company that markets its products or services by using an advertisingprogram.
The setup of an advertiser is similar to a publisher, but you would only need to fll in the basic information, like a name, the network and the currency.
v 1.89 6

Channels and AppsWhen you have established the components in your marketplace, you must defne how you want your inventory to appear to your buyers. In Ooyala Pulse SSP, you do this by creating channels and placements. A single channel can have multiple placements.
Channels = Inventory packages/Categories
In the channel, you defne:
• Basic information: Name, transparent or semitransparent
• Pricing: Floor CPM, currency, third party revenue shares
• Placements: Specifc placeholders within the channel
• Ad Tags: Generate the channels VAST tag to Ooyala Pulse SSP the publisher site with Ooyala Pulse SSP
• Exclusion: Buyers black or whitelists
• Real Time Reporting
How do you create a channel in Ooyala Pulse SSP?
Basic
Go to the Channel and Apps tab, click Add Channel, and select the publisher the channel corresponds to.
Add the basic information to create the channel: Name and URL
v 1.89 7

In this moment you defne if the channel is Transparent or Semitransparent:
Transparent: The buyers will see that they can buy “Your.URL"
Semi-transparent: The buyers will see this URL regardless of where the inventory comes from. When doing so you should inform the buyers of the full site list behind this fxed URL and make them aware you are running semi-transparent. If not, buyer technology may pick up a discrepancy between this URL and the real URL detected at page level and misidentify the inventory as fraudulent.
To ensure the highest Fill Rates and CPM's it is recommended to run fully transparent – buyers will pay highest CPMs only when they know what they’re buying.
Frequency Cap: Time based frequency cap for all campaigns against this channel.
Pricing
Floor Price
Here you establish the minimum CPM a buyer will need in order to buy inventory from this channel. Tick the CPM box and defne the currency you will be using.
This floor CPM can be overwritten in the different placements if necessary. For example, if you have a special deal in place with a demand source, you can set separate CPM for that deal only
3rd Party Fees
You can reflect any fees you may have in place with a third party. The revenue reports that you pull from Ooyala Pulse SSP will reflect these fees.
Fixed CPM: Set amount to be paid to the third party from revenue generated against this channel
Revenue share: Percentage of total revenue to be paid to the third party from revenue generated against this channel
v 1.89 8

Placements
A Placement is a video ad format within a Channel that defnes the ad’s specifc type and dimensions.
In the placement, you defne:
• Basic: Name, ad format specifcations, video player specifcations and frequency capping if any.
• Pricing: Possibility of overwriting the Channel Floor CPM and third party revenue shares
• Active Bookings
• Real Time Reporting
How do you create a placement in Ooyala Pulse SSP?
Basic
Go to the Placement tab and create a new channel in the add button and selecting the publisher the channel corresponds to.
Now complete the felds in the Create new Placement view.
Name: The name of this placement shown in targeting and reporting
External ID: Allows this placement to be targeted with a custom ID rather than the generated placement ID
Tag Type: Automatically set to Video
Format: Select Pre/Mid/Post Roll
Above the fold: Inform DSPs through RTB that this inventory is above the fold
Status: Active or Inactive
Aspect Ratio: Select the aspect ratio for the video player. If unknown, select 16:9
Player size: Enter dimensions of video player, this info will be sent to DSPs through RTB
Mime types: Remove any incompatible types from this list
v 1.89 9

VPAID: Unticking this option will cause RTB requests from this placement to flag to the DSPs that VPAID is not supported
Frequency Cap: Time based frequency cap for all campaigns against this placement.
Pricing
By default, a placement will maintain the same Floor Price and 3rd party fees that are in the channel settings.
You can overwrite these settings by un-ticking the use channel settings box:
Active Bookings
The bookings tab allows you to quickly see which demand connections are currently active and targeted to this placement.
Ad Tags
When you have created the channels and their placements, go to the Ad Tags tab and click on ‘Generate Tags for defned Placements’ to generate the tags that should be implemented in your ad server.
v 1.89 10
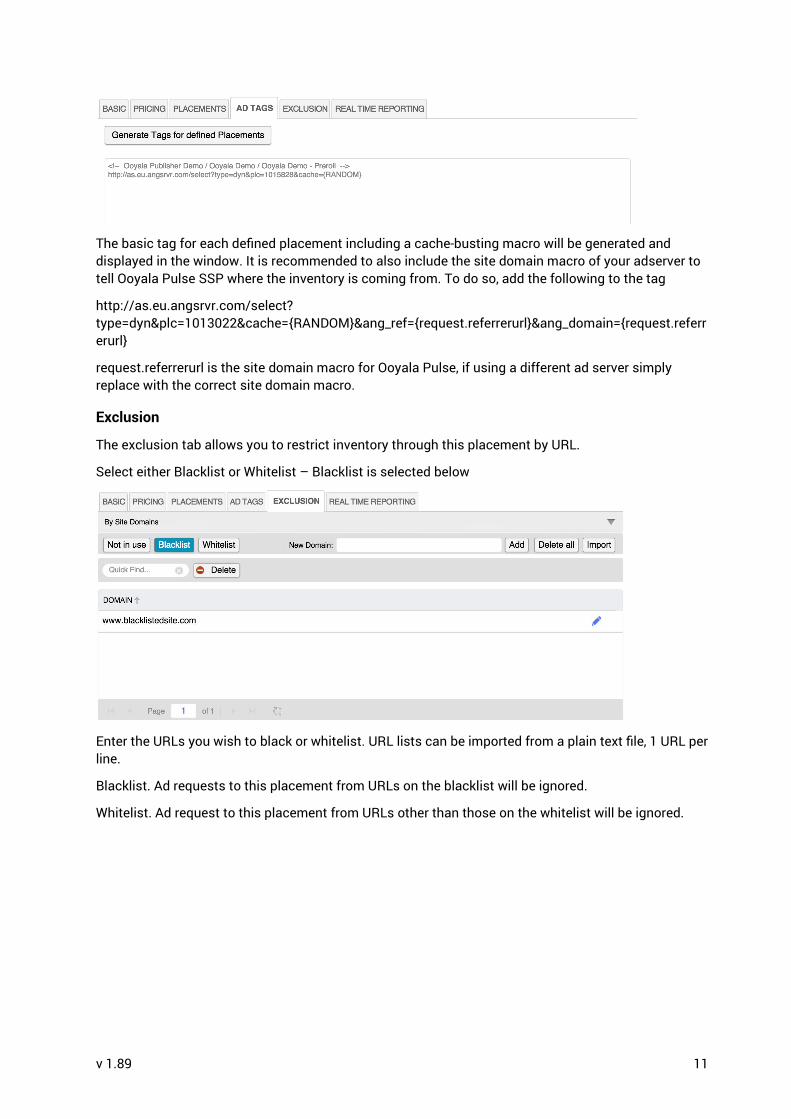
The basic tag for each defned placement including a cache-busting macro will be generated and displayed in the window. It is recommended to also include the site domain macro of your adserver to tell Ooyala Pulse SSP where the inventory is coming from. To do so, add the following to the tag
http://as.eu.angsrvr.com/select?type=dyn&plc=1013022&cache={RANDOM}&ang_ref={request.referrerurl}&ang_domain={request.referrerurl}
request.referrerurl is the site domain macro for Ooyala Pulse, if using a different ad server simply replace with the correct site domain macro.
Exclusion
The exclusion tab allows you to restrict inventory through this placement by URL.
Select either Blacklist or Whitelist – Blacklist is selected below
Enter the URLs you wish to black or whitelist. URL lists can be imported from a plain text fle, 1 URL perline.
Blacklist. Ad requests to this placement from URLs on the blacklist will be ignored.
Whitelist. Ad request to this placement from URLs other than those on the whitelist will be ignored.
v 1.89 11

Network BuyersHere you create connections to buyers through VAST/VPAID tags. Before creating a connection you need to make sure that you have your advertiser and publisher created under Accounts, but also have your placements setup, under Channels & Apps in order to link it with the connection.
Creating a connectionTo create a connection:
1. Click the Add button.
2. Select the Advertiser for whom these campaigns will run
3. Optionally select the Agency also associated with the campaign.
Basic
By default the Basic tab is displayed
Name: The connection name used for targeting and reporting.
Start date: Connection start date
End date: Connection end date. It is also possible to choose to have no end date. Currency: Select currency to be used for this connection.
Status: By default the Status is set to Inactive. When you are ready to run the connection you must setthis to Active.
Priority: Select from 5 (low) to 100 (high). Network Buyers and Programmatic Buyers both compete based on this priority level.
v 1.89 12

Click Save to save your connection and return to the main list of Connections, or click Apply to save your work and continue editing.
Creative
Click the Creative tab and click on Add
When you are in Create new Creative make sure to fll:
Name: The name you want to give to the creative in Name,
Aspect Ratio: The size of the player in Aspect Ratio,
VAST URI: The tag from the demand in VAST URI
Size: Select from Pre/Mid or Post Roll
Status: By default the Status is set to Inactive. To add this creative to a connection the status must beactive.
After completion, click Apply then Save and Close.
Goal
When the creative is created, you are ready to create a goal. Go to the Goal tab and click on Add.
Goal – Basic
v 1.89 13

Name: The goal name used for targeting and reporting.
Start date: goal start date
End date: goal end date. It is also possible to choose to have no end date.
Status: Must be set to active in order to deliver impressions.
Type: Select from Pre/Mid or Post Roll
Click Apply to save your work.
Pricing
Budget: Limit delivery to a total budget (Based on CPM defned below)
Volume: Limit delivery to number of impressions
Currency: Select the currency for the CPM
Cost: Enter the CPM being paid by this network buyer for this goal.
Click Apply to save your work and continue editing.
Creative
v 1.89 14

Creatives available for this goal appear on the left. Simply move creative from left to right in order to select for this goal.
Click Apply to save changes and continue editing.
Delivery
You have here three sub-tab options.
Delivery option:
Pacing: For impression based goals only. Choose evenly across goal lifetime or ASAP.
Daily Cap – Budget: Limit delivery to daily budget, calculated by goal CPM
Daily Cap – Volume: Limit delivery by impressions.
Frequency Cap: Choose x times in x time period. For example limit delivery of this goal to 3 times in 1 day per user.
Day of Week: Restrict delivery to certain days by moving the day left to right
Hour of Day: Restrict delivery to certain hours by moving the hour left to right
Click Apply to save your work.
Targeting
Country: Select either Blacklist or Whitelist move countries from left to right to select them.
Use the same process to Blacklist or Whitelist Regions, Cities, Operating Systems and Devices.
Click Apply to save your work.
Placement
v 1.89 15

Deliver to: Choose to deliver this goal to All Placements, All Active Placements or Specifc placements.
Specifc Placements:
Quick Search: Search amongst the publisher, channel and placement names for the matching search term.
Select placements individually by moving from left to right using the single arrows. Moving a publisherwill move all sub Channels and Placements too.
Use the double arrows to move all Publishers, Channels and Placements
v 1.89 16

RTB (Real Time Bidding/Buyers)
Programmatic BuyersProgrammatic Buyers can be split into 2 types of Deals:
• Direct Deals – a direct deal between a publisher and one buyer (Seat) through one DSP for a certain amount of inventory with agreed CPM, dates, certain amount of impressions and a DealID code.
• Marketplace Deals – a RTB marketplace with several buyers (Seats) through several (or only one) DSPs with a floor price for the inventory – this is a second price auction (highest bidder wins and pays the second highest CPM price).
Create a Direct Deal
1. Expand RTB, select Programmatic Buyer and click Add.
2. In the Create new Programmatic Buyer window, select Deal and click Save.
3. In the next Create new Programmatic Buyer window, fll in:
a) Name: Campaign’s name with the name of the buyer and – Deal ID.
b) Network: Select your own network
v 1.89 17

c) Seat (buyer): for a Direct Deal, only select 1 seat (buyer).This feld provides a drop-down with all the buyers you are connected to. If the certain buyer seat is not shown, simply contact your account manager to request and provide the following:
▪ Buyer name.
▪ DSP the buyer uses.
▪ Buyers Seat ID within the DSP.
Important. In some cases your Account Manager will inform you that the connection from Ooyala Pulse SSP to your buyer’s DSP will be done through BidSwitch. In this case your buyer will need to ensure they are targeting the ‘Falk Technology’ seat within BidSwitch and use of a Deal ID is mandatory.
d) DSP: the DSP that the buyer has a seat in.* All the DSPs that Pulse SSP has integrated with, are already set in the platform – the Pulse SSP team will update publishers when a new DSP is added.
e) Start date, End date and Priority.
f) Deal ID: create the Deal ID for this connection.* This Deal ID needs to be sent to the Buyer, because this is their "Password" for them to see and get your inventory.
4. Click Apply, which also enables the other tabs in the window.
5. Target at least one placement in the Placement tab: all available placements are shown, move them from Available to Selected or the other way around with the arrows. Click Apply when
v 1.89 18

you are done.
6. Set a fxed price for the Direct Deal in the Pricing tab. You can choose between different types of pricing models and currencies. If your required currency is not available, contact your account manager to have them add it.Note: although the interface reads Floor Price Settings, the entered price is interpreted as a fxed price for Direct Deals.
7. Optionally, set up targeting rules in the Targeting tab. You have several categories for which you can defne blacklists (exclude target) and whitelists (include target). For example:
v 1.89 19

Note: all times are set for the CET timezone.
8. Optionally, set up creative restrictions in the Creative Restrictions tab: several categories exist to defne restrictions on:
a) Frequency capping.
b) Video spot length: restricting ads to min/max seconds.
c) Advertising domains: blocking certain domains of advertisers – usually being used in openmarket place situations.
d) IAB categories: white/blacklisting certain categories from the IAB list.For example:
9. Set your domain transparency in the Transparency tab: this setting dictates how a DSP will see your domain. The possible values are, from most recommended to least recommended:
◦ Fully transparent: your domain appears in the DSP bidding process as it is.
v 1.89 20

◦ Semi transparent: your domains appear as you set them in the Channel under Semi-transparent or as indicated in this tab (select Overwrite Site in this case).
◦ Blind: DSPs are not able to see your domain, which is not recommended.For example: we set the domain to be semi-transparent, and then specify which domain should be shown in the DSP:
Create a Marketplace Deal
The process of creating a new marketplace deal is very similar to that of a direct deal. The difference isthat now multiple buyers are selected, a floor price is chosen and the buyers compete against each other to win the auction.
To create a marketplace you create a new Programmatic Buyer campaign in the same way as for creating a direct deal (Create a Direct Deal) with the following differences:
1. Select Open Market or Private Marktet:
Open Markets are available to all buyers connected to your network. Any new DSPs or buyers added to your network will also automatically have access to all your existing open markets.
2. In case of a Private Market, select multiple buyers.
3. In case of a Private Market, you may select one or more DSPs.
For example:
v 1.89 21
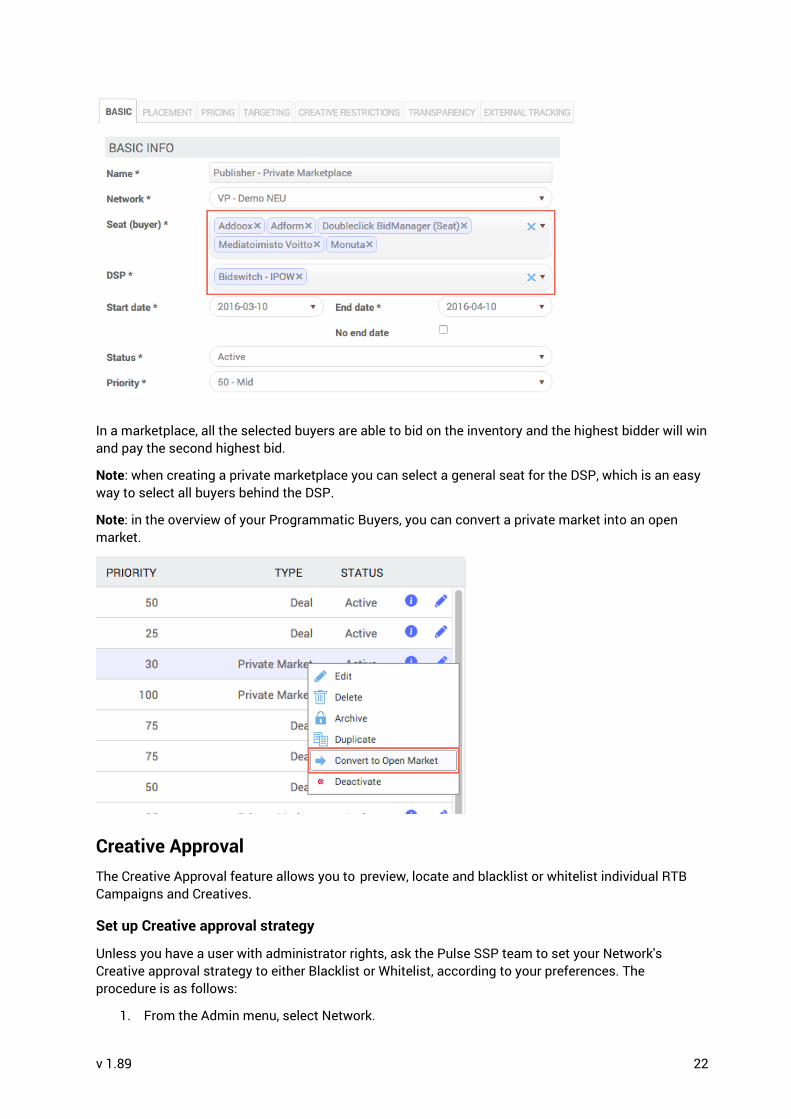
In a marketplace, all the selected buyers are able to bid on the inventory and the highest bidder will winand pay the second highest bid.
Note: when creating a private marketplace you can select a general seat for the DSP, which is an easy way to select all buyers behind the DSP.
Note: in the overview of your Programmatic Buyers, you can convert a private market into an open market.
Creative ApprovalThe Creative Approval feature allows you to preview, locate and blacklist or whitelist individual RTB Campaigns and Creatives.
Set up Creative approval strategy
Unless you have a user with administrator rights, ask the Pulse SSP team to set your Network's Creative approval strategy to either Blacklist or Whitelist, according to your preferences. The procedure is as follows:
1. From the Admin menu, select Network.
v 1.89 22
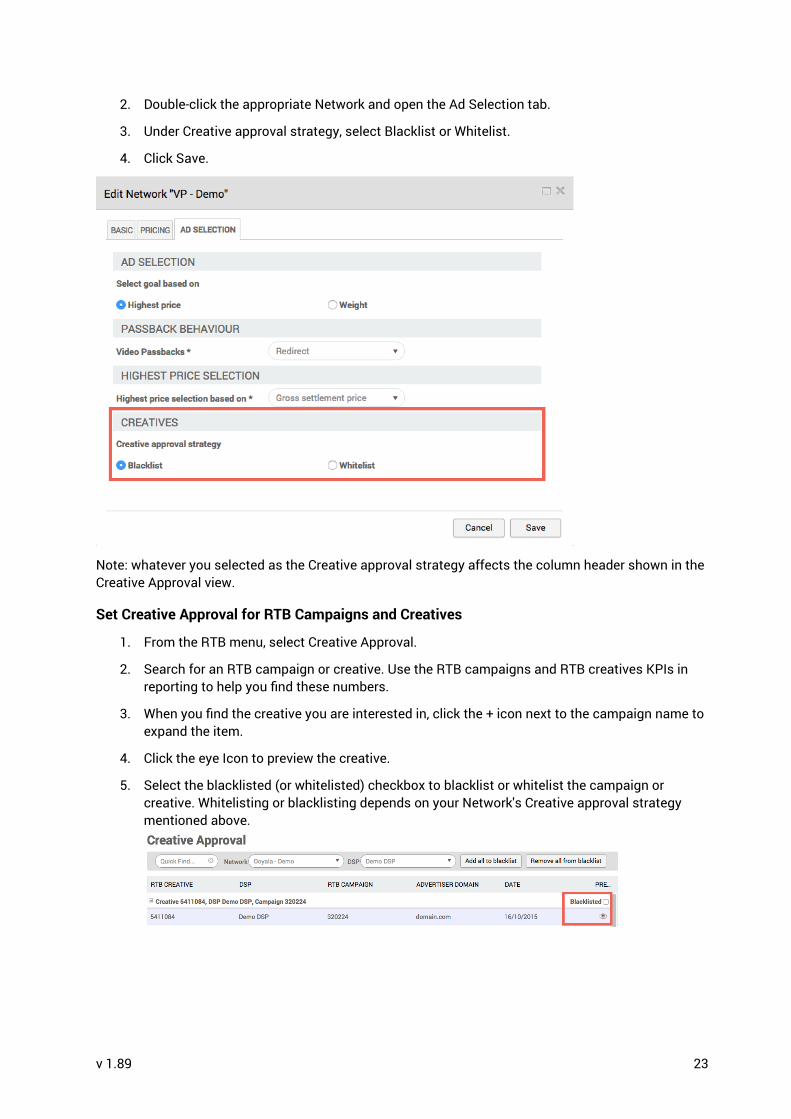
2. Double-click the appropriate Network and open the Ad Selection tab.
3. Under Creative approval strategy, select Blacklist or Whitelist.
4. Click Save.
Note: whatever you selected as the Creative approval strategy affects the column header shown in the Creative Approval view.
Set Creative Approval for RTB Campaigns and Creatives
1. From the RTB menu, select Creative Approval.
2. Search for an RTB campaign or creative. Use the RTB campaigns and RTB creatives KPIs in reporting to help you fnd these numbers.
3. When you fnd the creative you are interested in, click the + icon next to the campaign name to expand the item.
4. Click the eye Icon to preview the creative.
5. Select the blacklisted (or whitelisted) checkbox to blacklist or whitelist the campaign or creative. Whitelisting or blacklisting depends on your Network's Creative approval strategy mentioned above.
v 1.89 23

Reporting
DashboardsAll reports in the Ooyala Pulse SSP platform are based on Dashboards. There are several default dashboards created to match standard reports, plus new dashboards can be created, customised and scheduled to deliver through email.
Creating a Dashboard
Select ‘New General Dashboard' from the New Dashboard menu.
A new general dashboard will be created consisting of several Widgets and a Filter. Widgets are used to display the data in different ways. Each widget can be customised or removed from the dashboard. Filters are applied to all widgets within a dashboard.
Filters
Timespan: Select from the dropdown menu for standard time flters or use the date picker to select a custom date range.
Select time: Tick this box to add an hourly flter to the dashboard.
Filter: Click the cogwheel to select dimensions on which to flter.
Currency: Select the currency for all revenue metrics in the dashboard
v 1.89 24

Adding a Widget
Customising a Widget
Each widget contains Dimensions and Metrics. To customise these click on the cogwheel in the top right corner of the widget.
Dimensions can be customised using the dropdown menu on the left. Up to 3 different dimensions canbe selected for each Widget.
Metrics can be customised using the multi selection menu on the right hand side. There is no limit to the number of metrics per dashboard, however it is recommended to keep to 10 or less if viewing within the UI for visibility.
v 1.89 25

Downloading a Widget
Data can be downloaded to an excel fle using the option in the top right of the Widget
Removing a Widget
A Widget can be removed from the dashboard with the option in the far top right
Scheduling ReportsTo schedule dashboards to be delivered through email, select ‘Reports’ from the top menu
v 1.89 26
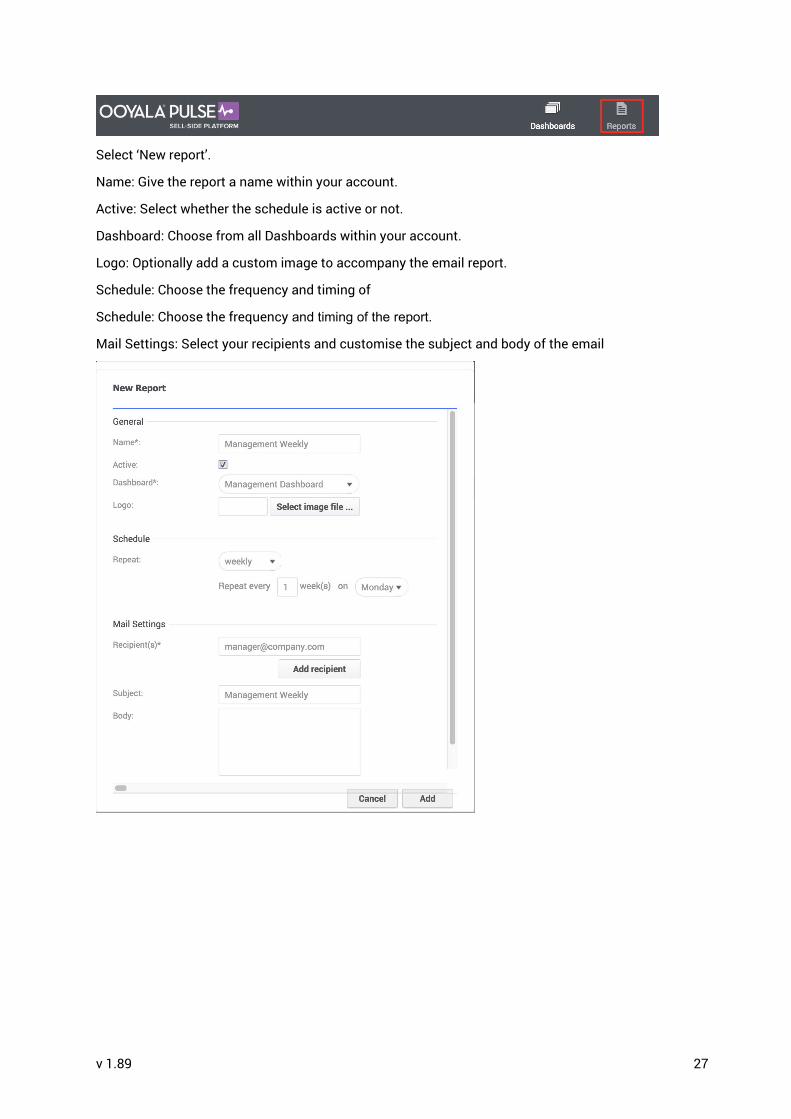
Select ‘New report’.
Name: Give the report a name within your account.
Active: Select whether the schedule is active or not.
Dashboard: Choose from all Dashboards within your account.
Logo: Optionally add a custom image to accompany the email report.
Schedule: Choose the frequency and timing of
Schedule: Choose the frequency and timing of the report.
Mail Settings: Select your recipients and customise the subject and body of the email
v 1.89 27

Appendix
MacrosMacros are placeholders within the HTML response of an ad request. Typically, a Macro is usually used within a URL to pass information to a 3rd part such as another ad server.
A typical example for a Macro is CLICK_URL within a third party tag. In this case the Macro is replaced by a URL, which has been entered in the Ooyala Pulse SSP platform which contains a URL to a fnal adserver as parameter.
Macros in Ooyala Pulse SSP must have the [ ] symbols replaced by { }. For example {RANDOM} works, but [RANDOM] does not.
For each macro, we have provided suggestions on how you might use it. However, how you use macros is up to you.
Find below a list of all possible macros:
MACRO DESCRIPTION
{IMAGE_URL}the plain image url as defned in the creative variables, expanding included macros
{IMAGE_URL_ENC}the url encoded image url as defned in the creative variables, expanding included macros
{CLICK_URL}the plain click-through url as defned in the creative variables, expanding included macros
{CLICK_URL_ENC}the url encoded click-through url as defned in the creative variables, expanding included macros
{IMPRESSION_COUNT} yields an impression counting url, redirecting to a 1x1 pixel
{IMPRESSION_COUNT_ENC}yields a url encoded impression counting url, redirecting to a 1x1 pixel
{CLICK_COUNT}yields a click counting url, redirecting to the creatives click-through url
{CLICK_COUNT_ENC}yields a url encoded click counting url, redirecting to the creatives click-through url
{ACTION_COUNT} yields an action counting url, redirecting to a 1x1 pixel
{PIXEL_URL} an Alias for {IMPRESSION_COUNT}
{TIMESTAMP}the current server time as unix epoch (seconds since 1970-01-01),meaning yields what time(NULL) returns
v 1.89 28

MACRO DESCRIPTION
{EPOCH}the current requests unique epoch, meaning yields the posix timestamp of when the request started (also used when the "ep" query variable is set)
{RANDOM}a random number between 0 and a confgurable upper bound (defaults to 10000000)
{PLACEMENT_ID} the current placement id
{PLACEMENT_EXTERNAL_ID}the external ID of the current placement - also called placement alias
{SITE_ID} the current site id
{SECTION_ID} the current section id
{SECTION_NAME} the current section name
{PUBLISHER_ID} the current publisher id
{CREATIVE_ID} the current creative id
{LINEITEM_ID} the current line item id
{SMARACD_LINEITEM_ID}the current line item id with removed DIR_ prefx; example: internalID DIR_123 becomes Smaracd ID 123
{CAMPAIGN_ID} the current campaign id
{ADVERTISER_ID} the current advertiser id
{REFERRER}the plain referrer as provided in the http headers or through query parameter ang_ref
{REFERRER_ENC}the plain referrer as provided in the http headers or through query parameter ang_ref - in an encoded representation for use in query parameters for instance
{WIDTH} the current creative's width in pixels
{HEIGHT} the current creative's height in pixels
{PLACEMENT_WIDTH} the current placement's width in pixels
{PLACEMENT_HEIGHT} the current placement's height in pixels
{UUID} the requesting users unique user id
{IID} a unique id for the current request
v 1.89 29

MACRO DESCRIPTION
{URL_ARGS}yields a list of query arguments (name=value&...) that are relevantfor impression/click/... counting
{IMAGE_SRV_URL}a confgurable image server base url (for example, http://my.favorite.cdn/customer1/)
{CLICK_SRV_URL}a confgurable counting server base url, must include a trailing "?" (for example, http://my.adserver.com/count?)
{TARGET} yields the creatives target attribute as used in <a> tags
{VAR:[name]}the creative variable with the given name, for example, {VAR:FOO} yields the value of creative variable "FOO" (case sensitive!)
{FWD:[name]}
the forward variable with the given name, see above. Forward variables must be prefxed with "fwd_", for example, a variable
"fwd_bar=something" in the ad-request URL will yield "something" for {FWD:bar}
{TRACKING_EVENT:[type]}
add a event tracking pixel, usually related but not limited to VAST creatives. Each pixel if requested yields the counting of a specifc event which is connected to the current impression. Supported event types are: acceptInvitation close collapse complete creativeView expand frstQuartile fullscreen midpoint mute pause replay resume rewind start stop thirdQuartile
{WIN_NOTICE}implements a 1x1 pixel, that forwards vital information to our ownbidders
{HTTP_PROTOCOL} yields "http" or "https" depending on the calling ad-tag
{EXT_CHECKSUM}creates a md5 hash consisting of LineItemId + PublisherId + CreativeId + PlacementId + a (mandatory) secret token (confgured as ANG.AdSelect.SecretToken)
{PB_ITE} Network_Passbacks: already tried LineitemIDs
{PB_IID} Network_Passbacks: Impression ID to be invalidated
{PB_EPOCH} Network_Passbacks: epoch belonging to PB_IID
v 1.89 30