SECC User Guide · Web viewWhile the collection is open you may add, change and remove records.12...
109
2017-2018 User Guide & Technical Information Data Manager & Consolidated Applications Special Education Data Collections OREGON DEPARTMENT OF EDUCATION Office of Student Services 255 Capitol Street NE Salem, Oregon 97310-0203 It is a policy of the State Board of Education and a priority of the Oregon Department of Education that there will be no discrimination or harassment on the grounds of race, color, sex, marital status, religion, national origin, age or disability in any educational programs, activities or employment. Persons having questions about equal opportunity and nondiscrimination should contact the State
Transcript of SECC User Guide · Web viewWhile the collection is open you may add, change and remove records.12...

2017-2018 User Guide& Technical Information
Data Manager & Consolidated Applications
Special Education Data Collections
OREGON DEPARTMENT OF EDUCATIONOffice of Student Services
255 Capitol Street NESalem, Oregon 97310-0203
It is a policy of the State Board of Education and a priority of the Oregon Department of Education that there will be no discrimination or harassment on the grounds of race, color, sex, marital status, religion, national origin, age or disability in any educational programs, activities or employment. Persons having questions about equal opportunity and nondiscrimination should contact the State Superintendent of Public Instruction at the address above; phone 503-947-5740; fax 503-378-4772; or TDD 503-378-2892.
Table of Contents
CONTACT INFORMATION.................................................................................................................
Data Unit:...........................................................................................................................................Child Find (Indicator 11):..................................................................................................................System Performance Review & Improvement (SPR&I):..................................................................ODE Website:....................................................................................................................................Special Education Data Collection Webpages..................................................................................
Special Education Child Count (SECC).......................................................................................Special Education Child Find:......................................................................................................
ODE District Website:.......................................................................................................................2017-2018 DATA CALENDAR............................................................................................................
Data Manager......................................................................................................................................
Introduction........................................................................................................................................Acronyms.........................................................................................................................................
Important Notes for the Data Manager Application...........................................................................
Installing the Application................................................................................................................Import (Only) Once.........................................................................................................................Auto Save.........................................................................................................................................Validation: SECC Record Type Determination..............................................................................Auto Update of Application.............................................................................................................Don’t Delete the Data Folder...........................................................................................................Navigation........................................................................................................................................
Main Menu.................................................................................................................................SECC Navigation Window.........................................................................................................Child Find Navigation Window...................................................................................................SECC and Child Find Navigation Windows:..............................................................................To Change View........................................................................................................................To Close Student Grid...............................................................................................................Change Column View................................................................................................................
Importing............................................................................................................................................
Import an Initial Data File...............................................................................................................Appending Additional Data Files....................................................................................................Overwriting vs. Deleting with Backup............................................................................................Import a Backup File.......................................................................................................................Import a Tab Delimited File............................................................................................................Import a Comma Delimited File......................................................................................................

Table of Contents
Editing Records.................................................................................................................................
Sorting Records...............................................................................................................................Filter/Finding Records................................................................................................................Search Records.........................................................................................................................Find Duplicates..........................................................................................................................
Validating for December SECC......................................................................................................Validating for June Exit Collection.................................................................................................Validating for Child Find Collection...............................................................................................Validating a Single Record..............................................................................................................Editing: Single Record View...........................................................................................................Editing: Grid View..........................................................................................................................Deleting Records.............................................................................................................................
Deleting Single Records............................................................................................................Deleting Multiple Records..........................................................................................................
Adding a New Record.....................................................................................................................Auto Saving.....................................................................................................................................
Utilities...............................................................................................................................................
Selecting a SECC Utility Function..................................................................................................SECC: Remove Exited Records......................................................................................................SECC: Auto-Advance Grade...........................................................................................................SECC: Auto-Populate LEP..............................................................................................................
Exporting Files...................................................................................................................................
Creating Submission, Backup, or Export Files................................................................................Create ODE Submission File for December Child Count (SECC).................................................Create ODE Submission File for June Exit Collection...................................................................Create ODE Submission File for Child Find Collection.................................................................Create Backup File..........................................................................................................................Create a Tab Delimited File.............................................................................................................Create a Comma Delimited File......................................................................................................
ODE District Website...........................................................................................................................
Submitting Data to ODE....................................................................................................................Submitting a Submission File......................................................................................................Error Management.......................................................................................................................
Verification Reports...........................................................................................................................

Table of Contents
Printing Data Reports........................................................................................................................ECR Review Audits...........................................................................................................................
While the collection is open you may add, change and remove records...................................Verification reports..........................................................................................................................
SECC Regional Reports....................................................................................................................SECC Oregon School for the Deaf Reports......................................................................................
Consolidated Collections Reports.....................................................................................................
Production Download of Your Records..........................................................................................Data Manager Reports......................................................................................................................
Selecting a Report............................................................................................................................Create Custom Reports....................................................................................................................The Report Wizard:.........................................................................................................................Standard Report...............................................................................................................................Label Reports...................................................................................................................................Editing Custom Reports...................................................................................................................Adding a Page Break.......................................................................................................................


CONTACT INFORMATION
Data Unit:Jackie McKim Research Analyst (503) 947-5629 [email protected] Bevers Research Analyst (503) 947-5817 [email protected] Foutch Research Analyst (503) 947-5776 [email protected] Manning Office Specialist (503) 947-5696 [email protected]
Child Find (Indicator 11):Linda Brown Education Specialist (503) 947-5825 [email protected]
System Performance Review & Improvement (SPR&I):Nicole Garcia Education Specialist (503) 947-5936 [email protected]
Here are some helpful links:
ODE Website
Special Education Data Collection Webpages
Special Education Child Count (SECC) SECC Instruction Manuals Training Resources SECC Forms Technical Information
Special Education Child Find
ODE District Website
Welcome and call us anytime you need to, that’s what we are here for!

2017-2018 DATA CALENDAR
Note: Shaded rows are the responsibility of the DistrictDate Activities
July 3, 2017 June Special Education Exit collection closes Child Find (Indicator 11) collection closes Discipline Incidents collection closes
July 10, 2017 Last day for EI/ECSE programs to submit June Special Education Exit and Child Find data
Aug. 24, 2017 Coordinated Early Intervening Services (CEIS) collection opens
Aug. 24, 2017 June Special Education Exit ECR 16-17 collection opens Child Find ECR 16-17 collection opens Discipline Incidents 16-17 collection opens
August 2017 First allocation of the 2017-2018 IDEA Part B grant award distributed to LEAs
September 2017 SECC information, documentation, reference links, and ODE Video Training Calendar available to districts/agencies at this page.
Sept. 28, 2017 Parentally Placed Private School collection opens and data forms distributed to school districts via Listserv
Sept. 17, 2017 Electronic corrections for June Exit collection due Electronic corrections for Child Find collection due Electronic corrections for Discipline Incidents collection due
Sept. 28, 2017 Post School Outcomes: Exit Interviews 16-17 closesOct. 2, 2017 Coordinated Early Intervening Services (CEIS) form due
Oct. 4-6, 2017 Special Education Conference for Administrators – 2017 Fall Conference
October 2017 Systems Performance Review & Improvement (SPR&I) Trainings SECC Fall Regional Training 2017 Sessions
October 2017
Regional Programs and EI/ECSE agencies send districts a list of students they serve
OSD send districts a list of students they serve It is critical that communication between districts, regional programs and
OSD takes place in order to accurately report students
October 2017 Second allocation of the 2017-2018 IDEA Part B grant award distributed to LEAs
October 2017 SECC Video Training (webinar) 2017-2018 Video Training ScheduleOct. 30, 2017 Parentally Placed Private School Data Form due
Nov. 3, 2017 Federal Reports due based on 2016-17 Exiting, Discipline, Personnel Data and Dispute Resolution
Nov. 16, 2017 Special Education Child Count Collection 16-17 opensDec. 1, 2017 Official date for December Special Education Child Count (SECC)
Dec. 16, 2017 Federal Reports due based on 2016-17 assessment dataDec. 14, 2017 Staff Position collection 16-17 opensDec. 18, 2017 December Special Education Child Count 16-17 closes
Dec. 19, 2017 Online reports of regional students available to all Regional Programs Online report of OSD students available to OSD
Jan. 4, 2018 Post School Outcomes: Exit Interviews 16-17 (Optional) opens. Closes

Date Activities9/30/2017
Jan. 18, 2018 December SECC Electronic Correction period 16-17 opensJan. 29, 2018 Staff Position Collection 16-17 closesFeb. 1, 2018 State Performance Plan (SPP)/Annual Performance Report (APR) due
Feb. 12, 2017 December SECC Electronic Correction period 16-17 closes
April 2018 Final allocation of the 2017-2018 IDEA Part B grant award distributed to LEAs
March 10 - 17, 2018 District & EI/ECSE Special Education Report Card validation period
March 29, 2018 Special Education Report Card – final English & Spanish PDFs available to districts
April 1, 2018 Coordinated Early Intervening Services (CEIS) corrections due
April 7, 2018 Public Release of Special Education Report Cards Federal Reports due based on 2017-18 Special Education Child Count data
April 21, 2018 IDEA Annual Application for federal funds available to districts on the web
May 10, 2018 June Exit, Child Find and Post School Outcomes (webinar). 2017-2018 Video Training Schedule
May 24, 2018 Discipline Incidents 17-18 collection opens
May 24, 2018 June Special Education Exit 17-18 collection opens Child Find 17-18 collection (Indicator 11) opens
May 31, 2018 2016-17 Special Education Post School Outcomes (Indicator 14) Follow-up opens (closes Sept. 30, 2018)
June 4, 2018 IDEA Annual Application for federal funds due to ODE

Data Manager
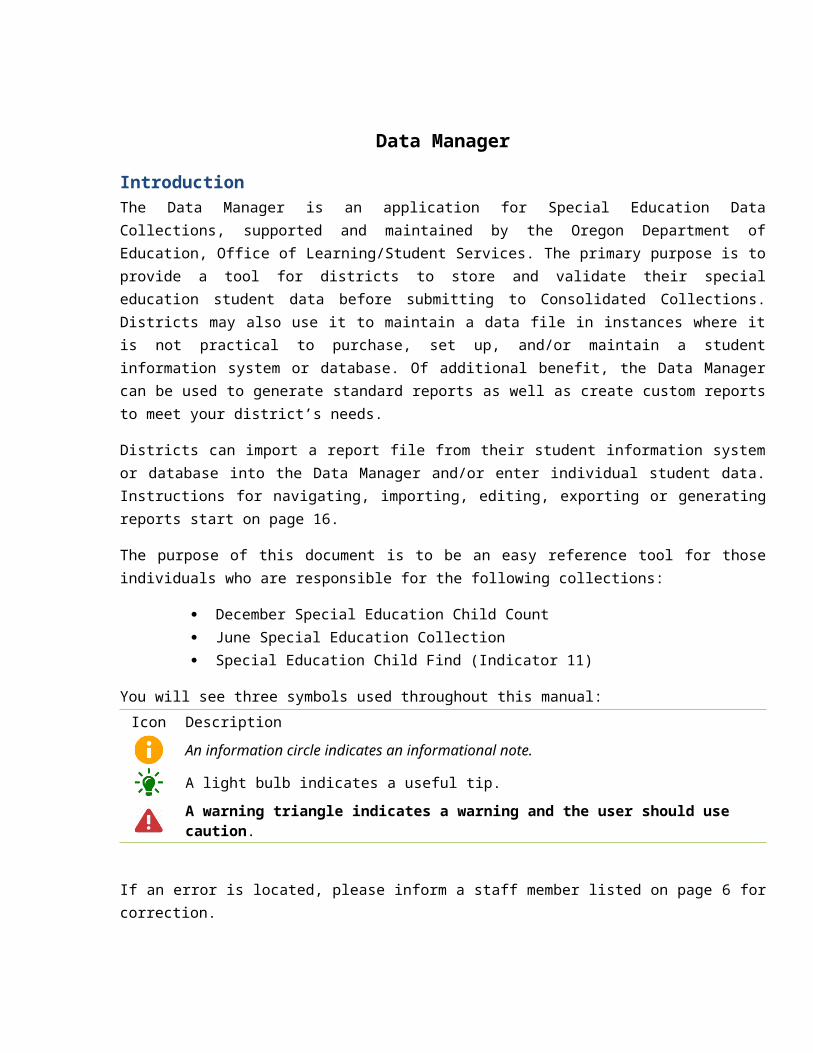
IntroductionThe Data Manager is an application for Special Education Data Collections, supported and maintained by the Oregon Department of Education, Office of Learning/Student Services. The primary purpose is to provide a tool for districts to store and validate their special education student data before submitting to Consolidated Collections. Districts may also use it to maintain a data file in instances where it is not practical to purchase, set up, and/or maintain a student information system or database. Of additional benefit, the Data Manager can be used to generate standard reports as well as create custom reports to meet your district’s needs.
Districts can import a report file from their student information system or database into the Data Manager and/or enter individual student data. Instructions for navigating, importing, editing, exporting or generating reports start on page 16.
The purpose of this document is to be an easy reference tool for those individuals who are responsible for the following collections:
December Special Education Child Count June Special Education Collection Special Education Child Find (Indicator 11)
You will see three symbols used throughout this manual:Icon Description
An information circle indicates an informational note.
A light bulb indicates a useful tip.
A warning triangle indicates a warning and the user should use caution.
If an error is located, please inform a staff member listed on page 6 for correction.
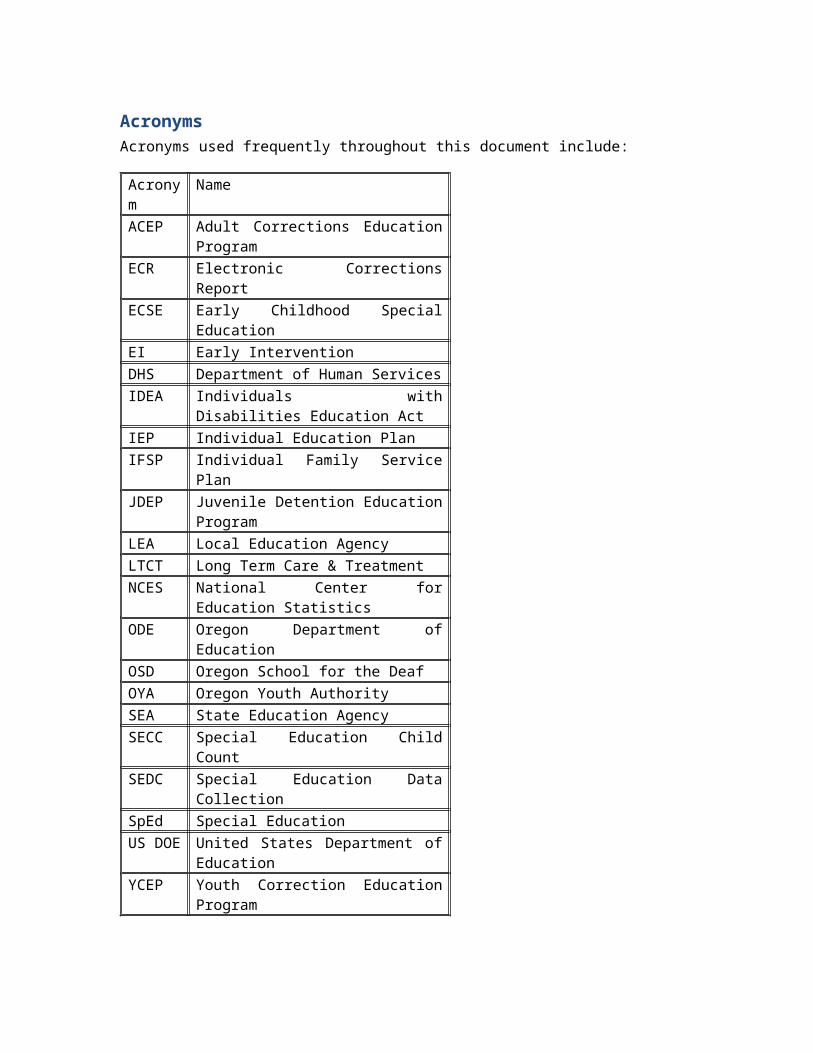
AcronymsAcronyms used frequently throughout this document include:
Acronym NameACEP Adult Corrections Education ProgramECR Electronic Corrections ReportECSE Early Childhood Special EducationEI Early InterventionDHS Department of Human ServicesIDEA Individuals with Disabilities Education ActIEP Individual Education PlanIFSP Individual Family Service PlanJDEP Juvenile Detention Education ProgramLEA Local Education AgencyLTCT Long Term Care & TreatmentNCES National Center for Education StatisticsODE Oregon Department of EducationOSD Oregon School for the DeafOYA Oregon Youth AuthoritySEA State Education AgencySECC Special Education Child CountSEDC Special Education Data CollectionSpEd Special EducationUS DOE United States Department of EducationYCEP Youth Correction Education Program

Important Notes for the Data Manager Application
The Data Manager has six main functions for use:1. Importing a file2. Entering an individual student record3. Editing a record4. Utilities for editing numerous records at once5. Exporting a file for submission to Consolidated, to create a back-up or save it to another location6. Generating Reports
The Data Manager will need to be installed on your computer prior to use. Once installed, you may begin using the application immediately. Instructions for navigating this application follow in the next section.
Installing the Application 1. Download the application from the ODE SECC Application Download Webpage 2. Follow the instructions and “Save” the application to your desktop by clicking the ‘download the
SECC Client Application or Update’ link.3. Go to your desktop and double click “SECC vx.xxxx.x.xx Install” to install.4. Accept the installation defaults during installation.5. Once installed, double click the “SECC Data Manager” icon on your desktop to access the
application.a. (Note: the icon looks like a text book
with fountain pen laying on top)
Import (Only) OnceFor many users of the application you will only need to import your file once. Once the file is imported, it continues to be edited and automatically saved when you move out of the Grid View and when you exit the program. When you open up the application later (the following day or week), the file that you worked on – complete with edits – is automatically loaded into the application. If you choose to start with an existing file (as the majority of users do), you will need to import that file to begin with.
When you exit the program, your data stays in the application.
Auto SaveThe application saves your data file when you exit the grid screen. Basically, the application saves your edits without you having to click a save button. The data files are named SECCStudent and childfindstudent and are saved in the following directory: C:\Program Files\SECC Data Manager (if you used all the default settings while installing the program). We strongly recommend you leave this file alone.
Validation: SECC Record Type Determination The application uses a “record type” for each submitted record. The record type tells the system what validations to use on a record. Specific coding combinations within specific fields are used to determine the record type. The fields are Date of Birth and Reason for Exit. The table below provides a simplistic look at how a user should assign a record into one of eight Record Types.
Record Type Age Range* Reason For ExitActive School Age 5 -21 Null or blankExited School Age 5-22 30, 31, 32, 33, 34, 35, 36, 37, or 39Active ECSE 3-4+ Null or blankExited ECSE 3-5+ 20, 21, 22, 23, 24, 25, 26, 27, 28, or 29Active EI 0-2 Null or blankExited EI 0-2 10, 11, 12, 13, 15, 16, 17, 18, 19Not Reported to SECC
0-22 Agency Serving Must be 70
Not Claimed 0-22 Record must still past field level validations based on record typeFailed Record
Failed Records receive a message that indicates that the Record Type cannot be determined and validation has been halted and the record must be corrected before further validation can continue.
Once a record type has been determined, all subsequent validations are based on the record type. Records are validated much the same as they have always been with color coding indicating a record’s status and error messages for that record listed on the lower portion of the grid view
Auto Update of ApplicationThe application is client based, meaning that you can access and use it without connecting to the web. However, when you start the application it will check to see if an internet connection is available. If such a connection is found, it will look to see that you are using the latest version of the application. If a later version is available, it will ask you if you wish to update your version.
We recommend you update to the newest version of the application when available and after a backup of your data has been completed.
If the application does not ask you if you wish to update your version of the data manager, your system security is blocking the update. You will need to go to the ODE SECC Application Download Webpage to update your application.
Don’t Delete the Data FolderThe SECC application is saved in the following directory on your computer: C:\Program Files\SECC Data Manager. The data are stored in a file named SECCStudent and childfindstudent. Do not delete these files! We strongly recommend you leave these files alone.

NavigationThis section will explain how to navigate the various screens in the Data Manager.
Within the Data Manager, there are two main tabs:
1. SECC – use this tab for December Child Count and June Exit data. 2. Child Find – use this tab exclusively for Child Find data.
Each tab contains functions for importing, editing, exporting and reports for the respective collection.
Main Menu
CollectionTabs:
Click on these tabs to change collection menus.
Figure 1: Main SECC Menu Figure 2: Main Child Find Menu

SECC Navigation WindowTo access the SECC navigation window, with the SECC tab selected click on Edit All SECC records.
Validate (Dec. SECC/June Exit): When clicked, validates all the student records in the database using the validations for the December Child Count or June Exit. The record is highlighted with a validation color in preparation for the specified collection.
Find Duplicates: Evaluates all records for duplication, based on SSID and first name, last name, and date of birth. If duplicate records are found, they are highlighted with the color matching the Duplicate validation color key.
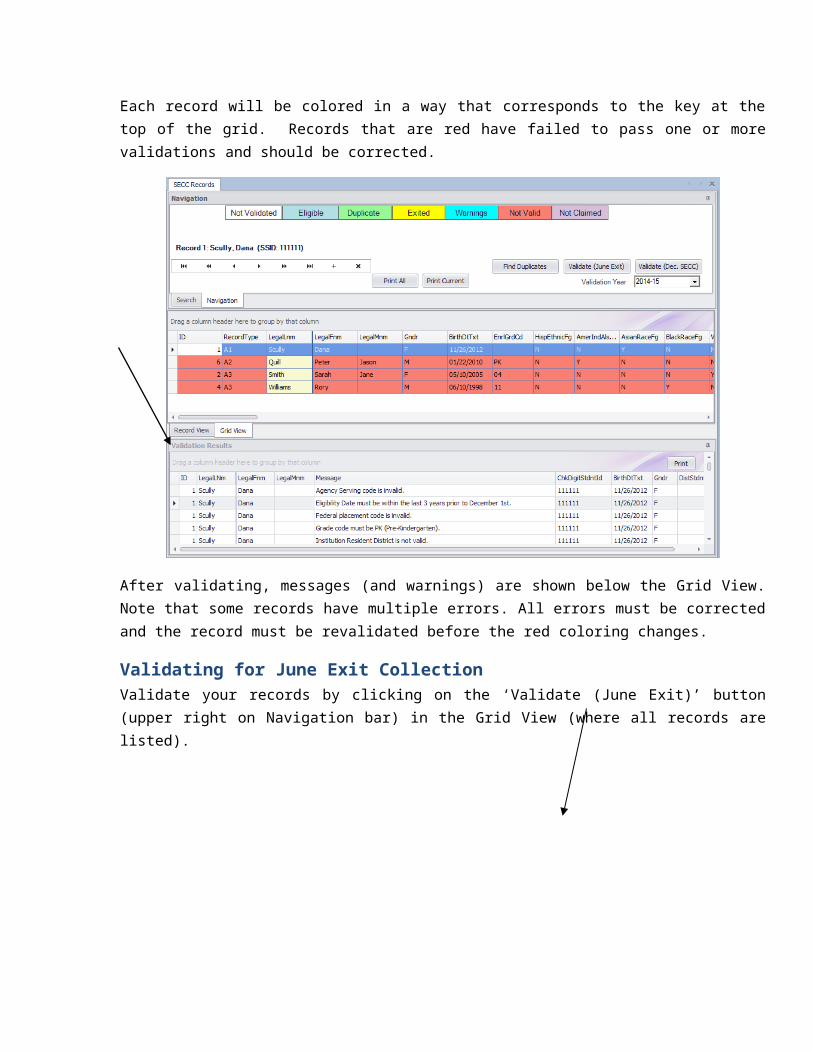
Validation Color Key: The validation color key indicates the color a record will turn after the validate button has been clicked. Records that are red have failed to pass one or more validations and need correcting prior to ODE submission.
Validation Year: Drop-down menu that allows users to select collection/school year.
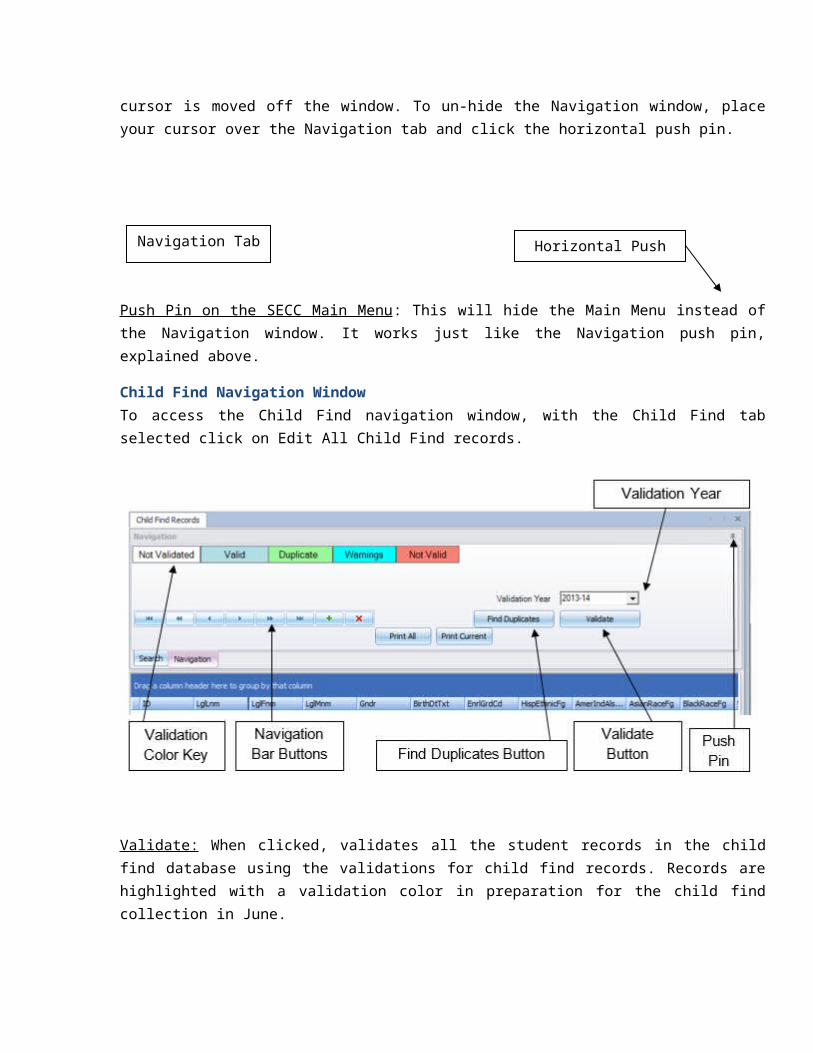
Push Pin: The push pin will hide the Navigation window. Once the window is hidden, placing your cursor over the Navigation tab will cause the window to re-appear, but the window will hide again as soon as your cursor is moved off the window. To un-hide the Navigation window, place your cursor over the Navigation tab and click the horizontal push pin.
Push Pin
Validation Year
Validate Buttons
Find Duplicates Button
Navigation Bar Buttons
Validation Color Key
Figure 3: SECC Navigation Window
Figure 4: Closed Navigation Window in Hidden Mode
Navigation Tab Horizontal Push Pin

Push Pin on the SECC Main Menu: This will hide the Main Menu instead of the Navigation window. It works just like the Navigation push pin, explained above.
Child Find Navigation WindowTo access the Child Find navigation window, with the Child Find tab selected click on Edit All Child Find records.
Validate: When clicked, validates all the student records in the child find database using the validations for child find records. Records are highlighted with a validation color in preparation for the child find collection in June.
Find Duplicates: Evaluates all records for duplication, based on SSID and Consent Date. If duplicate records are found, they are highlighted with the color matching the Duplicate validation color key.
Validation Color Key: The validation color key indicates the color a record will turn after the validate button has been clicked. Records that are red have failed to pass one or more validations and need correcting prior to ODE submission.
Validation Year: Drop-down menu that allows users to select collection/school year.
Push Pin: The push pin will hide the Navigation window. Once the window is hidden, placing your cursor over the Navigation tab will cause the window to re-appear, but the window will hide again as soon as your cursor is moved off the window. To un-hide the Navigation window, place your cursor over the Navigation tab and click the horizontal push pin.

SECC and Child Find Navigation Windows:
Navigation Bar Buttons
The double left arrow slash button will take the user to the first record in the database.
The double left arrow button will take the user back one page at a time.
The single left arrow button will take the user back one record at a time.
The single right arrow button will advance the user one record at a time.
The double right arrow button will advance the user one page at a time.
The double right arrow slash button will take the user to the last record in the database.
The plus button will add a record to the database.
The ‘X’ button will delete the marked or highlighted record(s).
The print all button will ‘print preview’ all the records in the database. The preview is to allow the user to change the document print variables (e.g. margins) before printing. To cancel the print, close the preview window.
The print current button will only print the currently selected record.
To Change View
The application provides the user with two views; a grid and a record view. After records are imported, the user will automatically view the records in the ‘grid view’ mode. To change how the records will be viewed click on the view tabs located at the bottom of the student grid screen.
To Close Student Grid
To close the student grid when in edit record mode, click on the secondary or student grid screen close button, a grey ‘X’ located directly above the push pin and below the application close button.
View Tabs
Student Grid Screen Close

Change Column ViewIn edit record mode, the user can change the order of columns. The user can also remove columns from view.
To Change Column Order:1. Click and hold mouse clicker down on the heading of the column to move.2. Drag the heading to the new location.3. Drop the heading by un-clicking or releasing the mouse clicker.
To Remove Columns from View:1. Click and hold the left mouse button on the heading of the column you want to remove.2. Drag the heading down over the records until cursor turns into an ‘X.’
3. Release the mouse button and the column will be removed.
To view removed columns, either close and re-open the student grid or exit and re-enter the application.

ImportingYou can import different file types into the Data Manager. However, you must import a file that conforms to the consolidated file layout. The type of file imported may be a tab delimited, comma delimited, fixed length or back-up file created previously with the Data Manager. Be sure to select the appropriate file type from the Import Data Menu. The instructions below address this process.
All import options can be used for SECC or Child Find. Make sure to select the proper import option from the proper menu (SECC or Child Find).
Import an Initial Data File1. Open the application, and in the Main Menu, in the ‘Import Data’ box, select one of the four import
file types that is applicable.
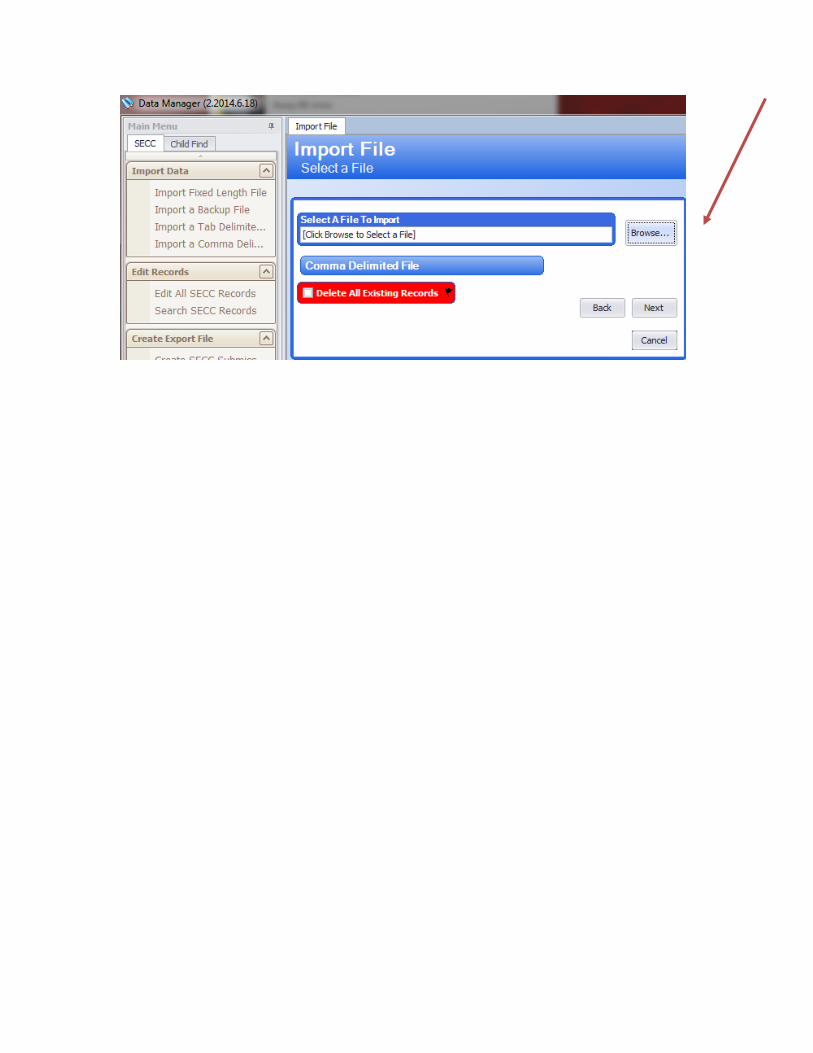
2. On the Import File screen, click on the ‘Browse…’ button to locate the file you wish to import.
3. Click on the ‘Next’ button, and the confirmation screen will appear.
4. To cancel your selection, click on the ‘Cancel’ button. To confirm your selection, click on the ‘Import File’ button.
5. Once the file has been imported successfully, you will receive the File Imported screen.
6. Click on the ‘Yes’ button to view your files. Click on ‘No’ to return to the Main Menu.
The Data Manager stores your data within the application. You only need to import once unless you maintain your data in another system and only use the Data Manager for validating and creating a submission file.

Appending Additional Data FilesA few agencies need to take separate files and combine them into a single file in the Data Manager Application. Appending files is accomplished by repeatedly going to the import function and importing each individual file.
Make sure that you do NOT have the Delete All Existing Records box checked when importing each file.
Once all files are imported, move to the Edit All Records function to begin editing or validating the records that have been consolidated into a single file.
Overwriting vs. Deleting with BackupOn occasion, some users may wish to do either of the following tasks.
Overwrite Existing File – To overwrite an existing file with another, simply repeat the import process making sure to check the box in the red text window that says Delete All Existing Records. When you click on the Delete All Existing Records box, another window opens giving you the opportunity to Create Backup File First, of your existing file. If you wish to overwrite the existing file (not saving the existing file) do not check the Create Backup File First box.
Deleting Existing File and Creating a Backup – Repeat the above process for overwriting an existing file making sure to check the box that Creates Backup File First. After you have chosen the file to import and checked all the boxes you will be given an opportunity to name the backup and save it as you desire. A default name will be SECC_Backup(date), where (“date”) will be populated with the actual date.
Import a Backup File
The following steps will delete ALL existing records in the Application.
1. If the user is in Edit Record Mode, close the Student Grid.
2. From the Main Menu, click on Import a Backup File.3. The Import Backup Select a File screen will appear.
Student Grid Close

4. Click on ‘Browse…’ to locate the backup file to import.
5. The Open window will appear. Locate the backup file to import, and click on the ‘Open’ button.
6. On the Import Backup Select a File screen, check the Delete All Existing Records box (highlighted in red).
7. Click on the ‘Next’ button.
8. The Import Backup Confirmation screen will appear.9. Click on the ‘Import File’ button to continue.
Delete All Existing Records

10. The File Imported window will appear when the import is completed. Click on the ‘Yes’ button to view the records.
Import a Tab Delimited File
The following steps will delete ALL existing records in the Application.
1. If the user is in Edit Record Mode, close the Student Grid.2. From the Main Menu, in Import Data box, select ‘Import a Tab Delimited File.’3. The Import Tab Delimited Select a File screen will appear.4. Click ‘Browse…’ to locate the tab delimited file to import.
5. The Open window will appear. Locate the tab delimited file to import, and click on the ‘Open’ button.

6. On the Import Tab Delimited Select a File screen, check the Delete All Existing Records box (highlighted in red).
7. Click on the ‘Next’ button.8. The Import Tab Delimited Confirmation screen will appear.9. Click on the ‘Import File’ button to continue.
10. The File Imported window will appear when the import is completed. Click on the ‘Yes’ button to view the records.
Import a Comma Delimited File
The following steps will delete ALL existing records in the Application.
Delete All Existing Records

1. If the user is in Edit Record Mode, close the Student Grid.2. From the Main Menu, in Import Data box, select ‘Import a Comma Delimited File.’3. The Import Comma Delimited Select a File screen will appear.4. Click on ‘Browse…’ to locate the comma delimited file to import.
Import Comma Delimited Select a File Screen
5. The Open window will appear. Locate the comma delimited file to import, and click on the ‘Open’ button.
Open Window
6. On the Import Comma Delimited Select a File screen, check the Delete All Existing Records box (highlighted in red).
7. Click on the ‘Next’ button.
The Import Comma Delimited Confirmation screen will appear.
8. Click on the ‘Import File’ button to continue.
Import Comma Delimited Confirmation Screen
9. The File Imported window will appear when the import is completed. Click on the ‘Yes’ button to view the records.
File Imported Window

Editing Records
Sorting RecordsWhile in edit record mode, you have the option to sort the records ascending or descending by any column. This can be useful when looking for specific records.
Down Arrow
Column Headings

Filter/Finding RecordsOn the grid screen, the user is able to filter or find records using specific criterion. Any field with a filter icon can be used to find specific records.
Edit Record Mode-Grid Screen View
Single Criterion FindTo find records using a single criterion, select one drop down and choose the criteria. For example, to find all males:
1. Click on the Filter Icon located on the Gender heading.
2. Select the M from the Gender Drop Down box.
Filter Icon

Multiple Criterion FindTo find records using multiple criterions, select one drop down and choose the first criterion then select another drop down and the next criterion. For example, to find all males who have an American Indian or Alaskan Native race/ethnicity:
1. Click on the drop down box located on the Gender heading.
2. Select the M from the Gender Drop Down box.
3. Click on the drop down box located on the AmerIndAlsknNtvRaceFg heading.

4. On the Ethnicity drop down menu, click on the Y and all the records that are male and American Indian or Alaskan Native will appear.
Exiting the Find ResultsTo exit the find results and view all records:
1. Click on the black ‘X’ at the bottom of the screen to close out of the Filter/Find mode. (The check box next to the ‘X’ is a toggle on/off for criteria find results).
Filter/Find Mode – Bottom of Screen
Search RecordsThe search feature allows you to search for records matching criteria you define. To use the search feature, click on the Search tab in the Navigation window or select ‘Search Records’ from the Edit Records box in the Main Menu.
Search Tab
Search Records

To use the search feature, fill in the search fields you want to use for your search and use the following buttons to retrieve your results:
After filling in the search field(s), click this button to load the search results in Grid View.
You can use any number of search criteria. For example you can search for records by just filling in the Last Name field or you could also fill in other fields, like DOB and First Name.
When checked, only searches within the records currently loaded in the Grid View (for example, you could use this to search within your search results).
Loads ALL records back into the Grid View (not just those matching the search criteria).
Clears all the search fields (SSID, DOB, etc.).
Find DuplicatesThe ‘Find Duplicates’ button, when clicked will evaluate all records for duplication based on First Name, Last Name, DOB, and SSID. If more than one record is found with the same SSID or First Name, Last Name, and DOB, the records will be colored to match the Duplicate color key at the top of the Navigation window. The results explaining what duplicates were found will be displayed below the Grid View of records.

Validating for December SECCValidate your records by clicking on the ‘Validate (Dec. SECC)’ button (upper right on Navigation bar) in Grid View (where all records are listed).
Each record will be colored in a way that corresponds to the key at the top of the grid. Records that are red have failed to pass one or more validations and should be corrected.
After validating, messages (and warnings) are shown below the Grid View. Note that some records have multiple errors. All errors must be corrected and the record must be revalidated before the red coloring changes.

Validating for June Exit CollectionValidate your records by clicking on the ‘Validate (June Exit)’ button (upper right on Navigation bar) in the Grid View (where all records are listed).
Each record will be colored in a way that corresponds to the key at the top of the grid. Records that are red have failed to pass one or more validations and should be corrected.
After validating, messages (and warnings) are shown below the Grid View. Note that some records have multiple errors. All errors must be corrected and the record must be revalidated before the red coloring changes.

Validating for Child Find CollectionValidate your records by clicking on the ‘Validate’ button (upper right on Navigation bar) in the Grid View (where all records are listed).
Each record will be colored in a way that corresponds to the key at the top of the grid. Records that are red have failed to pass one or more validations and should be corrected.
After validating, messages (and warnings) are shown below the Grid View. Note that some records have multiple errors. All errors must be corrected and the record must be revalidated before the red coloring changes.
Validating a Single RecordValidate a single record by clicking on the record in the grid view. Place the mouse on the highlighted record, and right click for the validation menu.

After you select an option from the validation menu, the record will be colored in a way that corresponds to the key at the top of the grid. Records that are red have failed to pass one or more validations and should be corrected.
After validating, messages (and warnings) are shown below the Grid View. All errors must be corrected and the record must be revalidated before the red coloring changes.
Editing: Single Record ViewClicking on the Record View (the tab next to the Grid View at the bottom of the screen) will bring up a page with all the information on an individual record.

You may click in any field to edit the record. Some fields have pull down lists of codes to minimize data entry error (e.g., Primary Disability), while other fields require typing the information (e.g., Name and Date fields).
Editing: Grid ViewYou may also edit records in the grid view. Clicking on any field allows you to either select from the pull down options or type directly in the field. Records that were previously validated (colored) and then modified in the Grid View turn white until they are revalidated.
Deleting Records
Deleting Single RecordsA single record can be deleted on either the Record View tab or Grid View tab. For either tab, make sure the Navigation tools are showing (tab at top of screen). In Record View navigate to the record you wish to delete

then click the “X” navigation button (SECC Records, this button is black; Child Find Records, this button is red). On the Grid View click anywhere on the record you wish to delete then click the “X” navigation button.
Deleting Multiple RecordsMore than one record can be deleted in the Grid View by holding down the Ctrl-key and clicking anywhere on the records you wish to delete then hitting the “X” navigation button. If you want to delete multiple records that are grouped together, you can click on the record at the top of the group, hold down the Shift-key, and click the last record in the grouping. Then click the “X” button to delete all the selected (highlighted) records.
Adding a New RecordTo add a new record, click on the “+” navigation button (SECC Records, this button is black; Child Find Records, this button is red). This will add a new record to the database and allow you to type in the child’s information.
Auto SavingThis application saves when you exit the grid screen. Basically, the application saves your edits continually. You do not have to click on a button to save your file. The data files are named SECCStudent and Childfindstudent and are saved in the following directory: C:\Program Files\SECC Data Manager (assuming you approved the default settings during installation). We strongly recommend you leave this file alone.

UtilitiesTo edit numerous records at once, using one or more of the Utility functions may be faster, than editing each individual record. Listed below are the Utility functions that are available.
Before using any of the Utility functions, it is recommended that you create a Backup File of your current data.
Selecting a SECC Utility FunctionIf the user is in Edit Record Mode, close the Student Grid.
Edit Record Mode
1. From the Main Menu, click on any of the three Utility functions listed in the Utilities box.
Utility Functions Tab
2. The Utility Functions Tab will then list three of the four different Utilities that are available to use with a description of what it will do to your data (one utility checks for updates to the Data Manager application).
SECC: Remove Exited RecordsTo remove all records that have an exit date prior to (any date you select), use the Remove Exited Records Utility.
Student Grid Close

1. Select the date to use as the cutoff for Exited Records in the Date Box. You can either type in the date or use the drop-down menu.
2. Click the ‘Delete Exited Records’ button.
3. The Confirm Record Deletion(s) screen will now appear with the records listed that are going to be deleted. If the information is correct, select ‘Delete.’ If the information in incorrect, click ‘Cancel.’
Confirm Record Deletion(s) Screen
4. If you click ‘Delete,’ the records have now been deleted; click ‘OK.’
Confirmation Screen
5. If you have no records with an Exit Date prior to the one you selected in the Date Box, you will receive the No Records Found Screen instead of the Confirm Record Deletion(s) Screen.
Date Box
Delete Exited Records button

No Records Found Screen
SECC: Auto-Advance GradeTo advance the grade for all active records, use the Auto-Advance Grade function. This will advance the grade by one for all records, except Exited records, which are not considered active records.
1. Click the ‘Advance Grades’ button to update the grade for all active records.
2. All active records’ grades have been updated; click ‘OK.’
Confirmation Screen
SECC: Auto-Populate LEPTo populate the LEP field for all records that currently have a blank LEP field, use the Auto-Populate LEP function. This will populate all blank LEP fields with a value of ‘N.’
1. Click the Update button.
2. All records with a blank LEP filed have now been updated with a value of N; click ‘OK.’
Confirmation Screen

Exporting Files
Creating Submission, Backup, or Export FilesEven though the application auto saves your file periodically, creating a backup is always prudent. When you wish, you can manually save a copy of your file. Remember you do not need to have your file “error free” to create a backup.
One very important time to create a backup is when you have finalized the file you will submit to ODE. Any changes you make inside the application after you submit your submission file will alter your data in the application. Because the data you submit is a snapshot as of December 1, having a backup of the file as submitted is critical. In the event your submission file gets corrupted or other problems occur, your backup file could be used to resubmit your data. Call ODE staff if you need assistance backing up your data.
Creating a submission, backup, or export file in tab or comma delimited formats follows the exact same process.
1. In the Main Menu, select the type of file you wish to save from the Create Export File box.
Make sure you are on the proper menu (SECC or Child Find).

Create ODE Submission File for December Child Count (SECC)1. If the user is in Edit Record Mode, close the Student Grid.
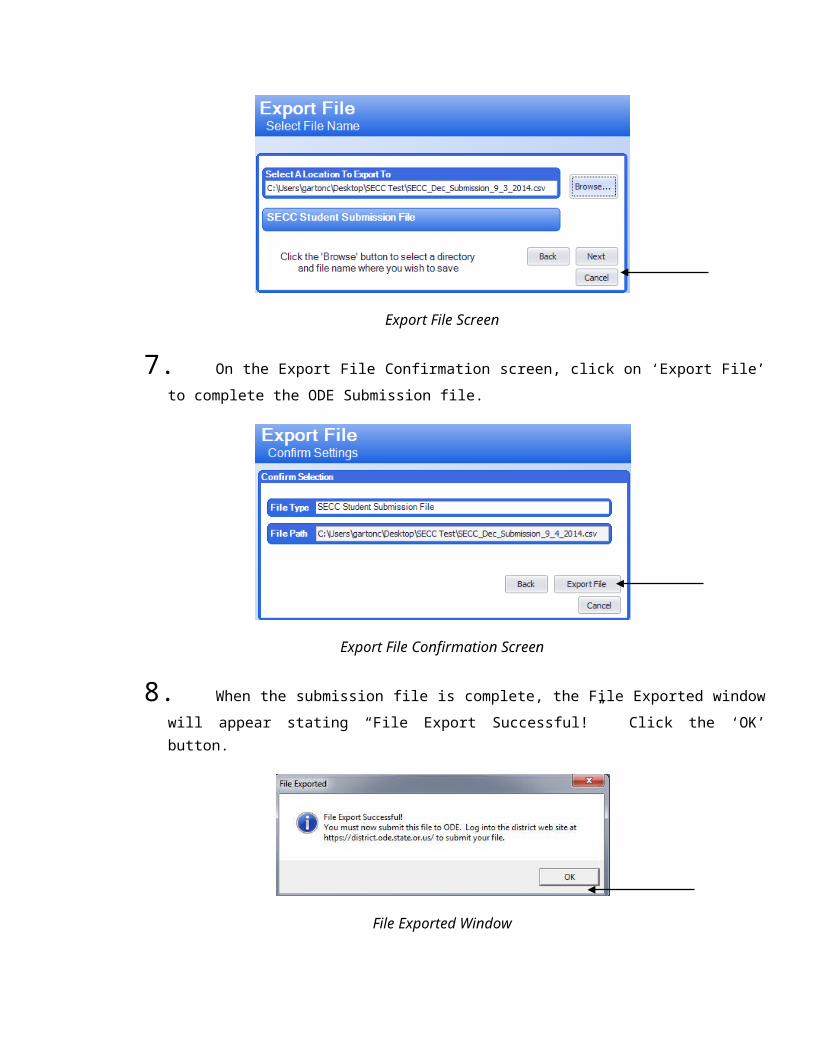
2. From the SECC Main Menu, in the Create Export File box, click on Create SECC Submission file.3. The Export File Screen will appear.4. Click on the ‘Browse…’ button to select a location to save the ODE submission file.
Export File Screen
5. The Save As window will appear. Select the location and click on ‘Save.’
Save As Window

The file name will default to SECC_Submission and the current date.
6. The file location will automatically be placed in the File Path field. Click ‘Next’ to continue to the Export File Confirmation screen. Click on ‘Back’ to change export file type.
Export File Screen
7. On the Export File Confirmation screen, click on ‘Export File’ to complete the ODE Submission file.
Export File Confirmation Screen
8. When the submission file is complete, the File Exported window will appear stating “File Export Successful!” Click the ‘OK’ button.
File Exported Window

Create ODE Submission File for June Exit Collection1. If the user is in Edit Record Mode, close the Student Grid.2. From the SECC Main Menu, in the Create Export File box, click on Create Exited Submission file.3. The Export File Screen will appear. Click on the ‘Browse…’ button to select a location to save the
ODE Submission file.
Export File Screen
4. The Save As window will appear. Select the location and click on Save.
Save As Window
The file name will default to SECC_Submission and the current date.
5. The file location is automatically placed in the File Path field. Click ‘Next’ to continue to the Export File Confirmation screen. Click ‘Back’ to change export file type.

Export File Screen
6. On the Export File Confirmation page, click on ‘Export File’ to complete the ODE Submission file.
Export File Confirmation Screen
7. When the submission file is complete, the File Exported window will appear stating ‘File Export Successful!’ Click on the ‘OK’ button.
File Exported Window
Create ODE Submission File for Child Find Collection1. If the user is in Edit Record Mode, close the Student Grid.2. From the Child Find Main Menu, in the Create Export File box, click on Create ODE Submission File.3. The Export File Screen will appear.4. Click on the ‘Browse…’ button to select a location to save the ODE Submission file.

Export File Screen
5. The Save As window will appear. Select the location and click ‘Save.’
Save As Window
The file name will default to childfind_Submission and the current date.
6. The file location will automatically be placed in the File Path field. Click on ‘Next’ to continue to the Export File Confirmation screen. Click on ‘Back’ to change export file type.
Export File Screen
7. On the Export File Confirmation screen, click on ‘Export File’ to complete the ODE Submission file.

Export File Confirmation Screen
8. When the submission file is complete, the File Exported window will appear stating ‘File Export Successful!’ Click the ‘OK’ button.
File Exported Window
Create Backup FileThe backup process is the same for both Child Find and SECC. You must do separate backups for each database.
1. If the user is in Edit Record Mode, close the Student Grid.
Edit Record Mode
2. From the Main Menu, in Create Export File box, click on Create Backup File.3. The Export File Screen will appear.4. Click on the ‘Browse…’ button to select a location to save the backup file.
Student Grid Close

Export File Screen
5. The Save As window will appear. Select the location and click on ‘Save.’
Save As Window
6. The file location will automatically be placed in the File Path field. Click ‘Next’ to continue to the Export File Confirmation screen. Click on ‘Back’ to Change export file type.
Export File Screen
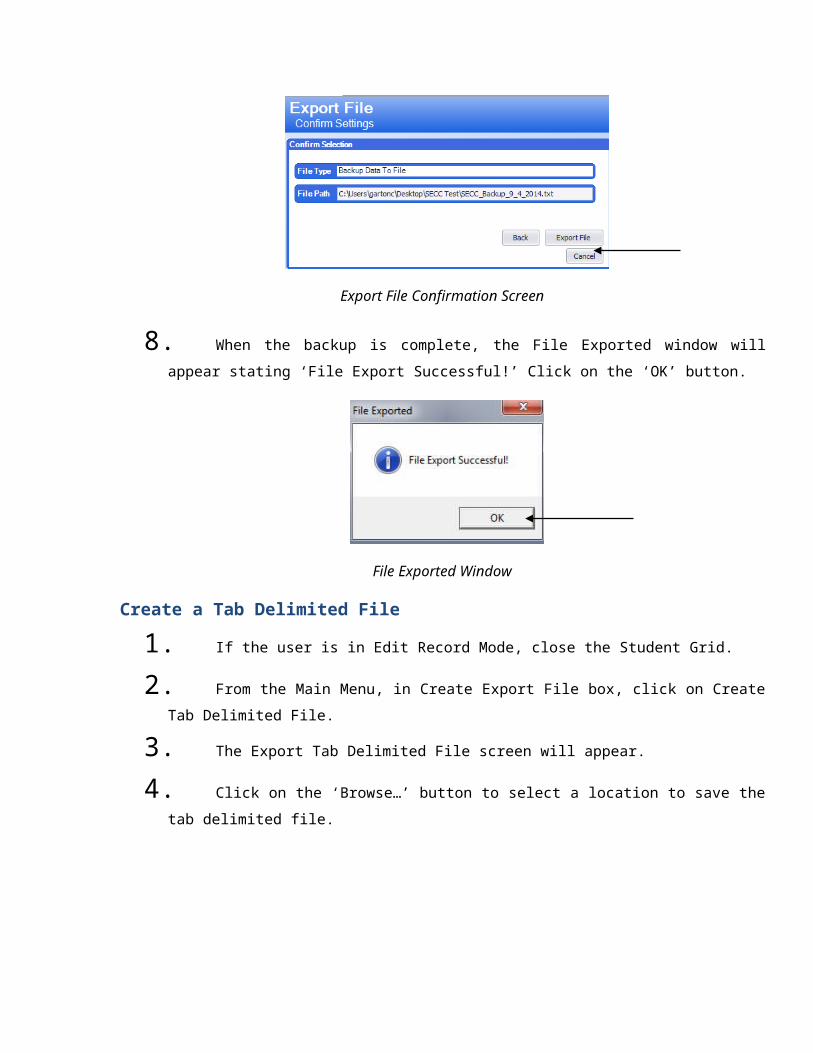
7. On the Export File Confirmation screen, click on ‘Export File’ to complete the backup.

The file name will default to SECC_Backup and the current date.
Export File Confirmation Screen
8. When the backup is complete, the File Exported window will appear stating ‘File Export Successful!’ Click on the ‘OK’ button.
File Exported Window
Create a Tab Delimited File1. If the user is in Edit Record Mode, close the Student Grid.2. From the Main Menu, in Create Export File box, click on Create Tab Delimited File.3. The Export Tab Delimited File screen will appear.4. Click on the ‘Browse…’ button to select a location to save the tab delimited file.
Export Tab Delimited File Screen

5. The Save As window will appear. Select the location and click on ‘Save.’
Save As Window
The file name will default to SECC_Tab_Delimited and the current date.
6. The file location will automatically be placed in the File Path field. Click ‘Next’ to continue to the Export File Confirmation screen. Click on ‘Back’ to Change export file type.
Export Tab Delimited File Screen
7. On the Export Tab Delimited File Confirmation screen, click on ‘Export File’ to complete the export.
Export Tab Delimited File Confirmation Screen

8. When the export is complete, the File Exported window will appear stating ‘File Export Successful!’ Click on the ‘OK’ button.
File Exported Window
Create a Comma Delimited File1. If the user is in Edit Record Mode, close the Student Grid.2. From the Main Menu, in Create Export File box, click on Create Comma Delimited File.3. The Export Comma Delimited File screen will appear.4. Click on the ‘Browse…’ button to select a location to save the Comma delimited file.
Export Comma Delimited File Screen
5. The Save As window will appear. Select the location and click on ‘Save.’

Save As Window
The file name will default to SECC_Comma_Delimited and the current date.
6. The file location will automatically be placed in the File Path field. Click ‘Next’ to continue to the Export File Confirmation screen. Click on ‘Back’ to Change export file type.
Export Comma Delimited File Screen
7. On the Export Comma Delimited File Confirmation screen, click on ‘Export File’ to complete the export.
Export Comma Delimited File Confirmation Screen
8. When the export is complete, the File Exported window will appear stating ‘File Export Successful!’ Click the ‘OK’ button.

File Exported Window

ODE District Website
Submitting Data to ODEOnce you have created a submission file you can submit the file to ODE.
The steps for submitting data to ODE are the same for all collections. Make sure to select the correct collection from the student collections menu.
A new submission file DOES NOT REPLACE any previously submitted files.
Submitting a Submission File1. Open your web browser and go to the ODE District Website located here.
a. Tip: Internet Explorer is the least buggy browser.
2. Enter your User Name and Password (top right corner).3. From the list of Applications, select Consolidated Collections.
Page 1 of 35 Revised – August 2017
4. After clicking the Consolidated Collections Menu link, select from the drop menu:a. Student Collections (example below is from an ECR collection)
i. December Special Education Child Count (SECC), orii. June Special Education Exit, or
iii. Special Ed Child Find (Indicator 11) b. Data Submissionc. File Upload
5. On the Submit Data screen, click on the Browse button.
Submit Data Screen
6. On the Choose file screen, locate the submission file you exported from the SECC Application.7. Select the submission file, and click ‘Open.’
Choose File Screen
Page 2 of 35 Revised – August 2017
Link to submit data

8. On the Submit Data screen, the submission file will appear. Click on the ‘Upload’ button.
Upload Results Screen
9. The Upload Results screen will appear. 10. To see where your file is at in the posting process:
a. Select from the drop menu Student Collections at the top of the screenb. Select the appropriate collection, December Special Education Child Count (SECC), or
June Special Education Exit, or Special Ed Child Find (Indicator 11)c. Select Error Managementd. Select Review Queue
Page 3 of 35 Revised – August 2017

11. The file you selected to upload will be displayed in the Review Queue. Once your file has been validated and posted, you can check for errors.
12. You will also receive an email from ODE Helpdesk with a subject line of “Process information on your data” when your file has posted (uploaded).
Error ManagementAfter your submission file has uploaded, you need to check for errors.
Even if you used the SECC Data Manager, you NEED to check for errors.
1. To see if your file has errors: a. Select from the drop menu Student Collections at the top of the screenb. Select the appropriate collection, December Special Education Child Count (SECC), or
June Special Education Exit, or Special Ed Child Find (Indicator 11)c. Select Error Managementd. Select Review Errors
2. If errors were found in your data, they will be listed on the next screen.3. To fix the errors record by record, select the ‘Fix Errors’ link. If you would rather download your
errors to fix them and then re-upload the records, select the ‘Download Errors’ link button at the top of the error list.
Page 4 of 35 Revised – August 2017

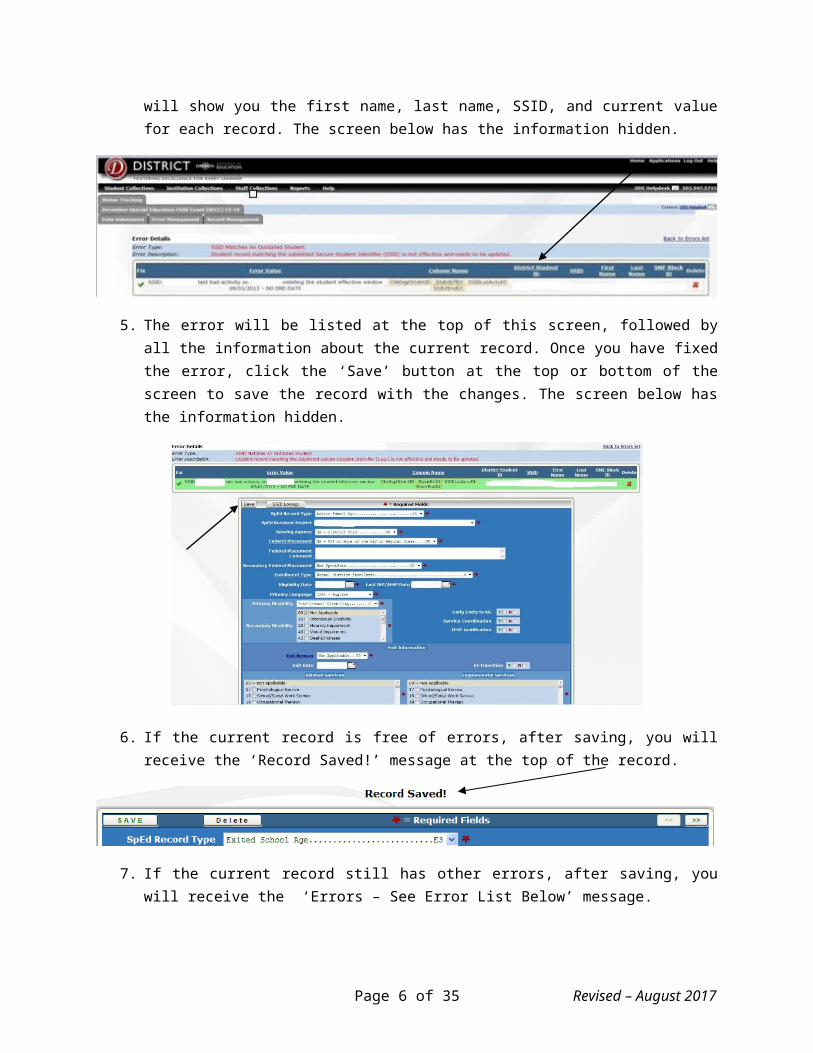
4. After selecting ‘Fix Errors,’ the screen will show you which records matched the error you are attempting to fix. Select the ‘Fix’ link next to each record to fix the error. This screen will show you the first name, last name, SSID, and current value for each record. The screen below has the information hidden.
5. The error will be listed at the top of this screen, followed by all the information about the current record. Once you have fixed the error, click the ‘Save’ button at the top or bottom of the screen to save the record with the changes. The screen below has the information hidden.
6. If the current record is free of errors, after saving, you will receive the ‘Record Saved!’ message at the top of the record.
Page 5 of 35 Revised – August 2017

7. If the current record still has other errors, after saving, you will receive the ‘Errors – See Error List Below’ message.
8. At the top of the current record, all errors that exist for the record will be displayed. Once you have fixed all the errors, click the ‘Save’ button again.
9. Return to the Review Errors screen to ensure all errors have been fixed.10. If there are more errors, follow the instructions above (1-8), until your file is error free.
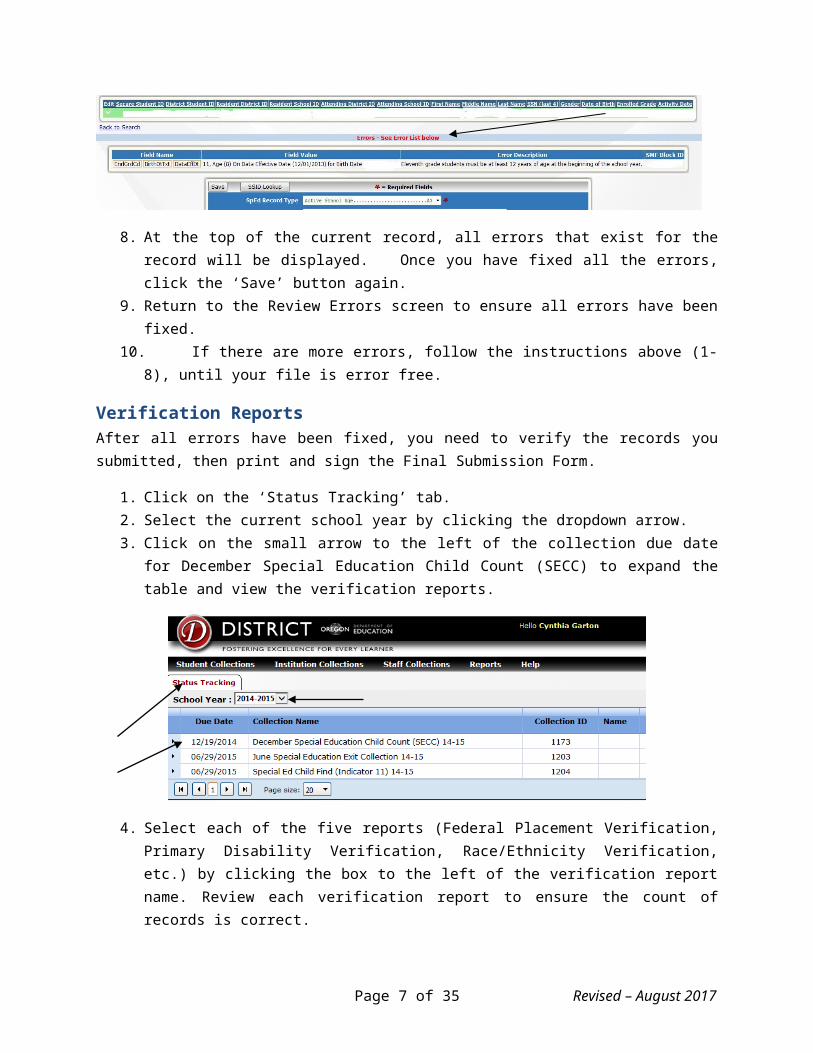
Verification ReportsAfter all errors have been fixed, you need to verify the records you submitted, then print and sign the Final Submission Form.
1. Click on the ‘Status Tracking’ tab. 2. Select the current school year by clicking the dropdown arrow.3. Click on the small arrow to the left of the collection due date for December Special Education
Child Count (SECC) to expand the table and view the verification reports.
4. Select each of the five reports (Federal Placement Verification, Primary Disability Verification, Race/Ethnicity Verification, etc.) by clicking the box to the left of the verification report name. Review each verification report to ensure the count of records is correct.
Page 6 of 35 Revised – August 2017

5. Click on the ‘Approve Report’ button for each verification report if the data for each are accurate.
6. When all reports are approved for the collection you are working on:a. Green check marks will show next to each report and the Final Submission Form button
will appear in the upper left.
7. Print the form, have it signed and mail it as indicated on the form. Please pay attention to when the Final Submission Form is due and the agencies listed on the form.
Page 7 of 35 Revised – August 2017

The submission process is not final until ODE receives the original signed Final Submission Form. Faxed forms will not be accepted.
Printing Data Reports1. With the click of a button you can export the data to an Excel report. If only the Export to Excel
button is available, there is no graph to display.
2. Several reports have the option of viewing a data chart. Click View Chart to pull the report. In the upper right hand corner is a button Create PDF which will create a report with the data and graph in one document.
Page 8 of 35 Revised – August 2017
You may also want to view the data reported in a graph by clicking the ‘View Chart’ button or export the data to Excel by clicking on the ‘Export to Excel’ button.
Page 9 of 35 Revised – August 2017

ECR Review AuditsThe Electronic Correction Reports (ECRs), also known as Review Audits, are provided in January for SECC and September for June Exit and Child Find collections. The ECRs are provided to catch possible duplicates, miscodes, under reported exited students, over reported exited students, and generate a list of OSD students for OSD and regionally served students for the Regional Programs, etc. You must access and approve these reports online.
1. Log on to the district website on this webpage.
2. Enter your User Name and Password (top right corner).3. From the list of Applications, select Consolidated Collections.
4. Click on Student Collections, select appropriate collection, select Error Management, then Review Audits.
Page 10 of 35 Revised – August 2017

5. The Audit Categories will appear. Click on ‘Review’ to go into the appropriate report.
6. Each report will list basic fields and a comment. The comment will instruct you on what is incorrect or what you need to verify.
7. If you need to correct the record, click on the green check mark under the Edit column. As soon as you make the change and click on the save button, the Last Activity column will reflect the date and time the last change was made. The record will stay on the report.
8. If the data is correct and you need to confirm the record, click on the box at the beginning of the row (under the Select All column). Then click on the ‘Confirm’ button. Do not confirm the record
Page 11 of 35 Revised – August 2017

until you are sure there is not an error. If the record is confirmed, it will disappear from the report.
You can select the box at the top of the ‘Select All’ column to confirm all records
Caution: If you confirm all records and there are still uncorrected records, your district will be considered “Inaccurate” for the data submission.
While the collection is open you may add, change and remove records.
Add a RecordA. The following steps will add a record:
1. Select Consolidated Collections from the Application menu.2. Select Student Collections from the top menu bar.3. Select the appropriate collection; Data Submission, Web Submission.4. Enter either the student’s SSID or First and Last Name.5. Click Search.6. Select the appropriate student if a list is provided otherwise enter the student’s
information and click the Save button.7. Make sure you check for errors (Error Management/Review Errors).
Change/Edit a RecordA. The following steps will change a record that is not on the ECR Audit report:
1. Select Consolidated Collections from the Application menu.2. Select Student Collections from the top menu bar.3. Select the appropriate collection; Record Management, Record Maintenance.4. Enter either the students SSID or First and Last Name.5. Click Search.
Page 12 of 35 Revised – August 2017

6. Select the appropriate student if a list is provided by clicking the green ‘√’ on the left side of the screen.
7. Edit the appropriate fields and click the Save button.8. Make sure you check for errors (Error Management/Review Errors).
Remove a RecordA. The following steps will remove a student:
1. Select Consolidated Collections from the Application menu.2. Select Student Collections from the top menu bar.3. Select the appropriate collection; Record Management, Record Maintenance.4. Enter either the students SSID or First and Last Name.5. Click Search.6. Select the appropriate student if a list is provided and click the red ‘X’ on the right side
of the screen.
Verification reportsFor information on how to verify your reports, see page 55-57 for steps.
SECC Regional Reports1. Login on the district home page site on this page.
2. An Applications list will appear on the next page.
3. Click on Consolidated Collections.
Page 13 of 35 Revised – August 2017

4. Select the ‘Reports’ tab located next to the ‘Status Tracking’ tab.
5. Select Special Education Child Census (SECC) in the menu.
6. In the box that appears below or to the right, select DecSECC14-15.
Page 14 of 35 Revised – August 2017

7. In the box that appears below or to right, select Regional Report - Detail.
8. A pop-up will appear with the report table, which you can export to Excel or PDF.9. If you prefer, click on Regional Report – Summary, for information at the district level broken
down by School Age, EI/ECSE and EI totals without disability information.
SECC Oregon School for the Deaf Reports1. Login on the district home page site here.
2. An Applications list will appear on the next page.
Page 15 of 35 Revised – August 2017

3. Click on Consolidated Collections.
4. Select the ‘Reports’ tab located next to the ‘Status Tracking’ tab.
5. Select Special Education Child Census (SECC) in the menu.
6. In the box that appears below or to the right, select SECC OSD Report.
Page 16 of 35 Revised – August 2017

7. A pop-up will appear with the report table, which you can export to Excel or PDF.
Consolidated Collections Reports
Production Download of Your RecordsIf you would like a copy of your final records submitted to ODE after all errors have been corrected, you can do a production download.
A. At the top of the screen,1. With your mouse, hover over the Student Collections menu,2. Select Special Education Child Find (Indicator 11) 14-15,3. Select Record Management, and4. Select Production Download.
A new screen will appear.
Page 17 of 35 Revised – August 2017

On the bottom of the screen, the following options will appear. Click on ‘CSV.’
The production download file will now be generated and the following screen will appear.
A secure email will be sent to your mailbox, titled File Transfer. Click on the link provided in the email to access your file.
Type your email address into space provided on next screen and submit.
Click the ‘Download’ icon to download and retrieve your file.
Click ‘Save’ on the File Download pop up box. Save the file to desired location. Click ‘Open’ on Download complete pop up to view your data. CSV works best when opened with Excel.
These instructions will work for all three collections: June Exit, Child Find and December Child Count.
Page 18 of 35 Revised – August 2017

Data Manager Reports
Selecting a ReportThe Data Manager allows you to view, save, and/or print a variety of reports.
1. To view the Reports Menu: in the SECC Main Menu, click on ‘User Reports’ in the User Reports box.
2. From the Reports Menu, select the type of records to include in your report (All Records, Eligible Only, or Exited Only).
3. Select the type of Report. a. All Students Report: will display all the records in the database that match the type
selected (all records, eligible only, or exited only records).b. Attending School Report: will display the records grouped by the Attending School
(records with the same Attending School listed will be grouped together and displayed under the heading of that school).
Page 19 of 35 Revised – August 2017
1. Link for Reports Menu
2. Select the type of Records to include on the Report
3. Select the type of Report
c. Enrollment Type Reportd. Ethnicity Reporte. Exit Census Reportf. Federal Placement Code Reportg. Inter-District Transfer Reporth. Primary Handicapping Condition (PHC) Report: will group records together by PHC
(records with the same PHC listed will be grouped together and displayed under the heading of that PHC).
i. Regional Report: will display records with a regional program listed for the Agency Serving Code.
j. Related Services Reportk. State Programs Report: will group records together by the type of state program (OSD,
LTCT, ACEP, YCEP, JDEP) the records are listed under for the Agency Serving Code. Teacher Report: will group records by the teacher associated with the records (records with the same teacher listed will be grouped together and displayed under the heading of that teacher).
l. Teacher Report: will group records by the teacher associated with the records (records with the same teacher listed will be grouped together and displayed under the heading of that teacher).
m. Verification Reportn. Create or Edit Custom Reports
4. The Report will open in a separate Preview window. The Preview window allows the user to make adjustments to the Report layout, page setup, and background. In addition to printing, the Report can also be saved (exported) and/or emailed in a variety of formats. The toolbar at the top of the Preview window provides these options.
a. The rules for the IEP and Eligibility dates are as follows:i. If the date is blank, past due or coming due within the next 30 days it will be red
and underlined.ii. If the date is coming due within the next 31-90 days, then it is green and
underlined.iii. All other values should be black text and no underline.
Page 20 of 35 Revised – August 2017
Create Custom ReportsThe Data Manager now allows users to create custom reports.
1. To create a custom report: in the SECC Main Menu, click on ‘User Reports’ in the User Reports box.
2. Click on ‘Create or Edit Custom reports.’
3. Enter a name for the new report and click the ‘Create New Report’ button.
Page 21 of 35 Revised – August 2017

4. The Report Designer will open in a new window.5. Click the ‘Report Tasks’ button (white box with a black triangle in it, to the left of the top ruler),
and click ‘Design in Report Wizard…’
6. The Report Wizard will open. Determine what type of report to create and click the ‘Next’ button.
Page 22 of 35 Revised – August 2017
Link for Report Wizard

The Report Wizard: A. The Standard Report will display data similarly to the reports that are already available (All
Students, Regional Programs, etc.). B. The Label Report will set up the report to print labels. This would be useful for student mailing
labels, etc.
Standard Report1. After selecting Standard Report, you have to decide what fields to include in your report. Select
a field and click the top arrow button to move that field to the other column.
a. The fields will be displayed on the report in the order they are listed in the column on the Right. If you want your fields listed in a specific order, you will need to move the fields over in that order.
2. The below image is an example of fields that you might want to include in your report. Once you have selected all the necessary fields, click the ‘Next’ button.
Page 23 of 35 Revised – August 2017

3. If you want to group your data together by one of the fields you selected, you have the option to do so at this point in the wizard. Select the field to group the records by and click the top arrow button. You can choose more than one grouping.
4. Below is an example of grouping records by Agency Serving Code and then by Primary Disability. To see a preview, click ‘Next.’
Page 24 of 35 Revised – August 2017

5. The Wizard allows you to choose different layouts for your report. A preview of the layout selected will be displayed on the Left in the Wizard dialog box. You can also change the page orientation in this step. Once you have made your selections, click the ‘Next’ button.
6. In this step, you can choose different styles for your report. A preview of the selected report will be displayed on the Left in the Wizard dialog box. After making the style selection, click ‘Next.’
Page 25 of 35 Revised – August 2017

7. The final step in the Wizard is to create a Title for your report. This is the title that will be displayed at the top of your report on the first page. Once you have typed in the Title name, click the ‘Finish’ button.
8. Your report will now be displayed in the Report Designer. If you want to see what your report will look like, click the Preview tab at the bottom of the page. To go back to the Designer, click the Designer tab. If you want to make further adjustments or changes, you can do so now. When finished click the ‘Save’ button and close the Report Designer.
Page 26 of 35 Revised – August 2017

9. To view your report, you need to click the ‘Cancel’ button to get back to the main User Reports menu.
10. To view the report you just created, with your records, select which records to include (All Records, Eligible Only, or Exited Only).
11. Select your Report from the drop-down box and click the ‘Show Report’ button.
Page 27 of 35 Revised – August 2017
Designer and Preview tabs

12. Your report will open in the Preview window. This is a view of the first screen with the Report title and the different groupings shown.
13. This is view of a different page in the report, showing how the records are grouped by Agency Serving Code and then by Primary Disability.
Page 28 of 35 Revised – August 2017

Label ReportsIn addition to creating Standard Reports, the Reports Wizard also allows you to create Label Reports.
1. To create a Label Report, select Label Report on the Reports Wizard and click the ‘Next’ button.
2. The Reports Wizard allows the user to select the type of label they plan on using for their labels. The first drop-down box, Label Products, will let you select the name of the label. A common label product would be Avery Standard. The second drop-down box, Product Number, is used to select the type of label, or the product number. After you have selected the label product and product number, click ‘Next.’
Page 29 of 35 Revised – August 2017

3. This screen in the wizard allows you to adjust the size of the label, margins, and page size. The settings for the label you selected on the previous screen are automatically displayed here, so it is recommended to keep all the default settings that are displayed on this screen. When finished making adjustments, click ‘Finish.’
4. The Reports Wizard will close and the label you selected will be displayed on the Designer. The size of the label on this screen is the size of the label you selected. Anything you want displayed on the label will need to fit in the label box.
Page 30 of 35 Revised – August 2017

5. To add variables to your label, drag them from the Field List into the label box. The example below is set up like a mailing label for the records.
6. LegalFNm, LegalLNm, Addr, City, and ZipCd were added to the label area from the Field List. 7. A RichText box (from the Standard Controls Toolbar on the left) was selected and placed
between City and ZipCd. “OR” was typed in the box to be automatically included as the state for the address labels.
8. The font for each of the fields was changed to 8 in order for all data to fit on the label.
Page 31 of 35 Revised – August 2017
RichText – Used to insert a box for “OR” to be included on address labels
Label Area
Designer and Preview tabs
Standard Controls Toolbar
Field List – Drag fields from here to Label Area

9. You can see what your data would look like on the report, by clicking the ‘Preview’ tab at the bottom of the screen. This will be useful in determining if other changes need to be made to your report before you save and close. To go back to the Designer, click the ‘Designer’ tab at the bottom of the screen.
10. To view the final Label Report, click ‘Save’ and close the Report Designer. Then click the ‘Cancel’ button to return to the main Reports Menu. Click the ‘Show Report’ button and a print preview will open in a new window.
Print Preview of the Label Report
Editing Custom ReportsThe Data Manager also allows users to edit the custom reports they create.
1. To edit a custom report: in the SECC Main Menu, click on ‘User Reports’ in the User Reports box.2. Click on the Create or Edit Custom Reports.
Page 32 of 35 Revised – August 2017

3. Select the report you want to edit from the drop-down box and click the ‘Edit’ button.
4. Your report will open in the Report Designer. You can now make any necessary changes. When complete, click the ‘Save’ button and close the Report Designer.
Adding a Page BreakYou may want to add a Page Break to your report. The purpose of this would be to break your records up into sections that are grouped according to what is placed in your groupHeaderBands. From the Standard Report example, this page break could be used to list only records on a page together if they matched one of the Agency Serving Codes. For example, this would display all records that have an Agency Serving Code of 30 listed together. A new page would begin with a different Agency Serving Code, such as 31.
Page 33 of 35 Revised – August 2017

1. To add a Page Break at the Group level, you first need to add a Group Footer. To do this, Right-click anywhere on the design grid and hover over Insert Band and then click GroupFooter in the submenu.
2. A Group Footer has now been added to your report. It is listed after the Detail section and before the Page Footer Band.
3. To add the Page Break, click on PageBreak (on the Standard Controls Toolbar menu). 4. Click anywhere in the GroupFooter1 detail section. After you release the mouse button, you
should see a Page Break inserted.
Page 34 of 35 Revised – August 2017
5. To see what you your report will look like with the page break inserted, click the Preview tab. When finished with all changes click the ‘Save’ button and close the Report Designer.
Page 35 of 35 Revised – August 2017
Page Break selected
Page Break inserted in the GroupFooter1 detail section


![AWSD1_1 [Secc 6] _ 6.12.3](https://static.fdocuments.us/doc/165x107/577d279c1a28ab4e1ea45a91/awsd11-secc-6-6123.jpg)