ScanJet Pro 2000 s1 and 3000 s3 - GfK Etilize · Perform scans using the HP ScanJet Pro 2000 s1 and...
70
User Guide ScanJet Pro 2000 s1 and 3000 s3 3000 s3 2000 s1 www.hp.com/go/sj2000s1 www.hp.com/go/sj3000s3
Transcript of ScanJet Pro 2000 s1 and 3000 s3 - GfK Etilize · Perform scans using the HP ScanJet Pro 2000 s1 and...
User Guide
ScanJet Pro 2000 s1 and 3000 s3
3000 s32000 s1
www.hp.com/go/sj2000s1www.hp.com/go/sj3000s3


HP ScanJet Pro 2000 s1 and 3000 s3
User Guide

Copyright and License
© Copyright 2016 HP Development Company,L.P.
Reproduction, adaptation, or translationwithout prior written permission is prohibited,except as allowed under the copyright laws.
The information contained herein is subject tochange without notice.
The only warranties for HP products andservices are set forth in the express warrantystatements accompanying such products andservices. Nothing herein should be construedas constituting an additional warranty. HP shallnot be liable for technical or editorial errors oromissions contained herein.
Edition 1, 10/2016
Trademark Credits
Adobe®, Adobe Photoshop®, Acrobat®, andPostScript® are trademarks of Adobe SystemsIncorporated.
Apple and the Apple logo are trademarks ofApple Inc., registered in the U.S. and othercountries.
AirPrint is a trademark of Apple Inc., registeredin the U.S. and other countries.
OS X is a trademark of Apple Inc., registered inthe U.S. and other countries.
Microsoft®, Windows®, Windows® XP, andWindows Vista® are U.S. registered trademarksof Microsoft Corporation.
Google™ and Google Maps™ are trademarks ofGoogle Inc.
Table of contents
1 Product overview .......................................................................................................................................... 1
Product views ........................................................................................................................................................ 2
Front view ............................................................................................................................................ 2Back view—2000 s1 models ............................................................................................................... 3
Back view—3000 s3 models ............................................................................................................... 3Serial number and product number location ...................................................................................... 4Control-panel view—2000 s1 models ................................................................................................ 5Control-panel view—3000 s3 models ................................................................................................ 6
Product specifications ........................................................................................................................................... 7Technical specifications ...................................................................................................................... 7Supported operating systems ............................................................................................................ 7
Product dimensions ............................................................................................................................. 8Power consumption, electrical specifications, and acoustic emissions ............................................ 8
Operating environmental range ......................................................................................................... 9Product hardware setup and software installation ............................................................................................ 10Scanner software (Windows) .............................................................................................................................. 11
HP Scan software .............................................................................................................................. 11
HP Scanner Tools Utility .................................................................................................................... 11HP TWAIN ........................................................................................................................................... 11ISIS (3000 s3 models only) ................................................................................................................ 11
WIA ..................................................................................................................................................... 11Scanner software (OS X) ...................................................................................................................................... 12
HP Easy Scan ..................................................................................................................................... 12HP Utility ............................................................................................................................................ 12
Sleep Mode and auto-off settings ....................................................................................................................... 12
2 Use the scanner ........................................................................................................................................... 13
Load originals ...................................................................................................................................................... 14Document loading tips ...................................................................................................................... 14
Supported paper sizes and types ..................................................................................................... 16Load documents ................................................................................................................................ 17
Load cards ......................................................................................................................................... 19
ENWW iii
Start a scan from the hardware .......................................................................................................................... 21
Scan from the control panel buttons ................................................................................................ 21Use the scanning software (Windows) ................................................................................................................ 21
Scan to a picture ................................................................................................................................ 21Scan to a PDF ..................................................................................................................................... 22Scan text for editing (OCR) ................................................................................................................ 22Scan to email ..................................................................................................................................... 22
Scan to cloud ..................................................................................................................................... 22Scan long or extra-long documents ................................................................................................. 23Detect multi-feeds (3000 s3 models only) ....................................................................................... 23
Everyday Scan ................................................................................................................................... 23Filter out color from a document (color dropout) ............................................................................ 23
Automatically detect page size ........................................................................................................ 24Automatically crop or pad scanned image to selected page size .................................................... 24Automatically detect color ................................................................................................................ 24Automatically straighten scanned images ....................................................................................... 25
Scan by using other scan software ................................................................................................... 25Use the scanning software (OS X) ....................................................................................................................... 26
Scan to email ..................................................................................................................................... 26
HP Easy Scan ..................................................................................................................................... 26Scan from other applications ............................................................................................................ 26
Advanced configuration with HP Utility for OS X .............................................................................. 27Open HP Utility ................................................................................................................ 27HP Utility features ........................................................................................................... 27
Mobile scanning (wireless 3000 s3 models only) ............................................................................................... 28
Scanning tips ....................................................................................................................................................... 29Optimize scanning and task speeds ................................................................................................. 29Scanning fragile originals ................................................................................................................. 29
3 Care and maintenance .................................................................................................................................. 31
Clean the product ................................................................................................................................................ 32Clean the scanning strips .................................................................................................................. 32Clean the paper path ......................................................................................................................... 33Clean the rollers ................................................................................................................................ 34
Replace parts ....................................................................................................................................................... 38Replace the roller kit (2000 s1 models) ........................................................................................... 38
Replace the pickup roller module ................................................................................... 38
Replace the separation rollers ....................................................................................... 39Replace the roller kit (3000 s3 models) ........................................................................................... 40
Replace the pickup roller module ................................................................................... 41Replace the separation rollers ....................................................................................... 42
iv ENWW

Order parts and accessories ................................................................................................................................ 44
4 Solve problems ........................................................................................................................................... 45
Basic troubleshooting tips .................................................................................................................................. 46Test the scanner ................................................................................................................................ 46
Interpret control panel lights and patterns ........................................................................................................ 48Scanner installation problems ............................................................................................................................ 49
Check the cables ................................................................................................................................ 49Uninstall and then reinstall the HP ScanJet drivers and tools (Windows) ....................................... 49
Power issues ........................................................................................................................................................ 51
Check that the scanner has power .................................................................................................... 51Scanner will not turn on .................................................................................................................... 51
The scanner has paused or shut down ............................................................................................. 51Scanner keeps turning off ................................................................................................................. 52
Paper jams ........................................................................................................................................................... 53Clear jams from the document feeder .............................................................................................. 53
An item loaded in the scanner jams repeatedly ............................................................................... 53Paper feed issues ................................................................................................................................................ 54
Paper jamming, skewing, misfeeds, or multiple-page feeds .......................................................... 54
Paper does not feed from the scanner ............................................................................................. 54Image quality problems ...................................................................................................................................... 55
Vertical white or colored stripes appear on the printed page ......................................................... 55Scanned images are not straight ...................................................................................................... 55The scanned images have streaks or scratches ............................................................................... 55Scanned image is fuzzy ..................................................................................................................... 55
The scan is completely black or completely white ........................................................................... 56The bottom of the scanned image is cut off ..................................................................................... 56The image cannot be enlarged ......................................................................................................... 56
Scanner operation problems ............................................................................................................................... 57Connection issues ............................................................................................................................. 57
Check the USB connection .............................................................................................. 57Buttons are not working properly .................................................................................................... 57Scanning performance issues ........................................................................................................... 58
Scanner does not scan immediately .............................................................................. 58
Scanner is scanning items very slowly ........................................................................... 58Scanner scans only one side of a two-sided page ......................................................... 58Scanned pages are missing at the scan destination ...................................................... 58
Scanned pages are out of order at the scan destination ............................................... 58Scan files are too large ................................................................................................... 58
Issues with text recognition (OCR) (Windows) .................................................................................. 59Additional troubleshooting ................................................................................................................................. 60
ENWW v

Index ............................................................................................................................................................. 61
vi ENWW
1 Product overview
This user guide covers important information about the scanner.
● Product views
● Product specifications
● Product hardware setup and software installation
● Scanner software (Windows)
● Scanner software (OS X)
● Sleep Mode and auto-off settings
The following information is correct at the time of publication. For current information, see www.hp.com/go/sj2000s1 or www.hp.com/go/sj3000s3.
HP’s all-inclusive help for this product includes the following:
● Install and configure
● Learn and use
● Solve problems
● Download software updates
● Join support forums
● Find warranty and regulatory information
ENWW 1
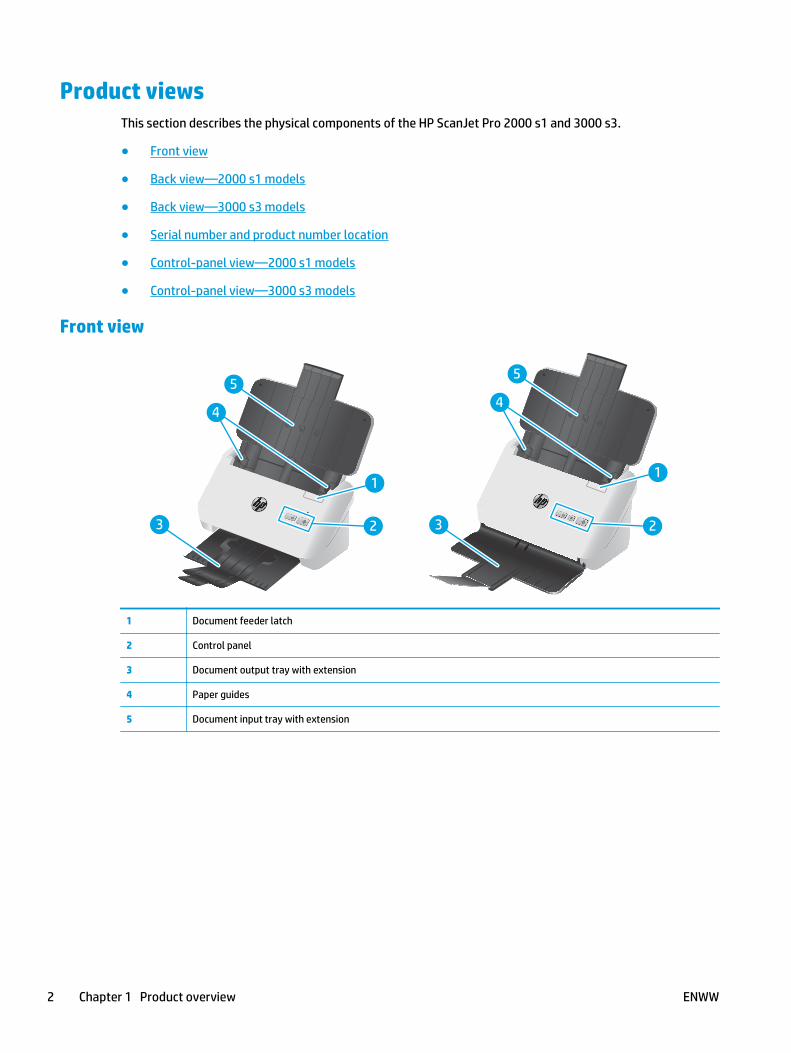
Product viewsThis section describes the physical components of the HP ScanJet Pro 2000 s1 and 3000 s3.
● Front view
● Back view—2000 s1 models
● Back view—3000 s3 models
● Serial number and product number location
● Control-panel view—2000 s1 models
● Control-panel view—3000 s3 models
Front view
3 2
1
5
1
23
45
4
55
44
3 3
11
2 2
1 Document feeder latch
2 Control panel
3 Document output tray with extension
4 Paper guides
5 Document input tray with extension
2 Chapter 1 Product overview ENWW
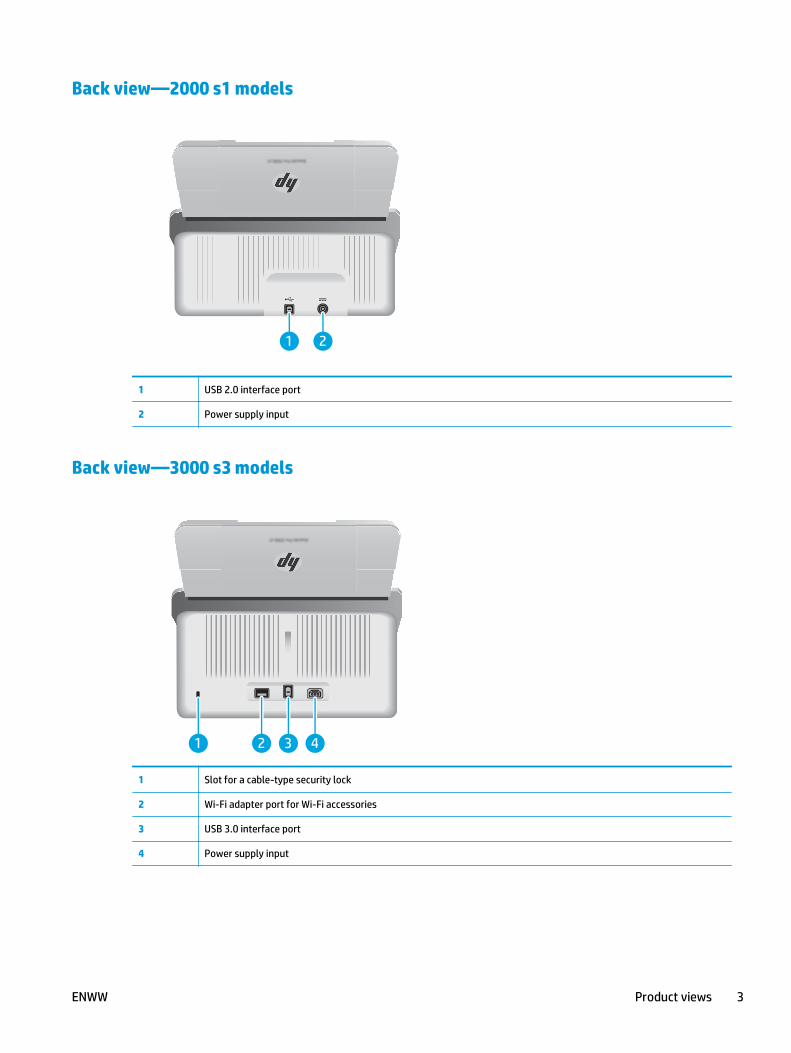
Back view—2000 s1 models
21
1 USB 2.0 interface port
2 Power supply input
Back view—3000 s3 models
2 31 4
1 Slot for a cable-type security lock
2 Wi-Fi adapter port for Wi-Fi accessories
3 USB 3.0 interface port
4 Power supply input
ENWW Product views 3
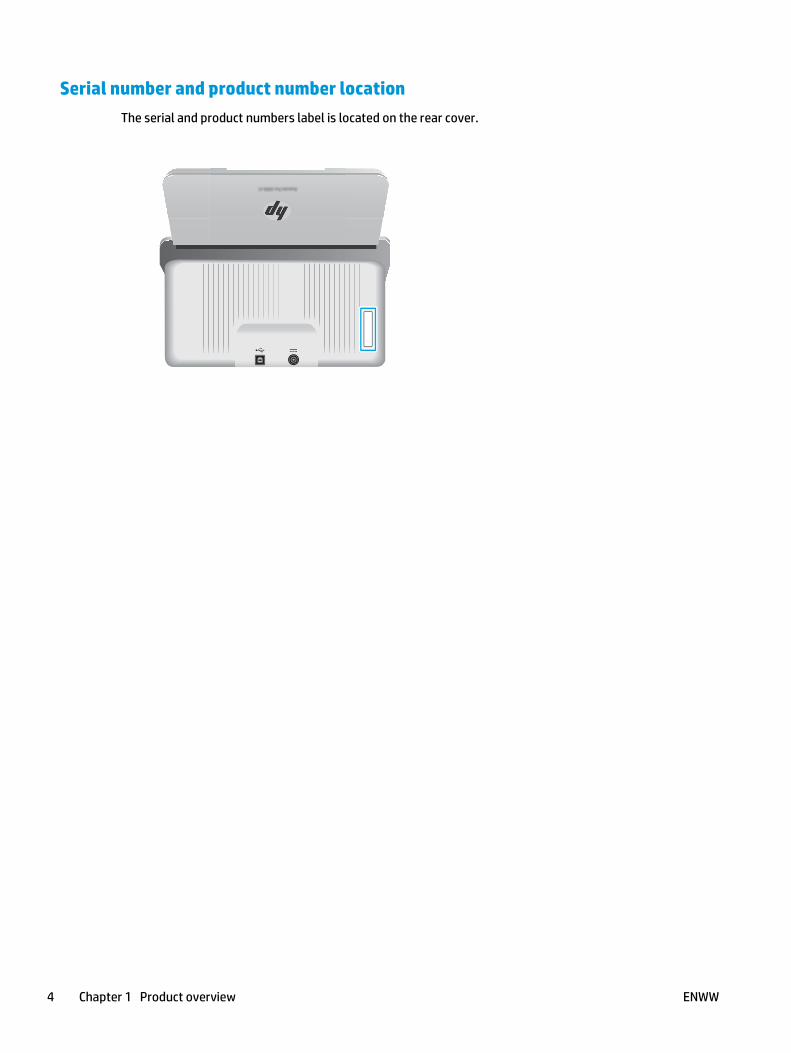
Serial number and product number locationThe serial and product numbers label is located on the rear cover.
4 Chapter 1 Product overview ENWW
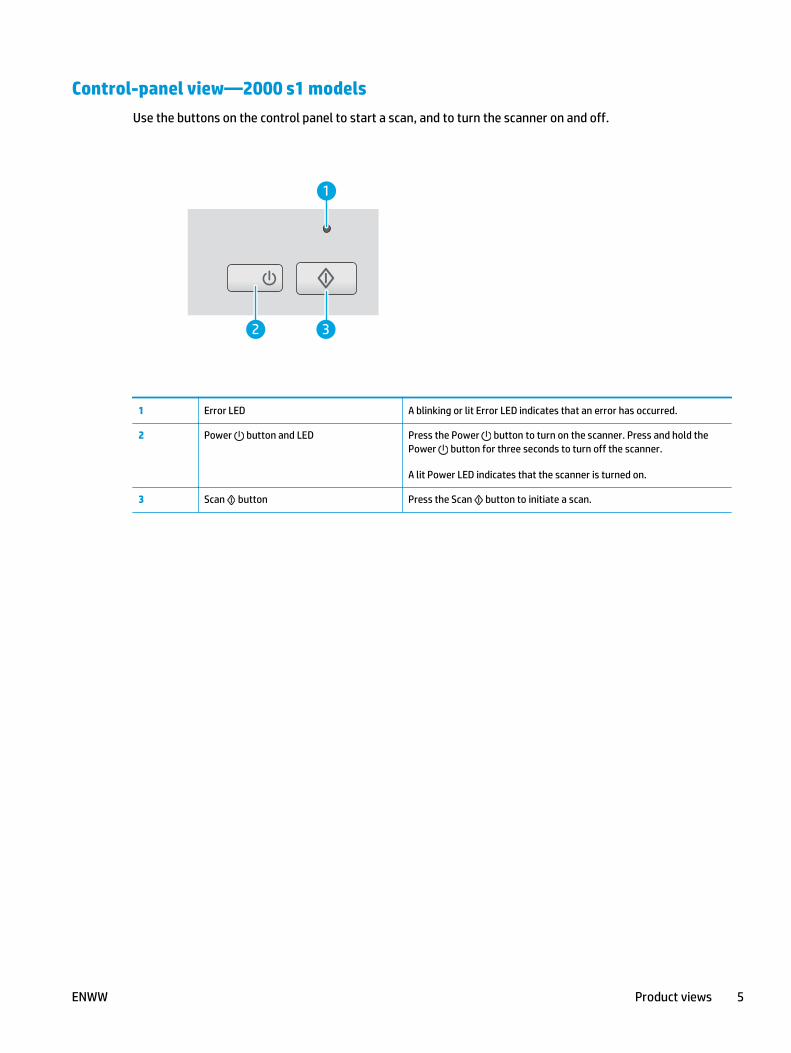
Control-panel view—2000 s1 modelsUse the buttons on the control panel to start a scan, and to turn the scanner on and off.
1
2 3
1 Error LED A blinking or lit Error LED indicates that an error has occurred.
2 Power button and LED Press the Power button to turn on the scanner. Press and hold thePower button for three seconds to turn off the scanner.
A lit Power LED indicates that the scanner is turned on.
3 Scan button Press the Scan button to initiate a scan.
ENWW Product views 5
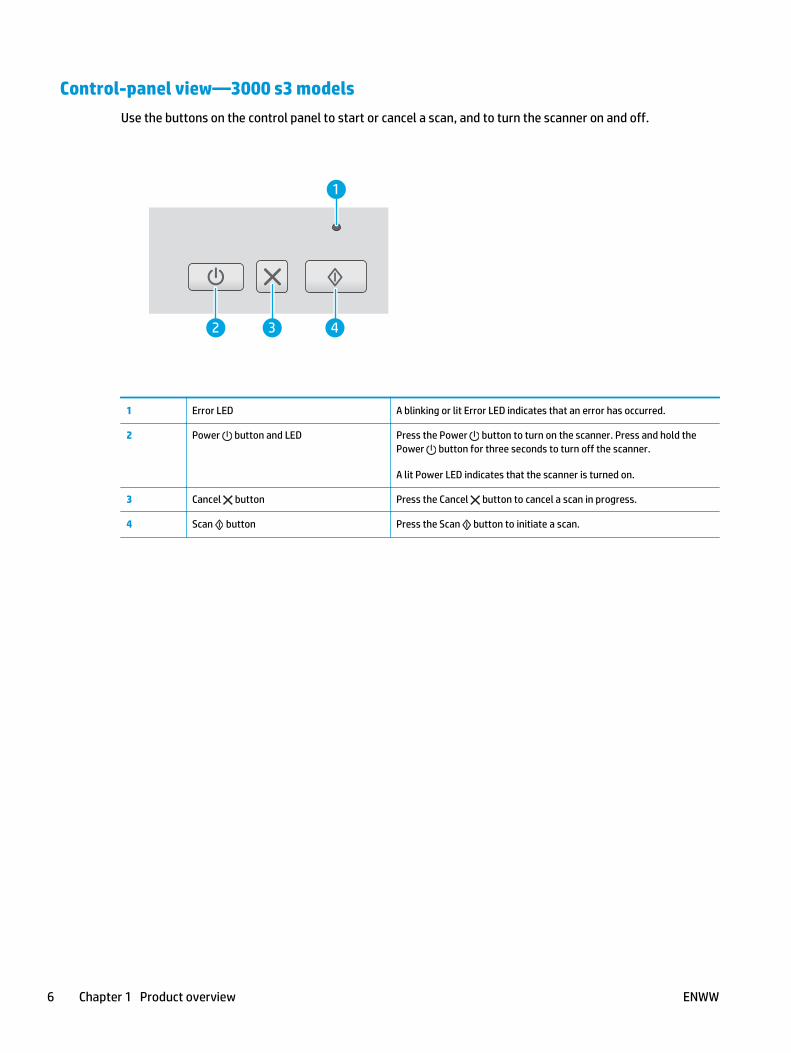
Control-panel view—3000 s3 modelsUse the buttons on the control panel to start or cancel a scan, and to turn the scanner on and off.
1
3 42
1 Error LED A blinking or lit Error LED indicates that an error has occurred.
2 Power button and LED Press the Power button to turn on the scanner. Press and hold thePower button for three seconds to turn off the scanner.
A lit Power LED indicates that the scanner is turned on.
3 Cancel button Press the Cancel button to cancel a scan in progress.
4 Scan button Press the Scan button to initiate a scan.
6 Chapter 1 Product overview ENWW
Product specifications● Technical specifications
● Supported operating systems
● Product dimensions
● Power consumption, electrical specifications, and acoustic emissions
● Operating environmental range
Technical specifications
Feature Specification
Input tray capacity 50 sheets of 75g/m2 (20 lb)
Minimum paper size 2000 s1: 51 x 51 mm (2 x 2 in)
3000 s3: 51 x 74 mm (2 x 2.9 in)
Maximum paper size 3100 x 216 mm (122 x 8.5 in)
Minimum paper weight 2000 s1: 50 g/m2 (13 lb)
3000 s3: 40 g/m2 (10.7 lb)
Maximum paper weight 2000 s1: 180 g/m2 (48 lb)
3000 s3: 413 g/m2 (110 lb)
Minimum paper guiding space 51 mm (2 in)
Resolution 600 pixels per inch (ppi) for scanning
Environmental features ● By default, scanner enters Sleep Mode prior to 15 minutes of inactivity
● ENERGY STAR® qualified
Paper-handling ● Two-sided scanning: Two-sided documents scan in a single pass
● HP EveryPage with Ultrasonic multi-feed sensor: Detects when multiple pages feedthrough simultaneously (3000 s3 models only)
Supported operating systemsThe scanner supports the following operating systems.
Windows Windows 7
Windows 8
Windows 8.1
Windows 10
OS X OS X 10.9 Mavericks (2000 s1 models only)
OS X 10.10 Yosemite (2000 s1 models only)
OS X 10.11 El Capitan
ENWW Product specifications 7
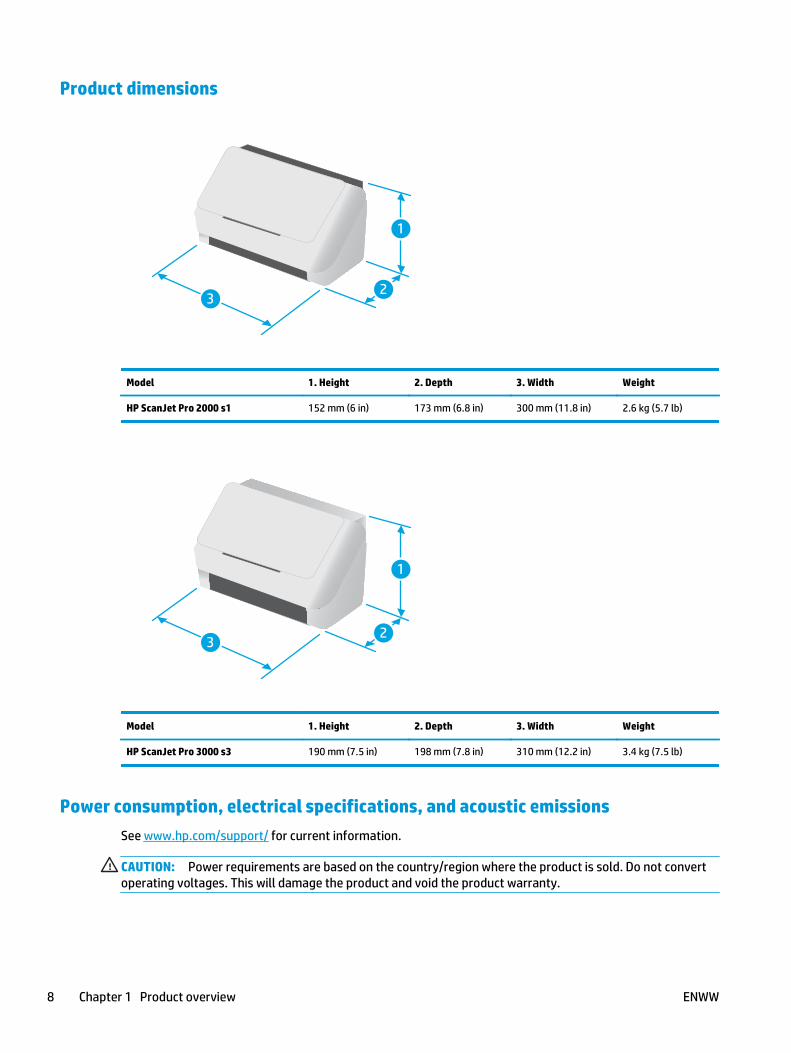
Product dimensions
1
32
Model 1. Height 2. Depth 3. Width Weight
HP ScanJet Pro 2000 s1 152 mm (6 in) 173 mm (6.8 in) 300 mm (11.8 in) 2.6 kg (5.7 lb)
1
32
Model 1. Height 2. Depth 3. Width Weight
HP ScanJet Pro 3000 s3 190 mm (7.5 in) 198 mm (7.8 in) 310 mm (12.2 in) 3.4 kg (7.5 lb)
Power consumption, electrical specifications, and acoustic emissionsSee www.hp.com/support/ for current information.
CAUTION: Power requirements are based on the country/region where the product is sold. Do not convertoperating voltages. This will damage the product and void the product warranty.
8 Chapter 1 Product overview ENWW

Operating environmental range
Environment Recommended Allowed
Temperature 17.5° to 25°C (63.5° to 77°F) 10° to 35°C (50° to 95°F)
Relative humidity 30% to 70% relative humidity (RH) 10% to 80% RH
Altitude Not applicable 0 to 3048 m (0 to 10,000 ft)
ENWW Product specifications 9

Product hardware setup and software installationFor basic setup instructions, see the Installation Guide that came with the product. For additionalinstructions, go to HP support on the web.
Go to www.hp.com/go/sj2000s1 or www.hp.com/go/sj3000s3 for HP's all-inclusive help for the product. Findthe following support:
● Install and configure
● Learn and use
● Solve problems
● Download software and firmware updates
● Join support forums
● Find warranty and regulatory information
10 Chapter 1 Product overview ENWW
Scanner software (Windows)The scanner comes with a variety of Windows scanning software and drivers, including HP Scan.
● HP Scan software
● HP Scanner Tools Utility
● HP TWAIN
● ISIS (3000 s3 models only)
● WIA
HP Scan software Perform scans using the HP ScanJet Pro 2000 s1 and 3000 s3 scanner.
HP Scanner Tools UtilityUse the HP Scanner Tools Utility to complete the following tasks:
● Set maintenance and status update notification options
● Change the scanner's power management settings
● View scanner information (firmware version, serial number, total number of pages scanned)
To open the utility, do one of the following:
● Windows 7: Double-click the HP Scanner Tools Utility icon on your desktop.
● Windows 8, 8.1, and 10: On the Start screen, click the HP Scanner Tools Utility tile.
● Click Start, select Programs or All Programs, select HP, select Scanjet, select 2000 s1 or 3000 s3, andthen click Scanner Tools Utility.
For more information, click the Help button at the bottom of the HP Scanner Tools Utility.
HP TWAINHP TWAIN provides a software interface between imaging/scanning hardware and TWAIN-compliant softwareapplications. Not all TWAIN-compliant software works in the same way, so consult the softwaredocumentation for details on how to acquire scans.
ISIS (3000 s3 models only)ISIS (Image and Scanner Interface Specification) provides a software interface between imaging/scanninghardware and software applications. ISIS drivers provide a consistent interaction with all ISIS-compliantscanners.
WIAWIA provides a software interface between imaging/scanning hardware and WIA-compliant softwareapplications. Not all WIA-compliant software works in the same way, so consult the software documentationfor details on how to acquire scans.
ENWW Scanner software (Windows) 11

Scanner software (OS X) The 3000 s3 model is compliant with Apple AirPrint-Scan functionality. Without installing any additionalsoftware, you can scan using Image Capture or other ICA-compliant applications.
To take advantage of all features of your scanner, HP recommends installing the HP provided scan solution,including HP Easy Scan and HP Utility.
● HP Easy Scan
● HP Utility
HP Easy ScanScan documents and photos, and manage scan shortcuts.
HP UtilityYou can use the HP Utility when the scanner is connected with a USB cable.
The Maintenance pane in HP Utility displays the scanner usage, maintenance history, and notifies the userwhen maintenance is due. The notification displays in HP Utility when the Maintenance pane is selected.
HP Utility allows you to configure the scanner and assign the Scan button workflow on a Mac. HP Utility isavailable in the Applications > HP folder.
Sleep Mode and auto-off settings By default, the scanner will enter Sleep Mode prior to 15 minutes of inactivity, and will turn off automaticallyafter two hours of inactivity to conserve power.
Windows: To change the default sleep and auto-off settings, use the HP Scanner Tools Utility.
1. Start the HP Scanner Tools Utility.
2. Click the Settings tab.
3. Select the desired values from the Auto-Off: Turn off the scanner after: drop-down list and the Putthe scanner to sleep after: drop-down list.
OS X: To change the default auto-off setting use the HP Utility Energy pane.
1. Start HP Utility.
2. Click the Energy icon.
3. Select a Lamp Mode setting.
4. Select an auto-off time setting from the Automatically power off the scanner: drop-down box.
12 Chapter 1 Product overview ENWW
2 Use the scanner
The following topics describe how to load and scan originals.
● Load originals
● Start a scan from the hardware
● Use the scanning software (Windows)
● Use the scanning software (OS X)
● Mobile scanning (wireless 3000 s3 models only)
● Scanning tips
ENWW 13
Load originalsThe following topics describe how to load originals into the input tray.
● Document loading tips
● Supported paper sizes and types
● Load documents
● Load cards
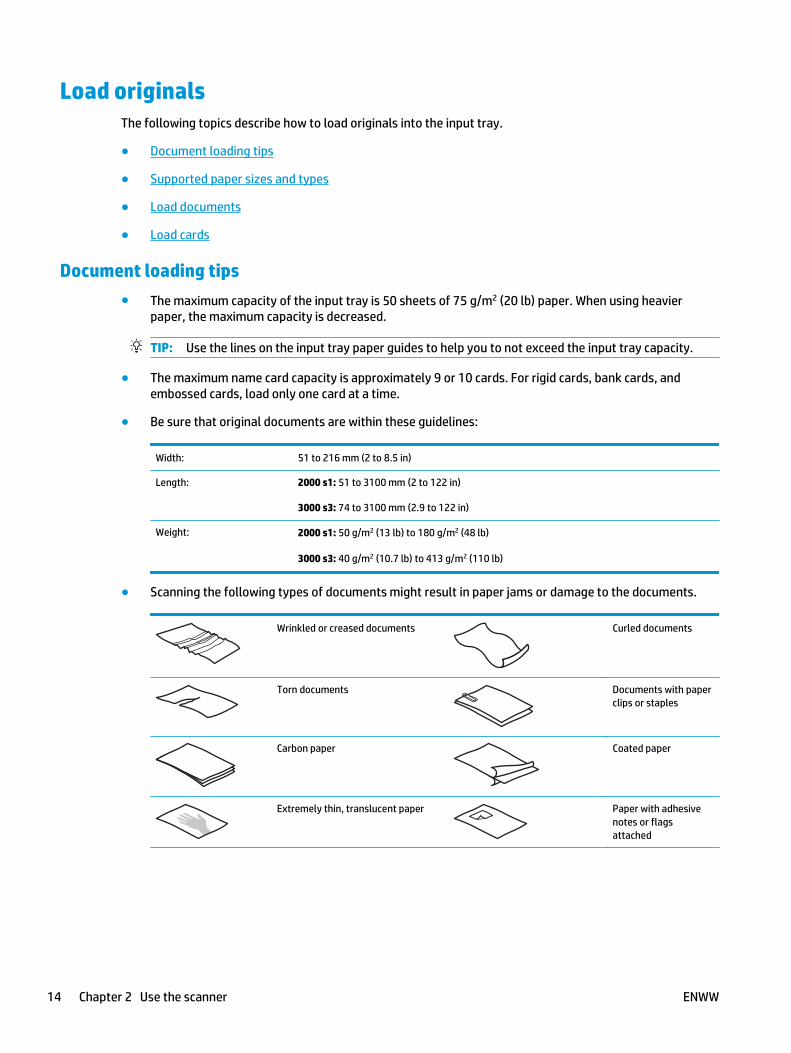
Document loading tips● The maximum capacity of the input tray is 50 sheets of 75 g/m2 (20 lb) paper. When using heavier
paper, the maximum capacity is decreased.
TIP: Use the lines on the input tray paper guides to help you to not exceed the input tray capacity.
● The maximum name card capacity is approximately 9 or 10 cards. For rigid cards, bank cards, andembossed cards, load only one card at a time.
● Be sure that original documents are within these guidelines:
Width: 51 to 216 mm (2 to 8.5 in)
Length: 2000 s1: 51 to 3100 mm (2 to 122 in)
3000 s3: 74 to 3100 mm (2.9 to 122 in)
Weight: 2000 s1: 50 g/m2 (13 lb) to 180 g/m2 (48 lb)
3000 s3: 40 g/m2 (10.7 lb) to 413 g/m2 (110 lb)
● Scanning the following types of documents might result in paper jams or damage to the documents.
Wrinkled or creased documents Curled documents
Torn documents Documents with paperclips or staples
Carbon paper Coated paper
Extremely thin, translucent paper Paper with adhesivenotes or flagsattached
14 Chapter 2 Use the scanner ENWW
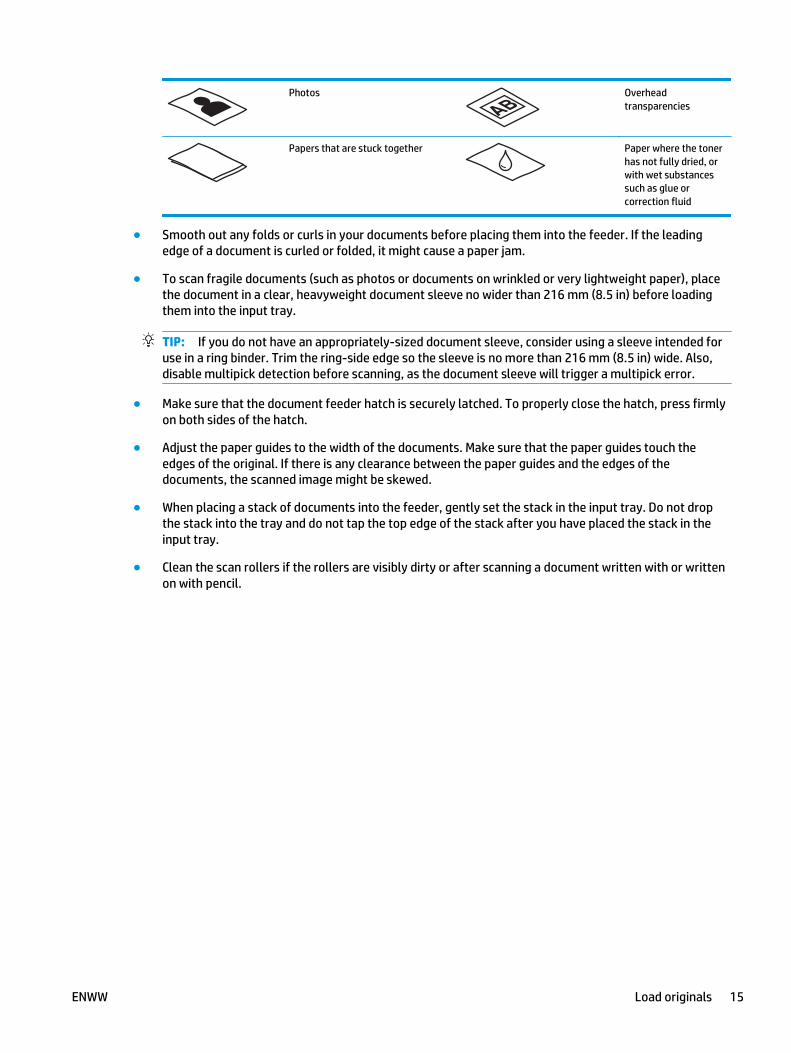
Photos Overheadtransparencies
Papers that are stuck together Paper where the tonerhas not fully dried, orwith wet substancessuch as glue orcorrection fluid
● Smooth out any folds or curls in your documents before placing them into the feeder. If the leadingedge of a document is curled or folded, it might cause a paper jam.
● To scan fragile documents (such as photos or documents on wrinkled or very lightweight paper), placethe document in a clear, heavyweight document sleeve no wider than 216 mm (8.5 in) before loadingthem into the input tray.
TIP: If you do not have an appropriately-sized document sleeve, consider using a sleeve intended foruse in a ring binder. Trim the ring-side edge so the sleeve is no more than 216 mm (8.5 in) wide. Also,disable multipick detection before scanning, as the document sleeve will trigger a multipick error.
● Make sure that the document feeder hatch is securely latched. To properly close the hatch, press firmlyon both sides of the hatch.
● Adjust the paper guides to the width of the documents. Make sure that the paper guides touch theedges of the original. If there is any clearance between the paper guides and the edges of thedocuments, the scanned image might be skewed.
● When placing a stack of documents into the feeder, gently set the stack in the input tray. Do not dropthe stack into the tray and do not tap the top edge of the stack after you have placed the stack in theinput tray.
● Clean the scan rollers if the rollers are visibly dirty or after scanning a document written with or writtenon with pencil.
ENWW Load originals 15
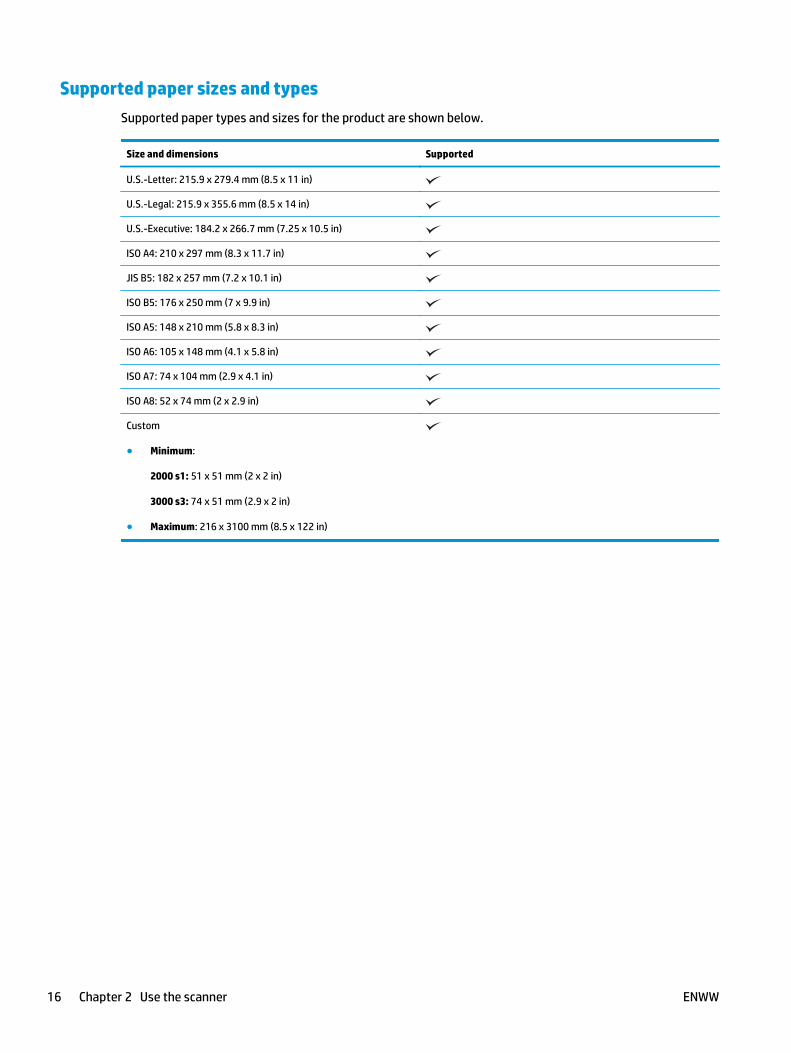
Supported paper sizes and typesSupported paper types and sizes for the product are shown below.
Size and dimensions Supported
U.S.-Letter: 215.9 x 279.4 mm (8.5 x 11 in)
U.S.-Legal: 215.9 x 355.6 mm (8.5 x 14 in)
U.S.-Executive: 184.2 x 266.7 mm (7.25 x 10.5 in)
ISO A4: 210 x 297 mm (8.3 x 11.7 in)
JIS B5: 182 x 257 mm (7.2 x 10.1 in)
ISO B5: 176 x 250 mm (7 x 9.9 in)
ISO A5: 148 x 210 mm (5.8 x 8.3 in)
ISO A6: 105 x 148 mm (4.1 x 5.8 in)
ISO A7: 74 x 104 mm (2.9 x 4.1 in)
ISO A8: 52 x 74 mm (2 x 2.9 in)
Custom
● Minimum:
2000 s1: 51 x 51 mm (2 x 2 in)
3000 s3: 74 x 51 mm (2.9 x 2 in)
● Maximum: 216 x 3100 mm (8.5 x 122 in)
16 Chapter 2 Use the scanner ENWW

Load documents1. Open the document input and output trays, and then extend the tray extensions.
3000 s3 models: For the output tray, slide the tray out from underneath the scanner, unfold the firstextension, slide the second extension outward, and then rotate the small third tab 90 degrees.
NOTE: 3000 s3 models: For sheets longer than Letter or A4, such as Legal, leave the small tab folded.
2. Adjust the paper guides on the input tray to the width of the documents. Take care not to overtightenthe guides, which can restrict paper feeding.
When scanning small originals such as checks, it is especially important that the paper guides fit snuglyagainst the edges of the original yet not restrict paper feeding.
ENWW Load originals 17
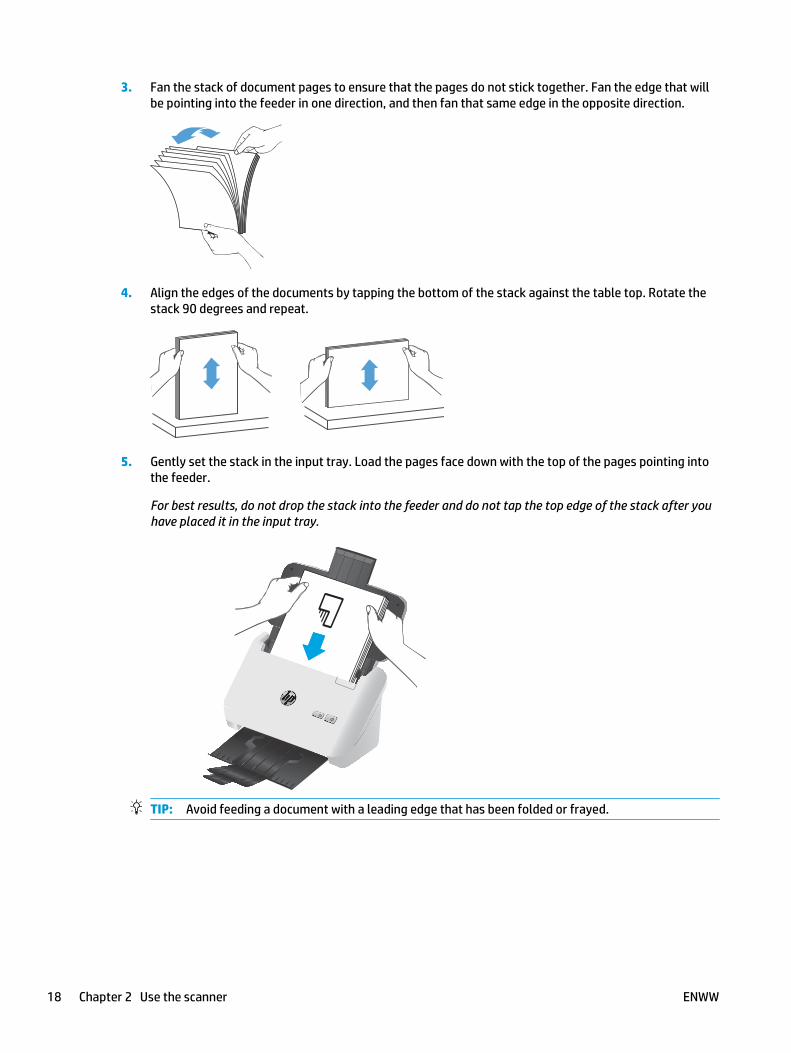
3. Fan the stack of document pages to ensure that the pages do not stick together. Fan the edge that willbe pointing into the feeder in one direction, and then fan that same edge in the opposite direction.
4. Align the edges of the documents by tapping the bottom of the stack against the table top. Rotate thestack 90 degrees and repeat.
5. Gently set the stack in the input tray. Load the pages face down with the top of the pages pointing intothe feeder.
For best results, do not drop the stack into the feeder and do not tap the top edge of the stack after youhave placed it in the input tray.
TIP: Avoid feeding a document with a leading edge that has been folded or frayed.
18 Chapter 2 Use the scanner ENWW
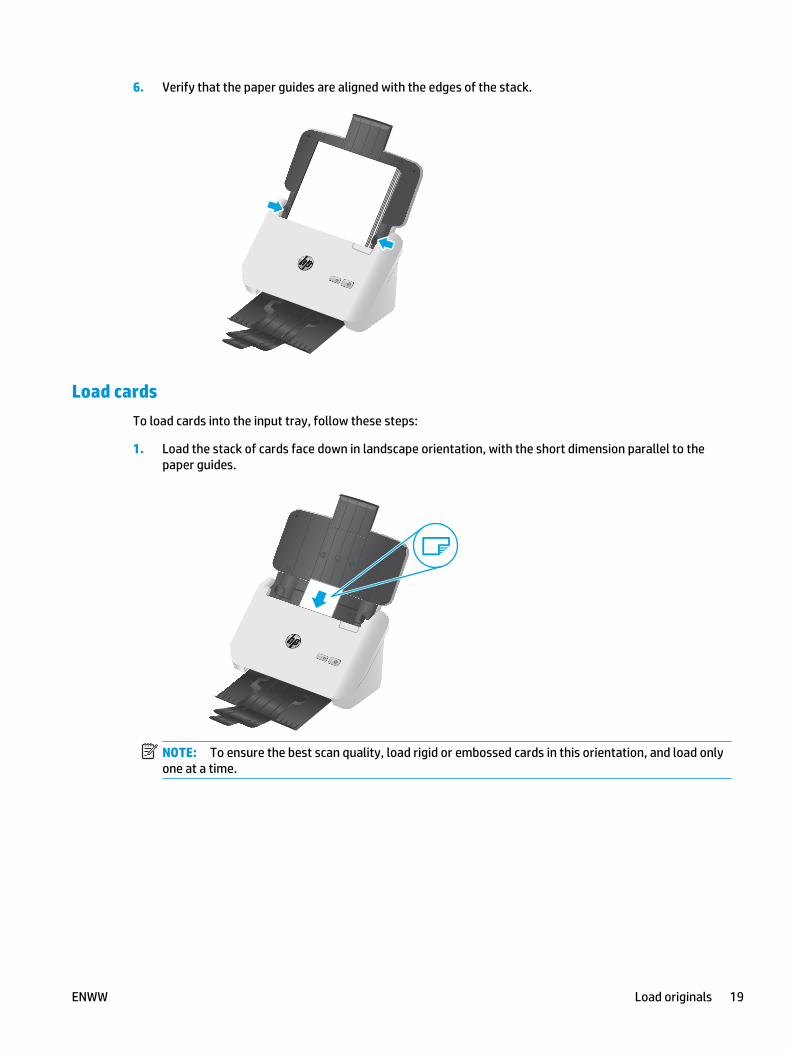
6. Verify that the paper guides are aligned with the edges of the stack.
Load cardsTo load cards into the input tray, follow these steps:
1. Load the stack of cards face down in landscape orientation, with the short dimension parallel to thepaper guides.
NOTE: To ensure the best scan quality, load rigid or embossed cards in this orientation, and load onlyone at a time.
ENWW Load originals 19

2. Adjust the paper guides to center the cards, making sure the paper guides touch the edges of the cards.
3. 3000 s3 models: Set the output tray small media guide, and disable the multi-feed detection setting.
20 Chapter 2 Use the scanner ENWW
Start a scan from the hardwareScan from the control panel buttons
To scan from the control panel, follow these steps:
1. Load the originals.
2. Press the Scan button.
2000 s1 models: To cancel a scan, click the Cancel button in the HP Scan software.
3000 s3 models: To cancel a scan, press the control-panel Cancel button.
Use the scanning software (Windows)The following topics describe how to use the scanning software.
● Scan to a picture
● Scan to a PDF
● Scan text for editing (OCR)
● Scan to email
● Scan to cloud
● Scan long or extra-long documents
● Detect multi-feeds (3000 s3 models only)
● Everyday Scan
● Filter out color from a document (color dropout)
● Automatically detect page size
● Automatically crop or pad scanned image to selected page size
● Automatically detect color
● Automatically straighten scanned images
● Scan by using other scan software
Scan to a picture1. Load the document into the input tray.
2. Open the HP Scan software.
3. Select Save as JPEG or Email as JPEG, and then click Scan.
-or-
Choose any other scan shortcut, change the Item Type to Photo, select a picture file from the File Typedrop down list, and then click Scan.
ENWW Start a scan from the hardware 21
Scan to a PDF1. Load the document into the input tray.
2. Open the HP Scan software.
3. Select Save as PDF or Email as PDF, and then click Scan.
-or-
Choose any other scan shortcut and select PDF from the File Type drop down list, and then click Scan.
Scan text for editing (OCR)The HP scanner software uses optical character recognition (OCR) to convert text on a page to text that canbe edited on a computer. The OCR software comes with the HP Scan and ReadIris Pro software. Forinformation about using the OCR software, see scan text for editing in the online Help.
Scan to email
NOTE: To scan to email, make sure there is an Internet connection.
1. Load the document into the input tray.
2. Open the HP Scan software.
3. Select Email as PDF or Email as JPEG, and then click Scan.
-or-
Choose any other scan shortcut and select Email from the Send To drop down list, and then click Scan.
Scan to cloud
NOTE: To scan to the cloud, make sure there is an Internet connection.
1. Load the document into the input tray.
2. Open the HP Scan software.
3. Select Send to Cloud, and then select the file destination, such as Google Drive or DropBox.
4. Select Scan.
22 Chapter 2 Use the scanner ENWW
Scan long or extra-long documentsBy default, the scanner automatically detects page size using the Auto Detect Size selection for page lengthsless than or equal to 356 mm (14 in).
For long or extra-long documents, select Long (8.5 x 34 in) or Extra Long (8.5 x 122 in) from the page sizedrop-down list in the scan shortcut settings.
NOTE: Only one page at a time can be scanned when using a long or extra-long page setting.
If the scanner is set to scan long or extra-long pages, it will scan one page at a time. Using this setting to scanregular pages will slow down the process and should only be used to scan pages longer than 356 mm (14 in).
Detect multi-feeds (3000 s3 models only)The multi-feed detection feature stops the scan process if it senses that multiple pages are fed into thescanner at one time. This feature is enabled by default.
Disabling this feature might be helpful when scanning:
● Multipart forms (a use that HP does not recommend).
● Documents which have labels or sticky notes attached to them.
NOTE: Use the ISIS or WIA user interface to enable multi-feed detection when scanning from non-HPsoftware.
Everyday ScanThe Everyday Scan shortcut allows users to define and save a scan shortcut for their everyday needs. Thefollowing Scan Shortcut Settings are customizable when the Everyday Scan shortcut is selected:
● Item Type
● Page Sides
● Page Size
● Color Mode
● Destination/File Type
Filter out color from a document (color dropout)You can filter out a color channel (red, green, or blue) or up to three individual colors. For specific colors, thesensitivity setting controls how closely a scanned color must approximate the specified color.
Removing colors from the scan might reduce the scan file size and improve optical character recognition(OCR) results.
To select colors to eliminate from a scan in HP Scan software, follow these steps:
1. Open the HP Scan software.
2. Scan a sample page, which has the colors to be dropped, into the viewer.
ENWW Use the scanning software (Windows) 23
3. Click the More button, and then click the Image tab and select the Color Dropout feature.
4. Enable a color to drop and select the color from the preview using the eyedropper tool. Be sure to savethe colors.
Only the color dropout options available for your scanner are selectable.
For information about the color dropout settings, see the online help for the scanning software that you areusing.
Automatically detect page sizeThe HP Scan software is capable of automatically detecting page size using the Auto Detect Size option.When the Auto Detect Size option is used, the scanned image is cropped to the size of the detected page andstraighten any skewed content.
Automatically crop or pad scanned image to selected page sizeTo automatically crop or pad a scanned image to a selected page size, follow these steps:
1. Open the HP Scan software.
2. Select a scan shortcut, and then click Edit shortcut.
3. Select your crop options.
● To automatically crop to the content of the document, click the Image Processing tab of the Editdialog box, select the Crop to content on page check box, and then click Crop settings.
● To automatically crop to the dimensions of the document, click the Scan Settings tab of the Editdialog box, click Page Size, and then select the Auto detect size check box.
NOTE: Use the ISIS or TWAIN user interface to set crop options when scanning from non-HP scanningsoftware.
For information about the auto-crop settings, see the online help for the scanning software that you areusing.
Automatically detect colorUse this feature to reduce the size of the scanned file by only saving pages that contain color as color scans,and saving all other pages as black and white.
To automatically detect color in a scanned image, follow these steps:
1. Open the HP Scan software.
2. Select a scan shortcut.
3. To adjust the Auto Detect Color sensitivity and output mode settings, click More, select Image, andthen click the Auto Detect Color drop-down box.
4. Click on the Color Mode drop-down box, and then select Auto Detect Color.
24 Chapter 2 Use the scanner ENWW
NOTE: For information about the automatic color detection settings, see the online help for the scanningsoftware that you are using.
Use the ISIS or WIA user interface to automatically detect color when scanning from non-HP scanningsoftware.
Automatically straighten scanned imagesWindows: Use the Auto-Straighten feature to straighten content that is skewed relative to the pagedimensions in the source document. Use the Auto Detect Size feature to deskew page images that mighthave become skewed during the scanning process.
1. Open the HP Scan software.
2. Select a scan shortcut.
3. Click More, select the Document tab, and then select Straighten Content.
Scan by using other scan softwareThe following third-party applications are also supported by the scanner:
● Readiris Pro: OCR application.
● Cardiris: Business card application.
● PaperPort: Personal document management application.
● Third-party applications that support TWAIN, ISIS, and WIA.
ENWW Use the scanning software (Windows) 25

Use the scanning software (OS X)The following topics describe how to scan using HP Easy Scan.
● Scan to email
● HP Easy Scan
● Scan from other applications
● Advanced configuration with HP Utility for OS X
Scan to emailThe computer must be connected to the Internet to complete this task.
To scan to an email, complete these steps:
1. Load the document into the input tray.
2. In the Applications folder, double-click the Apple Image Capture icon.
3. In the Image Capture window, select your scanner from the Devices list.
TIP: For more Apple Image Capture scanning options, click Show Details.
4. Select Mail in the Scan To list to automatically attach the scan to an email message.
NOTE: If you use an email application other than Apple Mail, you can scan the document to a file andmanually attach it to an email, or you can add your email application to the Scan To list.
To add your email application to the list, select Other, select your email application, and then clickChoose.
5. On the resulting email message, enter the email address, subject, and any message text, and then sendthe email.
HP Easy Scan1. Load the document into the input tray.
2. In the Applications folder, double-click the HP Easy Scan icon.
3. Confirm that the HP ScanJet Pro 2000 s1 or 3000 s3 is the selected scanner.
4. Select a scan preset appropriate for the scan job.
5. Click the Scan button.
6. Once all the pages have been scanned, click File and then Save.
7. Specify how and where the file is to be saved, and then click Save.
Scan from other applicationsAn image can be scanned directly into any ICA-compliant application. In the application, look for options toimport or acquire images from a scanner.
26 Chapter 2 Use the scanner ENWW
NOTE: The HP software does not support TWAIN scanning. If the application has import or acquire functionsbut your HP scanner is not listed, the application might only be searching for scanners that support TWAIN.
Advanced configuration with HP Utility for OS XUse the HP Utility to check scanner status or to view or change scanner settings from your computer.
You can use the HP Utility when the scanner is connected with a USB cable.
Open HP Utility
1. At the computer, open the Applications folder.
2. Select HP, and then select HP Utility.
HP Utility features
The HP Utility toolbar includes these items:
● Devices: Click this button to show or hide Mac products found by the HP Utility.
● All Settings: Click this button to return to the HP Utility main view.
● HP Support: Click this button to open a browser and go to the HP support website.
● Supplies: Click this button to open the HP SureSupply website.
● Registration: Click this button to open the HP registration website.
● Recycling: Click this button to open the HP Planet Partners Recycling Program website.
HP Utility consists of pages that you open by clicking in the All Settings list.
ENWW Use the scanning software (OS X) 27

Mobile scanning (wireless 3000 s3 models only)HP offers multiple mobile solutions to enable easy scanning to an HP scanner from a tablet, smart phone, orother mobile device. For more information, go to www.hp.com/go/sj3000s3.
NOTE: Purchase the HP ScanJet Wireless Adapter 100 (L2761A) from HP.com in order to enable mobilescanning. Follow the installation guide to install the Wi-Fi accessory.
28 Chapter 2 Use the scanner ENWW
Scanning tips● Optimize scanning and task speeds
● Scanning fragile originals
Optimize scanning and task speedsSeveral settings influence the total time for a scanning job. To optimize scanning performance, consider thefollowing information.
● To optimize performance, make sure the computer meets the recommended system requirements. Toview minimum and recommended system requirements, see www.hp.com, and then search for thescanner model plus the word specifications.
● Saving a scanned image to a searchable format (for example, searchable PDF) takes more time thansaving to an image format because the scanned image is analyzed using optical character recognition(OCR). Verify the need for a searchable output file before selecting a searchable scan format.
● Scanning at a higher resolution than necessary increases scanning time and creates a larger file with noadditional benefit. If scanning at a high resolution, set the resolution to a lower level to increasescanning speed.
Scanning fragile originals To scan fragile documents (such as photos or documents on wrinkled or very lightweight paper), place thedocument in a clear, heavyweight document sleeve before loading it into the input tray.
ENWW Scanning tips 29

30 Chapter 2 Use the scanner ENWW

3 Care and maintenance
This section presents information about how to care for and maintain the scanner. For the latestmaintenance information, see www.hp.com/go/sj2000s1 or www.hp.com/go/sj3000s3.
● Clean the product
● Replace parts
● Order parts and accessories
ENWW 31
Clean the productOccasional cleaning of the scanner helps ensure high-quality scans. The amount of care necessary dependson several factors, including the amount of use and the environment. Perform routine cleaning as necessary.
● Clean the scanning strips
● Clean the paper path
● Clean the rollers
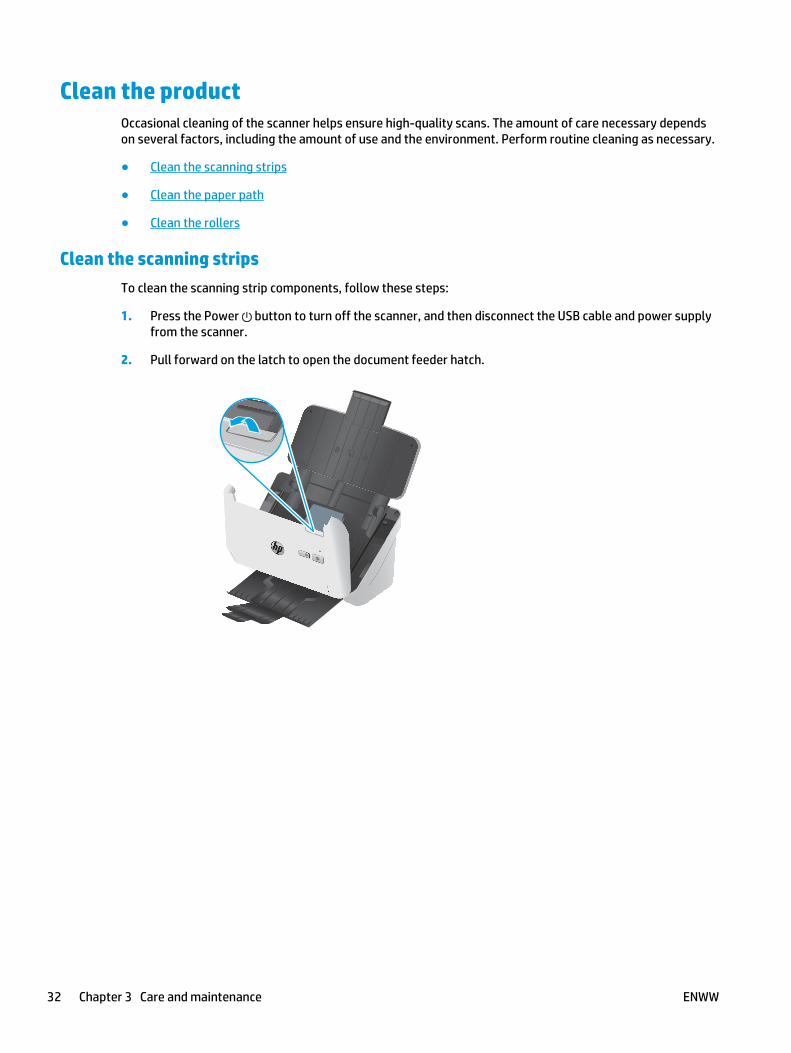
Clean the scanning stripsTo clean the scanning strip components, follow these steps:
1. Press the Power button to turn off the scanner, and then disconnect the USB cable and power supplyfrom the scanner.
2. Pull forward on the latch to open the document feeder hatch.
32 Chapter 3 Care and maintenance ENWW
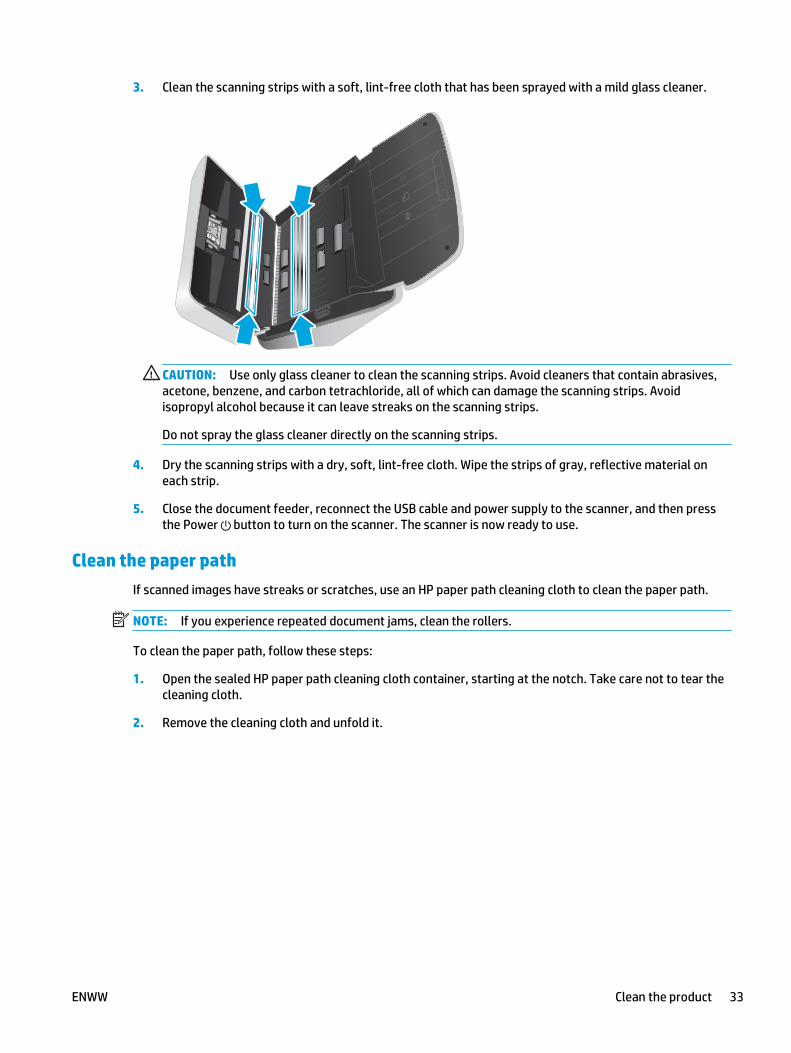
3. Clean the scanning strips with a soft, lint-free cloth that has been sprayed with a mild glass cleaner.
CAUTION: Use only glass cleaner to clean the scanning strips. Avoid cleaners that contain abrasives,acetone, benzene, and carbon tetrachloride, all of which can damage the scanning strips. Avoidisopropyl alcohol because it can leave streaks on the scanning strips.
Do not spray the glass cleaner directly on the scanning strips.
4. Dry the scanning strips with a dry, soft, lint-free cloth. Wipe the strips of gray, reflective material oneach strip.
5. Close the document feeder, reconnect the USB cable and power supply to the scanner, and then pressthe Power button to turn on the scanner. The scanner is now ready to use.
Clean the paper pathIf scanned images have streaks or scratches, use an HP paper path cleaning cloth to clean the paper path.
NOTE: If you experience repeated document jams, clean the rollers.
To clean the paper path, follow these steps:
1. Open the sealed HP paper path cleaning cloth container, starting at the notch. Take care not to tear thecleaning cloth.
2. Remove the cleaning cloth and unfold it.
ENWW Clean the product 33
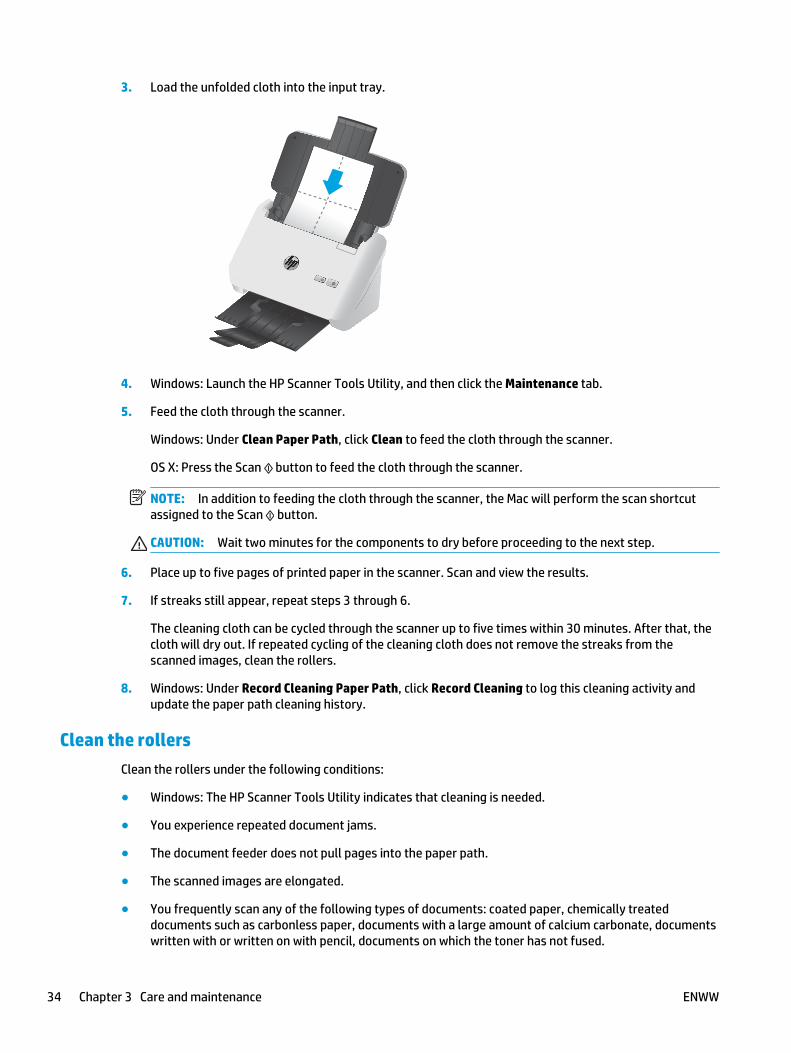
3. Load the unfolded cloth into the input tray.
4. Windows: Launch the HP Scanner Tools Utility, and then click the Maintenance tab.
5. Feed the cloth through the scanner.
Windows: Under Clean Paper Path, click Clean to feed the cloth through the scanner.
OS X: Press the Scan button to feed the cloth through the scanner.
NOTE: In addition to feeding the cloth through the scanner, the Mac will perform the scan shortcutassigned to the Scan button.
CAUTION: Wait two minutes for the components to dry before proceeding to the next step.
6. Place up to five pages of printed paper in the scanner. Scan and view the results.
7. If streaks still appear, repeat steps 3 through 6.
The cleaning cloth can be cycled through the scanner up to five times within 30 minutes. After that, thecloth will dry out. If repeated cycling of the cleaning cloth does not remove the streaks from thescanned images, clean the rollers.
8. Windows: Under Record Cleaning Paper Path, click Record Cleaning to log this cleaning activity andupdate the paper path cleaning history.
Clean the rollersClean the rollers under the following conditions:
● Windows: The HP Scanner Tools Utility indicates that cleaning is needed.
● You experience repeated document jams.
● The document feeder does not pull pages into the paper path.
● The scanned images are elongated.
● You frequently scan any of the following types of documents: coated paper, chemically treateddocuments such as carbonless paper, documents with a large amount of calcium carbonate, documentswritten with or written on with pencil, documents on which the toner has not fused.
34 Chapter 3 Care and maintenance ENWW
To clean the rollers, follow these steps:
1. Press the Power button to turn off the scanner, and then disconnect the USB cable and power supplyfrom the scanner.
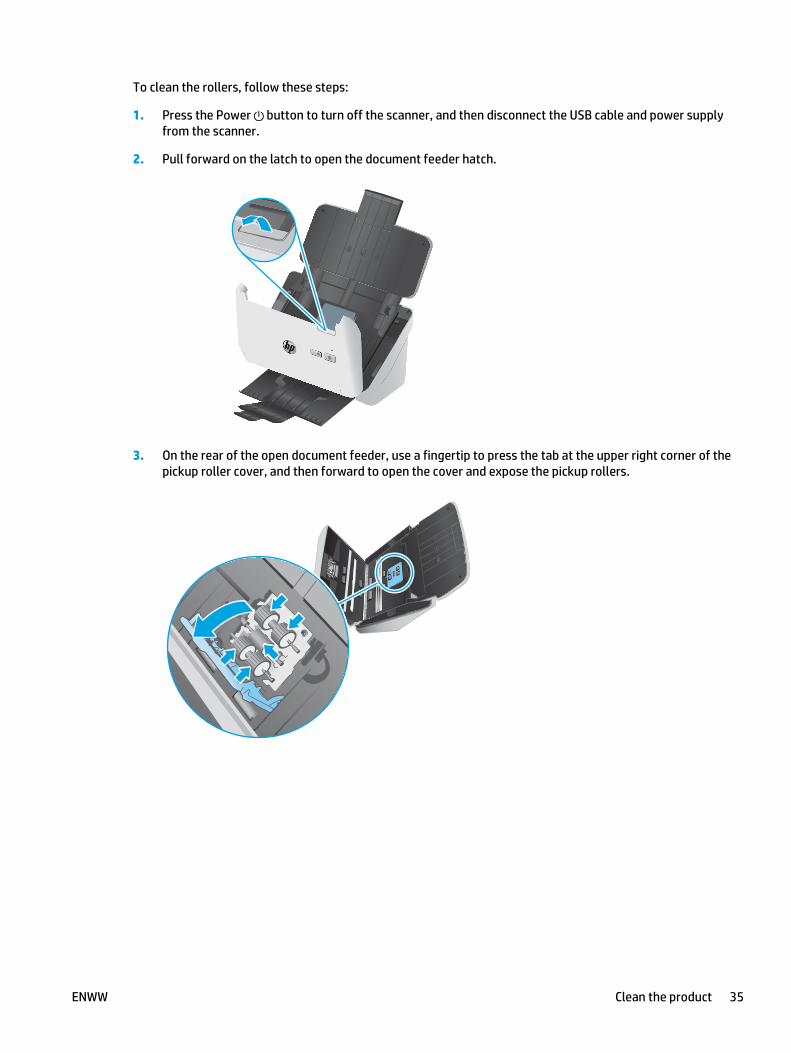
2. Pull forward on the latch to open the document feeder hatch.
3. On the rear of the open document feeder, use a fingertip to press the tab at the upper right corner of thepickup roller cover, and then forward to open the cover and expose the pickup rollers.
ENWW Clean the product 35
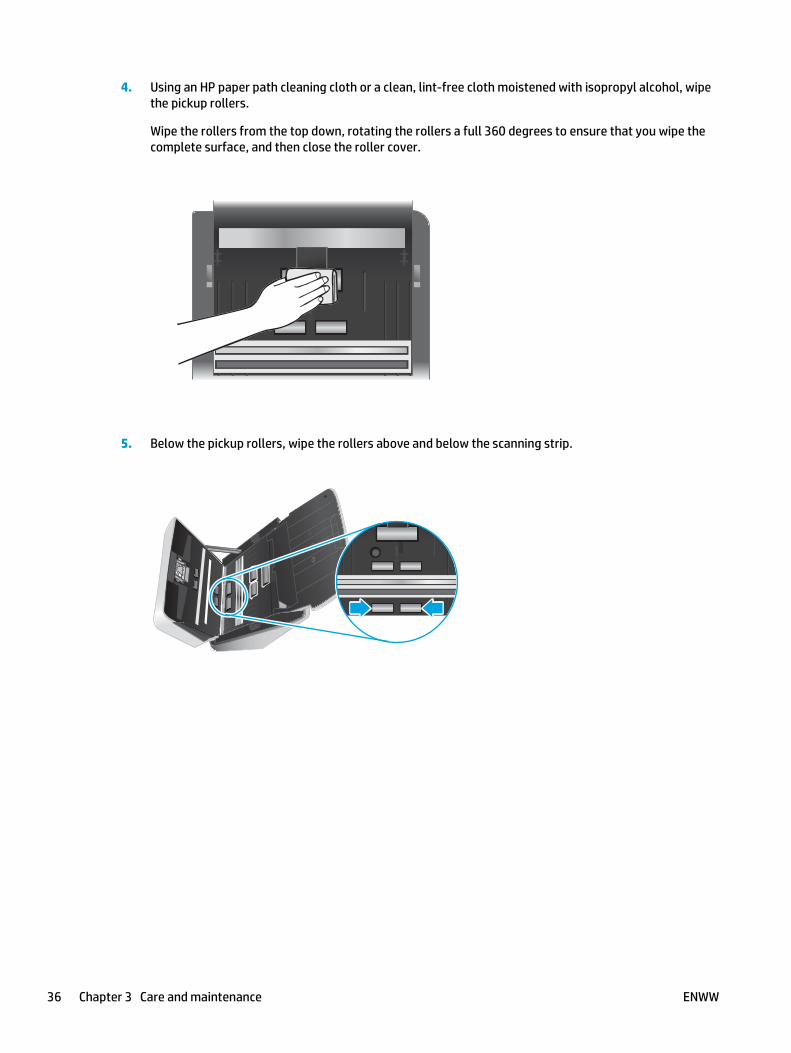
4. Using an HP paper path cleaning cloth or a clean, lint-free cloth moistened with isopropyl alcohol, wipethe pickup rollers.
Wipe the rollers from the top down, rotating the rollers a full 360 degrees to ensure that you wipe thecomplete surface, and then close the roller cover.
5. Below the pickup rollers, wipe the rollers above and below the scanning strip.
36 Chapter 3 Care and maintenance ENWW
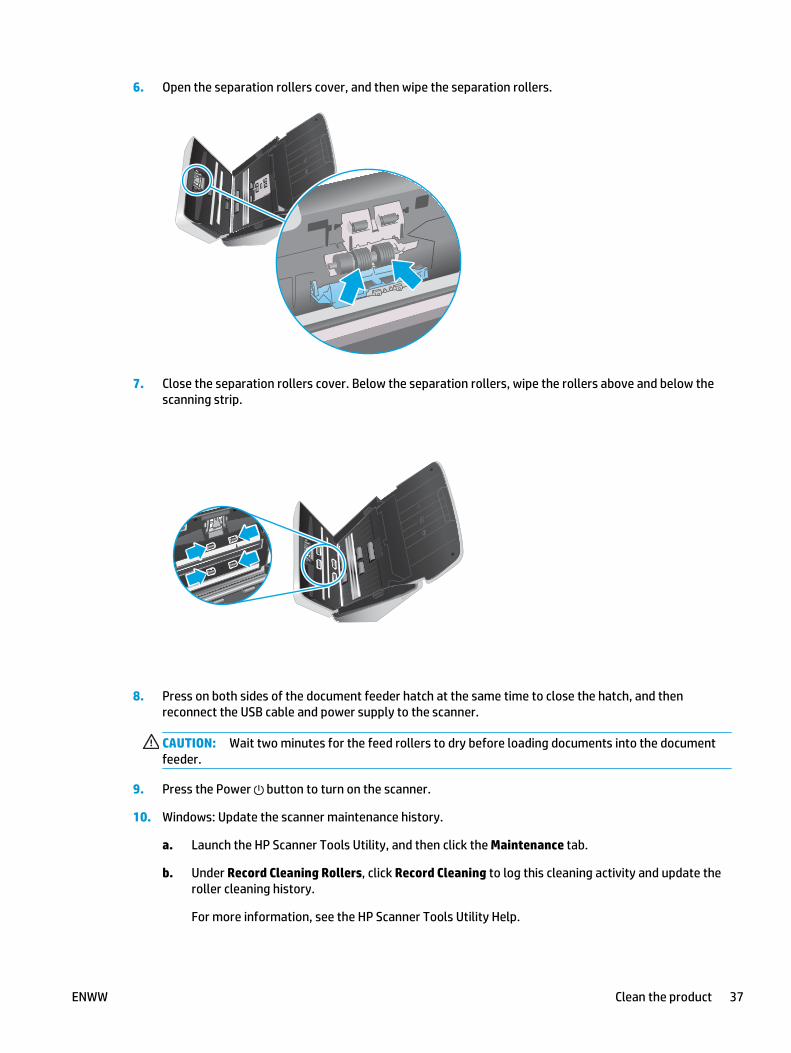
6. Open the separation rollers cover, and then wipe the separation rollers.
7. Close the separation rollers cover. Below the separation rollers, wipe the rollers above and below thescanning strip.
8. Press on both sides of the document feeder hatch at the same time to close the hatch, and thenreconnect the USB cable and power supply to the scanner.
CAUTION: Wait two minutes for the feed rollers to dry before loading documents into the documentfeeder.
9. Press the Power button to turn on the scanner.
10. Windows: Update the scanner maintenance history.
a. Launch the HP Scanner Tools Utility, and then click the Maintenance tab.
b. Under Record Cleaning Rollers, click Record Cleaning to log this cleaning activity and update theroller cleaning history.
For more information, see the HP Scanner Tools Utility Help.
ENWW Clean the product 37
Replace partsReplacing parts when necessary helps ensure high-quality scans. Parts might need to be replaced whenindicated by the HP Scanner Tools Utility, or if the scanner is not working correctly. The roller replacement kitincludes the following replacement parts:
● Pickup rollers
● Separation rollers
The replacement kit also includes detailed instructions for replacing each of these parts.
● Replace the roller kit (2000 s1 models)
● Replace the roller kit (3000 s3 models)
Replace the roller kit (2000 s1 models)Replace the rollers under the following conditions:
● Windows: When the Maintenance Recommended dialog indicates they are due for maintenance.
● If the scanner experiences repeated document jams.
NOTE: HP recommends replacing the rollers every 100,000 scans.
Windows: The HP Scanner Tools Utility can provide a reminder when service is needed, which depends onmany conditions and might be sooner than this replacement interval.
NOTE: The roller replacement kit is a consumable and is not covered under warranty or standard serviceagreements.
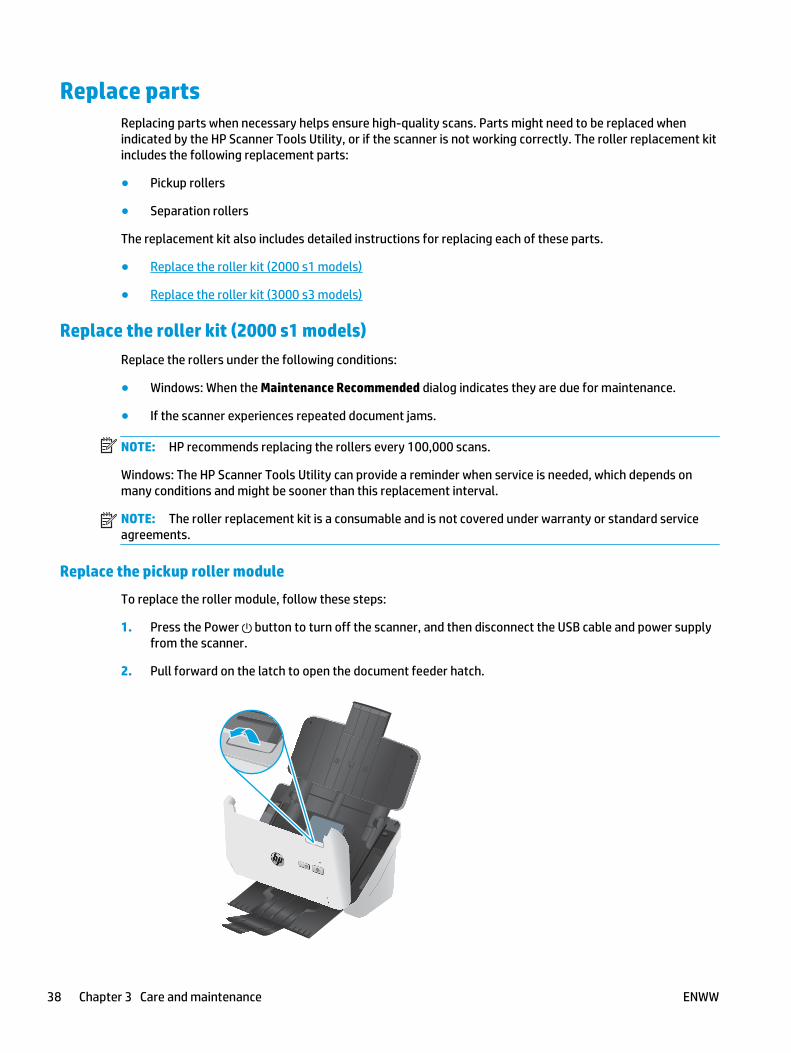
Replace the pickup roller module
To replace the roller module, follow these steps:
1. Press the Power button to turn off the scanner, and then disconnect the USB cable and power supplyfrom the scanner.
2. Pull forward on the latch to open the document feeder hatch.
38 Chapter 3 Care and maintenance ENWW
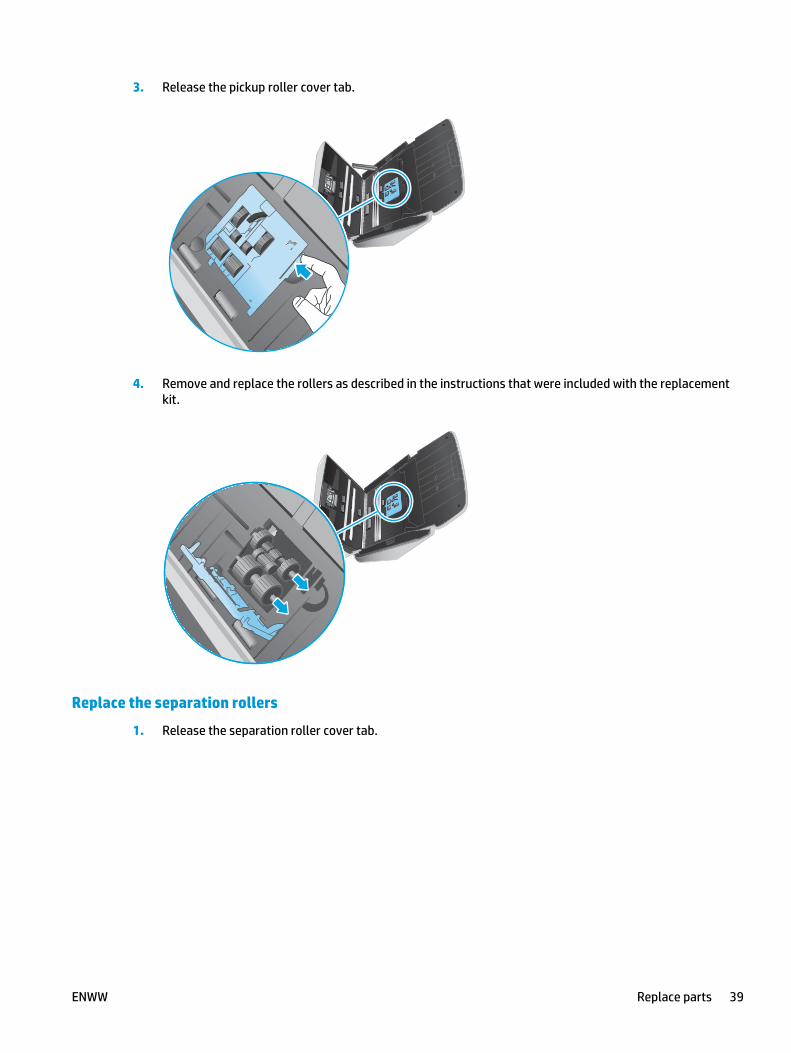
3. Release the pickup roller cover tab.
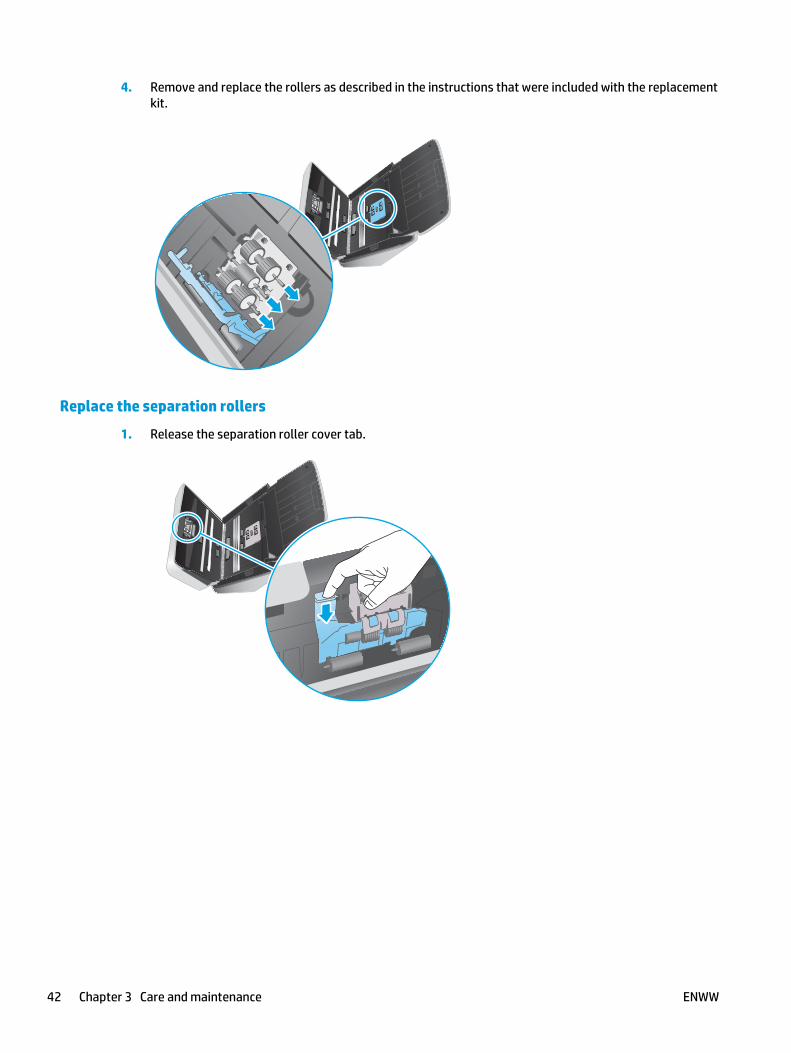
4. Remove and replace the rollers as described in the instructions that were included with the replacementkit.
Replace the separation rollers
1. Release the separation roller cover tab.
ENWW Replace parts 39
2. Remove and replace the rollers as described in the instructions included with the replacement kit.
3. Press firmly on both sides of the document feeder hatch at the same time to close the hatch.
4. Press the Power button to turn on the scanner.
5. Windows: Update the scanner maintenance history.
a. Open the HP Scanner Tools Utility.
b. Under Record Replacement, click Record Replacement to log this replacement activity andupdate the roller replacement history.
Replace the roller kit (3000 s3 models)Replace the rollers under the following conditions:
● Windows: When the Maintenance Recommended dialog indicates they are due for maintenance.
● If the scanner experiences repeated document jams.
40 Chapter 3 Care and maintenance ENWW
NOTE: HP recommends replacing the rollers every 100,000 scans.
Windows: The HP Scanner Tools Utility can provide a reminder when service is needed, which depends onmany conditions and might be sooner than this replacement interval.
NOTE: The roller replacement kit is a consumable and is not covered under warranty or standard serviceagreements.
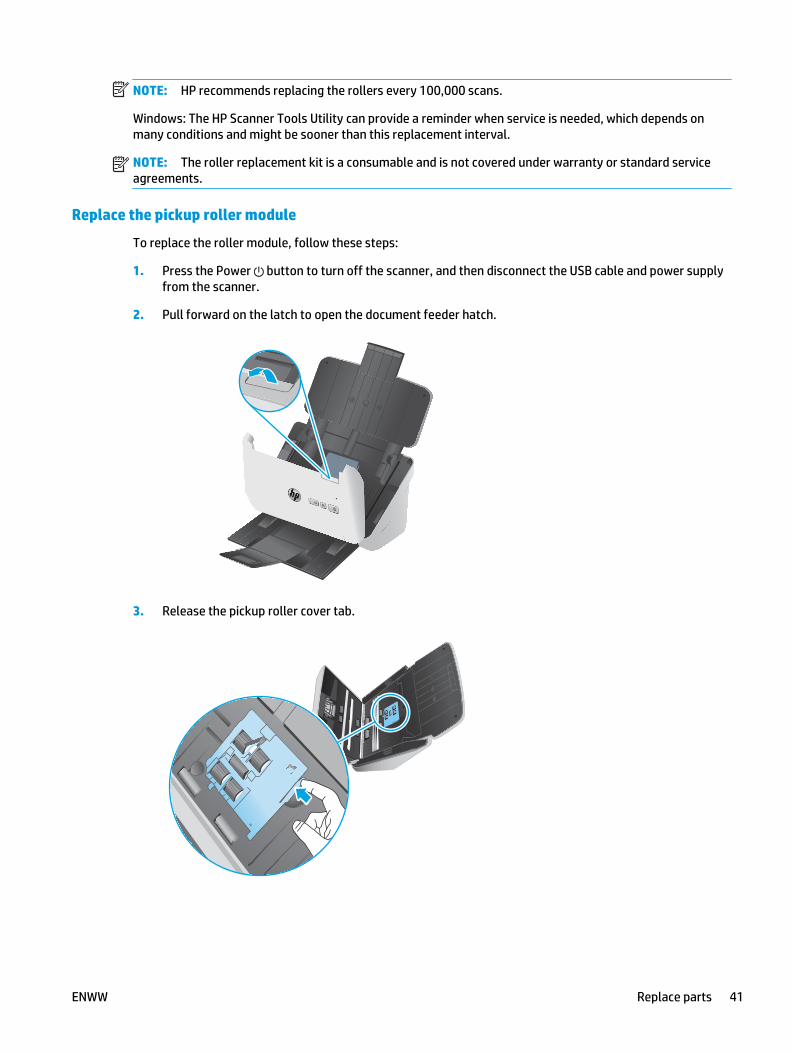
Replace the pickup roller module
To replace the roller module, follow these steps:
1. Press the Power button to turn off the scanner, and then disconnect the USB cable and power supplyfrom the scanner.
2. Pull forward on the latch to open the document feeder hatch.
3. Release the pickup roller cover tab.
ENWW Replace parts 41
4. Remove and replace the rollers as described in the instructions that were included with the replacementkit.
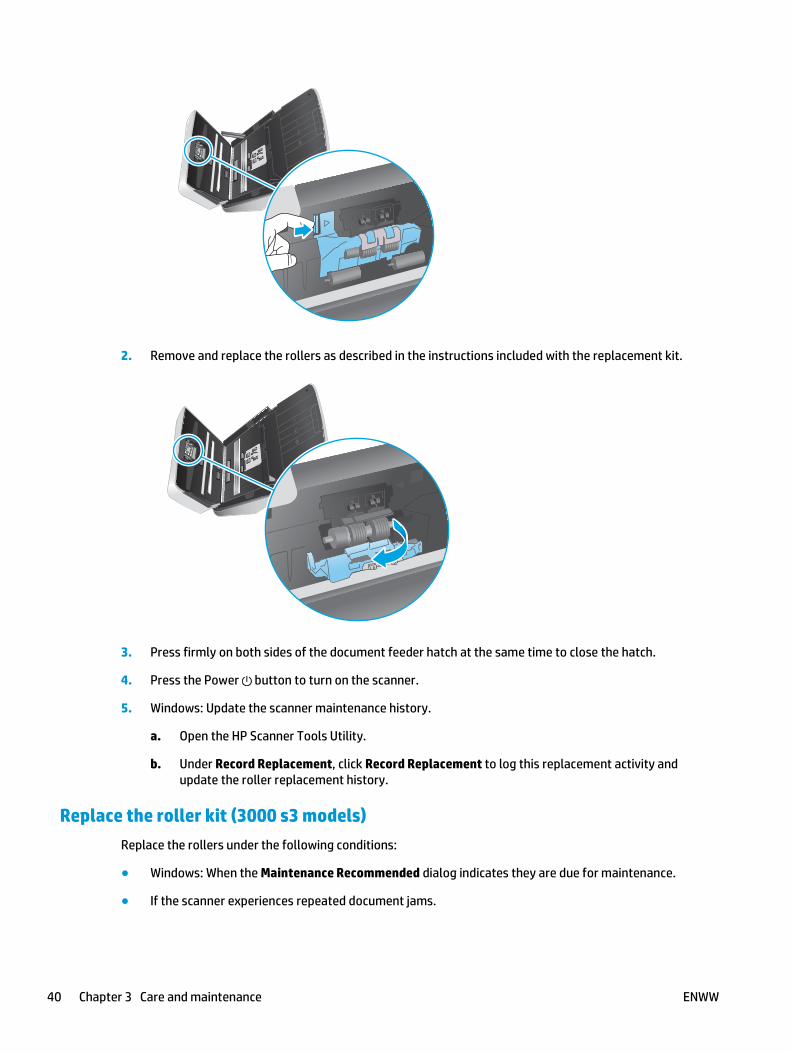
Replace the separation rollers
1. Release the separation roller cover tab.
42 Chapter 3 Care and maintenance ENWW

2. Remove and replace the rollers as described in the instructions included with the replacement kit.
3. Press firmly on both sides of the document feeder hatch at the same time to close the hatch.
4. Press the Power button to turn on the scanner.
5. Windows: Update the scanner maintenance history.
a. Open the HP Scanner Tools Utility.
b. Under Record Replacement, click Record Replacement to log this replacement activity andupdate the roller replacement history.
ENWW Replace parts 43

Order parts and accessoriesTo order maintenance parts for the scanner, see the HP scanner parts website at www.hp.com/buy/parts.
Item Description Part number
Roller replacement kit Replacement pickup and separation rollers for the HP ScanJetPro 2000 s1
L2759-60001
Roller replacement kit Replacement pickup and separation rollers for the HP ScanJetPro 3000 s3
L2753-60001
44 Chapter 3 Care and maintenance ENWW
4 Solve problems
This section contains solutions for common problems with the scanner.
For additional troubleshooting, see the Help for the HP scanning program being used.
● Basic troubleshooting tips
● Interpret control panel lights and patterns
● Scanner installation problems
● Power issues
● Paper jams
● Paper feed issues
● Image quality problems
● Scanner operation problems
● Additional troubleshooting
ENWW 45
Basic troubleshooting tipsSimple issues such as smudges on the scanning strips or loose cables can cause the scanner to produce fuzzyscans, operate in an unexpected manner, or fail to operate. Always check the following items whenencountering scanning problems.
● If scanning a document that will be analyzed using optical character recognition (OCR), make sure thatthe original document is clear enough to be analyzed.
● Make sure that the USB and power cables are firmly seated in their respective connectors on the back ofthe scanner, and that the power cord is plugged into a working electrical outlet or surge protector.
● Make sure the scanner has not automatically powered off. If it has, press the Power button to turn onthe scanner.
● Ensure that the scanner is receiving power.
— Check that the Power LED on the control panel is on.
— If the Power LED is not on, ensure that power is available to the power outlet or surge protectorthat the power supply is plugged into.
— If power is available to the power outlet or surge protector but the Power LED is still not on, thepower supply might be defective. Go to www.hp.com/go/sj2000s1 or www.hp.com/go/sj3000s3for assistance.
● If the scanning software displays a Scanner not found message when trying to use the scanner, turn offthe scanner, wait 30 seconds, and then turn on the scanner. If the message still displays, the scannermight need to be reset.
● If the scanner is connected to the computer through a USB hub or through a USB port on the front of thecomputer, disconnect the scanner and then reconnect it to a USB port on the back of the computer.
● Windows: Make sure that the Scan button is enabled (see “Product accessibility” for moreinformation).
● Turn off the scanner, wait 30 seconds, and then turn on the scanner.
● Make sure the document feeder hatch is closed.
● Restart the computer.
If problems continue, it is possible that the HP scanning software, firmware, or associated drivers are out ofdate or have become corrupted. See www.hp.com/go/sj2000s1 or www.hp.com/go/sj3000s3 to locatesoftware, firmware, and driver updates for the scanner.
Test the scannerFollow this procedure to test the scanner:
1. Ensure that the power supply is securely connected between the scanner and a live electrical outlet orsurge protector. Check that the Power LED on the control panel is on to verify that the power supply isfunctional.
2. If the power supply is connected to a surge protector, ensure that the surge protector is plugged into anoutlet and turned on.
46 Chapter 4 Solve problems ENWW

3. Press the Power button to turn off the scanner, disconnect the power supply from the scanner, andthen turn off the computer to which the scanner is connected. Wait 30 seconds, reconnect the powersupply to the scanner, press the Power button to turn on the scanner, and then turn on the computer.
4. Try to rescan.
ENWW Basic troubleshooting tips 47
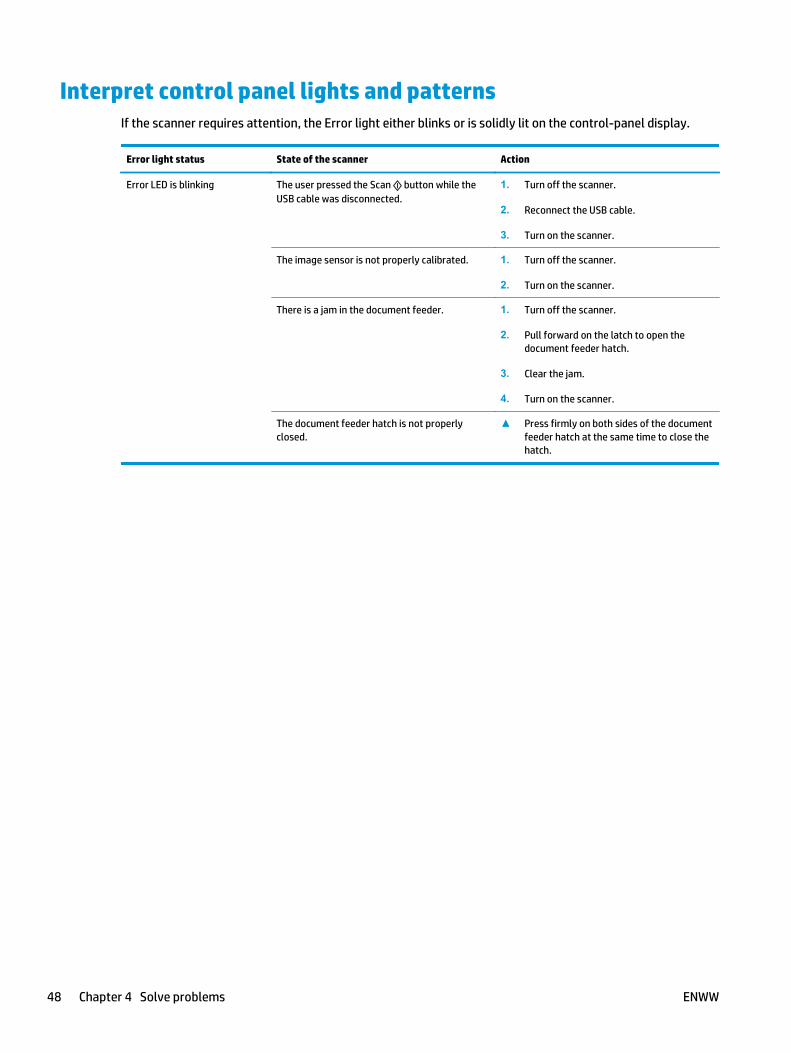
Interpret control panel lights and patternsIf the scanner requires attention, the Error light either blinks or is solidly lit on the control-panel display.
Error light status State of the scanner Action
Error LED is blinking The user pressed the Scan button while theUSB cable was disconnected.
1. Turn off the scanner.
2. Reconnect the USB cable.
3. Turn on the scanner.
The image sensor is not properly calibrated. 1. Turn off the scanner.
2. Turn on the scanner.
There is a jam in the document feeder. 1. Turn off the scanner.
2. Pull forward on the latch to open thedocument feeder hatch.
3. Clear the jam.
4. Turn on the scanner.
The document feeder hatch is not properlyclosed.
▲ Press firmly on both sides of the documentfeeder hatch at the same time to close thehatch.
48 Chapter 4 Solve problems ENWW
Scanner installation problems● Check the cables
● Uninstall and then reinstall the HP ScanJet drivers and tools (Windows)
Check the cables
Cable type Action
Power cable The power cable is connected between the scanner and a power outlet.
● Ensure that the power cable is securely connected between the scanner and a live electricaloutlet or surge protector.
● If the power cable is connected to a surge protector, ensure that the surge protector isplugged into an outlet and turned on.
● Press the Power button to turn off the scanner, and then turn off the computer. After 30seconds, turn on the scanner and then turn on the computer, in that order.
USB cable The USB cable is connected between the scanner and the computer.
● Use the cable that was included with the scanner. Another USB cable might not be compatiblewith the scanner.
● Ensure that the USB cable is securely connected between the scanner and the computer.
● If the USB cable is connected to a USB port on the front of the computer, move it to a USB porton the back of the computer.
For additional USB troubleshooting information, see www.hp.com/go/sj2000s1 or www.hp.com/go/sj3000s3, select your country/region, and then use the search tool to find USB troubleshootingtopics.
Uninstall and then reinstall the HP ScanJet drivers and tools (Windows)If checking the scanner cable connections did not solve the problem, the problem might have occurredbecause of an incomplete installation. Try uninstalling and then reinstalling the HP ScanJet drivers and tools.
1. Press the Power button to turn off the scanner, and then disconnect the USB cable and power cablefrom the scanner.
2. On the computer, open Control Panel and use the Add/Remove tool (in Windows 7, Windows 8,Windows 8.1, and Windows 10 use the Programs and Features tool) to uninstall the followingapplications:
● HP ScanJet Pro 2000 s1 or 3000 s3 scanner
● HP Scan
3. Restart the computer.
4. Reinstall the HP ScanJet Drivers and Tools.
ENWW Scanner installation problems 49

● Turn off the scanner, wait 30 seconds, and then turn on the scanner. The required software anddrivers should install automatically.
● If the drivers and tools do not install automatically, install them from the HP scanning softwareCD.
5. Reconnect the USB cable and power cable to the scanner, and then press the Power button to turn onthe scanner.
50 Chapter 4 Solve problems ENWW
Power issues● Check that the scanner has power
● Scanner will not turn on
● The scanner has paused or shut down
● Scanner keeps turning off
Check that the scanner has powerThe power cable is connected between the scanner and a power outlet.
● Ensure that the power cable is securely connected between the scanner and a live electrical outlet.
● If the power cable is connected to a surge protector, ensure that the surge protector is plugged into anoutlet and turned on.
● Ensure that the scanner is receiving power.
— Check that the Power LED on the control panel is on.
— If the Power LED is not on, ensure that power is available to the power outlet or surge protectorthat the power supply is plugged into.
— If power is available to the power outlet or surge protector but the Power LED is still not on, thepower supply might be defective. Go to www.hp.com/go/sj2000s1 or www.hp.com/go/sj3000s3for assistance.
Scanner will not turn onIf the scanner will not turn on after pressing the Power button, check the following:
● The scanner might have been unplugged. Check to see that the power supply has not becomedisconnected from the scanner or unplugged from the power source.
● The power supply might not be working.
— Check that the Power LED on the control panel is on.
— If the Power LED is not on, ensure that power is available to the power outlet or surge protectorthat the power supply is plugged into.
— If power is available to the power outlet or surge protector but the Power LED is still not on, thepower supply might be defective. Go to www.hp.com/go/sj2000s1 or www.hp.com/go/sj3000s3for assistance.
The scanner has paused or shut downIf the scanner stops scanning, follow these steps. After each step, start a scan to see if the scanner isworking. If the problem persists, proceed with the next step.
ENWW Power issues 51
1. A cable might be loose. Ensure that both the USB cable and power supply are properly connected.
Use the cable that was included with the scanner. Another USB cable might not be compatible with thescanner.
2. Ensure that the scanner is receiving power.
a. Check that the Power LED on the control panel is on.
b. If the Power LED is not on, ensure that power is available to the power outlet or surge protectorthat the power supply is plugged into.
c. If power is available to the power outlet or surge protector but the Power LED is still not on,unplug the power cable from the power source, wait 30 seconds, and then plug it back in.
d. If the issue is not fixed, the power supply might be defective. Go to www.hp.com/go/sj2000s1 orwww.hp.com/go/sj3000s3 for assistance.
3. Restart your computer.
4. Windows: On the computer, open Control Panel and use the Add/Remove tool (in Vista, Windows 7, andWindows 8, the Programs and Features tool) to uninstall the following applications:
● HP ScanJet Pro 2000 s1 or 3000 s3
● HP ScanJet Pro 3000 s3 ISIS Driver
● HP ScanJet Plugin
● HP Scan
5. Reinstall the applications by doing one of the following.
● Reconnect the USB cable and power supply to the scanner, and then press the Power button toturn on the scanner. Reinstall the HP ScanJet Pro 2000 s1 or HP ScanJet 3000 s3 software anddrivers.
● Reinstall the applications using the HP scanning software CD that came with your scanner.
Scanner keeps turning offBy default, the scanner will enter Sleep Mode prior to 15 minutes of inactivity, and will turn off automaticallyafter two hours of inactivity to conserve power.
Windows: To change the defaults, complete these steps:
1. Launch the HP Scanner Tools Utility.
2. Click the Settings tab, and then select the appropriate Sleep Mode and Auto-Off settings.
● To specify the period of inactivity after which the scanner goes into Sleep Mode, select 15 minutesor 59 minutes from the Sleep: Put the scanner to sleep after: drop-down list.
● To specify the period of inactivity after which the scanner automatically turns off, select theappropriate value (1 hour, 2 hours, 4 hours, or 8 hours) from the Auto-Off: Turn off the scannerafter: drop-down list.
OS X: Use HP Utility to change these defaults.
52 Chapter 4 Solve problems ENWW
Paper jams ● Clear jams from the document feeder
● An item loaded in the scanner jams repeatedly
NOTE: Scanning damp or wet pages can cause paper jams. Make sure that the pages being fed arecompletely dry (such as, the toner is dry, or there are no wet substances such as glue or correction fluid onthe page).
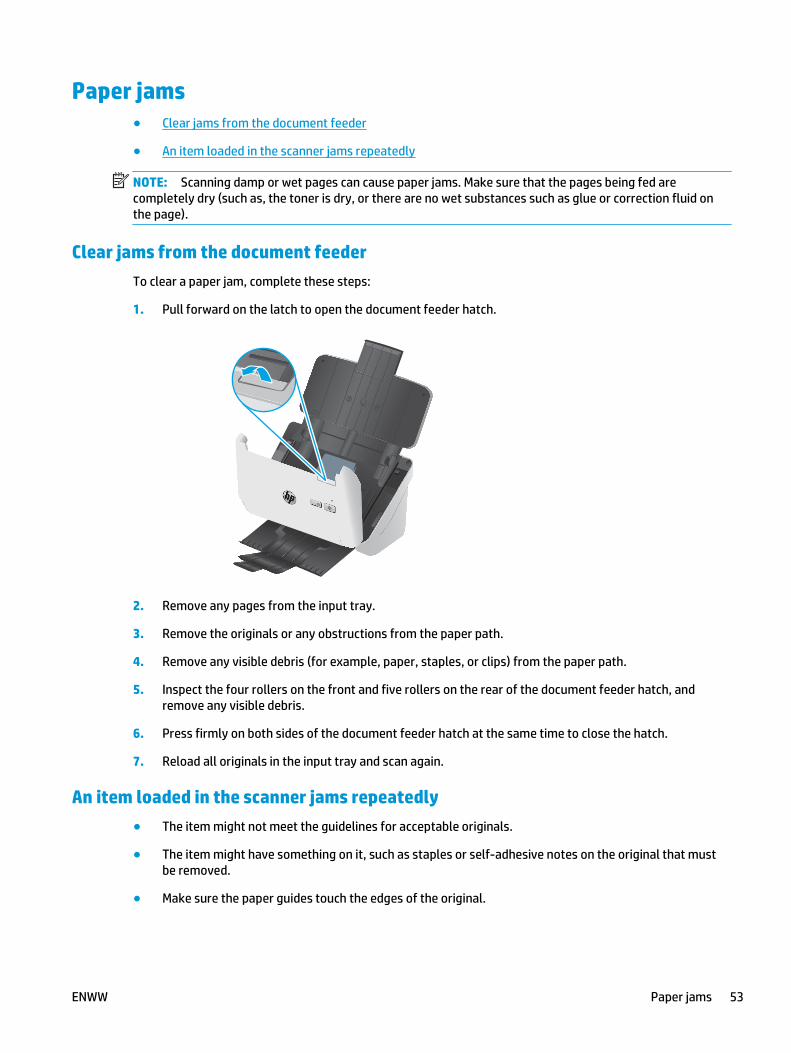
Clear jams from the document feederTo clear a paper jam, complete these steps:
1. Pull forward on the latch to open the document feeder hatch.
2. Remove any pages from the input tray.
3. Remove the originals or any obstructions from the paper path.
4. Remove any visible debris (for example, paper, staples, or clips) from the paper path.
5. Inspect the four rollers on the front and five rollers on the rear of the document feeder hatch, andremove any visible debris.
6. Press firmly on both sides of the document feeder hatch at the same time to close the hatch.
7. Reload all originals in the input tray and scan again.
An item loaded in the scanner jams repeatedly● The item might not meet the guidelines for acceptable originals.
● The item might have something on it, such as staples or self-adhesive notes on the original that mustbe removed.
● Make sure the paper guides touch the edges of the original.
ENWW Paper jams 53
Paper feed issues● Paper jamming, skewing, misfeeds, or multiple-page feeds
● Paper does not feed from the scanner
Paper jamming, skewing, misfeeds, or multiple-page feeds● Scanning damp or wet pages can cause paper jams. Make sure that the pages you are feeding are
completely dry (toner is dry, there are no wet substances such as glue or correction fluid).
● Check that all rollers are in place and that the roller door and document feeder hatch are closed.
● If the pages look skewed as they feed into the scanner paper path, check the resulting scanned imagesin the software to ensure that they are not skewed.
● The pages might not be placed correctly. Straighten the pages and adjust the paper guides to center thestack.
● The paper guides must be touching the sides of the paper stack to work properly. Please ensure that thepaper stack is straight and the guides are against the paper stack.
● The input tray or output tray might contain more than the maximum number of pages. Load fewerpages in the input tray, and remove pages from the output tray.
● Clean the scanner paper path to help reduce misfeeds. If misfeeds still occur, clean the rollers. Ifmisfeeds still occur, replace the rollers.
Paper does not feed from the scannerReload the pages into the input tray, ensuring that they make contact with the rollers.
The document feeder hatch might not be securely latched. Open the hatch and then close it, pressing firmlyon both sides to ensure the hatch is closed.
A problem with the scanner hardware might exist. Follow this procedure to test the scanner:
1. Ensure that the power supply is securely connected between the scanner and a live electrical outlet orsurge protector. Check that the Power LED on the control panel is on to verify that the power supply isfunctional.
2. If the power supply is connected to a surge protector, ensure that the surge protector is plugged into anoutlet and turned on.
3. Press the Power button to turn off the scanner, disconnect the power supply from the scanner, andthen turn of the computer to which the scanner is connected. Wait 30 seconds, reconnect the powersupply to the scanner, press the Power button to turn on the scanner, and then turn on the computer.
4. Try to rescan.
54 Chapter 4 Solve problems ENWW
Image quality problems● Vertical white or colored stripes appear on the printed page
● Scanned images are not straight
● The scanned images have streaks or scratches
● Scanned image is fuzzy
● The scan is completely black or completely white
● The bottom of the scanned image is cut off
● The image cannot be enlarged
Vertical white or colored stripes appear on the printed pageThe destination printer might be out of toner or ink. Scan a different original to the same printer to see if theissue lies with the printer.
If the second scan has the same problem, try scanning to a different printer.
Dust can build up on the scanning strips inside the document feeder and cause artifacts in scanned images.Clean the scanning strips with a soft, lint-free cloth that has been sprayed with a mild glass cleaner.
Scanned images are not straight● Verify that the paper guides are centered on the scanner and set to an appropriate width for the original
being scanned. Make sure the paper guides touch the edges of the original.
● Windows: Use the Auto-Straighten feature to straighten content that is skewed relative to the pagedimensions in the source document. Use the Auto Detect Size feature to deskew page images thatmight have become skewed during the scanning process.
The scanned images have streaks or scratchesFor information on cleaning the scanner, see the Care and maintenance section of the User Guide.
● Check that the originals are clean and unwrinkled.
● Clean the scanner strips.
Scanned image is fuzzy● Check for any obstructions in the scanner paper path and make sure the paper width guides are
positioned appropriately. Try another scan.
● Verify that the document is not fuzzy.
ENWW Image quality problems 55

The scan is completely black or completely white● The item might not be placed correctly in the input tray. Make sure that the item being scanned is placed
face down in the input tray.
● Windows: If scanning to a black and white image, make sure the black and white threshold is not set toeither extreme. Setting the threshold to an extreme will result in an image that is all white or all black.
● OS X: If scanning to a text image using the Image Capture application, set Image Correction to Manualand use the Threshold slider bar to adjust the threshold.
The bottom of the scanned image is cut offBy default, the scanning software can scan media that is up to 356 mm (14 in) long.
Verify that the page size selected in the scanning software (or the scan shortcut selected) will accommodatethe length of the document being scanned.
The image cannot be enlargedThe software might be setting the exposure for the entire scan area instead of for one small original. Selectand drag the handles around the selection area until you see the image area you want to scan.
56 Chapter 4 Solve problems ENWW
Scanner operation problems● Connection issues
● Buttons are not working properly
● Scanning performance issues
● Issues with text recognition (OCR) (Windows)
Connection issues
Check the USB connection
Check the physical connection to the scanner.
● Use the cable that was included with the scanner. Another USB cable might not be compatible with thescanner.
● Ensure that the USB cable is securely connected between the scanner and the computer. The tridenticon on the USB cable faces down when the cable is properly connected to the scanner.
If the problem persists after verifying the above items, try the following:
1. Do one of the following tasks depending on how the scanner is connected to the computer:
● If the USB cable is connected to a USB hub or a docking station for a laptop, disconnect the USBcable from the USB hub or the docking station, and then connect the USB cable to a USB port onthe back of the computer.
● If the USB cable is directly connected to the computer, plug it into a different USB port on the backof the computer.
● Remove all other USB devices from the computer except for the keyboard and the mouse.
2. Press the Power button to turn off the scanner, wait 30 seconds, and then turn on the scanner.
3. Restart the computer.
4. After the computer has restarted, try using the scanner.
● If the scanner works, reconnect any additional USB devices one at a time; try the scanner afterconnecting each additional device. Disconnect any USB devices that prevent the scanner fromworking.
● Windows: If the scanner does not work, uninstall and then reinstall the HP ScanJet drivers andsoftware.
Buttons are not working properlyIf the buttons are not working properly, complete the following steps.
1. A cable might be loose. Ensure that the USB cable and the power supply are securely connected.
2. Turn off the scanner, wait 30 seconds, and then turn the scanner back on.
ENWW Scanner operation problems 57

3. Restart the computer.
4. If the problem still persists, there might be a problem with the control panel. Contact HP Support atwww.hp.com/go/sj2000s1 or www.hp.com/go/sj3000s3.
Scanning performance issues
Scanner does not scan immediately
Make sure the document feeder hatch is closed, and that the scanner is turned on.
Scanner is scanning items very slowly
When scanning to edit text, the optical character recognition (OCR) causes the scanner to scan more slowly,which is normal. Wait for the item to scan.
NOTE: Windows: For the best OCR results, scanner compression should be set to the minimumcompression level or be disabled.
Scanning at a higher resolution than necessary increases scanning time and creates a larger file with noadditional benefit. If you are scanning at a high resolution, set the resolution to a lower level to increasescanning speed.
Scanner scans only one side of a two-sided page
Verify that the selected scan shortcut specifies two-sided scanning.
Scanned pages are missing at the scan destination
When scanning, pages that stick together are scanned as one item. Check to confirm that scanned pages arenot stuck together.
Scanned pages are out of order at the scan destination
● Verify that the page order of the original document is correct before placing the document face downinto the input tray.
● Make sure that there are no staples, paper clips, or any other attached material (such as adhesivenotes) that might cause the pages to feed incorrectly.
● Verify that pages are not stuck together.
Scan files are too large
● Most scanning software allows a smaller file size to be selected when selecting the output file type. Formore information, see the Help for the scanning software being used.
● Verify the scan resolution setting (for more information, see the Help for the scanning software beingusing):
— 200 dpi is sufficient for storing documents as images.
— For most fonts, 300 dpi is sufficient for using optical character recognition (OCR) to create editabletext.
— For Asian fonts and small fonts, choosing a higher resolution is recommended.
58 Chapter 4 Solve problems ENWW
NOTE: For some special black dot background scans, saving the image as a .tif file might make theimage smaller.
Scanning at a higher resolution than necessary creates a larger file with no additional benefit.
● Color scans create larger files than do black and white scans.
● If scanning a large number of pages at one time, consider scanning fewer pages at a time to createmore, smaller files.
Issues with text recognition (OCR) (Windows)The scanner uses optical character recognition (OCR) to convert text on a page to text that can be edited on acomputer.
● If text can be scanned but cannot be edited, make the following selections before scanning:
— Select a scan shortcut that supports OCR. The following scan shortcuts support OCR:
○ Save as PDF
○ Email as PDF
○ Save as Editable Text (OCR)
○ Send to Cloud
○ Everyday Scan
— Select one of the following OCR-based, output-file types from the File Type drop-down box:
○ Text (*.txt)
○ Rich Text (*.rtf)
○ Searchable PDF (*.pdf)
NOTE: If an OCR-based, output-file type is not selected, the document is scanned as a graphic and the textis not editable.
● Check the originals
— The software might not recognize text that is tightly spaced. For example, if the text that thesoftware converts has missing or combined characters, "rn" might appear as "m".
— The accuracy of the software depends on the image quality, text size, and structure of the originaland the quality of the scan itself. Make sure that the original has good image quality.
— Colored backgrounds can cause images in the foreground to blend too much.
● If the scanner strips are dirty, the scan file does not have optimum clarity. Make sure the scanner stripsare clean.
ENWW Scanner operation problems 59

Additional troubleshootingGet telephone support for your country/region
Have the product name, serial number, date of purchase, andproblem description ready.
Country/region phone numbers are on the flyer that was in thebox with the product or at www.hp.com/support/.
Get 24-hour Internet support, and download software utilities,drivers, and electronic information
www.hp.com/go/sj2000s1 or www.hp.com/go/sj3000s3
Order additional HP service or maintenance agreements www.hp.com/support/
60 Chapter 4 Solve problems ENWW
Index
Aacoustic specifications 8Auto color detect 24automatically crop or pad scanned
image to selected page size 24automatically detect page size 24
Bblack scans
troubleshoot 56blurry images 55buttons
Cancel 6Power 5, 6Scan 5, 6scanner control panel 5, 6
Ccables
troubleshoot 49Cancel button 6clean
paper path 33rollers 34
cleaning cloth 33cloud, scan to 22control panel
locating 2crooked images 55crop or pad scanned image to
selected page size 24customer support
online 60cut-off images
troubleshoot 56
Ddetect multi-feeds 23detect page size 24
driverspaper sizes 16
Eelectrical specifications 8extra-long-page support 23
Ffeatures
auto color detect 24crop or pad scanned image to
selected page size 24detect page size 24extra-long-page support 23long-page support 23multi-feed detection 23
feeding problems 53fragile items, scanning 29fuzzy images 55
HHP Customer Care 60HP paper path cleaning cloth 33HP Scan Extended software
about 11HP Scanner Tools Utility
uses for 11HP TWAIN 11HP Utility 27HP Utility for Mac
Bonjour 27features 27
HP Utility, Mac 27
Iinput and output trays
locating 2input tray
load cards 19
load documents 17tips on loading 14
install softwaretroubleshoot 49
ISIS 11
Jjams
troubleshoot 53
LLED
error 48long-page support 23
MMacintosh
HP Utility 27maintenance
clean paper path 33clean rollers 34
manage power settings 52media
jams 53misfeeds 54not feeding 54troubleshoot 54
memoryincluded 7
misfeedstroubleshoot 54
mobile printing solutions 7multi-feed detection 23multiple-page feeds 54
Nnetworks
supported 7
ENWW Index 61

Oon/off button, locating 2online support 60operating systems (OS)
supported 7order
roller replacement kit 38, 40supplies 44
OS (operating system)supported 7
OS X software 12output tray
locating 2
Ppages missing, troubleshoot 58pages out of order 58pages per minute 7paper
jams 53misfeeds 54not feeding 54supported sizes 16troubleshoot 54
paper guides, locating 2paper path
clean 33feeding problems 53
partsorder 38, 40
powerconsumption 8
Power button 5, 6power button, locating 2Power LED 6power management 52power supply
troubleshoot cable 49product
auto-off 12Sleep Mode 12
product info 1
Rreplace rollers 38, 40roller kit
replace 38, 40rollers
clean 34replace 38, 40
Sscan
cards 19feeding problems 53files too large 58fragile items 29originals 17
Scan button 5, 6scan to cloud 22scanner
control panel 5, 6scanner software
Mac 12Windows 11
skewed images 55Sleep Mode 12software
HP Utility 27Mac 12troubleshoot installation 49uninstall and reinstall 49, 51Windows 11
specificationselectrical and acoustic 8
speedtroubleshoot 58
speed, troubleshoot 29status
HP Utility, Mac 27streaks
troubleshoot 55supplies
order 44status, viewing with HP Utility for
Mac 27support
online 60
Ttechnical support
online 60trays
capacity 7included 7
troubleshootbasic tips 46black scans 56cables 49check power 51crooked images 55
cut-off images 56feeding problems 53fragile items 29fuzzy images 55installation 49jams 53large scan files 58misfeeds 54page order 58pages missing 58paper not feeding 54power 51scanning fragile items 29speed 29, 58stops working 51streaks 55two-sided scans 58uninstall and reinstall software
49, 51white scans 56
turn on scannertroubleshoot 51
TWAIN 11two-sided scans
troubleshoot 58
Uuninstall and reinstall software 49,
51USB cable
troubleshoot 49
Wwebsites
customer support 60order supplies 44replacement parts 38, 40
white scanstroubleshoot 56
Windows software 11
62 Index ENWW