Saving Time with Templates Presentation to: 2009 FMI-CMA ... · PDF fileSaving Time with...
18
ADVISORY SERVICES ADVISORY SERVICES Saving Time with Templates Saving Time with Templates Presentation to: Presentation to: 2009 FMI 2009 FMI- CMA CMA- CGA PD Event CGA PD Event Gordon Gunn, Associate Partner Gordon Gunn, Associate Partner [email protected] [email protected] Saving Time with Templates – Ten Tips Saving Time with Templates – Ten Tips When to Use a Template When to Use a Template 1. 1. Word Word – Form Fields Form Fields 2. 2. Word Word - Advanced Field Codes Advanced Field Codes 3. 3. Word Word – Mail Merge Mail Merge 4. 4. Excel Excel – Data Validation Data Validation 5. 5. Excel Excel – Protecting Formulas Protecting Formulas 6. 6. Excel Excel – Automating Data Entry Automating Data Entry 7. 7. Excel Excel – Navigation Buttons Navigation Buttons 8. 8. Excel Excel – Lookup Tables Lookup Tables 9. 9. Excel Excel – Conditional Formatting Conditional Formatting 10. 10. Word/Excel Word/Excel – Saving a Template Saving a Template Resources Resources
Transcript of Saving Time with Templates Presentation to: 2009 FMI-CMA ... · PDF fileSaving Time with...

1
ADVISORY SERVICESADVISORY SERVICES
Saving Time with TemplatesSaving Time with TemplatesPresentation to:Presentation to:
2009 FMI2009 FMI--CMACMA--CGA PD EventCGA PD EventGordon Gunn, Associate PartnerGordon Gunn, Associate Partner
[email protected]@kpmg.ca
Saving Time with Templates – Ten TipsSaving Time with Templates – Ten Tips
When to Use a TemplateWhen to Use a Template
1.1. Word Word –– Form FieldsForm Fields
2.2. Word Word -- Advanced Field CodesAdvanced Field Codes
3.3. Word Word –– Mail MergeMail Merge
4.4. Excel Excel –– Data ValidationData Validation
5.5. Excel Excel –– Protecting FormulasProtecting Formulas
6.6. Excel Excel –– Automating Data EntryAutomating Data Entry
7.7. Excel Excel –– Navigation ButtonsNavigation Buttons
8.8. Excel Excel –– Lookup TablesLookup Tables
9.9. Excel Excel –– Conditional FormattingConditional Formatting
10.10. Word/Excel Word/Excel –– Saving a TemplateSaving a Template
ResourcesResources

2
When to Use a TemplateWhen to Use a Template
Many of the tasks we perform in Word are repeated over and overMany of the tasks we perform in Word are repeated over and over
Writing a letterWriting a letter
Sending a FaxSending a Fax
Preparing an invoicePreparing an invoice
Writing a reportWriting a report
Preparing an Expense ReportPreparing an Expense Report
Any time you find yourself reAny time you find yourself re--performing a Word or Excel task, consider performing a Word or Excel task, consider the opportunity to create a reusable templatethe opportunity to create a reusable template
If you are interested in maintaining corporate standards for looIf you are interested in maintaining corporate standards for look, feel k, feel and content, templates are the way to go.and content, templates are the way to go.
1. Word – Using Form Fields (cont)1. Word – Using Form Fields (cont)
Form Fields using the Forms ToolbarForm Fields using the Forms Toolbar
To use Form Fields, add the Forms Toolbar by selecting Toolbars To use Form Fields, add the Forms Toolbar by selecting Toolbars from from the View Menuthe View Menu
3
1. Word – Using Form Fields (cont)1. Word – Using Form Fields (cont)
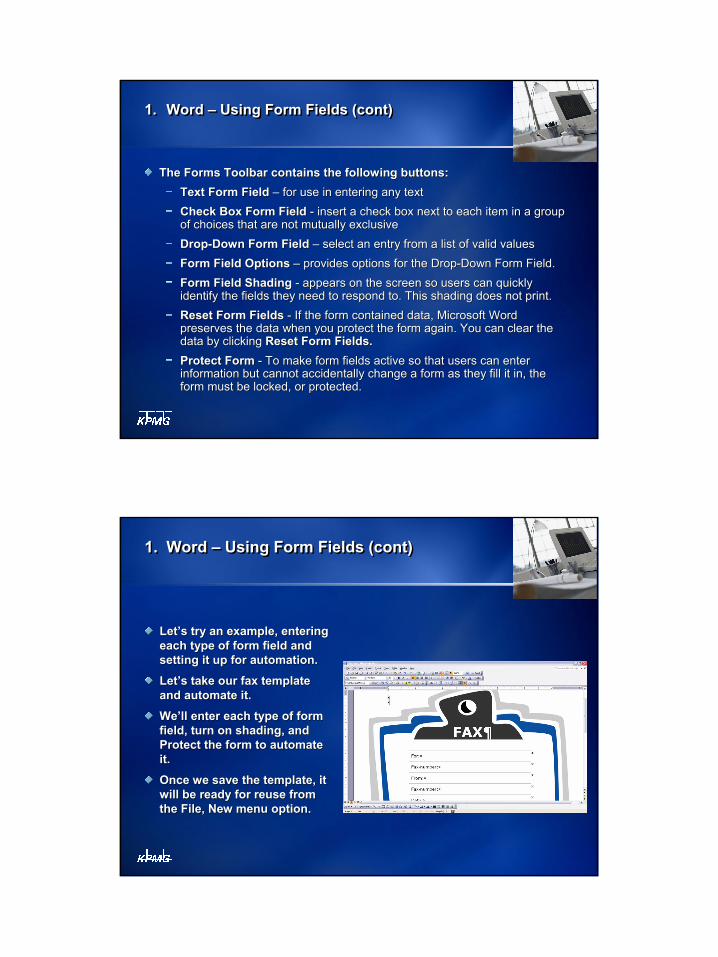
The Forms Toolbar contains the following buttons:The Forms Toolbar contains the following buttons:Text Form FieldText Form Field –– for use in entering any textfor use in entering any textCheck Box Form FieldCheck Box Form Field -- insert a check box next to each item in a group insert a check box next to each item in a group of choices that are not mutually exclusive of choices that are not mutually exclusive
DropDrop--Down Form FieldDown Form Field –– select an entry from a list of valid valuesselect an entry from a list of valid valuesForm Field OptionsForm Field Options –– provides options for the Dropprovides options for the Drop--Down Form Field. Down Form Field.
Form Field ShadingForm Field Shading -- appears on the screen so users can quickly appears on the screen so users can quickly identify the fields they need to respond to. This shading does nidentify the fields they need to respond to. This shading does not print.ot print.Reset Form FieldsReset Form Fields -- If the form contained data, Microsoft Word If the form contained data, Microsoft Word preserves the data when you protect the form again. You can cleapreserves the data when you protect the form again. You can clear the r the data by clicking data by clicking Reset Form Fields.Reset Form Fields.Protect FormProtect Form -- To make form fields active so that users can enter To make form fields active so that users can enter information but cannot accidentally change a form as they fill iinformation but cannot accidentally change a form as they fill it in, the t in, the form must be locked, or protected. form must be locked, or protected.
1. Word – Using Form Fields (cont)1. Word – Using Form Fields (cont)
LetLet’’s try an example, entering s try an example, entering each type of form field and each type of form field and setting it up for automation.setting it up for automation.
LetLet’’s take our fax template s take our fax template and automate it.and automate it.
WeWe’’ll enter each type of form ll enter each type of form field, turn on shading, and field, turn on shading, and Protect the form to automate Protect the form to automate it.it.
Once we save the template, it Once we save the template, it will be ready for reuse from will be ready for reuse from the File, New menu option.the File, New menu option.
4
2. Word - Advanced Field Codes2. Word - Advanced Field Codes
Field Codes using the Insert, Fields menu optionField Codes using the Insert, Fields menu option
Word also comes with over 70 additional form fields that can be Word also comes with over 70 additional form fields that can be added added to your document from the Insert, Fields menu optionto your document from the Insert, Fields menu option
Examples include:Examples include:Entering page numbers and file names in your footerEntering page numbers and file names in your footer
Entering a date and time stamp in your letterheadEntering a date and time stamp in your letterhead
For information on each of these fields, hit the F1 button and eFor information on each of these fields, hit the F1 button and enter the nter the field name in the search for boxfield name in the search for box
2. Word - Advanced Field Codes2. Word - Advanced Field Codes
Field Codes using the Insert, Fields menu optionField Codes using the Insert, Fields menu option
My personal favorites are the My personal favorites are the AskAsk, , RefRef and and FillFill--inin fieldsfields
These fields allow you to create These fields allow you to create customized dialog boxescustomized dialog boxes that prompt that prompt the user for data entry and then populate the document as requirthe user for data entry and then populate the document as required.ed.
I use the I use the AskAsk and and RefRef fields whenever the required data is to appear in fields whenever the required data is to appear in the document multiple times.the document multiple times.
I use the I use the FillFill--In fieldIn field whenever the required data is only required once in whenever the required data is only required once in the document.the document.

5
2. Word - Advanced Field Codes2. Word - Advanced Field Codes
Field Codes using the Insert, Fields Field Codes using the Insert, Fields menu optionmenu option
LetLet’’s try an examples try an example
Open a blank Word documentOpen a blank Word document
From the Insert menu, select Field From the Insert menu, select Field and click on Askand click on AskIn the Prompt box, enter In the Prompt box, enter ““Enter the Enter the client name then click OKclient name then click OK””
In the Bookmark Name, enter In the Bookmark Name, enter ““ClientNameClientName””, with no spaces , with no spaces
Click OKClick OK
When the dialog box appears, type When the dialog box appears, type ““ABC Co. Ltd.ABC Co. Ltd.”” and click OKand click OKHit the Enter key to move to the Hit the Enter key to move to the next line in the documentnext line in the document
2. Word - Advanced Field Codes2. Word - Advanced Field Codes
Field Codes using the Insert, Fields Field Codes using the Insert, Fields menu optionmenu option
Now, we will add a REF fieldNow, we will add a REF field
Select REF, in the Insert, Field Select REF, in the Insert, Field dialog boxdialog box
In the Bookmark name box, select In the Bookmark name box, select ClientNameClientName –– if the Bookmark if the Bookmark Name doesnName doesn’’t appear, click the t appear, click the Field Codes button and enter Field Codes button and enter ““ClientNameClientName”” after REF in the Field after REF in the Field Codes boxCodes boxClick OKClick OK
You should now see the resultYou should now see the result
Use the REF field wherever you Use the REF field wherever you want the client name to appear in want the client name to appear in your templateyour template

6
2. Word - Advanced Field Codes2. Word - Advanced Field Codes
Field Codes using the Insert, Field Codes using the Insert, Fields menu optionFields menu option
Now, we will add a FillNow, we will add a Fill--in Fieldin Field
Select FillSelect Fill--in, in the Insert, Field in, in the Insert, Field dialog boxdialog box
In the Prompt box, type In the Prompt box, type ““Enter Enter the Client Name and then click the Client Name and then click OKOK””
Click OKClick OK
When dialog box appears, type When dialog box appears, type ““ABC Co. Ltd.ABC Co. Ltd.”” and click OKand click OK
2. Word - Advanced Field Codes2. Word - Advanced Field Codes
Of course, being a Of course, being a MicroSoftMicroSoft product, the use of advanced field codes in product, the use of advanced field codes in Word has its challenges. One challenge is to activate the fieldWord has its challenges. One challenge is to activate the field codes.codes.
Dialog boxes can be activated by hitting the F9 key. However, tDialog boxes can be activated by hitting the F9 key. However, this only his only works if you highlight the Ask field code, which is hidden in yoworks if you highlight the Ask field code, which is hidden in your ur document. If you have multiple dialog boxes, it can even be a gdocument. If you have multiple dialog boxes, it can even be a greater reater challenge.challenge.
Here is my solution:Here is my solution:
Create a macro in the Word template, that highlights the entire Create a macro in the Word template, that highlights the entire document document and presses the F9 key. This will activate all dialog boxes in and presses the F9 key. This will activate all dialog boxes in the the document.document.
Create a button on your form, called Activate Form, with a hyperCreate a button on your form, called Activate Form, with a hyperlink to the link to the macro.macro.
This may sound complicated, but IThis may sound complicated, but I’’ll demonstrate that it is not too difficult.ll demonstrate that it is not too difficult.
7
2. Word - Advanced Field Codes2. Word - Advanced Field Codes
From the Tools menu, select Macro, Record New Macro. From the Tools menu, select Macro, Record New Macro.
Name the macro, i.e. Automate Form. Name the macro, i.e. Automate Form.
In the Store Macro In dropdown box, select the name of the In the Store Macro In dropdown box, select the name of the ““All documents (All documents (normal.dotnormal.dot). ).
Under Under ““Assign Macro ToAssign Macro To””, click on Toolbars. The Forms , click on Toolbars. The Forms toolbar should display on the left, and the Automate Form toolbar should display on the left, and the Automate Form macro should appear on the right. Drag the Automate macro should appear on the right. Drag the Automate Form macro to the Forms Toolbar on your desktop. Click Form macro to the Forms Toolbar on your desktop. Click Close. The Macro toolbar will display on screen.Close. The Macro toolbar will display on screen.
On the Edit menu, click Select All. Press F9. Click OK for On the Edit menu, click Select All. Press F9. Click OK for any dialog boxes that appear.any dialog boxes that appear.
Press CTRL+HOME so that the text is no longer selected.Press CTRL+HOME so that the text is no longer selected.
Click the Stop Recording button on the Macro toolbar.Click the Stop Recording button on the Macro toolbar.
LettersLetters
3. Word – Mail Merge3. Word – Mail Merge
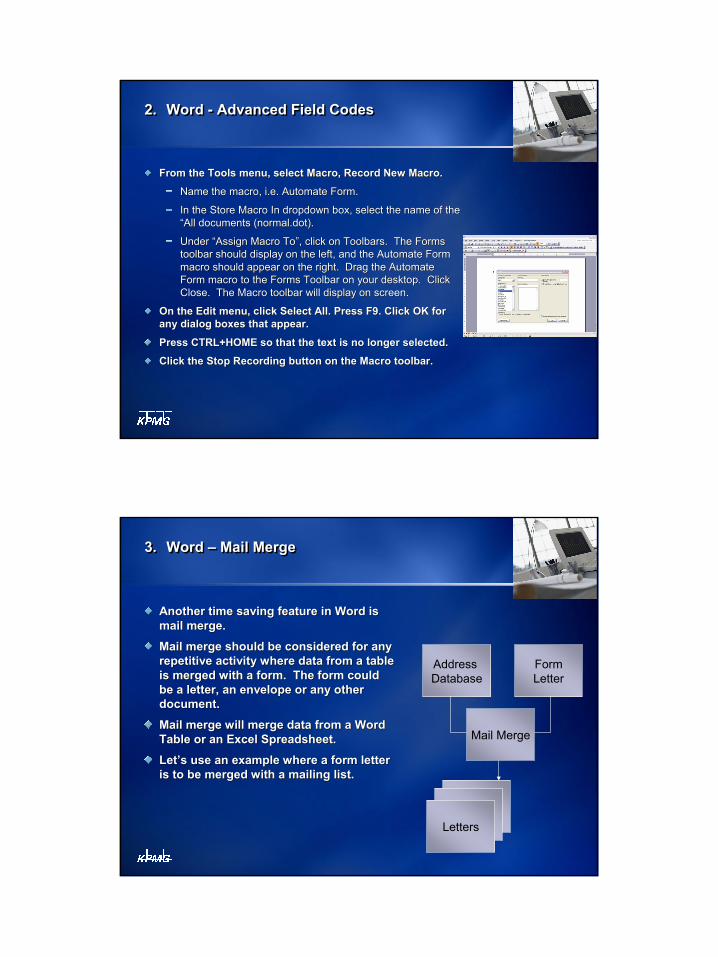
Another time saving feature in Word is Another time saving feature in Word is mail merge. mail merge.
Mail merge should be considered for any Mail merge should be considered for any repetitive activity where data from a table repetitive activity where data from a table is merged with a form. The form could is merged with a form. The form could be a letter, an envelope or any other be a letter, an envelope or any other document.document.
Mail merge will merge data from a Word Mail merge will merge data from a Word Table or an Excel Spreadsheet.Table or an Excel Spreadsheet.
LetLet’’s use an example where a form letter s use an example where a form letter is to be merged with a mailing list.is to be merged with a mailing list.
Address Database
FormLetter
Mail Merge
Letters

8
3. Word – Mail Merge3. Word – Mail Merge
Example:Example:
We have a form letter We have a form letter to merge with the to merge with the database.database.
We have an address We have an address database in Word.database in Word.
Each column has a Each column has a unique name.unique name.
Open the form letter Open the form letter and from the Tools and from the Tools menu, select Letters menu, select Letters and Mailings, Mail and Mailings, Mail Merge.Merge.
3. Word – Mail Merge3. Word – Mail Merge
Example:Example:In the dialog box on the right, In the dialog box on the right, select Letters. At the bottom, select Letters. At the bottom, click to the Next Step.click to the Next Step.
Select, Use the Current Select, Use the Current Document. Click Next Step.Document. Click Next Step.In Select Recipients, select In Select Recipients, select Use an Existing List. Click the Use an Existing List. Click the Browse button to locate your Browse button to locate your address database file. Click address database file. Click OK. Click to Next Step.OK. Click to Next Step.Position your cursor where you Position your cursor where you want the address located. want the address located. Click on Address Block on the Click on Address Block on the left. Configure the Address left. Configure the Address Block as required. Click on Block as required. Click on Match Fields button to link the Match Fields button to link the address database to the address database to the merge.merge.

9
3. Word – Mail Merge3. Word – Mail Merge
Example:Example:Next, highlight where you Next, highlight where you want the greetings to go want the greetings to go and click on Greetings Line and click on Greetings Line on the right. Select the on the right. Select the options that fit best. Click options that fit best. Click OK. Click Next Step.OK. Click Next Step.
You can now preview your You can now preview your merged letter. If changes merged letter. If changes are required, go back to are required, go back to the appropriate step and the appropriate step and make the correction.make the correction.If finished, click Next: If finished, click Next: Complete the Merge. A Complete the Merge. A merged document file is merged document file is now created.now created.
4. Excel – Data Validation4. Excel – Data Validation
For many organizations, Excel is the tool of choice when it comeFor many organizations, Excel is the tool of choice when it comes to s to developing small databases or financial applications.developing small databases or financial applications.
As with any EndAs with any End--User developed application, there is a high risk of data User developed application, there is a high risk of data quality problems.quality problems.
ExcelExcel’’s Validation feature provides a mechanism for reducing the risk s Validation feature provides a mechanism for reducing the risk of of data entry errors and speeding data entry.data entry errors and speeding data entry.
ItIt’’s relatively simple to use!s relatively simple to use!
So, how does it work?So, how does it work?

10
4. Excel – Data Validation4. Excel – Data Validation
LetLet’’s use an Expense Report as an s use an Expense Report as an example.example.
In this example, there are two In this example, there are two fields (name and account) that fields (name and account) that must be validated.must be validated.
First, we need a list of valid First, we need a list of valid values. A table of valid employee values. A table of valid employee names is located in the workbook. names is located in the workbook. For Validation to work, the table For Validation to work, the table must be in the Expense Report must be in the Expense Report worksheet. Copy the table and worksheet. Copy the table and paste it to cell V1.paste it to cell V1.
In cell C7, click on the Data menu In cell C7, click on the Data menu and select Validation.and select Validation.
4. Excel – Data Validation4. Excel – Data Validation
In the Allow box, select List. In the In the Allow box, select List. In the Source box, click on the Arrow to Source box, click on the Arrow to browse to the Employee Table.browse to the Employee Table.Select cells W2:W7. This includes Select cells W2:W7. This includes all the employee names, plus a all the employee names, plus a blank record (hint: so you can blank record (hint: so you can leave the field blank). Click on the leave the field blank). Click on the Arrow button, then Click OK.Arrow button, then Click OK.Return to cell C7. You will now Return to cell C7. You will now see a drop down arrow in the right see a drop down arrow in the right corner of cell C7. Click on the corner of cell C7. Click on the arrow to see the employee list. arrow to see the employee list. Now only values from this list can Now only values from this list can be entered.be entered.The list must be maintained in the The list must be maintained in the template.template.
11
4. Excel – Data Validation4. Excel – Data Validation
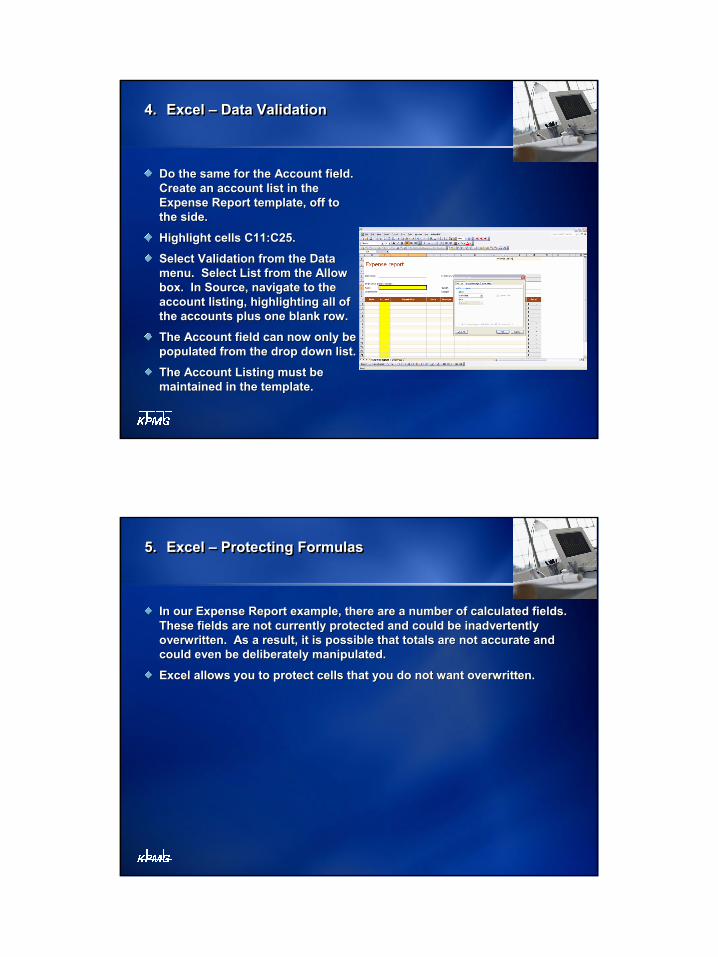
Do the same for the Account field. Do the same for the Account field. Create an account list in the Create an account list in the Expense Report template, off to Expense Report template, off to the side.the side.
Highlight cells C11:C25.Highlight cells C11:C25.
Select Validation from the Data Select Validation from the Data menu. Select List from the Allow menu. Select List from the Allow box. In Source, navigate to the box. In Source, navigate to the account listing, highlighting all of account listing, highlighting all of the accounts plus one blank row.the accounts plus one blank row.
The Account field can now only be The Account field can now only be populated from the drop down list.populated from the drop down list.
The Account Listing must be The Account Listing must be maintained in the template.maintained in the template.
5. Excel – Protecting Formulas5. Excel – Protecting Formulas
In our Expense Report example, there are a number of calculated In our Expense Report example, there are a number of calculated fields. fields. These fields are not currently protected and could be inadvertenThese fields are not currently protected and could be inadvertently tly overwritten. As a result, it is possible that totals are not acoverwritten. As a result, it is possible that totals are not accurate and curate and could even be deliberately manipulated.could even be deliberately manipulated.
Excel allows you to protect cells that you do not want overwrittExcel allows you to protect cells that you do not want overwritten.en.
12
5. Excel – Protecting Formulas5. Excel – Protecting Formulas
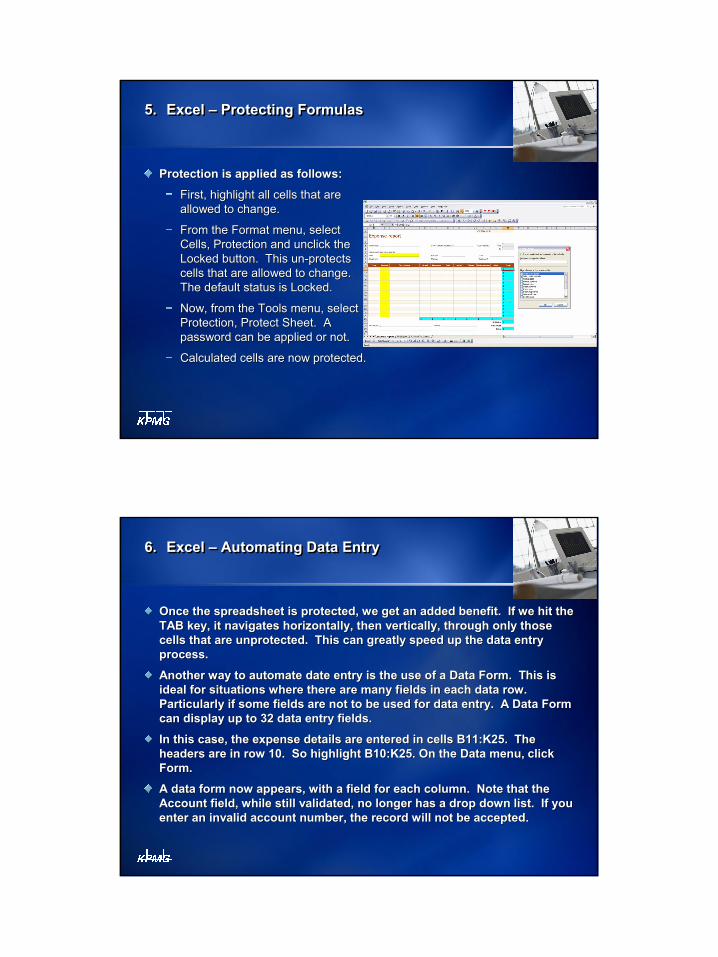
Protection is applied as follows:Protection is applied as follows:
First, highlight all cells that are First, highlight all cells that are allowed to change.allowed to change.
From the Format menu, select From the Format menu, select Cells, Protection and unclick the Cells, Protection and unclick the Locked button. This unLocked button. This un--protects protects cells that are allowed to change. cells that are allowed to change. The default status is Locked.The default status is Locked.
Now, from the Tools menu, select Now, from the Tools menu, select Protection, Protect Sheet. A Protection, Protect Sheet. A password can be applied or not.password can be applied or not.
Calculated cells are now protected.Calculated cells are now protected.
6. Excel – Automating Data Entry6. Excel – Automating Data Entry
Once the spreadsheet is protected, we get an added benefit. If Once the spreadsheet is protected, we get an added benefit. If we hit the we hit the TAB key, it navigates horizontally, then vertically, through onlTAB key, it navigates horizontally, then vertically, through only those y those cells that are unprotected. This can greatly speed up the data cells that are unprotected. This can greatly speed up the data entry entry process.process.
Another way to automate date entry is the use of a Data Form. TAnother way to automate date entry is the use of a Data Form. This is his is ideal for situations where there are many fields in each data roideal for situations where there are many fields in each data row. w. Particularly if some fields are not to be used for data entry. Particularly if some fields are not to be used for data entry. A Data Form A Data Form can display up to 32 data entry fields.can display up to 32 data entry fields.
In this case, the expense details are entered in cells B11:K25. In this case, the expense details are entered in cells B11:K25. The The headers are in row 10. So highlight B10:K25. On the Data menu, headers are in row 10. So highlight B10:K25. On the Data menu, click click Form.Form.
A data form now appears, with a field for each column. Note thaA data form now appears, with a field for each column. Note that the t the Account field, while still validated, no longer has a drop down Account field, while still validated, no longer has a drop down list. If you list. If you enter an invalid account number, the record will not be acceptedenter an invalid account number, the record will not be accepted..

13
7. Excel - Navigation Buttons7. Excel - Navigation Buttons
Navigating back and forth through multiple spreadsheets in a worNavigating back and forth through multiple spreadsheets in a workbook kbook can be a pain, especially when the number of spreadsheets is larcan be a pain, especially when the number of spreadsheets is large.ge.
There are several built in methods of navigation:There are several built in methods of navigation:
We can click on the worksheet tabs on the navigation bar at the We can click on the worksheet tabs on the navigation bar at the bottom of bottom of the screen.the screen.
On the left of the navigation bar, there are four arrow buttons,On the left of the navigation bar, there are four arrow buttons, which allow which allow you to move right or left through the sheets, or to the first oryou to move right or left through the sheets, or to the first or last sheet. As last sheet. As well, you can also right mouse click on the arrows and a listingwell, you can also right mouse click on the arrows and a listing of all sheets of all sheets will appear. Click any of the sheets to go to it.will appear. Click any of the sheets to go to it.
7. Excel - Navigation Buttons7. Excel - Navigation Buttons
Another approach is to create navigation buttons on each Another approach is to create navigation buttons on each worksheet, that are linked to macros that quickly move worksheet, that are linked to macros that quickly move between worksheets.between worksheets.HereHere’’s an example:s an example:
Open the Expense Report sheet. Select an Open the Expense Report sheet. Select an AutoshapeAutoshape from from the Drawing Toolbar to create a Button. Enter the Drawing Toolbar to create a Button. Enter ““Go To Chart Go To Chart of Accountsof Accounts”” in the in the AutoshapeAutoshape. Format to your preference.. Format to your preference.From the Tools menu, select Macro, Record New Macro. From the Tools menu, select Macro, Record New Macro. Assign a name, with no spaces (Assign a name, with no spaces (i.e.,ChartOfAccountsi.e.,ChartOfAccounts). ). Select which workbook to include the macro in. The macro Select which workbook to include the macro in. The macro can also be assigned a shortcut key. Click OK.can also be assigned a shortcut key. Click OK.Now, navigate to the Chart of Accounts Sheet and press the Now, navigate to the Chart of Accounts Sheet and press the STOP button on the Macro Toolbar. Return to the Expense STOP button on the Macro Toolbar. Return to the Expense Report.Report.Now, right mouse click on the Button, and select Assign Now, right mouse click on the Button, and select Assign Macro. Click on the Macro. Click on the ChartOfAccountsChartOfAccounts macro and click OK.macro and click OK.Now, click on the Button and you will automatically be Now, click on the Button and you will automatically be transferred to the Chart of Accounts.transferred to the Chart of Accounts.Perform the same steps to create a button to navigate from Perform the same steps to create a button to navigate from the Chart of Accounts back to the Expense Report.the Chart of Accounts back to the Expense Report.

14
8. Excel – Lookup Tables8. Excel – Lookup Tables
Another method for enhancing an Excel Another method for enhancing an Excel template is with the use of Lookup Tables.template is with the use of Lookup Tables.
Lookup Tables are ideal for populating data Lookup Tables are ideal for populating data when there are relationships between data when there are relationships between data elements.elements.
LetLet’’s use the Expense Report as our example.s use the Expense Report as our example.
In the Expense Report, the employee is asked to In the Expense Report, the employee is asked to identify their name, department, position, identify their name, department, position, manager, SSN and Employee ID. These manager, SSN and Employee ID. These relationships seldom change. Once we know relationships seldom change. Once we know the employee name, we should be able to the employee name, we should be able to populate all other data elements with a Lookup populate all other data elements with a Lookup Table.Table.
8. Excel – Lookup Tables8. Excel – Lookup Tables
LetLet’’s start with the department field. Make C8 s start with the department field. Make C8 the active cell. In the formula bar, click on the the active cell. In the formula bar, click on the Formula button (Formula button (fxfx). Enter ). Enter ““VlookupVlookup”” and click and click Go. Select Go. Select VlookupVlookup and click OK. and click OK. In the Lookup Value, enter C7 (Employee In the Lookup Value, enter C7 (Employee Name).Name).In the Table Array, click the arrow and highlight In the Table Array, click the arrow and highlight the Employee Table in the other worksheet. The the Employee Table in the other worksheet. The Employee Name must be in the left most Employee Name must be in the left most column.column.In the Column Index #, enter the column number In the Column Index #, enter the column number for department (3for department (3rdrd column from left).column from left).Repeat the process for all remaining data fields.Repeat the process for all remaining data fields.Now, only the employee name need be entered.Now, only the employee name need be entered.

15
9. Excel – Conditional Formatting9. Excel – Conditional Formatting
As financial managers, we regularly perform financial analyses uAs financial managers, we regularly perform financial analyses using sing Excel. We may be looking for unusual entries or unusual variancExcel. We may be looking for unusual entries or unusual variances. es. The easier it is to see these variances, the more effective is tThe easier it is to see these variances, the more effective is the he spreadsheet.spreadsheet.
Conditional Formatting is a means of highlighting certain cells Conditional Formatting is a means of highlighting certain cells based based upon a set of preupon a set of pre--conditions.conditions.
9. Excel – Conditional Formatting9. Excel – Conditional Formatting
HereHere’’s an example:s an example:
Open the example spreadsheet with three columns Open the example spreadsheet with three columns of invoice information: Invoice #, Invoice Date and of invoice information: Invoice #, Invoice Date and Invoice Amount.Invoice Amount.
Table 1 is the data without conditional formatting.Table 1 is the data without conditional formatting.
In Table 2, we will apply conditional formatting to all In Table 2, we will apply conditional formatting to all three columns.three columns.
For Invoice number, the starting invoice number was For Invoice number, the starting invoice number was 222 and ending was 246.222 and ending was 246.
For Date, all invoice dates should be in 2008.For Date, all invoice dates should be in 2008.
All invoice amounts should be a positive amount. All invoice amounts should be a positive amount. We are interested in identifying any credit notes or We are interested in identifying any credit notes or large unusual amounts (>$2,500).large unusual amounts (>$2,500).
Can you see any data problems in Table 1?Can you see any data problems in Table 1?

16
9. Excel – Conditional Formatting9. Excel – Conditional Formatting
HereHere’’s an example:s an example:To apply Conditional Formatting, first highlight the cells to apTo apply Conditional Formatting, first highlight the cells to apply the ply the formatting to.formatting to.
From the Format menu, select Conditional Formatting. Multiple cFrom the Format menu, select Conditional Formatting. Multiple conditions onditions can be applied.can be applied.
For the Invoice column, apply the condition that invoice numbersFor the Invoice column, apply the condition that invoice numbers must be must be between 221 and 247. Click on the Format button and pick a condbetween 221 and 247. Click on the Format button and pick a conditional itional format (make it stand out!). Click OK.format (make it stand out!). Click OK.
For the date column, apply the condition that dates must be betwFor the date column, apply the condition that dates must be between een January 1, 2008 and December 31, 2008.January 1, 2008 and December 31, 2008.
For the amount column, apply two conditions: that amounts less For the amount column, apply two conditions: that amounts less than $0 than $0 are highlighted and amounts greater than $2,500 are highlighted.are highlighted and amounts greater than $2,500 are highlighted.With conditional formatting applied, was it easier to identify tWith conditional formatting applied, was it easier to identify the data he data problems?problems?
10. Word/Excel – Saving a Template10. Word/Excel – Saving a Template
Whether Word or Excel, we can save our Whether Word or Excel, we can save our document as a template. document as a template.
Select Save As, from the File MenuSelect Save As, from the File Menu
In the Save as type box, select Document In the Save as type box, select Document Template (Word) or Template (Excel).Template (Word) or Template (Excel).
Office should automatically open your Office should automatically open your personal template folderpersonal template folder
Select the appropriate folder and click on Select the appropriate folder and click on the Save button.the Save button.
You now have templates to support your You now have templates to support your administrative productivity.administrative productivity.

17
10. Word/Excel – Saving a Template10. Word/Excel – Saving a Template
To use the template, select New from the File MenuTo use the template, select New from the File Menu
A New Document list will come up on the left side of the screenA New Document list will come up on the left side of the screen
Select Templates, On My ComputerSelect Templates, On My Computer
10.Word/Excel – Saving a Template10.Word/Excel – Saving a Template
Navigate to the document template you want in the Template FoldeNavigate to the document template you want in the Template Folder listr list
Select the document and click OKSelect the document and click OK

18
ResourcesResources
http://office.microsoft.com/enhttp://office.microsoft.com/en--us/templates/default.aspxus/templates/default.aspx
http://search.techrepublic.com.com/http://search.techrepublic.com.com/search/microsoft+office+and+templsearch/microsoft+office+and+template.htmlate.html
Don’t let theRecession Worry
You