PVC Platform with Shelf for a Minivan - Dog Toys, Dog Treats, Dog
3
12 Clean Run T his lightweight but very sturdy and stable platform is quick and easy to make. It is 46" wide, 30" deep, and 14.5" high and is designed to fit into the back of a 1999 Toyota Sienna LE minivan with the rear bench seat re- moved. However, it should fit most minivans or can be easily customized to do so. The platform holds two #400 Vari Kennels (or for better vis- ibility and ventilation, use wire crates measuring 21"W x 30"D x 24"H) on top, and two 36" x-pens on the shelf, with room for mat, tarps, chair, and so on underneath. The cost was approximately $60 including tools, and the construction time was approximately three hours. Materials Needed • 4 – 10' lengths of 1" Schedule 40 PVC pipe • 16 – 1" PVC tee connectors • 4 – 1" PVC 90° elbow connectors • 4 – 1" to 1" PVC male adapters (with threads on the outside) • 4 – 1" galvanized metal floor flanges (look in the plumbing section near the PVC) • 4 – 1" C-clamps (also in plumbing) • 8 – #12 x 1 /2" pan-head Phillips tapping screws • 1 – piece of 1 /2" thick plywood, any grade, cut to 30" x 46" • 10 – yards of black 2" cloth duct tape (to match non-skid surface) • 15 – feet of 1 1 /4" wide, or wider, double-sided carpet tape • PVC cement, regular • Non-skid material for top surface of the plat- form. I highly recommend 36" wide industrial walkway matting of ribbed, black vinyl. Buy a 46" length and then trim width to 30" by cut- ting along one of the ribs for an easy straight edge. PVC Platform with Shelf for a Minivan By Susan McClair Tools Needed • PVC cutter • Scissors • Phillips screwdriver or drill with driver bits • Tape measure • (Optional) Saw Assembling the Platform Please read all of the directions before starting. Also, do not glue any parts together until in- structed to do so. It is critical to make sure that all the pieces fit together correctly before you glue. 1. Measure the interior width and height of your minivan to make sure the platform will fit. If not, see step 6. 2. Cut the PVC pipe into the following lengths: 2 – 30" pieces (A) 6 – 27 1 /2" pieces (B) 2 – 20" pieces (C) 4 – 6" pieces (D) 4 – 5" pieces (E) 4 – 4" pieces (F) 8 – 1 3 /4" pieces (G) 3. Put together the top of the platform frame as shown in Figure 1. Each corner is comprised of two tees, one elbow, and two 1 3 /4" pieces of pipe (G) that are used to connect these parts as illustrated in the enlargement. Push the pipe into each connector as deeply as it will go; the tees and elbow should fit flush to each other. If they don’t (there are variances in different brands of fittings), trim the 1 3 /4" pieces as necessary. Add the two 30" pieces of PVC pipe (A) and four 27 1 /2" cross bars (B). 4. Add the legs using the 5" (E) and 4" (F) pieces of PVC pipe joined by a tee as shown. Fit a 1" to 1" male adapter to the end of each leg. Next screw on a metal floor flange as shown in the enlargement in Figure 1. 5. Assemble the framework for the shelf, which is the second “layer” of the platform. Fit the four 6" pieces of pipe (D) to the tees on the legs, facing across the width of the frame. Join them with the remaining four tees and the two 20" pieces of PVC pipe (C). With these tees facing each other across the length of the frame, attach the remaining two 27 1 /2" pieces (B) to form the support bars of the shelf. 6. Now make sure that the frame fits in your van. Lay the plywood on top and test to see if your gear fits on top and underneath it. If not, the platform can easily be made smaller in any direction by symmetrically cutting the PVC lengths (and plywood) as needed. NOTE: Enlarging the platform by more than an inch or so in any direction may adversely affect stability. An increase in width will require an increase in depth, and possibly shortening the legs to prevent wobbling. In order to add height, depth should be added. Similarly, the shelf can be omitted, but the legs should then be shortened for stability. Gluing the Frame 1. First, glue the four top corner sections. The easiest way to be sure the right angles are square is to take off the metal feet, lay the frame on its side on a flat surface, square the legs to each other, and then take apart each corner one at a time. Glue a tee to the elbow with a short connecting piece of pipe (G) and quickly reattach this two-piece glued segment to the frame at the proper angle before the glue sets. Glue the second connecting piece of pipe (G) to the second tee and, again, quickly reattach the two-piece glued segment to the frame at the proper angle. Be sure to push the pipe deeply into the fittings so that they fit flush and to wipe off excess glue at each step. Glue each corner section in this way.
Transcript of PVC Platform with Shelf for a Minivan - Dog Toys, Dog Treats, Dog
12 Clean Run
This lightweight but very sturdy and stable platform is quick and easy to make. It is 46" wide, 30" deep, and 14.5" high and
is designed to fit into the back of a 1999 Toyota Sienna LE minivan with the rear bench seat re-moved. However, it should fit most minivans or can be easily customized to do so. The platform holds two #400 Vari Kennels (or for better vis-ibility and ventilation, use wire crates measuring 21"W x 30"D x 24"H) on top, and two 36" x-pens on the shelf, with room for mat, tarps, chair, and so on underneath. The cost was approximately $60 including tools, and the construction time was approximately three hours.
Materials Needed• 4 – 10' lengths of 1" Schedule 40 PVC pipe
• 16 – 1" PVC tee connectors
• 4 – 1" PVC 90° elbow connectors
• 4 – 1" to 1" PVC male adapters (with threads on the outside)
• 4 – 1" galvanized metal floor flanges (look in the plumbing section near the PVC)
• 4 – 1" C-clamps (also in plumbing)
• 8 – #12 x 1/2" pan-head Phillips tapping screws
• 1 – piece of 1/2" thick plywood, any grade, cut to 30" x 46"
• 10 – yards of black 2" cloth duct tape (to match non-skid surface)
• 15 – feet of 1 1/4" wide, or wider, double-sided carpet tape
• PVC cement, regular
•Non-skid material for top surface of the plat-form. I highly recommend 36" wide industrial walkway matting of ribbed, black vinyl. Buy a 46" length and then trim width to 30" by cut-ting along one of the ribs for an easy straight edge.
PVC Platform with Shelf for a MinivanBy Susan McClair
Tools Needed• PVC cutter
• Scissors
• Phillips screwdriver or drill with driver bits
• Tape measure
• (Optional) Saw
Assembling the PlatformPlease read all of the directions before starting. Also, do not glue any parts together until in-structed to do so. It is critical to make sure that all the pieces fit together correctly before you glue.
1. Measure the interior width and height of your minivan to make sure the platform will fit. If not, see step 6.
2. Cut the PVC pipe into the following lengths:
2 – 30" pieces (A) 6 – 27 1/2" pieces (B) 2 – 20" pieces (C) 4 – 6" pieces (D) 4 – 5" pieces (E) 4 – 4" pieces (F) 8 – 1 3/4" pieces (G)
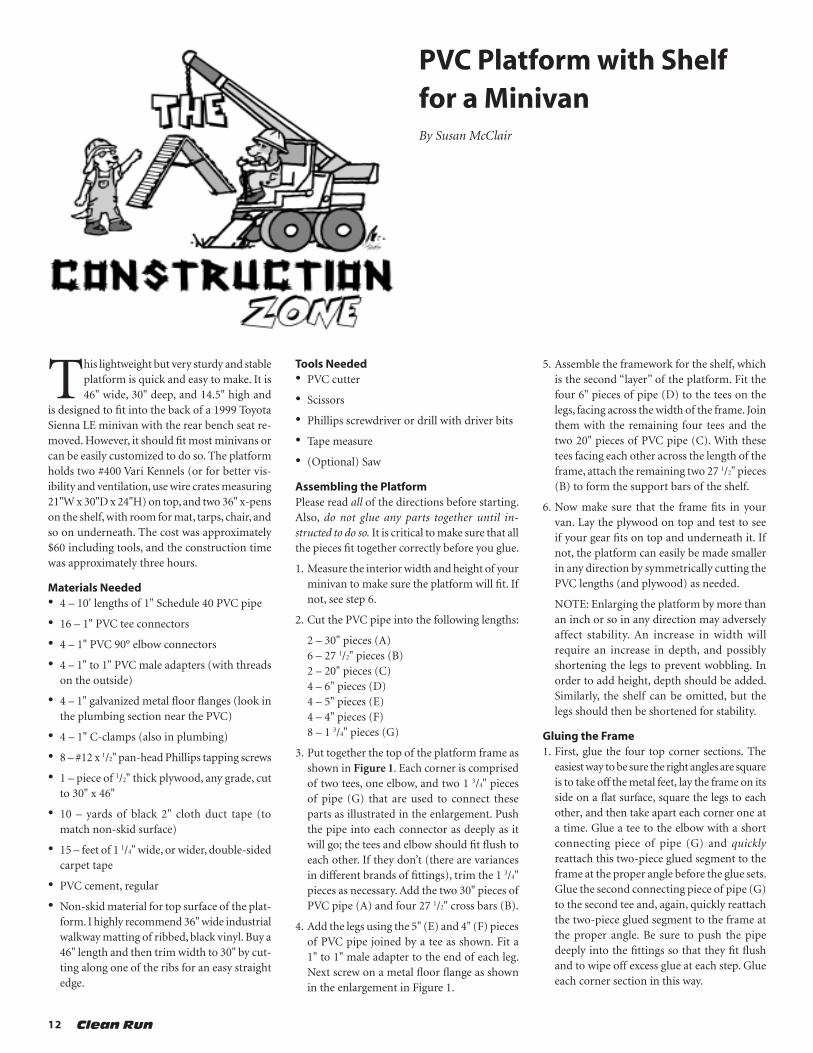
3. Put together the top of the platform frame as shown in Figure 1. Each corner is comprised of two tees, one elbow, and two 1 3/4" pieces of pipe (G) that are used to connect these parts as illustrated in the enlargement. Push the pipe into each connector as deeply as it will go; the tees and elbow should fit flush to each other. If they don’t (there are variances in different brands of fittings), trim the 1 3/4" pieces as necessary. Add the two 30" pieces of PVC pipe (A) and four 27 1/2" cross bars (B).
4. Add the legs using the 5" (E) and 4" (F) pieces of PVC pipe joined by a tee as shown. Fit a 1" to 1" male adapter to the end of each leg. Next screw on a metal floor flange as shown in the enlargement in Figure 1.
5. Assemble the framework for the shelf, which is the second “layer” of the platform. Fit the four 6" pieces of pipe (D) to the tees on the legs, facing across the width of the frame. Join them with the remaining four tees and the two 20" pieces of PVC pipe (C). With these tees facing each other across the length of the frame, attach the remaining two 27 1/2" pieces (B) to form the support bars of the shelf.
6. Now make sure that the frame fits in your van. Lay the plywood on top and test to see if your gear fits on top and underneath it. If not, the platform can easily be made smaller in any direction by symmetrically cutting the PVC lengths (and plywood) as needed.
NOTE: Enlarging the platform by more than an inch or so in any direction may adversely affect stability. An increase in width will require an increase in depth, and possibly shortening the legs to prevent wobbling. In order to add height, depth should be added. Similarly, the shelf can be omitted, but the legs should then be shortened for stability.
Gluing the Frame1. First, glue the four top corner sections. The
easiest way to be sure the right angles are square is to take off the metal feet, lay the frame on its side on a flat surface, square the legs to each other, and then take apart each corner one at a time. Glue a tee to the elbow with a short connecting piece of pipe (G) and quickly reattach this two-piece glued segment to the frame at the proper angle before the glue sets. Glue the second connecting piece of pipe (G) to the second tee and, again, quickly reattach the two-piece glued segment to the frame at the proper angle. Be sure to push the pipe deeply into the fittings so that they fit flush and to wipe off excess glue at each step. Glue each corner section in this way.
13 Clean Run
Figure 1
2. Remove and then glue on the 30" pieces (A) that provide the width, positioning the un-sightly lettering on the pipe to face upward where it will be hidden by the plywood.
3. Glue the four cross bars (B) for the top of the platform to the appropriate elbows and tees on one side of the frame only.
4. Glue together the pieces for the shelf, starting on the same side as in the previous step. Take apart the frame one joint at a time, gluing it and quickly reassembling it to be sure angles are correct before the glue sets. Again, turn the pipe lettering so that it isn’t visible.
5. Glue the two cross bars (B) for the shelf to the tees on one side of the frame only.
6. Finish gluing all six of the cross bars (B) on the opposite side of the frame.
7. Glue the legs last.
Prepare the Platform1. Prepare the plywood by taping all four edges
with cloth tape so that there won’t be splinters. On the finished side of the plywood, apply a single long piece of double-sided carpet tape along the top of each edge. Apply any remain-ing carpet tape evenly in long strips across the center of the plywood.
2. Remove the paper backing from the carpet tape. Center the non-skid material to align the 46" long edge with the long edge of the plywood, and then press onto the tape. Do the same for one of the 30" edges. Then carefully cover the surface of the plywood, making sure the non-skid vinyl lies flat and smooth. Finish each edge by taping it with a long strip of cloth tape and folding under on each side.
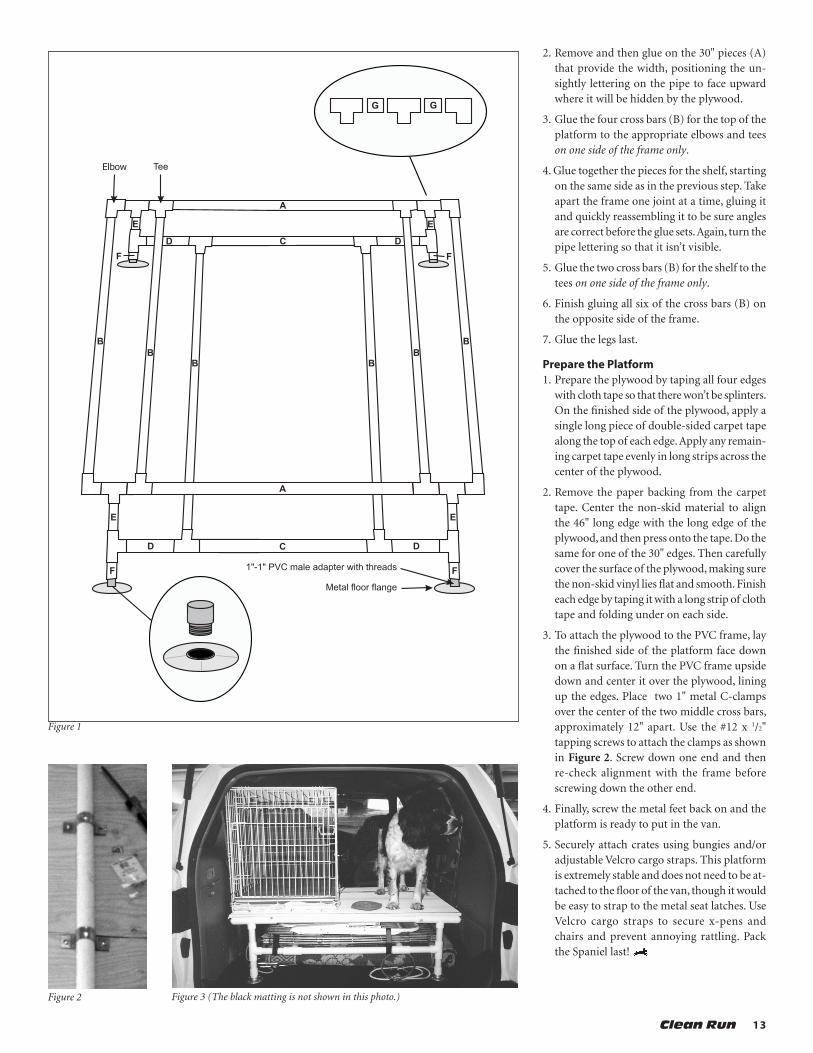
3. To attach the plywood to the PVC frame, lay the finished side of the platform face down on a flat surface. Turn the PVC frame upside down and center it over the plywood, lining up the edges. Place two 1" metal C-clamps over the center of the two middle cross bars, approximately 12" apart. Use the #12 x 1/2" tapping screws to attach the clamps as shown in Figure 2. Screw down one end and then re-check alignment with the frame before screwing down the other end.
4. Finally, screw the metal feet back on and the platform is ready to put in the van.
5. Securely attach crates using bungies and/or adjustable Velcro cargo straps. This platform is extremely stable and does not need to be at-tached to the floor of the van, though it would be easy to strap to the metal seat latches. Use Velcro cargo straps to secure x-pens and chairs and prevent annoying rattling. Pack the Spaniel last!
Figure 2 Figure 3 (The black matting is not shown in this photo.)
14 Clean Run
®
Available at cleanrun.com