![ELITE PRO BEDT-ZQ-501 - barudankentitikes.grDT]-ZQ-501_parts.pdf · HIGH SPEED AUTOMATIC EMBROIDERY MACHINE ELITE PRO PARTS LIST BEDT-ZQ-501. ... 10 MH790010 Barudan logomark seal](https://static.fdocuments.us/doc/165x107/5b2337287f8b9ab94d8b480c/elite-pro-bedt-zq-501-dt-zq-501partspdf-high-speed-automatic-embroidery.jpg)
Pro Elite™ Professional Series Water Treatment System … · Pro Elite™ Professional Series...
36
Operation Manual Pro Elite Demand, Kit Series Pro Elite™ Professional Series Water Treatment System by GE
Transcript of Pro Elite™ Professional Series Water Treatment System … · Pro Elite™ Professional Series...

Pro Elite™ Professional SeriesWater Treatment System by GE
Operation ManualPro Elite Demand, Kit Series
Table of ContentsHow To Use This Manual . . . . . . . . . . . . . . . . . . . . . . . . . . . . . . . . . . . . . . . . . . . . . . . . . . . . . . 3
Safety Information . . . . . . . . . . . . . . . . . . . . . . . . . . . . . . . . . . . . . . . . . . . . . . . . . . . . . . . . . . . . 3
Valve Layout . . . . . . . . . . . . . . . . . . . . . . . . . . . . . . . . . . . . . . . . . . . . . . . . . . . . . . . . . . . . . . . . . 5
Valve Layout . . . . . . . . . . . . . . . . . . . . . . . . . . . . . . . . . . . . . . . . . . . . . . . . . . . . . . . . . . . . . . . . . 5
Demand Control Layout . . . . . . . . . . . . . . . . . . . . . . . . . . . . . . . . . . . . . . . . . . . . . . . . . . . . . . . 5
System Specifications 762. . . . . . . . . . . . . . . . . . . . . . . . . . . . . . . . . . . . . . . . . . . . . . . . . . . . . 5
Location Selection . . . . . . . . . . . . . . . . . . . . . . . . . . . . . . . . . . . . . . . . . . . . . . . . . . . . . . . . . . . . 6
Outdoor Locations . . . . . . . . . . . . . . . . . . . . . . . . . . . . . . . . . . . . . . . . . . . . . . . . . . . . . . . . . . . . 6
System Features . . . . . . . . . . . . . . . . . . . . . . . . . . . . . . . . . . . . . . . . . . . . . . . . . . . . . . . . . . . . . . 7
Equipment Installation . . . . . . . . . . . . . . . . . . . . . . . . . . . . . . . . . . . . . . . . . . . . . . . . . . . . . . . . 8
Water Line & Bypass Connections . . . . . . . . . . . . . . . . . . . . . . . . . . . . . . . . . . . . . . . . . . . . 11
Drain Line Connection . . . . . . . . . . . . . . . . . . . . . . . . . . . . . . . . . . . . . . . . . . . . . . . . . . . . . . . 11
Regenerant Line Connections . . . . . . . . . . . . . . . . . . . . . . . . . . . . . . . . . . . . . . . . . . . . . . . . 12
Overflow Line Connection . . . . . . . . . . . . . . . . . . . . . . . . . . . . . . . . . . . . . . . . . . . . . . . . . . . . 12
Electrical Connection . . . . . . . . . . . . . . . . . . . . . . . . . . . . . . . . . . . . . . . . . . . . . . . . . . . . . . . . 13
System Operation. . . . . . . . . . . . . . . . . . . . . . . . . . . . . . . . . . . . . . . . . . . . . . . . . . . . . . . . . . . . 14
Cycle Water Flows . . . . . . . . . . . . . . . . . . . . . . . . . . . . . . . . . . . . . . . . . . . . . . . . . . . . . . . . . . . 14
Camshaft Cycle Positions . . . . . . . . . . . . . . . . . . . . . . . . . . . . . . . . . . . . . . . . . . . . . . . . . . . . 15
Valve Disc Location/Function. . . . . . . . . . . . . . . . . . . . . . . . . . . . . . . . . . . . . . . . . . . . . . . . . 15
Disinfection of Water Conditioning Systems . . . . . . . . . . . . . . . . . . . . . . . . . . . . . . . . . . . 16
Displays, Icons & Cursors. . . . . . . . . . . . . . . . . . . . . . . . . . . . . . . . . . . . . . . . . . . . . . . . . . . . . 17
Button Functions . . . . . . . . . . . . . . . . . . . . . . . . . . . . . . . . . . . . . . . . . . . . . . . . . . . . . . . . . . . . 18
Programming Overview . . . . . . . . . . . . . . . . . . . . . . . . . . . . . . . . . . . . . . . . . . . . . . . . . . . . . . 18
Demand Control Operation. . . . . . . . . . . . . . . . . . . . . . . . . . . . . . . . . . . . . . . . . . . . . . . . . . . 18
Level I Programming . . . . . . . . . . . . . . . . . . . . . . . . . . . . . . . . . . . . . . . . . . . . . . . . . . . . . . . . . 18
Level l Programming - Demand Conditioner . . . . . . . . . . . . . . . . . . . . . . . . . . . . . . . . . . . 19
Level II Programming – P Values . . . . . . . . . . . . . . . . . . . . . . . . . . . . . . . . . . . . . . . . . . . . . . 21
Programming the Lockout Feature . . . . . . . . . . . . . . . . . . . . . . . . . . . . . . . . . . . . . . . . . . . 22
Level lll Cycle Programming – C Values. . . . . . . . . . . . . . . . . . . . . . . . . . . . . . . . . . . . . . . . 22
Level IV Viewing History - H Values . . . . . . . . . . . . . . . . . . . . . . . . . . . . . . . . . . . . . . . . . . . 23
Program Reset. . . . . . . . . . . . . . . . . . . . . . . . . . . . . . . . . . . . . . . . . . . . . . . . . . . . . . . . . . . . . . . 23
Placing 268 Water Conditioning System Into Operation (Fill Brine Tank Last) . . . . 24
Refill First Operation . . . . . . . . . . . . . . . . . . . . . . . . . . . . . . . . . . . . . . . . . . . . . . . . . . . . . . . . . 25
Manual Regeneration Options . . . . . . . . . . . . . . . . . . . . . . . . . . . . . . . . . . . . . . . . . . . . . . . . 26
Pro Elite Valve Exploded View & Parts List . . . . . . . . . . . . . . . . . . . . . . . . . . . . . . . . . . . . . 27
Conditioner Tank and Regenerant Tank Assembly Exploded View & Parts List . . . 29
Brine Well Assembly Exploded View & Parts List CH15675. . . . . . . . . . . . . . . . . . . . . . 31
Troubleshooting . . . . . . . . . . . . . . . . . . . . . . . . . . . . . . . . . . . . . . . . . . . . . . . . . . . . . . . . . . . . . 32
2

How To Use This ManualThis installation manual is designed to guide the installer through the process of installing and starting water conditioning systems featuring Pro Elite equipment.
This manual is a reference and will not include every system installation situation. The person installing this equipment should have:
• Training in the Pro Elite Demand systems.
• Knowledge of water conditioning and how to determine proper control settings.
• Adequate plumbing skills and qualifications per local and state laws, codes, and ordinances.
Icons That Appear In This Manual
WARNING: Failure to follow this instruction can result in personal injury or damage to the equipment.
Note: Helpful hint to simplify procedure.
Safety Information• Observe all warnings that appear in this manual.
• Please review the entire Installation and Operation Manual before installing the water conditioning system.
• As with all plumbing projects, it is recommended that a trained professional water treatment dealer install the water conditioning system. Please follow all local plumbing codes for installing this water conditioning system.
WARNING: Excessive Weight Hazard. Use two or more people to move and install the conditioner. Failure to do so can result in injury (including back injury).
• System is not intended to be used for treating water that is microbiologically unsafe or of unknown quality without adequate disinfection before or after the system.
• This water conditioning system is to be used only for potable water.
• Inspect the water conditioning system for carrier shortage or shipping damage before beginning installation.
• Use only lead-free solder and flux, as required by federal and state codes, when installing soldered copper plumbing.
• Use caution when installing soldered metal piping near the water conditioning system. Heat can adversely affect the plastic control valve and bypass valve.
• All plastic connections should be hand tightened.
Teflona tape may be used on connections that do not use an O-ring seal. Do not use pipe dope type sealants on the valve body. Do not use pliers or pipe wrenches.
• Do not use petroleum-based lubricants such as Vaseline, oils or hydrocarbon-based lubricants. Use only 100% silicone lubricants.
• Use only the power transformer supplied with this water conditioning system.
• All electrical connections must be completed according to local codes.
• The power outlet must be grounded
Install an appropriate grounding strap across the inlet and outlet piping of the water conditioning system to ensure that a proper ground is maintained.
WARNING: Dry location use only, unless used with a Listed Class 2 Power Supply suitable for outdoor use.
• To disconnect power, unplug the AC adapter from its power source.
• Observe drain line requirements. The drain line must be a minimum of 1/2-inch diameter. Use 3/4-inch pipe if the backwash flow rate is greater than 5 gpm (19 Lpm) or the pipe length is greater than 20 feet (6 m).
• Do not support the weight of the system on the control valve fittings, plumbing, or the bypass.
• Do not allow this water conditioning system to freeze. Damage from freezing will void this water conditioning system’s warranty.
• Operating ambient temperature: 34° to 120°F (1° to 49°C).
• Operating water temperature: 35° to 100°F (1.7° to 38°C).
• Operating water pressure range : 20 to 125 psi (1.38 to 8.62 bar). In Canada the acceptable operating water pressure range is 20 to 100 psi (1.38 to 6.89 bar).
a. Teflon is a trademark of E. I. duPont de Nemours.
3

WARNING: The valve and tank components of this Pro Elite unit have been assembled and tightened to the proper factory torque specifications. Over
tightening may result in improper valve, probe and tank alingnment and may damage the tank O-ring (PN1010154)
• Keep the media tank in the upright position. Do not turn upside down or drop. Turning the tank upside down or laying the tank on its side can cause media to enter the valve.
• Ensure that all wiring and plumbing connections on the mineral and brine tanks are installed correctly.
• Use only regenerants designed for water conditioning. Do not use ice melting salt , block salt or rock salt.
4
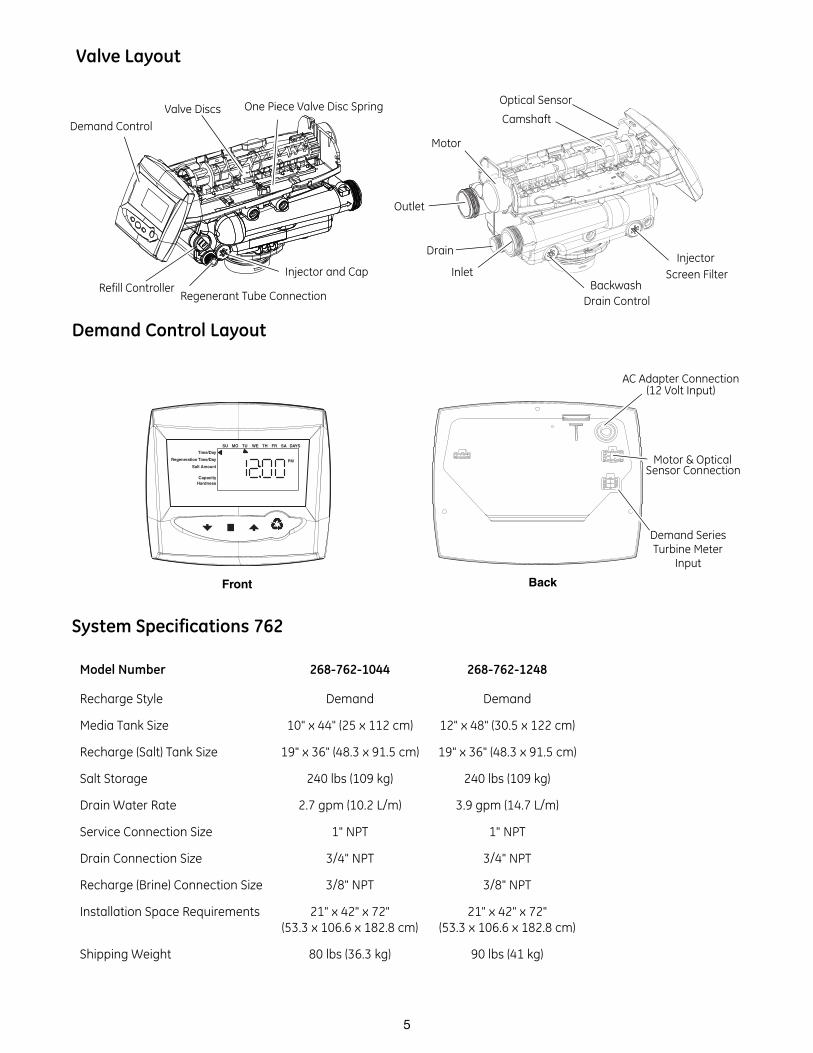
Valve Layout
Demand Control Layout
System Specifications 762
Motor
Injector Screen Filter
BackwashDrain Control
Inlet
Drain
Outlet
Camshaft
Optical SensorValve Discs One Piece Valve Disc Spring
Demand Control
Injector and Cap
Regenerant Tube ConnectionRefill Controller
Time/Day
Regeneration Time/Day
Salt Amount
SU MO TU WE TH FR SA DAYS
PM
CapacityHardness
Front Back
AC Adapter Connection(12 Volt Input)
Motor & OpticalSensor Connection
Demand SeriesTurbine Meter
Input
Model Number 268-762-1044 268-762-1248
Recharge Style Demand Demand
Media Tank Size 10" x 44" (25 x 112 cm) 12" x 48" (30.5 x 122 cm)
Recharge (Salt) Tank Size 19" x 36" (48.3 x 91.5 cm) 19" x 36" (48.3 x 91.5 cm)
Salt Storage 240 lbs (109 kg) 240 lbs (109 kg)
Drain Water Rate 2.7 gpm (10.2 L/m) 3.9 gpm (14.7 L/m)
Service Connection Size 1" NPT 1" NPT
Drain Connection Size 3/4" NPT 3/4" NPT
Recharge (Brine) Connection Size 3/8" NPT 3/8" NPT
Installation Space Requirements 21" x 42" x 72"(53.3 x 106.6 x 182.8 cm)
21" x 42" x 72"(53.3 x 106.6 x 182.8 cm)
Shipping Weight 80 lbs (36.3 kg) 90 lbs (41 kg)
5
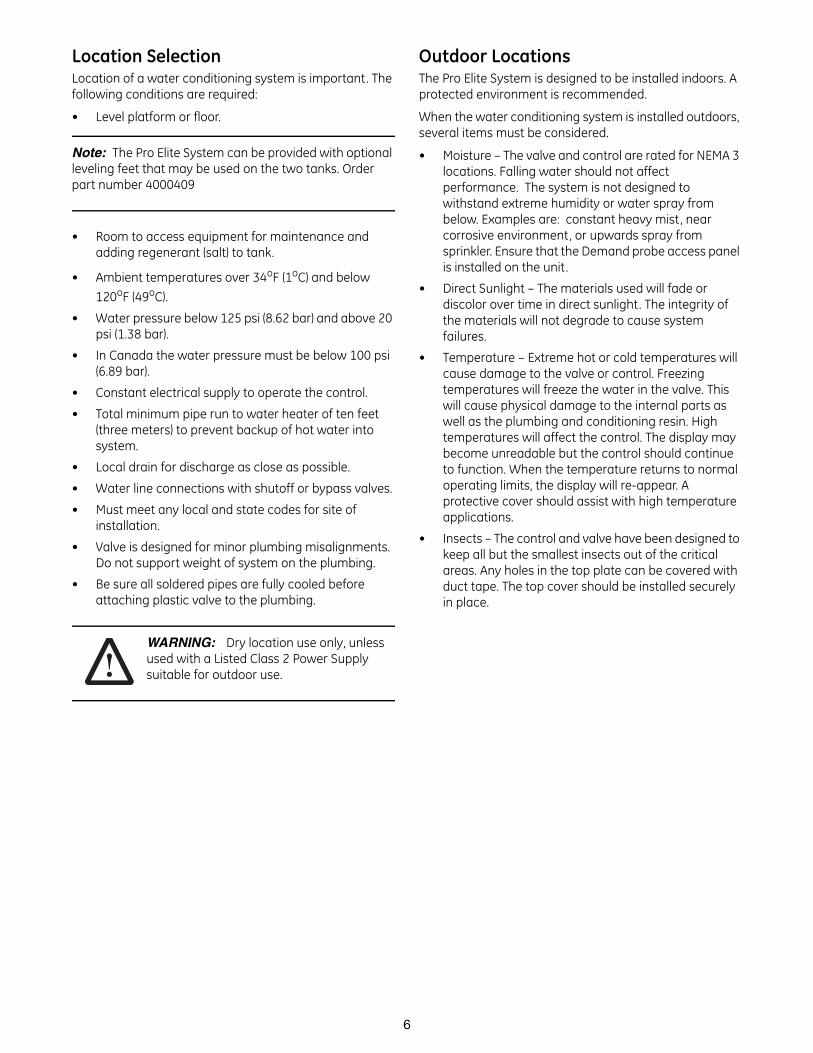
Location SelectionLocation of a water conditioning system is important. The following conditions are required:
• Level platform or floor.
Note: The Pro Elite System can be provided with optional leveling feet that may be used on the two tanks. Order part number 4000409
• Room to access equipment for maintenance and adding regenerant (salt) to tank.
• Ambient temperatures over 34oF (1oC) and below
120oF (49oC).
• Water pressure below 125 psi (8.62 bar) and above 20 psi (1.38 bar).
• In Canada the water pressure must be below 100 psi (6.89 bar).
• Constant electrical supply to operate the control.
• Total minimum pipe run to water heater of ten feet (three meters) to prevent backup of hot water into system.
• Local drain for discharge as close as possible.
• Water line connections with shutoff or bypass valves.
• Must meet any local and state codes for site of installation.
• Valve is designed for minor plumbing misalignments. Do not support weight of system on the plumbing.
• Be sure all soldered pipes are fully cooled before attaching plastic valve to the plumbing.
WARNING: Dry location use only, unless used with a Listed Class 2 Power Supply suitable for outdoor use.
Outdoor LocationsThe Pro Elite System is designed to be installed indoors. A protected environment is recommended.
When the water conditioning system is installed outdoors, several items must be considered.
• Moisture – The valve and control are rated for NEMA 3 locations. Falling water should not affect performance. The system is not designed to withstand extreme humidity or water spray from below. Examples are: constant heavy mist, near corrosive environment, or upwards spray from sprinkler. Ensure that the Demand probe access panel is installed on the unit.
• Direct Sunlight – The materials used will fade or discolor over time in direct sunlight. The integrity of the materials will not degrade to cause system failures.
• Temperature – Extreme hot or cold temperatures will cause damage to the valve or control. Freezing temperatures will freeze the water in the valve. This will cause physical damage to the internal parts as well as the plumbing and conditioning resin. High temperatures will affect the control. The display may become unreadable but the control should continue to function. When the temperature returns to normal operating limits, the display will re-appear. A protective cover should assist with high temperature applications.
• Insects – The control and valve have been designed to keep all but the smallest insects out of the critical areas. Any holes in the top plate can be covered with duct tape. The top cover should be installed securely in place.
6

System FeaturesResin Tank
Brine Tank
1 Cover 8 Cover
2 Cap, Cover 9 Foot, Leveling
3 Jacket,Resin Tank 10 Latch Mechanism
4 Base 11 Tank Collar
5 268 Logix PE Valve w/762 Control
12 Riser Tube
6 Resin Tank 13 Upper Basket
7 Shield
1
2
3
4
5
6
7
8
9
10
11
12
13
1 Cover 5 Brine Tube Assembly
2 Collar, Tank 6 Foot, Leveling
3 Tank, Brine 7 Latch Mechanism
4 Base, Tank
1
2
3
4
5
6
7
7

Equipment Installation
Dimensions
36.9 (938.1)
60.7 (1541.6)
19.8 (503.8)16.8 (427.1)
17.6 (447)
20.5 (521.1)
35.1 (890.4)
28.2 (715.9)
32.2 (817.5)
53.4 (1356.6)
55 (1398.1)
5.0 (127)
2.5 (63.5)
8

9
Typical System Layout
Figure 1 Standard Basement Before Installation. Cold water lines shown.
Figure 2 Softened Water Flow Diagram.
Laundry TubsPump
orMeter
Hot Water Outlet
Outside Faucet
Outside Faucet
WaterHeater
Bath Tub Lavatory Toilet Kitchen
Floor Drain
Soft Water
Hard Water
OutsideFaucet
OutsideFaucet
Bath Tub Lavatory Toilet Kitchen
Laundry TubsPump or
Meter
Hot Water Outlet
Water Heater
Brine Tank Overflow Drain
Floor Drain
Drain Line
Bypass
Softener
GroundingStrap

10
InspectionThe Pro Elite system is shipped with several parts unassembled. When parts are removed from the packing, they should be inspected for damage. If any parts are damaged or missing, contact your supplier.
WARNING: When handling the media tank, do not turn it upside down or drop on its side.
When the carton is first opened, the softener will be standing upright. The salt tank will be turned over and covering the softener (Figure 3).
Figure 3
To assemble the system, remove the salt tank components (cover, collar, base and brine tube assembly) from the shipping container. The media tank can now be removed. Locate the miscellaneous parts bag.
To assemble the Salt Tank:
1. If the floor under the salt tank is uneven, the leveling feet may be installed. Lay the empty salt tank on its side. Press or tap the feet into the pockets.
2. Stand the salt tank up and in position. Level as needed. The tank has two ports that will be connected. One to a drain and one to the valve.
3. Place the brine tube in position inside the pocket at the bottom of the tank. Install the overflow fitting.
4. Place the tank collar over the top of the brine tube. Position the collar and push it down into the tank. Lay the cover aside for now.
To assemble the Media Tank:
1. If the floor under the media tank is uneven, the leveling feet may be installed. Slowly lay the tank on its side. Press or tap the feet into the pockets.
WARNING: The media tank contains loose particles that will shift . If the tank is turned upside down or laid back quickly, the particles may enter the valve. If this happens, the valve may need to be disassembled and cleaned.
2. Stand the tank up and in position. Level as needed.
3. Remove cover by pressing in on the latch and lifting cover (Figure 4). When the cover is removed, the valve is visable. Remove the power adapter. It should be secured to the tank collar near the inlet/outlet connections.
Figure 4
Salt Tank Cover
Salt Tank CollarSalt Tank Base
Salt Tank
Media Tank
Media Tank Base
Brine Tube
(Upside Down)
(Softener)Assembly
Press in
Lift

Water Line & Bypass ConnectionsA bypass valve system should be installed on all water conditioning systems. A model 1265 bypass is included with this system. The bypass valve isolates the conditioner from the water system and provides unconditioned water to service during routine maintenance and servicing procedures. See Figure 5 and Figure 6.
Figure 5 Model 1265 Bypass (Included)
Figure 6 Typical Three Valve Bypass Configuration (Not provided by manufacturer)
Note: Before turning on the water to the valve, rotate the two handles on the bypass valve 2-3 times. This will help seat the O-rings and prevent leaking.
WARNING: Do not use tools to tighten plastic fittings. Over time, stress may break the connections. Hand tighten the nuts.
WARNING: Do not use petroleum grease on gaskets when connecting bypass plumbing. Use only 100% silicone grease products when installing any Pro Elite brand valve. Non-silicone grease may cause plastic components to fail over time.
WARNING: The inlet water must be connected to the inlet port of the valve. When replacing non-Pro Elite valves, it is possible that the inlet and outlet plumbing is installed in a reversed position. Ensure that the plumbing is not installed in the opposite order. Tank media may be pushed into the valve.
Drain Line Connection
Note: Standard commercial practices are expressed here. Local codes may require changes to the following suggestions. Check with local authorities before installing a water conditioning system
1. The unit should be above and not more than 20 feet (6.1 m) from the drain. Use an appropriate adapter fitting to connect ½-inch (1.3 cm) plastic tubing to the drain line connection of the control valve.
2. If the backwash flow rate exceeds 5 gpm (22.7 Lpm) or if the unit is located 20-40 feet (6.1 – 12.2 m) from drain, use ¾-inch (1.9 cm) tubing. Use appropriate fittings to connect the ¾-inch tubing to the ¾-inch NPT drain connection on valve.
3. The drain line may be elevated up to 6 feet (1.8 m) providing the run does not exceed 15 feet (4.6 m) and water pressure at the conditioner is not less than 40 psi (2.76 bar). Elevation can increase by 2 feet (61 cm) for each additional 10-psi (.69 bar) of water pressure at the drain connector.
4. Where the drain line is elevated but empties into a drain below the level of the control valve, form a 7-inch (18 cm) loop at the far end of the line so that the bottom of the loop is level with the drain line connection. This will provide an adequate siphon trap. Tie or wire the hose in place at the drain point. Also provide an air gap of at least 1-1/2 inch between the end of the hose and the drain point.
5. Where the drain empties into an overhead sewer line, a sink-type trap must be used.
6. Secure the end of the drain line to prevent it from moving.
BYPASS BYPASS
BY
PA
SS
BY
PA
SS
Water ConditionerWater Conditioner
In Out In Out
Normal Operation In Bypass
Water ConditionerWater Conditioner
Normal Operation In Bypass
11

Figure 7 Drain Line Connection
WARNING: Never insert drain line directly into a drain, sewer line or trap (Figure 7). Always allow an air gap between the drain line and the wastewater to prevent the possibility of sewage being back-siphoned into the conditioner.
Regenerant Line ConnectionsThe regenerant line from the brine tank safety brine valve (Figure 9) connects to the valve. Make the connections and hand tighten. Be sure that the regenerant line is secure and free from air leaks. Even a small leak may cause the regenerant line to drain out, and the conditioner will not draw regenerant from the tank. This may also introduce air into the valve causing problems with valve operation.
Ensure that Teflona tape pipe sealant is applied to the 3/8-inch NPT regenerant line connection (Figure 8).
Figure 8
Figure 9 Salt Tank Safety Brine Valve and Brine Well Assembly
Overflow Line ConnectionIn the event of a malfunction, the regenerant TANK OVERFLOW will direct “overflow” to the drain instead of spilling on the floor. This fitting should be on the side of the cabinet or regenerant tank, Figure 10.
To connect the overflow line, locate the connection on side of the regenerant tank. Insert overflow fitting into tank and tighten with plastic thumbnut and gasket. Attach length of ½-inch (1.3 cm) I. D. tubing (not supplied) to fitting and run to drain. Do not elevate overflow line higher than overflow fitting.
Do not tie into drain line of control unit . Overflow line must be a direct, separate line from overflow fitting to drain, sewer or tub with an air gap at the drain.
Figure 10
a. Teflon is a Trademark of E.I. duPont de Nemours.
Right Way
Regenerant Line Connection
Regenerant Line Connection
Overflow Fitting
Drain Tubing
Secure hose in place
Air GapDrain
Regenerant Line Opening
12

Electrical Connection
Note: There are no user serviceable parts in the AC adaptor, motor or the control board.
The Demand control operates on a 12-volt alternating current power supply. This requires use of the Pentair Water supplied AC adapter. AC adapters are available from your supplier for different applications. They include:
120 VAC AC Adapters:Make sure power source matches the rating printed on the AC adapter.
Note: The power source should be constant. Be certain the AC adapter is not on a switched outlet. Power interruptions longer than 8 hours may cause the control to lose the day and time settings. When power is restored, the control will display four dashes (- - :- -) indicating that the day and time settings must be re-entered.
AC AdapterInput
VoltageApplication
Part Number
Standard wall-mount Energy Star
120V 60 Hz
UL listed for dry locations
3019151
Outdoor rated
120V 60 Hz
UL listed for outdoor installations
1235448
13

System Operation
Treated Water (Downflow) Untreated water is conditioned as it flows through the resin bed and up the riser.
If the model selected at first start-up was 268r, this is a system that will refill the salt tank at the start of a regeneration cycle. When a regeneration cycle begins, the salt tank is filled and brine is allowed to develop before Cycle 1 starts.
Backwash (Upflow) – Cycle C1Flow is reversed by the control valve, directed down the riser, up through the resin bed and sent to drain. The bed is expanded and debris is flushed to the drain.
Regenerant Draw (Downflow) – Cycle C2a Water passes through the injector and regenerant is drawn from the regenerant tank. The regenerant is directed to the resin bed. The hardness ions are dis-placed by sodium ions. Regenerant draw is com-pleted when the air check closes.
Slow Rinse (Downflow) – Cycle C3a
Water flow moves the regenerant through the resin at a specific rate and rinses to the drain. The resin is regenerated.
Repressurization – Cycle C4Pressure is balanced in the valve before continuing the regeneration.
Fast Rinse (Downflow) - Cycle C5Water passes through the resin bed and up through the riser to drain. All remaining regenerant residual is rinsed from the resin bed.
2nd Backwash (Upflow) – Cycle C6Flow is identical to C1 Backwash. The resin is reclassi-fied.
2nd Rinse (Downflow) - Cycle C7Flow is identical to C5 Fast Rinse. The resin bed is rinsed to quality.
Regenerant Refill – Cycle C8Water is directed to the regenerant tank to create regenerant for the next regeneration.
Cycle Water Flows
a. The camshaft does not change position between the C2 and C3 cycles. C2 is only momentarily displayed.
Backwash Fast RinseService Regenerant Draw/Slow Rinse
FromRegenerant Tank
Repressurize
To RegenerantTank
Refill
14

Camshaft Cycle PositionsThe front end of the camshaft has an indicator cup. The cup has slots in the outer edge and cycle numbers on the inside face (Figure 11).
Remove the cover and look over the top of the Demand control to view the cycle numbers. The number at the top indicates the current cycle position of the control valve. The corresponding slot for the number is positioned at the optical sensor, which is rotated approximately 90 degrees out of phase.
Note: If electrical power is not available, the camshaft can be rotated counterclockwise by hand if the motor is removed.
Cycle Indicators:
0 = Treated Water or brine make-up if recharge cycle has started.
1 = Backwash Cycle
2 = Regenerant Draw Cycle
3 = Slow Rinse Cycle
4 = System Pause
5 = Fast Rinse Cycle 1
6 = 2nd Backwash
7 = 2nd Fast Rinse
8 = Regenerant Refill (if system is 268r, regenerant refill takes place before backwash cycle #1)
Figure 11
Valve Disc Location/Function
Figure 12 Valve
Treated Water
Treated Water
Cycle Number
Slot
15

Disinfection of Water Conditioning SystemsThe materials of construction in the modern water conditioning system will not support bacterial growth, nor will these materials contaminate a water supply. During normal use, a conditioner may become fouled with organic matter, or in some cases with bacteria from the water supply. This may result in an off-taste or odor in the water.
Some conditioners may need to be disinfected after installation and some conditioners will require periodic disinfection during their normal life.
Depending upon the conditions of use, the style of conditioner, the type of ion exchanger, and the disinfectant available, a choice can be made among the following methods.
Sodium or Calcium HypochloriteThese materials are satisfactory for use with polystyrene resins, synthetic gel zeolite, and bentonites.
5.25% Sodium HypochloriteThese solutions are available under trade names such as Cloroxa. If stronger solutions are used, such as those sold for commercial laundries, adjust the dosage accordingly.
1. Dosage• Polystyrene resin; 1.2 fluid ounce (35.5 mL) per
cubic foot.
• Non-resinous exchangers; 0.8 fluid ounce (23.7 mL) per cubic foot.
2. Regenerant tank conditionersA. Backwash the conditioner and add the
required amount of hypochlorite solution to the well of the regenerant tank. The regenerant tank should have water in it to permit the solution to be carried into the conditioner.
B. Proceed with the normal regeneration.
Calcium HypochloriteCalcium hypochlorite, 70% available chlorine, is available in several forms including tablets and granules. These solid materials may be used directly without dissolving before use.
1. DosageA. Two grains (approximately 0.1 ounce (3 mL)
per cubic foot.
2. Regenerant tank conditionersA. Backwash the conditioner and add the
required amount of hypochlorite to the well of the regenerant tank. The regenerant tank should have water in it to permit the chlorine solution to be carried into the conditioner.
B. Proceed with the normal regeneration.
a. Clorox is a trademark of the Clorox Company.
16

Displays, Icons & Cursors
Note: In normal operation and during programming, only a few of the icons will actually be displayed.
1. Used to select and indicate the actual Day of the Week setting.
2. This cursor is displayed when programming the Days Override.
3. PM indicator displayed when setting Time of Day and Time of Regeneration. Note: There is no AM indicator.
4. Indicates displayed value in minute increments.
5. Indicated kilograins or kilograms when estimated capacity is diplayed.
6. Used to display “P”, “H”, and “C” parameter.
7. Indicates access into “H” Level IV History viewing.
8. Indicates access into “P” Level ll programming.
9. Used to display cycle position during regeneration. Also indicates access into “C” Level III cycle programming.
10. This cursor is displayed during Level l programming: Time of Day, Regen Time, Day, Salt Amount, Capacity and Hardness.
11. When flashing, this indicates regeneration is to occur at next Time of Regen. Appears as a solid icon during regeneration.
12. When hourglass is flashing, this indicates that the control is moving to a regeneration cycle. Appears as a solid icon during a cancelled regeneration and the control is cycling directly back to the home position.
13. Indicates the selected program setting has been locked out. Lock settings are changed in Level II programming.
14. Indicates double regeneration.
15. When Lbs/ft3 is displayed, the value for regenerant amount entered is in pounds per cubic foot.
16. X100 multiplier for large values.
17. When “g/L” is displayed, the valve is in grams per liter.
18. Maintenance display turns on if the months in service exceed the valve programmed in P11 Service Interval.
19. Faucet is displayed when the current flow rate is displayed. Control may show the faucet and “O” indicating no flow.
Time/Day
Regeneration Time/Day
Salt Amount
Capacity
SU MO TU WE TH FR SA DAYS
g/L
PMMIN
KGx2
x100PHC Lbs/ft3Hardness
2
3
4
5
67
8
9
1
10
11
12
13 14
15
16
17
18 19
17

Button Functions
DOWN & UP Arrows: Used to scroll through settings or change setting value.
SET: Used to enter a setting into memory or activate a setting to be changed.
REGEN: Used to command the control to regenerate and enable or disable lockout setting.
Programming OverviewThe Demand control includes multiple program levels that allow the Water Treatment Professional to customize the system for many water conditions. Additionally, historical data can be viewed allowing quick and easy troubleshooting. In most cases, Level I programming is all that is required to set up the water conditioning system for proper operation. A brief description of each program level is listed below.
Level I Used to program control for normal applications..
Level II (P-Values) Allows the installer to customize programming for non-standard applications.
Level Ill (C-Values) Allows the installer to adjust the length of select cycles for non-standard applications.
Level IV History (H-Values) Allows access to historical information for troubleshooting the system.
Note: If a button is not pushed for thirty seconds, the control returns to normal operation mode.
Demand Control Operation
Power Loss Memory RetentionThe Demand control features battery-free Time of Day and Day of Week retention during loss of power. A super capacitor is designed to hold the information in memory for 8 to 24 hours depending on the installation. If the super capacitor is exhausted, the Demand control will display four dashes (- - :- -) immediately upon power up. The Time of Day and Day of Week must be reset.
All other programmed parameters are stored in the static memory and are retained during power outages.
Level I ProgrammingThe Demand control can be quickly programmed by following the sequential procedure on the following page. Level I program parameters are those that can be accessed by pressing the UP or DOWN buttons.
• Valve Type: Select 268 for traditional refilling the salt tank last.
• Resin Volume Setting: Set to match the volume (cubic feet) of resin in the mineral tank.
• Time of Day: Includes PM indicator. Can be set to display as a 24-hour clock. See Level ll programming
• Day of Week: Set to actual day of the week.
• Time of Regeneration: Fully adjustable. Default is 2:00 AM.
• Days Override: Range 0.5 to 99 days. Leave at 0 to disable.
• Salt Dosage: Set at pounds of salt per cubic foot of resin in the conditioner tank.
Note: When the control is set up for a twelve-hour clock, a PM indicator will illuminate when the displayed time is in the PM hours. There is no AM indicator.
For Regeneration
SET UP arrow
DOWNarrow
18

Level l Programming - Demand Conditioner
Note: Upon completing the Level l Programming, the Regen Icon will begin flashing indicating that a delayed regeneration will occur at the next programmed time of regeneration. If a delayed regeneration is not desired, press the REGEN Button to disable the delayed regeneration and the system will regenerate by water usage.
Salt Amount
SU MO TU WE TH FR SA DAYS
Salt Amount
SU MO TU WE TH FR SA DAYS
Salt Amount
SU MO TU WE TH FR SA DAYS
Salt Amount
SU MO TU WE TH FR SA DAYS
Capacity
Salt Amount
SU MO TU WE TH FR SA DAYS
Salt Amount
SU MO TU WE TH FR SA DAYS
Salt Amount
SU MO TU WE TH FR SA DAYS
Capacity
2. Resin Volume Select correct resin volume
3. Time of Day (12 hr.) Set to time of day
Note: Setting includes PM indicator.
4. Day of Week Set to actual day of the week
5. Time of Regeneration Set to desired time of regeneration
6. Days Override Leave at 0 to disable or
Set to desired days between regeneration
7. Salt Dosage Set to desired desired dosage lbs per cubic feet of resin
Screen Buttons to Description Range Press
Days:1 to 30
Lbs/ft3 3 to 18
orpress
then
or
press
press
then
or
press
press
then
or
press
press
then
or
press
press
then
or
press
press
then
PM
Cubic feet: 1.0 to 2.0
Lbs/ft3
:
Time/Day
Regeneration Time/Day
Time/Day
Regeneration Time/Day
Time/Day
Regeneration Time/Day
Time/Day
Regeneration Time/Day
Time/Day
Regeneration Time/Day
Time/Day
Regeneration Time/Day
Time/Day
Regeneration Time/Day
Salt Amount
SU MO TU WE TH FR SA DAYS
KG
pressTime/Day
Regeneration Time/Day Programming is complete
Estimated exchange capacity (view only)based on resin volume and salt setting
1. Valve Select
TypeModel
Salt Amount
SU MO TU WE TH FR SA DAYS
Time/Day
Regeneration Time/Day Service Display
or
press
press
then
Displays alternates between Flow Rate and Capacity Remaining.
Model: 268 (Refill Last)
Hardness
Capacity
Hardness
Capacity
Hardness
Capacity
Hardness
Capacity
Hardness
Capacity
Hardness
Capacity
Hardness
Capacity
Hardness
19

Level I Programming – P ValuesPressing the SET key will enter the change mode at “Time of Day”. The change mode will be entered at the displayed parameter if the control is in data mode when the SET key is pressed. The displayed parameter will flash. Pressing the Up or Down key will change the flashing value of the parameter. Holding the UP or DOWN key will scroll the flashing parameter value. Pressing the SET key again will enter the flashing value in the appropriate parameter and advance to the next parameter.
P# Description Range Minimum Increments Default Units Notes
P1 Time of Day1:00 - 12:59
AM or PM00:00 - 23:59
1 Min 12:00 PM Hr./Min.Range depends on value selected for P10. Clock mode.
P2 Day of Week N/A 1 Day None N/AUses arrows under days of week on overlay.
P3 Time of Regen1:00 - 12:59
AM or PM00:00 - 23:59
1 Min 2:00 AM Hr./Min.Range depends on value selected for P10. Clock mode.
P4 Calendar Override 0-99 1 3 Days
0 = No calendar override,0.5 = Regeneration twice a day at time of regeneration and 12 hours later.Calendar Override skipped if at least one Day of Regeneration selected. Can be locked out of changes in Level I Programming.
P5Day of Week Regeneration
N/A 1 Day None N/A
Uses bars under days of week on overlay. Day of Week Regeneration is skipped if calendar override is more than zero.
P6 Salt Setting3-18
50-2901
Varies9
110Lbs/Cu Ft
g/LUnit of measure depends on value in P9. Units of Measure.
P7Capacity of Unit (Demand Only)
1-9000.1-90.0
1 0.1
(1)Kilograins Kilograms
Unit of measure depends on value in P9. Units of Measure.
P8 Hardness of Water3-200
30-20001
1025
250
Grains per Gallon
Milligrams per liter
Unit of measure depends value selected for P9. Units of measure.
Notes: (1) Calculated depending on salt setting and resin volume.
20

Level II Programming – P ValuesLevel II program parameters can be adjusted and used to fine-tune the conditioner’s operation. The parameters are accessible by pressing and holding the UP and DOWN buttons until the control displays a “P” value. Note: The control must be in the home position to change settings. See Table below for Level ll parameters. Typically the Level ll parameters will not need to be adjusted, as the default settings accommodate most applications. Contact your Water Treatment Professional before attempting any programming.
P# Description Range Minimum Increments Default Units Notes
P9 Units of Measure 0-1 1 (2) 0 = US 1 = Metric
P10 Clock Mode 0-3 1 (2)
0 = 12 Hr Clock, flow rate displayed1 = 24 Hr Clock, flow rate displayed2 = 12 Hr Clock, time of day displayed3 = 24 Hr Clock, time of day displayed
P11 Service Interval 0-250 1 0 Months Uses 30 days for each month.
P12Remote switch delay for regeneration
3-250 1 60 SecondsTime remote switch must be active to start regeneration on 742 time clock units.
P13Chlorine Generator Options
0-2 1 00 = No Chlorine Generator1 = Salt Check Only2 = Generate Chlorine
P14 Refill Rate 1-700 1 (1) gpm x 100
P15 Draw Rate 1-700 1 (1) gpm x 100
P16 Reserve Type 0-3 1 0
0 = Variable reserve delayed regeneration1 = Fixed reserve delayed regeneration2 = Variable reserve immediate regeneration3 = Fixed reserve immediate regeneration
P17Initial average or fixed reserve
0-70 1 30% of
CapacityDepends on value entered in P16
P18 Flow sensor select 0-5 1 (1)
0 = Internal magnum NHWB1 = 1” Pro Elite turbine2 = 2” Pro Elite turbine3 = User define K-Factor4 = User defined Pulse Equivalent5 = Internal magnum HWB
P19K-factor or Pulse Equivalent
1.0-99.990-9999
0.011
0.011
K-factor P18 = 3Pulse Equivalent P18 = 4
P r Refill First 0-1 1 00 = Refill first off1 = Refill first on
P dRemote switch operation
0-1 1 00 = Immediate Regeneration1 = Delayed Regeneration
Notes: (1) Default selected with valve type and resin volume.(2) Factory Default is “0” for North America units and “1” for World Units
21

Programming the Lockout FeatureAll parameters can be locked out when the control is in Level ll programming. Simply press the REGEN button during Level ll programming and a Lock Icon will appear indicating that the specific setting has been locked out. When locked out, the setting cannot be adjusted. To disable the Lock Out Feature, press the REGEN button when in Level ll. The lock icon will not be displayed.
Level lll Cycle Programming – C ValuesSeveral Level III program parameters can be adjusted to fine-tune a conditioner’s operation for non-standard applications. Typically these parameters will not need to be adjusted, as the default settings accommodate most applications. Contact your Water Treatment Professional before attempting any programming. The parameters are accessible by pressing and holding the UP and SET buttons until the display shows a “C” value.
Note: The control must be in the treated water position to change settings.
Time/Day
Regeneration Time/Day
Salt Amount
SU MO TU WE TH FR SA DAYS
PM
Capacity
Hardness
C# Description Range Minimum Increments
Default Setting Notes
C1 Backwash 0 – 200 1 Min 10Flow rate dictated by size of drain line flow controller
C2 Regenerant DrawNot
Adjustable1 Min See Notes
Automatically calculated from resin volume and salt dosage settings
C3 Slow Rinse 0 – 200 1 Min See NotesAutomatically calculated from resin volume.
C4 Repressurization 0 – 200 1 Min 3Allows system to equalize water pressure across valve discs
C5 Fast Rinse 0 – 200 1 Min 4 Rinses residual regenerant from tank
C6 2nd Backwash 0 – 200 1 Min 1Disperses non-regenerated areas of the resin bed
C7 2nd Fast Rinse) 0 – 200 1 Min 1 Rinses to Quality
C8 Regenerant RefillNot
Adjustable1 Min See Notes
Automatically calculated from resin volume and salt dosage settings
C0 Service/Brine Prep 0 - 200 1 Min 120Used when Pr is set to 1. Brine prep allows brine to come up to concentration after refill.
22

Level IV Viewing History - H ValuesHistorical information can be viewed by pressing the SET and DOWN buttons simultaneously with the Demand control in the home position. Release both buttons when the control displays an “H” value. Press the UP or DOWN buttons to navigate to each setting.
Program ResetThe Demand control can be reset to original factory parameters when viewing the H0 parameter. Press and hold the SET button for three seconds while H0 is displayed. Release the button. All settings except for Time of Day and Day of Week will be reset. The Demand control will now display three dashes indicating that the resin volume must be set.
System CapacitiesThe Demand control software contains the following preloaded system capacities for each salt setting:
H# Description Range Notes
H0 Initial Setting Value Cubic Feet or Liters Resin Volume
H1 Days since last regeneration 0-255
H2 Current Flow Rate Depends on Turbine Used 762 only
H3Water used today in gallons/m3 since Time of Regeneration
0-131,070 gallons or 0-1,310.70 m3 762 only
H4 Water used since last regeneration in gallons/m3 0-131,070 gallons or 0-1,310.70 m3 762 only
H5 Total water used since reset in 100s 0-999900 gallons or 0-9999 m3 762 only
H6 Total water used since reset in 1,000,000 4,294 x 106 gal or 4264 x 104 m3 762 only
H7 Average useage for Sunday in gallons or m3 0-131,070 gallons or 0-1,310.70 m3 762 only
H8 Average useage for Monday in gallons or m3 0-131,070 gallons or 0-1,310.70 m3 762 only
H9 Average useage for Tuesday in gallons or m3 0-131,070 gallons or 0-1,310.70 m3 762 only
H10 Average useage for Wednesday in gallons or m3 0-131,070 gallons or 0-1,310.70 m3 762 only
H11 Average useage for Thursday in gallons or m3 0-131,070 gallons or 0-1,310.70 m3 762 only
H12 Average useage for Friday in gallons or m3 0-131,070 gallons or 0-1,310.70 m3 762 only
H13 Average useage for Saturday in gallons or m3 0-131,070 gallons or 0-1,310.70 m3 762 only
H14 Average service cycle 0-255 days 762 only
H15 Peak Flow Rate 0-200 gpm or 1000 lpm 762 only
H16 Day and Time of Peak Flow RateTime and day that peak flow occurred
762 only
H17 Months since service 0-2184 Months
H r Number of regenerations since last serviced 0-65536
Salt: Lbs/Ft3 3 4 5 6 7 8 9 10 11 12 13 14 15 16 17 18Cap KG: 10x44 1.00 14 18 21 23 25 27 28 30 31 32 33 34 35 36 36 37
Cap KG: 12x48 1.50 21 27 31 35 38 40 43 45 46 48 50 51 52 54 55 56
Cap KG: 12x48 2.00 28 36 42 46 50 54 56 60 62 64 66 68 70 72 72 74
23

Placing 268 Water Conditioning System Into Operation (Fill Brine Tank Last)
Quick Cycling the Demand ControlIt is required that the control be quick cycled to specific regeneration cycles when placing the conditioner into operation. Please review the following instructions for quick cycling the control before proceeding to start-up.
1. With the control in the treated water position, press and hold the REGEN button on the control for 5 seconds. This will initiate a manual regeneration. The control will display an hourglass indicating that the motor and camshaft are turning. The control also displays the total regeneration time remaining. When the control reaches the backwash cycle, the hourglass is no longer displayed and the motor will turn off. Pressing the SET button will display the time remaining for the current cycle.
2. Press and release the UP and SET buttons to move the control to the next cycle.
Note: The control can be sent directly back to the treated water position from any regeneration cycle. Press the UP and SET buttons (about 5 seconds) until the hourglass icon appears solid. The control will now skip all remaining regeneration cycles.
Start-UpAfter you have programmed the control, the conditioner will need to be placed into operation. Follow these steps carefully, as they differ from previous Pro Elite valve instructions.
1. Remove the cover from the valve. Removing the cover will allow you to see that the camshaft is turning, and in which cycle the camshaft is currently positioned.
2. With the supply water for the system still turned off, position the bypass valve to the “not in bypass” (normal operation) position.
3. Press and hold the REGEN button on the Demand control for 5 seconds. This will initiate a manual regeneration. The control will display an hourglass indicating that the motor and camshaft are turning to the backwash cycle (C1). The control also displays the total regeneration time remaining. When the control reaches the backwash cycle, the hourglass is no longer displayed and the motor will turn off. Pressing the SET button will display the time remaining for the current cycle.
4. Filling the media tank with water.
A. While the Demand control is in cycle (Backwash), open the water supply valve very slowly to approximately the ¼ open position. Water will begin to enter the media tank. Air will begin to be purged to drain as the media tank fills with water.
WARNING: If opened too rapidly or too far, media may be lost out of the tank into the valve or the plumbing. In the ¼ open position, you should hear air slowly escaping from the valve drain line.
B. When all of the air has been purged from the media tank (water begins to flow steadily from the drain line), open the main supply valve all of the way. This will purge the final air from the tank.
C. Allow water to run to drain until the water runs clear from the drain line. This purges any debris from the media bed.
5. Adding water to the regenerant tank.
A. With a bucket or hose, add approximately 4 gallons (15 liters) of water to the regenerant tank.
If the tank has a salt platform in the bottom of the tank, add water until the water level is approximately 1 inch (25 mm) above the platform.
Note: It’s recommended that you do not put regenerant into the tank until after the control valve has been put into operation. With no regenerant in the tank, it is much easier to view water flow and motion in the tank.
6. Priming the regenerant line.
A. Slowly open the main water supply valve again to the fully open position. Be sure not to open too rapidly, as that would push the media out of the media tank.
B. Quick cycle the control to the regenerant tank Refill position (C8).
Note: As you advance through each cycle, there will be a slight delay before you can advance to the next cycle. There will be a pause after the regenerant draw and slow rinse cycles. This cycle (C4) is a repressurization cycle and is designed to allow the water pressure to equalize on each side of the valve discs. Allow the control to repressurize (3 minutes) before cycling the control to the regenerant tank refill position.
24

C. The control will cycle to the regenerant tank refill cycle and water will be directed down through the regenerant line to the regenerant tank. Let the water flow through the line until all air bubbles have been purged from the line.
D. Once the air is purged from the line, press the SET button and the UP button simultaneously to advance to Treated Water position.
7. Checking Regenerant Draw.
A. From the treated water position, initiate a manual regeneration.
B. The control will begin a manual regeneration, and advance the control valve to the backwash cycle. Press the SET and UP button to advance to regenerant draw/slow rinse cycle.
C. C2 will be displayed. With the control in this position, check to see that the water is being drawn out of the regenerant tank. The water level in the regenerant tank should recede very slowly.
D. Observe that water is being drawn from the regenerant tank for at least three minutes. If the water level does not recede, check all regenerant line connections for air leaks.
8. If the water level is receding from the regenerant tank, you can quick cycle the control back to the treated water position by pressing SET and the UP buttons simultaneously.
9. Finally, turn on a faucet plumbed after the water conditioner. Run the faucet until the water runs clear.
10. Add the appropriate amount of regenerant to the regenerant tank.
The Water Conditioning System is Now Fully Operational
Refill First OperationThe ProElite Demand system operates using a wet salt tank. When the system is started up and 268 is selected as the valve type, the salt tank will fill with water at the end of the regeneration cycle. In this “Refill Last” system, the water turns to brine between regenerations. The ProElite Demand system can be programmed to have a dry salt tank between regenerations. This operation refills the salt tank first. Cycles for a “Refill First” system will change to fill first. Then, after the brine make-up cycle (120 minutes), the regeneration continues.
To change to a refill first operation, enter the Level II Programming. Change value Pr to 1.
Water levels in the salt tank will adjust automatically after the first cycle.
Cycle Sequence Table
C# Cycle Description Time in Minutes
C0 Service
C4* Re-pressurize 3
C8 Brine Refill Calculated
C0 Brine Make-up 120
C1 Backwash 14
C2 Brine Draw Calculated
C3 Slow Rinse Calculated
C4* 2nd Re-pressurize 3
C5 Fast Rinse 6
C6 2nd Backwash 1
C7 2nd Fast Rinse 1
*Note: C4 re-pressurization does not have flow to drain.
25
Manual Regeneration OptionsThe Demand control features several options that offer additional flexibility for manually regenerating the conditioner.
Delayed Manual Regeneration
Pressing and releasing the REGEN button starts a delayed manual regeneration. The Regeneration icon on the display will flash indicating a regeneration will start when the time of day reaches the programmed time of regeneration. Pressing the REGEN button again will turn off the regeneration icon and cancel the delayed regeneration.
Immediate Manual Regeneration
Pressing and holding the REGEN button for three seconds starts an immediate manual regeneration. A solid regeneration icon will be displayed. The control will immediately begin a regeneration.
Delayed Second Regeneration
Pressing and releasing the REGEN button while the control is in regeneration will program the control for a delayed second regeneration. A flashing x2 icon next to the regeneration icon will appear, indicating a second regeneration will start when the time of day reaches the programmed time of regeneration.
Double Immediate Manual Regeneration
Back-to-Back manual regenerations are initiated by pressing and holding the REGEN button for three seconds while the control is in the regenerating mode. A solid x2 icon next to the regeneration icon will appear, indicating a second manual regeneration will start immediately after current regeneration is complete.
26

Pro Elite Valve Exploded View & Parts List
BYPASS
BYPASS
1
2
34
5
6
7
8
9
10
11
12
13
1415
1617
18
19
20
12
22
2123
27

Item PartNumber Description Qty. Item Part
Number Description Qty.
1 3022430 Demand Control 1 13Not
IncludedAdapter Kit, Multiple Options 1
2 1244651 Valve Assembly w/o Flow Controls 1 14 Injector Options: 1
3 1235338 Top Plate, Valve 1 1035734 “J” Injector, Lt Blue 10-inch tank 1
4 1234170 Screw, Top Plate 18 1035735 “K” Injector, Pink 12-inch tank 1
5 1235339 Valve Disc Spring, Valve 1 15 1000269 Injector Cap with O-Ring 1
6 1235352 Cam Valve, Black 1 16 1243511Refill Ball & Cone Type Flow Controller
1
7 4000584 Cover, Pro Elite Lt. Gray 1 17 1035622 Tank Ring 1
* 4000585 Skirt, Pro Elite Lt. Gray 1 18 1010154 O-Ring, Tank 1
8 1000811Transformer, 120 VAC, 60 z, N. American Plug
1 19 1010428 O-Ring, Riser Tube 1
9 3019221 Motor/Optical Cable 1 20 1040930 1265 Bypass, Valve 1
10 1000226 Screen/Cap Assembly w/O-Ring 1 21 1264271 10” Drain Line Flow Control 1
11 Drain Control Assembly: 1 1264402 12” Drain Line Flow Control 1
1000212 No. 10 (2.7 gpm; 10.2 Lpm) 22 4001129 Brine Fitting 1
1000213 No. 12 (3.9 gpm; 14.8 Lpm) 23 1002449Valve Drain Connection Fitting, Elbow, 3/4 NPT x 1/2 Hose (Tubing)
1
12 1030502 Ball, Flow Restrictor 12 * 1041174 Valve Disc Kit 1
* Not Shown on Drawing
28
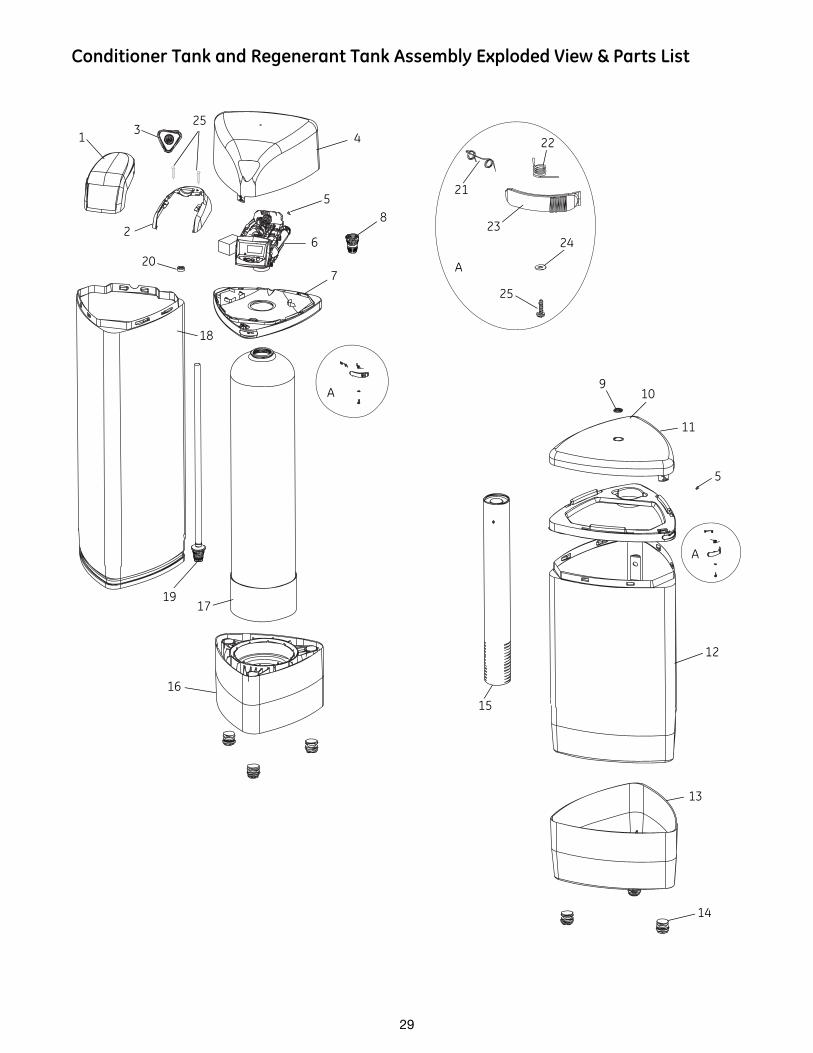
Conditioner Tank and Regenerant Tank Assembly Exploded View & Parts List
1
2
34
5
6
7
8
910
11
13
14
12
15
16
17
18
19
20
21
22
2324
25
A
A
5
A
25
29

Kits
Item PartNumber Description Qty. Item Part
Number Description Qty.
1 4000584 Cover, 268/762 Valve 1 15 CH15675 Brine Tube Assembly 1
2 4000585Shield, Decorative, Performa Logix Valve
1 16 4000354 Base, Resin Jacket, Pro Elite 1
3 4000586 Assembly, Cover Plate with Labels 1 17 CH20093 Tank Assembly 12 x 48 1
4 4000351 Cover, Jacket, Resin Tank, Pro Elite 1 CH20529 Tank Assembly 10 x 44 1
5 4000458Bracket, Lift Spring, Double Torsion, Pro Elite
2 18 4000356 Jacket, Resin Tank, Pro Elite 1
64000521 268 Logix Valve W/762 Cont. 10" Tank 1
194000988
Lower Distributor Assembly 10x44 Tank"
1
4000522 268 Logix Valve w/762 Cont. 12" Tank 1 4000987Lower Distributor Assembly 12x48 Tank"
1
7 4000352 Collar, Jacket, Resin Tank, Pro Elite 1 20 1239647 Bushing All Fit , Adjustable 1
8 4000562 Distributor, Basket, Upper 1 21 4000357 Spring, Double Torsion 2
9 4000407 Button, GE Logo, 1.4" 1 22 4000359 Spring, Torsion 2
10 4000347 Cover, Brine Tank, Pro Elite 1 23 4000358 Latch, Cover, Pro Elite 2
11 4000348 Collar, Brine Tank, Pro Elite 1 24 1396149 Washer Stainless Steel 2
12 4000349 Tank, Brine, Pro Elite 1 25 1234170 Screw, #8-18 x 9/16, Type 25 4
13 4000350 Base, Brine Tank, Pro Elite 1 * 4000871Valve Brine Connection Fitting, Female Elbow, 3/8 NPT x 3/8 NPT
1
14 4000409 Kit, Feet, Set of 6, Leveling, Pro Elite N/A
*Not Shown
PartNumber Description Qty.
4000893Assembly, Cover, Resin Tank Includes Item Numbers 3, 4 and 5
1
4000892Assembly, Cover, Brine Tank Includes Item Numbers 5, 9 and 10
1
30

Brine Well Assembly Exploded View & Parts List CH15675
1
2 3
4
6
7
8
5
8
Item PartNumber Description Qty.
1 CH15013-1 Brine Well w/Slots 1
2 CH15062 Safety Brine Valve 1
3 CH15070 Grommet 2
4 CH16371-60 Tubing, 3/8" x 60" Long 1
5 CH15024 Cap, Brine Well 4" Dia. (Caplug STP -4) 1
6 CH15064-1 Brine Float w/One Grommet (As Purchased) 1
7 CH15063-1 Air Check Assembly 1
8 BR10332 Tubing Insert, Brass 2
9* CH20774 Overflow Fitting Assembly 1
CH15031-1 Overflow Elbow 1
CH15031-2 Overflow Nut 1
CH16331 Gasket 1
CH20731-1 Polypro Washer 1
*Items included, but not shown - Shipped in a plastic bag along with Brine Well Assembly
31

Troubleshooting
Demand Control – Error Codes & Check Salt Light
Problem Possible Cause Solution
ERR 1 is displayed. Program settings have been corrupted.Press any key and reprogram Level I settings.
ERR 2 is displayed.The control is not a “North American” 60 Hz model.
Install 60 Hz Demand control.
ERR 3 is displayed.Control does not know the position of the camshaft. Camshaft should be rotating to find Home position.
Wait for two minutes for the control to return to Home position. The hourglass should be flashing on the display indicating the motor is running.
Camshaft is not turning during ERR 3 display.
Check that motor is connected. Verify that motor wire harness is connected to motor and control module.
Verify that optical sensor is connected and in place.
Verify that motor gear has engaged cam gear.
If everything is connected, try replacing in this order:
1. Wire harness, motor, optical sensor assembly
2. Control
Camshaft is turning more than five minutes to find Home position:
Verify that optical sensor is in place and connected to wire.
Verify that camshaft is connected appropriately.
Verify that no dirt or rubbish is clogging any of the cam slots.
If motor continues to rotate indefinitely, replace the following components in this order:
1. Wire harness, motor, optical sensor assembly
2. Control
32

System Troubleshooting
Problem Possible Cause Solution
Regenerant tank overflow.
a. Uncontrolled refill flow rate.
b. Air Leak in regenerant line to air check.
c. Drain control clogged with resin or other debris.
a. Remove refill flow control to clean ball and seat.
b. Check all connections in regenerant linefor leaks.
c. Clean drain control.
Flowing or dripping water at drain or regenerant line after regeneration.
a. Valve stem return spring weak.
b. Debris is preventing valve disc from closing.
a. Replace spring. (Contact dealer).
b. Remove debris.
Hard water leakage after regeneration.
a. Improper regeneration.
b. Leaking of external bypass valve.
c. O-Ring around riser pipe damaged.
d. System capacity too low due to incorrect resin volume setting
a. Repeat regeneration after making certain correct regenerant dosage was set.
b. Replace bypass valve. (Contact dealer).
c. Replace O-ring.
d. Reset control and program resin volumeto correct setting.
Control will not draw regenerant.
a. Low water pressure.
b. Restricted drain line.
c. Injector plugged.
d. Injector defective.
e. Valve disc 2 and/or 3 not closed.
f. Air check valve prematurely closed.
a. Make correct setting according to instructions.
b. Remove restriction.
c. Clean injector and screen.
d. Replace injector and cap. (Contact dealer).
e. Remove foreign matter from disc and check disc for closing by pushing in on stem. Replace if needed. (Contact dealer).
f. Put control momentarily into brine refill.Replace or repair air check if needed. (Contact dealer).
Control will not regenerate automatically.
a. AC adapter or motor not connected.
b. Defective motor.
a. Connect power.
b. Replace motor. (Contact dealer).
Control regenerates at wrong time of day.
Control set incorrectly.Correct the time setting according to instructions.
Intermittent or irregular regenerant draw.
a. Low water pressure.
b. Defective injector.
a. Set pump to maintain 20 psi at conditioner.
b. Replace injector (Contact dealer).
No conditioned water after regeneration.
a. No regenerant in regenerant tank.
b. Injector plugged.
a. Add regenerant to regenerant tank.
b. Clean injector and screen (Contact dealer).
Backwashes or purges at excessively low or high rate.
a. Incorrect drain controller used.
b. Foreign matter affecting valve operation.
a. Replace with correct size control (Contact dealer).
b. Remove drain controller and clean ball and seat.
Run out of conditioned water between regenerations.
a. Improper regeneration.
b. Incorrect resin volume setting.
a. Repeat regeneration,
b. Reset control and program resin volumeto correct setting.
33

34

35

Pentair Residential Filtration, LLC5730 North Glen Park RoadMilwaukee, WI 53209-4454 USA(262) 238-4400 Phone (262) 238-4402 Fax
©2011 Pentair Residential Filtration, LLCP/N 4001012 Rev B FE11