Photoshop CS for Restoration and Retouching by...restoration and retouching techniques Adobe Systems...
44
Addendum to Photoshop Restoration & Retouching, 2 nd edition by Katrin Eismann © 2003. All Rights Reserved. Katrin Eismann Page 1 of 44 Photoshop CS for Restoration and Retouching Practicing and improving your imaging skills is an ongoing process and just as we better our restoration and retouching techniques Adobe Systems is also constantly refining and improving Photoshop. With each new release of Photoshop people wonder, “do I really need to upgrade?” or “I just figured out how to do something and now the software is being changed again”. That frustration is understandable, as we prefer to work with the known, but the release of Photoshop CS will make your restoration and retouching work better and more efficient. The following chapter addresses the most important features in Photoshop CS so you can get back to work without missing a single mouse click. • Preferences, Automation, and Keyboard Shortcuts • Viewing and Organizing Files • Improved Camera RAW • Working in 16-bit • New Color and Tone Correction Tools • Improved Healing, Patching, and Redeye Reduction Numerous books have been released that address Photoshop CS in great detail. In this overview, I’ll point out the most important features for photographers and retouchers, presented in the order you would see them when working with Photoshop CS for the first time – from preferences and automation to working with Adobe Camera RAW to fine-tuning files with the new shadow/highlight and color correction features. Note: Sections of the following addendum are excerpted and quoted by permission from “Real World Digital Photography, 2 nd edition” by Katrin Eismann, Sean Duggan, and Tim Grey for Peachpit Press, November 2003, the Adobe Help pages, and www.imagingrevue.com Preferences and Custom Keyboard Shortcuts Photoshop CS requires a fast computer with a lot of RAM. On the Macintosh platform you’ll need a G3, G4, or G5 running OS 10.2.4 or later Adobe recommends OS 10.2.6 or 10.3. On the PC you’ll need Intel® Pentium® III or 4 processor Microsoft® Windows® 2000 with Service Pack 3 or Windows XP. Adobe recommends a minimum of 192 MB of RAM for either platform, but I recommend a minimum of 512 MB since adding more RAM is the best way to increase Photoshop performance. Visit http://www.adobe.com/products/photoshop/main.html for complete system requirements. There are a lot of preferences, and I won’t be discussing each one in minute detail. Many of them are specific to tasks and workflows that are more for graphic design and web-related fields. Instead, I’ll address the most important new preferences (figure 11.1) in Photoshop CS that impact the work of restoration and retouching professionals.
Transcript of Photoshop CS for Restoration and Retouching by...restoration and retouching techniques Adobe Systems...

Addendum to Photoshop Restoration & Retouching, 2nd edition by Katrin Eismann
© 2003. All Rights Reserved. Katrin Eismann
Page 1 of 44
Photoshop CS for Restoration and Retouching
Practicing and improving your imaging skills is an ongoing process and just as we better ourrestoration and retouching techniques Adobe Systems is also constantly refining and improvingPhotoshop. With each new release of Photoshop people wonder, “do I really need to upgrade?”or “I just figured out how to do something and now the software is being changed again”. Thatfrustration is understandable, as we prefer to work with the known, but the release ofPhotoshop CS will make your restoration and retouching work better and more efficient. Thefollowing chapter addresses the most important features in Photoshop CS so you can get back towork without missing a single mouse click.
• Preferences, Automation, and Keyboard Shortcuts
• Viewing and Organizing Files
• Improved Camera RAW
• Working in 16-bit
• New Color and Tone Correction Tools
• Improved Healing, Patching, and Redeye Reduction
Numerous books have been released that address Photoshop CS in great detail. In thisoverview, I’ll point out the most important features for photographers and retouchers,presented in the order you would see them when working with Photoshop CS for the first time –from preferences and automation to working with Adobe Camera RAW to fine-tuning files withthe new shadow/highlight and color correction features.
Note: Sections of the following addendum are excerpted and quoted bypermission from “Real World Digital Photography, 2nd edition” by KatrinEismann, Sean Duggan, and Tim Grey for Peachpit Press, November 2003, theAdobe Help pages, and www.imagingrevue.com
Preferences and Custom Keyboard Shortcuts
Photoshop CS requires a fast computer with a lot of RAM. On the Macintosh platform you’llneed a G3, G4, or G5 running OS 10.2.4 or later Adobe recommends OS 10.2.6 or 10.3. On the PCyou’ll need Intel® Pentium® III or 4 processor Microsoft® Windows® 2000 with Service Pack 3or Windows XP. Adobe recommends a minimum of 192 MB of RAM for either platform, but Irecommend a minimum of 512 MB since adding more RAM is the best way to increase Photoshopperformance. Visit http://www.adobe.com/products/photoshop/main.html for completesystem requirements.
There are a lot of preferences, and I won’t be discussing each one in minute detail. Many of themare specific to tasks and workflows that are more for graphic design and web-related fields.Instead, I’ll address the most important new preferences (figure 11.1) in Photoshop CS thatimpact the work of restoration and retouching professionals.
Addendum to Photoshop Restoration & Retouching, 2nd edition by Katrin Eismann
© 2003. All Rights Reserved. Katrin Eismann
Page 2 of 44
figure 11.1
The General Preferences
General Preferences Settings
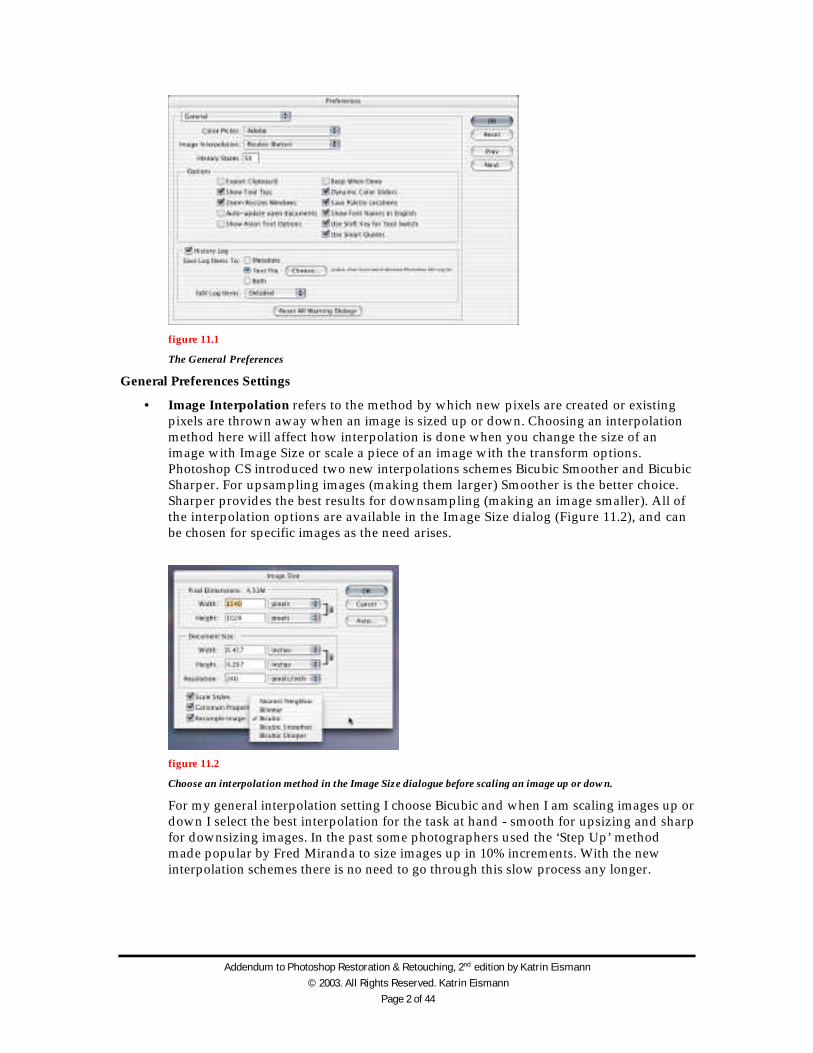
• Image Interpolation refers to the method by which new pixels are created or existingpixels are thrown away when an image is sized up or down. Choosing an interpolationmethod here will affect how interpolation is done when you change the size of animage with Image Size or scale a piece of an image with the transform options.Photoshop CS introduced two new interpolations schemes Bicubic Smoother and BicubicSharper. For upsampling images (making them larger) Smoother is the better choice.Sharper provides the best results for downsampling (making an image smaller). All ofthe interpolation options are available in the Image Size dialog (Figure 11.2), and canbe chosen for specific images as the need arises.
figure 11.2
Choose an interpolation method in the Image Size dialogue before scaling an image up or down.
For my general interpolation setting I choose Bicubic and when I am scaling images up ordown I select the best interpolation for the task at hand - smooth for upsizing and sharpfor downsizing images. In the past some photographers used the ‘Step Up’ methodmade popular by Fred Miranda to size images up in 10% increments. With the newinterpolation schemes there is no need to go through this slow process any longer.
Addendum to Photoshop Restoration & Retouching, 2nd edition by Katrin Eismann
© 2003. All Rights Reserved. Katrin Eismann
Page 3 of 44
The new image interpolation algorithms are available in the main Photoshop CSpreferences and the Image Size dialog. If you choose to scale an image larger or smallerusing the Free Transform tool, however, there is no way to specify and interpolationmethod and the default one will be used.
• The History Log allows you to save a record of your activity in Photoshop, or thespecific steps you applied to an image. You can choose to save this information to afile’s metadata, to a separate text file, or both. The details can be restricted to basicsession information, which simply records when you open and close a file; concise,which tracks session info plus keeps a record of every step you perform; and detailedwhich tracks session info and keeps a surprisingly detailed record of every thing you doto an image, including specific settings used for filters, color correction and other tools.If you want to remember what you have done to an image, the detailed option can bevery useful. Additionally, the History Log is a fantastic way to keep track of how longyou’re worked on an image and can be useful for client billing and productionmanagement.
File Handling
• Ignore EXIF sRGB tag. Color tags are used to give meaning to the color numbers in adigital image so that the appearance of an image will be consistent on different color-managed computers. Some digital cameras will automatically tag their images with ansRGB color profile, even if you have specifically chosen Adobe RGB in the camera’ssetup menu. While the sRGB profile may represent a correct interpretation for theimages a camera produces, it is just as likely to be no more than a “default” tag by thecamera that does not necessarily reflect the best way to interpret the colors in an image.If you determine that another color profile, such as Adobe RGB or ColorMatch RGBworks better with the images from your camera, you can use this preference to havePhotoshop ignore the sRGB tag contained in a camera’s EXIF data.
• Ask Before Saving Layered TIFF Files. In the old days of Photoshop 6 or earlier, onlyPhotoshop’s native PSD format could save layers. Now the club is not so exclusive andas the TIFF specification has matured, it, too, has developed the ability to supportlayers. This is really only an issue for those who may be using TIFF files in page layoutprograms. In the past, some layout applications would get downright cranky if theyencountered a layered TIFF. Photographers and production artists would also use theTIFF format for the flattened (non layered) images that were placed in the layoutprogram and reserve the PSD format for the master layered image. The different fileformats were another way to keep it clear that the correct, non-layered file was placedin the page layout. Although the ability of programs like InDesign to handle layeredTIFFs and PSDs is allowing modification to the previous workflow of only using non-layered TIFFs, such changes are being adopted slowly. If you want a reminder thatyou’re saving a layered file in TIFF format, turn this option on. I leave it off.
• Enable Large Document Format (.psb). This preference is new to Photoshop CS and itallows you to save very large files (300,000x300,000 pixels) that were not possible inearlier versions. The previous 30,000 pixel limit is still the largest size that can besaved using the PSD format, but larger files can now be saved as TIFF (up to 4GB) or thenew PSB format, or in Photoshop RAW (which is not the same as Camera Raw and Irecommend you avoid it) with no file size limit. This new format and the new imagesize limits are not backwards compatible with earlier versions of Photoshop. Thenumber of people who have a need for such gargantuan files is very small. If you feelcompelled to stitch together 97 6-megapixel photos into a single, monumental image,however, then this is where you need to go to make that possible.
Addendum to Photoshop Restoration & Retouching, 2nd edition by Katrin Eismann
© 2003. All Rights Reserved. Katrin Eismann
Page 4 of 44
• Maximize PSD File Compatibility. This option has been around in Photoshop under avariety of names for several versions, and it controls whether Photoshop will include ahidden, composite layer along with the regular layers when you save a file. Thecomposite layer is essentially just a single layer that represents what the image wouldlook like with all the visible layers flattened. This preference is primarily for peoplewho need to use their layered PSD files in other applications that claim to read PSDfiles, but that really need that composite layer in order to do so. The main problemwith this option is that the extra composite layer will make your file size much larger– up to 33% larger - than it needs to be. While this is not much of an issue with smallfiles, it can quickly become a big issue with larger documents. If you’re only working onyour images in Photoshop, then I feel that you should leave this off and save some diskspace.
• Version Que is used in conjunction with Adobe Illustrator, Acrobat, InDesign, andGoLive. Allowing you to track, find, share, and edit images from within eachapplication. If you’re just using Photoshop, Version Que will not play a role in yourproduction, but if you use the other Creative Suite applications and/or work in aproduction team it can be a real life saver to identify which file is being used whereand who changed it last.
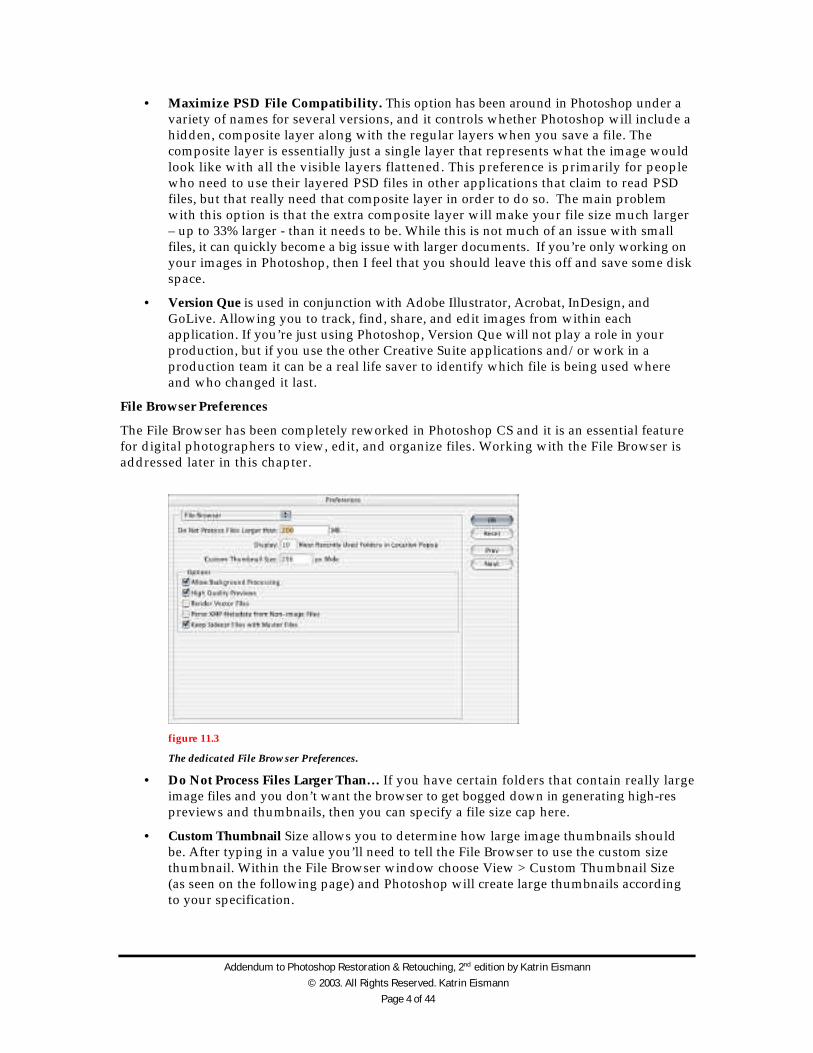
File Browser Preferences
The File Browser has been completely reworked in Photoshop CS and it is an essential featurefor digital photographers to view, edit, and organize files. Working with the File Browser isaddressed later in this chapter.
figure 11.3
The dedicated File Browser Preferences.
• Do Not Process Files Larger Than… If you have certain folders that contain really largeimage files and you don’t want the browser to get bogged down in generating high-respreviews and thumbnails, then you can specify a file size cap here.
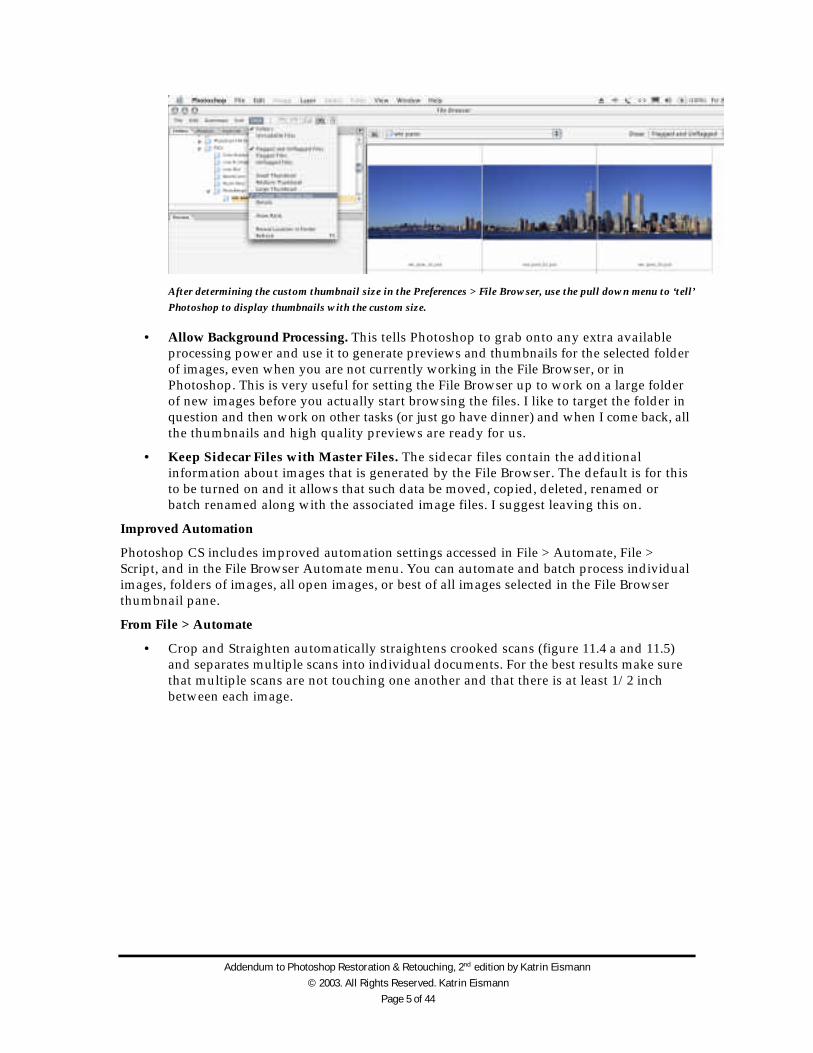
• Custom Thumbnail Size allows you to determine how large image thumbnails shouldbe. After typing in a value you’ll need to tell the File Browser to use the custom sizethumbnail. Within the File Browser window choose View > Custom Thumbnail Size(as seen on the following page) and Photoshop will create large thumbnails accordingto your specification.
Addendum to Photoshop Restoration & Retouching, 2nd edition by Katrin Eismann
© 2003. All Rights Reserved. Katrin Eismann
Page 5 of 44
After determining the custom thumbnail size in the Preferences > File Browser, use the pull down menu to ‘tell’
Photoshop to display thumbnails with the custom size.
• Allow Background Processing. This tells Photoshop to grab onto any extra availableprocessing power and use it to generate previews and thumbnails for the selected folderof images, even when you are not currently working in the File Browser, or inPhotoshop. This is very useful for setting the File Browser up to work on a large folderof new images before you actually start browsing the files. I like to target the folder inquestion and then work on other tasks (or just go have dinner) and when I come back, allthe thumbnails and high quality previews are ready for us.
• Keep Sidecar Files with Master Files. The sidecar files contain the additionalinformation about images that is generated by the File Browser. The default is for thisto be turned on and it allows that such data be moved, copied, deleted, renamed orbatch renamed along with the associated image files. I suggest leaving this on.
Improved Automation
Photoshop CS includes improved automation settings accessed in File > Automate, File >Script, and in the File Browser Automate menu. You can automate and batch process individualimages, folders of images, all open images, or best of all images selected in the File Browserthumbnail pane.
From File > Automate
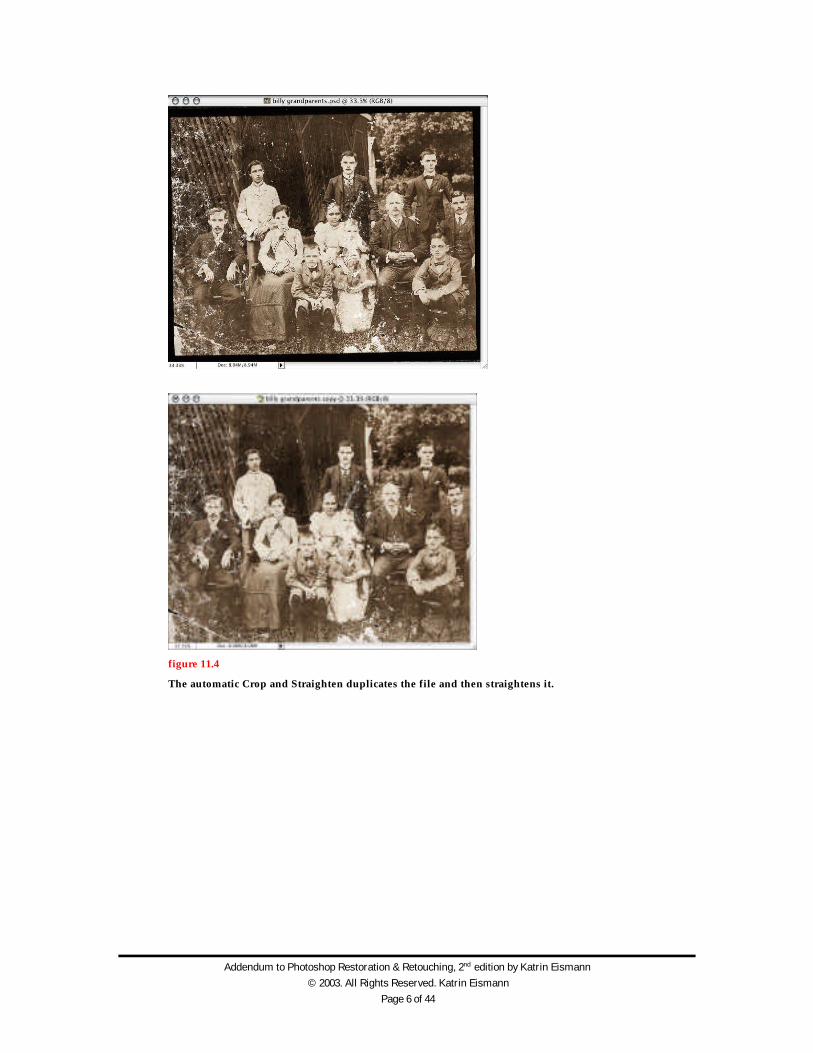
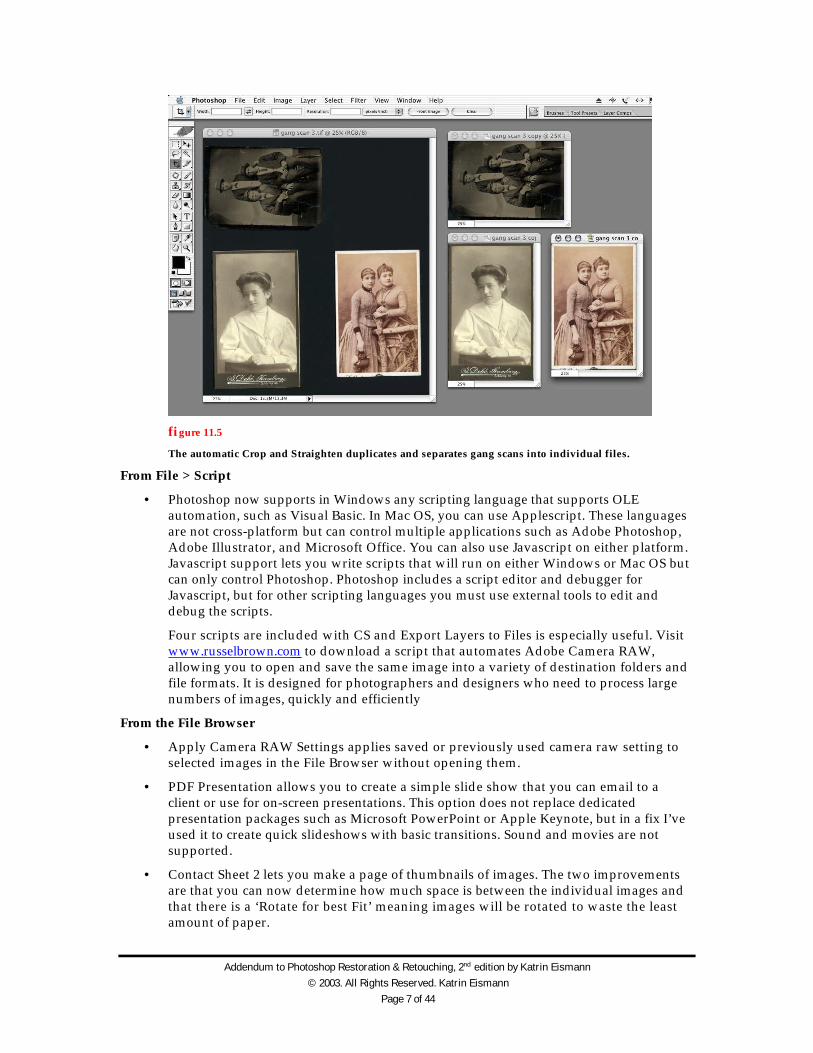
• Crop and Straighten automatically straightens crooked scans (figure 11.4 a and 11.5)and separates multiple scans into individual documents. For the best results make surethat multiple scans are not touching one another and that there is at least 1/2 inchbetween each image.
Addendum to Photoshop Restoration & Retouching, 2nd edition by Katrin Eismann
© 2003. All Rights Reserved. Katrin Eismann
Page 6 of 44
figure 11.4
The automatic Crop and Straighten duplicates the file and then straightens it.
Addendum to Photoshop Restoration & Retouching, 2nd edition by Katrin Eismann
© 2003. All Rights Reserved. Katrin Eismann
Page 7 of 44
figure 11.5
The automatic Crop and Straighten duplicates and separates gang scans into individual files.
From File > Script
• Photoshop now supports in Windows any scripting language that supports OLEautomation, such as Visual Basic. In Mac OS, you can use Applescript. These languagesare not cross-platform but can control multiple applications such as Adobe Photoshop,Adobe Illustrator, and Microsoft Office. You can also use Javascript on either platform.Javascript support lets you write scripts that will run on either Windows or Mac OS butcan only control Photoshop. Photoshop includes a script editor and debugger forJavascript, but for other scripting languages you must use external tools to edit anddebug the scripts.
Four scripts are included with CS and Export Layers to Files is especially useful. Visitwww.russelbrown.com to download a script that automates Adobe Camera RAW,allowing you to open and save the same image into a variety of destination folders andfile formats. It is designed for photographers and designers who need to process largenumbers of images, quickly and efficiently
From the File Browser
• Apply Camera RAW Settings applies saved or previously used camera raw setting toselected images in the File Browser without opening them.
• PDF Presentation allows you to create a simple slide show that you can email to aclient or use for on-screen presentations. This option does not replace dedicatedpresentation packages such as Microsoft PowerPoint or Apple Keynote, but in a fix I’veused it to create quick slideshows with basic transitions. Sound and movies are notsupported.
• Contact Sheet 2 lets you make a page of thumbnails of images. The two improvementsare that you can now determine how much space is between the individual images andthat there is a ‘Rotate for best Fit’ meaning images will be rotated to waste the leastamount of paper.
Addendum to Photoshop Restoration & Retouching, 2nd edition by Katrin Eismann
© 2003. All Rights Reserved. Katrin Eismann
Page 8 of 44
• Online Services is a direct link to on-line photo finishers such as Shutterfly or Ofotoallowing you to order prints directly through Photoshop CS.
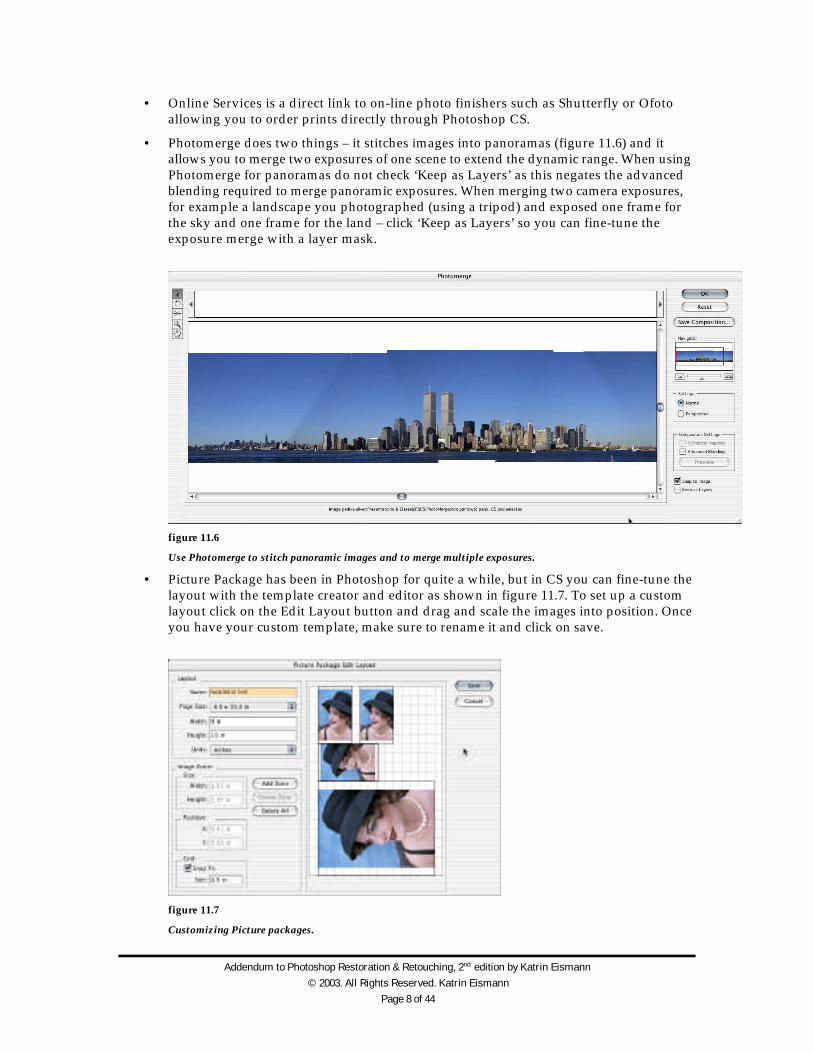
• Photomerge does two things – it stitches images into panoramas (figure 11.6) and itallows you to merge two exposures of one scene to extend the dynamic range. When usingPhotomerge for panoramas do not check ‘Keep as Layers’ as this negates the advancedblending required to merge panoramic exposures. When merging two camera exposures,for example a landscape you photographed (using a tripod) and exposed one frame forthe sky and one frame for the land – click ‘Keep as Layers’ so you can fine-tune theexposure merge with a layer mask.
figure 11.6
Use Photomerge to stitch panoramic images and to merge multiple exposures.
• Picture Package has been in Photoshop for quite a while, but in CS you can fine-tune thelayout with the template creator and editor as shown in figure 11.7. To set up a customlayout click on the Edit Layout button and drag and scale the images into position. Onceyou have your custom template, make sure to rename it and click on save.
figure 11.7
Customizing Picture packages.
Addendum to Photoshop Restoration & Retouching, 2nd edition by Katrin Eismann
© 2003. All Rights Reserved. Katrin Eismann
Page 9 of 44
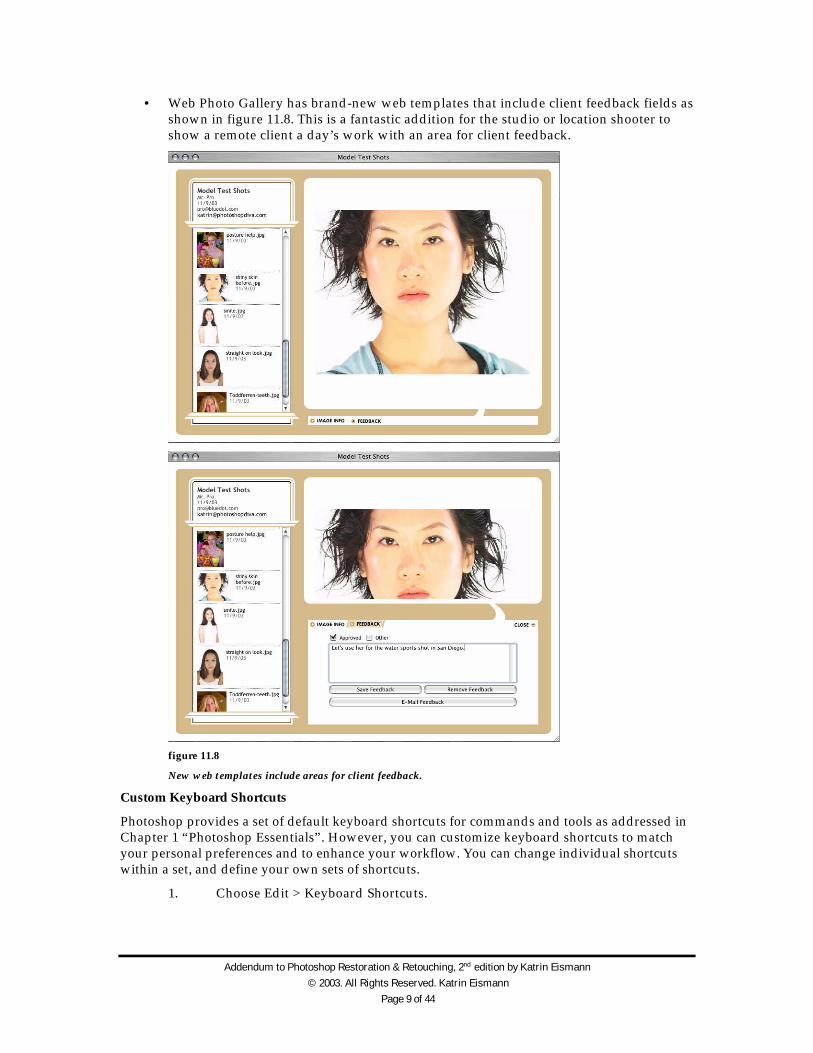
• Web Photo Gallery has brand-new web templates that include client feedback fields asshown in figure 11.8. This is a fantastic addition for the studio or location shooter toshow a remote client a day’s work with an area for client feedback.
figure 11.8
New web templates include areas for client feedback.
Custom Keyboard Shortcuts
Photoshop provides a set of default keyboard shortcuts for commands and tools as addressed inChapter 1 “Photoshop Essentials”. However, you can customize keyboard shortcuts to matchyour personal preferences and to enhance your workflow. You can change individual shortcutswithin a set, and define your own sets of shortcuts.
1. Choose Edit > Keyboard Shortcuts.

Addendum to Photoshop Restoration & Retouching, 2nd edition by Katrin Eismann
© 2003. All Rights Reserved. Katrin Eismann
Page 10 of 44
2. Choose a set of shortcuts from the Set menu at the top of the KeyboardShortcuts dialog box (Photoshop Defaults is the only option until you create anew set).
3. Choose a shortcut type (Application Menus, Palette Menus, or Tools) from theShortcuts For menu.
4. In the Shortcut column of the scroll list, select the shortcut you want to modify.For example, how often have you accessed the Image Size or the Unsharp Maskfilter? These would be ideal candidates for a shortcut.
5. Type a new shortcut. After you make changes, the name in the Set menu issuffixed with (modified).
If the keyboard shortcut is already assigned to another command or tool in the set, an alertinforms you that another command or tool has the shortcut. Click Accept to assign the shortcutto the new command or tool, and to erase the previously assigned shortcut. Once you havereassigned a shortcut, you can click Undo Changes to undo the change, or click Accept and Go toConflict to go to the other command or tool and assign it a new shortcut. When you havefinished changing shortcuts, do one of the following:
1. To discard all changes and exit the dialog box, click Cancel.
2. To discard the last saved change without closing the dialog box, click Undo.
3. To return a new shortcut to the default, click Use Default.
4. To export the displayed set of shortcuts, click Summarize. You can use thisHTML file to display in a Web browser.
Viewing and Organizing Files
How you see files when they are in folders or how they are displayed in Photoshop issomething some may take for granted. But if you work with a lot of images everyday, knowingwhich file is where and seeing the area of the image you need to evaluate without a lot ofclicking, dragging, and zooming is a very important functions.
The File Browser
For digital photographers the File Browser is an essential, cannot live without feature. Afterdownloading images use it to edit images by ranking, rating, choosing, renaming, addingcaptions and copyright all without opening the files.
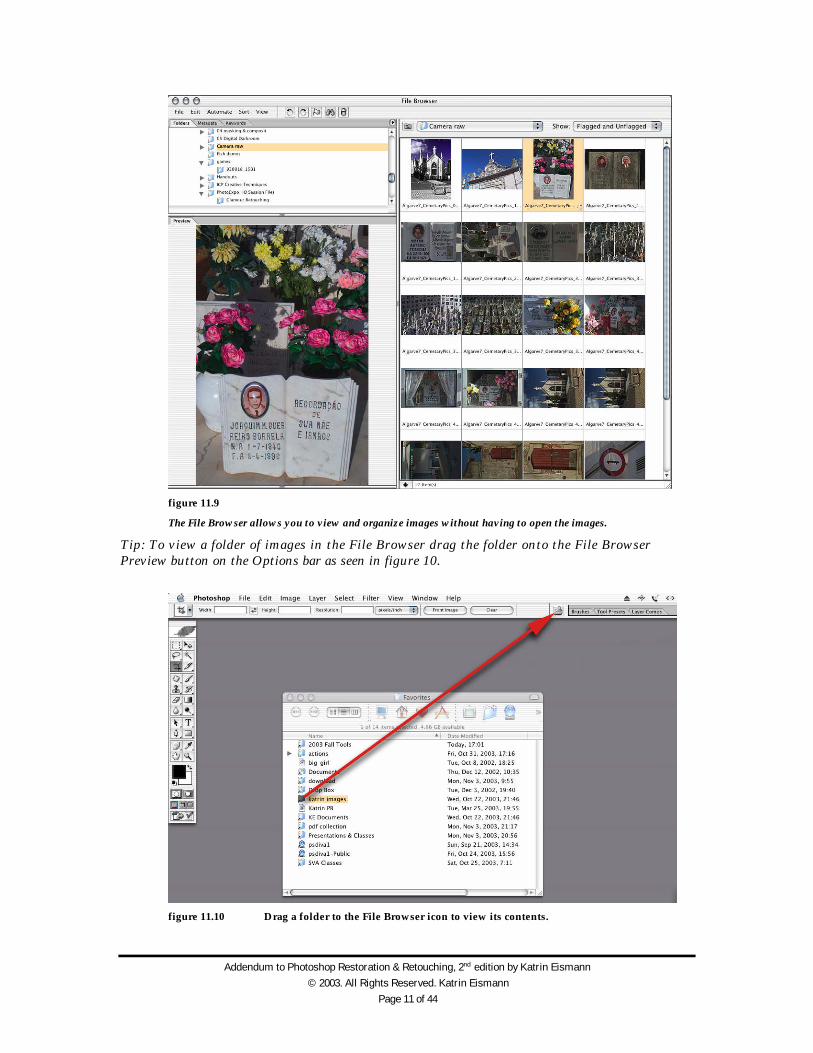
The File Browser is made up of six primary panes: folder, preview, keywords, metadata,thumbnails, and the controls that run along the top of the browser window. Arrange the tabs toyour liking. I prefer to have a large preview and keep the text elements of the browser smalleras seen in figure 11.9.
Addendum to Photoshop Restoration & Retouching, 2nd edition by Katrin Eismann
© 2003. All Rights Reserved. Katrin Eismann
Page 11 of 44
figure 11.9
The File Browser allows you to view and organize images without having to open the images.
Tip: To view a folder of images in the File Browser drag the folder onto the File BrowserPreview button on the Options bar as seen in figure 10.
figure 11.10 Drag a folder to the File Browser icon to view its contents.
Addendum to Photoshop Restoration & Retouching, 2nd edition by Katrin Eismann
© 2003. All Rights Reserved. Katrin Eismann
Page 12 of 44
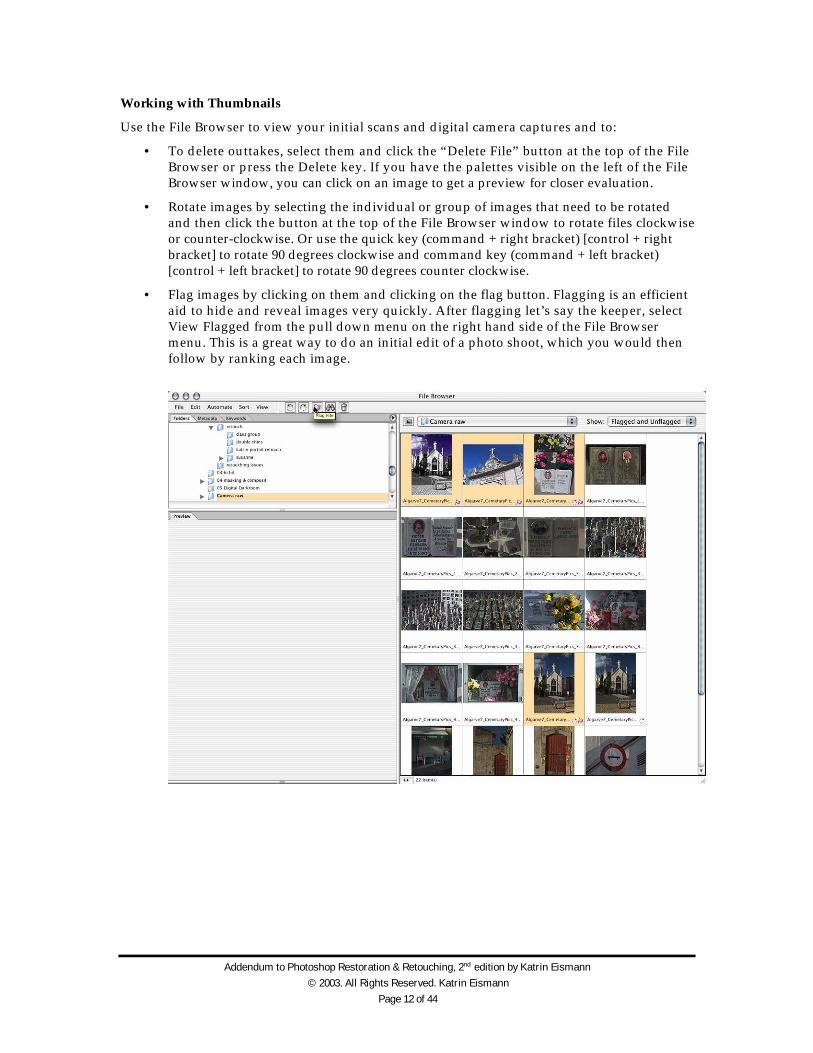
Working with Thumbnails
Use the File Browser to view your initial scans and digital camera captures and to:
• To delete outtakes, select them and click the “Delete File” button at the top of the FileBrowser or press the Delete key. If you have the palettes visible on the left of the FileBrowser window, you can click on an image to get a preview for closer evaluation.
• Rotate images by selecting the individual or group of images that need to be rotatedand then click the button at the top of the File Browser window to rotate files clockwiseor counter-clockwise. Or use the quick key (command + right bracket) [control + rightbracket] to rotate 90 degrees clockwise and command key (command + left bracket)[control + left bracket] to rotate 90 degrees counter clockwise.
• Flag images by clicking on them and clicking on the flag button. Flagging is an efficientaid to hide and reveal images very quickly. After flagging let’s say the keeper, selectView Flagged from the pull down menu on the right hand side of the File Browsermenu. This is a great way to do an initial edit of a photo shoot, which you would thenfollow by ranking each image.
Addendum to Photoshop Restoration & Retouching, 2nd edition by Katrin Eismann
© 2003. All Rights Reserved. Katrin Eismann
Page 13 of 44
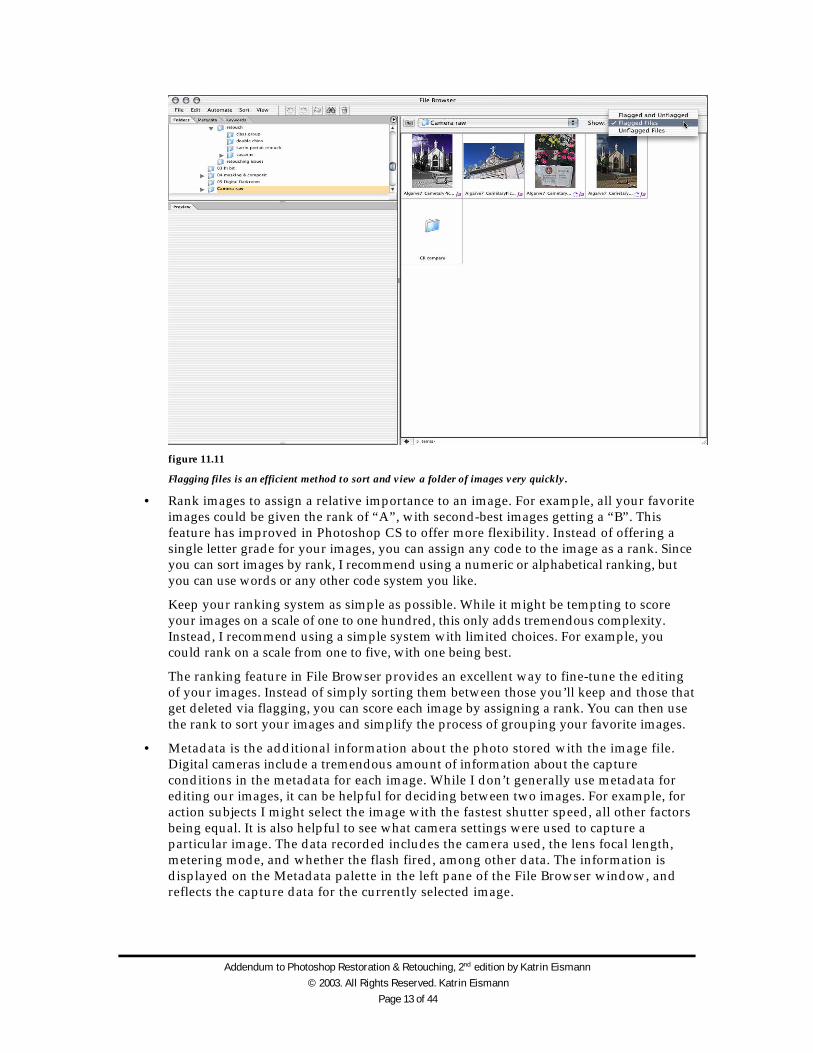
figure 11.11
Flagging files is an efficient method to sort and view a folder of images very quickly.
• Rank images to assign a relative importance to an image. For example, all your favoriteimages could be given the rank of “A”, with second-best images getting a “B”. Thisfeature has improved in Photoshop CS to offer more flexibility. Instead of offering asingle letter grade for your images, you can assign any code to the image as a rank. Sinceyou can sort images by rank, I recommend using a numeric or alphabetical ranking, butyou can use words or any other code system you like.
Keep your ranking system as simple as possible. While it might be tempting to scoreyour images on a scale of one to one hundred, this only adds tremendous complexity.Instead, I recommend using a simple system with limited choices. For example, youcould rank on a scale from one to five, with one being best.
The ranking feature in File Browser provides an excellent way to fine-tune the editingof your images. Instead of simply sorting them between those you’ll keep and those thatget deleted via flagging, you can score each image by assigning a rank. You can then usethe rank to sort your images and simplify the process of grouping your favorite images.
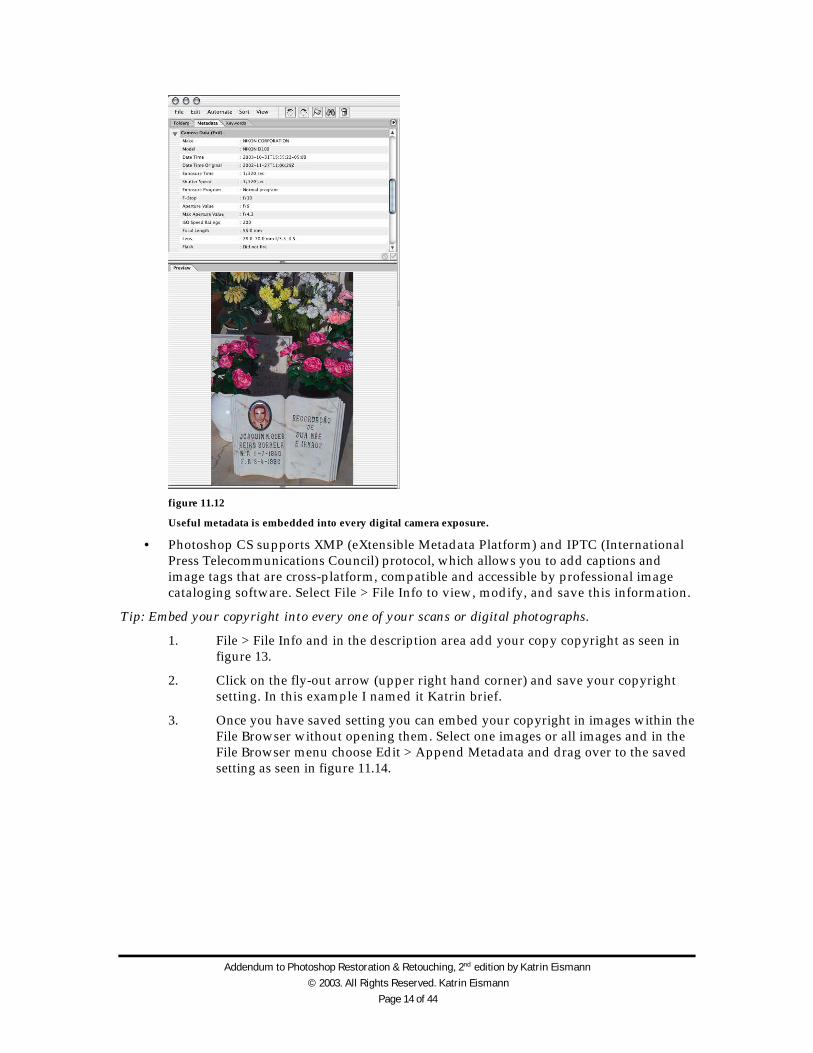
• Metadata is the additional information about the photo stored with the image file.Digital cameras include a tremendous amount of information about the captureconditions in the metadata for each image. While I don’t generally use metadata forediting our images, it can be helpful for deciding between two images. For example, foraction subjects I might select the image with the fastest shutter speed, all other factorsbeing equal. It is also helpful to see what camera settings were used to capture aparticular image. The data recorded includes the camera used, the lens focal length,metering mode, and whether the flash fired, among other data. The information isdisplayed on the Metadata palette in the left pane of the File Browser window, andreflects the capture data for the currently selected image.
Addendum to Photoshop Restoration & Retouching, 2nd edition by Katrin Eismann
© 2003. All Rights Reserved. Katrin Eismann
Page 14 of 44
figure 11.12
Useful metadata is embedded into every digital camera exposure.
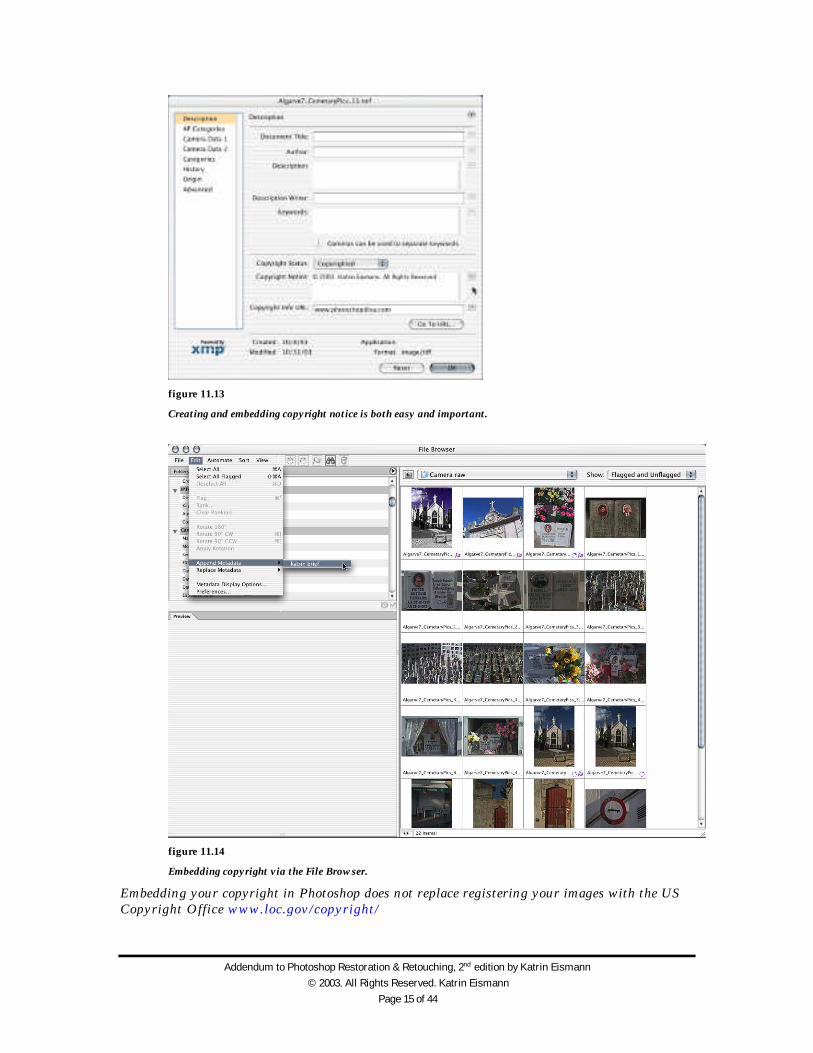
• Photoshop CS supports XMP (eXtensible Metadata Platform) and IPTC (InternationalPress Telecommunications Council) protocol, which allows you to add captions andimage tags that are cross-platform, compatible and accessible by professional imagecataloging software. Select File > File Info to view, modify, and save this information.
Tip: Embed your copyright into every one of your scans or digital photographs.
1. File > File Info and in the description area add your copy copyright as seen infigure 13.
2. Click on the fly-out arrow (upper right hand corner) and save your copyrightsetting. In this example I named it Katrin brief.
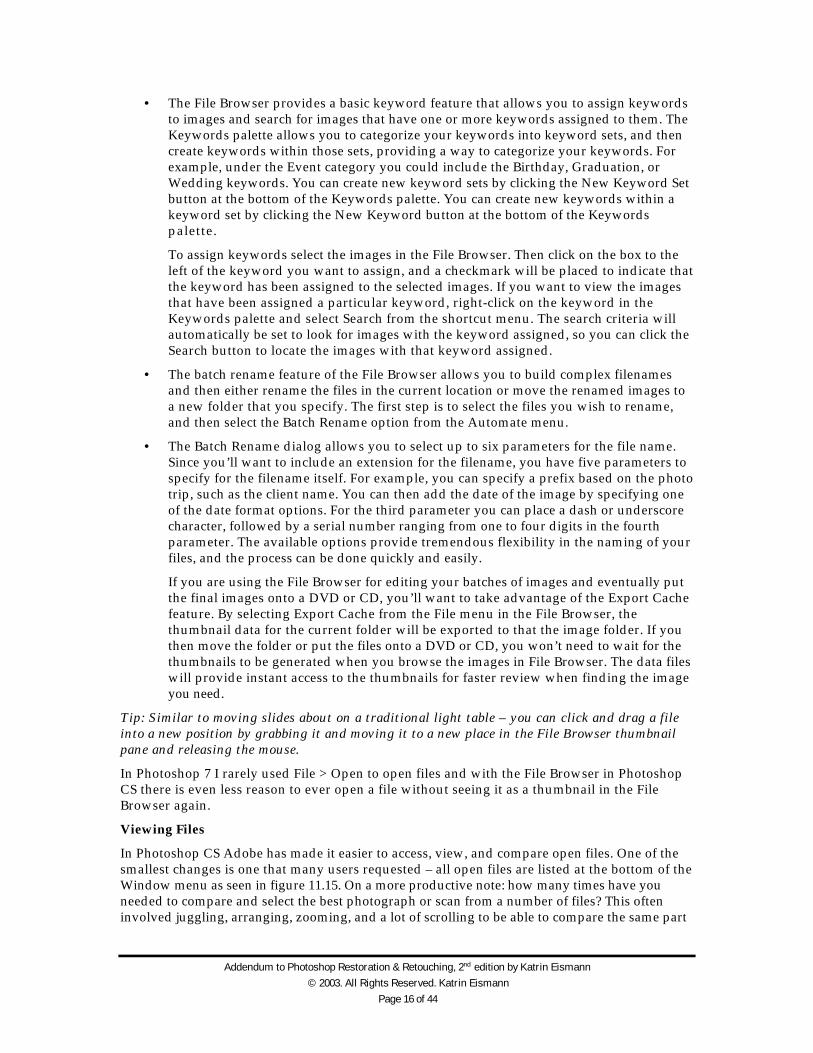
3. Once you have saved setting you can embed your copyright in images within theFile Browser without opening them. Select one images or all images and in theFile Browser menu choose Edit > Append Metadata and drag over to the savedsetting as seen in figure 11.14.
Addendum to Photoshop Restoration & Retouching, 2nd edition by Katrin Eismann
© 2003. All Rights Reserved. Katrin Eismann
Page 15 of 44
figure 11.13
Creating and embedding copyright notice is both easy and important.
figure 11.14
Embedding copyright via the File Browser.
Embedding your copyright in Photoshop does not replace registering your images with the USCopyright Office www.loc.gov/copyright/
Addendum to Photoshop Restoration & Retouching, 2nd edition by Katrin Eismann
© 2003. All Rights Reserved. Katrin Eismann
Page 16 of 44
• The File Browser provides a basic keyword feature that allows you to assign keywordsto images and search for images that have one or more keywords assigned to them. TheKeywords palette allows you to categorize your keywords into keyword sets, and thencreate keywords within those sets, providing a way to categorize your keywords. Forexample, under the Event category you could include the Birthday, Graduation, orWedding keywords. You can create new keyword sets by clicking the New Keyword Setbutton at the bottom of the Keywords palette. You can create new keywords within akeyword set by clicking the New Keyword button at the bottom of the Keywordspalette.
To assign keywords select the images in the File Browser. Then click on the box to theleft of the keyword you want to assign, and a checkmark will be placed to indicate thatthe keyword has been assigned to the selected images. If you want to view the imagesthat have been assigned a particular keyword, right-click on the keyword in theKeywords palette and select Search from the shortcut menu. The search criteria willautomatically be set to look for images with the keyword assigned, so you can click theSearch button to locate the images with that keyword assigned.
• The batch rename feature of the File Browser allows you to build complex filenamesand then either rename the files in the current location or move the renamed images toa new folder that you specify. The first step is to select the files you wish to rename,and then select the Batch Rename option from the Automate menu.
• The Batch Rename dialog allows you to select up to six parameters for the file name.Since you’ll want to include an extension for the filename, you have five parameters tospecify for the filename itself. For example, you can specify a prefix based on the phototrip, such as the client name. You can then add the date of the image by specifying oneof the date format options. For the third parameter you can place a dash or underscorecharacter, followed by a serial number ranging from one to four digits in the fourthparameter. The available options provide tremendous flexibility in the naming of yourfiles, and the process can be done quickly and easily.
If you are using the File Browser for editing your batches of images and eventually putthe final images onto a DVD or CD, you’ll want to take advantage of the Export Cachefeature. By selecting Export Cache from the File menu in the File Browser, thethumbnail data for the current folder will be exported to that the image folder. If youthen move the folder or put the files onto a DVD or CD, you won’t need to wait for thethumbnails to be generated when you browse the images in File Browser. The data fileswill provide instant access to the thumbnails for faster review when finding the imageyou need.
Tip: Similar to moving slides about on a traditional light table – you can click and drag a fileinto a new position by grabbing it and moving it to a new place in the File Browser thumbnailpane and releasing the mouse.
In Photoshop 7 I rarely used File > Open to open files and with the File Browser in PhotoshopCS there is even less reason to ever open a file without seeing it as a thumbnail in the FileBrowser again.
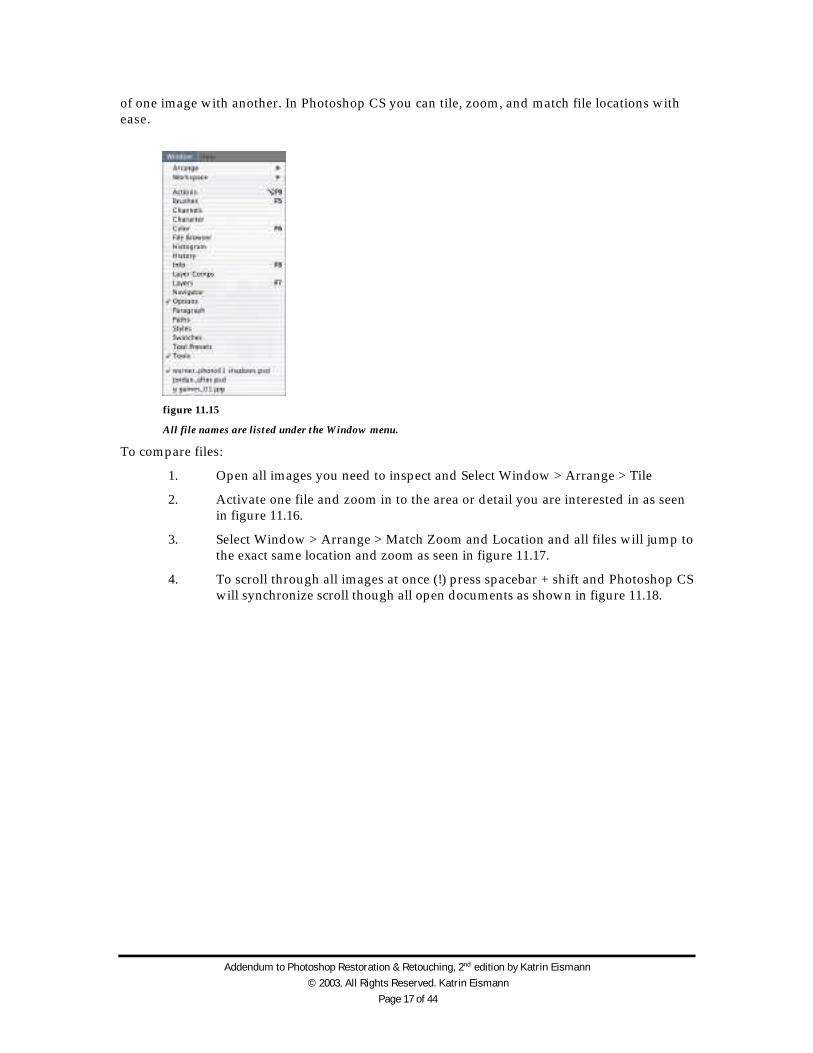
Viewing Files
In Photoshop CS Adobe has made it easier to access, view, and compare open files. One of thesmallest changes is one that many users requested – all open files are listed at the bottom of theWindow menu as seen in figure 11.15. On a more productive note: how many times have youneeded to compare and select the best photograph or scan from a number of files? This ofteninvolved juggling, arranging, zooming, and a lot of scrolling to be able to compare the same part
Addendum to Photoshop Restoration & Retouching, 2nd edition by Katrin Eismann
© 2003. All Rights Reserved. Katrin Eismann
Page 17 of 44
of one image with another. In Photoshop CS you can tile, zoom, and match file locations withease.
figure 11.15
All file names are listed under the Window menu.
To compare files:
1. Open all images you need to inspect and Select Window > Arrange > Tile
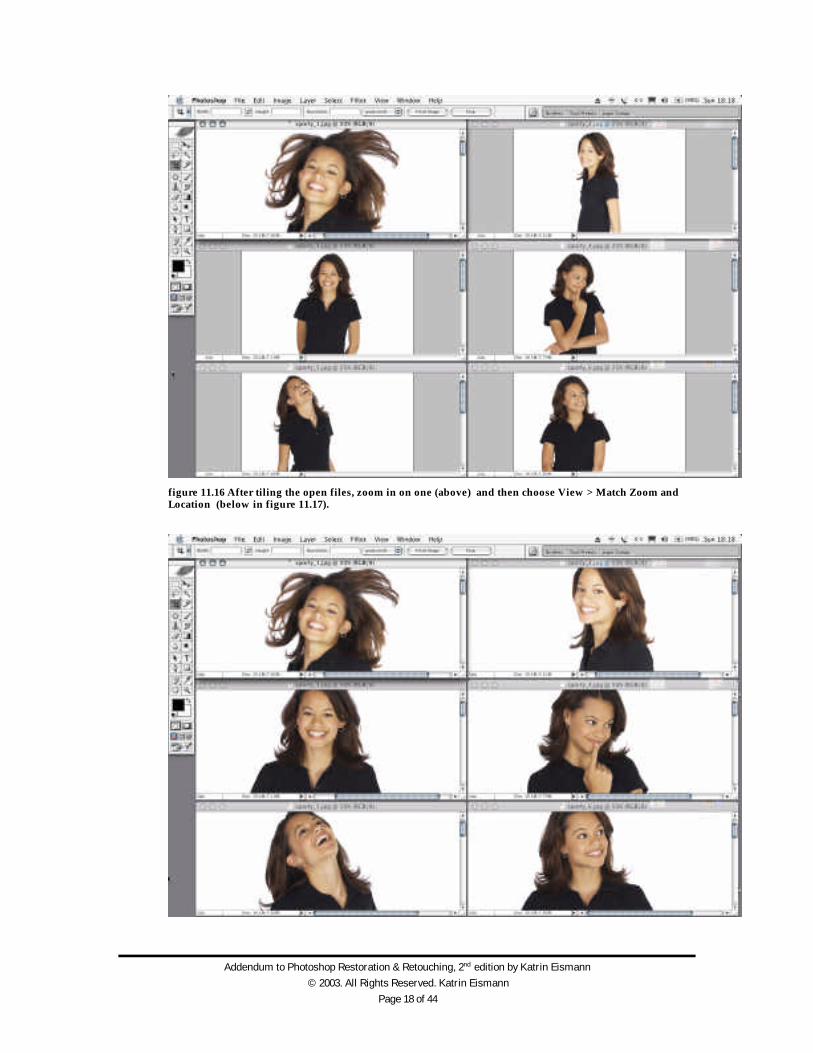
2. Activate one file and zoom in to the area or detail you are interested in as seenin figure 11.16.
3. Select Window > Arrange > Match Zoom and Location and all files will jump tothe exact same location and zoom as seen in figure 11.17.
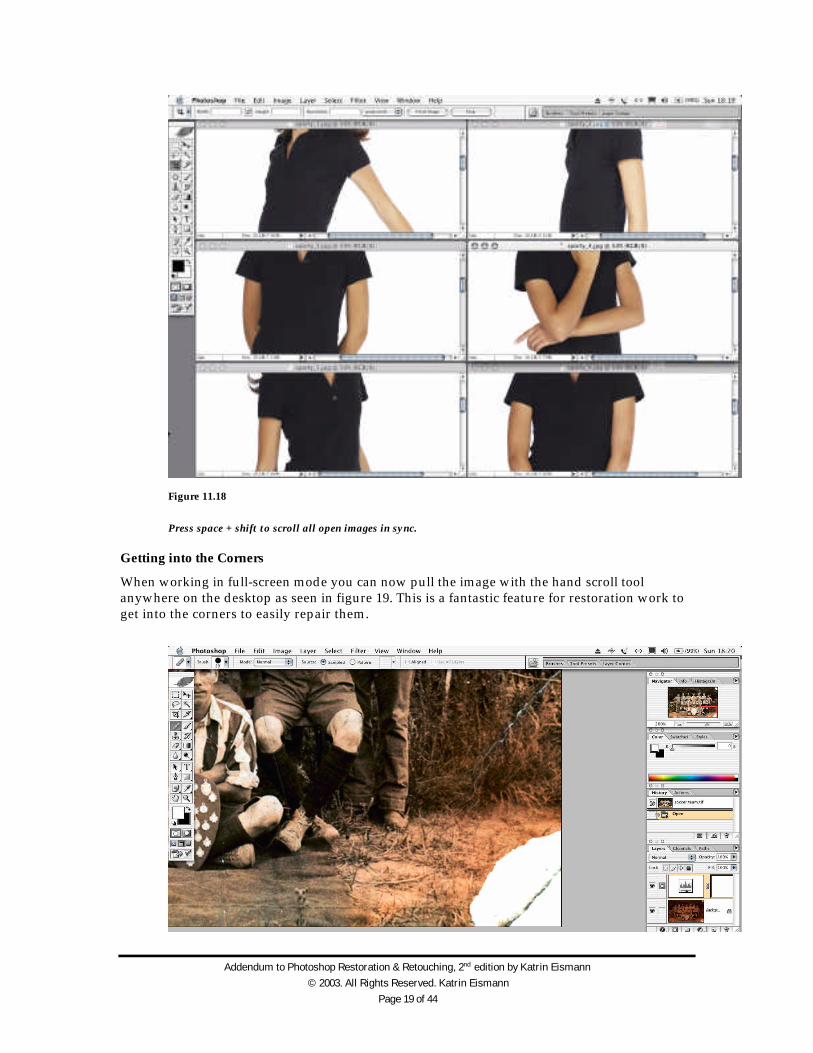
4. To scroll through all images at once (!) press spacebar + shift and Photoshop CSwill synchronize scroll though all open documents as shown in figure 11.18.
Addendum to Photoshop Restoration & Retouching, 2nd edition by Katrin Eismann
© 2003. All Rights Reserved. Katrin Eismann
Page 18 of 44
figure 11.16 After tiling the open files, zoom in on one (above) and then choose View > Match Zoom andLocation (below in figure 11.17).
Addendum to Photoshop Restoration & Retouching, 2nd edition by Katrin Eismann
© 2003. All Rights Reserved. Katrin Eismann
Page 19 of 44
Figure 11.18
Press space + shift to scroll all open images in sync.
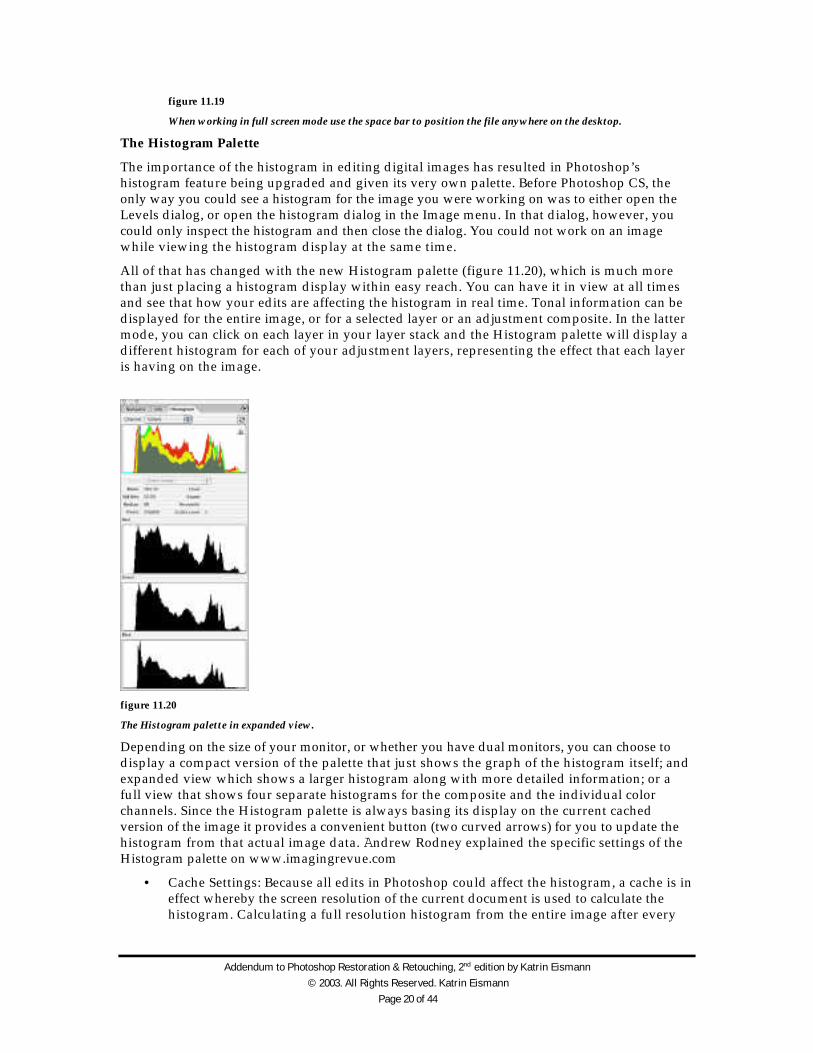
Getting into the Corners
When working in full-screen mode you can now pull the image with the hand scroll toolanywhere on the desktop as seen in figure 19. This is a fantastic feature for restoration work toget into the corners to easily repair them.
Addendum to Photoshop Restoration & Retouching, 2nd edition by Katrin Eismann
© 2003. All Rights Reserved. Katrin Eismann
Page 20 of 44
figure 11.19
When working in full screen mode use the space bar to position the file anywhere on the desktop.
The Histogram Palette
The importance of the histogram in editing digital images has resulted in Photoshop’shistogram feature being upgraded and given its very own palette. Before Photoshop CS, theonly way you could see a histogram for the image you were working on was to either open theLevels dialog, or open the histogram dialog in the Image menu. In that dialog, however, youcould only inspect the histogram and then close the dialog. You could not work on an imagewhile viewing the histogram display at the same time.
All of that has changed with the new Histogram palette (figure 11.20), which is much morethan just placing a histogram display within easy reach. You can have it in view at all timesand see that how your edits are affecting the histogram in real time. Tonal information can bedisplayed for the entire image, or for a selected layer or an adjustment composite. In the lattermode, you can click on each layer in your layer stack and the Histogram palette will display adifferent histogram for each of your adjustment layers, representing the effect that each layeris having on the image.
figure 11.20
The Histogram palette in expanded view.
Depending on the size of your monitor, or whether you have dual monitors, you can choose todisplay a compact version of the palette that just shows the graph of the histogram itself; andexpanded view which shows a larger histogram along with more detailed information; or afull view that shows four separate histograms for the composite and the individual colorchannels. Since the Histogram palette is always basing its display on the current cachedversion of the image it provides a convenient button (two curved arrows) for you to update thehistogram from that actual image data. Andrew Rodney explained the specific settings of theHistogram palette on www.imagingrevue.com
• Cache Settings: Because all edits in Photoshop could affect the histogram, a cache is ineffect whereby the screen resolution of the current document is used to calculate thehistogram. Calculating a full resolution histogram from the entire image after every

Addendum to Photoshop Restoration & Retouching, 2nd edition by Katrin Eismann
© 2003. All Rights Reserved. Katrin Eismann
Page 21 of 44
edit and operation would slow CS down tremendously. So, just like the Adobe CameraRAW histogram, the histogram palette is normally based on a downsampled version ofthe image. When any operation takes place, the cache kicks in indicated by a smalltriangle seen in the upper right of the composite histogram. Clicking on that triangle orusing the Uncache Refresh menu item allows Photoshop to produce a fully calculatedhistogram. For very precise editing, this is usually a good idea. Note that the “UseCache for Histogram” preferences (command/control K) are for the Levels Histogramand not this Histogram palette.
• Compact/Expanded View: The Histogram palette has two sizes and the expanded sizeis really the way to go assuming you have the monitor space.
• All Channel View: This allows all the color channels to be seen below the compositechannel, a handy and new way to view histogram data. Again, assuming monitor realestate isn’t an issue, it’s very handy to have all the color channels seen.
• Show Statistics: This produces statistical data as the user moves the cursor over thehistogram much as the older and now removed Histogram dialog provided. Clickingand dragging an area in either the composite or individual color channels will producestatistics on all selected (highlighted) pixels.
• Show Channels in Color: Like the preference that allows the channels palette to showindividual channels in their respective color, this option shows the histogram channelstheir actual colors, as seen in figure 1.
• Source popup menu: This popup allows the user to view the Histogram of a selectedlayer. Target the layer you wish to view if more than one is in a file.
• 16 bit: The Histogram can’t show a true 16 bit Histogram. Each level in the file isdrawn in the Histogram so what is always seen is 256 levels. Had a true 16 bitHistogram been possible, you’d need a display the size of a small wall to show 65,000odd levels! The “Level” read out in statistics always provides a zero to 256 scale.
The new Histogram palette is a great way to keep an eye on what’s happening to your file asyou edit. Keep in mind that precise clipping of pixels will only be visible when the cache is offso clicking on the double circle icon or triangle icon in the upper right of the palette issomething you might want to do from time to time. For precise clipping control, Levels using theAlt/Option drag on the black and white input level sliders is still the way to work.
Improved Camera RAW
My preferred method for converting RAW captures is the Camera Raw interface in Photoshop.This was offered as an optional plug-in for Photoshop 7, and is now included as part ofPhotoshop CS. It provides tremendous control over the process of converting your images, andalso offers an efficient workflow. To convert RAW captures, you simply open them in Photoshopas you would any other image file, and the Camera Raw dialog will automatically bedisplayed so you can fine-tune the adjustments to the image in the conversion process.

Addendum to Photoshop Restoration & Retouching, 2nd edition by Katrin Eismann
© 2003. All Rights Reserved. Katrin Eismann
Page 22 of 44
figure 11.21
The Camera RAW interface offers a great deal of control.
Basic settings
• The navigation controls in the upper left hand corner provide the same functionality ofthe Zoom and Hand tools in Photoshop, making it very easy to focus on particular areasof the image as you fine-tune the adjustments to be applied in the RAW conversionprocess. These tools function exactly as they do in Photoshop, including the ability todouble-click the Zoom tool to view the image at 100%, and double-click the hand toolto size the image to fit the window and hold the space bar to scrub through an image. Inthe lower left hand corner, use the pull down menu to view an image at an exactincrement. When judging sharpness or color artifacts it is best to view the file at 100%view.
• Just as the digital camera histogram is invaluable when capturing images to ensureproper exposure, the histogram and clipping display in the Camera Raw dialog arecritical for ensuring that you aren’t clipping highlights or shadows when bringing filesinto Photoshop.
As Lee Varis explained in the on-line forum www.imagingrevue.com , “The clippingdisplay for Exposure and Shadows is based on the way Photoshop does the thresholdcommand. When you move the Threshold slider to the right, towards the highlightend of the scale what you see is the image turning black until the very last, brightestarea is still white - that represents the lightest thing in the image or the first thingthat will "clip" to white when you move the Exposure slider to the right. The lightestregion will be different in each of the channels based on the colors of the image. Whenyou add these "clipping displays together you get the expected additive colors (whiteor 255 in the red channel is "red" in RGB, 255-R + 255-G = yellow) On the shadow sidethe Threshold command shows the last region to turn "white" as you move the slider to

Addendum to Photoshop Restoration & Retouching, 2nd edition by Katrin Eismann
© 2003. All Rights Reserved. Katrin Eismann
Page 23 of 44
the left – it’s exactly the opposite! So... one more time, the shadow slider is showingyou the darkest area in a channel based on the Threshold display - if an area is blackin one channel only, then it is white in the other two channels (if red and green are"white" or 255 each, then you see yellow where the blue channel is black) You'redisplaying the regions that are still black when everything is clipped to white in thedisplay. In order to display the color of the clipped channel you'd have to invert thedisplay for the Shadows slider clipping.
When the highlight slider shows:
White = 255 in all three channels
Red = 255 in the red channel
Green =255 in the green channel
Blue=255 in the blue channel
Cyan=255 in the green and blue channels
Magenta=255 in the red and blue channels
Yellow=255 in the red and green channels
When the shadow slider shows:
Black = 0 in all three channels
Cyan=0 in the red channel
Magenta=0 in the green channel
Yellow=0 in the blue channel
Red=0 in the green and blue channels
Green=0 in the red and blue channels
Blue=0 in the red and green channels
• The white balance adjustments in the Camera Raw dialog consist of two sliders and alist of preset options. Because the white balance adjustments are not applied to theactual image during a RAW capture, the changes are only applied in the conversionprocess. Therefore, you can adjust the white balance settings with the same result as ifyou had used those settings for the original capture.
If you used the wrong white balance preset in the camera, you can select another optionfrom the dropdown list. The default is to leave the settings as they werephotographed. Because of the control provided during the conversion, I simply captureall images at the automatic white balance setting and then fine-tune them as needed.
If a white balance preset doesn’t provide the perfect adjustment for the image, fine-tune the Temperature and Tint sliders. The Temperature slider controls the overallwhite balance setting for the image. Moving the slider to the right will result in animage with warmer colors (yellows and reds), as though it was captured at a highertemperature setting. Moving the slider to the left will result in an image with coolercolors (blues and greens), as though it was captured at a lower temperature setting. Youcan also fine-tune the overall color in the image with the Tint slider, which shifts theimage between green and magenta.
The Tonal & Color Adjustments tonal adjustment options provide excellent control over thebrightness and contrast of the final image, as well as the saturation as discussed here:
• The Exposure adjustment allows you to produce a linear shift in brightness. The unit ofmeasure is Exposure Value, which is what photographers would think of as the numberof stops of exposure compensation. Because this is a linear adjustment that affects thebrightness of all pixels in the image, it is possible to clip highlights or shadows of yourimage. It is important to watch the Histogram display as you adjust this setting. TheExposure control would typically be used to adjust images that are significantly over orunder exposed.
Addendum to Photoshop Restoration & Retouching, 2nd edition by Katrin Eismann
© 2003. All Rights Reserved. Katrin Eismann
Page 24 of 44
• The Shadows slider functions the same way the black point slider in the Levels dialogdoes. It allows you to define a black point for your image, so that you can maximizecontrast in the final image. You can get a preview of where detail is being clipped byholding the Alt (Windows) or Option (Macintosh) key while moving the slider. As youmove the slider, you can see what color channels are losing detail based on where thecolor appears. When black appears, it is an indication that those areas of the imagehave been clipped to pure black.
• The Brightness slider allows you to adjust the overall brightness of the image, similarto the control provided by the Exposure slider. The only difference is that theBrightness slider will not clip highlights or shadows, but will instead compress thetonal information at the ends of the tonal range as you make adjustments. It is thereforea safer adjustment tool, although it doesn’t provide the range offered by the Exposureslider. It can be thought of as behaving like the middle tone slider in the Levels dialog.
• The Contrast slider adjusts the contrast in the middle tones of your image. Highlightsand shadows will not be clipped by this control. It therefore operates similar tocreating an “S” curve to enhance image contrast.
• The Saturation slider allows you to fine-tune the saturation of colors in the image. Aswith the Hue/Saturation dialog in Photoshop, it is important not to increase saturationtoo much or you will produce artificial looking colors and lose detail in highlysaturated areas of the image.
All in all, I use these controls to bring a good image into Photoshop, where I then use adjustmentlayers and selections to fine-tune the final look of an image.
Detail Settings
Click on the detail tab to adjust image sharpness and apply smoothing and noise reduction.
• The Sharpness setting allows you to apply some sharpening to compensate for the lossof sharpness that occurs in the digital capture process. I find that the default value of25 is excessive for most images. Our preference is to set this to the zero and apply ourown sharpening using the Unsharp Mask filter or to use Pixelgenius Photokit Sharpnerwww.pixelgenius.com.
• Luminance Smoothing and Color Noise Reduction both target noise in your image,breaking down the adjustments between luminosity variations and color variations. Ifyou have noise in your images due to high ISO setting, long exposure, or other factors,these controls can help minimize that noise. The Color Noise Reduction setting can alsobe used to minimize Moiré patterns.
Advanced Settings
Clicking the Advanced radio button in the Camera Raw dialog adds the Lens and Calibrate tabto the available camera RAW controls to correct chromatic aberration and vignetting.
Lens tab
• Camera RAW corrects chromatic aberration where due to lens failure the size of eachcolor channel is slightly different. This results in no color problems in the center of theframe, but color fringing away from the center of the image.
The controls for adjusting this chromatic aberration are split into an “R/C” slider thatcontrols fringing between red and cyan, and a “B/Y” slider that controls fringingbetween blue and yellow. These controls will not affect the center of the image, but willaffect the area outside the center, with maximum effect in the corners of the image.
Addendum to Photoshop Restoration & Retouching, 2nd edition by Katrin Eismann
© 2003. All Rights Reserved. Katrin Eismann
Page 25 of 44
• The vignette controls allow you to compensate for images that have darker outer edges -particularly the corners - that are darker than the rest of the image. The VignettingAmount determines how much lightening or darkening is applied to the edge of theimage, and the Vignetting Midpoint slider determines how large an area will getadjusted.
Calibrate tab
• The calibrate section provides a variety of controls designed to compensate forinaccurate camera profiles. Camera Raw includes profiles for supported cameras,which describe the color behavior of the cameras. If you feel the canned profile is notproviding optimal results you can fine-tune these controls to tweak the profile. Includedcontrols are Shadow Tint, which controls the color temperature in shadow areas, aswell as hue and saturation adjustments for each of the color channels. These controls areonly recommended for advanced users who are very familiar with the use of cameraprofiles.
Output Settings
On the lower left of the Camera Raw dialog are settings that affect the output of the finalimage file.
• The space pull-down menu specifies the target color space profile that the file will beopened into. Generally, this should be set to the same value as your Photoshop RGBworking space. If you want to use a color space that's not listed in the Space menu,choose ProPhoto RGB, and then convert to the working space of your choice when thefile opens in Photoshop.
• The Depth dropdown allows you to select between 8 bits per channel and 16 bits perchannel. I strongly recommend working with 16 bits per channel, as it provides themaximum amount of information in the final file. If you immediately convert the imageto 8-bit, you are eliminating much of the benefit of capturing in RAW mode to beginwith. If you convert the image to a 16-bit file, you will be able to maintain muchsmoother gradations of tone and color in your images. Working in 16-bit is addressedshortly.
• The Size option provides the ability to change the size of the image in the conversionprocess. As Bruce Fraser wrote on a www.imagingrevue.com , "If you look solely at theinterpolation, with no sharpening, or with ACR sharpening applied equally to both,there's very little difference between upsampling in ACR and upsampling using BicubicSmoother. ACR upsamples on the raw data because that's all it has to work with, notbecause there's any inherent superiority in doing so. The new interpolation options inPhotoshop CS—Bicubic Sharper and Bicubic Smoother—are pretty awesome. All thisapplies only to Photoshop CS and the new Bicubic Smoother. In Photoshop 7, I'd do theupsample using ACR."
• The Resolution setting will not affect the actual output size of the image, but only thedefault output resolution setting for the file. This can simplify your workflow if youneed to prepare images for print. For example, you can set this to the resolution you usefor printing your images, and the file will be set to that output resolution.
Working in 16-bit
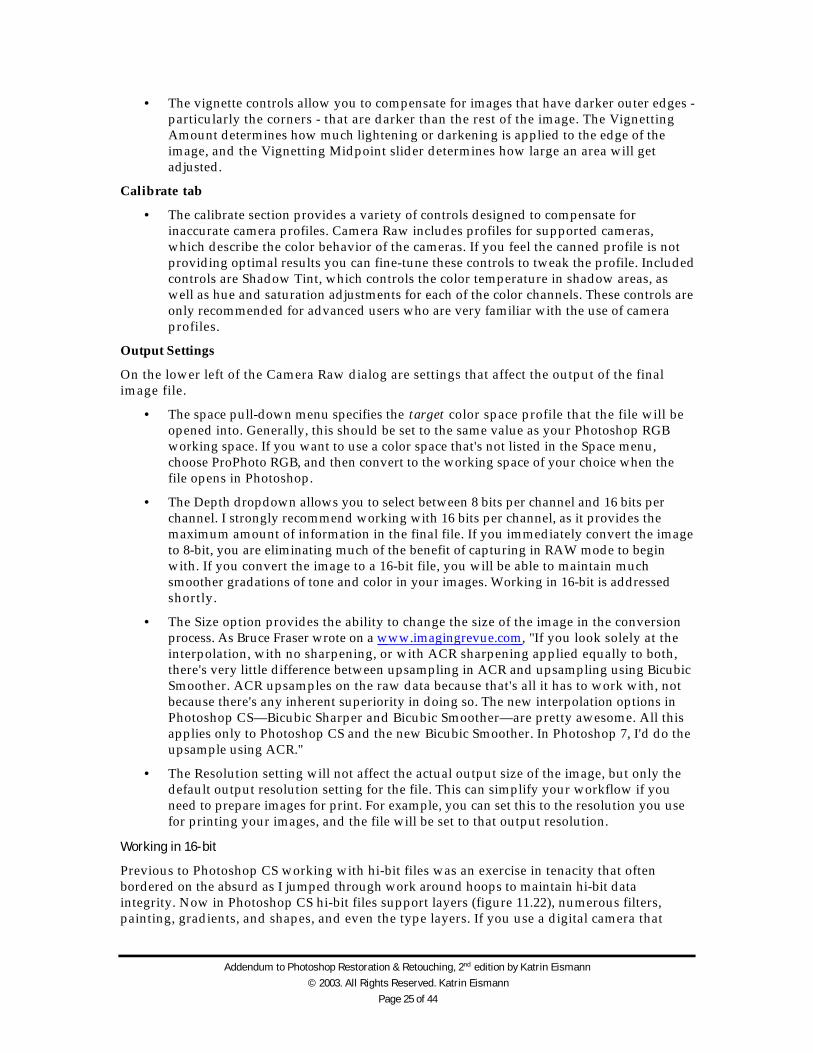
Previous to Photoshop CS working with hi-bit files was an exercise in tenacity that oftenbordered on the absurd as I jumped through work around hoops to maintain hi-bit dataintegrity. Now in Photoshop CS hi-bit files support layers (figure 11.22), numerous filters,painting, gradients, and shapes, and even the type layers. If you use a digital camera that
Addendum to Photoshop Restoration & Retouching, 2nd edition by Katrin Eismann
© 2003. All Rights Reserved. Katrin Eismann
Page 26 of 44
shoots into the RAW file format or a scanner that delivers hi-bit files, consider takingadvantage of this new feature on images where the highest quality is required. For example, Iuse hi-bit files for all of my fine-art work, glamour portraits, and on high-key images wherethe tonal differences are so subtle that every single bit of tonal information needs to bemaintained.
figure 11.22
The number 16 on the right hand side of the file name signifies high bit files.
The downside to working in hi-bit is that your files will be twice the size – meaning a 10 Mbscan will automatically become a 20 MB file – implying the need for larger hard drives andmore RAM. Also, there is no advantage to converting an 8-bit image to 16-bit in the hope toimprove image quality. It won’t work and it will clog up your hard drive. To take fulladvantage of the new hi-bit capabilities in Photoshop CS always start with true hi-bit filesfrom digital cameras or scanners.
New Color and Tone Correction Tools
Sometimes I am simply amazed at the improvements the Adobe engineers create with eachrelease of the application. With Photoshop CS they have once again amazed me with anumber of features – especially the new Shadow/Highlight correction and Photo Filtercontrols.
Shadow/Highlight
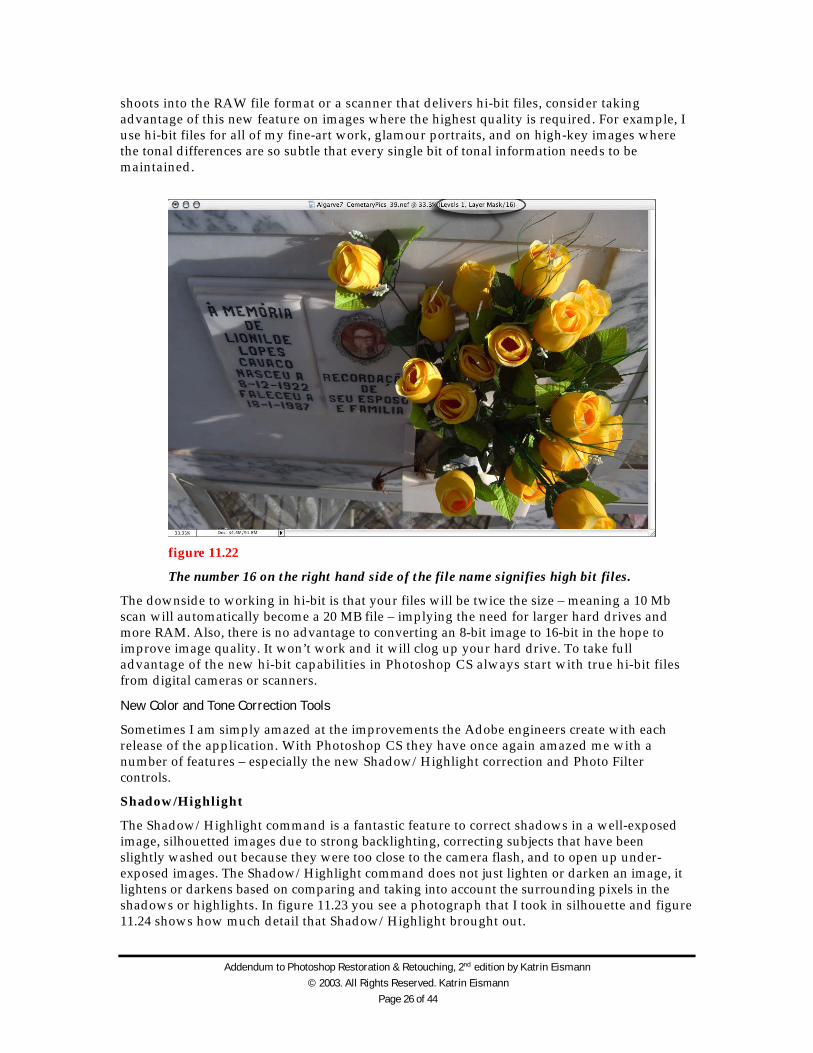
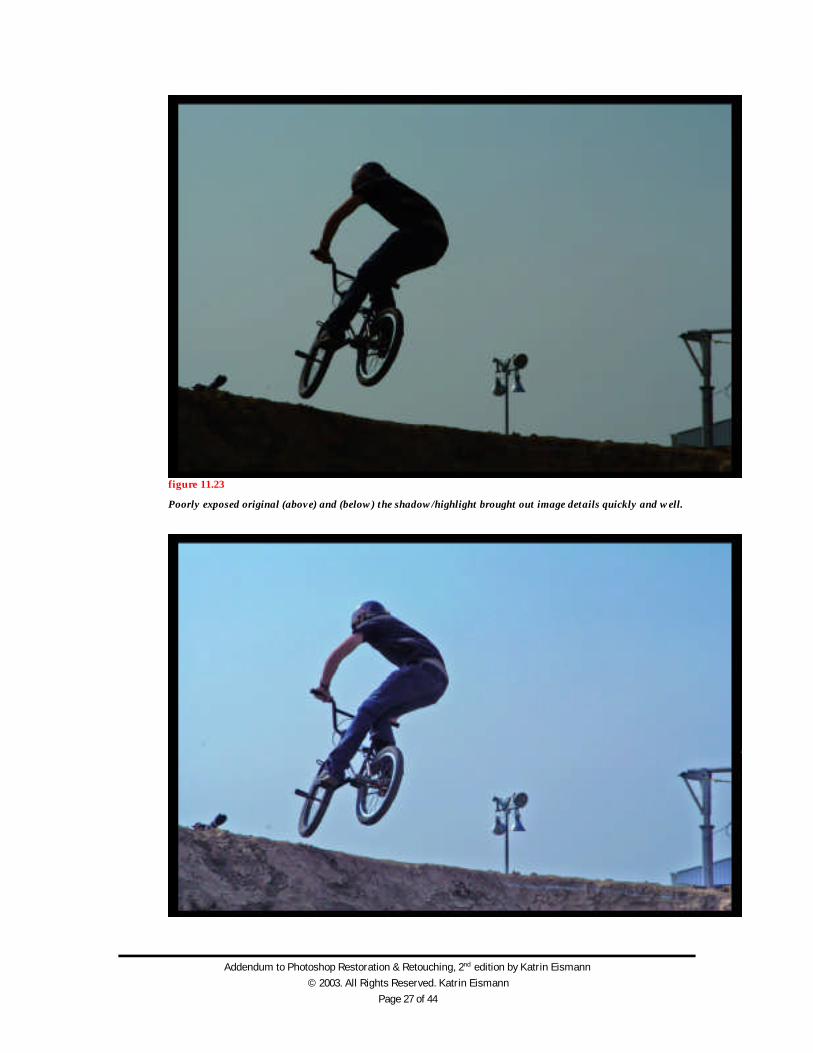
The Shadow/Highlight command is a fantastic feature to correct shadows in a well-exposedimage, silhouetted images due to strong backlighting, correcting subjects that have beenslightly washed out because they were too close to the camera flash, and to open up under-exposed images. The Shadow/Highlight command does not just lighten or darken an image, itlightens or darkens based on comparing and taking into account the surrounding pixels in theshadows or highlights. In figure 11.23 you see a photograph that I took in silhouette and figure11.24 shows how much detail that Shadow/Highlight brought out.
Addendum to Photoshop Restoration & Retouching, 2nd edition by Katrin Eismann
© 2003. All Rights Reserved. Katrin Eismann
Page 27 of 44
figure 11.23
Poorly exposed original (above) and (below) the shadow/highlight brought out image details quickly and well.
Addendum to Photoshop Restoration & Retouching, 2nd edition by Katrin Eismann
© 2003. All Rights Reserved. Katrin Eismann
Page 28 of 44
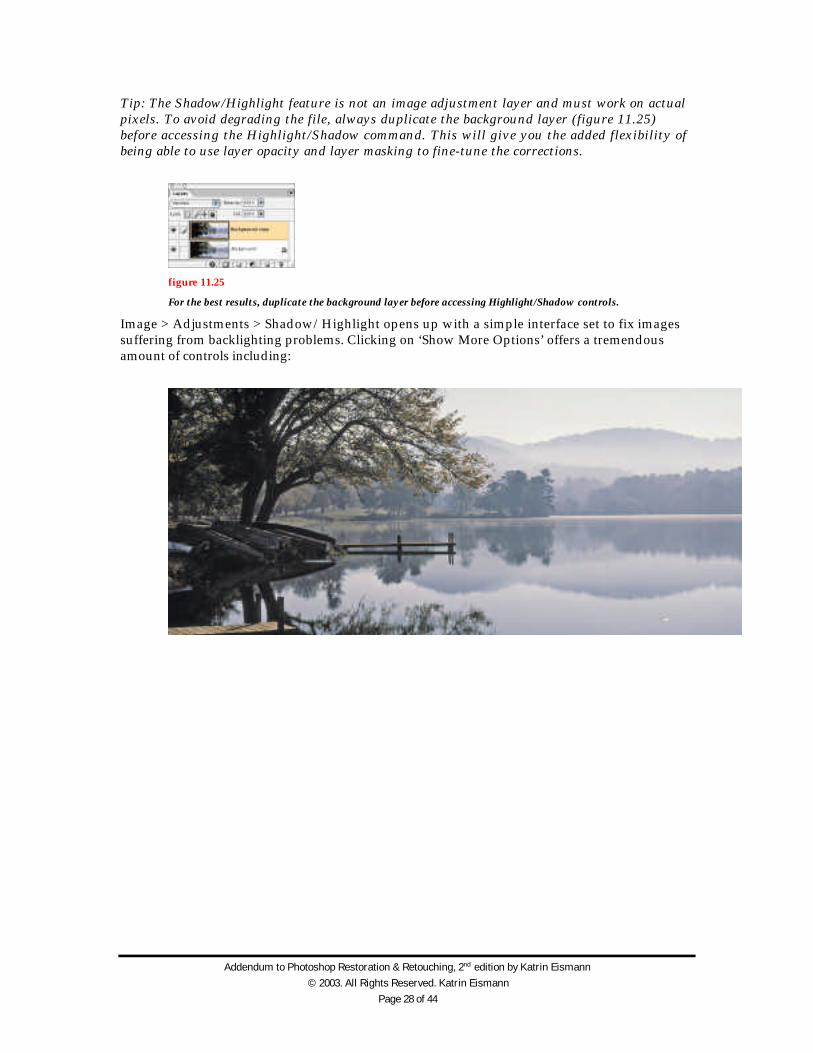
Tip: The Shadow/Highlight feature is not an image adjustment layer and must work on actualpixels. To avoid degrading the file, always duplicate the background layer (figure 11.25)before accessing the Highlight/Shadow command. This will give you the added flexibility ofbeing able to use layer opacity and layer masking to fine-tune the corrections.
figure 11.25
For the best results, duplicate the background layer before accessing Highlight/Shadow controls.
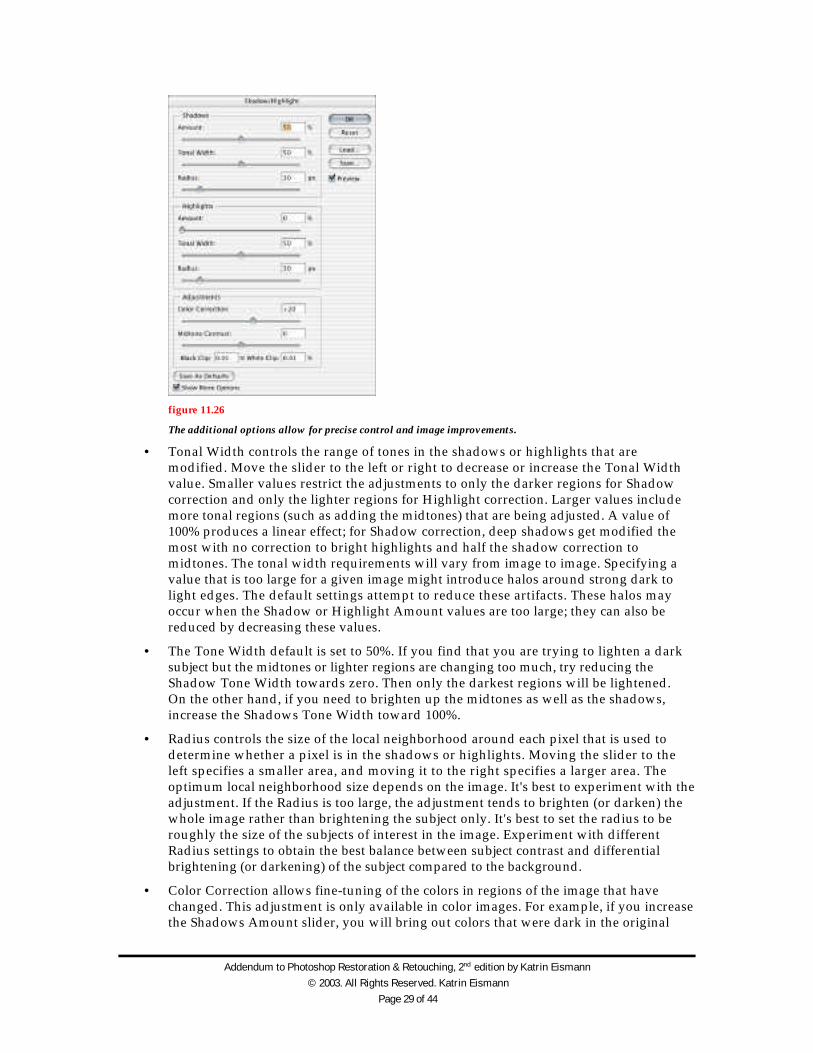
Image > Adjustments > Shadow/Highlight opens up with a simple interface set to fix imagessuffering from backlighting problems. Clicking on ‘Show More Options’ offers a tremendousamount of controls including:
Addendum to Photoshop Restoration & Retouching, 2nd edition by Katrin Eismann
© 2003. All Rights Reserved. Katrin Eismann
Page 29 of 44
figure 11.26
The additional options allow for precise control and image improvements.
• Tonal Width controls the range of tones in the shadows or highlights that aremodified. Move the slider to the left or right to decrease or increase the Tonal Widthvalue. Smaller values restrict the adjustments to only the darker regions for Shadowcorrection and only the lighter regions for Highlight correction. Larger values includemore tonal regions (such as adding the midtones) that are being adjusted. A value of100% produces a linear effect; for Shadow correction, deep shadows get modified themost with no correction to bright highlights and half the shadow correction tomidtones. The tonal width requirements will vary from image to image. Specifying avalue that is too large for a given image might introduce halos around strong dark tolight edges. The default settings attempt to reduce these artifacts. These halos mayoccur when the Shadow or Highlight Amount values are too large; they can also bereduced by decreasing these values.
• The Tone Width default is set to 50%. If you find that you are trying to lighten a darksubject but the midtones or lighter regions are changing too much, try reducing theShadow Tone Width towards zero. Then only the darkest regions will be lightened.On the other hand, if you need to brighten up the midtones as well as the shadows,increase the Shadows Tone Width toward 100%.
• Radius controls the size of the local neighborhood around each pixel that is used todetermine whether a pixel is in the shadows or highlights. Moving the slider to theleft specifies a smaller area, and moving it to the right specifies a larger area. Theoptimum local neighborhood size depends on the image. It's best to experiment with theadjustment. If the Radius is too large, the adjustment tends to brighten (or darken) thewhole image rather than brightening the subject only. It's best to set the radius to beroughly the size of the subjects of interest in the image. Experiment with differentRadius settings to obtain the best balance between subject contrast and differentialbrightening (or darkening) of the subject compared to the background.
• Color Correction allows fine-tuning of the colors in regions of the image that havechanged. This adjustment is only available in color images. For example, if you increasethe Shadows Amount slider, you will bring out colors that were dark in the original

Addendum to Photoshop Restoration & Retouching, 2nd edition by Katrin Eismann
© 2003. All Rights Reserved. Katrin Eismann
Page 30 of 44
image. You may want these colors to be more or less vivid. Adjust the Color Correctionslider to give the best results. In general, increasing values tend to produce moresaturated colors and decreasing values produce less saturated colors.
Since the Color Correction slider only affects changed portions of the image, the amountof color variation depends on how much or little Shadows or Highlights Amount isapplied. The greater the correction made to the shadows and highlights, the greaterthe range of color correction available. The Color Correction slider applies subtlecontrol over the darkened or lightened colors in the image. If you want to change thecolor hues or saturation over the whole image, use the Hue/Saturation command afterapplying the Shadow/Highlight command.
• Brightness adjusts the brightness in a grayscale image. This adjustment is onlyavailable for grayscale images. Moving the Brightness slider to the left darkens agrayscale image, and moving the slider to the right lightens a grayscale image.
• Midtone Contrast adjusts the contrast in the midtones. Move the slider to the left toreduce the contrast and to the right to increase the contrast. You can also enter a valuein the Midtone Contrast text box. A negative value reduces contrast, and a positivevalue increases contrast. An increase in Midtone Contrast adjustment produces greatercontrast in the midtones while tending to darken the shadows and lighten thehighlights.
• Black Clip and White Clip specifies how much of the shadows and highlights will beclipped to the new extreme shadow (level 0) and highlight (level 255) colors in theimage. Larger values produce an image with greater contrast. Be careful of setting theclipping values too large, as this will lead to reduced detail in the shadows orhighlights as the intensity values get clipped and sent to pure black or white.
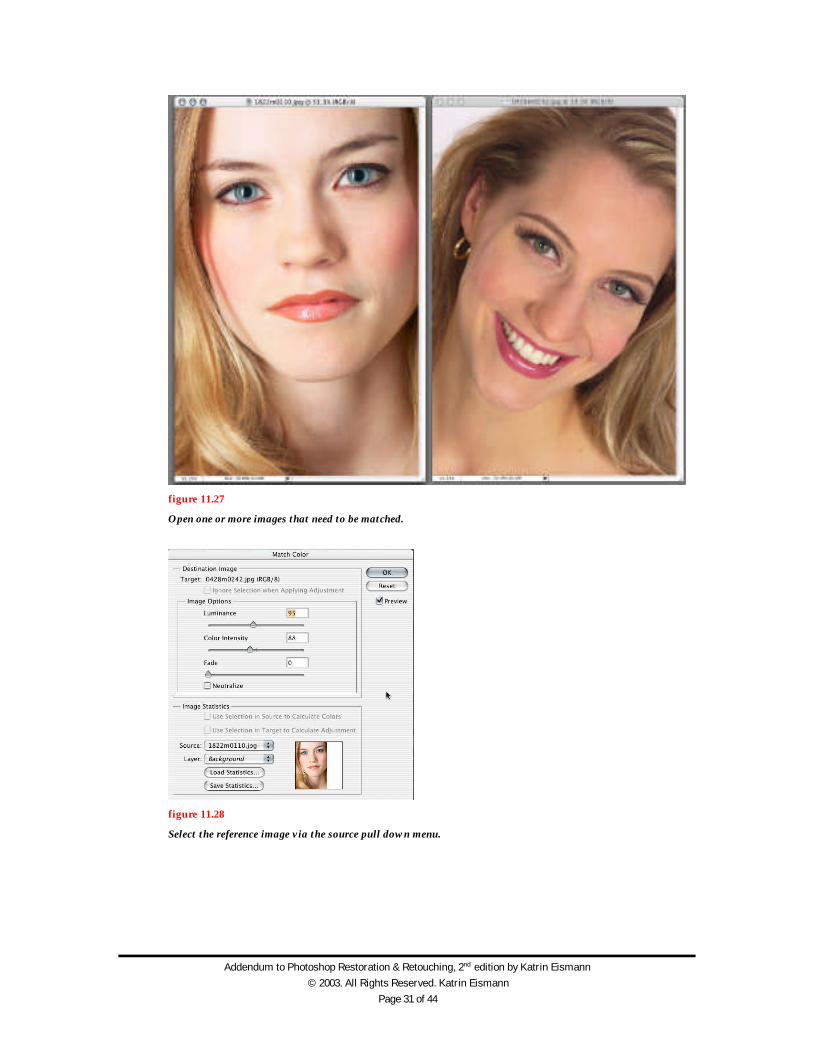
Color Match
The Match Color command matches colors between multiple images, between multiple layers,or between multiple color selections. It also lets you adjust the colors in an image by changingthe luminance, the color range, and neutralize a colorcast. It is an ideal feature for when youneed to match the color feel of a series of images.
Note: The Match Color command only works in RGB mode.
To match the color between two images:
1. Open all images that need to be matched and select Image > Adjustments >Match Color as seen in figure 11.27.
2. Use the source pull down menu to select the reference image (figure 11.28).
3. Adjust luminance, color intensity, and fade options as needed to match theportraits as seen in figure 11.29.
Addendum to Photoshop Restoration & Retouching, 2nd edition by Katrin Eismann
© 2003. All Rights Reserved. Katrin Eismann
Page 31 of 44
figure 11.27
Open one or more images that need to be matched.
figure 11.28
Select the reference image via the source pull down menu.
Addendum to Photoshop Restoration & Retouching, 2nd edition by Katrin Eismann
© 2003. All Rights Reserved. Katrin Eismann
Page 32 of 44
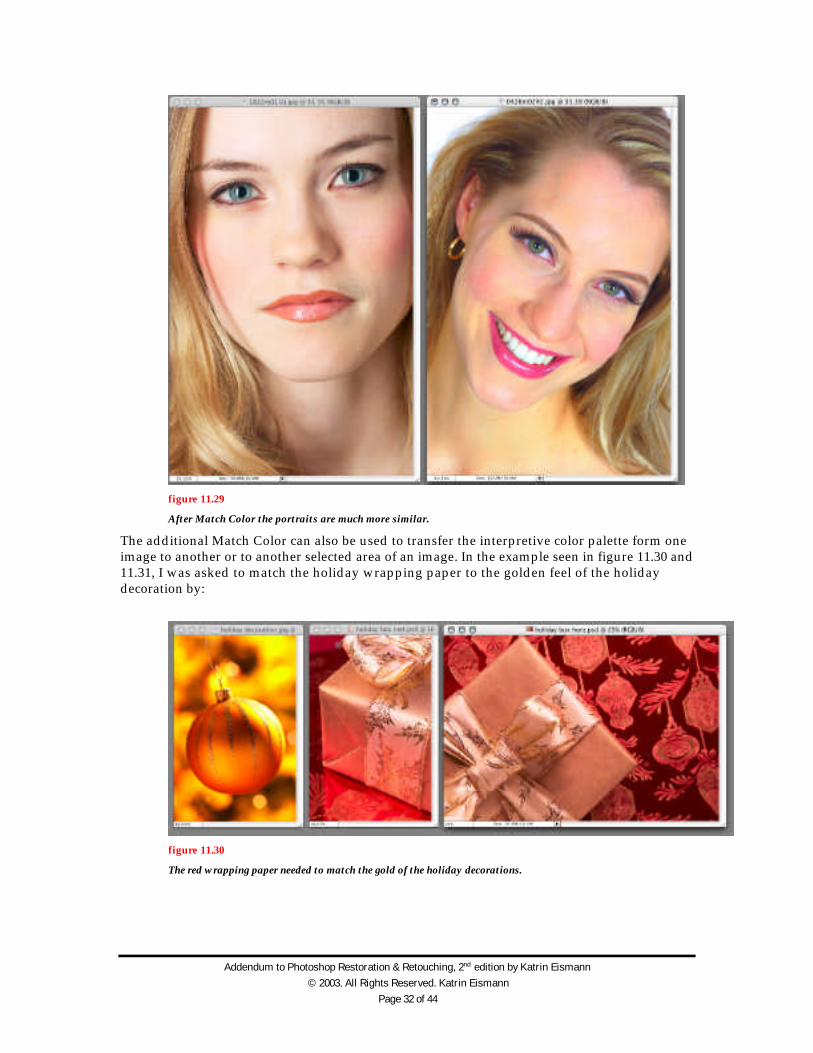
figure 11.29
After Match Color the portraits are much more similar.
The additional Match Color can also be used to transfer the interpretive color palette form oneimage to another or to another selected area of an image. In the example seen in figure 11.30 and11.31, I was asked to match the holiday wrapping paper to the golden feel of the holidaydecoration by:
figure 11.30
The red wrapping paper needed to match the gold of the holiday decorations.
Addendum to Photoshop Restoration & Retouching, 2nd edition by Katrin Eismann
© 2003. All Rights Reserved. Katrin Eismann
Page 33 of 44
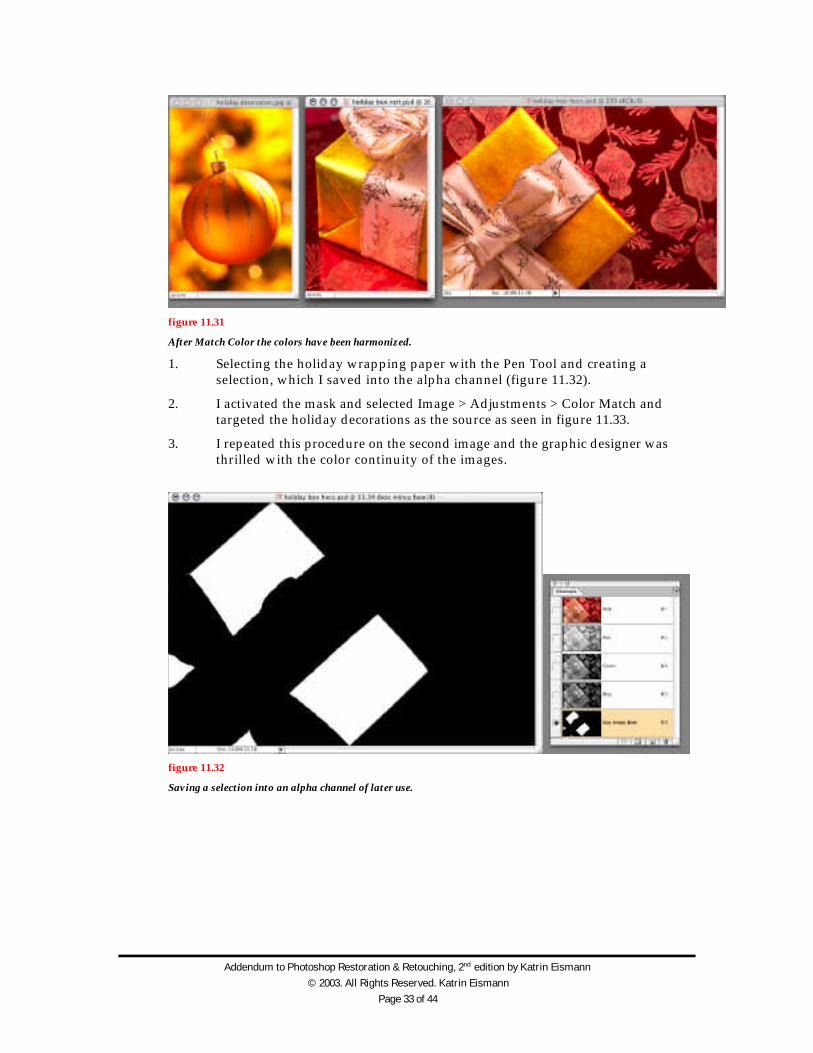
figure 11.31
After Match Color the colors have been harmonized.
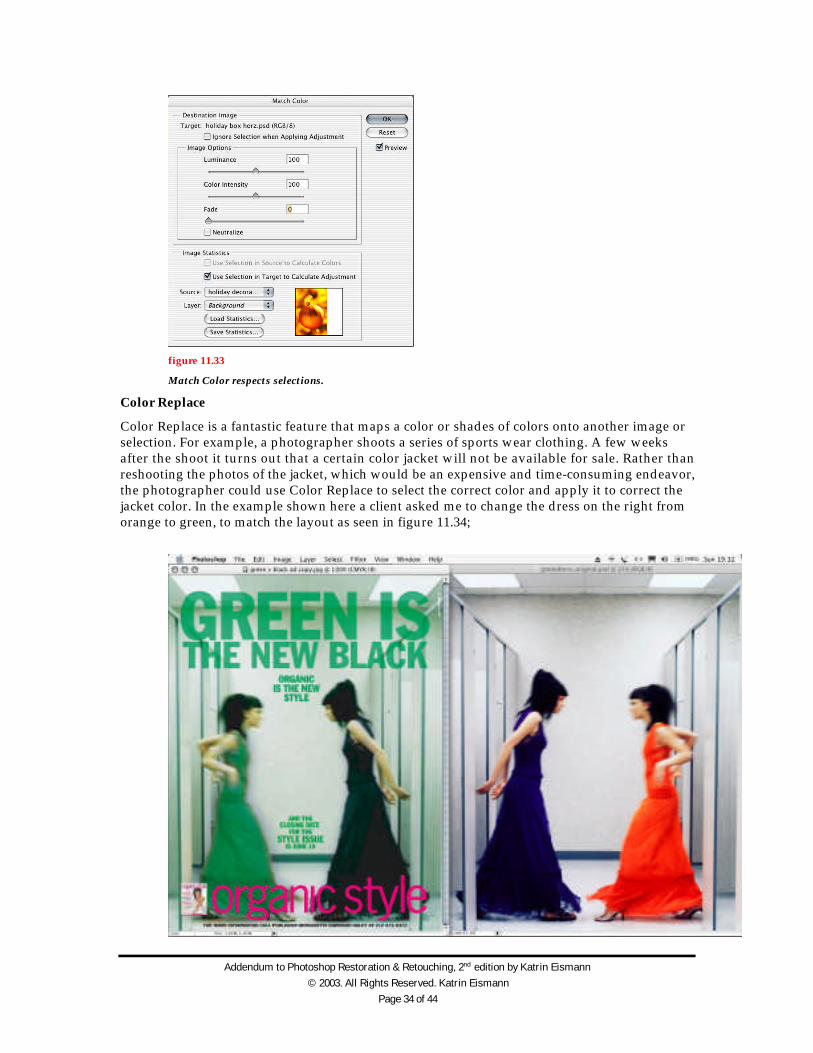
1. Selecting the holiday wrapping paper with the Pen Tool and creating aselection, which I saved into the alpha channel (figure 11.32).
2. I activated the mask and selected Image > Adjustments > Color Match andtargeted the holiday decorations as the source as seen in figure 11.33.
3. I repeated this procedure on the second image and the graphic designer wasthrilled with the color continuity of the images.
figure 11.32
Saving a selection into an alpha channel of later use.
Addendum to Photoshop Restoration & Retouching, 2nd edition by Katrin Eismann
© 2003. All Rights Reserved. Katrin Eismann
Page 34 of 44
figure 11.33
Match Color respects selections.
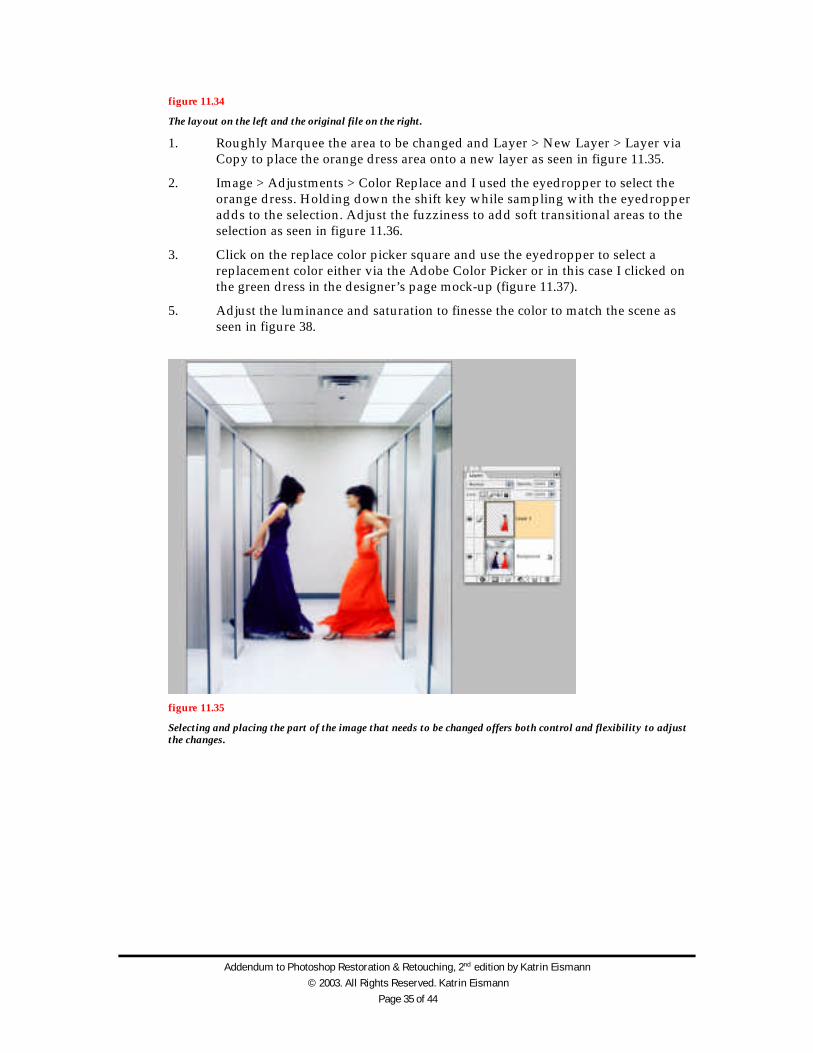
Color Replace
Color Replace is a fantastic feature that maps a color or shades of colors onto another image orselection. For example, a photographer shoots a series of sports wear clothing. A few weeksafter the shoot it turns out that a certain color jacket will not be available for sale. Rather thanreshooting the photos of the jacket, which would be an expensive and time-consuming endeavor,the photographer could use Color Replace to select the correct color and apply it to correct thejacket color. In the example shown here a client asked me to change the dress on the right fromorange to green, to match the layout as seen in figure 11.34;
Addendum to Photoshop Restoration & Retouching, 2nd edition by Katrin Eismann
© 2003. All Rights Reserved. Katrin Eismann
Page 35 of 44
figure 11.34
The layout on the left and the original file on the right.
1. Roughly Marquee the area to be changed and Layer > New Layer > Layer viaCopy to place the orange dress area onto a new layer as seen in figure 11.35.
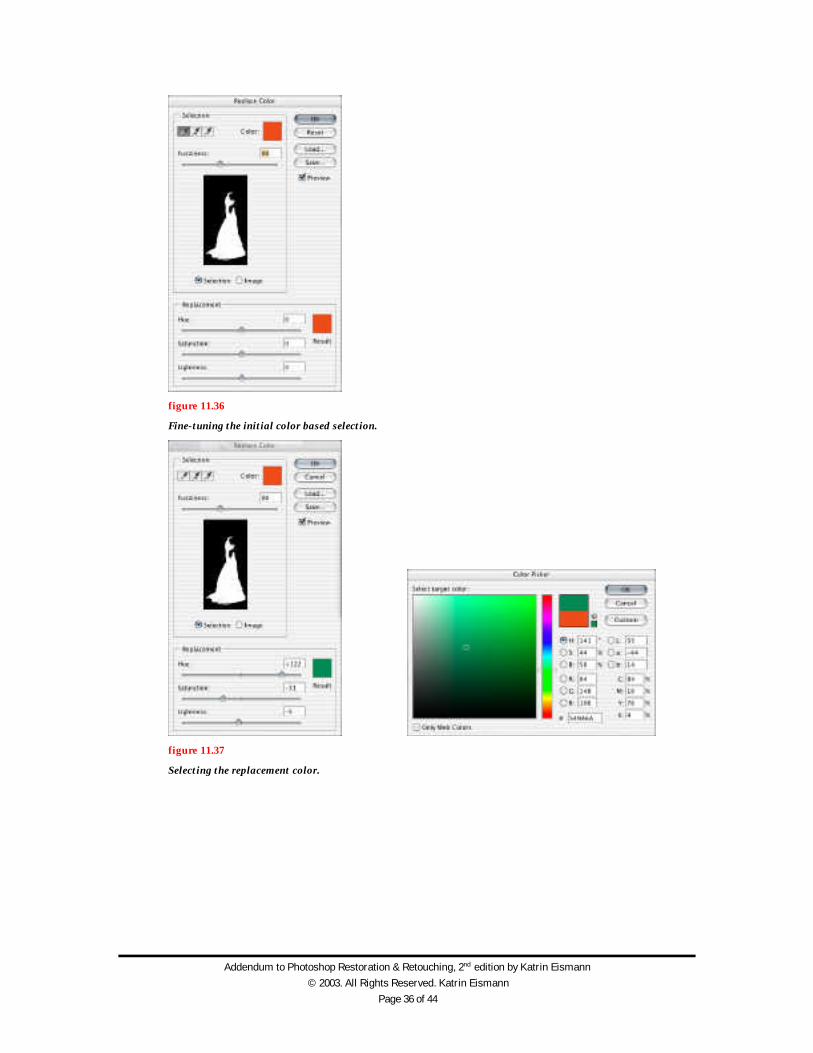
2. Image > Adjustments > Color Replace and I used the eyedropper to select theorange dress. Holding down the shift key while sampling with the eyedropperadds to the selection. Adjust the fuzziness to add soft transitional areas to theselection as seen in figure 11.36.
3. Click on the replace color picker square and use the eyedropper to select areplacement color either via the Adobe Color Picker or in this case I clicked onthe green dress in the designer’s page mock-up (figure 11.37).
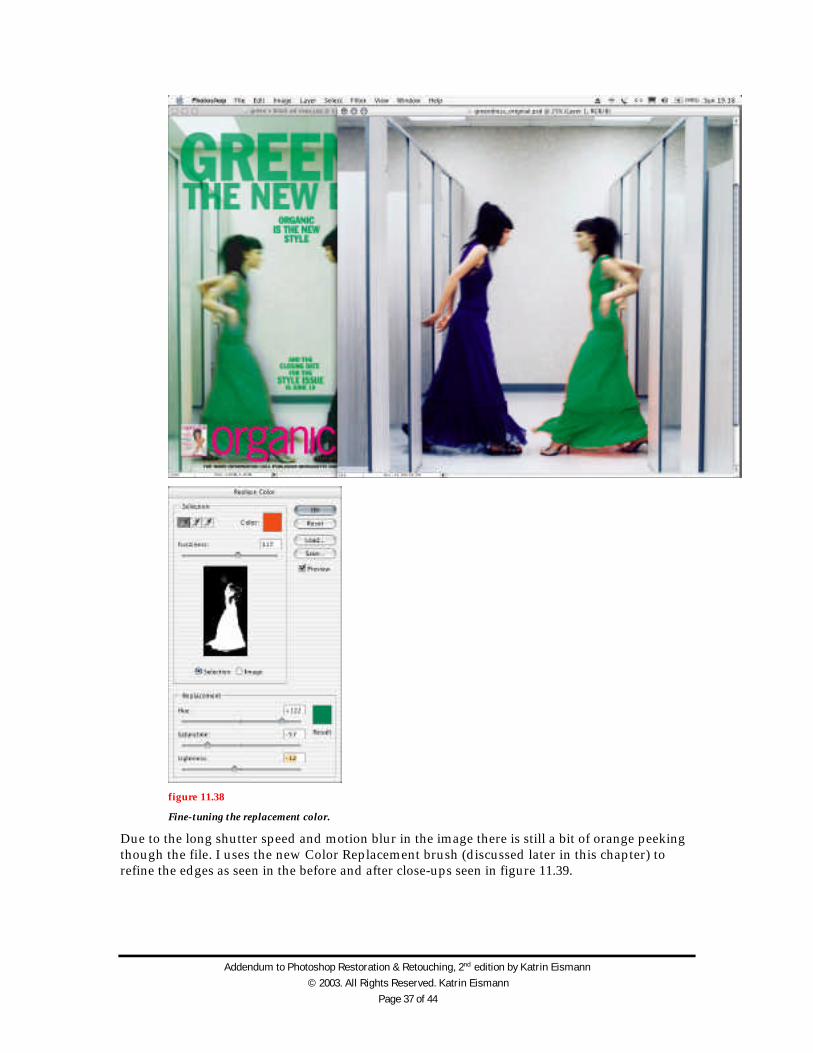
5. Adjust the luminance and saturation to finesse the color to match the scene asseen in figure 38.
figure 11.35
Selecting and placing the part of the image that needs to be changed offers both control and flexibility to adjustthe changes.
Addendum to Photoshop Restoration & Retouching, 2nd edition by Katrin Eismann
© 2003. All Rights Reserved. Katrin Eismann
Page 36 of 44
figure 11.36
Fine-tuning the initial color based selection.
figure 11.37
Selecting the replacement color.
Addendum to Photoshop Restoration & Retouching, 2nd edition by Katrin Eismann
© 2003. All Rights Reserved. Katrin Eismann
Page 37 of 44
figure 11.38
Fine-tuning the replacement color.
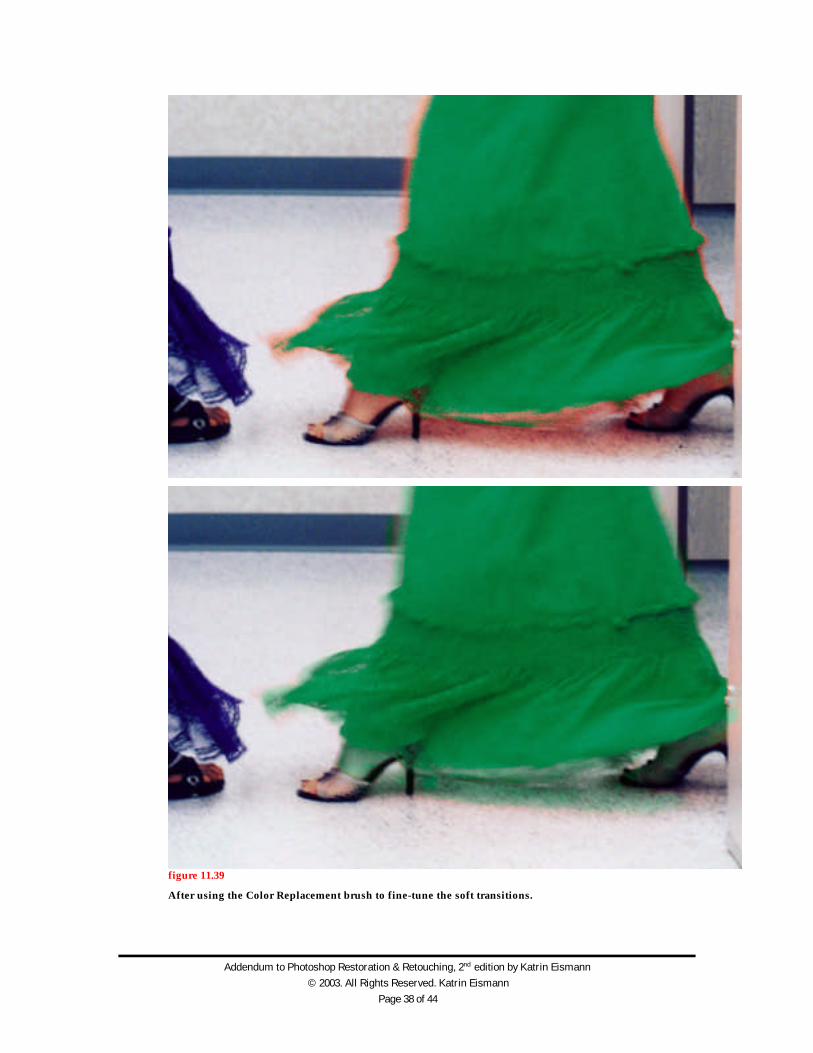
Due to the long shutter speed and motion blur in the image there is still a bit of orange peekingthough the file. I uses the new Color Replacement brush (discussed later in this chapter) torefine the edges as seen in the before and after close-ups seen in figure 11.39.
Addendum to Photoshop Restoration & Retouching, 2nd edition by Katrin Eismann
© 2003. All Rights Reserved. Katrin Eismann
Page 38 of 44
figure 11.39
After using the Color Replacement brush to fine-tune the soft transitions.
Addendum to Photoshop Restoration & Retouching, 2nd edition by Katrin Eismann
© 2003. All Rights Reserved. Katrin Eismann
Page 39 of 44
Photo Filters
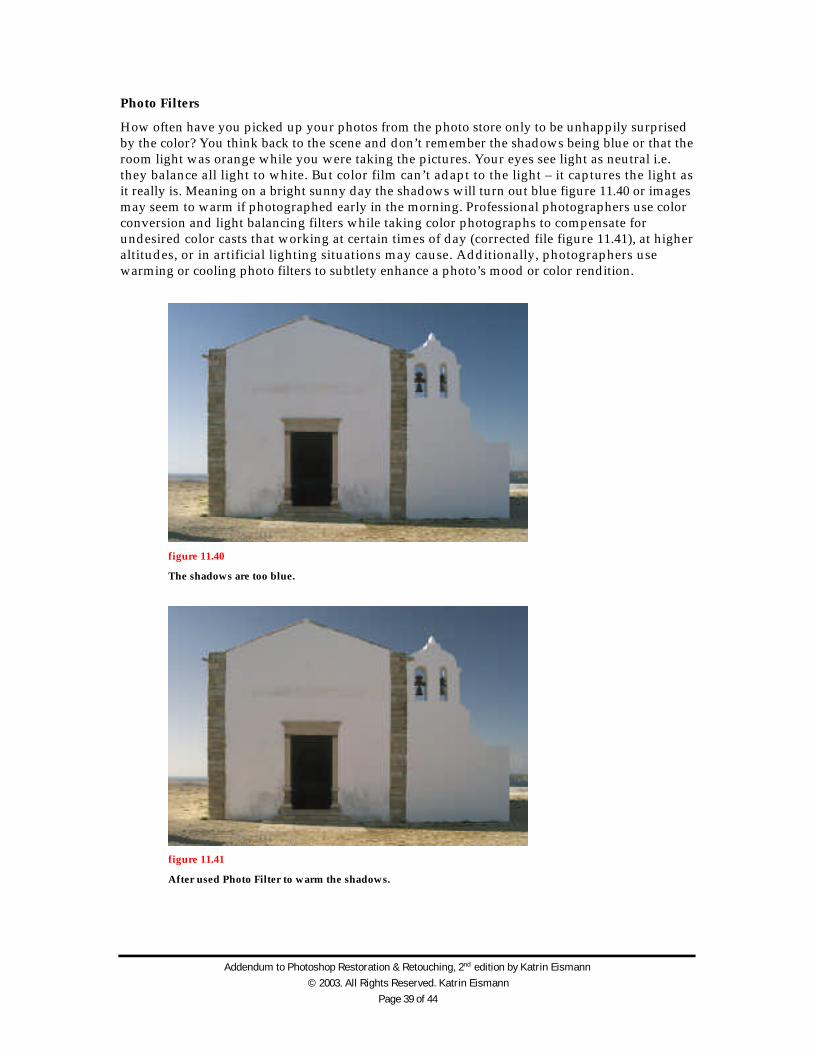
How often have you picked up your photos from the photo store only to be unhappily surprisedby the color? You think back to the scene and don’t remember the shadows being blue or that theroom light was orange while you were taking the pictures. Your eyes see light as neutral i.e.they balance all light to white. But color film can’t adapt to the light – it captures the light asit really is. Meaning on a bright sunny day the shadows will turn out blue figure 11.40 or imagesmay seem to warm if photographed early in the morning. Professional photographers use colorconversion and light balancing filters while taking color photographs to compensate forundesired color casts that working at certain times of day (corrected file figure 11.41), at higheraltitudes, or in artificial lighting situations may cause. Additionally, photographers usewarming or cooling photo filters to subtlety enhance a photo’s mood or color rendition.
figure 11.40
The shadows are too blue.
figure 11.41
After used Photo Filter to warm the shadows.
Addendum to Photoshop Restoration & Retouching, 2nd edition by Katrin Eismann
© 2003. All Rights Reserved. Katrin Eismann
Page 40 of 44
Which Filter to Use and When
The Photo Filters in Photoshop CS mimic the filters that professional photographers use tocorrect for color temperature contamination and shifts. The two primary types of colorcompensation filters are warming and cooling. The warming filters are orange to amber in colorand subtract blues and cyan. The cooling filters are blue in color and subtract red, green, andyellow.
• The 85 filter is a warming filter. Amber in color; use it to accentuate the warm renditionof a sunset or sunrise and to enrich skin tones.
• The 81 filter is a milder warming filter. Pale amber in color; use this filter to removeblue tones in photos taken on overcast days or to clear up bluish shadows in sunny scenes.It is also ideal to add warmth to portraits.
• The 80 filter is a cooling filter. Blue in color; use it to correct pictures with strong yellowto orange colorcasts created by taking the picture in tungsten or candlelight.
• The 82 filter is a milder cooling filter. Use it for waterfalls or snow scenes to turn themslightly blue, emphasizing the coolness of the subject.
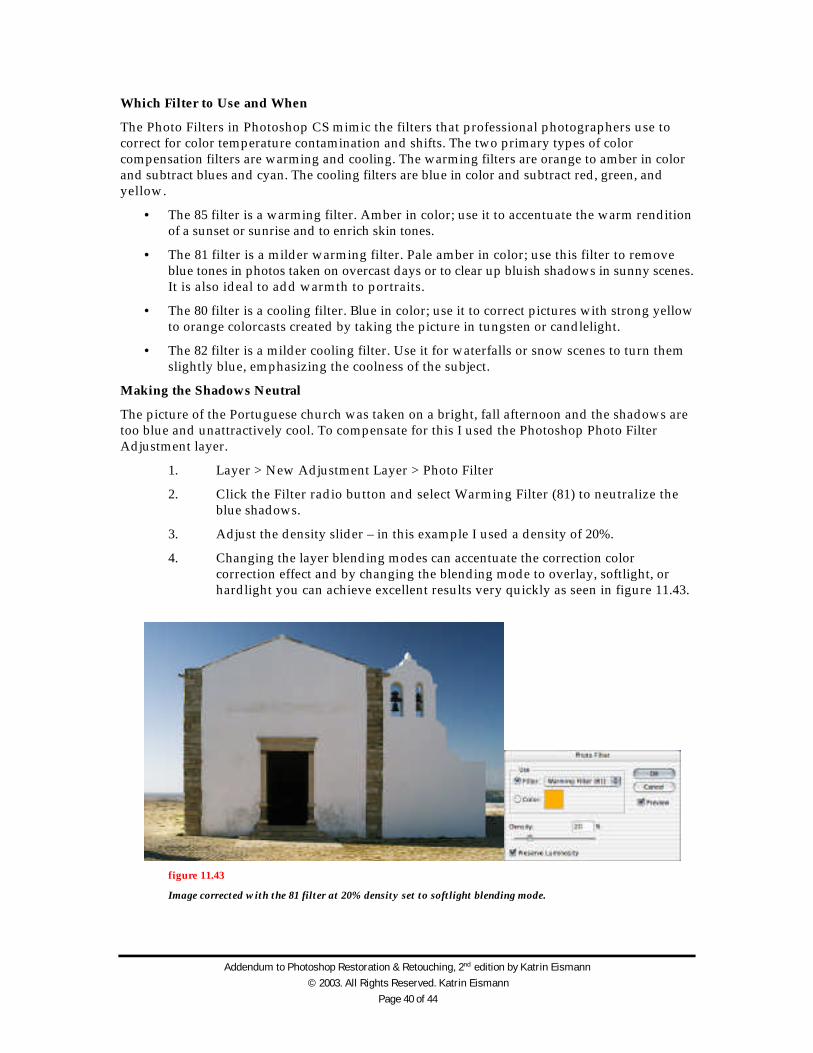
Making the Shadows Neutral
The picture of the Portuguese church was taken on a bright, fall afternoon and the shadows aretoo blue and unattractively cool. To compensate for this I used the Photoshop Photo FilterAdjustment layer.
1. Layer > New Adjustment Layer > Photo Filter
2. Click the Filter radio button and select Warming Filter (81) to neutralize theblue shadows.
3. Adjust the density slider – in this example I used a density of 20%.
4. Changing the layer blending modes can accentuate the correction colorcorrection effect and by changing the blending mode to overlay, softlight, orhardlight you can achieve excellent results very quickly as seen in figure 11.43.
figure 11.43
Image corrected with the 81 filter at 20% density set to softlight blending mode.
Addendum to Photoshop Restoration & Retouching, 2nd edition by Katrin Eismann
© 2003. All Rights Reserved. Katrin Eismann
Page 41 of 44
Since the Photo Filters are Image Adjustment Layers you have the additional advantage ofbeing able to adjust their strength with the layer opacity, layer blending modes, and controlwhere the corrections take place with layer masks.
Improved Healing, Patching, and Redeye Reduction
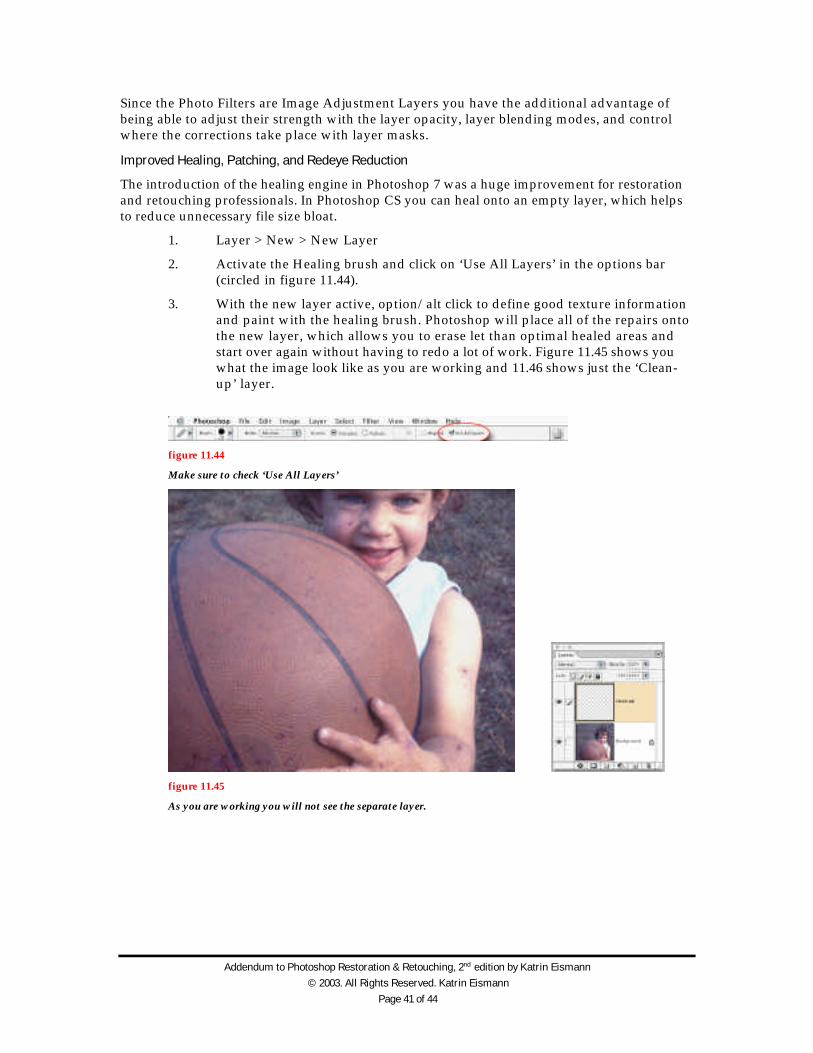
The introduction of the healing engine in Photoshop 7 was a huge improvement for restorationand retouching professionals. In Photoshop CS you can heal onto an empty layer, which helpsto reduce unnecessary file size bloat.
1. Layer > New > New Layer
2. Activate the Healing brush and click on ‘Use All Layers’ in the options bar(circled in figure 11.44).
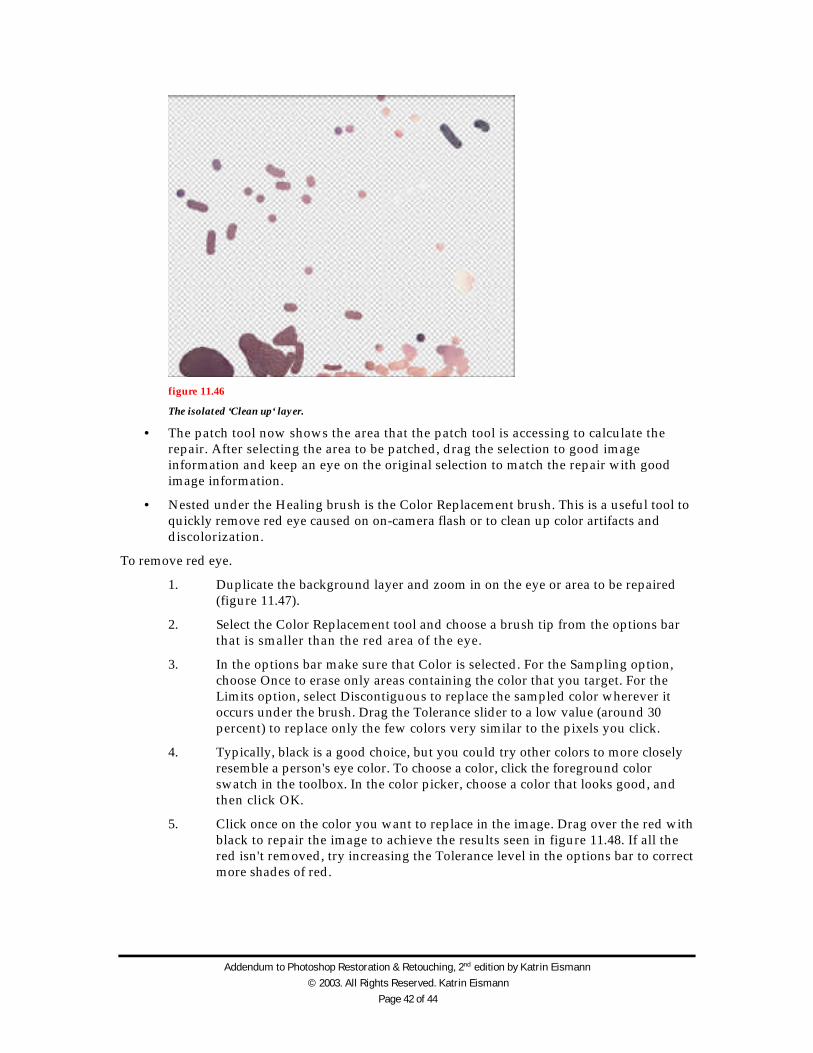
3. With the new layer active, option/alt click to define good texture informationand paint with the healing brush. Photoshop will place all of the repairs ontothe new layer, which allows you to erase let than optimal healed areas andstart over again without having to redo a lot of work. Figure 11.45 shows youwhat the image look like as you are working and 11.46 shows just the ‘Clean-up’ layer.
figure 11.44
Make sure to check ‘Use All Layers’
figure 11.45
As you are working you will not see the separate layer.
Addendum to Photoshop Restoration & Retouching, 2nd edition by Katrin Eismann
© 2003. All Rights Reserved. Katrin Eismann
Page 42 of 44
figure 11.46
The isolated ‘Clean up‘ layer.
• The patch tool now shows the area that the patch tool is accessing to calculate therepair. After selecting the area to be patched, drag the selection to good imageinformation and keep an eye on the original selection to match the repair with goodimage information.
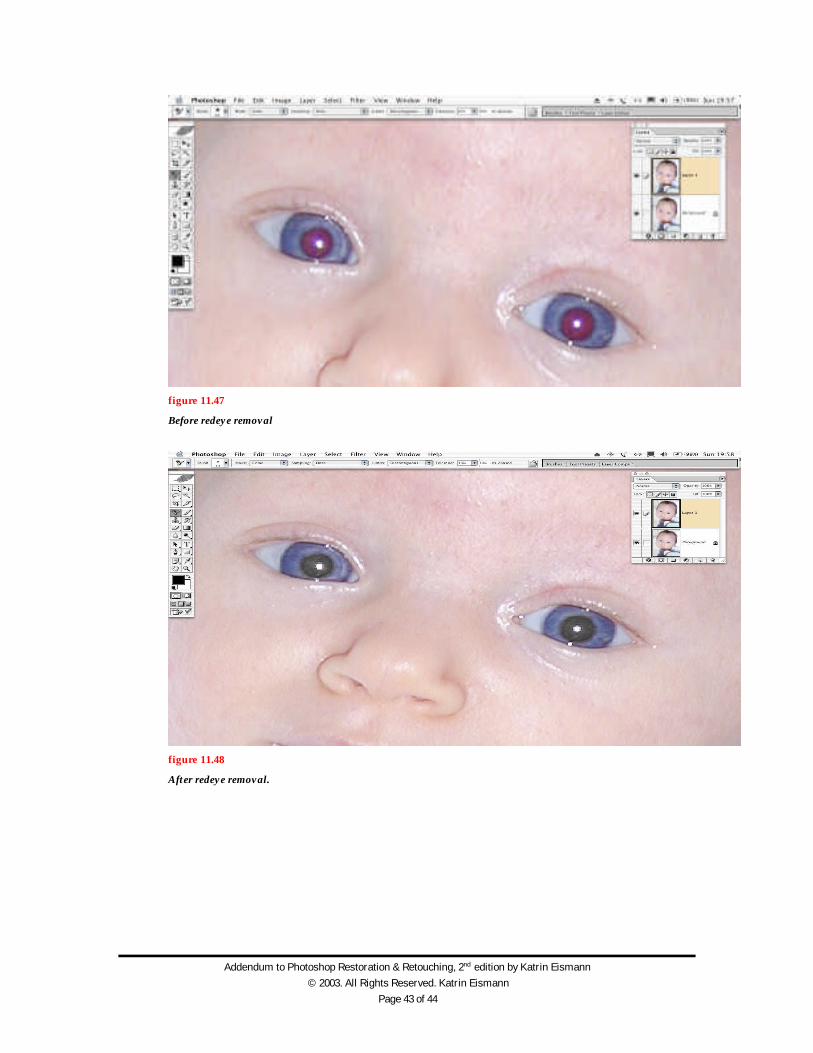
• Nested under the Healing brush is the Color Replacement brush. This is a useful tool toquickly remove red eye caused on on-camera flash or to clean up color artifacts anddiscolorization.
To remove red eye.
1. Duplicate the background layer and zoom in on the eye or area to be repaired(figure 11.47).
2. Select the Color Replacement tool and choose a brush tip from the options barthat is smaller than the red area of the eye.
3. In the options bar make sure that Color is selected. For the Sampling option,choose Once to erase only areas containing the color that you target. For theLimits option, select Discontiguous to replace the sampled color wherever itoccurs under the brush. Drag the Tolerance slider to a low value (around 30percent) to replace only the few colors very similar to the pixels you click.
4. Typically, black is a good choice, but you could try other colors to more closelyresemble a person's eye color. To choose a color, click the foreground colorswatch in the toolbox. In the color picker, choose a color that looks good, andthen click OK.
5. Click once on the color you want to replace in the image. Drag over the red withblack to repair the image to achieve the results seen in figure 11.48. If all thered isn't removed, try increasing the Tolerance level in the options bar to correctmore shades of red.
Addendum to Photoshop Restoration & Retouching, 2nd edition by Katrin Eismann
© 2003. All Rights Reserved. Katrin Eismann
Page 43 of 44
figure 11.47
Before redeye removal
figure 11.48
After redeye removal.
Addendum to Photoshop Restoration & Retouching, 2nd edition by Katrin Eismann
© 2003. All Rights Reserved. Katrin Eismann
Page 44 of 44
Closing Thoughts
In addition to the broad-brush stroke approach of this addendum, Photoshop CS includes manysmaller but not less important improvements: a New document interface, support for videoprofessionals, a photo-realistic Lens Blur filter, Layer Comps to organize and view layers,nested layers, a Filter Gallery interface, type on a path functions, and an intriguing ‘How to’function that lets you write tips and techniques that will appear in the Photoshop Help menu.
All in all, the Photoshop CS offer powerful and subtle features to help you improve and createimages. No one is suggesting that you take bad pictures on purpose – but now you will be able toimprove those photos that didn’t turn out the way you expected.