Parallels® Virtual Automation...
37
Parallels ® Virtual Automation 4.5 Getting Started Guide Copyright © 1999-2009 Parallels, Inc.
Transcript of Parallels® Virtual Automation...

Parallels® Virtual Automation 4.5 Getting Started Guide
Copyright © 1999-2009 Parallels, Inc.

ISBN: N/A Parallels Holdings, Ltd. c/o Parallels Software, Inc. 13755 Sunrise Valley Drive Suite 600 Herndon, VA 20171 USA Tel: +1 (703) 815 5670 Fax: +1 (703) 815 5675 Copyright © 1999-2009 Parallels Holdings, Ltd. and its affiliates. All rights reserved. Parallels, Coherence, Parallels Transporter, Parallels Compressor, Parallels Desktop, and Parallels Explorer are registered trademarks of Parallels Software International, Inc. Virtuozzo, Plesk, HSPcomplete, and corresponding logos are trademarks of Parallels Holdings, Ltd. The Parallels logo is a trademark of Parallels Holdings, Ltd. This product is based on a technology that is the subject matter of a number of patent pending applications. Virtuozzo is a patented virtualization technology protected by U.S. patents 7,099,948; 7,076,633; 6,961,868 and having patents pending in the U.S. Plesk and HSPcomplete are patented hosting technologies protected by U.S. patents 7,099,948; 7,076,633 and having patents pending in the U.S. Distribution of this work or derivative of this work in any form is prohibited unless prior written permission is obtained from the copyright holder. Apple, Bonjour, Finder, Mac, Macintosh, and Mac OS are trademarks of Apple Inc. Microsoft, Windows, Microsoft Windows, MS-DOS, Windows NT, Windows 95, Windows 98, Windows 2000, Windows XP, Windows 2003 Server, Windows Vista, Windows 2008, Microsoft SQL Server, Microsoft Desktop Engine (MSDE), and Microsoft Management Console are trademarks or registered trademarks of Microsoft Corporation. Linux is a registered trademark of Linus Torvalds. Red Hat is a registered trademark of Red Hat Software, Inc. SUSE is a registered trademark of Novell, Inc. Solaris is a registered trademark of Sun Microsystems, Inc. X Window System is a registered trademark of X Consortium, Inc. UNIX is a registered trademark of The Open Group. IBM DB2 is a registered trademark of International Business Machines Corp. SSH and Secure Shell are trademarks of SSH Communications Security, Inc. MegaRAID is a registered trademark of American Megatrends, Inc. PowerEdge is a trademark of Dell Computer Corporation. eComStation is a trademark of Serenity Systems International. FreeBSD is a registered trademark of the FreeBSD Foundation. Intel, Pentium, Celeron, and Intel Core are trademarks or registered trademarks of Intel Corporation. OS/2 Warp is a registered trademark of International Business Machines Corporation. VMware is a registered trademark of VMware, Inc. All other marks and names mentioned herein may be trademarks of their respective owners.
3
Contents
Introduction 4 Getting Help .................................................................................................................................................4 Feedback.......................................................................................................................................................5
Installing Parallels Virtual Automation 6 System Requirements ...................................................................................................................................6
Software Requirements......................................................................................................................7 Hardware Requirements ..................................................................................................................10
Installing on Parallels Server Bare Metal ...................................................................................................11 Installing on Windows................................................................................................................................12 Installing on Linux......................................................................................................................................13
Parallels Virtual Automation Basics 14 Parallels Virtual Automation Infrastructure................................................................................................15 Getting Started ............................................................................................................................................16 Interface Overview .....................................................................................................................................18
Managing Physical Servers 20 Registering Physical Servers ......................................................................................................................21 Logging in to Physical Servers ...................................................................................................................22 Monitoring Physical Server Resources .......................................................................................................23 Rebooting Physical Server..........................................................................................................................24 Managing Parallels Licenses ......................................................................................................................25
Managing Virtual Environments 26 Creating Virtual Environments ...................................................................................................................26
Creating Virtual Machines...............................................................................................................27 Creating Containers .........................................................................................................................29
Starting and Stopping Virtual Environments ..............................................................................................31 Logging into Virtual Environments ............................................................................................................32
Logging in to Virtual Machines.......................................................................................................32 Logging in to Containers .................................................................................................................32
Deleting Virtual Environments ...................................................................................................................33
Glossary 34
Index 36
4
C H A P T E R 1
Introduction
Parallels Virtual Automation is a flexible and easy-to-use administration tool designed for managing physical servers with Parallels Virtuozzo Containers and Parallels Server Bare Metal software. With Parallels Virtual Automation, you can create groups of physical servers and perform both collective and individual administration operations on these groups. Moreover, you can also manage the virtual environments residing on the registered physical servers: their productivity and resources, system tasks and processes, configuration, and much more. To work with the registered physical servers and their virtual environments, you will need a standard Web browser running on any platform.
This guide is aimed at a wide range of users who are new to Parallels Virtual Automation or just want to make sure they are doing everything right.
You can read more about Parallels Virtual Automation and its functionality in Parallels® Virtual Automation Administrator's Guide.
In This Chapter Getting Help.......................................................................................................................... 4 Feedback ............................................................................................................................... 5
Getting Help Parallels Virtual Automation offers several options for accessing necessary information:
Parallels Virtual Automation documentation Parallels Virtual Automation Administrator's Guide. This document contains extensive
information about the product, its usage and troubleshooting. To access the PDF version of the document, go to the Support link in the left pane and then click the Downloads pane. You can download any document of the Parallels Virtual Automation documentation bundle from the Parallels website.
Parallels Virtual Automation Installation Guide. This document contains extensive information on system requirements for physical computers and instructions how to install Parallels Virtual Automation components on them.
Getting Started With Parallels Virtual Automation. This document contains the basic information how to install, launch and manage Parallels Virtual Automation.
Parallels Power Panel User's Guide. This document contains extensive information about the Power Panel application.
Parallels Virtual Automation Upgrade Guide. This document contains instructions on how to upgrade from Parallels Infrastructure Manager 4.0 to Parallels Virtual Automation 4.5.
Introduction 5
Context-sensitive help
You can open a help page for the current screen by clicking the Help link in the right upper corner.
Parallels Web Site
Parallels web site http://www.parallels.com. Explore the Support web page that includes product help files and the FAQ section.
Parallels Knowledge Base
Parallels Knowledge Base http://kb.parallels.com. This online resource comprises valuable articles about using the Parallels Virtual Automation 4.5, Parallels Virtuozzo Containers and Parallels Server Bare Metal products.
Feedback If you spot a typo in this guide, or if you have thought of a way to make this guide better, we would love to hear from you!
The ideal place for your comments and suggestions is the Parallels documentation feedback page (http://www.parallels.com/en/support/usersdoc/).

6
C H A P T E R 2
Installing Parallels Virtual Automation
Installing Parallels Virtual Automation components is a quick and easy procedure, that comprises basic steps: starting Parallels Virtual Automation installer, configuring installation options, selecting the Parallels Virtual Automation components to be installed.
Parallels Virtual Automation components can be installed either via the Parallels Virtual Automation autoinstaller or from the Parallels Virtual Automation installation archives that you should download on your physical servers. This guide contains instructions on how to install Parallels Virtual Automation via the autoinstaller. If you choose to install from the archives, please, turn to the Parallels Virtuozzo Automation Installation Guide.
To have a clear structure of the Parallels Virtual Automation components and to understand where to install every component, you can refer to the Parallels Virtual Automation Infrastructure (p. 15) section.
In This Chapter System Requirements............................................................................................................ 6 Installing on Parallels Server Bare Metal.............................................................................. 11 Installing on Windows .......................................................................................................... 12 Installing on Linux ................................................................................................................ 13
System Requirements In most cases, there are no special requirements for the physical servers on which you want to install Parallels Virtual Automation components. However, we strongly recommend you to read the following information carefully, so that you can ensure a successful installation of the product.

Installing Parallels Virtual Automation 7
Software Requirements
Software Requirements for PVA Client Computer
A Client computer (p. 15) should have one of the supported Web-browser clients:
Internet Explorer 6.x and above for Windows; Mozilla Firefox 2.x and 3.x for all platforms; Safari 3.x for Mac;
Although other browsers will most likely work, only those listed above have been extensively tested for compatibility with Parallels Virtual Automation.
Software Requirements for PVA Slave Server
If a Windows- or Linux-based computer serves as a Slave Server (p. 15) where virtual environments will be stored and managed, then Parallels Virtual Automation will call for more complex requirements, as the creation and management of Containers demand more complex software resources. So, in choosing an appropriate Windows- and Linux-based computer, you should be guided by the Parallels Virtuozzo Containers system requirements. For the detailed and more concrete information on the requirements, see Parallels® Virtuozzo Containers for Linux and Parallels® Virtuozzo Containers for Windows user guides.
Software Requirements for PVA Master Server
If a Windows-based computer serves as a Master Server, it should be free from a any software virtualization technology and can have an operating system with the following characteristics:
x86 full versions of Windows Server 2008 with or without Hyper-V:
- Windows Server 2008 with Service Pack 1 or Service Pack 2, Enterprise Edition (US English)
- Windows Server 2008 with Service Pack 1 or Service Pack 2, Standard Edition (US English)
- Windows Server 2008 with Service Pack 1 or Service Pack 2, Datacenter Edition (US English)
- Windows Server 2008 with Service Pack 2, Enterprise Edition (French, German, Japan, Italian, Korean, Spanish, Russian, and Simplified Chinese)
- Windows Server 2008 with Service Pack 2, Standard Edition (French, German, Japan, Italian, Korean, Spanish, Russian, and Simplified Chinese)
- Windows Server 2008 with Service Pack 2, Datacenter Edition (French, German, Japan, Italian, Korean, Spanish, Russian, and Simplified Chinese)
x86 full versions of Windows Server 2008 without Hyper-V:
- Windows Server 2008 with Service Pack 1, Datacenter Edition (German and Simplified Chinese)
x86 versions of Windows Server 2003:
Installing Parallels Virtual Automation 8
- Standard or Enterprise Edition of Windows Server 2003 Service Pack 1 with or without R2: US English, German, French, Korean, Spanish, Traditional Chinese, Simplified Chinese, or Japanese
- Standard or Enterprise Edition of Windows Server 2003 Service Pack 2 with or without R2: US English, German, French, Italian, Korean, Russian, Spanish, Traditional Chinese, Simplified Chinese, or Japanese
- Standard or Enterprise Edition of Windows Server 2003 Service Pack 2 (Russian)
- Datacenter Edition of Windows Server 2003 Service Pack 1 with or without R2 (US English)
- Datacenter Edition of Windows Server 2003 Service Pack 2 with or without R2 (US English)
x64 full versions of Windows Server 2008 with or without Hyper-V:
- Windows Server 2008 with Service Pack 1 or Service Pack 2, Enterprise Edition (US English)
- Windows Server 2008 with Service Pack 1 or Service Pack 2, Standard Edition (US English)
- Windows Server 2008 with Service Pack 1 or Service Pack 2, Datacenter Edition (US English)
- Windows Server 2008 with Service Pack 2, Enterprise Edition (French, Japan, Italian, Korean, Spanish, Russian, and Simplified Chinese)
- Windows Server 2008 with Service Pack 2, Standard Edition (French, German, Japan, Italian, Korean, Spanish, Russian, and Simplified Chinese)
- Windows Server 2008 with Service Pack 2, Datacenter Edition (French, German, Japan, Italian, Korean, Spanish, Russian, and Simplified Chinese)
X64 full versions of Windows Server 2008 without Hyper-V:
- Windows Server 2008 with Service Pack 1, Datacenter Edition (German and Simplified Chinese)
x64 versions of Windows Server 2003:
- Standard or Enterprise Edition of Windows Server 2003 x64 Service Pack 1 with or without R2 (US English or Japanese)
- Standard or Enterprise Edition of Windows Server 2003 x64 Service Pack 2 with or without R2 (US English, French, German, Japanese, Italian, Korean, Simplified Chinese, Spanish, or Traditional Chinese)
- Standard or Enterprise Edition of Windows Server 2003 x64 Service Pack 2 (Russian)
- Datacenter Edition of Windows Server 2003 x64 Service Pack 1 with or without R2 (US English)
- Datacenter Edition of Windows Server 2003 x64 Service Pack 2 with or without R2 (US English)
- Datacenter Edition of Windows Server 2003 x64 with Service Pack 2 (Japanese)

Installing Parallels Virtual Automation 9
If a Linux-based computer serves as a Master Server, it should be a physical server without any software virtualization technology running IA64 versions of RHEL5, RHEL4, SLES10, CentOS4.
If a Parallels Server Bare Metal computer serves as a Master Server, it should have a Parallels Container created by means of the Parallels Virtuozzo Containers product. This Container will be used as the hosting computer for the PVA Management Server component.
A Linux- and Windows-based computer may also serve as a Master Server even if it has a software virtualization product installed (Parallels Virtuozzo Containers). In this case, you should create a Container and start the PVA Management Server component installation there. The Linux Container should be created on the basis of the ve-slm.2048MB.conf-sample template, whereas a Windows Container needs no special sample to be created.
Note: At the moment, Parallels Virtual Automation doesn't support Security Enhanced (SE) Linux, so make sure its working mode is set to Permissive before trying to install the product. To set the SE Linux mode to Permissive, enter the following command: /usr/bin/setenforce Permissive.
Any physical server that will be managed via PVA should have a virtualization technology installed: Parallels Virtuozzo Containers software for Linux- and Windows-based computers and Parallels Serve Bare Metal software for a bare metal computer.
Note: The software requirements above serve as additional requirements and are true for the proper functioning of Parallels Virtual Automation only. Correct work of virtual environments is guaranteed by adhering to the system requirements of the Parallels Virtuozzo Containers product.
Installing Parallels Virtual Automation 10
Hardware Requirements If a Windows-based, Linux-based, or Parallels Server bare metal computer serves as a Master Server, there are no special requirements for it. However, you can use the following list of the basic hardware requirements as a checklist:
Intel Celeron, Pentium III, Pentium 4, Xeon, or AMD Athlon CPU; at least 1 GB of RAM; hard drive with at least 15 GB of free disk space; network card.
If a Windows-based, Linux-based, or Parallels Server bare metal computer serves as a Slave Server where virtual environments will be stored and managed, then Parallels Virtual Automation will call for more complex hardware. The general considerations regarding the configuration of your physical servers could be as follows:
CPUs. The more virtual environments you plan to run simultaneously, the more CPUs you need.
Memory. The more memory you have, the more virtual environments you can run. The exact figure depends on the number and nature of applications you are planning to run in your virtual environments.
Disk space. Each virtual environment occupies 40–150 MB of hard disk space for system files in addition to the user data inside the virtual environment (for example, web site content). You should consider it when planning disk partitioning and the number of virtual environments to run.
Intel VT-x or AMD-V hardware virtualization technology support (for Parallels Server Bare Metal virtual machines management).
For the detailed and more concrete information on the requirements for the physical computer, see Parallels® Server Bare Metal Administration Guide, Parallels® Virtuozzo Containers for Linux and Parallels® Virtuozzo Containers for Windows User Guides.
Installing Parallels Virtual Automation 11
Installing on Parallels Server Bare Metal
You can install Parallels Virtual Automation on your Parallels Server Bare Metal physical server using the autoinstaller. The autoinstaller scans the physical server and offers to download and to install only those Parallels Virtual Automation components that can be installed on this server. Thus, the autoinstaller saves the downloading time and the disk space.
The installation procedure consists of the following steps:
1 Download the necessary autoinstaller to the physical server where you are going to install Parallels Virtual Automation.
2 Go down to the directory, where the autoinstaller is stored.
3 Start the autoinstaller by executing the following command: # ./autoinstaller_file_name
In the above command, autoinstaller_file_name stands for the name of the autoinstaller file.
4 In the Welcome to pva-setup window, click Configure to specify the Internet repository information and the local download directory to which you want to upload the files. After you have specified the necessary information, click OK and then Next to proceed with the installation.
5 In the Choose installation type window, choose the installation type. By default, you are offered to install
PVA Agent for Virtuozzo and PVA Agent for Parallels Server components;
PVA Power Panel component.
Note: Installing Power Panel component is optional, whereas installing both PVA Agents is obligatory.
SNMP component. This component can be installed on the physical server only if the net-snmp >= 5.1.1-3 package is present on the server.
Click Next to start the installation. Keep in mind that, by default, the wizard will install both the PVA Agents and PVA Power Panel components. If you want to deselect PVA Power Panel or select the SNMP component, select Custom installation and click Next. Pass on to the next step.
6 After you have selected Custom installation and clicked Next, you will see the Choose components to install window displayed. Choose the component for the installation.
7 Click Next to start the installation.
For the instructions on how to install Parallels Virtual Automation from the installation archive, refer to the Parallels Virtual Automation Installation Guide.
Installing Parallels Virtual Automation 12
Installing on Windows You can install Parallels Virtual Automation components on your Windows-based physical server using the autoinstaller. The autoinstaller scans the physical server and offers to download and to install only those Parallels Virtual Automation components that can be installed on this server. Thus, the autoinstaller saves the downloading time and the disk space.
The installation procedure consists of the following steps:
1 Download the necessary autoinstaller to the physical server where you are going to install Parallels Virtual Automation components.
2 Start the autoinstaller by double-clicking it.
3 In the Welcome window, click Configure Settings to specify the Internet repository information and the local download directory to which you want to upload the Parallels Virtual Automation installation files.
When the necessary information is specified, click Next to proceed with the installation.
4 In the Choose Setup Type window, choose the installation type. The components for the default installation may differ. This depends whether the physical server is clean or already has any software virtualization technology installed on it.
If the physical server is clean (i.e. has no software virtualization technology installed), you will be offered to install the PVA Management Server component by default. Click Next to start the installation. If you want to change the destination folder for the Management Server component, choose Custom installation and click Next.
If the physical server has Parallels Virtuozzo Containers for Windows installed, you will be offered to install the PVA Agent for Virtuozzo component. Keep in mind that, by default, the wizard installs both the PVA Agent for Virtuozzo and PVA Power Panel components. Additionally, you can select the SNMP component for installation.
If you want to install only PVA Agent and Power Panel components, click Next to start the installation. If you want to deselect PVA Power Panel or select the SNMP component, select Custom installation and click Next to specify the components which will be installed. Pass on to the next step.
5 After you have selected Custom installation, you will see the Choose components to install window displayed. You can manually select where the program files will be placed by typing the path in the Choose destination folder field.
6 Click Next to start the installation.
For the instructions on how to install Parallels Virtual Automation from the installation archive, refer to the Parallels Virtual Automation Installation Guide.
Installing Parallels Virtual Automation 13
Installing on Linux You can install Parallels Virtual Automation on your Linux-based physical server using the autoinstaller. The autoinstaller scans the physical server and offers to download and to install only those Parallels Virtual Automation components that can be installed on this server. Thus, the autoinstaller saves the downloading time and the disk space.
The installation procedure consists of the following steps:
1 Download the necessary autoinstaller to the physical server where you are going to install Parallels Virtual Automation.
2 Go down to the directory, where the autoinstaller is stored.
3 Start the autoinstaller by executing the following command: # ./autoinstaller_file_name
In the above command, autoinstaller_file_name stands for the name of the autoinstaller file.
4 In the Welcome to pva-setup window, click Configure to specify the Internet repository information and the local download directory to which you want to upload the files. After you have specified the necessary information, click OK and then Next to proceed with the installation.
5 In the Choose installation Type window, choose the installation type. The component for the default installation may differ. This depends on whether the physical server is clean or already has any software virtualization technology installed on it.
If the physical server is clean (i.e. has no software virtualization technology installed), you will be offered to install the PVA Management Server component by default. Click Next to start the installation. If you want to change the destination folder for the Management Server component, choose Custom installation and click Next.
If the physical server has Parallels Virtuozzo Containers installed, you will be offered to install the PVA Agent for Virtuozzo component. Keep in mind that, by default, the wizard will install both the PVA Agent for Virtuozzo and PVA Power Panel component. Additionally, you can install SNMP component. This component can be installed on the physical server only if the net-snmp >= 5.1.1-3 package is present on the server. If you want to deselect PVA Power Panel or select SNMP component, select Custom installation and click Next. Pass on to the next step.
6 After you have selected Custom installation, you will see the Choose components to install window displayed. Choose the component to be installed and, if necessary, change the default destination folder for the components installed.
7 Click Next to start the installation.
For the instructions on how to install Parallels Virtual Automation from the installation archive, refer to the Parallels Virtual Automation Installation Guide.
14
C H A P T E R 3
Parallels Virtual Automation Basics
The main thing about Parallels Virtual Automation you should know before starting to use it, is that Parallels Virtual Automation is a Web service that enables you to manage physical servers and the virtual environments residing on them over a network. This means that Parallels Virtual Automation is not a conventional application you can launch by opening an EXE or RPM file, but rather a low-level software that enables you to remotely access physical servers and the virtual environments they host via LAN or Internet.
Parallels Virtual Automation is an advanced, yet an easy-to-use tool, that couples intuitive interface with extensive functionality. With Parallels Virtual Automation, you can manage separate physical servers and each of their virtual environments, organize servers into server groups and administer the resulting units; supervise user accounts and privileges, and much more. For more information about the Parallels Virtual Automation features, see Parallels® Virtual Automation Administrator's Guide.
This chapter provides basic information about the Parallels Virtual Automation concept and usage.
In This Chapter Parallels Virtual Automation Infrastructure.......................................................................... 15 Getting Started ...................................................................................................................... 16 Interface Overview................................................................................................................ 18
Parallels Virtual Automation Basics 15
Parallels Virtual Automation Infrastructure
With Parallels Virtual Automation, you can easily deploy an effectively functioning virtual infrastructure that can help you to significantly reduce your costs in terms of time and resources. While Parallels software virtualization products enable you to create complex formations of virtual environments, you may find it hard to manage these formations using different management tools. However, with Parallels Virtual Automation you can handle this challenging task with ease. Since Parallels Virtual Automation supports the whole set of the Parallels products, you can use it with any of its virtualization solutions, be it Parallels Virtuozzo Containers or Parallels Server virtual machines.
Of course, if you work with only one software virtualization product, you can just as well use the native management tool – Parallels Management Console (PMC) – designed to manage either Parallels Virtuozzo Containers or Parallels Server Virtual Machines. However, if you build up your infrastructure with both software- and hardware-based virtualization, you need a more sophisticated tool for managing such infrastructure.
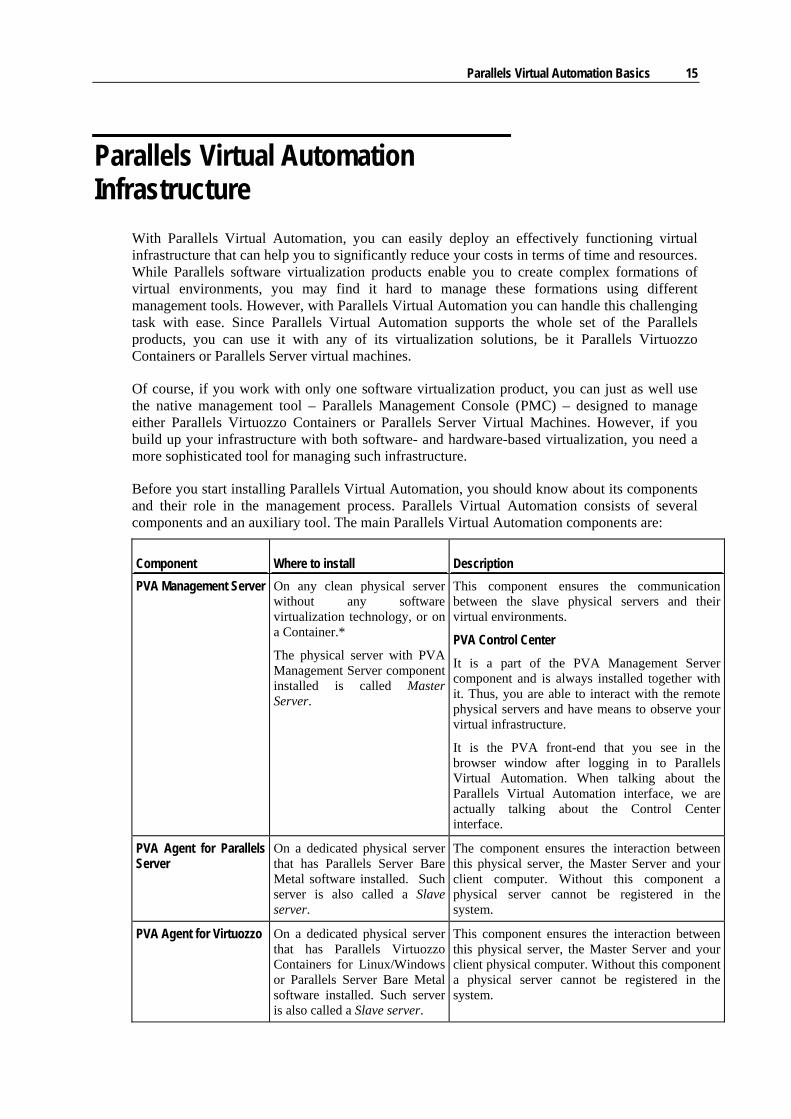
Before you start installing Parallels Virtual Automation, you should know about its components and their role in the management process. Parallels Virtual Automation consists of several components and an auxiliary tool. The main Parallels Virtual Automation components are:
Component Where to install Description PVA Management Server On any clean physical server
without any software virtualization technology, or on a Container.*
The physical server with PVA Management Server component installed is called Master Server.
This component ensures the communication between the slave physical servers and their virtual environments.
PVA Control Center It is a part of the PVA Management Server component and is always installed together with it. Thus, you are able to interact with the remote physical servers and have means to observe your virtual infrastructure.
It is the PVA front-end that you see in the browser window after logging in to Parallels Virtual Automation. When talking about the Parallels Virtual Automation interface, we are actually talking about the Control Center interface.
PVA Agent for Parallels Server
On a dedicated physical server that has Parallels Server Bare Metal software installed. Such server is also called a Slave server.
The component ensures the interaction between this physical server, the Master Server and your client computer. Without this component a physical server cannot be registered in the system.
PVA Agent for Virtuozzo On a dedicated physical server that has Parallels Virtuozzo Containers for Linux/Windows or Parallels Server Bare Metal software installed. Such server is also called a Slave server.
This component ensures the interaction between this physical server, the Master Server and your client physical computer. Without this component a physical server cannot be registered in the system.
Parallels Virtual Automation Basics 16
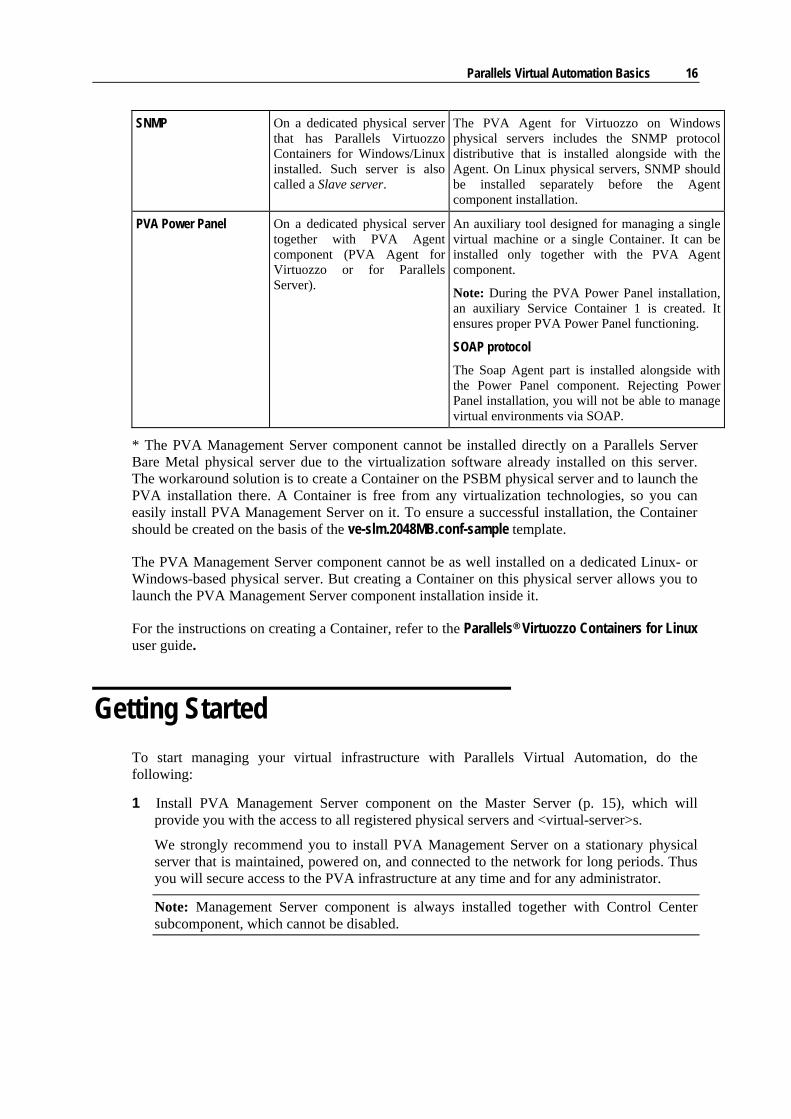
SNMP On a dedicated physical server that has Parallels Virtuozzo Containers for Windows/Linux installed. Such server is also called a Slave server.
The PVA Agent for Virtuozzo on Windows physical servers includes the SNMP protocol distributive that is installed alongside with the Agent. On Linux physical servers, SNMP should be installed separately before the Agent component installation.
PVA Power Panel On a dedicated physical server together with PVA Agent component (PVA Agent for Virtuozzo or for Parallels Server).
An auxiliary tool designed for managing a single virtual machine or a single Container. It can be installed only together with the PVA Agent component.
Note: During the PVA Power Panel installation, an auxiliary Service Container 1 is created. It ensures proper PVA Power Panel functioning.
SOAP protocol The Soap Agent part is installed alongside with the Power Panel component. Rejecting Power Panel installation, you will not be able to manage virtual environments via SOAP.
* The PVA Management Server component cannot be installed directly on a Parallels Server Bare Metal physical server due to the virtualization software already installed on this server. The workaround solution is to create a Container on the PSBM physical server and to launch the PVA installation there. A Container is free from any virtualization technologies, so you can easily install PVA Management Server on it. To ensure a successful installation, the Container should be created on the basis of the ve-slm.2048MB.conf-sample template.
The PVA Management Server component cannot be as well installed on a dedicated Linux- or Windows-based physical server. But creating a Container on this physical server allows you to launch the PVA Management Server component installation inside it.
For the instructions on creating a Container, refer to the Parallels® Virtuozzo Containers for Linux user guide.
Getting Started To start managing your virtual infrastructure with Parallels Virtual Automation, do the following:
1 Install PVA Management Server component on the Master Server (p. 15), which will provide you with the access to all registered physical servers and <virtual-server>s.
We strongly recommend you to install PVA Management Server on a stationary physical server that is maintained, powered on, and connected to the network for long periods. Thus you will secure access to the PVA infrastructure at any time and for any administrator.
Note: Management Server component is always installed together with Control Center subcomponent, which cannot be disabled.

Parallels Virtual Automation Basics 17
2 Install the PVA Agent for Parallels Server or PVA Agent for Virtuozzo on the physical servers you want to manage. The choice on the PVA component depends on the software virtualization product which is already installed on the physical server. After you have installed these components, you can register the physical server in the Master Server.
Note: Power Panel is installed together with PVA Agents by default, but can be disabled on your wish.
3 On the Master Server or any other computer, open the available Web browser and log in to Parallels Virtual Automation by typing the Management Server IP address( or hostname) and the open TCP port (default port is 4648) in the address bar. The resulting line may look like as follows: https://10.50.120.70:4648.
When logging in from the Management Server, replace the IP address with localhost.
Note: You can access the Management Server and, therefore, all Parallels Virtual Automation functionality from any computer on the network, irrespective whether it has any Parallels Virtual Automation components installed or not. The point is that as soon as you connect to the Management Server, you automatically connect to its Control Center and thus can use it remotely.
4 When the browser displays the login window, type your user name and password and click the Login button. To log in as an administrator, provide the administrative credentials for the operating system installed on the Master Server.
5 Now that you have successfully logged in to Parallels Virtual Automation, you can deploy your virtual infrastructure by registering the required physical servers and creating virtual environments. The following section - Interface Overview (p. 18) - will help you to get accustomed to the Parallels Virtual Automation interface, while the Managing Virtual Environments (p. 26) and the Managing Physical Servers (p. 20) chapters will introduce the basic management operations.

Parallels Virtual Automation Basics 18
Interface Overview The Parallels Virtual Automation interface has been designed to let the physical server administrator quickly perform all possible tasks through an intuitive navigation system.
The main components of the Parallels Virtual Automation interface are the following:
The left menu frame listing and allowing access to all your physical servers and virtual environments. The left menu also allows access to the main types of operations to be performed on them with the help of Parallels Virtual Automation.
The toolbar on top of the right frame enabling you to perform the basic actions on your physical servers and virtual environments. The set of the toolbar buttons varies depending on the type of the object you explore, for example, Infrastructure, Resource Library, or Setup menu items.
The content part on the right frame displays a summary for the object you select, be it a physical server, a virtual environment, or a template. The content part may consist of several tabs, each containing more detailed object information and links to advanced actions.
The Tasks pane at the bottom of the right frame allowing you to view all the operations recently finished and running at the moment, their start times, the objects they are applied to, their statuses, progress information and other details. The pane is minimized by default. To expand it, click Tasks at the bottom of the screen.
The picture below illustrates the interface layout:
Figure 1: Interface Overview - Viewing Interface Summary Tab
As you can see from the picture, the left menu frame contains several menus:

Parallels Virtual Automation Basics 19
Infrastructure Displays the physical structure of your registered physical servers (Parallels Virtual Automation infrastructure) in the form of a hierarchical tree with physical servers as its upper levels and the virtual environments hosted on them as lower levels. Using the Infrastructure context menu or toolbar, you can arrange the physical servers into groups, thus making the servers management more convenient.
Note: Although you can create and rearrange Server Groups in the Infrastructure menu, each physical server can be located in only one group at a time. If the Server Group arrangement requires adding the same server to two or more different groups, use the Logical View for viewing and managing your servers.
Each of the physical servers and virtual environments that make up your Parallels Virtual Automation infrastructure displays its name on the Infrastructure-oriented left menu which, if clicked on, leads to its dashboard.
Logical View Displays the custom structure of the registered physical servers. The Logical View provides a flexible solution for Server Groups arrangement, as it enables you to add one and the same physical server to several groups or place virtual environments hosted on different servers in one folder.
Resource Library Provides quick access to the auxiliary information, such as IP Pools, available virtual environment templates, etc.
Management Provides access to the Parallels Virtual Automation management tools, such as the Scheduler or the Support error report tool.
Setup Provides access to the general configuration information, such as Licensing or Security settings.
By default, the left menu frame displays all available menu items from Infrastructure to Setup. However, you can change the menu layout by clicking any of the buttons placed on the bottom.
While the actual appearance of the Parallels Virtual Automation interface content part on the right frame is dictated by the tag opened at the moment, there are always two main operational levels: the virtual environments level and the physical servers level that determine its overall appearance and the available options. Both levels afford to perform operations on a single virtual environment or physical server, as well as multiple operations. Each time you click on a Datacenter, or on a Room, a Cage, a Rack on the left Parallels Virtual Automation menu, - the right pane loads a screen with the Summary, Physical Servers, Virtual Environments, Templates, Backups, and Security tabs; the Summary tab is opened by default.
20
C H A P T E R 4
Managing Physical Servers
As soon as you register a physical server in Parallels Virtual Automation, you can manage it. To be registered, the physical server should have
Parallels Virtuozzo Containers or Parallels Server Bare Metal software, used for hosting virtual environments (Containers and/or Virtual Machines), and
PVA Agent for Virtuozzo or Parallels Server accordingly.
The Parallels Virtual Automation functionality enables you to register and manage a number of physical Servers via PVA Control Center, group them under logical units and consolidate their IP addresses into an IP addresses pool.
The servers collectively registered in Parallels Virtual Automation are easier to manage because all of them are accessible from any computer when you log to the PVA Control Center. For information on registering physical servers, refer to the Registering Physical Servers section (p. 21).
Note: PVA Control Center is always installed together with PVA Management server Component.
When you find out that the number of registered servers (and, consequently, of virtual environments that run on them) has grown, you may consider dividing them into a number of logical units representing certain classes - the servers based on a certain architecture, hosted virtual environments of a particular type or purposes, etc. The IP addresses of the physical servers group united into an IP addresses pool present a more convenient distribution because, when assigning IP addresses to virtual environments, there will be no IP conflicts and no manually entering IP addresses - they will be selected from the pool.
On the Physical Servers screen, you can review the list of physical servers currently registered in Parallels Virtual Automation and see the servers details, such as the current operating system, its CPU and memory usage, etc.
Note: If this screen is loaded in the Logical View, the servers displayed in this table are those which have been added to the Logical View, otherwise the servers list is empty. To add a physical server to the Logical View, click Add on the Parallels Virtual Automation toolbar, select Physical Server from the menu and choose the server(s) on the screen it opens.
Below, there are several how-to's for basic management operations:
To manage any of the servers registered in PVA, click its name in the leftmost column of the table.
To display a certain server from a long list of servers, click the Show Search link on top of the table, enter the name of the server and click the Search link; to have the list of the servers back, click Reset Results.
To stop managing a physical server via PVA, select its checkbox and click Unregister.
Managing Physical Servers 21
To add a new server to the list of the physical servers registered in PVA, click the Add button on the main toolbar.
In This Chapter Registering Physical Servers................................................................................................. 21 Logging in to Physical Servers ............................................................................................. 22 Monitoring Physical Server Resources ................................................................................. 23 Rebooting Physical Server .................................................................................................... 24 Managing Parallels Licenses................................................................................................. 25
Registering Physical Servers You can register in Parallels Virtual Automation any Windows, Linux or bare metal computer providing there is a Parallels Virtuozzo Containers or Parallels Server Bare Metal installation on it. The newly registered physical servers will be displayed in the servers list on the Physical Servers screen and accessible for all the usual managing and monitoring operations Parallels Virtual Automation provides you with.
Besides this, the servers registered in Parallels Virtual Automation form a joint physical servers' pool which provides for the following collective actions:
creating a logical structure of physical servers and the virtual environments residing on them;
migrating virtual environments between physical servers; copying OS and application templates from one physical server to another; making Container templates stored on the Management Server available to other registered
physical servers; consolidating server IP addresses into a network address range.
Registering a new physical server for management via Parallels Virtual Automation is simple, and all it takes is entering the following information on the new server:
1 The server's valid IP address that will be used by Parallels Virtual Automation components to connect to this server. Enter this IP address to the Server Address field in the Connection to Physical Server section.
In case you do not remember the IP address of the required physical server running Parallels
Server or Parallels Server Bare Metal, you can click the Autosearch button to see a list of all physical servers, running Parallels Server or Parallels Server Bare Metal, connected to your network. To add a particular server, select its name from the list.
2 The administrative login and password to connect to the physical server as the administrator. Specify the credentials in the Administrative Login to Physical Server section.
3 Selecting the Force Registration checkbox in the Registration Options section is the option to choose when the physical server you are registering has already been and still is registered in another Server Group and you need it to be registered in your Server Group. If you forcibly register the server, it will be removed from the Server Group it currently belongs to.
Pressing the Register button initiates the registering procedure.
Managing Physical Servers 22
Logging in to Physical Servers If you are managing a physical server with the Windows operating system installed, you can
use Remote Desktop Connection - a standard Windows application - to connect to the physical server by means of the Remote Desktop Protocol (RDP).
Note. The feature is available only for Internet Explorer 5.0 or above.
To connect to a physical server via RDP, do the following:
1 Open the Remote Desktop window by clicking the Remote Desktop button on the Server's toolbar.
2 In the Remote Desktop window, click the Login button to open a Remote Desktop session.
If you are doing this for the first time, your browser may display a security warning asking you to install additional components. Click Yes and wait for the Remote Desktop terminal window to appear.
3 In this window, specify your user name and password you created for this Physical Server and click Enter to get connected to the physical server and start sending commands to the server via Remote Desktop.
If you are managing a Physical Server with the Linux operating system installed, you can use the Secure Shell (ssh) application to remotely connect to the Server and work inside its directory tree using standard Linux command line tools.
Note. The feature is available only for Internet Explorer 5.0 or above.
To connect to a Physical Server by ssh, do the following:
1 Open the SSH Connection window by clicking the Terminal Login button on the Server's toolbar.
2 In the SSH Connection window, specify your user name and password you created for this Physical Server and click Login to get connected.
If you are doing this for the first time, your browser may display a security warning asking you to install additional components. Click Yes and wait for the ssh terminal window to appear, whereupon you get connected to the Server and may start sending commands to it via ssh.
Managing Physical Servers 23
Monitoring Physical Server Resources
Parallels Virtual Automation enables you to monitor and manage not only the virtual environments operation, but also the physical servers resources. In Parallels Virtual Automation, you can view the current resource usage statistics and adjust the values to improve the performance of the physical server, as well as that of the virtual environments it hosts.
The overall CPU, disk and memory-related resources usage of the physical server registered in Parallels Virtual Automation are displayed on the physical server Dashboard.
The Disk Partitions and Memory sections inform you about the respective resources consumption on the physical server.
The information on the Disk Partitions size usage in all the Linux partitions or Windows logical disks existing on your physical server is presented in the following tables (corresponding to the number of partitions/logical disks):
Column Name Description Mount Point The name of the partition/logical disk using the resource.
Used Used amount of disk size in the partition/logical disk
Free Free amount of disk size in the partition/logical disk.
Total The total amount of disk size allocated for the partition/logical disk.
The information on the Memory usage is displayed in the following way:
Field Description Physical memory The percentage of the current physical server utilization in terms of
allocated memory.
Swap Space The percentage of the current physical server utilization in terms of allocated swap space. The bar is not displayed if swapping is not configured on the physical server.
RAM+Swap The simple average of the resources above.
If you need to free some of the resources, click the Resources tab. You will see which of the virtual environments hosted on the physical server consume the biggest piece of a corresponding resource. Then, depending on how important the operations run on these virtual environments are, you can suspend some of them. A suspended virtual environments stays put, and so its processes and services do, to be later resumed from the checkpoint. Suspending virtual environments is a good method to release the physical server recourses for a certain period of time or saving the state of current operations which can be quickly launched again later.
Note: Remember, that repairing, restarting and reinstalling a suspended virtual environment can change the saved state of the virtual environments, so these actions are not recommended.
Managing Physical Servers 24
Rebooting Physical Server Sometimes you may need to reboot your Physical Server, for example, if you have installed a new Linux kernel want to start using it.
Before rebooting the server, keep in mind that usually this process takes about 3-5 minutes. During this time, the physical server and all virtual environments residing on it will be unavailable.
To reboot the physical server, you can do one of the following:
Go to the Physical Servers page of the Infrastructure window, right-click the server name and select Reboot from the context menu.
Click the server name in the infrastructure tree to open the Physical Server page and select Reboot from the Tasks list.

Managing Physical Servers 25
Managing Parallels Licenses Physical servers running Parallels Virtuozzo Containers technology demand Parallels Containers licenses to create and work with Containers. Physical servers running Parallels Server Bare Metal technology demand Parallels Server Bare Metal license to create and work with virtual machines and Containers. You do not need to additionally install Parallels Containers license on PSBM physical servers to run Containers on them.
Any of the licenses can be installed either as a key string or as a text file with the help of the Install License Key or Install License File links, correspondingly. Whereas a license key can be installed directly on the target physical server, the license file first should be uploaded to Parallels Virtual Automation and only then it can be installed on the physical server.
A license includes a set of parameters, the full list of which (such as, the number of CPUs, virtual environments, or users your license allows you to have on the physical server) is available on the screen which opens if you click the key number of the license or the license serial number. If any of these parameters has been or will be changed (say, you upgraded your physical server with more CPUs, or want to extend the limit of the virtual environments that the physical server may host), you will need to update your physical server license as well.
You may also want to update the license if the data in the Status or Expiration columns suggest that you do. For example, if the Status column tells you that the license is invalid, or expired, or the expiration date displayed in the Expiration column is close, this is a good reason to update it. Finally, you can update your trial license. To update your license, select its checkbox on the list and click Refresh on the Parallels Virtual Automation toolbar.
The Licensing screen contains all the necessary information on the Parallels Virtuozzo Containers and Parallels Server Bare Metal product keys installed on physical servers that registered in Parallels Virtual Automation.
The Licenses table on shows the information on all your licenses:
Column Name Description Serial Number The string of symbols that serves for both activating the license and as an identifier
of the license on the physical server.
Key Number The key number of the license, which identifies the license on the Parallels Key Authentication (KA) server.
Hardware Node The physical server on which the license is installed.
Status The status of the license.
Expiration The expiration date and time of the license.
26
C H A P T E R 5
Managing Virtual Environments
When you have created the PVA infrastructure with all the necessary physical servers, you can pass on to creating and managing virtual environments. This section provides you with the information on creating Containers and virtual machines, as well as on how to log into them via outside applications and how to perform the main management operations.
In This Chapter Creating Virtual Environments ............................................................................................. 26 Starting and Stopping Virtual Environments ........................................................................ 31 Logging into Virtual Environments ...................................................................................... 32 Deleting Virtual Environments ............................................................................................. 33
Creating Virtual Environments This section provides basic instructions for creating a virtual environment using Parallels Virtual Automation.
You can create either a virtual machine or a Container. The two types belong to different software virtualization technologies and have a number of differences in their configuration settings.
When deciding on the new virtual environment type, you may consider the following points:
Containers are less resource consuming than virtual machines, as they do not emulate the physical server hardware.
Virtual machines require a guest OS to be installed after creation, while Containers are created with a guest OS and can be started right away.
The virtual machine OS, unlike a Container OS, does not depend on the physical serve OS. You can choose any operating system you need from the list of supported OSs for the virtual machine.
Each virtual environment configuration you make up during the creation process contains a number of advanced settings that you may skip when learning the basics of Parallels Virtual Automation. In case you would want to learn more about the advanced options, you can click
the Help button in the upper right-hand corner of the window, or see Parallels® Virtual Automation Administrator's Guide.
Managing Virtual Environments 27
Creating Virtual Machines Creation of a Parallels Server virtual machine is quite an easy process, during which you define basic virtual machine settings and create initial configuration that you can edit later from the virtual machine dashboard or with the help of Parallels Server.
To create a new virtual machine, perform the following actions:
1 Click the New button and select Virtual Environment from the drop-down list.
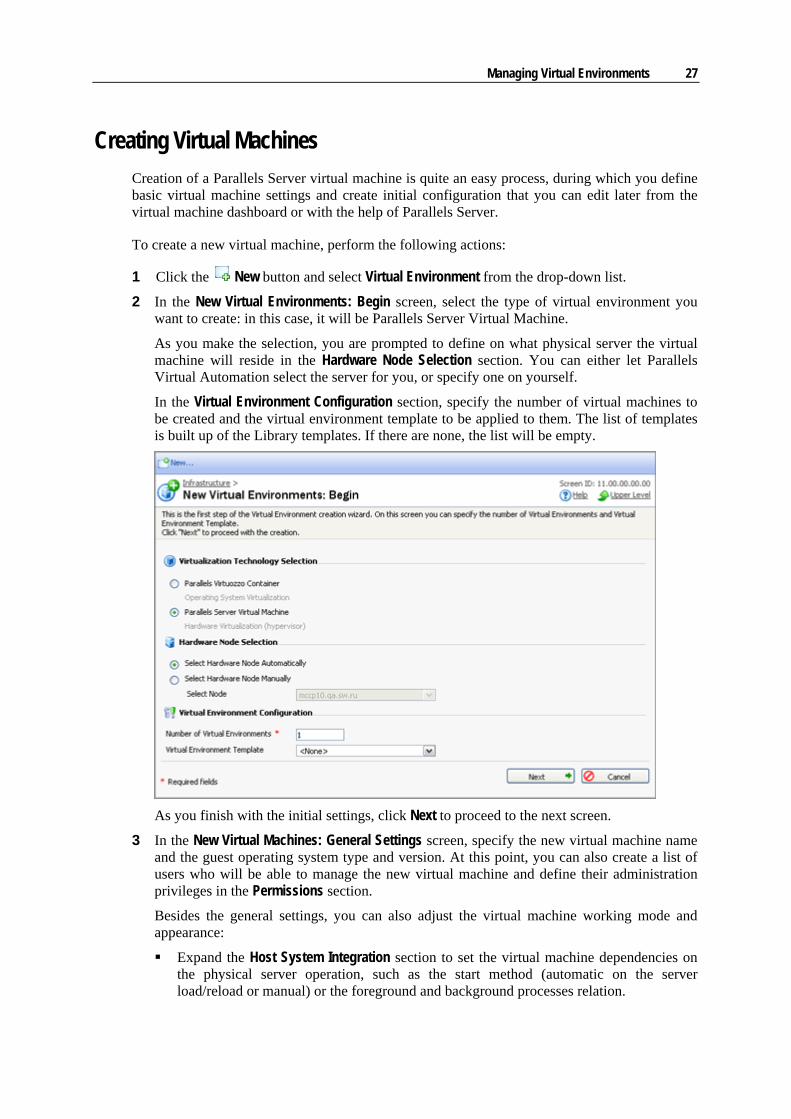
2 In the New Virtual Environments: Begin screen, select the type of virtual environment you want to create: in this case, it will be Parallels Server Virtual Machine.
As you make the selection, you are prompted to define on what physical server the virtual machine will reside in the Hardware Node Selection section. You can either let Parallels Virtual Automation select the server for you, or specify one on yourself.
In the Virtual Environment Configuration section, specify the number of virtual machines to be created and the virtual environment template to be applied to them. The list of templates is built up of the Library templates. If there are none, the list will be empty.
As you finish with the initial settings, click Next to proceed to the next screen.
3 In the New Virtual Machines: General Settings screen, specify the new virtual machine name and the guest operating system type and version. At this point, you can also create a list of users who will be able to manage the new virtual machine and define their administration privileges in the Permissions section.
Besides the general settings, you can also adjust the virtual machine working mode and appearance:
Expand the Host System Integration section to set the virtual machine dependencies on the physical server operation, such as the start method (automatic on the server load/reload or manual) or the foreground and background processes relation.

Managing Virtual Environments 28
To receive a full description on all sections on this page, refer to the Parallels Virtual Automation Administrator's Guide, see the Managing Virtual Environment --> Managing Virtual Machines section.
When finished, click Next to define the hardware settings, or click Create to apply the default hardware settings and create the virtual machine.
4 In the Hardware Settings screen, specify the characteristics of the new virtual machine hardware, such as the number of virtual CPUs, the amount of the Physical Server RAM to be used by the virtual machine, and various virtual devices settings. To view and edit the default settings, click the device name in the device panel to the left.
By default, the virtual devices you can set up in this step are the virtual machine hard disk, network adapter and CD/DVD-ROM. However, you can add more devices to the virtual machine configuration by clicking the Add Device button at the bottom of the devices panel. From the pop-up list that appears, select the required virtual hardware and click Add.
When you are done with the hardware settings, click Next to proceed.
5 In the Review screen, check the virtual machine configuration settings you have specified and either click Back to go back to the previous steps and change them, or click Create to schedule the new virtual machine creation task.
At this point, you will be redirected to the Virtual Environments tab of the Infrastructure screen. The information bar at the top of the screen informs you about the scheduled task and provides the Details link to the task progress information.
After the virtual machine is created, you can find it in the list of available virtual environments. If it doesn't appear, click the Refresh button and check again.
Managing Virtual Environments 29
Creating Containers The procedure of Parallels Container creation is a little bit more complicated than that of a Parallels virtual machine, since almost every window contains not only the basic configuration options, but also a number of advanced settings. The good thing about it is that you can easily skip the advanced options or simply use the default parameters that the Parallels Virtual Automation team has developed for your convenience. Or you may learn more about these
options by clicking the Help button and reading the corresponding help page.
In any case, you can always edit the Container configuration later from the Container dashboard or with the help of Parallel Virtuozzo Container software.
To create a new Container, perform the following actions:
1 Click the New button and select Virtual Environment from the drop-down list.
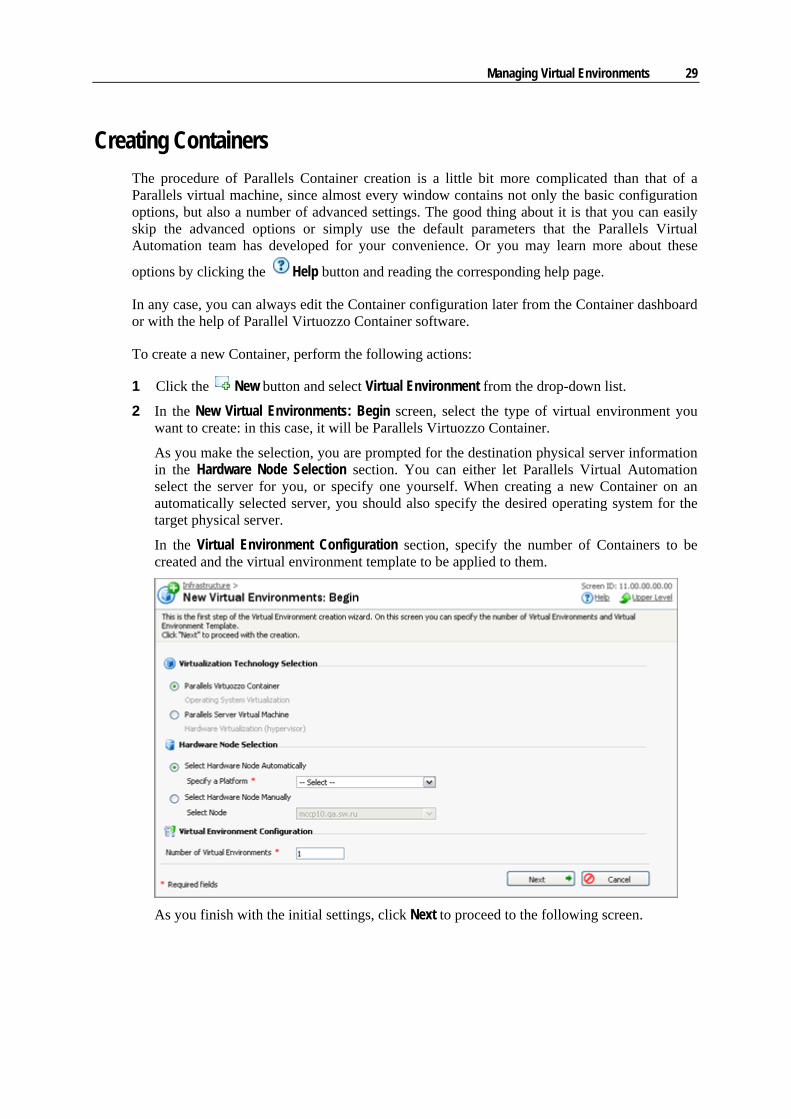
2 In the New Virtual Environments: Begin screen, select the type of virtual environment you want to create: in this case, it will be Parallels Virtuozzo Container.
As you make the selection, you are prompted for the destination physical server information in the Hardware Node Selection section. You can either let Parallels Virtual Automation select the server for you, or specify one yourself. When creating a new Container on an automatically selected server, you should also specify the desired operating system for the target physical server.
In the Virtual Environment Configuration section, specify the number of Containers to be created and the virtual environment template to be applied to them.
As you finish with the initial settings, click Next to proceed to the following screen.

Managing Virtual Environments 30
3 In the New Containers: Setup screen, specify the new Container name and the Virtuozzo OS template to be applied to create a Container.
It is also recommended to specify the administrative password at this point, so that you won't have to do this later. The default username for the administrator of the Containers with the Windows and Linux operating system will be Administrator and root respectively. Besides setting up the administrator credentials, you can make up a list of users who will be able to manage the Container and define their administration privileges in the Permissions section.
In this window, you can also configure a number of advanced settings found in the following sections:
Advanced Configuration section lists several customization options and advanced functions you can enable.
Terminal Services section enables you to define in which Windows TS mode (Remote Desktop for Administration and Terminal Server) the Container will operate and which licenses it will use.
Offline Management section enables you to define the services that will be available even when the physical server hosting your Container is down.
When finished, click Next to define the network settings, or click Create to apply the default settings and create the Container.
4 In the New Containers: Network Configuration screen, provide the connection information that will be used for connecting to the new Container, such as the Container hostname and its IP address. Click Next.
5 In the New Containers: Resources Customization screen, adjust the advanced settings concerning the Container CPU, memory and operating system parameters. Since setting up these values is quite a challenging task, you can use the default settings.
Note: If you'd like to learn more about the advanced options, you can click the Help button in the upper right-hand corner of the window, or see Parallels® Virtual Automation Administrator's Guide.
Managing Virtual Environments 31
6 In the New Containers: Application Selection screen, specify the applications you want to automatically install in the Container upon its creation. To select an application, select it in
the Available Applications list and click to move it to the Scheduled for Installation list, as shown below:
7 In the Review screen, check the Container configuration settings you have specified and either click Back to go back to the previous steps and change them, or click Create to schedule the new Container creation task.
At this point, you will be redirected to the Virtual Environments tab of the Infrastructure window. The information bar at the top of the window informs you about the scheduled task and provides the Details link to the task progress information:
After the Container is created, you can find it in the list of available virtual environments. If it doesn't appear, click the Refresh button and check again.
Starting and Stopping Virtual Environments
A virtual environment can be started up, restarted, paused, and shut down like an ordinary computer. Depending on the virtual environment state, only those operations are accessible that comply with its current state. For example, a running virtual environment cannot be started for obvious reasons, and so on. The following states can be characterized as stable:
Status Description Running The virtual environment is running; therefore, it may be restarted, suspended, pauses or
stopped.
Down The virtual environment is stopped; therefore, it may only be started.
Repairing The virtual environment is being repaired. You cannot perform any action on the virtual environment until you click the Finish Repair button.
Besides these states, a virtual environment may be in one of the transitional states: mounting, starting, stopping, etc. When a virtual environment is in a transitional state, you cannot perform any action on it until the operation is finished.
To change the virtual environment state, go the Virtual Environments tab of the Infrastructure page and click the Start, Stop, Pause or Restart button to perform the corresponding action. On clicking one of these buttons, this action is logged.
The current status of the virtual environment is available in the Status table of the virtual environment dashboard. The history of the status changes can be viewed from the Logs -> Tasks page of the virtual environment.
Note: Some operations are available either for virtual machines or Containers. For example, you can pause virtual machines only.
Managing Virtual Environments 32
Logging into Virtual Environments Sometimes you may find it necessary to log in to a virtual environment to monitor or manage it from the inside. The topics in this section explain how you can do this using PVA Control Center.
Logging in to Virtual Machines You can connect to the virtual machine via Virtual Network Computing (VNC) - a graphical desktop sharing system.
To connect to a virtual machine via VNC, do the following:
1 Make sure that the required virtual machine is running. If it is not, start it via PVA.
2 Open the virtual machine Console tab by selecting the corresponding option from the virtual machine context menu (right-click the virtual machine name and select Open Console), or by clicking Open Console in the Tasks section of the virtual machine Summary tab.
On the Console tab, the virtual machine remote display will open automatically.
If you do this for the first time, your browser may display a security warning asking you to install additional components. Click Yes and wait for the remote desktop window to appear. In this window, specify your user name and password you created for this virtual machine and click Enter to get connected to the virtual machine and start sending commands to it via VNC.
Logging in to Containers You can use Remote Desktop Connection - a standard Windows application - to connect to
a Windows Container by means of the Remote Desktop Protocol (RDP).
Note: The feature is available only for Internet Explorer 6.x and above.
To connect to a Container via RDP, do the following:
1 Make sure that the required Container is running. If it is not, start it.
2 Open the Remote Desktop window by selecting the corresponding option either from the Container's context menu (right-click the Container's name and select Log In -> Remote Desktop), or from the Container's toolbar (click the Log In button and select Remote Desktop).
3 In the Remote Desktop window, click the Login button to open a Remote Desktop session.
If you are doing this for the first time, your browser may display a security warning asking you to install additional components. Click Yes and wait for the Remote Desktop terminal window to appear.
Managing Virtual Environments 33
4 In this window, specify your user name and password you created for this Container and click Enter to get connected to the Container and start sending commands to it via Remote Desktop.
You can use the Secure Shell (ssh) application to remotely connect to a Linux Container and work with SSH-application via command line utility.
Note: The feature is available for all the browsers supported by Parallels Virtual Automation.
To connect to a Container by ssh, do the following:
1 Make sure that the required Container is running. If it is not, start it.
2 Open the SSH Connection window by selecting the corresponding option either from the Container's context menu (right-click the Container's name and select Log In -> Terminal Login), or from the Container's toolbar (click the Log In button and select Terminal Login).
3 In the SSH Connection window, specify your user name and password you created for this Container and click Login to get connected to the Container.
If you do this for the first time, your browser may display a security warning asking you to install additional components. Click Yes and wait for the ssh terminal window to appear, whereupon you get connected to the Container and may start sending commands to it via ssh.
Deleting Virtual Environments The Delete screen allows you to remove those virtual environments from your physical servers that you do not need anymore.
To delete a virtual environment, do the following:
1 Go to the Virtual Environments tab of the Infrastructure window, choose the virtual environment and click the Delete icon.
All the virtual environments scheduled for removing are listed in the Delete Virtual Environment section of the Delete screen.
2 To delete the listed virtual environments, select the Yes, I want to delete the Virtual Environment(s) check box and click the Delete button; otherwise, click Cancel.
When removing virtual environment, please, keep in mind the following:
Removing a virtual environment means that the private area of the virtual environment is completely deleted from the Host OS and all the virtual environment private files are irrevocably erased from the physical server.
Deleting a considerable number of virtual environments may take a while.
Glossary 34
Glossary
Application template is a template used to install a set of applications on virtual environments. See also Template.
Container is a virtual private server, which is functionally identical to an isolated standalone server, with its own IP addresses, processes, files, its own users database, its own configuration files, applications, system libraries, and so on. Containers on one and the same physical server (or Hardware node) share one OS kernel. However, they are isolated from each other.
EZ template is built up from separate chunks of code that are uploaded from the web every time you pick an EZ template to install in the Container. This means, that an EZ template is not an independent package but rather a unit containing all the necessary information about repositories from where the necessary packages will be uploaded to the physical server.
Hardware Node is a physical server where the Parallels software is installed for hosting virtual environments. The Hardware Node term is used in the product interface, while in technical documentation, you will find the term physical server.
Hardware Virtualization, or hypervisor, virtualizes at the hardware level creating a duplicate of all system resources such as operating system, CPU, memory and configuration files.
Host Operating System (or Host OS) is an operating system installed on the physical server.
Master Server is a physical server where the Parallels Virtual Automation Management Server component is installed.
OS template (or Operating System template) is used to create new virtual environments with a preinstalled operating system. See also Template.
Parallels Virtual Automation is a tool designed for managing physical server and all virtual environments residing on them with the help of a standard Web browser on any platform.
Parallels Power Panel is an easy-to-use web-based tool designed for administering single personal virtual environment. With Power Panel, a user with administrative access to a virtual environment can easily perform many critical management tasks, while not requiring access rights to the physical server:
Parallels Virtuozzo Containers (or Parallels Containers) is a complete server automation and software virtualization solution allowing you to create multiple isolated Containers on a single physical server to share hardware, licenses, and management effort with maximum efficiency.
Software Virtualization, in Parallels Virtual Automation documentation, stands for the Parallels software virtualization products, such as Parallels Virtuozzo Containers for Linux and Windows, Parallels Server Bare Metal, etc.
SSH stands for Secure Shell. It is a protocol for logging into a remote physical server or virtual environment and executing commands.
Glossary 35
Standard template is a solid bundle of all the necessary template files together with the Virtuozzo virtual environments software. If newer versions of any of these packages appear, a standard template can be correspondingly updated.
TCP (TCP/IP) stands for Transmission Control Protocol/Internet Protocol. This suite of communications protocols is used to connect hosting physical servers on the Internet.
Template (or package set) is a set of original application files (packages) repackaged for mounting over Parallels File System. There are two types of templates. OS Templates are used to create new virtual environments with a preinstalled operating system. Application templates are used to install an application or a set of applications on virtual environments.
Parallels Containers and Parallels Server license is a special license that you should install on the Hardware Node to be able to start using the virtual environments software. Every Hardware Node shall have its own unique Server license.
Virtual Machine is an emulation of a physical computer by means of Parallels Server virtualization technology. It is functionally identical to an isolated standalone server. A virtual machine has its own virtual hardware and requires an operating system to control its hardware. The installed operating system and its applications are isolated inside the virtual machine and share physical hardware resources of the physical server where the virtual machine resides.
Virtual Environment is a generic name for virtual machines and Containers.
36
Index
C Containers
creating • 29 deleting • 33 logging into • 32 starting • 31 stopping • 31
Creating Container • 29 Virtual Environment • 26 Virtual Machine • 27
Creating Containers • 29 Creating Virtual Environments • 26 Creating Virtual Machines • 27
D Deleting
Containers • 33 Virtual Environment • 33 Virtual Machines • 33
Deleting Virtual Environments • 33
F Feedback • 5
G Getting Help • 4 Getting Started • 16 Glossary • 34
H Hardware Requirements • 10
I Installing on Linux • 13 Installing on Parallels Server Bare Metal • 11 Installing on Windows • 12 Installing Parallels Virtual Automation • 6
on Linux • 13 on Windows • 12
Interface Overview • 18 Introduction • 4
L Logging in to Containers • 32
Logging in to Physical Servers • 22 Logging in to Virtual Machines • 32 Logging Into
Containers • 32 Physical Servers • 22 Virtual Environment • 32 Virtual Machines • 32
Logging into Virtual Environments • 32
M Managing
Containers • 26 Physical Servers • 20 Virtual Environment • 26 Virtual Machines • 26
Managing Parallels Licenses • 25 Managing Physical Servers • 20 Managing Virtual Environments • 26 Monitoring Physical Server Resources • 23
P Parallels Virtual Automation
basics • 14 components • 15 getting started with • 16 infrastructure • 15 interface • 18
Parallels Virtual Automation Basics • 14 Parallels Virtual Automation Infrastructure •
15 Physical Servers
logging into • 22 managing • 20 rebooting • 24 registering • 21 resources • 23
R Rebooting Physical Server • 24 Registering Physical Servers • 21
S Software Requirements • 7 Starting
Index 37
Containers • 31 Virtual Environment • 31 Virtual Machines • 31
Starting and Stopping Virtual Environments • 31
Stopping Containers • 31 Virtual Environment • 31 Virtual Machines • 31
System Requirements • 6 hardware requirements • 10 software requirements • 7
V Virtual Environment
creating • 26 deleting • 33 logging into • 32 managing • 26 starting • 31 stopping • 31
Virtual Machines creating • 27 deleting • 33 logging into • 32 starting • 31 stopping • 31