
New Hire Onboarding User’s Guide
35
New Hire Onboarding User’s Guide
Transcript of New Hire Onboarding User’s Guide

New Hire Onboarding
User’s Guide
Onboarding
OCTOBER 2020 PAGE 1
Table of Contents
TABLE OF CONTENTS .............................................................................................................................................. 1
INTRODUCTION ..................................................................................................................................................... 2
GLOSSARY OF TERMS: ..................................................................................................................................................... 2
ONE-TIME SETUP ................................................................................................................................................... 3
CLIENT USER ROLES................................................................................................................................................ 3
CLIENT USER—ONBOARDING ROLE ................................................................................................................................... 3 CLIENT USER—ONBOARDING WITH WORKFLOW ................................................................................................................. 4
ESS ROLE FOR MANAGERS AND/OR SUPERVISORS ................................................................................................ 5
ESS MANAGER ONBOARDING .......................................................................................................................................... 5 ESS MANAGER ONBOARDING INITIATE ONLY ...................................................................................................................... 5
NEW HIRE ROLE ..................................................................................................................................................... 6
I-9 VERIFICATION ........................................................................................................................................................... 6
CLIENT ONBOARDING SETUP STEPS ....................................................................................................................... 6
ONBOARDING TEMPLATE ................................................................................................................................................. 7 Template Tab ........................................................................................................................................................ 8 HR Fields Categories ............................................................................................................................................ 12 Miscellaneous Fields Category ............................................................................................................................ 13 Fillable Forms ...................................................................................................................................................... 13 Multiple Templates ............................................................................................................................................. 13
INITIATE ONBOARDING SCREEN ....................................................................................................................................... 14
THE NEW EMPLOYEE’S EXPERIENCE ..................................................................................................................... 16
NEW HIRE ONBOARDING WIZARD ....................................................................................................................... 17
DOCUMENTS WHICH REQUIRE ACKNOWLEDGEMENT .......................................................................................................... 19 EMPLOYEE DATA .......................................................................................................................................................... 19 PERSONAL AND CONTACT INFORMATION .......................................................................................................................... 20 EDUCATION ................................................................................................................................................................. 20 TAX INFORMATION-SYMMETRY FORMS ............................................................................................................................ 21 I-9 DOCUMENT CREATION AND E-SIGNATURE ................................................................................................................... 22
Employee I-9 Screen ............................................................................................................................................ 22 FEDERAL REPORTING DATA ............................................................................................................................................ 23
Disability Self-Identification ................................................................................................................................ 23 EEO Self-Identification ........................................................................................................................................ 23 VETS Self-Identification ....................................................................................................................................... 24
MISCELLANEOUS FIELDS ................................................................................................................................................ 24 PRIOR EMPLOYMENT .................................................................................................................................................... 25 DIRECT DEPOSIT ........................................................................................................................................................... 25 CONFIRMATION STATEMENT .......................................................................................................................................... 26
PENDING EE DASHBOARD .................................................................................................................................... 26
Employer I-9 Verification Screen ......................................................................................................................... 27
ONBOARDING WOTC QUESTIONNAIRE ................................................................................................................ 30
COMPLETING THE WOTC QUESTIONNAIRE THROUGH ESS ................................................................................... 33
REBOARDING ....................................................................................................................................................... 34
Onboarding
OCTOBER 2020 PAGE 2
Introduction
New Hire Onboarding is a feature within iSolved that provides employees with an electronic solution for completing new hire paperwork. The new employee will enter their information directly into iSolved, which eliminates the need for an HR or Payroll Admin to enter the data from paper forms.
The new employee is guided through the new hire process with an Onboarding Wizard that takes them through the screens required to complete their employee data. Once complete, the employee will receive a confirmation of their entries electronically for final review.
The employer can customize the new employee’s experience using Onboarding Templates, which define the messages, documents and screens the new employee sees in the Onboarding Wizard. An employer will have the ability to create multiple Onboarding Templates for varying groups of new hires (ex. Union vs. Non-Union or Salary vs Hourly, etc.).
Glossary of Terms:
Onboarding Template – Used by the Client to define the Onboarding Wizard to be completed by the new hire.
Initiate New Hire – Workflow step where the Client can define a person/group to initiate the new hire process.
Allow Edits – Workflow step where the Client can define a person/group to enter/edit employee data after the employee completes the wizard, and prior to the save of the new hire.
Onboarding Approver - Workflow step where the Client can define a person/group to approve the information and save the new hire as an employee.
Initiate New Hire Onboarding – Screen used to enter key employee fields and start the new hire process.
New Hire Onboarding Wizard – Onboarding screens to be completed by the new employee. The wizard includes a “Welcome” message and the ability to attach documents and links for acknowledgement.
Pending EE Dashboard – Lists all employees currently active in the Onboarding process with their step in the process. This is the screen that users designated to edit or approve new employees will use to access the employees for the edit or approval process.

Onboarding
OCTOBER 2020 PAGE 3
One-Time Setup
Five new menus were added for Onboarding. New Security Roles need to be created for the Client user, Manager or Supervisor Self-Service users.
Parent Rule Purpose
Employee Management Access EE Initiate New Hire Onboarding
The Client user that will begin the new hire process will need access to this screen.
Client Management Menu Item New Hire Onboarding The Client user will be able to locate the onboarding menus under this category.
New Hire Onboarding Access Client Onboarding Templates
The Client user can design the New Hire Wizard based on the company requirements and save it as a template.
Employee Maintenance Access EE Employer I-9 Verification
Client users or Managers can complete the I-9 information.
Employee Self Service Access ESS Employee I-9 ESS users can view their I-9 information.
Client User Roles
Client User—Onboarding Role
Create a “Client” User Role for Client Onboarding, and provide access to the new rules and the Pending New Hire Dashboard. These are the screens necessary for a Client admin to create the template, initiate a new hire, and complete the new hire process using the Pending New Hire Dashboard.
Access Client Onboarding Templates
Access EE Employer I-9 Verification
Access EE Initiate New Hire Onboarding
Access EE Pending New Hires Dashboard
Menu Item New Hire Onboarding
Menu Item Employee Maintenance
Menu Item Employee Management
Menu Item Employee Hire
Menu Item Employee Management Tools
To complete the onboarding process a Client user would also need the New Hire Wizard and Quick Hire screen. Typically, most Clients have these screens with the “Client” User Role. However, in the event that a Client user was working only in onboarding new employees it is best to add these screens to the “Client Onboarding” role also.
Access EE New Hire Wizard
Access EE Quick Hire

Onboarding
OCTOBER 2020 PAGE 4
Client User—Onboarding with Workflow
To make the role more robust you may also add the Workflow screens. The Workflow screens are not necessary, but can be used for a custom workflow route, or for Clients who wish to create their own email messages. Each Partner must decide whether the Client will have access to Workflow screens, or whether the Partner will complete them for the Client, if necessary.
Here is the suggested list for a “Client” User Role for Onboarding with Workflow.
Access Client Email Templates
Access Client Onboarding Templates
Access Client User Groups
Access Client Workflow Routes
Access Client Workflow Transactions
Access EE Employer I-9 Verification
Access EE Initiate New Hire Onboarding
Access EE Pending New Hires Dashboard
Menu Item Client Workflow Setup
Menu Item New Hire Onboarding
Menu Item Employee Management
Menu Item Employee Maintenance
Menu Item Employee Hire
Menu Item Employee Management Tools
Access EE New Hire Wizard
Access EE Quick Hire
Steps to add the new role(s): Navigate to Security>Role Setup and add the new role.
Example: On the Rules tab, add each rule from the list above to “Full Access.”

Onboarding
OCTOBER 2020 PAGE 5
ESS Role for Managers and/or Supervisors
You may have a client that requires the Manager or Supervisor to be a part of the hiring process. This might be used for stores or restaurants when the onsite manager is in charge of the hiring and the payroll department is in a corporate office.
A one-time setup of the ESS role for the Manager or Supervisor is necessary. Here are some suggested roles.
ESS Manager Onboarding
Navigate to Security>Role Setup and click on the Add New icon. Name the role “ESS Manager Onboarding.” The User Type is “Self Service.”
Suggested rules to include with full access:
Access EE Initiate New Hire Onboarding
Access EE Employer I-9 Verification
Access EE New Hire Wizard
Access EE Pending New Hire Dashboard
Access EE Quick Hire
Menu Item Employee Management
Menu Item Employee Maintenance
ESS Manager Onboarding Initiate Only
If the Manager or Supervisor would initiate the new hire, but not edit the new hire information when submitted by the employee, the role will look like this:
Navigate to Security>Role Setup and click on the Add New icon.
Name the role “ESS Manager Onboarding Initiate Only.” The User Type is “Self Service.”
Access EE Initiate New Hire Onboarding
Menu Employee Management
Managers or Supervisors will need to be assigned the appropriate role to provide them access to these screens. Select the role from the Client Utilities>Self Service Roles screen.
The Manager will now have access to the screen where they can initiate or edit the new hire’s information. Note: Do not provide access to these screens for an “Employee” user.
Onboarding
OCTOBER 2020 PAGE 6
New Hire Role
*No Role is Needed for the New Hire.
iSolved has programmed a role for the new hire. No action is required. Do not assign the New Hire Wizard to any role.
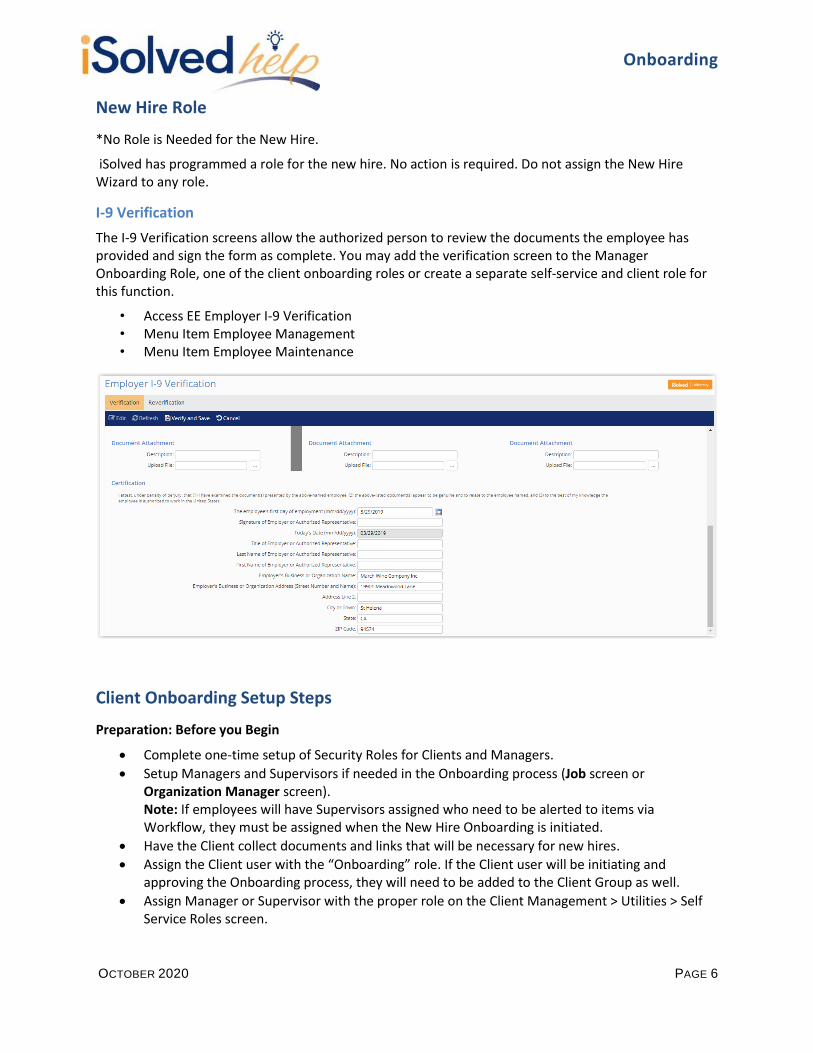
I-9 Verification
The I-9 Verification screens allow the authorized person to review the documents the employee has provided and sign the form as complete. You may add the verification screen to the Manager Onboarding Role, one of the client onboarding roles or create a separate self-service and client role for this function.
• Access EE Employer I-9 Verification • Menu Item Employee Management • Menu Item Employee Maintenance
Client Onboarding Setup Steps
Preparation: Before you Begin
Complete one-time setup of Security Roles for Clients and Managers.
Setup Managers and Supervisors if needed in the Onboarding process (Job screen or Organization Manager screen). Note: If employees will have Supervisors assigned who need to be alerted to items via Workflow, they must be assigned when the New Hire Onboarding is initiated.
Have the Client collect documents and links that will be necessary for new hires.
Assign the Client user with the “Onboarding” role. If the Client user will be initiating and approving the Onboarding process, they will need to be added to the Client Group as well.
Assign Manager or Supervisor with the proper role on the Client Management > Utilities > Self Service Roles screen.
Onboarding
OCTOBER 2020 PAGE 7
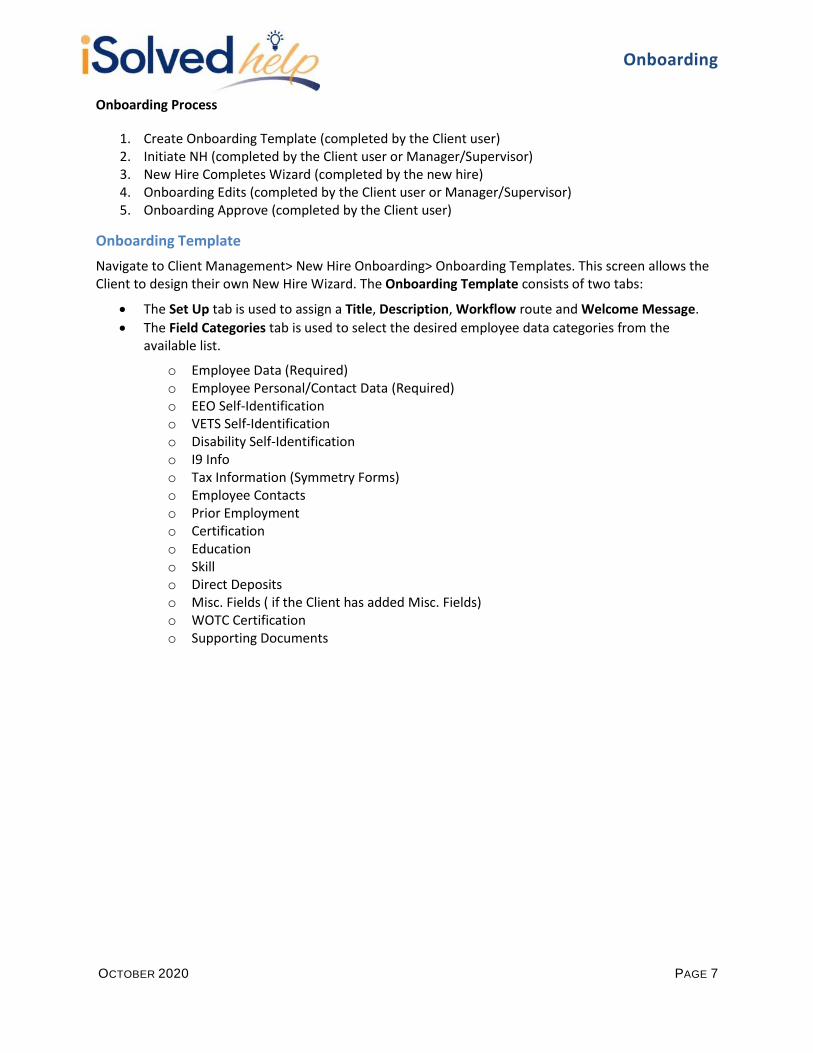
Onboarding Process
1. Create Onboarding Template (completed by the Client user) 2. Initiate NH (completed by the Client user or Manager/Supervisor) 3. New Hire Completes Wizard (completed by the new hire) 4. Onboarding Edits (completed by the Client user or Manager/Supervisor) 5. Onboarding Approve (completed by the Client user)
Onboarding Template
Navigate to Client Management> New Hire Onboarding> Onboarding Templates. This screen allows the Client to design their own New Hire Wizard. The Onboarding Template consists of two tabs:
The Set Up tab is used to assign a Title, Description, Workflow route and Welcome Message.
The Field Categories tab is used to select the desired employee data categories from the available list.
o Employee Data (Required) o Employee Personal/Contact Data (Required) o EEO Self-Identification o VETS Self-Identification o Disability Self-Identification o I9 Info o Tax Information (Symmetry Forms) o Employee Contacts o Prior Employment o Certification o Education o Skill o Direct Deposits o Misc. Fields ( if the Client has added Misc. Fields) o WOTC Certification o Supporting Documents

Onboarding
OCTOBER 2020 PAGE 8
Click Add New to start the wizard
Template Tab
The Client creates a New Hire Onboarding Wizard by selecting Add New from first the Template tab of the Onboarding Template. Multiple templates may be configured to accommodate different groups of employees which may have different welcome messages, paperwork required, or workflow routes.
Title–Choose a name for the wizard you are creating. (Required)
Onboarding
OCTOBER 2020 PAGE 9
Description - Provide a description of the template so that you can easily identify it and differentiate it from other Onboarding Templates. Welcome Message—A default welcome message exists in the system. Users may also create their own message, if desired. The default welcome message is as follows: “Welcome to the [Company Name} New Hire Onboarding Process. Please navigate through all screens listed on the left and complete any required fields, which are designated with an asterisk.”
o To create a custom welcome message, navigate to the Employee Messages screen. Begin by adding an “Onboarding” message category at Client Management> HR> Message Categories. Next, draft the text for the message at Employee Messages > Message Info tab. Welcome messages can be edited or changed at any time.
Legal Company Access - Select all Legal Companies that will utilize this template. For this template to be available in the selection list on the Initiate New Hire screen, a minimum of one legal company must be selected.
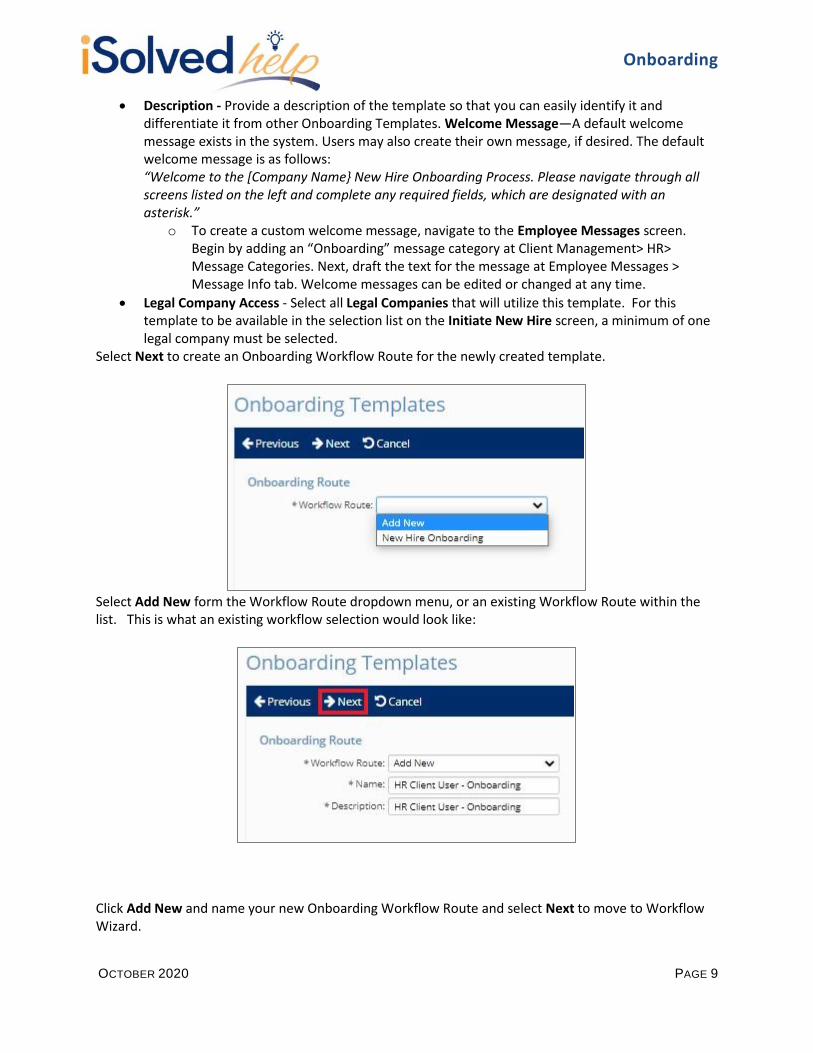
Select Next to create an Onboarding Workflow Route for the newly created template.
Select Add New form the Workflow Route dropdown menu, or an existing Workflow Route within the list. This is what an existing workflow selection would look like:
Click Add New and name your new Onboarding Workflow Route and select Next to move to Workflow Wizard.

Onboarding
OCTOBER 2020 PAGE 10
Initiates Onboarding (Required) — Select the Client Group, Manager or Supervisor that will
initiate the Onboarding for the new hire.
Employee Onboarding Wizard – This Workflow step is pre-populated by the Workflow wizard, no additional set-up of this step is required.
Client Onboarding Wizard (Required) - The person or group identified here will review and save the new employee.
o If additional steps are needed, add the plus sign next to either Initiate Onboarding or Client Onboarding Wizard to add additional User types.
To access the email screen, click on the envelope icon. A new window will pop up with options for the user who will receive the email notification and which template to use.
o Select the User Type: It is the person or group who will receive the email when this step is complete.
o Template: Choose the email template that should be sent within the step. o Click Save when finished to go back to the Onboarding Workflow wizard page.
Repeat this step until all envelope icons are completed.
Onboarding
OCTOBER 2020 PAGE 11
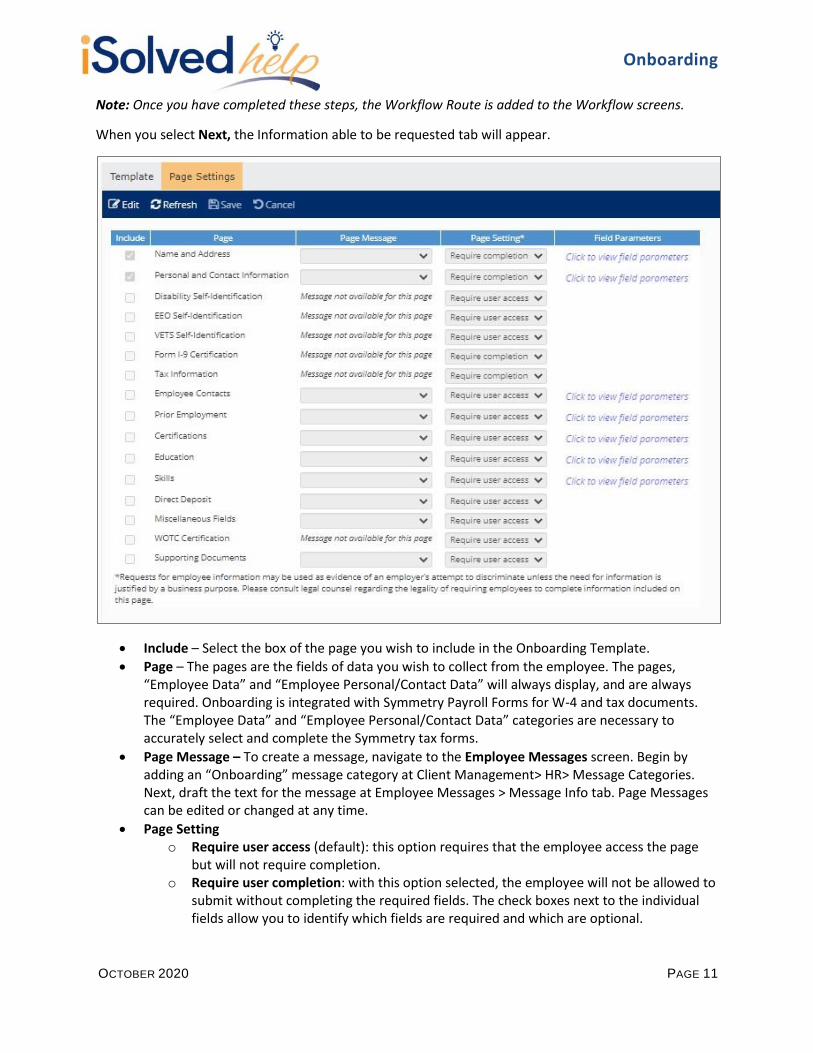
Note: Once you have completed these steps, the Workflow Route is added to the Workflow screens.
When you select Next, the Information able to be requested tab will appear.
Include – Select the box of the page you wish to include in the Onboarding Template.
Page – The pages are the fields of data you wish to collect from the employee. The pages, “Employee Data” and “Employee Personal/Contact Data” will always display, and are always required. Onboarding is integrated with Symmetry Payroll Forms for W-4 and tax documents. The “Employee Data” and “Employee Personal/Contact Data” categories are necessary to accurately select and complete the Symmetry tax forms.
Page Message – To create a message, navigate to the Employee Messages screen. Begin by adding an “Onboarding” message category at Client Management> HR> Message Categories. Next, draft the text for the message at Employee Messages > Message Info tab. Page Messages can be edited or changed at any time.
Page Setting o Require user access (default): this option requires that the employee access the page
but will not require completion. o Require user completion: with this option selected, the employee will not be allowed to
submit without completing the required fields. The check boxes next to the individual fields allow you to identify which fields are required and which are optional.
Onboarding
OCTOBER 2020 PAGE 12
Note: if collecting any Federal Reporting data, employees will be required to view the page but not required to disclose their personal data. o Information button reads: “Requests for employee information may be used as evidence of an employer’s attempt to discriminate unless the need for information is justified by a business purpose. Please consult legal counsel regarding the legality of requiring employees to complete information included on this page”.
Field Parameters – Once you have selected your category, select Click to view field parameters. You will be able to customize the screen by hiding fields you do not need, or requiring fields that are essential.
o Required – When selecting the Required option, the employee will not be allowed to move forward without completing the required fields.
o Hide – selecting Hide under Field Parameters will block the access of those fields from the employee’s view.
o If neither Required nor Hide are selected, the employee is given the option to complete the data field, but it is not required to submit.
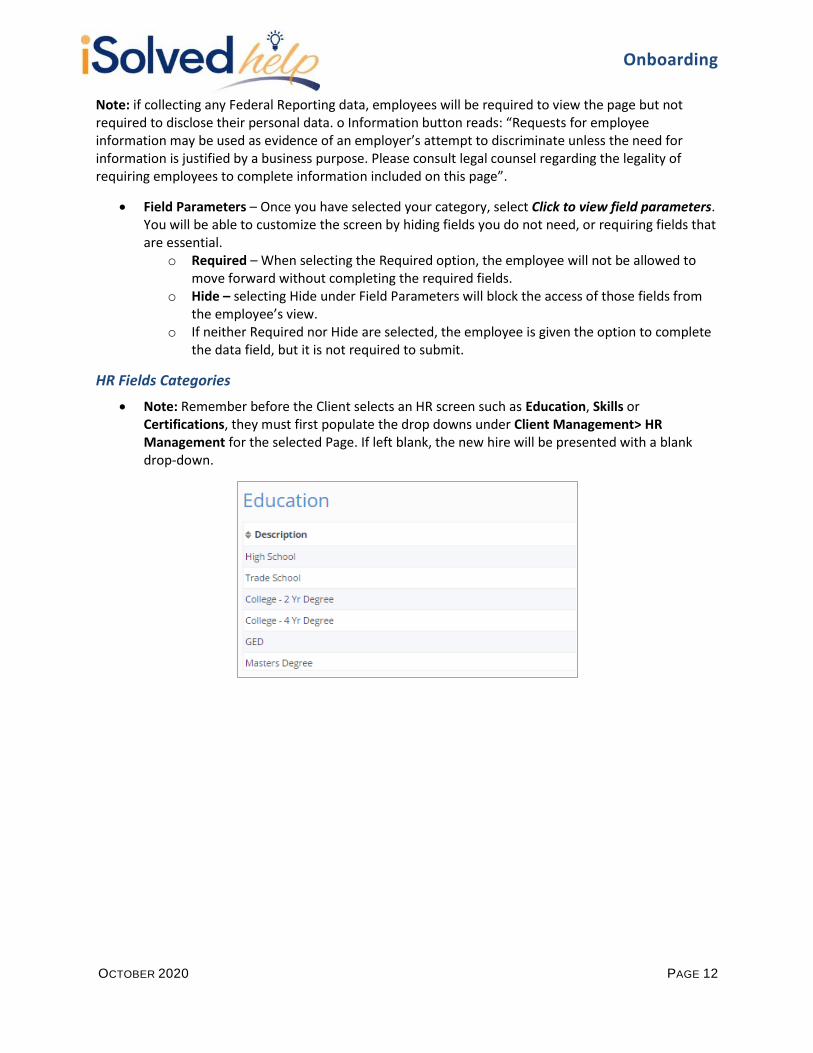
HR Fields Categories
Note: Remember before the Client selects an HR screen such as Education, Skills or Certifications, they must first populate the drop downs under Client Management> HR Management for the selected Page. If left blank, the new hire will be presented with a blank drop-down.

Onboarding
OCTOBER 2020 PAGE 13
Miscellaneous Fields Category
In order to add a Miscellaneous Field to the Onboarding template, you must first create the Category and Miscellaneous Field. When creating the field, make sure the “Allow Employee Access” is checked.
Note: Only Miscellaneous Fields can be added to the Onboarding template. Miscellaneous Data sets are not able to be added to the template.
From the Onboarding Template, select Misc. Fields select either Require user access or Require
completion.
Fillable Forms
Fillable Forms can be added to either the “Welcome” or “Supporting Documents” message. Please refer to the Fillable Forms article at https://learning.myisolved.com/library/articles/952 in the University Library for more information on the setup and usage of forms.
Multiple Templates
By creating multiple templates you can customize each Onboarding Wizard for varying groups of new hires. Example: FT and PT, or hourly and salary, or union and non-union, etc.
Onboarding
OCTOBER 2020 PAGE 14
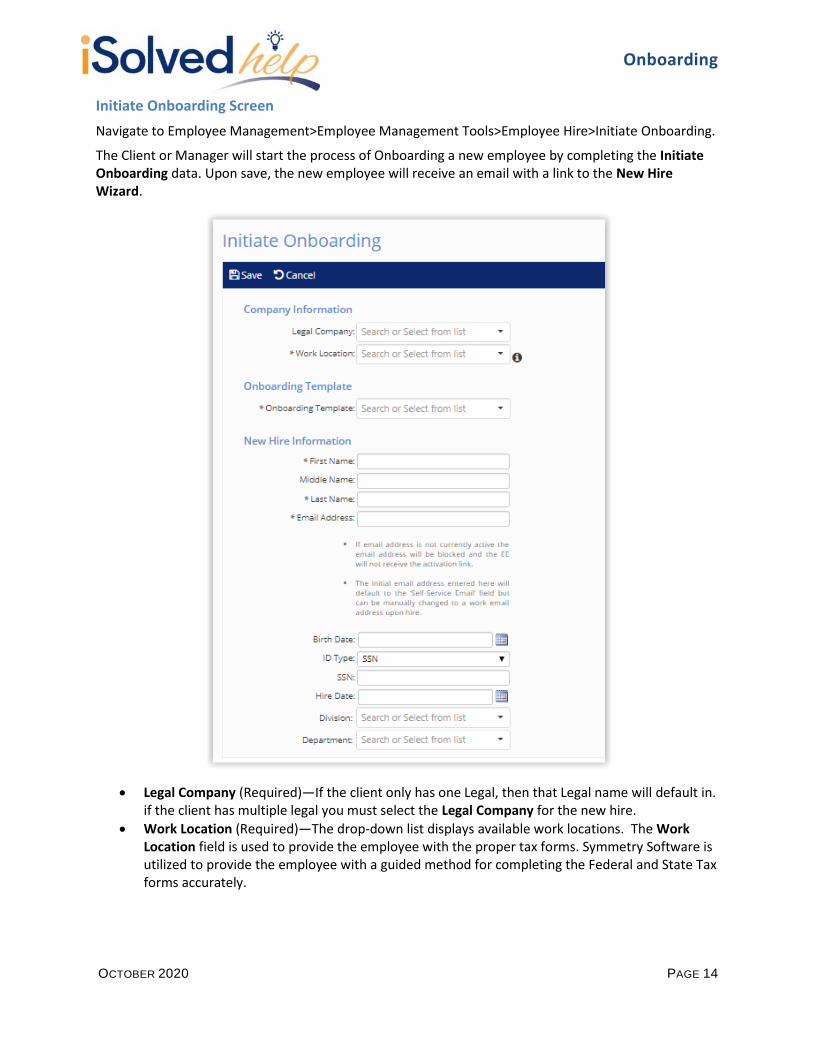
Initiate Onboarding Screen
Navigate to Employee Management>Employee Management Tools>Employee Hire>Initiate Onboarding.
The Client or Manager will start the process of Onboarding a new employee by completing the Initiate Onboarding data. Upon save, the new employee will receive an email with a link to the New Hire Wizard.
Legal Company (Required)—If the client only has one Legal, then that Legal name will default in. if the client has multiple legal you must select the Legal Company for the new hire.
Work Location (Required)—The drop-down list displays available work locations. The Work Location field is used to provide the employee with the proper tax forms. Symmetry Software is utilized to provide the employee with a guided method for completing the Federal and State Tax forms accurately.

Onboarding
OCTOBER 2020 PAGE 15
The Tax Location Code must match the Work Location Address on the Tax Maintenance screen.
Therefore the Initiate New Hire screen will exclude locations if the Tax Location address doesn't
match or the work location is missing the address.
Examples: Virtual employees, sales reps, construction companies with jobs all over the state are
all examples where the Client may not have an address, or it does not match the tax location.
Onboarding Template (Required)—Select the appropriate template the new hire should receive.
First Name/Last Name (Required)
Email Address (Required)—The initial email address entered here will send the welcome email to the new hire, and default to the Self Service Email address field. This email can be manually changed to a work email address on the Employee General screen once assigned.
Validation details (optional): Birth Date and SSN are available fields for validation to ensure the employee record is not duplicated for the company. Note: if either name, birth date, or SSN match an employee on file, a message will appear with information comparing records. The user will be able to proceed with sending the email or cancel to initiate Reboarding instead.
Hire Date (Optional)—The date entered in this field will display on the Welcome screen of the New Hire Wizard. If the hire date is not known and entered by the person initiating the onboarding, it may be added before the employee is added to iSolved during the edit step.
Organization values – The drop-down list will display the active values from the Organization Tables. If a Supervisor/Manager initiates the new hire, the organization value will default to the Manager’s org value (or values, if more than one). This is a required field if an Org Supervisor/Manager is assigned in the Workflow Route as an approver. Otherwise, this field is optional.
If you wish to Initiate New Hire Onboarding for multiple new hires, follow this process:
Navigate to Employee Management > Employee Management Tools > Pending New Hire Import.
Select the Import Type of “Onboarding Initiation.”
Select a Template of “Default.”
For File Format, chose either “Excel,” “CSV,” “Fixed File Format,” or “BAI File Format.”
Attach the desired file using the Attach File icon.
Click on Next.
Resolve any “Critical” or “File Format” errors on spreadsheet.
Repeat process above.
Once no errors appear, click on Next.
In order to prepare your file, please refer to the Data Conversion Master for Imports in the University Library and look for the tab titled “Onboarding Initiation Import.”
Note: if an Onboarding template is selected that has an Assigned/Organization Manager/Supervisor within the template workflow, the Manager/Supervisor must be assigned at this stage of the onboarding process.

Onboarding
OCTOBER 2020 PAGE 16
Once the information on the screen is saved, an automatic email will be sent to the new hire, including
the link to the New Hire Wizard. The new hire will have 72 hours to access the link in the authorization
email before it expires. If the new hire is a current or previous ESS user, even with another Client, they
will not be able to authenticate, but rather will be redirected to the iSolved login page.
If the email is not received, you can resend an activation link by clicking the button “Resend Activation Link” in the same row as the employee who needs it.
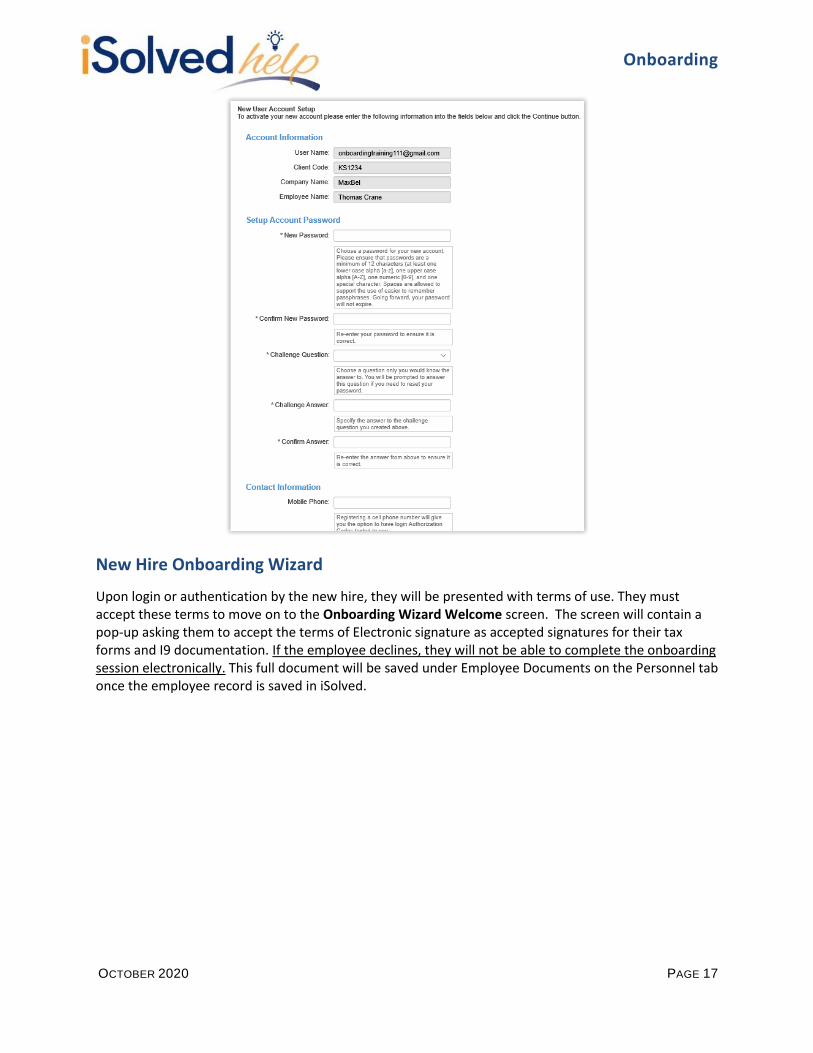
The New Employee’s Experience
The new employee will receive a “Welcome” message. The default message is displayed below. The new hire’s name and the Client’s name are automatically added.
When the employee clicks the link at the bottom, it will take them to the authentication page. Here they will add their own password and security questions.
Onboarding
OCTOBER 2020 PAGE 17
New Hire Onboarding Wizard
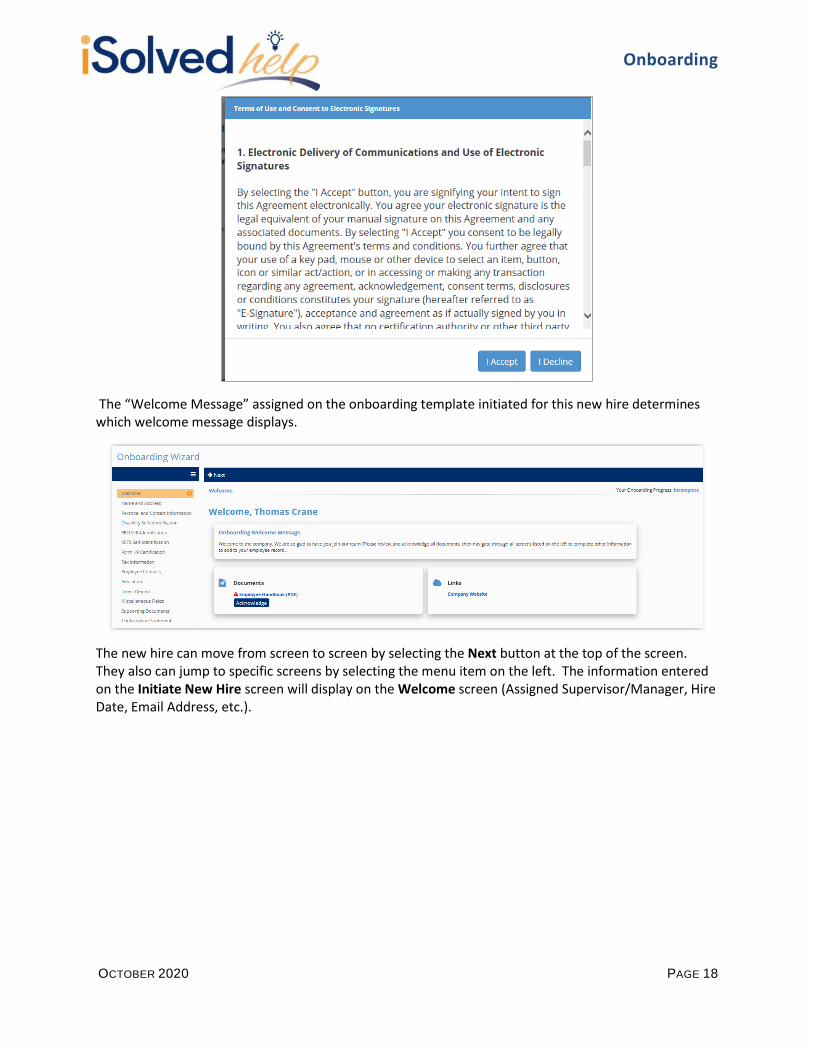
Upon login or authentication by the new hire, they will be presented with terms of use. They must accept these terms to move on to the Onboarding Wizard Welcome screen. The screen will contain a pop-up asking them to accept the terms of Electronic signature as accepted signatures for their tax forms and I9 documentation. If the employee declines, they will not be able to complete the onboarding session electronically. This full document will be saved under Employee Documents on the Personnel tab once the employee record is saved in iSolved.
Onboarding
OCTOBER 2020 PAGE 18
The “Welcome Message” assigned on the onboarding template initiated for this new hire determines which welcome message displays.
The new hire can move from screen to screen by selecting the Next button at the top of the screen. They also can jump to specific screens by selecting the menu item on the left. The information entered on the Initiate New Hire screen will display on the Welcome screen (Assigned Supervisor/Manager, Hire Date, Email Address, etc.).

Onboarding
OCTOBER 2020 PAGE 19
Documents Which Require Acknowledgement
When attached to the Welcome Message, a document can require acknowledgement and will be shown on the Welcome page of the Onboarding Wizard. The New Hire Onboarding Wizard prevents a new hire from completing the Onboarding Wizard if required documents have not been reviewed and acknowledged on the Welcome screen. The employee will be alerted in the “Action Required” message box on the confirmation statement. The alert will specify that the new hire should return to the welcome screen. The employee will not be able to acknowledge the document(s) without opening them first.
Employee Data
Any data you have entered on the Initiate New Hire screen will appear here. The new hire will be required to enter their full address before moving to the next screen.
Onboarding
OCTOBER 2020 PAGE 20
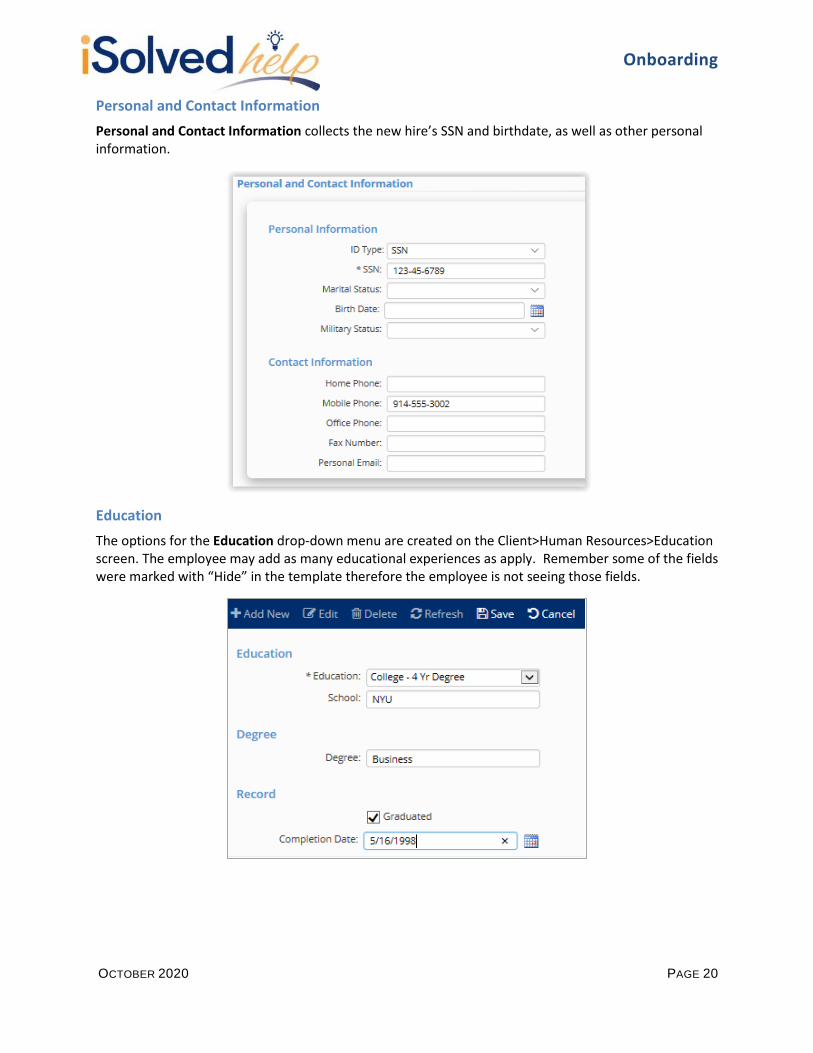
Personal and Contact Information
Personal and Contact Information collects the new hire’s SSN and birthdate, as well as other personal information.
Education
The options for the Education drop-down menu are created on the Client>Human Resources>Education screen. The employee may add as many educational experiences as apply. Remember some of the fields were marked with “Hide” in the template therefore the employee is not seeing those fields.
Onboarding
OCTOBER 2020 PAGE 21
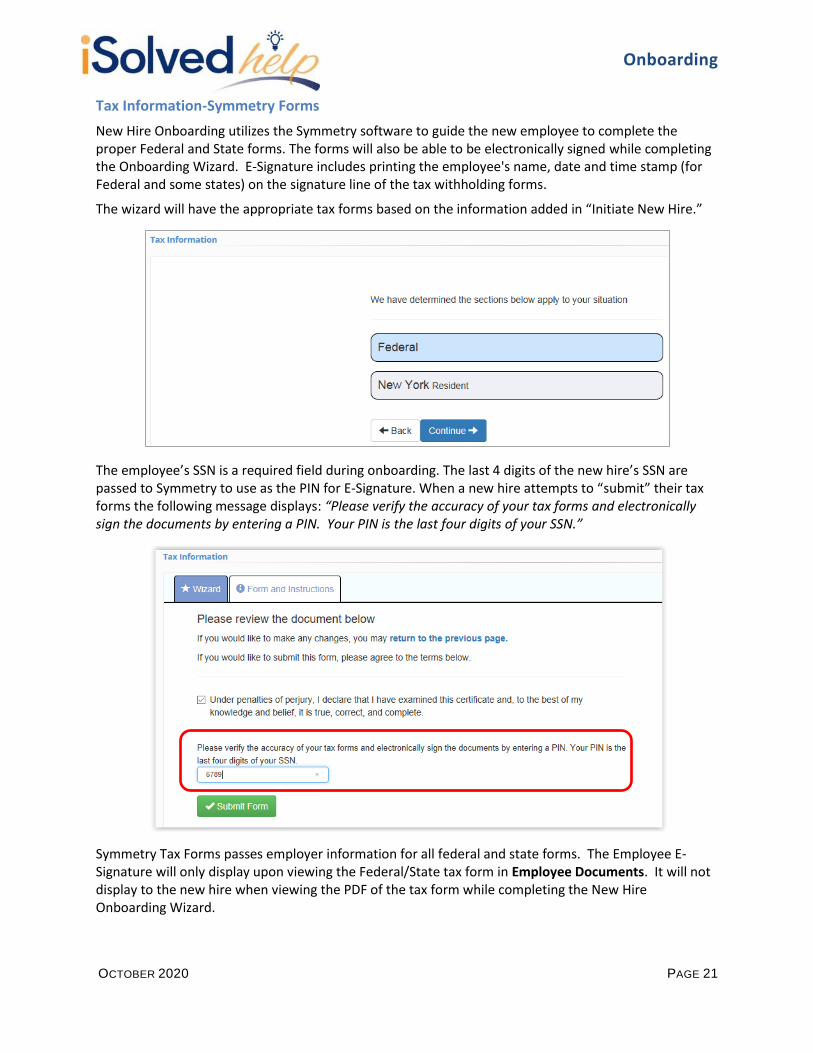
Tax Information-Symmetry Forms
New Hire Onboarding utilizes the Symmetry software to guide the new employee to complete the proper Federal and State forms. The forms will also be able to be electronically signed while completing the Onboarding Wizard. E-Signature includes printing the employee's name, date and time stamp (for Federal and some states) on the signature line of the tax withholding forms.
The wizard will have the appropriate tax forms based on the information added in “Initiate New Hire.”
The employee’s SSN is a required field during onboarding. The last 4 digits of the new hire’s SSN are passed to Symmetry to use as the PIN for E-Signature. When a new hire attempts to “submit” their tax forms the following message displays: “Please verify the accuracy of your tax forms and electronically sign the documents by entering a PIN. Your PIN is the last four digits of your SSN.”
Symmetry Tax Forms passes employer information for all federal and state forms. The Employee E-Signature will only display upon viewing the Federal/State tax form in Employee Documents. It will not display to the new hire when viewing the PDF of the tax form while completing the New Hire Onboarding Wizard.

Onboarding
OCTOBER 2020 PAGE 22
I-9 Document Creation and E-Signature
The new screen for the Employee I-9 will be available both in the Onboarding Wizard and in Employee Self-Service. There will be a second screen after the employee record is saved for the authorized representative (i.e. Manager, Supervisor or Client) to upload verification documents, validate the employee I-9, and complete the employer portion of the I-9 document. Once complete a final version of the I-9 will be available under Employee Documents.
Employee I-9 Screen
Available in Onboarding and Employee Self Service.
The screen will show required fields that must be filled in by the employee. Note: the SSN is only required if the company is has the Legal Service “E-Verify” enabled.
Users can edit data before clicking the Sign Form button. At this point, the data will only be used on the saved PDF of the I-9, but not saved to the database until the Manager/Supervisor has completed the verification process.
The completed I-9 PDF will be stored in Employee Documents.
The (check one of the following) drop-down populates with citizenship choices.
The Signature of Employee field appears at the bottom of the screen. The employee should type their name, first and last. It must match the information they had entered exactly.
Click on the Sign Form button. The employee will receive the following message and must click the “Acknowledge” button in order to complete the signature.
Onboarding
OCTOBER 2020 PAGE 23
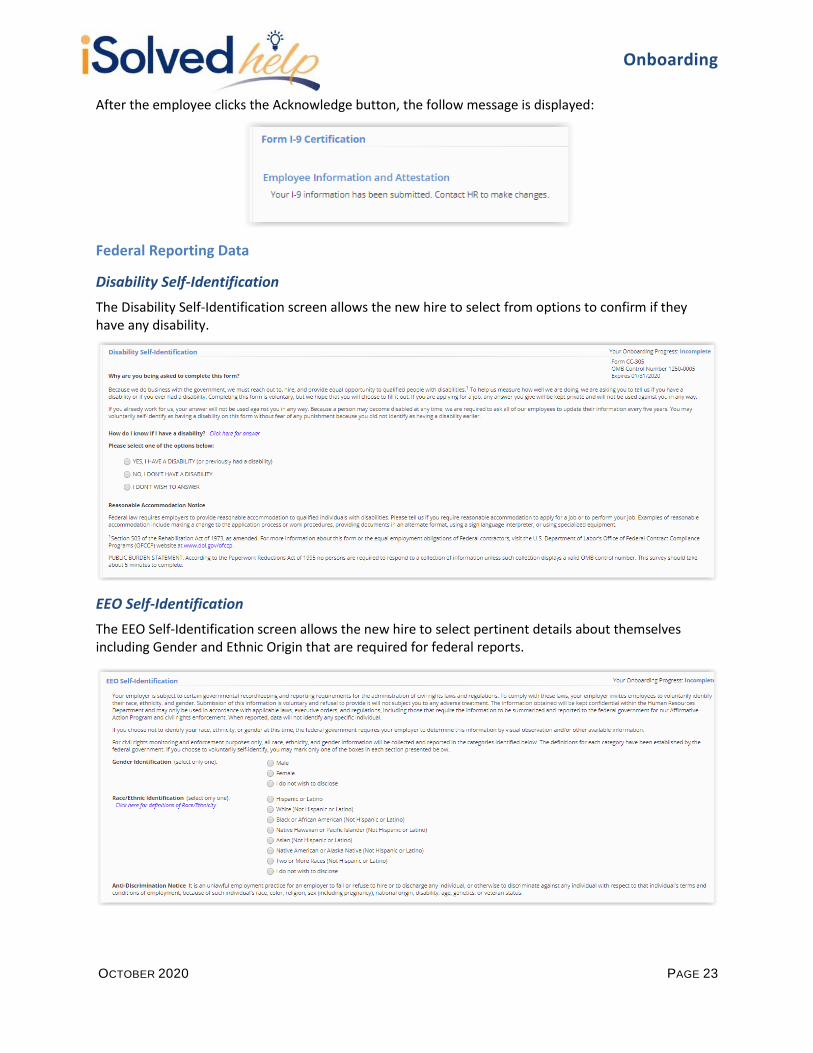
After the employee clicks the Acknowledge button, the follow message is displayed:
Federal Reporting Data
Disability Self-Identification
The Disability Self-Identification screen allows the new hire to select from options to confirm if they have any disability.
EEO Self-Identification
The EEO Self-Identification screen allows the new hire to select pertinent details about themselves including Gender and Ethnic Origin that are required for federal reports.

Onboarding
OCTOBER 2020 PAGE 24
VETS Self-Identification
The VETS Self-Identification screen allows the new hire to select pertinent details such as their veteran status/discharge date that are required for federal reports.
Miscellaneous Fields
Since Miscellaneous Fields would be added to capture some customized information, it is required to
complete this field. The field(s) will appear and the data type selected when setting up the
Miscellaneous Employee Fields will be used in the template.

Onboarding
OCTOBER 2020 PAGE 25
Prior Employment
The new hire may add as many applicable employments as needed.
Direct Deposit
The employee can add direct deposit account(s) by clicking the “Add New” button on the left side of the screen. If a page message has been added, it will show on the right side of the screen.
Onboarding
OCTOBER 2020 PAGE 26
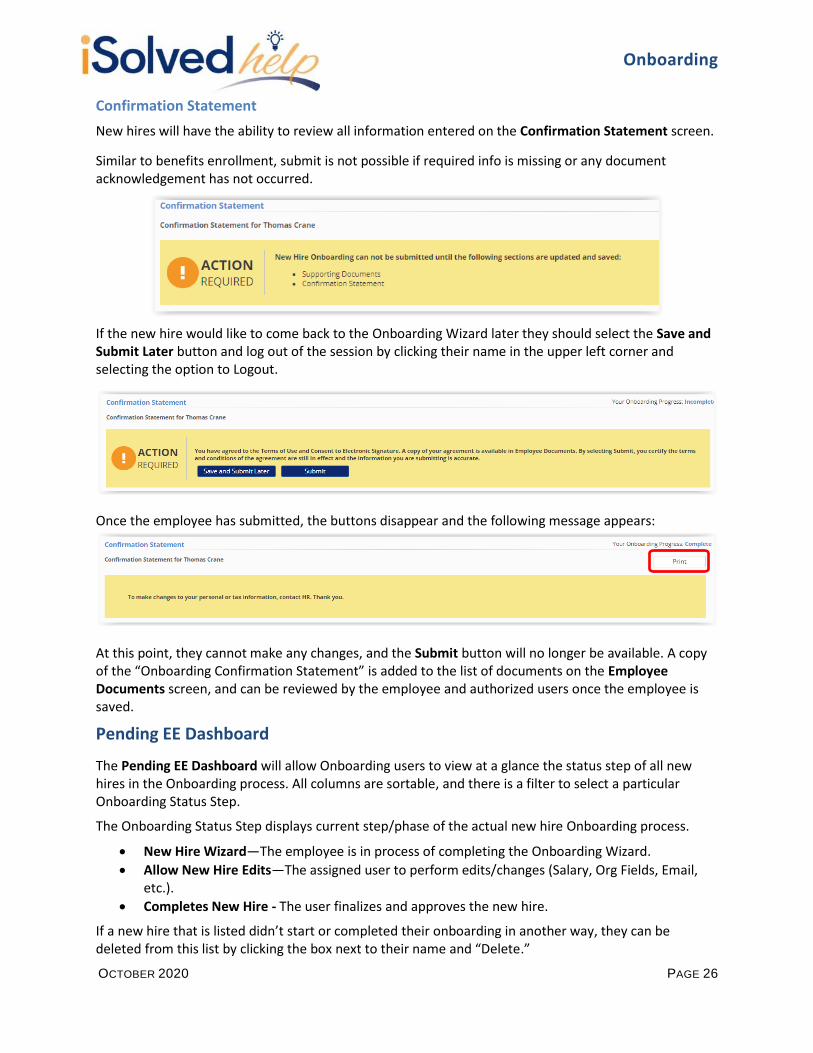
Confirmation Statement
New hires will have the ability to review all information entered on the Confirmation Statement screen.
Similar to benefits enrollment, submit is not possible if required info is missing or any document acknowledgement has not occurred.
If the new hire would like to come back to the Onboarding Wizard later they should select the Save and Submit Later button and log out of the session by clicking their name in the upper left corner and selecting the option to Logout.
Once the employee has submitted, the buttons disappear and the following message appears:
At this point, they cannot make any changes, and the Submit button will no longer be available. A copy of the “Onboarding Confirmation Statement” is added to the list of documents on the Employee Documents screen, and can be reviewed by the employee and authorized users once the employee is saved.
Pending EE Dashboard
The Pending EE Dashboard will allow Onboarding users to view at a glance the status step of all new hires in the Onboarding process. All columns are sortable, and there is a filter to select a particular Onboarding Status Step.
The Onboarding Status Step displays current step/phase of the actual new hire Onboarding process.
New Hire Wizard—The employee is in process of completing the Onboarding Wizard.
Allow New Hire Edits—The assigned user to perform edits/changes (Salary, Org Fields, Email, etc.).
Completes New Hire - The user finalizes and approves the new hire.
If a new hire that is listed didn’t start or completed their onboarding in another way, they can be deleted from this list by clicking the box next to their name and “Delete.”
Onboarding
OCTOBER 2020 PAGE 27
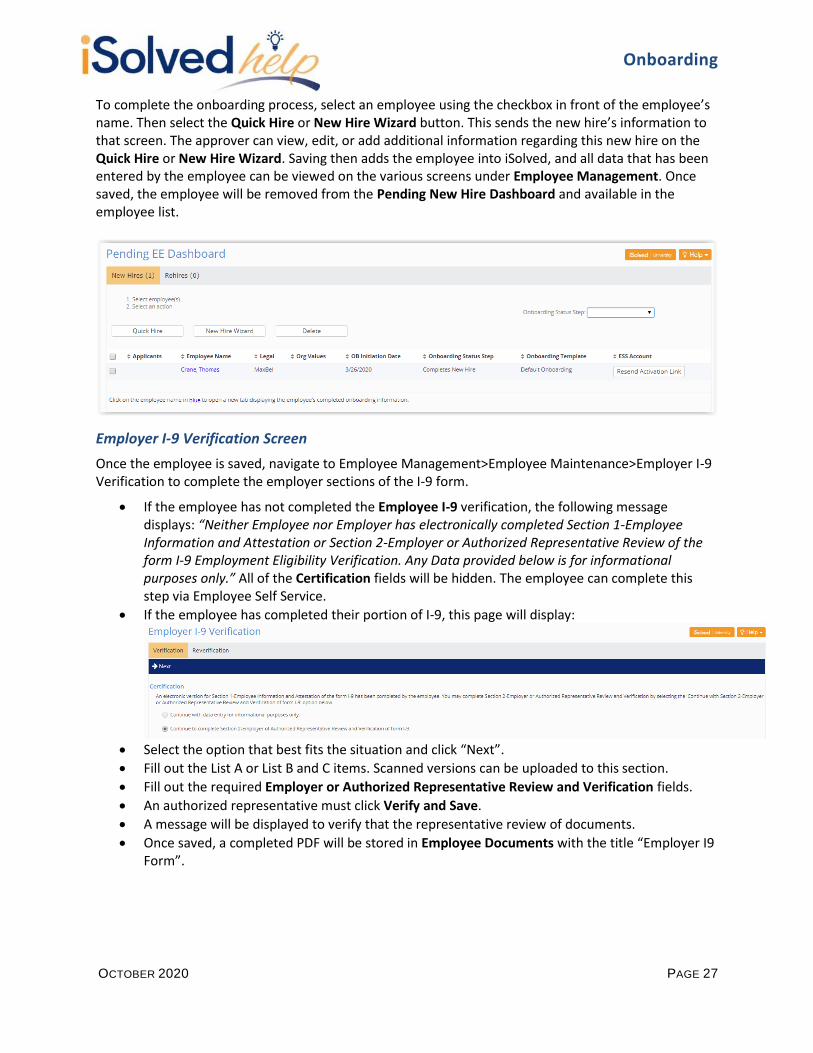
To complete the onboarding process, select an employee using the checkbox in front of the employee’s name. Then select the Quick Hire or New Hire Wizard button. This sends the new hire’s information to that screen. The approver can view, edit, or add additional information regarding this new hire on the Quick Hire or New Hire Wizard. Saving then adds the employee into iSolved, and all data that has been entered by the employee can be viewed on the various screens under Employee Management. Once saved, the employee will be removed from the Pending New Hire Dashboard and available in the employee list.
Employer I-9 Verification Screen
Once the employee is saved, navigate to Employee Management>Employee Maintenance>Employer I-9 Verification to complete the employer sections of the I-9 form.
If the employee has not completed the Employee I-9 verification, the following message displays: “Neither Employee nor Employer has electronically completed Section 1-Employee Information and Attestation or Section 2-Employer or Authorized Representative Review of the form I-9 Employment Eligibility Verification. Any Data provided below is for informational purposes only.” All of the Certification fields will be hidden. The employee can complete this step via Employee Self Service.
If the employee has completed their portion of I-9, this page will display:
Select the option that best fits the situation and click “Next”.
Fill out the List A or List B and C items. Scanned versions can be uploaded to this section.
Fill out the required Employer or Authorized Representative Review and Verification fields.
An authorized representative must click Verify and Save.
A message will be displayed to verify that the representative review of documents.
Once saved, a completed PDF will be stored in Employee Documents with the title “Employer I9 Form”.

Onboarding
OCTOBER 2020 PAGE 28
The Client User, Manager, or Supervisor who is completing the verification will receive a pop-up notification with the language found on the I-9 form. Acknowledging the message will complete the employer portion of Form I-9 and the completed form will be saved to the I-9 tab of Employee Documents.
Onboarding
OCTOBER 2020 PAGE 29
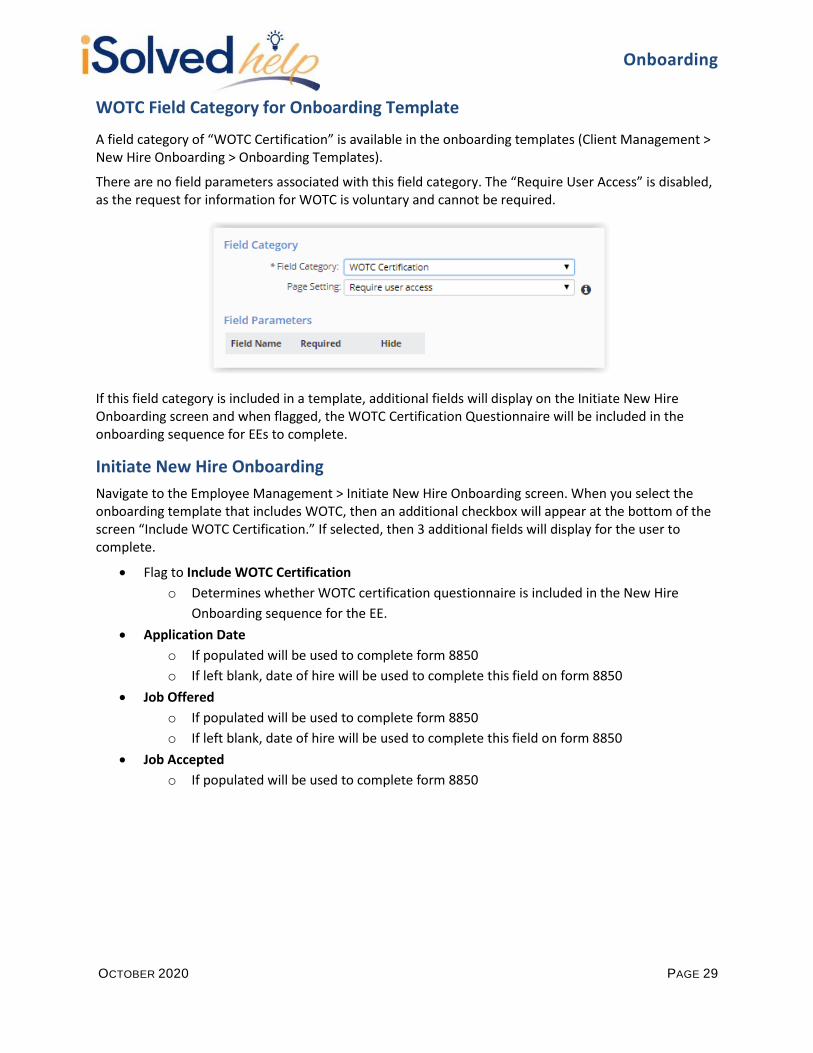
WOTC Field Category for Onboarding Template
A field category of “WOTC Certification” is available in the onboarding templates (Client Management > New Hire Onboarding > Onboarding Templates).
There are no field parameters associated with this field category. The “Require User Access” is disabled, as the request for information for WOTC is voluntary and cannot be required.
If this field category is included in a template, additional fields will display on the Initiate New Hire Onboarding screen and when flagged, the WOTC Certification Questionnaire will be included in the onboarding sequence for EEs to complete.
Initiate New Hire Onboarding
Navigate to the Employee Management > Initiate New Hire Onboarding screen. When you select the onboarding template that includes WOTC, then an additional checkbox will appear at the bottom of the screen “Include WOTC Certification.” If selected, then 3 additional fields will display for the user to complete.
Flag to Include WOTC Certification
o Determines whether WOTC certification questionnaire is included in the New Hire
Onboarding sequence for the EE.
Application Date
o If populated will be used to complete form 8850
o If left blank, date of hire will be used to complete this field on form 8850
Job Offered
o If populated will be used to complete form 8850
o If left blank, date of hire will be used to complete this field on form 8850
Job Accepted
o If populated will be used to complete form 8850
Onboarding
OCTOBER 2020 PAGE 30
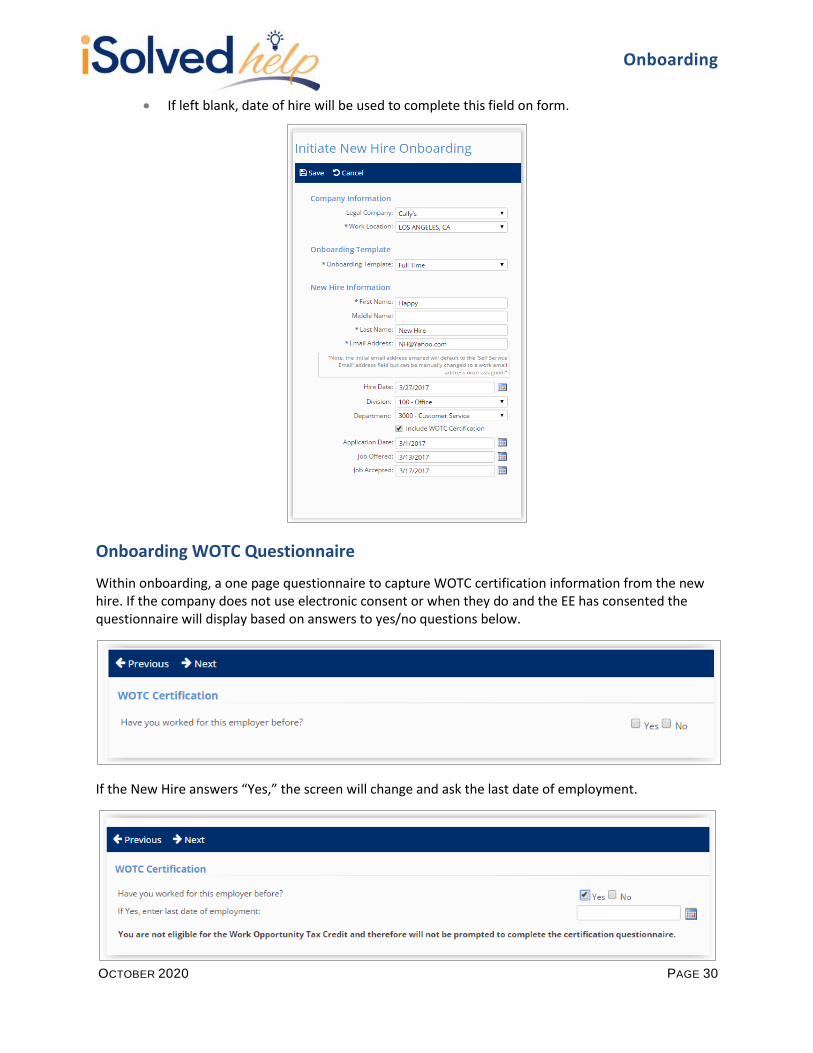
If left blank, date of hire will be used to complete this field on form.
Onboarding WOTC Questionnaire
Within onboarding, a one page questionnaire to capture WOTC certification information from the new hire. If the company does not use electronic consent or when they do and the EE has consented the questionnaire will display based on answers to yes/no questions below.
If the New Hire answers “Yes,” the screen will change and ask the last date of employment.

Onboarding
OCTOBER 2020 PAGE 31
If the New Hire answers “No,” the screen will refresh to present the questionnaire.
When Electronic Consent is on and active, the Signature of Employee box will appear and populate as an electronic signature on the forms. When Electronic Consent is not utilized the signature section shown below will not appear, and a signature will not be populated on the forms.
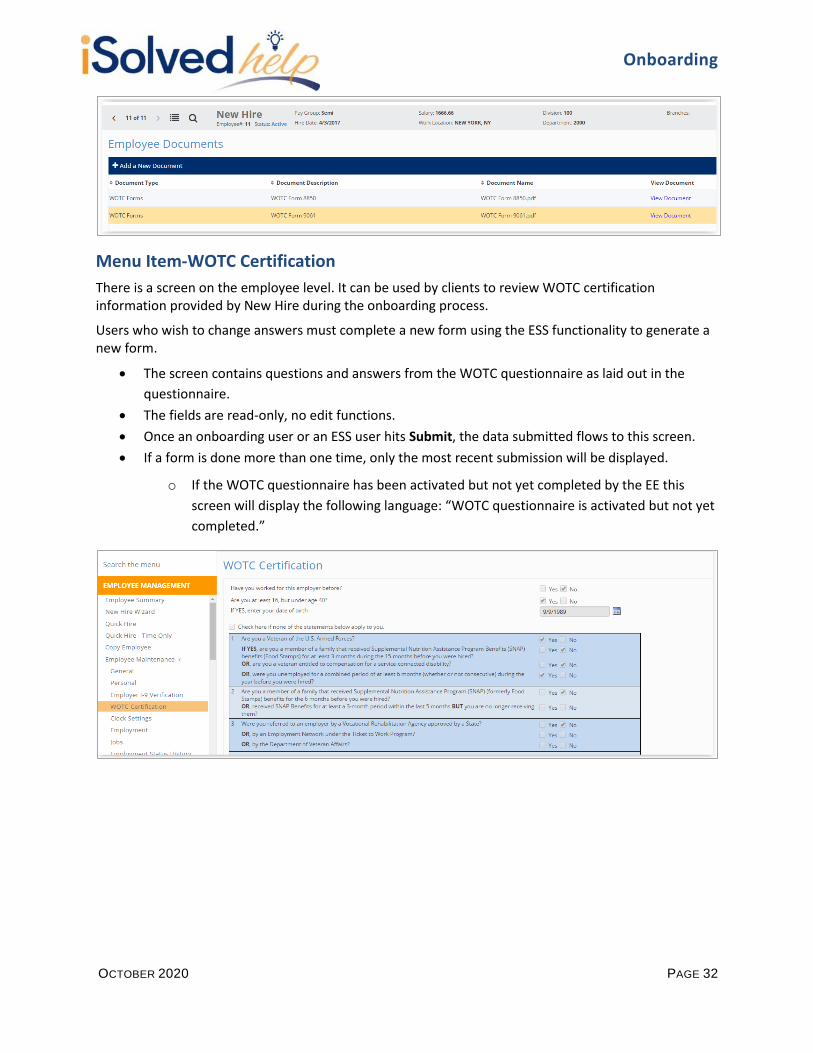
WOTC Forms Employee Document Type
Once the New Hire has completed onboarding with the WOTC questionnaire and the pending new hire is saved from the Quick Hire or New Hire Wizard, the system generates and stores in employee documents a copy of the IRS Form 8850 and the ETA Form 9061.
The documents are saved as document type “WOTC Forms” and available to the EE (provided client has that functionality enabled for ESS users), client users and SB users through ESS.
If New Hire/EE answers yes to “Have you worked for this employer before,” this form will not be created.
Onboarding
OCTOBER 2020 PAGE 32
Menu Item-WOTC Certification
There is a screen on the employee level. It can be used by clients to review WOTC certification information provided by New Hire during the onboarding process.
Users who wish to change answers must complete a new form using the ESS functionality to generate a new form.
The screen contains questions and answers from the WOTC questionnaire as laid out in the
questionnaire.
The fields are read-only, no edit functions.
Once an onboarding user or an ESS user hits Submit, the data submitted flows to this screen.
If a form is done more than one time, only the most recent submission will be displayed.
o If the WOTC questionnaire has been activated but not yet completed by the EE this
screen will display the following language: “WOTC questionnaire is activated but not yet
completed.”

Onboarding
OCTOBER 2020 PAGE 33
Completing the WOTC Questionnaire through ESS
For EEs who do not complete the WOTC questionnaire through onboarding or for those who need to make updates to an existing form the method for doing so will be to complete a new questionnaire and submit.
When a client user, Service Bureau user or partner user accesses the ESS WOTC Questionnaire:
Toolbar allows users to edit, refresh, save, cancel or reset a form.
Contains the same data as added to the Initiate New Hire Onboarding including:
o Flag to Include WOTC Certification
o Application Date
o Job Offered
o Job Accepted
If Electronic Consent is turned on and EE has not consented, the fields are disabled.
The fields are editable if the WOTC questionnaire has not yet been activated or activated but
not yet completed by the EE.
Once an EE has completed the WOTC questionnaire, the Reset Employee Form icon must be
used to trigger activation.
When an employee user accesses the screen and the client/SB/partner user has flagged “Include WOTC Certification,” Electronic Consent is turned on for the company but the EE has not consented to Electronic Consent:
The following message displays:
You have not agreed to the Terms of Use and Consent to Electronic Signature; therefore, this document is unavailable to complete online with an electronic signature. You may access the Terms of Use and Consent to Electronic Signature through the User Account options found by clicking the down arrow next to your name in the menu to change your preference.
Onboarding
OCTOBER 2020 PAGE 34
When an employee user accesses the UI and the client/SB/partner user has flagged “Include WOTC Certification,” Electronic Consent is turned on for the company and EE has agreed to Electronic Consent OR Electronic Consent is not turned on for the company:
The questionnaire displays and can be edited by the EE.
Once an EE has completed and submitted the questionnaire the following language displays on
the screen:
o You have completed the WOTC questionnaire and if applicable, you can access a copy
of any resulting forms from the Documents menu.
When an employee user accesses the screen and the client/SB/partner user has not flagged “Include WOTC Certification:”
The following message displays:
You are not eligible to access the Work Opportunity Tax Credit (WOTC) questionnaire at this time. Please contact your system administrator for access to the questionnaire.
Reboarding
Reboarding is a feature where employees who are being rehired can go through the same process to ensure that all information is updated and complete. Please refer to this article in the University for more information: https://learning.myisolved.com/library/articles/825