Mini Guide: ZHRLDSTR Labor Distribution...
14
Page 1 Mini Guide: ZHRLDSTR Labor Distribution Report Report Description: Displays the distribution of employee costs by wage type (employee/employer contributions, benefits, retirement, for example), amount, period and cost objects such as Cost Center, Fund, Functional Area or Grant. Report Timing: Run the ZHRLDSTR Labor Distribution Report each pay period, on or after “blue” days on the Comptroller General’s Office payroll calendar. Who Can Run This Report: Employees with Display Payroll or Agency Payroll Administrator security roles. Important Note: SCEIS users at large agencies, and those seeking a large amount of data through the Labor Distribution Report should run the report in the background. Running the report in the background will make the most efficient use of your computer’s system resources and will allow you to continue working while the report runs. Instructions for running the Labor Distribution Report in the background are included in this guide, beginning on page 9. 1. Log into SCEIS, enter ZHRLDISTR into the Command Field and click on the green Enter button to access the report. This will take you to the Build a Preliminary Index screen shown below. 2. Complete the Preliminary Selection Criteria section (boxed in red in the screen shot above) as appropriate. Definitions: Preliminary Selection Criteria • Posting Date Field: This is the date for which you would like to view results. It is used to build the index of documents that contain financial entries related to the posting date, which is the pay date. You can select a single date or a range of dates. • Business Area: A Business Area is an agency code in SCEIS, so enter your agency code here. This field is required. • By-Pass Preliminary Index: Leave this box un-checked.
Transcript of Mini Guide: ZHRLDSTR Labor Distribution...

Page 1
Mini Guide: ZHRLDSTR Labor Distribution Report
Report Description: Displays the distribution of employee costs by wage type (employee/employer contributions, benefits, retirement, for example), amount, period and cost objects such as Cost Center, Fund, Functional Area or Grant.
Report Timing: Run the ZHRLDSTR Labor Distribution Report each pay period, on or after “blue” days on the Comptroller General’s Office payroll calendar.
Who Can Run This Report: Employees with Display Payroll or Agency Payroll Administrator security roles.
Important Note: SCEIS users at large agencies, and those seeking a large amount of data through the Labor Distribution Report should run the report in the background. Running the report in the background will make the most efficient use of your computer’s system resources and will allow you to continue working while the report runs. Instructions for running the Labor Distribution Report in the background are included in this guide, beginning on page 9.
1. Log into SCEIS, enter ZHRLDISTR into the Command Field and click on the green Enter button to access the report. This will take you to the Build a Preliminary Index screen shown below.
2. Complete the Preliminary Selection Criteria section (boxed in red in the screen shot above) as appropriate.
Definitions: Preliminary Selection Criteria
• Posting Date Field: This is the date for which you would like to view results. It is used to build the index of documents that contain financial entries related to the posting date, which is the pay date. You can select a single date or a range of dates.
• Business Area: A Business Area is an agency code in SCEIS, so enter your agency code here. This field is required.
• By-Pass Preliminary Index: Leave this box un-checked.
Mini Guide: Labor Distribution Report (ZHRLDISTR)
Page 2
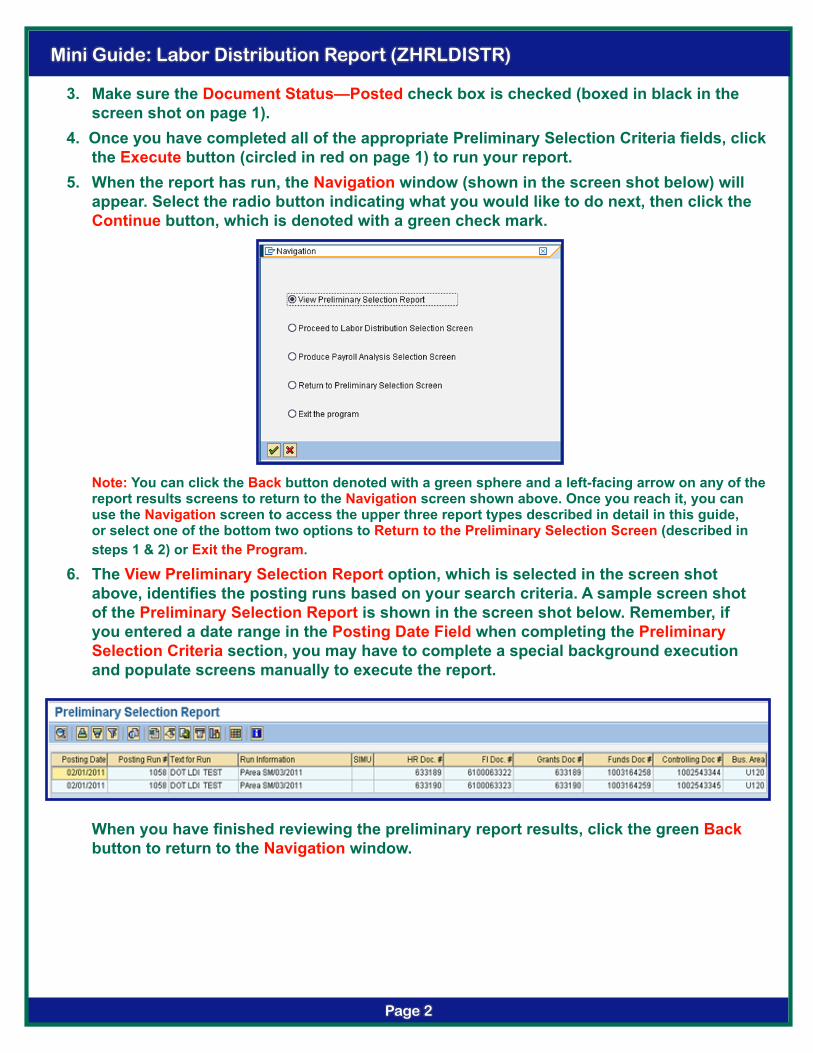
3. Make sure the Document Status—Posted check box is checked (boxed in black in the screen shot on page 1).
4. Once you have completed all of the appropriate Preliminary Selection Criteria fields, click the Execute button (circled in red on page 1) to run your report.
5. When the report has run, the Navigation window (shown in the screen shot below) will appear. Select the radio button indicating what you would like to do next, then click the Continue button, which is denoted with a green check mark.
Note: You can click the Back button denoted with a green sphere and a left-facing arrow on any of the report results screens to return to the Navigation screen shown above. Once you reach it, you can use the Navigation screen to access the upper three report types described in detail in this guide, or select one of the bottom two options to Return to the Preliminary Selection Screen (described in steps 1 & 2) or Exit the Program.
6. The View Preliminary Selection Report option, which is selected in the screen shot above, identifies the posting runs based on your search criteria. A sample screen shot of the Preliminary Selection Report is shown in the screen shot below. Remember, if you entered a date range in the Posting Date Field when completing the Preliminary Selection Criteria section, you may have to complete a special background execution and populate screens manually to execute the report.
When you have finished reviewing the preliminary report results, click the green Back button to return to the Navigation window.

Mini Guide: Labor Distribution Report (ZHRLDISTR)
Page 3
7. Next, select the Proceed to Labor Distribution Selection Screen radio button, as shown in the screen shot immediately below, and click the Continue button denoted by the green check mark to view the Display Payroll Posting Document Screen.
8. You may refine your search criteria, but it is recommended that you leave the default information in the Selection Criteria for Posting Documents and Editing Options sections. Please also note that:• The Posting Run Number(s) and Business Area are populated based on your preliminary search.
• The Display Variant Field defaults to display “/EXP_ONLY,” meaning it displays only expense-related data in General Ledger Accounts 5000000000 through 5999999999.

Mini Guide: Labor Distribution Report (ZHRLDISTR)
Page 4
9. When you’re ready, click the Execute button to view your report, which will look like the partial report shown in the screen shot below.
The report includes the columns listed below:• Account Number with Text• Psting Date• Doc. Date• Year• Period• Type• Run Number• Type• Rev. Doc• Document• Line• Line Type
• G/L• Pay per.• BusA• Pers. No• Cost Center• Order• Cost Object• WBS Element• Funds Center• Fund• Number of• Amount Posted Commitment Item
• Functional Area• Grant• NP• Credit Amount• Debit Amount• Co Account Assignment• Funds Center Text• Commitment Item Text• Description• Posting Type• Functional Area Text• Description

Mini Guide: Labor Distribution Report (ZHRLDISTR)
Page 5
10. If you double click on an item in the Account Number with Text column:• The detail at the PERNR level is displayed for this particular posting run. The data includes both debits and credits, revealing both the backed-out previous entry and the new entry created as a result of the off-cycle posting.
• The detail at the Employee’s Payroll Results and Posted Amounts for a Period display for all wage types as shown in the screen shot below.

Mini Guide: Labor Distribution Report (ZHRLDISTR)
Page 6
11. To view only the posted wage types, the view shown in the screen shot below, click the Only Posted Wage Type button (circled in red in the screen shot on page 5).
12. The third report view, called the Payroll Analysis Report, is designed to show different views so that you can analyze the payroll results based on items you select. This version of the Labor Distribution Report allows for multiple views based on the data you enter into the Produce Payroll Analysis Selection Screen.
To access the Produce Payroll Analysis Selection Screen, click the Back button several times until you reach the Navigation screen shown below. Select the Produce Payroll Analysis Selection Screen radio button and then click the Continue button, which is denoted with a green check mark.

Page 7
Mini Guide: Labor Distribution Report (ZHRLDISTR)
13. When you reach the Payroll Analysis Report screen shown below, complete the fields as needed to search for the specific data you need. Once you have completed all the appropriate fields, click the Execute button (circled in red in the screen shot below) to run the report. Once executed, the report will look similar to the screen shot on page 8.

14. The Run St (meaning Run Status) column (the third column from the left in the screen shot below) displays a letter value for each entry, which indicates the age of the payroll result. The indicators’ meanings are:• A: The payroll result was generated by the most recent payroll run.• P: The payroll result was replaced by a new record during a retroactive accounting run. It becomes the predecessor of the current record.
• O: The payroll result has been replaced by two or more retroactive accounting runs, meaning it is no longer current and is not the predecessor of the current record.
15. To return to the Navigation screen click the Exit button (denoted with a yellow sphere and an upward-pointing arrow) twice.
To exit the program and return to the SAP Easy Access screen, select the Exit the Program option, then click the Continue button.
Page 8
Mini Guide: Labor Distribution Report (ZHRLDISTR)

Mini Guide: Labor Distribution Report (ZHRLDISTR)
Page 9
Running the Labor Distribution Report in the Background
SCEIS users at large agencies, and those seeking a large amount of data through the Labor Distribution Report should run the report in the background. Running the report in the background will make the most efficient use of your computer’s system resources and will allow you to continue working while the report runs. Below are instructions for running the Labor Distribution Report in the background.
1. From the top left portion of the Display Payroll Posting Document screen, select the Program drop down menu and click on Execute in Background, as shown in the screen shot below.
2. The Background Print Parameters window will open as shown in the screen shot below. Click on the Properties button to set the correct parameters to run the report.

Mini Guide: Labor Distribution Report (ZHRLDISTR)
Page 10
3. The Spool Request Attributes window, shown below, will open. Double-click on Print out immediately under the Parameter Value column to change the location of where the report will display.
4. The Other Properties Time of printing box will display. As shown in the screen shot below, from the Time of print drop down menu, select Send to Spooler Only for now. Click the Continue button, which is circled in red in the screen shot below.

Mini Guide: Labor Distribution Report (ZHRLDISTR)
Page 11
5. The Background Print Parameters window will re-open. Click the Continue button, which is circled in red in the screen shot below.
6. The Start Time window will open. Click the Immediate button, which is circled in red in the screen shot below.

Mini Guide: Labor Distribution Report (ZHRLDISTR)
Page 12
7. The Start Time window should now look like the screen shot below. Click on the Save button, which is circled in red below.
8. You will be returned to the Display Payroll Posting Document screen. At the bottom, left-hand corner of the screen you should now see the message “Background job was scheduled for program ZRPCIPS00,” as shown in the screen shot below. This message lets you know that you have successfully run this job in the background.

Mini Guide: Labor Distribution Report (ZHRLDISTR)
Page 13
Viewing a Report that You Have Run in the Background1. To access your Labor Distribution Report after you have run it in the background, click
on Menu in the toolbar at the top of the screen bar, then select System, and then Own Jobs and from the drop down menu (circled in the screen shot below).
2. The Job Overview screen, shown below, will display. To access your report, place a check mark in the box next to the appropriate job and then click on the Spool button, which is circled in red in the screen shot below.
Note: Jobs you have run that contain data will be denoted with a spool symbol in the Spool column, as shown in the screen shot above. The spool symbol is boxed in black above.
3. The Output Controller: List of Spool Request window will display. Place a check mark in the box next the appropriate job and then click on the Display in Maximum Width button, which is circled in red in the screen shot below.

Mini Guide: Labor Distribution Report (ZHRLDISTR)
Page 14
4. The Graphical display of spool request (spool number) in system (client) screen, shown in the screen shot below, will display. You will now be able to see your Labor Distribution Report, which you ran in the background.