
Positioning the University for the Future Milt Hakel August 31, 2007.

MILT 3.0
Medi-Dose Information Labeling Technology,
Version 3.0 - Software Documentation
Medi-Dose®, Inc.
Milton Building
70 Industrial Drive, Ivyland, PA 18974-6101
Phone: (800) 523-8966 Fax: (800) 323-8966
E-Mail: [email protected]
Web Site: www.medi-dose.com
© Medi-Dose®, Inc. 2007
MILT 3.0 Help 3.0.04Welcome to MILT 3.0
Page 1 of 81Welcome to MILT 3.0
6/1/2009file://C:\Documents and Settings\Don Lawson\Local Settings\Temp\~hh5161.htm

Thank you for ordering and using our new Medi-Dose Information Labeling
Technology, Version 3.0 (MILT® 3.0) software. We're excited about all the new features and enhancements, and we hope you will be too!
MILT 3.0 was developed as a result of the many positive suggestions we received from pharmacists, nurses and other health care professionals. It has a totally new look since a wide variety of new features and capabilities have been added. 1. New Printing Capabilities and New Labels
Like earlier programs, MILT 3.0 prints Medi-Dose® LaserLabel Lid-Label® Cover, EPS® LiquiDose® laser labels and MINI-LiquiDose 100 laser labels. And, in addition to supporting laser and ink jet printing, MILT 3.0 now supports both direct thermal and thermal transfer printing. We’ve added thermal Lid-Label Covers, LiquiDose and MINI-LiquiDose labels. Plus, two new label designs are part of our growing line. LiquiDose Butterfly labels, both for thermal and laser/ink jet printing, have been designed to help you with syringe and ampule identification. 2. Enhanced Bar Coding Capabilities
MILT 3.0 contains the ability for you to read (scan) and write 1-dimensional [1-D] , 2-dimensional [2-D] and multi-part bar codes. 2-D and multi-part codes allow you to encode several pieces of information, like an NDC, Lot Number and Beyond-Use Date, in one bar code. MILT makes it easy to implement the international standard patterns used by most manufacturers or to customize the patterns to accommodate the requirements of your scanning software. 3. Flexible Formatting Options
MILT 3.0 lets you custom design your labels. You can place information anywhere you want on your labels and can use different fonts, colors, shapes, tall-man lettering, graphics (like facility logos) – anything you want. This feature will help you call attention to important labeling information that needs to be recognized throughout the medication distribution and dispensing process. You can either use the formatting templates we provide or design your own. MILT 3.0 lets you be creative and informative at the same time! 4. Customized Work Flow and Tighter Security
Every facility is different. Some are small – where only a few people are printing, checking and packaging medication. Some are much larger – there may be many people, of varying skills and authority, responsible for detailed portions of the process.
MILT 3.0 Help 3.0.04Overview
Page 2 of 81Welcome to MILT 3.0
6/1/2009file://C:\Documents and Settings\Don Lawson\Local Settings\Temp\~hh5161.htm
MILT 3.0 lets you specify who can enter, approve and print labels – affording you greater security. Labels can printed “on the fly” or viewed prior to printing in order to ensure accuracy. And, like always, MILT provides complete packaging log information (now with new graphics), controlled substance/scheduled classification drug identification, network support and enhanced bar coding capability…for all our supported labels.
While we feel much of the software is self-explanatory and intuitive, we encourage you to refer to this documentation, access the on-line “tool-tip” pop-ups and Help information carefully. If you haven't done so already, click the Show Me button on the main screen and choose "Show me how to find my way around in MILT 3.0" for a guided tour. It’s an excellent way to learn about the features of the program. Should you still have questions, please contact us by any of the methods listed at the end of this documentation. We’d be happy to help.
Please remember…this is your software! We welcome your input, and if we can, we'll incorporate your suggestions in future upgrades. This is how MILT 3.0 became what it is today!
We hope you'll enjoy using MILT
as much as we enjoyed making it!
Adding all these features and providing all the benefits and capabilities people asked for was challenging, informative and fun!
But, it's not magic…it’s MILT 3.0!
Minimum Requirements
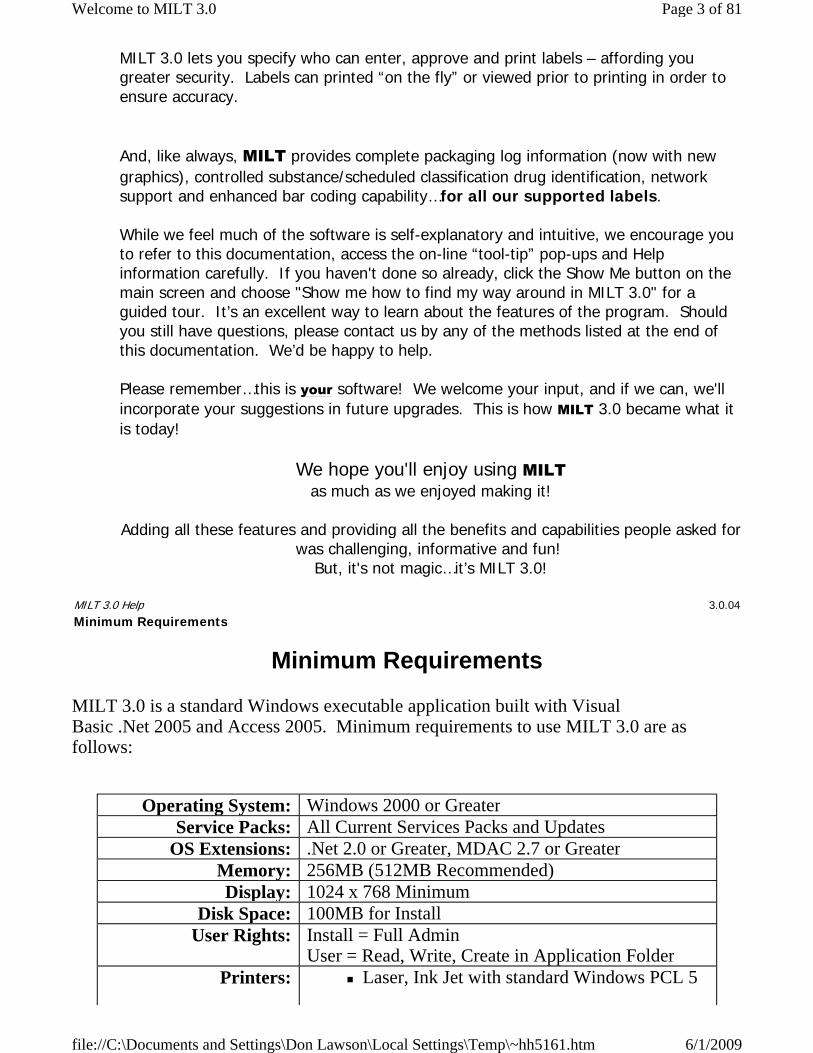
MILT 3.0 is a standard Windows executable application built with Visual Basic .Net 2005 and Access 2005. Minimum requirements to use MILT 3.0 are as follows:
MILT 3.0 Help 3.0.04Minimum Requirements
Operating System: Windows 2000 or Greater
Service Packs: All Current Services Packs and Updates
OS Extensions: .Net 2.0 or Greater, MDAC 2.7 or Greater
Memory: 256MB (512MB Recommended)
Display: 1024 x 768 Minimum
Disk Space: 100MB for Install User Rights: Install = Full Admin
User = Read, Write, Create in Application Folder
Printers: Laser, Ink Jet with standard Windows PCL 5
Page 3 of 81Welcome to MILT 3.0
6/1/2009file://C:\Documents and Settings\Don Lawson\Local Settings\Temp\~hh5161.htm

To print this documentation:
1. Select "MILT 3.0 Help" in the Contents and click the Print Button
2. Select "Print the selected heading and all subtopics" and click the OK button
Printer Driver. Zebra LP2844 Required for Thermal Printing.
MILT 3.0 Help 3.0.04Print Documentation
MILT 3.0 Help 3.0.04Main Screen
Page 4 of 81Welcome to MILT 3.0
6/1/2009file://C:\Documents and Settings\Don Lawson\Local Settings\Temp\~hh5161.htm

Welcome to the Main Screen of MILT 3.0. It’s definitely different from all the screens we built in our previous programs. MILT 3.0 was designed so virtually all your work will be done on this screen. You don’t have to remember a great deal of steps to use a particular function. Plus, you can move your mouse across the screen and Windows pop-up “tool-tips” will briefly describe the feature you highlighted. The main screen has five different work zones:
Action Buttons down the left side
Workflow Tabs across the top
Your Formulary toward the left Data Fields in the center
Label Patterns on the right.
Action Buttons
Along the left side of MILT 3.0’s main screen are Action Buttons which control the general
Page 5 of 81Welcome to MILT 3.0
6/1/2009file://C:\Documents and Settings\Don Lawson\Local Settings\Temp\~hh5161.htm

operation of the program. From these buttons, you print an entry, clear the fields of an entry, save an entry, delete an entry, lookup text, modify your user settings and change users of the program (via the login feature). In addition, with MILT 3.0’s Show Me feature, you can get step-by-step guidance for using the program. Workflow Tabs
Across the top of the main screen are 2 tabs – Create and Report. These tabs control the workflow of your software. Depending on the degree of clearance granted within the software, certain users can only perform certain functions while others have more authority and control. In short:
“Create” lets a designated user enter medication information
“Pre-Check” lets a designated user review the medication information prior to printing to ensure accuracy
“Print” lets a designated user print the labels which have been subjected to the Pre-Approval process
"Post-Check" lets a designated user approve or reject print jobs before they go to the log report
“Report” lets a designated user review the labels that have been printed and generate reports of that information
Formulary
The Formulary section of the Main Screen is a list of all the medications in your MILT 3.0 database…solids, liquids, syringe meds, ampules, IV’s. This data can either be entered as you use the program or can be imported from previous versions of Medi-Dose software. Data Fields
The Data Fields section of the Main Screen displays the highlighted entry of the formulary. The default field names are user-defined and can be set by clicking on the actual Field Name and selecting “Change Field Name”
Label Patterns
Every listing in your Formulary can be associated with a particular label pattern. You can either use the defaults patterns we set within the program or you can design your own. There are patterns set for:
Medi-Dose Lid-Label Covers
Medi-Dose Oval Lid-Label Covers
LiquiDose Labels
Mini-LiquiDose Labels
LiquiDose Butterfly Labels
Line Tracing Labels
MILT 3.0 Help 3.0.04Show Me Menu
Page 6 of 81Welcome to MILT 3.0
6/1/2009file://C:\Documents and Settings\Don Lawson\Local Settings\Temp\~hh5161.htm

The Show Me feature is a tutorial that walks you through basic processes. By clicking on a topic, you can see how to perform a particular function with step-by-step instructions (your topics may be different than what is pictured below.)
Follow along with the displayed instructions and then choose <Next> to move to the next
Page 7 of 81Welcome to MILT 3.0
6/1/2009file://C:\Documents and Settings\Don Lawson\Local Settings\Temp\~hh5161.htm

step.
The Help Menu offers several options if you are in need of assistance:
Documentation - Opens this MILT 3.0 Help file Training Movies - Animated films that demonstrate and explain the features of MILT
3.0 Show Me! - In application walk-throughs for common processes Medi-Dose Support Site - Direct link to our Internet Support Site About - Version and install information for support
MILT 3.0 Help 3.0.04Help Menu
MILT 3.0 Help 3.0.04Print Menu
Page 8 of 81Welcome to MILT 3.0
6/1/2009file://C:\Documents and Settings\Don Lawson\Local Settings\Temp\~hh5161.htm

Once an entry has been selected from the Formulary, you can print it by selecting the Print Action Button. Depending on the label associated with that medication, a print screen pops up using the defaults for that label pattern. In the example shown here, a medication associated with Medi-Dose “25” Lid-Label Cover was selected for printing. 25 labels of that medication will be printed on the sheet. Also, 2 sets of log labels will be printed…one set of 4 and the other set of 2.
The Printer, Paper Source and Paper Size will be saved with this type of label so you can print different types of labels to different printers or from different paper trays. With all label formats, you will be able to see how many printed sheets or labels will be generated prior to the actual printing. You can:
Click on PRINT to print the labels
Click on PREVIEW to see the labels on screen prior to printing to ensure accuracy. Click on SUBMIT to submit the label for approval or printing by another user (see
Workflow/Rights to turn on this feature.)
Click on ALIGN to ensure that all your data is fitting within the prescribed dimensions of your selected label.
MILT 3.0 Help 3.0.04
Page 9 of 81Welcome to MILT 3.0
6/1/2009file://C:\Documents and Settings\Don Lawson\Local Settings\Temp\~hh5161.htm

The Align Menu lets you “tweak” your output to ensure your data is fitting within the prescribed dimensions of your selected label. You can move your output in increments of 1/32”.
Clicking on “Save” makes those measurements the default for that particular label pattern.
Clicking on “Test” lets you see test output to ensure your defaults are correct.
Each brand of thermal printer has its own settings and behaviors. There are many brands and models of thermal printers on the market. Obviously, we could not test the software with every thermal printer on the market. The two printers that we have tested extensively with MILT 3.0 are:
Zebra LP 2844 - Direct (ink is in the paper, no ribbon required) Zebra TLP 2844 - Transfer (ribbon required)
We picked these two printers for their balance of cost, size and availability. If you want to try a different printer, it must be able to handle a 4.25" wide label stock. For the Medi-Dose Lid Label Cover, the printer must be able to accept fan-folded stock.
Custom paper sizes need to be created for our label stock. The Medi-Dose Lid Label Cover is 4.12" wide by 6.25" tall. All other labels are 4.25" wide by 1.5" tall. To create these sizes on
Align Menu
MILT 3.0 Help 3.0.04Thermal Printers
Page 10 of 81Welcome to MILT 3.0
6/1/2009file://C:\Documents and Settings\Don Lawson\Local Settings\Temp\~hh5161.htm
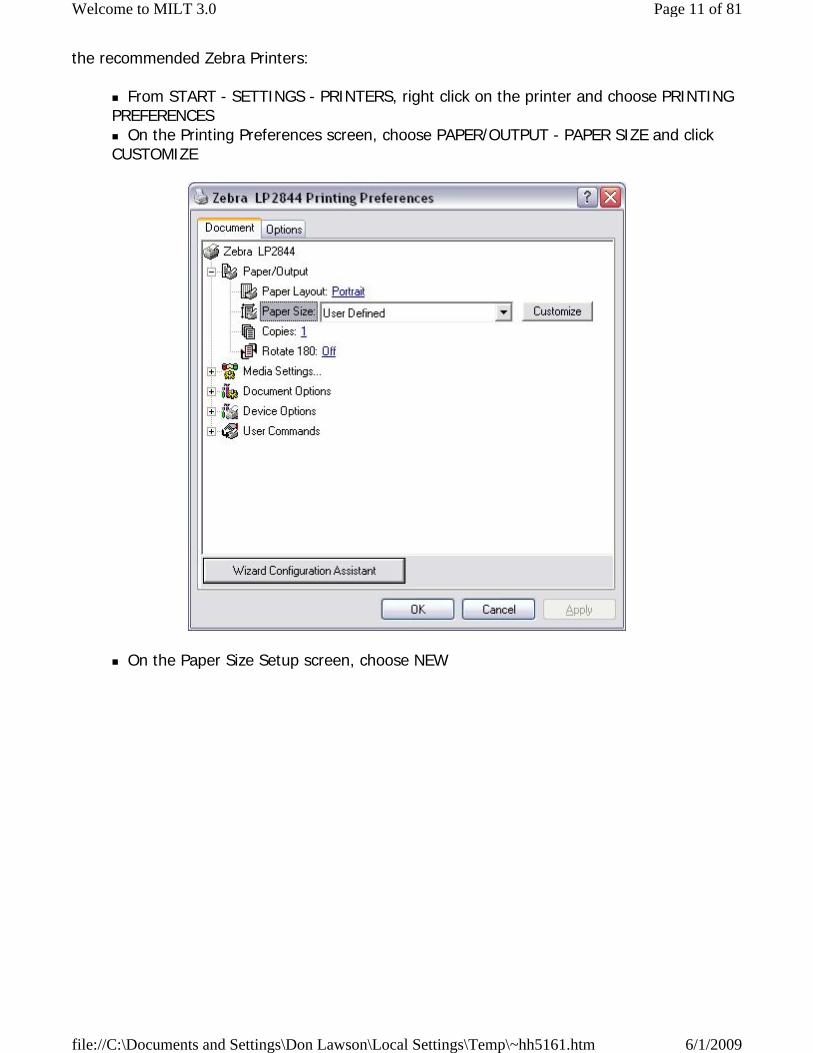
the recommended Zebra Printers:
From START - SETTINGS - PRINTERS, right click on the printer and choose PRINTING PREFERENCES
On the Printing Preferences screen, choose PAPER/OUTPUT - PAPER SIZE and click CUSTOMIZE
On the Paper Size Setup screen, choose NEW
Page 11 of 81Welcome to MILT 3.0
6/1/2009file://C:\Documents and Settings\Don Lawson\Local Settings\Temp\~hh5161.htm

For the Medi-Dose Lid Label Cover, enter the settings as shown below and then choose OK to save them
Page 12 of 81Welcome to MILT 3.0
6/1/2009file://C:\Documents and Settings\Don Lawson\Local Settings\Temp\~hh5161.htm

For any of the other label types, enter the settings as shown below and then choose OK to save them
Back on the Printing Preferences Screen, choose DEVICE OPTIONS - HEAD SETTINGS - PRINT DARKNESS and change it to 15 and click OK
Page 13 of 81Welcome to MILT 3.0
6/1/2009file://C:\Documents and Settings\Don Lawson\Local Settings\Temp\~hh5161.htm

When you print a thermal label type for the first time you will need to set the "Printer" to the Zebra LP2844, the "Paper Source" to Paper Source, and the Paper Size to one of the two types you just created as explained above.
Page 14 of 81Welcome to MILT 3.0
6/1/2009file://C:\Documents and Settings\Don Lawson\Local Settings\Temp\~hh5161.htm

Your Manufacturer's Expiration Date cannot be less than your Packaged Expiration Date. Change one or the other to correct the issue, and then press OK to continue to the Print Menu.
By default, the Manufacturer's Expiration Date is stored with the item in the formulary. Each time the item is selected from the Formulary, the same Manufacturer's Expiration Date is displayed. To save a new Manufacturer's Expiration Date, edit the item, press Save and
MILT 3.0 Help 3.0.04Verify Expiration Date
Page 15 of 81Welcome to MILT 3.0
6/1/2009file://C:\Documents and Settings\Don Lawson\Local Settings\Temp\~hh5161.htm

choose Overwrite.
The option to turn on or off the Verify Expiration Date feature can be found in Tools - Date Menu.
The Clear Action Button lets you start over. It clears all the information from the Data Fields on the Main Screen, but it does not delete any data that has been saved by any operation of the program.
MILT 3.0 Help 3.0.04Clear Button
MILT 3.0 Help 3.0.04Save Menu
Page 16 of 81Welcome to MILT 3.0
6/1/2009file://C:\Documents and Settings\Don Lawson\Local Settings\Temp\~hh5161.htm

When an entry to the Formulary has either been added or modified, you can either save that entry as a new one or overwrite the entry over the modified one using the Save Action Button. The selected entry appears under the “Existing Item” section. You have a choice of either:
“Save New” which will save your revised formulary item as a new entry or…
“Overwrite” which will save your revised formulary item OVER your existing entry, thereby replacing it in the Formulary Listing.
Selecting "Default to Current Label Type" and/or "Default to Current Pattern" will associate this Formulary Item with the current Label and/or Pattern. This Label and/or Pattern will appear when you select this Formulary Item by default. You can still pick a different Label and/or Pattern.
MILT 3.0 Help 3.0.04Delete Menu
Page 17 of 81Welcome to MILT 3.0
6/1/2009file://C:\Documents and Settings\Don Lawson\Local Settings\Temp\~hh5161.htm

Choosing the Delete Action button lets you delete an entry from the active Formulary, Log, Print List or Approval List. If you have Multi-Select turned on, you can delete all selected items at once.
MILT 3.0 Help 3.0.04Lookup Menu
Page 18 of 81Welcome to MILT 3.0
6/1/2009file://C:\Documents and Settings\Don Lawson\Local Settings\Temp\~hh5161.htm

One of the most requested items we heard from our customers is for the ability to lookup data within the program, regardless of whatever field it’s in or whatever label pattern it’s associated with. So we designed the Lookup menu to do just that. To search:
1. Enter or scan any information into the FOR: field
2. Choose MILT (Formulary) to search your Formulary, or NDC (FDA) to search the NDC Database from the IN: field
3. Press <SEARCH>
4. Select your item from the list and press <SELECT> to copy the information to your Data Fields.
If MILT recognizes that the bar code you entered in the "For" field has multiple parts, MILT will split them and they will appear in the Bar Code Parts Field. The <ASSIGN> button will allow you to map the NDC fields to your Data Fields. The <UPDATE NDC> button will allow you to download the latest FDA NDC Database. Quarterly, we download and format the official FDA NDC database directly from the FDA and make it available to you at no cost. ** The FDA National Drug Code INFORMATION in the MILT system is provided for informational purposes only. Medi-Dose, Inc. does not guarantee the correctness or completeness of this INFORMATION. The INFORMATION in the MILT system is not provided as, or intended to be, a substitute for expert pharmacological knowledge. Should you find an error in the FDA NDC Database, please notify us at [email protected]. We will forward the error information to the FDA for their review.
Page 19 of 81Welcome to MILT 3.0
6/1/2009file://C:\Documents and Settings\Don Lawson\Local Settings\Temp\~hh5161.htm

The Lookup Assignment Menu is where you can map NDC fields to your MILT Data Fields.
Choose NDC Fields on the left, MILT Data Fields on the right, and press <SAVE> to save the assignments.
The Edit AI button will allow you to create and edit Application Identifiers, special codes that identify the different items in multi-part bar codes.
MILT 3.0 Help 3.0.04Lookup Assignment Menu
MILT 3.0 Help 3.0.04Application Identifier Menu
Page 20 of 81Welcome to MILT 3.0
6/1/2009file://C:\Documents and Settings\Don Lawson\Local Settings\Temp\~hh5161.htm

Application Identifiers
In order to read and write variable length information, 2-D and Multi-Part bar codes require the use of Application Identifiers (AI.) These AI 's are special codes that identify the information that follows them. MILT 3.0 provides three styles of AI's: International Standard, Manufacturer's Packaging Number and Custom.
International Standard
In the international standards, (01) identifies the NDC number, (17) is the expiration date in YYMMDD format, and (10) is the lot number. So, for example, if you wanted to encode an NDC number of 24208029915, an expiration of November 26th, 2007, and a lot number ABC123, the characters encoded and then returned by a bar code generated with the international standard would read:
01000242080299151707112610ABC123.
When the scanning software reads this bar code from left to right, 01 tells it that the next 14 characters will be the NDC number (padded with zeros.) Then the 17 tells it that the next 6 characters are the date in YYMMDD format. Finally, the 10 tells it that up to the next 20 characters will be the lot number. Because the lot number can be a variable length, it must go last.
Details of the international standards for Application Identifiers as defined by GS1
Page 21 of 81Welcome to MILT 3.0
6/1/2009file://C:\Documents and Settings\Don Lawson\Local Settings\Temp\~hh5161.htm

International Standards Organization can be found at http://www.gs1uk.org/EANUCC/WORD_Files/GS_Section_2-7_V7.doc.
Manufacturer's Packaging Number (McKesson CareCast Style)
The Manufacturer's Packaging Number (MPN) is a special format for encoding NDC numbers and expiration dates that is required by several of the leading bed-side scanning software companies. The MPN starts with a 3, followed by the NDC number with a zero, specified by the FDA Database, removed. MPN then adds a 1, 2 or 3, to identify which zero was removed. This is followed by either the expiration date in either MMYYDD format, MMYY format or a 0 for no expiration date.
So, for example, if you have selected the "MPN + MMYYDD" format, and you have an NDC number of 24208029915 and an expiration of November 26th, 2007, the bar code generated would read 324208299152110726. Note that the zero between the eight and the two has been removed from the NDC number. Programs that expect bar codes to be in MPN format know how to decode this information back into the NDC number and expiration date.
Custom
If your facility does not use one of the standards above, MILT 3.0 allows you to create your own Application Identifiers. So, for example, if your bed-side scanning software expects "NDC" to mean that the next 13 characters will be the NDC number, MILT 3.0 will allow you to create bar codes in that format.
Creating Bar Code Process
When MILT creates a bar code using Application Identifiers it applies the associated formatting to the data in the first selected Data Field, then the second, and so on.
As an example, if you have set up a bar code with the following settings:
MILT will create the bar code data as follows:
Page 22 of 81Welcome to MILT 3.0
6/1/2009file://C:\Documents and Settings\Don Lawson\Local Settings\Temp\~hh5161.htm

1st NDC Data Field = 12345678901
Bar Code = 0100012345678901 (AI 01 + NDC padded with zeros to 14 characters)
Note - 14 Characters are used because this data type is used by the international standard for more than just NDC numbers
2nd
Exp. Date Data Field = 01/02/2010
Bar Code = 010001234567890117100102 (AI 17 + Exp Date in YYMMDD format)
3rd
Lot Data Field = 123B-12
Bar Code = 01000123456789011710010210123B-12 (AI 10 + Lot)
Reading Bar Code Process
When MILT reads a bar code that contains Application Identifiers it processes them from left to right.
The bar code created above would be read as follows:
1st 01000123456789011710010210123B-12 AI 01 = NDC padded with zeros to 14 characters
2nd
01000123456789011710010210123B-12
AI 17 = Exp Date in YYMMDD format 3rd
01000123456789011710010210123B-12
AI 10 = Lot (up to 20 characters.)
Application Identifier Settings
The settings on the Application Identifier Menu determine how MILT uses the Application Identifier to create and read bar codes:
Title - The name of the Application Identifier
Scanner Code - The code that will be read by a bar code scanner
Human Code - Human Readable code that identifies an Application Identifier
Type of Data - Numeric, Alpha-Numeric or Date
Date Format - How the date will be formatted
Minimum # of Characters - Lowest number of characters allowed
Maximum # of Characters - Highest number of characters allowed Pad - If the data should be padded to the Maximum # of Characters
Pad Character - Character to use for padding
Front/Back - Pad the front or the back
Writing - Make the AI available for creating bar codes
Reading - Make this AI available for reading bar codes
Read To - The Data Field the processed data will be mapped to
Page 23 of 81Welcome to MILT 3.0
6/1/2009file://C:\Documents and Settings\Don Lawson\Local Settings\Temp\~hh5161.htm

Search - If checked, MILT will use this data item from your bar code when it searches the NDC database
MILT 3.0 Help 3.0.04Update NDC
Page 24 of 81Welcome to MILT 3.0
6/1/2009file://C:\Documents and Settings\Don Lawson\Local Settings\Temp\~hh5161.htm

MILT 3.0 contains a built-in database of NDC numbers, direct from FDA. We update the NDC database on quarterly. From this screen, you can download these updates at no charge.
MILT 3.0 Help 3.0.04Tools Menu
Page 25 of 81Welcome to MILT 3.0
6/1/2009file://C:\Documents and Settings\Don Lawson\Local Settings\Temp\~hh5161.htm

The Tools Menu lets you:
Auto-Text - manage Auto-Text entries
Dates - pick your desired default beyond-use date and format File - backup, restore, import and export data
Labels - select the Medi-Dose/EPS supported labels you wish to use
Network - publish and connect to a shared database
Pattern Browser - install ready-made patterns
Users - manage users
Workflow/Rights - customize MILT to your workflow
Auto-Text allows you to store common phrases, like warnings or manufacturer names, and insert them into a field with a few key strokes. This is similar to the Hot-Key feature in previous version of Medi-Dose software.
When you open Auto-Text from the Tools Menu you will see this informational warning:
Basically, you can manage your entries by opening Auto-Text from the Tools Menu. When you want to insert Auto-Text, with your cursor in a field, press the "F12" function key on the top row of your keyboard.
MILT 3.0 Help 3.0.04Auto Text
Page 26 of 81Welcome to MILT 3.0
6/1/2009file://C:\Documents and Settings\Don Lawson\Local Settings\Temp\~hh5161.htm

To insert Auto-Text into a field you can:
Double-Click the item in the list Use your Up and Down arrow keys to select the item and press the Enter key insert it Click the item in the list and then click the Select button
The New, Edit and Delete buttons allow you to maintain the list of Auto-Text Items.
New - Enter any text and click Save New
Edit - Your selected item will appear. Edit it as desired and click Save
Page 27 of 81Welcome to MILT 3.0
6/1/2009file://C:\Documents and Settings\Don Lawson\Local Settings\Temp\~hh5161.htm

Delete - Click Delete to remove this Auto-Text item from the list
MILT 3.0 has several options to calculate the beyond-use date and time. Regardless of the options you select, the expiration date can always be manually changed for each label.
• Today's Date
o The Beyond-Use is set to the System Date.
• Today's Date + Years, Months, Days
o The Beyond-Use Date is set to the System Date plus the number of Years, Months and Days you have set here.
• Last Date Used
o When you select a label, or create a new one, the Beyond-Use Date will not recalculate.
MILT 3.0 Help 3.0.04Dates Menu
Page 28 of 81Welcome to MILT 3.0
6/1/2009file://C:\Documents and Settings\Don Lawson\Local Settings\Temp\~hh5161.htm

• Turn off Expiration date
o This choice globally eliminates the use of the beyond-use date field.
• Date Format
Eight different formats can be selected for your beyond-use date display. (M = Month, D = Day, Y = Year).
For example, April 6, 2010 can be displayed as:
M / D / YY =4/6/10 (Note - If we had used a two digit month, this format will show both digits, but does not pad a single digit month with a zero.)
M / D / YYYY =4/6/2010
MM / DD / YY = 04/06/10
MM / DD / YYYY = 04/06/2010
MMM/d/yy = APR/6/10
MMM/d/yyyy = APR/6/2010
MMM/dd/yy = APR/06/10
MMM/dd/yyyy = APR/06/2010
M / YY = 4/10
MM / YY = 04/10
M / YYYY = 4/2010
MM / YYYY = 04/2010
YY / MM / DD = 10/04/06
YYYY / MM / DD = 2010/04/06
YY / MM = 10/04
YYYY / MM = 2010/04
DD / MM / YY = 06/04/10
DD / MM / YYYY = 06/04/2010
For the Time Format, using nine thirty-five in the morning as an example:
h:mm tt = 9:35 AM
hh:mm tt = 09:35 AM
H:mm = 9:35 (Military or 24 Hour Time)
HH:mm = 09:35 (Military or 24 Hour Time)
• Show Expiration Time Field
The Expiration Time Field allows you to print an Expiration Time on your label for medications that have a very short shelf life, like insulin.
• Compare Expiration Date to Manufacturer's Expiration Date
If you turn on this option, when you try to print an item, MILT will verify that the Packaged Expiration Date is less than the Manufacturer's Expiration Date. If it fails this test, the dates will have to be corrected before you are allowed to print that item.
MILT 3.0 Help 3.0.04File Menu
Page 29 of 81Welcome to MILT 3.0
6/1/2009file://C:\Documents and Settings\Don Lawson\Local Settings\Temp\~hh5161.htm

From the File Menu you can:
Backup - Perform a manual backup of your database or schedule an automatic one. Restore - Restore a backup of your database. Import - Import data from previous version of Medi-Dose software.
From the Backup Menu you can perform a manual backup of your database or schedule an automatic backup.
Manual Backup
1. Backup To - Click Browse and select a location to store your backup file. 2. File Name - A file name is automatically generated (MILT30 + YYYY + MM + DD) but you may enter your own name if desired. 3. Click the Backup Action Button to complete the backup.
Automatic Backup
MILT 3.0 Help 3.0.04Backup Menu
Page 30 of 81Welcome to MILT 3.0
6/1/2009file://C:\Documents and Settings\Don Lawson\Local Settings\Temp\~hh5161.htm

1. Click the Schedule Action Button 2. See Help Topic "Backup Schedule Menu"
From the Backup Schedule Menu you can schedule an automatic backup.
Click Browse and select a location for you backup files. Select how often to make a backup and how many versions to keep. Click the Save Action button to save your backup schedule.
Changing the schedule to zero days and zero backups turns off the scheduled backup feature.
MILT 3.0 Help 3.0.04Backup Schedule Menu
MILT 3.0 Help 3.0.04Restore Menu
Page 31 of 81Welcome to MILT 3.0
6/1/2009file://C:\Documents and Settings\Don Lawson\Local Settings\Temp\~hh5161.htm

*NOTE* Do not restore from a prior version of Medi-Dose software - Use IMPORT for prior versions.
From the Restore Menu you can restore a backup of your MILT database.
1. You must be the only user logged into MILT or the restore will not perform. 2. Click Browse and select the desired backup file to restore. 3. Click the Restore Action Button.
*NOTE* Do not restore from a prior version of Medi-Dose software - Use IMPORT for prior versions.
MILT 3.0 Help 3.0.04Import Wizard
Page 32 of 81Welcome to MILT 3.0
6/1/2009file://C:\Documents and Settings\Don Lawson\Local Settings\Temp\~hh5161.htm

MILT 3.0 will import your data from 2.0 and newer versions of Medi-Dose software so you don’t have to recreate all your data and reports when upgrading. The Import Wizard was designed as a step-by-step process to determine the program from which you’re importing from, locate your data on your hard drive or network, verify that the data to be imported is correct and proceed with the import. There are two cautions when using the Import Wizard. First, please do NOT use the Windows Copy utility to bring data over from previous versions. This may result in a corruption of your data and will render your data unusable in MILT 3.0. Second, only use the Import Wizard once. Multiple use of this utility will result in duplication of your data.
If you are converting from a version prior to 2.0 you will need to install version 2.6, which is included on your CD, convert your data to 2.6, and then convert it to 3.0.
If you have any questions, please feel free to call us. MILT 3.0 Help 3.0.04Labels Menu
Page 33 of 81Welcome to MILT 3.0
6/1/2009file://C:\Documents and Settings\Don Lawson\Local Settings\Temp\~hh5161.htm

The Labels utility lets you select those Medi-Dose/EPS supported labels you wish to use. The selected labels you choose will be available from the label pull-down menu under Label Pattern. We hope to include more labels as we continue with further development of our software. For each selected label, the size and number of labels per page is displayed.
MILT 3.0 Help 3.0.04Network Settings
Page 34 of 81Welcome to MILT 3.0
6/1/2009file://C:\Documents and Settings\Don Lawson\Local Settings\Temp\~hh5161.htm

From the Network Settings Menu you can publish your database on a network share for other machine to access, or connect to a database that was already published.
1. Create a folder on the network where all users have Read, Write and Create permissions.
2. On the computer with the best database, choose TOOLS - NETWORK, browse to the folder from step #1 and click SAVE. This will publish the database to the folder.
3. On the next computer, choose TOOLS - NETWORK, browse to the folder from Step #1 and click SAVE. MILT will see the database is already there and just connect this computer to that database.
4. Repeat step #3 on all other computers.
*NOTE* Users must have full rights to the folder where your MILT data is published for sharing.
MILT 3.0 Help 3.0.04Pattern Browser Menu
Page 35 of 81Welcome to MILT 3.0
6/1/2009file://C:\Documents and Settings\Don Lawson\Local Settings\Temp\~hh5161.htm
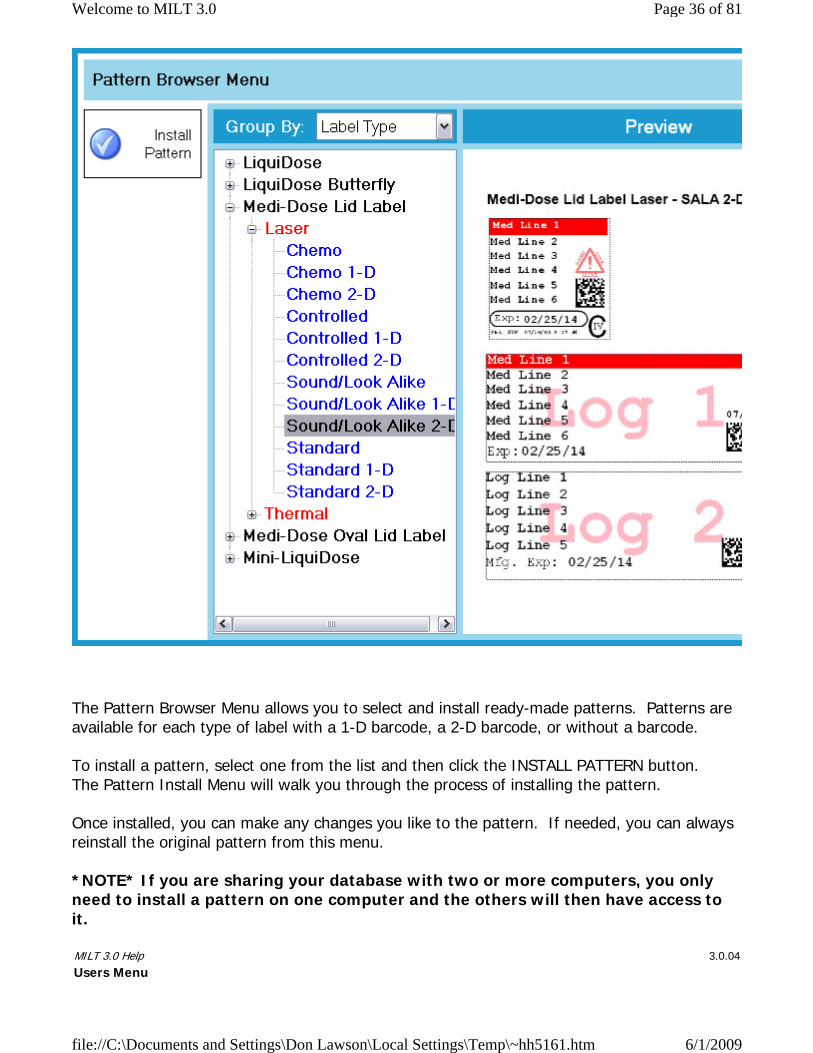
The Pattern Browser Menu allows you to select and install ready-made patterns. Patterns are available for each type of label with a 1-D barcode, a 2-D barcode, or without a barcode.
To install a pattern, select one from the list and then click the INSTALL PATTERN button. The Pattern Install Menu will walk you through the process of installing the pattern.
Once installed, you can make any changes you like to the pattern. If needed, you can always reinstall the original pattern from this menu.
*NOTE* If you are sharing your database with two or more computers, you only need to install a pattern on one computer and the others will then have access to it.
MILT 3.0 Help 3.0.04Users Menu
Page 36 of 81Welcome to MILT 3.0
6/1/2009file://C:\Documents and Settings\Don Lawson\Local Settings\Temp\~hh5161.htm
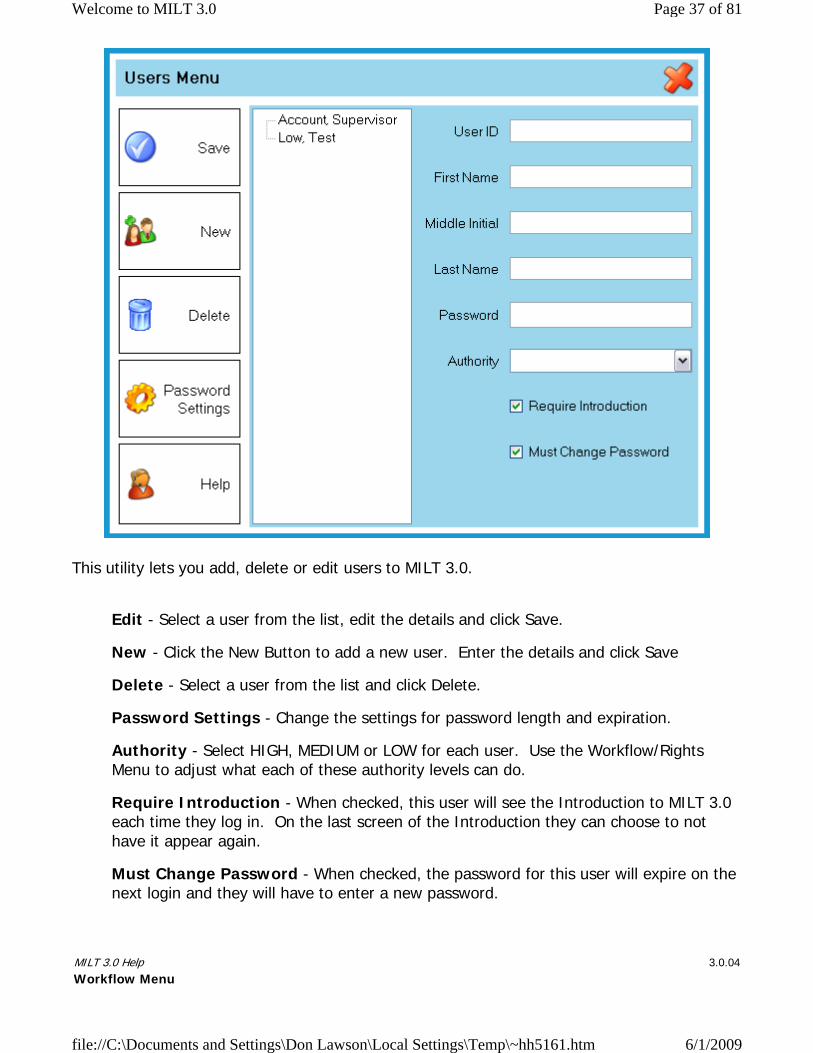
This utility lets you add, delete or edit users to MILT 3.0.
Edit - Select a user from the list, edit the details and click Save.
New - Click the New Button to add a new user. Enter the details and click Save
Delete - Select a user from the list and click Delete.
Password Settings - Change the settings for password length and expiration.
Authority - Select HIGH, MEDIUM or LOW for each user. Use the Workflow/Rights Menu to adjust what each of these authority levels can do.
Require Introduction - When checked, this user will see the Introduction to MILT 3.0 each time they log in. On the last screen of the Introduction they can choose to not have it appear again.
Must Change Password - When checked, the password for this user will expire on the next login and they will have to enter a new password.
MILT 3.0 Help 3.0.04Workflow Menu
Page 37 of 81Welcome to MILT 3.0
6/1/2009file://C:\Documents and Settings\Don Lawson\Local Settings\Temp\~hh5161.htm

The Workflow/Rights Menu allows you to configure MILT to adapt to your workflow by turning on and off steps and setting the access rights for the three types of users.
---“Create” lets a designated user enter medication information
--- “Pre-Check” lets a designated user review the medication information prior to
printing to ensure accuracy
---“Print” lets a designated user print the labels which have been subjected to the Pre-
Approval process
---"Post-Check" lets a designated user approve or reject print jobs after they print, but before they go to the log.
---“Report” lets a designated user review the labels that have been printed and
generate reports of that information
The Workflow section allows you to give users access to the different steps in your workflow. The Rights section allows you to define what they can do in that step.
Workflow
Page 38 of 81Welcome to MILT 3.0
6/1/2009file://C:\Documents and Settings\Don Lawson\Local Settings\Temp\~hh5161.htm

The HIGH, MEDIUM and LOW columns allow you to set the access for each of the steps in your workflow. For example, the settings for the Report Step above will allow HIGH users to access the Reports Screen, but MEDIUM and LOW users will not even see the tab for that step.
Allowed - User has full rights to this step. Required - User is required to follow this step. They can open the tab for this step and
view items, but can not perform management functions, like delete or approve, in it. Denied - User will not see this tab.
Rights
You can refine the access to each step with the Rights section. With these settings you could, for example, allow MEDIUM users access to the Create Step, but not let them save any changes to the Label Pattern by changing the setting from MANAGE to EDIT.
Manage - User can edit, delete and save changes in this part of the screen. Edit - User can edit and print changes, but can not save changes they made in this
part of the screen. View - User can not edit in this part of the screen.
MILT 3.0 Help 3.0.04Change Password
Page 39 of 81Welcome to MILT 3.0
6/1/2009file://C:\Documents and Settings\Don Lawson\Local Settings\Temp\~hh5161.htm

MILT 3.0 lets you set user ID’s and passwords for all software users. You should be the only person that knows your password. MILT allows all users access to the Change Password feature so they can set their own password. To change passwords:
1. Type in the old password on the “Old Password” line. 2. Enter the new password on the “New Password” line. 3. Type the new password again on the “Confirm New Password” line to ensure the
proper password has been associated with the User’s ID. 4. Click on the “Save New Password” button to confirm the change.
MILT 3.0 Help 3.0.04Login Menu
Page 40 of 81Welcome to MILT 3.0
6/1/2009file://C:\Documents and Settings\Don Lawson\Local Settings\Temp\~hh5161.htm

When using MILT 3.0 for the first time, you’ll need to use our standard user identification and password protection settings. You can edit these codes through the User utility from the Tools button on the main screen (more on that later).
Please enter SUP (for Supervisor) in the ID field and medi in the password field and hit the Login button to get started.
MILT 3.0 Help 3.0.04Filter Menu
Page 41 of 81Welcome to MILT 3.0
6/1/2009file://C:\Documents and Settings\Don Lawson\Local Settings\Temp\~hh5161.htm

With the Filter Menu you can filter your log and error entries. The results of your filter will determine what entries are displayed in the Log Entries List and in your reports.
To create a filter, check a field and enter the text you want in the associated line. When you apply the filter, only records that have that text in that field will appear. If you choose multiple fields, only records that match all of those entries will be displayed.
In the example below, the log will only display records that have "Abc" in the Medication Field and were packaged between 7/6/2007 and 8/6/2007.
Page 42 of 81Welcome to MILT 3.0
6/1/2009file://C:\Documents and Settings\Don Lawson\Local Settings\Temp\~hh5161.htm

To clear the filter, and thereby display all log or error items, press the <CLEAR> button.
MILT 3.0 provides detailed reporting of your log or error items. Two reports have been provided within this version of the program:
Report – Detailed: label and log information in both text and graphic form
MILT 3.0 Help 3.0.04Reports Menu
Page 43 of 81Welcome to MILT 3.0
6/1/2009file://C:\Documents and Settings\Don Lawson\Local Settings\Temp\~hh5161.htm

Report – Summary: label and log information displayed in text form
With either of these reports, you can use MILT 3.0’s filter utility to obtain the necessary information you desire. Whether you want to run a report of all the meds you packaged…or all the meds which Mr. Pharmacist packaged…or just the aspirin that Mrs. Pharmacist packaged…or just the aspirin that Ms. Pharmacist packaged in a given time period…regardless of what you need, MILT 3.0 can generate the necessary information. And both reports will show you exactly what information is being requested. To use the reports feature:
1. Click the "Show Log" or "Show Errors" action button to display either the log or error items. 2. Filter the log or error data as desired 3. From the Reports Menu, select the type of report 4. Select Preview or Print
Pumps are a special feature used to print and maintain unique bar codes for individual smart pump channels.
This feature is not activated by default. Please contact Medi-Dose if you are interested in activating this feature.
0.0 Main Screen 0.1 The Main Screen is divided into three columns:
Formulary is the list of Pump Channels.
Data Fields are the details of a selected Pump Channel.
Label Pattern is the layout of the Data Fields on the printed label.
MILT 3.0 Help 3.0.04Pumps (Special Feature)
Page 44 of 81Welcome to MILT 3.0
6/1/2009file://C:\Documents and Settings\Don Lawson\Local Settings\Temp\~hh5161.htm

0.2 Assigned Data Fields
Prefix – First part of the Channel Bar Code data. Always CMMMU/LN. Channel ID – Second part of the Channel Bar Code data. Unique for each Pump +
Channel. Suffix – Third part of the Channel Bar Code Data. Always /Z70. Channel Letter – Human friendly name of the channel (A, B, C, etc.) Pump ID – Unique identifier of the pump. Operation – DO NOT USE. This field is reserved for logging purposes. No other fields are relevant for this installation.
Page 45 of 81Welcome to MILT 3.0
6/1/2009file://C:\Documents and Settings\Don Lawson\Local Settings\Temp\~hh5161.htm

1.0 Print a Pump Channel 1.1 Double-Click on a Pump Channel in the Formulary
1.2 The information for that Pump Channel will appear in the Data Fields area, and the layout of the label will appear in the Label Pattern area.
1.3 If the data and layout are correct, click the PRINT button.
Page 46 of 81Welcome to MILT 3.0
6/1/2009file://C:\Documents and Settings\Don Lawson\Local Settings\Temp\~hh5161.htm

1.4 The Print Menu will appear. All options should be set as shown below
(5 labels = 1 strip.) Click the PRINT button to print your label.
1.5 Once your label has printed, the Verify Pump Menu will appear. Select the Channel Letter and then scan the bar codes on the printed label and the pump. Click the VERIFY button to check that the printed label matches your pump.
Page 47 of 81Welcome to MILT 3.0
6/1/2009file://C:\Documents and Settings\Don Lawson\Local Settings\Temp\~hh5161.htm

1.6 Possible results of the Verify Pump Menu when required after printing:
Message Cause Result Action
All Information is Correct
Adds PRINT - VERIFIED operation to Log (Current Time & User ID)
None
Incorrect Channel Bar Code Scan
Return to Verify Pump Menu
Correct the Channel Scan
Incorrect Pump Scan
Return to Verify Pump Menu
Correct the Pump Scan
Incorrect Channel Letter
Return to Verify Pump Menu
Correct the Channel Letter
Page 48 of 81Welcome to MILT 3.0
6/1/2009file://C:\Documents and Settings\Don Lawson\Local Settings\Temp\~hh5161.htm

User Closed Menu Instead of Verifying Pump
Adds PRINT – NOT VERIFIED operation to Log (Current Time & User ID)
Yes = Cancel, No = Return to Verify Pump Menu
*NOTE* If Verify Pump is Not Required with Print Jobs
Option is Turned off in PUMP SETTINGS
Adds PRINT – VERIFY OFF operation to Log (Current Time & User ID)
None
Page 49 of 81Welcome to MILT 3.0
6/1/2009file://C:\Documents and Settings\Don Lawson\Local Settings\Temp\~hh5161.htm

2.0 Search for a Pump or Channel 2.1 Click the LOOKUP button on the Main Screen.
2.2 The Lookup Menu will appear.
2.3 In the For: field, scan or type in the Channel or Pump bar code.
Page 50 of 81Welcome to MILT 3.0
6/1/2009file://C:\Documents and Settings\Don Lawson\Local Settings\Temp\~hh5161.htm

2.4 The In: field should read MILT (Formulary). Click the SEARCH button.
2.5 Search will return one record if you used a Channel bar code, or all channels for that pump if you used the Pump bar code. Double-Click on the one you want to select.
2.6 The Pump Channel information will appear in the Data Fields area, and the layout of the label will appear in the Label Pattern area. Print your label as shown in 1.0 Print an Existing Pump Channel – Steps 1.3 to 1.6.
Page 51 of 81Welcome to MILT 3.0
6/1/2009file://C:\Documents and Settings\Don Lawson\Local Settings\Temp\~hh5161.htm

Page 52 of 81Welcome to MILT 3.0
6/1/2009file://C:\Documents and Settings\Don Lawson\Local Settings\Temp\~hh5161.htm

3.0 Verify a Pump 3.1 From the Main Screen, click the PUMPS button. The Pump Menu will appear. Click the VERIFY button.
3.2 The Verify Pump Menu will appear. Select the Channel Letter and then scan the bar codes on the channel and the pump. Click the VERIFY button to check that the printed label matches your pump.
3.3 Possible results of the Verify Pump Menu when not from Print Job:
Message Cause Result Action
All Information Adds PUMP None
Page 53 of 81Welcome to MILT 3.0
6/1/2009file://C:\Documents and Settings\Don Lawson\Local Settings\Temp\~hh5161.htm

is Correct VERIFIED operation to Log (Current Time & User ID)
Incorrect Channel Bar Code Scan
Return to Verify Pump Menu
Correct the Channel Scan
Incorrect Pump Scan
Return to Verify Pump Menu
Correct the Pump Scan
Incorrect Channel Letter
Return to Verify Pump Menu
Correct the Channel Letter
Cancel User Closed Menu Instead of Verifying Pump
Verify Pump Menu Closes
None
Page 54 of 81Welcome to MILT 3.0
6/1/2009file://C:\Documents and Settings\Don Lawson\Local Settings\Temp\~hh5161.htm
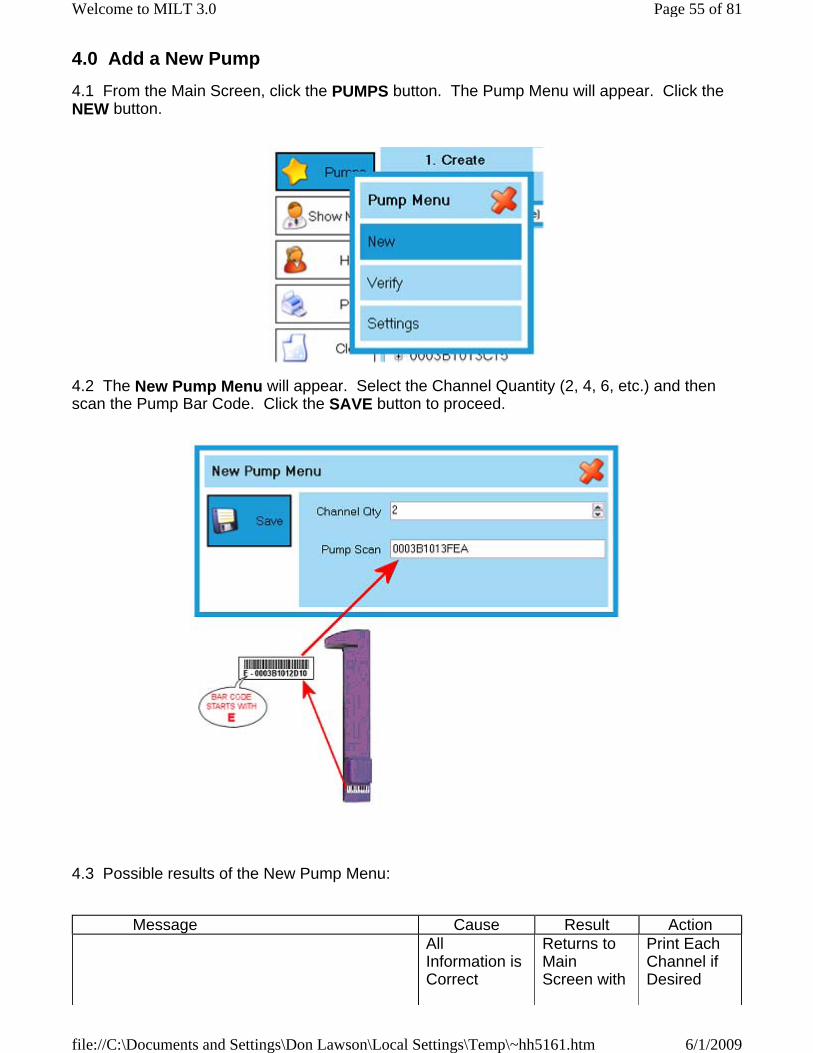
4.0 Add a New Pump 4.1 From the Main Screen, click the PUMPS button. The Pump Menu will appear. Click the NEW button.
4.2 The New Pump Menu will appear. Select the Channel Quantity (2, 4, 6, etc.) and then scan the Pump Bar Code. Click the SAVE button to proceed.
4.3 Possible results of the New Pump Menu:
Message Cause Result Action
All Information is Correct
Returns to Main Screen with
Print Each Channel if Desired
Page 55 of 81Welcome to MILT 3.0
6/1/2009file://C:\Documents and Settings\Don Lawson\Local Settings\Temp\~hh5161.htm

New Channel A Selected for Printing
Pump Already Exists in Database
Replace Pump or Cancel
Yes = Replace
No = Return to New Pump Menu
Invalid Number of Characters – See Pump Settings
Returns to New Pump Menu
Correct Pump Scan
Validation Character not Found – See Pump Settings
Returns to New Pump Menu
Correct Pump Scan
Page 56 of 81Welcome to MILT 3.0
6/1/2009file://C:\Documents and Settings\Don Lawson\Local Settings\Temp\~hh5161.htm

5.0 Pump Settings – Restricted Access 5.1 From the Main Screen, click the PUMPS button. The Pump Menu will appear. Click the SETTINGS button.
5.2 The Pump Settings Menu will appear. The recommended settings for LGH are shown below.
5.3 Settings
Pump Scan Validation
Length Must Be __ to __ Characters
When enabled, New Pumps will require this number of characters. Character __ Must Be __
When enabled, New Pumps will require this character in this position. Channel ID Parts
Prefix – Part One of Channel Bar Code
Page 57 of 81Welcome to MILT 3.0
6/1/2009file://C:\Documents and Settings\Don Lawson\Local Settings\Temp\~hh5161.htm

New Pumps will get this Prefix
Channel ID – Part Two of Channel Bar Code
New Pumps will get this Channel ID
Suffix – Part Three of the Channel Bar Code
New Pumps will get this Suffix
Defaults
Label New Pumps will default to this label
Pattern
New Pumps will default to this pattern
Require Verification After Each Print Job
When enabled, users must verify the pump with each print job
The Formulary section of the Main Screen is a list of all the medications in your MILT 3.0 database…solids, liquids, syringe meds, ampules, IV’s. They’ll all be arranged in whatever order you’ve selected by using the drop down menus (Sort List 1, 2 and 3) at the top of the field. The Sort Lists use the names you have set for each field. For example, if you have identified your first field as Medication, your second field as Strength and your third field as Manufacturer, then your data will be alphabetized by the name of the Medication, by the Strength within that med and then by the manufacturer of that med. Clicking on the little box next to each entry in the Formulary will reveal all the entries which match the displayed drug. Different strengths, manufacturers, lot numbers, etc. pertaining to that drug will show underneath it. Since each medication can be associated with a label format, when you select a particular medication in the Formularly listing, the appropriate Data Fields will be populated in the center of the screen and the associated label pattern of that Formulary listing will be displayed on the right (Medi-Dose, LiquiDose, Mini-LiquiDose, Butterfly LiquiDose, etc.).
MILT 3.0 Help 3.0.04Formulary
MILT 3.0 Help 3.0.04
Page 58 of 81Welcome to MILT 3.0
6/1/2009file://C:\Documents and Settings\Don Lawson\Local Settings\Temp\~hh5161.htm

The three Sort Lists at the top of the Formulary allow you to group your formulary by any field. For example, you could group all of your drugs by name with the dosage on the second level.
Selecting (None) in the second and third Sorts will give you a flat list. Click on any item to select it.
Selecting (None) in just the third Sort will give you a two level list. To select an item, open the top level item, then select the second level item you want.
Selecting a field in all three Sorts will give you a three level list. To select an item, open the top level item, then the second level, and then select the third level item you want.
Sort Lists
Page 59 of 81Welcome to MILT 3.0
6/1/2009file://C:\Documents and Settings\Don Lawson\Local Settings\Temp\~hh5161.htm

Sorts are remember for each user and by each workflow tab.
With the Multi-Select button you can turn on and off the multi-select feature.
With Multi-Select on, you can perform operations on several items at one time by checking the box next to each item. If you have your list grouped into more than one level, checking an item at a higher level will select all the items under that one.
Within each workflow step, you can use Multi-Select to:
Create Tab
Save - will associate all of the selected items with the currently displayed label type and pattern.
Delete - will delete all of the selected items.
Pre-Check Tab
MILT 3.0 Help 3.0.04Multi-Select
Page 60 of 81Welcome to MILT 3.0
6/1/2009file://C:\Documents and Settings\Don Lawson\Local Settings\Temp\~hh5161.htm
Approve - will approve all of the selected items. Delete - will delete all of the selected items.
Print Tab
Delete - will delete all of the selected items.
Post-Check Tab
Approve - will approve all of the selected items. Reject - will reject all of the selected items. Every item will get the same reason
and comments. Delete - will delete all of the selected items.
Report Tab
Delete - will delete all of the selected items.
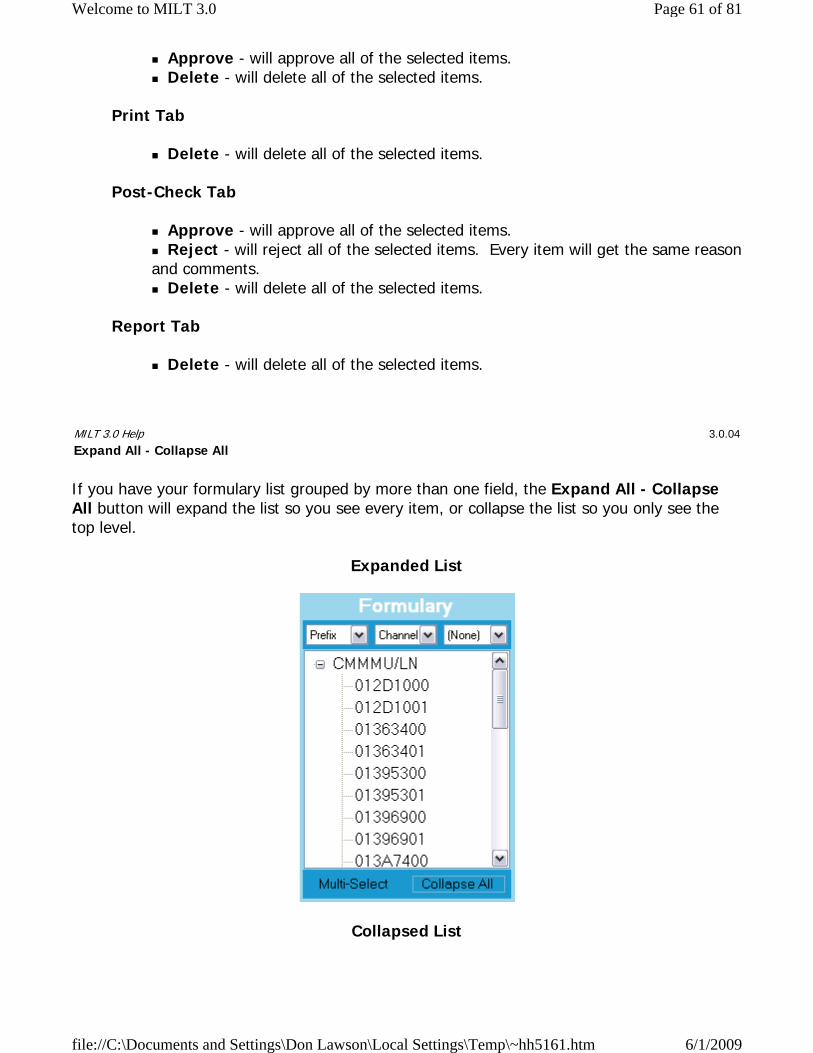
If you have your formulary list grouped by more than one field, the Expand All - Collapse All button will expand the list so you see every item, or collapse the list so you only see the top level.
Expanded List
Collapsed List
MILT 3.0 Help 3.0.04Expand All - Collapse All
Page 61 of 81Welcome to MILT 3.0
6/1/2009file://C:\Documents and Settings\Don Lawson\Local Settings\Temp\~hh5161.htm

The Data Fields section of the main screen displays the selected item in the formulary in the appropriate fields. By clicking on the name of the field, you can customize each field name to guide your staff to consistently place desired information in the correct fields.
MILT 3.0 Help 3.0.04Data Fields
MILT 3.0 Help 3.0.04Data Field Menu
Page 62 of 81Welcome to MILT 3.0
6/1/2009file://C:\Documents and Settings\Don Lawson\Local Settings\Temp\~hh5161.htm

When you click on the field name, you have a variety of options from which to choose in order to design your labels.
Add to Label - Add a line associated with this Data Field on the Label Lock - Lock this field so only certain users can edit the data
Change Field Name - Change the name of this field
Help - Display this help page
To add a Data Field to a Label Pattern, click on the name of the data field and choose “Add to Label.” The item will appear in the top left corner of the Label Pattern. Drag the item to the area you want it to appear on the label or logs and format it as you wish. Please note that only the portion of the field in the white space will print on the label. So it’s important you make sure that the field doesn’t exceed this white space.
Clicking on “Lock Field” allows your High Authority staff members to edit the information on that line, but locks out your Low Authority staff members from doing so. As an example, you could lock all but the Lot # field on a label that you have verified is correct. Your Medium and Low Authority staff members could only edit the Lot # when they print the label.
MILT 3.0 Help 3.0.04Add To Label
MILT 3.0 Help 3.0.04Lock Field
MILT 3.0 Help 3.0.04Change Field Name
Page 63 of 81Welcome to MILT 3.0
6/1/2009file://C:\Documents and Settings\Don Lawson\Local Settings\Temp\~hh5161.htm

Clicking on “Change Field Name” lets you change the name for that particular field. The selected field name will be displayed in all reports and menus. So it’s important that you choose an appropriate name (like "Medication", "Strength" or "NDC") for each field so users will know what data you expect in that field. Field Names are limited to 14 characters.
The Label Work Area of the Label Pattern section displays how your output will appear when printed. The area was designed so you can always see the results of your actions and make any changes prior to printing. The text and graphics in the white areas of the Label Work Area will print on your labels. Anything in the gray area will not. For some labels, the white area is much smaller than the gray. But this can be changed when the Label Zoom feature is activated. But regardless of the size, only the information in the white area will print on your labels. Please note that the Label Work Area contains spots for “Labels” and “Logs”. Those spots that
MILT 3.0 Help 3.0.04Label Pattern Work Area
Page 64 of 81Welcome to MILT 3.0
6/1/2009file://C:\Documents and Settings\Don Lawson\Local Settings\Temp\~hh5161.htm

are designated as “Labels” were designed to contain the information you wish to have on the dispensed label of medication. Those spots designated as “Logs” were designed to generate labels for use in packaging log report books, storage bins, etc.
Changes you make to the Label Pattern can be saved by pressing the blue and white check on the toolbar.
The label pattern section of the main screen lets you design and format your labels anyway you want. Every listing in your Formulary can be associated with a particular label pattern. You can either use the default patterns we set within the program, or you can design your own.
You can add Data Fields and other items to your label pattern and then print it, or save it to apply to other formulary items.
This drop-down menu lets you select the particular Medi-Dose/EPS supported label you wish to use. The labels displayed can be turned on and off from the Tools / Labels utility from the Main Screen’s Action Buttons.
MILT 3.0 has been designed with a variety of default label patterns. You can design your own pattern and name it accordingly. Then you can associate all the pertinent formulary items with the selected particular label pattern.
MILT 3.0 Help 3.0.04Label Pattern
MILT 3.0 Help 3.0.04Label Type
MILT 3.0 Help 3.0.04Pattern
MILT 3.0 Help 3.0.04Pattern Menu
Page 65 of 81Welcome to MILT 3.0
6/1/2009file://C:\Documents and Settings\Don Lawson\Local Settings\Temp\~hh5161.htm

From the Pattern Menu you can save your Label Pattern over the existing one or as a new one. Your new label pattern can then be used with any formulary item. When you save a new pattern, or overwrite an existing one, you will be prompted to select a default pattern for the current label type. This default pattern will be displayed when you select this label type again.
Delete will allow you to delete a pattern you no long need.
*NOTE* The default Medi-Dose patterns "Pattern 1" and "Blank" may not be delete or overwritten. You can use these patterns to start designing your own and then save it with a new name.
You can delete any field or object on a label. Select the object on the label and click on the large red X to delete it. If you do not save the altered pattern then that item will come back the next time you choose that pattern.
There are times when you may want to have standard text print consistently on your labels. For example, you may always want the words “Lot Number” to appear next to the Lot Number field you placed on your Label Pattern. To do so:
1. Press the <Add Fixed Text> button
2. Enter the text you require and click the check button
3. Your text will appear in the top left corner of the label 4. Drag the text and format it as you wish
5. Save the label pattern
MILT 3.0 Help 3.0.04Delete
MILT 3.0 Help 3.0.04Fixed Text Menu
Page 66 of 81Welcome to MILT 3.0
6/1/2009file://C:\Documents and Settings\Don Lawson\Local Settings\Temp\~hh5161.htm

Every time you use this pattern, that text will appear the same.
The Function Menu allows you to add special fields to your label patterns that will calculate at print time.
fxQTY: Quantity Printed - Prints the number of labels (doses) selected.
fxLID: Label ID Number - Prints a sequential number, starting with 1, on each label in a print job.
*NOTE* Because it is added to each individual label at print time, the fxLID function has special properties:
This function is always printed with a Bold 7pt Courier New Font It will not respond to any formatting command (i.e. Bold, Font Size, Align Left,
etc.)
Only one copy of this function can be used on a pattern at a time
It can only be moved around inside the Label 1 area.
fxPID: Print ID Number - Prints a sequential number for each print job. Print jobs that do not have an fxLID will not increment the sequential number. The number for the next print job can be set in Function Settings on this menu.
fxRND: Random Number - Prints a random number. The number of digits can be set in the Funcion Settings on this menu.
Function Settings - Change settings for certain functions:
MILT 3.0 Help 3.0.04Function Menu
Page 67 of 81Welcome to MILT 3.0
6/1/2009file://C:\Documents and Settings\Don Lawson\Local Settings\Temp\~hh5161.htm
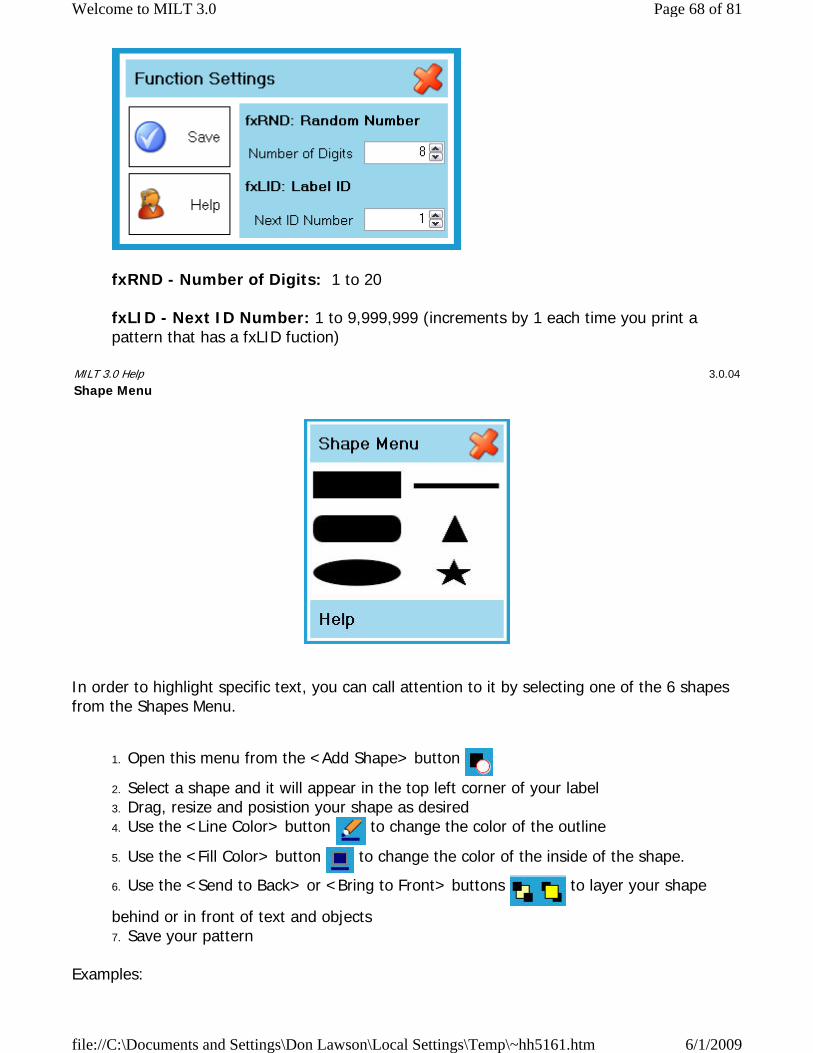
fxRND - Number of Digits: 1 to 20
fxLID - Next ID Number: 1 to 9,999,999 (increments by 1 each time you print a pattern that has a fxLID fuction)
In order to highlight specific text, you can call attention to it by selecting one of the 6 shapes from the Shapes Menu.
1. Open this menu from the <Add Shape> button
2. Select a shape and it will appear in the top left corner of your label 3. Drag, resize and posistion your shape as desired
4. Use the <Line Color> button to change the color of the outline
5. Use the <Fill Color> button to change the color of the inside of the shape.
6. Use the <Send to Back> or <Bring to Front> buttons to layer your shape
behind or in front of text and objects
7. Save your pattern
Examples:
MILT 3.0 Help 3.0.04Shape Menu
Page 68 of 81Welcome to MILT 3.0
6/1/2009file://C:\Documents and Settings\Don Lawson\Local Settings\Temp\~hh5161.htm

A star with a black line color, a yellow fill color, sent behind the word "TEXT" with the <Send to Back> button:
A Rounded Rectangle with a red line color, a white fill color, sent behind the word "TEXT", but in front of the word "MILT":
In order to help minimize the potential of medication error, we concentrated a great deal of time developing the bar coding module of MILT 3.0. You can use 1-D, 2-D and multi-part bar
MILT 3.0 Help 3.0.04Bar Code Menu
Page 69 of 81Welcome to MILT 3.0
6/1/2009file://C:\Documents and Settings\Don Lawson\Local Settings\Temp\~hh5161.htm

codes on any of the Medi-Dose/EPS supported labels within MILT 3.0.
If multiple data fields need to be associated to a bar code, we suggest the use of 2-D bar codes, like Data Matrix or PDF417. But in order to successfully use these bar codes, you need to ensure that not only your scanners but those throughout the BPOC chain (pharmacy, nursing, lab, etc.) can read 2-D codes.
In MILT 3.0, bar codes are associated with a label pattern. To add a bar code to your label pattern:
1. Click the "Add Bar Code" button on the toolbar.
2. Select the bar code font to use. 3. Choose Large, Medium, Small, Extra-Small, Tiny, Micro or Thin for each area that you want a bar code. 4. Select one of more Data Fields to encode and, if needed, the Application Identifier to format that data. 5. Choose Save.
You can also add digital images to your labels. Many hospitals have suggested this so that pharmacy packaged products can be quickly identified since they can carry a hospital logo.
To add a digital image, click on the “Add Image” icon and locate the image (on your hard
drive or network) you wish to place in the label pattern.
MILT 3.0 Help 3.0.04Image Menu
Page 70 of 81Welcome to MILT 3.0
6/1/2009file://C:\Documents and Settings\Don Lawson\Local Settings\Temp\~hh5161.htm

Size and place it on the label pattern where you’d like it to print.
You can resize the image in MILT but results will vary. If you have an image that you need to considerably change the size, we recommend you do so in a professional graphics program before you add the image to your Label Pattern.
If you wish to save the digital image to a label pattern, you need to save the label pattern by clicking on the Blue and White Check from the Label Pattern menu bar.
In order to provide you with the best representation of how your data will appear on your labels, MILT 3.0 has a drop-down zooming feature. You can view your label patterns at Actual Size so you can see how they will appear prior to printing. Or you can access different views so you can best position your data on your labels. Each of the supported labels has an Actual Size selection. Using this feature as well as the Print Preview feature (from the Print button) will give you the best idea of the appearance of your labels.
MILT 3.0 lets you use any system font you have installed on your system to design your labels. Highlight the field on the Label Pattern screen you want to change and select the desired font from the Font pull-down menu. Please keep in mind that you may have many fonts on your system. Many are rather pretty but certain fonts are much easier to read than others. So, when designing your label, please keep legibility and ease-of-recognition in mind. If you wish to save the font to a label pattern, you need to save the label pattern by clicking on the Blue and White Check from the Label Pattern menu bar.
MILT 3.0 Help 3.0.04Zoom
MILT 3.0 Help 3.0.04Font Name
MILT 3.0 Help 3.0.04Font Size
Page 71 of 81Welcome to MILT 3.0
6/1/2009file://C:\Documents and Settings\Don Lawson\Local Settings\Temp\~hh5161.htm

MILT 3.0 lets you use any system font point size you have installed on your system to design your labels. Highlight the field on the Label Pattern screen you want to change and select the desired font point size from the Font Point Size pull-down menu. Please keep in mind that you may have many fonts and various point sizes on your system. Many are rather pretty. Many, though, may be too big or too small for your labels. And, of course, certain point sizes are easier to read than others. So, when designing your label, please keep legibility and ease-of-recognition in mind. If you wish to save the font’s point size to a label pattern, you need to save the label pattern by clicking on the Blue and White Check from the Label Pattern menu bar.
NOTE - Technically, most fonts are only available in specific sizes. MILT 3.0, like other software, will allow you to choose sizes that are not native to a font. Windows will do it's best to approximate these sizes, but kearning issues (spacing between letters) may occur. Some fonts, like Courier New and Tahoma, perform better at the non-native sizes than others, like Arial.
You can bold any field in your label pattern. To do so, select the Bold button <B> from the Label Pattern menu bar.
If you wish to save the Bold feature to a label pattern, you need to save the label pattern by clicking on the Blue and White Check from the Label Pattern menu bar.
You can italicize any field in your label pattern. To do so, select the Italics button <I> from the Label Pattern menu bar. If you wish to save the Italicized feature to a label pattern, you need to save the label pattern by clicking on the Blue and White Check from the Label Pattern menu bar.
You can underline any field in your label pattern. To do so, select the Underline button <U> from the Label Pattern menu bar.
If you wish to save the Underline feature to a label pattern, you need to save the label pattern by clicking on the Blue and White Check from the Label Pattern menu bar.
MILT 3.0 Help 3.0.04Bold
MILT 3.0 Help 3.0.04Italic
MILT 3.0 Help 3.0.04Underline
Page 72 of 81Welcome to MILT 3.0
6/1/2009file://C:\Documents and Settings\Don Lawson\Local Settings\Temp\~hh5161.htm

You can have text and graphics appear in the background of your label pattern. This will allow other text and graphics to appear over the background items but these items will still be visible on-screen and will still print on your labels. To do this, highlight the selected text or graphic and choose the Send to Back <STB> button on the Label Pattern menu bar If you wish to save the “sent to back” text or graphic to a label pattern, you need to save the label pattern by clicking on the Blue and White Check from the Label Pattern menu bar.
You can have text and graphics appear in the foreground of your label pattern. This will allow other text and graphics to appear behind the foreground items but these items will still be visible on-screen and will still print on your labels. To do this, highlight the selected text or graphic and choose the Bring to Front button on the Label Pattern menu bar.
If you wish to save the “bring to front” text or graphic to a label pattern, you need to save the label pattern by clicking on the Blue and White Check from the Label Pattern menu bar.
You may want to left justify text. Label space may necessitate running text on the left side of the label. You may also wish to do this in order to call attention to a particular bit of information. To do this, highlight the desired text or graphic and choose the Align Left button from the Label Pattern menu bar.
If you wish to save the “Align Left” text to a label pattern, you need to save the label pattern by clicking on the Blue and White Check from the Label Pattern menu bar.
You may want to center text. Label space may necessitate running text in the middle of the label. You may also wish to do this in order to call attention to a particular bit of information. To do this, highlight the desired text and choose the Align Center button from the Label
MILT 3.0 Help 3.0.04Send To Back
MILT 3.0 Help 3.0.04Bring To Front
MILT 3.0 Help 3.0.04Align Left
MILT 3.0 Help 3.0.04Align Center
Page 73 of 81Welcome to MILT 3.0
6/1/2009file://C:\Documents and Settings\Don Lawson\Local Settings\Temp\~hh5161.htm

Pattern menu bar. If you wish to save the “Align Center” text to a label pattern, you need to save the label pattern by clicking on the Blue and White Check from the Label Pattern menu bar.
You may want to right justify text. Label space may necessitate running text on the right side of the label. You may also wish to do this in order to call attention to a particular bit of information. To do this, highlight the desired text and choose the Align Right button from the Label Pattern menu bar.
If you wish to save the “Align Right” text to a label pattern, you need to save the label pattern by clicking on the Blue and White Check from the Label Pattern menu bar.
You may want to add color to your label text to call attention to a particular bit of information. To do this, highlight the desired text and choose the Font Color menu button from the Label Pattern menu bar. You have the option of choosing from 16 different colors. Please keep in mind that your screen will display the selected color but if you do not have a color printer, your output will appear in shades of gray.
MILT 3.0 Help 3.0.04Align Right
MILT 3.0 Help 3.0.04Font Color Menu
Page 74 of 81Welcome to MILT 3.0
6/1/2009file://C:\Documents and Settings\Don Lawson\Local Settings\Temp\~hh5161.htm

If you wish to save the “Font Color” to a label pattern, you need to save the label pattern by clicking on the Blue and White Check from the Label Pattern menu bar.
You may want to add a colored underline to your label text to call to call attention to a particular bit of information. To do this, highlight the desired text and choose the Line Color menu button from the Label Pattern menu bar. You have the option of choosing from 16 different colors for your underscore icon. Please keep in mind that your screen will display the selected colored underscore but if you do not have a color printer, your output will appear in shades of gray.
If you wish to save the “Line Color" to a label pattern, you need to save the label pattern by clicking on the Blue and White Check from the Label Pattern menu bar.
MILT 3.0 Help 3.0.04Line Color Menu
MILT 3.0 Help 3.0.04Fill Color Menu
Page 75 of 81Welcome to MILT 3.0
6/1/2009file://C:\Documents and Settings\Don Lawson\Local Settings\Temp\~hh5161.htm
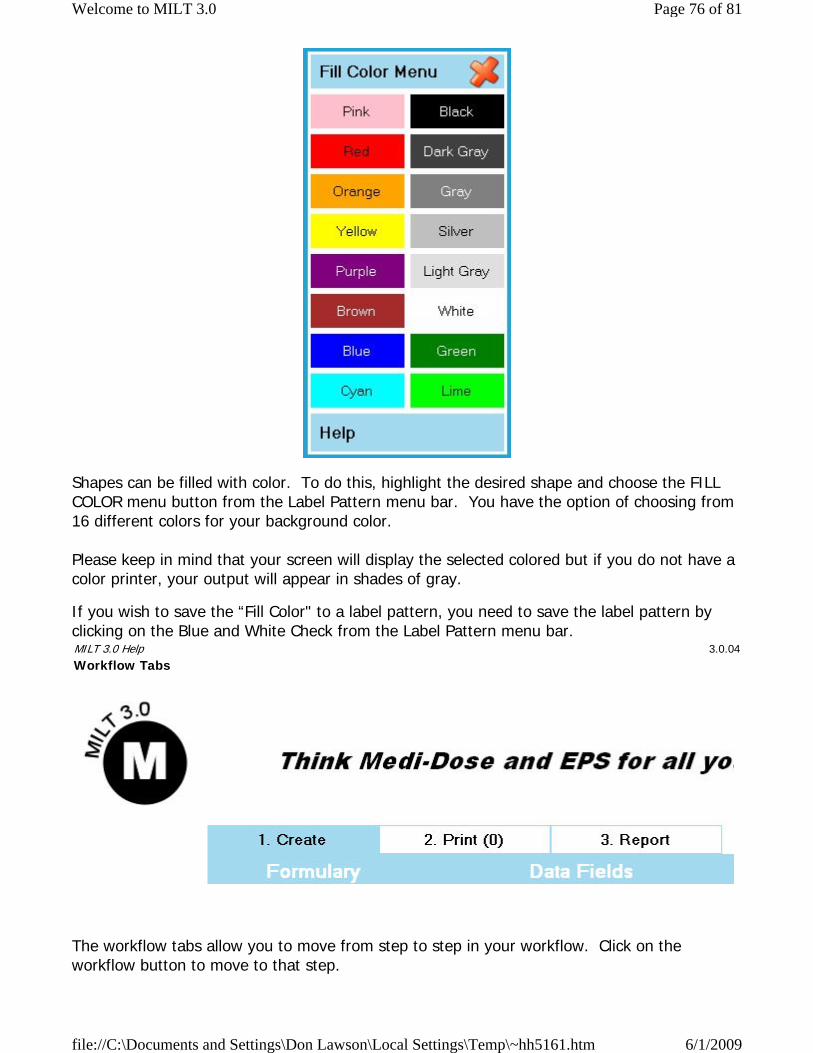
Shapes can be filled with color. To do this, highlight the desired shape and choose the FILL COLOR menu button from the Label Pattern menu bar. You have the option of choosing from 16 different colors for your background color. Please keep in mind that your screen will display the selected colored but if you do not have a color printer, your output will appear in shades of gray.
If you wish to save the “Fill Color" to a label pattern, you need to save the label pattern by clicking on the Blue and White Check from the Label Pattern menu bar.
The workflow tabs allow you to move from step to step in your workflow. Click on the workflow button to move to that step.
MILT 3.0 Help 3.0.04Workflow Tabs
Page 76 of 81Welcome to MILT 3.0
6/1/2009file://C:\Documents and Settings\Don Lawson\Local Settings\Temp\~hh5161.htm
Some buttons, like the <2. Print (0)> one shown above, show the number of items waiting for your attention. In this case, there are 0 labels waiting to be printed.
To configure MILT to match your workflow, go to <TOOLS> <WORKFLOW/RIGHTS> on the main screen.
The Create Tab is the workflow step where you create formulary items and label patterns.
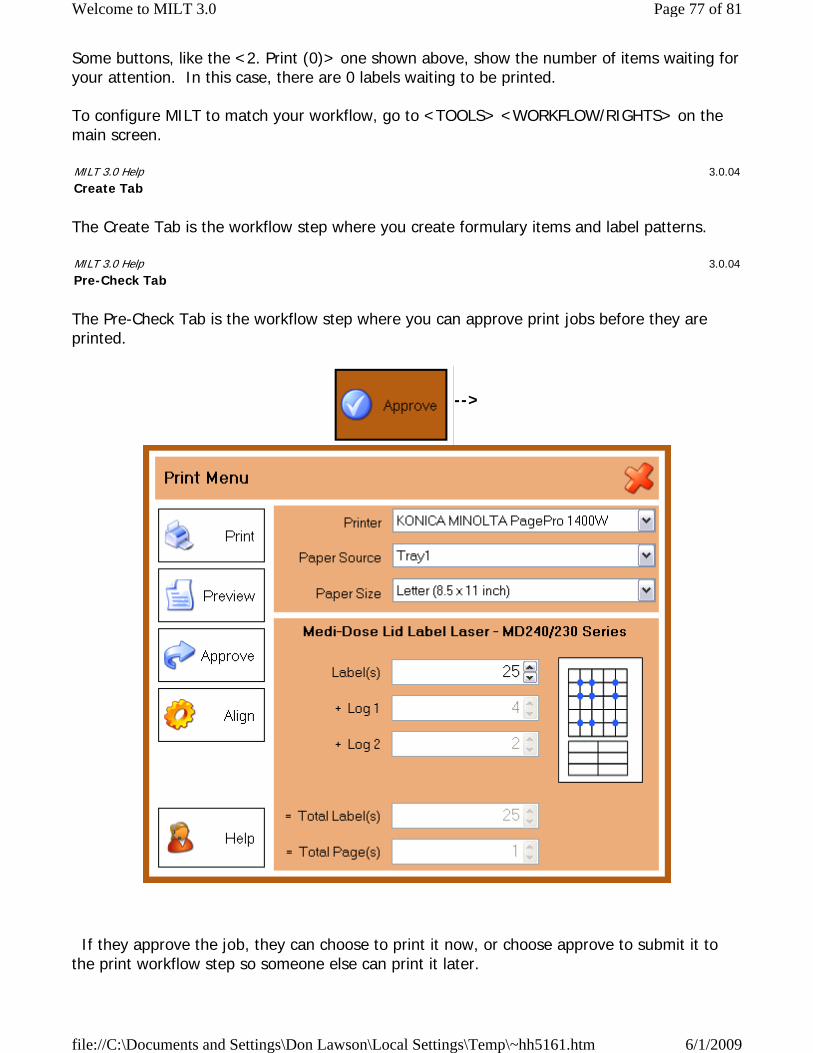
The Pre-Check Tab is the workflow step where you can approve print jobs before they are printed.
-->
If they approve the job, they can choose to print it now, or choose approve to submit it to the print workflow step so someone else can print it later.
MILT 3.0 Help 3.0.04Create Tab
MILT 3.0 Help 3.0.04Pre-Check Tab
Page 77 of 81Welcome to MILT 3.0
6/1/2009file://C:\Documents and Settings\Don Lawson\Local Settings\Temp\~hh5161.htm

Workflow Rights
ALLOWED - User can approve or delete items on this list.
REQUIRED - User can not print from the Create Tab. Each print job will go to this step for approval by someone with the "ALLOWED" right.
DENIED - User will not see this tab. User can not print from the Create Tab. Each print job will go to this step for approval by someone with the "ALLOWED" right.
The Print Tab is the workflow step where users can print a job that was submitted and approved for printing through the Pre-Check step.
Users Rights
ALLOWED - User can print or delete items on this list.
REQUIRED - User can not print from the Create Tab. They can print from this step, but can not delete an item.
DENIED - User will not see this tab.
The Post-Check Tab is the workflow step where you can approve or reject jobs after they have been printed, but before they go to the log report (like pharmacist sign-off in prior versions.)
To Approve an item, select the item in the list and click Approve.
To Reject an item, select the item in the list and click Reject. You will be prompted to choose a Reason and to enter Comments.
MILT 3.0 Help 3.0.04Print Tab
MILT 3.0 Help 3.0.04Post-check Tab
Page 78 of 81Welcome to MILT 3.0
6/1/2009file://C:\Documents and Settings\Don Lawson\Local Settings\Temp\~hh5161.htm

Workflow Rights
ALLOWED - User can approve, reject or delete items on this list.
REQUIRED - Each print job will go to this step for approval by someone with the "ALLOWED" right.
DENIED - User will not see this tab. Each print job will go to this step for approval by someone with the "ALLOWED" right.
The Report Tab is the workflow step where you can view and print log and error entries.
The Report button will open the Reports Menu where you can select and print a report.
The Filter button will open the Filter Menu where you can filter your log and error list by any of the fields.
The Show Errors / Show Log button will toggle the list from errors to logs.
Workflow Rights
ALLOWED - User can view, print or delete log and error items.
REQUIRED - User can view and print log and error items, but can not delete them.
DENIED - User will not see this tab.
MEDI-DOSE®, INC. LICENSING AGREEMENT
Important-read carefully - This License Agreement (“License Agreement”) is a legal agreement between you (either an individual,
pharmacy, company or organization) and Medi-Dose®, Inc. By opening the sealed packages OR exercising your rights to make and use copies of the SOFTWARE, you agree to be bound by the terms of this License Agreement. If you do not agree to terms of this License
MILT 3.0 Help 3.0.04Report Tab
MILT 3.0 Help 3.0.04Licensing Agreement
Page 79 of 81Welcome to MILT 3.0
6/1/2009file://C:\Documents and Settings\Don Lawson\Local Settings\Temp\~hh5161.htm

Agreement promptly return this package to the place from which you obtained it for a full refund. MEDI-DOSE®, INC. SOFTWARE LICENSE
1. GRANT OF LICENSE. Medi-Dose, Inc. grants you the right to use the enclosed software product, which includes “online” or electronic documents (the “SOFTWARE”), in the manner provided below. Medi-Dose, Inc. grants to you (as an individual, pharmacy, company or organization) the right to make copies of the SOFTWARE for the sole purpose of backup and archiving of data. You may install copies of the SOFTWARE on more than one computer in your facility only. Contact Medi-Dose, Inc. directly for multi-user options and licensing. 2. UPGRADES. If the SOFTWARE is an upgrade, you may continue to use, but not resell the original version. It is not a requirement of Medi-Dose, Inc. to continue support for any prior versions. 3. COPYRIGHT. The SOFTWARE is licensed, not sold. Title and copyrights in and to the SOFTWARE (including any images, applets, photographs, animations, video, audio, music and text incorporated into the SOFTWARE), accompanying printed materials, and any copies you are permitted to make herein are owned by Medi-Dose, Inc. or its suppliers and are protected by United States copyright laws and international treaty provisions. Therefore, you must treat the SOFTWARE like any other copyrighted material (e.g., a book or musical recording) except that you may either (a) make a copy of the SOFTWARE solely for backup or archival purposes, or (b) transfer the SOFTWARE to a hard disk provided you keep the original solely for backup or archival purposes. 4. INFORMATION. The FDA National Drug Code INFORMATION in the MILT system is provided for informational purposes only. Medi-Dose, Inc. does not guarantee the correctness or completeness of this INFORMATION. The INFORMATION in the MILT system is not provided as, or intended to be, a substitute for expert pharmacological knowledge. 5. OTHER RESTRICTIONS. You may not rent or lease the SOFTWARE, but you may transfer the SOFTWARE and user documentation on a permanent basis provided you retain no copies and the recipient agrees to the terms of this Agreement. You may terminate this License at any time. Medi-Dose, Inc. may terminate this License if you fail to comply with the terms and conditions of this License. In either event, you must destroy all copies of the SOFTWARE. LIMITED WARRANTY LIMITED WARRANTY. Medi-Dose, Inc. warrants that the SOFTWARE will perform substantially in accordance with the accompanying written materials for a period of ninety (90) days from the date of receipt. The software will perform with all printers that are supported by Medi-Dose, Inc. within the software. Medi-Dose may choose to support additional printers as they are marketed. Any implied warranties on the SOFTWARE and hardware are limited to ninety (90) days. Some states/jurisdictions do not allow limitations on duration of an implied warranty, so the above limitation may not apply to you. CUSTOMER REMEDIES. Medi-Dose, Inc.’s entire liability and your exclusive remedy shall be to either have a return of the price paid if every attempt to modify the software to meet the Limited Warranty or site requirements are unsuccessful. Any modifications to the software to meet a specific individual’s or organization’s requirements that will not be incorporated into the retail version of the software constitutes a custom program that will be developed at the customer’s request and billed at a nominal programming rate. This Limited Warranty is void if failure of the SOFTWARE has resulted from accident, abuse or misapplication. Any replacement SOFTWARE will be warranted for the remainder of the original warranty period or thirty (30) days, whichever is longer.
Page 80 of 81Welcome to MILT 3.0
6/1/2009file://C:\Documents and Settings\Don Lawson\Local Settings\Temp\~hh5161.htm

NO OTHER WARRANTIES. TO THE MAXIMUM EXTENT PERMITTED BY APPLICABLE LAW, MEDI-DOSE, INC. AND ITS SUPPLIERS DISCLAIM ALL OTHER WARRANTIES, EITHER EXPRESS OR IMPLIED, INCLUDING, BUT NOT LIMITED TO, IMPLIED WARRANTIES OF MERCHANTABILITY AND FITNESS FOR A PARTICULAR PURPOSE, WITH REGARD TO THE SOFTWARE, THE ACCOMPANYING WRITTEN MATERIALS, INFORMATION CONTAINED IN THE FDA NATIONAL DRUG CODE DATABASE, AND ANY ACCOMPANYING HARDWARE. THIS LIMITED WARRANTY GIVES YOU SPECIFIC LEGAL RIGHTS. YOU MAY HAVE OTHERS, WHICH VARY FROM STATE/JURISDICTION TO STATE/JURISDICTION. NO LIABILITY FOR CONSEQUENTIAL DAMAGES. TO THE MAXIMUM EXTENT PERMITTED BY APPLICABLE LAW, IN NO EVENT SHALL MEDI-DOSE, INC. OR ITS SUPPLIERS BE LIABLE FOR ANY DAMAGES WHATSOEVER (INCLUDING, WITHOUT LIMITATION, DAMAGES FOR LOSS OF BUSINESS PROFITS, BUSINESS INTERRUPTION, LOSS OF BUSINESS INFORMATION, OR ANY OTHER PECUNIARY LOSS) ARISING OUT OF THE USE OF OR INABILITY TO USE THIS MEDI-DOSE, INC. PRODUCT, EVEN IF MEDI-DOSE, INC. HAS BEEN ADVISED OF THE POSSIBILITY OF SUCH DAMAGES. BECAUSE SOME STATES/JURISDICTIONS DO NOT ALLOW THE EXCLUSION OR LIMITATION OF LIABILITY FOR CONSEQUENTIAL OR INCIDENTAL DAMAGES, THE ABOVE LIMITATION MAY NOT APPLY TO YOU.
Page 81 of 81Welcome to MILT 3.0
6/1/2009file://C:\Documents and Settings\Don Lawson\Local Settings\Temp\~hh5161.htm


![VSA 3 - · PDF fileVSA 3.0 ROOF FANS Curb skirt Roof curb ... VSA 190 S 3.0 VSA 190 L 3.0 Voltage/Frequency [V/Hz] 230/50 230/50 Power consumption ... RD - red; BN - braun](https://static.fdocuments.us/doc/165x107/5a86aa7f7f8b9ac96a8d3fa4/vsa-3-vsa-30-roof-fans-curb-skirt-roof-curb-vsa-190-s-30-vsa-190-l-30.jpg)