Manual Version 2.3 - May 2008 - ANK Audio Kits
88
Copyright © 2007, 2008 AudioNote Kits www.AudioNoteKits.com [email protected] Page 1 Manual Version 2.3 - May 2008
Transcript of Manual Version 2.3 - May 2008 - ANK Audio Kits

Copyright © 2007, 2008 AudioNote Kits www.AudioNoteKits.com [email protected]
Page 1
Manual Version 2.3 - May 2008

Copyright © 2007, 2008 AudioNote Kits www.AudioNoteKits.com [email protected]
Page 2
Table of Contents Section1: Introduction..............................................................................................................................................................4 General Information .............................................................................................................................................................4 Preparation ..........................................................................................................................................................................4 Soldering ..............................................................................................................................................................................5 De-soldering.........................................................................................................................................................................6
Section 2: Mechanical Assembly.............................................................................................................................................7 Installing the feet..................................................................................................................................................................7 Mains Transformer, Choke, and Mains Installation .............................................................................................................7 Configuring the Primary Winding for your World Region .................................................................................................9 Installing the IEC Socket (AC Socket) and Rocker Switch ............................................................................................12 Installing the Choke........................................................................................................................................................13 Installing the Mains Transformer....................................................................................................................................13 Wiring up the Mains........................................................................................................................................................14 Shield Positioning...........................................................................................................................................................15
Section 3: M2 Power Supply .................................................................................................................................................17 M2 Power Supply Board Parts List ....................................................................................................................................18 M2 Power Supply Board Construction Steps.....................................................................................................................19 Installing the Valve Bases ..............................................................................................................................................19 Installing the Resistors ...................................................................................................................................................21 Installing resistors in the HT ADJUST position ..............................................................................................................23 Zener Diode Installation .................................................................................................................................................24 Electrolytic Capacitor Installation ...................................................................................................................................25 Installing the Bridge Rectifier .........................................................................................................................................27 Installing the Non-Polarized Capacitors .........................................................................................................................27 Wiring the M2 Power Supply Board ...............................................................................................................................28 Filament Component Section of the M2 Power Supply Board.......................................................................................31 Regulator Installation......................................................................................................................................................32 Installing the LED Harness.............................................................................................................................................33 Remaining Wire Connections.........................................................................................................................................33 Installing the Heatsink ....................................................................................................................................................34 Installing the Choke Wire ...............................................................................................................................................35 Inter-wiring to the Mains Transformer ............................................................................................................................36 Securing the Regulators to the Heatsink........................................................................................................................39
Section 4: M2 Power Supply Testing ....................................................................................................................................41 Preparations.......................................................................................................................................................................41 Fitting the Mains Fuse....................................................................................................................................................41 Installing the LED Indicator ............................................................................................................................................42 Installing the tubes .........................................................................................................................................................42 Tidying Up ......................................................................................................................................................................42
Ohm Check ........................................................................................................................................................................43 Electrical Testing................................................................................................................................................................43 Voltage Check Summary ...................................................................................................................................................45 DC Voltage Checks........................................................................................................................................................45 AC Voltage Checks ........................................................................................................................................................45
Section 5: Install the Screen..................................................................................................................................................46 Section 6: Line Board Assembly ...........................................................................................................................................47 Line Stage Schematic ........................................................................................................................................................48 Line Board Parts List..........................................................................................................................................................49 Installing the Board Spacers..............................................................................................................................................49 Valve Base Installation.......................................................................................................................................................49 Resistor Installation............................................................................................................................................................50 Capacitor Installation .........................................................................................................................................................51
Section 7: Wiring Up the Line Stage .....................................................................................................................................53 Filament Wiring ..................................................................................................................................................................53

Copyright © 2007, 2008 AudioNote Kits www.AudioNoteKits.com [email protected]
Page 3
HT and Power Supply Ground Wiring................................................................................................................................54 Electrical Test ....................................................................................................................................................................55
Section 8: RCA input, Selector and Noble Volume Pot.........................................................................................................57 Installing and wiring your first pair of RCA inputs ..............................................................................................................57 ELMA Switch Hook-up.......................................................................................................................................................59 Volume Pot Installation ......................................................................................................................................................60
Section 9: Audio Signal Test .................................................................................................................................................65 Section 10: Output Wiring......................................................................................................................................................67 RCA Connections ..............................................................................................................................................................67 Line Board Connections.....................................................................................................................................................67
Section 11: L2 Phono Board Build and Installation ...............................................................................................................68 Phono Board Parts List ......................................................................................................................................................69 Installing the Spacers and Valve Bases ............................................................................................................................70 Installing the Resistors.......................................................................................................................................................72 Installing the Capacitors.....................................................................................................................................................73 Filament Wiring ..................................................................................................................................................................77 Wiring the Output of the PHONO Stage into the ELMA selector.......................................................................................78 Connecting the HT and Power Supply Ground..................................................................................................................79 Phono Input Connections...................................................................................................................................................79 Controlled Phono Input Test ..............................................................................................................................................80 Ground Post Installation.....................................................................................................................................................81
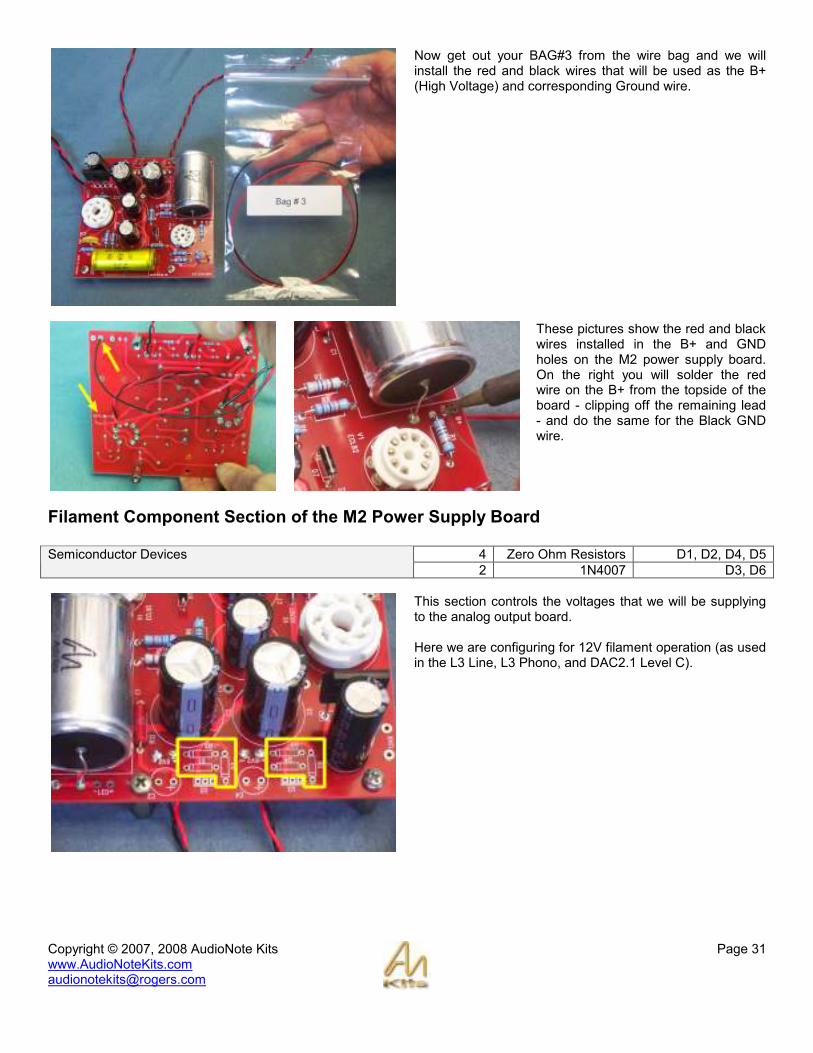
Section 11: Finishing Off .......................................................................................................................................................82 Fitting the Faceplate ..........................................................................................................................................................82 Attaching the LED to the Faceplate ...................................................................................................................................82 Final Thoughts ...................................................................................................................................................................83
Appendix................................................................................................................................................................................84 Resistor Color Code Reference.........................................................................................................................................85 Line Stage Schematic ........................................................................................................................................................86 M2 Power Supply Schematic .............................................................................................................................................87 Phono Board Schematic ....................................................................................................................................................88

Copyright © 2007, 2008 AudioNote Kits www.AudioNoteKits.com [email protected]
Page 4
Section1: Introduction
Thank you for choosing the L2 Pre-Amplifier Kit from AudioNote Kits. We hope that your build experience will be a satisfying and rewarding one.
General Information
Should you encounter any problems with the kit, please call AudioNote Kits on 613 822 7188 or via e-mail to [email protected]. Please read through the assembly manual fully to familiarize yourself with each stage of assembly before starting construction. Also read each individual section thoroughly before and during construction. This manual has been presented in a simple step-by-step manner following a logical method of assembly.
Preparation Before starting assembly, open the packaging and familiarize yourself with the components and compare them with the parts list(s) provided in the manual. Take sufficient time to become really familiar with the parts, as this will help prevent any confusion later. Don’t worry if you cannot read the resistor values from their color codes, for we have prepared a chart toward the end of the manual to help you differentiate the values. Alternatively, a web-based resistance calculator is available on the AudioNote Kits website. Upon inspection of the parts, you will notice that in particular the electrolytic capacitors and rectifier diodes are polarized, that is, have a plus and a minus terminal. These components must be inserted correctly, otherwise serious damage to the kit could occur. The electrolytic capacitors have the plus and minus identifiers marked on them. The rectifier diodes have their polarity indicated by a light colored band on one end of the body of the diode, which is always the cathode end of the diode. The following tools are required to assemble the kit:
1. A soldering Iron, preferably 15 to 35 Watts power, with a small chisel tip (approximately 1/8” or 2.5 mm). Also, an accessory stand with damp sponge for cleaning the soldering iron tip is recommended. It is appropriate to note here that we do not provide solder with the kit. We recommend a rosin core flux solder, NOT acid core, such as “Kester 44”. An even higher recommendation is AUDIO NOTE corrosive-free silver solder, which you can purchase from Audio Note.
2. Small and medium size Philips head screwdrivers (No.1 and No.2 size) for the 4-40 and 6-32 machine screws
respectively.

Copyright © 2007, 2008 AudioNote Kits www.AudioNoteKits.com [email protected]
Page 5
3. Long nose or “needle” nose electronic pliers. Round nose pliers for bending component leads are recommended, but not essential.
4. A pair of small diagonal wire cutters and a wire stripper. The US made ‘T-Stripper’® is recommended.
5. 1/4”(7mm), 5/16”(8mm), 11/32”(9mm), 3/8”(10mm) and 1/2”(13mm) open-end wrenches and/or nut drivers.
6. 5/32” (3.5mm) Allen or hex key.
7. Adjustable wrench.
8. A de-soldering tool is also useful. The best type is a ‘solder-sucker’ (Edsyn™ brand) but a de-soldering wick will
suffice.
9. Clear silicone adhesive.
Soldering The golden rule is that solder is not glue, so that even though it is electrically conductive, the joints to be soldered joints should be as mechanically solid and electrically sound as possible before the connection is soldered. This will ensure low oxidization, prevent crystallization and thereby reduce the chances of the joint going “cold”. Once a good mechanical joint has been made between the two parts, touch both materials with the soldering iron’s tip and after a few seconds of pre-heating the junction, apply the solder to the joint - not the tip of the soldering iron. It is important that both the components, or the component and PCB pad, are hot enough to melt the solder to ensure even flow of the melted solder around and between the parts being joined, as you gradually feed in the strand of solder as it melts. You then remove first the solder and then the soldering iron. Try not to leave the soldering iron in contact for much longer than two or three seconds. If you fail to complete the joint in this time, remove the iron and leave the PCB to cool for 10 to 15 seconds, then repeat the operation. With experience it should be possible to take the soldering iron away within one and a half seconds of first touching the iron to the joint. Wipe the tip of the soldering iron on a damp cloth, or damp (not wet) sponge to clean off the excess solder and leave a thin film on the tip. This should be done before and after every joint is made to ensure a ‘wet’ tip. A good solder joint looks bright and clean, with concave surfaces, and with a slight residue of flux around it. If the wire from the joint is pulled, the wire should not pull out of the joint. It is worth repeating that unless both the materials are hot enough, the solder will not flow properly, even though there is a metal-to-metal contact. Very often a film of oxide on the surface of the component leg is enough to insulate the two parts and the result is a “dry” or “cold” joint that will soon give problems with electrical contact. If you are unsure as to your abilities, practice by joining some pieces of wire until you are happy that you can achieve the type of connection described above. You will never lose the feeling that you need three hands but experience allows you to ignore it more frequently! Thanks for purchasing this Audio Note kit. Our goal is to provide you with the highest quality Kit that you will build from scratch with these instructions. If you have any questions or comments during the build feel free to contact us and we would be happy to help out.

Copyright © 2007, 2008 AudioNote Kits www.AudioNoteKits.com [email protected]
Page 6
De-soldering Should you have to remove a component from the board, you will need to use either a solder ‘sucker’ or de-soldering braid. Removal is best achieved from the solder side of the board in either of the following ways: Solder Sucker - first ensure that the plunger is depressed on the tool; next re-heat the joint to be de-soldered. When the solder is molten, and with the iron still applied to the joint, place the solder sucker over the joint and activate. It may take more than one attempt to remove enough solder for the component leg to be freed. It is important that the component is not over-heated; therefore allow it to cool for several minutes before re-attempting the above. Use a pair of fine-nosed pliers to pull the leg from the board once the solder has been removed. De-Solder Braid - once the offending joint has been re-heated, apply the de-soldering braid with the soldering iron on top of it to keep the joint hot. The waste solder will be drawn up into the braid by capillary action. Remove the component lead with fine-nose pliers.

Copyright © 2007, 2008 AudioNote Kits www.AudioNoteKits.com [email protected]
Page 7
Section 2: Mechanical Assembly
In this beginning section we will start by installing the 4 feet from the Fittings Bag then we will install the Mains transformer and Choke as shown in the pictures below.
Installing the feet
Insert 4 feet in the bottom of the chassis. Fix them each in place using an M4 nut and washer.
Mains Transformer, Choke, and Mains Installation
Above you can see the Mains transformer that is used with the M2 Power Supply. The first step is to take the supplied M4 GND lug from the Hardware Bag and solder it to the end of the green wire.

Copyright © 2007, 2008 AudioNote Kits www.AudioNoteKits.com [email protected]
Page 8
Trim the wire to about __ inches.
Strip about ¼” of insulation off the end of the green wire.
Tin the bare wire by adding solder to the end.

Copyright © 2007, 2008 AudioNote Kits www.AudioNoteKits.com [email protected]
Page 9
Add solder to secure the GND Lug to the end of the wire.
Configuring the Primary Winding for your World Region Next step is to decide what world voltage you require – for example we have some of the most popular regions listed below:
United States 120v
Canada 120v
UK 230v or 240v
Europe 230v / 240v
Hong Kong 220v
In order to wire up the for 120V operation we will need to connect the primaries as shown below:
The graphic shows above the correct wiring for of the Primaries for 120V operation where the 0 of one winding connects to the 0 of the second winding & the 120 of one winding connects to the 120 of the second primary winding. Check the chart on the next page for the correct PRIMARY winding for the world Voltage you live in.

Copyright © 2007, 2008 AudioNote Kits www.AudioNoteKits.com [email protected]
Page 11
Now we must configure our Mains transformer for the World Voltage that we reside in. For this example we will show 120V Operation.
Start by cutting two short pieces of wire approx 2” in length each, stripping the insulation off the ends and tinning the wire.
Then we will inter-wire the Mains transformer primaries. Remember, we are wiring here for 120v - if your region is different then you will need to consult the wiring chart on the previous page to determine how you inter-wire for your region.
From the IEC bag we want to take the brown and blue wires with the crimps on one end. Trim the wires to about _____ inches in length and then solder on to the correct Mains transformer primary tags for your region.

Copyright © 2007, 2008 AudioNote Kits www.AudioNoteKits.com [email protected]
Page 12
Here, the wires are soldered onto the top-most 0v and the bottom-most 120v for North American/Canadian 120v. Remember, we are wiring here for 120v - if your region is different then you will need to consult the regional wiring chart to determine how you inter-wire for your region.
Installing the IEC Socket (AC Socket) and Rocker Switch
The rocker switch simply snaps into pace in the chassis slot. Use the CSK M3 10mm screw and M3 nut to secure the IEC socket into position.
Here you can see the correct installation of the IEC socket and rocker switch from inside the chassis.

Copyright © 2007, 2008 AudioNote Kits www.AudioNoteKits.com [email protected]
Page 13
Installing the Choke
Since the Choke fits into a tight location we suggest you put the screws and washers into position through the holes in the choke covers – then lower the choke into position making sure that you align with the non painted hole - see opposite. Note the wires at the back of the choke.
The left-most picture shows the final position of the choke from inside the chassis. The central picture shows its position under the chassis where you will now secure the 4 holes of the choke with serrated M4 washers and M4 nuts.
Installing the Mains Transformer
The picture opposite shows the correct orientation for the Mains Transformer. The following instructions will show how this is achieved.

Copyright © 2007, 2008 AudioNote Kits www.AudioNoteKits.com [email protected]
Page 14
When installing the Mains transformer be sure to line it up with the unpainted hole in order to ensure a ground connection. Secure the transformer at all four corners.
Wiring up the Mains
Once the transformer is installed you can connect up the Blue and Brown Crimped wires from the Mains transformer directly to the Rocker Switch.
Also connect the green earth wire from the mains transformer to the GND lug as shown opposite.

Copyright © 2007, 2008 AudioNote Kits www.AudioNoteKits.com [email protected]
Page 15
Add the twisted wire (Cable #3) and the ground wire (Cable #4) as shown in the graphic opposite.
Let’s add one final GROUND wire connection from the M4 screw in the chassis. Strip, tin and solder this wire to the 0 on the 400-300-0-300-400 side of the transformer SECONDARY – the text on the transformer and the lug will not line up so you need to count down from the top – the ZERO tap will be the third one from the top. See the following pictures:
Shield Positioning I would like to explain where the shield fits at this stage – you won’t actually be installing this until the end of the build but by then there will be a number of things inside the chassis.
Take a look at the shield provided and locate the hole underneath that has no paint on it – this will match up with a hole on the chassis that is also unpainted in order to ensure a good grounding of the SHIELD when in stalled in the chassis.

Copyright © 2007, 2008 AudioNote Kits www.AudioNoteKits.com [email protected]
Page 16
Here you can see the correct installation of the shield – You will need to remove it later on when we wire up to the Mains transformer but for now you can leave it in and show off your wonderful work to your wife!
This concludes the IEC Wiring section for the Mains Transformer. You may want to double-check your work at this point. Also, make sure that the crimped end on the Rocker switch are not coming into contact with each other - make sure there is plenty of clearance. If you want to add some solder to hold them into place that is fine but I would wait a little bit. Also remember that you can use the rubber hoods that are supplied to cover up the rocker and IEC plug and it is a matter of threading the crimped end through the rubber hood. With this section completed we are going to move onto the building of the M2 Power Supply Board.

Copyright © 2007, 2008 AudioNote Kits www.AudioNoteKits.com [email protected]
Page 17
Section 3: M2 Power Supply
In this section we will be assembling the M2 Power Supply Board PCB.
Here is a view of the parts that you will find in the M2 Power Supply Kit Bag
Most of the parts for this section can be found in the M2 Power Supply bag (although the filament wires may be located elsewhere). For an experienced builder you can look at the parts list on the next page and get started but I would read through the step by step instructions as we feel that this is the best and most efficient error free method of building the board.

Copyright © 2007, 2008 AudioNote Kits www.AudioNoteKits.com [email protected]
Page 18
M2 Power Supply Board Parts List The Complete Parts list for the M2 board is shown below. For resistor color code chart refer to the APPENDIX. You can also find an 'Interactive Resistor Color Code Calculator' on our website (available from the Links page).
Category Quantity Part Designator
2 470uf 16V C2, C4
1 2200uF 35V C9
2 22uF 450V C6 ,C7
Capacitors (Electrolytic)
2 68uF 450V C3, C5
1 Disc 4700uF 1000v C10
1 .22uf 600V C8
Capacitors (Non-polarized)
1 .47uF 600V C1
1 100R R8
2 1K0 R5, R6
1 2K7 R12
1 15K R11
1 33K R2
1 68K R3
2 100K R1, R10
1 150K R7
1 220K R9
Resistors
1 470K R4
1 KBU6J6A U1
1 3.5W 150V Zener D7
4 Zero Ohm Resistors D1, D2, D4, D5
2 1N4007 D3, D6
Semiconductor Devices
2 78S12 U2, U3
Variable Resistor NOTE: This may be replaced with 2x 22K resistors
1 50K 500mW VR1
1 8 pin valve base Valve Bases
1 9 pin valve base
1 6X5 Tube Tubes
1 ECL82 / 6BM8 tube

Copyright © 2007, 2008 AudioNote Kits www.AudioNoteKits.com [email protected]
Page 19
M2 Power Supply Board Construction Steps
Installing the Valve Bases
Lets start by installing the 8-pin valve base with correct orientation.
The 8-pin (octal) valve base is shown opposite. It’s a fairly tight fit into the board so take you will need to take your time and make sure all the legs are individually positioned over the holes in the board. Now, let’s make sure we have the correct orientation - note the Notch on the valve base along with the Notch on the PCB. These need to line up - see next image.
Here you can clearly see the notches lined up – this is a correct orientation of the 8-pin valve base.

Copyright © 2007, 2008 AudioNote Kits www.AudioNoteKits.com [email protected]
Page 20
The next job is to solder the valve base into position – Once you have fitted the octal into position I suggest you use a cap or something to support the board so that it is nice and horizontal. The reason for this is so that the valve base will be soldered into the board nice and level – you may want to solder a pin on one side and then the opposite and then double check that the valve base is nice and level see the following images.
It is only necessary to solder half the valve base whole – feel free to put solder on the entire hole if you feel like you need to do so – I usually pick one side and solder the lead to the board – you may want to pull on the lead to make sure that it is all the way out – sometimes a valve base lead can stick in position.
Next step is to solder in the 9-pin valve base – this one only goes in one way so you can’t really make a mistake. I would suggest using some tape though to make sure that the valve base is level to the board – then solder a pin on one side and then the other to make sure the valve base is level and that you are on track. See pictures below:

Copyright © 2007, 2008 AudioNote Kits www.AudioNoteKits.com [email protected]
Page 21
Installing the Resistors
1 100R R8
2 1K0 R5, R6
1 2K7 R12
1 15K R11
1 33K R2
1 68K R3
2 100K R1 ,R10
1 150K R7
1 220K R9
Resistors
1 470K R4
If you have a voltmeter you can check the value of each resistor prior to soldering in OR you can refer to the color code chart in the above parts list. Identity the correct resistor and then install in the specified designator (R1 for example). Resistors have no polarity so it does not matter the orientation but I find that if I stick to one direction from left to right it makes it a lot easier to read the resistors on the board.
RESISTOR NAMING LESSON: When a resistor has a value of lets say 10 ohms we will refer to this as 10R. If the resistor has a value of 10.5 ohms we would say 10R5. When a resistor value is 250 ohms we would say 250R – When it becomes 1000 ohms we say 1K or 1K0 or 1 Kilo ohm. Its common to see 1K5 which would be like 1.5 K ohm or 1500 ohms – Just like when we get to 1 Mega Ohms we would say 1M or 1M0. For 1.2M we would use 1M2 – so this is the standard way of naming resistors – The first resistor we are going to install is the 100R or 100 ohm resistor!
Here we are installing the 100R resistor. You should locate the reference designator on the board (in this case it is R8) and then do an approx bend on the correct length as we have done opposite.

Copyright © 2007, 2008 AudioNote Kits www.AudioNoteKits.com [email protected]
Page 22
Above shows the installation of the 100R resistor into the R8 position – Bend the legs slightly on the underside to keep the resistor in place.
We suggest you install the spacers on the board at this point.
Once you are feeling confident of your resistor installation it is time to solder on the underside of the board. For first time soldering here are some tips to follow:
1. Clean the tip with a wet sponge after each solder so as not to let resin build up.
2. ‘Tin’ the tip (i.e. add a small amount of solder to it)
just before soldering.

Copyright © 2007, 2008 AudioNote Kits www.AudioNoteKits.com [email protected]
Page 23
Once the joints have been made, give them a quick inspection and touch up any that look suspicious in any way. Next step is to clip the leads - you want to do this but be careful not to clip off too close to the board where you endanger the pad – see picture opposite for a good example.
Installing resistors in the HT ADJUST position
We used to use a little trim pot in this position – but due to its unavailability we are now using a resistor combination to do this. The diagram below illustrates what we are about to do:
Insert the resistors into position as shown.

Copyright © 2007, 2008 AudioNote Kits www.AudioNoteKits.com [email protected]
Page 24
Bend one of the legs over and through the hole in the board as shown - solder into position from the top of the board.
Take the leg of the other resistor and twist it around the leg of the other one as shown opposite. Here you can see the resistors in position – you will want to solder the two resistors now on the underside of the PCB.
Zener Diode Installation
Semiconductor Devices 1 3.5W 150V Zener D7
This is a critical part and therefore warrants its own individual bag. The Zener diode goes into the D7 Position . You will notice a gray stripe on the zener and you will want to position this to match the stripe on the stencil on the PCB in D7 position.

Copyright © 2007, 2008 AudioNote Kits www.AudioNoteKits.com [email protected]
Page 25
Here you can see the Zener diode installed in the correct orientation.
Electrolytic Capacitor Installation
1 2200uF 35V C9
2 22uF 450V C6 ,C7
Capacitors (Electrolytic) Do not install C2 and C4 at this stage 2 68uF 450V C3, C5
We are now going to install the Electrolytic Capacitors into the power supply Board. Note that C2 and C4 will be installed at a later stage. Electrolytic Capacitor Lesson: An electrolytic capacitor is a device that has a positive and a negative side to it. In other words it MUST be installed correctly or it will basically explode. Luckily the modern capacitors have a slow explosion mode that will look like a dragon breathing fire.
Let’s begin by installing C3. You will notice that the capacitor has some markings on it - a 68 for 68uF, a 450 for 450Volts, and a large strip down one side which signifies the NEGATIVE side of the capacitor. You will notice on the stencil on the PCB that there is a + designator on the board and you will need to orient such that the + side is the opposite to the NEGATIVE stripe - The electrolytic capacitor also has a longer lead on the POSITIVE side.

Copyright © 2007, 2008 AudioNote Kits www.AudioNoteKits.com [email protected]
Page 26
Here we can see both 68uF capacitors (C3 and C5) correctly installed.
Install the remaining electrolytic capacitors that are required at this stage (i.e. C9, C6, and C7). You can see these installed in the picture opposite.

Copyright © 2007, 2008 AudioNote Kits www.AudioNoteKits.com [email protected]
Page 27
Installing the Bridge Rectifier
Semiconductor Devices 1 KBU6J6A U1
Install the Bridge Rectifier into position in U1. Note the notch is located facing into the middle of the board - you will also see a corresponding notch stenciled on the PCB.
Installing the Non-Polarized Capacitors
1 Disc 4700uF 3000v C10
1 .22uf 600V C8
Capacitors (Non-polarized)
1 .47uF 600V C1
Install in C10 the DISC capacitor – this capacitor is not polarized so it does not matter which direction you put it in. Now the same for C8 which is called a FILM capacitor and also is not polarized so it does not matter the orientation. You will notice on the .22uF capacitor it designates 300 V~. This means that it is rated for 300V AC which is like 600V DC - well within the range of this power supply.
Next step is to install the .47uF AN FILM capacitor into position. Again this capacitor is not polarized so the orientation does not matter

Copyright © 2007, 2008 AudioNote Kits www.AudioNoteKits.com [email protected]
Page 28
Wiring the M2 Power Supply Board
Get your Bag #2 from the Wire Bag as we will be installing the “filament” wires onto the board. We are going to connect several wires to the M2 power supply board – this is easier to do at this stage. FILAMENT LESSON: In order for a tube to function it must be supplied with a Filament Voltage – this is basically a DC (or AC) voltage applied to 2 pins on the tube - this is what makes the tube “light up”. We get these filament voltage supplies from the M2 Power supply board - these twisted wires will be supplying the filament voltage to the tubes on the audio board!
Remove the two long twisted wires from the Bag #2 – We will be inserting these into the PCB from the underside of the board.
From the underside of the board you can see how the wires are positioned. On the topside of the board you can see the wires protruding through in the correct location – the red wire will be the + side and the black wire will be the negative. You will see the +6V2- Note that we use this board in a number of different configurations for both 12v and 6.3v filaments for different kits – the stencil is always marked 6V2.
Solder the filament wires from the top of the board now and you will then want to clip the tops of the wires - be careful not to let them flick up and hit you in the face!

Copyright © 2007, 2008 AudioNote Kits www.AudioNoteKits.com [email protected]
Page 29
Now take the short wire from BAG #2 - we will be using this to hardwire from the 8-pin valve base to the 9-pin valve base.
The graphic to the left shows the connections for the twisted wires. EXPLANATION: On the M2 Power Supply Board we will have 2 different tubes - a 6X5 and an ECL82. As explained before, in order for tubes to operate they need a filament voltage - we will be supplying 6.3V AC to both of these tubes. The wire we are installing here is used to “parallel” the 6.3V AC that will be coming from the secondary of the Mains transformer.
Note in these pictures the twisted wire has been soldered into pins 4 & 5 on the 9-pin valve base. On the 9-pin valve base note the upper and lower holes through the pins. Connect the current red & black wires to the lower hole on the valve pin.

Copyright © 2007, 2008 AudioNote Kits www.AudioNoteKits.com [email protected]
Page 30
Here is the completed connection of the “parallel filament”.
We are now going to install the 6X5 filament wire - this is the THICK black & white twisted wire that is located in Bag #1 of your WIRE BAG. This is the wire that will connect from the Mains transformer secondary to the 6X5 filament. Start by stripping about ¼” of insulation off the end of the wire and then tinning the copper ends – these ends will be inserted into the holes on the 8-pin octal base – the same pins we have already connected to with the Parallel filament wire from the last step.
Use the upper hole on the 8-pin valve base pin to connect these wires.
Copyright © 2007, 2008 AudioNote Kits www.AudioNoteKits.com [email protected]
Page 31
Now get out your BAG#3 from the wire bag and we will install the red and black wires that will be used as the B+ (High Voltage) and corresponding Ground wire.
These pictures show the red and black wires installed in the B+ and GND holes on the M2 power supply board. On the right you will solder the red wire on the B+ from the topside of the board - clipping off the remaining lead - and do the same for the Black GND wire.
Filament Component Section of the M2 Power Supply Board
4 Zero Ohm Resistors D1, D2, D4, D5 Semiconductor Devices
2 1N4007 D3, D6
This section controls the voltages that we will be supplying to the analog output board. Here we are configuring for 12V filament operation (as used in the L3 Line, L3 Phono, and DAC2.1 Level C).

Copyright © 2007, 2008 AudioNote Kits www.AudioNoteKits.com [email protected]
Page 32
The 1N4007 Diodes are polarized and therefore need to be installed correctly. In the picture above you will note the D3 & D6 designators which shows a bar – this bar lines up with the gray strip on the zener diode – Note how they are correctly installed. Go ahead and install the zero ohm components into position and the zener diodes.
Regulator Installation
Two regulators have been provided with the kit – these have been specially made to an exact length by AudioNote Kits. They use a solid core wire so that it is easy to position on the board through the tiny holes – Read this section before doing any soldering! IMPORTANT: Note the position of the regulators in the pictures below.
Place the regulators into position as shown opposite and below.

Copyright © 2007, 2008 AudioNote Kits www.AudioNoteKits.com [email protected]
Page 33
The pictures above and opposite show a successfully configured regulator. Once these components are in place you can then install the remaining two electrolytic capacitors (C2 and C4).
Installing the LED Harness
Take the LED Harness from your M2 PS bag and you can solder it onto the board as shown opposite. Solder from underside of the board.
Remaining Wire Connections
Take the remaining thick Black & White twisted wire from the BAG#1 and solder it to the 13V6 locations on the PCB. It does not matter which is red or black as it is an AC voltage signal.

Copyright © 2007, 2008 AudioNote Kits www.AudioNoteKits.com [email protected]
Page 34
Then take the twisted thick RED wires and connect these to the 300V 300V on the PCB.
The picture opposite is what your M2 Power supply board should now look like!
Installing the Heatsink
Feel free now to “place” (do not screw in) your newly assembled board into position in the chassis. Now install the metal heatsink under where the regulators will sit. This must be firmly attached to the chassis. One more step and then time for a coffee break on a job well done!

Copyright © 2007, 2008 AudioNote Kits www.AudioNoteKits.com [email protected]
Page 35
Installing the Choke Wire
The Black CHOKE that is located at the rear of the chassis and has a red and black wire. you will want to twist these wires by hand and feed them along the shield towards the M2 PCB. We will now solder these wires directly to the underside of the PCB – You will notice that on the top of the PCB there is marked “CH” in two locations – these are the holes that the CHOKE will be connected to – Flip over the M2 PCB and locate the holes on the under side
You will want to cut the choke wires to the correct length, leaving a nice amount of slack. Trim the insulation from the ends and tin the wires if you see fit. Then insert the wires from the underside of the board - no polarity for red or black so you can follow along with the pictures opposite.
Now that the choke wires have been soldered to the board, you can now place the board back into position. Well done – we will be soldering connections to the Mains transformer in the next session!

Copyright © 2007, 2008 AudioNote Kits www.AudioNoteKits.com [email protected]
Page 36
Inter-wiring to the Mains Transformer
I would suggest at this stage to REMOVE the black shield so that we can work on this side of the chassis. The following graphic shows the wiring between the M2 PCB and Mains Transformer. Note that the ‘second’ transformer is simply another view of the same mains transformer.

Copyright © 2007, 2008 AudioNote Kits www.AudioNoteKits.com [email protected]
Page 37
We are now going to take the 3 pairs of twisted wires that are already connected to the M2 Power Supply Board and connect these directly to the SECONDARY of the Mains transformer.
Start by taking the RED / RED twisted pair and trim to a good length and then solder to the ‘300’ lugs on the Mains transformer. I would suggest stripping the insulation off the end of the red wires and tinning. Then place the tinned lead through the lug on the Mains transformer and then apply solder – it is not necessary to twist the lead around the post. Also, take the earth wire (Cable #6) and connect one end to ‘0’ and the other end connect to the chassis GND lug.
Next step is to take the Red/Black twisted wire that is connected to the 8-pin octal valve base. For the 6X5 – this is the filament wire which will be supply 6.3V to the 6X5 and ECL82 tubes on the M2 power supply.

Copyright © 2007, 2008 AudioNote Kits www.AudioNoteKits.com [email protected]
Page 38
The third pair of wires is the Red/Black twisted pair that is connected to the 13V6 on the M2 power supply board. Note that the 0 tap is not used here.
The last wire for hookup in this section will be the long green wire with the GND lug on one end found in your IEC Kit Bag- Secure the GND lug end on the M4 screw in the chassis and trim and solder from the top of the board the green wire into the GND hole located near the 13V6 pads on the M2 power supply Board.
Now review your connections made in this section using the graphic opposite and wiring table below.
Wire M2 PCB Mains Transformer
RED / RED 300v 300v 300 300
RED/BLACK 13V6 13V6 8 8
RED/BLACK Pin 2 & 7 6X5 0 6.3v
Check that you have made the connection between the chassis GND lug and GND on the M2 PCB. Check that you have made the connection between the chassis GND lug and 0 on the mains transformer (i.e. the 0 between 300 and 300).

Copyright © 2007, 2008 AudioNote Kits www.AudioNoteKits.com [email protected]
Page 39
Securing the Regulators to the Heatsink
We are now going to secure the regulators to the Heat Sink that is installed in the chassis. The picture opposite shows the parts that are necessary to do this. EXPLANATION: It is ideal to electrically isolate the regulator from the ground on the chassis (i.e. the heatsink) – this way the regulator is floating – we do this with our little insulation kit which consists of a mica layer and a plastic insert. You can get these from the Hardware Bag marked Heat Sink.
Begin by taking one of the mica washers and laying it on the heatsink as shown in the left-most picture. The plastic insert should be fitted onto the screw as shown in the central picture.
I would suggest that you line up the mica strip with the hole in the heat sink and install the screw and plastic insert into the hole in the regulator. Then gently screw the regulator into the heat sink- the mica piece may try and move so just gently ease it back into position. Repeat for the second regulator.
At this point you can secure the M2 power supply board to the chassis with one or more of the M4 screws provided.

Copyright © 2007, 2008 AudioNote Kits www.AudioNoteKits.com [email protected]
Page 40
That completes our assembly of the M2 Power Supply Board. Feel free to re install the shield back into position or you can wait until nearer the end of the kit build if you prefer.

Copyright © 2007, 2008 AudioNote Kits www.AudioNoteKits.com [email protected]
Page 41
Section 4: M2 Power Supply Testing
Preparations
Fitting the Mains Fuse
In this section we are going to electrically test the power supply. Start by installing a 1A Slo Blo fuse (IEC BAG) into position as shown. Use a screwdriver or flat edge or your fingers pull the Fuse holder out - you will need to squeeze to completely remove it.
Insert the fuse into the holder as shown opposite.
With the fuse installed into the holder insert back into the IEC plug. With the Fuse installed we are ready to do some testing! READ the entire remaining section first before taking any actions!

Copyright © 2007, 2008 AudioNote Kits www.AudioNoteKits.com [email protected]
Page 42
Installing the LED Indicator
The LED on the M2 Power Supply Board will be the first indicator that we have power – I would suggest just taping the LED – make sure the metal leads of the LED are not touching any other circuitry or chassis – Note the Led has not been pushed in all the way. Also note that the LED will only work when inserted the correct way around.
Installing the tubes
Let’s install our tubes into the board – the supplied 6X5 in the 8-pin valve base and the ECL82 (or 6BM8) in the 9-pin base.
Tidying Up
Seeing as we have a number of loose filament and HT wires coming from the PCB, I would suggest taping the ends to make sure that they do not short with one another when we go to test with power!

Copyright © 2007, 2008 AudioNote Kits www.AudioNoteKits.com [email protected]
Page 43
Ohm Check
EXPLANATION: There are a number of terms that we will be using in this section that we should be familiar with – the HT or High Voltage or B+ is all the same thing – this is the HIGHEST DC voltage in the circuit typically and is the voltage that we will be supplying to the Tubes in our audio signal path. THE UNIT IS STILL OFF AT THIS POINT If you have a Multimeter set it to OHMS and measure the resistance from B+ to GND on the M2 Board – you can see from the picture opposite the approx location on the board to find these 2 points. You should see a reading in the 300K ohm range – this is a good sign – if you have a very low ohmage then there could be a problem and you may want to contact us first.
Electrical Testing
Take a power chord and plug in the unit but make sure the amplifier is off. Before the first power on we suggest the following steps: 1. Make sure that you have a quiet environment when
you are turning on for the first time – that way if there is a problem with the circuit you will be able to see & hear a crackle or a vibration or hum etc. if there is any.
2. If you have a Variac then it would be useful to use it
so you can power on slowly and check DC voltages – If not we will just turn on.
3. Press the Rocker switch such that the 1 is pushed
flat against the chassis. 4. Observe the LED light turning on and also look for
glow from the tubes. 5. Get ready to switch off immediately if anything goes
wrong. 6. Get your voltmeter ready – you will want to perform
a High Voltage check.

Copyright © 2007, 2008 AudioNote Kits www.AudioNoteKits.com [email protected]
Page 44
First measure from B+ to GND on the M2 PCB (use the ground point closest to the LED section). You should read approximately 260v DC.
Now measure the filament voltages - these are the connections labeled +6V2- on top of the PCB. These should be approximately 12v DC.
If there is a problem with any of the above voltages, switch to AC volts and measure the 300 300 points on the M2 PCB – you should get somewhere over 600V AC.

Copyright © 2007, 2008 AudioNote Kits www.AudioNoteKits.com [email protected]
Page 45
While in AC mode measure the 13V6 pads on the M2 PCB – We have 8 0 8 taps which should give us roughly 16V AC.
Voltage Check Summary
DC Voltage Checks
Location Approx Reading
B+ to GND 260v DC
+6V2- 12v DC
+6V2- 12v DC
AC Voltage Checks These are optional if DC voltages are correct.
Location Approx Reading
300 300 >600v AC
13V6 13V6 16v AC
If you have correct voltage readings on the M2 Power Supply then Congratulations are in order and you have completed the first half of the kit. Feel free to contact us if you have any problems with your power supply or have any questions up to this point [email protected] Also feel free to give us an update that things are going according to plan.

Copyright © 2007, 2008 AudioNote Kits www.AudioNoteKits.com [email protected]
Page 46
Section 5: Install the Screen
The next step is to install the metal screen. It is important that a good electrical contact is maintained between the chassis and the screen itself. This picture shows the hole that will make that contact from the chassis – note that the surrounding paint has been removed.
As you can see here, the screen has a corresponding hole where the paint has been removed. These holes should mate and provide a good electrical contact.
This picture shows the final position of the shield. Use 3 M4 10mm screws and nuts to secure the screen in place - insert screws from underneath the chassis.

Copyright © 2007, 2008 AudioNote Kits www.AudioNoteKits.com [email protected]
Page 47
Section 6: Line Board Assembly
In this section we will be building the Line Stage for the L2 Pre-Amplifier, which consists of a pair of 12AU7’s.

Copyright © 2007, 2008 AudioNote Kits www.AudioNoteKits.com [email protected]
Page 48
Line Stage Schematic

Copyright © 2007, 2008 AudioNote Kits www.AudioNoteKits.com [email protected]
Page 49
Line Board Parts List
Category Quantity Part Designator
Capacitors (Electrolytic) 2 470uf 16v C36, C37
1 .47uf Capacitors (Non-polarized)
2 .47uf, 600v C34, C35
2 680R R42, R43
6 1K R39, R46, R47, R48, R51, R52
4 36K R40, R41, R44, R45
Resistors
4 1M or
1M2
R37, R38, R49, R50
Valve Bases 2 9 pin gold Valve Bases
Tubes 2 ECC82/12AU7/5814 V5, V6
Installing the Board Spacers
Start by installing the M4 spacers and M4 x 10mm screws to secure them in position.
Valve Base Installation
Install the 9 pin valve bases. Use the spacer, M3 screw, and nut provided to secure them into position - they can only go in one way.

Copyright © 2007, 2008 AudioNote Kits www.AudioNoteKits.com [email protected]
Page 50
Once the valve base has been screwed into position then we can solder the legs as shown opposite. you will probably feed plenty of solder into the hole to secure into position.
Resistor Installation
2 680R R42, R43
6 1K R39, R46, R47, R48, R51, R52
4 36K R40, R41, R44, R45
Resistors
4 1M or
1M2
R37, R38, R49, R50
Resistor Lesson - The naming convention for resistors is as follows: A resistor value under 1000 ohms is typically referred to with an R – For example 100R means 100 ohms. Or you could have a value of 47R5, which would mean 47.5 ohms – the R is used to specify the decimal point as well as Resistance in Ohms. A 1000-ohm resistor would be referred to as 1K ohms or you could have a 1K5, which means 1500 ohms. And so on to 1M or 1M5 etc…
Using the color code table or an ohmmeter you can select the resistors and install them into the PCB. Here we have selected the 680R resistor and measured on the ohmmeter.

Copyright © 2007, 2008 AudioNote Kits www.AudioNoteKits.com [email protected]
Page 51
Here we are installing the resistor into the correct reference designator R42. It’s a good idea to look at the schematic as you are populating the board as a good double check with the manual. Once the resistor is installed then you can bend the legs back slightly on an angle so that the resistor will stay in position.
We recommend you install all the resistors in this fashion and then double check them with the manual picture to make sure all the correct values are in position – and then you can start soldering! Check the HI Resolution picture on the L2 support page on the web site if you need to see the color codes in better detail. With all the resistors in position then you can start soldering on the underside of the board.
Once the resistors are soldered in you can proceed to cut the legs off – a good technique is to HOLD the leg in one hand so it does not fly off, and cut with the other hand – this is also good safety!
Capacitor Installation
Capacitors (Electrolytic) 2 470uf 16v C36, C37
1 .47uf Capacitors (Non-polarized)
2 .47uf, 600v C34, C35

Copyright © 2007, 2008 AudioNote Kits www.AudioNoteKits.com [email protected]
Page 52
We will start by installing the two electrolytic capacitors. As you are aware, the stripe is the negative side. Note that the Board is not marked with a ‘+’ or a ‘-‘ so you will have to follow our instructions - You will see the stripe of the electrolytic capacitor is facing the input side of the board – If you look underneath you will see the Negative side of the capacitors connect to Ground.
Now take the .47uf cap that we use as a bridge. It is non-polarized so it does not matter the direction of installation – and position it as shown opposite! Note that your capacitor may not look exactly like the one shown in the picture.
Next step is to install the .47uf 600v AN Film capacitors as shown with the bar facing the front of the board - Installing these the other way round is fine also but we recommend following our picture opposite.
Here is a picture of your completed L2 Line Board!

Copyright © 2007, 2008 AudioNote Kits www.AudioNoteKits.com [email protected]
Page 53
Section 7: Wiring Up the Line Stage
Position the L2 Line Board into the chassis – Don’t screw into position but place it in the correct orientation. As you can see, the input side of the Line Board is closest to the front of the chassis – the signal will travel from front towards back of chassis.
Filament Wiring
Filament Wiring Note If you are building the L2 pre-amp as a LINE ONLY and never plan to use a PHONO section then you can use a separate filament pair from the M2 power supply for each tube valve base. If you are building a L2 Line with Phono then you will just use one filament supply for the L2 line board and you will use a twisted wire to “parallel” the voltage to both tubes at the same time. The instructions that follow assume that you are going to parallel the line board filaments as if you are going to build with an additional phono board. This is also a good method if you may intend to add a phono board in future.
The first thing we are going to do is to take one of the 6V2 filament wires from the M2 power supply and we are going to connect it to the L2 Line Board – You will have a little extra wire length so I suggest you trim it but leave yourself some extra room as you will be flipping the board over afterwards and we will use the extra piece to ‘parallel’ the two valve bases.

Copyright © 2007, 2008 AudioNote Kits www.AudioNoteKits.com [email protected]
Page 54
In order for the 12AU7 tubes on the line board to “light up” and function properly a filament voltage needs to be applied to pins 4 & 5 – In this case we are supplying approx 12V DC between these pins. The one filament supply from the M2 Power supply board will supply the two tubes on the L2 Line Board. In the picture opposite you can see the filament wires from the power supply connecting to pins 4 & 5 with the extra twisted wire used to connect to pins 4 & 5 of the other tube – the red black connections are not critical but you can follow the pictures. See the following diagram for further clarity.
As shown from the underside of the board you can see the filament wiring and the location of pin1. The filaments are wired into pin 4 & 5 – It’s a DC voltage applied but the direction is not critical.
HT and Power Supply Ground Wiring
EXPLANATION: HT is the HIGH TENSION or High DC voltage in the circuit. The most important purpose of the M2 Power supply is to supply this High Voltage level which will be around 260V. The L2 Board has been designed to support a LEFT and RIGHT High Voltage rail. In our case we will be connecting these together with the silver wire as you can see in the pictures that follow.
With the Filaments now wired in our next step is to install the B+ and GND from the M2 Power supply – this is supplying the High Voltage. We have tested our Power Supply in the M2 section and know that we have a working power supply!

Copyright © 2007, 2008 AudioNote Kits www.AudioNoteKits.com [email protected]
Page 55
Locate the HT-R, HT-L and HTGND pads - These are the pads that we will be working with. The HT wire will connect to one of the HT pads and you will use some silver wire to short between the two HT pads. The GND wire from the M2 Power Supply connects to the HTGND pad.
Go ahead and solder the Red Wire from the B+ of the M2 power supply over to the HT R or HT Left along with the silver bridge wire. Then connect the Black GND wire from the M2 Power supply over to the HTGND as shown in the picture to the left. Make sure that the HTGND does not come into contact with the bridge wire.
Electrical Test
Time for a DC voltage check - With the filaments and the HT and GND connected to the L2 board we should do a quick DC voltage test on the board. Before installing the 12AU7 tubes, turn the unit on if you are satisfied with your wiring and measure the High voltage between the GND and the B+ on the M2 PS – Should be in the 250-260v range. You can then power down and install your 2 x 12AU7 tubes into position. Upon power-up check that your tubes are lighting up which means our filament voltage supply is working fine.

Copyright © 2007, 2008 AudioNote Kits www.AudioNoteKits.com [email protected]
Page 56
Check the voltage across any of the 36K resistors R40, R41, R44, and R45 – all of these resistors should have a 120 volt drop across them – These are the plate resistors.
Then check the cathode resistors – R42 & R43 – measure the DC voltage across these resistors and we should see something in the 4.5V range. With these tests done successfully, this ensures that the tubes have proper DC conditions and will allow and audio signal to pass through them as we move through the rest of the build.

Copyright © 2007, 2008 AudioNote Kits www.AudioNoteKits.com [email protected]
Page 57
Section 8: RCA input, Selector and Noble Volume Pot
In this section we will be hooking up the first RCA input and testing for successful audio.
Installing and wiring your first pair of RCA inputs Effectively, you will be repeating the same procedure for all six pairs to stereo inputs. Therefore, this section will go into the greatest detail when showing the first stereo pair. The RCA’s are made up of a number of parts as illustrated below:
When fitting an RCA connector to the chassis, first remove the securing nut, ground lug, and flat insulation washer. Bend the ground lug slightly so that the part that you will be soldering onto will be at a better angle for threading wires and for when you are to solder onto it. With the ‘lipped’ insulation washer in place, fit into the chassis hole from the back. Make sure that the ‘lip’ fits into the hole while securing. Now that the RCA is through the hole, fit the flat washer, ground lug, and securing nut (in that order). At first, only hand-tighten the securing nut.
Before you give the RCA a final tighten, there are a couple of things to line up. First, turn the body of the RCA so that ‘U’ formed by the RCA post is upright. This allows for easier soldering as it acts as a ‘bucket’ for the solder. Next the ground lug has to be placed in the required position (this may be out to the left, right, pointing up or downward etc). This can be a little awkward because when you come to finally tighten up, the ground lug may want to turn with the nut. Sometimes it is necessary to initially position it counter-clockwise to where you want it to end up. The RCA can now be finally tightened - do not over-tighten. Now that you know how to fit the RCA’s, let’s get back to our instructions…

Copyright © 2007, 2008 AudioNote Kits www.AudioNoteKits.com [email protected]
Page 58
Step 1: Install the first set of RCA connectors. Install the BLACK RCA (left) on the bottom of the chassis and RED RCA (right) on the top of the chassis.
Install the Black RCA on the top and the red RCA on the bottom. Note that we have used the second set of holes for our first set of RCA’s – the reason for this is that this is the LINE input – we reserve the first pair of holes for Phono input so that it corresponds with the front faceplate.
The next step is to TIN the RCA connectors – put a puddle of solder into the main signal hole as shown in the first picture. Then tin the Ground post by adding some solder to this.
Trim the ends of a length of twisted PTFE (you can select your own color) – you can also tin the short end of the PTFE wire also. Once the wire is tinned then all you need to do is heat up the puddle of solder on the RCA and then insert the colored wire into position as shown opposite. Then repeat for the ground with the black wire and thread it through the small hole in the ground lead.
EXPLANATION: The twisted PTFE wire is a high quality silver-plated copper stranded wire. The Black wire is always the ground signal and the colored wire is always the signal.

Copyright © 2007, 2008 AudioNote Kits www.AudioNoteKits.com [email protected]
Page 59
Repeat this for the other RCA and you should have two pairs of wires as shown to the left.
ELMA Switch Hook-up
The next step is to wire up the ELMA selector switch. You may want to add the knob to it with the little hex wrench so you can stand it up for easy soldering!
The pictures opposite show that the colored wire prepared to solder to the ELMA selector. OPTIONAL: At this stage you may also want to put your wire through the BRAID provided which keeps things clean – another option is to just tie wrap then.
Trim the colored wire to the correct length – give yourself plenty of slack! On each side of the ELMA you can see 6 short leads – there are a total of 12 around the outside perimeter. See the following diagram.

Copyright © 2007, 2008 AudioNote Kits www.AudioNoteKits.com [email protected]
Page 60
This diagram shows the pin layouts of the ELMA selector switch. The order that you wire your inputs is dictated by the order shown on the front panel:
1. PHONO 2. CD 3. DAC 4. AUX 5. TUNER 6. LINE
Of source you may only wish to wire up the inputs that you will be using - the choice is yours. At this stage take the LEFT RCA (black) PTFE wire and hold it in your hand – unravel the last 6 inches of twisted pair so that you just have the colored wire – (the black wire will be going somewhere else in a few minutes).
Here is the first line stage input correctly wired into the ELMA selector. Now you can position the ELMA switch into the front of the chassis – the switch is keyed and you will notice that it will slot into position – you may want to file off the paint very slightly from the chassis in the small key hole but it is not usually necessary - try fitting it into position and then securing with the nut.
Volume Pot Installation
The next step is to install our Volume Pot. If you are using the Noble Volume pot then you can use the small PCB provided for easy soldering. Make sure the board goes on in the correct orientation as per the pictures opposite.

Copyright © 2007, 2008 AudioNote Kits www.AudioNoteKits.com [email protected]
Page 61
Install the Volume pot in the center hole. TIP: You may want to scrape off the Black paint on the Noble pot where the pot comes in contact with the chassis - this would be on the inside of the chassis - use a flat headed screw driver and just take off some of the black paint - this way the pot makes a good ground connection with the chassis (this will avoid hum caused by touching the Volume Knob).
Now with the colored wires connected correctly to the ELMA selector you can now twist the two remaining Black ground wires together – these are going to be soldered to the Noble PCB.
See the GND pads on the left side of the Noble PCB – you can take your two black wires and solder them into this board as shown in the pictures opposite.
Next step is to cut a length of red/black twisted wire and we will connect the Output of the ELMA selector to the INPUT of the Noble Volume PCB. We will use the RED wire as the RIGHT and the Black wire as the LEFT.

Copyright © 2007, 2008 AudioNote Kits www.AudioNoteKits.com [email protected]
Page 62
Here we can see the wire soldered to the Noble PCB.
Now take the wire and solder to the ELMA selector – The red wire would go on the RIGHT side of the ELMA output and the black wire on the LEFT side of the ELMA output (see ELMA graphic).
Here is our wiring up to this point. Check the following:
• The PTFE wire from the RCA’s to the ELMA
• The grounds from the RCA to the Noble PCB
• The PTFE wire from the output of the ELMA (central pins) to the input of the NOBLE PCB.
Next wiring step is to connect the OUTPUT of the Noble Pot to the inputs of the Line Board that you have completed. For the Output of the Noble PCB connect the red wire to the RIN and the Black wire to the LIN (these are our right and left audio signals).

Copyright © 2007, 2008 AudioNote Kits www.AudioNoteKits.com [email protected]
Page 63
Now connect a ground wire – Black – from the NOBLE PCB Ground to either the LINGND or the RINGND (these are connected internally).
That should do it! We now have a completed wiring for a single Line Stereo Input for your pre-amp! You can do a quick tie wrap to clean up some of the wiring. You can now add your required number of extra line inputs or wait until you have carried out the test outlined in the next section.
Step 2: Prepare a twisted PTFE pair.
Take one end and strip the ends off with wire strippers. Then tin the ends by adding solder to them – see opposite.

Copyright © 2007, 2008 AudioNote Kits www.AudioNoteKits.com [email protected]
Page 64
Step 3: Solder the twisted pair to the RCA connector.
Next, tine the RCA post - applying a small amount of solder to the center area. Also, tine the ground lug. One the RCA has been tinned, heat the solder in the center section of the RCA. It should be like a little puddle and slide the yellow lead into position – hold for a couple of seconds until it is solid. Then slide the black wire through the ground post and touch the ground lead with the soldering iron – the tinned wire and tinned ground lead should quickly adhere! (Note that the picture opposite has not had it’s ground lug soldered yet).
While working with the RCA’s the black wire will always be the ground lead and we will use colored wire for the signal. Any pairs of RCA’s will use the same color for the signal – for example the pair of RCA’s we are working on now will both use the yellow wire.

Copyright © 2007, 2008 AudioNote Kits www.AudioNoteKits.com [email protected]
Page 65
Section 9: Audio Signal Test
I would suggest adding the knobs to the front panel with the ALLEN Key provided so that you can make adjustments. With the selector switch, turn the knob all the way to the LEFT or counter clockwise - Once it has reached this position then turn it ONE position to the RIGHT - This is the correct position for our first line stage signal to be selected.
Then turn the volume pot all the way to the LEFT again (counter clockwise) - this would be zero volume level - turn the pot all the way to the right for FULL volume and then leave in this position.
We are now going to test our audio signal to make sure that all our wiring is correct! Use a CD player and connect the inputs into the installed RCA pair. Power on the Pre-amplifier unit and make sure tubes are glowing – then play track 1 of the AUDIO Test CD provided.

Copyright © 2007, 2008 AudioNote Kits www.AudioNoteKits.com [email protected]
Page 66
By measuring the AC voltage at the output of the Line Board you will see an AC signal coming through - You will want to see a value of approximately 5mV at full volume - if you can adjust the volume control you should be able to see the audio signal larger or smaller - you can also try moving the selector switch and seeing the signal disappear and then reappear as you select. Do this for both channels to assure a proper working Line Stage! If you have wired anymore line level inputs then you may repeat the test for the other wired inputs (again using the CD and test disc as described). Congratulations you have completed the Line Stage testing – If you are having problems at this point check over your wiring and or contact us at [email protected] to help you debug.

Copyright © 2007, 2008 AudioNote Kits www.AudioNoteKits.com [email protected]
Page 67
Section 10: Output Wiring
If you are building the Phono Version of the L2 Pre-amplifier then it may be a good idea to now switch to the L2 Phono Board construction manual. If you choose, you could do that after wiring up the output - however, it may be more difficult because you would have to route the phono board and additional wiring under the output wiring! An AN-A (or AN-V), stereo paired wire has been supplied with your kit to connect the output of the line board to the output RCA connectors. This is a very high quality cable and should be handled with care. The ends of the stereo-paired cable have been pre-prepared to make installation easier. You will notice that at one end, the screen wires and ground (white) are shorted together. This is the end that will connect to the analog output board.
RCA Connections
The Output RCA’s should be fitted on the bottom row closest to the screen as shown opposite. The end with just the red and white wires (i.e. no screen) will connect to the output RCA. Solder white wires to the appropriate RCA’s ground lug and the red wires to the appropriate RCA’s center connection.
HINT: When connecting to the RCA’s – tin the RCA or apply solder. The center part of the RCA is where the red lead will go – melt a little puddle of solder into the central part and then heat the puddle such that you can slide the tinned red lead into it. Then tin the ground post and slide the white lead wire into position and solder.
Line Board Connections
The end with the thick ground wires will connect to the Line Board. The cable connected to the LEFT output connects to the line board at LOUT (red) and LOUTGND (black/screen). The cable connected to the RIGHT output connects to the line board at ROUT (red) and ROUTGND (black/screen).

Copyright © 2007, 2008 AudioNote Kits www.AudioNoteKits.com [email protected]
Page 68
Section 11: L2 Phono Board Build and Installation
This section is only relevant to you if you are building the Phono version of the L2 Pre-amplifier. If you are not then you can skip this section and move onto the next. In this section we will build the L2 Phono PCB – The circuit uses a 12AX7 on the input followed by a passive RIAA section with a 12AU7 on the output stage.
The picture above shows all the parts required for the phono stage including resistors, film and electrolytic capacitors, valves bases, shields and the PCB.

Copyright © 2007, 2008 AudioNote Kits www.AudioNoteKits.com [email protected]
Page 69
Phono Board Parts List The Complete Parts list for the Phono Board is shown below.
Category Quantity Part Designator
2 470uf 16v C9, C10
2 100uf 10v C1, C2
Capacitors (Electrolytic)
1 47uf 450v C13
2 .047uf C3, C4
2 .22uf C11, C12
2 2.7n C7, C8
Capacitors (Non-polarized)
2 8n2 (8200pf) C5, C6
2 1K R3, R4, R15, R16
2 1K2 R5, R6
1 2K2 R21
2 33K R18, R19
2 39K2 R11, R12
2 47K R1, R2
2 100K R9, R10
2 270K R7, R8
2 1M R19, R20
Resistors
2 1M82 R13, R14
2 9 pin gold Valve Bases
2 Tube shields
2 GND Lugs
Fittings
1 GND Post Kit
1 AN-A shielded Input
1 Short Twisted Filament parallel filaments
1 Long 6V2 Filament M2 Filament
1 Red PTFE 20 M2 PS to HT
Wire
1 Black PTFE 20 M2 PS GND
1 12AX7/ ECC83 Tubes
1 12au7/ECC82
4 Spacers Hardware
8 Screws

Copyright © 2007, 2008 AudioNote Kits www.AudioNoteKits.com [email protected]
Page 70
Above we have a view of the top and underside of the board.
Installing the Spacers and Valve Bases
First install the M3 Hex spacers into position at the four corners of the board.
Position the 9-pin valve bases onto the board – they can only go in one way! For each valve base, install the bottom of the metallic tube shield over top of the valve base – then using a small round washer from the hardware bag – place in position for the M3 screw to thread through.

Copyright © 2007, 2008 AudioNote Kits www.AudioNoteKits.com [email protected]
Page 71
Fit the M3 screw from the top and secure with an M3 nut underneath.
The next step is to solder the valve base into position by soldering each leg of the valve base – you can use plenty of solder to secure the valve base.
Repeat the process for both valve bases.

Copyright © 2007, 2008 AudioNote Kits www.AudioNoteKits.com [email protected]
Page 72
Installing the Resistors
2 1K R3, R4, R15, R16
2 1K2 R5, R6
1 2K2 R21
2 33K R18, R19
2 39K2 R11, R12
2 47K R1, R2
2 100K R9, R10
2 270K R7, R8
2 1M R19, R20
Resistors
2 1M82 R13, R14
You can check out the color code chart for the resistors or use an ohmmeter to verify the value prior to insertion. Lets start by installing R1 & R2, which are the 47K input resistors. Could be time to get out your schematic and see which resistors you are installing – this is a good way to double check your work.
Do a nice gentle bend on the resistor so that it can be placed neatly through the holes in the PCB in the correct designation location.

Copyright © 2007, 2008 AudioNote Kits www.AudioNoteKits.com [email protected]
Page 73
On the underside of the board you can gently bend the legs back on an angle (not as far as 90 degrees!) so that the resistor will stay in position for later when we solder. Continue installing all the resistors – you will notice that we have the Beyschlag resistors for many of the values along with the red PNP precision resistors and the black HOLCO precision. In a phono stage there are some standard values and some exact values and this is why the mix of resistor types!
Compare your board to the picture opposite and double check that all correct values have been inserted in the correct locations. Once you are confident then you can begin soldering on the underside of the board and clipping!
Installing the Capacitors
2 .047uf C3, C4
2 .22uf C11, C12
2 2.7n C7, C8
Capacitors (Non-polarized)
2 8n2 (8200pf) C5, C6
We will now install some of the RIAA capacitors. You will notice the capacitor in the pictures opposite with the smaller value soldered in parallel – this is a 2N7 farad value – you will want to bend the capacitor as it appears in the picture in the middle – then install this into position in C7 and C8.

Copyright © 2007, 2008 AudioNote Kits www.AudioNoteKits.com [email protected]
Page 74
Here are C7 and C8 installed on the board.
Now go ahead and install the 8200p or 8N2 farad capacitors into positions C5 and C6. The remaining film capacitors will be dealt with later.
2 470uf 16v C9, C10
2 100uf 10v C1, C2
Capacitors (Electrolytic)
1 47uf 450v C13
Lets install the electrolytic capacitors now – these are polarized and must be installed the correct way around.
Here you can see we have installed the first of the electrolytics - It’s a 47uf snap in capacitor - note the NEGATIVE stripe on the side of the cap - this is facing into the board. You will see a + designator on the board itself.

Copyright © 2007, 2008 AudioNote Kits www.AudioNoteKits.com [email protected]
Page 75
Here we are installing the electrolytic capacitor 470uf 16v in C10 – note the + stenciled on the board and the negative stripe of the capacitor on the opposite side – These value capacitors are used on the cathodes on the tubes. Go ahead and install C9 also; again taking care to get the polarity right.
And finally we can install the 100uf 10V caps into C1 and C2 – note the location of the stripe – the cap standing up is to show you the + stencil on the board!

Copyright © 2007, 2008 AudioNote Kits www.AudioNoteKits.com [email protected]
Page 76
2 .047uf C3, C4
2 .22uf C11, C12
2 2.7n C7, C8
Capacitors (Non-polarized)
2 8n2 (8200pf) C5, C6
The .047uf caps are installed underneath the board as in the picture opposite. Look for the correct hole locations on the board and place capacitor into position. You will then need to clip the extra lead on the top side of the board – these caps are not polarized so it does not matter which way they are installed – although some people prefer to have the line on the cap on the input signal side (see illustration opposite).
Here you can see the clipping off of the extra leads on the .047uf film. We have also installed the 2 .22uf caps into position on the top of the board. This completes the build of the L2 Phono Board. It is now time to install the phono board into the Pre-amplifier.

Copyright © 2007, 2008 AudioNote Kits www.AudioNoteKits.com [email protected]
Page 77
Installing the Phono Section requires that we do the following things:
• Wire-up the valve filaments to the power supply.
• Connect the output of the phono board to the ELMA selector and Noble pot PCB as we did with the line inputs.
• Connect the HT and GND.
• Install RCA’s in the Phono Input positions at the rear of the chassis and connect the phono inputs.
• Test the phono input.
• Add a ground post that will connect to the chassis.
Filament Wiring
The first step is to take the remaining twisted PTFE filament wires from the 6V2 on the M2 power supply and bring them over to the Phono board. We will be connecting on the underside of the chassis – We also need to connect the two valve bases in parallel as we did in the line board section.
Here you can see pins 4 & 5 connected to the filament wires from the 6V2 on the M2 power supply board – along with that the valve bases are wired in parallel so that the one filament will supply both tubes

Copyright © 2007, 2008 AudioNote Kits www.AudioNoteKits.com [email protected]
Page 78
Wiring the Output of the PHONO Stage into the ELMA selector
Take the two 12” lengths of PTFE wire and connect the Signal and ground for the left and right output channels of the Phono Board. Then unwind about 6” of the color and black wires and then twist the black wires together.
The blue arrows in this diagram indicate the correct pins to wire the phono leads to. The orange wires (in this case) will be cut to length to then be soldered into position on the ELMA selector. You may wish to position the line board so that the wires go underneath it - see the following pictures.
The first picture shows the line board positioned over the phono output wiring. Take the twisted lengths of Black wire and connect to the GND on the Noble PCB. Once this is completed then you have successful wired the Phono Board outputs to the ELMA selector.

Copyright © 2007, 2008 AudioNote Kits www.AudioNoteKits.com [email protected]
Page 79
Connecting the HT and Power Supply Ground
Now we are going to take the two lengths of PTFE wire for the HT and GND. Let’s begin by connecting one end of the red cable to one of the B+ pads on the M2 power supply board.
Now let’s hook up the B+ to the PHONO Board’s HT pad. Once the HT is connected then also connect a Black PTFE wire from the GND in the corner of the M2 Power Supply to the HT GND on the Phono Board - You can twist the black wire around the red wire (HT & HT GND).
Phono Input Connections
Begin by installing two RCA’s in the back panel in the phono position. Here is a close up of the input section of the PHONO board - you will connect the signal and GND to the RIN and RGND.

Copyright © 2007, 2008 AudioNote Kits www.AudioNoteKits.com [email protected]
Page 80
We can now connect the input AN-A cable. The shielded AN-A cable has a red and white lead on one end – this is the end for the RCA’s. The other end has the red signal wire and the thicker ground wire - this is the side that connects to the PHONO board.
The RCA post with Black on it is the LEFT signal - so you will want to connect the red lead to the center of the RCA post (signal) and the white lead to the GND peg on the RCA post. The LEFT input will connect to the board’s LIN (red) and LGND (black/screen) pads. The RIGHT input will connect to the board’s RIN (red) and RGND (black/screen) pads.
Controlled Phono Input Test
With the PHONO Audio Inputs connected along with Phono Filament and HT/GND, we can perform an audio test to see if all is well on our Phono Board. Install the tubes in the PHONO section - the 12Ax7 is the input tube and the 12AU7 is the output tube! Set up your CD player and play the PHONO Test Track into your PHONO input on the back of the pre-amp. You will want turn the ELMA selector knob all the way counterclockwise to the left - this will select the phono input.

Copyright © 2007, 2008 AudioNote Kits www.AudioNoteKits.com [email protected]
Page 81
Play the PHONO Test track and take an AC voltage measurement on the output of the LINE Board - this is to ensure that the audio signal is passing through the phono stage - into the ELMA selector - then to the Volume PCB - then to the input of the Line stage - and to the Output of the LINE stage - it’s an almost complete Audio test path! If you are getting some voltage reading of a few volts - then try adjusting the volume pot to see that the voltage is increasing or decreasing with rotation of the volume pot. Once this is completed - they try measuring the other channel - if all is well turn off the pre-amp and put away the CD player as we are going to do some more work (unless you need a break of course!)
Ground Post Installation
Install the Turntable Ground Post on the back of the chassis as shown in the picture above. It is a tight fit - push it slowly into the small oblong hole on the back of the chassis. Put the washer and the nut on the inside of the chassis. Use an M4 screw as we did with the main chassis earth point where there is no paint on the chassis (see above picture). Solder a wire from the ground post to the screw on the chassis.

Copyright © 2007, 2008 AudioNote Kits www.AudioNoteKits.com [email protected]
Page 82
Section 11: Finishing Off
Fitting the Faceplate
Peel off the plastic and position and secure with the 4 x M4x10mm black CSK (countersunk or flat) screws Tighten these with care, as you do not want to let the screwdriver slip and mark the faceplate.
Attaching the LED to the Faceplate
Secure the LED to the front of the faceplate with the supplied BLU-TAK supplied in the M2 power supply bag.
Copyright © 2007, 2008 AudioNote Kits www.AudioNoteKits.com [email protected]
Page 83
Final Thoughts I think that is about it - you may now wish to fit the cover - I hope you enjoyed your experience with AudioNote Kits and your new L2 Pre-Amplifier Kit.
Please send us an e-mail and tell us what you thought about the whole process – Send us a picture of your completed pre-amplifier if you can and also a little review or write-up would be useful. Enjoy you new Pre-Amplifier Best Regards Brian Smith AudioNote Kits

Copyright © 2007, 2008 AudioNote Kits www.AudioNoteKits.com [email protected]
Page 84
Appendix
The appendix contains auxiliary information. That is information that is either common to most project manuals or any last minute pieces of information that did not make it into the manual in time. It may also contain pull-out circuit diagrams that may be handy to have outside the manual etc.

Copyright © 2007, 2008 AudioNote Kits www.AudioNoteKits.com [email protected]
Page 85
Resistor Color Code Reference

Copyright © 2007, 2008 AudioNote Kits www.AudioNoteKits.com [email protected]
Page 86
Line Stage Schematic

Copyright © 2007, 2008 AudioNote Kits www.AudioNoteKits.com [email protected]
Page 87
M2 Power Supply Schematic

Copyright © 2007, 2008 AudioNote Kits www.AudioNoteKits.com [email protected]
Page 88
Phono Board Schematic