Manual for JVC camcorder
104
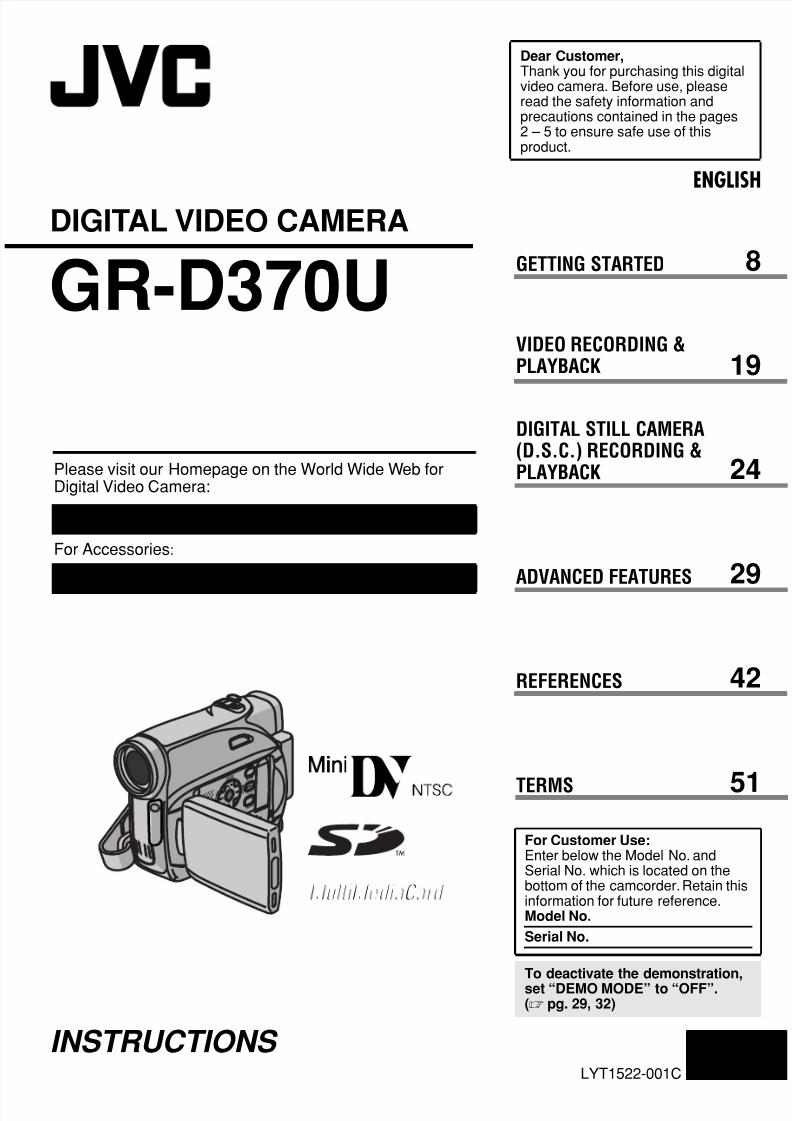
ENGLISH GR-D370U LYT1522-001C EN TERMS Dear Customer, Thank you for purchasing this digital video camera. Before use, please read the safety information and precautions contained in the pages 2 –5 to ensure safe use of this product. Please visit our Homepage on the World Wide Web for Digital Video Camera: For Accessories: http://www.jvc.co.jp/english/cyber/ http://www.jvc.co.jp/english/accessory/ INSTRUCTIONS DIGITAL VIDEO CAMERA GETTING STARTED 8 VIDEO RECORDING & PLAYBACK 19 DIGITAL STILL CAMERA (D.S.C.) RECORDING & PLAYBACK 24 ADVANCED FEATURES 29 REFERENCES 42 51 For Customer Use: Enter below the Model No. and Serial No. which is located on the bottom of the camcorder. Retain this information for future reference. Model No. Serial No. To deactivate the demonstration, set “DEMO MODE” to “OFF”. ( pg. 29, 32)
-
Upload
igor-dacevic -
Category
Documents
-
view
314 -
download
0
description
Manual for JVC GR-700
Transcript of Manual for JVC camcorder
7/17/2019 Manual for JVC camcorder
http://slidepdf.com/reader/full/manual-for-jvc-camcorder 1/104
ENGLISH
GR-D370U
LYT1522-001C EN
TERMS
Dear Customer,Thank you for purchasing this digitalvideo camera. Before use, pleaseread the safety information andprecautions contained in the pages2 – 5 to ensure safe use of thisproduct.
Please visit our Homepage on the World Wide Web forDigital Video Camera:
For Accessories:
http://www.jvc.co.jp/english/cyber/
http://www.jvc.co.jp/english/accessory/
INSTRUCTIONS
DIGITAL VIDEO CAMERA
GETTING STARTED 8
VIDEO RECORDING &PLAYBACK 19
DIGITAL STILL CAMERA(D.S.C.) RECORDING &PLAYBACK 24
ADVANCED FEATURES 29
REFERENCES 42
51
For Customer Use:Enter below the Model No. andSerial No. which is located on thebottom of the camcorder. Retain thisinformation for future reference.Model No.
Serial No.
To deactivate the demonstration,set “DEMO MODE” to “OFF”.( pg. 29, 32)
7/17/2019 Manual for JVC camcorder
http://slidepdf.com/reader/full/manual-for-jvc-camcorder 2/104
2 EN
Before recording important video, be sure tomake a trial recording.Play back your trial recording to make sure thevideo and audio have been recorded properly.
We recommend cleaning your video heads beforeuse.If you haven’t used yourcamcorder for awhile, theheads may be dirty. Werecommend periodicallycleaning the video headswith a cleaning cassette(optional).
Be sure to store yourcassette tapes and camcorder in the properenvironment.Video heads can become dirty more easily if your
cassette tapes and camcorder are stored in adusty area. Cassette tapes should be removedfrom the camcorder and stored in cassette cases.Store the camcorder in a bag or other container.
Use SP (Standard) mode for important videorecordings.LP (Long Play) mode lets you record 50% morevideo than SP (Standard) mode, but you mayexperience mosaic-like noise during playbackdepending on the tape characteristics and theusage environment.So, for important recordings, we recommend
using SP mode. For safety and reliability.
It is recommended only genuine JVC batteriesand accessories are used in this camcorder.
This product includes patented and otherproprietary technology and will operate only withJVC Data Battery. Use the JVC BN-VF707U/ VF714U/VF733U battery packs. Using genericnon-JVC batteries can cause damage to theinternal charging circuitry.
This camcorder is designed exclusively for thedigital video cassette, SD Memory Card and
MultiMediaCard. Only cassettes marked “ ”and memory cards marked “ ” or“ ” can be used with this unit.
Remember that this camcorder is intended forprivate consumer use only.Any commercial use without proper permission isprohibited. (Even if you record an event such as ashow, performance or exhibition for personalenjoyment, it is strongly recommended that youobtain permission beforehand.)
DO NOT leave the unit- in place of over 50°C (122°F)- in place where humidity is extremely low (below
35%) or extremely high (80%).- in direct sunlight.- in a closed car in summer.- near a heater.
The LCD monitor is made with high-precisiontechnology. However, black spots or bright spotsof light (red, green or blue) may appear constantlyon the LCD monitor. These spots are notrecorded on the tape. This is not due to anydefect of the unit. (Effective dots: more than99.99%)
Do not leave the battery pack attached when thecamcorder is not in use and check the unit
regularly whether it is working or not.
Read This First!
7/17/2019 Manual for JVC camcorder
http://slidepdf.com/reader/full/manual-for-jvc-camcorder 3/104
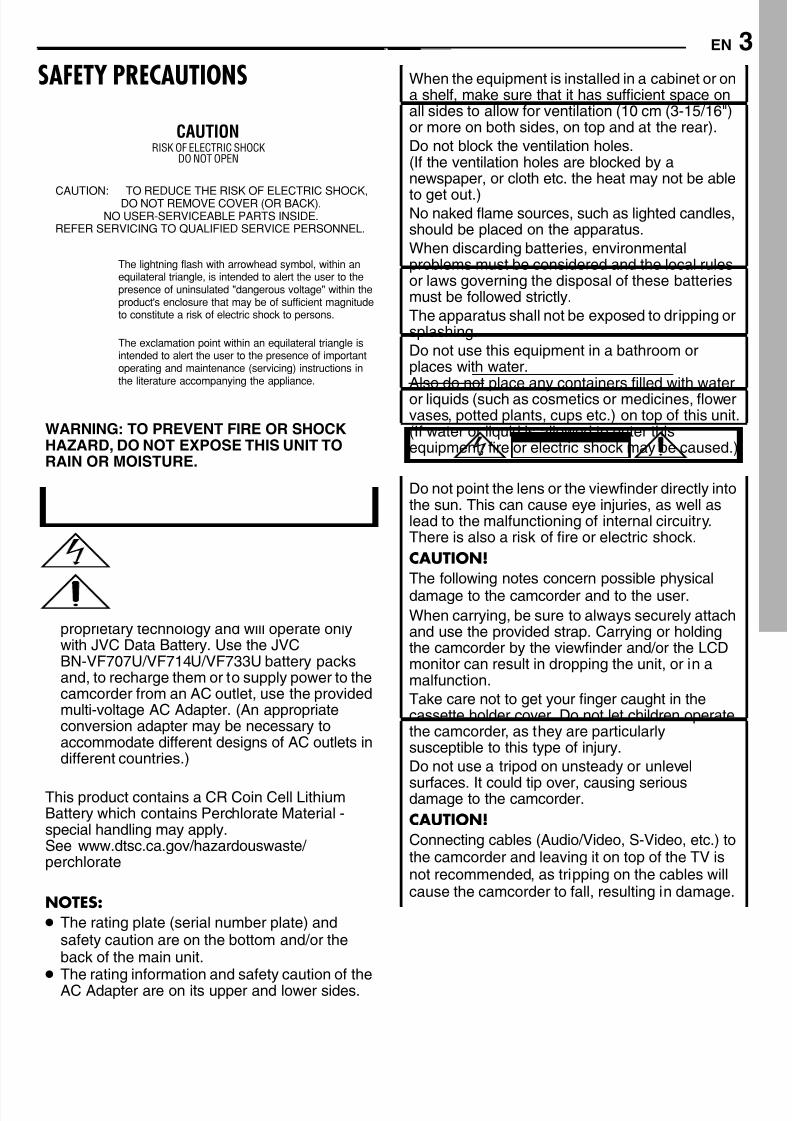
EN 3SAFETY PRECAUTIONS
WARNING: TO PREVENT FIRE OR SHOCKHAZARD, DO NOT EXPOSE THIS UNIT TORAIN OR MOISTURE.
CAUTIONS:
This camcorder is designed to be used withNTSC-type color television signals. It cannot beused for playback with a television of a differentstandard. However, live recording and LCD
monitor/viewfinder playback are possibleanywhere. This product includes patented and other
proprietary technology and will operate onlywith JVC Data Battery. Use the JVCBN-VF707U/VF714U/VF733U battery packsand, to recharge them or to supply power to thecamcorder from an AC outlet, use the providedmulti-voltage AC Adapter. (An appropriateconversion adapter may be necessary toaccommodate different designs of AC outlets indifferent countries.)
This product contains a CR Coin Cell LithiumBattery which contains Perchlorate Material -special handling may apply.See www.dtsc.ca.gov/hazardouswaste/perchlorate
NOTES:
The rating plate (serial number plate) andsafety caution are on the bottom and/or theback of the main unit.
The rating information and safety caution of theAC Adapter are on its upper and lower sides.
CAUTIONRISK OF ELECTRIC SHOCK
DO NOT OPEN
CAUTION: TO REDUCE THE RISK OF ELECTRIC SHOCK, DO NOT REMOVE COVER (OR BACK).NO USER-SERVICEABLE PARTS INSIDE.
REFER SERVICING TO QUALIFIED SERVICE PERSONNEL.
The lightning flash with arrowhead symbol, within anequilateral triangle, is intended to alert the user to thepresence of uninsulated "dangerous voltage" within theproduct's enclosure that may be of sufficient magnitudeto constitute a risk of electric shock to persons.
The exclamation point within an equilateral triangle isintended to alert the user to the presence of importantoperating and maintenance (servicing) instructions inthe literature accompanying the appliance.
When the equipment is installed in a cabinet or ona shelf, make sure that it has sufficient space onall sides to allow for ventilation (10 cm (3-15/16")or more on both sides, on top and at the rear).
Do not block the ventilation holes.(If the ventilation holes are blocked by anewspaper, or cloth etc. the heat may not be able
to get out.)No naked flame sources, such as lighted candles,should be placed on the apparatus.
When discarding batteries, environmentalproblems must be considered and the local rulesor laws governing the disposal of these batteriesmust be followed strictly.
The apparatus shall not be exposed to dripping orsplashing.
Do not use this equipment in a bathroom orplaces with water.
Also do not place any containers filled with wateror liquids (such as cosmetics or medicines, flowervases, potted plants, cups etc.) on top of this unit.(If water or liquid is allowed to enter thisequipment, fire or electric shock may be caused.)
Do not point the lens or the viewfinder directly intothe sun. This can cause eye injuries, as well aslead to the malfunctioning of internal circuitry.There is also a risk of fire or electric shock.
CAUTION!
The following notes concern possible physicaldamage to the camcorder and to the user.
When carrying, be sure to always securely attachand use the provided strap. Carrying or holdingthe camcorder by the viewfinder and/or the LCDmonitor can result in dropping the unit, or in amalfunction.
Take care not to get your finger caught in thecassette holder cover. Do not let children operatethe camcorder, as they are particularlysusceptible to this type of injury.
Do not use a tripod on unsteady or unlevel
surfaces. It could tip over, causing seriousdamage to the camcorder.
CAUTION!
Connecting cables (Audio/Video, S-Video, etc.) tothe camcorder and leaving it on top of the TV isnot recommended, as tripping on the cables willcause the camcorder to fall, resulting in damage.
7/17/2019 Manual for JVC camcorder
http://slidepdf.com/reader/full/manual-for-jvc-camcorder 4/104
4 EN
IMPORTANT SAFETY INSTRUCTIONS1. Read these instructions.2. Keep these instructions.3. Heed all warnings.4. Follow all instructions.5. Do not use this apparatus near water.
6. Clean only with dry cloth.7. Do not block any ventilation openings. Install inaccordance with the manufacturer’s instructions.
8. Do not install near any heat sources such asradiators, heat registers, stoves, or otherapparatus (including amplifiers) that produceheat.
9. Only use attachments/accessories specified bythe manufacturer.
10. Use only with the cart, stand, tripod, bracket, ortable specified by the manufacturer, or sold withthe apparatus. When a cart is used, use cautionwhen moving the cart/apparatus combination toavoid injury from tip-over.
11. Unplug this apparatus during lightning storms orwhen unused for long periods of time.
12. Refer all servicing to qualified servicepersonnel. Servicing is required when theapparatus has been damaged in any way, suchas power-supply cord or plug is damaged, liquidhas been spilled or objects have fallen into theapparatus, the apparatus has been exposed torain or moisture, does not operate normally, orhas been dropped.

7/17/2019 Manual for JVC camcorder
http://slidepdf.com/reader/full/manual-for-jvc-camcorder 5/104
EN 5Before Using This Camcorder
Make sure you only use cassettes with the MiniDV mark .Make sure you only use memory cards with themark or .This camcorder is designed exclusively for thedigital video cassette, SD Memory Card andMultiMediaCard. Only cassettes marked “ ”and memory cards marked “ ” or“ ” can be used with this unit.
Remember that this camcorder is notcompatible with other digital video formats.Remember that this camcorder is intended forprivate consumer use only.Any commercial use without proper permission isprohibited. (Even if you record an event such as ashow, performance or exhibition for personal
enjoyment, it is strongly recommended that youobtain permission beforehand.)
Before recording important video, be sure tomake a trial recording.Play back your trial recording to make sure thevideo and audio have been recorded properly.
We recommend cleaning your video headsbefore use.If you haven’t used your camcorder for a while, theheads may be dirty. We recommend periodicallycleaning the video heads with a cleaning cassette(optional).
Be sure to store your cassette tapes andcamcorder in the proper environment.Video heads can become dirty more easily if yourcassette tapes and camcorder are stored in a dustyarea. Cassette tapes should be removed from thecamcorder and stored in cassette cases. Store thecamcorder in a bag or other container.
Use SP (Standard) mode for important videorecordings.LP (Long Play) mode lets you record 50% morevideo than SP (Standard) mode, but you may
experience mosaic-like noise during playbackdepending on the tape characteristics and theusage environment.So, for important recordings, we recommend usingSP mode.
It is recommended that you use JVC brandcassette tapes.Your camcorder is compatible with all brands ofcommercially available cassette tapes complyingwith the MiniDV standard, but JVC brand cassettetapes are designed and optimized to maximize theperformance of your camcorder.
Also read “CAUTIONS” on pages 47 – 49.
Microsoft® and Windows® are either registeredtrademarks or trademarks of MicrosoftCorporation in the United States and/or othercountries.
Macintosh is a registered trademark of AppleComputer, Inc.
QuickTime is a registered trademark of Apple
Computer, Inc.
7/17/2019 Manual for JVC camcorder
http://slidepdf.com/reader/full/manual-for-jvc-camcorder 6/104
6 EN
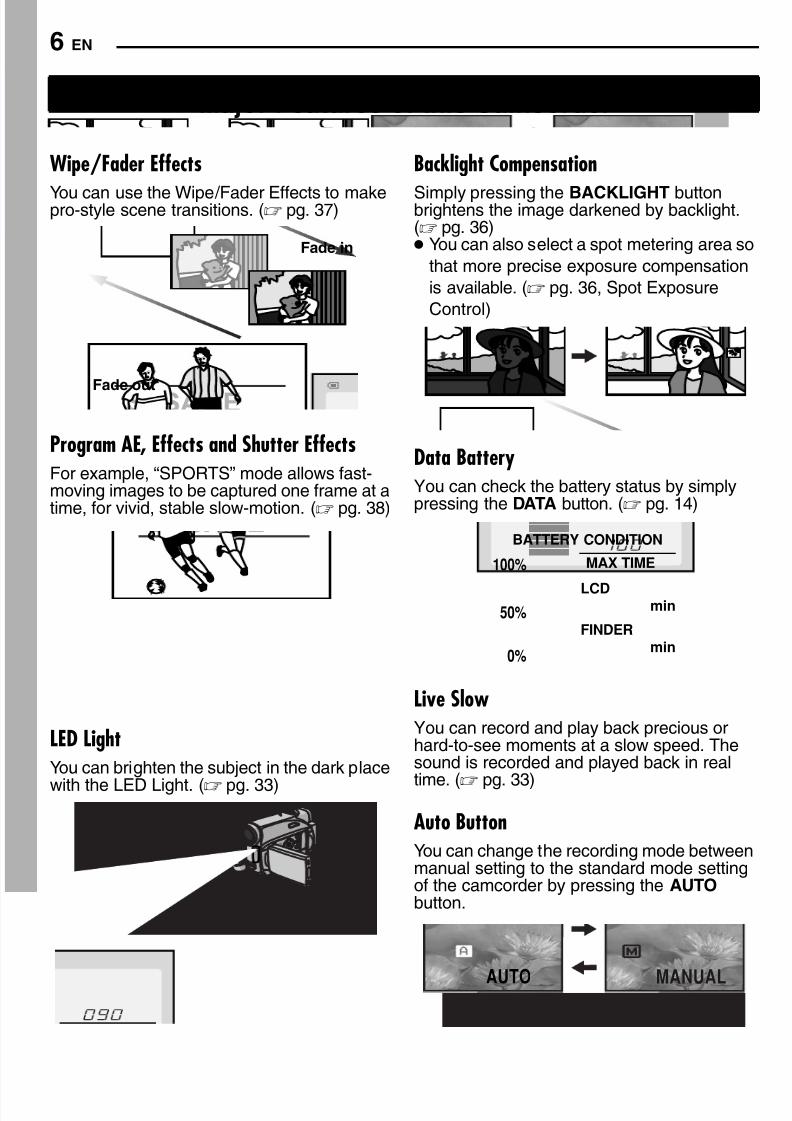
Wipe/Fader Effects
You can use the Wipe/Fader Effects to makepro-style scene transitions. ( pg. 37)
Program AE, Effects and Shutter EffectsFor example, “SPORTS” mode allows fast-moving images to be captured one frame at atime, for vivid, stable slow-motion. ( pg. 38)
LED LightYou can brighten the subject in the dark place
with the LED Light. ( pg. 33)
Backlight Compensation
Simply pressing the BACKLIGHT buttonbrightens the image darkened by backlight.( pg. 36) You can also select a spot metering area so
that more precise exposure compensation
is available. ( pg. 36, Spot Exposure
Control)
Data BatteryYou can check the battery status by simplypressing the DATA button. ( pg. 14)
Live SlowYou can record and play back precious orhard-to-see moments at a slow speed. Thesound is recorded and played back in real
time. ( pg. 33)
Auto ButtonYou can change the recording mode betweenmanual setting to the standard mode settingof the camcorder by pressing the AUTO button.
Major Features of this Camcorder
Fade in
Fade out
MAX TIME
LCDmin
min
FINDER
100%
50%
0%
BATTERY CONDITION
MANUALAUTO
7/17/2019 Manual for JVC camcorder
http://slidepdf.com/reader/full/manual-for-jvc-camcorder 7/104
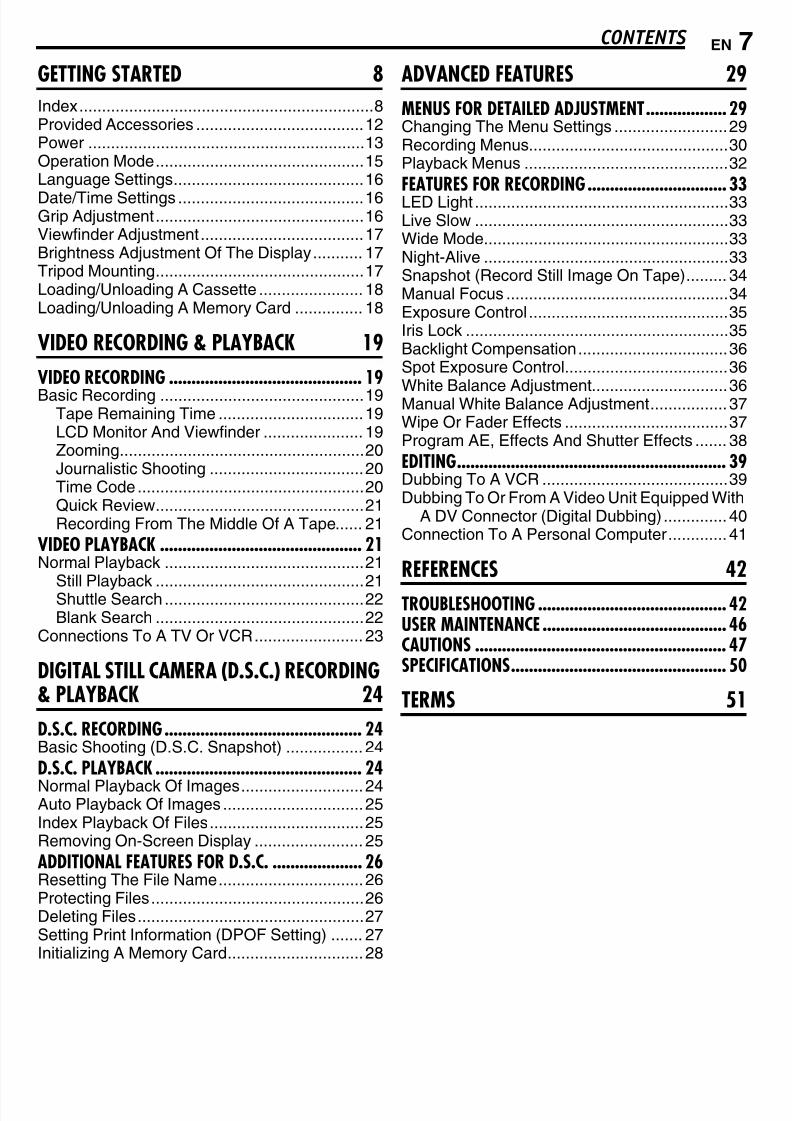
EN 7CONTENTS
GETTING STARTED 8
Index.................................................................8Provided Accessories ..................................... 12Power .............................................................13Operation Mode.............................................. 15Language Settings.......................................... 16
Date/Time Settings ......................................... 16Grip Adjustment .............................................. 16Viewfinder Adjustment .................................... 17Brightness Adjustment Of The Display ........... 17Tripod Mounting.............................................. 17Loading/Unloading A Cassette ....................... 18Loading/Unloading A Memory Card ............... 18
VIDEO RECORDING & PLAYBACK 19
VIDEO RECORDING ........................................... 19Basic Recording ............................................. 19
Tape Remaining Time ................................ 19LCD Monitor And Viewfinder ...................... 19Zooming......................................................20Journalistic Shooting .................................. 20Time Code .................................................. 20Quick Review.............................................. 21Recording From The Middle Of A Tape...... 21
VIDEO PLAYBACK ............................................. 21Normal Playback ............................................ 21
Still Playback .............................................. 21Shuttle Search ............................................ 22Blank Search .............................................. 22
Connections To A TV Or VCR........................ 23
DIGITAL STILL CAMERA (D.S.C.) RECORDING& PLAYBACK 24
D.S.C. RECORDING............................................ 24Basic Shooting (D.S.C. Snapshot) ................. 24
D.S.C. PLAYBACK .............................................. 24Normal Playback Of Images........................... 24Auto Playback Of Images ............................... 25Index Playback Of Files.................................. 25Removing On-Screen Display ........................ 25
ADDITIONAL FEATURES FOR D.S.C. .................... 26Resetting The File Name................................ 26Protecting Files............................................... 26Deleting Files.................................................. 27Setting Print Information (DPOF Setting) ....... 27Initializing A Memory Card.............................. 28
ADVANCED FEATURES 29
MENUS FOR DETAILED ADJUSTMENT..................29Changing The Menu Settings ......................... 29Recording Menus............................................30Playback Menus .............................................32
FEATURES FOR RECORDING...............................33LED Light ........................................................33Live Slow ........................................................33Wide Mode......................................................33Night-Alive ......................................................33Snapshot (Record Still Image On Tape)......... 34Manual Focus .................................................34Exposure Control ............................................35Iris Lock ..........................................................35Backlight Compensation................................. 36Spot Exposure Control....................................36
White Balance Adjustment.............................. 36Manual White Balance Adjustment................. 37Wipe Or Fader Effects ....................................37Program AE, Effects And Shutter Effects ....... 38
EDITING............................................................39Dubbing To A VCR .........................................39Dubbing To Or From A Video Unit Equipped With
A DV Connector (Digital Dubbing) .............. 40Connection To A Personal Computer ............. 41
REFERENCES 42
TROUBLESHOOTING ..........................................42USER MAINTENANCE .........................................46CAUTIONS ........................................................47SPECIFICATIONS................................................50
TERMS 51

7/17/2019 Manual for JVC camcorder
http://slidepdf.com/reader/full/manual-for-jvc-camcorder 8/104
8 EN GETTING STARTED
Index
16:9
7/17/2019 Manual for JVC camcorder
http://slidepdf.com/reader/full/manual-for-jvc-camcorder 9/104
EN 9GETTING STARTED
G E T T I N G S T A R T E D
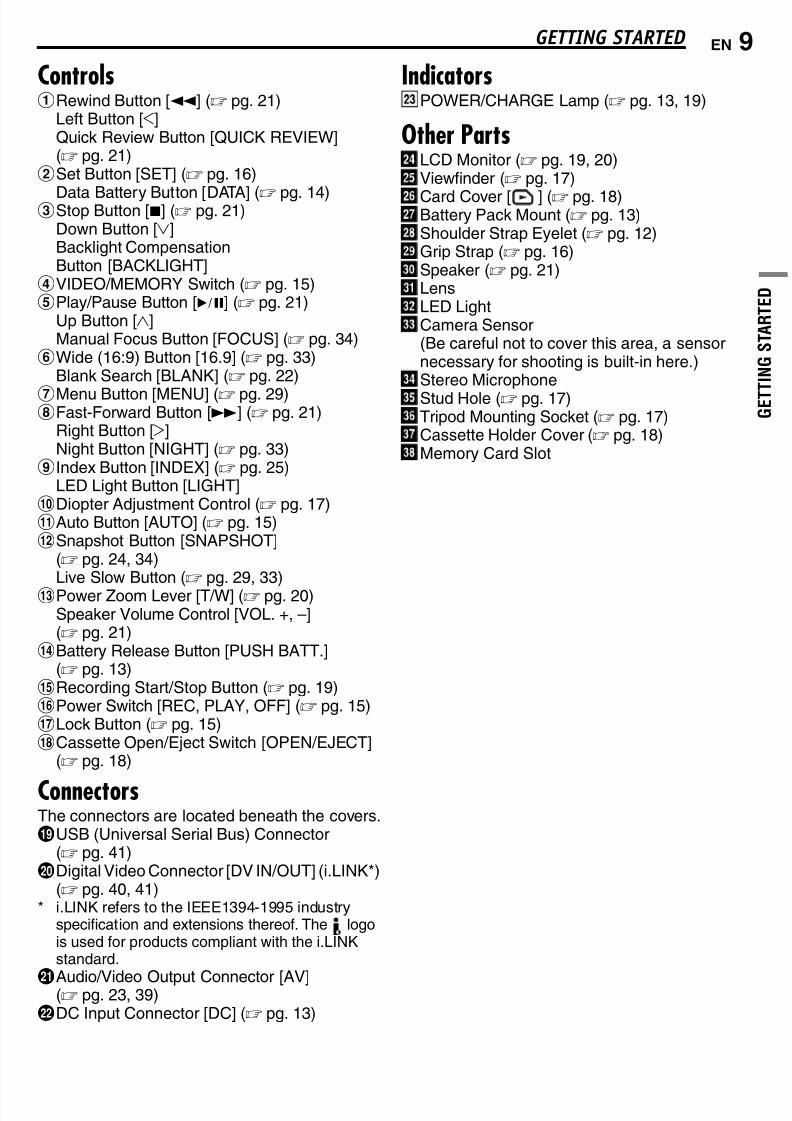
Controls1Rewind Button [1] ( pg. 21)
Left Button [1]Quick Review Button [QUICK REVIEW]( pg. 21)
2Set Button [SET] ( pg. 16)
Data Battery Button [DATA] ( pg. 14)3Stop Button [7] ( pg. 21)
Down Button [4]Backlight CompensationButton [BACKLIGHT]
4VIDEO/MEMORY Switch ( pg. 15)5Play/Pause Button [6] ( pg. 21)
Up Button [3]Manual Focus Button [FOCUS] ( pg. 34)
6Wide (16:9) Button [16.9] ( pg. 33)Blank Search [BLANK] ( pg. 22)
7Menu Button [MENU] ( pg. 29)8Fast-Forward Button [¡] ( pg. 21)
Right Button [2]Night Button [NIGHT] ( pg. 33)
9Index Button [INDEX] ( pg. 25)LED Light Button [LIGHT]
!Diopter Adjustment Control ( pg. 17)"Auto Button [AUTO] ( pg. 15)#Snapshot Button [SNAPSHOT]
( pg. 24, 34)Live Slow Button ( pg. 29, 33)
$Power Zoom Lever [T/W] ( pg. 20)Speaker Volume Control [VOL. +, –]( pg. 21)
%Battery Release Button [PUSH BATT.]( pg. 13)
&Recording Start/Stop Button ( pg. 19)(Power Switch [REC, PLAY, OFF] ( pg. 15))Lock Button ( pg. 15)~Cassette Open/Eject Switch [OPEN/EJECT]
( pg. 18)
ConnectorsThe connectors are located beneath the covers.+USB (Universal Serial Bus) Connector
( pg. 41),Digital Video Connector [DV IN/OUT] (i.LINK*)
( pg. 40, 41)* i.LINK refers to the IEEE1394-1995 industry
specification and extensions thereof. The logois used for products compliant with the i.LINKstandard.
-Audio/Video Output Connector [AV]( pg. 23, 39)
.DC Input Connector [DC] ( pg. 13)
Indicators ç POWER/CHARGE Lamp ( pg. 13, 19)
Other Parts é
LCD Monitor ( pg. 19, 20) è
Viewfinder ( pg. 17) ê Card Cover [ ] ( pg. 18) ë
Battery Pack Mount ( pg. 13) í Shoulder Strap Eyelet ( pg. 12) ì
Grip Strap ( pg. 16) î
Speaker ( pg. 21) ï
Lens ñ
LED Light ó Camera Sensor
(Be careful not to cover this area, a sensornecessary for shooting is built-in here.)
ò Stereo Microphone
ô Stud Hole ( pg. 17)
ö Tripod Mounting Socket ( pg. 17) õ
Cassette Holder Cover ( pg. 18) ú
Memory Card Slot
7/17/2019 Manual for JVC camcorder
http://slidepdf.com/reader/full/manual-for-jvc-camcorder 10/104
GETTING STARTED10 EN
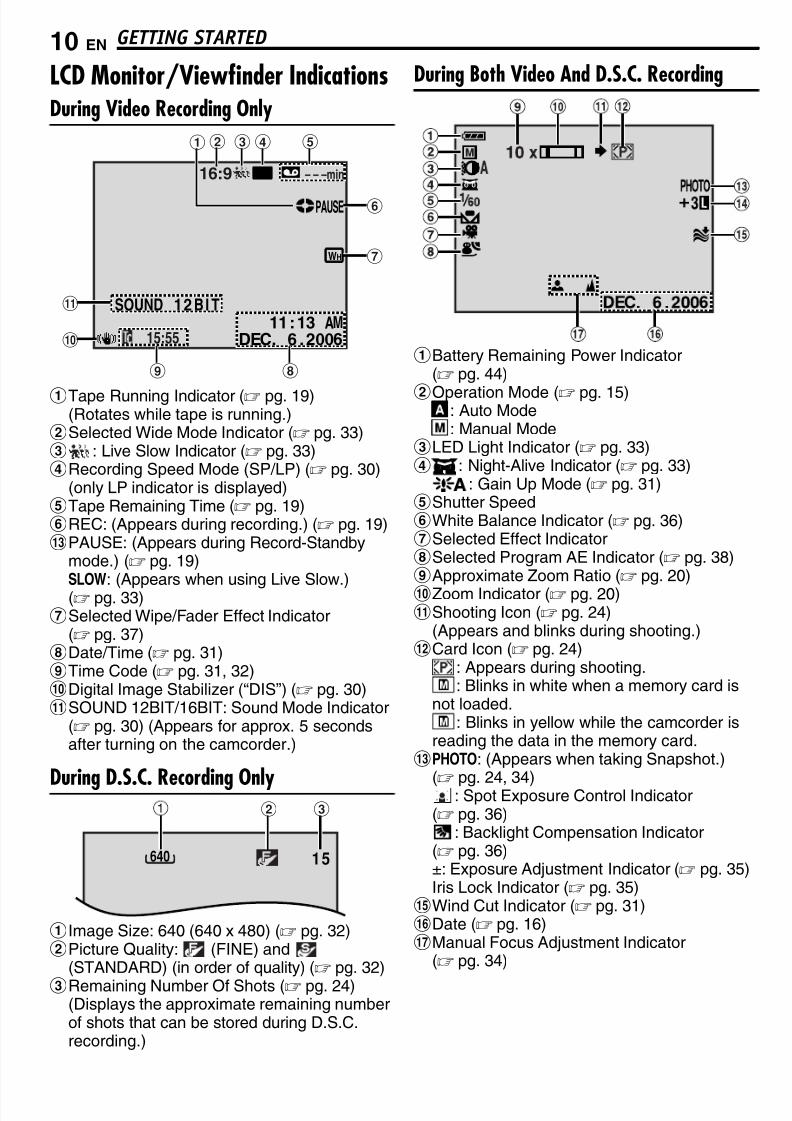
LCD Monitor/Viewfinder IndicationsDuring Video Recording Only
1Tape Running Indicator ( pg. 19)(Rotates while tape is running.)
2Selected Wide Mode Indicator ( pg. 33)3 : Live Slow Indicator ( pg. 33)4Recording Speed Mode (SP/LP) ( pg. 30)
(only LP indicator is displayed)5Tape Remaining Time ( pg. 19)6REC: (Appears during recording.) ( pg. 19)$PAUSE: (Appears during Record-Standby
mode.) ( pg. 19)SLOW
: (Appears when using Live Slow.)( pg. 33)7Selected Wipe/Fader Effect Indicator
( pg. 37)8Date/Time ( pg. 31)9Time Code ( pg. 31, 32)!Digital Image Stabilizer (“DIS”) ( pg. 30) "SOUND 12BIT/16BIT: Sound Mode Indicator
( pg. 30) (Appears for approx. 5 secondsafter turning on the camcorder.)
During D.S.C. Recording Only
1Image Size: 640 (640 x 480) ( pg. 32)2Picture Quality: (FINE) and
(STANDARD) (in order of quality) ( pg. 32)3Remaining Number Of Shots ( pg. 24)
(Displays the approximate remaining numberof shots that can be stored during D.S.C.recording.)
During Both Video And D.S.C. Recording
1Battery Remaining Power Indicator( pg. 44)
2Operation Mode ( pg. 15) A
: Auto Mode M
: Manual Mode3LED Light Indicator ( pg. 33)4 : Night-Alive Indicator ( pg. 33)
: Gain Up Mode ( pg. 31)5Shutter Speed6White Balance Indicator ( pg. 36)7Selected Effect Indicator8Selected Program AE Indicator ( pg. 38)9Approximate Zoom Ratio ( pg. 20)!Zoom Indicator ( pg. 20)"Shooting Icon ( pg. 24)
(Appears and blinks during shooting.)#Card Icon ( pg. 24)
: Appears during shooting.: Blinks in white when a memory card is
not loaded.: Blinks in yellow while the camcorder is
reading the data in the memory card.$PHOTO: (Appears when taking Snapshot.)
( pg. 24, 34): Spot Exposure Control Indicator( pg. 36)
: Backlight Compensation Indicator( pg. 36)±: Exposure Adjustment Indicator ( pg. 35)Iris Lock Indicator ( pg. 35)
&Wind Cut Indicator ( pg. 31)(Date ( pg. 16))Manual Focus Adjustment Indicator
( pg. 34)
LP
WH
SOUND 12 BI T
– – –min16:9
!
9 8
1 2 3 5
6
7
4
"
C 0:6
1 1.32
A
0M
6
E D15:55
PAUSE
1.
51640
32

7/17/2019 Manual for JVC camcorder
http://slidepdf.com/reader/full/manual-for-jvc-camcorder 11/104
EN 11GETTING STARTED
G E T T I N G S T A R T E D
During Video Playback
1Battery Remaining Power Indicator( pg. 44)
2Sound Mode Indicator ( pg. 32)3Blank Search Indicator ( pg. 22)4Tape Speed (SP/LP) ( pg. 32)
(only LP indicator is displayed)53: Playback¡: Fast-Forward/Shuttle Search1: Rewind/Shuttle Search8: Pause8 3: Forward Frame-By-Frame Playback/ Slow-Motion2 8: Reverse Frame-By-Frame Playback/ Slow-Motion
6Date/Time ( pg. 32)7VOLUME: Volume Level Indicator ( pg. 21)
BRIGHT: Brightness Control Indicator (LCDmonitor/Viewfinder) ( pg. 17)
8Time Code ( pg. 32)
During D.S.C. Playback
1Folder/File Number ( pg. 25)2Operation Mode Indicator ( pg. 25)3Brightness Control Indicator (LCD monitor/
Viewfinder) ( pg. 17).
1
L2
2
0
:
/
2
M
V
1
I
O
:
X
L
2
D
E
C
1
.
1 1
.3
20
A
0
M
6
:6
B I T
U
5
M
E
21 3 4 5
678
LP
BLANK SEARCHPUSH "STOP" BUTTON
TO CANCEL
100-0013
1
3 2
BRIGHT – 5
7/17/2019 Manual for JVC camcorder
http://slidepdf.com/reader/full/manual-for-jvc-camcorder 12/104
GETTING STARTED12 EN
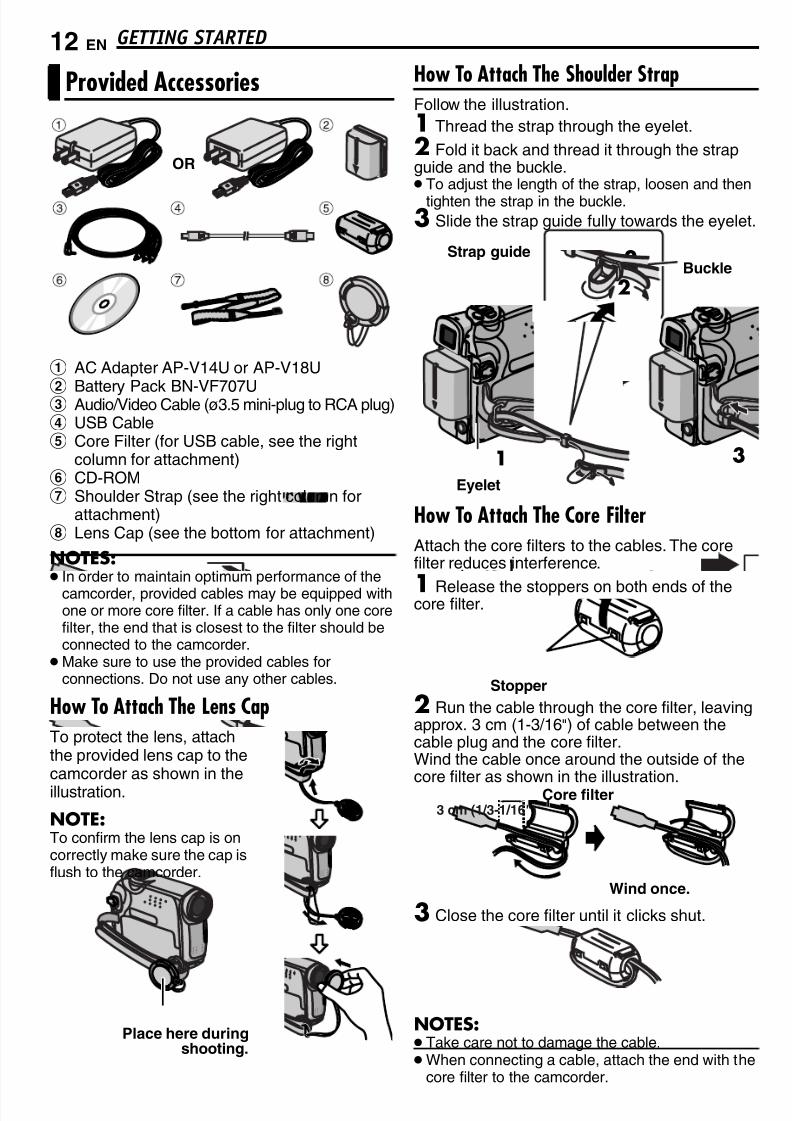
1 AC Adapter AP-V14U or AP-V18U
2 Battery Pack BN-VF707U3 Audio/Video Cable (ø3.5 mini-plug to RCA plug)4 USB Cable5 Core Filter (for USB cable, see the right
column for attachment)6 CD-ROM7 Shoulder Strap (see the right column for
attachment)8 Lens Cap (see the bottom for attachment)
NOTES: In order to maintain optimum performance of the
camcorder, provided cables may be equipped withone or more core filter. If a cable has only one corefilter, the end that is closest to the filter should beconnected to the camcorder.
Make sure to use the provided cables forconnections. Do not use any other cables.
How To Attach The Lens CapTo protect the lens, attachthe provided lens cap to the
camcorder as shown in theillustration.
NOTE:To confirm the lens cap is oncorrectly make sure the cap isflush to the camcorder.
How To Attach The Shoulder StrapFollow the illustration.
1 Thread the strap through the eyelet.
2 Fold it back and thread it through the strapguide and the buckle. To adjust the length of the strap, loosen and then
tighten the strap in the buckle.
3 Slide the strap guide fully towards the eyelet.
How To Attach The Core FilterAttach the core filters to the cables. The corefilter reduces interference.
1 Release the stoppers on both ends of thecore filter.
2 Run the cable through the core filter, leavingapprox. 3 cm (1-3/16") of cable between thecable plug and the core filter.Wind the cable once around the outside of the
core filter as shown in the illustration.
3 Close the core filter until it clicks shut.
NOTES: Take care not to damage the cable.When connecting a cable, attach the end with the
core filter to the camcorder.
Provided Accessories
OR
Place here duringshooting.
3
2
2
1
Strap guideBuckle
Eyelet
Stopper
3 cm (1/3-1/16")Core filter
Wind once.
7/17/2019 Manual for JVC camcorder
http://slidepdf.com/reader/full/manual-for-jvc-camcorder 13/104
EN 13GETTING STARTED
G E T T I N G S T A R T E D
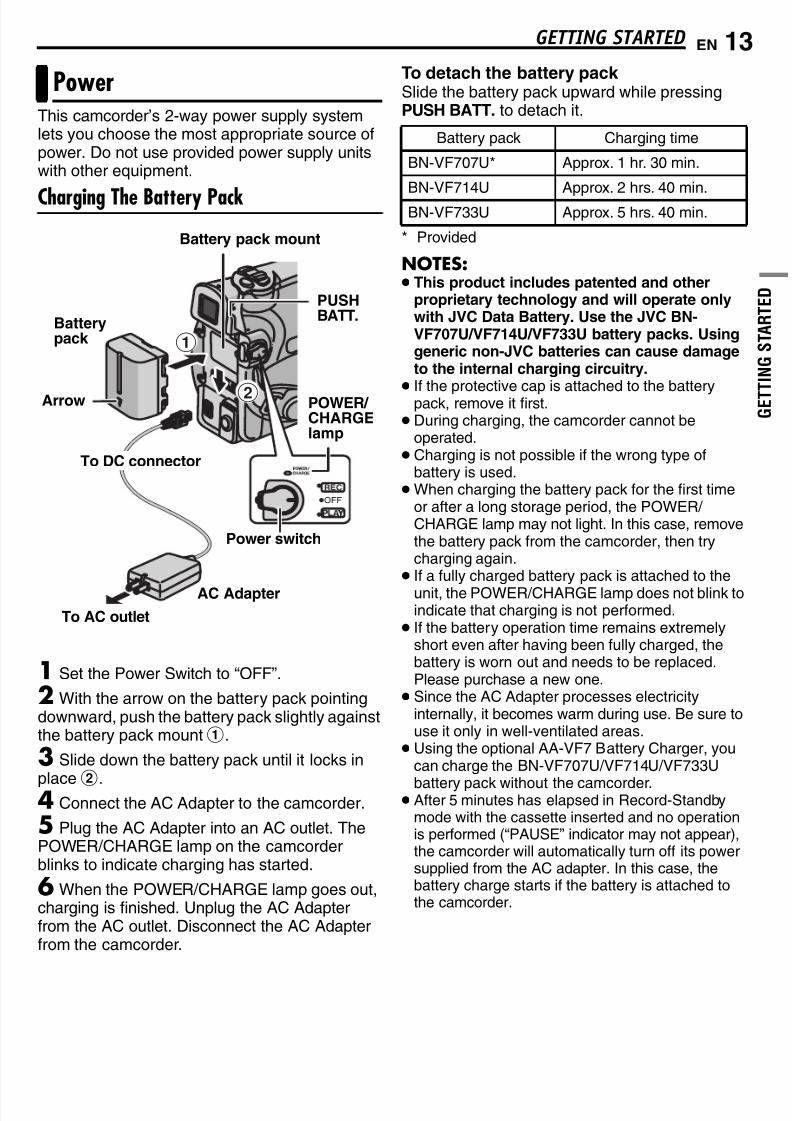
This camcorder’s 2-way power supply systemlets you choose the most appropriate source ofpower. Do not use provided power supply unitswith other equipment.
Charging The Battery Pack
1 Set the Power Switch to “OFF”.
2 With the arrow on the battery pack pointingdownward, push the battery pack slightly againstthe battery pack mount 1.
3 Slide down the battery pack until it locks in
place 2.4 Connect the AC Adapter to the camcorder.
5 Plug the AC Adapter into an AC outlet. ThePOWER/CHARGE lamp on the camcorderblinks to indicate charging has started.
6 When the POWER/CHARGE lamp goes out,charging is finished. Unplug the AC Adapterfrom the AC outlet. Disconnect the AC Adapterfrom the camcorder.
To detach the battery pack Slide the battery pack upward while pressingPUSH BATT. to detach it.
* Provided
NOTES: This product includes patented and other
proprietary technology and will operate onlywith JVC Data Battery. Use the JVC BN-VF707U/VF714U/VF733U battery packs. Usinggeneric non-JVC batteries can cause damageto the internal charging circuitry.
If the protective cap is attached to the batterypack, remove it first. During charging, the camcorder cannot be
operated. Charging is not possible if the wrong type of
battery is used.When charging the battery pack for the first time
or after a long storage period, the POWER/ CHARGE lamp may not light. In this case, removethe battery pack from the camcorder, then trycharging again.
If a fully charged battery pack is attached to theunit, the POWER/CHARGE lamp does not blink toindicate that charging is not performed.
If the battery operation time remains extremelyshort even after having been fully charged, thebattery is worn out and needs to be replaced.Please purchase a new one.
Since the AC Adapter processes electricityinternally, it becomes warm during use. Be sure touse it only in well-ventilated areas.
Using the optional AA-VF7 Battery Charger, youcan charge the BN-VF707U/VF714U/VF733U
battery pack without the camcorder. After 5 minutes has elapsed in Record-Standby
mode with the cassette inserted and no operationis performed (“PAUSE” indicator may not appear),the camcorder will automatically turn off its powersupplied from the AC adapter. In this case, thebattery charge starts if the battery is attached tothe camcorder.
Power
1
2 POWER/ CHARGElamp
Batterypack
PUSHBATT.
Power switch
Battery pack mount
To DC connector
To AC outlet
AC Adapter
Arrow
Battery pack Charging time
BN-VF707U* Approx. 1 hr. 30 min.
BN-VF714U Approx. 2 hrs. 40 min.BN-VF733U Approx. 5 hrs. 40 min.
7/17/2019 Manual for JVC camcorder
http://slidepdf.com/reader/full/manual-for-jvc-camcorder 14/104
GETTING STARTED14 EN
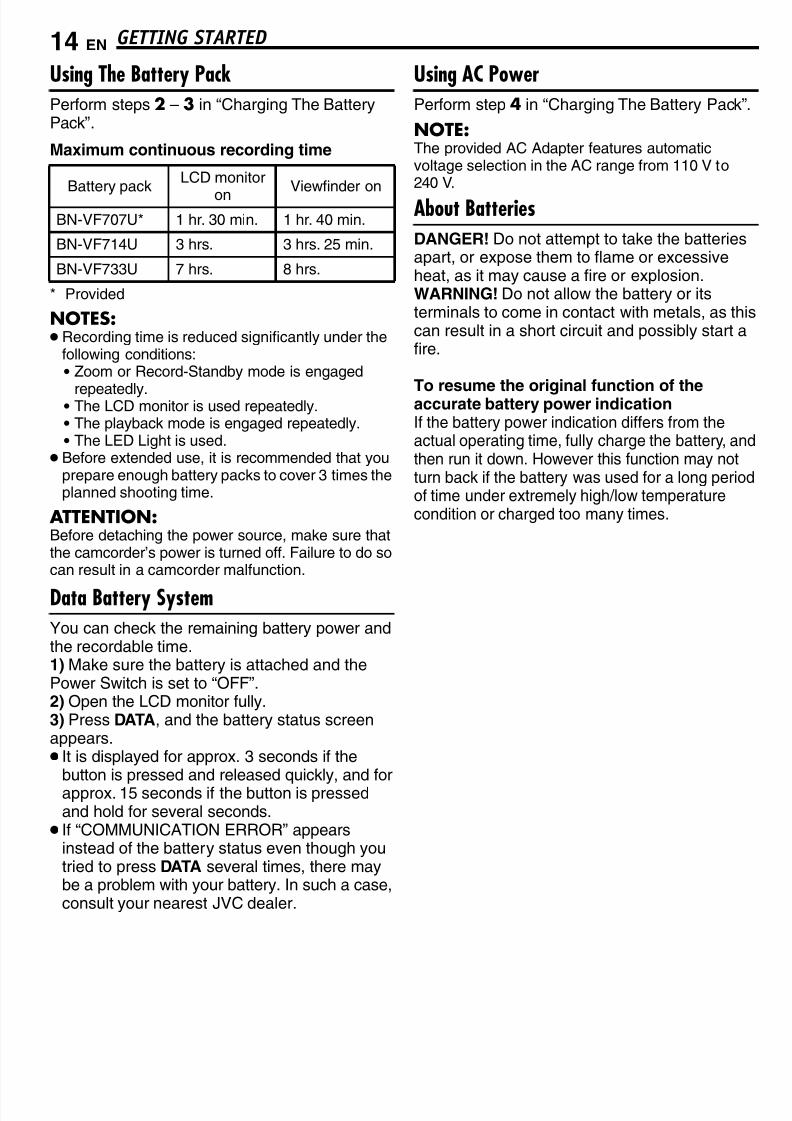
Using The Battery PackPerform steps 2 – 3 in “Charging The BatteryPack”.
Maximum continuous recording time
* Provided
NOTES: Recording time is reduced significantly under the
following conditions:• Zoom or Record-Standby mode is engaged
repeatedly.• The LCD monitor is used repeatedly.• The playback mode is engaged repeatedly.• The LED Light is used.
Before extended use, it is recommended that youprepare enough battery packs to cover 3 times theplanned shooting time.
ATTENTION:Before detaching the power source, make sure thatthe camcorder’s power is turned off. Failure to do socan result in a camcorder malfunction.
Data Battery SystemYou can check the remaining battery power andthe recordable time.1) Make sure the battery is attached and thePower Switch is set to “OFF”.2) Open the LCD monitor fully.3) Press DATA, and the battery status screenappears. It is displayed for approx. 3 seconds if the
button is pressed and released quickly, and forapprox. 15 seconds if the button is pressedand hold for several seconds. If “COMMUNICATION ERROR” appears
instead of the battery status even though youtried to press DATA several times, there maybe a problem with your battery. In such a case,consult your nearest JVC dealer.
Using AC PowerPerform step 4 in “Charging The Battery Pack”.
NOTE:The provided AC Adapter features automaticvoltage selection in the AC range from 110 V to240 V.
About BatteriesDANGER! Do not attempt to take the batteriesapart, or expose them to flame or excessiveheat, as it may cause a fire or explosion.WARNING! Do not allow the battery or itsterminals to come in contact with metals, as thiscan result in a short circuit and possibly start afire.
To resume the original function of theaccurate battery power indicationIf the battery power indication differs from theactual operating time, fully charge the battery, andthen run it down. However this function may notturn back if the battery was used for a long periodof time under extremely high/low temperaturecondition or charged too many times.
Battery packLCD monitor
onViewfinder on
BN-VF707U* 1 hr. 30 min. 1 hr. 40 min.
BN-VF714U 3 hrs. 3 hrs. 25 min.
BN-VF733U 7 hrs. 8 hrs.
7/17/2019 Manual for JVC camcorder
http://slidepdf.com/reader/full/manual-for-jvc-camcorder 15/104
EN 15GETTING STARTED
G E T T I N G S T A R T E D
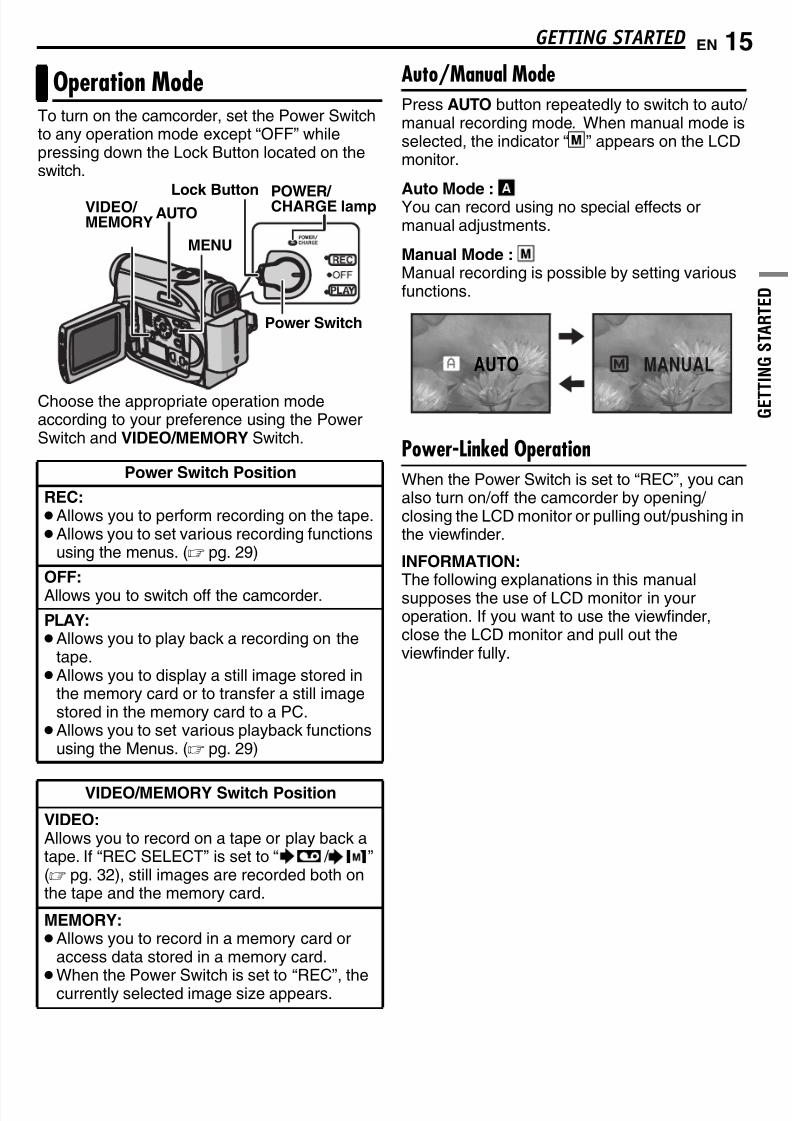
To turn on the camcorder, set the Power Switchto any operation mode except “OFF” whilepressing down the Lock Button located on theswitch.
Choose the appropriate operation modeaccording to your preference using the PowerSwitch and VIDEO/MEMORY Switch.
Auto/Manual ModePress AUTO button repeatedly to switch to auto/ manual recording mode. When manual mode isselected, the indicator “ M ” appears on the LCDmonitor.
Auto Mode : A
You can record using no special effects ormanual adjustments.
Manual Mode : M
Manual recording is possible by setting variousfunctions.
Power-Linked OperationWhen the Power Switch is set to “REC”, you canalso turn on/off the camcorder by opening/ closing the LCD monitor or pulling out/pushing inthe viewfinder.
INFORMATION:
The following explanations in this manualsupposes the use of LCD monitor in youroperation. If you want to use the viewfinder,close the LCD monitor and pull out theviewfinder fully.
Operation Mode
Power Switch Position
REC:Allows you to perform recording on the tape.Allows you to set various recording functions
using the menus. ( pg. 29)
OFF:Allows you to switch off the camcorder.
PLAY:Allows you to play back a recording on the
tape.Allows you to display a still image stored in
the memory card or to transfer a still imagestored in the memory card to a PC.Allows you to set various playback functions
using the Menus. ( pg. 29)
VIDEO/MEMORY Switch Position
VIDEO:Allows you to record on a tape or play back atape. If “REC SELECT” is set to “ / ”( pg. 32), still images are recorded both onthe tape and the memory card.
MEMORY:Allows you to record in a memory card or
access data stored in a memory card.
When the Power Switch is set to “REC”, thecurrently selected image size appears.
POWER/ CHARGE lampVIDEO/ MEMORY
Power Switch
Lock Button
MENU
AUTO
MANUALAUTO
7/17/2019 Manual for JVC camcorder
http://slidepdf.com/reader/full/manual-for-jvc-camcorder 16/104
GETTING STARTED16 EN
The language on the display can be changed.( pg. 29, 31)
1 Set the Power Switch to “REC” while pressingdown the Lock Button located on the switch.
2 Open the LCD monitor fully. ( pg. 19)
3 Set the recording mode to “ M ”.( pg. 15)
4 Press MENU. The Menu Screen appears.
5 Press 3, 4, 2 or 1 toselect “DISPLAY”, andpress SET. The DISPLAYMenu appears.
6 Press 3, 4, 2 or 1 toselect “LANGUAGE”, andpress SET.
7 Press 3 or 4 to selectthe desired language, andpress SET or 2.Press 1 whenever you
want to return to theprevious menu screen.
8 Press MENU. TheMenu Screen closes.
The date/time is recorded onto the tape at alltimes, but its display can be turned on or offduring playback. ( pg. 31, 32)
1 Perform steps 1 – 5 in “Language Settings”(on the left column)
2 Press 3, 4, 2 or 1 to select “CLOCK ADJ.”,and press SET. The date display format ishighlighted.
3 Press 3 or 4 to select the desired datedisplay format, then press SET or 2. Select from“MONTH.DATE.YEAR”, “DATE.MONTH.YEAR”or “YEAR.MONTH.DATE”.
4 Press 3 or 4 to select the time display
format, then press SET or 2. Select from “24h”or “12h”.
5 Set the year, month, date, hour and minute.Press3 or4 to select the value, then press SET or 2. Repeat this step until you have input all thesettings.
NOTE:Press 1 to return to the previous setting.
6 Press MENU.The Menuscreen closes.
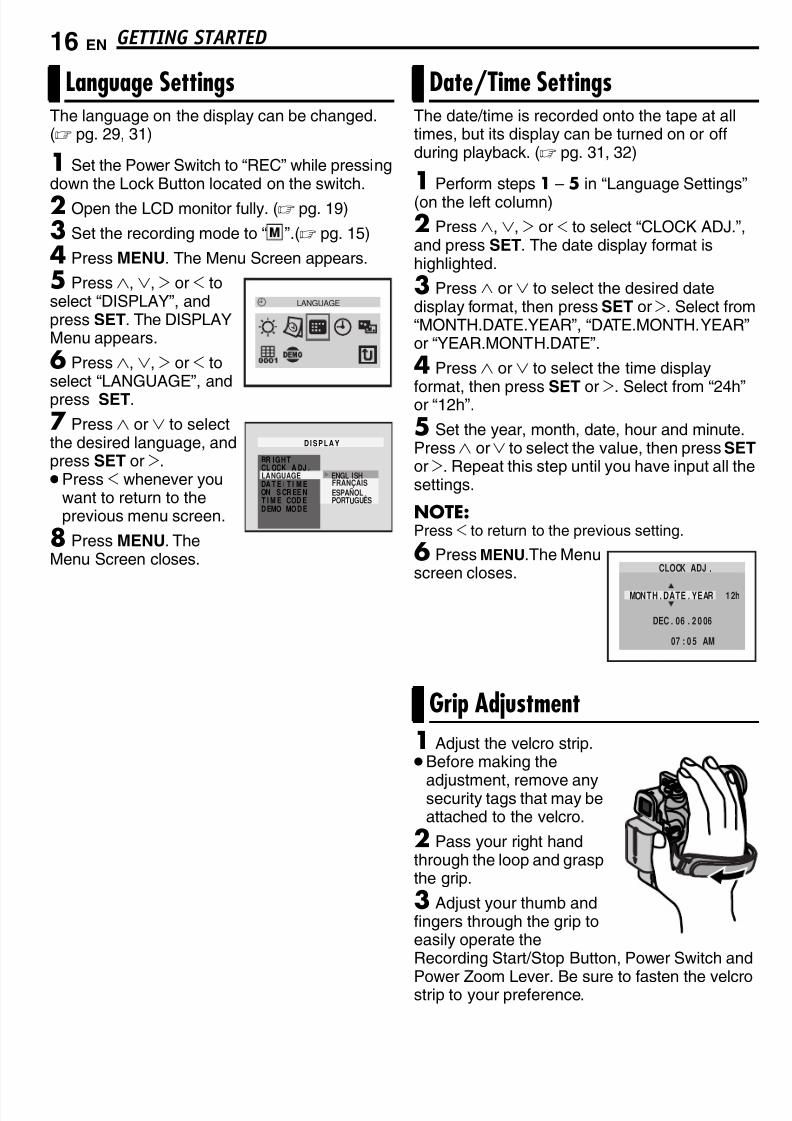
1 Adjust the velcro strip.Before making the
adjustment, remove anysecurity tags that may beattached to the velcro.
2 Pass your right handthrough the loop and graspthe grip.
3 Adjust your thumb andfingers through the grip toeasily operate theRecording Start/Stop Button, Power Switch and
Power Zoom Lever. Be sure to fasten the velcrostrip to your preference.
Language Settings
LANGUAGE
BR IGHT
D I S P L A Y
LANGUAGE ENGL ISHFRANÇAISESPAÑOLPORTUGUÊS
DA T E / T I M E
DEMO MO DE
T I M E COD EON S CR EE N
CL OCK A DJ .
Date/Time Settings
Grip Adjustment
M N T H
DEC
7
0
0 : 0 5
6 2 0 06
AM
1 2h
. .
DATE YEAR. .O
CLOCK ADJ .
7/17/2019 Manual for JVC camcorder
http://slidepdf.com/reader/full/manual-for-jvc-camcorder 17/104
EN 17GETTING STARTED
G E T T I N G S T A R T E D
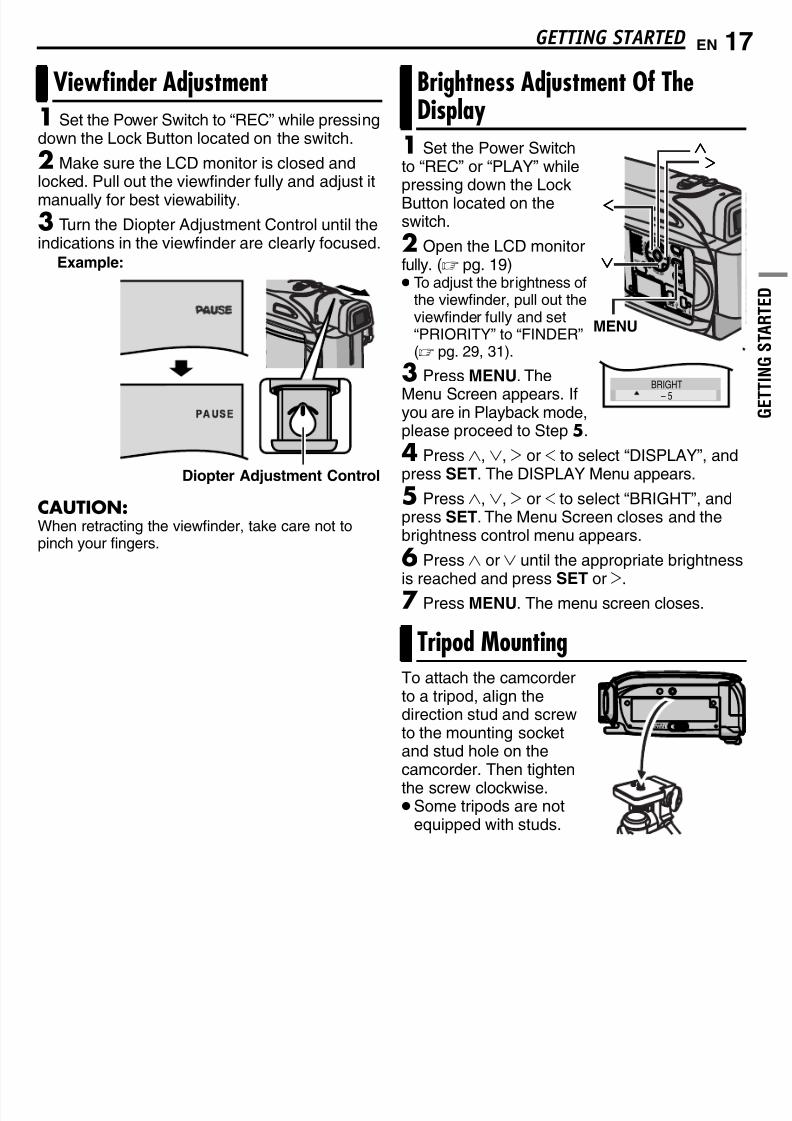
1 Set the Power Switch to “REC” while pressingdown the Lock Button located on the switch.
2 Make sure the LCD monitor is closed andlocked. Pull out the viewfinder fully and adjust it
manually for best viewability.
3 Turn the Diopter Adjustment Control until theindications in the viewfinder are clearly focused.
CAUTION:When retracting the viewfinder, take care not topinch your fingers.
1 Set the Power Switchto “REC” or “PLAY” whilepressing down the LockButton located on theswitch.
2 Open the LCD monitorfully. ( pg. 19) To adjust the brightness of
the viewfinder, pull out theviewfinder fully and set“PRIORITY” to “FINDER”( pg. 29, 31).
3 Press MENU. The
Menu Screen appears. Ifyou are in Playback mode,please proceed to Step 5.
4 Press 3, 4, 2 or 1 to select “DISPLAY”, andpress SET. The DISPLAY Menu appears.
5 Press 3, 4, 2 or 1 to select “BRIGHT”, andpress SET. The Menu Screen closes and thebrightness control menu appears.
6 Press 3 or 4 until the appropriate brightness
is reached and press SET or2
.7 Press MENU. The menu screen closes.
To attach the camcorderto a tripod, align thedirection stud and screwto the mounting socketand stud hole on thecamcorder. Then tightenthe screw clockwise.Some tripods are not
equipped with studs.
Viewfinder Adjustment
Diopter Adjustment Control
Example:
Brightness Adjustment Of TheDisplay
Tripod Mounting
BRIGHT
– 5BRIGHT
– 5
1111
2222
MENU
4444
3333
7/17/2019 Manual for JVC camcorder
http://slidepdf.com/reader/full/manual-for-jvc-camcorder 18/104
GETTING STARTED18 EN
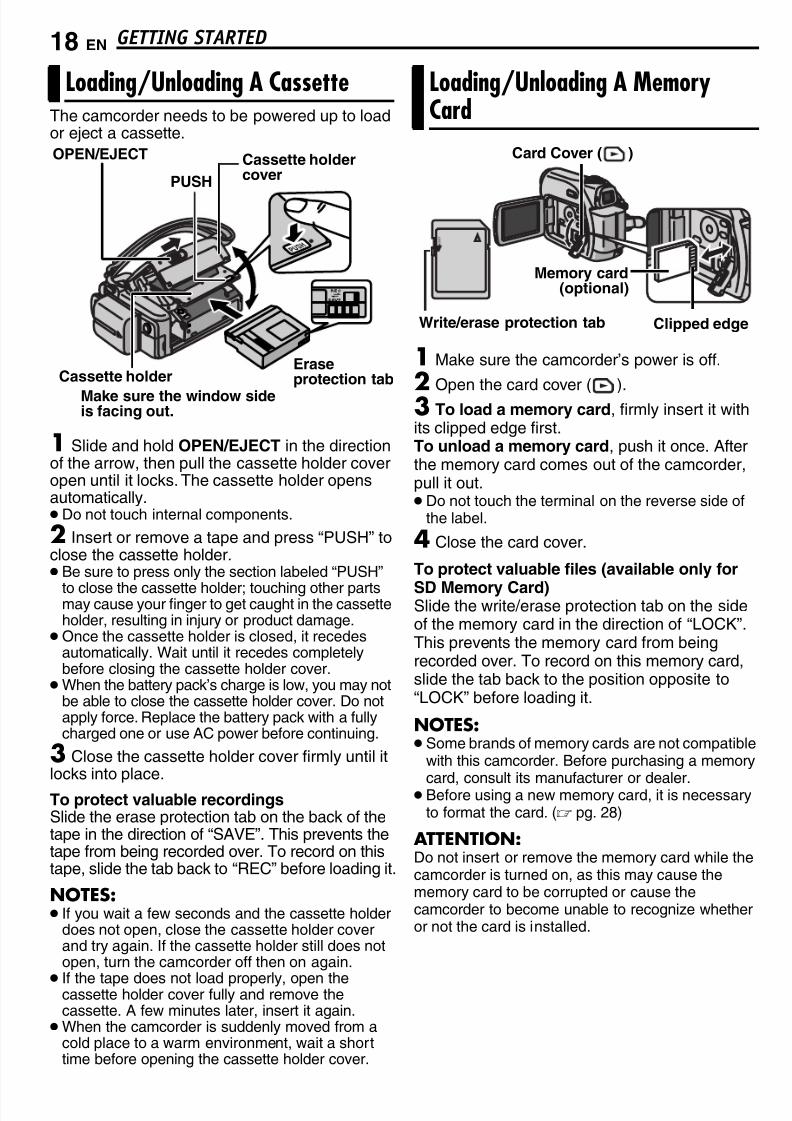
The camcorder needs to be powered up to loador eject a cassette.
1 Slide and hold OPEN/EJECT in the directionof the arrow, then pull the cassette holder coveropen until it locks. The cassette holder opensautomatically. Do not touch internal components.
2 Insert or remove a tape and press “PUSH” toclose the cassette holder. Be sure to press only the section labeled “PUSH”
to close the cassette holder; touching other partsmay cause your finger to get caught in the cassetteholder, resulting in injury or product damage.
Once the cassette holder is closed, it recedesautomatically. Wait until it recedes completelybefore closing the cassette holder cover.
When the battery pack’s charge is low, you may notbe able to close the cassette holder cover. Do notapply force. Replace the battery pack with a fullycharged one or use AC power before continuing.
3 Close the cassette holder cover firmly until it
locks into place.To protect valuable recordingsSlide the erase protection tab on the back of thetape in the direction of “SAVE”. This prevents thetape from being recorded over. To record on thistape, slide the tab back to “REC” before loading it.
NOTES: If you wait a few seconds and the cassette holder
does not open, close the cassette holder coverand try again. If the cassette holder still does notopen, turn the camcorder off then on again.
If the tape does not load properly, open thecassette holder cover fully and remove thecassette. A few minutes later, insert it again.
When the camcorder is suddenly moved from acold place to a warm environment, wait a shorttime before opening the cassette holder cover.
1 Make sure the camcorder’s power is off.
2 Open the card cover ( ).3 To load a memory card, firmly insert it withits clipped edge first.To unload a memory card, push it once. Afterthe memory card comes out of the camcorder,pull it out. Do not touch the terminal on the reverse side of
the label.
4 Close the card cover.
To protect valuable files (available only for
SD Memory Card)Slide the write/erase protection tab on the sideof the memory card in the direction of “LOCK”.This prevents the memory card from beingrecorded over. To record on this memory card,slide the tab back to the position opposite to“LOCK” before loading it.
NOTES: Some brands of memory cards are not compatible
with this camcorder. Before purchasing a memory
card, consult its manufacturer or dealer. Before using a new memory card, it is necessary
to format the card. ( pg. 28)
ATTENTION:Do not insert or remove the memory card while thecamcorder is turned on, as this may cause thememory card to be corrupted or cause thecamcorder to become unable to recognize whetheror not the card is installed.
Loading/Unloading A Cassette
Make sure the window sideis facing out.
Cassette holdercover
OPEN/EJECT
PUSH
Cassette holderEraseprotection tab
Loading/Unloading A MemoryCard
Memory card(optional)
Card Cover ( )
Write/erase protection tab Clipped edge
7/17/2019 Manual for JVC camcorder
http://slidepdf.com/reader/full/manual-for-jvc-camcorder 19/104
EN 19
V I D E O
R E C O R D I N G &
P L A Y B A C K
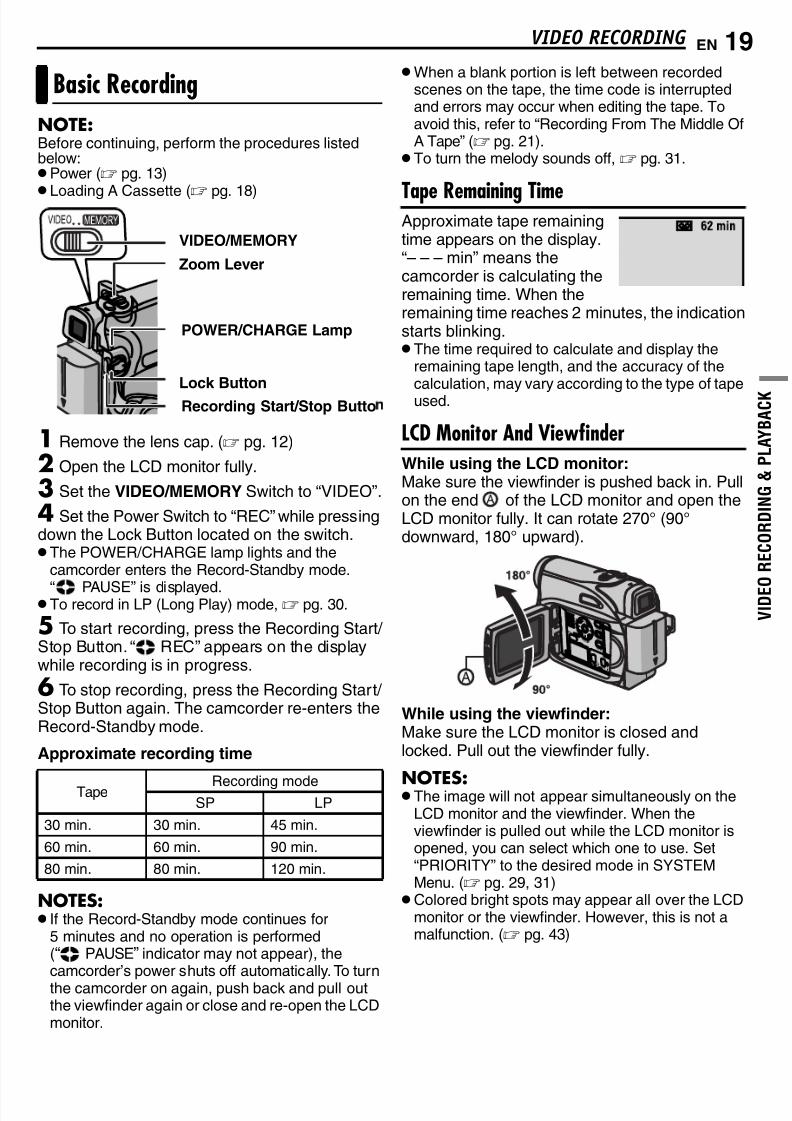
VIDEO RECORDING
NOTE:Before continuing, perform the procedures listedbelow: Power ( pg. 13)
Loading A Cassette ( pg. 18)
1 Remove the lens cap. ( pg. 12)
2 Open the LCD monitor fully.
3 Set the VIDEO/MEMORY Switch to “VIDEO”.
4 Set the Power Switch to “REC” while pressingdown the Lock Button located on the switch. The POWER/CHARGE lamp lights and the
camcorder enters the Record-Standby mode.
“ PAUSE” is displayed. To record in LP (Long Play) mode, pg. 30.
5 To start recording, press the Recording Start/ Stop Button. “ REC” appears on the displaywhile recording is in progress.
6 To stop recording, press the Recording Start/ Stop Button again. The camcorder re-enters theRecord-Standby mode.
Approximate recording time
NOTES: If the Record-Standby mode continues for
5 minutes and no operation is performed(“ PAUSE” indicator may not appear), the
camcorder’s power shuts off automatically. To turnthe camcorder on again, push back and pull outthe viewfinder again or close and re-open the LCDmonitor.
When a blank portion is left between recordedscenes on the tape, the time code is interruptedand errors may occur when editing the tape. Toavoid this, refer to “Recording From The Middle OfA Tape” ( pg. 21). To turn the melody sounds off, pg. 31.
Tape Remaining TimeApproximate tape remainingtime appears on the display.“– – – min” means thecamcorder is calculating theremaining time. When theremaining time reaches 2 minutes, the indicationstarts blinking. The time required to calculate and display the
remaining tape length, and the accuracy of the
calculation, may vary according to the type of tapeused.
LCD Monitor And ViewfinderWhile using the LCD monitor:Make sure the viewfinder is pushed back in. Pullon the end of the LCD monitor and open theLCD monitor fully. It can rotate 270° (90°downward, 180° upward).
While using the viewfinder:Make sure the LCD monitor is closed andlocked. Pull out the viewfinder fully.
NOTES: The image will not appear simultaneously on the
LCD monitor and the viewfinder. When theviewfinder is pulled out while the LCD monitor isopened, you can select which one to use. Set“PRIORITY” to the desired mode in SYSTEMMenu. ( pg. 29, 31)Colored bright spots may appear all over the LCD
monitor or the viewfinder. However, this is not amalfunction. ( pg. 43)
Basic Recording
Tape Recording modeSP LP
30 min. 30 min. 45 min.
60 min. 60 min. 90 min.
80 min. 80 min. 120 min.
POWER/CHARGE Lamp
Recording Start/Stop ButtoLock Button
Zoom Lever
VIDEO/MEMORY
7/17/2019 Manual for JVC camcorder
http://slidepdf.com/reader/full/manual-for-jvc-camcorder 20/104
VIDEO RECORDING 20 EN
ZoomingProduces the zoom in/out effect, or aninstantaneous change in image magnification.
Zoom InSlide the Power Zoom Lever towards “T”.
Zoom OutSlide the Power Zoom Lever towards “W”. The further you slide the Power Zoom Lever, the
quicker the zoom action.
NOTES:
Focusing may become unstable during Zooming.In this case, set the zoom while in Record-Standby, lock the focus by using the manual focus( pg. 34), then zoom in or out in Record mode. Zooming is possible to a maximum of 800X, or it
can be switched to 32X magnification using theoptical zoom. ( pg. 30) Zoom magnification of over 32X is done through
Digital image processing, and is therefore calledDigital Zoom.During Digital zoom, the quality of image may
suffer.Digital zoom cannot be used when the VIDEO/
MEMORY Switch is set to “MEMORY”.Macro shooting (as close as approx. 5 cm (2") to
the subject) is possible when the Power ZoomLever is set all the way to “W”. Also see “TELEMACRO” in FUNCTION Menu on page 30.When shooting a subject close to the lens, zoom
out first. If zoomed-in in the auto focus mode, thecamcorder may automatically zoom outdepending on the distance between thecamcorder and the subject. This will not occurwhen “TELE MACRO” is set to “ON”. ( pg. 30)
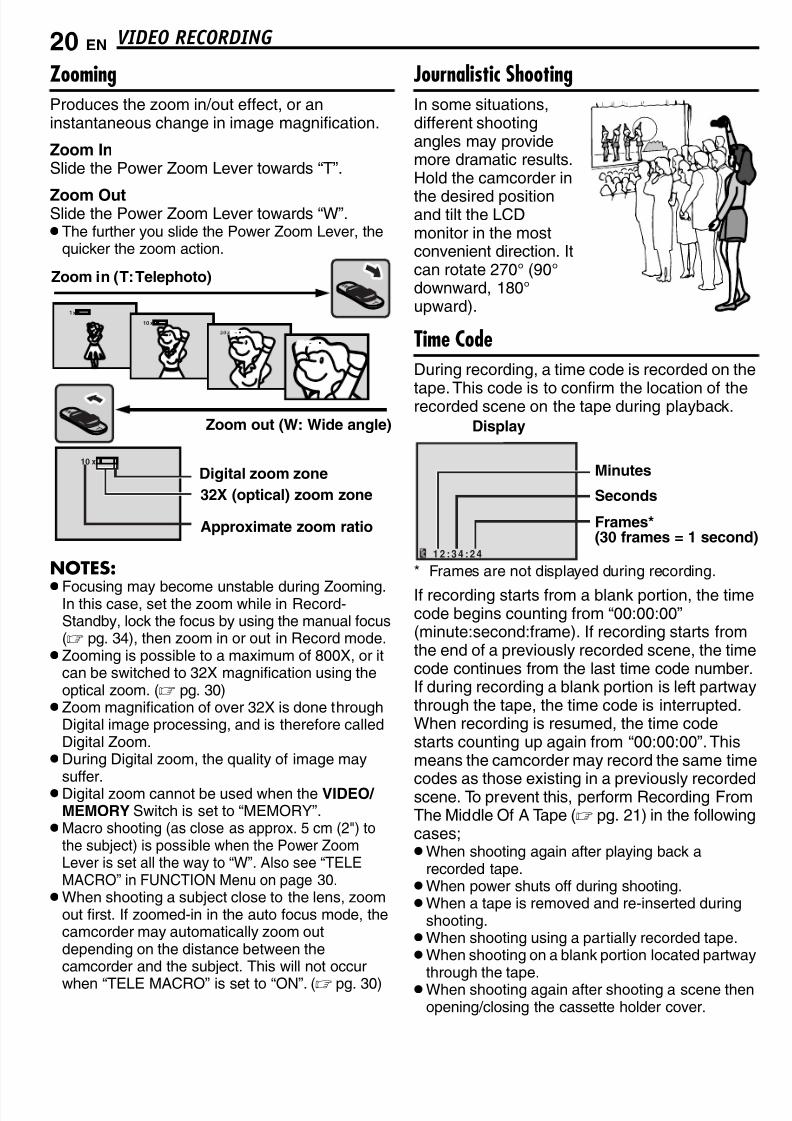
Journalistic ShootingIn some situations,different shootingangles may providemore dramatic results.Hold the camcorder in
the desired positionand tilt the LCDmonitor in the mostconvenient direction. Itcan rotate 270° (90°downward, 180°upward).
Time CodeDuring recording, a time code is recorded on the
tape. This code is to confirm the location of therecorded scene on the tape during playback.
* Frames are not displayed during recording.
If recording starts from a blank portion, the timecode begins counting from “00:00:00”(minute:second:frame). If recording starts fromthe end of a previously recorded scene, the timecode continues from the last time code number.If during recording a blank portion is left partwaythrough the tape, the time code is interrupted.When recording is resumed, the time codestarts counting up again from “00:00:00”. Thismeans the camcorder may record the same time
codes as those existing in a previously recordedscene. To prevent this, perform Recording FromThe Middle Of A Tape ( pg. 21) in the followingcases;When shooting again after playing back a
recorded tape.When power shuts off during shooting.When a tape is removed and re-inserted during
shooting.When shooting using a partially recorded tape.When shooting on a blank portion located partway
through the tape.When shooting again after shooting a scene then
opening/closing the cassette holder cover.
10 x
1x
10 x
4
Digital zoom zone
Zoom in (T: Telephoto)
Zoom out (W: Wide angle)
32X (optical) zoom zone
Approximate zoom ratio
12 : 34 : 2 4
Minutes
Seconds
Frames*(30 frames = 1 second)
Display
7/17/2019 Manual for JVC camcorder
http://slidepdf.com/reader/full/manual-for-jvc-camcorder 21/104
V I D E O
R E C O R D I N G &
P L A Y B A C K
EN 21
NOTES: The time code cannot be reset.During fast-forwarding and rewinding, the time
code indication does not move smoothly. The time code is displayed only when “TIME
CODE” is set to “ON”. ( pg. 32)
Quick ReviewEnables to check the end of the last recording.1) Press QUICK REVIEW during the Recording-Standby mode.2) Tape is rewound for about several secondsand played back automatically, then pauses inthe Recording-Standby mode for the next shot.Distortion may occur at start of playback. This is
normal.
Recording From The Middle Of A Tape1) Play back a tape or use Blank Search( pg. 22) to find the spot at which you want tostart recording, then engage the Still Playbackmode. (See the right column.)2) Set the Power Switch to “REC” while pressingdown the Lock Button located on the switch,then start recording.
1 Load a cassette. ( pg. 18)
2 Set the VIDEO/MEMORY Switch to “VIDEO”.
3 Set the Power Switch to “PLAY” while
pressing down the Lock Button located on theswitch.
4 To start playback, press6.
5 To stop playback, press 7.During Stop mode, press1 to rewind, or¡ to
fast-forward the tape.
To control the speaker volumeSlide the Power Zoom Lever (VOL. +/ –) towards“+” to turn up the volume, or towards “–” to turndown the volume.
NOTES: The playback picture can be viewed in the LCD
monitor, viewfinder or on a connected TV.( pg. 23) If Stop mode continues for 5 minutes when power
is supplied from a battery, the camcorder shuts offautomatically. To turn on again, set the PowerSwitch to “OFF”, then to “PLAY”.When a cable is connected to the AV connector,
the sound is not heard from the speaker.
Still PlaybackPauses during video playback.1) Press6 during playback.2) To resume normal playback, press6 again. If still playback continues for more than about
3 minutes, the camcorder’s Stop mode isautomatically engaged.
Normal Playback
Speaker
6 Lock Button
¡¡¡¡
7
MENU
1
VOL. +/ –
VIDEO/ MEMORY
VIDEO PLAYBACK
7/17/2019 Manual for JVC camcorder
http://slidepdf.com/reader/full/manual-for-jvc-camcorder 22/104
VIDEO PLAYBACK 22 EN
Shuttle SearchAllows high-speed search in either directionduring video playback.1) During playback, press¡ for forwardsearch, or1 for reverse search.2) To resume normal playback, press6.
During playback, press and hold¡ or1. Thesearch continues as long as you hold the button.Once you release the button, normal playbackresumes. A slight mosaic effect appears on the display
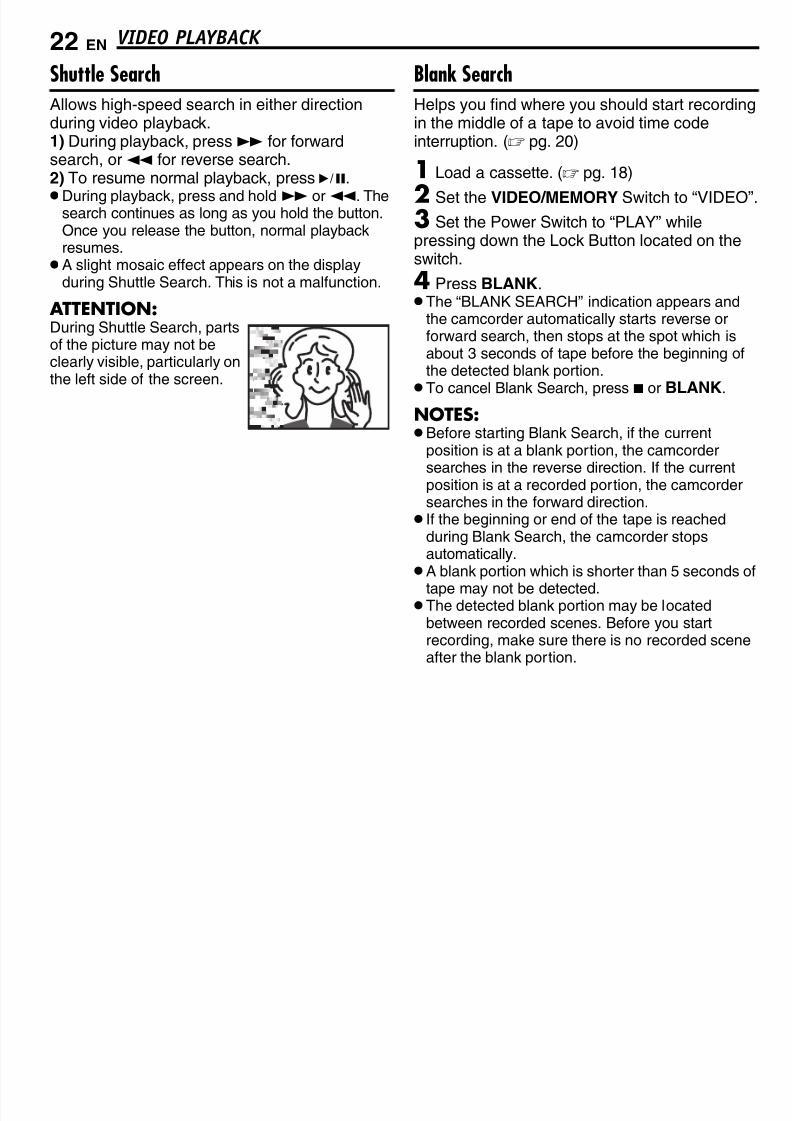
during Shuttle Search. This is not a malfunction.
ATTENTION:During Shuttle Search, partsof the picture may not beclearly visible, particularly onthe left side of the screen.
Blank SearchHelps you find where you should start recordingin the middle of a tape to avoid time codeinterruption. ( pg. 20)
1 Load a cassette. ( pg. 18)
2 Set the VIDEO/MEMORY Switch to “VIDEO”.
3 Set the Power Switch to “PLAY” whilepressing down the Lock Button located on theswitch.
4 Press BLANK. The “BLANK SEARCH” indication appears and
the camcorder automatically starts reverse orforward search, then stops at the spot which isabout 3 seconds of tape before the beginning ofthe detected blank portion.
To cancel Blank Search, press 7 or BLANK.
NOTES: Before starting Blank Search, if the current
position is at a blank portion, the camcordersearches in the reverse direction. If the currentposition is at a recorded portion, the camcordersearches in the forward direction. If the beginning or end of the tape is reached
during Blank Search, the camcorder stopsautomatically. A blank portion which is shorter than 5 seconds of
tape may not be detected. The detected blank portion may be located
between recorded scenes. Before you startrecording, make sure there is no recorded sceneafter the blank portion.
7/17/2019 Manual for JVC camcorder
http://slidepdf.com/reader/full/manual-for-jvc-camcorder 23/104
EN 23VIDEO PLAYBACK
V I D E O
R E C O R D I N G &
P L A Y B A C K
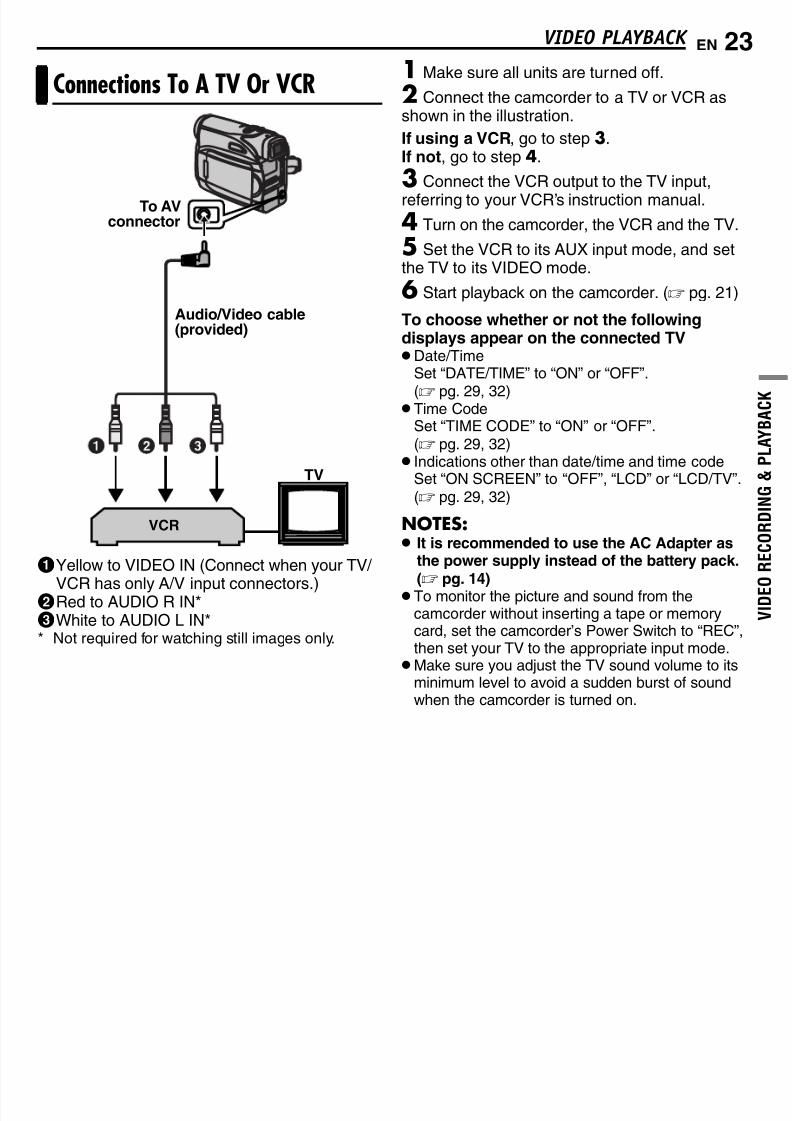
1Yellow to VIDEO IN (Connect when your TV/
VCR has only A/V input connectors.)2Red to AUDIO R IN*3White to AUDIO L IN** Not required for watching still images only.
1 Make sure all units are turned off.
2 Connect the camcorder to a TV or VCR asshown in the illustration.
If using a VCR, go to step 3.If not, go to step 4.
3 Connect the VCR output to the TV input,
referring to your VCR’s instruction manual.
4 Turn on the camcorder, the VCR and the TV.
5 Set the VCR to its AUX input mode, and setthe TV to its VIDEO mode.
6 Start playback on the camcorder. ( pg. 21)
To choose whether or not the followingdisplays appear on the connected TVDate/Time
Set “DATE/TIME” to “ON” or “OFF”.
( pg. 29, 32) Time Code
Set “TIME CODE” to “ON” or “OFF”.( pg. 29, 32) Indications other than date/time and time code
Set “ON SCREEN” to “OFF”, “LCD” or “LCD/TV”.( pg. 29, 32)
NOTES:
It is recommended to use the AC Adapter asthe power supply instead of the battery pack.
(
pg. 14) To monitor the picture and sound from thecamcorder without inserting a tape or memorycard, set the camcorder’s Power Switch to “REC”,then set your TV to the appropriate input mode.Make sure you adjust the TV sound volume to its
minimum level to avoid a sudden burst of soundwhen the camcorder is turned on.
Connections To A TV Or VCR
TV
VCR
To AVconnector
Audio/Video cable(provided)
7/17/2019 Manual for JVC camcorder
http://slidepdf.com/reader/full/manual-for-jvc-camcorder 24/104
24 EN
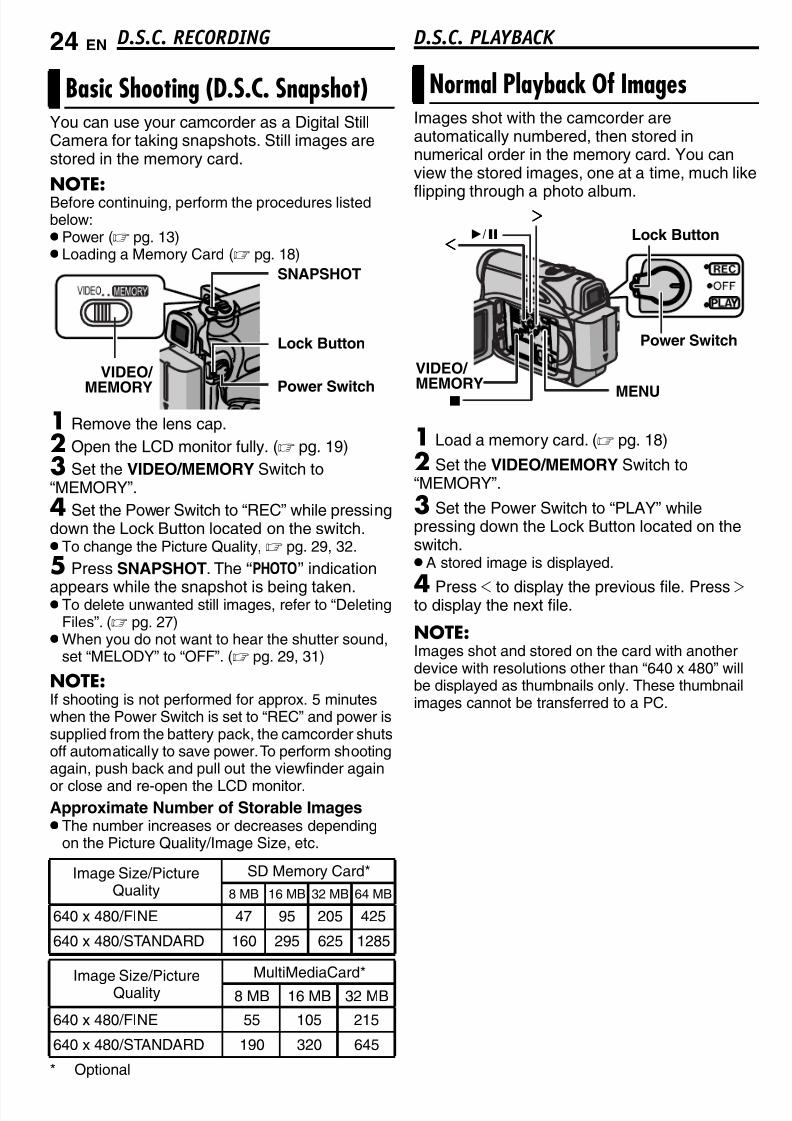
You can use your camcorder as a Digital StillCamera for taking snapshots. Still images arestored in the memory card.
NOTE:Before continuing, perform the procedures listedbelow: Power ( pg. 13) Loading a Memory Card ( pg. 18)
1 Remove the lens cap.
2 Open the LCD monitor fully. ( pg. 19)
3 Set the VIDEO/MEMORY Switch to“MEMORY”.
4 Set the Power Switch to “REC” while pressingdown the Lock Button located on the switch. To change the Picture Quality, pg. 29, 32.
5 Press SNAPSHOT. The “PHOTO” indication
appears while the snapshot is being taken. To delete unwanted still images, refer to “Deleting
Files”. ( pg. 27)When you do not want to hear the shutter sound,
set “MELODY” to “OFF”. ( pg. 29, 31)
NOTE:If shooting is not performed for approx. 5 minuteswhen the Power Switch is set to “REC” and power issupplied from the battery pack, the camcorder shutsoff automatically to save power. To perform shootingagain, push back and pull out the viewfinder again
or close and re-open the LCD monitor.
Approximate Number of Storable Images The number increases or decreases depending
on the Picture Quality/Image Size, etc.
* Optional
Basic Shooting (D.S.C. Snapshot)
Image Size/PictureQuality
SD Memory Card*
8 MB 16 MB 32 MB 64 MB
640 x 480/FINE 47 95 205 425
640 x 480/STANDARD 160 295 625 1285
Image Size/PictureQuality
MultiMediaCard*8 MB 16 MB 32 MB
640 x 480/FINE 55 105 215
640 x 480/STANDARD 190 320 645
Power Switch
Lock Button
VIDEO/
MEMORY
SNAPSHOT
Images shot with the camcorder areautomatically numbered, then stored innumerical order in the memory card. You canview the stored images, one at a time, much like
flipping through a photo album.
1 Load a memory card. ( pg. 18)
2 Set the VIDEO/MEMORY Switch to“MEMORY”.
3 Set the Power Switch to “PLAY” whilepressing down the Lock Button located on theswitch. A stored image is displayed.
4 Press 1 to display the previous file. Press 2 to display the next file.
NOTE:Images shot and stored on the card with anotherdevice with resolutions other than “640 x 480” willbe displayed as thumbnails only. These thumbnailimages cannot be transferred to a PC.
Normal Playback Of Images
Power Switch
Lock Button
7
6
2222
1111
MENU
VIDEO/
MEMORY
D.S.C. RECORDING D.S.C. PLAYBACK
7/17/2019 Manual for JVC camcorder
http://slidepdf.com/reader/full/manual-for-jvc-camcorder 25/104
EN 25
D I G I T A L S T I L L C A M
E R A ( D . S . C . )
R E C O R D I N G &
P L A Y B A C K
D.S.C. PLAYBACK
You can run through all the images stored inmemory card automatically.
1 Perform steps 1 – 3 in “Normal Playback OfImages”.
2 Press6 to start Auto Playback. If you press 1 during Auto Playback, files are
displayed in descending order.
If you press 2 during Auto Playback, files are
displayed in ascending order.
To end Auto Playback, press 7.
You can view several different files stored in thememory card at a time. This browsing capabilitymakes it easy to locate a particular file you want.
1 Perform steps 1 – 3 in “Normal Playback OfImages”.
2 Press INDEX. TheIndex Screen appears.
3 Press 4, 3, 1 or 2 tomove the frame to the
desired file.
4 Press SET. Theselected file is displayed.
1 Perform steps 1 – 3 in “Normal Playback OfImages”.
2 Press MENU. The Menu Screen appears.
3 Press 4, 3, 1 or 2 to select “ON SCREEN”,and press SET. The ON SCREEN Menuappears.
4 Press 4 or 3 to select “OFF”, and press SET or 2, then press MENU. The operation modeindicator, folder/file number and batteryremaining power indicator disappear. To display the indicators again, select “ON”.
Auto Playback Of Images
Index Playback Of Files
3
4 5
6
7
8 9
Selected file
Index number
Removing On-Screen Display
Operation mode indicator
Folder/ file number
7/17/2019 Manual for JVC camcorder
http://slidepdf.com/reader/full/manual-for-jvc-camcorder 26/104
26 EN ADDITIONAL FEATURES FOR D.S.C.
By resetting the file name, a new folder will bemade. The new files you are going to make willbe stored in the new folder. It is convenient toseparate the new files from previously made
files.
1 Perform steps 1 – 3 in “Normal Playback OfImages”. ( pg. 24)
2 Press MENU. The Menu Screen appears.
3 Press 4, 3, 1 or 2 to select “NO. RESET”,and press SET. The NO. RESET screenappears.
4 Press 4 or 3 to select “EXECUTE”, andpress SET. The new folder (such as
“101JVCGR”) will be made and the file name ofthe next shot starts from DVC00001.
NOTE:If the file name reaches DVC09999, a new folder(such as “101JVCGR”) will be made and the filename will start again from DVC00001.
The Protect mode helps prevent the accidental
erasure of files.
1 Perform steps 1 – 3 in “Normal Playback OfImages”. ( pg. 24)
2 Press MENU. The Menu Screen appears.
3 Press 4, 3, 1 or 2 to select “PROTECT”, andpress SET. The PROTECT Menu appears.
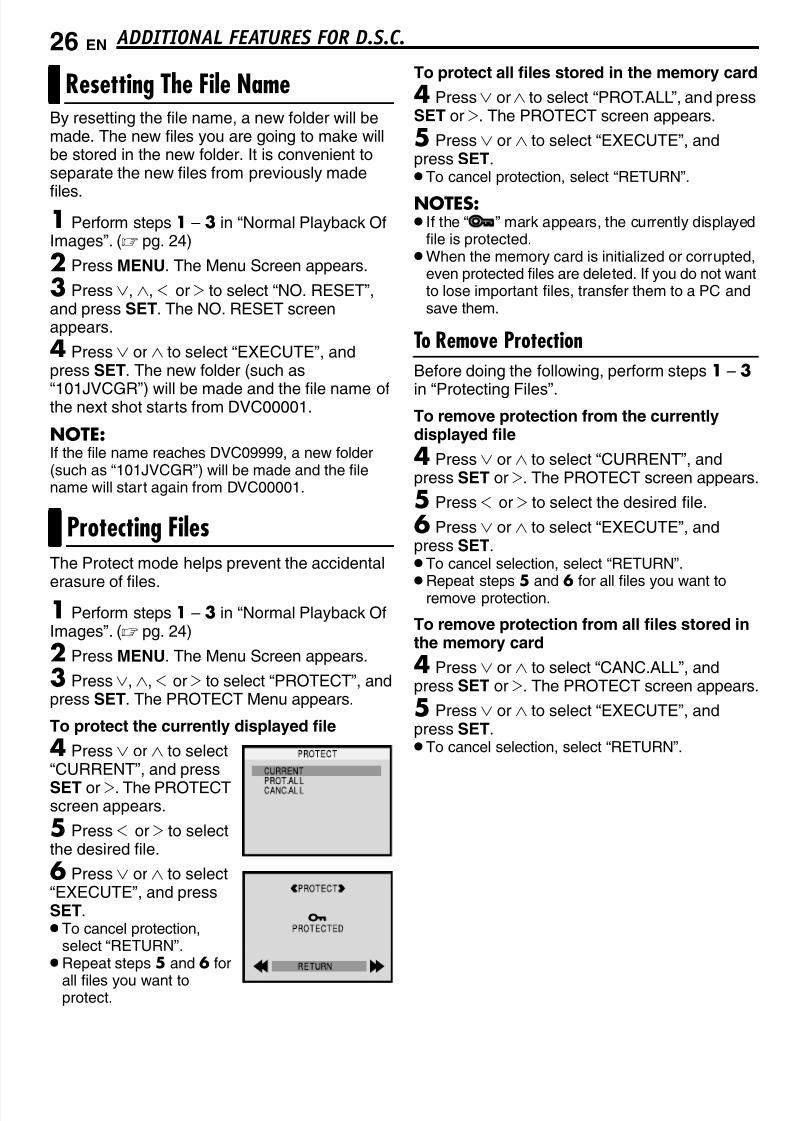
To protect the currently displayed file
4 Press 4 or 3 to select“CURRENT”, and pressSET or 2. The PROTECTscreen appears.
5 Press 1 or 2 to selectthe desired file.
6 Press 4 or 3 to select“EXECUTE”, and pressSET. To cancel protection,
select “RETURN”.Repeat steps 5 and 6 for
all files you want toprotect.
To protect all files stored in the memory card
4 Press 4 or3 to select “PROT.ALL”, and pressSET or 2. The PROTECT screen appears.
5 Press 4 or 3 to select “EXECUTE”, andpress SET. To cancel protection, select “RETURN”.
NOTES: If the “ ” mark appears, the currently displayed
file is protected.When the memory card is initialized or corrupted,
even protected files are deleted. If you do not wantto lose important files, transfer them to a PC andsave them.
To Remove ProtectionBefore doing the following, perform steps 1 – 3
in “Protecting Files”.To remove protection from the currentlydisplayed file
4 Press 4 or 3 to select “CURRENT”, andpress SET or 2. The PROTECT screen appears.
5 Press 1 or 2 to select the desired file.
6 Press 4 or 3 to select “EXECUTE”, andpress SET. To cancel selection, select “RETURN”.
Repeat steps5
and6
for all files you want toremove protection.
To remove protection from all files stored inthe memory card
4 Press 4 or 3 to select “CANC.ALL”, andpress SET or 2. The PROTECT screen appears.
5 Press 4 or 3 to select “EXECUTE”, andpress SET. To cancel selection, select “RETURN”.
Resetting The File Name
Protecting Files
7/17/2019 Manual for JVC camcorder
http://slidepdf.com/reader/full/manual-for-jvc-camcorder 27/104
EN 27 ADDITIONAL FEATURES FOR D.S.C.
D I G I T A L S T I L L C A M
E R A ( D . S . C . )
R E C O R D I N G &
P L A Y B A C K
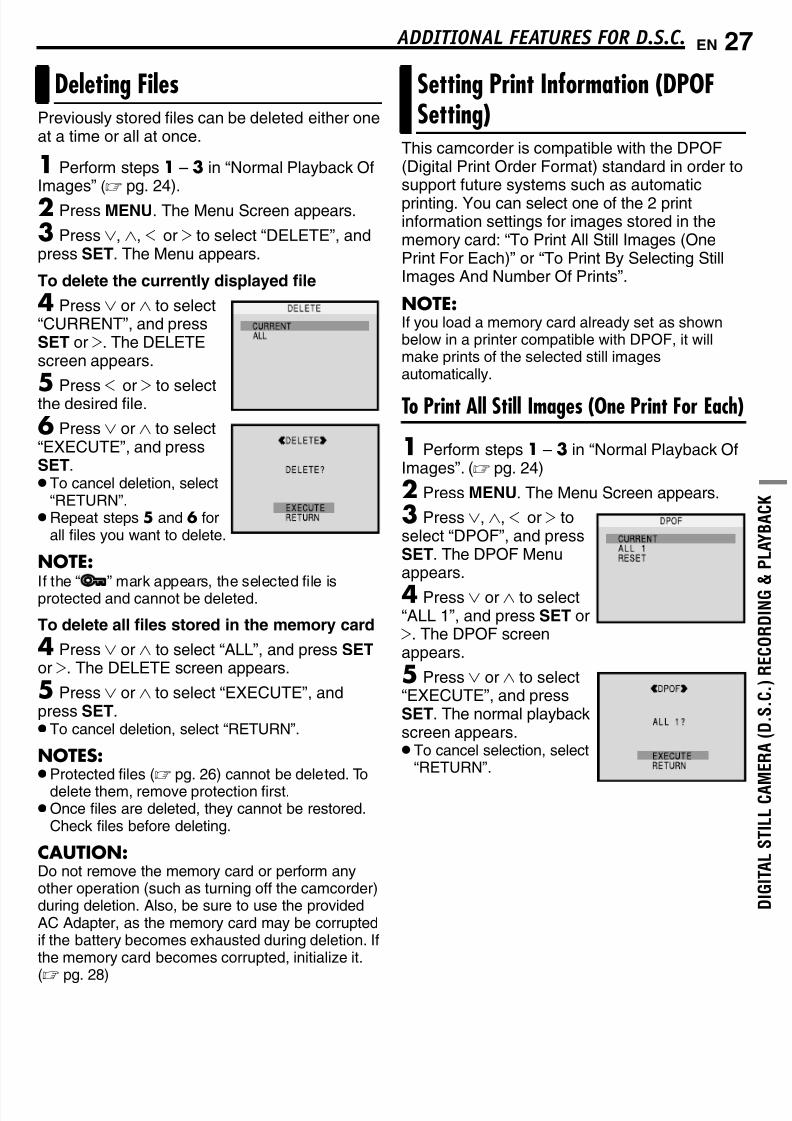
Previously stored files can be deleted either oneat a time or all at once.
1 Perform steps 1 – 3 in “Normal Playback OfImages” ( pg. 24).
2 Press MENU. The Menu Screen appears.
3 Press 4, 3, 1 or 2 to select “DELETE”, andpress SET. The Menu appears.
To delete the currently displayed file
4 Press 4 or 3 to select“CURRENT”, and pressSET or 2. The DELETEscreen appears.
5 Press1
or2
to selectthe desired file.
6 Press 4 or 3 to select“EXECUTE”, and pressSET. To cancel deletion, select
“RETURN”.Repeat steps 5 and 6 for
all files you want to delete.
NOTE:
If the “ ” mark appears, the selected file isprotected and cannot be deleted.
To delete all files stored in the memory card
4 Press 4 or 3 to select “ALL”, and press SET or 2. The DELETE screen appears.
5 Press 4 or 3 to select “EXECUTE”, andpress SET. To cancel deletion, select “RETURN”.
NOTES:
Protected files (
pg. 26) cannot be deleted. Todelete them, remove protection first.Once files are deleted, they cannot be restored.
Check files before deleting.
CAUTION:Do not remove the memory card or perform anyother operation (such as turning off the camcorder)during deletion. Also, be sure to use the providedAC Adapter, as the memory card may be corruptedif the battery becomes exhausted during deletion. Ifthe memory card becomes corrupted, initialize it.
( pg. 28)
This camcorder is compatible with the DPOF(Digital Print Order Format) standard in order tosupport future systems such as automaticprinting. You can select one of the 2 printinformation settings for images stored in thememory card: “To Print All Still Images (OnePrint For Each)” or “To Print By Selecting StillImages And Number Of Prints”.
NOTE:If you load a memory card already set as shownbelow in a printer compatible with DPOF, it willmake prints of the selected still imagesautomatically.
To Print All Still Images (One Print For Each)
1 Perform steps 1 – 3 in “Normal Playback OfImages”. ( pg. 24)
2 Press MENU. The Menu Screen appears.
3 Press 4, 3, 1 or 2 toselect “DPOF”, and pressSET. The DPOF Menuappears.
4 Press 4 or 3 to select“ALL 1”, and press SET or2. The DPOF screenappears.
5 Press 4 or 3 to select“EXECUTE”, and pressSET. The normal playbackscreen appears. To cancel selection, select
“RETURN”.
Deleting Files
Setting Print Information (DPOFSetting)
7/17/2019 Manual for JVC camcorder
http://slidepdf.com/reader/full/manual-for-jvc-camcorder 28/104
ADDITIONAL FEATURES FOR D.S.C.28 EN
To Print By Selecting Still Images AndNumber Of Prints
1 Perform steps 1 – 3 in “To Print All StillImages (One Print For Each)”. ( pg. 27)
2 Press 4 or 3 to select
“CURRENT”, and pressSET or 2. The DPOFscreen appears.
3 Press 1 or 2 to selectthe desired file.
4 Press 4 or 3 to select the number indication(00), and press SET.
5 Select the number ofprints by pressing 3 to
increase the number, or4
to decrease the number,and press SET.Repeat steps 3 through 5
for the desired number ofprints. The number of prints can be set up to 15. To correct the number of prints, select the image
again and change the number.
6 Press 4 or 3 to select“RETURN”, and pressSET. The “SAVE?”
appears. If you did not change any
settings in step 3 through5, the DPOF Menureappears.
7 Press 4 or 3 to select “EXECUTE” to savethe setting you have just made, and press SET. To cancel selection, select “CANCEL”.
To Reset The Number Of Prints
1 Perform steps 1 – 3 in “To Print All StillImages (One Print For Each)”. ( pg. 27)
2 Press 4 or 3 to select “RESET”, and pressSET. The DPOF screen appears.
3 Press 4 or 3 to select “EXECUTE”, andpress SET. The normal playback screenappears. To cancel selection, select “RETURN”. The number of prints is reset to 0 for all still
images.
CAUTION:While performing the above, never disconnectpower, as this may cause the memory card to becorrupted.
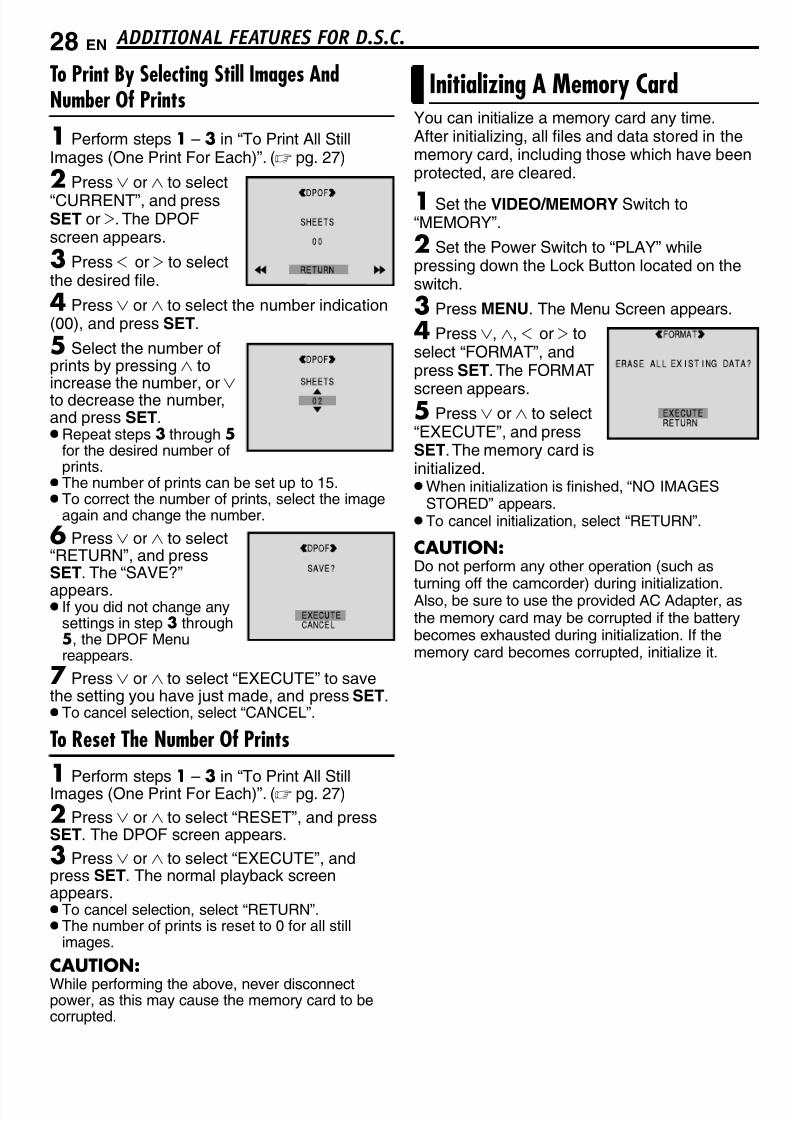
You can initialize a memory card any time.After initializing, all files and data stored in thememory card, including those which have beenprotected, are cleared.
1 Set the VIDEO/MEMORY Switch to“MEMORY”.
2 Set the Power Switch to “PLAY” whilepressing down the Lock Button located on theswitch.
3 Press MENU. The Menu Screen appears.
4 Press 4, 3, 1 or 2 toselect “FORMAT”, andpress SET. The FORMAT
screen appears.5 Press 4 or 3 to select“EXECUTE”, and pressSET. The memory card isinitialized.When initialization is finished, “NO IMAGES
STORED” appears. To cancel initialization, select “RETURN”.
CAUTION:Do not perform any other operation (such as
turning off the camcorder) during initialization.Also, be sure to use the provided AC Adapter, asthe memory card may be corrupted if the batterybecomes exhausted during initialization. If thememory card becomes corrupted, initialize it.
Initializing A Memory Card
7/17/2019 Manual for JVC camcorder
http://slidepdf.com/reader/full/manual-for-jvc-camcorder 29/104
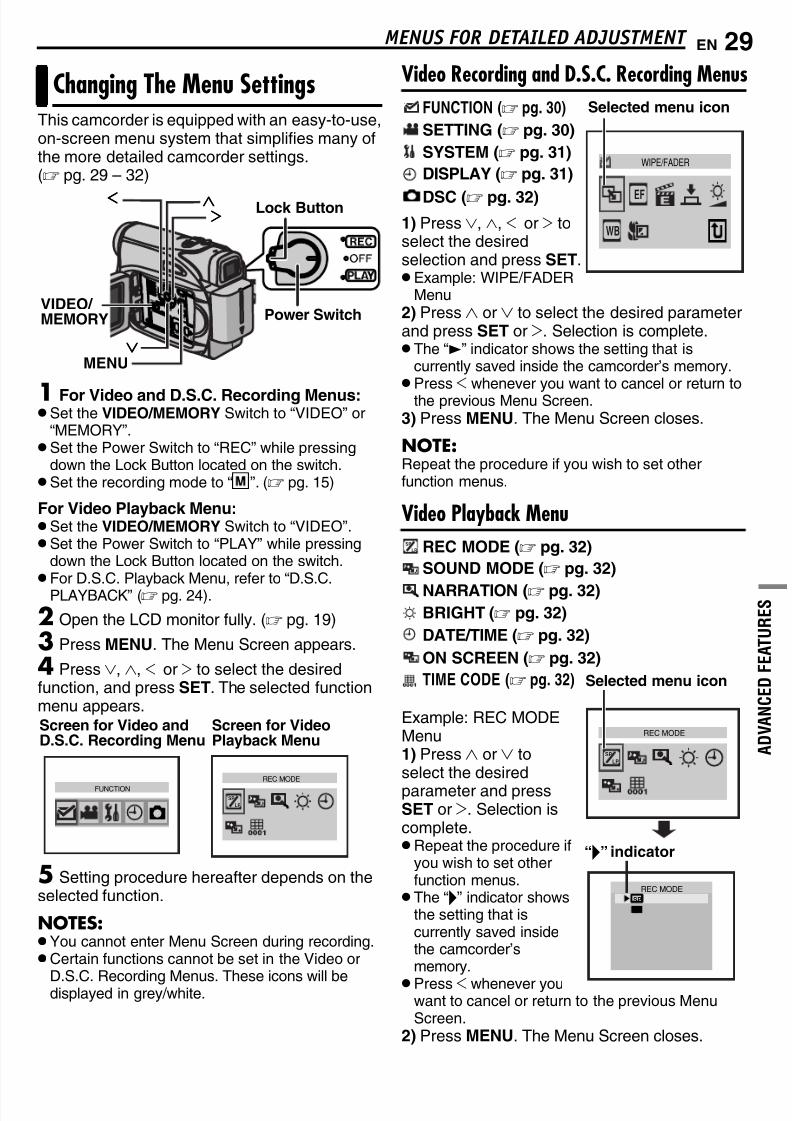
EN 29
A D V A N C E D F E A T U R E S
MENUS FOR DETAILED ADJUSTMENT
This camcorder is equipped with an easy-to-use,on-screen menu system that simplifies many ofthe more detailed camcorder settings.( pg. 29 – 32)
1 For Video and D.S.C. Recording Menus: Set the VIDEO/MEMORY Switch to “VIDEO” or
“MEMORY”. Set the Power Switch to “REC” while pressing
down the Lock Button located on the switch. Set the recording mode to “ M ”. ( pg. 15)
For Video Playback Menu: Set the VIDEO/MEMORY Switch to “VIDEO”. Set the Power Switch to “PLAY” while pressing
down the Lock Button located on the switch.
For D.S.C. Playback Menu, refer to “D.S.C.PLAYBACK” ( pg. 24).
2 Open the LCD monitor fully. ( pg. 19)
3 Press MENU. The Menu Screen appears.
4 Press 4, 3, 1 or 2 to select the desiredfunction, and press SET. The selected functionmenu appears.
5 Setting procedure hereafter depends on theselected function.
NOTES: You cannot enter Menu Screen during recording.Certain functions cannot be set in the Video or
D.S.C. Recording Menus. These icons will bedisplayed in grey/white.
Video Recording and D.S.C. Recording Menus
FUNCTION ( pg. 30)
SETTING ( pg. 30)
SYSTEM ( pg. 31)
DISPLAY ( pg. 31)
DSC ( pg. 32)
1) Press 4, 3, 1 or 2 toselect the desiredselection and press SET. Example: WIPE/FADER
Menu2) Press 3 or 4 to select the desired parameterand press SET or 2. Selection is complete. The “3” indicator shows the setting that is
currently saved inside the camcorder’s memory.
Press1
whenever you want to cancel or return tothe previous Menu Screen.3) Press MENU. The Menu Screen closes.
NOTE:Repeat the procedure if you wish to set otherfunction menus.
Video Playback Menu
REC MODE ( pg. 32)
SOUND MODE ( pg. 32)
NARRATION ( pg. 32)
BRIGHT ( pg. 32)
DATE/TIME ( pg. 32)
ON SCREEN ( pg. 32)
TIME CODE ( pg. 32)
Example: REC MODEMenu1) Press 3 or 4 toselect the desiredparameter and pressSET or 2. Selection iscomplete.Repeat the procedure if
you wish to set otherfunction menus. The “‰” indicator shows
the setting that iscurrently saved insidethe camcorder’smemory. Press 1 whenever you
want to cancel or return to the previous MenuScreen.
2) Press MENU. The Menu Screen closes.
Changing The Menu Settings
Power Switch
Lock Button
VIDEO/ MEMORY
MENU
1111
22223333
4444
FUNCTION
SP
LP
REC MODE
Screen for Video andD.S.C. Recording Menu
Screen for VideoPlayback Menu
WIPE/FADER
WB
EF
Selected menu icon
SP
LP
SP
LP
REC MODE
Selected menu icon
REC MODE
SP
LP
“‰” indicator
7/17/2019 Manual for JVC camcorder
http://slidepdf.com/reader/full/manual-for-jvc-camcorder 30/104
MENUS FOR DETAILED ADJUSTMENT 30 EN
FUNCTION
The following menu settings can be changedonly when the Power Switch is set to “REC”.
[ ] = Factory-preset
( pg. 37), “Wipe or Fader Effects”
( pg. 38), “Program AE, Effects and ShutterEffects”
( pg. 38), “Program AE, Effects and Shutter
Effects”
( pg. 38), “Program AE, Effects and ShutterEffects”
( pg. 35), “Exposure Control”
( pg. 36), “White Balance Adjustment”
[OFF]: Disables the function.ON: When the distance to the subject is lessthan 1 m (3.3 ft), set “TELE MACRO” to “ON”.You can shoot a subject as large as possible at adistance of approx. 40 cm (1.4 ft).Depending on the zoom position, the lens may go
out of focus.
SETTING
The following settings are effective when thePower Switch is set to “REC”.[ ] = Factory-preset
[SP]*: To record in the SP (Standard Play) modeLP: Long Play—more economical, providing 1.5times the recording time.* SP indicator does not appear on the screen.
NOTES: If the recording mode is switched, the playback
picture will be blurred at the switching point. It is recommended that tapes recorded in the LP
mode on this camcorder be played back on thiscamcorder.During playback of a tape recorded on another
camcorder, blocks of noise may appear or theremay be momentary pauses in the sound.
[12BIT]: Enables video recording of stereosound on four separate channels. (Equivalent tothe 32 kHz mode of previous models)16BIT: Enables video recording of stereo soundon two separate channels. (Equivalent to the
48 kHz mode of previous models)
OFF: Disables the function.[ON ]: To compensate for unstable imagescaused by camera-shake, particularly at highmagnification.
NOTES: Accurate stabilization may not be possible if hand
shake is excessive, or depending on the shooting
condition. The “ ” indicator blinks or goes out if the
Stabilizer cannot be used. Switch off this mode when recording with the
camcorder on a tripod.* Available only when the VIDEO/MEMORY Switch
is set to “VIDEO”.
[SNAP]: Snapshot modeSLOW : Live Slow mode
For details on the procedure, refer to “Live Slow” ( pg. 33) and “Snapshot (Record Still ImageOn Tape)” ( pg. 34).* Available only when the VIDEO/MEMORY Switch
is set to “VIDEO”.
[32X]: When set to “32X” while using digitalzoom, the zoom magnification will reset to 32Xsince digital zoom will be disengaged.64X*: Allows you to use the Digital Zoom. By
digitally processing and magnifying images,zooming is possible from 32X (the optical zoomlimit), to a maximum of 64X digital magnification.800X*: Allows you to use the Digital Zoom. Bydigitally processing and magnifying images,zooming is possible from 32X (the optical zoomlimit), to a maximum of 800X digitalmagnification.* Available only when the VIDEO/MEMORY Switch
is set to “VIDEO”.
Recording Menus
WIPE/FADER
EFFECT
PROGRAM AE
SHUTTER
EXPOSURE
W. BALANCE
TELE MACRO
REC MODE
SOUND MODE
DIS*
SNAP/SLOW*
ZOOM*
7/17/2019 Manual for JVC camcorder
http://slidepdf.com/reader/full/manual-for-jvc-camcorder 31/104
EN 31MENUS FOR DETAILED ADJUSTMENT
A D V A N C E D F E A T U R E S
OFF: Allows you to shoot dark scenes with nopicture brightness adjustment.[AGC]: The overall appearance may be grainy,but the image is bright.AUTO : The shutter speed is automatically
adjusted. Shooting a subject in low or poorlighting at slow shutter speed provides a brighterimage than in the AGC mode, but the subject’smovements are not smooth or natural. Theoverall appearance may be grainy. While theshutter speed is being automatically adjusted,“ ” is displayed.
[OFF]: Disengages the function.ON : Helps cut down on noise created by
wind. The “ ” indicator appears. The quality ofthe sound will change. This is normal.
SYSTEM
The “ SYSTEM” functions which are set whenthe Power Switch is set to “REC” are alsoapplied when the Power Switch is set to “PLAY”.[ ] = Factory-preset
OFF: Even though not heard while shooting,shutter sound is recorded on the tape.[ON]: A melody sounds when any operation isperformed. It also activates the shutter soundeffect. ( pg. 24, 34)
[RETURN]: Does not reset all settings to thefactory-preset.EXECUTE: Resets all settings to the factory-
preset.
[LCD]: The image is displayed on the LCDmonitor when the viewfinder is pulled out whilethe LCD monitor is opened.FINDER: The image is displayed in theviewfinder when the viewfinder is pulled outwhile the LCD monitor is opened.
DISPLAY
The following menu settings can be changed onlywhen the Power Switch is set to “REC”. The DISPLAY settings except “BRIGHT” and
“LANGUAGE” are effective only for shooting.[ ] = Factory-preset
pg. 17, “Brightness Adjustment Of TheDisplay”
pg. 16, “Date/Time Settings”
/ / / [ENGLISH] / FRANÇAIS / ESPAÑOL / PORTUGUÊSThe language setting can be changed.( pg. 16)
[OFF]: The date/time does not appear.ON: The date/time is always displayed.
LCD: Keeps the camcorder’s display (except thedate, time and time code) from appearing on the
connected TV screen.[LCD/TV]: Makes the camcorder’s displayappear on screen when the camcorder isconnected to a TV.
[OFF]: Time code is not displayed.ON: Time code is displayed on the camcorderand on the connected TV. Frame numbers arenot displayed during recording. ( pg. 20)
GAIN UP
WIND CUT
MELODY
CAM RESET
PRIORITY
BRIGHT
CLOCK ADJ.
LANGUAGE
DATE/TIME
ON SCREEN
TIME CODE
7/17/2019 Manual for JVC camcorder
http://slidepdf.com/reader/full/manual-for-jvc-camcorder 32/104
MENUS FOR DETAILED ADJUSTMENT 32 EN
OFF: Automatic demonstration will not takeplace.[ON]: Demonstrates certain functions such asWipe/Fader and Effects, etc., and can be usedto confirm how these functions operate.
Demonstration starts in the following cases:When the Menu Screen is closed after “DEMO
MODE” is turned “ON”.With “DEMO MODE” set to “ON”, if there is no
operation for about 3 minutes after the PowerSwitch is set to “REC”. Performing any operation during the
demonstration stops the demonstrationtemporarily. If no operation is performed for morethan 3 minutes after that, the demonstration willresume.
NOTES: If a cassette is in the camcorder, the
demonstration cannot be turned on. “DEMO MODE” remains “ON” even if the
camcorder power is turned off.
DSC
[ ] = Factory-preset
[FINE] / STANDARDThe Picture Quality mode can be selected tobest match your needs. Two Picture Qualitymodes are available: FINE ( ) andSTANDARD ( ) (in order of quality).
NOTE:The number of storable images depends on theselected picture quality as well as the compositionof the subjects in the images and the type ofmemory card being used. ( pg. 24)
[ (TAPE)]: When Snapshot recording isperformed with the VIDEO/MEMORY Switch setto “VIDEO”, still images are recorded only ontothe tape.
/ (TAPE/CARD): When Snapshotrecording is performed with the VIDEO/ MEMORY Switch set to “VIDEO”, still imagesare recorded not only onto the tape but also inthe memory card (640 x 480 pixels).
[ ] = Factory-preset
SOUND MODE and NARRATIONDuring tape playback, the camcorder detects thesound mode in which the recording was made,
and plays the sound back. Select the type ofsound to accompany your playback picture.According to the menu access explanation onpage 29, select “SOUND MODE” or“NARRATION” from the Menu Screen and set itto the desired parameter.The setting below are effective only for videoplayback except “BRIGHT” and “REC MODE”.The parameters (except “OFF” in ON SCREEN,SOUND MODE and NARRATION settings) arethe same as in the description on page 30.
Allows you to set the video recording mode (SPor LP) depending on your preference.It is recommended you use “REC MODE” inPlayback Menu, when using this camcorder as arecorder during dubbing.* SP indicator does not appear on the sreen.
[STEREO ]: Sound is output on both “L” and“R” channels in stereo.SOUND L : Sound from the “L” channel isoutput.SOUND R : Sound from the “R” channel isoutput.
Although it is not possible to perform audiodubbing with this camcorder, you can hearsound from as audio-dubbed tape duringplayback using this function.[OFF]: Original sound is output on both “L” and“R” channels in stereo.
ON: Dubbed sound is output on both “L” and “R” channels in stereo. ( pg. 45)MIX: Original and dubbed sounds are combinedand output in stereo on both “L” and “R” channels.
pg. 17, “Brightness Adjustment Of TheDisplay”
[OFF]: The DATE/TIME does not appear.ON: The DATE/TIME is always displayed.
When set to “OFF”, the camcorder’s displaydisappears.
pg. 20, “Time Code”
DEMO MODE
QUALITY
REC SELECT
Playback Menus
REC MODE [SP]* / LP
SOUND MODE
NARRATION
BRIGHT
DATE/TIME
ON SCREEN OFF / [LCD] / LCD/TV
TIME CODE [OFF] / ON
7/17/2019 Manual for JVC camcorder
http://slidepdf.com/reader/full/manual-for-jvc-camcorder 33/104
EN 33
A D V A N C E D F E A T U R E S
FEATURES FOR RECORDING
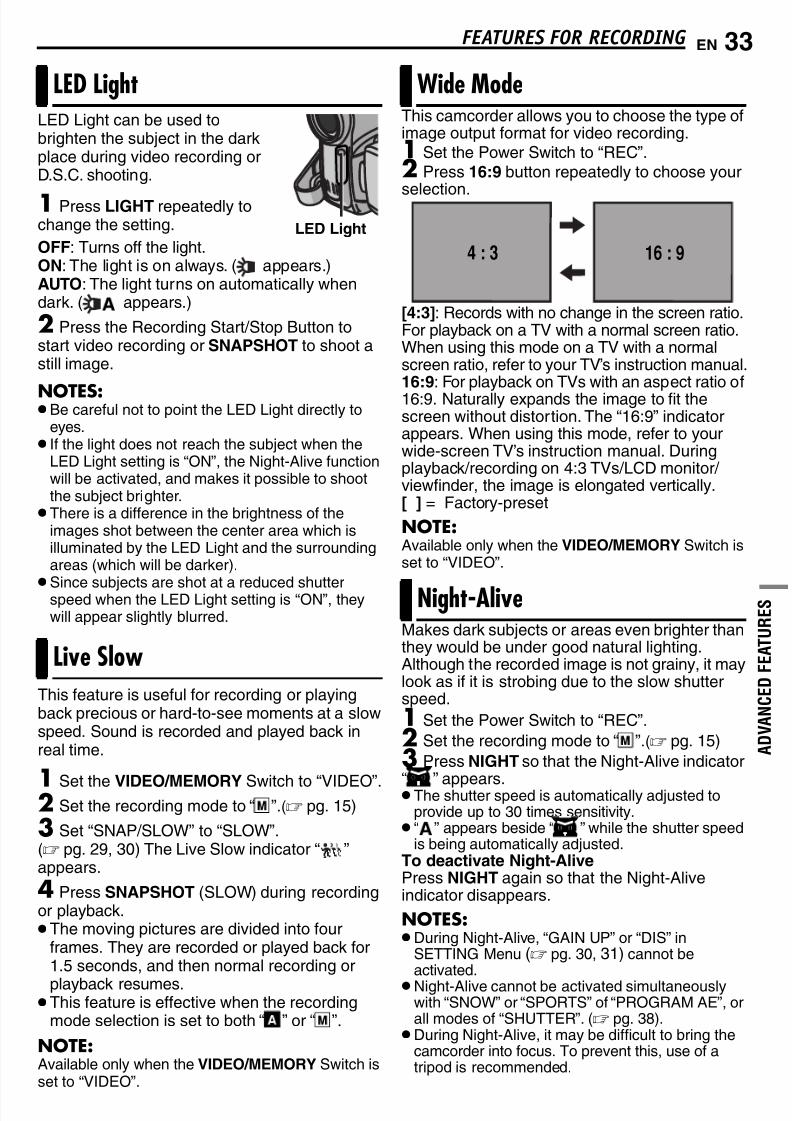
LED Light can be used tobrighten the subject in the darkplace during video recording orD.S.C. shooting.
1 Press LIGHT repeatedly tochange the setting.
OFF: Turns off the light.ON: The light is on always. ( appears.)AUTO: The light turns on automatically whendark. ( appears.)
2 Press the Recording Start/Stop Button tostart video recording or SNAPSHOT to shoot astill image.
NOTES: Be careful not to point the LED Light directly to
eyes. If the light does not reach the subject when the
LED Light setting is “ON”, the Night-Alive functionwill be activated, and makes it possible to shootthe subject brighter. There is a difference in the brightness of the
images shot between the center area which isilluminated by the LED Light and the surroundingareas (which will be darker).
Since subjects are shot at a reduced shutterspeed when the LED Light setting is “ON”, theywill appear slightly blurred.
This feature is useful for recording or playingback precious or hard-to-see moments at a slowspeed. Sound is recorded and played back inreal time.
1 Set the VIDEO/MEMORY Switch to “VIDEO”.2 Set the recording mode to “
M
”.( pg. 15)
3 Set “SNAP/SLOW” to “SLOW”.( pg. 29, 30) The Live Slow indicator “ ” appears.
4 Press SNAPSHOT (SLOW) during recordingor playback. The moving pictures are divided into four
frames. They are recorded or played back for1.5 seconds, and then normal recording orplayback resumes. This feature is effective when the recording
mode selection is set to both “ A
” or “ M
”.
NOTE:Available only when the VIDEO/MEMORY Switch isset to “VIDEO”.
This camcorder allows you to choose the type ofimage output format for video recording.
1 Set the Power Switch to “REC”.2 Press 16:9 button repeatedly to choose your
selection.
[4:3]: Records with no change in the screen ratio.For playback on a TV with a normal screen ratio.When using this mode on a TV with a normalscreen ratio, refer to your TV’s instruction manual.16:9: For playback on TVs with an aspect ratio of16:9. Naturally expands the image to fit thescreen without distortion. The “16:9” indicatorappears. When using this mode, refer to yourwide-screen TV’s instruction manual. Duringplayback/recording on 4:3 TVs/LCD monitor/ viewfinder, the image is elongated vertically.[ ] = Factory-preset
NOTE:Available only when the VIDEO/MEMORY Switch isset to “VIDEO”.
Makes dark subjects or areas even brighter thanthey would be under good natural lighting.Although the recorded image is not grainy, it maylook as if it is strobing due to the slow shutterspeed.
1 Set the Power Switch to “REC”.
2 Set the recording mode to “ M
”.( pg. 15)
3 Press NIGHT so that the Night-Alive indicator
“ ” appears. The shutter speed is automatically adjusted to
provide up to 30 times sensitivity. “ ” appears beside “ ” while the shutter speed
is being automatically adjusted.To deactivate Night-AlivePress NIGHT again so that the Night-Aliveindicator disappears.
NOTES:During Night-Alive, “GAIN UP” or “DIS” in
SETTING Menu ( pg. 30, 31) cannot be
activated.Night-Alive cannot be activated simultaneouslywith “SNOW” or “SPORTS” of “PROGRAM AE”, orall modes of “SHUTTER”. ( pg. 38).During Night-Alive, it may be difficult to bring the
camcorder into focus. To prevent this, use of atripod is recommended.
LED Light
Live Slow
LED Light
Wide Mode
Night-Alive
16 : 94 : 3
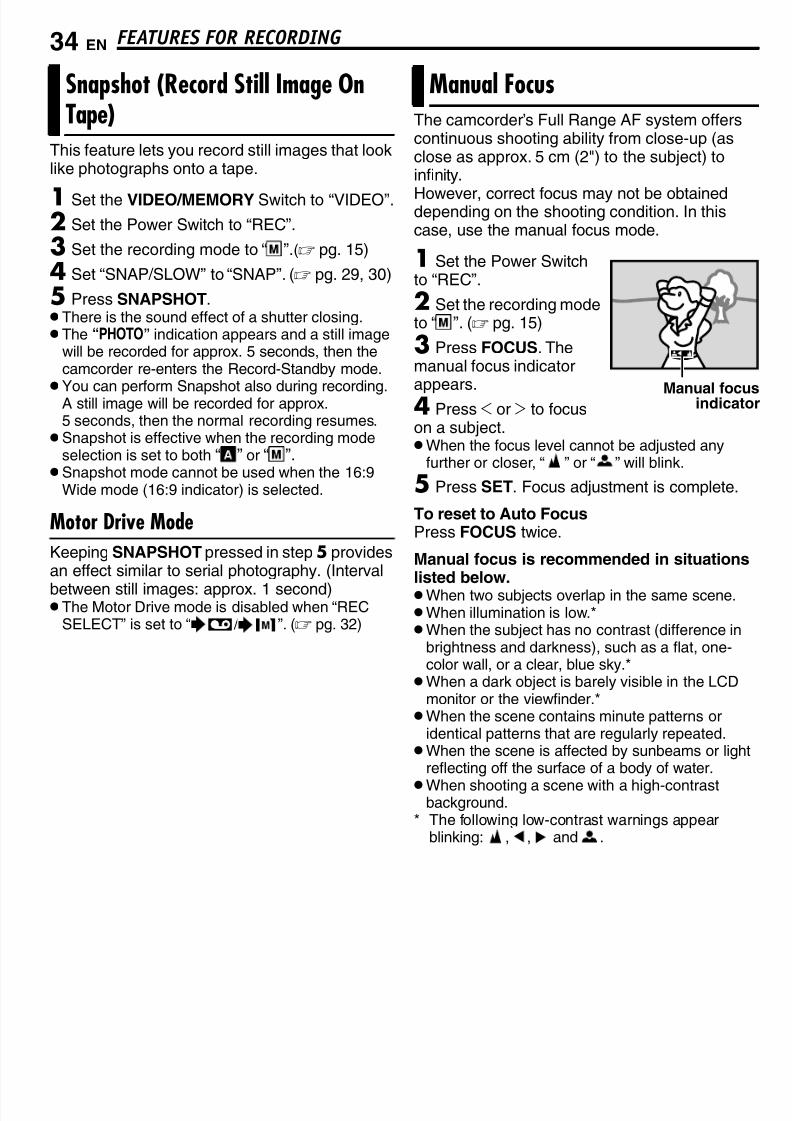
7/17/2019 Manual for JVC camcorder
http://slidepdf.com/reader/full/manual-for-jvc-camcorder 34/104
FEATURES FOR RECORDING 34 EN
This feature lets you record still images that looklike photographs onto a tape.
1 Set the VIDEO/MEMORY Switch to “VIDEO”.
2 Set the Power Switch to “REC”.
3 Set the recording mode to “ M ”.( pg. 15)
4 Set “SNAP/SLOW” to “SNAP”. ( pg. 29, 30)
5 Press SNAPSHOT. There is the sound effect of a shutter closing. The “PHOTO” indication appears and a still image
will be recorded for approx. 5 seconds, then thecamcorder re-enters the Record-Standby mode.
You can perform Snapshot also during recording.A still image will be recorded for approx.5 seconds, then the normal recording resumes. Snapshot is effective when the recording mode
selection is set to both “ A
” or “ M
”. Snapshot mode cannot be used when the 16:9
Wide mode (16:9 indicator) is selected.
Motor Drive ModeKeeping SNAPSHOT pressed in step 5 providesan effect similar to serial photography. (Interval
between still images: approx. 1 second) The Motor Drive mode is disabled when “REC
SELECT” is set to “ / ”. ( pg. 32)
The camcorder’s Full Range AF system offerscontinuous shooting ability from close-up (asclose as approx. 5 cm (2") to the subject) toinfinity.
However, correct focus may not be obtaineddepending on the shooting condition. In thiscase, use the manual focus mode.
1 Set the Power Switchto “REC”.
2 Set the recording modeto “
M
”. ( pg. 15)
3 Press FOCUS. Themanual focus indicator
appears.4 Press 1 or 2 to focuson a subject.When the focus level cannot be adjusted any
further or closer, “ ” or “ ” will blink.
5 Press SET. Focus adjustment is complete.
To reset to Auto FocusPress FOCUS twice.
Manual focus is recommended in situationslisted below.When two subjects overlap in the same scene.When illumination is low.*When the subject has no contrast (difference in
brightness and darkness), such as a flat, one-color wall, or a clear, blue sky.*When a dark object is barely visible in the LCD
monitor or the viewfinder.*When the scene contains minute patterns or
identical patterns that are regularly repeated.When the scene is affected by sunbeams or light
reflecting off the surface of a body of water.
When shooting a scene with a high-contrastbackground.
* The following low-contrast warnings appearblinking: , , and .
Snapshot (Record Still Image OnTape)
Manual Focus
Manual focusindicator
7/17/2019 Manual for JVC camcorder
http://slidepdf.com/reader/full/manual-for-jvc-camcorder 35/104
EN 35FEATURES FOR RECORDING
A D V A N C E D F E A T U R E S
Manual exposure control is recommended in thefollowing situations:When shooting using reverse lighting or when the
background is too bright.
When shooting on a reflective natural backgroundsuch as at the beach or when skiing.When the background is overly dark or the subject
is bright.
1 Set the Power Switch to “REC”.
2 Set the recording mode to “ M
”. ( pg. 15)
3 Set “EXPOSURE” to “MANUAL” inFUNCTION Menu. ( pg. 29) The exposure control menu appears.
4To brighten the image, press
3. To darken theimage, press 4. (maximum ±6)
+3 exposure has the same effect as the backlightcompensation. ( pg. 36) –3 exposure has the same effect as when
“PROGRAM AE” is set to “SPOTLIGHT”.( pg. 38)
5 Press SET or 2. Exposure adjustment iscomplete.
To return to automatic exposure controlSelect “AUTO” in step 3.
NOTES: You cannot use the manual exposure control at
the same time when “PROGRAM AE” is set to“SPOTLIGHT” or “SNOW” ( pg. 38), or with thebacklight compensation. If the adjustment does not cause any visible
change in brightness, set “GAIN UP” to “AUTO”.( pg. 29, 31)
Like the pupil of the human eye, the iriscontracts in well-lit environments to keep toomuch light from entering, and dilates in dimenvironments to allow in more light.
Use this function in the following situations:When shooting a moving subject.When the distance to the subject changes (so its
size in the LCD monitor or the viewfinderchanges), such as when the subject is backingaway.When shooting on a reflective natural background
such as at the beach or when skiing.When shooting objects under a spotlight.When zooming.
1 Set the Power Switch to “REC”.
2 Set the recording mode to “ M
”. ( pg. 15)
3 Set “EXPOSURE” to “MANUAL” inFUNCTION Menu. ( pg. 29) The exposure control menu appears.
4 Adjust zoom so that the subject fills the LCDmonitor or the viewfinder, then press and holdSET or 2 for over 2 seconds. The “ ” indicationappears.
5 Press SET or 2. The iris is locked.
6 Press MENU. The Menu Screen closes. The“ ” indicator appears.
To return to automatic iris controlSelect “AUTO” in step 3. The exposure control indicator and “ ”
disappear.
To lock the exposure control and the irisAfter step 3, adjust the exposure by pressing 3 or 4. Then lock the iris in steps 4 – 6. For
automatic locking, select “AUTO” in step3
. Theexposure control and the iris become automatic.
Exposure Control
Operation Mode Video Memory
Exposure Level ± 0± 1± 2
± 3± 4± 5± 6
± 0EV± 0.3EV± 0.7EV
± 1.0EV± 1.3EV± 1.7EV± 2.0EV
Iris Lock
7/17/2019 Manual for JVC camcorder
http://slidepdf.com/reader/full/manual-for-jvc-camcorder 36/104
FEATURES FOR RECORDING 36 EN
Backlight compensation brightens the subjectquickly.With simple operation, backlight compensationfeature brightens the dark subject portion by
increasing the exposure.
1 Set the Power Switch to “REC”.
2 Press BACKLIGHT so that the BacklightCompensation indicator “ ” appears.
To cancel Backlight CompensationPress BACKLIGHT twice so that the “ ” indicator disappears.
NOTE:Using Backlight Compensation may cause the light
around the subject to become too bright and thesubject to become white.
Selection of a spot metering area enables moreprecise exposure compensation. You can selectone of the three metering areas on the LCDmonitor/viewfinder.
1 Set the Power Switch to “REC”.2 Set the recording mode to “ M ”. ( pg. 15)
3 Press BACKLIGHT twice so that the SpotExposure Control indicator “ ” appears.A spot metering area frame appears at the
center of the LCD monitor/viewfinder.
4 Press 2 or 1 to select the desired spotmetering area frame.
5 Press SET.Spot Exposure Control is engaged.Exposure is adjusted to make the brightness of
the selected area most appropriate.
To lock the iris
After step 4, press and hold SET over 2seconds. The “ ” indication appears and the irisis locked.
To cancel Spot Exposure Control
Press BACKLIGHT once so that the “ ” indicator disappears.
NOTES: You cannot use the Spot Exposure Control at the
same time with following functions.• “16:9” in “WIDE MODE” ( pg. 33)
• “STROBE” in EFFECT ( pg. 38)
•Digital Zoom ( pg. 20)
Depending on the shooting location and condition,optimum result may not be attained.
The white balance refers to the correctness ofcolor reproduction under various lighting. If thewhite balance is correct, all other colors will beaccurately reproduced.The white balance is usually adjustedautomatically. However, more advancedcamcorder operators control this functionmanually to achieve a more professional color/ tint reproduction.
To change the settingSet “W. BALANCE” to the desired mode.( pg. 29) The selected mode indicator except “AUTO”
appears.
[AUTO]: White balance is adjustedautomatically.
MWB: Adjust the white balance manuallywhen shooting under various types of lighting.(“Manual White Balance Adjustment” ( pg. 37))
FINE: Outdoors on a sunny day.
CLOUD: Outdoors on a cloudy day.[ ] = Factory-preset
To return to automatic white balanceSet “W. BALANCE” to “AUTO”. ( pg. 29)
Backlight Compensation
Spot Exposure Control
White Balance Adjustment
7/17/2019 Manual for JVC camcorder
http://slidepdf.com/reader/full/manual-for-jvc-camcorder 37/104
EN 37FEATURES FOR RECORDING
A D V A N C E D F E A T U R E S
Adjust the white balancemanually when shootingunder various types oflighting.
1 Set the Power Switchto “REC”.
2 Set the recording mode to “ M
”. ( pg. 15)
3 Hold a sheet of plain white paper in front ofthe subject. Adjust zoom or position yourself sothat the white paper fills the screen.
4 Select “MWB” in “ W. BALANCE” menu( pg. 29), then press and hold SET or 2 until
begins blinking.
When the setting is completed, stops blinking.5 Press SET or 2 to engage the setting.
6 Press MENU. The Menu Screen closes andthe Manual White Balance indicator isdisplayed.
NOTES: In step 3, it may be difficult to focus on the white
paper. In such a case, adjust focus manually.( pg. 34) A subject can be shot under various types of
lighting conditions indoors (natural, fluorescent,candlelight, etc.). Because the color temperatureis different depending on the light source, thesubject tint will differ depending on the whitebalance settings. Use this function for a morenatural result.Once you adjust white balance manually, the
setting is retained even if the power is turned off orthe battery removed.
These effects let you make pro-style scenetransitions. Use them to spice up the transitionfrom one scene to the next.
Wipe or Fader works when video recording is
started or stopped.
1 Set the VIDEO/MEMORY Switch to “VIDEO”.
2 Set the Power Switch to “REC”.
3 Set the recording mode to “ M ”. ( pg. 15)
4 Set “ ” in FUNCTION Menu. ( pg. 29) The WIPE/FADER menu disappears and the
effect is reserved. The selected effect indicator appears.
5 Press the Recording Start/Stop Button toactivate the Fade-in/out or Wipe-in/out.
To deactivate the selected effectSelect “OFF” in step 4. The effect indicatordisappears.
NOTE:You can extend the length of a Wipe or Fader bypressing and holding the Recording Start/StopButton.
WIPE/FADEROFF: Disables the function. (Factory-preset)
WHITE : Fade in or out with a white screen.
BLACK : Fade in or out with a black screen.
SLIDE : Wipe in from right to left, or wipe outfrom left to right.
SCROLL : The scene wipes in from thebottom to the top of a black screen, or wipes outfrom top to bottom, leaving a black screen.
Manual White Balance Adjustment
White paper
Wipe Or Fader Effects
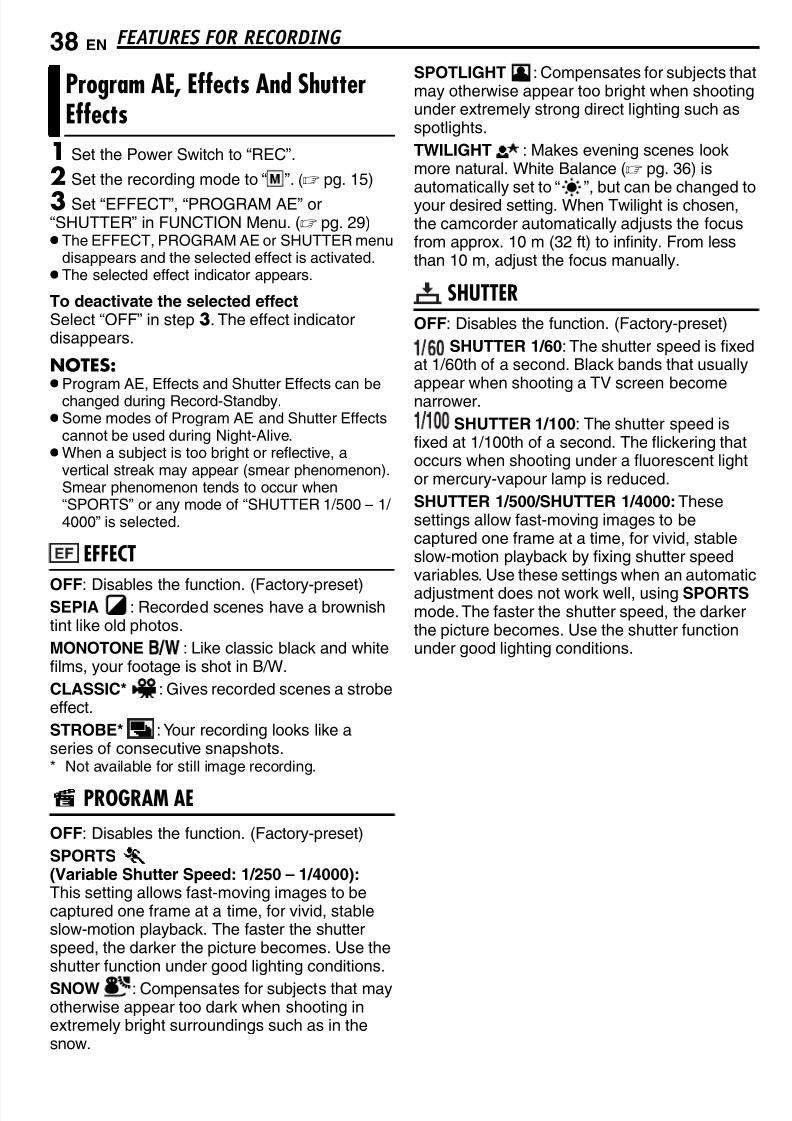
7/17/2019 Manual for JVC camcorder
http://slidepdf.com/reader/full/manual-for-jvc-camcorder 38/104
FEATURES FOR RECORDING 38 EN
1 Set the Power Switch to “REC”.
2 Set the recording mode to “ M
”. ( pg. 15)
3 Set “EFFECT”, “PROGRAM AE” or“SHUTTER” in FUNCTION Menu. ( pg. 29) The EFFECT, PROGRAM AE or SHUTTER menu
disappears and the selected effect is activated. The selected effect indicator appears.
To deactivate the selected effectSelect “OFF” in step 3. The effect indicatordisappears.
NOTES:
Program AE, Effects and Shutter Effects can bechanged during Record-Standby. Some modes of Program AE and Shutter Effects
cannot be used during Night-Alive.When a subject is too bright or reflective, a
vertical streak may appear (smear phenomenon).Smear phenomenon tends to occur when“SPORTS” or any mode of “SHUTTER 1/500 – 1/ 4000” is selected.
EFFECT
OFF: Disables the function. (Factory-preset)SEPIA : Recorded scenes have a brownishtint like old photos.
MONOTONE : Like classic black and whitefilms, your footage is shot in B/W.
CLASSIC* : Gives recorded scenes a strobeeffect.
STROBE* : Your recording looks like aseries of consecutive snapshots.* Not available for still image recording.
PROGRAM AE
OFF: Disables the function. (Factory-preset)
SPORTS (Variable Shutter Speed: 1/250 – 1/4000):This setting allows fast-moving images to becaptured one frame at a time, for vivid, stableslow-motion playback. The faster the shutterspeed, the darker the picture becomes. Use theshutter function under good lighting conditions.
SNOW : Compensates for subjects that mayotherwise appear too dark when shooting inextremely bright surroundings such as in thesnow.
SPOTLIGHT : Compensates for subjects thatmay otherwise appear too bright when shootingunder extremely strong direct lighting such asspotlights.
TWILIGHT : Makes evening scenes lookmore natural. White Balance ( pg. 36) is
automatically set to “ ”, but can be changed toyour desired setting. When Twilight is chosen,the camcorder automatically adjusts the focusfrom approx. 10 m (32 ft) to infinity. From lessthan 10 m, adjust the focus manually.
SHUTTEROFF: Disables the function. (Factory-preset)
SHUTTER 1/60: The shutter speed is fixedat 1/60th of a second. Black bands that usually
appear when shooting a TV screen becomenarrower.
SHUTTER 1/100: The shutter speed isfixed at 1/100th of a second. The flickering thatoccurs when shooting under a fluorescent lightor mercury-vapour lamp is reduced.
SHUTTER 1/500/SHUTTER 1/4000: Thesesettings allow fast-moving images to becaptured one frame at a time, for vivid, stableslow-motion playback by fixing shutter speedvariables. Use these settings when an automaticadjustment does not work well, using SPORTS mode. The faster the shutter speed, the darkerthe picture becomes. Use the shutter functionunder good lighting conditions.
Program AE, Effects And ShutterEffects
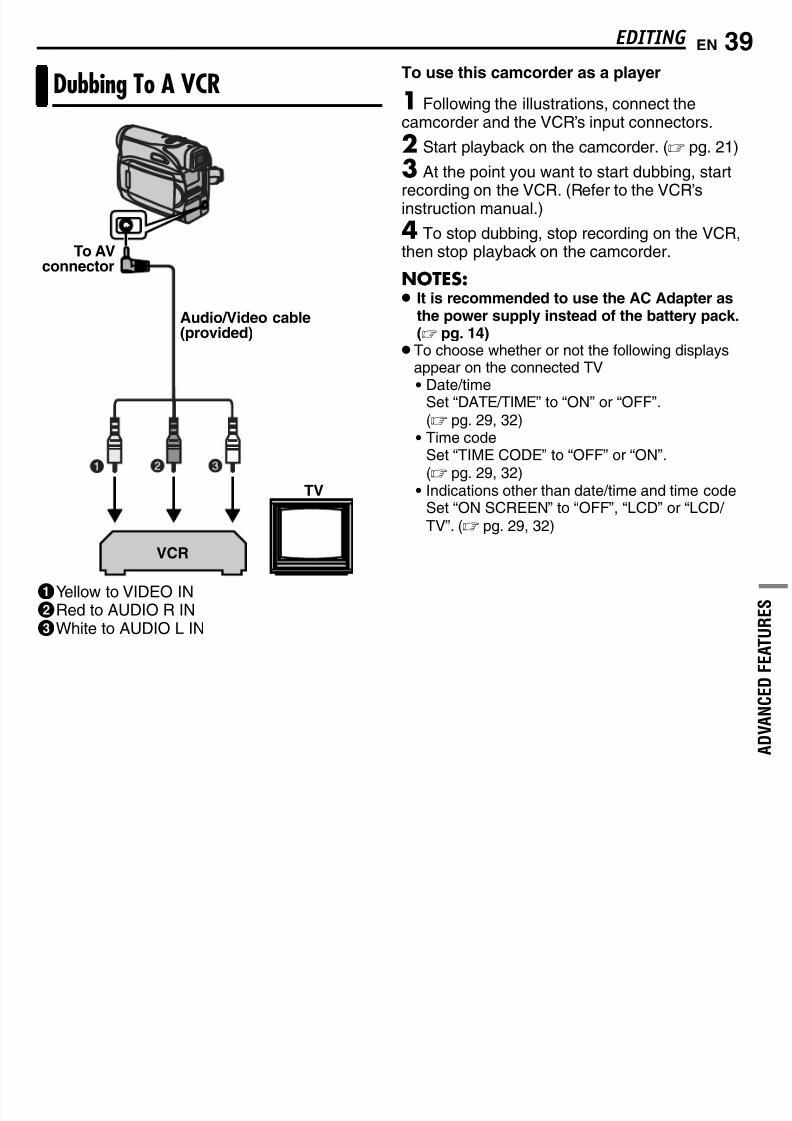
7/17/2019 Manual for JVC camcorder
http://slidepdf.com/reader/full/manual-for-jvc-camcorder 39/104
EN 39
A D V A N C E D F E A T U R E S
EDITING
1Yellow to VIDEO IN2Red to AUDIO R IN3White to AUDIO L IN
To use this camcorder as a player
1 Following the illustrations, connect thecamcorder and the VCR’s input connectors.
2 Start playback on the camcorder. ( pg. 21)
3 At the point you want to start dubbing, start
recording on the VCR. (Refer to the VCR’sinstruction manual.)
4 To stop dubbing, stop recording on the VCR,then stop playback on the camcorder.
NOTES:
It is recommended to use the AC Adapter asthe power supply instead of the battery pack.( pg. 14)
To choose whether or not the following displaysappear on the connected TV•
Date/timeSet “DATE/TIME” to “ON” or “OFF”.( pg. 29, 32)
• Time codeSet “TIME CODE” to “OFF” or “ON”.( pg. 29, 32)
• Indications other than date/time and time codeSet “ON SCREEN” to “OFF”, “LCD” or “LCD/ TV”. ( pg. 29, 32)
Dubbing To A VCR
TV
VCR
Audio/Video cable(provided)
To AVconnector
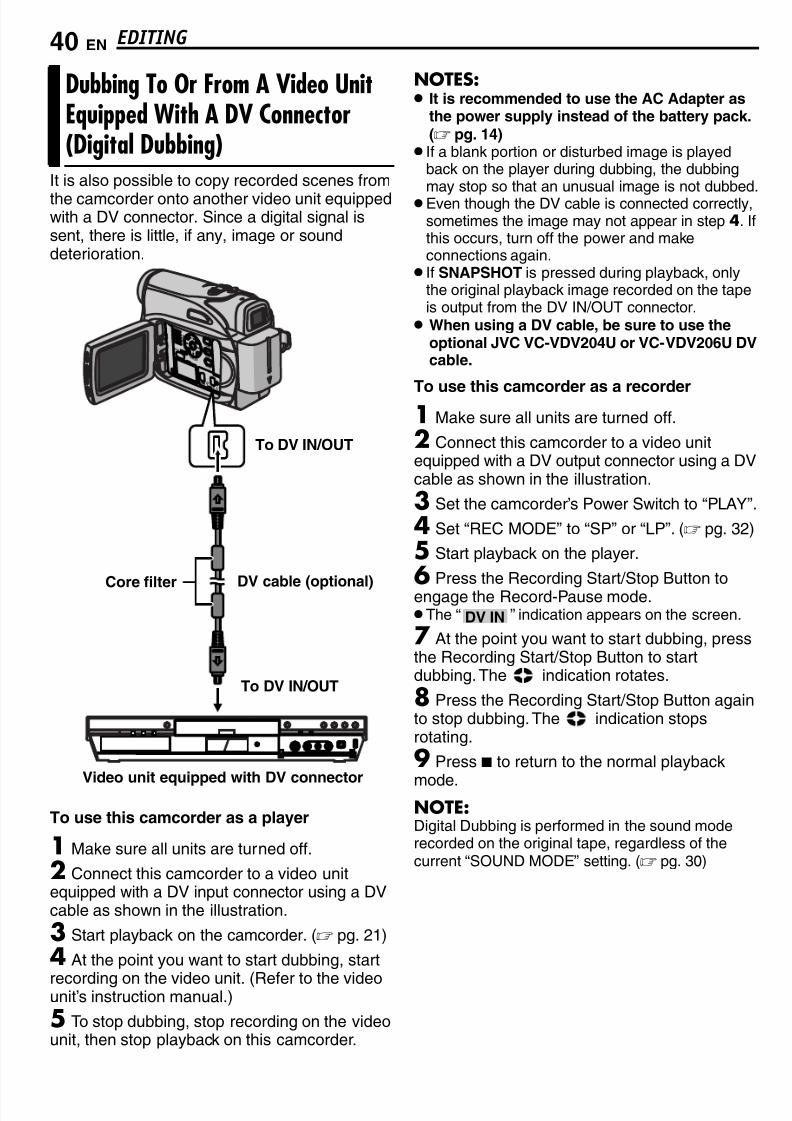
7/17/2019 Manual for JVC camcorder
http://slidepdf.com/reader/full/manual-for-jvc-camcorder 40/104
EDITING 40 EN
It is also possible to copy recorded scenes from
the camcorder onto another video unit equippedwith a DV connector. Since a digital signal issent, there is little, if any, image or sounddeterioration.
To use this camcorder as a player
1 Make sure all units are turned off.
2 Connect this camcorder to a video unitequipped with a DV input connector using a DVcable as shown in the illustration.
3 Start playback on the camcorder. ( pg. 21)
4 At the point you want to start dubbing, start
recording on the video unit. (Refer to the videounit’s instruction manual.)
5 To stop dubbing, stop recording on the videounit, then stop playback on this camcorder.
NOTES:
It is recommended to use the AC Adapter asthe power supply instead of the battery pack.( pg. 14)
If a blank portion or disturbed image is playedback on the player during dubbing, the dubbingmay stop so that an unusual image is not dubbed. Even though the DV cable is connected correctly,
sometimes the image may not appear in step 4. Ifthis occurs, turn off the power and makeconnections again. If SNAPSHOT is pressed during playback, only
the original playback image recorded on the tapeis output from the DV IN/OUT connector. When using a DV cable, be sure to use the
optional JVC VC-VDV204U or VC-VDV206U DVcable.
To use this camcorder as a recorder
1 Make sure all units are turned off.
2 Connect this camcorder to a video unitequipped with a DV output connector using a DVcable as shown in the illustration.
3 Set the camcorder’s Power Switch to “PLAY”.
4 Set “REC MODE” to “SP” or “LP”. ( pg. 32)
5 Start playback on the player.
6Press the Recording Start/Stop Button toengage the Record-Pause mode.
The “ ” indication appears on the screen.
7 At the point you want to start dubbing, pressthe Recording Start/Stop Button to startdubbing. The indication rotates.
8 Press the Recording Start/Stop Button againto stop dubbing. The indication stopsrotating.
9 Press 7 to return to the normal playback
mode.
NOTE:Digital Dubbing is performed in the sound moderecorded on the original tape, regardless of thecurrent “SOUND MODE” setting. ( pg. 30)
Dubbing To Or From A Video UnitEquipped With A DV Connector(Digital Dubbing)
Core filter
To DV IN/OUT
DV cable (optional)
To DV IN/OUT
Video unit equipped with DV connector
DV IN
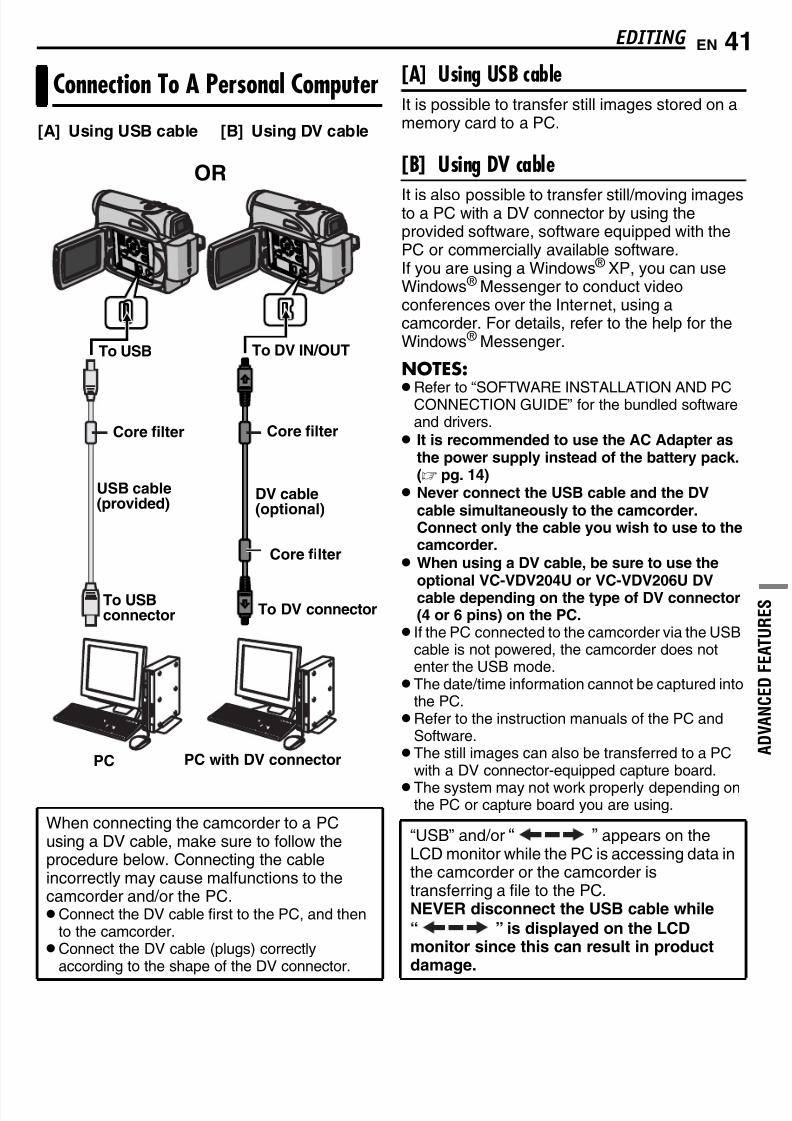
7/17/2019 Manual for JVC camcorder
http://slidepdf.com/reader/full/manual-for-jvc-camcorder 41/104
EN 41EDITING
A D V A N C E D F E A T U R E S
[A] Using USB cableIt is possible to transfer still images stored on amemory card to a PC.
[B] Using DV cable
It is also possible to transfer still/moving imagesto a PC with a DV connector by using theprovided software, software equipped with thePC or commercially available software.If you are using a Windows ® XP, you can useWindows ® Messenger to conduct videoconferences over the Internet, using acamcorder. For details, refer to the help for theWindows ® Messenger.
NOTES:
Refer to “SOFTWARE INSTALLATION AND PCCONNECTION GUIDE” for the bundled softwareand drivers. It is recommended to use the AC Adapter as
the power supply instead of the battery pack.( pg. 14)
Never connect the USB cable and the DVcable simultaneously to the camcorder.Connect only the cable you wish to use to thecamcorder.
When using a DV cable, be sure to use the
optional VC-VDV204U or VC-VDV206U DVcable depending on the type of DV connector(4 or 6 pins) on the PC.
If the PC connected to the camcorder via the USBcable is not powered, the camcorder does notenter the USB mode. The date/time information cannot be captured into
the PC.Refer to the instruction manuals of the PC and
Software. The still images can also be transferred to a PC
with a DV connector-equipped capture board. The system may not work properly depending on
the PC or capture board you are using.
Connection To A Personal Computer
When connecting the camcorder to a PCusing a DV cable, make sure to follow theprocedure below. Connecting the cableincorrectly may cause malfunctions to thecamcorder and/or the PC.Connect the DV cable first to the PC, and then
to the camcorder.Connect the DV cable (plugs) correctly
according to the shape of the DV connector.
[A] Using USB cable
To USB
PC PC with DV connector
USB cable(provided)
To DV IN/OUT
[B] Using DV cable
To USBconnector To DV connector
Core filter
Core filter
DV cable(optional)
OR
Core filter
“USB” and/or “ ” appears on theLCD monitor while the PC is accessing data inthe camcorder or the camcorder istransferring a file to the PC.NEVER disconnect the USB cable while“ ” is displayed on the LCDmonitor since this can result in productdamage.
7/17/2019 Manual for JVC camcorder
http://slidepdf.com/reader/full/manual-for-jvc-camcorder 42/104
42 EN TROUBLESHOOTING
If, after following the steps in the chart below, theproblem still exists, please consult your nearestJVC dealer.
Power
The power is not connected properly.
Connect the AC Adapter securely. ( pg. 14) The battery pack is not attached firmly.Detach the battery pack once again and re-attach
it firmly. ( pg. 13) The battery is dead.Replace the dead battery with a fully charged
one. ( pg. 13)
Video and D.S.C. Recording
The tape’s erase protection tab is set to “SAVE”.Set the tape’s erase protection tab to “REC”.
( pg. 18) “TAPE END” appears.Replace with new cassette. ( pg. 18) The cassette holder cover is open.Close the cassette holder cover.
This is not a malfunction.
This is not a malfunction.
“DATE/TIME” is set to “OFF”.Set “DATE/TIME” to “ON”. ( pg. 29, 32)
Effects and “DIS” functions that cannot be usedtogether are selected at the same time.
Re-read the sections covering Effects and “DIS”.( pg. 29, 30, 38)
32X optical zoom is selected.Set “ZOOM” to “64X” or “800X”. ( pg. 30) The VIDEO/MEMORY Switch is set to
“MEMORY”.Set the VIDEO/MEMORY Switch to “VIDEO”.
Video and D.S.C. Playback
Your TV has AV input terminals, but is not set toits VIDEO mode.
Set the TV to the mode or channel appropriate forvideo playback. ( pg. 21)
The cassette holder cover is open.Close the cassette holder cover. ( pg. 18)
Clean the video heads with an optional cleaningcassette. ( pg. 48)
Advanced features
Focus is set to the Manual mode.
Set Focus to the Auto mode. (
pg. 34) The lens is dirty or covered with condensation.Clean the lens and check the focus again.
( pg. 46)
The Wide (16:9) mode (16:9 indicator) is selected.Disengage the 16:9 (16:9 indicator) Wide mode.
( pg. 33)
The light source or the subject does not includewhite. Or there are various different light sourcesbehind the subject.
Find a white subject and compose your shot sothat it also appears in the frame. ( pg. 34, 37)
Shooting was performed under backlit conditions.Press BACKLIGHT. ( pg. 36)
The subject is too bright.Set “ ” to “SPOTLIGHT”. ( pg. 38)
The camcorder is a microcomputer-controlleddevice. External noise and interference (from aTV, a radio, etc.) might prevent it from
functioning properly. In such cases, firstdisconnect its power supply unit (battery pack,AC Adapter, etc.) and wait a few minutes; andthen re-connect it and proceed as usual fromthe beginning.
No power is supplied.
Recording cannot be performed.
When shooting a subject illuminated bybright light, vertical lines appear.
When the screen is under direct sunlightduring shooting, the screen becomes red orblack for an instant.
During recording, the date/ time does notappear.
The LCD monitor or viewfinder indicationsblink.
Digital Zoom does not work.
The tape is moving, but there is no picture.
Blocks of noise appear during playback, orthere is no playback picture and the screenbecomes blue.
The focus does not adjust automatically.
Snapshot mode cannot be used.
The color of Snapshot looks strange.
The image taken using Snapshot is toodark.
The image taken using Snapshot is toobright.
7/17/2019 Manual for JVC camcorder
http://slidepdf.com/reader/full/manual-for-jvc-camcorder 43/104
EN 43TROUBLESHOOTING
R E
F E R E N C E S
The Sepia (SEPIA) or Monotone (MONOTONE)mode is activated.
Disengage the Sepia (SEPIA) or Monotone(MONOTONE) mode before setting WhiteBalance. ( pg. 38)
When shooting in the dark, the unit becomeshighly sensitive to light when “GAIN UP” is set to“AUTO”.
If you want the lighting to look more natural, set“GAIN UP” to “AGC” or “OFF”. ( pg. 29, 31)
Other problems
Charging is difficult in places subject to extremelyhigh/low temperatures.
To protect the battery, it is recommended tocharge it in places with a temperature of 10°C to35°C (50°F to 95°F). ( pg. 47)
The battery pack is not attached firmly.Detach the battery pack once again and re-attach
it firmly. ( pg. 13)
The date/time is not set.Set the date/time. ( pg. 16) The built-in clock battery has run out and the
previously set date/time has been erased.Consult your nearest JVC dealer for replacement.
Files stored in the memory card are protected.Remove protection from the files stored in the
memory card and delete them. ( pg. 26)
This is not a malfunction.By recording with “DIS” de-activated ( pg. 29, 30)
this can be avoided.
The DV cable was plugged/unplugged with powerturned on.
Turn the camcorder’s power off and on again,then operate it.
In places subject to low temperature, imagesbecome dark due to the characteristics of theLCD monitor. This is not a malfunction.
Adjust the brightness and angle of the LCD
monitor. (
pg. 17, 19) When the LCD monitor’s fluorescent light reaches
the end of its service life, images on the LCDmonitor become dark.
Consult your nearest JVC dealer.
The LCD monitor and the viewfinder are madewith high-precision technology. However, blackspots or bright spots of light (red, green or blue)
may appear constantly on the LCD monitor or theviewfinder. These spots are not recorded on thetape. This is not due to any defect of the unit.(Effective dots: more than 99.99%)
The battery’s charge is low.Install a fully charged battery. ( pg. 13)
Push in the memory card a few more times.( pg. 18)
The viewfinder is pulled out and “PRIORITY” isset to “FINDER”.
Push the viewfinder back in or set “PRIORITY” to“LCD”. ( pg. 19, 29, 31)
The LCD monitor’s brightness setting is too dark.Adjust the brightness of the LCD monitor.
( pg. 19)
If the monitor is tilted upward 180 degrees, openthe monitor fully. ( pg. 19)
A malfunction of some kind has occured. In thiscase the camcorder’s functions becomeunusable.
pg. 45.
White Balance cannot be activated.
The image looks like the shutter speed istoo slow.
The POWER/CHARGE lamp on thecamcorder does not light during charging.
“SET DATE/TIME!” appears.
Files stored in the memory card cannot bedeleted.
When the image is printed from the printer,a black bar appears at the bottom of thescreen.
When the camcorder is connected via the
DV connector, the camcorder does notoperate.
Images on the LCD monitor appear dark orwhitish.
Colored bright spots appear all over theLCD monitor or the viewfinder.
The cassette will not load properly.
The memory card cannot be removed fromthe camcorder.
Picture does not appear on the LCD monitor.
An error indication (01 – 04 or 06) appears.
7/17/2019 Manual for JVC camcorder
http://slidepdf.com/reader/full/manual-for-jvc-camcorder 44/104
TROUBLESHOOTING 44 EN
Warning Indications
Displays the battery remaining power.Remaining power level
As the battery power comes close to nil, thebattery remaining power indicator blinks.When the battery power is exhausted, powerturns off automatically.
Appears if a tape is loaded. Blinks when no tape is loaded.
Appears when the erase protection tab is set to“SAVE” while the Power Switch is set to “REC” and the VIDEO/MEMORY Switch is set to“VIDEO”. ( pg. 15)
Appears if dirt is detected on the heads duringrecording. Use an optional cleaning cassette.( pg. 48)
Appears if condensation occurs. When thisindication is displayed, wait more than 1 houruntil condensation disappears.
Appears if a tape is not loaded when theRecording Start/Stop Button or SNAPSHOT Button is pressed while the Power Switch is set
to “REC” and the VIDEO/MEMORY Switch is setto “VIDEO”.
Appears when the tape ends during recording orplayback.
Appears when the date/time is not set.( pg. 16)
The built-in clock battery has run out and thepreviously set date/time has been erased.Consult your nearest JVC dealer forreplacement.
Appears for 5 seconds after power is turned on ifthe lens cap is attached or when it is dark.
Appears when the memory card’s memory is full
and shooting is not possible.
Appears when pictures recorded in the HDVformat are detected. The pictures in the HDVformat cannot be played back with thiscamcorder.
Appears when playing back a file that is not
compatible with DCF or a file with a size that isnot compatible with this camcorder.
Appears if dubbing of copyguarded signals isattempted while this camcorder is being used asa recorder.
Appears if there is no memory card loaded when
the SNAPSHOT Button is pressed while thePower Switch is set to “REC” and the VIDEO/ MEMORY Switch is set to “MEMORY”.
Appears when there is a problem with a memorycard and its memory is corrupt, or it has notbeen initialized. Initialize the memory card.( pg. 28)
Appears if there are no image files stored in thememory card when you attempt memory cardplayback.
Appears when the camcorder does notrecognize the loaded memory card. Remove thememory card once and insert it again. Repeatthese procedures until no indication appears. Ifthe indication still appears, the memory card is
corrupted.
CHECK TAPE’S ERASE PROTECTION TAB
USE CLEANING CASSETTE
CONDENSATION, OPERATIONPAUSED PLEASE WAIT
TAPE!
TAPE END
SET DATE/TIME!
ExhaustedHigh
LENS CAP
MEMORY IS FULL
HDV
?
COPY PROTECTED
MEMORY CARD!
PLEASE FORMAT
NO IMAGES STORED
CARD ERROR!
7/17/2019 Manual for JVC camcorder
http://slidepdf.com/reader/full/manual-for-jvc-camcorder 45/104
EN 45TROUBLESHOOTING
R E
F E R E N C E S
Appears when you attempt to shoot digital stillimages when the write protection tab on the SDMemory Card is set to the “LOCK” position.
The error indications (01, 02 or 06) show whattype of malfunction has occured. When an errorindication appears, the camcorder turns offautomatically. Remove the power supply(battery, etc.) and wait a few minutes for theindication to clear. When it does, you canresume using the camcorder. If the indication
remains, consult your nearest JVC dealer.
The error indications (03 or 04) show what typeof malfunction has occured. When an errorindication appears, the camcorder turns offautomatically. Eject the cassette once and re-insert it, then check if the indication clears.When it does, you can resume using thecamcorder. If the indication remains, consult
your nearest JVC dealer.
CHECK CARD’S WRITE PROTECTIONSWITCH
UNIT IN SAFEGUARD MODEREMOVE AND REATTACH BATTERY OR DCPLUG
UNIT IN SAFEGUARD MODEEJECT AND REINSERT TAPE
7/17/2019 Manual for JVC camcorder
http://slidepdf.com/reader/full/manual-for-jvc-camcorder 46/104
46 EN USER MAINTENANCE
Before cleaning, turn off the camcorder andremove the battery pack and AC Adapter.
To clean the exterior
Wipe gently with a soft cloth. Put the cloth indiluted mild soap and wring it well to wipe offheavy dirt. Then wipe again with a dry cloth.
To clean the LCD monitorWipe gently with a soft cloth. Be careful not todamage the monitor. Close the LCD monitor.
To clean the lensBlow it with a blower brush, then wipe gentlywith lens cleaning paper.
To clean the viewfinder lensRemove dust from the viewfinder using a blowerbrush.
NOTES: Avoid using strong cleaning agents such as
benzine or alcohol. Cleaning should be done only after the battery
pack has been removed or other power units havebeen disconnected.
Mold may form if the lens is left dirty.When using a cleaner or chemically treated cloth
refer to the cautions of each product. To clean the viewfinder, please consult your
nearest JVC dealer.
Cleaning The Camcorder
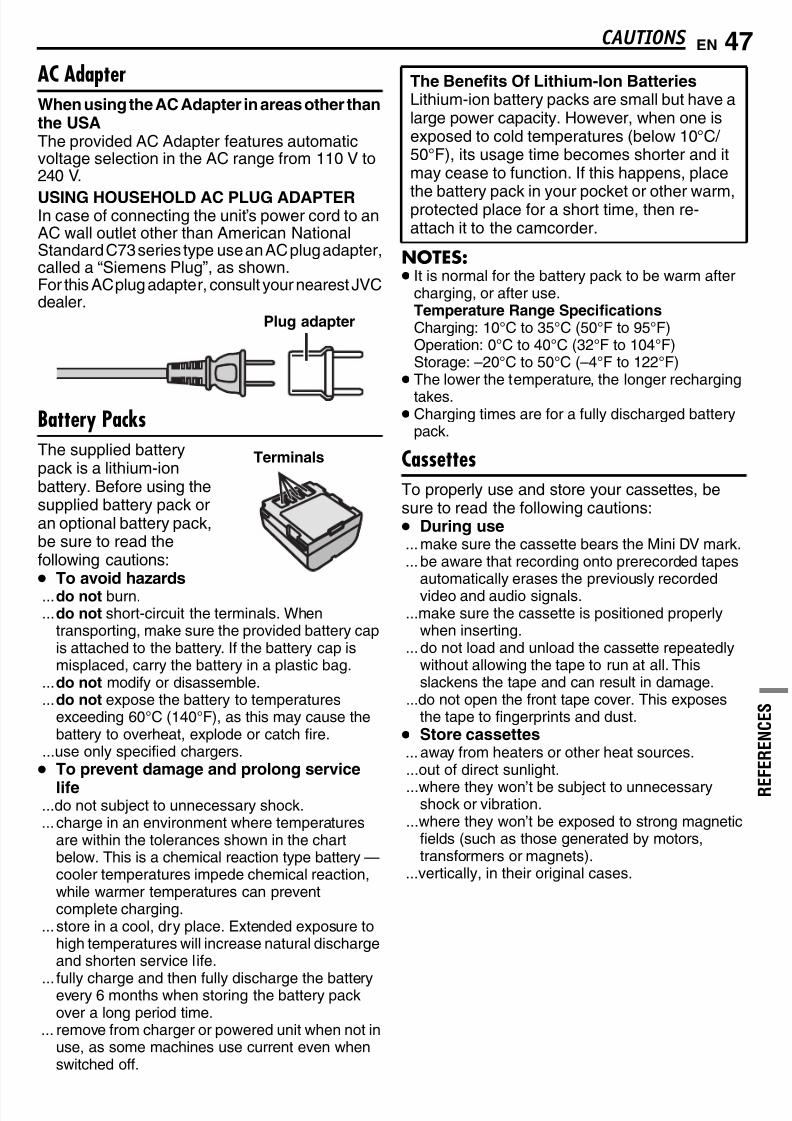
7/17/2019 Manual for JVC camcorder
http://slidepdf.com/reader/full/manual-for-jvc-camcorder 47/104
EN 47
R E
F E R E N C E S
CAUTIONS
AC AdapterWhen using the AC Adapter in areas other thanthe USAThe provided AC Adapter features automaticvoltage selection in the AC range from 110 V to240 V.
USING HOUSEHOLD AC PLUG ADAPTERIn case of connecting the unit’s power cord to anAC wall outlet other than American NationalStandard C73 series type use an AC plug adapter,called a “Siemens Plug”, as shown.For this AC plug adapter, consult your nearest JVCdealer.
Battery PacksThe supplied batterypack is a lithium-ionbattery. Before using thesupplied battery pack oran optional battery pack,be sure to read thefollowing cautions:
To avoid hazards ...do not burn. ...do not short-circuit the terminals. When
transporting, make sure the provided battery capis attached to the battery. If the battery cap ismisplaced, carry the battery in a plastic bag.
...do not modify or disassemble. ...do not expose the battery to temperatures
exceeding 60°C (140°F), as this may cause thebattery to overheat, explode or catch fire.
...use only specified chargers. To prevent damage and prolong service
life ...do not subject to unnecessary shock. ... charge in an environment where temperatures
are within the tolerances shown in the chartbelow. This is a chemical reaction type battery — cooler temperatures impede chemical reaction,while warmer temperatures can preventcomplete charging.
... store in a cool, dry place. Extended exposure tohigh temperatures will increase natural dischargeand shorten service life.
... fully charge and then fully discharge the batteryevery 6 months when storing the battery packover a long period time.
... remove from charger or powered unit when not inuse, as some machines use current even whenswitched off.
NOTES: It is normal for the battery pack to be warm after
charging, or after use.Temperature Range SpecificationsCharging: 10°C to 35°C (50°F to 95°F)Operation: 0°C to 40°C (32°F to 104°F)Storage: –20°C to 50°C (–4°F to 122°F)
The lower the temperature, the longer rechargingtakes.
Charging times are for a fully discharged batterypack.
CassettesTo properly use and store your cassettes, besure to read the following cautions: During use ...make sure the cassette bears the Mini DV mark. ... be aware that recording onto prerecorded tapes
automatically erases the previously recordedvideo and audio signals. ...make sure the cassette is positioned properly
when inserting. ...do not load and unload the cassette repeatedly
without allowing the tape to run at all. Thisslackens the tape and can result in damage.
...do not open the front tape cover. This exposesthe tape to fingerprints and dust.
Store cassettes ... away from heaters or other heat sources. ...out of direct sunlight.
...where they won’t be subject to unnecessaryshock or vibration.
...where they won’t be exposed to strong magneticfields (such as those generated by motors,transformers or magnets).
...vertically, in their original cases.
Plug adapter
Terminals
The Benefits Of Lithium-Ion BatteriesLithium-ion battery packs are small but have alarge power capacity. However, when one isexposed to cold temperatures (below 10°C/50°F), its usage time becomes shorter and itmay cease to function. If this happens, place
the battery pack in your pocket or other warm,protected place for a short time, then re-attach it to the camcorder.
7/17/2019 Manual for JVC camcorder
http://slidepdf.com/reader/full/manual-for-jvc-camcorder 48/104
CAUTIONS 48 EN
Memory CardsTo properly use and store your memory cards,be sure to read the following cautions: During use ...make sure the memory card bears the SD or
MultiMediaCard mark.
...make sure the memory card is positionedproperly when inserting.
While the memory card is being accessed(during recording, playback, deletion,initialization, etc.)
... never unload the memory card and never turn offthe camcorder.
Store memory cards ... away from heaters or other heat sources. ...out of direct sunlight. ...where they won’t be subject to unnecessary
shock or vibration. ...where they won’t be exposed to strong magnetic
fields (such as those generated by motors,transformers or magnets).
LCD Monitor To prevent damage to the LCD monitor, DO
NOT ...push it strongly or apply any shocks. ... place the camcorder with the LCD monitor on the
bottom.
To prolong service life ...avoid rubbing it with coarse cloth. Be aware of the following phenomena for
LCD monitor use. These are notmalfunctions
...While using the camcorder, the surface aroundthe LCD monitor and/or the back of the LCDmonitor may heat up.
... If you leave power on for a long time, the surfacearound the LCD monitor becomes hot.
Main Unit For safety, DO NOT ...open the camcorder’s chassis. ...disassemble or modify the unit. ...short-circuit the terminals of the battery pack.
Keep it away from metallic objects when not inuse.
...allow inflammables, water or metallic objects toenter the unit.
... remove the battery pack or disconnect the powersupply while the power is on.
... leave the battery pack attached when thecamcorder is not in use.
Avoid using the unit ... in places subject to excessive humidity or dust. ... in places subject to soot or steam such as near a
cooking stove. ... in places subject to excessive shock or vibration.
...near a television set. ...near appliances generating strong magnetic or
electric fields (speakers, broadcasting antennas,etc.).
... in places subject to extremely high (over 40°C or104°F) or extremely low (under 0°C or 32°F)temperatures.
DO NOT leave the unit ...in places of over 50°C (122°F). ... in places where humidity is extremely low (below
35%) or extremely high (above 80%). ...in direct sunlight. ... in a closed car in summer. ...near a heater. To protect the unit, DO NOT ...allow it to become wet. ...drop the unit or strike it against hard objects. ... subject it to shock or excessive vibration during
transportation. ... keep the lens directed at extremely bright objectsfor long periods.
...expose the lens and viewfinder’s lens to directsunlight.
...carry it by holding the LCD monitor or theviewfinder.
...swing it excessively when using the hand strap orthe grip.
...swing the soft camera case excessively when thecamcorder is inside it.
Dirty heads can cause the followingproblems:
...No picture during playback. ...Blocks of noise appear during playback. ...During recording or playback, the Head Clog
Warning indicator “ ” appears. ...Recording cannot be performed properly.
In such cases, use an optional cleaningcassette. Insert it and play back. If the cassetteis used more than once consecutively, damageto the video heads may result. After thecamcorder plays back for about 20 seconds, itstops automatically. Also refer to the cleaningcassette’s instructions.If, after using the cleaning cassette, theproblems still exist, consult your nearest JVCdealer.Mechanical moving parts used to move thevideo heads and video tape tend to becomedirty and worn out over time. In order to maintaina clear picture at all times, periodic check-upsare recommended after using the unit for about1,000 hours. For periodic check-ups pleaseconsult your nearest JVC dealer.
7/17/2019 Manual for JVC camcorder
http://slidepdf.com/reader/full/manual-for-jvc-camcorder 49/104
EN 49CAUTIONS
R E
F E R E N C E S
How To Handle A CD-ROM Take care not to soil or scratch the mirror surface
(opposite to the printed surface). Do not writeanything or put a sticker on either the front or backsurface. If the CD-ROM gets dirty, gently wipe itwith a soft cloth outward from the center hole.
Do not use conventional disc cleaners or cleaningspray.
Do not bend the CD-ROM or touch its mirrorsurface.
Do not store your CD-ROM in a dusty, hot orhumid environment. Keep it away from directsunlight.
Serious malfunctioning
About moisture condensation You have observed that pouring a cold liquid
into a glass will cause drops of water to form onthe glass’ outer surface. This same
phenomenon occurs on the head drum of acamcorder when it is moved from a cool placeto a warm place, after heating a cold room,under extremely humid conditions or in a placedirectly subjected to the cool air from an airconditioner.
Moisture on the head drum can cause severedamage to the video tape, and can lead tointernal damage to the camcorder itself.
If malfunctioning occurs, stop using the unitimmediately and consult your local JVCdealer.
The camcorder is a microcomputer-controlleddevice. External noise and interference (froma TV, a radio, etc.) might prevent it fromfunctioning properly. In such cases, firstdisconnect its power supply unit (battery pack,AC Adapter, etc.) and wait a few minutes and
then re-connect it and proceed as usual fromthe beginning.
Declaration of ConformityModel Number : GR-D370UTrade Name : JVCResponsible party : JVC AMERICAS
CORP.Address : 1700 Valley Road
Wayne, N. J. 07470Telephone Number : 973-317–5000This device complies with Part 15 of FCCRules. Operation is subject to the followingtwo conditions: (1) This device may not causeharmful interference, and (2) this device mustaccept any interference received, includinginterference that may cause undesiredoperation.
Changes or modifications not approved byJVC could void the user’s authority to operatethe equipment. This equipment has beentested and found to comply with the limits for aClass B digital device, pursuant to Part 15 ofthe FCC Rules. These limits are designed toprovide reasonable protection against harmfulinterference in a residential installation. Thisequipment generates, uses, and can radiateradio frequency energy and, if not installedand used in accordance with the instructions,
may cause harmful interference to radiocommunications. However, there is noguarantee that interference will not occur in aparticular installation. If this equipment doescause harmful interference to radio ortelevision reception, which can be determinedby turning the equipment off and on, the useris encouraged to try to correct the interferenceby one or more of the following measures:
Reorient or relocate the receiving antenna.Increase the separation between the
equipment and receiver.Connect the equipment into an outlet on acircuit different from that to which thereceiver is connected.Consult the dealer or an experienced radio/TV technician for help.
This Class B digital apparatus complies withCanadian ICES-003.Cet appareil numérique de la classe B est
conforme à la norme NMB-003 du Canada.
7/17/2019 Manual for JVC camcorder
http://slidepdf.com/reader/full/manual-for-jvc-camcorder 50/104
50 EN SPECIFICATIONS
Camcorder
Power supplyDC 11 V (Using AC Adapter)DC 7.2 V (Using battery pack)
Power consumptionApprox. 2.8 W (3.0 W*) (LCD monitor off, viewfinderon)Approx. 3.2 W (3.4 W*) (LCD monitor on, viewfinderoff)Approx. 6.5 W (Maximum; when charging thebattery pack)* Using LED LightDimensions (W x H x D)59 mm x 94 mm x 114 mm (2-5/16" x 3-11/16" x4-1/2") (with the LCD monitor closed and theviewfinder pushed back in)WeightApprox. 400 g (0.88 lbs) (without battery, cassetteand lens cap)Approx. 480 g (1.06 lbs) (incl. battery, cassette andlens cap)Operating temperature0°C to 40°C (32°F to 104°F)Operating humidity35% to 80%Storage temperature–20°C to 50°C (–4°F to 122°F)
Pickup1/6" CCDLensF 2.0, f = 2.3 mm to 73.6 mm, 32:1 power zoom lensFilter diameterø27 mmLCD monitor2.5" diagonally measured, LCD panel/TFT activematrix systemViewfinderElectronic viewfinder with 0.33" color LCD
SpeakerMonauralLED LightEffective distance: 1.5 m (5 ft)
FormatDV format (SD mode)Signal formatNTSC standardRecording/Playback format
Video: Digital component recordingAudio: PCM digital recording, 32 kHz 4-channel(12-BIT), 48 kHz 2-channel (16-BIT)CassetteMini DV cassetteTape speedSP: 18.8 mm/s, LP: 12.5 mm/sMaximum recording time (using 80 min.cassette)SP: 80 min., LP: 120 min.
Storage mediaSD Memory Card/MultiMediaCardCompression systemJPEG (compatible)File sizeStill image:1 mode (640 x 480 pixels)Picture quality2 modes (FINE/STANDARD)Approximate number of storable images pg. 24
AVVideo output: 1.0 V (p-p), 75 Ω, analogAudio output: 300 mV (rms), 1 kΩ, analog, stereoDVInput/output: 4-pin, IEEE1394 compliantUSBMini USB-B type, USB 1.1 compliant
AC Adapter
Power requirementAC 110 V to 240 V~, 50 Hz/60 HzOutputDC 11 V=, 1 A
Specifications shown are for SP mode unlessotherwise indicated. E & O.E. Design andspecifications subject to change without notice.
For General
For Digital Video Camera
For Digital Still Camera
For Connectors
7/17/2019 Manual for JVC camcorder
http://slidepdf.com/reader/full/manual-for-jvc-camcorder 51/104
EN 51
T E R M S
TERMS
AAC Adapter .................................................... 14
BBacklight Compensation ................................ 36Battery Pack ...................................... 13, 14, 47Blank Search ................................................. 22
CChanging The Menu Settings ................ 29 – 32Charging The Battery Pack ........................... 13Connection To A Personal Computer ............ 41Connections To A TV Or VCR ....................... 23
DData Battery ................................................... 14Date/Time Settings ........................................ 16Deleting Files .................................................27Demonstration Mode ..................................... 32Digital Image Stabilization (DIS) .................... 30DPOF Setting
(Digital Print Order Format) .............. 27, 28Dubbing ................................................... 39, 40
EExposure Control ........................................... 35
IInitializing A Memory Card ............................. 28
Iris Lock ......................................................... 35
LLCD Monitor and Viewfinder .................... 15, 19LED Light .......................................................33Live Slow ....................................................... 33Loading A Cassette ....................................... 18Loading A Memory Card ................................ 18
MManual Focus ................................................ 34
Memory Card ................................................. 18Motor Drive Mode .......................................... 34
NNight-Alive .....................................................33
PPicture Quality ...............................................32Playback Sound .............................................32Power-Linked Operation ................................ 15Program AE, Effects and Shutter Effects .......38
QQuick Review ................................................. 21
RRecording Capacity
Memory Card .......................................... 24Tape ........................................................19
Recording Media Selection ............................ 32Resetting The File Name ............................... 26
SSnapshot Mode .............................................. 34Sound Mode ............................................30, 32Speaker Volume ............................................ 21Specifications .................................................50Spot Exposure Control ................................... 36
TTape Speed (REC MODE) ............................ 30Tele Macro ..................................................... 30
Time Code ..................................................... 20Tripod Mounting ............................................. 17Troubleshooting ........................................42-45
WWarning Indications ....................................... 44White Balance ................................................ 36Wide Mode ..................................................... 33Wipe Or Fader Effects ...................................37
Z
Zooming ......................................................... 20

7/17/2019 Manual for JVC camcorder
http://slidepdf.com/reader/full/manual-for-jvc-camcorder 52/104
EN
USPrinted in Malaysia0206ASR-NF-VM © 2006 Victor Company of Japan, Limited
GR- D 3
7 0 U
7/17/2019 Manual for JVC camcorder
http://slidepdf.com/reader/full/manual-for-jvc-camcorder 53/104
ESPAÑOL
GR-D370U
LYT1522-001C SP
TÉRMINOS
Estimado cliente:Gracias por comprar estavideocámara digital. Antes de usarla,lea la información de seguridad y lasprecauciones contenidas en laspáginas 2 – 5 para garantizar un usoseguro de este producto.
Por favor, visite nuestra página en Internet para cámara devídeo digital:
Para accesorios:
http://www.jvc.co.jp/english/cyber/
http://www.jvc.co.jp/english/accessory/
MANUAL DE INSTRUCCIONES
VIDEOCÁMARA DIGITALPREPARATIVOS 8
GRABACIÓN YREPRODUCCIÓN DE VÍDEO 19
GRABACIÓN Y REPRODUCCIÓNDE CÁMARA FIJA DIGITAL(DSC) 24
FUNCIONES AVANZADAS
29
REFERENCIAS 42
51
Para desactivar la demostración,ajuste “MODO DEMO” en “OFF”.( p. 29, 32)
7/17/2019 Manual for JVC camcorder
http://slidepdf.com/reader/full/manual-for-jvc-camcorder 54/104
2 ES
Antes de grabar vídeos importantes asegúresede efectuar una grabación de prueba.Reproduzca su grabación de prueba paraasegurarse de que el vídeo y el audio se hangrabado como es debido.
Recomendamos limpiar los cabezales del vídeoantes de usarlo.Si no se ha utilizado lavideocámara durante untiempo, los cabezalespueden estar sucios.Recomendamos limpiarperiódicamente loscabezales de vídeo conuna cinta de limpieza(opcional).
Asegúrese de guardar las cintas y lavideocámara en el lugar apropiado.Los cabezales de vídeo se pueden ensuciar másfácilmente si las cintas y la videocámara seguardan en entornos polvorientos. Las cintasdeben extraerse de la videocámara y guardarseen sus carcasas respectivas. Guarde lavideocámara en una bolsa o en algún otrocontenedor.
Use el modo SP (Reproducción estándar) paragrabaciones de vídeo importantes.El modo LP (Larga reproducción) le permitegrabar un 50% de vídeo más que el modo SP
(Reproducción estándar), pero es posible que seobserven perturbaciones en forma de mosaicodurante la reproducción, dependiendo de lascaracterísticas de la cinta y de las condiciones deuso.De modo que para grabaciones importantes,recomendamos usar el modo SP.
Para seguridad y fiabilidad.Se recomiendan sólo auténticas pilas JVC y losaccesorios que son utilizados en esta videocámara.
Este producto incluye tecnología patentada yotras tecnologías privadas, y sólo funciona con
batería de datos JVC. Utilice las bateríasrecargables JVC BN-VF707U/VF714U/VF733UJVC. El uso de baterías genéricas que no seanJVC puede ocasionar daños en el circuito decarga interno.
Esta videocámara está diseñada exclusivamentepara cassettes de video digital, tarjetas dememoria SD y tarjetas MultiMediaCard.Solamente cassettes de marca “ ” y tarjetasde memoria de marca “ ” o“ ” pueden ser utilizadas con estaunidad.
Recuerde que la videocámara es para usuariosprivados exclusivamente.Está prohibido cualquier uso comercial sin laautorización correspondiente. (Aunque grabeeventos tales como espectáculos, o exhibicionespara entretenimiento personal, se recomiendaespecialmente que obtenga autorización previa.)
NO deje el aparato- en lugares con más de 50°C.- en lugares con humedad extremadamente baja
(inferior al 35%) o extremadamente alta(superior al 80%).
- bajo luz solar directa.- en un coche cerrado en verano.- cerca de una calefacción.
El monitor LCD está hecho con tecnología de alta
precisión. Sin embargo, las manchas oscuras oclaras de luz (rojo, verde o azul) pueden aparecerconstantemente sobre el monitor LCD. Estasmanchas no quedan registradas en la cinta. Estono es debido a un defecto de la unidad. (Puntoseficaces: más del 99,99%)
No deje las baterías puestas cuando no se estéutilizando la videocámara y compruebe la unidadregularmente por si está en funcionamiento o no.
¡Lea primero esto!
7/17/2019 Manual for JVC camcorder
http://slidepdf.com/reader/full/manual-for-jvc-camcorder 55/104
ES 3PRECAUCIONES DE SEGURIDAD
ADVERTENCIA: PARA EVITAR RIESGO DEINCENDIOS O ELECTROCUCIONES, NOEXPONGA ESTE APARATO A LA LLUVIA OHUMEDAD.
PRECAUCIONES: Esta videocámara está diseñada para ser
utilizada con señales de televisión en color tipoNTSC. No puede emplearse para reproducir enun televisor de otra norma. Sin embargo, sonposibles grabar en vivo y reproducir en elmonitor LCD o el visor en cualquier lugar.
Este producto incluye tecnología patentada yotras tecnologías privadas, y sólo funciona conbatería de datos JVC. Utilice las bateríasrecargables BN-VF707U/VF714U/VF733UJVC y, para recargarlas o para suministraralimentación a la videocámara desde untomacorriente de CA, utilice el adaptador deCA de multivoltaje suministrado. (Posiblementesea necesario un adaptador de conversiónapropiado que se adecúe al tipo de toma decorriente de su país.)
Este producto contiene una batería de litio CR detipo botón que contiene perclorato (puederequerirse una manipulación especial).Visite www.dtsc.ca.gov/hazardouswaste/ perchlorate
NOTAS: La placa indicadora (placa del número de
serie) y la precaución de seguridad están en laparte inferior y/o en la parte trasera de launidad principal.
La información del valor nominal y lasprecauciones de seguridad del adaptador deCA están en la parte superior e inferior delmismo.
Cuando el equipo se encuentra instalado en ungabinete o en un estante, asegúrese que tengasuficiente espacio en todos los lados parapermitir la ventilación (10 cm o más en cada lado,en la parte superior y en la parte trasera).No bloquee los orificios de ventilación.(Si los orificios de ventilación están bloqueados
por un periódico, o paño, etc., el calor no podrásalir.)Ningúna fuente de llama sin protección, talescomo velas encendidas, deberá ser colocada enel aparato.Cuando descarte las pilas, deberá considerar losproblemas ambientales y respetar estrictamentelas normas locales o leyes vigentes para laeliminación de estas pilas.La unidad no deberá ser expuesta a goteos nisalpicaduras.
No use esta unidad en un cuarto de baño o enlugares con agua.Tampoco no coloque ningún envase lleno deagua o líquidos (tales como cosméticos omedicinas, floreros, macetas, vasos, etc.) en laparte superior de la unidad.(Si penetra agua o líquidos en la unidad, podráproducirse electrocuciones o incendios.)
No apunte el objetivo o el visor directamentehacia el sol. Esto puede causarle lesiones en losojos así como también fallas en los circuitos
internos de la cámara. Esto también puedeproducir riesgo de incendio o de choque eléctrico.¡PRECAUCI N!Las siguientes notas indican posibles daños a lacámara de video o lesiones al usuario.Cuando transporte la cámara de video asegúresede colocar y utilizar la correa suministrada. Eltransportar o sostener la videocámara por el visory/o el monitor LCD puede resultar en la caída oen fallas de la unidad.Tome precauciones para no atraparse los dedosen la cubierta del portacassette. No permita quelos niños operen la videocámara, ya que ellosson particularmente susceptibles a este tipo deaccidente.No utilice el trípode sobre superficies inestables odesniveladas ya que la videocámara puedecaerse, produciendo graves daños a la misma.¡PRECAUCI N!Evite conectar los cables (audio/video, S-video,etc.) a la videocámara y dejar la unidad sobre elTV, ya que el tropezar con uno de los cablespuede derribar la videocámara resultando éstadañada.
7/17/2019 Manual for JVC camcorder
http://slidepdf.com/reader/full/manual-for-jvc-camcorder 56/104
4 ES
INSTRUCCIONES IMPORTANTES DESEGURIDAD1. Lea estas instrucciones.2. Conserve estas instrucciones.3. Preste atención a las advertencias.4. Siga todas las instrucciones.
5. No utilice este aparato cerca del agua.6. Limpie sólo con paño seco.7. No bloquee ninguna abertura de ventilación.
Instale de acuerdo con las instrucciones delfabricante.
8. No lo instale cerca de ninguna fuente de calortales como, radiadores, calefactores, cocinas, uotros aparatos (incluyendo amplificadores) queproduzcan calor.
9. Sólo utilice dispositivos/accesoriosespecificados por el fabricante.
10. Utilice sólo con lacarretilla, estante,trípode, soporte omesa especificadopor el fabricante ovendido con elaparato. Cuandoutilice una carretilla,sea cauteloso almover el conjunto decarretilla/aparato para evitar lesiones
provocadas por caídas.11. Desenchufe este aparato durante estruendosde relámpagos o cuando esté fuera de uso porlargo tiempo.
12. Refiera toda reparación a personal de serviciocalificado. Se requiere de reparación cuando elaparato ha sido dañado de alguna manera, porejemplo, si el cable o enchufe de alimentaciónestá dañado, si ocurrió derrame de líquidos ocaída de objetos dentro del aparato, si elaparato fue expuesto a la lluvia o humedad, sino funciona normalmente, o sufrió caídas.
7/17/2019 Manual for JVC camcorder
http://slidepdf.com/reader/full/manual-for-jvc-camcorder 57/104
ES 5Antes de usar esta videocámaraAsegúrese de utilizar cassettes con la marca
exclusivamente.Asegúrese de utilizar solamente tarjetas dememoria que llevan esta marca o
.
Esta videocámara está diseñada exclusivamentepara cassettes de video digital, tarjetas de memoriaSD y tarjetas MultiMediaCard. Solamente cassettesde marca “ ” y tarjetas de memoria de marca“ ” o “ ” pueden ser utilizadascon esta unidad.
Recuerde que la videocámara no es compatiblecon otros formatos de video digital.Recuerde que la videocámara es para usuariosprivados exclusivamente.Está prohibido cualquier uso comercial sin laautorización correspondiente. (Aunque grabeeventos tales como espectáculos, o exhibicionespara entretenimiento personal, se recomiendaespecialmente que obtenga autorización previa.)
Antes de grabar vídeos importantes asegúresede efectuar una grabación de prueba.Reproduzca su grabación de prueba paraasegurarse de que el vídeo y el audio se hangrabado como es debido.
Recomendamos limpiar los cabezales del vídeoantes de usarlo.Si no se ha utilizado la videocámara durante un
tiempo, los cabezales pueden estar sucios.Recomendamos limpiar periódicamente loscabezales de vídeo con una cinta de limpieza(opcional).
Asegúrese de guardar las cintas y lavideocámara en el lugar apropiado.Los cabezales de vídeo se pueden ensuciar másfácilmente si las cintas y la videocámara seguardan en entornos polvorientos. Las cintas debenextraerse de la videocámara y guardarse en suscarcasas respectivas. Guarde la videocámara enuna bolsa o en algún otro contenedor.
Use el modo SP (Reproducción estándar) paragrabaciones de vídeo importantes.El modo LP (Larga reproducción) le permite grabarun 50% de vídeo más que el modo SP (Reproducciónestándar), pero es posible que se observenperturbaciones en forma de mosaico durante lareproducción, dependiendo de las características dela cinta y de las condiciones de uso.De modo que para grabaciones importantes,recomendamos usar el modo SP.
Se recomienda utilizar cintas de la marca JVC.
Su videocámara es compatible con todas lasmarcas de cintas disponibles en el mercado yhomologadas conforme al estándar MiniDV, perolas cintas de la marca JVC han sido diseñadas paraoptimizar el funcionamiento de su videocámara.
Lea también “PRECAUCIONES” en las páginas47 – 49.
Microsoft® y Windows® son marcas comercialesregistradas o marcas comerciales de MicrosoftCorporation en los Estados Unidos y/o en otrospaíses.
Macintosh es una marca registrada de AppleComputer.
QuickTime es una marca registrada de Apple
Computer.
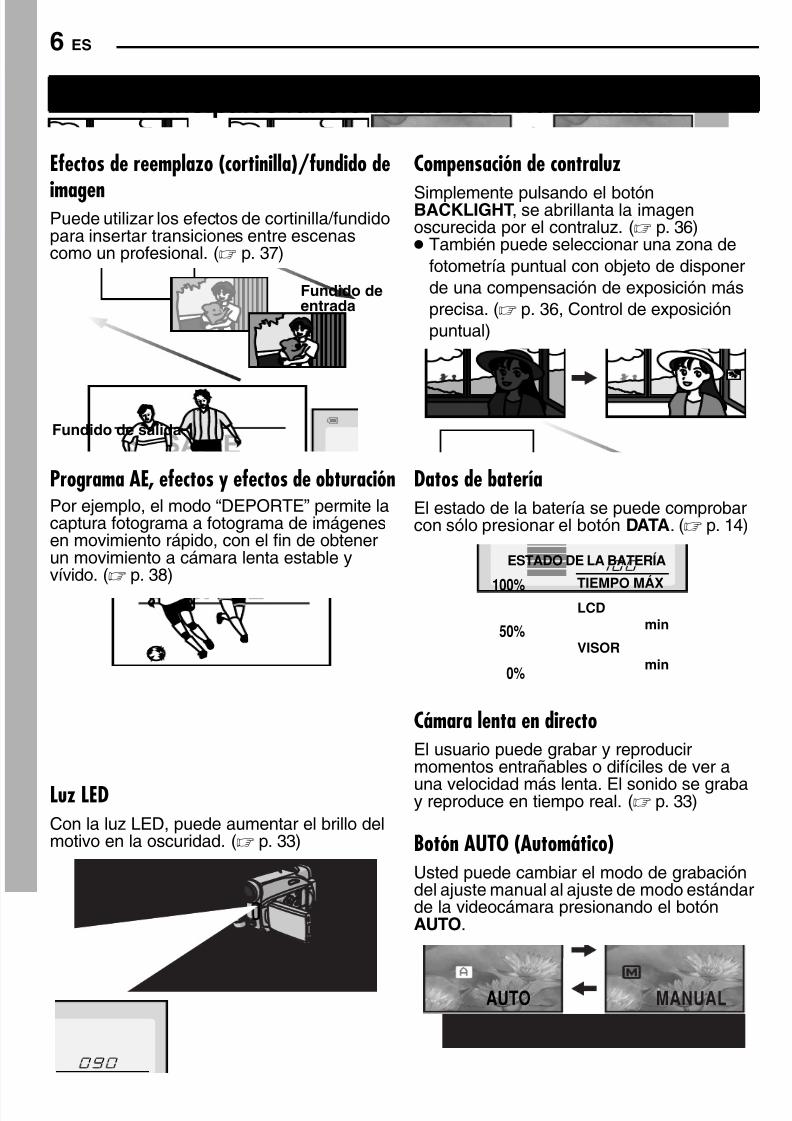
7/17/2019 Manual for JVC camcorder
http://slidepdf.com/reader/full/manual-for-jvc-camcorder 58/104
6 ES
Efectos de reemplazo (cortinilla)/fundido de
imagenPuede utilizar los efectos de cortinilla/fundidopara insertar transiciones entre escenascomo un profesional. ( p. 37)
Programa AE, efectos y efectos de obturaciónPor ejemplo, el modo “DEPORTE” permite lacaptura fotograma a fotograma de imágenesen movimiento rápido, con el fin de obtenerun movimiento a cámara lenta estable yvívido. ( p. 38)
Luz LEDCon la luz LED, puede aumentar el brillo delmotivo en la oscuridad. ( p. 33)
Compensación de contraluz
Simplemente pulsando el botónBACKLIGHT, se abrillanta la imagenoscurecida por el contraluz. ( p. 36) También puede seleccionar una zona de
fotometría puntual con objeto de disponerde una compensación de exposición másprecisa. ( p. 36, Control de exposiciónpuntual)
Datos de bateríaEl estado de la batería se puede comprobarcon sólo presionar el botón DATA. ( p. 14)
Cámara lenta en directoEl usuario puede grabar y reproducirmomentos entrañables o difíciles de ver a
una velocidad más lenta. El sonido se grabay reproduce en tiempo real. ( p. 33)
Botón AUTO (Automático)Usted puede cambiar el modo de grabacióndel ajuste manual al ajuste de modo estándarde la videocámara presionando el botónAUTO.
Principales funciones de esta videocámara
Fundido deentrada
Fundido de salida
TIEMPO MÁXLCD
min
min
VISOR
100%
50%
0%
ESTADO DE LA BATERÍA
MANUALAUTO
7/17/2019 Manual for JVC camcorder
http://slidepdf.com/reader/full/manual-for-jvc-camcorder 59/104
ES 7CONTENIDO
PREPARATIVOS 8Índice ................................................................8Accesorios suministrados............................... 12Alimentación................................................... 13Modo de funcionamiento ................................ 15Configuración de idioma................................. 16
Ajustes de fecha/hora..................................... 16Ajuste de la empuñadura................................ 16Ajuste del visor ............................................... 17Ajuste de brillo de la pantalla.......................... 17Soporte del trípode ......................................... 17Carga/descarga de una cinta ......................... 18Carga/descarga de una tarjeta de memoria ... 18
GRABACIÓN Y REPRODUCCIÓN DE VÍDEO 19GRABACIÓN DE VÍDEO ...................................... 19Grabación básica............................................ 19
Tiempo restante de cinta ............................ 19Monitor LCD y visor .................................... 19Zoom ..........................................................20Filmación periodística................................. 20Código de tiempo ....................................... 20Revisión rápida........................................... 21Grabación desde un punto intermedio de unacinta ............................................................21
REPRODUCCIÓN DE VÍDEO ................................ 21
Reproducción normal ..................................... 21Reproducción de imagen fija ...................... 21Búsqueda rápida ........................................ 22Búsqueda de partes en blanco................... 22
Conexiones a un televisor o una grabadora devídeo ............................................................. 23
GRABACIÓN Y REPRODUCCIÓN DE CÁMARAFIJA DIGITAL (DSC) 24GRABACIÓN DSC...............................................24Fotografiado básico (Fotografiado DSC)........ 24REPRODUCCIÓN DSC......................................... 24Reproducción normal de las imágenes .......... 24Reproducción automática de las imágenes.... 25Reproducción de índice de archivos .............. 25Supresión de la pantalla OSD (Información en
pantalla)......................................................25OTRAS FUNCIONES DE LA CÁMARA FIJA DIGITAL ..26Restauración del nombre de archivo.............. 26Protección de archivos ................................... 26
Eliminar archivos ............................................ 27Ajuste de información de impresión (ajusteDPOF) ........................................................27
Inicializar una tarjeta de memoria................... 28
FUNCIONES AVANZADAS 29MENÚS PARA UN AJUSTE DETALLADO................29Cambiar las configuraciones de menú ........... 29Menús de grabación .......................................30Menús de reproducción ..................................32FUNCIONES DE GRABACIÓN...............................33Luz LED..........................................................33Cámara lenta en directo ................................. 33Modo Ancho....................................................33Filmación nocturna .........................................33Fotografiado (Para grabaciones de vídeo) ..... 34Enfoque manual..............................................34Control de exposición .....................................35Bloqueo del diafragma....................................35Compensación de contraluz ........................... 36Control de exposición puntual ........................ 36
Ajuste del balance del blanco ......................... 36Ajuste manual del balance del blanco ............ 37Efectos de reemplazo (cortinilla) o fundido de im-
agen............................................................37Programa AE, efectos y efectos de obtu-
ración ..................................................38EDICIÓN ...........................................................39Copia en grabadora de vídeo ......................... 39Copia en o desde un aparato de vídeo equipado
con un conector DV (Copia digital) ............. 40Conexión a un PC...........................................41
REFERENCIAS 42SOLUCIÓN DE PROBLEMAS ................................42MANTENIMIENTO DEL USUARIO ........................46PRECAUCIONES.................................................47ESPECIFICACIONES ............................................50
TÉRMINOS 51
7/17/2019 Manual for JVC camcorder
http://slidepdf.com/reader/full/manual-for-jvc-camcorder 60/104
8 ES PREPARATIVOS
Índice
16:9

7/17/2019 Manual for JVC camcorder
http://slidepdf.com/reader/full/manual-for-jvc-camcorder 61/104
ES 9PREPARATIVOS
P
R E P A R A T I V O S
Controles1Botón de rebobinado [1] ( p. 21)
Botón Izquierda [1]Botón de revisión rápida [QUICK REVIEW]( p. 21)
2Botón de ajuste [SET] ( p. 16)
Botón de datos de batería [DATA] (
p. 14)3Botón de parada [7] ( p. 21)Botón de bajar [4]Botón de compensación de contraluz[BACKLIGHT]
4Interruptor VIDEO/MEMORY ( p. 15)5Botón de reproducción/pausa [6] ( p. 21)
Botón de subir [3]Botón de enfoque manual [FOCUS] ( p. 34)
6Botón de selección de ancho 16:9 [16.9]( p. 33)
Búsqueda de partes en blanco [BLANK]( p. 22)7Botón de menú [MENU] ( p. 29)8Botón de avance rápido [¡] ( p. 21)
Botón Derecha [2]Botón de noche [NIGHT] ( p. 33)
9Botón de índice [INDEX] ( p. 25)Botón de luz LED [LIGHT]
!Control de ajuste de dioptría ( p. 17)"Botón de automático [AUTO] ( p. 13)#Botón de fotografiado [SNAPSHOT]
( p. 24, 34)Botón de cámara lenta en directo( p. 29, 33)
$Palanca del zoom motorizado [T/W] ( p. 20)Control del volumen del altavoz [VOL. +, –]( p. 21)
%Botón de liberación de la batería[PUSH BATT.] ( p. 13)
&Botón de inicio/parada de grabación ( p. 19)(Interruptor de alimentación
[REC, PLAY, OFF] ( p. 15)
)Botón de bloqueo ( p. 15)~Interruptor de abrir/expulsar cinta[OPEN/EJECT] ( p. 18)
ConectoresLos conectores están situados junto a las tapas.+Conector USB (Bus Serial Universal)
( p. 41),Conector de vídeo digital [DV IN/OUT]
(i.LINK*) ( p. 40, 41)* i.LINK se refiere a la especificación industrial
IEEE1394-1995 y extensiones correspondientes.El logotipo se utiliza para productoscompatibles con la norma i.LINK.
-Conector de salida de Audio/Vídeo [AV]( p. 23, 39)
.Conector de entrada de CC [DC] ( p. 13)
Indicadores ç Lámpara POWER/CHARGE ( p. 13, 19)
Otras piezas é
Monitor LCD ( p. 19, 20) è
Visor ( p. 17) ê
Tapa de la tarjeta [ ] ( p. 18) ë
Montura de batería ( p. 13) í
Ojal de correa hombrera ( p. 12) ì Correa de empuñadura ( p. 16) î
Altavoz ( p. 21) ï Objetivo ñ
Luz LED ó
Sensor de cámara(Tenga cuidado para no tapar esta zona, quelleva incorporado un sensor necesario paralas tomas.)
ò Micrófono estereofónico ô
Agujero para tornillo ( p. 17) ö Zócalo de fijación del trípode ( p. 17) õ
Tapa del portacintas ( p. 18) ú Ranura de la Tarjeta de Memoria
7/17/2019 Manual for JVC camcorder
http://slidepdf.com/reader/full/manual-for-jvc-camcorder 62/104
PREPARATIVOS 10 ES
Indicaciones de Monitor LCD/VisorDurante la grabación de vídeo solamente
1Indicador de cinta en funcionamiento (
p. 19)(Gira mientras la cinta está funcionando.)2Indicador de modo “Wide” (Ancho)
seleccionado ( p. 33)3 : Indicador de cámara lenta en directo
( p. 33)4Indicador de modo de velocidad de grabación
(SP/LP) ( p. 30)(Sólo el indicador de LP es mostrado)
5Tiempo restante de cinta ( p. 19)6REC: (Aparece durante la grabación.) ( p. 19)
$PAUSE: (Aparece durante modo de espera degrabación.) ( p. 19)SLOW: (Aparece cuando se usa la cámaralenta en directo.) ( p. 33)
1Indicador de efecto de cortinilla/fundido deimagen seleccionado ( p. 37)
2Fecha/hora ( p. 31)3Código de tiempo ( p. 31, 32)!Estabilizador de imagen digital (“DIS”) ( p. 30)"AUDIO 12BIT/16BIT: Indicador de modo de
sonido ( p. 30) (Aparece durante unos 5
segundos después de encender lavideocámara.)
Durante la grabación DSC solamente
1Tamaño de imagen: 640 (640 x 480) (
p. 32)2Calidad de imagen: (FINA) y(ESTÁNDAR) (por orden de calidad) ( p. 32)
3Número restante de tomas ( p. 24)(Muestra el número aproximado de tomasrestantes que se pueden guardar durante lagrabación de cámara fija digital.)
Durante la grabación de vídeo y durantegrabación DSC
1Indicador de energía restante de la batería
(
p. 44)2Modo de funcionamiento ( p. 15) A : Modo automático M
: Modo manual3Indicador de luz LED ( p. 33)4 : Indicador de filmación nocturna ( p. 33)
: Modo de ganancia de luz ( p. 31)5Velocidad del obturador6Indicador de balance del blanco ( p. 36)7Indicador de Efectos Seleccionados8Indicador del Programa AE Seleccionado
( p. 38)9Porcentaje aproximado del zoom ( p. 20)!Indicador de zoom ( p. 20)"Icono de toma de imágenes ( p. 24)
(Aparece y parpadea durante la toma deimágenes.)
#Icono de tarjeta ( p. 24): Aparece durante la toma de imágenes.: Parpadea en blanco cuando no hay una
tarjeta de memoria cargada.: Parpadea en amarillo mientras la
videocámara lee datos de la tarjeta dememoria.$PHOTO: (Aparece cuando se está haciendo
una fotografía.) ( p. 24, 34): Indicador de control de exposición
puntual ( p. 36): Indicador de compensación de contraluz
( p. 36)±: Indicador de ajuste de exposición ( p. 35)Indicador de bloqueo del diafragma ( p. 35)
&Indicador de reducción de viento
(Fecha ( p. 16))Indicador de ajuste de enfoque manual
( p. 34)
LP
WH
AUDIO 12BIT
– – –min16:9
!
9 8
1 2 3 5
6
7
4
"
C 0:6
1 1.32
A
0M
6
E D15:55
PAUSE
1.
51640
32
7/17/2019 Manual for JVC camcorder
http://slidepdf.com/reader/full/manual-for-jvc-camcorder 63/104
ES 11PREPARATIVOS
P
R E P A R A T I V O S
Durante la reproducción de vídeo
1Indicador de energía restante de la batería( p. 44)
2Indicador de modo de sonido ( p. 32)3Indicador de búsqueda de partes en blanco( p. 22)
4Velocidad de la cinta (SP/LP) ( p. 32)(Sólo el indicador de LP es mostrado)
53: Reproducción¡: Avance rápido/búsqueda rápida haciaadelante1: Rebobinado/búsqueda rápida hacia atrás8: Pausa8 3: Reproduccion fotograma por fotograma/
cámara lenta hacia adelante2 8: Reproduccion fotograma por fotograma/ cámara lenta hacia atrás
6Fecha/hora ( p. 32)7VOLUMEN: Indicador de nivel de volumen
( p. 21)BRILLO: Indicador de control de brillo(monitor LCD/visor) ( p. 17)
8Código de tiempo ( p. 32)
Durante la reproducción DSC
1Número de carpeta y archivo ( p. 25)2Indicador de modo de funcionamiento
( p. 25)3Indicador de control de brillo (monitor LCD/
visor) ( p. 17)
1
L
2
2
0
:
D
E
C
1
.
1 1
.
3
20
A
0
M
6
:
62 : 25
678
LP
VOLUMEN
1
BITS/MEZCLA
BÚS.BLANCOPULSE BOTÓN "STOP"
PARA CANCELAR
21 3 4 5
100-0013
1
3 2
BRILLO
– 5
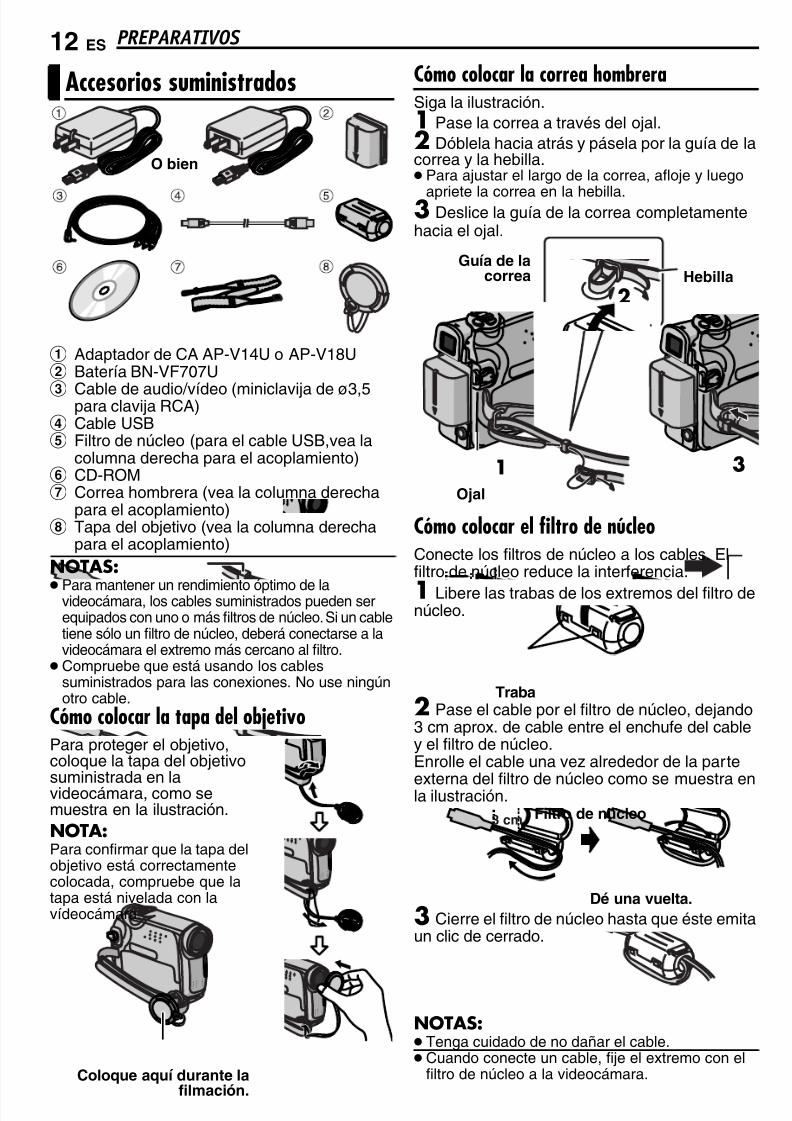
7/17/2019 Manual for JVC camcorder
http://slidepdf.com/reader/full/manual-for-jvc-camcorder 64/104
PREPARATIVOS 12 ES
1 Adaptador de CA AP-V14U o AP-V18U2 Batería BN-VF707U
3 Cable de audio/vídeo (miniclavija de ø3,5para clavija RCA)4 Cable USB5 Filtro de núcleo (para el cable USB,vea la
columna derecha para el acoplamiento)6 CD-ROM7 Correa hombrera (vea la columna derecha
para el acoplamiento)8 Tapa del objetivo (vea la columna derecha
para el acoplamiento)NOTAS: Para mantener un rendimiento óptimo de lavideocámara, los cables suministrados pueden ser
equipados con uno o más filtros de núcleo. Si un cabletiene sólo un filtro de núcleo, deberá conectarse a lavideocámara el extremo más cercano al filtro.
Compruebe que está usando los cablessuministrados para las conexiones. No use ningúnotro cable.
Cómo colocar la tapa del objetivoPara proteger el objetivo,coloque la tapa del objetivo
suministrada en lavideocámara, como semuestra en la ilustración.NOTA:Para confirmar que la tapa delobjetivo está correctamentecolocada, compruebe que latapa está nivelada con lavídeocámara.
Cómo colocar la correa hombreraSiga la ilustración.1 Pase la correa a través del ojal.2 Dóblela hacia atrás y pásela por la guía de lacorrea y la hebilla. Para ajustar el largo de la correa, afloje y luego
apriete la correa en la hebilla.3 Deslice la guía de la correa completamentehacia el ojal.
Cómo colocar el filtro de núcleoConecte los filtros de núcleo a los cables. Elfiltro de núcleo reduce la interferencia.
1 Libere las trabas de los extremos del filtro denúcleo.
2 Pase el cable por el filtro de núcleo, dejando3 cm aprox. de cable entre el enchufe del cabley el filtro de núcleo.Enrolle el cable una vez alrededor de la parte
externa del filtro de núcleo como se muestra enla ilustración.
3 Cierre el filtro de núcleo hasta que éste emitaun clic de cerrado.
NOTAS: Tenga cuidado de no dañar el cable. Cuando conecte un cable, fije el extremo con el
filtro de núcleo a la videocámara.
Accesorios suministrados
O bien
Coloque aquí durante lafilmación.
3
2
2
1
Guí a de lacorrea Hebilla
Ojal
Traba
3 cm Filtro de núcleo
Dé una vuelta.
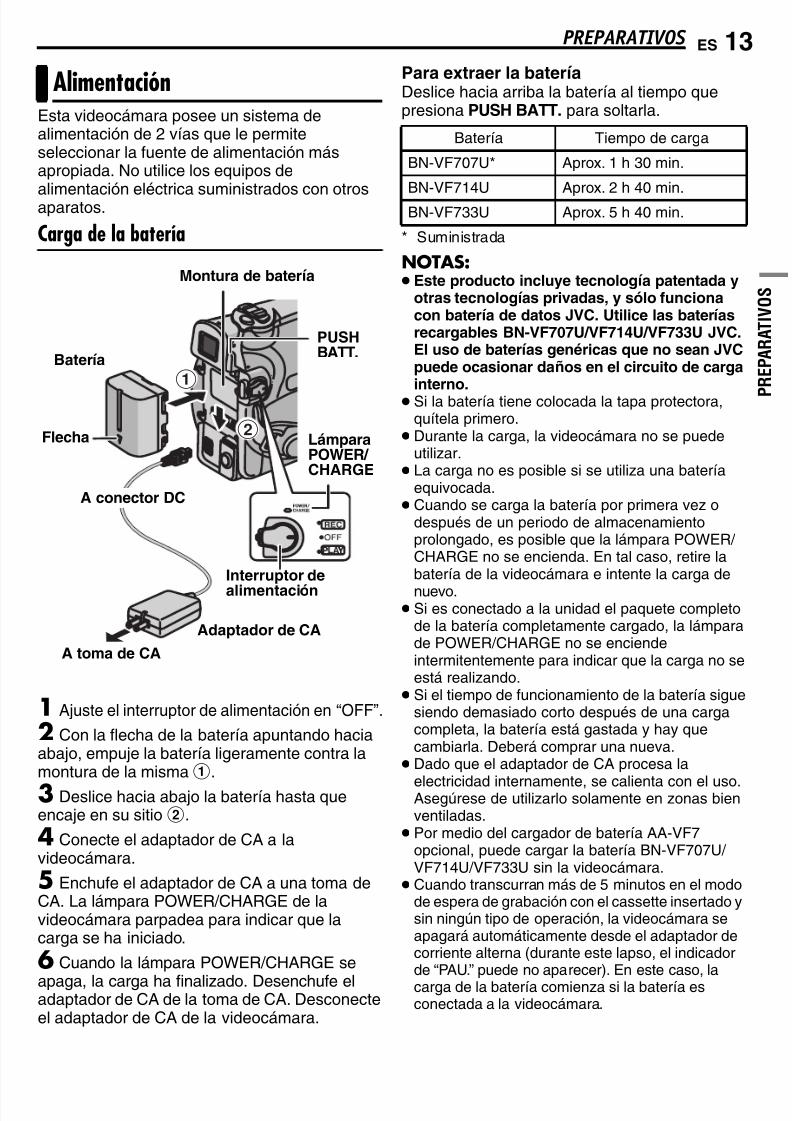
7/17/2019 Manual for JVC camcorder
http://slidepdf.com/reader/full/manual-for-jvc-camcorder 65/104
ES 13PREPARATIVOS
P
R E P A R A T I V O S
Esta videocámara posee un sistema dealimentación de 2 vías que le permiteseleccionar la fuente de alimentación másapropiada. No utilice los equipos de
alimentación eléctrica suministrados con otrosaparatos.
Carga de la batería
1 Ajuste el interruptor de alimentación en “OFF”.
2 Con la flecha de la batería apuntando haciaabajo, empuje la batería ligeramente contra lamontura de la misma 1.
3 Deslice hacia abajo la batería hasta queencaje en su sitio 2.
4 Conecte el adaptador de CA a lavideocámara.
5 Enchufe el adaptador de CA a una toma deCA. La lámpara POWER/CHARGE de lavideocámara parpadea para indicar que lacarga se ha iniciado.
6 Cuando la lámpara POWER/CHARGE se
apaga, la carga ha finalizado. Desenchufe eladaptador de CA de la toma de CA. Desconecteel adaptador de CA de la videocámara.
Para extraer la baterí aDeslice hacia arriba la batería al tiempo quepresiona PUSH BATT. para soltarla.
* Suministrada
NOTAS: Este producto incluye tecnologí a patentada y
otras tecnologí as privadas, y sólo funcionacon baterí a de datos JVC. Utilice las baterí asrecargables BN-VF707U/VF714U/VF733U JVC.El uso de baterí as genéricas que no sean JVCpuede ocasionar daños en el circuito de carga
interno. Si la batería tiene colocada la tapa protectora,quítela primero.
Durante la carga, la videocámara no se puedeutilizar.
La carga no es posible si se utiliza una bateríaequivocada.
Cuando se carga la batería por primera vez odespués de un periodo de almacenamientoprolongado, es posible que la lámpara POWER/ CHARGE no se encienda. En tal caso, retire labatería de la videocámara e intente la carga denuevo.
Si es conectado a la unidad el paquete completode la batería completamente cargado, la lámparade POWER/CHARGE no se enciendeintermitentemente para indicar que la carga no seestá realizando.
Si el tiempo de funcionamiento de la batería siguesiendo demasiado corto después de una cargacompleta, la batería está gastada y hay quecambiarla. Deberá comprar una nueva.
Dado que el adaptador de CA procesa la
electricidad internamente, se calienta con el uso.Asegúrese de utilizarlo solamente en zonas bienventiladas.
Por medio del cargador de batería AA-VF7opcional, puede cargar la batería BN-VF707U/ VF714U/VF733U sin la videocámara.
Cuando transcurran más de 5 minutos en el modode espera de grabación con el cassette insertado ysin ningún tipo de operación, la videocámara seapagará automáticamente desde el adaptador decorriente alterna (durante este lapso, el indicador
de “PAU.” puede no aparecer). En este caso, lacarga de la batería comienza si la batería esconectada a la videocámara.
Alimentación
1
2LámparaPOWER/ CHARGE
Baterí a
PUSHBATT.
Interruptor dealimentación
Montura de baterí a
A conector DC
A toma de CA
Adaptador de CA
Flecha
Batería Tiempo de carga
BN-VF707U* Aprox. 1 h 30 min.
BN-VF714U Aprox. 2 h 40 min.BN-VF733U Aprox. 5 h 40 min.
7/17/2019 Manual for JVC camcorder
http://slidepdf.com/reader/full/manual-for-jvc-camcorder 66/104
PREPARATIVOS 14 ES
Uso de la bateríaSiga los pasos 2 – 3 de “Carga de la batería”.
Tiempo máximo de grabación continua
* Suministrada
NOTAS: El tiempo de grabación se reduce
considerablemente en las siguientes condiciones:•Uso repetido del modo Zoom o del modo de
espera de grabación.•
Uso repetido del monitor LCD.•Uso repetido del modo de reproducción.•Uso de la luz LED.
Antes de un uso prolongado, se recomiendapreparar baterías suficientes para cubrir 3 vecesel tiempo de filmación previsto.
ATENCIÓN:Antes de desconectar la fuente de alimentación,compruebe que la videocámara está apagada. Delo contrario, se podría producir un fallo defuncionamiento de la cámara.
Sistema de datos de bateríaSe puede comprobar la energía restante de labatería y el tiempo disponible para grabación.1) Asegúrese de que la batería está conectada yde que el interruptor de encendido está ajustadoen “OFF”.2) Abra por completo el monitor LCD.3) Presione DATA, y aparecerá la pantalla deestado de la batería.Se mostrará durante aprox. 3 segundos si el
botón se presiona y se suelta rápidamente, ydurante aprox. 15 segundos si el botón sepresiona durante varios segundos.Si en lugar del estado de la batería aparece la
indicación “ERROR DE COMUNICACIÓN”pese a haber presionado DATA varias veces,es posible que la batería tenga algúnproblema. En tal caso, consulte a sudistribuidor de JVC más cercano.
Uso con alimentación de CASiga el paso 4 de “Carga de la batería”.
NOTA:El adaptador de CA suministrado tiene una funciónde selección automática de tensión en la escala decorriente alterna de 110 V a 240 V.
Sobre las baterías¡PELIGRO! No intente desmontar las baterías niexponerlas a fuego o calor excesivo, puespodría producirse un incendio o una explosión.¡ADVERTENCIA! No permita que la batería nisus terminales entren en contacto con metales,pues podría producirse un cortocircuito, conpeligro de incendio.
Para reanudar la función original de
indicación precisa de energí a de la baterí aSi la indicación de energía de la batería difiere deltiempo de funcionamiento real, carguecompletamente la batería, y luego deje que seagote. Sin embargo, esta función puede norecuperarse si la batería se ha usado durante unperiodo prolongado de tiempo bajo condicionesextremas de temperaturas altas o bajas, o si se hacargado demasiadas veces.
BateríaMonitor LCDconectado
Visorconectado
BN-VF707U* 1 h 30 min. 1 h 40 min.
BN-VF714U 3 h. 3 h 25 min.
BN-VF733U 7 h. 8 h.
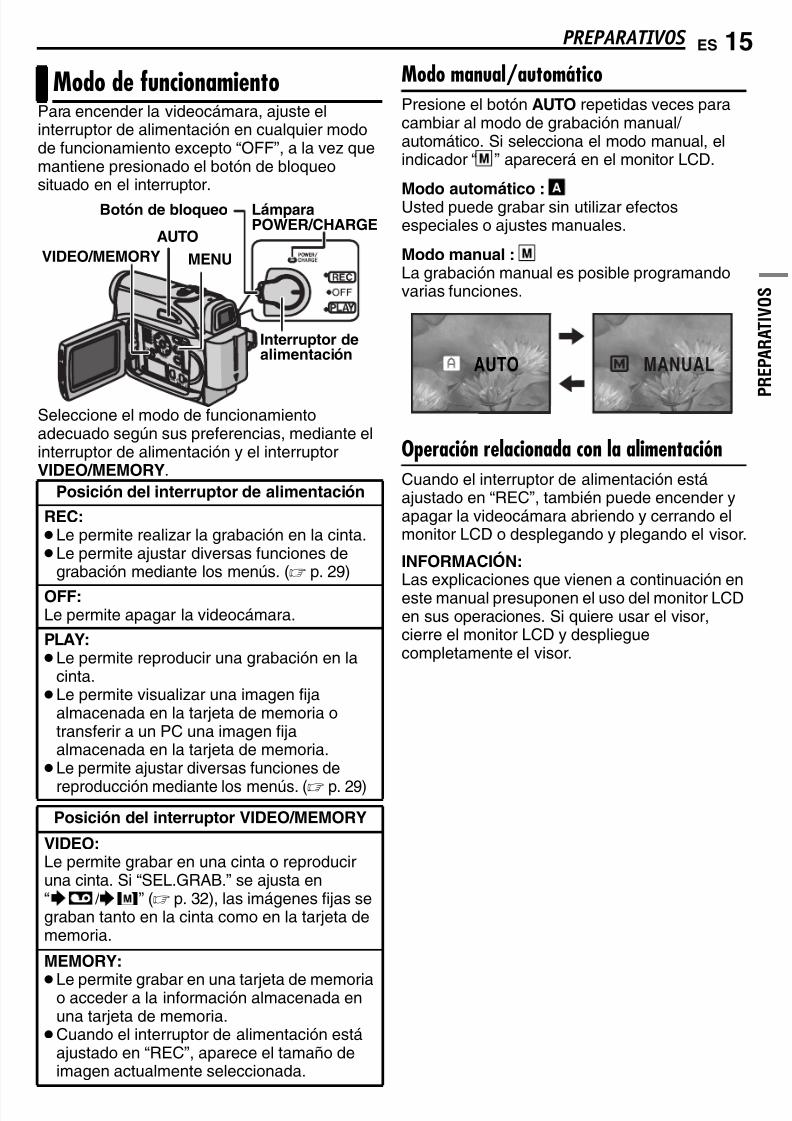
7/17/2019 Manual for JVC camcorder
http://slidepdf.com/reader/full/manual-for-jvc-camcorder 67/104
ES 15PREPARATIVOS
P
R E P A R A T I V O S
Para encender la videocámara, ajuste elinterruptor de alimentación en cualquier modode funcionamiento excepto “OFF”, a la vez quemantiene presionado el botón de bloqueosituado en el interruptor.
Seleccione el modo de funcionamientoadecuado según sus preferencias, mediante elinterruptor de alimentación y el interruptorVIDEO/MEMORY.
Modo manual/automáticoPresione el botón AUTO repetidas veces paracambiar al modo de grabación manual/ automático. Si selecciona el modo manual, elindicador “
M ” aparecerá en el monitor LCD.
Modo automático : A
Usted puede grabar sin utilizar efectosespeciales o ajustes manuales.
Modo manual : M
La grabación manual es posible programandovarias funciones.
Operación relacionada con la alimentaciónCuando el interruptor de alimentación estáajustado en “REC”, también puede encender yapagar la videocámara abriendo y cerrando elmonitor LCD o desplegando y plegando el visor.
INFORMACIÓN:
Las explicaciones que vienen a continuación eneste manual presuponen el uso del monitor LCDen sus operaciones. Si quiere usar el visor,cierre el monitor LCD y desplieguecompletamente el visor.
Modo de funcionamiento
Posición del interruptor de alimentación
REC: Le permite realizar la grabación en la cinta. Le permite ajustar diversas funciones de
grabación mediante los menús. ( p. 29)
OFF:Le permite apagar la videocámara.
PLAY: Le permite reproducir una grabación en la
cinta. Le permite visualizar una imagen fija
almacenada en la tarjeta de memoria otransferir a un PC una imagen fijaalmacenada en la tarjeta de memoria. Le permite ajustar diversas funciones de
reproducción mediante los menús. ( p. 29)
Posición del interruptor VIDEO/MEMORY
VIDEO:Le permite grabar en una cinta o reproduciruna cinta. Si “SEL.GRAB.” se ajusta en“ / ” ( p. 32), las imágenes fijas segraban tanto en la cinta como en la tarjeta dememoria.
MEMORY:
Le permite grabar en una tarjeta de memoriao acceder a la información almacenada enuna tarjeta de memoria.Cuando el interruptor de alimentación está
ajustado en “REC”, aparece el tamaño deimagen actualmente seleccionada.
LámparaPOWER/CHARGE
VIDEO/MEMORY
Interruptor dealimentación
Botón de bloqueo
MENU
AUTO
MANUALAUTO
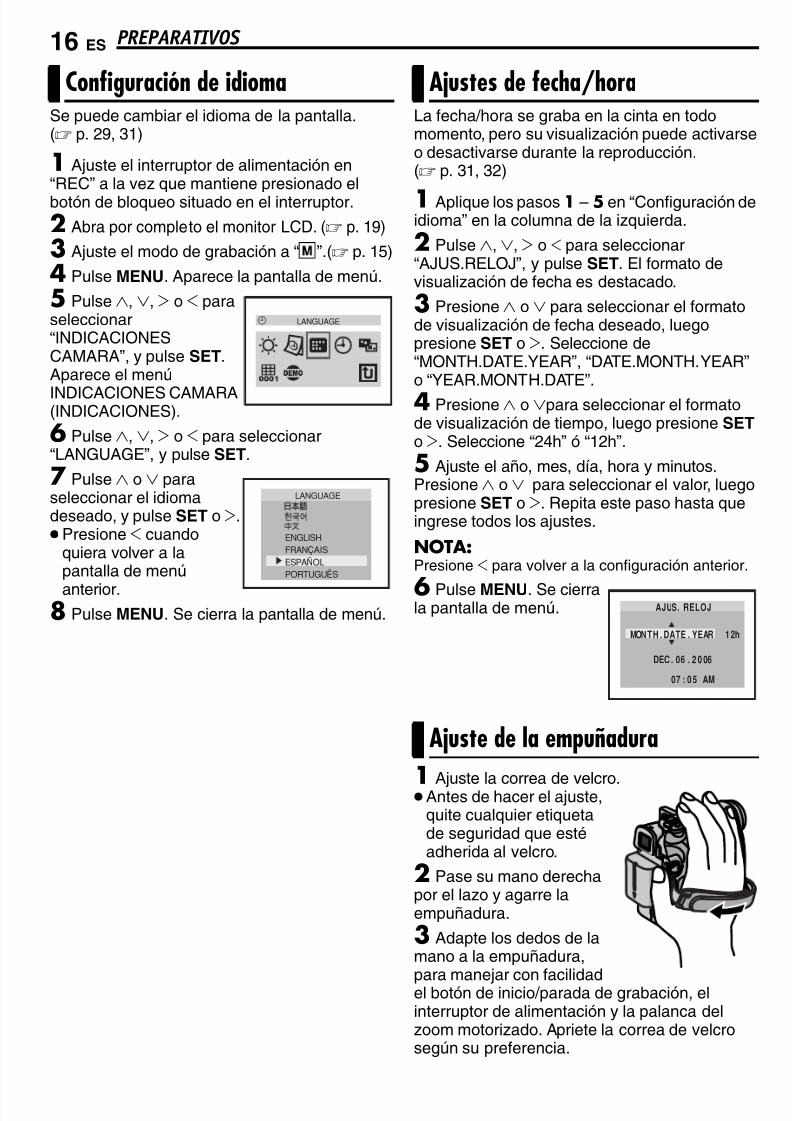
7/17/2019 Manual for JVC camcorder
http://slidepdf.com/reader/full/manual-for-jvc-camcorder 68/104
PREPARATIVOS 16 ES
Se puede cambiar el idioma de la pantalla.( p. 29, 31)
1 Ajuste el interruptor de alimentación en“REC” a la vez que mantiene presionado elbotón de bloqueo situado en el interruptor.2 Abra por completo el monitor LCD. ( p. 19)
3 Ajuste el modo de grabación a “ M
”.( p. 15)
4 Pulse MENU. Aparece la pantalla de menú.
5 Pulse 3, 4, 2 o 1 paraseleccionar“INDICACIONESCAMARA”, y pulse SET.Aparece el menú
INDICACIONES CAMARA(INDICACIONES).
6 Pulse 3, 4, 2 o 1 para seleccionar“LANGUAGE”, y pulse SET.
7 Pulse 3 o 4 paraseleccionar el idiomadeseado, y pulse SET o 2.Presione 1 cuando
quiera volver a lapantalla de menú
anterior.8 Pulse MENU. Se cierra la pantalla de menú.
La fecha/hora se graba en la cinta en todomomento, pero su visualización puede activarseo desactivarse durante la reproducción.( p. 31, 32)
1 Aplique los pasos 1 – 5 en “Configuración deidioma” en la columna de la izquierda.
2 Pulse 3, 4, 2 o 1 para seleccionar“AJUS.RELOJ”, y pulse SET. El formato devisualización de fecha es destacado.
3 Presione 3 o 4 para seleccionar el formatode visualización de fecha deseado, luegopresione SET o 2. Seleccione de“MONTH.DATE.YEAR”, “DATE.MONTH.YEAR”o “YEAR.MONTH.DATE”.
4 Presione 3 o 4para seleccionar el formatode visualización de tiempo, luego presione SET o 2. Seleccione “24h” ó “12h”.
5 Ajuste el año, mes, día, hora y minutos.Presione 3 o 4 para seleccionar el valor, luegopresione SET o 2. Repita este paso hasta queingrese todos los ajustes.
NOTA:Presione 1 para volver a la configuración anterior.
6 Pulse MENU. Se cierrala pantalla de menú.
1 Ajuste la correa de velcro.Antes de hacer el ajuste,
quite cualquier etiquetade seguridad que estéadherida al velcro.
2 Pase su mano derechapor el lazo y agarre laempuñadura.
3 Adapte los dedos de lamano a la empuñadura,
para manejar con facilidadel botón de inicio/parada de grabación, elinterruptor de alimentación y la palanca delzoom motorizado. Apriete la correa de velcrosegún su preferencia.
Configuración de idioma
LANGUAGE
ENGLISH
FRANÇAIS
ESPAÑOL
PORTUGUÊS
LANGUAGE
Ajustes de fecha/hora
Ajuste de la empuñadura
M N TH
DEC
7
0
0 : 0 5
6 2 0 06
AM
1 2h
. .
DATE YEAR. .O
AJUS. RELOJ

7/17/2019 Manual for JVC camcorder
http://slidepdf.com/reader/full/manual-for-jvc-camcorder 69/104
ES 17PREPARATIVOS
P
R E P A R A T I V O S
1 Ajuste el interruptor de alimentación en“REC” a la vez que mantiene presionado elbotón de bloqueo situado en el interruptor.
2 Asegúrese de que el monitor LCD está
cerrado y bloqueado. Extraiga por completo elvisor y ajústelo manualmente para optimizar lavisibilidad.
3 Gire el control de ajuste de dioptría hasta quelas indicaciones del visor queden claramenteenfocadas.
PRECAUCIÓN:
Al cerrar el visor, tenga cuidado de no pillarse losdedos.
1 Ajuste el interruptor dealimentación en “REC” oen “PLAY” a la vez quemantiene presionado el
botón de bloqueo situadoen el interruptor.
2 Abra por completo elmonitor LCD. ( p. 19) Para ajustar el brillo del
visor, ábralocompletamente y ajuste“PRIORIDAD” en “VISOR”( p. 29, 31).
3 Pulse MENU. Aparece
la pantalla de menú. Si launidad está en modo de reproducción, por favorcontinúe al Paso 5.
4 Pulse 3, 4, 2 o 1 para seleccionar“INDICACIONES CAMARA”, y pulse SET.Aparece el menú INDICACIONES CAMARA.
5 Pulse 3, 4, 2 o 1 para seleccionar “BRILLO”,y pulse SET. La pantalla de menú se cierra yaparece indicador de control de brillo.
6 Pulse 3 o 4 hasta alcanzar el brillo
apropiado y pulse SET o 2.7 Pulse MENU. Se cierra la pantalla de menú.
Para montar lavideocámara sobre untrípode, alinee el tornilloy el perno de dirección alzócalo de fijación y al
agujero para el perno dela videocámara. Luegoapriete el tornillo en elsentido de las agujas delreloj.Algunos trípodes no vienen equipados con
pernos.
Ajuste del visor
Control de ajuste de dioptrí a
Ejemplo:
Ajuste de brillo de la pantalla
Soporte del trípode
BRILLO
– 5
1111
2222
MENU
4444
3333
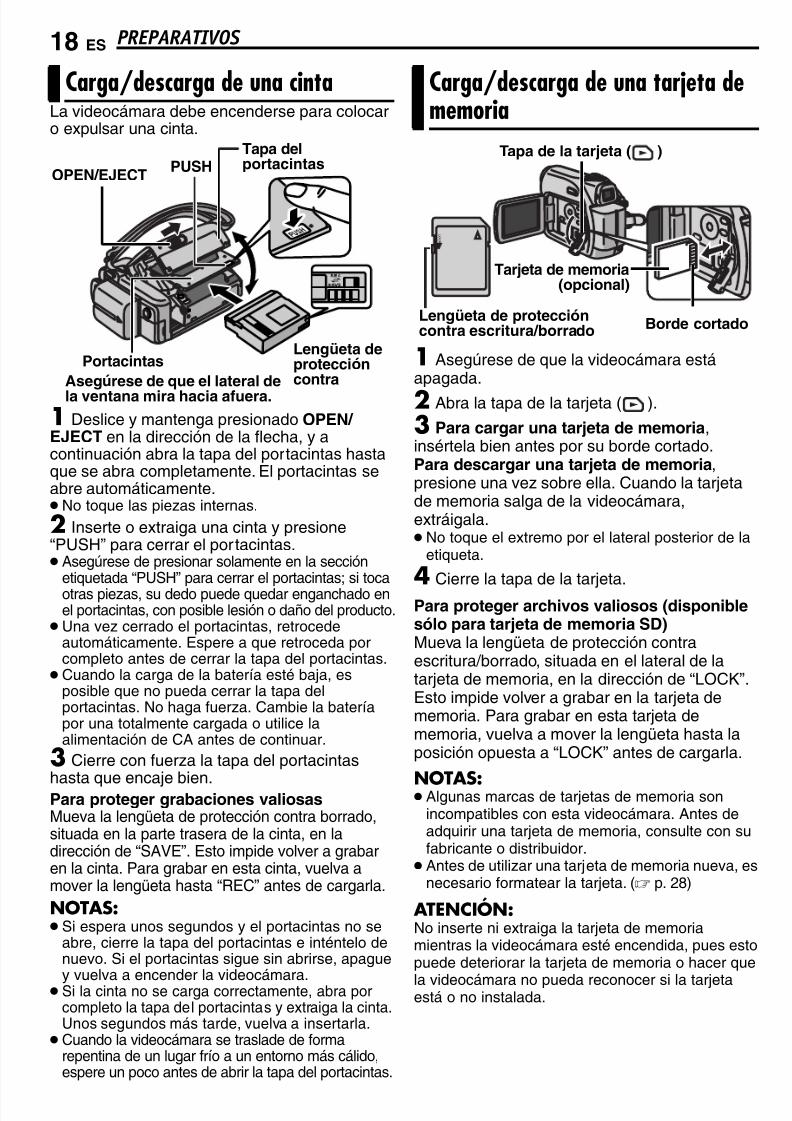
7/17/2019 Manual for JVC camcorder
http://slidepdf.com/reader/full/manual-for-jvc-camcorder 70/104
PREPARATIVOS 18 ES
La videocámara debe encenderse para colocaro expulsar una cinta.
1 Deslice y mantenga presionado OPEN/ EJECT en la dirección de la flecha, y acontinuación abra la tapa del portacintas hastaque se abra completamente. El portacintas seabre automáticamente. No toque las piezas internas.
2 Inserte o extraiga una cinta y presione“PUSH” para cerrar el portacintas. Asegúrese de presionar solamente en la sección
etiquetada “PUSH” para cerrar el portacintas; si tocaotras piezas, su dedo puede quedar enganchado enel portacintas, con posible lesión o daño del producto.
Una vez cerrado el portacintas, retrocedeautomáticamente. Espere a que retroceda porcompleto antes de cerrar la tapa del portacintas.
Cuando la carga de la batería esté baja, esposible que no pueda cerrar la tapa delportacintas. No haga fuerza. Cambie la bateríapor una totalmente cargada o utilice laalimentación de CA antes de continuar.3 Cierre con fuerza la tapa del portacintas
hasta que encaje bien.Para proteger grabaciones valiosasMueva la lengüeta de protección contra borrado,situada en la parte trasera de la cinta, en ladirección de “SAVE”. Esto impide volver a grabaren la cinta. Para grabar en esta cinta, vuelva amover la lengüeta hasta “REC” antes de cargarla.
NOTAS: Si espera unos segundos y el portacintas no se
abre, cierre la tapa del portacintas e inténtelo denuevo. Si el portacintas sigue sin abrirse, apague
y vuelva a encender la videocámara. Si la cinta no se carga correctamente, abra por
completo la tapa del portacintas y extraiga la cinta.Unos segundos más tarde, vuelva a insertarla.
Cuando la videocámara se traslade de formarepentina de un lugar frío a un entorno más cálido,espere un poco antes de abrir la tapa del portacintas.
1 Asegúrese de que la videocámara estáapagada.
2 Abra la tapa de la tarjeta ( ).
3 Para cargar una tarjeta de memoria,insértela bien antes por su borde cortado.Para descargar una tarjeta de memoria,presione una vez sobre ella. Cuando la tarjetade memoria salga de la videocámara,extráigala. No toque el extremo por el lateral posterior de la
etiqueta.
4Cierre la tapa de la tarjeta.
Para proteger archivos valiosos (disponiblesólo para tarjeta de memoria SD)Mueva la lengüeta de protección contraescritura/borrado, situada en el lateral de latarjeta de memoria, en la dirección de “LOCK”.Esto impide volver a grabar en la tarjeta dememoria. Para grabar en esta tarjeta dememoria, vuelva a mover la lengüeta hasta laposición opuesta a “LOCK” antes de cargarla.
NOTAS: Algunas marcas de tarjetas de memoria son
incompatibles con esta videocámara. Antes deadquirir una tarjeta de memoria, consulte con sufabricante o distribuidor.
Antes de utilizar una tarjeta de memoria nueva, esnecesario formatear la tarjeta. ( p. 28)
ATENCIÓN:No inserte ni extraiga la tarjeta de memoriamientras la videocámara esté encendida, pues estopuede deteriorar la tarjeta de memoria o hacer que
la videocámara no pueda reconocer si la tarjetaestá o no instalada.
Carga/descarga de una cinta
Asegúrese de que el lateral dela ventana mira hacia afuera.
Tapa delportacintasPUSH
PortacintasLengüeta deproteccióncontra
OPEN/EJECT
Carga/descarga de una tarjeta dememoria
Tarjeta de memoria(opcional)
Tapa de la tarjeta ( )
Lengüeta de proteccióncontra escritura/borrado Borde cortado
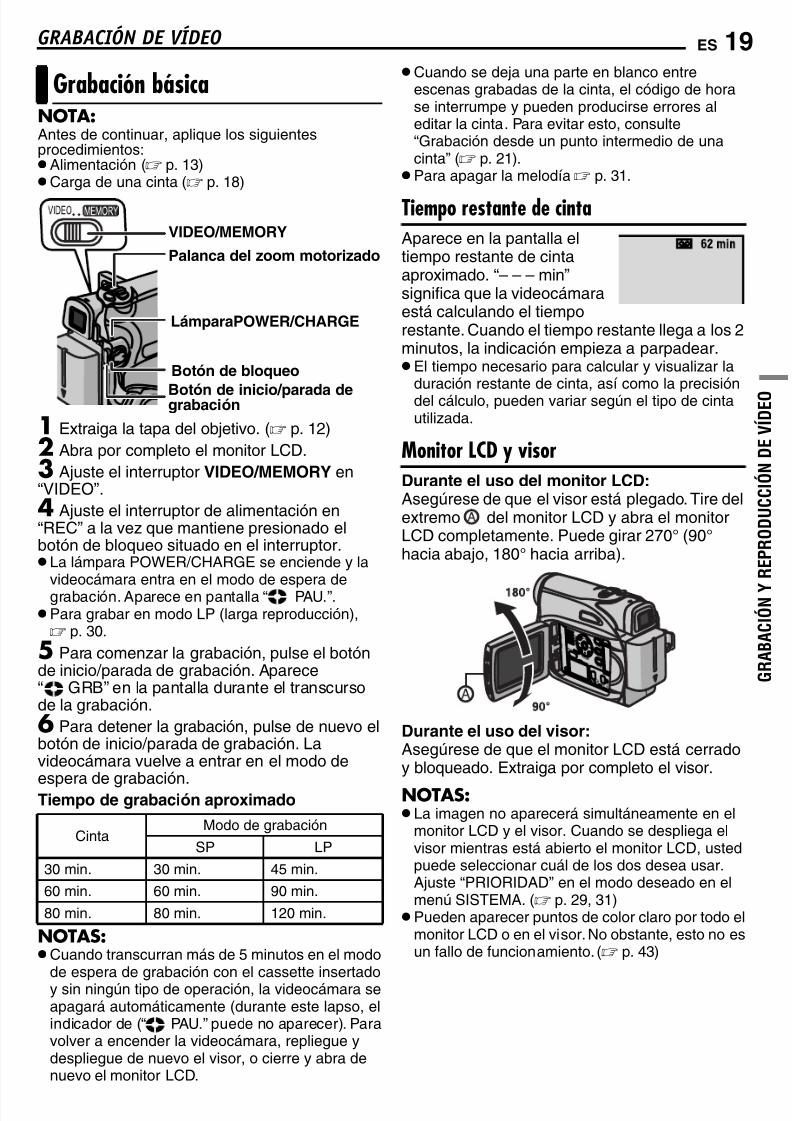
7/17/2019 Manual for JVC camcorder
http://slidepdf.com/reader/full/manual-for-jvc-camcorder 71/104
ES 19
G R A B A C I Ó N Y
R E P R O D U C C I Ó N D E V Í D E O
GRABACIÓN DE VÍDEO
NOTA:Antes de continuar, aplique los siguientesprocedimientos: Alimentación ( p. 13)Carga de una cinta ( p. 18)
1 Extraiga la tapa del objetivo. ( p. 12)2 Abra por completo el monitor LCD.3 Ajuste el interruptor VIDEO/MEMORY en“VIDEO”.4 Ajuste el interruptor de alimentación en“REC” a la vez que mantiene presionado elbotón de bloqueo situado en el interruptor. La lámpara POWER/CHARGE se enciende y la
videocámara entra en el modo de espera degrabación. Aparece en pantalla “ PAU.”. Para grabar en modo LP (larga reproducción), p. 30.
5 Para comenzar la grabación, pulse el botónde inicio/parada de grabación. Aparece“ GRB” en la pantalla durante el transcursode la grabación.6 Para detener la grabación, pulse de nuevo elbotón de inicio/parada de grabación. Lavideocámara vuelve a entrar en el modo de
espera de grabación.Tiempo de grabación aproximado
NOTAS:Cuando transcurran más de 5 minutos en el modo
de espera de grabación con el cassette insertadoy sin ningún tipo de operación, la videocámara seapagará automáticamente (durante este lapso, elindicador de (“ PAU.” puede no aparecer). Paravolver a encender la videocámara, repliegue ydespliegue de nuevo el visor, o cierre y abra denuevo el monitor LCD.
Cuando se deja una parte en blanco entreescenas grabadas de la cinta, el código de horase interrumpe y pueden producirse errores aleditar la cinta. Para evitar esto, consulte“Grabación desde un punto intermedio de unacinta” ( p. 21). Para apagar la melodía p. 31.
Tiempo restante de cintaAparece en la pantalla eltiempo restante de cintaaproximado. “– – – min”significa que la videocámaraestá calculando el tiemporestante. Cuando el tiempo restante llega a los 2minutos, la indicación empieza a parpadear. El tiempo necesario para calcular y visualizar la
duración restante de cinta, así como la precisióndel cálculo, pueden variar según el tipo de cintautilizada.
Monitor LCD y visorDurante el uso del monitor LCD:Asegúrese de que el visor está plegado. Tire delextremo del monitor LCD y abra el monitorLCD completamente. Puede girar 270° (90°hacia abajo, 180° hacia arriba).
Durante el uso del visor:Asegúrese de que el monitor LCD está cerradoy bloqueado. Extraiga por completo el visor.
NOTAS: La imagen no aparecerá simultáneamente en el
monitor LCD y el visor. Cuando se despliega elvisor mientras está abierto el monitor LCD, ustedpuede seleccionar cuál de los dos desea usar.Ajuste “PRIORIDAD” en el modo deseado en elmenú SISTEMA. ( p. 29, 31) Pueden aparecer puntos de color claro por todo el
monitor LCD o en el visor. No obstante, esto no esun fallo de funcionamiento. ( p. 43)
Grabación básica
CintaModo de grabación
SP LP
30 min. 30 min. 45 min.
60 min. 60 min. 90 min.
80 min. 80 min. 120 min.
LámparaPOWER/CHARGE
Botón de inicio/parada degrabación
Botón de bloqueo
Palanca del zoom motorizado
VIDEO/MEMORY
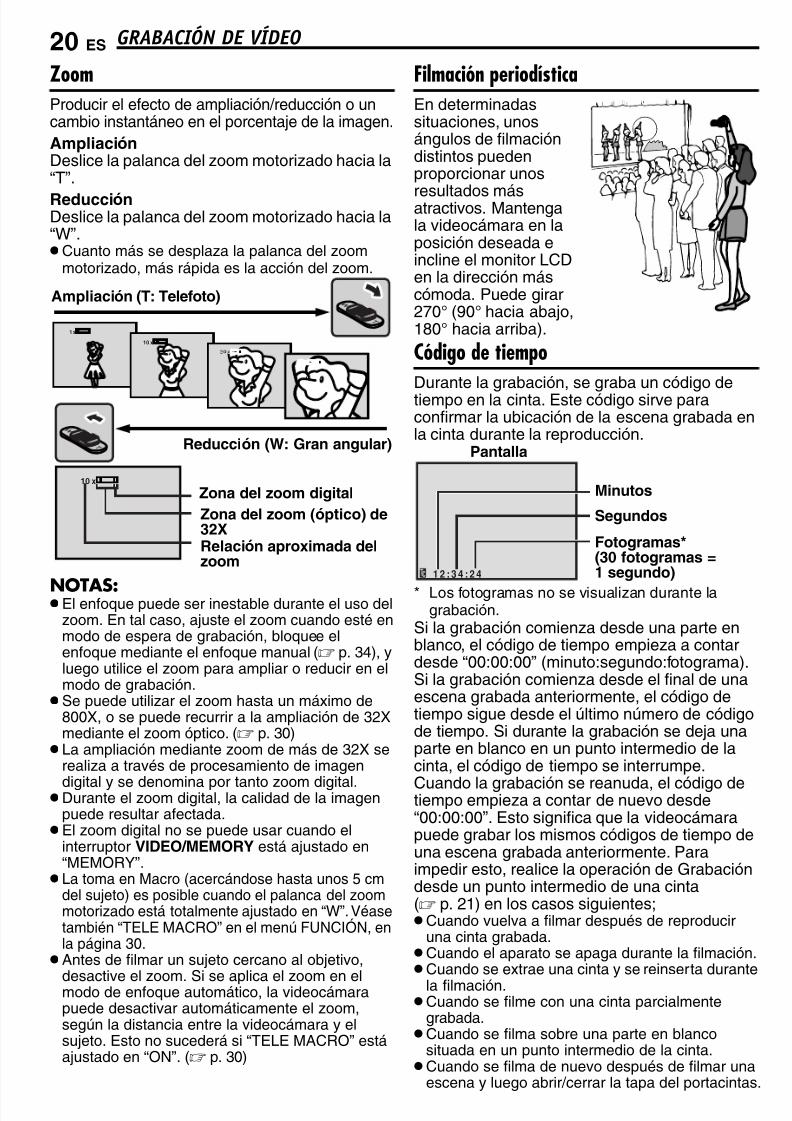
7/17/2019 Manual for JVC camcorder
http://slidepdf.com/reader/full/manual-for-jvc-camcorder 72/104
GRABACIÓN DE VÍDEO20 ES
ZoomProducir el efecto de ampliación/reducción o uncambio instantáneo en el porcentaje de la imagen.AmpliaciónDeslice la palanca del zoom motorizado hacia la“T”.
ReducciónDeslice la palanca del zoom motorizado hacia la“W”.Cuanto más se desplaza la palanca del zoom
motorizado, más rápida es la acción del zoom.
NOTAS: El enfoque puede ser inestable durante el uso del
zoom. En tal caso, ajuste el zoom cuando esté enmodo de espera de grabación, bloquee elenfoque mediante el enfoque manual ( p. 34), yluego utilice el zoom para ampliar o reducir en elmodo de grabación. Se puede utilizar el zoom hasta un máximo de
800X, o se puede recurrir a la ampliación de 32Xmediante el zoom óptico. ( p. 30) La ampliación mediante zoom de más de 32X se
realiza a través de procesamiento de imagen
digital y se denomina por tanto zoom digital.Durante el zoom digital, la calidad de la imagen
puede resultar afectada. El zoom digital no se puede usar cuando el
interruptor VIDEO/MEMORY está ajustado en“MEMORY”. La toma en Macro (acercándose hasta unos 5 cm
del sujeto) es posible cuando el palanca del zoommotorizado está totalmente ajustado en “W”. Véasetambién “TELE MACRO” en el menú FUNCIÓN, enla página 30. Antes de filmar un sujeto cercano al objetivo,
desactive el zoom. Si se aplica el zoom en elmodo de enfoque automático, la videocámarapuede desactivar automáticamente el zoom,según la distancia entre la videocámara y elsujeto. Esto no sucederá si “TELE MACRO” estáajustado en “ON”. ( p. 30)
Filmación periodísticaEn determinadassituaciones, unosángulos de filmacióndistintos puedenproporcionar unos
resultados másatractivos. Mantengala videocámara en laposición deseada eincline el monitor LCDen la dirección máscómoda. Puede girar270° (90° hacia abajo,180° hacia arriba).
Código de tiempo
Durante la grabación, se graba un código detiempo en la cinta. Este código sirve paraconfirmar la ubicación de la escena grabada enla cinta durante la reproducción.
* Los fotogramas no se visualizan durante lagrabación.
Si la grabación comienza desde una parte enblanco, el código de tiempo empieza a contardesde “00:00:00” (minuto:segundo:fotograma).Si la grabación comienza desde el final de unaescena grabada anteriormente, el código detiempo sigue desde el último número de códigode tiempo. Si durante la grabación se deja unaparte en blanco en un punto intermedio de lacinta, el código de tiempo se interrumpe.
Cuando la grabación se reanuda, el código detiempo empieza a contar de nuevo desde“00:00:00”. Esto significa que la videocámarapuede grabar los mismos códigos de tiempo deuna escena grabada anteriormente. Paraimpedir esto, realice la operación de Grabacióndesde un punto intermedio de una cinta( p. 21) en los casos siguientes;Cuando vuelva a filmar después de reproducir
una cinta grabada.Cuando el aparato se apaga durante la filmación.Cuando se extrae una cinta y se reinserta durante
la filmación.Cuando se filme con una cinta parcialmente
grabada.Cuando se filma sobre una parte en blanco
situada en un punto intermedio de la cinta.Cuando se filma de nuevo después de filmar una
escena y luego abrir/cerrar la tapa del portacintas.
10 x
1x
10 x
4
Zona del zoom digital
Ampliación (T: Telefoto)
Reducción (W: Gran angular)
Zona del zoom (óptico) de32XRelación aproximada delzoom
1 2 : 3 4 : 2 4
Minutos
Segundos
Fotogramas*(30 fotogramas =1 segundo)
Pantalla
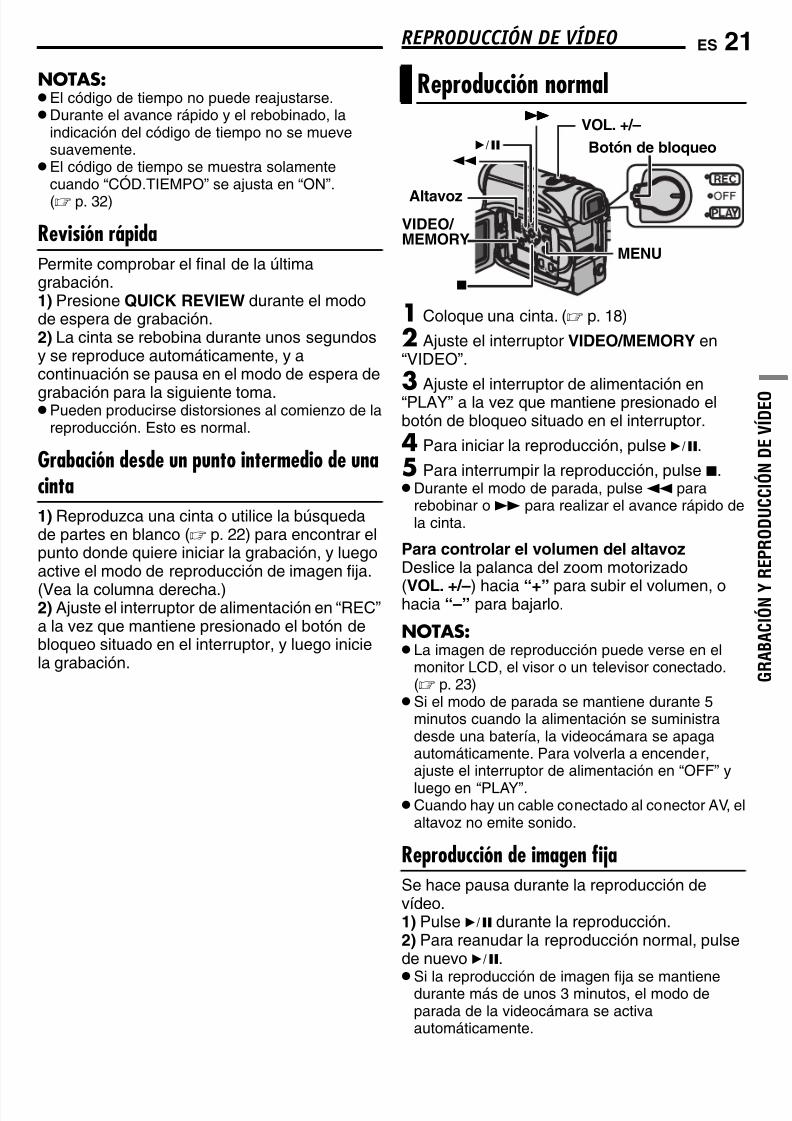
7/17/2019 Manual for JVC camcorder
http://slidepdf.com/reader/full/manual-for-jvc-camcorder 73/104
G R A B A C I Ó N Y
R E P R O D U C C I Ó N D E V Í D E O
ES 21
NOTAS: El código de tiempo no puede reajustarse.Durante el avance rápido y el rebobinado, la
indicación del código de tiempo no se muevesuavemente. El código de tiempo se muestra solamente
cuando “CÓD.TIEMPO” se ajusta en “ON”.( p. 32)
Revisión rápidaPermite comprobar el final de la últimagrabación.1) Presione QUICK REVIEW durante el modode espera de grabación.2) La cinta se rebobina durante unos segundosy se reproduce automáticamente, y acontinuación se pausa en el modo de espera de
grabación para la siguiente toma. Pueden producirse distorsiones al comienzo de la
reproducción. Esto es normal.
Grabación desde un punto intermedio de unacinta1) Reproduzca una cinta o utilice la búsquedade partes en blanco ( p. 22) para encontrar elpunto donde quiere iniciar la grabación, y luegoactive el modo de reproducción de imagen fija.
(Vea la columna derecha.)2) Ajuste el interruptor de alimentación en “REC”a la vez que mantiene presionado el botón debloqueo situado en el interruptor, y luego iniciela grabación.
1 Coloque una cinta. ( p. 18)
2 Ajuste el interruptor VIDEO/MEMORY en“VIDEO”.
3Ajuste el interruptor de alimentación en“PLAY” a la vez que mantiene presionado el
botón de bloqueo situado en el interruptor.
4 Para iniciar la reproducción, pulse6.
5 Para interrumpir la reproducción, pulse 7.Durante el modo de parada, pulse1 para
rebobinar o¡ para realizar el avance rápido dela cinta.
Para controlar el volumen del altavozDeslice la palanca del zoom motorizado
(VOL. +/ –) hacia “+” para subir el volumen, ohacia “–” para bajarlo.
NOTAS: La imagen de reproducción puede verse en el
monitor LCD, el visor o un televisor conectado.( p. 23) Si el modo de parada se mantiene durante 5
minutos cuando la alimentación se suministradesde una batería, la videocámara se apagaautomáticamente. Para volverla a encender,ajuste el interruptor de alimentación en “OFF” yluego en “PLAY”.Cuando hay un cable conectado al conector AV, el
altavoz no emite sonido.
Reproducción de imagen fijaSe hace pausa durante la reproducción devídeo.1) Pulse6 durante la reproducción.2) Para reanudar la reproducción normal, pulsede nuevo6. Si la reproducción de imagen fija se mantienedurante más de unos 3 minutos, el modo de
parada de la videocámara se activaautomáticamente.
Reproducción normal
Altavoz
6 Botón de bloqueo
¡¡¡¡
7
MENU
1
VOL. +/ –
VIDEO/ MEMORY
REPRODUCCIÓN DE VÍDEO
7/17/2019 Manual for JVC camcorder
http://slidepdf.com/reader/full/manual-for-jvc-camcorder 74/104
REPRODUCCIÓN DE VÍDEO22 ES
Búsqueda rápidaPermite la búsqueda de alta velocidad encualquier dirección durante la reproducción devídeo.1) Durante la reproducción, pulse¡ parabúsqueda hacia adelante, o1 para búsqueda
hacia atrás.2) Para reanudar la reproducción normal, pulse6.Durante la reproducción, pulse y mantenga
pulsado¡ o1. La búsqueda continúamientras se mantenga presionado el botón. Alsoltar el botón, se reanuda la reproducciónnormal.Durante la búsqueda rápida aparece en pantalla
un ligero efecto de mosaico. Esto no es un fallo defuncionamiento.
ATENCIÓN:Durante la búsqueda rápida,partes de la imagen puedenno ser claramente visibles,especialmente en el ladoizquierdo de la pantalla.
Búsqueda de partes en blancoLe ayuda a encontrar el punto donde iniciar lagrabación en medio de una cinta para evitar lainterrupción del código de tiempo. ( p. 20)
1 Coloque una cinta. ( p. 18)
2 Ajuste el interruptor VIDEO/MEMORY en“VIDEO”.
3 Ajuste el interruptor de alimentación en“PLAY” a la vez que mantiene presionado elbotón de bloqueo situado en el interruptor.
4 Pulse BLANK. La indicación “BÚS.BLANCO” aparece y la
videocámara inicia automáticamente la búsquedahacia atrás o hacia adelante, y luego se detieneen el punto situado en unos 3 segundos de la
cinta antes del inicio de la parte en blancodetectada. Para cancelar la búsqueda de partes en blanco,
pulse 7 o BLANK.
NOTAS: Antes de iniciar la búsqueda de partes en blanco,
si la posición actual está en una parte en blanco,la videocámara busca en la dirección deretroceso. Si la posición actual está en una partegrabada, la videocámara busca en la dirección deavance. Si se llega al comienzo o al final de la cinta
durante la búsqueda de partes en blanco, lavideocámara se detiene automáticamente.Una parte en blanco inferior a 5 segundos de
cinta puede no ser detectada. La parte en blanco detectada puede estar situada
entre escenas grabadas. Antes de iniciar lagrabación, compruebe que no hay ningunaescena grabada después de la parte en blanco.
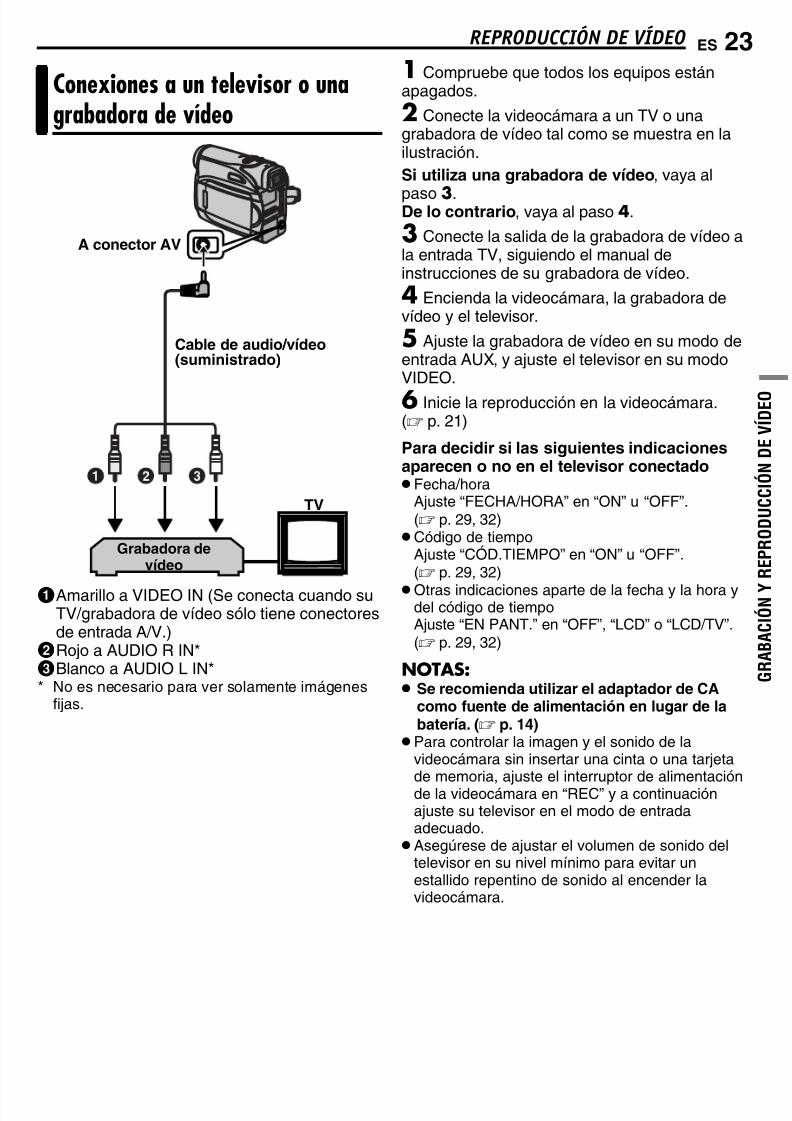
7/17/2019 Manual for JVC camcorder
http://slidepdf.com/reader/full/manual-for-jvc-camcorder 75/104
ES 23REPRODUCCIÓN DE VÍDEO
G R A B A C I Ó N Y
R E P R O D U C C I Ó N D E V Í D E O
1Amarillo a VIDEO IN (Se conecta cuando suTV/grabadora de vídeo sólo tiene conectoresde entrada A/V.)
2Rojo a AUDIO R IN*3Blanco a AUDIO L IN** No es necesario para ver solamente imágenes
fijas.
1 Compruebe que todos los equipos estánapagados.
2 Conecte la videocámara a un TV o unagrabadora de vídeo tal como se muestra en lailustración.Si utiliza una grabadora de ví deo, vaya al
paso 3.De lo contrario, vaya al paso 4.
3 Conecte la salida de la grabadora de vídeo ala entrada TV, siguiendo el manual deinstrucciones de su grabadora de vídeo.
4 Encienda la videocámara, la grabadora devídeo y el televisor.
5 Ajuste la grabadora de vídeo en su modo deentrada AUX, y ajuste el televisor en su modoVIDEO.
6 Inicie la reproducción en la videocámara.( p. 21)
Para decidir si las siguientes indicacionesaparecen o no en el televisor conectado Fecha/hora
Ajuste “FECHA/HORA” en “ON” u “OFF”.( p. 29, 32)Código de tiempo
Ajuste “CÓD.TIEMPO” en “ON” u “OFF”.( p. 29, 32)Otras indicaciones aparte de la fecha y la hora y
del código de tiempoAjuste “EN PANT.” en “OFF”, “LCD” o “LCD/TV”.( p. 29, 32)
NOTAS:
Se recomienda utilizar el adaptador de CAcomo fuente de alimentación en lugar de labaterí a. ( p. 14)
Para controlar la imagen y el sonido de lavideocámara sin insertar una cinta o una tarjeta
de memoria, ajuste el interruptor de alimentaciónde la videocámara en “REC” y a continuaciónajuste su televisor en el modo de entradaadecuado. Asegúrese de ajustar el volumen de sonido del
televisor en su nivel mínimo para evitar unestallido repentino de sonido al encender lavideocámara.
Conexiones a un televisor o unagrabadora de vídeo
TV
Grabadora deví deo
A conector AV
Cable de audio/ví deo(suministrado)
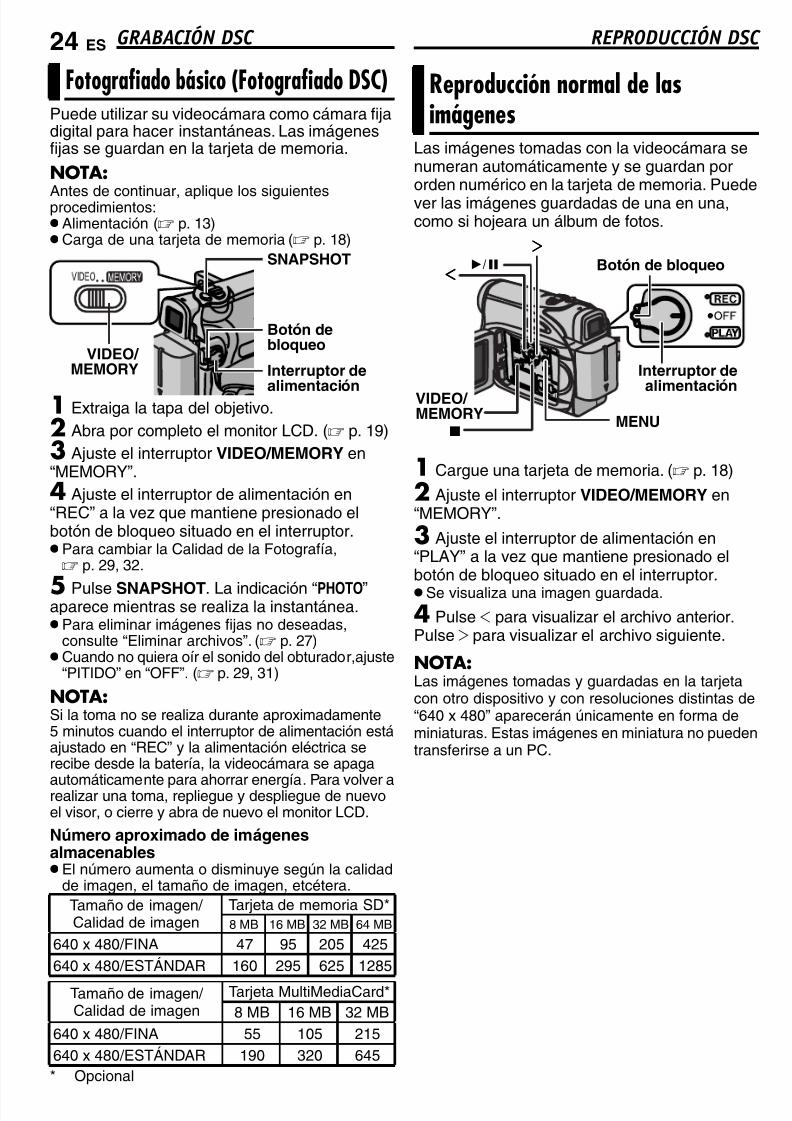
7/17/2019 Manual for JVC camcorder
http://slidepdf.com/reader/full/manual-for-jvc-camcorder 76/104
24 ES
Puede utilizar su videocámara como cámara fijadigital para hacer instantáneas. Las imágenesfijas se guardan en la tarjeta de memoria.
NOTA:
Antes de continuar, aplique los siguientesprocedimientos: Alimentación ( p. 13)Carga de una tarjeta de memoria ( p. 18)
1 Extraiga la tapa del objetivo.2 Abra por completo el monitor LCD. ( p. 19)3 Ajuste el interruptor VIDEO/MEMORY en“MEMORY”.4 Ajuste el interruptor de alimentación en“REC” a la vez que mantiene presionado elbotón de bloqueo situado en el interruptor. Para cambiar la Calidad de la Fotografía, p. 29, 32.
5 Pulse SNAPSHOT. La indicación “PHOTO”aparece mientras se realiza la instantánea. Para eliminar imágenes fijas no deseadas,
consulte “Eliminar archivos”. ( p. 27)Cuando no quiera oír el sonido del obturador,ajuste
“PITIDO” en “OFF”. ( p. 29, 31)
NOTA:Si la toma no se realiza durante aproximadamente5 minutos cuando el interruptor de alimentación estáajustado en “REC” y la alimentación eléctrica serecibe desde la batería, la videocámara se apaga
automáticamente para ahorrar energía. Para volver arealizar una toma, repliegue y despliegue de nuevoel visor, o cierre y abra de nuevo el monitor LCD.
Número aproximado de imágenesalmacenables El número aumenta o disminuye según la calidad
de imagen, el tamaño de imagen, etcétera.
* Opcional
Fotografiado básico (Fotografiado DSC)
Tamaño de imagen/Calidad de imagen
Tarjeta de memoria SD*8 MB 16 MB 32 MB 64 MB
640 x 480/FINA 47 95 205 425640 x 480/ESTÁNDAR 160 295 625 1285
Tamaño de imagen/Calidad de imagen
Tarjeta MultiMediaCard*8 MB 16 MB 32 MB
640 x 480/FINA 55 105 215640 x 480/ESTÁNDAR 190 320 645
Interruptor de
alimentación
Botón debloqueo
VIDEO/ MEMORY
SNAPSHOT
Las imágenes tomadas con la videocámara senumeran automáticamente y se guardan pororden numérico en la tarjeta de memoria. Puedever las imágenes guardadas de una en una,como si hojeara un álbum de fotos.
1 Cargue una tarjeta de memoria. ( p. 18)
2 Ajuste el interruptor VIDEO/MEMORY en“MEMORY”.
3 Ajuste el interruptor de alimentación en“PLAY” a la vez que mantiene presionado elbotón de bloqueo situado en el interruptor. Se visualiza una imagen guardada.
4 Pulse 1 para visualizar el archivo anterior.Pulse 2 para visualizar el archivo siguiente.
NOTA:Las imágenes tomadas y guardadas en la tarjetacon otro dispositivo y con resoluciones distintas de“640 x 480” aparecerán únicamente en forma deminiaturas. Estas imágenes en miniatura no puedentransferirse a un PC.
Reproducción normal de lasimágenes
Interruptor de
alimentación
Botón de bloqueo
7
62222
1111
MENU
VIDEO/ MEMORY
GRABACIÓN DSC REPRODUCCIÓN DSC
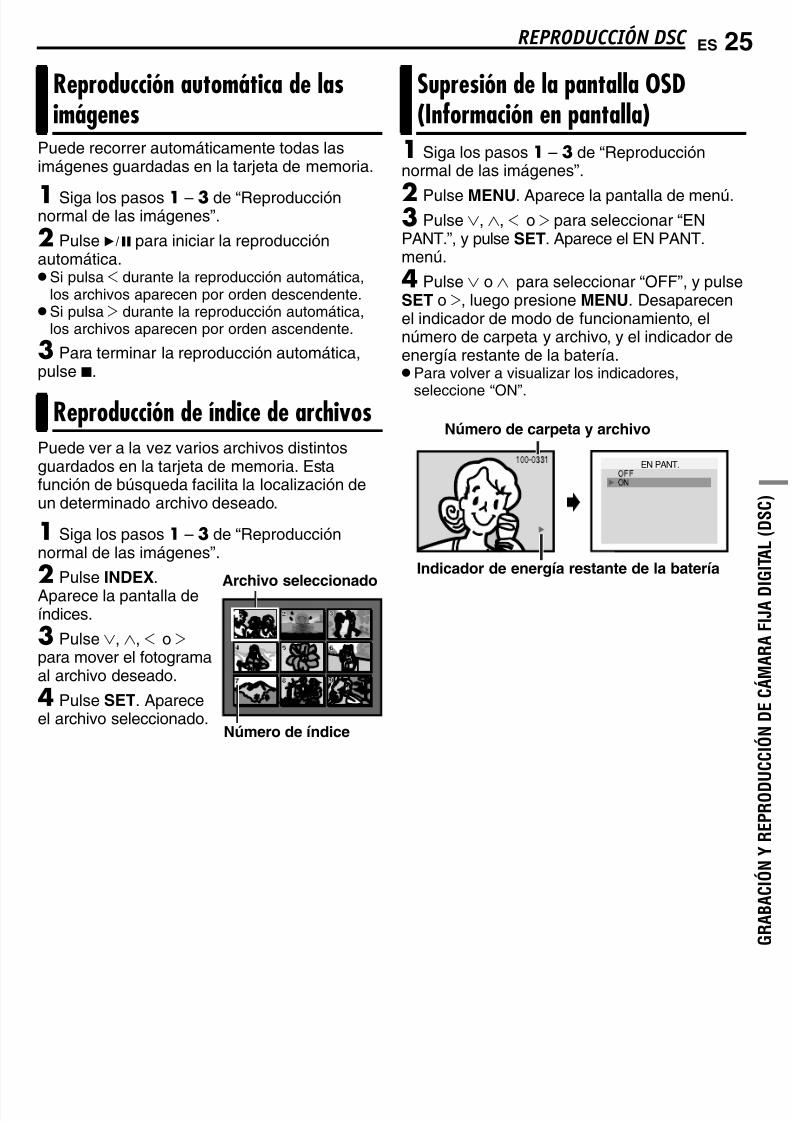
7/17/2019 Manual for JVC camcorder
http://slidepdf.com/reader/full/manual-for-jvc-camcorder 77/104
ES 25
G R A B A C I Ó N Y R E P R O D U C C I Ó N D E C Á M A R A F I J A D I G I T A L ( D S C )
REPRODUCCIÓN DSC
Puede recorrer automáticamente todas lasimágenes guardadas en la tarjeta de memoria.
1 Siga los pasos 1 – 3 de “Reproducciónnormal de las imágenes”.
2 Pulse6 para iniciar la reproducciónautomática. Si pulsa 1 durante la reproducción automática,
los archivos aparecen por orden descendente. Si pulsa 2 durante la reproducción automática,
los archivos aparecen por orden ascendente.
3 Para terminar la reproducción automática,pulse 7.
Puede ver a la vez varios archivos distintosguardados en la tarjeta de memoria. Estafunción de búsqueda facilita la localización deun determinado archivo deseado.
1 Siga los pasos 1 – 3 de “Reproducciónnormal de las imágenes”.
2 Pulse INDEX.Aparece la pantalla deíndices.
3 Pulse 4, 3, 1 o 2 para mover el fotogramaal archivo deseado.
4 Pulse SET. Apareceel archivo seleccionado.
1 Siga los pasos 1 – 3 de “Reproducciónnormal de las imágenes”.
2 Pulse MENU. Aparece la pantalla de menú.3 Pulse 4, 3, 1 o 2 para seleccionar “ENPANT.”, y pulse SET. Aparece el EN PANT.menú.
4 Pulse 4 o 3 para seleccionar “OFF”, y pulseSET o 2, luego presione MENU. Desaparecenel indicador de modo de funcionamiento, elnúmero de carpeta y archivo, y el indicador deenergía restante de la batería. Para volver a visualizar los indicadores,
seleccione “ON”.
Reproducción automática de lasimágenes
Reproducción de índice de archivos
3
4 5
6
7
8 9
Archivo seleccionado
Número de í ndice
Supresión de la pantalla OSD(Información en pantalla)
EN PANT.
Indicador de energí a restante de la baterí a
Número de carpeta y archivo
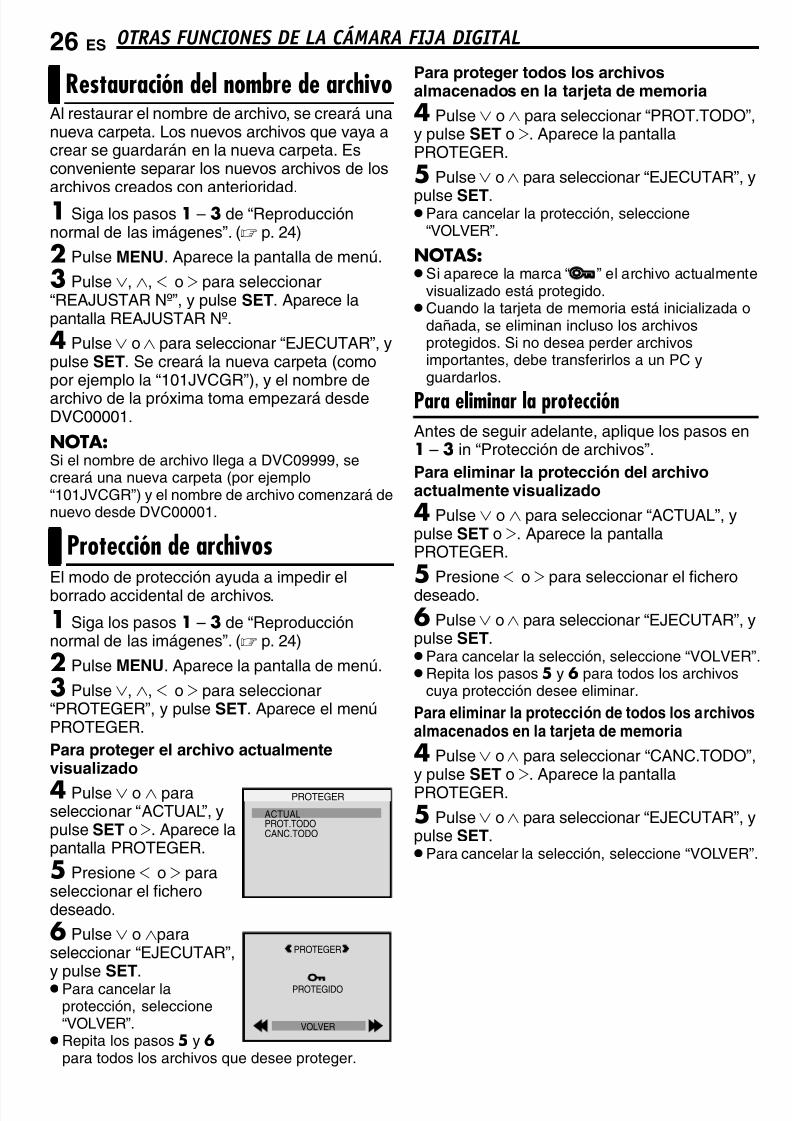
7/17/2019 Manual for JVC camcorder
http://slidepdf.com/reader/full/manual-for-jvc-camcorder 78/104
26 ES OTRAS FUNCIONES DE LA CÁMARA FIJA DIGITAL
Al restaurar el nombre de archivo, se creará unanueva carpeta. Los nuevos archivos que vaya acrear se guardarán en la nueva carpeta. Esconveniente separar los nuevos archivos de los
archivos creados con anterioridad.1 Siga los pasos 1 – 3 de “Reproducciónnormal de las imágenes”. ( p. 24)
2 Pulse MENU. Aparece la pantalla de menú.
3 Pulse 4, 3, 1 o 2 para seleccionar“REAJUSTAR Nº”, y pulse SET. Aparece lapantalla REAJUSTAR Nº.
4 Pulse 4 o3 para seleccionar “EJECUTAR”, ypulse SET. Se creará la nueva carpeta (comopor ejemplo la “101JVCGR”), y el nombre dearchivo de la próxima toma empezará desdeDVC00001.
NOTA:Si el nombre de archivo llega a DVC09999, secreará una nueva carpeta (por ejemplo“101JVCGR”) y el nombre de archivo comenzará denuevo desde DVC00001.
El modo de protección ayuda a impedir elborrado accidental de archivos.
1 Siga los pasos 1 – 3 de “Reproducciónnormal de las imágenes”. ( p. 24)
2 Pulse MENU. Aparece la pantalla de menú.
3 Pulse 4, 3, 1 o 2 para seleccionar“PROTEGER”, y pulse SET. Aparece el menúPROTEGER.Para proteger el archivo actualmentevisualizado
4 Pulse 4 o 3 paraseleccionar “ACTUAL”, ypulse SET o 2. Aparece lapantalla PROTEGER.
5 Presione 1 o 2 paraseleccionar el ficherodeseado.
6 Pulse 4 o 3paraseleccionar “EJECUTAR”,
y pulse SET. Para cancelar laprotección, seleccione“VOLVER”.Repita los pasos 5 y 6
para todos los archivos que desee proteger.
Para proteger todos los archivosalmacenados en la tarjeta de memoria
4 Pulse 4 o 3 para seleccionar “PROT.TODO”,y pulse SET o 2. Aparece la pantallaPROTEGER.
5 Pulse 4 o3 para seleccionar “EJECUTAR”, y
pulse SET. Para cancelar la protección, seleccione
“VOLVER”.
NOTAS: Si aparece la marca “ ” el archivo actualmente
visualizado está protegido.Cuando la tarjeta de memoria está inicializada o
dañada, se eliminan incluso los archivosprotegidos. Si no desea perder archivosimportantes, debe transferirlos a un PC yguardarlos.
Para eliminar la protecciónAntes de seguir adelante, aplique los pasos en1 – 3 in “Protección de archivos”.Para eliminar la protección del archivoactualmente visualizado
4 Pulse 4 o 3 para seleccionar “ACTUAL”, ypulse SET o 2. Aparece la pantallaPROTEGER.
5 Presione 1 o 2 para seleccionar el ficherodeseado.
6 Pulse 4 o3 para seleccionar “EJECUTAR”, ypulse SET. Para cancelar la selección, seleccione “VOLVER”.Repita los pasos 5 y 6 para todos los archivos
cuya protección desee eliminar.
Para eliminar la protección de todos los archivosalmacenados en la tarjeta de memoria
4 Pulse 4 o3 para seleccionar “CANC.TODO”,
y pulse SET o2
. Aparece la pantallaPROTEGER.
5 Pulse 4 o3 para seleccionar “EJECUTAR”, ypulse SET. Para cancelar la selección, seleccione “VOLVER”.
Restauración del nombre de archivo
Protección de archivos
PROTEGER
ACTUAL
PROT.TODO
CANC.TODO
PROTEGER
PROTEGIDO
VOLVER
7/17/2019 Manual for JVC camcorder
http://slidepdf.com/reader/full/manual-for-jvc-camcorder 79/104
ES 27OTRAS FUNCIONES DE LA CÁMARA FIJA DIGITAL
G R A B A C I Ó N Y R E P R O D U C C I Ó N D E C Á M A R A F I J A D I G I T A L ( D S C )
Los archivos previamente almacenados puedeneliminarse de uno en uno o todos a la vez.
1 Siga los pasos 1 – 3 de “Reproducciónnormal de las imágenes” ( p. 24).
2 Pulse MENU. Aparece la pantalla de menú.
3 Pulse 4, 3, 1 o 2 para seleccionar“ELIMINAR”, y pulse SET. Aparece el submenú.
Para eliminar el archivo actualmente visualizado
4 Pulse 4 o 3 paraseleccionar “ACTUAL”, ypulse SET o 2. Aparece lapantalla ELIMINAR.
5 Presione 1 o 2 para
seleccionar el ficherodeseado.
6 Pulse 4 o 3 paraseleccionar “EJECUTAR”,y pulse SET. Para cancelar la
eliminación, seleccione“VOLVER”.Repita los pasos 5 y 6
para todos los archivos que desea eliminar.
NOTA:
Si aparece la marca “ ”, el archivo seleccionadoestá protegido y no puede ser eliminado.
Para eliminar todos los archivosalmacenados en la tarjeta de memoria
4 Pulse 4 o 3 para seleccionar “TODO”, ypulse SET o 2. Aparece la pantalla ELIMINAR.
5 Pulse 4 o3 para seleccionar “EJECUTAR”, ypulse SET. Para cancelar la eliminación, seleccione “VOLVER”.
NOTAS:
Los archivos protegidos ( p. 26) no pueden sereliminados. Para eliminarlos, primero debequitarles la protección.Una vez eliminados los archivos, no pueden ser
restaurados. Compruebe los archivos antes deeliminarlos.
PRECAUCIÓN:No extraiga la tarjeta de memoria ni realice ningunaotra operación (por ejemplo apagar la cámara)durante la eliminación. Además, asegúrese deutilizar el adaptador de CA suministrado, ya que latarjeta de memoria puede resultar dañada si labaterí a se agota durante la eliminación. Si la tarjetade memoria resulta dañada, deberá inicializarla.( p. 28)
Esta videocámara es compatible con la normaDPOF (Formato de orden de impresión digital),para lograr la compatibilidad con futuros sistemas
como la impresión automática. Puede seleccionaruno de los dos ajustes de información deimpresión para imágenes guardadas en la tarjetade memoria: “Para imprimir todas las imágenesfi jas (una impresión por cada una)” o “Paraimprimir mediante selección de imágenes fi jas ynúmero de copias”.
NOTA:Si carga una tarjeta de memoria ya configuradacomo se indica a continuación en una impresoracompatible con DPOF, realizará automáticamentecopias de impresión de las imágenes fi jasseleccionadas.
Para imprimir todas las imágenes fijas (unaimpresión por cada una)
1 Siga los pasos 1 – 3 de “Reproducciónnormal de las imágenes”. ( p. 24)
2 Pulse MENU. Aparece la pantalla de menú.
3 Pulse 4, 3, 1 o 2 paraseleccionar “DPOF”, ypulse SET. Aparece elmenú DPOF.
4 Pulse 4 o 3 paraseleccionar “TODO 1”, ypulse SET o 2. Aparece lapantalla DPOF.
5 Pulse 4 o 3 paraseleccionar “EJECUTAR”,
y pulse SET. Aparece lapantalla de reproducciónnormal. Para cancelar la selección,
seleccione “VOLVER”.
Eliminar archivos
ELIMINAR
ACTUALTODO
ELIMINAR
¿ELIMINAR?
EJECUTAR
VOLVER
Ajuste de información de impresión(ajuste DPOF)
TODO 1REAJUSTAR
ACTUAL
¿TODO 1?
EJECUTAR
VOLVER
7/17/2019 Manual for JVC camcorder
http://slidepdf.com/reader/full/manual-for-jvc-camcorder 80/104
OTRAS FUNCIONES DE LA CÁMARA FIJA DIGITAL28 ES
Para imprimir mediante selección deimágenes fijas y número de copias1 Siga los pasos 1 – 3 de “Para imprimir todaslas imágenes fi jas (una impresión por cada una)”.( p. 27)
2Pulse
4 o3
paraseleccionar “ACTUAL”, ypulse SET o 2. Aparece lapantalla DPOF.
3 Presione 1 o 2 paraseleccionar el ficherodeseado.
4 Pulse 4 o3 para seleccionar la indicación denúmero (00), y pulse SET.
5 Seleccione el número
de copias pulsando3
para aumentar el número,o 4 para disminuir elnúmero, y pulse SET.Repita los pasos de 3 a 5
para el número deseadode copias. El número de copias puede ajustarse hasta 15. Para corregir el número de copias, seleccione
otra vez la imagen y cambie el número.
6 Pulse 4 o 3 para
seleccionar “VOLVER”, ypulse SET. Aparece“¿GUARDAR?”. Si usted no realizó ningún
cambio de ajuste en elintervalo del paso 3 a5, elmenú de DPOF aparece nuevamente.
7 Pulse 4 o 3 para seleccionar “EJECUTAR” para guardar la configuración que acaba dehacer, y pulse SET. Para cancelar la selección, seleccione “CANCELAR”.
Para reajustar el número de copias1 Siga los pasos 1 – 3 de “Para imprimir todaslas imágenes fi jas (una impresión por cadauna)”. ( p. 27)
2 Pulse 4 o 3 para seleccionar “REAJUSTAR”,y pulse SET. Aparece la pantalla DPOF.
3 Pulse 4 o3 para seleccionar “EJECUTAR”, ypulse SET. Aparece la pantalla de reproducciónnormal.
Para cancelar la selección, seleccione “VOLVER”. El número de copias se reajusta en “0” para todas
las imágenes fi jas.
PRECAUCIÓN:Mientras realiza esta operación, no desconectenunca la alimentación eléctrica, pues esto puededañar la tarjeta de memoria.
Puede inicializar una tarjeta de memoria encualquier momento.Después de la inicialización, se borran todos losarchivos y datos almacenados en la tarjeta de
memoria, incluidos los que estuvieranprotegidos.
1 Ajuste el interruptor VIDEO/MEMORY en“MEMORY”.
2 Ajuste el interruptor de alimentación en“PLAY” a la vez que mantiene presionado elbotón de bloqueo situado en el interruptor.
3 Pulse MENU. Aparece la pantalla de menú.
4 Pulse 4, 3, 1 o 2 para
seleccionar“FORMATEAR”, y pulseSET. Aparece la pantallaFORMATEAR.
5 Pulse 4 o 3 paraseleccionar“EJECUTAR”, y pulse SET. La tarjeta dememoria se inicializa.Una vez finalizada la inicialización, aparece “NO
HAY IMÁGENES ALMACENADAS”. Para cancelar la inicialización, seleccione
“VOLVER”.
PRECAUCIÓN:No realice ninguna otra operación (por ejemplo,apagar la videocámara) durante la inicialización.Además, asegúrese de utilizar el adaptador de CAsuministrado, ya que la tarjeta de memoria puederesultar dañada si la baterí a se agota durante lainicialización. Si la tarjeta de memoria resultadañada, deberá inicializarla.
N˚ DE COPIAS
VOLVER
N˚ DE COPIAS
¿GUARDAR?
EJECUTAR
CANCELAR
Inicializar una tarjeta de memoria
FORMATEAR
¿BORRAR TODOS
DATOS EXISTENTES?
EJECUTAR
VOLVER
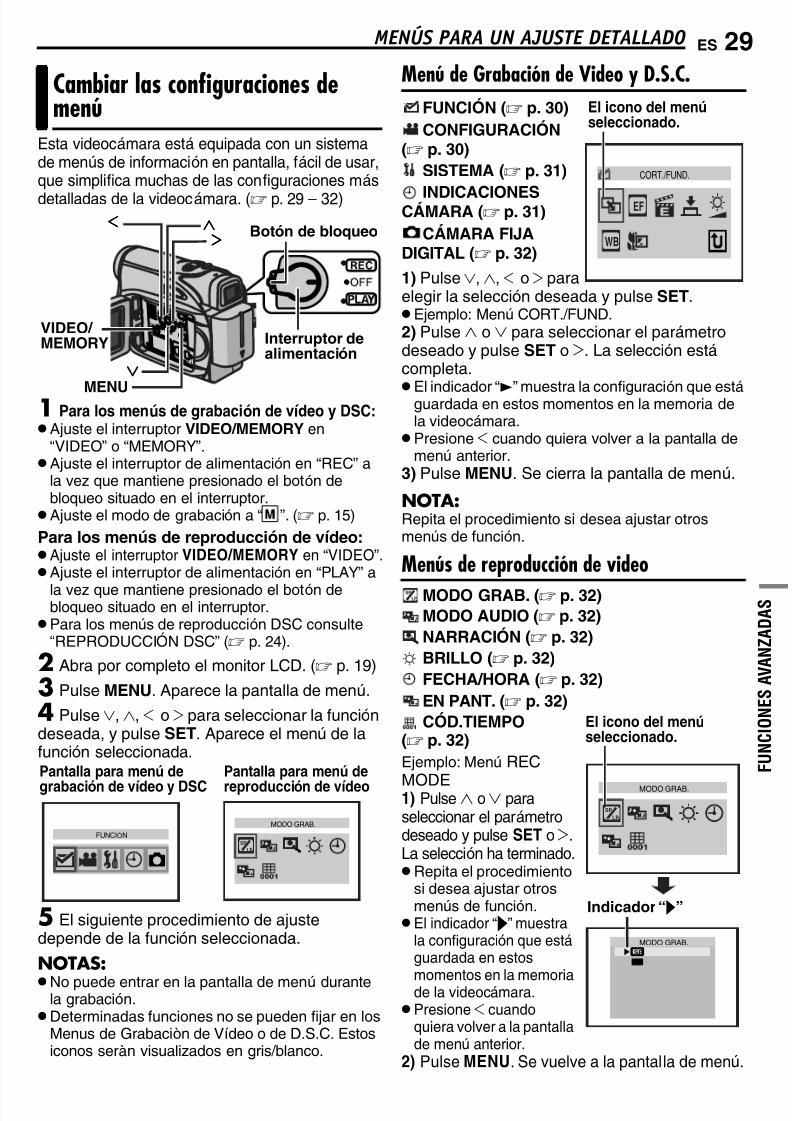
7/17/2019 Manual for JVC camcorder
http://slidepdf.com/reader/full/manual-for-jvc-camcorder 81/104
ES 29
F U N C I O N E S A V A N Z A D A S
MENÚS PARA UN AJUSTE DETALLADO
Esta videocámara está equipada con un sistemade menús de información en pantalla, fácil de usar,que simplifica muchas de las configuraciones más
detalladas de la videocámara. ( p. 29 – 32)
1 Para los menús de grabación de ví deo y DSC: Ajuste el interruptor VIDEO/MEMORY en
“VIDEO” o “MEMORY”. Ajuste el interruptor de alimentación en “REC” a
la vez que mantiene presionado el botón debloqueo situado en el interruptor. Ajuste el modo de grabación a “
M ”. ( p. 15)
Para los menús de reproducción de ví deo: Ajuste el interruptor VIDEO/MEMORY en “VIDEO”. Ajuste el interruptor de alimentación en “PLAY” a
la vez que mantiene presionado el botón debloqueo situado en el interruptor. Para los menús de reproducción DSC consulte
“REPRODUCCIÓN DSC” ( p. 24).
2 Abra por completo el monitor LCD. ( p. 19)
3 Pulse MENU. Aparece la pantalla de menú.
4 Pulse 4, 3, 1 o 2 para seleccionar la funcióndeseada, y pulse SET. Aparece el menú de lafunción seleccionada.
5 El siguiente procedimiento de ajustedepende de la función seleccionada.
NOTAS:No puede entrar en la pantalla de menú durante
la grabación.Determinadas funciones no se pueden fi jar en los
Menus de Grabaciòn de Ví deo o de D.S.C. Estosiconos seràn visualizados en gris/blanco.
Menú de Grabación de Video y D.S.C.FUNCIÓN ( p. 30)
CONFIGURACIÓN( p. 30)
SISTEMA ( p. 31)
INDICACIONESCÁMARA ( p. 31)
CÁMARA FIJADIGITAL ( p. 32)
1) Pulse 4, 3, 1 o 2 paraelegir la selección deseada y pulse SET. Ejemplo: Menú CORT./FUND.2) Pulse 3 o 4 para seleccionar el parámetrodeseado y pulse SET o 2. La selección está completa.
El indicador “3” muestra la configuración que está guardada en estos momentos en la memoria dela videocámara. Presione 1 cuando quiera volver a la pantalla de
menú anterior.3) Pulse MENU. Se cierra la pantalla de menú.
NOTA:Repita el procedimiento si desea ajustar otrosmenús de función.
Menús de reproducción de videoMODO GRAB. ( p. 32)
MODO AUDIO ( p. 32)
NARRACIÓN ( p. 32)
BRILLO ( p. 32)
FECHA/HORA ( p. 32)
EN PANT. ( p. 32)
CÓD.TIEMPO ( p. 32)
Ejemplo: Menú REC
MODE1) Pulse 3 o4 paraseleccionar el parámetrodeseado y pulse SET o2.La selección ha terminado.Repita el procedimiento
si desea ajustar otrosmenús de función. El indicador “‰” muestra
la configuración que está guardada en estos
momentos en la memoriade la videocámara. Presione 1 cuando
quiera volver a la pantallade menú anterior.
2) Pulse MENU. Se vuelve a la pantalla de menú.
Cambiar las configuraciones demenú
Interruptor dealimentación
Botón de bloqueo
MENU
1111
22223333
4444
VIDEO/ MEMORY
FUNCIÓNSP
LP
MODO GRAB.
Pantalla para menú degrabación de ví deo y DSC
Pantalla para menú dereproducción de ví deo
CORT./FUND.
WB
EF
El icono del menú seleccionado.
SP
LP
MODO GRAB.
SP
LP
El icono del menúseleccionado.
LP
MODO GRAB.
SP
Indicador “‰”
7/17/2019 Manual for JVC camcorder
http://slidepdf.com/reader/full/manual-for-jvc-camcorder 82/104
MENÚS PARA UN AJUSTE DETALLADO30 ES
FUNCIÓN
Los siguientes ajustes del menú pueden sercambiados sólo cuando el interruptor dealimentación es puesto en “REC”.[ ] = Preajuste de fábrica
( p. 37), “Efectos de reemplazo (cortinilla) ofundido de imagen”
( p. 38), “Programa AE, efectos y efectos deobturación”
( p. 38), “Programa AE, efectos y efectos de
obturación”
( p. 38), “Programa AE, efectos y efectos deobturación”
( p. 35), “Control de exposición”
( p. 36), “Ajuste del balance del blanco”
[OFF]: Desactive esta función.ON: Cuando la distancia al motivo sea inferior a1 m, ajuste “TELE MACRO” en “ON”. Se puedefilmar un motivo de máximo tamaño a unadistancia de aproximadamente 40 cm.Según la posición del zoom, el objetivo sepuede desenfocar.
CONFIGURACIÓN
Los siguientes ajustes son operativos cuando elinterruptor se posiciona en “REC”.[ ] = Preajuste de fábrica
[SP]*: Para grabar en el modo SP(Reproducción estándar)LP: Larga reproducción—más económica,aumenta 1,5 veces el tiempo de grabación.* El indicador SP no aparece en la pantalla.
NOTAS: Si se conmuta el modo de grabación, la imagen
que se está reproduciendo se volverá borrosa en
el punto de conmutación. Se recomienda reproducir con esta videocámara las
cintas grabadas en modo LP con esta videocámara.Durante la reproducción de una cinta grabada con
otra videocámara, pueden producirse bloques deruido o pausas momentáneas en el sonido.
[12BITS]: Permite la grabación de ví deo desonido estereofónico en cuatro canalesdiferentes. (Equivalente al modo de 32 kHz enlos modelos anteriores)16BITS: Permite la grabación de ví deo de sonido
estereofónico en dos canales distintos. (Equivalenteal modo de 48 kHz en modelos anteriores)
OFF: Desactive esta función.[ON ]: Para compensar las imágenesinestables ocasionadas por sacudidas de lacámara, especialmente en casos de granamplificación.
NOTAS:
Puede resultar imposible efectuar unaestabilización precisa si el temblor de la mano esexcesivo, o las condiciones de filmación no lopermiten. El indicador “ ” parpadea o se apaga si no se
puede utilizar el estabilizador.Desactive este modo cuando vaya a grabar con la
videocámara montada sobre un trí pode.* Disponible solamente cuando el interruptor
VIDEO/MEMORY está ajustado en “VIDEO”.
[FOTO]: Modo fotografiadoLENTO : Modo de cámara lenta en directoPara más detalles sobre el procedimiento,consulte “Cámara lenta en directo” ( p. 33) y“Fotografiado (Para grabaciones de ví deo)” ( p. 34).* Disponible solamente cuando el interruptor
VIDEO/MEMORY está ajustado en “VIDEO”.
[32X]: Cuando se ajusta en “32X” durante el usodel zoom digital, la ampliación mediante zoomse reajustará en 32X, pues el zoom digital sedesactivará.64X*: Le permite utilizar el zoom digital.Mediante procesamiento digital y ampliación delas imágenes, la función de zoom es posibledesde 32X(el lí mite del zoom óptico), hasta unmáximo de ampliación digital de 64X.800X*: Le permite utilizar el zoom digital.Mediante procesamiento digital y ampliación delas imágenes, la función de zoom es posibledesde 32X(el lí mite del zoom óptico), hasta unmáximo de ampliación digital de 800X.* Disponible solamente cuando el interruptor
VIDEO/MEMORY está ajustado en “VIDEO”.
Menús de grabación
CORT./FUND.
EFECTO
PROGRAMA AE
OBTUR.
EXPOSICIÓN
BAL. BLANCO
TELE MACRO
MODO GRAB.
MODO AUDIO
DIS*
FOTO/LENTO*
ZOOM*
7/17/2019 Manual for JVC camcorder
http://slidepdf.com/reader/full/manual-for-jvc-camcorder 83/104
ES 31MENÚS PARA UN AJUSTE DETALLADO
F U N C I O N E S A V A N Z A D A S
OFF: Permite filmar escenas oscuras sin ajustede brillo de imagen.[AGC]: El aspecto general puede ser granulado,pero la imagen es clara.AUTO : La velocidad de obturación seajusta automáticamente. Filmar un sujeto conpoca o insuficiente iluminación y con unavelocidad lenta de obturación produce unaimagen más clara que en el modo AGC, pero losmovimientos del sujeto no son suaves ninaturales. El aspecto general puede sergranulado. Durante el ajuste automático de lavelocidad de obturación, “ ” aparece enpantalla.
[OFF]: Desactiva la función.
ON : Ayuda a reducir el ruido ocasionadopor el viento. Aparece la indicación “ ”. Lacalidad del sonido cambiará. Esto es normal.
SISTEMA
Las funciones “ SISTEMA” ajustadas cuandoel interruptor de alimentación está ajustado en“REC” se aplican también cuando el interruptorde alimentación se ajusta en “PLAY”.[ ] = Preajuste de fábrica
OFF: Aunque no se escuche durante lafilmación, el sonido del obturador quedagrabado en la cinta.[ON]: Cuando se realiza cualquier operación suena una melodí a. También activa el efecto desonido del obturador. ( p. 24, 34)
[VOLVER]: No reajusta todas las configuracionesen los valores preajustados en fábrica.EJECUTAR: Reajusta todas las configuraciones
en los valores preajustados en fábrica.
[LCD]: La imagen aparece en el monitor LCDcuando el visor se despliega mientras el monitorLCD está abierto.VISOR: La imagen aparece en el visor cuandoéste se despliega mientras el monitor LCD está abierto.
INDICACIONES CÁMARA
Los siguientes ajustes del menú pueden sercambiados sólo cuando el interruptor dealimentación es puesto en “REC”. La configuración de INDICACIONES CÁMARA
excepto “BRILLO” i “LANGUAGE” son solamenteefectivas durante la grabación
[ ] = Preajuste de fábrica
p. 17, “Ajuste de brillo de la pantalla”
p. 16, “Ajustes de fecha/hora”
/ / / [ENGLISH] / FRANÇAIS / ESPAÑOL / PORTUGUÊS
Se puede cambiar la configuración de idioma.( p. 16)
[OFF]: Los datos de fecha/hora no aparecen.ON: Los datos de fecha/hora se muestranpermanentemente.
LCD: Impide que los datos de visualización dela videocámara (excepto fecha, hora y código detiempo) aparezcan en la pantalla del televisorconectado.[LCD/TV]: Hace que los datos de visualizaciónde la videocámara aparezcan en la pantallacuando la videocámara está conectada a untelevisor.
[OFF]: El código de tiempo no se visualiza.ON: El código de tiempo se visualiza en lavideocámara y en el televisor conectado. Losnúmeros de fotogramas no se visualizan
durante la grabación. ( p. 20)
GANANCIA
SIN VIENTO
MELODÍ A
REAJUSTAR
PRIORIDAD
BRILLO
AJUS.RELOJ
LANGUAGE
FECHA/HORA
EN PANT.
CÓD.TIEMPO
7/17/2019 Manual for JVC camcorder
http://slidepdf.com/reader/full/manual-for-jvc-camcorder 84/104
MENÚS PARA UN AJUSTE DETALLADO32 ES
OFF: No se realizará la demostraciónautomática.[ON]: Hace una demostración de funciones como el programa AE con efectos especiales y de obturación, etc., y se puede usar para confirmar cómo funcionan. La demostración seinicia en los casos siguientes:Cuando el menú de pantalla se cierra después de
haber ajustado “MODO DEMO” en “ON”.Con “MODO DEMO” ajustado en “ON”, el aparato
no funciona durante unos 3 minutos después dehaberse ajustado el interruptor de alimentaciónen “REC”. La realización de cualquier operación durante la
demostración interrumpe temporalmente lademostración. Si no se realiza ninguna operacióndurante más de 3 minutos después de eso, la
demostración se reanudará.
NOTAS: Si hay una cinta en la videocámara, la
demostración no podrá activarse. “MODO DEMO” se mantiene en “ON” incluso si la
videocámara se apaga.
CÁMARA FIJA DIGITAL
[ ] = Preajuste de fábrica
[FINA] / ESTÁNDAREl modo de calidad de imagen se puedeseleccionar para adaptarlo mejor a lasnecesidades. Hay dos modos de calidad deimagen: FINA ( ) y ESTÁNDAR ( ) (pororden de calidad).
NOTA:El número de imágenes almacenables depende dela calidad de imagen seleccionada, así como de lacomposición de los sujetos en las imágenes y deltipo de tarjeta de memoria utilizada. ( p. 24)
[ (CINTA)]: Cuando la grabación en modoFotografiado se realiza con el interruptorVIDEO/MEMORY ajustado en “VIDEO”, lasimágenes fi jas se graban solamente en la cinta.
/ (CINTA/TAR.): Cuando lagrabación en modo Fotografiado se realiza conel interruptor VIDEO/MEMORY ajustado en“VIDEO”, las imágenes fi jas se graban nosolamente en la cinta, sino también en la tarjeta
de memoria (640 x 480 pí xeles).
[ ] = Preajuste de fábrica
MODO AUDIO y NARRACIÓN
Durante la reproducción de la cinta, lavideocámara detecta el modo de sonido en que serealizó la grabación y reproduce dicho sonido.Seleccione el tipo de sonido con el que deseaacompañar su imagen de reproducción. Según laexplicación de acceso al menú, en página 29,seleccione “MODO AUDIO” o “NARRACIÓN” en la
pantalla de menú y ajuste el parámetro deseado.Los ajustes de abajo son efectivos sólo para lavideorreproducción excepto “BRILLO” o “MODOGRAB.”.Los parámetros (excepto “OFF”en lasconfiguraciones de EN PANT., MODO AUDIOand NARRACIÓN) son los mismos que en ladescripción de la página 30.
Permite ajustar el modo de grabación de ví deo(SP o LP) según se prefiera. Se recomiendautilizar “MODO GRAB.” en el menú VÍ DEOcuando se utilice esta videocámara comograbadora durante la copia.* El indicador SP no aparece en la pantalla.
[ESTÉREO ]: El sonido sale en estereofónicopor los canales izquierdo y derecho (“L” y “R”).AUDIO I : El sonido sale por el canal izquierdo“L”.AUDIO D : El sonido sale por el canal
derecho “R”.
Aunque no es posible realizar el doblaje audiocon este camcorder, usando esta función ustedpuede escuchar el sonido de la cinta audio-doblada durante el playback/lectura.[OFF]: El sonido original sale en estereofónicopor los canales izquierdo y derecho (“L” y “R”).ON: El sonido de la copia sale en estereofónicopor los canales izquierdo y derecho (“L” y “R”).( p. 45)MEZCLA: Los sonidos original y de la copia secombinan y salen por los canales izquierdo yderecho (“L” y “R”).
p. 17, “Ajuste de brillo de la pantalla”
[OFF]: Los datos de FECHA/HORA no aparecen.ON: Los datos de FECHA/HORA se muestranpermanentemente.
Cuando está ajustada en “OFF”, los datos devisualización de la videocámara están apagada.
p. 20, “Código de tiempo”
MODO DEMO
CALIDAD
SEL.GRAB.
Menús de reproducción
MODO GRAB. [SP]* / LP
MODO AUDIO
NARRACIÓN
BRILLO
FECHA/HORA
EN PANT. OFF / [LCD] / LCD/TV
CÓD.TIEMPO [OFF] / ON
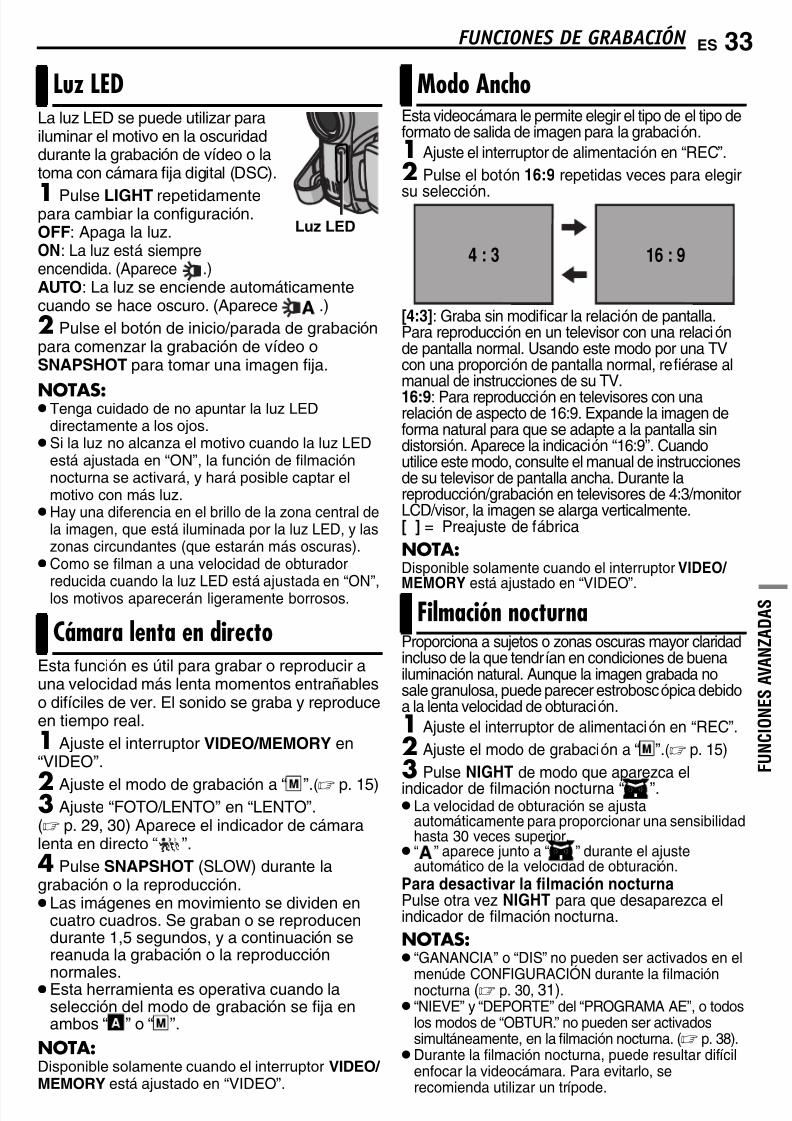
7/17/2019 Manual for JVC camcorder
http://slidepdf.com/reader/full/manual-for-jvc-camcorder 85/104
ES 33
F U N C I O N E S A V A N Z A D A S
FUNCIONES DE GRABACIÓN
La luz LED se puede utilizar parailuminar el motivo en la oscuridaddurante la grabación de ví deo o latoma con cámara fi ja digital (DSC).
1 Pulse LIGHT repetidamentepara cambiar la configuración.OFF: Apaga la luz.ON: La luz está siempreencendida. (Aparece .)AUTO: La luz se enciende automáticamentecuando se hace oscuro. (Aparece .)
2 Pulse el botón de inicio/parada de grabaciónpara comenzar la grabación de ví deo oSNAPSHOT para tomar una imagen fi ja.
NOTAS: Tenga cuidado de no apuntar la luz LED
directamente a los ojos. Si la luz no alcanza el motivo cuando la luz LED
está ajustada en “ON”, la función de filmaciónnocturna se activará, y hará posible captar elmotivo con más luz.Hay una diferencia en el brillo de la zona central de
la imagen, que está iluminada por la luz LED, y laszonas circundantes (que estarán más oscuras).Como se filman a una velocidad de obturador
reducida cuando la luz LED está ajustada en “ON”,los motivos aparecerán ligeramente borrosos.
Esta función es útil para grabar o reproducir auna velocidad más lenta momentos entrañableso difí ciles de ver. El sonido se graba y reproduceen tiempo real.
1 Ajuste el interruptor VIDEO/MEMORY en“VIDEO”.
2 Ajuste el modo de grabación a “ M ”.( p. 15)3 Ajuste “FOTO/LENTO” en “LENTO”.( p. 29, 30) Aparece el indicador de cámaralenta en directo “ ”.4 Pulse SNAPSHOT (SLOW) durante lagrabación o la reproducción. Las imágenes en movimiento se dividen en
cuatro cuadros. Se graban o se reproducendurante 1,5 segundos, y a continuación sereanuda la grabación o la reproducción
normales.Esta herramienta es operativa cuando la
selección del modo de grabación se fi ja enambos “
A ” o “
M
”.
NOTA:Disponible solamente cuando el interruptor VIDEO/ MEMORY está ajustado en “VIDEO”.
Esta videocámara le permite elegir el tipo de el tipo deformato de salida de imagen para la grabación.
1 Ajuste el interruptor de alimentación en “REC”.2 Pulse el botón 16:9 repetidas veces para elegir
su selección.
[4:3]: Graba sin modificar la relación de pantalla.Para reproducción en un televisor con una relaciónde pantalla normal. Usando este modo por una TVcon una proporción de pantalla normal, refiérase almanual de instrucciones de su TV.16:9: Para reproducción en televisores con unarelación de aspecto de 16:9. Expande la imagen deforma natural para que se adapte a la pantalla sindistorsión. Aparece la indicación “16:9”. Cuandoutilice este modo, consulte el manual de instruccionesde su televisor de pantalla ancha. Durante lareproducción/grabación en televisores de 4:3/monitorLCD/visor, la imagen se alarga verticalmente.[ ] = Preajuste de fábrica
NOTA:Disponible solamente cuando el interruptor VIDEO/
MEMORY está ajustado en “VIDEO”.
Proporciona a sujetos o zonas oscuras mayor claridadincluso de la que tendrí an en condiciones de buenailuminación natural. Aunque la imagen grabada nosale granulosa, puede parecer estroboscópica debidoa la lenta velocidad de obturación.
1 Ajuste el interruptor de alimentación en “REC”.2 Ajuste el modo de grabación a “ M ”.( p. 15)
3 Pulse NIGHT de modo que aparezca elindicador de filmación nocturna “ ”. La velocidad de obturación se ajusta
automáticamente para proporcionar una sensibilidadhasta 30 veces superior. “ ” aparece junto a “ ” durante el ajuste
automático de la velocidad de obturación.Para desactivar la filmación nocturnaPulse otra vez NIGHT para que desaparezca elindicador de filmación nocturna.
NOTAS: “GANANCIA” o “DIS” no pueden ser activados en el
menúde CONFIGURACIÓN durante la filmaciónnocturna ( p. 30, 31). “NIEVE” y “DEPORTE” del “PROGRAMA AE”, o todos
los modos de “OBTUR.” no pueden ser activadossimultáneamente, en la filmación nocturna. ( p. 38). Durante la filmación nocturna, puede resultar difí cil
enfocar la videocámara. Para evitarlo, serecomienda utilizar un trí pode.
Luz LED
Cámara lenta en directo
Luz LED
Modo Ancho
Filmación nocturna
16 : 94 : 3
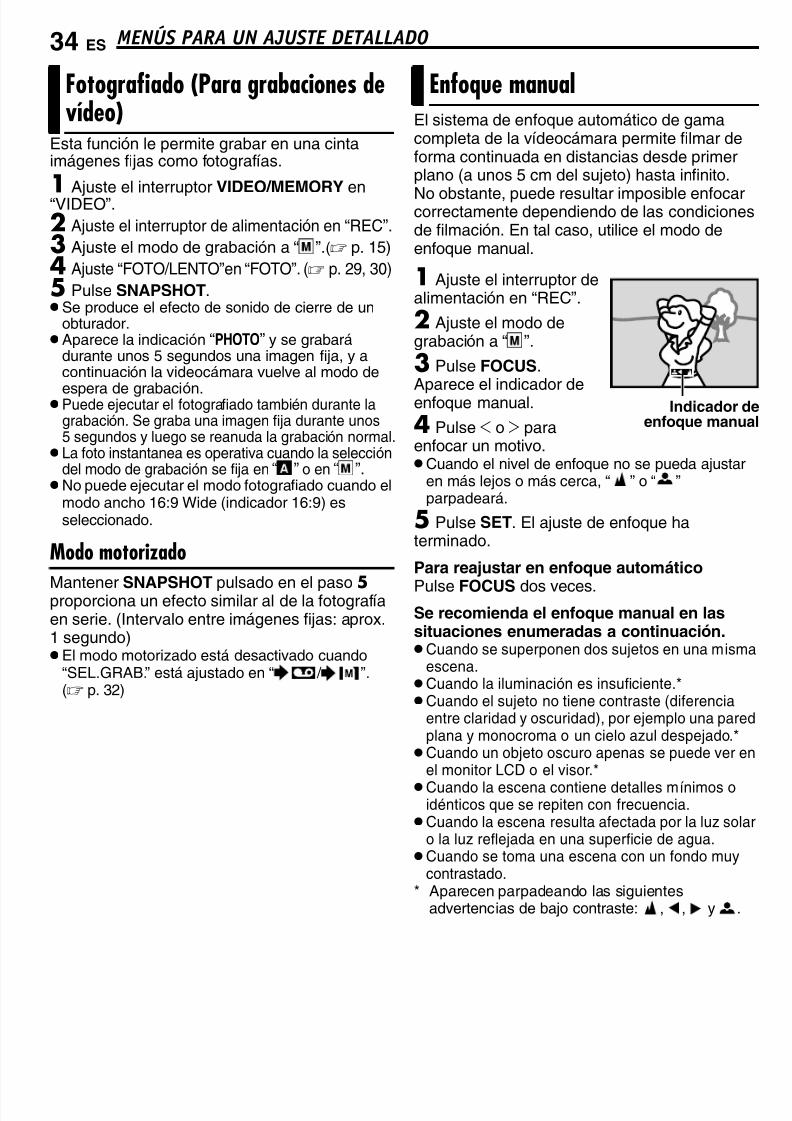
7/17/2019 Manual for JVC camcorder
http://slidepdf.com/reader/full/manual-for-jvc-camcorder 86/104
MENÚS PARA UN AJUSTE DETALLADO34 ES
Esta función le permite grabar en una cintaimágenes fi jas como fotografí as.
1Ajuste el interruptor VIDEO/MEMORY en“VIDEO”.
2 Ajuste el interruptor de alimentación en “REC”.3 Ajuste el modo de grabación a “ M ”.( p. 15)
4 Ajuste “FOTO/LENTO”en “FOTO”. ( p. 29, 30)
5 Pulse SNAPSHOT. Se produce el efecto de sonido de cierre de un
obturador. Aparece la indicación “PHOTO” y se grabará
durante unos 5 segundos una imagen fi ja, y acontinuación la videocámara vuelve al modo de
espera de grabación. Puede ejecutar el fotografiado también durante la
grabación. Se graba una imagen fi ja durante unos5 segundos y luego se reanuda la grabación normal. La foto instantanea es operativa cuando la selección
del modo de grabación se fi ja en “ A
” o en “ M
”.No puede ejecutar el modo fotografiado cuando el
modo ancho 16:9 Wide (indicador 16:9) esseleccionado.
Modo motorizado
Mantener SNAPSHOT pulsado en el paso 5 proporciona un efecto similar al de la fotografí aen serie. (Intervalo entre imágenes fi jas: aprox.1 segundo) El modo motorizado está desactivado cuando
“SEL.GRAB.” está ajustado en “ / ”.( p. 32)
El sistema de enfoque automático de gamacompleta de la ví deocámara permite filmar deforma continuada en distancias desde primerplano (a unos 5 cm del sujeto) hasta infinito.
No obstante, puede resultar imposible enfocarcorrectamente dependiendo de las condicionesde filmación. En tal caso, utilice el modo deenfoque manual.
1 Ajuste el interruptor dealimentación en “REC”.
2 Ajuste el modo degrabación a “
M
”.
3 Pulse FOCUS.
Aparece el indicador deenfoque manual.
4 Pulse 1 o 2 paraenfocar un motivo.Cuando el nivel de enfoque no se pueda ajustar
en más lejos o más cerca, “ ” o “ ” parpadeará.
5 Pulse SET. El ajuste de enfoque haterminado.
Para reajustar en enfoque automático
Pulse FOCUS dos veces.
Se recomienda el enfoque manual en lassituaciones enumeradas a continuación.Cuando se superponen dos sujetos en una misma
escena.Cuando la iluminación es insuficiente.*Cuando el sujeto no tiene contraste (diferencia
entre claridad y oscuridad), por ejemplo una paredplana y monocroma o un cielo azul despejado.*Cuando un objeto oscuro apenas se puede ver en
el monitor LCD o el visor.*Cuando la escena contiene detalles mí nimos o
idénticos que se repiten con frecuencia.Cuando la escena resulta afectada por la luz solar
o la luz reflejada en una superficie de agua.Cuando se toma una escena con un fondo muy
contrastado.* Aparecen parpadeando las siguientes
advertencias de bajo contraste: , , y .
Fotografiado (Para grabaciones devídeo)
Enfoque manual
Indicador deenfoque manual
7/17/2019 Manual for JVC camcorder
http://slidepdf.com/reader/full/manual-for-jvc-camcorder 87/104
ES 35MENÚS PARA UN AJUSTE DETALLADO
F U N C I O N E S A V A N Z A D A S
Se recomienda el control de exposición manualen las siguientes situaciones:Cuando se filme con iluminación trasera o cuando
el fondo sea demasiado claro.
Cuando se filme sobre un fondo naturalreflectante, por ejemplo en la playa o esquiando.Cuando el fondo sea muy oscuro o el sujeto muy
claro.
1 Ajuste el interruptor de alimentación en “REC”.
2 Ajuste el modo de grabación a “ M
”. ( p. 15)
3 Ajuste “EXPOSICIÓN” a “MANUAL” en menú FUNCIÓN. ( p. 29) Aparece el menú de control de exposición.
4Para aclarar la imagen, pulse
3. Paraoscurecer la imagen, pulse 4.(máximo ±6)
La exposición +3 tiene el mismo efecto que lacompensación de contraluz. ( p. 36) La exposición –3 tiene el mismo efecto que
cuando “PROGRAMA AE” está ajustado en“FOCO”. ( p. 38)
5 Pulse SET o 2. El ajuste de exposición haterminado.
Para volver al control automático deexposición
Seleccione “AUTO” en el paso 3.NOTAS:No puede utilizar el control de exposición manual
al mismo tiempo que “PROGRAMA AE” está ajustado en “FOCO” o “NIEVE” ( p. 38), ni conla compensación de contraluz. Si el ajuste no produce ningún cambio visible en
el brillo, ajuste “GANANCIA” en “AUTO”.( p. 29, 31)
Al igual que la pupila del ojo humano, eldiafragma se contrae en entornos bieniluminados para impedir la entrada de luzexcesiva, y se dilata en entornos poco
iluminados para permitir la entrada de más luz.Utilice esta función en las situacionessiguientes:Cuando filme un sujeto en movimiento.Cuando cambie la distancia con respecto al
sujeto (de modo que cambia su tamaño en elmonitor LCD o en el visor), por ejemplo cuando elsujeto retrocede.Cuando se filme sobre un fondo natural
reflectante, por ejemplo en la playa o esquiando.Cuando filme objetos bajo un foco de luz.
Cuando utilice el zoom.
1 Ajuste el interruptor de alimentación en “REC”.
2 Ajuste el modo de grabación a “ M ”. ( p. 15)
3 Ajuste “EXPOSICIÓN” a “MANUAL” en menú FUNCIÓN. ( p. 29) Aparece el menú de control de exposición.
4 Ajuste el zoom de modo que el sujeto llene elmonitor LCD o el visor, y luego pulse ymantenga pulsado SET o 2 durante más de 2
segundos. Aparece la indicación “ ”.5 Pulse SET o 2. El diafragma es bloqueado.
6 Pulse MENU. Se cierra la pantalla de menú.Aparece la indicación “ ”.
Para volver al control automático deldiafragmaSeleccione “AUTO” en el paso 3. El indicador de control de exposición y “ ”
desaparecen.
Para bloquear el control de exposición y eldiafragmaDespués del paso 3, ajuste la exposiciónpulsando 3 o 4. Luego, bloque el diafragma enen pasos 4 – 6. Para bloqueo automático,seleccione “AUTO” en el paso 3. El control de laexposición y el iris se realiza automáticamente.
Control de exposición
Modo defuncionamiento
Ví deo Memoria(Memory)
Nivel deexposición
± 0± 1
± 2± 3± 4± 5± 6
± 0EV± 0,3EV
± 0,7EV± 1,0EV± 1,3EV± 1,7EV± 2,0EV
Bloqueo del diafragma
7/17/2019 Manual for JVC camcorder
http://slidepdf.com/reader/full/manual-for-jvc-camcorder 88/104
MENÚS PARA UN AJUSTE DETALLADO36 ES
La compensación de contraluz proporcionarápidamente más claridad al sujeto.En la operación simple, la función decompensación de contraluz abrillanta la porción
oscurecida del motivo incrementando laexposición.
1 Ajuste el interruptor de alimentación en “REC”.
2 Pulse BACKLIGHT para que aparezca elindicador de compensación de contraluz “ ”.
Para cancelar la compensación de contraluzPulse BACKLIGHT dos veces para quedesaparezca el indicador “ ”.
NOTA:
El uso de la compensación de contraluz puedehacer que la luz alrededor del sujeto resultedemasiado clara de modo que el sujeto apareceblanco.
La selección de una zona de fotometrí a puntualpermite una compensación de exposición másprecisa. Puede seleccionar una de las tres
zonas de fotometrí a en el monitor LCD/visor.
1 Ajuste el interruptor de alimentación en “REC”.
2 Ajuste el modo de grabación a “ M ”. ( p. 15)
3 Pulse BACKLIGHT dos veces para queaparezca el indicador de control de exposiciónpuntual “ ”.Aparece un cuadro de zona de fotometrí a
puntual en el centro del monitor LCD/visor.
4 Pulse 2 o 1 para seleccionar el cuadro de
zona de fotometrí a puntual deseado.5 Pulse SET.El control de exposición puntual está
habilitada. La exposición se ajusta para optimizar el brillo
de la zona seleccionada.
Para fijar el iris
Después del paso 4, pulse y mantenga pulsadoSET durante más de 2 segundos. Aparece laindicación “ ” y el iris queda fi jado.
Para cancelar el control de exposiciónpuntual
Pulse BACKLIGHT una vez para quedesaparezca el indicador “ ”.
NOTAS:No se puede usar el control de exposición puntual
al mismo tiempo que las siguientes funciones.• “16:9” en “MODO ANCHO” ( p. 33)
• “ESTROBOSC.” en EFECTO ( p. 38)
• Zoom digital ( p. 20)
Dependiendo de la ubicación y las condiciones dela filmación, no siempre es posible obtenerresultados óptimos.
El balance del blanco se refiere a la correctareproducción de colores con distintasiluminaciones. Si el balance del blanco escorrecto, todos los demás colores sereproducirán con precisión.
El balance del blanco suele ajustarseautomáticamente. No obstante, los usuarios devideocámaras más avanzados controlan estafunción manualmente para lograr unareproducción de color/tono más profesional.
Para cambiar el ajusteAjuste “BAL.BLANCO” en el modo deseado.( p. 29) Aparece el indicador del modo seleccionado
excepto “AUTO”.
[AUTO]: El balance del blanco se ajustaautomáticamente.
BAL.B MAN: Ajuste manualmente elbalance del blanco cuando filme bajo distintostipos de iluminación. (“Ajuste manual delbalance del blanco” ( p. 37))
SOLEADO: Al aire libre en un dí asoleado.
NUBLADO: Al aire libre en un dí anublado.
[ ] = Preajuste de fábrica
Para volver al balance automático del blancoAjuste “BAL.BLANCO” en “AUTO”. ( p. 29)
Compensación de contraluz
Control de exposición puntual
Ajuste del balance del blanco
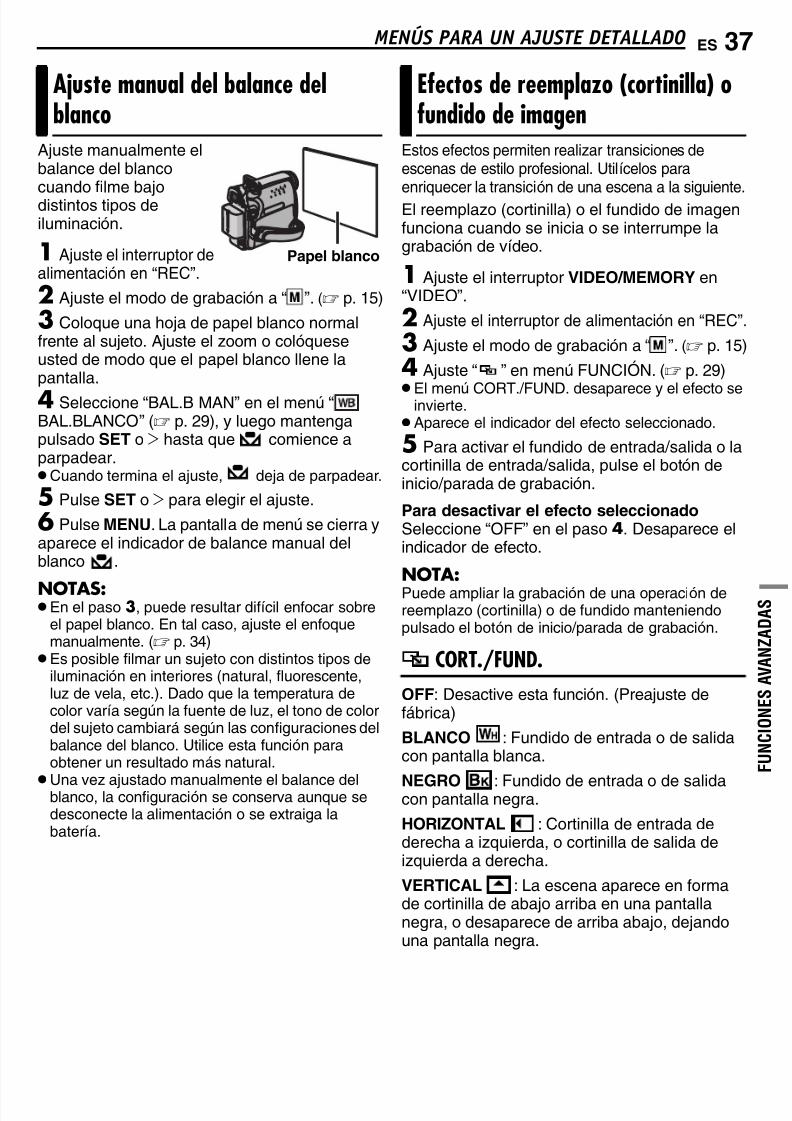
7/17/2019 Manual for JVC camcorder
http://slidepdf.com/reader/full/manual-for-jvc-camcorder 89/104
ES 37MENÚS PARA UN AJUSTE DETALLADO
F U N C I O N E S A V A N Z A D A S
Ajuste manualmente elbalance del blanco
cuando filme bajodistintos tipos deiluminación.
1 Ajuste el interruptor dealimentación en “REC”.
2 Ajuste el modo de grabación a “ M
”. ( p. 15)
3 Coloque una hoja de papel blanco normalfrente al sujeto. Ajuste el zoom o colóqueseusted de modo que el papel blanco llene lapantalla.
4 Seleccione “BAL.B MAN” en el menú “ BAL.BLANCO” ( p. 29), y luego mantengapulsado SET o 2 hasta que comience aparpadear.Cuando termina el ajuste, deja de parpadear.
5 Pulse SET o 2 para elegir el ajuste.
6 Pulse MENU. La pantalla de menú se cierra yaparece el indicador de balance manual delblanco .
NOTAS: En el paso 3, puede resultar difí cil enfocar sobre
el papel blanco. En tal caso, ajuste el enfoquemanualmente. ( p. 34) Es posible filmar un sujeto con distintos tipos de
iluminación en interiores (natural, fluorescente,luz de vela, etc.). Dado que la temperatura decolor varí a según la fuente de luz, el tono de colordel sujeto cambiará según las configuraciones delbalance del blanco. Utilice esta función paraobtener un resultado más natural.
Una vez ajustado manualmente el balance delblanco, la configuración se conserva aunque sedesconecte la alimentación o se extraiga labaterí a.
Estos efectos permiten realizar transiciones deescenas de estilo profesional. Utilí celos para
enriquecer la transición de una escena a la siguiente.El reemplazo (cortinilla) o el fundido de imagenfunciona cuando se inicia o se interrumpe lagrabación de ví deo.
1 Ajuste el interruptor VIDEO/MEMORY en“VIDEO”.
2 Ajuste el interruptor de alimentación en “REC”.
3 Ajuste el modo de grabación a “ M ”. ( p. 15)
4 Ajuste “ ” en menú FUNCIÓN. ( p. 29)
El menú CORT./FUND. desaparece y el efecto seinvierte. Aparece el indicador del efecto seleccionado.
5 Para activar el fundido de entrada/salida o lacortinilla de entrada/salida, pulse el botón deinicio/parada de grabación.
Para desactivar el efecto seleccionadoSeleccione “OFF” en el paso 4. Desaparece elindicador de efecto.
NOTA:Puede ampliar la grabación de una operación dereemplazo (cortinilla) o de fundido manteniendopulsado el botón de inicio/parada de grabación.
CORT./FUND.OFF: Desactive esta función. (Preajuste defábrica)
BLANCO : Fundido de entrada o de salidacon pantalla blanca.
NEGRO : Fundido de entrada o de salidacon pantalla negra.
HORIZONTAL : Cortinilla de entrada dederecha a izquierda, o cortinilla de salida deizquierda a derecha.
VERTICAL : La escena aparece en formade cortinilla de abajo arriba en una pantallanegra, o desaparece de arriba abajo, dejandouna pantalla negra.
Ajuste manual del balance delblanco
Papel blanco
Efectos de reemplazo (cortinilla) ofundido de imagen

7/17/2019 Manual for JVC camcorder
http://slidepdf.com/reader/full/manual-for-jvc-camcorder 90/104
MENÚS PARA UN AJUSTE DETALLADO38 ES
1 Ajuste el interruptor de alimentación en “REC”.
2 Ajuste el modo de grabación a “ M
”. ( p. 15)
3 Ajuste “EFECTO”, “PROGRAMA AE” o“OBTUR.” en menú FUNCIÓN. ( p. 29) El menú EFECTO, PROGRAMA AE o OBTUR.
desaparece y el efecto seleccionado se activa. Aparece el indicador del efecto seleccionado.
Para desactivar el efecto seleccionadoSeleccione “OFF” en el paso 3. Desaparece elindicador de efecto.
NOTAS: El programa AE, los efectos y los efectos de
obturación pueden ser cambiados durante laespera de grabación. Algunos modos de programa AE con efectos
especiales no pueden utilizarse durante lafilmación nocturna.Cuando el motivo es demasiado brillante o
reflectante, puede aparecer un destello vertical(fenómeno de corrimiento). El fenómeno decorrimiento tiende a ocurrir cuando se selecciona“DEPORTE” o cualquier modo de “OBTUR. 1/500– 1/4000”.
EFECTOOFF: Desactive esta función. (Preajuste defábrica)
SEPIA : Las escenas grabadas adquieren untono sepia como el de las fotografí as antiguas.
MONOCROMO : Como las pelí culas enblanco y negro, la filmación se realiza en blancoy negro.
FILM CLÁS.* : Proporciona a las escenasgrabadas un efecto estroboscópico.
ESTROBOSC* : Su grabación tendrá elaspecto de una serie de fotografí asconsecutivas.* No está disponible para la grabación de
imágenes fi jas.
PROGRAMA AEOFF: Desactive esta función. (Preajuste defábrica)
DEPORTE (Velocidad variable de obturación:1/250 – 1/4000):Este ajuste permite la captura de imágenes demovimiento rápido fotograma por fotograma,para una reproducción intensa y estable acámara lenta. Cuanto mayor sea la velocidad deobturación, más oscura se vuelve la imagen.Utilice la función del obturador en condicionesde iluminación adecuadas.
NIEVE : Realiza una compensación desujetos que aparecerí an demasiado oscuros alfilmar en ambientes demasiado claros, porejemplo en la nieve.
FOCO : Realiza una compensación desujetos que aparecerí an demasiado claros alfilmar en condiciones de iluminación directa
demasiado intensa, por ejemplo focos.ATARDECER : Hace que las escenas deatardecer parezcan más naturales. El balancedel blanco ( p. 36) se ajusta automáticamenteen “ ”, pero se puede modificar a laconfiguración deseada. Cuando se seleccionala función de atardecer, la ví deocámara ajustaautomáticamente el enfoque de unos 10 m ainfinito. Para menos de unos 10 m, ajuste elenfoque manualmente.
OBTUR.OFF: Desactive esta función. (Preajuste defábrica)
OBTUR. 1/60: La velocidad de obturaciónse fi ja en 1/60 de segundo. Las barras negrasque suelen aparecer cuando se filma unapantalla de TV se estrechan.
OBTUR. 1/100: La velocidad deobturación se fi ja en 1/100 de segundo. Se
reduce el parpadeo que se produce al filmarbajo luz fluorescente o lámpara de vapores demercurio.
OBTUR. 1/500/OBTUR. 1/4000: Estasconfiguraciones permiten la captura fotograma afotograma de imágenes en movimiento rápido,para obtener una reproducción a cámara lentaestable y ví vida mediante la fi jación de lasvariables de velocidad del obturador. Utiliceestas configuraciones desde el modo
DEPORTE cuando un ajuste automático nofuncione bien. Cuanto mayor sea la velocidadde obturación, más oscura se vuelve la imagen.Utilice la función del obturador en condicionesde iluminación adecuadas.
Programa AE, efectos y efectos deobturación
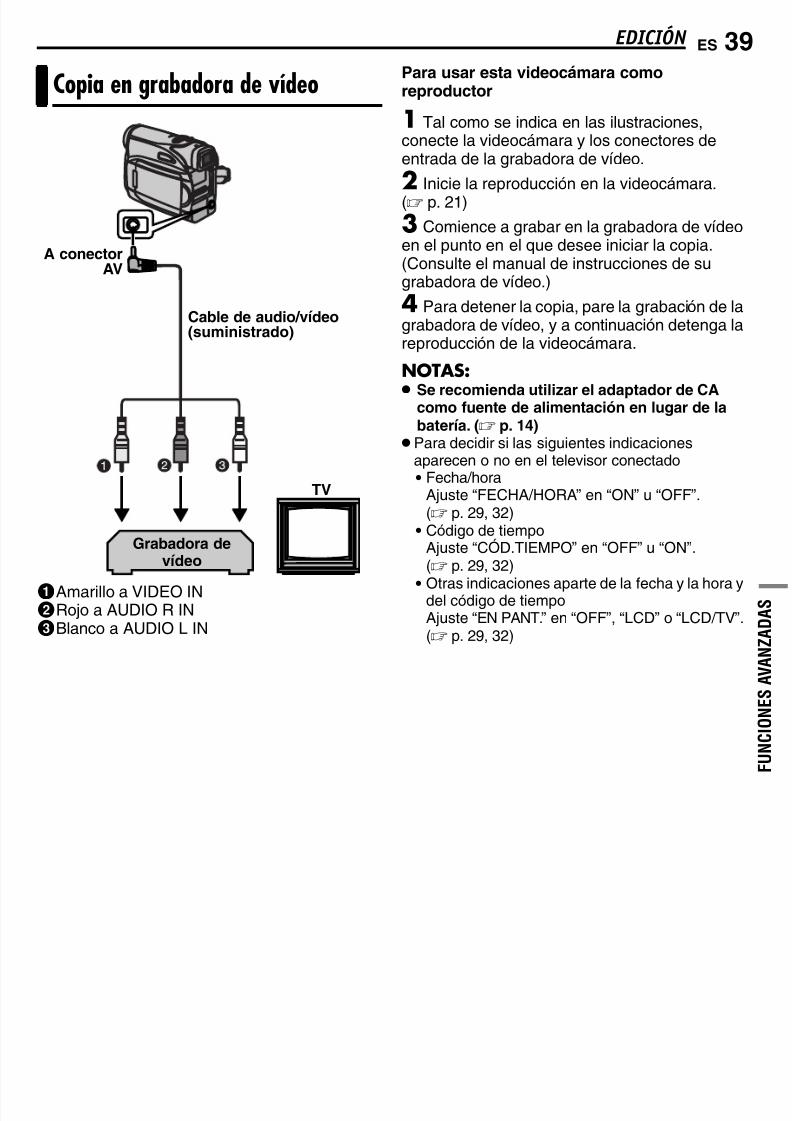
7/17/2019 Manual for JVC camcorder
http://slidepdf.com/reader/full/manual-for-jvc-camcorder 91/104
ES 39
F U N C I O N E S A V A N Z A D A S
EDICIÓN
1Amarillo a VIDEO IN2Rojo a AUDIO R IN3Blanco a AUDIO L IN
Para usar esta videocámara comoreproductor
1 Tal como se indica en las ilustraciones,conecte la videocámara y los conectores deentrada de la grabadora de ví deo.
2 Inicie la reproducción en la videocámara.( p. 21)
3 Comience a grabar en la grabadora de ví deoen el punto en el que desee iniciar la copia.(Consulte el manual de instrucciones de sugrabadora de ví deo.)
4 Para detener la copia, pare la grabación de lagrabadora de ví deo, y a continuación detenga lareproducción de la videocámara.
NOTAS:
Se recomienda utilizar el adaptador de CAcomo fuente de alimentación en lugar de labaterí a. ( p. 14)
Para decidir si las siguientes indicacionesaparecen o no en el televisor conectado• Fecha/hora
Ajuste “FECHA/HORA” en “ON” u “OFF”.( p. 29, 32)
•Código de tiempoAjuste “CÓD.TIEMPO” en “OFF” u “ON”.( p. 29, 32)
•Otras indicaciones aparte de la fecha y la hora ydel código de tiempoAjuste “EN PANT.” en “OFF”, “LCD” o “LCD/TV”.( p. 29, 32)
Copia en grabadora de vídeo
TV
Grabadora deví deo
Cable de audio/ví deo(suministrado)
A conectorAV

7/17/2019 Manual for JVC camcorder
http://slidepdf.com/reader/full/manual-for-jvc-camcorder 92/104
EDICIÓN 40 ES
También es posible copiar escenas grabadas
desde la videocámara a otro aparato de ví deoequipado con un conector DV. Dado que seenví a una señal digital, el deterioro de imagen ode sonido es mí nimo o inexistente.
Para usar esta videocámara como reproductor1 Compruebe que todos los equipos estánapagados.
2 Conecte esta videocámara a un aparato deví deo equipado con un conector de entrada DV,mediante un cable DV, como se muestra en lailustración.
3 Inicie la reproducción en la videocámara.( p. 21)
4 Comience a grabar en el aparato de ví deo en
el punto en el que desee iniciar la copia.(Consulte el manual de instrucciones de suaparato de ví deo.)
5 Para detener la copia, pare la grabación delaparato de ví deo, y a continuación detenga lareproducción en esta videocámara.
NOTAS:
Se recomienda utilizar el adaptador de CAcomo fuente de alimentación en lugar de labaterí a. ( p. 14)
Si durante la copia se reproduce en el lector unaparte en blanco o una imagen alterada, la copiapuede interrumpirse, para no copiar imágenesextrañas. Aunque el cable DV se conecte correctamente, a
veces la imagen puede no aparecer en el paso 4. Si sucede esto, apague la alimentación y realicede nuevo las conexiones. Si se pulsa SNAPSHOT durante la reproducción,
solamente la imagen de reproducción originalgrabada en la cinta sale del conector DV IN/OUT. Cuando utilice un cable DV, asegúrese de
utilizar el cable DV opcional JVC VC-VDV204Uo VC-VDV206U.
Para usar esta videocámara como grabadora
1 Compruebe que todos los equipos estánapagados.
2 Conecte esta videocámara a un aparato deví deo equipado con un conector de salida DV,mediante un cable DV, como se muestra en lailustración.
3 Ajuste el interruptor de alimentación de lavideocámara en “PLAY”.
4 Ajuste “MODO GRAB.” en “SP” o “LP”.( p. 32)
5 Inicie la reproducción en el reproductor.
6 Para activar el modo de grabación-pausa,pulse el botón de inicio/parada de grabación. Aparece en la pantalla la indicación “ ”.
7 En el punto en el que desee iniciar la copia,pulse el botón de inicio/parada de grabaciónpara comenzar la copia. La indicación gira.
8 Para interrumpir la copia, pulse de nuevo elbotón de inicio/parada de grabación. Laindicación deja de girar.
9 Pulse 7 para regresar al modo dereproducción normal.
NOTA:La copia digital se realiza en el modo de sonidograbado en la cinta original, con independencia dela configuración actual de “MODO AUDIO”.( p. 30)
Copia en o desde un aparato devídeo equipado con un conector DV(Copia digital)
Filtro de núcleo
A DV IN/OUT
Cable DV (opcional)
A DV IN/OUT
Aparato de ví deo equipado con conector DV
DV IN
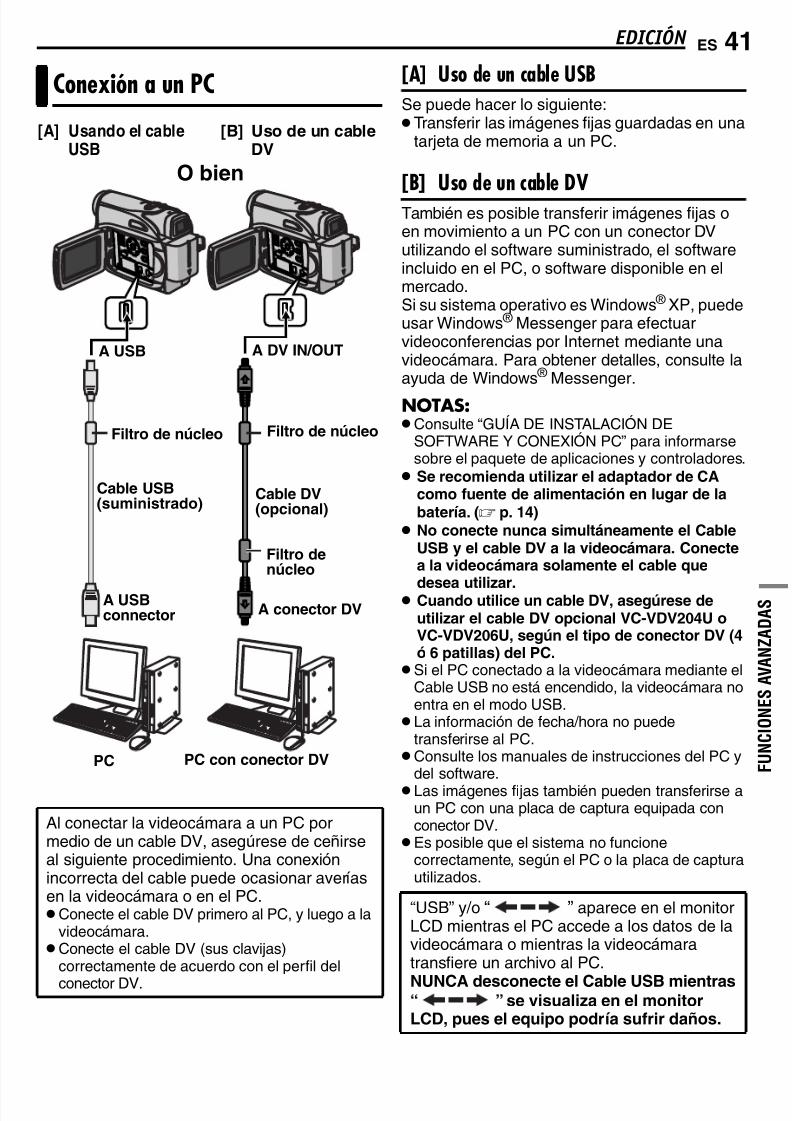
7/17/2019 Manual for JVC camcorder
http://slidepdf.com/reader/full/manual-for-jvc-camcorder 93/104
ES 41EDICIÓN
F U N C I O N E S A V A N Z A D A S
[A] Uso de un cable USBSe puede hacer lo siguiente: Transferir las imágenes fi jas guardadas en una
tarjeta de memoria a un PC.
[B] Uso de un cable DVTambién es posible transferir imágenes fi jas oen movimiento a un PC con un conector DVutilizando el software suministrado, el softwareincluido en el PC, o software disponible en elmercado.Si su sistema operativo es Windows ® XP, puedeusar Windows ® Messenger para efectuarvideoconferencias por Internet mediante unavideocámara. Para obtener detalles, consulte laayuda de Windows ® Messenger.
NOTAS:Consulte “GUÍ A DE INSTALACIÓN DE
SOFTWARE Y CONEXIÓN PC” para informarsesobre el paquete de aplicaciones y controladores. Se recomienda utilizar el adaptador de CA
como fuente de alimentación en lugar de labaterí a. ( p. 14)
No conecte nunca simultáneamente el CableUSB y el cable DV a la videocámara. Conectea la videocámara solamente el cable que
desea utilizar. Cuando utilice un cable DV, asegúrese de
utilizar el cable DV opcional VC-VDV204U oVC-VDV206U, según el tipo de conector DV (4ó 6 patillas) del PC.
Si el PC conectado a la videocámara mediante elCable USB no está encendido, la videocámara noentra en el modo USB. La información de fecha/hora no puede
transferirse al PC.Consulte los manuales de instrucciones del PC y
del software. Las imágenes fi jas también pueden transferirse a
un PC con una placa de captura equipada conconector DV. Es posible que el sistema no funcione
correctamente, según el PC o la placa de capturautilizados.
Conexión a un PC
Al conectar la videocámara a un PC pormedio de un cable DV, asegúrese de ceñirseal siguiente procedimiento. Una conexiónincorrecta del cable puede ocasionar averí asen la videocámara o en el PC.Conecte el cable DV primero al PC, y luego a la
videocámara.Conecte el cable DV (sus clavijas)
correctamente de acuerdo con el perfil delconector DV.
[A] Usando el cableUSB
A USB
PC PC con conector DV
Cable USB(suministrado)
A DV IN/OUT
[B] Uso de un cableDV
A USBconnector A conector DV
Filtro denúcleo
Filtro de núcleo
Cable DV(opcional)
O bien
Filtro de núcleo
“USB” y/o “ ” aparece en el monitorLCD mientras el PC accede a los datos de lavideocámara o mientras la videocámaratransfiere un archivo al PC.
NUNCA desconecte el Cable USB mientras“ ” se visualiza en el monitorLCD, pues el equipo podrí a sufrir daños.
7/17/2019 Manual for JVC camcorder
http://slidepdf.com/reader/full/manual-for-jvc-camcorder 94/104
42 ES SOLUCIÓN DE PROBLEMAS
Si el problema sigue existiendo después deseguir los pasos indicados en el siguientecuadro, consulte con su distribuidor JVC máspróximo.
Alimentación
La fuente de alimentación no está correctamenteconectada.
Conecte bien el adaptador de CA. ( p. 14) La baterí a no está bien sujeto.Suelte la baterí a y vuelva a instalarla de manera
que quede bien sujeto. ( p. 13) La baterí a está agotada.Cambie la baterí a agotada por otra totalmente
cargada. ( p. 13)
Grabación de vídeo y DSC
La lengüeta de protección contra borrado de lacinta está ajustada en “SAVE”.
Ajuste la lengüeta de protección contra borradode la cinta en “REC”. ( p. 18)
Aparece “FIN DE CINTA”.Utilice una cinta nueva. ( p. 18) La tapa del portacintas está abierta.Cierre la tapa del portacintas.
Esto no es un fallo de funcionamiento.
Esto no es un fallo de funcionamiento.
“FECHA/HORA” está ajustado en “OFF”.Ajuste “FECHA/HORA” en “ON”. ( p. 29, 32)
Los efectos y las funciones “DIS” que no puedenutilizarse juntas se seleccionan al mismo tiempo.
Vuelva a leer las secciones que traten los efectosy “DIS”. ( p. 29, 30, 38)
Se ha seleccionado el zoom óptico de 32X.Ajuste “ZOOM” en “64X” o “800X”. ( p. 30) El interruptor VIDEO/MEMORY está ajustado en
“MEMORY”.Ajuste el interruptor VIDEO/MEMORY en “VIDEO”.
Reproducción de vídeo y DSC
Su televisor tiene terminales de entrada AV, perono está ajustado en su modo VIDEO.
Ajuste el televisor en el modo o canal adecuadopara la reproducción de ví deo. ( p. 21)
La tapa del portacintas está abierta.Cierre la tapa del portacintas. ( p. 18)
Limpie los cabezales del ví deo con una cinta de
limpieza opcional. ( p. 48)
Funciones avanzadas
El enfoque está ajustado en el modo Manual.Ajuste el enfoque en modo automático. ( p. 34) El objetivo está sucio o cubierto de condensación.Limpie el objetivo y compruebe de nuevo el
enfoque. ( p. 46)
El modo ancho16:9 (indicador 16:9) esseleccionado.
Desconecta el modo ancho 16:9 (indicador 16:9)( p. 33)
La fuente de luz o el sujeto no incluye el blanco.O hay diversas fuentes de luz detrás del sujeto.
Busque un sujeto blanco y componga la toma demodo que también aparezca en el encuadre.( p. 34, 37)
La toma se realizó en condiciones de contraluz.Pulse BACKLIGHT. ( p. 36)
La videocámara es un dispositivo controladopor microcomputadora. El ruido externo y las
interferencias (de un televisor, una radio, etc.)podrí an impedir su correcto funcionamiento.En tales casos, desconecte primero sudispositivo de suministro de energí a (baterí a,adaptador de CA, etc.), espere unos minutos ya continuación vuelva a conectarlo y siga elprocedimiento habitual desde el principio.
No hay alimentación.
La grabación no puede realizarse.
Cuando filme un sujeto iluminado con luzclara, aparecerán lí neas verticales.
Cuando la pantalla está bajo luz solardirecta durante la filmación, se vuelve rojao negra durante un instante.
Durante la grabación, los datos de fecha/
hora no aparecen.
Las indicaciones del monitor LCD o delvisor parpadean.
El zoom digital no funciona.
La cinta se mueve, pero no hay imagen.
Aparecen bloques de ruido durante lareproducción, o no hay imagen dereproducción y la pantalla se vuelve azul.
El enfoque no se ajusta automáticamente.
No puede utilizarse el modo Fotografiado.
El color de Fotografiado parece extraño.
La imagen tomada mediante Fotografiadoes demasiado oscura.
7/17/2019 Manual for JVC camcorder
http://slidepdf.com/reader/full/manual-for-jvc-camcorder 95/104
ES 43 SOLUCIÓN DE PROBLEMAS
R E F
E R E N C I A S
El sujeto es demasiado claro.Ajuste “ ” en “FOCO”. ( p. 38)
Se ha activado el modo Sepia (SEPIA) oMonotono (MONOCROMO).
Desactive el modo Sepia (SEPIA) o Monotono(MONOCROMO) antes de configurar el balancedel blanco. ( p. 38)
Cuando se filma en la oscuridad, el aparato sevuelve muy sensible a la luz cuando“GANANCIA” se ajusta en “AUTO”.
Si desea que la iluminación parezca más natural,ajuste “GANANCIA” en “AGC” o “OFF”.( p. 29, 31)
Otros problemas
La carga resulta difí cil en lugares sometidos atemperaturas extremadamente altas/bajas.
Para proteger la baterí a, se recomienda cargarlaen lugares con una temperatura de 10°C a 35°C.( p. 47)
La baterí a no está bien sujeto.Suelte la baterí a y vuelva a instalarla de manera
que quede bien sujeto. ( p. 13)
La fecha/hora no está ajustada.Ajuste la fecha/hora. ( p. 16) La baterí a integrada del reloj se ha gastado y la
fecha/hora ajustada anteriormente se ha borrado.Consulte a su distribuidor JVC más cercano para
gestionar el recambio.
Los archivos almacenados en la tarjeta dememoria están protegidos.
Quite la protección de los archivos almacenadosen la tarjeta de memoria y elimí nelos. ( p. 26)
Esto no es un fallo de funcionamiento.Esto puede evitarse si se graba con “DIS” activado
( p. 29, 30).
El cable DV se ha enchufado o desenchufado conel aparato encendido.
Apague y encienda de nuevo la videocámara y
póngala en funcionamiento.
En lugares sometidos a baja temperatura, lasimágenes se oscurecen debido a lascaracterí sticas del monitor LCD. Esto no es unfallo de funcionamiento.
Ajusta el brillo y el ángulo del monitor LCD.( p. 17, 19)
Cuando la luz fluorescente del monitor LCD llega
al término de su vida útil, las imágenes delmonitor LCD se oscurecen.
Consulte con su distribuidor JVC más próximo.
El monitor LCD y el visor han sido fabricados contecnologí a de alta precisión. No obstante, puntosnegros o puntos claros de luz (rojo, verde o azul)pueden aparecer constantemente en el monitorLCD o en el visor. Estos puntos no se graban en
la cinta. Esto no se debe a ningún defecto delaparato. (Puntos efectivos: más de 99,99%)
La carga de la baterí a está baja.Instale una baterí a totalmente cargada. ( p. 13)
Presione varias veces más sobre la tarjeta dememoria. ( p. 18)
El visor se despliega y “PRIORIDAD” se pone en“VISOR”.
Vuelva a plegar el visor o ponga “PRIORIDAD” en“LCD”. ( p. 19, 29, 31)
La configuración de brillo del monitor LCD esdemasiado oscura.
Ajuste el brillo del monitor LCD. ( p. 19)Si el monitor está inclinado 180 grados hacia
arriba, abra el monitor por completo. ( p. 19)
Se ha producido algún tipo de fallo defuncionamiento. En este caso, las funciones de lavideocámara no se pueden utilizar.
p. 45.
La imagen tomada mediante Fotografiadoes demasiado clara.
El balance del blanco no puede activarse.
La imagen parece indicar que la velocidaddel obturador es demasiado lenta.
La lámpara POWER/CHARGE de lavideocámara no se enciende durante la carga.
Aparece“¡AJ. FECHA/HORA!”.
Los archivos almacenados en la tarjeta dememoria no se pueden eliminar.
Cuando la imagen se imprime desde laimpresora, aparece una barra negra en laparte inferior de la pantalla.
Cuando la videocámara se conectamediante el conector DV, la videocámara nofunciona.
Las imágenes aparecen oscuras oblancuzcas en el monitor LCD.
Aparecen puntos de color claro por todo elmonitor LCD o en el visor.
La cinta no se carga correctamente.
La tarjeta de memoria no se puede extraerde la videocámara.
La imagen no aparece en el monitor LCD.
Aparece una indicación de error (01 – 04 o 06).
7/17/2019 Manual for JVC camcorder
http://slidepdf.com/reader/full/manual-for-jvc-camcorder 96/104
SOLUCIÓN DE PROBLEMAS 44 ES
Indicaciones de advertencia
Muestra la energí a restante en la baterí a.Nivel de energí a restante
Cuando la energí a de la baterí a está a punto deagotarse, el indicador de energí a restante de labaterí a parpadea.Cuando la energí a de la baterí a está agotada, elaparato se apaga automáticamente.
Aparece si hay una cinta cargada. Parpadea cuando no hay una cinta cargada.
Aparece cuando la lengüeta de protección deborrado está ajustada en “SAVE” mientras elinterruptor de alimentación está ajustado en“REC”, y el interruptor VIDEO/MEMORY está ajustado en “VIDEO”. ( p. 15)
Aparece si se detecta suciedad en loscabezales durante la grabación. Utilice una cinta
de limpieza opcional. ( p. 48)
Aparece si se produce condensación. Cuandoaparezca esta indicación, espere más de 1 horahasta que la condensación desaparezca.
Aparece si no hay una cinta cargada cuando el
botón de inicio/parada de grabación o el botónSNAPSHOT se pulsa mientras el interruptor dealimentación está ajustado en “REC” y el interruptorVIDEO/MEMORY está ajustado en “VIDEO”.
Aparece cuando la cinta se termina durante lagrabación o la reproducción.
Aparece cuando no se han ajustado los datosde fecha/hora. ( p. 16) La baterí a integrada del reloj se ha gastado y
la fecha/hora ajustada anteriormente se haborrado. Consulte a su distribuidor JVC máscercano para gestionar el recambio.
Aparece durante 5 segundos al encenderse elaparato si la tapa del objetivo está acoplada o siestá oscuro.
Aparece cuando la memoria de la tarjeta dememoria está llena y no es posible la toma deimágenes.
Aparece cuando se detectan imágenes grabadasen formato HDV. En esta videocámara no sepueden reproducir imágenes en formato HDV.
Aparece cuando se reproduce un archivoincompatible con DCF o un archivo con untamaño incompatible con esta videocámara.
Aparece si se intenta la copia de señalesprotegidas contra copia mientras lavideocámara está siendo utilizada comograbadora.
Aparece si no hay una tarjeta de memoriacargada cuando se presiona el botónSNAPSHOT mientras que el Interruptor de laAlimentación se fi ja en “REC” y el de VIDEO/ MEMORY se fi ja en “MEMORY”.
Aparece cuando hay un problema con unatarjeta de memoria y su memoria está deteriorada o la tarjeta no ha sido inicializada.
Inicialice la tarjeta de memoria. ( p. 28)
Aparece si no hay archivos de imagen en latarjeta de memoria cuando se intenta reproducirla tarjeta de memoria.
Aparece cuando la videocámara no reconoce latarjeta de memoria cargada. Extraiga la tarjeta
de memoria una vez e insértela de nuevo.Repita estos procedimientos hasta que noaparezca ninguna indicación. Si la indicaciónsigue apareciendo, la tarjeta de memoria está deteriorada.
COMPRUEBE LENGÜETA PROTECCIÓN CINTA
USE CINTA DE LIMPIEZA
CONDENSACIÓN, OPERACIÓN ENPAUSA ESPERE
¡CINTA!
FIN DE CINTA
¡AJ. FECHA/HORA!
AgotadaAlto
TAPA DEL OBJETIVO
MEMORIA LLENA
HDV
?
PROT. CONTRA COPIA
TARJETA MEMORIA
FORMATEE
NO HAY IMÁGENES ALMACENADAS
¡ERROR DE TARJETA!
7/17/2019 Manual for JVC camcorder
http://slidepdf.com/reader/full/manual-for-jvc-camcorder 97/104
ES 45 SOLUCIÓN DE PROBLEMAS
R E F
E R E N C I A S
Aparece cuando se intenta fotografiar imágenesfi jas digitales cuando la lengüeta de proteccióncontra escritura de la tarjeta de memoria SDestá ajustada en la posición “LOCK”.
Las indicaciones de error (01, 02 o 06) muestranel tipo de fallo de funcionamiento producido.Cuando aparece una indicación de error, lavideocámara se apaga automáticamente. Retirela fuente de alimentación (baterí a, etc.) y espereunos minutos hasta que desaparezca laindicación. Cuando desaparezca, puede volver
a utilizar la videocámara. Si la indicación semantiene, consulte con su distribuidor JVC máspróximo.
Las indicaciones de error (03 o 04) muestran eltipo de fallo de funcionamiento producido.Cuando aparece una indicación de error, lavideocámara se apaga automáticamente.Expulse la cinta una vez y vuelva a insertarla, y
compruebe si la indicación desaparece. Cuandodesaparezca, puede volver a utilizar lavideocámara. Si la indicación se mantiene,consulte con su distribuidor JVC más próximo.
COMPRUEBE LENGÜETA PROTECCIÓNTARJETA
UNIDAD EN MODO SEGURO RETIRE YRECONECTE BATERí A/ENCHUFE CC
UNIDAD EN MODO SEGUROEXPULSE Y REINSERTE CINTA

7/17/2019 Manual for JVC camcorder
http://slidepdf.com/reader/full/manual-for-jvc-camcorder 98/104
MANTENIMIENTO DEL USUARIO46 ES
Antes de proceder a la limpieza, apague lavideocámara y saque la baterí a y el adaptadorde CA.
Para limpiar el exteriorPase con cuidado un trapo suave. Ponga eltrapo en jabón suave diluido y escúrralo bienpara eliminar la suciedad profunda. Luego, paseun trapo seco.
Para limpiar el monitor LCDPase con cuidado un trapo suave. Tengacuidado para no dañar el monitor. Cierre elmonitor LCD.
Para limpiar el objetivo
Sóplelo con un cepillo de aire, y luego lí mpielosuavemente con papel de limpieza paraobjetivos.
Para limpiar el objetivo del visorQuitar el polvo del visor utilizando un cepillo.
NOTAS: Evite utilizar agentes limpiadores fuertes como
bencina o alcohol. La limpieza se debe hacer solamente después de
haber quitado la baterí a o haber desconectado
otros aparatos eléctricos. Si el objetivo se deja sucio, se puede formar
moho. Cuando se utilice un limpiador o un trapo tratado
quí micamente, consulte las medidas deprecaución de cada producto.
Para limpiar el visor, le rogamos que consulte a sudistribuidor JVC más próximo.
Limpieza de la videocámara
MANTENIMIENTO DEL USUARIO
7/17/2019 Manual for JVC camcorder
http://slidepdf.com/reader/full/manual-for-jvc-camcorder 99/104
ES 47
R E F
E R E N C I A S
PRECAUCIONES
Adaptador de CACuando emplea el adaptador de CA en áreasque no sean EE.UU.El adaptador de CA suministrado tiene unafunción de selección automática de tensión en laescala de corriente alterna de 110 V a 240 V.
USO DEL ENCHUFE ADAPTADOR DE CAEn caso de conectar el cable de alimentación dela unidad a un tomacorriente de CA que no sea dela serie American National Standard C73, empleeun enchufe adaptador de CA, denominado“Siemens Plug”, como el mostrado.Consulte con su distribuidor JVC más cercano poreste enchufe adaptador.
BateríasLa baterí a suministradaes una baterí a de ion delitio. Antes de utilizar labaterí a suministrada ouna baterí a opcional, lealas precaucionessiguientes: Para evitar riesgos ...no quemar. ...no haga ningún cortocircuito en los terminales.
Durante el transporte, no olvide colocar en labaterí a la tapa suministrada. Si la tapa de labaterí a está mal colocada, guarde la baterí a enuna bolsa de plástico.
...no modifique ni desmonte la baterí a. ...no exponga la baterí a a temperaturas superiores
a 60°C, pues esto puede provocarsobrecalentamiento, explosión o incendio de la
baterí a. ...utilice solamente cargadores especificados. Para evitar daños y prolongar la vida útil ...no la someta a sacudidas innecesarias. ...cárguela en un entorno con temperaturas dentro
de las tolerancias indicadas en la siguiente tabla.Esta es una baterí a de reacción quí mica — lastemperaturas más frí as dificultan la reacciónquí mica, mientras que las temperaturas máscálidas pueden impedir la carga completa.
... guardar en lugar fresco y seco. La exposición
prolongada a temperaturas elevadas aumentará ladescarga natural y reducirá el periodo de vida útil.
...se debe cargar totalmente y luego descargartotalmente la baterí a cada seis meses cuando seguarde la baterí a durante un periodo de tiempoprolongado.
... cuando no se utilice, se debe retirar del cargadoro dispositivo eléctrico, pues algunas máquinasutilizan corriente incluso estando apagadas.
NOTAS: Es normal que la baterí a esté caliente después de
su carga o después de su uso.
Especificaciones de margen de temperaturaCarga: 10°C a 35°CFuncionamiento: 0°C a 40°CAlmacenamiento: –20°C a 50°C
Cuanto más baja sea la temperatura, más tiempose necesita para la recarga.
Los tiempos de carga se refieren a una baterí atotalmente descargada.
CintasPara utilizar y almacenar correctamente sus
cintas, lea las siguientes precauciones: Durante el uso ...asegúrese de que la cinta tiene la marca Mini DV. ...recuerde que la grabación sobre cintas
pregrabadas borra automáticamente las señalesde ví deo y audio previamente grabadas.
...al insertarla, compruebe que la cinta está colocada correctamente.
...no debe cargar y descargar la cintarepetidamente sin esperar a que se ponga enmarcha. La cinta puede aflojarse y deteriorarse.
... no abra la tapa frontal de la cinta. Esto expone lacinta a huellas dactilares y polvo. Guarde las cintas ... lejos de calefacciones u otras fuentes de calor. ...lejos de la luz solar directa. ...en lugares donde no estén sometidas a
sacudidas o vibraciones innecesarias. ...en lugares donde no estén expuestas a campos
magnéticos fuertes (como los generados pormotores, transformadores o imanes).
... verticalmente, en sus estuches originales.
Enchufe adaptador
Terminales
Ventajas de las baterí as de ion de litioLas baterí as de ion de litio son pequeñaspero de gran potencia. No obstante, cuando
se exponen a bajas temperaturas (inferiores a10°C), su tiempo de utilización se reduce ypuede dejar de funcionar. En tal caso,coloque la baterí a en su bolsillo o en otrolugar cálido y protegido durante un brevetiempo, y luego vuelva a colocarla en lavideocámara.
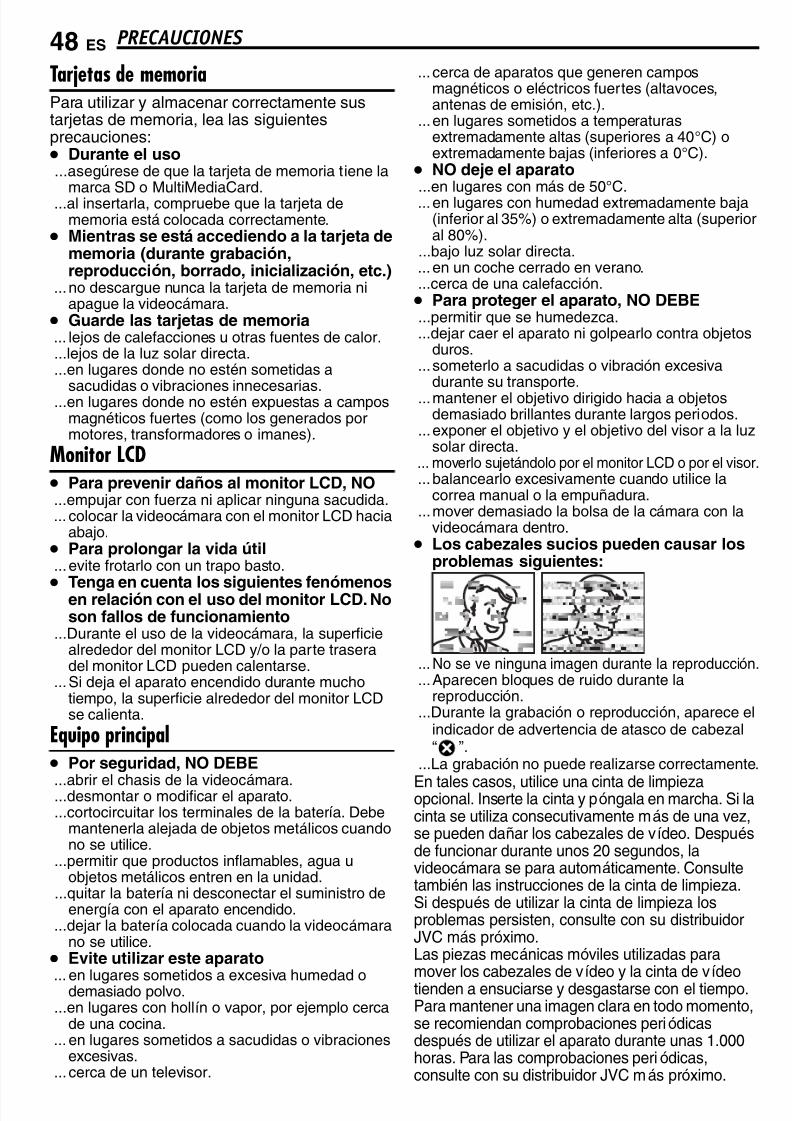
7/17/2019 Manual for JVC camcorder
http://slidepdf.com/reader/full/manual-for-jvc-camcorder 100/104
PRECAUCIONES 48 ES
Tarjetas de memoriaPara utilizar y almacenar correctamente sustarjetas de memoria, lea las siguientesprecauciones: Durante el uso ...asegúrese de que la tarjeta de memoria tiene la
marca SD o MultiMediaCard. ...al insertarla, compruebe que la tarjeta dememoria está colocada correctamente.
Mientras se está accediendo a la tarjeta dememoria (durante grabación,reproducción, borrado, inicialización, etc.)
...no descargue nunca la tarjeta de memoria niapague la videocámara.
Guarde las tarjetas de memoria ... lejos de calefacciones u otras fuentes de calor. ...lejos de la luz solar directa. ...en lugares donde no estén sometidas a
sacudidas o vibraciones innecesarias. ...en lugares donde no estén expuestas a camposmagnéticos fuertes (como los generados pormotores, transformadores o imanes).
Monitor LCD Para prevenir daños al monitor LCD, NO ...empujar con fuerza ni aplicar ninguna sacudida. ... colocar la videocámara con el monitor LCD hacia
abajo. Para prolongar la vida útil ...evite frotarlo con un trapo basto.
Tenga en cuenta los siguientes fenómenosen relación con el uso del monitor LCD. Noson fallos de funcionamiento
...Durante el uso de la videocámara, la superficiealrededor del monitor LCD y/o la parte traseradel monitor LCD pueden calentarse.
...Si deja el aparato encendido durante muchotiempo, la superficie alrededor del monitor LCDse calienta.
Equipo principal Por seguridad, NO DEBE
...abrir el chasis de la videocámara. ...desmontar o modificar el aparato. ...cortocircuitar los terminales de la baterí a. Debe
mantenerla alejada de objetos metálicos cuandono se utilice.
...permitir que productos inflamables, agua uobjetos metálicos entren en la unidad.
...quitar la baterí a ni desconectar el suministro deenergí a con el aparato encendido.
...dejar la baterí a colocada cuando la videocámarano se utilice.
Evite utilizar este aparato
... en lugares sometidos a excesiva humedad odemasiado polvo.
...en lugares con hollí n o vapor, por ejemplo cercade una cocina.
... en lugares sometidos a sacudidas o vibracionesexcesivas.
... cerca de un televisor.
... cerca de aparatos que generen camposmagnéticos o eléctricos fuertes (altavoces,antenas de emisión, etc.).
...en lugares sometidos a temperaturasextremadamente altas (superiores a 40°C) oextremadamente bajas (inferiores a 0°C).
NO deje el aparato ...en lugares con más de 50°C. ...en lugares con humedad extremadamente baja
(inferior al 35%) o extremadamente alta (superioral 80%).
...bajo luz solar directa. ...en un coche cerrado en verano. ...cerca de una calefacción. Para proteger el aparato, NO DEBE ...permitir que se humedezca. ...dejar caer el aparato ni golpearlo contra objetos
duros. ...someterlo a sacudidas o vibración excesiva
durante su transporte. ...mantener el objetivo dirigido hacia a objetos
demasiado brillantes durante largos periodos. ...exponer el objetivo y el objetivo del visor a la luz
solar directa. ... moverlo sujetándolo por el monitor LCD o por el visor. ...balancearlo excesivamente cuando utilice la
correa manual o la empuñadura. ...mover demasiado la bolsa de la cámara con la
videocámara dentro. Los cabezales sucios pueden causar los
problemas siguientes:
...No se ve ninguna imagen durante la reproducción. ...Aparecen bloques de ruido durante la
reproducción. ...Durante la grabación o reproducción, aparece el
indicador de advertencia de atasco de cabezal“ ”.
...La grabación no puede realizarse correctamente.
En tales casos, utilice una cinta de limpiezaopcional. Inserte la cinta y póngala en marcha. Si lacinta se utiliza consecutivamente más de una vez,se pueden dañar los cabezales de ví deo. Despuésde funcionar durante unos 20 segundos, lavideocámara se para automáticamente. Consultetambién las instrucciones de la cinta de limpieza.Si después de utilizar la cinta de limpieza losproblemas persisten, consulte con su distribuidorJVC más próximo.Las piezas mecánicas móviles utilizadas para
mover los cabezales de ví deo y la cinta de ví deotienden a ensuciarse y desgastarse con el tiempo.Para mantener una imagen clara en todo momento,se recomiendan comprobaciones periódicasdespués de utilizar el aparato durante unas 1.000horas. Para las comprobaciones periódicas,consulte con su distribuidor JVC más próximo.
7/17/2019 Manual for JVC camcorder
http://slidepdf.com/reader/full/manual-for-jvc-camcorder 101/104
ES 49PRECAUCIONES
R E F
E R E N C I A S
Cómo utilizar un CD-ROM Tenga cuidado para no ensuciar o rayar la
superficie reflectante (opuesta a la superficeimpresa). No escriba nada ni pegue ningunaetiqueta en ninguna de sus superficies. Si el CD-ROM se ensucia, se debe limpiar con cuidado con
un trapo suave, hacia afuera desde el agujerocentral. No utilice limpiadores convencionales de discos ni
aerosoles de limpieza. No doble el CD-ROM ni toque su superficie
reflectante. No guarde su CD-ROM en un ambiente
polvoriento, caliente o húmedo. Manténgaloalejado de la luz solar directa.
Graves fallos de funcionamiento
Acerca de la condensación por humedad Habrá observado que el vertido de un lí quido
frí o en un vaso de cristal hace que se formengotas de agua en la superficie externa delvaso. Este mismo fenómeno se produce en eltambor de la cabeza de una videocámaracuando se mueve de un lugar frí o a un lugarcálido, después de calentar una habitación frí a,en condiciones extremadamente húmedas o enun lugar directamente sometido al aire frí o deun aparato de aire acondicionado.
La humedad en el tambor de la cabeza deví deo puede provocar serios daños en la cinta
de ví deo y puede producir daños internos en lapropia videocámara.
Si se produce un fallo de funcionamiento, dejede usar inmediatamente el aparato y consultecon su distribuidor local de JVC.
La videocámara es un dispositivo controladopor microcomputadora. El ruido externo y lasinterferencias (de un televisor, una radio, etc.)podrí an impedir su correcto funcionamiento.En tales casos, desconecte primero sudispositivo de suministro de energí a (baterí a,adaptador de CA, etc.), espere unos minutosy a continuación vuelva a conectarlo y siga elprocedimiento habitual desde el principio.
Declaración de conformidadNúmero de modelo : GR-D370UNombre comercial : JVCParte responsable : JVC AMERICAS
CORP.Dirección : 1700 Valley Road
Wayne, N. J. 07470Número de teléfono : 973-317–5000Este dispositivo cumple con el Apartado 15de la reglamentación FCC. La operación está sujeta a las dos condiciones siguientes: (1)Este dispositivo no debe causar interferenciaperniciosa y (2) este dispositivo debe aceptarcualquier interferencia recibida, incluyendo lainterferencia que pueda causar fallas defuncionamiento.
Los cambios o modificaciones no aprobadospor JVC, puede anular la autoridad delusuario para operar el equipo. Este equipo hasido examinado y cumple con los lí mites dedispositivos digitales Clase B, de acuerdo alApartado 15 de la reglamentación FCC. Estoslí mites están diseñados para suministrar unaprotección razonable contra interferenciaperniciosa en una instalación residencial.Este equipo genera, usa y puede irradiar
radiofrecuencia y si no se lo instala y empleade acuerdo con las instrucciones puedecausar interferencia perniciosa a lascomunicaciones de radio. Sin embargo, no segarantiza que no ocurra interferencia en unainstalación en particular. Si este equipo causainterferencia perniciosa a la recepción deradio o televisión, lo cual puede serdeterminado desconectando y conectando laalimentación del equipo, se alienta al usuarioa que intente corregir la interferencia por
medio de una o más de las siguientesmedidas:
Reoriente o recoloque la antena de recepción.Aumente la separación entre el equipo y elreceptor.Conecte el equipo en un tomacorriente en uncircuito diferente al del receptor conectado.Consulte con su distribuidor o con un téncioexperimentado de radio/TV.

7/17/2019 Manual for JVC camcorder
http://slidepdf.com/reader/full/manual-for-jvc-camcorder 102/104
50 ES ESPECIFICACIONES
Videocámara
Fuente de alimentación eléctricaCC 11 V (Con adaptador de CA)CC 7,2 V (Con baterí a)
Consumo eléctricoAprox. 2,8 W (3,0 W*) (Monitor LCD desconectado,visor conectado)Aprox. 3,2 W (3,4 W*) (Monitor LCD conectado,visor desconectado)Aprox. 6,5 W (Máximo; cuando se carga la baterí a)* Uso de la luz LEDDimensiones (anchura x altura x fondo)59 mm x 94 mm x 114 mm (con el monitor LCD cerrado y el visor replegado)PesoAprox. 400 g (sin baterí a, cassette y tapa delobjetivo)Aprox. 480 g (con baterí a, cassette y tapa delobjetivo)Temperatura de funcionamiento0°C a 40°CHumedad operativa35% a 80%Temperatura de almacenamiento–20°C a 50°CFonocaptorCCD 1/6"
ObjetivoF 2,0, f = 2,3 mm a 73,6 mm, objetivo concapacidad de zoom 32:1Diámetro del filtroø27 mmMonitor LCDPanel LCD/sistema de matriz activa TFT conmedición diagonal de 2,5"VisorVisor electrónico con pantalla LCD de color de0,33"
AltavozMonoauralLuz LEDDistancia de efectividad: 1,5 m
FormatoFormato DV (modo SD)Formato de señalNorma NTSCFormato de grabación/reproducción
Video: grabación de componente digitalAudio: grabación digital PCM, 4-canales de 32 kHz(12 BITS), 2-canales de 48 kHz (16 BITS)Cinta de caseteCinta Mini DVVelocidad de cintaSP: 18,8 mm/s, LP: 12,5 mm/sTiempo máximo de grabación (con cinta de 80minutos)SP:80 min, LP:120 min
Soporte de almacenamientoTarjeta de memoria SD/Tarjeta MultiMediaCardSistema de compresiónJPEG (compatible)Tamaño de imagenImagen fi ja:1 modo (640 x 480 pí xeles)Calidad de imagen2 modos (FINA/ESTÁNDAR)Número aproximado de imágenes almacenables p. 24
AVSalida de ví deo: 1,0 V (p-p), 75 Ω, analógicaSalida de audio: 300 mV (rms), 1 kΩ analógica,estéreoDVEntrada/salida: 4-patillas, compatible IEEE1394USBTIPO Mini USB-B, Compatible con USB 1,1
Adaptador de CARequisito de alimentación eléctricaACA 110 V a 240 V~, 50 Hz/60 HzSalidaCC 11 V=, 1 A
Las especificaciones mostradas se refieren al modoSP, a menos que se indique otra cosa. Salvo error uomisión, el diseño y las especificaciones puedensufrir modificaciones sin previo aviso.
Aspectos generales
Para videocámara digital
Para cámara fija digital
Para conectores
7/17/2019 Manual for JVC camcorder
http://slidepdf.com/reader/full/manual-for-jvc-camcorder 103/104
ES 51
T É R M I N O S
AAdaptador de CA ........................................... 14Ajuste DPOF (Digital Print Order
Format) ............................................. 27, 28Ajustes de fecha/hora .................................... 16
BBalance del blanco ........................................ 36Baterí a ............................................... 13, 14, 47Bloqueo del diafragma ................................... 35Búsqueda de partes en blanco ...................... 22
CCalidad de imagen ......................................... 32Cámara lenta en directo ................................ 33Cambiar las configuraciones
de menú .......................................... 29 – 32
Capacidad de grabaciónCinta .......................................................18Tarjeta de memoria ................................. 24
Carga de la baterí a ........................................ 13Carga de una cinta ........................................ 18Carga de una tarjeta de memoria .................. 18Código de tiempo .................................... 20, 32Compensación de contraluz .......................... 36Conexión a un PC ......................................... 41Conexiones a un televisor o una grabadora
de ví deo .................................................. 23
Control de exposición .................................... 35Control de exposición puntual ....................... 36Copia ....................................................... 39, 40
DDatos de baterí a ............................................ 14
EEdición por inserción ..................................... 43Efectos de reemplazo (cortinilla) o fundido de
imagen ....................................................37
Eliminar archivos ........................................... 27Enfoque manual ............................................ 34Especificaciones ............................................ 50Estabilización de imagen digital (DIS) ........... 30
FFilmación nocturna ........................................ 33
IInicializar una tarjeta de memoria .................. 28Indicaciones de advertencia .................... 44, 45
LLuz LED .........................................................33
MModo Ancho ................................................... 33Modo de demostración ..................................32Modo de fotografiado ............................... 29, 34Modo de sonido .......................................29, 30Modo manual/automático .............................. 15
Modo motorizado ...........................................34Monitor LCD y visor ................................. 19, 20
OOperación relacionada con la alimentación ...15
PPrograma AE, efectos y efectos de
obturación ........................................38
RReproducción en cámara lenta ......................22Restauración del nombre de archivo ............. 26Revisión rápida ..............................................21
SSelección de medio de grabación .................. 32Solución de problemas .............................42-45Sonido de reproducción ................................. 32Soporte del trí pode ........................................17
TTele Macro ..................................................... 30
Tarjeta de memoria .................................. 19, 48
VVelocidad de cinta (MODO GRAB.) ......... 30, 32Volumen del altavoz ......................................21
ZZoom .............................................................. 20
TÉRMINOS

7/17/2019 Manual for JVC camcorder
http://slidepdf.com/reader/full/manual-for-jvc-camcorder 104/104
SP GR- D 3
7 0 U