
KIPFold 1000 User Guide€¦ · 2. If a report of a serious accident has been received from a...
20
1 KIPFold 1000 User Guide Ver Q1
Transcript of KIPFold 1000 User Guide€¦ · 2. If a report of a serious accident has been received from a...

1
KIPFold 1000
User Guide
Ver Q1

2
Safety instructions
For your protection, please read these safety instructions completely before operating the folder and keep this manual for future reference close to the folder. Carefully observe all warnings, pre-cautions and instructions on the folder or the ones described in the operating instructions.
In order to guarantee hazard-free operations all maintenance or repair work must only be performed by a trained technical person only.
Hazard Levels
DANGER: Indicates an imminently hazardous situation which, if not avoided, WILL result in death or serious injury.
WARNING: Indicates a potentially hazardous situation which, if not avoided, COULD result in death or serious injury.
Warning
CAUTION: Indicates a potentially hazardous situation which, if not avoided, MAY result in minor or moderate injury.
Maintenance and Modifications To avoid the risk of introducing hazards, all modifications and maintenance activities are strictly reserved to properly qualified and trained service techni-cians. In daily use, any electrical equipment may be subject to parts wear and eventual failure. In order to maintain safety and reliability, the Customer En-gineer (hereafter called CE) must perform regular maintenance inspections.
General • Make sure that the folder is placed on a level, horizontal surface of
sufficient strength. See the respective KIPFold specifications sheet for the weight of the equipment.
• Always use materials recommended for the respective folder. Mate-rials not approved can cause faults in your folder.
• Do not use the folder when it is emitting unusual sounds. Remove the plug from the power socket or turn off the fixed connection to the electricity grid and contact Customer Service.
• Do not use the folder in rooms which are subject to excessive vibra-tion.
• Move the folder careful and slow using two persons. • Set the adjustable feet on the ground when the folder is in the de-
sired position

3
Main connection cable
Do not use a different power connector cable, then that delivered. When replacement of the power supply cable is required because of dam-age or defect, contact your CE for proper replacement of this power supply cable.
Mains connection
• Do not use an extension cord to connect the machine. • The machine must be connected to a grounded socket outlet. • This machine is not designed for connection to an IT power supply
system. An IT power system is a voltage network in which the neu-tral wire is not connected to ground.
• When the machine is connected through a wall-socket, place the machine near a wall-socket that is easily accessible.
Warning
Measures to take in case of an accident
1. If an accident has occurred, the distributor who has been notified
first must immediately take emergency measures to provide relief to affected persons and to prevent further damage.
2. If a report of a serious accident has been received from a customer, an on-site evaluation must be carried out quickly and KIP must be notified.
3. To determine the cause of the accident, conditions and materials must be recorded through direct on-site checks, in accordance with instructions issued by KIP.
4. For reports and measures concerning serious accidents, follow the regulations specified by every distributor.
Disclaimer
These safeguards have been compiled to the best of our knowledge. They are intended as a compact guide to the safe handling of the product. We reserve the right to revise specification data sheets, as new infor-mation becomes available. It is the user´s responsibility to determine the suitability of this information for the adoption of safety precautions as may be necessary. It is the user´s responsibility to contact KIP to ensure that the specification data sheets are the latest ones issued. If and in so far as limitation of liability is permit-ted under the applicable laws, we do not accept liability for any inaccuracy that may occur in this infor-mation.

4
General KIPFold 1000 is an automatic folder that folds large sized plots created by any printer according to DIN 824. One of the 8 folding programs available can be selected by pressing a button on the folder’s keyboard. Details of the selected program are displayed on a large LCD display that allows the folder’s easy operation. Documents will be folded lengthwise according to the selected folding program. The specially designed bridge takes the plot from the printer and transports it to the folder. Documents that are not supposed to be folded will be deployed in the unfolded print bag. In order to control the folding process, the documents pass the automatic bridge to the folder‘s inlet. A switcher at the bridge’s entrance selects the plots that are not supposed to be folded and directs them into the unfolded print bag. When the plot enters the bridge it will be transported to the folder’s entrance with the exact synchronized speed. A sliding rail on the bridge allows documents to be fed manually. A very useful feature demonstrating the various purposes this folder can serve. The two gas pressure shock absorbers are supporting the bridge helping to tilt it into an almost vertical posi-tion. In consequence of that, general access to the printer is assured.

5
Dimensions
6
Setting up the Folder
Environment
The room in which the folder is to be placed should be dry and dust free. Humidity: 20% - 80% R.H. not condensing
Room temperature: 15° C to 35° C. The folder must stand horizontally aligned and very stable without shaking. Always ascertain to place the folder in a way that does not block exits and allows an ergonomic workflow. The set up of the folder should be done by a trained engineer in order to assure a 100 % functionality of the folder. Power Supply
The power supply is at the right bottom side of the folder. Please use the power cable delivered with the Folder. The folder is pre-adjusted to 230 Volts / 50 cycles as a factory default. It can be adjusted where needed by a trained technician only. DO NOT PLUG IN THE FOLDER UNLESS THE CORECT FOLDER SETING IS CONFIRMED Do not use a multi-outlet power strip. These cords will not stand the power consumption of both the printer and the folder.
Working with the folder
Switch the folder on
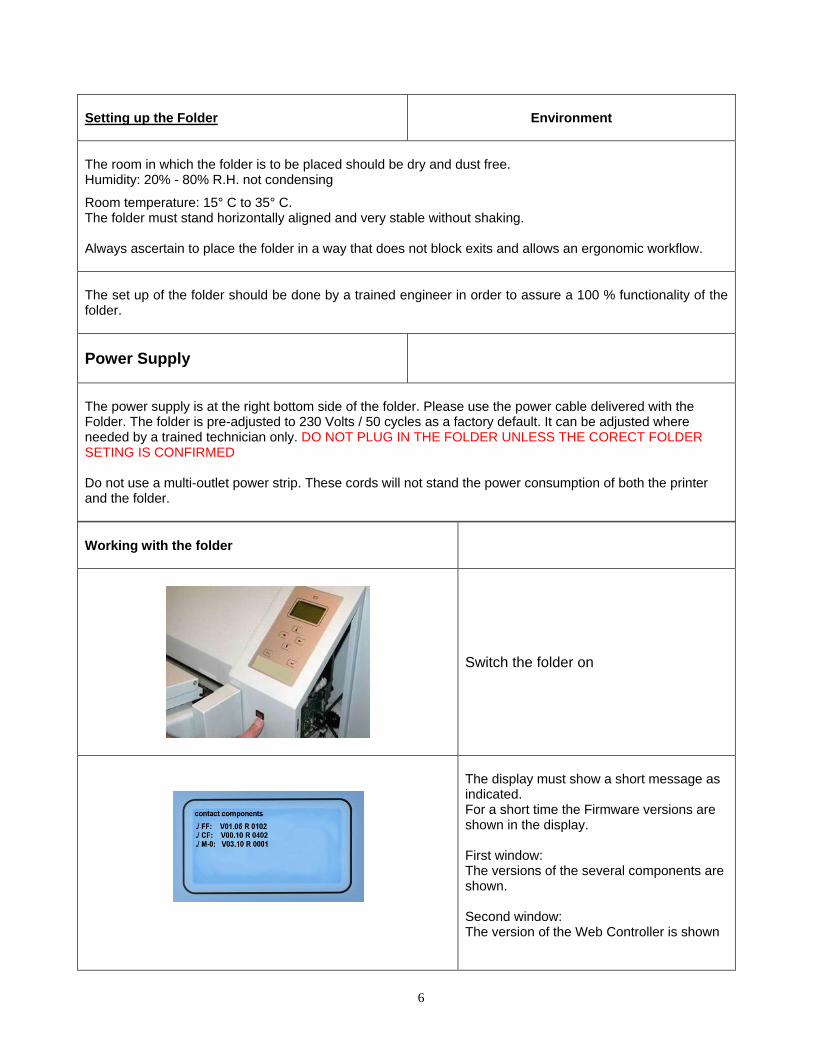
The display must show a short message as indicated. For a short time the Firmware versions are shown in the display. First window: The versions of the several components are shown. Second window: The version of the Web Controller is shown

7
Multi color led
Indicates the status of the folder
Red: error Green: ready Yellow: in operation
Error Code
In case of any error during startup or opera-tion the folder will give a beep signal and an error message in the display. The remaining paper will be transported out with low speed automatically or by pressing or .
To get a clear message refer to the Error Code List at the end of the user manual.
The example shows the error code 22 : 00 – this indicates that the light barrier 0 is cut. Find the light barrier positions at page 17.

8
Selecting folding programs (Off line mode)
There are eight standard folding programs available and four “Free Style” folding programs. By pressing the keys and you select a folding program of your own choice. On the left hand side of the display the selected program number will appear. The centre of the display shows an image of a folded package.
Folding programs
Factory programmed folding programs
The package can be applied with a tab strip as shown in the third program. This is not part of the KIPFold 1000 functions and shown as an example only. Length Fan Fold = unlimited Length Cross Fold= up to 1.5m
- Width max. 930mm. - Length min. 410 mm - Documents longer than 5m will skip two folds after 20-25 folds. - These documents have to be completed by hand
Cross fold size
Status Online/manual
Number of folding program
Folding style
Margin width Panel width

9
Two pages unfolded
20-25 Folds 20-25 Folds

10
Suitable Media
• Film or materials with glossy shiny surfaces are not suitable. • For application of media types, please contact the service engineer. • The paperweight should not be less than 60 g/m² and not more than 110 g/m².
Suitable Formats
Fan folding: All documents with length from 420 mm up to 50.000 mm (80 gr/m² Paper) and width up to max. 930 mm.
Cross folding: up to 1.50m
Aligning documents
In any case the title block (legend) has to be on the leading edge of the document entering the folder (on the right hand side of the leading edge). The title block position has to be set in the plot software you are using. Manual feeding
You must switch the folder into “offline” mode on the printer’s user panel first.
Change the mode to:
• Online • Offline • Manual By pressing the Enter button twice.

11
Manual feeding – fan fold
Before fan folding: Switch icon to manual mode
by pressing button twice.
Insert the sheet face down (title block must be in front), aligning centrically. The insertion rail on the table can be slid into an optimized position for the document you are feeding. Please take care to feed the paper as straight as possible.
Manual feeding – cross fold
Insert the sheet face up (title block must be in front). Please take care to feed the paper as straight as possible
Change the cross fold size:
In Order to change the cross fold size press - the cursor will start to blink. Buttons and move the cursor from icon to icon. Selected icons blink frequently. Select the number below the cross fold symbol. Pressing buttons and edit the blinking settings.
Press button within three seconds

12
Resolving a Paper Jam on the Bridge
The LED on top of the display shining red and a blinking icon for the fan folded document indicates an error either on the bridge or in the fan folder. After pressing button once, the display shows an error code indicat-ing type and location of the error. The most probable cause for a cut light barrier is that there is still a whole or a part of a document on the bridge. In order to remove the document on the bridge you lift the bridge cover by gripping it at the edge.
As soon as you have lifted the cover, you may lock it in the raised position by extending the suspending link. You can now inspect the bridges inside and remove any paper leftovers. As soon as the leftovers have been removed, the cover needs to be closed. Press button once in order to commence your job. You may have to call for a service engineer in case paper was not the cause to the error.
Suspending Link

13
Resolving a Paper Jam in the Fan Folder
The LED on top of the display shining red and a blinking icon for the fan folded document indicates an error either on the bridge or in the fan folder. After pressing button once, the display shows an error code indicating type and location of the error. The most probable cause for a cut light barrier is that there is still a whole or a part of a document in the fan folder. In order to remove the document in the fan folder you have to lift the fan folder top cover.
The folder will be powered off as a safety switch on the top cover cuts power at the same instance. As soon as you have lifted the cover, you will see the fan folder’s inside. Retrieve documents stuck be-tween the fold rollers by simply turning the fold rollers manually. The paper pieces will appear either at the folder’s top or its rear depending on the direction you are rotating the fold rollers.
Position of the Lightbarriers
Rotate this roller manually in order to remove jammed documents
Safety Switch Fan Folder
Lift Top Cover Here
LB2
LB4
LB1
LB0
LB3

14
Error Code List
ERROR
Example
Fan: 22 02 Cross: 00 00 RFU: 00 00 Rot.Unit: 00 00 Stacker: 00 00 Code Fan folder error Cause 21 Error on stepper control board 01 error during start stepper control board • 38V lost on board (green led on
stepper control board is off) • internal logic error 02 error during stop stepper control board
22 00 Light barrier 0 cut
• Paper between LB and prism • cable broken • Light barrier defective
01 Light barrier 1 cut 02 Light barrier 2 cut 03 Light barrier 3 cut 04 Light barrier 4 cut 23 permanent light on the receiver 00 receiver from LB 0 is always on high level
• Direct reflection from sender to re-ceiver
• dust on sender, receiver or prism • Port on PCB damaged
01 receiver from LB 1 is always on high level 02 receiver from LB 2 is always on high level 03 receiver from LB 3 is always on high level 04 receiver from LB 4 is always on high level 24 processing error for stepper control board 01 error during calculate the step width • mostly electrostatic
• developer tool 02 error during counting the steps 25 Hardware error 01 lack of 5 Volt external • Check fuses and connectors
• fan folder: top cover open • cross folder: door open
02 lack of LF 38 Volt or CF door open 03 ff cover open 26 Jam 01 after cut - no signal for ready • Jam on the printer’s knife 02 after cut - no paper on LB 1 • Jam on the bridge 03 without cut signal no paper on LB 1 • Jam on the bridge 04 between LB 0 and LB 1 • Jam in the fan folder 05 not paper end on LB 1 • Jam in the fan folder 06 too many folds • copy too long 07 no end of paper on LB 0 • Jam at output fan folder 08 Unexpected Paper on LB4 in Online-Mode
• Switch to offline mode 09 Unexpected Paper on “no fold” switch (LB5)
in Online-Mode 27 wrong direction at last sheet folding • defective LB

15
Using the KIPFold 1000 with KIP Applications and Drivers
Once the KIPFold 1000 is installed and functioning, KIP applications can be used to fold various packet
sizes that were set up during configuration of the folder.
KIP Applications and Drivers:
KIP Print
KIP PrinNet
KIP Windows Driver
KIP AutoCAD Driver

16
KIP Print and Folding
When using the KIP Print software there are two methods for printing using the KIPFold 1000.
Method 1
In this method the fold packet to
be used will be selected first by
clicking the Fold button on the
main screen ribbon bar. Once
here select the desired Folder
Packet setting to be applied to the
entire job. Doing this procedure
prior to selecting the files to be
printed will then apply the selected
fold packet to all selected files
making everything in the job ticket print and fold the same way.
Method 2
In this method files will be added
to the job ticket in the usual man-
ner (Add Files, Browse for and
select files, add them to the job to
be printed). Once the files to be
printed have been added, using
the dropdown menu in the Fold
column, each file can be given a
different fold packet. This method
can be used when a job has to
be folded in a very specific way.

17
KIP PrintNet and Folding
When using the KIP PrintNet software there are two methods for printing using the KIPFold 1000.
Method 1
In this method the fold packet to be
used will be selected first by clicking
the Job Defaults button on the main
screen ribbon bar. This will open the
Job Defaults screen. Once here select
the desired Folder Packet setting to be
applied to the entire job. Doing this
procedure prior to selecting the files to
be printed will then apply the selected
fold packet to all selected files making
everything in the job ticket print and
fold the same way.
Method 2
In this method files will be
added to the job ticket in the
usual manner (Add Files,
Browse for and select files,
add them to the job to be
printed). Once the files to be
printed have been added, us-
ing the dropdown menu in the
Fold column, each file can be
given a different fold packet. This method can be used when a job has to be folded in a very specific way.

18
KIP Windows Driver and Folding
When using the KIP Windows Driver to print and fold files follow these steps:
1. Select the file to be printed in the appropri-
ate application. For this example Adobe Ac-
robat is being used.
2. Go to File and select Print
3. When the Print window opens select the in-
stalled KIP Windows Driver and then select
the Properties button.
4. When the Properties button opens select
the Print Options Tab.
5. Under Folding check the box to enable fold-
ing and using the dropdown arrow make
sure that “On” is selected.
6. Select the Desired Fold Packet.
7. Select the “OK” button to set this.

19
KIP Autocad Driver and Folding
When using the KIP AutoCAD Driver to print and fold files follow these steps:
1. From Within AutoCAD go to File
and then Print.
2. Double click the installed KIP Au-
toCAD driver.
3. This will open the Plotter Configuration
Editor
4. Select the Device and Document Settings
Tab
5. Select the Custom Properties option
6. Select the Custom Properties button

20
7. Once the custom properties window
opens under Media Options select the
Folder Button.
8. Selecting On will use the Folder Presets
determined by the Presets.ini file in the
IPS.
9. Select any of the available presets to
apply that setting to the files being
printed.
10. Select OK to set this
11. Select OK again to return to the print
screen and submit the file.