Installing WordPress on Google Cloud Platform (GCP)
35
Installing WordPress on Google Cloud Platform (GCP) April 2016
-
Upload
manish-jain -
Category
Technology
-
view
2.549 -
download
3
Transcript of Installing WordPress on Google Cloud Platform (GCP)

InstallingWordPressonGoogleCloudPlatform(GCP)
April2016

What’sCoveredWhat’sCoveredSlide Topic3 Introduction4 IaaS vs.PaaSvs.SaaS5 ArchitectureOverview7 Part One– CreateaComputeEngineinstance11 Part Two– ConfigureComputeEngine15 PartThree– CreateaCloudSQLinstance24 PartFour– InstallandConfigure WordPress30 NowWhat?

IntroductionIntroduction
ThepurposeofthistutorialisnotonlytoinstallWordPressbuttolearnmoreabouttheGoogleCloudPlatformConsole.Inaddition,learnhowtousesomeoftheresourcessuchasComputeEngineandCloudSQL.
ThiswillgiveyouagoodbasicunderstandingofGoogle’scloudoffering.

InfrastructureasaService(IaaS) PlatformasaService(PaaS) SoftwareasaService(SaaS)
IaaSvs.PaaSvs.SaaSIaaSvs.PaaSvs.SaaS
AssembleandconfigurethevariousresourcesofComputeEngine,CloudSQLandCloudStoragetorunWordPress.
InstallWordPressonAppEngineandlettheprovisioningofresourceshappeninthebackground.
VisitWordPress.comandstartbloggingwithoutconfiguring,installingormaintainingWordPresssoftware.
ComputeEngine
CloudSQL
CloudStorage
AppEngine
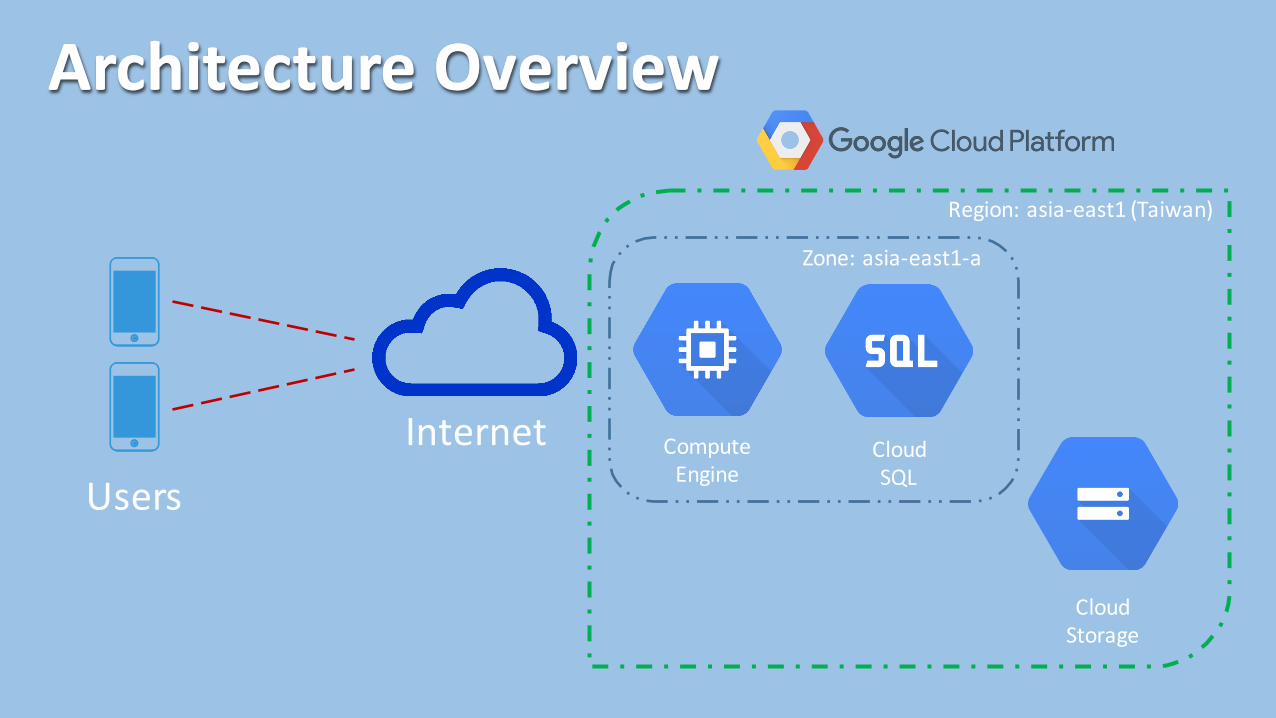
ArchitectureOverviewArchitectureOverview
UsersInternet
Region:asia-east1(Taiwan)
Zone:asia-east1-a
ComputeEngine
CloudSQL
CloudStorage

GetaFreeTrialGCPAccount@https://cloud.google.com/

PartOne:PartOne:CreateaComputeEngineInstanceCreateaComputeEngineInstance
Incloud-speakcreatinganewvirtualserveriscalledan“instance”.“Spinningupaninstance”isaphraseyouwillhearquiteoftenwhichjustreferstostartinganewComputeEngineinstance.
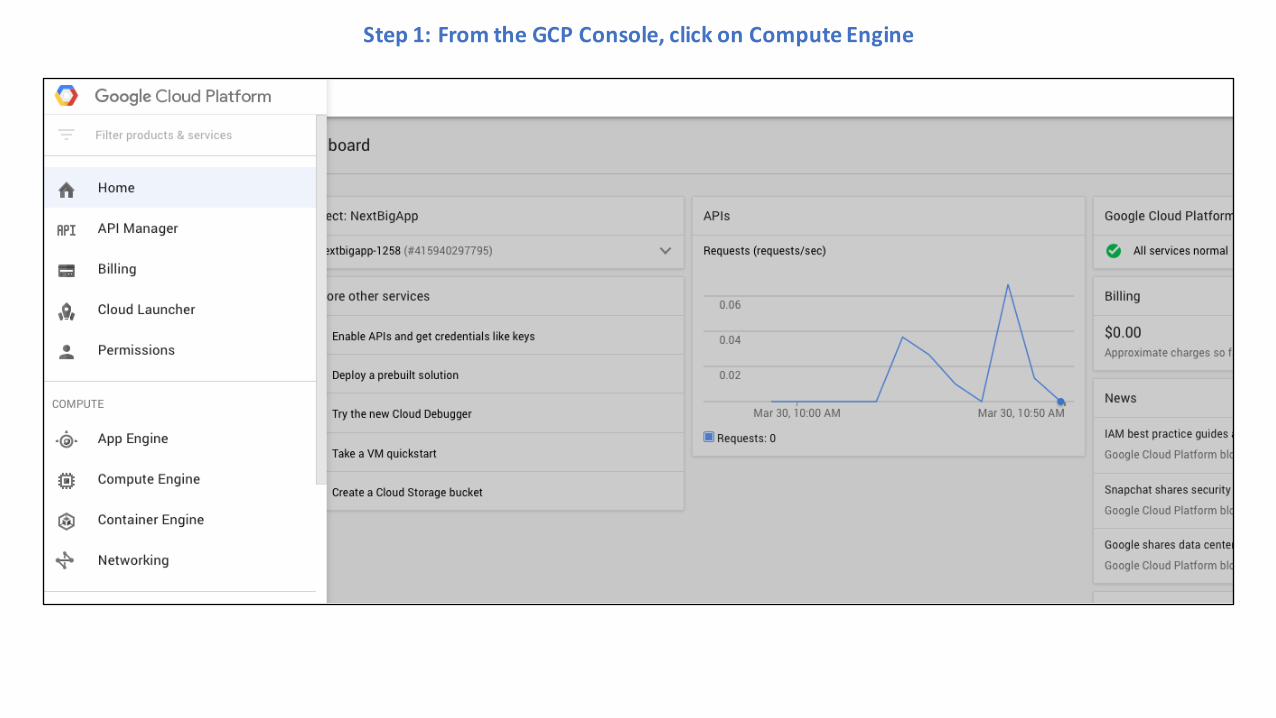
Step1:FromtheGCPConsole,clickonComputeEngine

Step2:ClickonCreateInstance
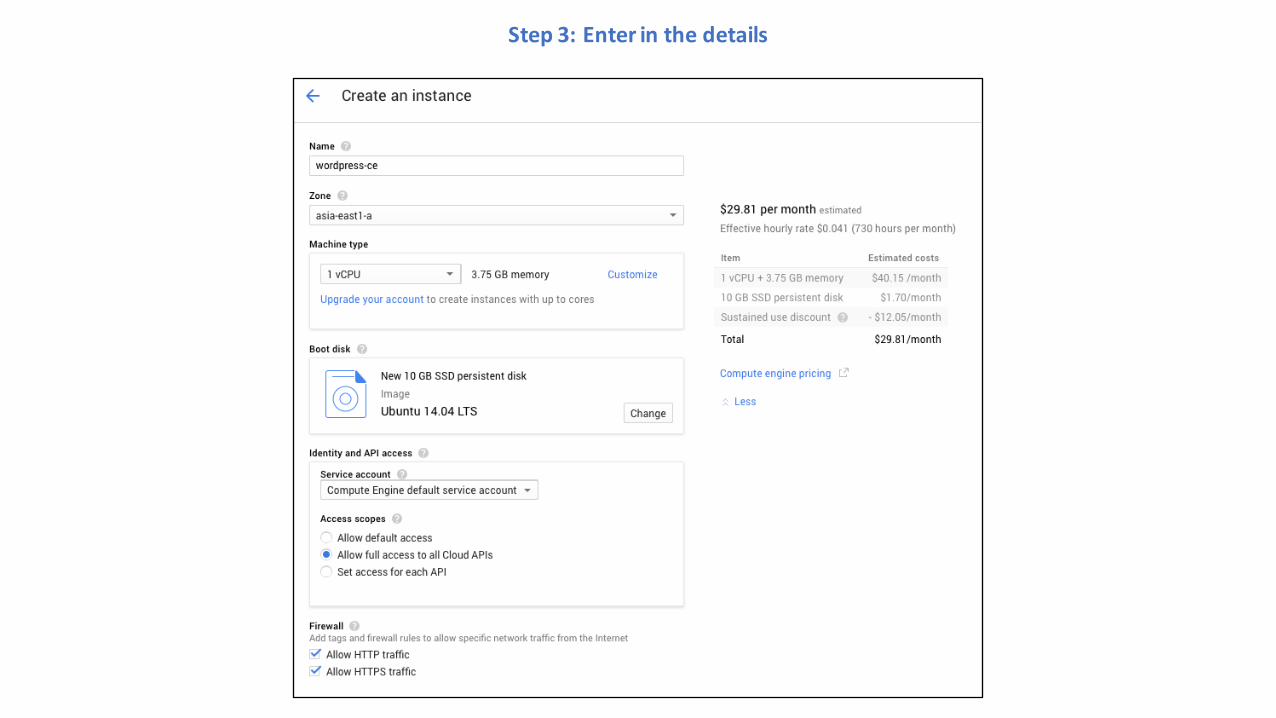
Step3:Enterinthedetails
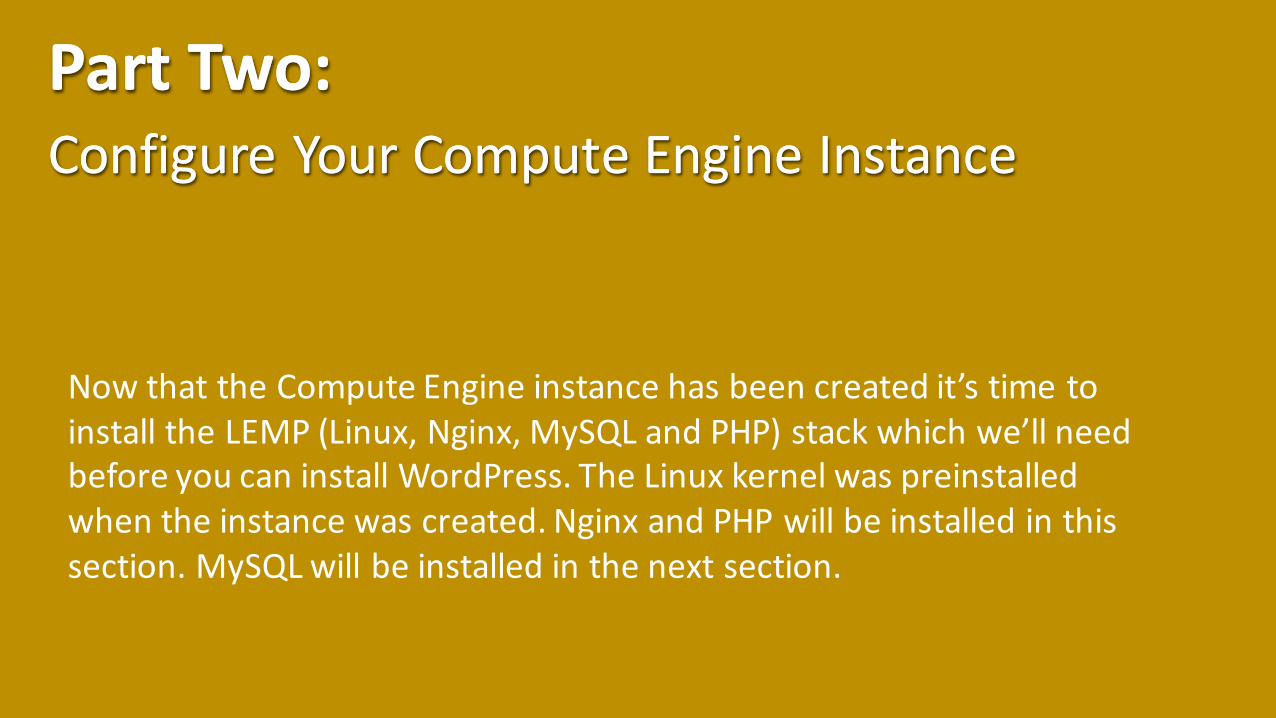
PartTwo:PartTwo:ConfigureYourComputeEngineInstanceConfigureYourComputeEngineInstance
NowthattheComputeEngineinstancehasbeencreatedit’stimetoinstalltheLEMP(Linux,Nginx,MySQLandPHP)stackwhichwe’llneedbeforeyoucaninstallWordPress.TheLinuxkernelwaspreinstalledwhentheinstancewascreated.Nginx andPHPwillbeinstalledinthissection.MySQLwillbeinstalledinthenextsection.

Step1:ConnecttotheComputeEngineinstance
Therearemultiplewaystoconnecttotheinstance:• FromtheGCPConsoleclickonSSHnexttotheinstancename• FromtheGoogleCloudShell• UsingSSHfromaterminalwindow• UsingCloudSDKCLIfromaterminalwindow
Touseyour terminalwindow,download theGCPCloudSDKandfollowtheinstructions toinstallit.Thenclickon“Viewglcloud command”andenterthatinyourterminalwindow.
gcloud compute --project ”Name of your project" ssh --zone "asia-east1-a" ”your instance name"

Step2:InstallNginx , PHPandMySQL
Onceconnectedtotheinstance,switchtosuperuser:sudo su
Installanynewupdates:apt-get update
InstallNginx , PHPandMySQLextension:apt-get install -y nginx php5-fpm php5-mysql mysql-client
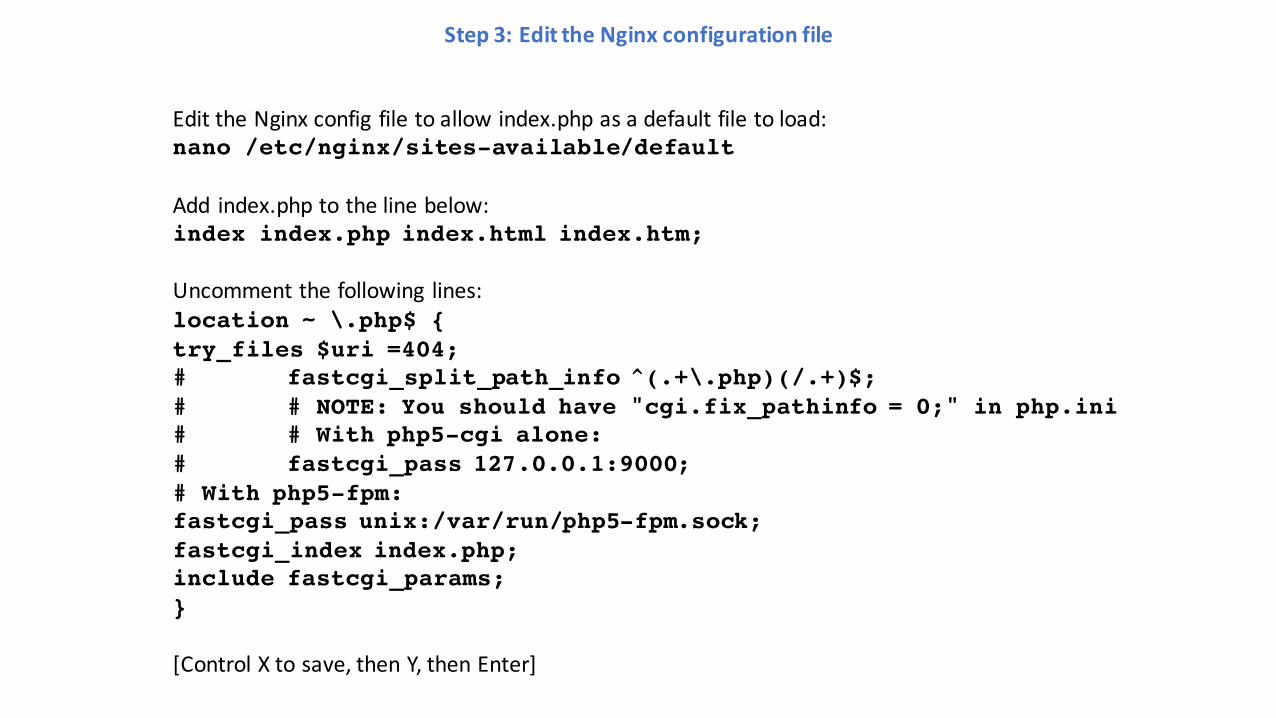
Step3:EdittheNginx configurationfile
EdittheNginx config filetoallowindex.php asadefaultfiletoload:nano /etc/nginx/sites-available/default
Add index.php tothelinebelow:index index.php index.html index.htm;
Uncommentthefollowing lines:location ~ \.php$ { try_files $uri =404; # fastcgi_split_path_info ^(.+\.php)(/.+)$; # # NOTE: You should have "cgi.fix_pathinfo = 0;" in php.ini# # With php5-cgi alone: # fastcgi_pass 127.0.0.1:9000;# With php5-fpm: fastcgi_pass unix:/var/run/php5-fpm.sock; fastcgi_index index.php; include fastcgi_params; }
[ControlX tosave,thenY,thenEnter]

PartThree:PartThree:CreateaCloudSQLInstanceCreateaCloudSQLInstance
InsteadofrunningMySQLonthesameComputeEngineinstancewewilluseCloudSQLtorunthedatabaseonaseparateserver.
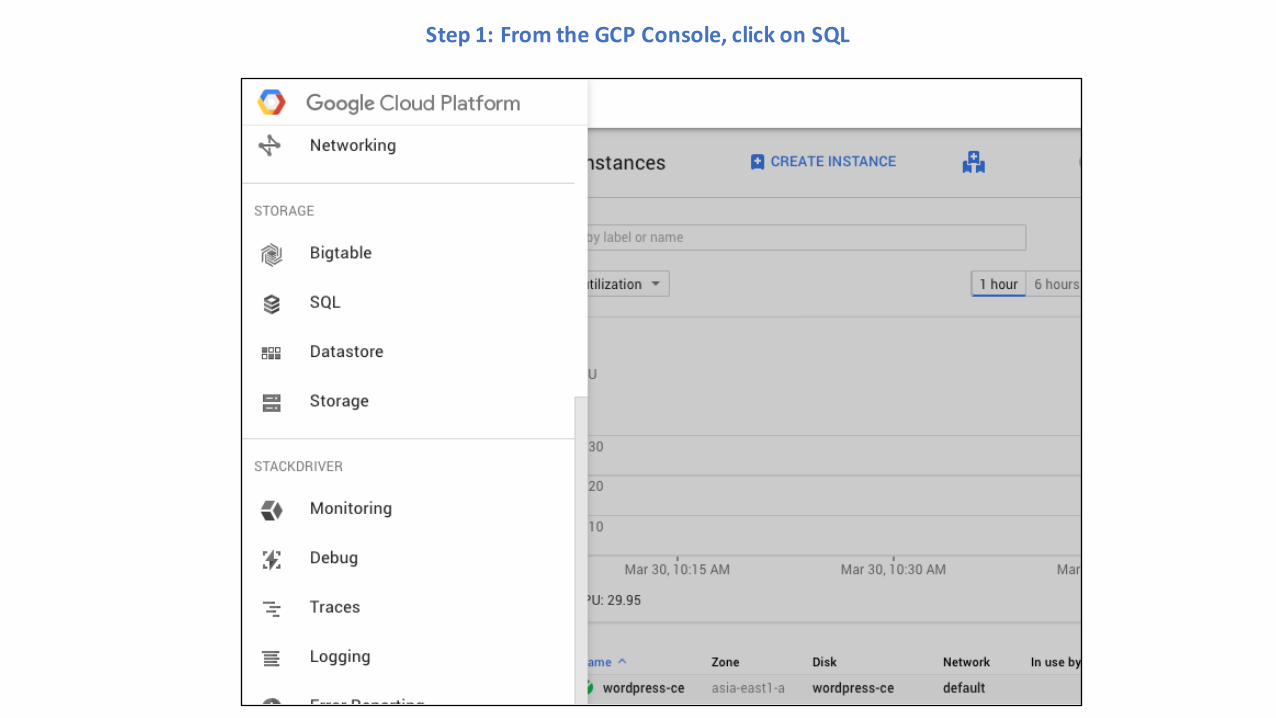
Step1:FromtheGCPConsole,clickonSQL

Step2:ClickonCreateInstance
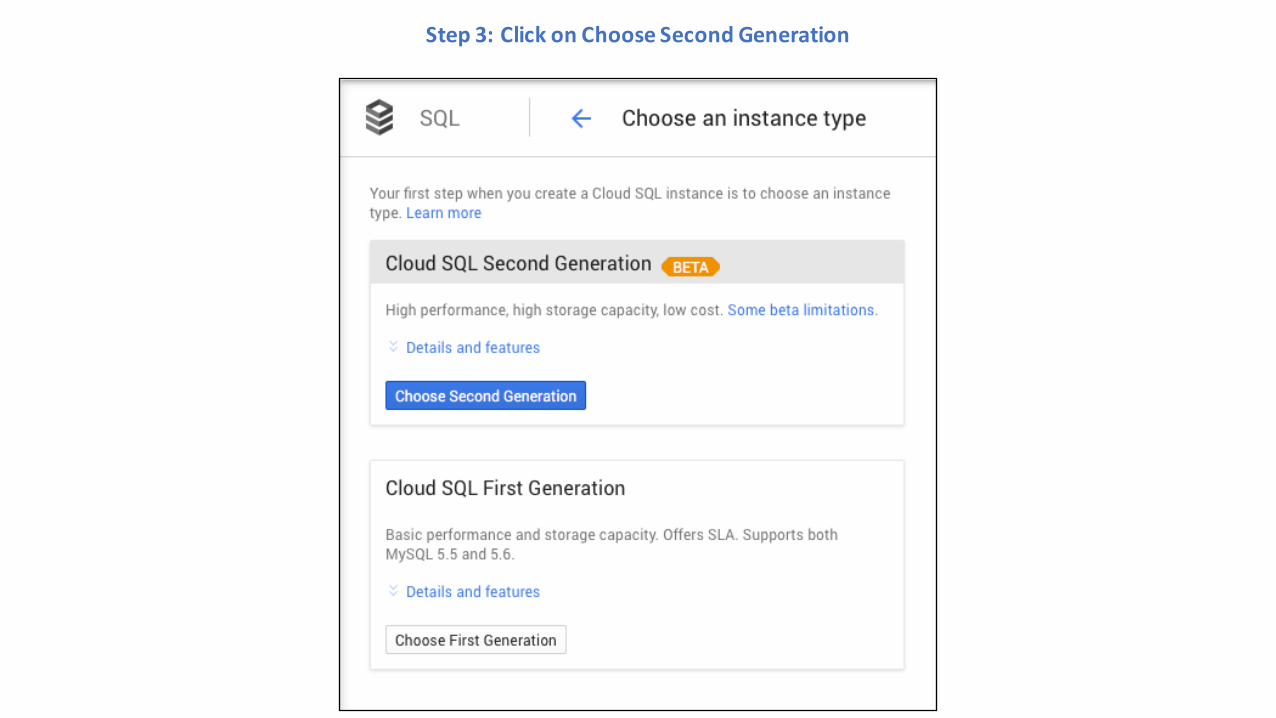
Step3:ClickonChooseSecondGeneration

Step4:Selecttheoptionsthencreatetheinstance

Step5:ClickontheInstanceIDthatwasjustcreated

Step6:Clickon“Additem”toaddtheIPaddressoftheComputeEnginethatyoucreated
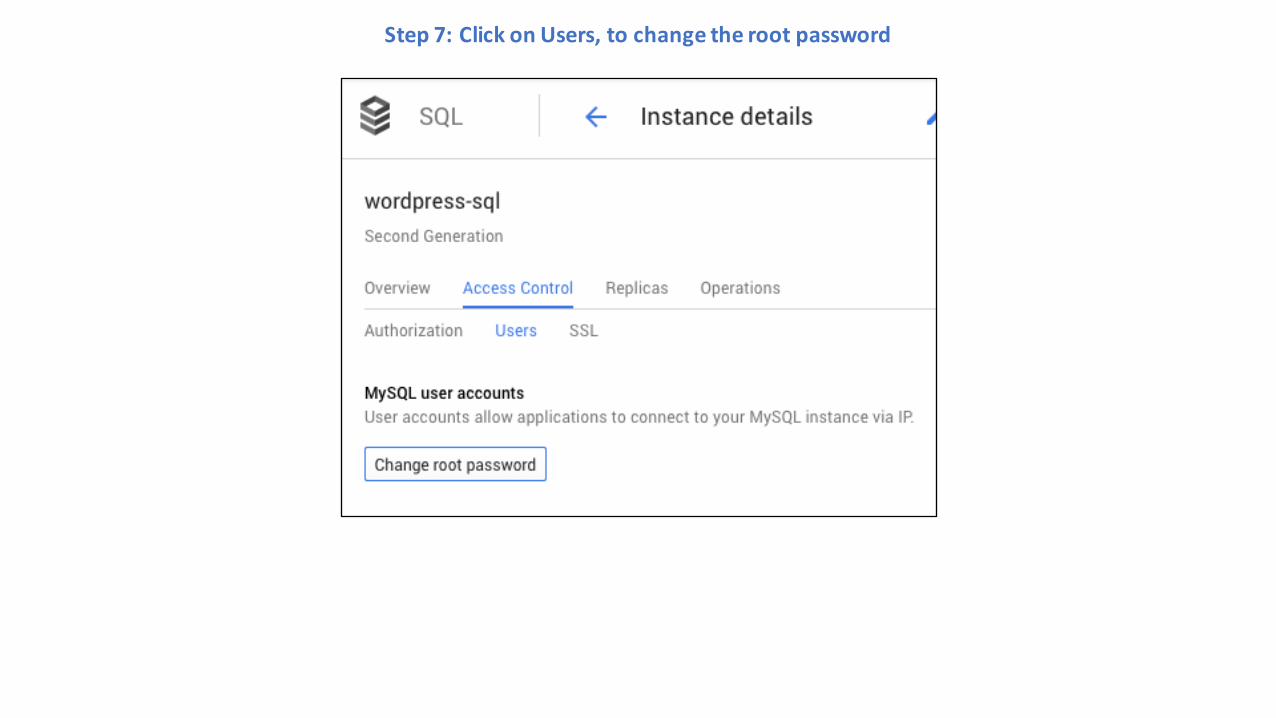
Step7:ClickonUsers,tochangetherootpassword

Step8:UsetheCloudSDKcommandlinetocreateadatabaseona2nd Geninstance
Connect to the Compute Engine instance, then type the following to connect to the Cloud SQL instance:mysql --host=<IP address of Cloud SQL> --user=root --password
At the mysql prompt:CREATEDATABASEwordpress;

PartFour:PartFour:InstallandConfigureWordPressInstallandConfigureWordPress
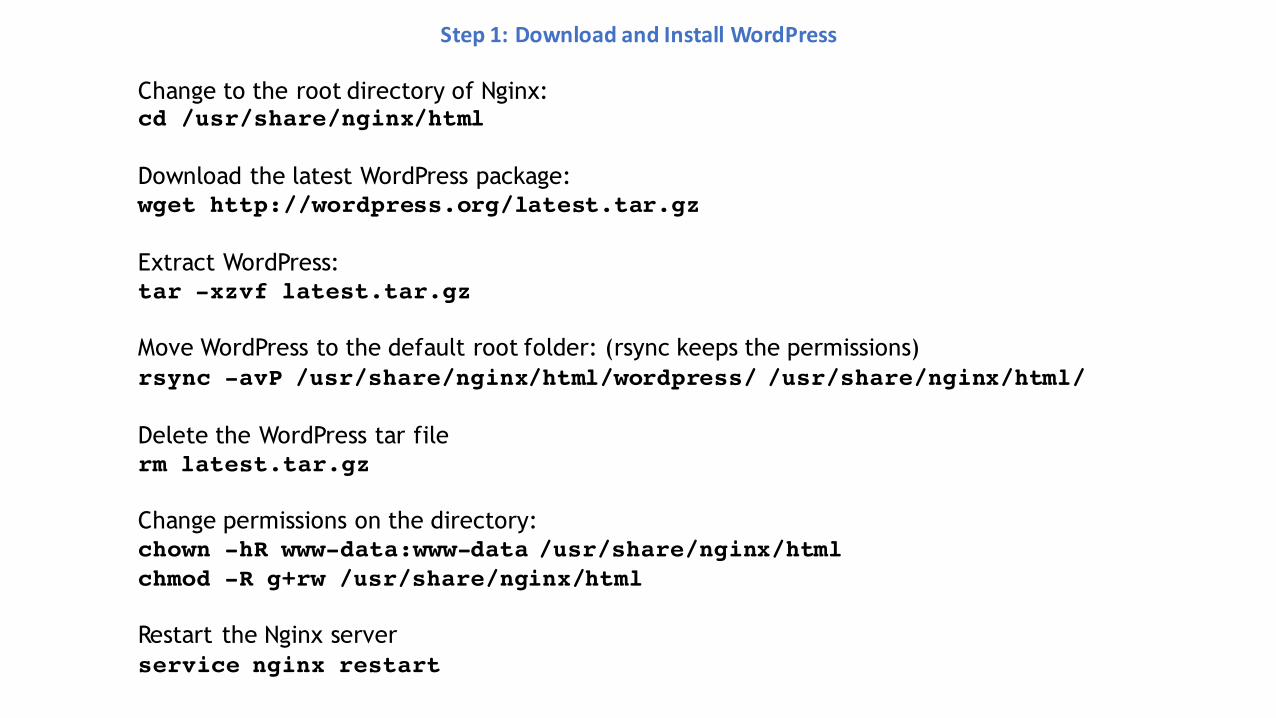
Step1:DownloadandInstallWordPress
Change to the root directory of Nginx:cd /usr/share/nginx/html
Download the latest WordPress package:wget http://wordpress.org/latest.tar.gz
Extract WordPress:tar -xzvf latest.tar.gz
Move WordPress to the default root folder: (rsync keeps the permissions)rsync -avP /usr/share/nginx/html/wordpress/ /usr/share/nginx/html/
Delete the WordPress tar filerm latest.tar.gz
Change permissions on the directory:chown -hR www-data:www-data /usr/share/nginx/htmlchmod -R g+rw /usr/share/nginx/html
Restart the Nginx serverservice nginx restart
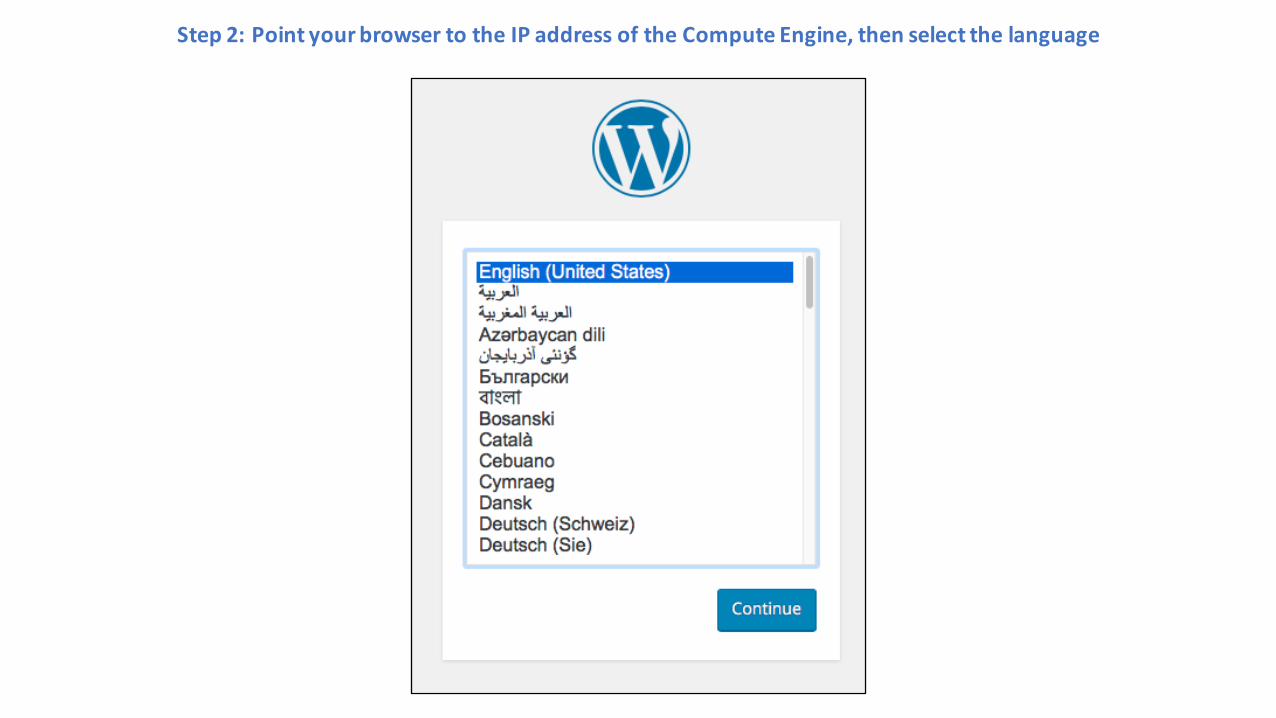
Step2:PointyourbrowsertotheIPaddressoftheComputeEngine,thenselectthelanguage

Step3:EntertheMySQLdetails

Step4:EntertheWordPressdetails

Step5:VisittheIPAddressoftheComputeEngine.Theblogislive!

NowWhat?NowWhat?
MakethingsandbreakthingstolearnhowallthevariousservicesofGCPworktogether.
VisitGCPformoretutorialsat:https://cloud.google.com/docs/

AppendixAppendix

ConnectingtoCloudSQLviaComputeEngineoverSSH(usingMySQLWorkbench)
IPaddressofComputeEngine
IPaddressofCloudSQL
Username

UsingCyberduck toTransferFilestoGoogleCloudStorage– Step1

UsingCyberduck toTransferFilestoGoogleCloudStorage– Step2