INSTALLATION LS/DLS MODEL - tinlizzie18.com · Shirley Stitcher Wood Frame Installation Shirley...
16
INSTALLATION LS/DLS MODEL
Transcript of INSTALLATION LS/DLS MODEL - tinlizzie18.com · Shirley Stitcher Wood Frame Installation Shirley...

INSTALLATION
LS/DLS MODEL
Shirley Stitcher Wood Frame Installation
Shirley Stitcher Wood Frame Installation – Rev 3.0
Page 2
TABLE OF CONTENTS Section 1: Included parts………………………………………………….... pg 4 Section 2: Installing the Shirley Stitcher on Quilt Frame …………….. …pg 5 Section 3: Connecting Shirley Stitcher to Tin Lizzie LS ……………… …pg 11 Section 4: Question and Answer………………………………………...… pg 15
Manufactured for Tin Lizzie 18 by: Quilt-EZ,LLC 8532 S. Paradise West Dr. Paradise, UT 84328 Copyright ©2009 by Quilt-EZ, LLC. All rights reserved. Printed in the United States of America. Except as permitted under the Copyright Act of 1976, no part of this publication may be reproduced or distributed in any form or by any means, or stored in a database or retrieval system, without the prior written permission of publisher.
Shirley Stitcher Wood Frame Installation
Shirley Stitcher Wood Frame Installation – Rev 3.0
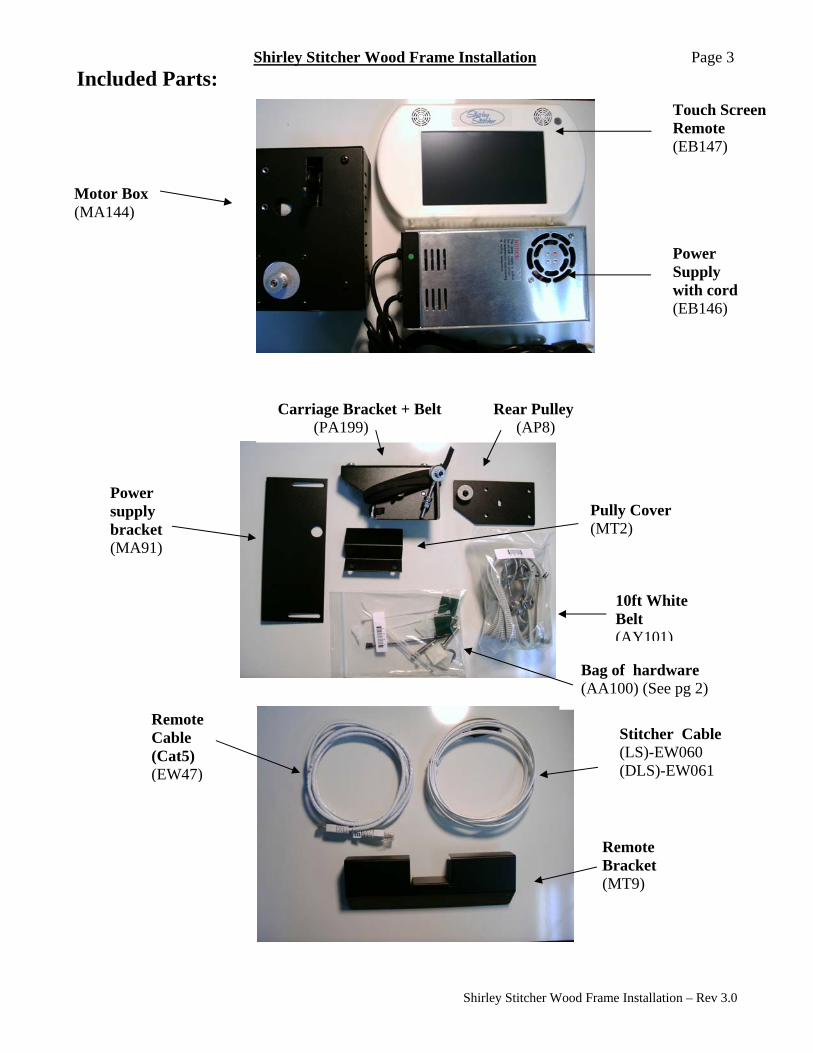
Page 3Included Parts:
Motor Box (MA144)
Touch Screen Remote (EB147)
Power Supply with cord (EB146)
Power supply bracket (MA91)
Bag of hardware (AA100) (See pg 2)
Carriage Bracket + Belt Rear Pulley (PA199) (AP8)
10ft White Belt (AY101)
Remote Cable (Cat5) (EW47)
Stitcher Cable (LS)-EW060 (DLS)-EW061
Remote Bracket (MT9)
Pully Cover (MT2)
Shirley Stitcher Wood Frame Installation
Shirley Stitcher Wood Frame Installation – Rev 3.0
Page 4
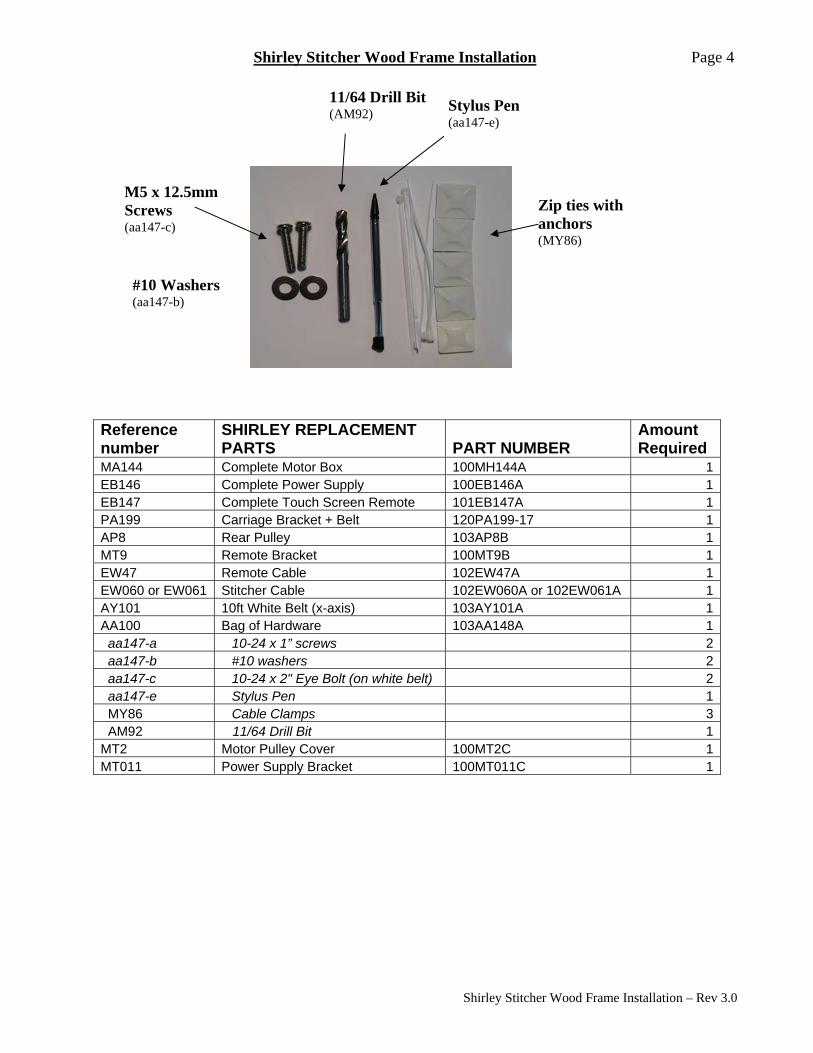
Stylus Pen (aa147-e)
11/64 Drill Bit (AM92)
Reference number
SHIRLEY REPLACEMENT PARTS PART NUMBER
Amount Required
MA144 Complete Motor Box 100MH144A 1EB146 Complete Power Supply 100EB146A 1EB147 Complete Touch Screen Remote 101EB147A 1PA199 Carriage Bracket + Belt 120PA199-17 1AP8 Rear Pulley 103AP8B 1MT9 Remote Bracket 100MT9B 1EW47 Remote Cable 102EW47A 1EW060 or EW061 Stitcher Cable 102EW060A or 102EW061A 1AY101 10ft White Belt (x-axis) 103AY101A 1AA100 Bag of Hardware 103AA148A 1 aa147-a 10-24 x 1” screws 2 aa147-b #10 washers 2 aa147-c 10-24 x 2" Eye Bolt (on white belt) 2 aa147-e Stylus Pen 1 MY86 Cable Clamps 3 AM92 11/64 Drill Bit 1MT2 Motor Pulley Cover 100MT2C 1MT011 Power Supply Bracket 100MT011C 1
M5 x 12.5mm Screws (aa147-c)
Zip ties with anchors (MY86)
#10 Washers (aa147-b)
Shirley Stitcher Wood Frame Installation
Shirley Stitcher Wood Frame Installation – Rev 3.0
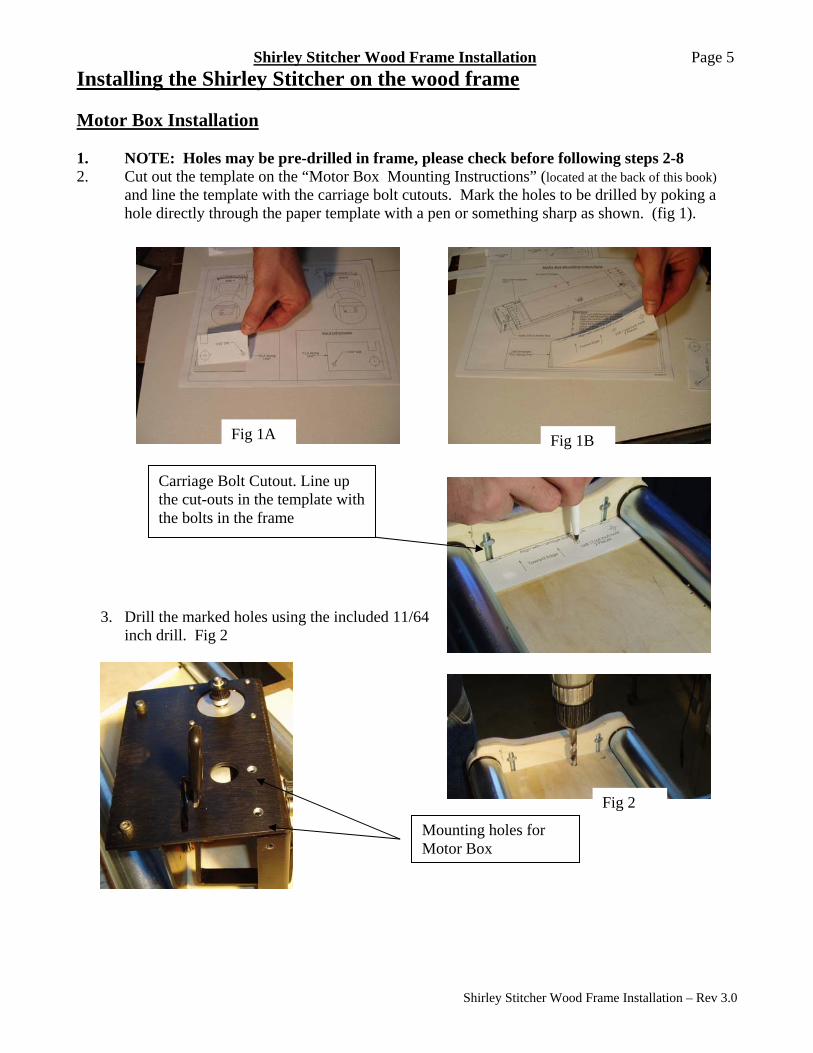
Page 5Installing the Shirley Stitcher on the wood frame Motor Box Installation
1. NOTE: Holes may be pre-drilled in frame, please check before following steps 2-8 2. Cut out the template on the “Motor Box Mounting Instructions” (located at the back of this book)
and line the template with the carriage bolt cutouts. Mark the holes to be drilled by poking a hole directly through the paper template with a pen or something sharp as shown. (fig 1).
3. Drill the marked holes using the included 11/64
inch drill. Fig 2
Carriage Bolt Cutout. Line up the cut-outs in the template with the bolts in the frame
Mounting holes for Motor Box
Fig 1A Fig 1B
Fig 2
Shirley Stitcher Wood Frame Installation
Shirley Stitcher Wood Frame Installation – Rev 3.0
Page 6
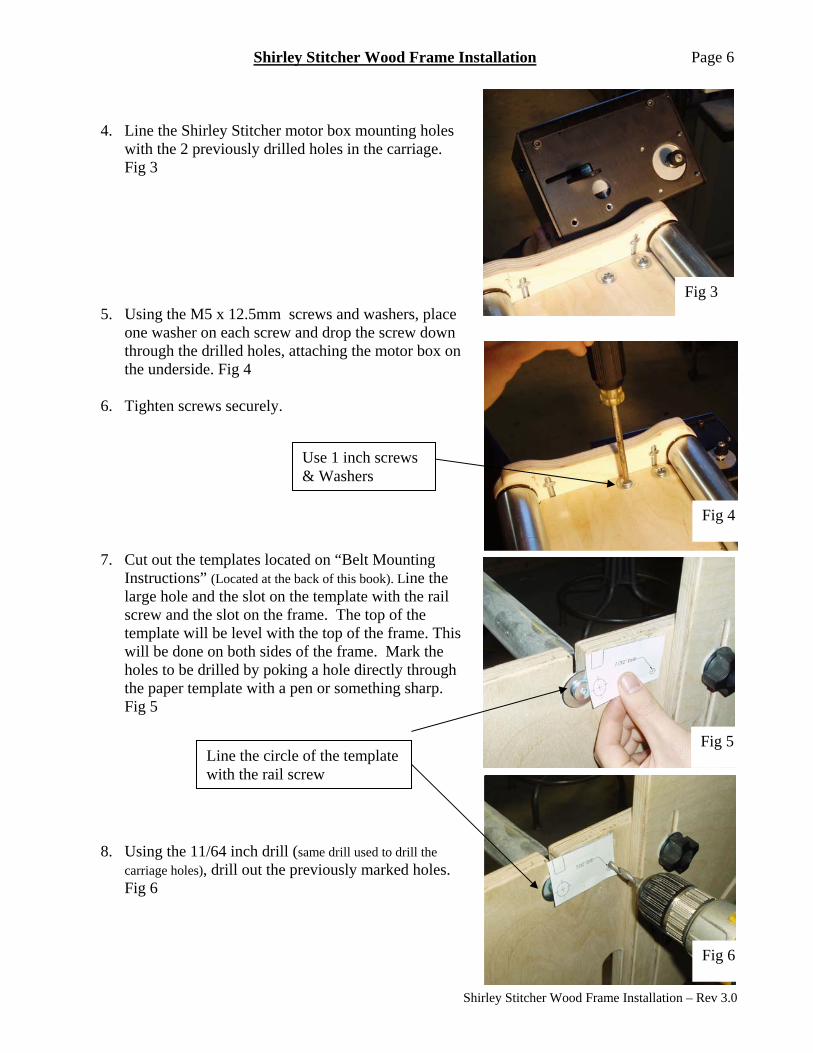
4. Line the Shirley Stitcher motor box mounting holes
with the 2 previously drilled holes in the carriage. Fig 3
5. Using the M5 x 12.5mm screws and washers, place
one washer on each screw and drop the screw down through the drilled holes, attaching the motor box on the underside. Fig 4
6. Tighten screws securely.
7. Cut out the templates located on “Belt Mounting
Instructions” (Located at the back of this book). Line the large hole and the slot on the template with the rail screw and the slot on the frame. The top of the template will be level with the top of the frame. This will be done on both sides of the frame. Mark the holes to be drilled by poking a hole directly through the paper template with a pen or something sharp. Fig 5
8. Using the 11/64 inch drill (same drill used to drill the
carriage holes), drill out the previously marked holes. Fig 6
Line the circle of the template with the rail screw
Use 1 inch screws & Washers
Fig 3
Fig 4
Fig 5
Fig 6
Shirley Stitcher Wood Frame Installation
Shirley Stitcher Wood Frame Installation – Rev 3.0
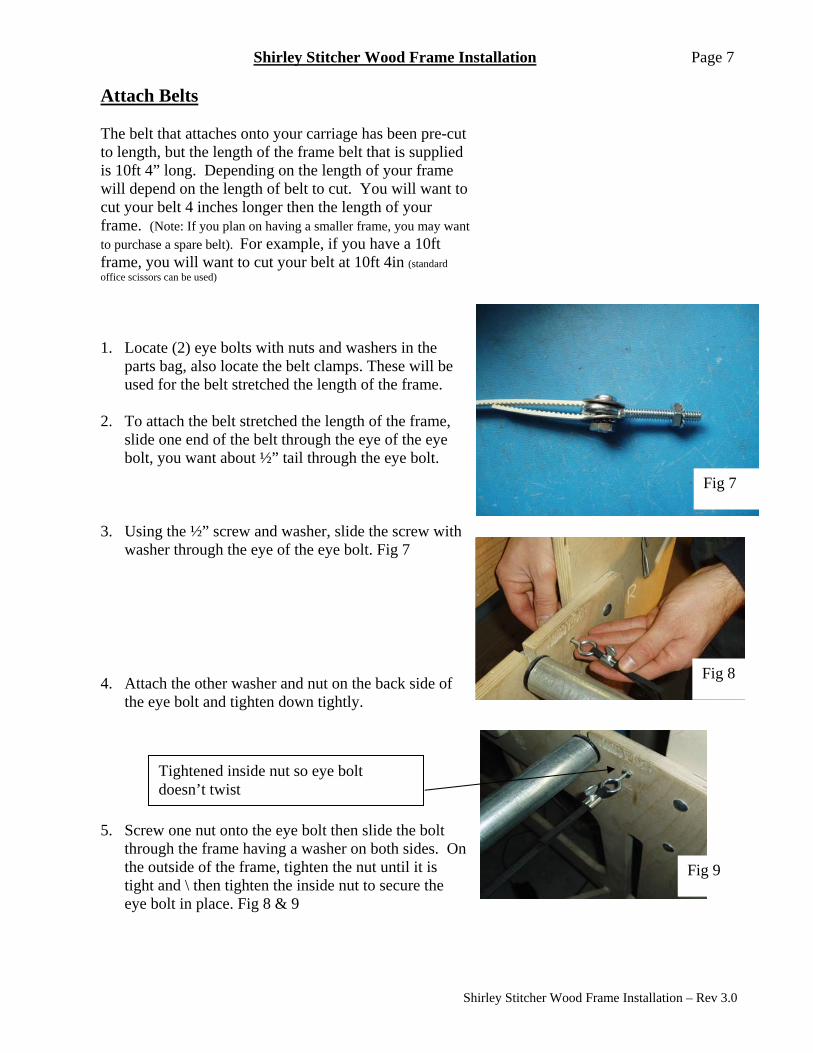
Page 7 Attach Belts The belt that attaches onto your carriage has been pre-cut to length, but the length of the frame belt that is supplied is 10ft 4” long. Depending on the length of your frame will depend on the length of belt to cut. You will want to cut your belt 4 inches longer then the length of your frame. (Note: If you plan on having a smaller frame, you may want to purchase a spare belt). For example, if you have a 10ft frame, you will want to cut your belt at 10ft 4in (standard office scissors can be used) 1. Locate (2) eye bolts with nuts and washers in the
parts bag, also locate the belt clamps. These will be used for the belt stretched the length of the frame.
2. To attach the belt stretched the length of the frame,
slide one end of the belt through the eye of the eye bolt, you want about ½” tail through the eye bolt.
3. Using the ½” screw and washer, slide the screw with
washer through the eye of the eye bolt. Fig 7
4. Attach the other washer and nut on the back side of
the eye bolt and tighten down tightly.
5. Screw one nut onto the eye bolt then slide the bolt through the frame having a washer on both sides. On the outside of the frame, tighten the nut until it is tight and \ then tighten the inside nut to secure the eye bolt in place. Fig 8 & 9
Tightened inside nut so eye bolt doesn’t twist
Fig 7
Fig 8
Fig 9
Shirley Stitcher Wood Frame Installation
Shirley Stitcher Wood Frame Installation – Rev 3.0
Page 8 6. Extend the belt to the other end of thr frame placing it
between the pulley and the tensioner on the motor box. Be sure to have the belt teeth facing up towards the pulley, Fig 10
7. Follow these steps for attaching the belt: fig 11 a. Screw one nut on the eye bolt and place on a
washer. b. Feed the eye bolt through the frame and
place a washer on the outside end and lastly a nut.
c. Push your machine to the opposite end. d. Tighten the eye bolt until the belt no longer
sags in the middle. e. Tighten one full turn of the nut to secure the
eye bolt. NOTE: For the belt tensions, you want to ensure the belt doesn’t vibrate when quilting. If you hear vibrations when quilting, your belts need to be tightened. A nice taught belt will do just fine, the belt should NEVER droop.
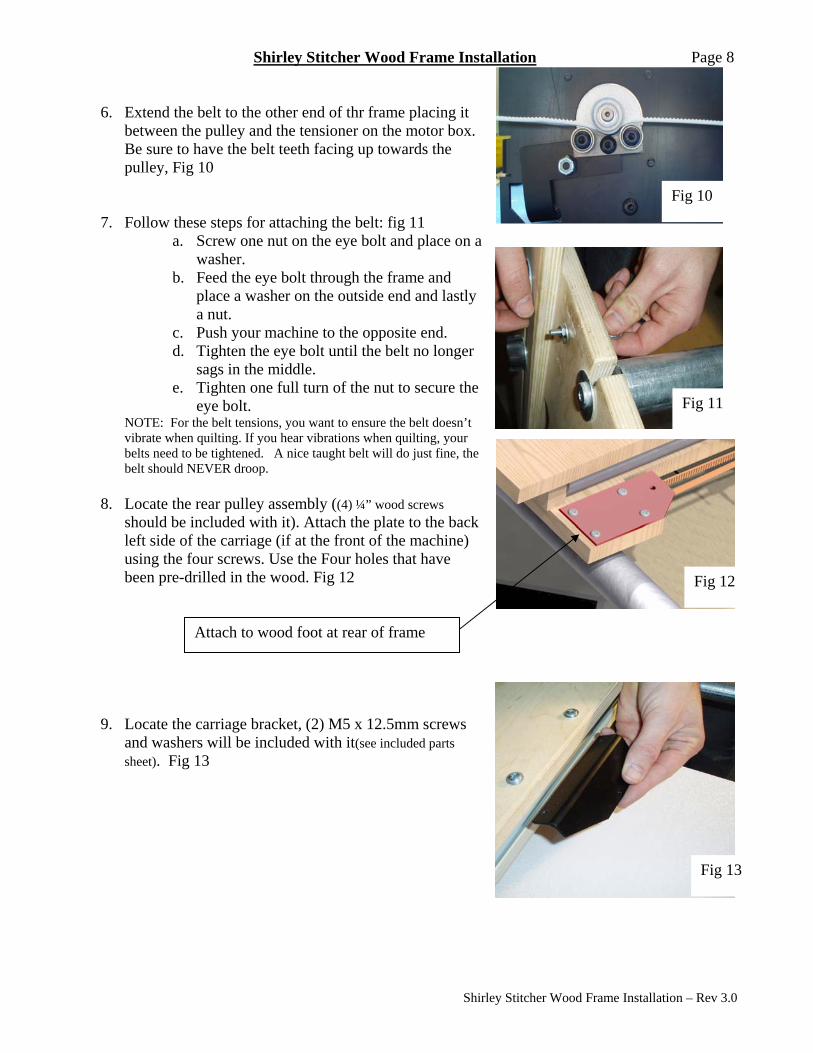
8. Locate the rear pulley assembly ((4) ¼” wood screws
should be included with it). Attach the plate to the back left side of the carriage (if at the front of the machine) using the four screws. Use the Four holes that have been pre-drilled in the wood. Fig 12
9. Locate the carriage bracket, (2) M5 x 12.5mm screws
and washers will be included with it(see included parts sheet). Fig 13
Attach to wood foot at rear of frame
Fig 10
Fig 11
Fig 12
Fig 13
Shirley Stitcher Wood Frame Installation
Shirley Stitcher Wood Frame Installation – Rev 3.0
Page 9
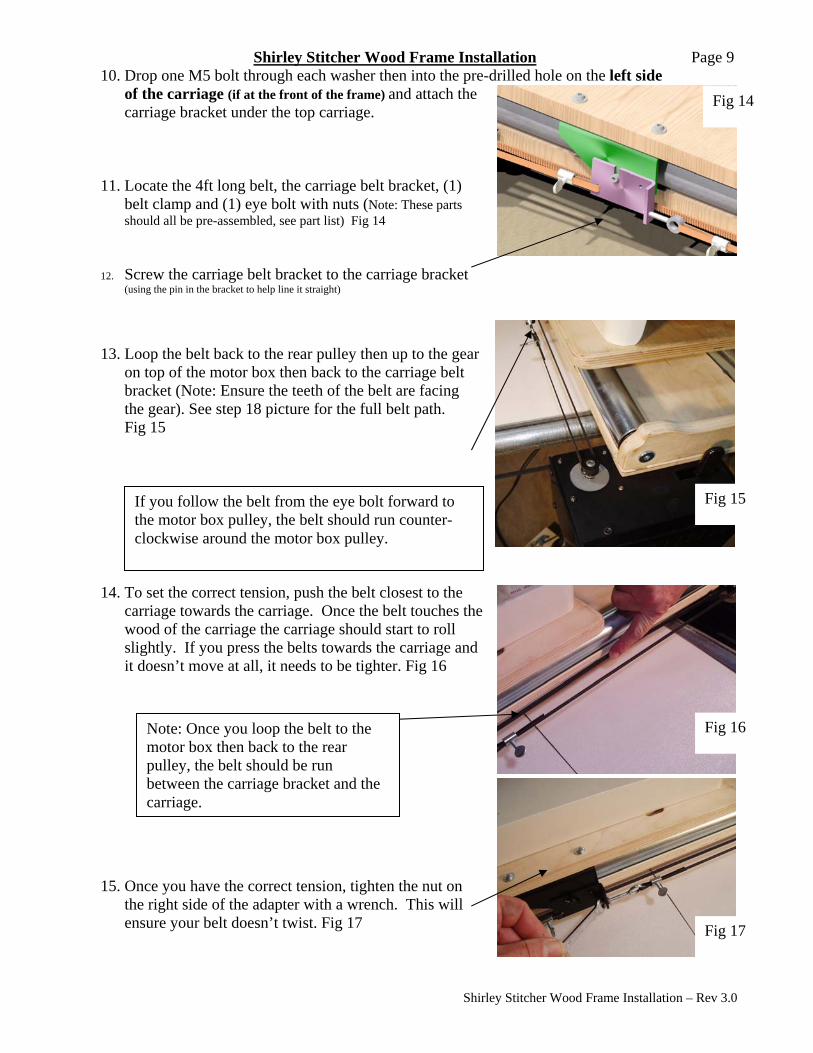
Note: Once you loop the belt to the motor box then back to the rear pulley, the belt should be run between the carriage bracket and the carriage.
If you follow the belt from the eye bolt forward to the motor box pulley, the belt should run counter-clockwise around the motor box pulley.
10. Drop one M5 bolt through each washer then into the pre-drilled hole on the left side of the carriage (if at the front of the frame) and attach the carriage bracket under the top carriage.
11. Locate the 4ft long belt, the carriage belt bracket, (1)
belt clamp and (1) eye bolt with nuts (Note: These parts should all be pre-assembled, see part list) Fig 14
12. Screw the carriage belt bracket to the carriage bracket
(using the pin in the bracket to help line it straight) 13. Loop the belt back to the rear pulley then up to the gear
on top of the motor box then back to the carriage belt bracket (Note: Ensure the teeth of the belt are facing the gear). See step 18 picture for the full belt path. Fig 15
14. To set the correct tension, push the belt closest to the
carriage towards the carriage. Once the belt touches the wood of the carriage the carriage should start to roll slightly. If you press the belts towards the carriage and it doesn’t move at all, it needs to be tighter. Fig 16
15. Once you have the correct tension, tighten the nut on the right side of the adapter with a wrench. This will ensure your belt doesn’t twist. Fig 17
Fig 14
Fig 15
Fig 16
Fig 17
Shirley Stitcher Wood Frame Installation
Shirley Stitcher Wood Frame Installation – Rev 3.0
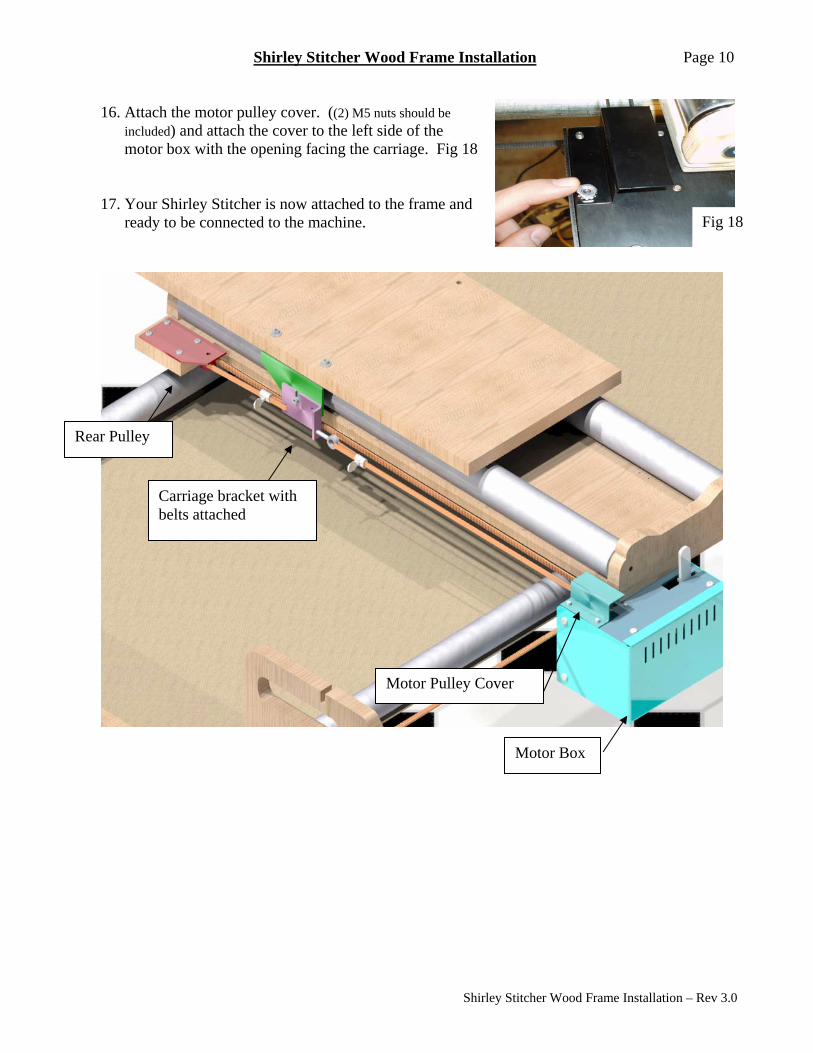
Page 10 16. Attach the motor pulley cover. ((2) M5 nuts should be
included) and attach the cover to the left side of the motor box with the opening facing the carriage. Fig 18
17. Your Shirley Stitcher is now attached to the frame and
ready to be connected to the machine.
Rear Pulley
Carriage bracket with belts attached
Motor Box
Motor Pulley Cover
Fig 18
Shirley Stitcher Wood Frame Installation
Shirley Stitcher Wood Frame Installation – Rev 3.0
Page 11 Connecting Shirley Stitcher to Quilt Machine
NOTE: Make sure all wires are connected before plugging in the power to the wall.
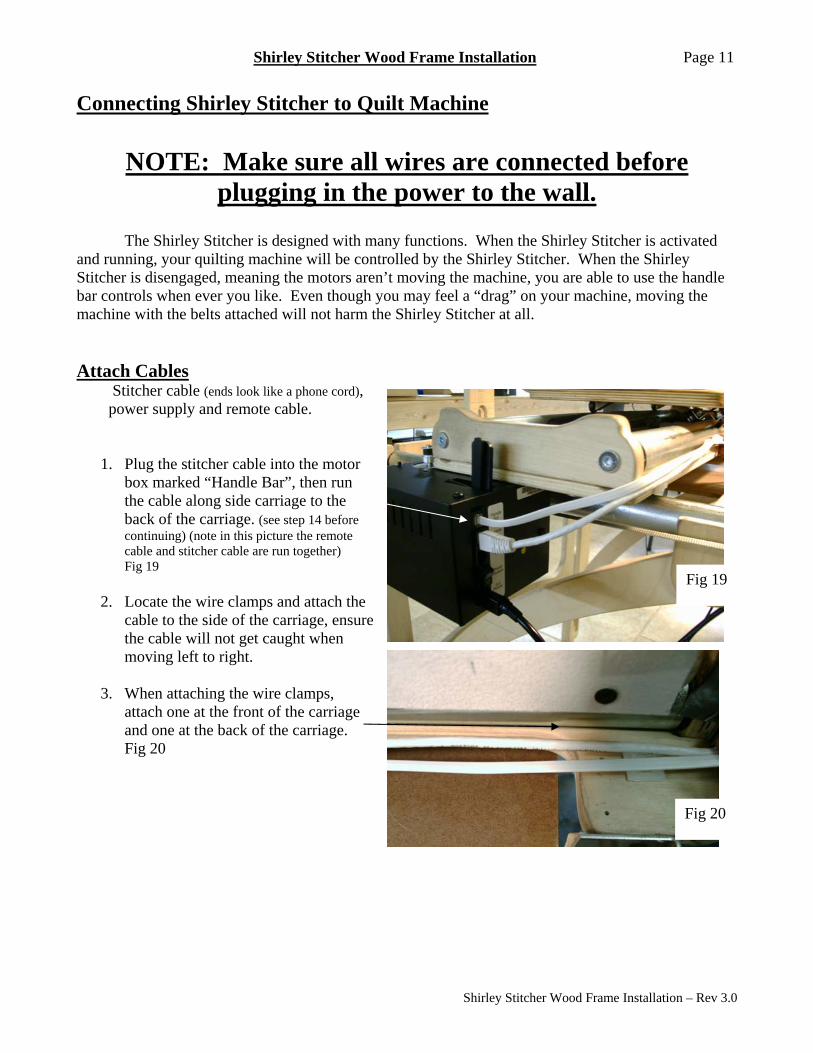
The Shirley Stitcher is designed with many functions. When the Shirley Stitcher is activated and running, your quilting machine will be controlled by the Shirley Stitcher. When the Shirley Stitcher is disengaged, meaning the motors aren’t moving the machine, you are able to use the handle bar controls when ever you like. Even though you may feel a “drag” on your machine, moving the machine with the belts attached will not harm the Shirley Stitcher at all. Attach Cables
Stitcher cable (ends look like a phone cord), power supply and remote cable.
1. Plug the stitcher cable into the motor box marked “Handle Bar”, then run the cable along side carriage to the back of the carriage. (see step 14 before continuing) (note in this picture the remote cable and stitcher cable are run together) Fig 19
2. Locate the wire clamps and attach the
cable to the side of the carriage, ensure the cable will not get caught when moving left to right.
3. When attaching the wire clamps,
attach one at the front of the carriage and one at the back of the carriage. Fig 20
Fig 19
Fig 20
Shirley Stitcher Wood Frame Installation
Shirley Stitcher Wood Frame Installation – Rev 3.0
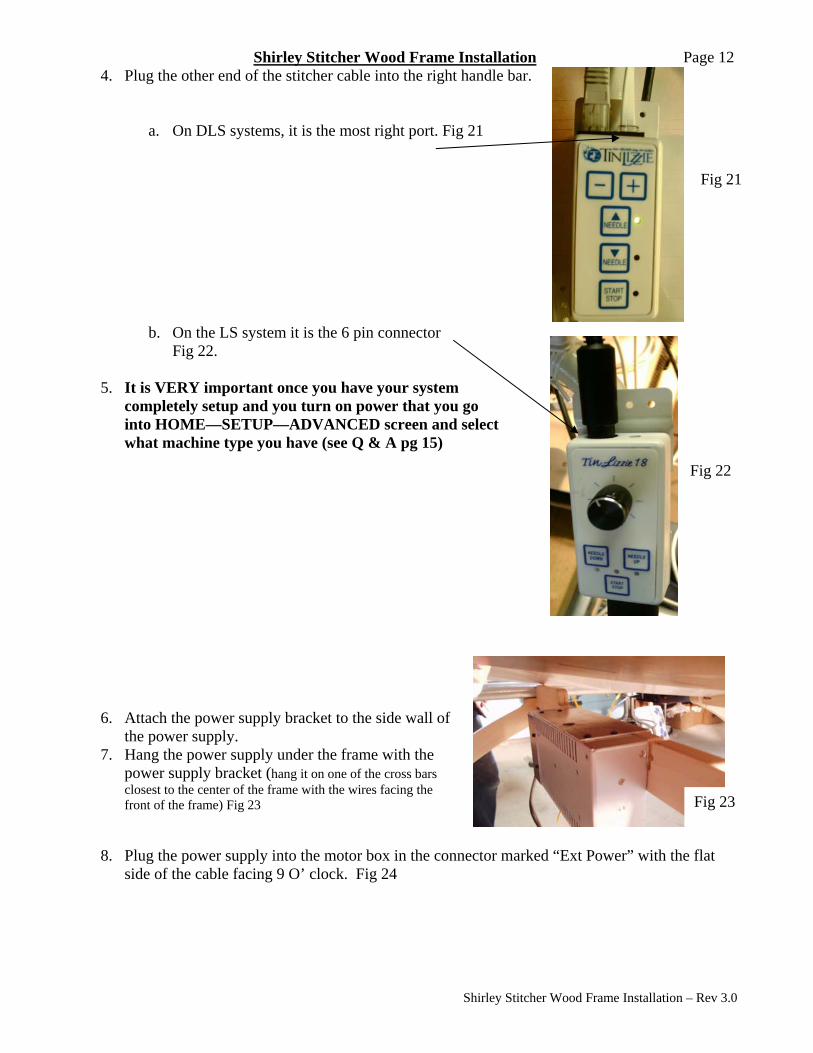
Page 124. Plug the other end of the stitcher cable into the right handle bar.
a. On DLS systems, it is the most right port. Fig 21
b. On the LS system it is the 6 pin connector Fig 22.
5. It is VERY important once you have your system
completely setup and you turn on power that you go into HOME—SETUP—ADVANCED screen and select what machine type you have (see Q & A pg 15)
6. Attach the power supply bracket to the side wall of the power supply.
7. Hang the power supply under the frame with the power supply bracket (hang it on one of the cross bars closest to the center of the frame with the wires facing the front of the frame) Fig 23
8. Plug the power supply into the motor box in the connector marked “Ext Power” with the flat
side of the cable facing 9 O’ clock. Fig 24
Fig 21
Fig 22
Fig 23

Shirley Stitcher Wood Frame Installation
Shirley Stitcher Wood Frame Installation – Rev 3.0
Page 13
9. Plug the white remote wire into the motor box into the connector marked “Remote”. Fig 24
10. Plug the other end of the remote wire into the top of the remote.
11. Attach the Remote Bracket on the back side of the remote using the included screws and 2 pre-drilled holes in the case. Fig 25
12. Slide the remote + remote bracket over the center
mount of the handle bars. Fig 26
13. Fasten the remote cable and stitching cable to the
carriage using the zip ties and anchors.
14. Plug the power into the wall jack (ONLY AFTER ALL CABLES ARE CONNECTED) (use
only standard 110V) 15. NOTE: Quilt robotics must be powered on before quilt machine. 16. Turn on the power switch on the motor box to the “on” position and the LED’s inside the motor
box should be lit.
Cable to handle bars Cable to remote Ext Power
Fig 24
Fig 25
Fig 26

Shirley Stitcher Wood Frame Installation
Shirley Stitcher Wood Frame Installation – Rev 3.0
Page 14 Detaching the Belts for Free Motion When the Shirley Stitcher is not running (meaning it isn’t moving your machine, but could still be on), the motors will be free and you can move your machine to where ever you like. If you want your machine to move as it did before you attached the Shirley Stitcher, it is very easy to disengage the belts.
1. On the motor box there is a locking lever. To dis-engage the lever press to the right, unlock the latch and slide the lever to the left. Fig 27
2. To detach the carriage belt simply unscrew the carriage belt bracket and hang it to the side. Having it still attached to the pulleys will be ok. Fig 28
Shutting Down the Shirley Stitcher Shutting down your Shirley Stitcher is very easy. There is no shutdown sequence like on your computer, there are only 2 steps.
1. Turn off your SHIRLEY black motor box using the power switch found on the right side of the box.
2. If you want to unplug and remove the remote only do so after power has been turned off.
Fig 27
Fig 28
Shirley Stitcher Wood Frame Installation
Shirley Stitcher Wood Frame Installation – Rev 3.0
Page 15 Question and Answer
System Setup Q: My black belt (Y axis) rubs on the carriage adapter. A: Make sure that it is not your belt clamp screw that is rubbing on your belt. Next check that your carriage adapter is squarely connected on the carriage, and also ensure your motor box is mounted square on the bottom carriage.
Q: When I move my machine left to right, my white belt falls off the pulley on the back (the X pulley). A: Ensure the motor box is mounted square on the bottom carriage, if it is skewed, this will cause the belt to come off when moving left to right. Also ensure your lever (on the top of your black box) is in the activated position in the long slot farthest away from the carriage. Next ensure the white belt is positioned correctly and is square with the black motor box.
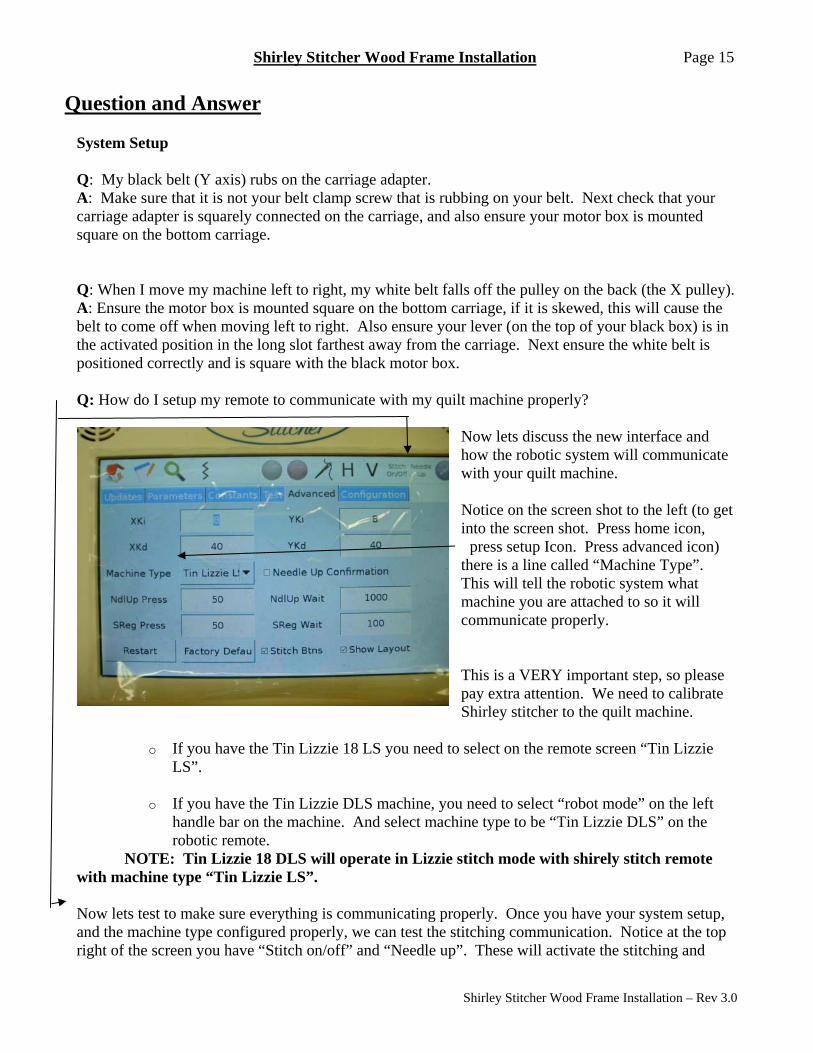
Q: How do I setup my remote to communicate with my quilt machine properly?
Now lets discuss the new interface and how the robotic system will communicate with your quilt machine. Notice on the screen shot to the left (to get into the screen shot. Press home icon,
press setup Icon. Press advanced icon) there is a line called “Machine Type”. This will tell the robotic system what machine you are attached to so it will communicate properly. This is a VERY important step, so please pay extra attention. We need to calibrate Shirley stitcher to the quilt machine.
o If you have the Tin Lizzie 18 LS you need to select on the remote screen “Tin Lizzie
LS”.
o If you have the Tin Lizzie DLS machine, you need to select “robot mode” on the left handle bar on the machine. And select machine type to be “Tin Lizzie DLS” on the robotic remote.
NOTE: Tin Lizzie 18 DLS will operate in Lizzie stitch mode with shirely stitch remote with machine type “Tin Lizzie LS”. Now lets test to make sure everything is communicating properly. Once you have your system setup, and the machine type configured properly, we can test the stitching communication. Notice at the top right of the screen you have “Stitch on/off” and “Needle up”. These will activate the stitching and

Shirley Stitcher Wood Frame Installation
Shirley Stitcher Wood Frame Installation – Rev 3.0
Page 16needle up just like your handle bars would. Press each one of them and ensure your “Needle up” does a needle up and your “Stitching on/off” activates your stitching. Note: Stitching on/off will activate the stitching mode you have selected on your handle bars. If you have selected “manual mode” on the right handle bar, when you press “stitching on/off” on the touch screen remote….manual stitching will activate. In order to have regulated stitching activate, select “lizzie stitch” on the left handle bar BEFORE pressing “stitching on/off”.