
G20 Stitcher Head · OPERATION AND MAINTENANCE MANUAL ... operating, or unloading this ... Each...
48
DELUXE STITCHER C O M P A N Y I N C . G20 Stitcher Head OPERATION AND MAINTENANCE MANUAL Wire Sizes: 23-28 Ga. Round and 21x25 and 20x24 Flat Crown Sizes: 1/2” (13.5 mm) and 5/8” (15.9 mm) Capacity: 2 sheets to 3/4” (20 mm) Before using this Stitcher Head, all operators must study this manual and follow the safety warnings and instructions. Keep these instructions with the G20 Stitcher Head for future reference. If you have any questions, contact your local DeLuxe Stitcher Graphic Arts Representative or Distributor. Head Serial Number : ______________________ Date Purchased : __________________________ Where Installed: __________________________ (make/model of machine)
Transcript of G20 Stitcher Head · OPERATION AND MAINTENANCE MANUAL ... operating, or unloading this ... Each...

DELUXE STITCHER C O M P A N Y I N C .
G20 Stitcher Head
OPERATION AND MAINTENANCE MANUAL
Wire Sizes: 23-28 Ga. Round and 21x25 and 20x24 Flat
Crown Sizes: 1/2” (13.5 mm) and 5/8” (15.9 mm)
Capacity: 2 sheets to 3/4” (20 mm)
Before using this Stitcher Head, all operators must study this manual and follow the safety warnings and instructions. Keep these instructions with the G20 Stitcher Head for future reference. If you have any questions, contact your local DeLuxe Stitcher Graphic Arts Representative or Distributor.
1
Head Serial Number : ______________________ Date Purchased : __________________________ Where Installed: __________________________ (make/model of machine)

2

W A R N I N G !
G20 Stitcher Head
Machine operators and others in the work area should always wear
safety glasses to prevent serious eye injury from
fasteners and flying debris when loading, operating,
or unloading this machine.
Do not operate this stitcher head without all stitcher machine
guards in place. Do not modify the guards in any way.
Always disconnect the power supply before removing
any guards for servicing.
Never operate the machine with wire feeding through
the head unless there is stock above the clinchers,
otherwise serious damage may result.
3

Table of Contents
Introduction ···················································································································· 5
Part Number Definition ·································································································· 5
Specifications ················································································································ 7
Installation ····················································································································· 9
Pre-Inspection ············································································································ 9
Inspection ·················································································································· 9
Assembly ················································································································· 10
Mounting ················································································································· 11
Operation ····················································································································· 13
Wire Threading ········································································································ 13
Wire Straightening ···································································································· 14
Adjustments & Settings ····························································································· 15
Maintenance ················································································································ 21
Lubrication ··············································································································· 21
Cleaning ·················································································································· 22
How To Order Spare Parts ························································································ 22
Replacing Spare Parts ······························································································ 22
Troubleshooting ··········································································································· 28
Formed Staple Parts ································································································· 28
Appendices ·················································································································· 30
Part / Part# Cross Reference ······················································································ 38
4

The part number for each Stitcher Head can be used to define the Stitcher Head itself, in most cases. The Head’s model type, mounting style, nominal wire size and crown size can all be determined from the part number.
G20SHD241/2L (or SCP)
G20 = Model Type
S = Release Type or Original Equipment Manufacturer
HD = Head
24 = Wire
1/2 = Crown Size
L = Loop Stitch or Solid Clincher Plate
Each Head in the G20 Stitcher Head Series is basically identical with respect to operation. The style variations in the Heads mentioned below, occur in some of the component parts used for adaptation to single stitch or gang stitch machines. As model design changes are made, part num-bers also change.
These Heads were designed with a side-feed element to eliminate the need for a Swivel and to increase their reliability. Well suited for all makes and models of Stitcher machines and collators, the G20-style Stitcher Head is user-friendly.
Typical Style Uses:
G20BHD ...................................................................... No. 19 and M19 Wire Stitchers
G20MHD ..................................................................... No. 27 and M27 Wire Stitchers
G20DHD, G20FHD, G20SHD .................................... Automatic Saddle-Stitchers, Gang- ..................................................................................... Stitchers, Multibinders and Others
Examples of Replacement Heads for OEM Users*:
AM Graphics ................................................................................... G20DSHD, G20SHD
Bielomatic ....................................................................................... G20DHD
ECH Will ......................................................................................... G20DHD
Harris 242, 750, 855, 950 ................................................................ G20DSHD, G20SHD
Kugler .............................................................................................. G20DHD
McCain 1500, 2500XL, 3000XL .................................................... G20SHD
Sheridan 705 .................................................................................... G20SHD
These are just a few examples of the replacement heads available for these OEM’s.
Introduction
Part No. Definition
5

Model Differences
Generally speaking, the following part numbers indicate which Stitcher Heads can be used as re-placement heads for your Stitcher Machine or collating system*. Refer to Figure 1 for more infor-mation.
Style BHD (back release) - Models G20BHD19211/2, G20BHD20241/2 and G20BHD241/2L.
These Heads are for use on Bolt-Mount / Crank-Driven Stitchers. They come with a Long Wire
Guide Spring Assembly (G20286A), a Clincher Plate Assembly (7253A), two Rear Mounting
Bolts (G20341), two Rear Clamp Pins (G20376) and two Bonnet Stud Nuts (HN1213).
Style DHD - Models G20DHD20241/2. These Heads come with a Long Wire Guide Spring
Assembly (G20286A), a Clincher Plate Assembly (7650A), a Bonnet Clamp Block (G20501)
and a Bonnet Clamp Eccentric (G20524).
Style SHD (side release) - Models G20SHD201/2, G20SHD205/8, G20SHD205/8-SCP,
G20SHD241/2, G20SHD241/2-SCP, G20SHD241/2L, G20SHD245/8, G20SHD245/8-SCP,
G20SHD20241/2 and G20SHD20245/8. These Heads come with a Short Wire Guide Spring
Assembly (G20679A), a Clincher Plate Assembly (7650A) on the standard heads and a Sided
Solid Clincher Plate (7650SCP) on those heads with a the Solid Clincher Plate option, a Bonnet
Clamp Block (G20501) and a Bonnet Clamp Eccentric (G20524).
* These are just examples and should be used as reference only.
6

Specifications
Weight
Shipping Weight ································································ 22 lbs [10 kg]
Physical Dimensions
Height ················································································ 17-1/2” [44.4 cm]
Width ················································································· 2-3/4” [7 cm]
Stitching Capacity ··························································· Two Sheets to 3/4” [20 mm]
(Stitching capacities are highly dependent on wire type, tensile strength and machine capacity.)
Wire Types ·········································································· 20 through 28 round or 19 x 21-1/2, ································································································· 20 x 24, 20 x 25 and 21 x 25 flat ································································································· (24 gauge round standard )
Crown Sizes ········································································ 1/2” [14 mm], 5/8” [16 mm]
13/64” [5 mm] Loop
Minimum Head Centers ················································ 2-3/4” [70 mm] at two sheets to
1/16” [1.5 mm] material thickness
Loop = 70 mm at two sheets to 2 mm
Stitches Per Hour ····························································· 18,000 or 12,000 with Loop Head
7

8
Dimensions

Carefully inspect the condition of the shipping container before unpacking your G20 Stitcher Head. If the container is broken or damaged and there is evidence that the Stitcher head may be damaged, immediately notify the carrier who delivered the head and the DeLuxe Stitcher Graphic Arts Representative from whom the G20 Stitcher Head was purchased.
Installation
Pre-Inspection
As you carefully unpack the head, check to make sure all components were delivered and are in good working order. Refer to Figure 2 in this manual for reference to the following pieces:
G20 Manual
2.0 mm Hex Key Wrench (G20374)
2.5 mm Hex Key Wrench (G20361)
3.0 mm Hex Key Wrench (G20360)
5.0 mm Hex Key Wrench (G20362)
7.0 mm Open End Wrench (G20364)
Adjustment Handle Assembly (G20628A)
Short (G20679A), Medium (G20279A) or Long (G20286A) Wire Guide Spring Assembly
Moving Clinch Clincher Plate Assembly (7253A) or (7650A) or 2-Sided Solid Clincher Plate
(7650SCP)
Clincher Slide (18182), Clincher Slide Adjustment Block (18183), Clincher Slide Block
Clamp (18184), Clincher Slide Adjustment Screw (18186), Set Screw (UA1428.1), two (2)
Slotted Fillister Machine Screws (UA3216.4) and two (2) Round Head Machine Screws
(UA3310.3). A Clincher Binder Plate (18179) and a Clincher Slide Retaining Strap (7256B) are
included on the multi-head model Clincher Plate Assemblies.
Flat (7024B) or Round (7257B) Clincher Points
Two (2) Bonnet Clamp Blocks (G20501 or G20502) and Eccentrics (G20524 or G20503) or two
(2) each of the following: Rear Mounting Bolt (G20341), Rear Clamp Pin (G20376) and Bonnet
Stud Nut (HN1213)
Stitch Samples
Inspection
9

Pre-Installation
Please take a few moments to fill out the registration card located on page 45 prior to begin-ning installation.
G20362
G20360
G20361
G20374
G20364
G20628A
G20268A*
G20279A*
G20679A*
G20376*(2)
G20524* or G20503*(2) 7024B or
7257B (2)
G20581
7253A or 7650A
G20341*(2)
G20501* or G20502*(2)
Figure 2 - Out-of-the-box items * as applicable to items of ordered Model
Assembly
Attach Wire Guide Spring Assembly to the G20 Head and secure with Socket Head Screw. (See Figure 3)
Appropriately mount G20 Head[s] as shown in Figure 4 (Bolt Mount) or Figure 6 (Multiple Head Mount).
Slide the Clincher Plate Assembly into the clincher mounting rail of the Stitcher as shown in (Figure 5).
Loosen set screw and rotate Wire Guide Spring Assembly to an appropriate position and re-tighten screw. (Figure 3)
10

Wire Guide Spring Plate Assy. G20286A
Upper Wire Tube
G20581
Socket Head Screw
G20288
ROTATE TO APPROPRIATE
WIRE FEED POSITION
Mounting (Figures 3-5)
Rear Mounting Bolt
G20341 (2)
Mounting Bolt Nut
HN1213 (2)
Bender Slide
G20562
Feed Slide Block
G20672
Adjustment Block
G20592
Rear Pin Clamp
G20376 (2)
SLIDE UNTIL CENTERED TO
DRIVER
Clincher Plate Assy.
7650A*
Figure 5 - Attaching & removing the Clincher Plate
Figure 4 - Bolt mount Figure 3 - Attaching the Wire Guide
* for M19 use 7253A
Anti-Wire Backup Unit G50800CA
11

Bon
net C
lam
p E
ccen
tric
G20
524
(2)
Bon
net C
lam
p B
lock
G
2050
1 (
2)
ALI
GN
N
OT
CH
ED
M
AR
KS
TO
M
OU
NT
OR
R
EM
OV
E
Wre
nch
5.0
mm
G
2036
2
RO
TA
TE
D
OW
N
(CC
W)
TO
L
OO
SE
N
RO
TA
TE
UP
(C
W)
AB
OU
T
200°
UN
TIL
LO
CK
ED
Figure 6 - Attaching & removing Heads
12

1. Slide the Wire Holder Retaining Spring over and remove the Wire Holder Assembly [Fig. 8].
2. Pass the wire from the Spool over the Wire Guide Spring between the Wire Guide Studs and the two (2) Wire Oiler Felts, then into the Anti-Wire Backup Unit and finally into the Up-per Wire Tube [Fig. 7].
3. Disengage the Feed Release Cam. Using a needle-nose pliers, gently guide the wire through the Upper Wire Tube, between the Small and Large Feed Gears and into the Mid-dle Wire Tube Assembly. (Or with the gears remaining engaged, place the Adjustment Han-dle Assembly over the pins in the Small Feed Gear and rotate clockwise. [See Fig. 9]) Engage the Gears again by turning the Feed Release Cam.
4. Turn the Stitcher machine on and cycle it until the wire emerges from the Lower Wire Tube in the Cutter Block Assembly. If the wire does not emerge, turn the Wire Straightener Nut and trip the Stitcher until the wire is visible to the right of the Left Wire Guide Bar. Make
Operation
Wire Threading (Figures 7-10)
Figure 9 - Threading the Head Figure 8 - Threading the Head
Figure 7 - Threading the Wire Spring
Wire Oiler Felt G20293
Anti-Wire Backup Unit G50800CA
Upper Wire Tube G20581
Wire Guide Spring G20679A,
G20279A or G20286A
Cutter Box Assy. G20597BA
Wire Holder
G20559A or
G20659A
Wire Holder Retaining Spring
G20583
Feed Release Cam
G20519
Lower Wire Tube
G20599A
Middle Wire Tube
G20544A
(SHOWN IN THE “OFF” POSITION)
(SHOWN IN THE “ON” POSITION)
Adjustment Handle
G20628A
13

sure the wire is leaving the Head completely straight horizontally and that it is not touching either the Left or Right Wire Guide Bar as it passes. Complete wire straightening instructions follow.
Figure 10 - Cut-out View of Wire Threading
Wire Straightening (Figures 11-13)
Front to Back Adjustments—Figs. 11a-11c
Figure 11a - Wire Curls Out
Figure 11b - Wire Curls In
Figure 11c - Straight Wire
ADJUST SCREW IN
WIRE GUIDE BARS
ADJUST SCREW OUT
14

Adjusting the Straightness (Figures 12-13)
.010 MIN. GAP
Wire Straightener Nut G20621
Wire Straightener
Roller G20608
Figure 12 - Adjust the Wire Feed Gap
Figure 13 - Wire Feed Clearance
Assure clear-ance for wire
emerging from the
Fixed Cutter (G20600)
Front to Back Adjustments—Figs. 14a-14c
Figure 14a - Wire Curls Up Figure 14c - Straight Wire Figure 14b - Wire Curls Down
ROTATE CLOCKWISE
ROTATE COUNTER-CLOCKWISE
Aligning the Wire Holder—Figs. 15a-15b
ALIGN TO
BENDER BAR GROOVE
WIRE IN WIRE
HOLDER
WIRE BETWEEN BENDER INSERT
GROOVES
(Loosen Flat Head Screws to adjust. [See Fig. 16])
Figure 15a - Aligning the Wire Holder Figure 15b - Aligning the Wire Holder
15

Adjust wire straightness every 3 - 10 lbs. of wire used, depending on its size:
5-10 lbs. Spool every 3 lbs.
10-25 lbs. Spool every 5 lbs.
25-70 lbs. Spool every 7 lbs.
70 lbs.+ Spool every 10 lbs.
If the wire coming out of the Lower Wire Tube does not prop-erly pass through the Wire Straightener Roller groove, it has to be aligned by adjusting the po-sition of the Lower Wire Tube. Turn the Wire Straightener Nut so that the maximum amount of space is allowed for the wire be-tween the two (2) Wire Straight-ener Rollers. Loosen, but do not remove, the two (2) Socket Head Set Screws in the Cutter Block Assembly.
One adjustment is to move the Tube up or down. Make sure the Wire Tube is close enough to the Wire Straightener Roller, but not pressed against the Roller. Leav-
ing a 0.010" (.025mm) space between the Tube and the Wire Straightener Roller is a good gauge. [Fig. 12] Tighten the two (2) Set Screws and double check the space between the Tube and the Roller before proceeding. The other adjustment is to tilt the Wire Tube toward or away from the Cutter Block. If the wire feeding out of the Cutter Block is curving up then tilt the Wire Tube to-ward the Cutter Block Assembly. If the wire is curving down then tilt the Wire Tube away from the Cutter Block Assembly [Fig. 13]. Before tightening the Set Screws, verify that there is still at least a 0.010” clearance between the Lower Wire Tube and the Wire Straightener Roller [Fig. 12].
Once the wire is successfully feeding between the two (2) Wire Straightener Rollers, turn the wire feeding off with the Feed Release Cam, remove the Middle Wire Tube enough to cut the wire as it exits from between the Large Feed Gear and the Small Feed Gear [Fig. 16] and remove the wire. Turn the wire feeding back on and activate the Stitcher head until the wire feeds out of the Lower Wire Tube. Make sure that the wire feeds between the Wire Straightener Rollers without assis-tance, if not, make adjustments to the Lower Wire Tube until it does.
Large Feed Gear
G20110A
Small Feed Gear
G20112
Flat Head Screw G20579
Flat Head Screw G20614 (2)
Wire Pivot Block
G20543 or G20643
Left Wire Guide Bar G20541
Right Wire Guide Bar G20542
Wire Holder Eccentric
Screw G20665
Socket Head Set Screw G20273
Figure 16 - Adjust the Wire Feed
[LOOSEN THESE TO ADJUST WIRE GUIDES]
[REMOVE TO ADJUST WIRE
GUIDES]
[REMOVE TO CUT FEEDING WIRE.]
Middle Wire Tube
G20544A
16

Before making any adjustments, make sure your stitching machine compres-sion setting is set to the proper thickness of work.
To adjust the length of stitch, disen-gage the Small Feed Gear by turning the Feed Release Cam 1/4 turn clock-wise and turn the Feed Rack Adjust-ment Knob as necessary. [See Figs. 17-21.]
After the length/draw adjustment, if the stitch was too long, the resulting stitch will be one as seen in Figure B. If the stitch was too short, the resulting stitch will be one as seen in Figure C. In either case, adjust as instructed below the illustrations to achieve the correct stitch as seen in Figure D.
Setting the Length & Alignment of the Stitch (Figures 17-21)
Large Feed Gear
G20510A
Feed Release
Cam G20519
Feed Rack G20527
Small Feed Gear
G20512A
Feed Lever G20532B
Feed Rack Adjustment
Knob G20173
Figure A Adjust Length
RIGHT LEG TOO SHORT
RIGHT LEG TOO LONG
Figure 17 - Adjust the Wire Draw
Socket Head Screw
G20697
Adjustment Block
G20592 Upper Adjustment
Slide G20645
Figure 18 - Adjust the Stitch Leg
17

Figure 19 - Adjusting the Stitch Figure 20 - Adjusting the Stitch
Figure 21 - Adjusting the Stitch
Figure C Adjust Length
Figure D Correct Stitch
Figure B Adjust Center
Gap of stitch is 1/16” off center to the right. To correct, move Cutter Box 1/16” to the left.
Gap of stitch is 1/8” off center to the left. To correct, move Cutter
Box 1/8” to the right.
The ideal stitch has the center of gap aligned to the center of the
finished stitch.
18

To produce properly clinched staples, the center of the Clincher Plate (standard or Solid) must be exactly in line with the Driver both left-to-right and front-to-back.
Front-to-Back
Looking from the side of the Stitcher Head, make sure the rib of the Driver or the stitch wire is aligned with the center of the gap between the front and back plates of the Clincher Plate or the Clincher Points.
Note: Adjustments must be made to the screws in the back of the G20 while the Stitcher Head is re-moved from the Stitcher Machine. When adjusting Set Screws A or B, keep the other set flush or un-der. Slight adjustments to the set screws make significant differences in position.
If alignment is too far forward of the Clincher Plate, adjust the Socket Head Set Screws [“A”] until they stick out slightly from the back of the Head. If it is positioned towards the back of the Clincher
Aligning the Clincher Plate (Figures 22-25)
Clincher Slide
18182
Clincher Slide
Retaining Strap 7256B
Socket Head Set
Screw G20619 (2)
CENTERED STITCH
Socket Head Set
Screw G20229 (4)
Socket Head Set
Screw 20619 (2)
ADJUSTMENT SET SCREWS “B”
ADJUSTMENT SET SCREWS “A”
Too Far Forward - Adjust Set Screws “B”
(See Fig. 24)
Too Far Forward - Adjust Set Screws “A”
(See Fig. 24)
Figure 24 - Clincher Plate Alignment
Figure 22 - Properly Aligned
Figure 23 - Front To Back Alignment
19
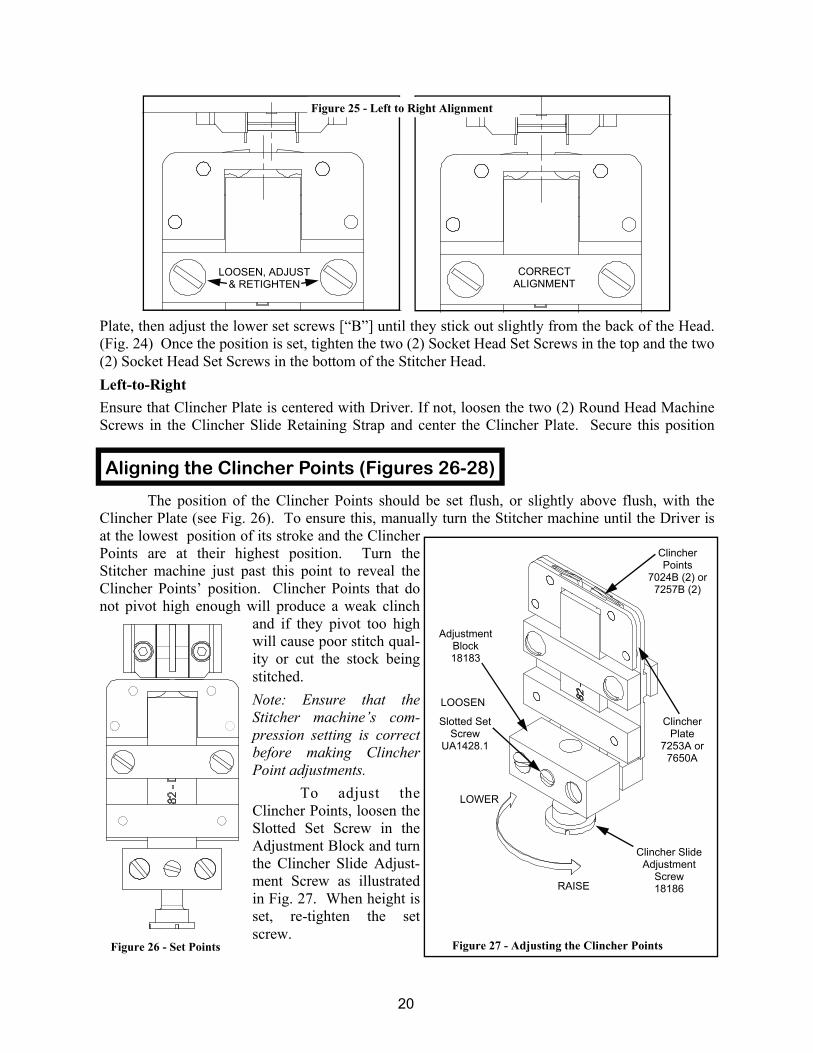
The position of the Clincher Points should be set flush, or slightly above flush, with the Clincher Plate (see Fig. 26). To ensure this, manually turn the Stitcher machine until the Driver is at the lowest position of its stroke and the Clincher Points are at their highest position. Turn the Stitcher machine just past this point to reveal the Clincher Points’ position. Clincher Points that do not pivot high enough will produce a weak clinch
and if they pivot too high will cause poor stitch qual-ity or cut the stock being stitched.
Note: Ensure that the Stitcher machine’s com-pression setting is correct before making Clincher Point adjustments.
To adjust the Clincher Points, loosen the Slotted Set Screw in the Adjustment Block and turn the Clincher Slide Adjust-ment Screw as illustrated in Fig. 27. When height is set, re-tighten the set screw.
Plate, then adjust the lower set screws [“B”] until they stick out slightly from the back of the Head. (Fig. 24) Once the position is set, tighten the two (2) Socket Head Set Screws in the top and the two (2) Socket Head Set Screws in the bottom of the Stitcher Head.
Left-to-Right
Ensure that Clincher Plate is centered with Driver. If not, loosen the two (2) Round Head Machine Screws in the Clincher Slide Retaining Strap and center the Clincher Plate. Secure this position
Aligning the Clincher Points (Figures 26-28)
Adjustment Block 18183
Slotted Set Screw
UA1428.1
Clincher Slide Adjustment
Screw 18186
Clincher Plate
7253A or 7650A
Clincher Points
7024B (2) or 7257B (2)
LOOSEN
LOWER
RAISE
CORRECT ALIGNMENT
LOOSEN, ADJUST & RETIGHTEN
Figure 25 - Left to Right Alignment
Figure 27 - Adjusting the Clincher Points Figure 26 - Set Points
20

• Use standard S.A.E. #10 oil for lubricating.
• Heads in constant operation should be lubri-cated daily.
• Heads that are operated periodically should be lubricated every five pound wire spool change or every month, which ever comes first.
• Usually, only a drop of oil is required at each lubrication point.
• Take care that parts of the head that contact the work to be stitched are free of oil.
Lubricate regularly instead of excessively. Ex-
For a Solid Clincher Plate, the legs of the stitch are formed when the wire hits the Clincher Plate instead of movable Clincher Points. The resulting stitch will be curled legs instead of flat. (See Fig. 28)
The only adjustment that can be made to a Solid Clincher Plate is to make sure it is cen-tered below the Head’s Driver and even that ad-justment can only be made on multi-head Stitcher machines.
Maintenance
Lubrication (Figures 29-30)
FLAT CLINCH
SOLID CLINCH 7650SCP
Figure 28 - Solid Clincher Plate
Driver G20608
G20598
G20262BA
G20262A
G20531
G20543 or
G20643
G20631
G20293A (2)
G20519
Figure 29 - Lubrication
Figure 30 - Lubrication
21

cessive oiling will result in work becoming spotted with oil.
Use one drop of oil in the following lubrication points:
• top of the Bonnet on both sides of the Feed Slide (G20531).
• the oil hole in the Feed Release Cam (G20519).
• the fittings on the two (2) Feed Lever Pin As-
semblies (G20262BA and G20262A).
• the Cutter Operating Lever Pivot Pin (G20631) and Cutter Lever Bearing Pin (G20571).
• the Wire Rollers (G20608) in the Cutter Block Assembly (G20597BA).
• where the Wire Holder Assembly (G20559BA) pivots in the Wire Holder
Pivot Block (G20543 or G20643).
Cleaning (Figures 31)
Ordering Spare Parts
Replacing Spare Parts (Figures 32-34)
In addition to proper lubrication, routine cleaning is important for the maintenance of your G20 Head. The entire Head should be torn down and rebuilt every three months or 15 million stitches, whichever comes first and the following areas should be cleaned once a month:
• Large Feed Gear (G20510A): remove and wash in an oil-dissolving solvent, dry and re-lubricate. An optional Feed Gear Grease Kit (G20KG) is available
• Anywhere that dust, oil or pieces of wire and paper have built up - for example: around the Clincher Points and around the Wire Straightener Rollers.
In time, you will need to replace some parts in your G20 style Stitcher Head. When this happens, first locate the needed part in one of the following diagrams. Then locate the DeLuxe Stitcher part number and contact your Graphic Arts Representative to order the part by the part number, descrip-tion and quantity.
Removing and Replacing the Wire Cutters - Figure 32
Loosen and remove the two (2) Socket Flat Head Screws on the front of the assembly and pull the Cutter Block away from the G20 Head. Be careful, the Cutter Operating Slide may spring out from the Cutter Block Assembly. Loosen the Flat Head Screw securing the Moving Wire Cutter to the Cutter Operating Slide and rotate it until a new cutting surface is exposed. If there are no more sharp edges available, remove it and install a new Moving Cutter. Be sure to tighten it com-pletely so that the Cutter does not rotate on the Slide.
Likewise the Fixed Wire Cutter can be rotated when the cutting surface is worn or replaced when no sharp surfaces are left. Loosen the Socket Head Set Screw securing the Cutter. Rotate the Cutter to a new surface or replace it if completely worn. The Cutter can be rotated three or four
Figure 31 - Large Feed Gear
22

times before needing to be re-placed. Before tightening it down, make sure the Fixed Wire Cutter is aligned correctly within the Cutter Block.
To obtain a clean edge on the cut wire, there can be no gap between the Moving and Fixed Cutters. Replace the Cut-ter Operating Slide by com-pressing the Cutter Operating Spring with the top surface of the spring recess and compress it against the Spirol Pin and push it into position. Holding this position, push the Fixed Cutter against the Moving Cut-ter, using a small screwdriver as a lever. Tighten the Cap Screw to secure the position of the Fixed Cutter. Test it once before re-assembling the Cutter Block by compressing the Cut-ter Operating Slide. The Moving Cutter must pass the Fixed Cutter freely and with no visible gap.
Securing the Cutter Operating Slide from springing out, re-assemble Cutter Block Assembly
by aligning the Cutter Block with the Slide Plate and se-cure with the (2) Socket Head Flat Screws.
Cutter Operat-ing Slide Spring
G20210
Figure 32 - Replacing the Wire Cutters
Figure 33 - Replacing Spare Parts
Figure 34 - Replacing Spare Parts
Cutter Operating
Slide G20598
Socket Head Set Screw G20615
Socket Flat Head Screw G20616 (2)
Fixed Wire Cutter
G20600
Moving Wire Cutter
(Various P/Ns)
Slotted Flat Head Screw
G20214
Dowel Pin G20588 (2)
Spirol Pin G20217
Cutter Operating Spring
G20210
Cutter Operating Slide
G20598
Cutter Block Assy.
G20597BA
Cutter Block Slide Plate
G20602
ROTATE TO A NEW SURFACE WHEN WORN
23

Removing and Replacing the Driver (Figure 35)
If the staples produced have crowns that are buckled or corners that stick up, or if wire is jam-ming between the Driver and Driver Bar, the Driver may have to be reversed or replaced. Swing the Wire Holder Retaining Spring off of the Wire Holder Assembly and out of the way. Remove the two (2) Socket Head Cap Screws securing the Driver to the Driver Bar and slide the Driver out from between the two (2) Bender Inserts. The ends of the Driver are identical so when one end is worn or chipped, it can be reversed. If both ends are worn, replace the exist-ing Driver with a new one. Add a little thread locker to the Screws before returning them to the Driver Bar. Replace the Wire Holder Assembly and Wire Holder Retaining Spring.
Removing and Replacing the Bender Inserts (Figure 36)
If the legs of the formed stitch are spread, the crown buckled or the wire exiting the head sheared the Bender Inserts may have to be replaced. Remove the two (2) Socket Head Cap Screws securing each of the Bender Inserts and slide them down and out from the Bender Bar. The Cutter Block Assembly may have to be repositioned or removed to gain ac-cess to the Bender Insert Screws. If only one end of the inserts is worn, reverse their positions on the Bender Bar and replace the Screws securing them. If there is excessive build-up or damage to the Inserts, replace them with new. Make sure the Inserts are placed firmly against the steps on the Bender Bar and the Driver* can pass freely between the Bender In-serts once the Screws are tightened.
Be sure the gauge and crown size of the Bender Inserts match the gauge and crown size of the Driver installed. For a complete list of parts and their descriptions, refer to page 47 at the back of this manual.
Wire Holder Assy.
G20559BA or G20659BA
Socket Head Screw
G20175 (2)
Driver Bar G20551
Socket Head Screw
G20589 or G20618 (4)
Bender Bar G20547
Figure 35 - Replacing the Driver
Figure 36 - Replacing the Bender Inserts
24

Removing and Replacing the Clincher Points (Figure 37)
The Clincher Point, when worn, may cause poorly formed staple legs. Loosen, but do not re-move, the two (2) Round Head Machine Screws un-til the Clincher Slide can be disengaged from the stitcher machine and slid out of the Clincher Plate Assembly or down within it. Rotate the Clincher
Socket Head Screw
G20589 and G20596
Wire Holder Pivot Block G20543 or
G20643
Socket Head Screw
G20589
Socket Head Screw
G20596 (2)
Feed Gear Bracket G20536
Socket Head Screw
G20175 (2)
Feed Lever Pin G20262A
Bender Bar G20547
Feed Slide G20531
Socket Head Screw
G20616 (2)
Clamp Block Eccentric
G20503 or G20524 (2)
Feed Lever Spring Bushing
G20267
Bonnet Clamp Block
G20501 or G20502
Feed Lever Spring
G20668
Feed Lever Extension G20534B
Bender Slide G20562
Clincher Slide Retaining
Strap 7256B
Clincher Slide
18182
Clincher Plate
7253A or 7650A
Clincher Points
7024B or 7257B (2)
Round Head Screw
UA3310.3 (2)
Figure 37 - Replacing the Clincher Points
Figure 38 - Replacing the Clincher Points
25

26
The G20 Stitcher Head

27

Troubleshooting (Figure 39)
The quality and quantity of work that can be produced with the G20 Stitcher Head is dependent upon the operator making all adjustments as accurately as possible and carefully maintaining the head. The cause of staple imperfections usually can be traced to inaccurate settings or normal wear of moving parts. In the event of trouble of this nature occurring, the operator can, by referring to the following troubleshooting chart, quickly locate and remedy the cause or causes of the trouble.
The following is a brief list of problems and solutions which should cover the majority of situations encountered when stitching with the G20 Stitching Head. In the event of problems of this nature occurring, the operator can, by referring to the following troubleshooting chart, quickly locate the
PROBLEM: Crown Not Straight SOLUTION: Straighten the wire. (See page 13) Align the Clincher Points. (See page 18) Reverse or replace the worn or broken Driver. (See page 23) Make sure the Cutters are aligned and not dull. (See page 21) Check for correct wire size and strength being used. Check for correct work thickness setting.
PROBLEM: Leg[s] Buckled SOLUTION: If the ends of an unformed piece of wire are not smooth, the Wire Cutters are worn. Check for wear and rotate or replace if needed. (See page 21) Make sure the Cutters are aligned properly. (See page 22) Make sure the correct wire size is being used and that the wire is straight. (See page 13).
PROBLEM: Corner Buckled SOLUTION: Check the Driver for a chipped corner and rotate or replace it if needed. (See page 23) Align the Wire Holder. (See page 13) Straighten wire. (See page 13) Check the tensile strength of the wire or use thicker wire.
PROBLEM: Clinch Too Loose SOLUTION: The Clincher Points are too low and need adjusting. (See page 18) The compression of the stitcher machine is insufficient and needs to be in-creased.
PROBLEM: Left Leg Too Short / Right Leg Too Long SOLUTION: Adjust the position of the Cutter Block Assembly by moving it away from the Head. (See page 15)
PROBLEM: Left Leg Too Long / Right Leg Too Short SOLUTION: Adjust the position of the Cutter Block Assembly by moving it away toward the Head. (See page 15)
28
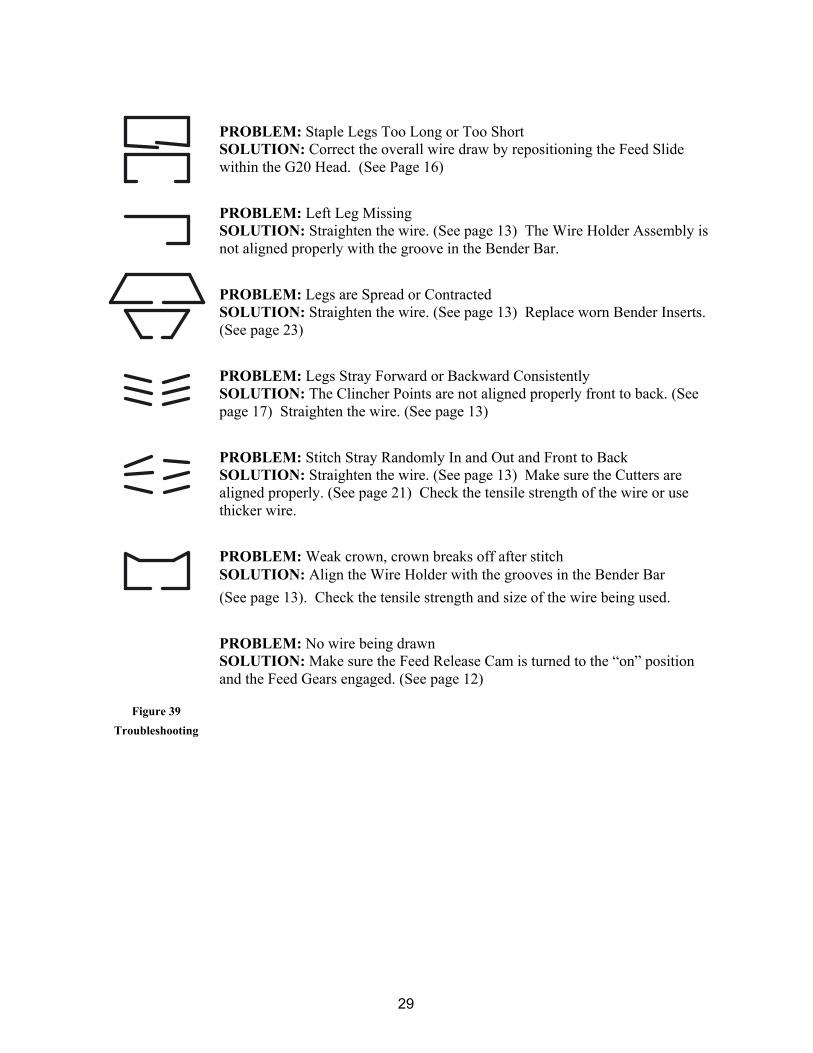
PROBLEM: Staple Legs Too Long or Too Short SOLUTION: Correct the overall wire draw by repositioning the Feed Slide within the G20 Head. (See Page 16)
PROBLEM: Left Leg Missing SOLUTION: Straighten the wire. (See page 13) The Wire Holder Assembly is not aligned properly with the groove in the Bender Bar.
PROBLEM: Legs are Spread or Contracted SOLUTION: Straighten the wire. (See page 13) Replace worn Bender Inserts. (See page 23)
PROBLEM: Legs Stray Forward or Backward Consistently SOLUTION: The Clincher Points are not aligned properly front to back. (See page 17) Straighten the wire. (See page 13)
PROBLEM: Stitch Stray Randomly In and Out and Front to Back SOLUTION: Straighten the wire. (See page 13) Make sure the Cutters are aligned properly. (See page 21) Check the tensile strength of the wire or use thicker wire.
PROBLEM: Weak crown, crown breaks off after stitch SOLUTION: Align the Wire Holder with the grooves in the Bender Bar
(See page 13). Check the tensile strength and size of the wire being used.
PROBLEM: No wire being drawn SOLUTION: Make sure the Feed Release Cam is turned to the “on” position and the Feed Gears engaged. (See page 12)
Figure 39
Troubleshooting
29

G20502 (2) [OPTIONAL VERTICAL
MOUNTING]
G20524 (2)
G20501 (2) [STANDARD MOUNTING]
G20229
G20376 (2)
G20619 (2)
G20589 (2) G20513 (2)
G20524 [FOR OPTIONAL
VERTICAL MOUNTING
BLOCK]
G20589 (2)
G20312
G20588 (4)
G20273 (2) G20681
G20522
G20523 (2)
G20522 (2)
G20503 [FOR OPTIONAL
VERTICAL MOUNTING
BLOCK]
G20275
G20273 (2)
HN1213 (2)
G20229 (2)
G20229 (2)
G20341 (2)
Bonnet Sub-Assembly
FOR BOLT MOUNTING
30

Bonnet Sub-Assembly
G20167 (2)
G20604
G20647 (2)
G20605
G20634 G20603 G20641
G20639
G20247
G20515
G20642
G20697
G20520
G20645
G20596 (2)
G20646
G20592
G20263 (2)
G20521
G20768
G20526
G20275
G20519
G20533
G20264
G20555 (2)
G20567
G20272 (2) G20596
G20582
G20589 (2)
G20236
G20244
G20640
G20575 (2)
G20571 (2)
G20263
G20631
G20544A
G20825A [OPTIONAL]
G20630
G20630A
31

Feed Lever and Feed Gear Assemblies
G20587
G20586
G20694
G20691
G20589
G20184
G20175
G20661
G20617
G20695
G20596 (2)
G20584
G20617 (2)
G20583
G20298
G20580
G20262A
G20512A G20263 (2)
G20262BA
G20697
G20267 G20539
G20568
G20668
G20567
G20666
G20581
G20533
G20264 G20540
G20596
G20272 (2)
G20555 (2)
G20536
G20511
G20528
G20537
G20510
G20529
G20264
G20534B
G20KFL2
OPTIONAL CONFIGURATION
G20514
G20510A
G20570 (2)
G20532B
G20229
32

Driving and Feed Slide Assemblies
G20552 [24 GA-1/2] G20556 [20x24 GA-1/2] G20558 [20 GA-1/2]
G20781 [19x21½ GA-1/2] G20652 [24 GA-5/8] G20656 [20x24 GA-5/8] G20658 [20 GA-5/8]
G20527
(G20527B)
FOR LOOP
G20175 (2)
G20625 (2)
G20579 (2)
G20563
G20569 G20564
15025
G20562 G20551
G20672
G20638
G20190 (2)
G20639 (2)
G20179
G20626 (2)
G20530
G20615
G20573
G20531
G20576
G20345 (2)
G20645
G20697
G20592 G20646
G20520
G20177 or G20578
G20574
33

Driving and Feed Slide Assemblies
G20548 (2) [24 GA-1/2] G20549 (2) [20 GA-1/2]
G20550 (2) [20x24 GA-1/2]
G20780 [19x21½ GA-1/2] G20648 (2) [24 GA-5/8] G20649 (2) [20 GA-5/8]
G20650 (2) [20x24 GA-5/8] G20547
G20557
G20742
G20542B
G20541
G20589
G20543 1/2”
G20643 5/8”
G20579
G20596
G20614 (2)
G20829
G20555
G20665
G20255
G20252
G20253
G20254
G20559A 1/2” G20659A 5/8”
G20226
G20273
G20744 or G20744B
G20554A 1/2”
G20654A 5/8”
G20589 (4) for 1/2” G20618 (4) for 5/8”
34

Cutter Block Assembly
G20606A
G20607A G20607BA (19x21.5 WIRE) G20611
G20623 (2)
G20621 G20219 (5)
G20613
G20624
G20589 G20599A
G20622 (2)
G20591 (2)
G20616 (2)
G20598
G20210
G20597BA
G20608 (2) G20608B (2) (19x21.5 WIRE)
G20602
G20214
*
* G20217
* G20615 (3)
* G20612 (2)
* G20597B
* G20588
THIS PART IS NOT INCLUDED IN CUTTER BLOCK ASSEMBLY
* PARTS INCLUDED IN G20597BA ASSEMBLY
SEE NOTE
G20597BAA - CUTTER BOX ASSEMBLY COMPLETE
G20597BAA-CAR - CUTTER BOX ASSEMBLY COMPLETE - CARBIDE
USED IN G20597BAA-CAR
G20600 STEEL
G20600C CARBIDE
USED IN G20597BAA-CAR
G20145 ROUND WIRE
G20145F FLAT WIRE
G20145C CARBIDE
35

Wire Guide Bracket, Spring and Clincher Plate Assemblies
18182 or 18186SS
UA3216.2 (2)
UA1428.1
18186 or 18186SS
18179
G20293 (2) or (1) & G20293B
G20288 (4)
G20292
G50800CA
G20287
G20679A G20286A
G20279A
G20297
G20298
18184
18183
7256B
UA3310.3 or 9081 (2)
7650A
7024B FLAT WIRE
7257B ROUND WIRE
7253A
7650AM
7650SP
7650SCP1/2 7650SCP5/8
SOLID CLINCHER PLATES
7650SCP1/2-SP 7650SCP5/8-SP
G50808
36

Loop Stitch Assemblies
G20589 (4)
G20555
G20753
G20742
G20829
G20547
G20548 (2) G20549 (2) G20550 (2) G20648 (2) G20649 (2) G20650 (2)
G20713A
G20557
G20714
G20551
G20744 or G20744B
G20190 (2)
G20638
G20639 (2)
G20527B
G20310
G20309A
G20305
G20273 G20307 G20312
G20311
G20226
G20135 G20301A
G20665
G20306
G20191
G20304A
G20615 (3)
G20600
G20616 (2) G20612 (2)
G20599A
G20700A
G20210 G20214
G20145, G20145C
or 20145F
G20598
37

15025 Bender Slide Spring 1
18179 Clincher Binder Plate 1
18182 Clincher Slide 1
18182SS Clincher Slide-Harris 1
18183 Clincher Slide Adjustment Block 1
18184 Clincher Slide Block Clamp 1
18186 Clincher Slide Adjustment Screw 1
18186SS Clincher Slide Adjustment Screw-Harris 1
7024B Clincher Point Flat - 1/2 2
7253A Clincher Plate Assembly - 1/2 1
7256B Clincher Slide Retaining Strap 1
7257B Clincher Point 1/2 - Round 2
7650A Clincher Plate Assembly 1
7650SCP Solid Clincher Plate 1
9081 Screw, #10-32 x 3/8”, Fillister Head 2
G20135 Dowel Pin, M5 x 24 1
G20145 Moving Cutter—Round Wire 1
G20145C Moving Cutter - Carbide 1
G20145F Moving Cutter - Flat Wire 1
G20167 Screw, M4 x 0.7 x 10 FHC 2
G20175 Screw M4 x 0.7 x 6 SHC 3
G20177 Feed Rack Adj. Knob Pointer 1
G20179 Screw M3 x 0.5 x 4, SHC 1
G20184 Wire Holder Retaining Spring Foot 1
G20190 Screw M3 x.5 x 10- FHM- Slotted 4
G20191 Screw M4 x 0.7 x 8 1
G20210 Cutter Operating Spring 1
G20214 Screw M4 x 0.7 x 8 FHM 5
G20217 Spirol Pin M5 x 12 1
G20219 Wire Straightener Disc Spring 4
G20226 Hex Nut M4 x 0.7 1
G20229 Set Screw M6 x 1.0 x 12, Nylon 7
G20236 Tube Pivot Screw 1
G20244 Tube Pivot Clip 1
G20247 Screw M4 x 0.7 x 6, Nylon 1
G20252 Wire Hook 1
G20253 Wire Hook Spring 1
G20254 Wire Hook Spring Screw, Nylon 1
G20255 Hook Pivot Pin 1
G20262A Feed Lever Pin Assembly 1
G20262BA Feed Lever Pin Assembly 1
G20263 Feed Lever E-Ring 6
G20264 Screw M5 x.8 x 5 SHC 2
G20267 Feed Lever Spring Bushing 1
G20272 Screw M5 x.8 x 12 2
G20273 Screw, M4 x 0.7 x 4, Nylon 4
G20275 Ball Spring Plunger 1
G20287 Wire Oiler Felt Spring 1
G20288 Screw, M4 x.7 x 8 SHC 2
G20292 Wire Oil Felt Washer 1
G20293B Wire Oiler Felt-Thick 1
G20293B Wire Oiler Felt-Thin 1
G20297 Screw, M6 x 1x 40 SHC 1
G20298 Nylock Lock Nut, M6 x 1 1
G20301A Wire Holder Assembly - Loop 1
G20304A Wire Hook Assembly - Loop 1
G20305 Anvil - Loop 1
G20306 Screw M3 x 0.5 x 25 1
G20307B Lever Pivot Screw - Loop 1
G20309A Wire Holder Lever Assembly - Loop 1
G20310 Wire Holder Roller Lever Spring 1
G20311 Spring Anchor Screw 1
G20312 Spirol Pin, M3 x 12 1
G20341 Rear Mounting Bolt 2
G20345 Dowel Pin, M5 x 20 2
G20360 Hex Key Wrench, 3.0mm 1
G20361 Hex Key Wrench 2.5mm 1
G20362 Clamp Wrench 5.0mm 1
G20364 Open End Wrench 1
G20374 Hex Key Wrench 2.0mm 1
G20376 Rear Clamp Pin 2
G20500 Bonnet – G20 1
G20500A Bonnet Assembly, G20 1
G20501 Bonnet Clamp Block – Horizontal 2
G20502 Bonnet Clamp Block – Vertical 2
G20503 Bonnet Clamp Eccentric-Short 1
Part / Number Description Cross-Reference
38

G20510 Large Feed Gear 1
G20510A Large Feed Gear Assembly 1
G20511 Feed Pinion 1
G20512A Small Feed Gear Assembly 1
G20513 Supporter Guide Plate 2
G20514 Feed Gear Shaft 1
G20515 Dowel Pin, M6 x 14 1
G20519 Feed Release Cam 1
G20520 Ribbed Lock Washer-M6 2
G20521 Feed Release Cam Shaft 1
G20522 Screw, M6 x 1.0 x 5, Nylon 3
G20523 Feed Slide Wear Plug 2
G20524 Bonnet Clamp Eccentric-Standard 2
G20526 Dowel Pin 1/4” x 2 1
G20527 Feed Rack 1
G20527B Feed Rack—Loop 1
G20527BA Feed Rack Assembly - Loop 1
G20528 Feed Pinion Washer 1
G20529 Feed Gear Washer 1
G20530 Feed Rack Block 1
G20531 Feed Slide 1
G20532B Feed Lever 1
G20533 Feed Lever Spring Block 1
G20534B Feed Lever Extension 1
G20536 Feed Gear Bracket 1
G20537 Feed Gear Clutch 1
G20539 Feed Lever Cam Bar 1
G20540 Feed Lever Bearing 1
G20541 Wire Guide Bar—Left 1
G20542B Wire Guide Bar—Right 1
G20543 Wire Holder Pivot Block-1/2” 1
G20544A Middle Wire Tube Assembly 1
G20547 Bender Bar 1
G20548 Bender Inserts-1/2” - 24 Wire 2
G20549 Bender Inserts-1/2” - 20 Wire 2
G20550 Bender Inserts-1/2” - 20 x 24 Wire 2
G20551 Driver Bar 1
G20552 Driver, 1/2” - 24 Wire 1
G20554A Supporter Assembly-1/2” 1
G20555 Dowel Pin, M4 x 30 1
G20556 Driver, 1/2” - 20 x 24 Wire 1
G20557 Dowel Pin, M5 x 28 1
G20558 Driver, 1/2” - 20 Wire 1
G20559BA Wire Holder Assembly—1/2” 1
G20562 Bender Slide 1
G20563 Cutter Operating Lever Cam 1
G20564 Bender Slide Plunger 1
G20567 Dowel Pin, M5 x 40 1
G20568 Screw, M4 x 0.7 x 16 2
G20569 Bender Slide Pin 1
G20570 Spirol Pin. M5 x 20 2
G20571 Cutter Lever Bearing Pin 2
G20573 Feed Rack Adjustment Knob 1
G20574 Feed Rack Adjustment 1
G20575 Bearing M5 x 5 x 11 2
G20576 Screw, M6 1.0 x 20 1
G20578 Rack Adjustment Knob Detent 1
G20579 Screw, M4 x 0.7 x 6 3
G20580 Shim Washer 2
G20581 Upper Wire Tube 1
G20582 Feed Gear Shaft Plate 1
G20583 Wire Holder Retaining Spring 1
G20584 Screw M6 x 1.0 x 20 1
G20586 Feed Gear Friction Spring 1
G20587 Feed Gear Friction Plug 1
G20588 Dowel Pin, M4 x 12 4
G20589 Screw, M4 x 0.7 x 10, Nylon 13
G20591 Screw, M3 x 0.5 x 16 2
G20592 Adjustment Block 1
G20596 Screw, M4 x 0.7 x 20 6
G20597BA Cutter Block Assembly 1
G20598 Cutter Slide 1
G20599A Lower Wire Tube Assembly 1
G20600 Fixed Wire Cutter 1
G20600C Fixed Wire Cutter - Carbide 1
G20602 Cutter Block Slide Plate 1
Part / Number Description Cross-Reference
39

G20603 Cutter Block Guide Plate 1
G20604 Cutter Block Rail - Upper 1
G20605 Cutter Block Rail - Lower 1
G20606A Straightener Slide Assembly 1
G20607BA Wire Roller Assembly 19x21-1/2 1
G20608 Wire Roller 2
G20608B Wire Roller 19x21-1/2 2
G20611 Wire Guide Block 1
G20612 Wire Roller Stud 2
G20613 Straightener Arm 1
G20614 Screw M4 x 0.7 x 12 2
G20615 Screw M5 x 0.8 x 8 4
G20616 Screw M5 x 0.8 x 25 2
G20617 Washer, M6 x 18 x 1.6 1-3
G20618 Bender Screw—5/8 4
G20619 Screw, M4 x 0.7 x 25 2
G20621 Straightener Nut 1
G20622 Straightener Nut Plate 2
G20623 Straightener Nut Spacer 2
G20624 Hex Nut M6 x 0.75 1
G20625 Screw, Feed Rack Guide, Nylon 2
G20626 Screw, M4 x 0.7 x 16, Nylon 2
G20628A Adjustment Handle Assembly 1
G20630A Cutter Operating Lever Assy. 1
G20631 Cutter Operating Lever Pivot Pin 1
G20634 Screw, M3 x 0.5 x 8 1
G20638 Feed Rack Cam Plate 1
G20639 Dowel Pin, M3 x 8 3
G20640 Washer, M8 x 14 x 0.5 1
G20641 Dowel Pin, M3 x 12 1
G20642 Adjustment Slide – Lower 1
G20643 Wire Holder Pivot Block-5/8” 1
G20645 Adjustment Slide – Upper 1
G20646 Adjustment Slide Connector 1
G20647 Screw, M3 x 0.5 x 5, Nylon 2
G20548 Bender Inserts-5/8” - 24 Wire 2
G20549 Bender Inserts-5/8” - 20 Wire 2
G20550 Bender Inserts-5/8” - 20 x 24 Wire 2
G20654A Supporter Assembly-5/8 1
G20659BA Wire Holder Assembly—5/8” 1
G20661 Wire Holder Retaining Spring Screw 1
G20665 Wire Holder Eccentric Screw 1
G20666 Feed Lever Bearing Pin 1
G20667 Screw M4 x 0.7 x 10 1
G20668 Feed Lever Spring 1
G20672 Feed Slide Block 1
G20681 Screw, M6 x 1.0 x 5, Nylon 1
G20691 Screw, M12 x 1.75 x 12 1
G20694 Feed Gear Friction Bushing 1
G20695 Screw, M8 x 1.25 x 12, Flat Point 1
G20697 Screw, M6 x 1.0 x 30 2
G20700A Cutter Block Assembly - Loop 1
G20700AA Cutter Block Assy. Complete - Loop 1
G20713A Supporter Assembly - Loop 1
G20714 Driver - Loop 1
G20742 Supporter Plunger 1
G20744 Supporter Spring 1
G20744B Supporter Spring - Light 1
G20753 Driver Retaining Screw 1
G20768 Yellow Vinyl Cap 1
G20780 Bender Insert 1/2 - 19x21-1/2 Wire 2
G20781 Driver 1/2 - 19x21-1/2 Wire 1
G20825A Extended Cutter Adj. Spacer Assy. 1
G20829 Screw M4 x 0.7 x 8 1
G50279A Wire Guide Spring Assembly - Short 1
G50286A Wire Guide Spring Assembly - Long 1
G50679A Wire Guide Spring Assembly 1
G50800CA Wire Anti-Back Up Unit 1
HN1213 Bonnet Stud Nut 1
UA1428.1 Set Screw 1/4-28X1/4 1
UA3216.4 Screw 10-32x7/8 2
UA3310.3 Screw 10-32x5/8 2
Part / Number Description Cross-Reference
40

The G20 Saddle Guide Kit attaches to the out-side of the G20 Head with a Hex Head Cap Screw, which is included. This Guide centers the stock under the Stitcher head for better and more accurate binding performance.
In addition to the standard features offered with the G20 Stitcher Head, optional equipment items can be purchased to better accommodate your stitching needs. The following kits can be pur-chased from your Graphic Arts Representative.
Optional Equipment
G20FLC (Figure 23)
G20K1 (Figure 24)
The G20 Feed Lever Conversion Kit converts the Transport/Feed Lever Assembly on your existing Hohner 70/20 Heads to the DeLuxe Stitcher Feed Lever Assembly. The G20FLC offers high quality parts for less money and provides extra durability for a longer life. Included in this Kit are the Feed Lever Assembly and Feed Lever Extension, already assem-bled, the new Feed Lever Pivot Pin, Feed Lever Spring and Bushing.
Save money on a new head by converting your old Hohner Heads with this Conversion Kit.
G20808
G20180
G20806A
Feed Lever Bushing
Pivot Pin and Spring
Figure 40 - Feed Lever Conversion Kit
Figure 41 - Saddle Guide Kit
41

G201921 (Figure 25)
G20KFL2 (Figure 26)
G20KG
The G20 19x21 Conversion Kit allows existing G20 Stitcher Heads to accommodate 19x21 gauge flat wire. 19x21 gauge flat wire allows your M19G20, M27G20 and other collating systems to consistently stitch at a higher capacity through thicker stock.
The parts included in this Kit have to only re-place their counterparts on the existing head. Complete instructions are included with each Conversion Kit.
The G20 Feed Lever Kit is intended for use on Stitchers using DeLuxe Stitcher G20 Stitching Heads. The G20KFL2 includes one Feed Lever Pin Assembly, one Feed Lever E-Ring, one Feed Lever, one Feed Lever Bearing, two Spirol Pins, two Shim Washers and one Feed Lever Bearing Pin.
Since variations of the G20 Feed Gear were manufactured in the past, the G20KFL2 was created to ensure replacement parts are always compatible.
The G20 Feed Gear Grease Kit assists in the regular cleaning and maintenance performed on the G20 Stitcher Head and its component parts. See the Maintenance section, on page 21 of this manual, for more information. Be sure to follow the instructions carefully and always use the cor-rect grease to repack the Gear.
G20262BA
G20580 G20540
G20532B G20570 (2)
G20781
7024B (2)
G20607BA
G20780 (2)
G20608B (2)
Figure 43 - Feed Lever Kit
Figure 42 - 19x21 Conversion Kit
42

G20KL (Figure 27)
G20KSH & G20KSH230
G20KSM
G20RPK
The standard G20 Head can be converted into a 24 or 25 gauge wire loop stitching head by exchanging four complete sub-assemblies and adding a new Driver and Right Wire Guide Bar in-cluded in the G20 Loop Stitch Kit. For further instructions and parts diagrams on Loop Stitching, refer to page 46 in this manual.
The G20KSH Stop Stitch Kit is designed for use with the G20 Series Stitching Heads. It mounts on the existing Stop Stitch Brackets of Harris Saddle Stitchers. The Stop Stitch Kit stops the feeding of wire through the stitching heads by pushing open the Feed Release Handles (thereby stopping the wire feed) when it receives a signal from the calipers of the Stitcher. It is available for standard 115V Harris Saddle Stitchers as well as for 230V models by requesting part number G20KSH230.
This kit is intended for use on McCain Stitchers using DeLuxe G20 Stitching Heads. The G20KSM includes two Stop Stitch Shims and two Screws which assemble to the McCain Saddle Stitcher. This Kit makes use of the components of the Saddle Stitcher itself and is easy to install.
The G20 Repair Kit is a collection of the most common replacement parts for the G20 Head organized in a handy, see-through box. This Kit saves both time and money for the user of the G20 Head.
Figure 44 - Loop Stitch Kit
G20700AA
G20527BA G20301A G20781
G20547
G20542B
43

L i m i t e d
W a r r a n t y
DeLuxe Stitcher Company warrants to the original retail purchaser
that this product is free from defects in material and workmanship and
agrees to repair or replace, at DeLuxe Stitcher’s option, any defective
product within 90 days from the date of purchase. This warranty is not
transferable. It covers damage resulting only from defects in material
or workmanship and does not cover conditions or malfunctions
resulting from normal wear, neglect, abuse or accident.
This warranty is in lieu of all other express warranties. Any warranty
of merchantability or fitness for a particular purpose is limited to the
duration of this warranty. DeLuxe Stitcher shall not be liable for
any incidental or consequential damages.
Some states do not allow limitations on how long an implied warranty lasts, or the exclusion or limitation of incidental or consequential
damages, so the above limitations or exclusions may not apply to
you. This warranty gives you specific legal rights and you may also
have other rights which vary from state to state.
To obtain warranty service you must return the product, at your
expense, together with proof of purchase to an authorized
DeLuxe Stitcher Company Graphic Arts Dealer.
Always use genuine DeLuxe Stitcher parts. When ordering parts, please identify the
part number, the part name, the wire size and crown size of your Stitcher.
DeLuxe Stitcher Company, Inc.
6635 West Irving Park Road
Chicago, Illinois 60634-2410 Phone: 773-777-6500 800-634-0810
44

RE
GIS
TR
AT
ION
T
o be
tter
serv
ice
your
wir
e st
itchi
ng n
eeds
, ple
ase
take
a m
omen
t to
fill
out a
nd r
etur
n th
is r
egis
trat
ion
card
.
Nam
e :
(
Firs
t )
( M
idd
le In
itia
l )
( La
st )
Co
mp
any
:
Stre
et A
dd
ress
:
City
:
St
ate/
Pro
vin
ce :
Zip
:
Co
un
try
:
Pho
ne
:
Fax
:
E-m
ail :
Mac
hin
e(s)
Pu
rch
ased
:
Seri
al N
um
ber
(s) :
With
Hea
d(s
) :
( T
ype
/Qua
ntit
y P
urc
hase
d )
Seri
al N
um
ber
(s) :
Hea
d(s
) Pu
rch
ased
:
Seri
al N
um
ber
(s) :
Dat
e Re
ceiv
ed :
Dea
ler
Nam
e :
Dea
ler
Stre
et A
dd
ress
:
City
:
Stat
e/Pr
ovi
nce
:
Z
ip :
Co
un
try
:
Dea
ler
Pho
ne
:
Oth
er B
ind
ery
Pro
du
cts
Use
d :
Wou
ld y
ou li
ke in
form
atio
n se
nt to
you
abo
ut n
ew p
rodu
cts
that
wou
ld b
enef
it yo
ur c
ompa
ny?
Yes
No
CUSTOMER PRODUCT DEALER
Ple
ase
take
a m
om
ent
to f
ill o
ut
the
atta
ched
car
d
and
mai
l it
to D
eLu
xe S
titc
her
Co
mp
any,
Inc.
In
ad
di-
tio
n, d
up
licat
e th
e in
form
atio
n f
or
you
r re
cord
s to
as-
sist
wh
en m
akin
g f
urt
her
inq
uir
ies.
P
RO
DU
CT
Mac
hin
e(s)
Pu
rch
ased
:
Seri
al N
um
ber
(s) :
With
Hea
d(s
) :
(Typ
e/Q
uan
tity
Purc
has
ed )
Seri
al N
um
ber
(s) :
Hea
d(s
) Pu
rch
ased
:
Seri
al N
um
ber
(s) :
DE
LU
XE
ST
ITC
HE
R G
RA
PH
IC A
RT
S R
EP
RE
SE
NT
AT
IVE
Dat
e Re
ceiv
ed :
Dea
ler
Nam
e :
Dea
ler
Stre
et A
dd
ress
:
City
:
Stat
e/Pr
ovi
nce
:
Zip
:
Co
un
try
:
Dea
ler
Pho
ne
:
45

46
Po
sta
ge S
tam
p R
equ
ired
DE
LU
XE
ST
ITC
HE
R
CO
MP
AN
Y I
NC
.
66
35
Wes
t Ir
vin
g P
ark
Road
Ch
icag
o, I
llin
ois
60
63
4-2
41
0 U
.S.A
.
Att
n: C
ust
om
er S
ervi
ce
Co
mm
on
Re
pla
ce
me
nt
Pa
rts
for
1/2
” C
row
n
Bel
ow
is a
list
of t
he m
ost c
omm
on w
ear
/re
plac
emen
t par
ts fo
r th
e G
20
Stit
cher
Hea
d. T
his
guid
e sh
oul
d h
elp
you
whe
n or
derin
g
repl
acem
ent
par
ts.
If th
e pa
rt y
ou
nee
d is
no
t lis
ted
belo
w, p
leas
e re
fer
to
the
mor
e de
taile
d pa
rts
list o
n pa
ges
48-
50 in
this
man
ual.
D
escr
ipti
on
Item
Nu
mb
er
M
ovin
g W
ire C
utte
r-F
lat W
ire
G
2014
5F
S
cre
w M
4x.
7x6
, w
/ N
ylo
n P
atch
G20
175
S
cre
w,
M3
x0.5
x6-N
ylo
n
G20
190
C
utte
r O
pera
ting
Spr
ing
G
2021
0
S
cre
w,
M4x
0.7x
8
G20
214
W
ire H
ook
G
2025
2
W
ire H
ook
Spr
ing
G
2025
3
W
ire H
ook
Spr
ing
Scr
ew
, N
ylo
n
G20
254
F
eed
Leve
r P
in A
ssem
bly
G20
262A
F
eed
Leve
r P
in A
ssy.
(w
/V-G
roov
e)
G20
262B
A
F
eed
Leve
r E
-rin
g
G20
263
F
eed
Leve
r B
ear
ing
G
2054
0
D
river
1/2
- 2
0x2
4 G
aug
e
G20
556
W
ashe
r S
him
G20
580
F
eed
Gea
r F
rictio
n S
prin
g
G
2058
6
F
eed
Gea
r F
rictio
n P
lug
G
2058
7
F
ixe
d W
ire C
utte
r
G
2060
0
F
eed
Rac
k C
am
Pla
te
G20
638
D
ow
el P
in
G
2063
9
F
eed
Leve
r B
ear
ing
Pin
G
2066
6
F
eed
Leve
r S
prin
g
G20
668
S
cre
w,
M6
x1.0
x5-N
ylo
n
G20
681
S
upp
orte
r S
prin
g
G20
744
* Y
ou c
an p
urch
ase
the
G20
RP
K w
hich
incl
udes
thes
e an
d ot
her
com
mon
rep
lace
men
t pa
rts
Co
mm
on
Re
pla
ce
me
nt
Pa
rts
for
1/2
” C
row
n

47

48
DBSG20-0210